AIRN65CN - Nailer MSW - Free user manual and instructions
Find the device manual for free AIRN65CN MSW in PDF.

| Product Type | Pneumatic Nailer |
| Model | MSW-AIRN65CN |
| Maximum Working Pressure | 8 bar |
| Nail Length | 32-65 mm |
| Air Consumption | 185 L/min |
| Magazine Capacity | 200-350 nails |
| Dimensions (L × D × H) | 260 × 330 × 130 mm |
| Weight | 2.7 kg |
| Power Supply | Compressed air |
| Nail Types | Nails 32 to 65 mm long |
| Operating Modes | Single or continuous (selector) |
| Intended Use | Domestic, wood assembly |
| Max. Ambient Temperature | 45 °C |
| Max. Relative Humidity | 85 % |
| Recommended Protective Equipment | Safety glasses, hearing protection, gloves, safety shoes |
| Maintenance | Daily lubrication of air inlet (2 drops of pneumatic oil) |
| Air Connection | Requires an air preparation kit (regulator, dryer, lubricator) |
| Cleaning | Soft cloth, do not immerse, clean vents with a brush |
| Repairability | Repairs only by the manufacturer's after-sales service |
| Warranty | Consult the manual |
Frequently Asked Questions - AIRN65CN MSW
User questions about AIRN65CN MSW
0 question about this device. Answer the ones you know or ask your own.
Ask a new question about this device
Download the instructions for your Nailer in PDF format for free! Find your manual AIRN65CN - MSW and take your electronic device back in hand. On this page are published all the documents necessary for the use of your device. AIRN65CN by MSW.
USER MANUAL AIRN65CN MSW
a) Druckluftquelle
b) Luftregler
c) Lufttrockner
d) Fettpresse
natural_image
Close-up of a hand operating a precision drill press tool with a mechanical component (no visible text or symbols)natural_image
Two views of a blue electric drill press tool with internal components and a meshed base (no text or symbols visible)natural_image
Close-up of a blue mechanical tool handle with black plastic and metallic components (no visible text or symbols)This User Manual has been translated for your convenience using machine translation. Reasonable efforts have been made to provide an accurate translation; however, no automated translation is perfect nor is it intended to replace human translators. The official User Manual is the English version. Any discrepancies or differences created in the translation are not binding and have no legal effect for compliance or enforcement purposes. If any questions arise related to the accuracy of the information contained in the User Manual, please refer to the English version of those contents which is the official version.
Technical data
| Parameter description Parameter value | |
| Product name | Coil nailer |
| Model | MSW-AIRN65CN |
| Max Working Pressure [bar] | 8 |
| Nails length [mm] | 32-65 |
| Air consumption [l/min] | 185 |
| Nail capacity [pcs] | 200 - 350 |
| Dimensions [width x depth x height; mm] | 260 x 330 x 130 |
| Weight [kg] | 2.7 |
1. General description
The user manual is designed to assist in the safe and trouble-free use of the device. The product is designed and manufactured in accordance with strict technical guidelines, using state-of-the-art technologies and components. Additionally, it is produced in compliance with the most stringent quality standards.
DO NOT USE THE DEVICE UNLESS YOU HAVE THOROUGHLY READ AND UNDERSTOOD THIS USER MANUAL.
To increase the product life of the device and to ensure trouble-free operation, use it in accordance with this user manual and regularly perform maintenance tasks. The technical data and specifications in this user manual are up to date. The manufacturer reserves the right to make changes associated with quality improvement. The device is designed to reduce noise emission risks to a minimum, taking into account technological progress and noise reduction opportunities.
Legend

The product satisfies the relevant safety standards.

Read instructions before use.

WARNING! or CAUTION! or REMEMBER! General warning sign.

Use ear protection. Exposure to loud noise may result in hearing loss.

Wear protective goggles.

Wear protective gloves.

Wear foot protection.

ATTENTION! Danger of hand injures!

PLEASE NOTE! Drawings in this manual are for illustration purposes only and in some details may differ from the actual product.
2. Usage safety

ATTENTION! Read all safety warnings and all instructions. Failure to follow the warnings and instructions may result in serious injury or even death.
The terms "device" or "product" are used in the warnings and instructions to refer to:
Coil nailer
2.1. Safety in the workplace
a) Do not touch the device with wet or damp hands.
b) Make sure the workplace is clean and well lit. A messy or poorly lit workplace may lead to accidents. Try to think ahead, observe what is going on and use common sense when working with the device.
c) Do not use the device in a potentially explosive environment, for example in the presence of flammable liquids, gases or dust. The device generates sparks which may ignite dust or fumes.
d) If you discover damage or irregular operation, immediately switch the device off and report it to a supervisor without delay.
e) If there are any doubts as to the correct operation of the device, contact the manufacturer's support service.
f) Only the manufacturer's service point may repair the device. Do not attempt any repairs independently!
g) Children or unauthorised persons are forbidden to enter a work station. (A distraction may result in loss of control over the device).
h) Only connect and disconnect the pressure line when the air valve is closed.
i) Do not point the pressure line towards yourself or toward other people or animals.
j) Do not cut off the supply of compressed air by crushing or bending pressure hoses.
k) When starting the device, increase the air supply to the device gradually in order to ensure that it is functioning properly. If you notice any abnormal operation of the device, disconnect it immediately from the compressed air and contact the manufacturer's service point.
I) Regularly inspect the condition of the safety labels. If the labels are illegible, they must be replaced.
m) Please keep this manual available for future reference. If this device is passed on to a third party, the manual must be passed on with it.
n) Keep packaging elements and small assembly parts in a place not available to children.
o) Keep the device away from children and animals.
p) If this device is used together with another equipment, the remaining instructions for use shall also be followed.

Remember! When using the device, protect children and other bystanders.
2.2. Personal safety
a) Do not use the device when tired, ill or under the influence of alcohol, narcotics or medication which can significantly impair the ability to operate the device.
b) The device is not designed to be handled by persons (including children) with limited mental and sensory functions or persons lacking relevant experience and/or knowledge unless they are supervised by a person responsible for their safety or they have received instruction on how to operate the device.
c) The device can be handled only by physically fit persons who are capable of handling it, properly trained, familiar with this manual and trained within the scope of occupational health and safety.
d) When working with the device, use common sense and stay alert. Temporary loss of concentration while using the device may lead to serious injuries.
e) Use personal protective equipment as required for working with the device, specified in section 1 (Legend).
The use of correct and approved personal protective equipment reduces the risk of injury.
f) To prevent the device from accidentally switching on, make sure the switch is on the OFF position before connecting to a power source.
g) Do not overestimate your abilities. When using the device, keep your balance and remain stable at all times. This will ensure better control over the device in unexpected situations.
h) Do not wear loose clothing or jewellery. Keep hair, clothes and gloves away from moving parts. Loose clothing, jewellery or long hair may get caught in moving parts.
i) The device is not a toy. Children must be supervised to ensure that they do not play with the device.
2.3. Safe device use
a) Do not overload the device. Use the appropriate tools for the given task. A correctly-selected device will perform the task for which it was designed better and in a safer manner.
b) Make sure the pressure line is disconnected before attempting any adjustments, accessory replacements or doing any work on the device. Such a preventive measure reduces the risk of an accident.
c) When not in use, store in a safe place, away from children and people not familiar with the device who have not read the user manual. The device may pose a hazard in the hands of inexperienced users.
d) Keep the device in perfect technical condition. Before each use check for general damage and especially check for cracked parts or elements and for any other conditions which may impact the safe operation of the device. If damage is discovered, hand over the device for repair before use.
e) Keep the device out of the reach of children.
f) Device repair or maintenance should be carried out by qualified persons, only using original spare parts. This will ensure safe use.
g) To ensure the operational integrity of the device, do not remove factory-fitted guards and do not loosen any screws.
h) Do not leave this appliance unattended while it is in use.
i) Clean the device regularly to prevent stubborn grime from accumulating.
j) At locations where there is a high risk of mechanical damage, use a reinforced hose for compressed air connections.
k) Before each use ensure the nozzle is correctly installed in the device and that the hose is correctly attached and undamaged.
I) The air supplied to the device should be dry, clean and free of contamination. Contamination can clog the conduits and lead to damage to the device and its components.
m) Do not carry or hang the device by the pressure line.
n) Do not touch any moving parts or accessories unless the device has been disconnected from the compressed air supply.
o) If you notice a leak from the device or hoses, immediately disconnect the compressed air supply and resolve the defects.
p) Do not exceed the recommended supply pressure as this may damage the device.
q) Do not cover the air intake and outlet.
r) The device is not a toy. Cleaning and maintenance may not be carried out by children without supervision by an adult person.
s) It is forbidden to interfere with the structure of the device in order to change its parameters or construction.
t) Keep the device away from sources of fire and heat.
u) Only use compressed air to supply the device, do not use any other gases.
v) It is forbidden to direct the outlet of the device at yourself, other people and animals.
w) Provide bystanders in the working area with personal protective equipment required for the operation of the device, as specified in section 1.
x) Do not keep hands on the trigger of the device while is not in use! Risk of uncontrolled start-up!
y) Always disconnect the device from the source of compressed air; loading and unloading the device or leaving the working area.
z) Attention! Releasing the trigger when the magazine is loaded generates a strong impact on the working surface. Stay particularly careful.
aa) Keep a safe distance between the working area and other objects that may be in the vicinity while operating the device.
bb) Attention! A fastening element may jam in the device's outlet. Remember to disconnect the device from source of compressed air before removing the jam. Otherwise, a user may suffer serious injuries!
cc) Lubricate the compressed air intake daily.

ATTENTION! Despite the safe design of the device and its protective features, and despite the use of additional elements protecting the operator, there is still a slight risk of accident or injury when using the device. Stay alert and use common sense when using the device.
3. Use guidelines
The machine is designed to install nails of the appropriate size.
The product is intended for home use only.
The user is liable for any damage resulting from unintended use of the device.
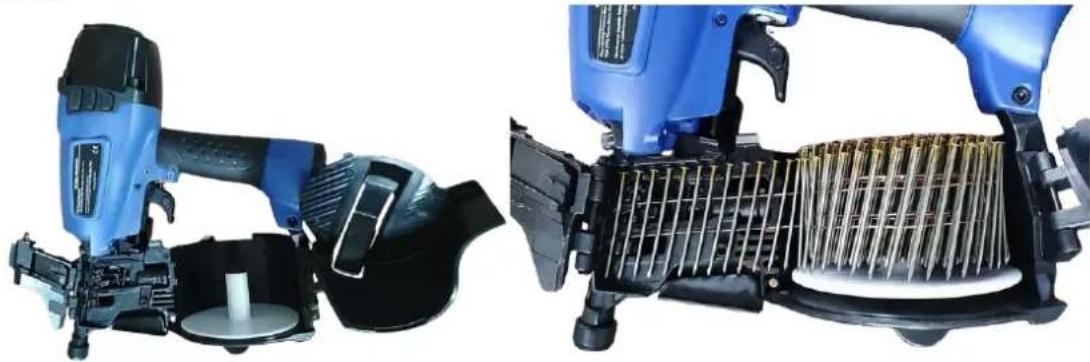
3.1. Device description
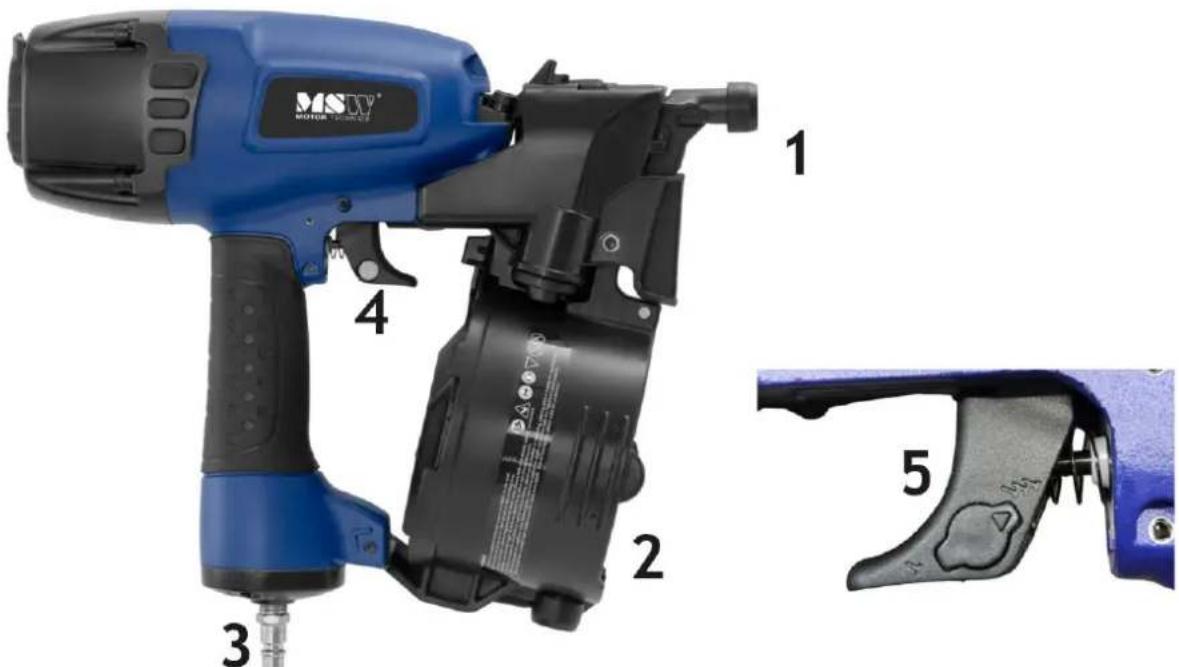
1 - Outlet tip
2 - Magazine
3 – Pneumatic connection
4 - Trigger
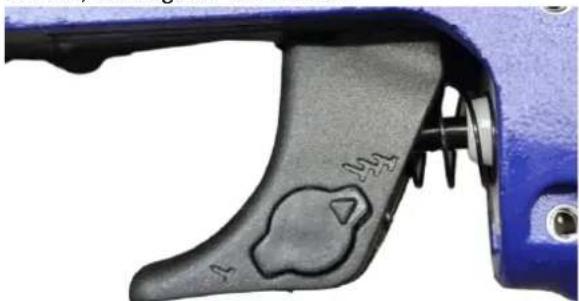
5 - Hammering mode regulator
3.2. Preparing for use
APPLIANCE LOCATION
The ambient temperature must not exceed 45^ C and the relative humidity should not exceed 85%. Only use the device in well-ventilated areas. Do not obstruct the air outlet of the device. Keep the device away from any hot surfaces. The device should always be used when positioned on an even, stable, clean, fireproof and dry surface, and be out of the reach of children and persons with limited mental and sensory functions. The valve that disables the compressed air supply should be immediately accessible from the area where the device is being used. Make sure that the pressure of the air supplying the device does not exceed the recommended range.
3.3. Assembling the device
The device is driven by compressed air - the supply connection of the device should be equipped with an air preparation kit, i.e. a dryer, an oiler (lubricator) and a pressure regulator:
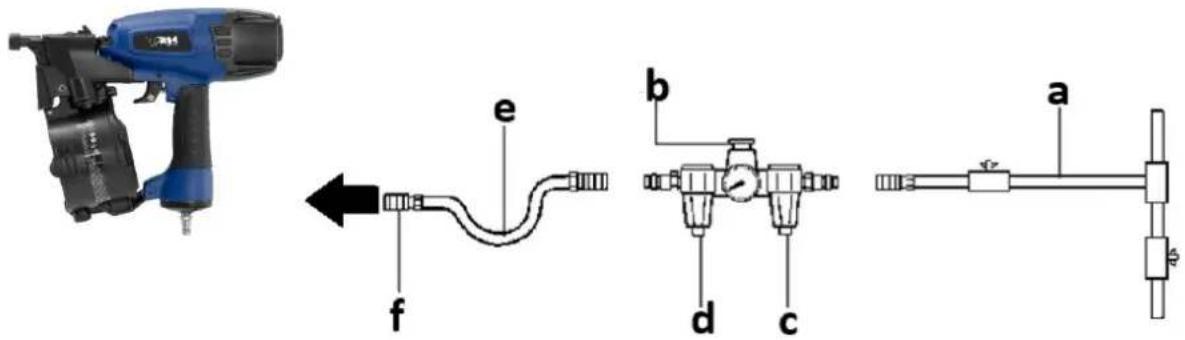
a) Compressed air source
b) Air regulator
c) Air dryer
d) Grease gun
e) Compressed air hose
f) Pneumatic quick coupler
Before connecting the device to the compressed air system, it should be depressurized. If you do not have a lubricator in your compressed air system, you should drip 2 drops of pneumatic equipment oil through the air inlet before each use of the device.
3.4. Device use
OPERATING PRINCIPLE
• After placing the nozzle on the element and pressing the trigger, the device will fire and apply a nail to the material.
- Another application of the nozzle to the material and pressing the trigger once again will apply the nail, and so on.
- Avoid working with the device on edges, hammering nails onto other nails, or on materials that are too hard.
- Never carry the device while holding the trigger.
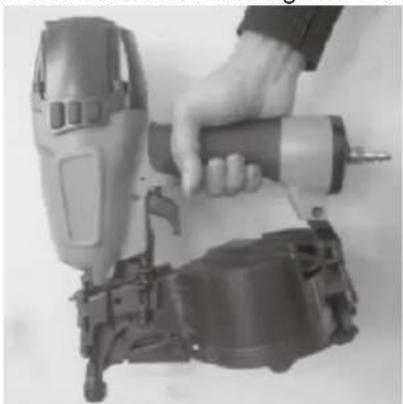
• Always hold the device firmly by the handle - risk of kickback, which is normal with this type of device.
ATTENTION: before any work on the device, such as adjusting, filling the magazine, etc. and never point the outlet towards yourself, bystanders or animals. Do not press the trigger during this time. The device should be disconnected from the air supply during these works.
Loading nails into the magazine
Release the magazine by moving the latch lever. Load the magazine with nails.
natural_image
Close-up of a hand using a precision drill bit on a mechanical assembly (no visible text or symbols)Insert the nails into the magazine. Then close the magazine by pushing it fully upwards. Machine is ready to work.
natural_image
Two views of a blue electric shock absorber with internal components and meshing (no text or symbols visible)Setting the hammering mode
With the lever located on the housing of the device right next to the trigger, adjust the hammering mode of nails, i.e. single or continuous:
natural_image
Close-up of a blue mechanical tool handle with black plastic and metallic components (no visible text or symbols)Single mode (lever set on the single nail icon) - is used to hammer nails one at a time. Useful in work where care and accuracy are required.
Multiple mode (three nails icon) - it is used for serial, continuous hammering.
3.5. Cleaning and maintenance
a) Before cleaning, adjustment or replacement of accessories, and when the device is not in use, pull the pressurized air supply plug.
b) Use only non-corrosive cleaning agents for cleaning the surfaces. Wipe the device with such a cleaner only if necessary.
c) Store the unit in a dry and cool place protected from moisture and direct sunlight.
d) Do not spray the unit with a stream of water or immerse it in water.
e) Make sure that no water enters through the ventilation openings in the casing.
f) Clean the ventilation openings with a brush and compressed air.
g) Perform regular inspections of the device to ensure that it is in good working order, that the screws are tightened, and any damage - before each operation.
h) Use a soft cloth for cleaning.
i) Do not use sharp and/or metal objects (e.g. wire brush or metal spatula) for cleaning as they may damage the surface of the appliance material.
j) For daily use, apply 2 drops of pneumatic oil to the air inlet of the device before each operation.
DISPOSING OF USED DEVICES:
Do not dispose of this device in municipal waste systems. Hand it over to an electric and electrical device recycling and collection point. Check the symbol on the product, instruction manual and packaging. The plastics used to construct the device can be recycled in accordance with their markings. By choosing to recycle you are making a significant contribution to the protection of our environment.
Contact local authorities for information on your local recycling facility.

5 - Regulator trybu wbijania
natural_image
Hand operating a precision drill bit with a mechanical component (no visible text or symbols)natural_image
Two views of a blue electric drill press tool with internal components and a meshed base (no text or symbols visible)natural_image
Close-up of a blue mechanical tool handle with black adjustment knob (no text or symbols visible)natural_image
Hand operating a precision drill bit with a handheld drill bit (no visible text or symbols)natural_image
Two views of a blue electric drill press tool with internal components and heat dissipation (no text or symbols visible)natural_image
Close-up of a blue mechanical tool handle with black plastic components (no visible text or symbols)natural_image
Close-up of a hand operating a precision drill bit with a mechanical component (no visible text or symbols)natural_image
Two views of a blue electric drill press tool with internal components and a meshed rack (no text or symbols visible)natural_image
Close-up of a blue tool handle with black plastic components and a small circular feature (no text or symbols visible)natural_image
Hand operating a precision drill bit with a tool, no visible text or symbolsnatural_image
Two views of a blue electric drill press tool showing internal components and exterior view (no text or symbols visible)natural_image
Close-up of a blue mechanical tool handle with black plastic components (no visible text or symbols)natural_image
Hand operating a precision drill press tool with a mechanical component (no visible text or symbols)natural_image
Two views of a blue electric drill press tool with internal components and a grid-patterned cover (no text or symbols visible)natural_image
Close-up of a blue mechanical tool handle with black plastic component (no visible text or symbols)natural_image
Close-up of a hand using a precision drill bit presser (no visible text or symbols)natural_image
Two views of a blue electric drill press tool showing internal components and a meshed rack (no text or symbols visible)natural_image
Close-up of a blue mechanical tool handle with black plastic component (no visible text or symbols)APPARATETS PLACERING
PRINCIPPET OM APPARATETS DRIFT
natural_image
Two views of a blue electric drill press tool with internal components and a meshed base (no text or symbols visible)natural_image
Close-up of a blue handheld tool handle with black plastic components and a small circular feature (no text or symbols visible)natural_image
Close-up of a hand operating a precision drill press tool (no visible text or symbols)natural_image
Two views of a blue electric drill press tool with internal components and heat dissipation (no text or symbols visible)natural_image
Close-up of a blue tool handle with black plastic component (no text or symbols visible)PLAATS VAN HET APPARAAT
a) Trykkluftkilde
b) Luftregulator
c) Lufttørker
d) Smørepistol
e) Trykkluftslange
f) Pneumatisk hurtigkobling
natural_image
Hand operating a precision drill bit with a tool, no visible text or symbolsnatural_image
Two views of a blue electric drill press tool with internal components and heat dissipation (no text or symbols visible)Stille inn hamringsmodus
natural_image
Close-up of a blue mechanical tool handle with black plastic components (no visible text or symbols)Enkeltmodus (spak satt på enkeltspikerikonet) - brukes til å slå spiker en om gangen. Nyttig i arbeid der omsorg og nøyaktighet kreves.
APPARATENS PLACERING
natural_image
Hand operating a precision drill bit with a handheld drill bit (no visible text or symbols)natural_image
Two views of a blue electric shock absorber with internal components and meshing (no text or symbols visible)natural_image
Close-up of a blue mechanical tool handle with black plastic and metallic components (no visible text or symbols)natural_image
Close-up of a hand operating a precision drill bit with a mechanical component (no visible text or symbols)natural_image
Two views of a blue electric drill press tool showing internal components and a grid-patterned cover (no text or symbols visible)Configurando o modo de martelar
natural_image
Close-up of a blue tool handle with black plastic component (no visible text or symbols)natural_image
Hand operating a precision drill bit with a tool, no visible text or symbolsnatural_image
Two views of a blue electric drill press tool with internal components and heat dissipation (no text or symbols visible)natural_image
Close-up of a blue mechanical tool handle with black plastic components and a small circular feature (no text or symbols visible)For the disposal of the device please consider and act according to the national and local rules and regulations.
CONTACT
expondo Polska sp. z o.o. sp. k.