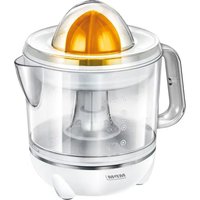
MSO-17 - Juicer MPM - Free user manual and instructions
Find the device manual for free MSO-17 MPM in PDF.

User questions about MSO-17 MPM
0 question about this device. Answer the ones you know or ask your own.
Ask a new question about this device
Download the instructions for your Juicer in PDF format for free! Find your manual MSO-17 - MPM and take your electronic device back in hand. On this page are published all the documents necessary for the use of your device. MSO-17 by MPM.
USER MANUAL MSO-17 MPM
EN We wish you satisfaction from using the product and invite you to check a wide range of other MPM appliances
natural_image
Exterior view of a modern kitchen brush unit with a glass cup beside it (no visible text or symbols)cz NAVOD K OBSLUZE 3

Two input openings for smaller and larger products Juice spout with anti-dripping protection

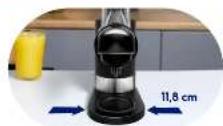
Juice collector - 500 ml and pulp collector - 400 ml Compact dimensions - width at only 11.8 cm
BEZPEČNOSTNÍ POKYNY PŘI POUŽÍVÁNÍ
natural_image
Technical line drawing of a mechanical device with no visible text or symbolsnatural_image
Technical line drawing of a mechanical device with no visible text or symbolsnatural_image
Technical line drawing of a mechanical component with no visible text or symbolsnatural_image
Technical line drawing of a mechanical device with no visible text or symbolsnatural_image
Technical line drawing of a mechanical device with no visible text or symbolsnatural_image
Line drawing of a three-wheeled food grainer with two cups (no text or symbols)natural_image
Line drawing of a hand mixer with three cups, showing no text or symbols
natural_image
Simple line drawing of two cups with bubbles rising from them (no text or symbols)PŘÍPRAVA OVOCE A ZELENINY
TYP VÝROBKŮ PŘÍKLAD PŘÍPRAVA
TVRDÉ KÓŘENY
ŽIVINY Z OVOCE A ZELENINY
| Ovoce/zelenina | Vitamínová/minerální látka | Kilokalorie / kalorie |
| Apple Witamina C 200 g = 150 kJ (72 cal) | ||
| Morela Vláknina, draslík 30 g = 85 kJ (20 cal) | ||
| Cukrová řepa | folacin, vláknina, červená řepa je bohatým zdrojem vitaminu C a draslíku. 160 g = 190 kJ (45 cal) | |
| Borůvky Witamina C 125 g = 295 kJ (70 cal) | ||
| Kapusta vitamín C, draslík, folacin, vitamín B6, vláknina 100 g = 110 kJ (26 cal) | ||
| Marchew | Vitamin A, C, B6, vláknina | 120 g = 125 kJ (30 cal) |
| Seler | Vitamin C, draslík | 80 g = 55 kJ (7 cal) |
| Okurka | Vitamina C | 280 g = 120 kJ (29 cal) |
| Fenykl | Vitamin C, vláknina | 300 g = 145 kJ (35 cal) |
| Hrozny | Vitamina C, B6, potas | 125 g = 355 kJ (85 cal) |
| Kiwi | Vitamin C, draslík | 100 g = 100 kJ (40 cal) |
| Melon | Vitamin C, folacin, vláknina, vitamin A | 200 g = 210 kJ (50 cal) |
| Nektarinka (bez pecky) | vitamín C, B3, draslík, vláknina | 180 g = 355 kJ (85 cal) |
| Broskev (bez pecky) | vitamín C, B3, draslík, vláknina | 150 g = 205 kJ (49 cal) |
| Hruška | Vlákna | 150 g = 205 kJ (60 cal) |
| Ananas | Vitamina C | 150 g = 250 kJ (59 cal) |
| Jahody vitamín C, železo, draslík a hořčík. 125 g = 130 kJ (31 cal) | ||
| Pomidor | Vitamin C, vláknina, vitamin E, folacin, vitamin A | 100 g = 90 kJ (22 cal) |
RECEPTY NA CHUTNÉ A ZDRAVÉ ŠŤÁVY
OBČERSTVENÍ I
natural_image
Technical line drawing of a mechanical device with no visible text or symbolsnatural_image
Technical line drawing of a mechanical device with no visible text or symbolsnatural_image
Technical line drawing of a mechanical device with no visible text or symbolsnatural_image
Technical line drawing of a mechanical device with no visible text or symbolsnatural_image
Technical line drawing of a manual manual mixer or brush unit (no text or symbols)natural_image
Line drawing of a manual hand mixer with two cups (no text or symbols)natural_image
Line drawing of a hand mixer with three cups, no text or symbols presentnatural_image
Simple line drawing of two cups with liquid bubbles (no text or symbols)DEMONTAGE DES ENTSAFTERS
natural_image
Technical line drawing of a mechanical device with no visible text or symbolsnatural_image
Technical line drawing of a mechanical device with no visible text or symbols2 Paigaldage pigistuskruvi (10) toitekambrisse (8) nii, et tihvt sobiks korpuses olevasse avasse.

natural_image
Technical line drawing of a mechanical component with no visible text or symbols3 Paigaldage pressimissõel (11) etteandekambri (8) sisse, asetades see pigistuskruvile (10). Veenduge, et söel (11) asub pigistuskruvi (10) all.

natural_image
Technical line drawing of a mechanical device with no visible text or symbolsnatural_image
Technical line drawing of a mechanical device with no visible text or symbolsnatural_image
Line drawing of a three-wheeled food grainer with two cups (no text or symbols)natural_image
Line drawing of a hand mixer with three cups, no text or symbols present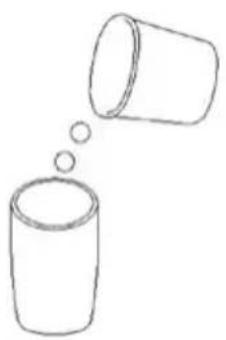
natural_image
Simple line drawing of two cups with bubbles rising from them (no text or symbols)7 Kasutage toidu etteandeava jaoks tōukurit (7).
natural_image
Technical line drawing of a mechanical component with no visible text or symbolsnatural_image
Technical line drawing of a mechanical device with no visible text or symbolsnatural_image
Technical line drawing of a mechanical component with no visible text or symbolsnatural_image
Technical line drawing of a mechanical device with no visible text or symbolsnatural_image
Line drawing of a manual hand mixer with no text or symbolsnatural_image
Line drawing of a manual hand mixer with two cups (no text or symbols)natural_image
Line drawing of a blender with three cups and a handle, no text or symbols presentnatural_image
Simple line drawing of two cups with bubbles rising from them (no text or symbols)-Read the instructions carefully before use.
- The machine is designed to squeeze juice from fresh fruit and vegetables. Do not use the device for purposes other than those for which it was intended.
-The device is intended for domestic use only.
- Do not use the device outdoors.
- Do not place hard foodstuffs in the juicer, e.g. large seeds, ice cubes, frozen products, etc.
-Check that the power parameters on the device's rating plate correspond to the parameters of your power supply network.
- The device should be connected to a mains socket outlet with a grounding pin!
- The equipment is not designed to operate using external timers or a separate remote control.
-Do not connect the plug to the power socket with wet hands.
- Do not pull the plug out of the power socket by pulling the cord.
-Do not handle the device with wet hands.
- Do not hang the power cable on sharp edges or allow it to come into contact with hot surfaces.
- Do not let the power cord hang off the edge of the table/countertop.
- Do not immerse the device, cable or charger in water or other liquids.
-Do not place the device on a hot surface.
- Do not place the device near other electric cookers, burners, ovens, etc.
- Place the appliance on a dry, flat, stain-resistant and stable surface.
-Always ensure that all parts of the device are correctly fitted before starting work.
-Take extra care, do not leave the appliance unattended when children are around.
- Disconnect the device from the power supply each time when the device is left unattended and before any assembling, disassembling, or cleaning works.
- Use of accessories not recommended by the manufacturer may cause damage to the device, fire or personal injury.
- Remember to keep a safe distance from rotating components of the machine during operation. Contact with them risks injury to the body or (i) damage to property e.g. by pulling out loose hanging items of clothing/jewellery etc.
- Place foodstuffs only with the dedicated pusher - do not put your hand into the chamber of the running appliance, do not place foodstuffs in the appliance with accessories not intended for this purpose, e.g. forks, spoons, etc.
-Cleaning of the appliance, in particular of the parts in direct contact with food, should be carried out before first use, immediately after use or if the appliance has not been used for a long time - the procedure is described in the chapter "CLEANING AND MAINTENANCE".
- Do not use sharp objects, abrasive polishes, solvents or other strong chemicals for cleaning since their use may cause damages to the device.
- Never use a damaged device, including one with a damaged cord or plug, in which case have it repaired at an authorised service centre.
- The appliance may be used by persons with limited physical, sensory or mental abilities, or without knowledge or experience of using this type of equipment, provided that they are supervised or instructed in the safe use of the equipment and understand the risks involved.
- The device must be kept away from children. Keep the device and cable out of the reach of children.
- Children are not allowed to perform cleaning and maintenance tasks.
-Children must not play with the device.
- For the safety of children, do not leave freely accessible parts of the packaging (plastic bags, cardboard boxes, polystyrene, etc.).
- WARNING! Do not allow children to play with the film. Danger of suffocation!
- Before the first use, remove all bags, stickers, tapes and transport locks from the device and its accessories.
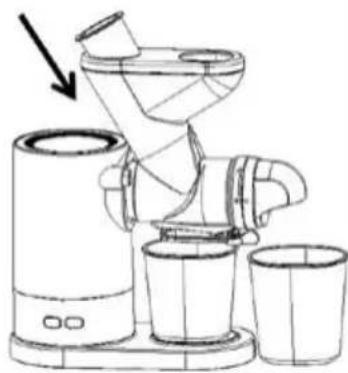
DEVICE DESCRIPTION
- Workstation/housing
- ON/OFF button
- REV button
- Drain feeder lock button
- Power cable
- Non-slip feet
-
Pusher
-
Feeder chamber with juice outlet
- Stopper for juice outlet
- Extrusion auger
- Squeezing screen
- Feeder cap with waste outlet
- Juice container (300 ml)
- Waste container (400 ml)
BEFORE FIRST USE
- Take the device out of the box and remove all the cardboard and foil protecting it.
- Inspect the unit for any damage that may have occurred during transport of the unit. In the event of suspected damage, do not operate the unit and consult your dealer.
- Make sure that the parameters of your mains electricity correspond to the data on the appliance's rating plate.
- Clean the appliance following the instructions in the chapter "CLEANING AND MAINTENANCE".
INSTALLATION OF A JUICER
natural_image
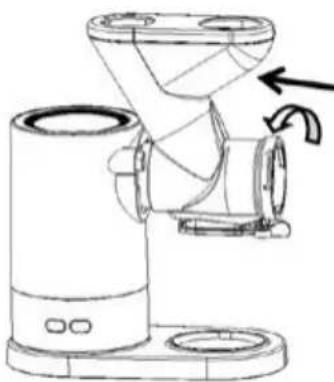
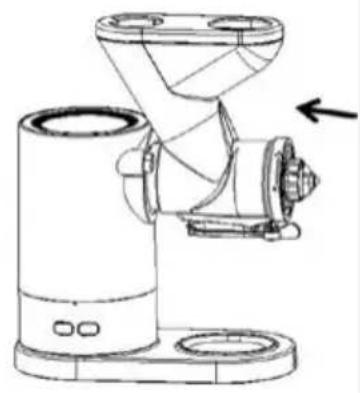
Technical line drawing of a mechanical device with no visible text or symbols1 Place the unit on a smooth, stable and flat surface. Fit the feeder chamber (8) onto the workstation (1), hitting the grooves on the housing with the tabs. Turn the feeder chamber (8) counterclockwise as far as possible until the drain feeder lock button (4) "clicks".
natural_image
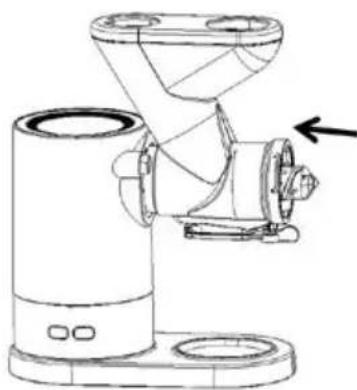
Technical line drawing of a mechanical device with no visible text or symbols2 Fit the extrusion auger (10) into the feeder chamber (8) so that the pin fits into the hole in the housing.

natural_image
Technical line drawing of a mechanical component with no visible text or symbols
natural_image
Technical line drawing of a mechanical device with no visible text or symbols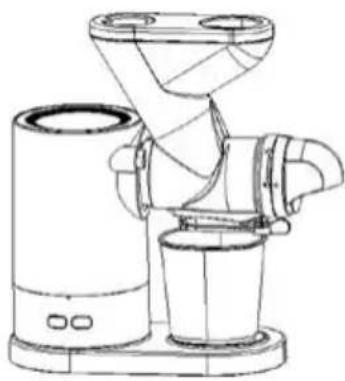
natural_image
Technical line drawing of a mechanical device with no visible text or symbols
natural_image
Line drawing of a three-wheeled food grainer with two cups (no text or symbols)3 Fit the extrusion screen (11) to the centre of the feeder chamber (8) by placing it over the extrusion auger (10). Ensure that the sieve (11) is underneath the squeezing auger (10).
4 Fit the feeder nut (12) and turn it counterclockwise as far as it will go so that it is tightly closed. Note the "closed padlock" marking on the feeder chamber (8).
5 Place the juice container (13) under the juice outlet (9)
6 Place the waste container (14) under the pulp outlet (12).
natural_image
Line drawing of a hand mixer with three cups, showing no text or symbols
natural_image
Simple line drawing of two cups with bubbles rising from them (no text or symbols)7 Use the pusher (7) for the food feed opening.
8 When you have finished, disconnect the power and remove the juice container from underneath the machine to pour into another container.
CAUTION! The fruit and vegetable juicer is equipped with a slow-speed gear motor, so the machine takes time to process the ingredients used. Rushing, trying to put in large veg - etables and fruit, or a large amount of fruit at once, and pushing hard with the pusher can cause the unit to jam.
PREPARATION OF FRUIT AND VEGETABLES
TYPE OF PRODUCTS EXAMPLE: PREPARATION:
HARD ROOTS
Note: don't put a lot of vegetables or fruit in at once. A large amount could clog the feed channel or the squeezing auger, which could cause the machine to jam.
- marchew
- beet
- celery
Wash and peel, especially from the tough skin, all the produce and cut into small pieces so that they pass easily through the feed channel. Cut a large carrot lengthwise into four pieces only. Cut off the green end approximately 1cm. Push the ends of the pieces with the pusher.
- Cut the beetroot and celery like apples into approx.8 parts
REMINDER! It is necessary to gently press the pressed, hard vegetables or fruit against the slowly rotating mechanism. For ease of use, cut the larger carrots lengthways, into two or more pieces. Use the pusher to press the last portion of the squeezed products.
TWARDE OWOCE
- apples
IMPORTANT! Choose mainly hard, juicy species. Wash and cut the peeled fruit into pieces that fit easily into the feed opening (approx. 8 pieces). Don't put too many pieces of fruit in at once - it will be hard to squeeze.
| SOFT FRUIT/VEGETABLES | tomatoescucumberspinachpeachesgrapeananas | Wash the products and cut them into pieces that fit easily into the feed opening. Peel if necessary. Do not place too many pieces of fruit in the feed opening so as not to overfill it.Push with the pusher. |
| DIGITS | orangesgrapefruitslemons | Peel the fruit and remove any excess white fibre. Divide into natural particles. If possible, remove the seeds. |
SQUEEZING THE JUICE
CAUTION! Fruits with stones, such as peaches, plums, cherries, must first be cored and the stones removed. Fruits and vegetables with cores, hard seeds, thick skins or hard shells should be removed before processing.
CAUTION! Do not cut vegetables and fruit into thin slices, cubes, etc. Pieces that are too small or too large will make it more difficult to squeeze the juice.
- Place the unit on a smooth, stable and flat surface. Connect the device to the mains supply.
- Thoroughly wash the fruit and vegetables you intend to juice and then cut them into small pieces (but not slices or small pieces) so that they can be easily dropped into the machine through the opening in the feeder chamber (8).
- Stand the juice container (13) and the waste container (14) under the respective outlet openings. Open the juice outlet with the outlet plug (9).
- Switch the extruder on using the ON/OFF button (2).
- Put the fruit and vegetables into the opening in the feeder chamber (8) pushing them only with the pusher (7).
- Check from time to time that the waste (14) and juice containers (13) are not full - if they need to be emptied, first switch off the appliance using the ON/OFF button (2) and close the juice outlet with the juice outlet plug (9).
- The device can stop its operation when it encounters too much resistance. If this happens, switch it off using the ON/OFF button (2), as this may mean that the pieces of fruit or vegetables thrown in are too large. This happens mainly with hard vegetables and fruit. The REV button (3) must then be pressed. The extruder will engage reverse rotation causing the motor to unlock. To deactivate the reverse rotation function, press the ON/OFF button (2). If the problem persists, the unit should be dismantled, cleaned and reassembled (see para. "Assembly of the extruder").
CAUTION! The juicer has a safety feature that will automatically stop the machine after 10 minutes of continuous operation. After this time, the unit should be allowed to cool for about 20-30 minutes.
ATTENTION! Do not close the stopper when juicing ingredients that foam (e.g. apples, celery). Be careful if you squeeze the juice with the stopper closed. If the amount of juice collected in the feeder chamber (8) exceeds its volume, the excess juice may spill out.
GENERAL COMMENTS
- Use fresh and ripe fruit and vegetables wherever possible.
- The seeds of citrus fruits should be removed, as they impart a bitter taste.
- Soft and over-ripe fruit will result in juice that is not clear.
- Apple juice can turn brown quickly - to slow down this process squeeze a few drops of lemon juice into the juice.
- If the juice is too thick, dilute it with mineral water.
DISMANTLING THE JUICER
- Switch the appliance off using the ON/OFF button (2) and disconnect it from the power supply.
- Wait until the squeezing auger has come to a complete stop.
- Remove the pusher (7) from the feeder chamber (8).
- To dismantle the feeder chamber (8) press and hold the tray lock button (4) and turn the feeder chamber (8) clockwise with the other hand.
- Disassemble the individual components in reverse order of assembly (feeder nut (12), extrusion screen (11), extrusion screw (10)).
- Thoroughly wash and clean the above items.
CLEANING AND MAINTENANCE
CAUTION! Proper washing and maintenance prolongs the life of the extruder. As the extruder squeezes minerals, including calcium, we recommend always washing all parts of the machine after use with anti-calcium build-up agents.
- Switch off the appliance before cleaning.
- The main housing can be cleaned with a damp cloth (if necessary, a small amount of detergent can be added). Wash all food-contact parts thoroughly after each use in warm water with a lit -tle detergent, preferably immediately after juicing. Do not use water above 80°C for washing.
- Do not use strong cleaning agents, acetone, alcohol, sharp materials, etc. for cleaning. Their use may cause damage to the device.
- The squeeze screen should be cleaned thoroughly after each use. A kitchen brush can be used for this purpose.
- Do not immerse the base of the unit in water or other liquids!
- If there is discolouration of the juicer parts due to carrots, oranges, etc., they can be wiped with a cloth with cooking oil. Discolouration does not affect the functionality of the device.
- Once all the parts have been cleaned and dried, the juicer should be assembled (see paragraph, "ASSEMBLING THE JUICE Squeezer").
SYMPTOMS OF MALFUNCTION
OBJECTS SEE
| Engine does not run – Is the power cord in the socket– Didn't something get stuck when feeding products for processing |
| The working device stops – Is the unit properly assembled– Is it not overloaded– Is the product you want to squeeze prepared in the right pieces |
| A "jam" is formed in the batch channel– If you are squeezing a lot of soft produce, try to alternate pushing hard produce (e.g. push an orange or apple with a carrot). Choose fresh produce with no signs of spoilage– Pturn the switch to the "REV" position several times– Do not overfill the feed channel with products, place products one by one, allow time for processing– If the cause is still unknown, the unit should be washed and reassembled |
Pulp stops escaping – Push through with a harder product
NUTRIENTS OF FRUIT AND VEGETABLES
| Fruit/vegetable | Vitamin/mineral substance | Kilocalories / calories |
| Apple Vitamin C 200 g = 150 kJ (72 cal) | ||
| Morela Fibre, potassium 30 g = 85 kJ (20 cal) | ||
| Sugar beet | Folacin, fibre, beetroot is a rich source of vitamin C and potassium 160 g = 190 kJ (45 cal) | |
| Blueberry Vitamin C 125 g = 295 kJ (70 cal) | ||
| Cabbage Vitamin C, potassium, folacin, vitamin B6, fibre 100 g = 110 kJ (26 cal) | ||
| Marchew | Vitamin A, C, B6, fibre | 120 g = 125 kJ (30 cal) |
| Seler | Vitamin C, potassium | 80 g = 55 kJ (7 cal) |
| Cucumber | Vitamin C | 280 g = 120 kJ (29 cal) |
| Fennel | Vitamin C, fibre | 300 g = 145 kJ (35 cal) |
| Grapes | Vitamin C, B6, potassium | 125 g = 355 kJ (85 cal) |
| Kiwi | Vitamin C, potassium | 100 g = 100 kJ (40 cal) |
| Melon | Vitamin C, folacin, fibre, vitamin A | 200 g = 210 kJ (50 cal) |
| Nectarine (without stone) | Vitamin C, B3, potassium, fibre | 180 g = 355 kJ (85 cal) |
| Peach (without stone) | Vitamin C, B3, potassium, fibre | 150 g = 205 kJ (49 cal) |
| Pear | Fibre | 150 g = 205 kJ (60 cal) |
| Ananas | Vitamin C | 150 g = 250 kJ (59 cal) |
| Strawberry | Vitamin C, iron, potassium and magnesium | 125 g = 130 kJ (31 cal) |
| 1 tomato | Vitamin C, fibre, vitamin E, folacin, vitamin A | 100 g = 90 kJ (22 cal) |
RECIPES FOR DELICIOUS AND HEALTHY JUICES
REFRESHMENT I
- 6 membranes (each cut into small pieces, remove core and seeds)
- bunch of parsley
- a few leaves and mint
REFRESHMENT II
- 6 apples (each cut into small pieces, remove core and seeds)
-
bunch of parsley
-
2 stalks of celery
- slice (1 cm) of ginger
METHOD OF PREPARATION:
Squeeze two - three apples first. Then squeeze in parsley and mint leaves as well as ginger and celery.
Finally, squeeze in the remaining apples.
VITALITY
- 6 carrots (cut very large carrots lengthwise and crosswise, medium carrots only lengthwise)
-4 apples (each cut into small pieces, remove core and seeds)
-2 medium celery stalks
-a slice (1 cm) of ginger to taste
METHOD OF PREPARATION:
Squeeze some of the carrots, apples, celery stalks and ginger.
Do it alternately hard - soft, you will get better efficiency.
Squeeze out the rest of the carrots at the end.
You can also add beetroot, orange etc. with each vegetable added changing the taste qualities.
CHLOROPHYLL COCKTAIL
The juice is squeezed from green plants; for variety, it can be made from other plants every day, e.g.: spinach, different varieties of lettuce, lamb's lettuce, beetroot, parsley, celery, etc., in the amount of about a hand - ful per 2 portions. In order to obtain as much juice as possible, put the leaves into the feed channel one at a time and finally squeeze out some hard product (piece of apple, carrot, etc.). Then pour 500ml water, the squeezed juice into the blender and add the fruit: banana, strawberry, peach, pear, etc. Mix for a few minutes. Drink slowly.
CAUTION! The chlorophyll cocktail has remarkable detoxifying properties, so, like beetroot juice, drink it slowly and drink no more than 300 - 400 ml a day.
CLEANSING THE LIVER
-0.5 beetroot (peel and cut into pieces)
-5 carrots (peel, cut very large carrot lengthwise and crosswise, medium carrot lengthwise only)
-2 cm fresh cucumber
-3 apples (each cut into small pieces, remove core and seeds)
-small bunch of parsley or lettuce
METHOD OF PREPARATION:
Squeeze beetroot, apple, cucumber, small bunch of parsley or lettuce.
Do it alternately hard - soft, you will get better efficiency.
Squeeze the carrots at the end.
FOR BEAUTY
-4 oranges (peel and split into pieces, remove seeds)
-5 carrots (cut a very large carrot length - wise and crosswise, a medium carrot just lengthwise)
-1 stalk of celery
-small bunch of parsley
-ginger root (approx. 1 cm)
SLIMFIT
-1 grapefruit (peel and cut into pieces, remove seeds)
-3 pineapple rings (remove core)
-2 oranges (peel and split into pieces, remove seeds)
-2 carrots(cut a very large carrot length - wise and crosswise, a medium carrot only lengthwise)
-1 cm ginger root
You can also add parsley, celery.
FRUIT LEMONADE
-3 hard apples (each cut into small pieces, remove core and seeds)
-3 oranges (peel and split into pieces, remove seeds)
-1/2 lemon (peel and cut into pieces, remove seeds)
Squeeze all the fruit, making sure to alternate between soft and hard. Can be served with mint and ice.
TECHNICAL DATA
| Model MSO-17 | |
| Power supply 220-240V~ 50-60HZ | |
| Rated power 100W | |
| Maximum power 450W | |
| Off and standby mode available available | |
| Power consumption in standby mode - | |
| Power consumption in off mode 0,16W | |
| Power consumption in standby mode with display | - |
| Power consumption in network standby mode | - |
| It automatically goes into standby mode after - | |
| Automatically goes into shutdown mode after - | |
| Network standby mode, if the device has a connection function with the appli cation | - |
| Length of mains cable 1.0 m |
CE
CAUTION! MPM agd S.A. reserves the right to technical changes.
Proper disposal of the product (waste electrical and electronic equipment)
Marking on the product indicates that after the service-life of the product expires, it should not be disposed with other type of municipal waste. Used equipment may have a negative impact on the environment and health of people due to potentially containing hazardous substances, mixtures and components. Mixing electric waste with other types of waste or disassembling those in an unprofessional manner may cause a release of substances that are hazardous to the environment and health.
Used equipment should be handed-over to a point for collection of electric waste. In order to obtain detailed information regarding the electric waste collection points, the user should contact the municipal point of electric waste collection or used equipment processing department.
natural_image
Technical line drawing of a mechanical component with no visible text or symbolsnatural_image
Technical line drawing of a mechanical device with no visible text or symbolsnatural_image
Technical line drawing of a mechanical component with no visible text or symbols
natural_image
Technical line drawing of a mechanical device with no visible text or symbols
natural_image
Technical line drawing of a mechanical device with no visible text or symbols
natural_image
Line drawing of a three-wheeled food grainer with two cups (no text or symbols)natural_image
Line drawing of a hand mixer with three cups, no text or symbols present
natural_image
Simple line drawing of two cups with bubbles rising from them (no text or symbols)natural_image
Technical line drawing of a mechanical device with no visible text or symbolsnatural_image
Technical line drawing of a mechanical device with no visible text or symbolsnatural_image
Technical line drawing of a mechanical device with no visible text or symbolsnatural_image
Technical line drawing of a mechanical device with no visible text or symbolsnatural_image
Technical line drawing of a manual manual mixer or brush unit (no text or symbols)natural_image
Line drawing of a hand mixer with three cups (no text or symbols)natural_image
Line drawing of a hand mixer with three cups, showing no text or symbolsnatural_image
Simple line drawing of two cups with liquid bubbles (no text or symbols)natural_image
Technical line drawing of a mechanical device with no visible text or symbolsnatural_image
Technical line drawing of a mechanical device with no visible text or symbolsnatural_image
Technical line drawing of a mechanical device with no visible text or symbolsnatural_image
Technical line drawing of a mechanical device with no visible text or symbolsnatural_image
Line drawing of a manual hand mixer with two cups and a side pump (no text or symbols)natural_image
Line drawing of a manual hand mixer with three cups (no text or symbols)natural_image
Line drawing of a hand mixer with three cups, showing no text or symbols
natural_image
Simple line drawing of two cups with liquid bubbles (no text or symbols)natural_image
Technical line drawing of a mechanical component with no visible text or symbolsnatural_image
Technical line drawing of a mechanical device with no visible text or symbolsnatural_image
Technical line drawing of a mechanical component with no visible text or symbols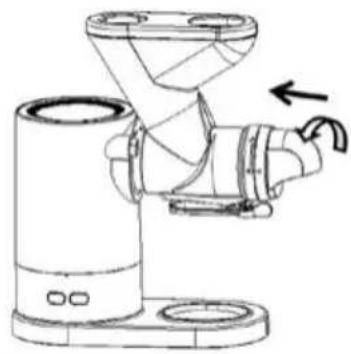
natural_image
Technical line drawing of a mechanical device with no visible text or symbols
natural_image
Technical line drawing of a mechanical device with no visible text or symbols
natural_image
Line drawing of a modern kitchen brush with three cups (no text or symbols)natural_image
Line drawing of a hand mixer with three cups, no text or symbols present
natural_image
Simple line drawing of two cups with liquid bubbles (no text or symbols)natural_image
Technical line drawing of a mechanical device with no visible text or symbolsnatural_image
Technical line drawing of a mechanical device with no visible text or symbolsnatural_image
Technical line drawing of a mechanical device with no visible text or symbolsnatural_image
Technical line drawing of a mechanical device with no visible text or symbolsnatural_image
Line drawing of a manual hand mixer with two cups (no text or symbols)natural_image
Line drawing of a manual hand mixer with three cups (no text or symbols)natural_image
Line drawing of a hand mixer with three cups, showing no text or symbols
natural_image
Simple line drawing of two cups with bubbles rising from them (no text or symbols)7 Naudokite stūmiklj (7) maisto tiekimo atidarymui.
natural_image
Technical line drawing of a mechanical device with no visible text or symbolsnatural_image
Technical line drawing of a mechanical device with no visible text or symbolsnatural_image
Technical line drawing of a mechanical device with no visible text or symbolsnatural_image
Technical line drawing of a mechanical device with no visible text or symbolsnatural_image
Line drawing of a manual hand mixer with two cups (no text or symbols)natural_image
Line drawing of a manual hand mixer with three cups (no text or symbols)6 Atkritumu tvertni (14) novieto zem celulozes izplüdes atveres (12).

natural_image
Line drawing of a hand mixer with three cups, no text or symbols present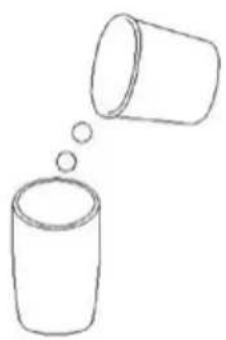
natural_image
Simple line drawing of two cups with liquid bubbles (no text or symbols)PRODUKTU VEIDS PIEMERS SAGATAVOŠANA
CIETA SAKNE
BESCHRIJVING VAN HET APPARAAT
natural_image
Technical line drawing of a mechanical device with no visible text or symbolsnatural_image
Technical line drawing of a mechanical device with no visible text or symbolsnatural_image
Technical line drawing of a mechanical device with no visible text or symbolsnatural_image
Technical line drawing of a mechanical device with no visible text or symbolsnatural_image
Technical line drawing of a manual manual mixer or brush tool (no text or symbols present)natural_image
Line drawing of a manual hand mixer with two cups (no text or symbols)natural_image
Line drawing of a hand mixer with three cups, showing no text or symbolsnatural_image
Simple line drawing of two cups with liquid bubbles (no text or symbols)natural_image
Technical line drawing of a mechanical component with no visible text or symbolsnatural_image
Technical line drawing of a mechanical device with no visible text or symbolsnatural_image
Technical line drawing of a mechanical device with no visible text or symbolsnatural_image
Technical line drawing of a mechanical device with no visible text or symbolsnatural_image
Line drawing of a manual hand mixer with no text or symbolsnatural_image
Line drawing of a manual hand mixer with two cups (no text or symbols)natural_image
Line drawing of a blender with three cups and a handle, no text or symbols presentnatural_image
Simple line drawing of two cups with bubbles rising from them (no text or symbols)SKŁADNIKI ODŻYWCZE OWOCÓW I WARZYW
natural_image
Technical line drawing of a mechanical device with no visible text or symbolsnatural_image
Technical line drawing of a mechanical device with no visible text or symbolsnatural_image
Technical line drawing of a mechanical device with no visible text or symbolsnatural_image
Technical line drawing of a mechanical device with no visible text or symbolsnatural_image
Technical line drawing of a manual manual mixer or brush tool (no text or symbols)
natural_image
Line drawing of a manual hand mixer with two cups (no text or symbols)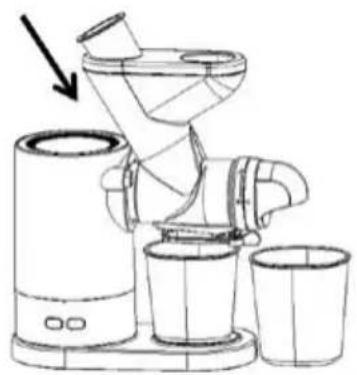
natural_image
Line drawing of a hand mixer with three cups, showing no text or symbols
natural_image
Simple line drawing of two cups with liquid bubbles (no text or symbols)natural_image
Line drawing of a manual hand mixer with no text or symbols
natural_image
Line drawing of a manual hand mixer with two cups (no text or symbols)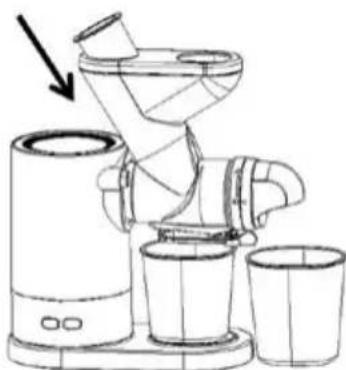
natural_image
Line drawing of a hand mixer with three cups, showing no text or symbols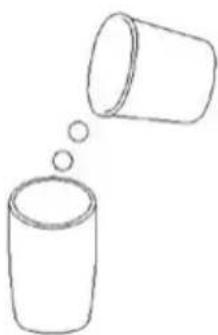
natural_image
Simple line drawing of two cups with bubbles rising from them (no text or symbols)natural_image
Technical line drawing of a mechanical device with no visible text or symbolsnatural_image
Technical line drawing of a mechanical device with no visible text or symbols2 Nasad'te vytláčací šnek (10) do komory podávača (8) tak, aby kolík zapadol do otvoru v kryte.
natural_image
Technical line drawing of a mechanical component with no visible text or symbolsnatural_image
Technical line drawing of a mechanical device with no visible text or symbolsnatural_image
Technical line drawing of a manual pump or grinder device (no text or symbols)natural_image
Line drawing of a three-wheeled food grainer with two cups (no text or symbols)natural_image
Line drawing of a hand mixer with three cups, showing no text or symbols
natural_image
Simple line drawing of two cups with bubbles rising from them (no text or symbols)ŽIVINY OBSIAHNUTÉ V OVOCÍ A ZELENINE
| Ovocie / zelenina | Vitamín / minerálna látka | Kilokalórie / kalórie |
| Jablko Vitamín C 200 g = 150 kJ (72 cal) | ||
| Marhuľa Vláknina, draslík 30 g = 85 kJ (20 cal) | ||
| Cukrová repa | Kyselina listová, vláknina, repa je bohatý zdroj vitamínu C a draslíka 160 g = 190 kJ (45 cal) | |
| Čučoriedka Vitamín C 125 g = 295 kJ (70 cal) | ||
| Kapusta | Vitamín C, draslík, kyselina listová, vitamín B6, vláknina | 100 g = 110 kJ (26 cal) |
| Mrkva Vitamín A, C, B6, vláknina | 120 g = 125 kJ (30 cal) | |
| Zeler | Vitamín C, draslík | 80 g = 55 kJ (7 cal) |
| Uhorka | Vitamín C 280 g = 120 kJ (29 cal) | |
| Fenikel | Vitamín C, vláknina | 300 g = 145 kJ (35 cal) |
| Hrozno | Vitamín C, B6, draslík | 125 g = 355 kJ (85 cal) |
| Kivi | Vitamín C, draslík | 100 g = 100 kJ (40 cal) |
| Dyňa | Vitamín C, kyselina listová, vláknina, vitamín A | 200 g = 210 kJ (50 cal) |
| Nektárinka (bez kôstky) | Vitamín C, B3, draslík, vláknina | 180 g = 355 kJ (85 cal) |
| Broskyňa (bez kôstky) | Vitamín C, B3, draslík, vláknina | 150 g = 205 kJ (49 cal) |
| Hruška Vláknina 150 g = 205 kJ (60 cal) | ||
| Ananás Vitamín C 150 g = 250 kJ (59 cal) | ||
| Jahoda Vitamín C, železo, draslík a horčík 125 g = 130 kJ (31 cal) | ||
| Rajčina | Vitamín C, vláknina, vitamín E, kyselina listová, vitamín A 100 g = 90 kJ (22 cal) |
RECEPTY NA VYNIKAJÚCE A ZDRAVÉ ŠŤAVY
OSVIEŽENIE II.
natural_image
Technical line drawing of a mechanical component with no visible text or symbols
natural_image
Technical line drawing of a mechanical device with no visible text or symbols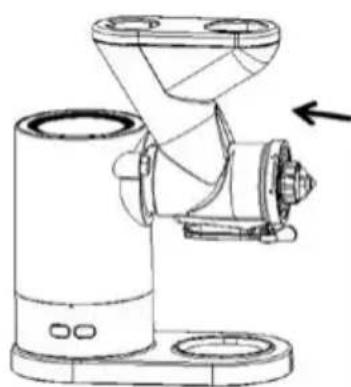
natural_image
Technical line drawing of a mechanical device with no visible text or symbols
natural_image
Technical line drawing of a mechanical device with no visible text or symbolsnatural_image
Line drawing of a manual hand mixer device with no text or symbols
natural_image
Line drawing of a manual hand mixer with three cups (no text or symbols)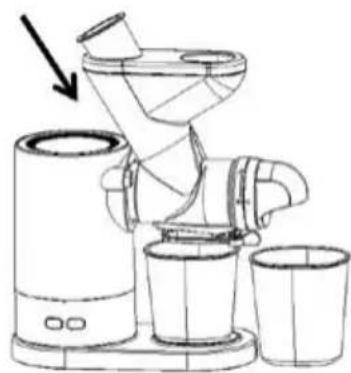
natural_image
Line drawing of a hand mixer with three cups, showing no text or symbols