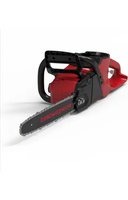
PD48CS36 - Saw Powerworks - Free user manual and instructions
Find the device manual for free PD48CS36 Powerworks in PDF.


| Product Type | Cordless Chainsaw |
| Brand | Powerworks |
| Model | PD48CS36 |
| Voltage | 48 V DC |
| No-load Speed | 20 m/s |
| Guide Bar Length | 360 mm |
| Oil Tank Capacity | 200 ml |
| Weight (without battery) | 3.6 kg |
| Sound Pressure Level | 92 dB(A) |
| Measured Sound Power Level | 101.1 dB(A) |
| Guaranteed Sound Power Level | 104 dB(A) |
| Vibration | 4.9 m/s² |
| Chain | CL14352 |
| Guide Bar | M14314 52-1041 TL |
| Power Source | 48 V lithium-ion battery (not included) |
| Chain Brake | Yes, with hand guard |
| Warranty | 3 years (product), 2 years (battery) |
| Main Functions | Felling, limbing, cross-cutting |
| Safety | Chain brake, unlock button, hand guard |
| Maintenance | Tension adjustment, sharpening, lubrication |
| Spare Parts | Chain, guide bar, battery, charger |
Frequently Asked Questions - PD48CS36 Powerworks
User questions about PD48CS36 Powerworks
0 question about this device. Answer the ones you know or ask your own.
Ask a new question about this device
Download the instructions for your Saw in PDF format for free! Find your manual PD48CS36 - Powerworks and take your electronic device back in hand. On this page are published all the documents necessary for the use of your device. PD48CS36 by Powerworks.
USER MANUAL PD48CS36 Powerworks
CSE402
CE
Original Instructions / Übersetzung der Originalanweisungen / Traducción de las instrucciones originales / Traduzione delle istruzioni originali / Traduction des instructions d'origine / Vertaling van de originele gebruiksaanwijzing / Alkuperäisten ohjeiden käännös / Översättning av original instruktionerna / Produsentens instruksjoner / Oversættelse af de originale vejledninger / Překlad originálního návodu / Preklad originálneho návodu / Prevod originalnih navodil / Prijevod izvornih uputa / Az eredeti utasítás fordítása / Превод на оригинаналните инструкции / Orijinal Talimatlann Tercümesi / Originaalkasutusjuhendi tõlge
EN
English
1 Description.... 5
1.1 Overview.... 5
2 Safety.... 5
3 Installation.... 5
3.1 Unpack the machine....5
3.2 Assemble the guide bar and the chain..... 5
3.3 Install the battery pack.... 5
3.4 Remove the battery pack.... 6
4 Operation....6
4.1 Examine the chain lubrication.... 6
4.2 Hold the machine.... 6
4.3 Start the machine.... 6
4.4 Stop the machine.... 6
4.5 Operate the chain brake....6
4.6 Fell a tree.... 6
4.7 Limb a tree.... 7
4.8 Buck a log....7
5 Maintenance....7
5.1 Adjust the chain tension.... 7
5.2 Sharpen the cutters....8
5.3 Guide bar maintenance....8
5.4 Add the bar and chain lubricant....8
6 Transportation and storage...... 9
7 Troubleshooting......9
8 Technical data.... 10
9 Warranty....10
10 EC Declaration of conformity.....10
1 DESCRIPTION
1.1 OVERVIEW
Figure 1-22
| 1 | Guide bar cover | 24 | Danger zone |
| 2 | Front handle guard / chain brake | 25 | Escape route |
| 26 | Direction of fall | ||
| 3 | Front handle | 27 | Notch |
| 4 | Lock out button | 28 | Felling back cut |
| 5 | Trigger | 29 | Hinge |
| 6 | Oil tank cap | 30 | Limb cut |
| 7 | Oil indicator | 31 | Keep work off |
| 8 | Spike bumpers | ground leave | |
| 9 | Saw chain | support limbs until log is cut | |
| 10 | Guide bar | ||
| 11 | Wrench | 32 | Log supported along the entire length |
| 12 | Rear handle | ||
| 13 | Chain tension screw | 33 | Cut from top (over buck) avoid cutting earth |
| 14 | Chain cover | ||
| 15 | Chain cover nuts | 34 | Log supported one end |
| 16 | Bolt for saw chain tension | 35 | Under buck |
| 17 | Sprocket | 36 | Over buck |
| 18 | Battery release button | 37 | Log supported both ends |
| 19 | Oil outlet | 38 | Bucking a log |
| 20 | Bar groove | 39 | Stand on uphill side when cutting because log may roll |
| 21 | Chain drive links | ||
| 22 | Cutter | ||
| 23 | Felling direction |
2 SAFETY
WARNING
Make sure that you do/obey all safety instructions.
Refer to Safety Manual.
3 INSTALLATION
WARNING
Do not change or make accessories that are not recommended by the manufacturer.
WARNING
Do not put in the battery pack until you assemble all the parts.
3.1 UNPACK THE MACHINE
WARNING
Make sure that you correctly assemble the machine before use.
WARNING
- If the parts have damage, do not use the machine.
- If you do not have all the parts, do not operate the machine.
-
If the parts are damaged or missing, speak to the service center.
-
Open the package.
- Read the documentation in the box.
- Remove all the unassembled parts from the box.
- Remove the machine from the box.
- Discard the box and package in compliance with local regulations.
3.2 ASSEMBLE THE GUIDE BAR AND THE CHAIN
Figure 1-7.
- Remove the chain cover nuts with the wrench.
- Remove the chain cover.
- Put the chain drive links into the bar groove.
- Put the chain cutters in the direction of the chain operation.
- Put the chain in position and make sure that the loop is behind the guide bar.
- Hold the chain and bar.
- Put the chain loop around the sprocket.
- Make sure the chain tension pin hole on the guide bar fits correctly with the bolt.
- Install the chain cover.
- Tighten the chain. Refer to Adjust the chain tension.
- Tighten the nuts when the chain is well tensioned.
NOTE
If you start the chain saw with a new chain, have a test for 2-3 minutes. A new chain gets longer after the first use, examine the tension and tighten the chain if necessary.
3.3 INSTALL THE BATTERY PACK
Figure 2
WARNING
- If the battery pack or charger is damaged, replace the battery pack or the charger.
- Stop the machine and wait until the motor stops before you install or remove the battery pack.
-
Read, know, and do the instructions in the battery and charger manual.
-
Align the lift ribs on the battery pack with the grooves in the battery compartment.
- Push the battery pack into the battery compartment until the battery pack locks into place.
- When you hear a click, the battery pack is installed.
3.4 REMOVE THE BATTERY PACK
Figure 2
- Push and hold the battery release button.
- Remove the battery pack from the machine.
4 OPERATION
NOTE
Remove the battery pack and keep hands clear of the lock out button when you move the machine.
i IMPORTANT
Examine the chain tension before each use.
4.1 EXAMINE THE CHAIN LUBRICATION
i NOTE
Do not use the machine without sufficient chain lubrication.
Figure 1
- Examine the lubricant level of the machine from the oil indicator.
- Add the lubricant if it is necessary.
4.2 HOLD THE MACHINE
Figure 8
- Hold the chainsaw with your right hand at the rear handle and left hand at the front handle.
- Hold the handles with the thumbs and the fingers around them.
- Make sure that your left hand holds the front handle and your thumb is below the handle.
4.3 START THE MACHINE
Figure 1.
- Press the lock-out button.
- Press the trigger while you hold the lock-out button.
- Release the lock-out button.
i IMPORTANT
The chain brake must be disengaged for the chain saw to start. Activate the brake by moving the front hand guard forwards.
4.4 STOP THE MACHINE
Figure 1.
- Release the trigger to stop the machine.
Make sure that your hands are on the handles at all times.
Figure 22
- Start the machine.
- Turn your left hand around the front handle to engage the chain brake.
- Pull the handle guard / chain brake toward the front handle to disengage the chain brake.
- Call approved service center for repair before use if
- The chain brake does not stop the chain immediately.
- The chain brake does not stay in the disengaged position without aid.
4.6 FELL A TREE
Figure 9-10.
Recommendation that the first-time user should, as a minimum practice, cutting logs on a saw-horse or cradle.
Before you start to fell a tree, make sure that
- The minimum distance between the areas of bucking and felling is two times the height of the tree.
• The operation does not - Cause injury to personnel.
- Hit utility lines. If the tree touches utility lines, immediately tell the utility company.
- Cause losses in property.
- The user is not in the dangerous area, for example, the downhill side of the area.
- The escape paths that extend back and diagonally behind the felling direction are clear. The felling direction is controlled by
• The natural lean of the tree.
English
EN
• The location of larger branches.
- The wind direction.
- There are no dirt, stones, loose bark, nails, and staples on the tree.
- Make a lower level notching cut. Make sure that this cut is
a) 1/3 wide of the diameter of the tree.
b) Perpendicular to the felling direction.
CAUTION
The level notching cut helps prevent pinching of the saw chain or the guide bar when you make the second notch.
- Make the felling cut no less than 50 mm and higher than the level notching cut. Make sure that this cut
a) Is parallel to the level notching cut.
b) Keeps sufficient wood to become a hinge which prevents the tree from twisting and felling to the wrong direction.
When the felling cut gets near the hinge, the tree falls. Stop the felling cut if the tree
- Does not fall to the correct direction or
-
Move rearward and forward and stuck the chain.
-
Use felling wedge to open the cut and let the tree fall to the correct direction.
-
When the tree starts to fall,
a) Remove the chainsaw from the cut.
b) Stop the machine.
c) Put the machine down.
d) Go away through the escape path. Be careful with overhead branches and your footing.
4.7 LIMB A TREE
Figure 11.
Limbing is to remove the branches from a fallen tree.
- Keep the larger lower branches to hold the log off the ground.
- Remove the small limbs in one cut.
- Limb the branches with tension from the bottom to up.
- Keep the larger lower branches as a support until the log is limbed.
4.8 BUCK A LOG
Figure 12-15.
Bucking is to cut a log into lengths. Keep your body balance. If it is possible, lift the log and hold it with branches, logs or chock.
- When the log is held along the full length, cut it from the top.
- When the log is held on one end,
- Cut the first time 1/3 of the diameter from the bottom.
- Cut the second time from the top to complete the bucking.
- When the log is held on two ends,
- Cut the first time 1/3 of the diameter from the top.
- Cut the second time lower 2/3 from the bottom to complete the bucking.
- When the log is on a slope,
- Stand on the uphill side.
- Control the chainsaw.
- Hold the handles tightly.
- Release the cut pressure near the end of the cut.
i NOTE
Do not let the chain touch the ground.
When bucking is complete,
- Release the trigger.
- Stop the chainsaw fully.
- Move the chainsaw from tree to tree.
5 MAINTENANCE
CAUTION
Do not let brake fluids, gasoline, petroleum-based materials touch the plastic parts. Chemicals can cause damage to the plastic, and make the plastic unserviceable.
CAUTION
Do not use strong solvents or detergents on the plastic housing or components.
WARNING
Remove the battery pack from the machine before maintenance.
5.1 ADJUST THE CHAIN TENSION
Figure 2-7.
The more you use a chain the longer it becomes. It is therefore important to adjust the chain regularly to take up the slack.
Tension the chain as tightly as possible, but not so tight that you cannot pull it round freely by hand.
WARNING
A slack chain may jump off and cause serious or even fatal injury.
CAUTION
Wear protective gloves if you touch the chain, bar or areas around the chain.
- Stop the machine.
- Loosen the lock nuts with the wrench.
i NOTE
It is not necessary to remove the chain cover to adjust the chain tension.
- Turn the chain adjustment screw clockwise to increase the chain tension.
- Turn the chain adjustment screw counterclockwise to decrease the chain tension.
- When the chain is at the wanted tension, tighten the lock nuts.
5.2 SHARPEN THE CUTTERS
Sharpen the cutters if it is not easy for the chain to go into the wood.
i NOTE
We recommend that a service center, which has an electric sharpener, perform important sharpening work.
Figure 16-19.
- Tensioning chain.
- Sharpen the cutters corner with a 5/32 in. (4 mm) diameter round file.
- Sharpen the top plate, side plate and depth gauge with a flat file.
- File all the cutters to the specified angles and the same length.
NOTE
During the process,
- Keep the file flat with the surface to be sharpened.
• Use the midpoint of the file bar. - Use light but firm pressure when sharpening the surface.
- Lift the file away on each return stroke.
- Sharpen the cutters on one side and then move to the other side.
Replace the chain if:
- The length of the cutting edges is less than 5 mm.
- There is too much space between the drive links and the rivets.
• The cut speed is slow - Sharpening the chain many times but it does not increase the cutting speed. The chain is worn.
5.3 GUIDE BAR MAINTENANCE
Figure 20-21.
i NOTE
Make sure that it is turned over periodically to keep symmetrical wear on the bar.
- Lubricate the bearings on the nose sprocket (if present) with the syringe (not included).
- Clean the bar groove with the scraping hook (not included).
- Clean the lubrication holes.
- Remove burr from the edges and level the cutters with a flat file.
Replace the bar if:
- the groove is not fit with the height of the drive links (which must never touch the bottom).
- the inside of the guide bar is worn and make the chain lean to one side.
5.4 ADD THE BAR AND CHAIN LUBRICANT
Examine the amount of oil in the machine. If the oil level is low, add the bar and chain lubricant as follows.
i IMPORTANT
Use bar and chain lubricant that is only for chains and chain oilers.
i NOTE
The machine comes from the factory without bar and chain lubricant.
- Loosen and remove the cap from the oil tank.
- Put the oil into the oil tank.
- Monitor the oil indicator to make sure that no dirt in the oil tank while you add the oil.
- Put the oil cap on.
- Tighten the oil cap.
- The whole oil tank will last for 20-40 minutes.
i IMPORTANT
Do not use dirty, used or contaminated oil. Damage can occur to the bar or chain.
6 TRANSPORTATION AND STORAGE
Before you move the machine, always
- Remove the battery pack from the machine.
- Keep hands clear of the lock-out button.
- Put the scabbard on the guide bar and the chain.
Before you put the machine into storage, always
- Remove the battery pack from the machine.
- Clean all unwanted material from the machine.
- Make sure that the storage area is
• Not available to children.
- Away from agents which can cause corrosion, such as garden chemicals and de-icing salts.
7 TROUBLESHOOTING
| Problem Possible | cause Solution | |
| The guide bar and the chain become hot and release smoke. | The chain is too tight. | Adjust the chain tension. |
| The oil tank is empty. | Add lubricants. | |
| Contamination causes a block-age of the dis-charge port. | Remove the guide bar and clean the dis-charge port. | |
| Contamination causes a block-age of the oil tank. | Clean the oil tank. Add new lubricant. | |
| Contamination causes a block-age of the guide bar and the oil tank cap. | Clean the guide bar and the oil tank cap. | |
| Contamination causes a block-age of the sprocket or guide wheels. | Clean the sprocket and the guide wheels. |
| Problem Possible | cause Solution | |
| The motor runs but the chain does not rotate. | The chain is too tight. | Adjust the chain tension. |
| The guide bar and the chain are damaged. | Replace the guide bar and the chain if it is necessary. | |
| The motor is damaged. | 1. Remove the battery pack from the machine.2. Remove the guide bar cover.3. Remove the bar and saw chain.4. Clean the machine.5. Install battery pack and operate the machine.If the sprocket rotates, it means the motor works properly. If not, call service center. | |
| The motor runs and the chain rotates, but the chain does not cut. | The chain is blunt. | Sharpen or replace the saw chain. |
| The chain is in the incorrect direction. | Turn the chain loop to the other direction. | |
| The chain is tight or loose. | Adjust the chain tension. | |
| The machine does not start. | The chain brake is engaged. | Pull the chain brake in the direction of the user to disengage it. |
| The machine and battery are not connected correctly. | Make sure that the battery release button clicks when you install the battery pack. | |
| The battery level is low. | Charge the battery pack. | |
| The lock out button and the trigger are not pushed at the same time. | 1. Push the lock-out button and hold it.2. Push the trigger to start the machine. | |
| The battery is too hot or too cold. | Refer to battery and charger manual. | |
| The motor runs, but the chain does not cut correctly, or the motor stops after around 3 seconds. | The machine is in the protection mode to protect the PCB. | Release the trigger and start the machine again. Do not force the machine to cut. |
| The battery is not charged. | Charge the battery. Refer to the battery and charger manual for correct charging procedures. | |
| The chain is not lubricated. | Lubricate the chain to decrease the friction. Do not let the guide bar and the chain operate without sufficient lubricant. | |
| Incorrect battery storage temperature | Cool the battery pack until it decreases to the ambient temperature. |
8 TECHNICAL DATA
| Voltage 48 V DC |
| No load speed 20 m/s | |
| Guide bar length 360 mm | |
| Chain stop < 0.12 s | |
| Chain oil capacity 200 ml | |
| Weight (without battery pack) | 3.6 kg |
| Measured sound pressure level | LpA = 92dB(A), KpA = 3 dB(A) |
| Measured sound power level | LwA = 101.1dB(A) |
| Guaranteed sound power level | LwA.d = 104 dB(A) |
| Vibration 4.9 m/s | 2, K = 1.5 m/s2 |
| Chain CL14352 | |
| Guide bar M1431452-1041 | TL |
9 WARRANTY
(The full warranty terms and conditions can be found on Powerworks webpage)
The Powerworks warranty is 3 years on the product, and 2 years on batteries (consumer/private usage) from the date of purchase. This warranty covers manufacturing faults. A faulty product under warranty might be either repaired or replaced. A unit that has been misused or used in other ways then described in the owner's manual might be rejected for warranty. Normal wear, and wear parts are not considered as warranty. The original manufacturer warranty is not affected by any additional warranty offered by a dealer or retailer.
A faulty product must be returned to the point of purchase in order to claim for warranty, together with the proof of purchase (receipt).
10 EC DECLARATION OF CONFORMITY
Name and address of the manufacturer:
Name: Changzhou Globe Co., Ltd.
Address: No. 65 (3-4) Xinggang Rd., Zhonglou Zone, Changzhou 213101 China.
Name and address of the person authorised to compile the technical file:
Name: Peter Söderström
Address: Propellergatan 1, 211 15 Malmö, Sweden
Herewith we declare that the product
Category: Chainsaw
Model: CSE402
Serial number: See product rating label
Year of Construction: See product rating label
- is in conformity with the relevant provisions of the Machinery Directive 2006/42/EC.
- is in conformity with the provisions of the following other EC-Directives:
• 2014/30/EC (EMC-Directive)
• RoHS Directive 2011/65/EU
• 2000/14/EC (Noise Directive) incl. modifications(2005/88/EC)
Furthermore, we declare that the following (parts/clauses of) European harmonised standards have been used:
• EN 55014-1, EN 55014-2;
• EN 60745-1, EN 60745-2-13, EN ISO 3744
Measured sound power level: LWA : 101.1dB(A)
Guaranteed sound LWA.d : 104dB(A) power level:
Conformity assessment method to Annex V Directive 2000/14/EC.
The EC type-examination certificate number: MDC1976 issued by SGS United Kingdom Limited (0890).
Place, date: Signature: Ted Qu, Quality Director Changzhou, 07/25/2018
Ted Au
Deutsch
DE
Adresse: No. 65 (3-4) Xinggang Rd., Zhonglou Zone, Changzhou 213101 China.
Indirizzo: No. 65 (3-4) Xinggang Rd., Zhonglou
Zone, Changzhou 213101 Cina.
10 DÉCLARATION DE CONFORMITÉ CE
Adresse : No. 65 (3-4) Xinggang Rd., Zhonglou Zone, Changzhou 213101 Chine.
• 2000/14/CE (Directive Bruit) modifications includes (2005/88/CE)
Adres: No. 65 (3-4) Xinggang Rd., Zhonglou Zone, Changzhou 213101 China.
6 TRANSPORT OCH FÖRVARING
Adress: No. 65 (3-4) Xinggang Rd., Zhonglou Zone, Changzhou 213101, Kina.
4.2 HOLD TAK I MASKINEN
Figur 8
5.3 VEDLIKEHOLD AV SVERD
Figur 20-21.
i MERK
Adresse: No. 65 (3-4) Xinggang Rd., Zhonglou Zone, Changzhou 213101, Kina.
Cím: No. 65 (3-4) Xinggang Rd., Zhonglou Zone, Changzhou 213101 China.
Adres: No. 65 (3-4) Xinggang Rd., Zhonglou Zone, Changzhou 213101 Çin.
Aadress: No. 65 (3-4) Xinggang Rd., Zhonglou Zone, Changzhou 213101, Hiina.



- EN
- ENGLISH
- 1 DESCRIPTION
- 1.1 OVERVIEW
- 2 SAFETY
- WARNING
- 3 INSTALLATION
- 3.1 UNPACK THE MACHINE
- 3.2 ASSEMBLE THE GUIDE BAR AND THE CHAIN
- FIGURE 1-7
- NOTE
- 3.3 INSTALL THE BATTERY PACK
- 3.4 REMOVE THE BATTERY PACK
- FIGURE 2
- 4 OPERATION
- I IMPORTANT
- 4.1 EXAMINE THE CHAIN LUBRICATION
- I NOTE
- FIGURE 1
- 4.2 HOLD THE MACHINE
- FIGURE 8
- 4.3 START THE MACHINE
- 4.4 STOP THE MACHINE
- FIGURE 22
- 4.6 FELL A TREE
- FIGURE 9-10
- BEFORE YOU START TO FELL A TREE, MAKE SURE THAT
- CAUTION
- 4.7 LIMB A TREE
- FIGURE 11
- 4.8 BUCK A LOG
- FIGURE 12-15
- 5 MAINTENANCE
- 5.1 ADJUST THE CHAIN TENSION
- FIGURE 2-7
- 5.2 SHARPEN THE CUTTERS
- FIGURE 16-19
- DURING THE PROCESS
- REPLACE THE CHAIN IF
- 5.3 GUIDE BAR MAINTENANCE
- REPLACE THE BAR IF
- 5.4 ADD THE BAR AND CHAIN LUBRICANT
- 6 TRANSPORTATION AND STORAGE
- 9 WARRANTY
- 10 EC DECLARATION OF CONFORMITY
- DEUTSCH
- DE
- 10 DÉCLARATION DE CONFORMITÉ CE
- 6 TRANSPORT OCH FÖRVARING
- 4.2 HOLD TAK I MASKINEN
- FIGUR 8
- 5.3 VEDLIKEHOLD AV SVERD
- I MERK
Brand : Powerworks
Model : PD48CS36
Category : Saw