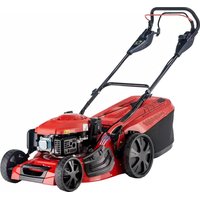
4731 VSI-A - Lawn mower SOLO - Free user manual and instructions
Find the device manual for free 4731 VSI-A SOLO in PDF.



| Product type | Gasoline lawn mower |
| Brand | Solo |
| Model | 4731 VSI-A |
| Power source | Unleaded gasoline and 4-stroke engine oil |
| Tank capacity | Approximately 0.6 L oil; gasoline according to engine |
| Cutting height | Adjustable centrally or by wheel, multiple notches |
| Cutting system | Rotary blade |
| Grass catcher | With level indicator, capacity not specified |
| Additional functions | Mulching kit (optional), side discharge (optional), wheel drive (optional), blade clutch (optional) |
| Starting | Manual (cable) or electric (optional) |
| Safety devices | Safety bar, deflector flap, engine stop when released |
| Handlebar adjustment | Height adjustable by buttons or lock |
| Routine maintenance | Cleaning after use, checking and sharpening blade, engine oil change, air filter and spark plug replacement |
| Storage | Fold handlebar, empty tank, store dry, frost-free |
| Warranty | Statutory warranty, wear parts excluded |
| Intended use | Private lawn, dry grass only |
| Not suitable for | Public spaces, parks, sports, agriculture, industrial use |
Frequently Asked Questions - 4731 VSI-A SOLO
User questions about 4731 VSI-A SOLO
0 question about this device. Answer the ones you know or ask your own.
Ask a new question about this device
Download the instructions for your Lawn mower in PDF format for free! Find your manual 4731 VSI-A - SOLO and take your electronic device back in hand. On this page are published all the documents necessary for the use of your device. 4731 VSI-A by SOLO.
USER MANUAL 4731 VSI-A SOLO
INFORMATION I MANUALS I SERVICE
BENZINRASENMAHER
Operating Instructions




470 592_c | 10/2014

D: Betriebsanleitung. 8 GB: Operating Instructions 22 NL: Instructies voor gebruik 36 F:Mode d'emploi. 50 E: Instrucciones de uso. 64 P: Instruções para o uso. 78 I: Libretto di istruzioni 92 SLO: Navodilo za uporabo. 106 HR: Upute za uporabu 120 SRB: ynytcba 3a ynotpe6y.134 PL: Instrukcja obslugi 148 CZ: Navod k použití 162 SK: Navod na použitie 176 H: Hasznalat. 190
DK: Brugsanvising. 204 S: Bruksanvising 218 N: Bruksanvising 232 FIN: Kayttoohjeet. 246 EST: Kasutusjuhend 260 LV: Instrukcijas. 274 LT: Instrukciju vadovas 288 RUS:PykoBoDCTBO no 3KcPnyatau..302 UA: Посibnк 3 ekcnnyatau.. 316 BG: PbkoBODCTBO 3a ekCnnoatauia 330 RO: Instructiuni 344 GR: O8nyiec 5eitoupyia358 MK: YnataTBO 3a pa6ota. 372 TR: Kullanim kilavuzu 386
Notice
O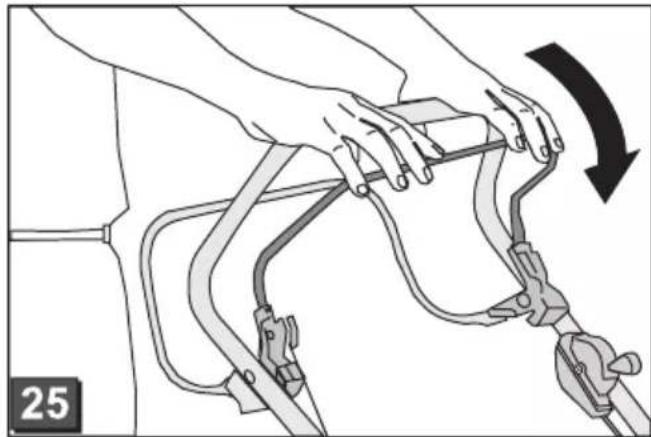
About this manual
Read through these operating instructions before starting up the machine. This is a prerequisite for safe and trouble-free working. You should save these instructions, and also pass them on to any subsequent users. Observe the safety and warning signs on the machine.
Pictogram description

Caution!
Strict following of these warning alerts can prevent injury to persons and/or materials.

Special information for better understanding and handling.

The camera symbol refers to illustrations
Contents
About this handbook 2 2 Product description 2 2 Safety and protection devices 2 2 Safety instructions 4 4 Assembly 5 5 Fuelling 5 5 Initial startup 6 6 Starting electrically (optional) 10 10 Maintenance and care 12 12 Storage 13 13 Repairs 13 13 Disposal 13 13 Faults and remedies 14 14 Warranty 15 15 EC declaration of conformity 15
Product description
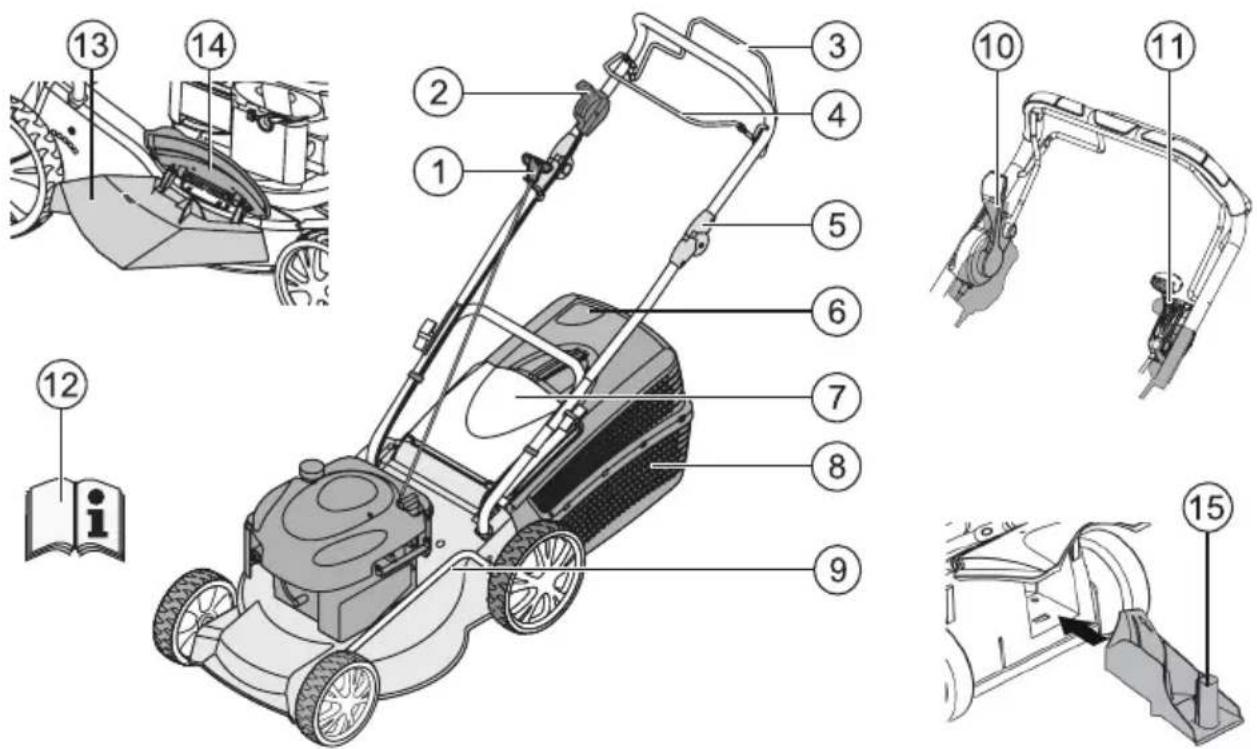
This document describes various models of petrol lawnmowers. Some models are equipped with a grass catcher and/or are suitable for mulching.
Please identify your particular model in the product illustrations and descriptions of the various options.
Proper use
This equipment is intended for moving lawns on private property and should be used on dry grass only.
Use for any other purpose is considered improper use.
Incorrect use
This lawnmower is not suitable for use in public spaces, parks, sports grounds, farming or forestry. Safety devices must not be removed or bypassed. Do not use the equipment on damp grass, or if it is raining. The equipment is intended for domestic use only.
Safety and protection devices

Caution - Risk of injury!
Safety/protection devices should not be disabled!
Safety brake handle
The lawnmower is equipped with a safety brake. Release the brake handle if there is an immediate danger.
Lawnmower without blade coupling:
Mower blade is stopped. Motor is stopped.
Lawnmower with blade coupling:
Mower blade is stopped. Motor continues running.
Deflector plate
The deflector plate provides protection against any projectiles thrown up.
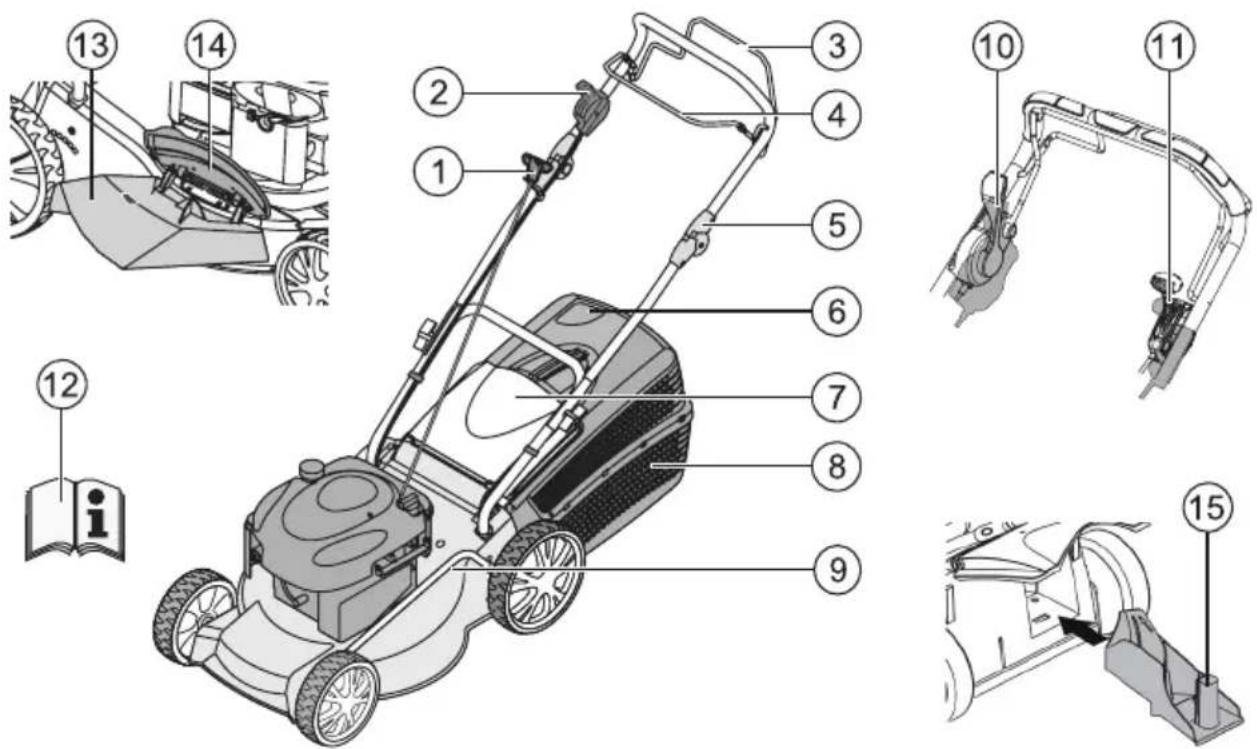
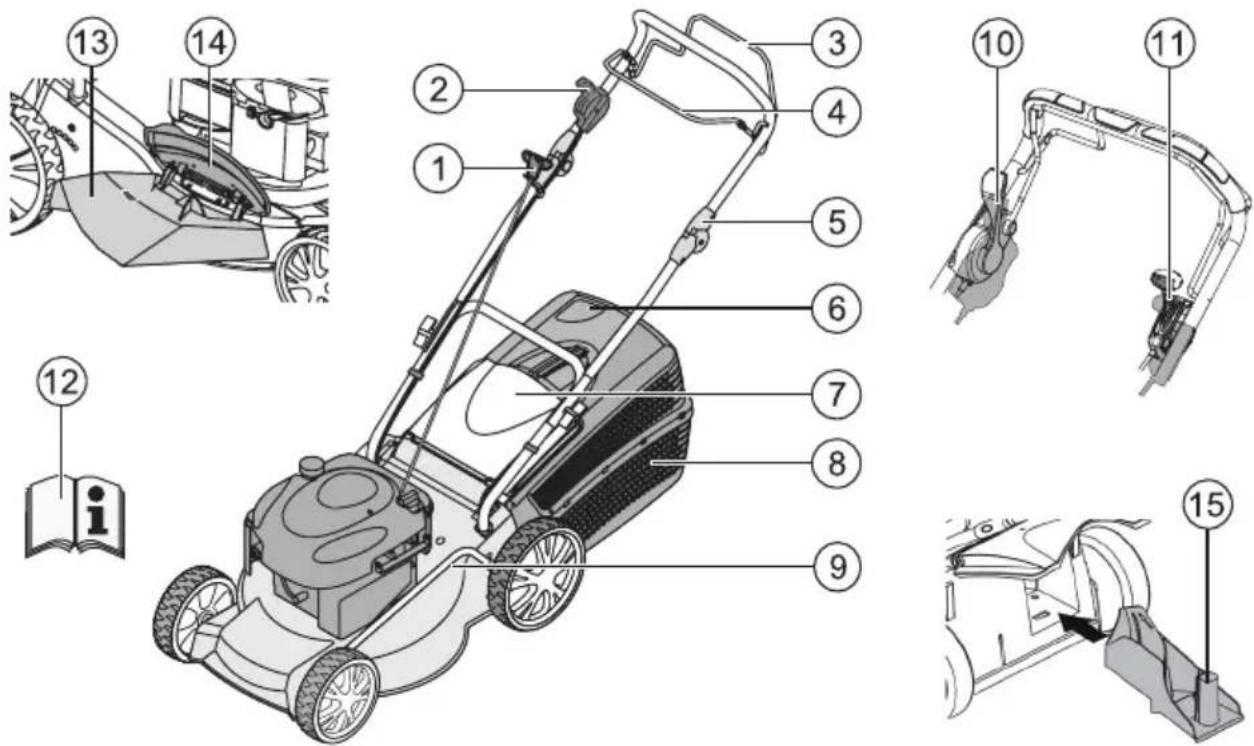
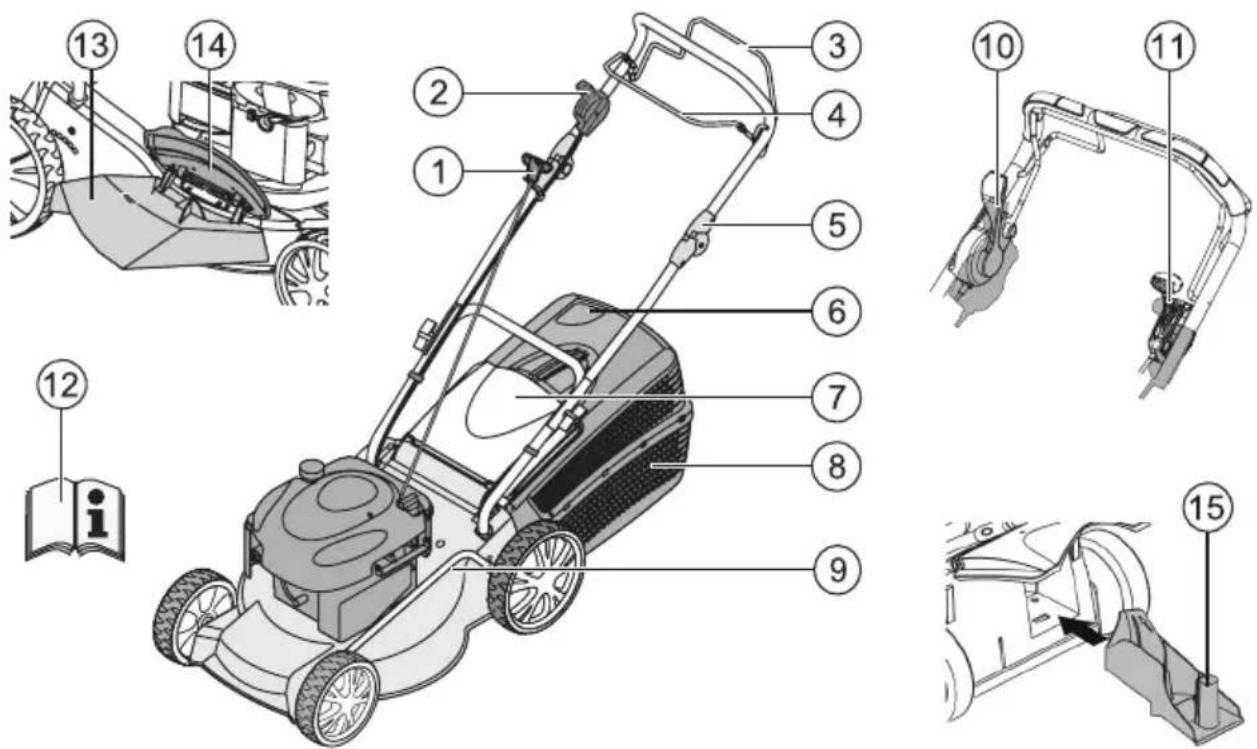
| 1 Starter cable 9 Cutting height adjustment* | ||
| 2 Start, stop* 10 Blade coupling* | ||
| 3 Wheel drive* 11 Vario transmission* | ||
| 4 Safety brake handle 12 Operating instructions | ||
| 5 Ergonomic height adjustment* 13 Outlet shaft insert* | ||
| 6 Fill level indicator* 14 Cover flap* | ||
| 7 Deflector plate* 15 Mulch kit* | ||
| 8 Grass catcher* * depending on version |
Symbols on the device
| Caution! Be particularly careful when handling. | Remove the spark plug connector before working on the cutting gear. | |
| Before initial startup read the instructions for use! Release the motor brake. | ||
| Keep other people out of the danger area! Switch on the switch drive. | ||
| Keep hands and feet away from the cutting gear! | Remote throttle control Start / Stop. | |
| Keep away from the danger area. | ||
Additional symbols on lawnmowers with Electrostart

Caution! Risk of electric shock.

Keep the connection line away from the mower blades.

If the cable is damaged, or when carrying out maintenance work, always disconnect the equipment from the mains supply.
Safety instructions

Caution!
Use the equipment only if it is in correct operating condition!

Caution - Risk of injury!
Safety/protection devices should not be disabled!

Caution - risk of fire!
After fuelling, do not store the machine in buildings where the petrol fumes might come into contact with naked flames or sparks!
Keep the area around the motor, exhaust, battery case, and fuel tank clear of grass cuttings, petrol and oil.
- Keep other people out of the danger area. The machine operator or user is responsible for any accidents affecting other people or their property. Children, or any persons who have not read these operating instructions, should not be allowed to use this machine. Follow the local regulations regarding the minimum age for operators of this type of machine.
- Do not use the equipment if under the influence of alcohol, drugs or medication. Wear appropriate work clothes.
Long trousers. Hard, non-slip shoes. Hearing protection.
If working on slopes:
always make sure you are positioned securely; always work across the slope, never upward or downward;
do not work on slopes where the gradient is greater than 20°.
Only use the lawnmower if there is sufficient daylight or artificial lighting. Keep the body, limbs and clothing away from the cutting gear. Follow the hours of use regulations applying in the country concerned. Do not leave the equipment unattended when ready to operate. Only use the lawnmower if the mower blade is sharp. Do not operate the equipment if the safety devices / protective grilles are damaged. Never operate the equipment if the safety devices are not fully assembled (e.g. deflector plate, grass catching devices). Before each use, check the equipment for damage; replace any damaged parts before using again. Switch off the motor, wait for the equipment to come to a standstill, then pull out the spark plug connector.
if leaving the equipment unattended; if a fault has occurred; before clearing blockages; before removing obstructions; if the lawnmower has run into foreign objects.

Check the lawnmower for damage, and carry out the necessary repairs before restarting or using the lawnmower again.
Insert the spark plug connector and start the motor.
after correcting the fault (see Faults table) and checking the equipment; after cleaning the equipment.
Carefully check the ground to be mowed, and remove any foreign objects. Take particular care when turning the lawnmower around, or if pulling it towards you. Do not mow over obstacles (such as branches, tree roots). Remove cuttings only when the motor has stopped.
Switch off the motor / mower blade when passing over areas other than those that have to be mowed. Never lift or carry the equipment while the motor is running. Do not eat or drink when topping up the petrol or motor oil. Do not inhale the petrol fumes.
Assembly
Follow the accompanying assembly instructions.

Caution!
The equipment can be used only after complete assembly.
Fuelling
Fill the lawnmower with fuel before the initial startup.

Warning - risk of fire!
Petrol and oil are highly inflammable!

Always observe the operating instructions supplied by the motor manufacturer.
Operating fluids
| Petrol Motor oil | ||
| Grade Regular petrol / unleaded | Refer to the motor manufacturer's instructions | |
| Filling capacity | Refer to the motor manufacturer's instructions | about 0.6 l |
Safety

Warning!
Never leave a motor running in an enclosed space. Toxic hazard!
Store petrol and oil only in containers intended for this purpose. Only add or drain oil in the open air, and when the motor has cooled down. Do not add petrol or oil while the motor is running. Do not overfill the tank (petrol expands). Do not smoke when refuelling. Do not open the tank lock when the motor is running or when hot. Replace the tank or tank lock if damaged. Always close the tank cap firmly. If petrol has been spilt:
Do not start the motor. Do not start the equipment. Clean the equipment.
If motor oil has been spilled:
Do not start the motor. Soak up the spilled oil with an oil binding agent and dispose of appropriately. Clean the equipment.

Used oil should not be:
disposed of with domestic rubbish, poured into the sewage system, drains, or onto the ground.
We recommend to collect the used oil in a closed container and to deliver it to a suitable recycling or service station.
Adding petrol
- Unscrew the tank cap, and keep in a clean place.
- Pour in petrol using a funnel.
- Firmly replace the cap on the filler opening and clean it.
Adding motor oil
- Unscrew the filler cap, and keep in a clean place.
- Pour in oil using a funnel.
- Firmly replace the cap on the filler opening and clean it.
Initial startup

Caution!
The equipment should not be used if the cutting gear and/or fastenings are loose, damaged or worn. Carry out a visual inspection before each startup.

The camera symbol on the following page refers to the illustrations on Page 4-7.
Adjusting the cutting height

Caution - Risk of injury!
Adjust the cutting height only with the motor switched off and when the mower blade has come to a standstill.

Always set all the wheels to the same cutting height. Cutting height adjustment depends on the particular model.
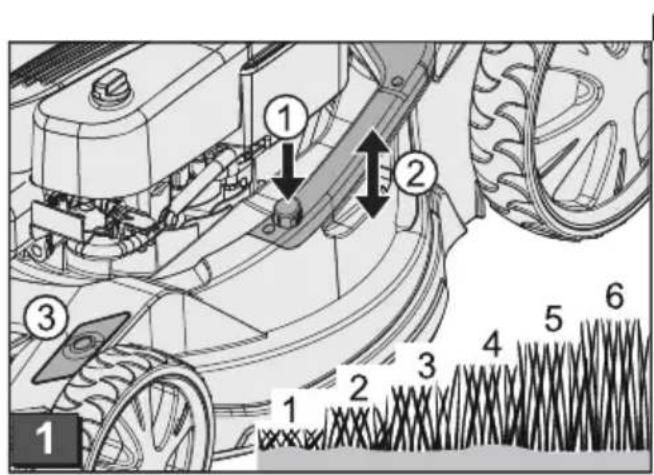
Central adjustment (3)
- Press and hold the central height adjustment knob (c/1).
For shorter grass, press the central adjustment handle downward (C1/2). For longer grass, pull the central adjustment handle upward (2). The central height adjustment level is indicated (3).
- Release the knob at the desired cutting height.
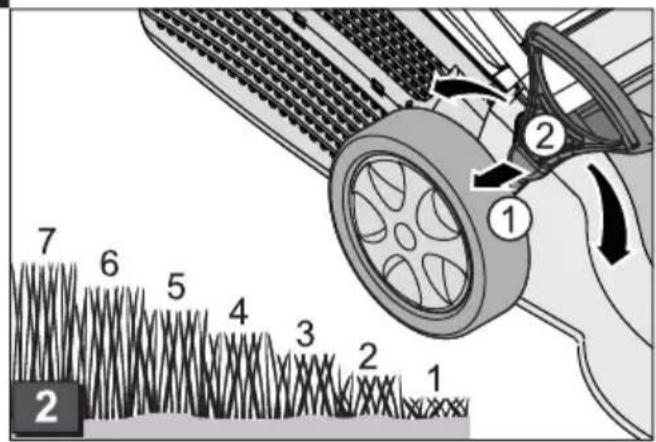
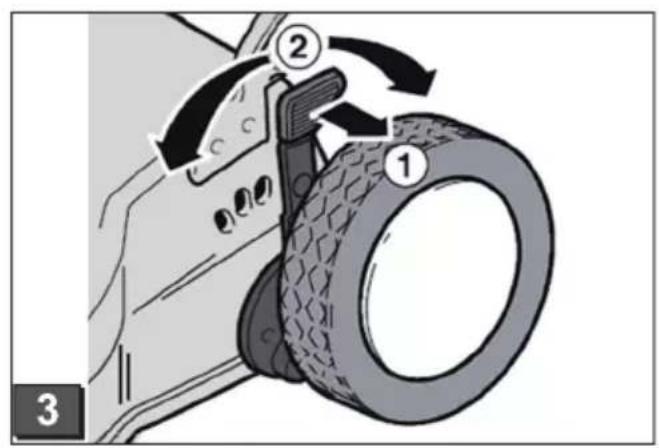
Axle adjustment or central adjustment (19), 3
- To release the lever, press to the side and hold.
- Push the lever to the left or right to select the desired cutting height.
- Let the lever click into position.
- Check that all wheels are set to the same position.
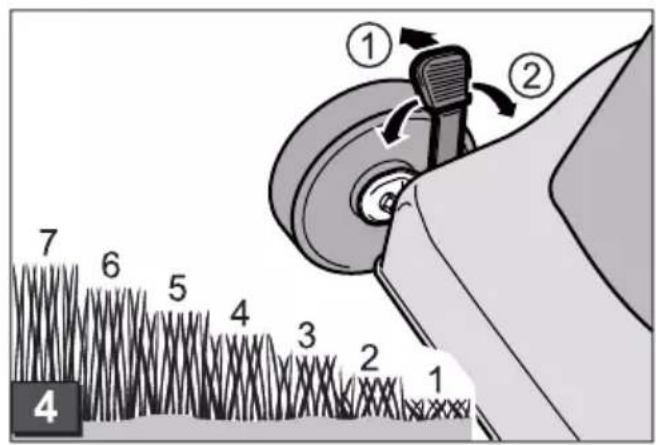
Quick adjustment of individual wheels or axle adjustment (4)
- To release the lever, press to the side and hold.
- Push the lever to the left or right to select the desired cutting height.
- Let the lever click into position.
- Check that all wheels are set to the same position.
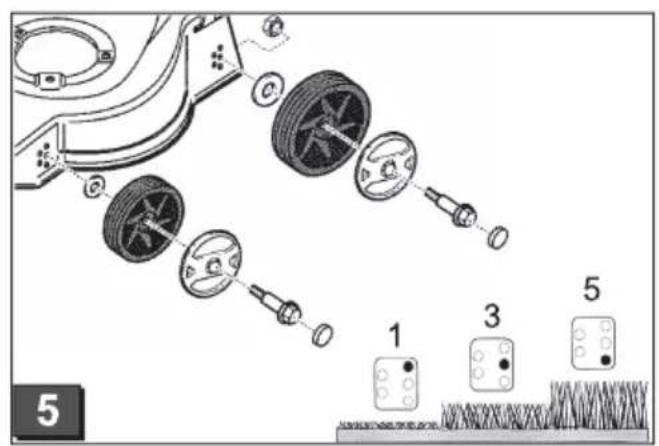
Individual wheel adjustment (C)
- Loosen the wheel bolt.
- Insert the wheel bolt in the hole corresponding to the desired cutting height.
- Tighten the wheel bolt.
- Check that all wheels are set to the same position.
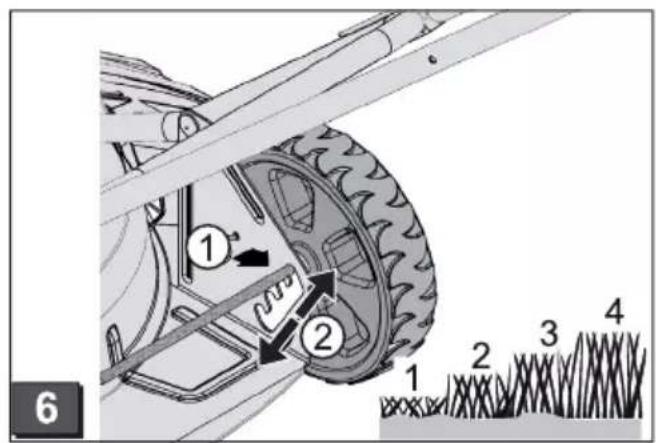
Central axle adjustment (36)
- Place a thumb at each end of the axle.
- Place the fingers under the mower housing.
- Using both thumbs, press the axle out of its present height setting notch.
- Using both thumbs, push the axle to the desired height setting notch, then allow it to engage.
- Check that all wheels are set to the same position.
Mowing with the grass catcher

Caution - Risk of injury!
Attach/detach the grass catcher only when the motor is switched off and the mower blade has come to a standstill.
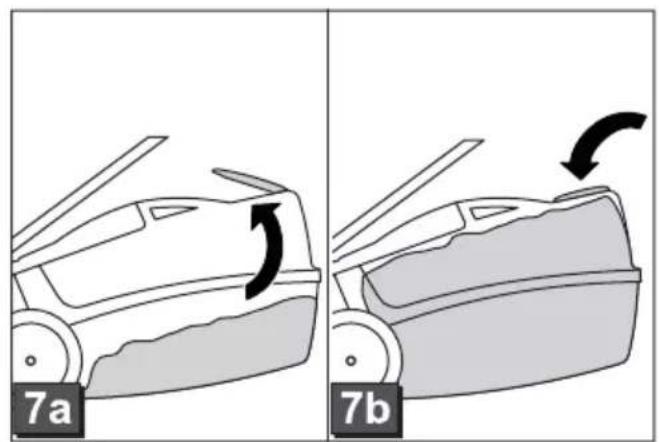
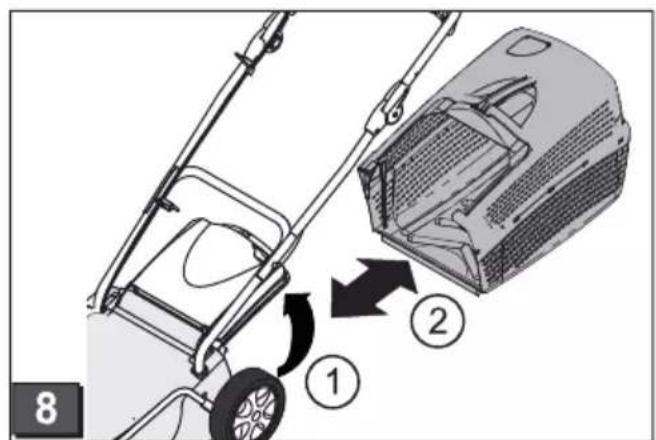
- Lift the deflector plate and insert the grass catcher in the holders (8).
Fill level indicator
The fill level indicator is pushed upward by the air flow when mowing (cda).
If the grass catcher is full, the indicator points to the box (c) The grass catcher must be emptied.
Emptying the grass catcher
- Lift the deflector plate.
- Unhook the grass catcher and pull backward to remove (18).
- Empty the grass catcher.
- Lift the deflector plate and insert the grass catcher in the holders (38).
Mowing without the grass catcher

Caution!
Only work without the grass catcher if the deflector plate torsion spring is working correctly.
The deflector plate is held to the mower by spring force. This causes the mowed grass to be thrown backward and downward.
Mulching with the mulch kit (optional)
When mulching, the grass cuttings are not collected, but are left on the lawn. The grass mulch prevents the soil from drying out, and supplies it with nutrients.
The best results are obtained by cutting back regularly by about 2cm . Only young grass with a soft leaf texture decomposes quickly.
Grass height before mulching: 8 cm maximum. Grass height after mulching: 4 cm minimum.

Adapt your walking pace to the mulching process, do not walk too fast.
Inserting the mulch kit

Caution - Risk of injury!
Insert/remove the mulch kit only with the motor switched off and when the mower blade has come to a standstill.
- Remove the grass catcher.
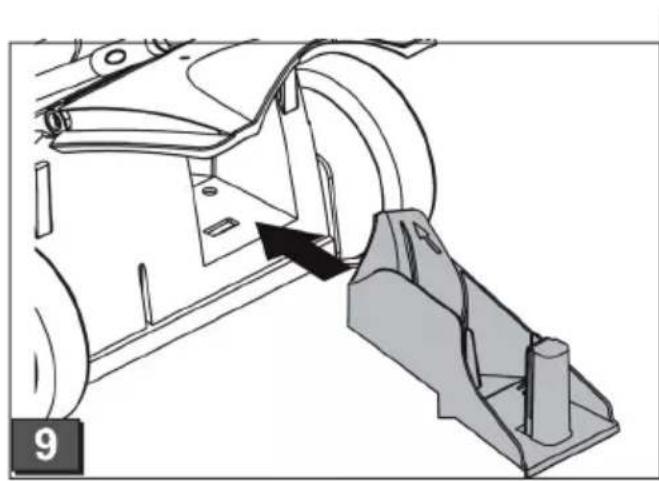
- Lift the deflector plate and insert the mulch kit in the outlet shaft (c). It must lock into place.

If the mulch kit is not locked into position, both the mulch kit and the mower blade may be damaged.
Removing the mulch kit
- Lift the deflector plate.
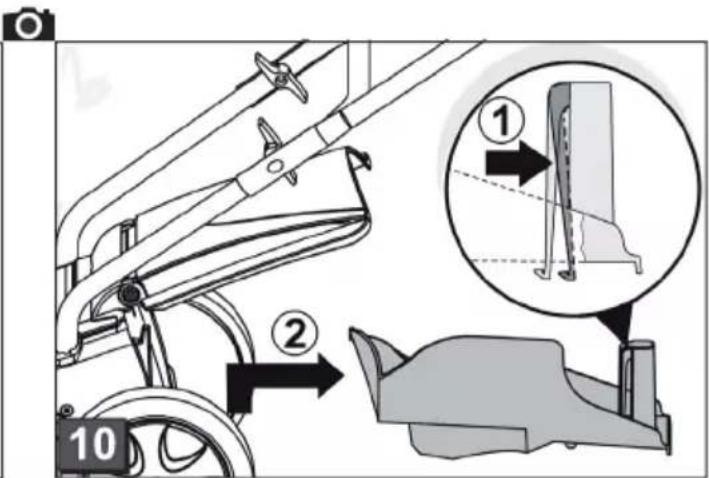
- Release the lock on the mulch kit (10/1). 3. Pull out the mulch kit (10/2).
housing by
Mowing with the side outlet duct (optional)

Caution - risk of injury!
Attach/detach the side outlet only when the motor is switched off and the mower blade has come to a standstill.
Inserting the side outlet
- Remove the grass catcher and insert the mulch kit.
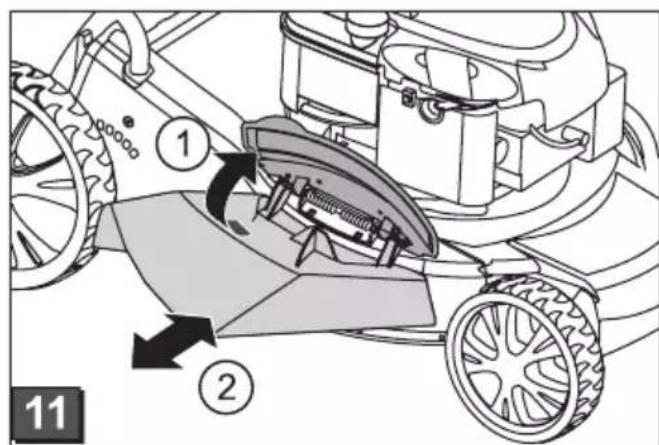
- Fold up the side outlet cover and hold it (1).
- Insert the side outlet duct (10/2).
- Slowly close the cover.
The cover holds the side outlet duct and prevents it falling out.
Removing the side outlet
- Fold up the side outlet cover and hold it (1d/1).
- Remove the side outlet and close the cover (1/2).
Setting the handle height (optional)
Knob adjustment
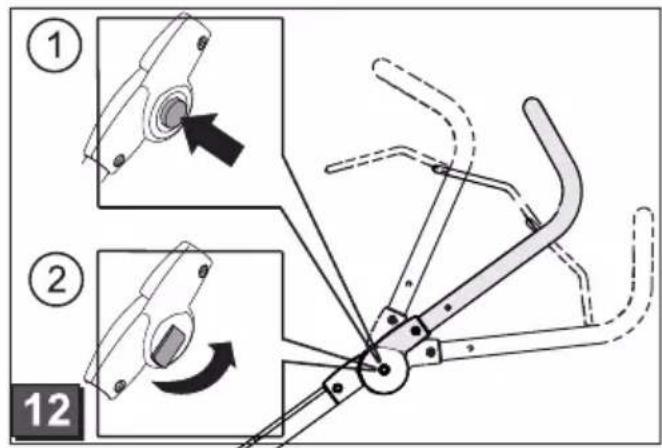
- Press and hold both knobs on the handlebar and select the desired position (2/1).
- Release the knobs to lock the handlebar in position.
Clamp adjustment
- Hold the bar and loosen both clamps (13/2).
- Move the bar to the desired position.
- Lock the clamps.
Starting the motor

Caution - risk of poisoning!
Never leave a motor running in an enclosed space.

Caution - Risk of injury!
Do not tilt the lawnmower while starting.

- Start the motor only when the blade is mounted (the blade acts as a flywheel mass). If starting the motor when hot, do NOT use the choke or primer button.
- Do not change the motor controller settings
- Do not start the equipment if the outlet shaft is not covered by one of the following parts:
Grass catcher, deflector plate, mulch kit
Be particularly careful when operating the starter switch - follow the manufacturer's instructions - keep your feet at a safe distance from the cutting gear. Start the lawnmower where the grass is shorter.
Position symbols on the equipment:
| Choke* On Off | |
| Remote throttle control* Start Stop | |
| Remote throttle control with choke* | |
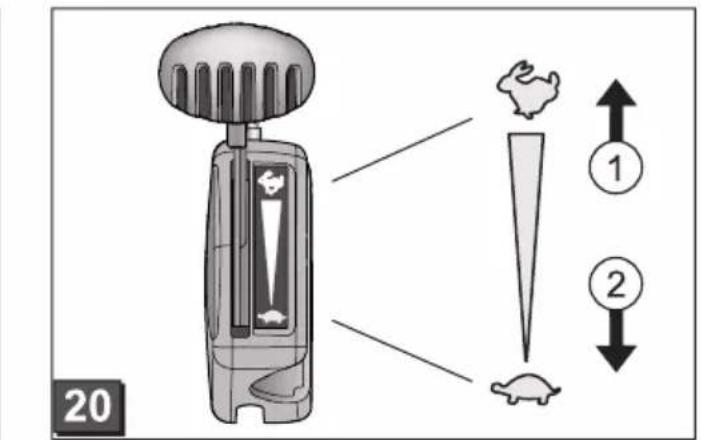
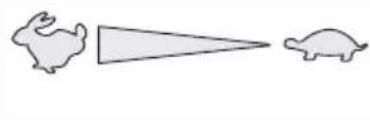
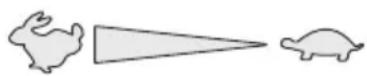
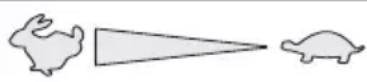
| Vario transmission* Fast Slow | |
| Blade coupling* On Off |
- depending on version
Starting manually
without remote throttle control, with choke
| Choke On | Off |
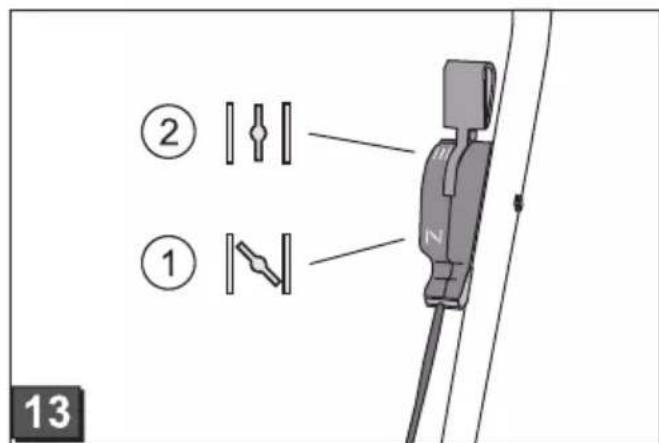
- Set the choke at position 1 (13/1).
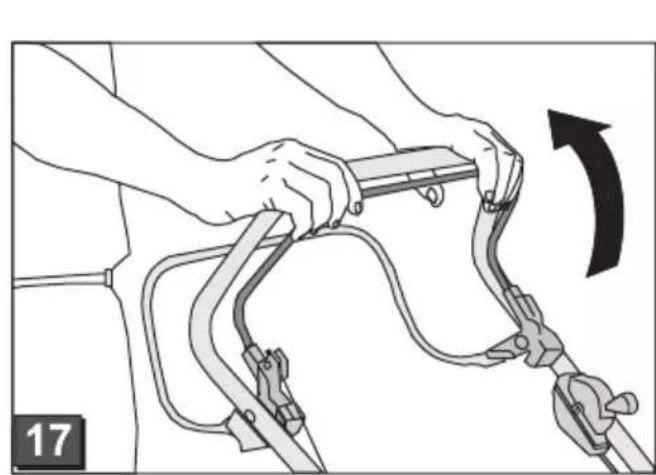
- Pull in the safety brake handle on the handlebar and hold it (17) - the brake handle does not lock.
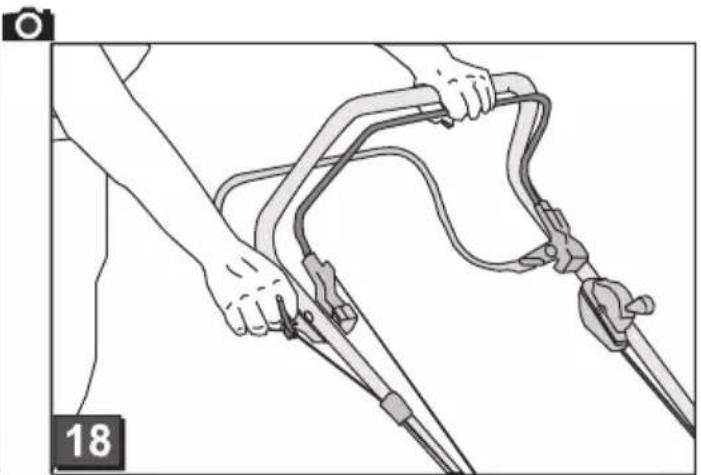
- Pull out the starter cord sharply, then allow it to slowly rewind (c8).
- When the motor has warmed up (about 15-20 seconds), set the choke to position 2 (3/2).

Motor speed (rpm value) is fixed. Motor speed cannot be adjusted.
without remote throttle control, with primer (6)
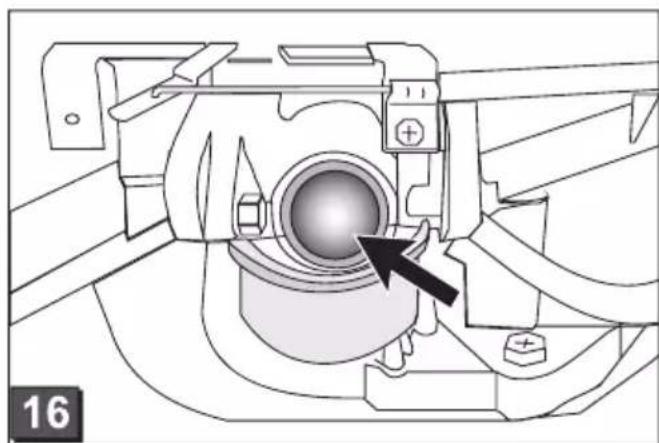
- Press the primer button 3 times at intervals of about 2 seconds (c6). If the temperature is below 10°C, press the primer button 5 times.
- Pull in the safety brake handle on the handlebar and hold it (17) - the brake handle does not lock.
- Pull out the starter cord sharply, then allow it to slowly rewind (68).

Motor speed (rpm value) is fixed. Motor speed cannot be adjusted.
without remote throttle control, without primer/choke
- Pull in the safety brake handle on the handlebar and hold it (17) - the brake handle does not lock.
- Pull out the starter cord sharply, then allow it to slowly rewind (68).

Motor speed (rpm value) is fixed. Motor speed cannot be adjusted.
with remote throttle control, with choke
Remote throttle control with choke

- Set the throttle lever to position 140
- Pull in the safety brake handle on the handlebar and hold it (17) - the brake handle does not lock.
- Pull out the starter cord sharply, then allow it to slowly rewind (C8).
- When the motor has warmed up (about 15-20 seconds), set the throttle lever to a position between and
with remote throttle control, without primer/choke
Remote throttle control Start Stop
- Set the throttle lever to position 20/1).
- Pull in the safety brake handle on the handlebar and hold it (17) - the brake handle does not lock.
- Pull out the starter cord sharply, then allow it to slowly rewind (68).
- When the motor has warmed up (about 15-20 seconds), set the throttle lever to a position between and
with remote throttle control, with primer (16)
| Remote throttle control Start Stop |
- Set the throttle lever to position 20(4).
- Press the primer button 3 times at intervals of about 2 seconds (6). If the temperature is below 10°C, press the primer button 5 times.
- Pull in the safety brake handle on the handlebar and hold it (17) - the brake handle does not lock.
- Pull out the starter cord sharply, then allow it to slowly rewind (98).
- As soon as the motor starts running, set the throttle lever for the desired motor rpm, at a position between and (20).
Starting electrically (optional)
Electrostart with primer (6)
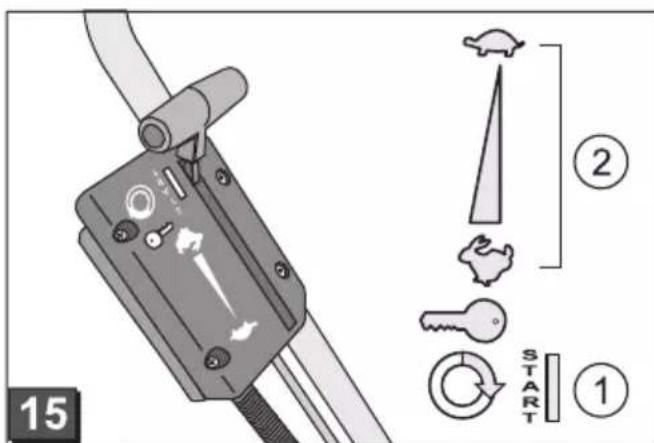
- Set the throttle lever to the "START" position (c5/1).
- Press the primer button 3 times at intervals of about 2 seconds (C6). If the temperature is below 10°C, press the primer button 5 times.
- Pull in the safety brake handle on the handlebar and hold it (c7) - the brake handle does not lock.
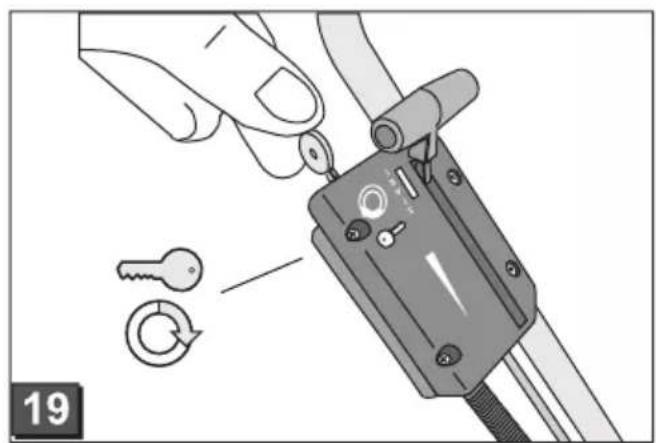
- Turn the ignition key fully to the right in the ignition lock (C9).
- As soon as the motor starts running, release the ignition key (it returns automatically to position "0").
- According to the desired motor speed, set the throttle lever to a position between and (15/2).
Electrostart without primer/choke (15)
- Set the throttle lever to the "START" position (45/1).
- Pull in the safety brake handle on the handlebar and hold it (17) - the brake handle does not lock.
- Turn the ignition key fully to the right in the ignition lock (C19).
- As soon as the motor starts running, release the ignition key (it returns automatically to position "0").
- According to the desired motor speed, set the throttle lever to a position between and
Blade coupling (optional)
Blade coupling On Off


With the blade coupling, the mower blade can be engaged or disengaged while the motor is running.
Engaging the blade coupling
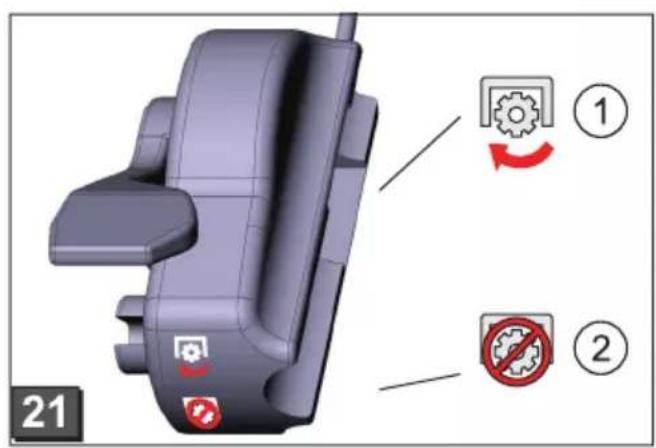
- Pull in the safety brake handle on the handlebar and hold it (C47) - The brake handle does not lock.
- Push the coupling lever away from you (1) - The blade coupling is engaged.
Disengaging the blade coupling.
- Release the safety brake handle (15).
- The blade coupling is disengaged.
- The coupling lever moves to rest position (21/2).
Turn the motor off
Lawnmower without blade coupling
- Set the throttle lever to position (20/2)
- Release the safety brake handle (16).
- The motor is switched off.

Caution - danger of serious cut injuries!
The motor may continue running. After switching off, make sure the motor has stopped turning.
Lawnmower with blade coupling
Blade coupling On Off


- Release the safety brake handle (16).
- Set the throttle lever to position - The motor is switched off.

Caution - danger of serious cut injuries!
The motor may continue running. After switching off, make sure the motor has stopped turning.
Wheel drive (optional) (2)

Caution!
Engage the transmission only when the motor is running.
Switching on the wheel drive
- Press the transmission control handle against the handlebar and hold it (2) - the transmission control handle does not lock.
- The wheel drive is switched on.
Switching off the wheel drive
- Release the transmission control handle (20).
- The wheel drive is switched off.
Vario transmission (Speed Control) (optional)
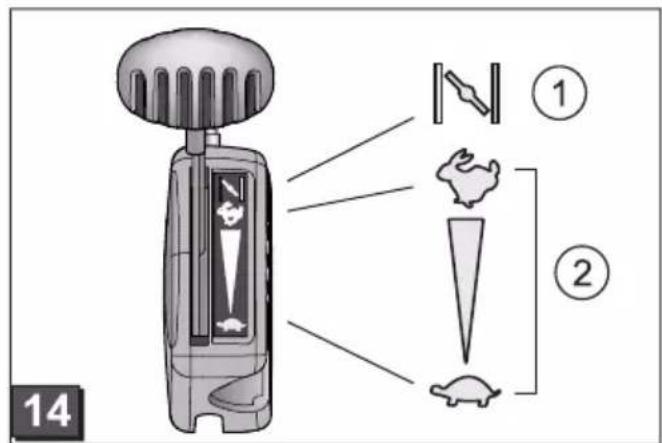
Vario transmission Fast Slow


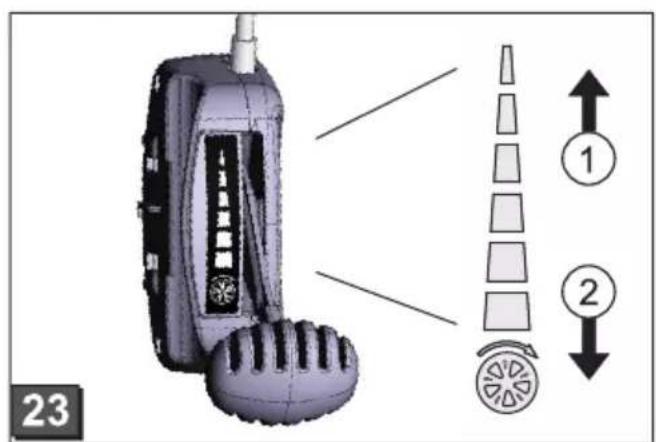
The Vario transmission allows continuous variation of the ground speed of the lawnmower.

Caution!
Operate the lever only when the motor is running. Operating the lever without the motor drive may damage the drive mechanism.
To increase the speed, pull the lever (23) towards (3/2) To lower the speed, pull the lever (23) towards 3/1

Always adjust the ground speed to suit the current ground and lawn conditions.
Maintenance and care

Caution - Risk of injury!
- Before carrying out any care or maintenance work, always switch off the motor and pull out the spark plug connector.
- The motor may continue running. After switching off, make sure the motor has stopped turning. Always wear working gloves when carrying out maintenance or repair work.
Check the grass catcher regularly for wear, and to ensure it is working correctly. Clean the equipment after each use. Do not wash the equipment by hosing or spraying with water. Water infiltration can cause faults (in the ignition system, carburettor). Check the mower blade regularly for damage. Always replace the muffler if faulty.
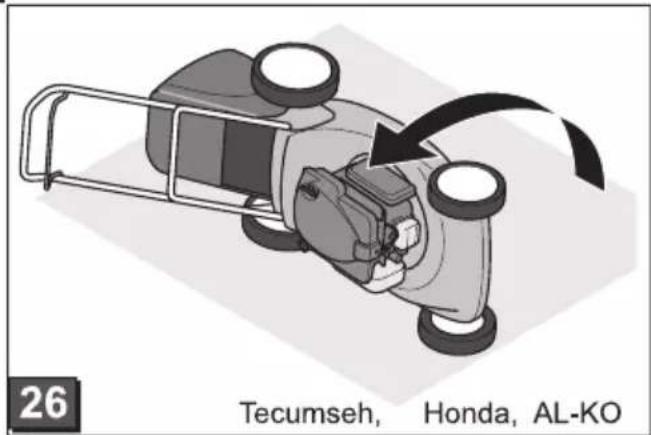
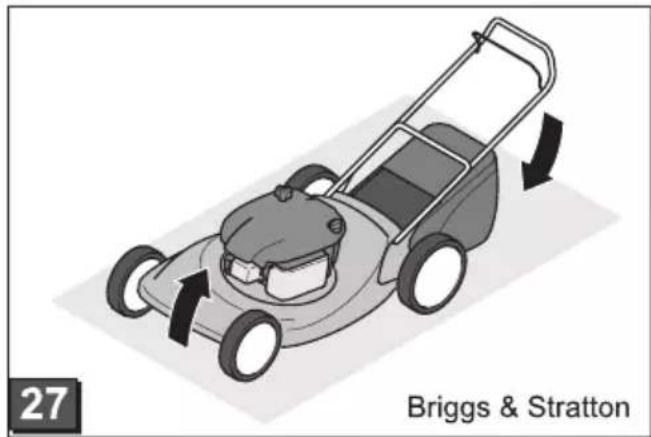
Tilting the lawnmower
Depending on the motor manufacturer:
the carburettor / air filter must be facing upward (16) the spark plug must be facing upward (27)

Follow the operating instructions of the motor manufacturer!
Resharpening/replacing the mower blade
Blunt or damaged blades should be resharpened / replaced only at a service point or by an authorised specialist. Resharpened blades must be rebalanced.

Caution!
Blades that have not been rebalanced can cause serious vibrations, and may result in damage to the lawnmower.
Charging the starter battery (optional)
The starter battery is maintenance-free and is normally charged by the lawnmower.
In certain cases, however, the battery will need to be charged by the user:
Before the initial start-up of the lawnmower. If discharged, before the winter season, or if left unused for long periods (>6 months).
Charging procedure:
- Take the battery charger out of the battery box.
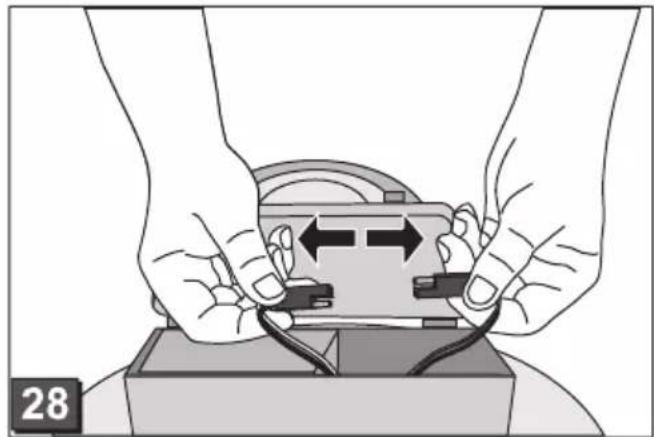
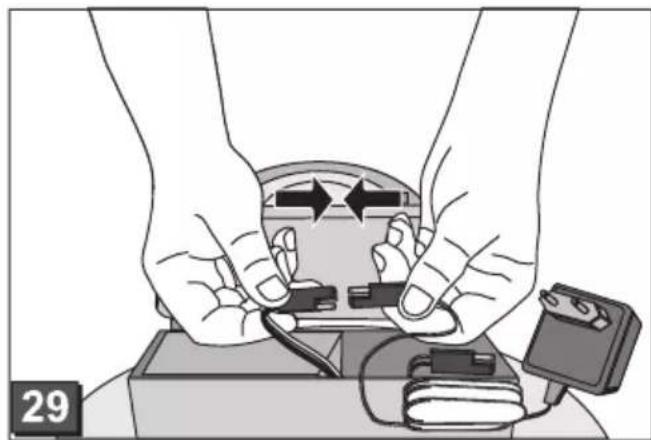
- Disconnect the battery cable from the motor cable (38).
- Connect the battery cable with the charger cable (29).
- Connect the charger to the mains supply. The mains voltage must match the operating voltage of the charger.
The required charging time is about 36 hours. Use only the original battery charger supplied.

Caution!
- Charge the starter battery only in dry, well-ventilated rooms.
- Do not start up the lawnmower while the battery is charging.
Care of the motor
Changing the motor oil
- Have a suitable container ready to collect the used oil.
- Drain or suction off all the oil through the oil filler opening.

Dispose of used motor oil in a manner that is compatible with the environment!
We recommend to collect the used oil in a closed container and to deliver it to a suitable recycling or service station.
Used oil should not be
- disposed of with domestic rubbish
- poured into the sewage system or drains
- poured out onto the ground
Changing the air filter
- Follow the instructions of the manufacturer of the motor.
Changing the spark plug
Follow the instructions of the manufacturer of the motor.
Wheel drive (optional)
Adjusting the Bowden cable
If the wheel drive can no longer be switched on or off while the motor is running, the related Bowden cable needs to be adjusted.

Caution!
Adjust the Bowden cable only when the motor is switched off.
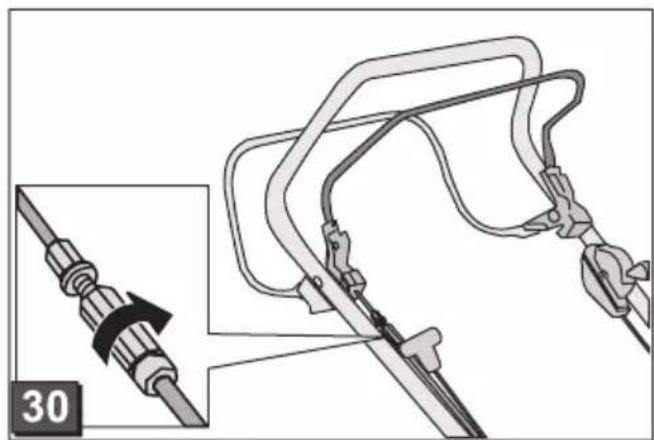
- Turn the adjuster on the Bowden cable in the direction of the arrow (0).
- To test the cable setting, switch on the motor and switch on the wheel drive.
- If the wheel drive is still not working, the lawnmower must be taken to a service point or an authorised specialist.
Lubricating the drive pinion
From time to time, lubricate the drive pinion on the transmission shaft.

The wheel drive gearing is maintenance free.
Storage

Caution - risk of explosion!
Do not store the equipment where there are naked flames or heat sources.
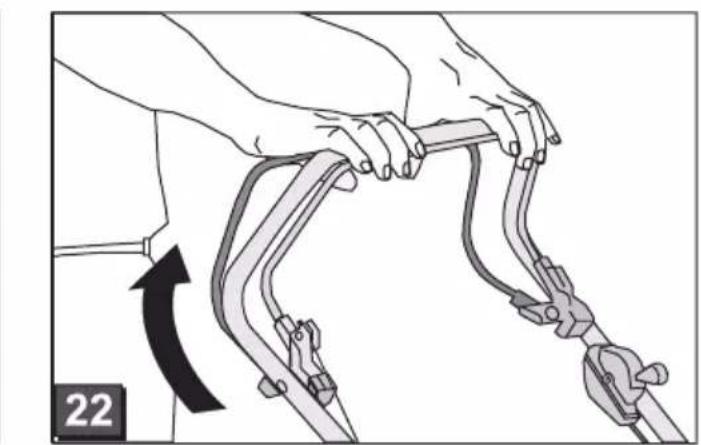
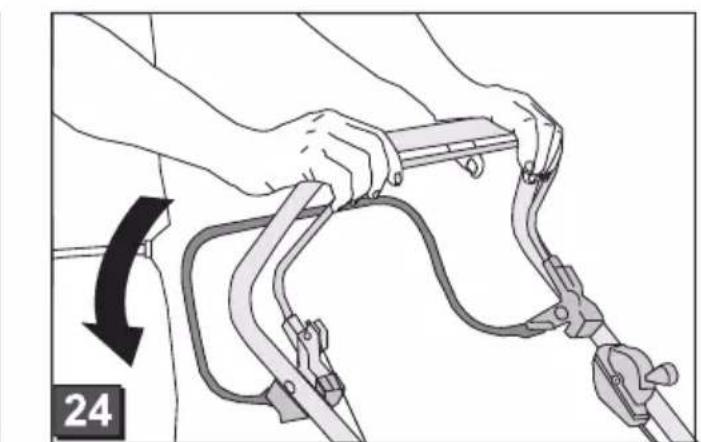
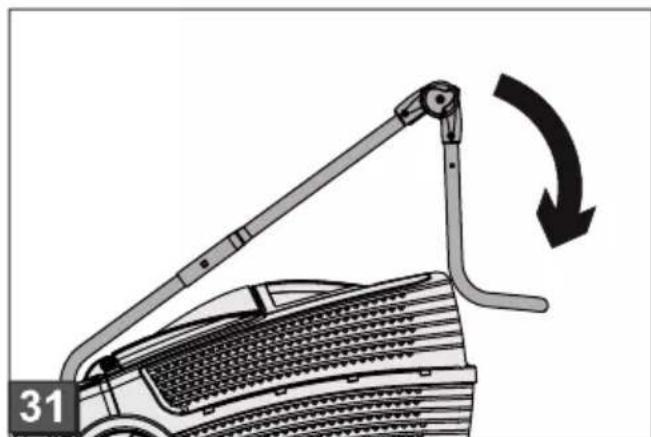
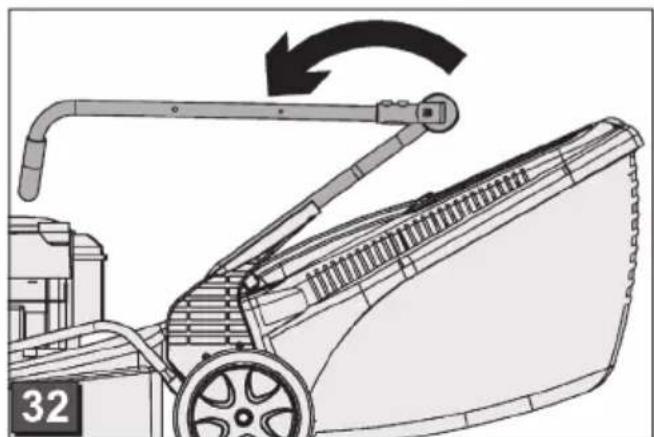
- Allow the motor to cool down. To save storage space, fold the handlebar down (1, 32). Store the equipment in an area which is kept dry, and which cannot be accessed by children or unauthorised persons. Store the starter battery where it will be protected from frost. Recharge the starter battery from time to time. Drain the fuel tank. Pull out the spark plug connector.
Repairs
Repairs should be carried out only by a service point or an authorised specialist.
Disposal
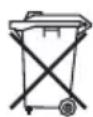
Do not dispose of old equipment, batteries or accumulators as household waste!
Machine, packaging, and accessories were made with recyclable materials, and should be disposed of accordingly.
Faults and remedies

Caution!
The motor shaft and mower blade should not be aligned.
| Fault Solution | |
| The motor does not start • Add petrol • Set throttle lever to "Start" • Switch on the choke • Press the motor switch at the handlebar • Check the spark plugs and replace if necessary. • Clean the air filter. • Spin the mower blade • Recharge the starter battery • Start on a surface already mowed | Motor power reduced • Adjust the cutting height • Resharpen / replace the mower blade • Clean the outlet shaft/housing • Clean the air filter. • Reduce the working speed |
| Lawnmower cuts unevenly • Resharpen/replace the mower blade • Adjust the cutting height | Grass catcher does not fill sufficiently • Adjust the cutting height • Allow the lawn to dry • Resharpen/replace the mower blade • Clear the grille on the grass catcher • Clean the outlet shaft/housing |
| Wheel drive does not work • Adjust the Bowden cable • V-belt faulty • Contact the service-workshop • Clean any dirt away from the wheel drive, toothed belt and gearing • Lubricate the freewheels (drive pinion on drive shaft) with spray oil | Wheels do not turn when the transmission is switched on • Retighten the wheel bolts • Wheel hub faulty • V-belt faulty • Contact the service-workshop |
| Unusually strong vibrations in the lawnmower | Check the mower blade |

For faults not listed in this table, or which you cannot resolve by yourself, please contact our customer service.
Always have the equipment checked out by a professional in the following cases:
after bumping against an obstacle if the motor stops suddenly if there is damage to the transmission if the V-belt is faulty if the blade is bent if there is warping of the motor shaft
EC declaration of conformity
see assembly instructions
Warranty
If any material or manufacturing defects are found during the statutory customer protection period, we will either repair or replace the equipment, whichever we consider the more appropriate. This statutory period may vary according to the legislation in force in the country where the equipment was purchased.
Our warranty is valid only if: The warranty is no longer valid if:
The equipment has been used properly
The equipment has been tampered with
The operating instructions have been followed
Technical modifications have been made
Genuine replacement parts have been used
The equipment was not used for its intended purpose (for example, used for commercial or communal applications)
The following are not covered by warranty:
Paint damage due to normal wear. Wear parts identified by a border XxxxX (X) on the spare parts list.
Combustion motors - these are covered by a separate warranty from the manufacturer concerned.
To make a claim under warranty, please take this statement of warranty and proof of purchase to the nearest authorised customer service centre. This warranty does not affect the usual statutory rights of the customer relative to the seller.
About this manual
1. Hold the machine by the central handle (6/1).
For cutting grass, hold the central handle (1/2) with both hands. For cutting grass, hold the central handle (1/2) with both hands. Adjust the height of the central handle (1/3).
- Release the machine to the desired height.
Adjust the main or central height (2,3).
- Press the lever to open the side and hold it.
- Tilt the lever left or right to adjust the cutting height.
- Release the lever and let it click into place.
- Be careful not to damage all the blades.
Quick adjustment of individual blades or adjustment of the main (C).
- Pull the lever to open the pressure relief valve.
- Pull the lever and set the desired cutting height.
- Push the lever into the slot.
- Make sure the lever is in the same position for all cutting heights.
Adjusting the individual cutting heights (1)
- Turn the locking knob.
- The locking knob engages in the hole for the desired cutting height.
- Tighten the locking knob.
- Make sure the knob is in the same position for all cutting heights.
Central adjustment of the base plate (1)
- Place both feet on the edges of the base plate.
- First place the foot under the handle.
- Pull the base plate out of the holder for the cutting height.
- Pull the base plate out of the holder for the cutting height and let it snap into place.
- Make sure the base plate is in the same position for all cutting heights.
Grass catcher box

Danger - risk of damage!
Store or place the grass catcher box only when the engine is switched off. The cutting blade is dangerous.
1. Lift the catch hook of the grass catcher box
and secure it in the holder (3).
Fill level indicator
The fill level indicator is pushed up by the air flow when the grass catcher box is full (c).
If the grass catcher box is full, the fill level indicator is pushed up against the box (c). The grass catcher box must be emptied.
Emptying the grass catcher box
1. Lift the catch hook. 2. Tip the grass catcher box and empty it towards the rear (8). 3. Empty the grass catcher box. 4. Lift the catch hook and secure the grass catcher box again in the holder (8).
Without grass catcher box

Danger!
Mow only with the discharge chute closed without the grass catcher box.
Mulching with the mulching kit (optional)
The mulching kit cuts the cut material and does not collect it.
This hero is a real hero. Manu 7TNTI TJ
IcuuhaNa n Cha6deBa rXpaHbMa.
Hajboyn pe3yIaTn noCTNky ce peoBHTM ceyeBeM yHa3a 3a oKO 2 cM. Bp3o ce pacna da ca TpaBa ca MeKaHm TKINbOM IiSha.
BucnHa TpaBe npe MaJyObaBa: MaKcImaJIHo 8 cM BucnHa TpaBe nocJe ManyObaHa: HajMaHbe 4 U

Bp3nHy ceeHa npilagOndte MaJyobAby, He xoJaTe npe6p30.
YMeTaBe KOMnIeTa 3a MaNyOBaHe

Paxha - onachocT od nobpega!
KoMnIeT 3a MaNObaBe yMeHnte nIi OndTaPaHyjTe cAmO KoI NCKJbUyeHOr MToPoa mPyjHer Hoxa 3a CeYeHe.
- CkHnTe KOpny 3a cakynbahe TpaBe ( 2.ДИГHNTe 3axBaTHN NOKIOnaU KOMnNET 3a MaJIyOBAHBe yMeTHNTe y OTBOp 3a n36aUmbHe TpaBe (9).
3acym Mopa da yckouy JneKnIWe.

YKOLNIKO KOMNPT 3a MaIyOBAHe He yCKOuN y JEXNITe, Mory Da ce OWTeTe KOMNPT 3a MaIyOBaBe HOK 3a CeYeHe.
OdtpaHbBaHe KOMJIeTa 3a MaIyObaBe
1.ДИRGHTe 3axBaTHn NOKIONaI. 2.Пonyuctte3acyнHaKOMnIeTy3aMaIyOBae (0/1).
3axBaTHn noklonauc 36or cnne onpyre Haneke 3. Bynte KOMnTe 3a MaHOBaHe (10/2).
kyhniute kocauuce. Ondpe3aHa TpaBa TaKo ce n36auyje
Warning - fire hazard!
Central installation (2)
Oil in motor gear
Warning - risk of injury!!
The motor must never run in closed rooms.

The symbol indicates an illustration.
Contents
Preface to the manual 302 Product description 302 Safety and protective devices 302 Safety instructions 304 Assembly 305 Filling 305 Commissioning 306 Electrical connection (optional) 310 Maintenance and care 312 Storage 313 Repair 313 Disposal 313 Troubleshooting 314 Warranty 315 EC Declaration of Conformity 315
Product description
This document describes various models of petrol lawn mowers. Some models are equipped with blades for grass and/or additional accessories for mulching.
Identify your model based on the illustrations of the product and the descriptions of the various options.
Intended use
This device is intended for cutting grass in the private sector. It may only be used on dry grass.
Using the tool for other purposes is considered misuse.
Possible variants of improper use
This gas-powered tool must not be used in public gardens, parks, sports grounds, or in agricultural and forestry operations. The protective devices must not be dismantled or modified. The device must not be used during rain or in a gas-filled atmosphere. The device is prohibited for use in industrial conditions.
Protective and safety devices

Attention! Danger of injury! Do not disconnect the protective safety devices!
Protective handle
The device is equipped with a protective handle. In case of danger, release the protective handle.
Devices without a blade clutch:
The cutting device stops, the device stops.
Devices with a blade clutch:
The cutting device stops, the engine continues to run.
Reflector flap
The reflector flap provides protection against ejected parts.
Gasoline is highly flammable!

Always follow the operating instructions supplied with the engine by the manufacturer.
Replacement parts
In this way, the cut grass is ejected to the rear.
Mulching with the mulching kit (optional)
During mulching, the cut grass is not collected but remains on the lawn. The mulch covers the soil and enriches it with nutrients.
The best results are achieved with regular cutting at a height of 2 cm. Only young grass with soft leaf tissue decomposes quickly.
Grass height before mulching: max. 8 cm. Grass height after mulching: min. 4 cm.

Set the travel speed before mulching, do not move too fast.
Using the mulching kit

Warning! Danger of injury from grass! Install or remove the mulching kit only after switching off the engine and the cutting blade has stopped.
- Remove the grass catcher (2). Lift the deflector flap and insert the mulching kit into the ejection chute (9). The locking mechanism must engage.

If the mulching kit does not lock into place, this can lead to damage to the mulching kit and the cutting blade.
Removing the mulching kit
- Lower the deflector flap.
- Release the locking mechanism on the mulching kit (10/1).
Side discharge (optional)

BhimaHne! Onachoctb noJyehnTpaBM!
ChmMaTe nIy uCTaHaBnBaIte 6OKOBoB BbIbPoc TOnbKO IocJIe BbIKHcyEHHa DBIrTaTeJI N OCTaHOBKn peKyuIero HOxa.
IcnoJb3OBAHne 6OKOBOro BbI6poca
- CHIMITE npneMnK dJa TpaBbI N BCTaBbTe KOMPJIeKT dJa MyJbUnpOBaHnI.
- OTKpoIte KpbIuKy 6oKOBoro Bbl6poca n npndepxnte ee (11/1).
- Bctabte kahan 6okoboro Bbybpoca (192).
- Мденино зakpoite Кршky. Кршka Фиксирует канл 6okoboro Вьбраса, He daBar emy Bblnactb.
YdaenHe 60koBoro BbI6poca
- OTKpoIe KpbIuKy 6oKOBOrO BbIbPoCa n npIepXnTe ee (1/1).
- YdaJInte 6OKOBON BbIbPoc n 3aKpOInTe KpbIshKy (1/2).
Hactpoika BbICOTbl pykoTn (onzna)
PerynpoBka c nOmoBIO KhoNOK
- Haxmnte u ydepkunBaTe DBe KhoNkHa Bepxnei nepeKnaDnHe. NapaJIeIbHo HacTpoTKeJeaemoe noLoXeHne (2/1).
- OTnyctnte KhoNKn, YTO6bI BepxHra NepeKnaHa 3aФИКсИрОВаJIacb.
PerynpoBka c nOMoBbIO 3axmOB
- After moving the guide bar, loosen both clamps (2/2). 2. Bring the guide bar to the desired position.
- Close the clamps.
Starting the engine

Warning - danger of poisoning!
Never start the engine in enclosed spaces.

Warning! Danger of injury!
Do not turn the device during the starting process.

Start the engine only with the blade mounted (the blade is used as the inertia mass) - when starting a warm engine, use the throttle or the primer button; do not change the carburetor settings on the engine.
Do not start the device if the exhaust duct is not closed with one of the following parts:
Grass catcher, deflector, or mulching plug
■ Activate the starter switch with special care, according to the manufacturer's instructions, make sure that your feet are at a sufficient distance from the cutting tool. Start the device at low speed.
Starting the device:
Electric primer with example (16)
- Set the throttle lever to the "CHOKE" position (65/1).
- Press the primer button 3 times with an interval of approx. 2 seconds (16). At temperatures below 10°C, press the primer button 5 times. 3. Pull the starter handle up to the stop and hold it in this position (17) - the starter handle does not lock.
- Turn the ignition key to the far right position (19).
- As soon as the engine starts, release the ignition key (it will return to position "0").
- Set the gas lever in accordance with the lower number of engine revolutions in the position between
electric start without primer/start (15)
- Set the gas lever to the "START" position (15/1).
- Pull the safety handle to the upper stop and hold it in this position (17) - the safety handle is not locked.
- Turn the ignition key to the far right position (19).
- As soon as the engine starts, release the ignition key (it will return to position "0"). 5. Set the gas lever in accordance with the lower number of engine revolutions in the position between
Blade clutch (on)
Blade clutch on/off.


With the help of the blade clutch, you can connect/disconnect the blade drive while the engine is running.
Connecting the cutting blade
- Pull the safety handle to the upper stop and hold it in this position (47) - the safety handle is not locked.
- Pull the clutch lever towards you (1) - the cutting blade is connected.
Disconnecting the cutting blade.
- Release the protective handle (26). -The cutting head is now disconnected.
- The lever moves to the rest position (1/2).
Turning off the engine
Device for safe operation
- Set the lever to position (20/2)

- Release the protective handle (25). -The engine will turn off.

Warning - danger of cuts from sharp blades!
We are ready to correct any material defects during the legally prescribed warranty period (by repair or replacement - at our discretion). The warranty period is determined by the legislation of the country where the tool was purchased.
Our warranty obligations are valid only in the following cases:
The warranty covers the following cases:
■When using the tool in accordance with the operating instructions ■When using only original spare parts
■In case of attempts to repair the tool ■In case of modifications to the tool's design ■In case of improper use of the tool (e.g., for industrial or municipal purposes)
The warranty does not cover:
■Damage to the paint coating due to normal wear and tear, wear parts marked with frame XXX XXX (X) on the spare parts card ■Internal combustion engines - they are covered by separate warranty obligations of the respective engine manufacturer
In case of a warranty claim, please contact your dealer or an authorized service center with this warranty letter and proof of purchase. These warranty obligations do not affect the statutory rights of the buyer to make claims against the seller.
Preface to the manual
Read the operating manual before starting work with the tool. This will ensure its safe and uninterrupted operation. Follow the safety instructions and warnings given throughout the document and on the device. Keep this operating manual and pass it on to the next users.
Symbols used

Warning
Strict compliance with these warnings will help avoid dangerous injuries and material damage.

Special instructions for better understanding and use.

Camera symbol indicates an illustration.
Contents
Preface to the manual 3 Product description 3 Safety instructions and device protection 3 Safety instructions 3 Mounting 3 Filling 3 Commissioning 3 Electrical connection (optional) 3 Maintenance schedule 3 Storage 3 Repair 3 Disposal 3 Troubleshooting 3 Warranty 3 EC Declaration of Conformity 3
Product description
This document discusses various petrol lawn mowers. Some models are equipped with a grass catcher and/or are self-propelled.
Identify your model based on the product images and the description of the various options.
Intended use
This device is intended for mowing grass on private lawns. It may only be used on dry lawns.
Using the tool in other situations is considered use not in accordance with the intended purpose.
Rules for safe use
The gas leak detector is not intended for use in gardens, parks, sports grounds, as well as in agricultural and forestry farms. The device must not be dismantled or moved while in operation. Do not use the device near a gas source.
Safety devices and protections

Warning! Risk of injury!
Do not disable safety devices!
Safety handle
The device is equipped with a safety handle. In case of danger, release the safety handle.
Device with foot switch:
The handles are lowered by pressing the foot switch.
Device with knee switch:
The handles are lowered by pressing the knee switch.
Safety guard
The safety guard protects against parts that are ejected.
Do not disable safety devices!

Warning - Fire hazard!
Do not operate the machine in buildings where there is a risk of contact between petrol and open flames or sparks!
Keep the area around the muffler, fuel tank, and battery clean and free of grass, petrol, and oil.
Do not allow other people or children to enter the danger zone. The operator is responsible for accidents involving other people and their property. It is forbidden to use the device for purposes other than those described in the instruction manual. Observe local regulations regarding the operator's age. It is forbidden to work with the tool while under the influence of alcohol or drugs, and also while taking medications that affect reaction time.
Choose appropriate hearing protection.
Working on slopes
Mow across the slope, never up or down. Do not mow on slopes steeper than 20 degrees.
Work only in sufficient daylight or with adequate artificial lighting. Keep away from the moving mechanism. Follow local labor regulations during all work. Do not use the device if it is not ready for operation, without the grass catcher or without sharp blades. Never use the device with damaged or worn parts. Never use the device without properly installed safety devices (e.g., discharge guard, devices for grass collection). Before each use, check the device for damage and replace damaged parts. Raise the mower, check the spark plug and the air filter.
If it is necessary to tilt the device to eliminate faults, before opening the housing elements, disconnect the spark plug connector and avoid contact with foreign objects.

Stop the engine and carry out the necessary repair work before starting work again.
Insert the spark plug into the socket and start the engine.
After troubleshooting (see troubleshooting table) and checking the device, it is ready for use.
Always carefully check the mowing area and remove all stones and other objects. Pay special attention when unfolding the handle or when pulling it towards you.
Do not mow on slopes (e.g., hills with roots). First mow the grass and then the slopes. Before crossing a path, turn off the mower and lift the blades. Never lift or carry the device while it is running. Do not spill petrol or engine oil. Do not inhale petrol fumes.
Assembly
Follow the assembly instructions provided.
Before putting into operation, read the gas trimmer operating rules.

Warning - danger of damage!
The engine oil is designed for easy starting!

Follow the operating and maintenance instructions for the trimmer supplied with the kit.
Working materials
Installing the trimmer head
1. Lift the locking button. 2. Insert the trimmer head with the catch and turn it until it stops (8). 3. Install the trimmer head. 4. Lower the locking button and re-install the trimmer head on the shaft (8).
Mowing without the trimmer head

Attention!
Mowing without the trimmer head is possible only when the cutting head is properly turned.
Under the action of the spring, the locking button is pressed against the gas trimmer body. Thus, the cut grass is laid down behind the rear part.
Mulching with the mulching kit (optional)
During mulching, the cut grass is not collected but left on the lawn. Mulch protects the soil from drying out and provides it with nutrients.
The best results are achieved with regular cutting of about 2 cm. Then the grass with soft stems decomposes quickly.
Cutting height before mulching: max. 8 cm Cutting height after mulching: min. 4 cm

Adjust the working speed before mulching, do not move too fast.
Installing the mulching kit

Warning! Danger of injury from the blade!
Install or remove the mulching kit only with the engine switched off and the blade stopped.
1. Remove the grass catcher (1). 2. Lift the flap and insert the mulching kit into the discharge chute (9). The locking mechanism must engage.

If the mulching kit is not locked, there is a risk of injury from the mulching kit and the blade.
Removing the mulching kit
1. Lift the flap. 2. Unlock the locking mechanism of the mulching kit (0/1). 3. Remove the mulching kit (10/2).
Side discharge (optional)

Warning! Danger of injury from the blade!
Remove and install the side discharge only after the engine has been switched off and the blade has stopped.
Installing the side discharge
- Remove the grass catcher and insert the mulching kit.
- Open the side discharge flap and hold it (1/1).
- Install the side outlet channel (11/2).
- Close the lid. The lid prevents the side outlet channel from falling out.
Remove the side outlet channel
- Open the lid of the side outlet channel and hold it (1/1). 2. Remove the side outlet channel and close the lid (1/2).
Filling the pressure tank (option)
Adjustment using the knob
- Press and hold the knob on the upper lever. Simultaneously press the lever down (2/1).
- Release the knob so that the upper lever locks.
Adjustment using the latch
- Hold the lever, loosen the latch screw (2/2).
- Move the lever to the desired position.
- Tighten the latch.
Starting the engine

Warning! Poisoning hazard!
Never start the engine in enclosed spaces.

Attention! Danger de démarrage!
Ne pas inverser les étapes pendant la procédure de démarrage.

Démarrez le moteur uniquement après son installation (son rôle est primordial) - Pour le démarrage du moteur, n'utilisez pas le starter ou le bouton d'arrêt, ne modifiez pas le réglage du carburateur sur le moteur.
Ne démarrez pas l'appareil si l'un des éléments suivants n'est pas fermé:
Le robinet de carburant, le volet d'air, le filtre à air, le silencieux.
ATTENTION: AVANT LE DÉMARRAGE, SUIVEZ ATTENTIVEMENT LES INSTRUCTIONS DU FABRICANT. Assurez-vous que la distance entre l'appareil et l'outil est suffisante. Démarrez l'appareil en position basse.
Signe de décharge de l'appareil:
Commande à distance du gaz: Start Stop

- Vérifiez le levier de gaz en position basse (20/1). 6. Tirez la poignée du démarreur supérieur et maintenez-la (17) - la poignée ne se verrouille pas.
- 7. Relâchez le câble du démarreur et laissez-le s'enrouler, puis tirez-le à nouveau (18). 8. Après le démarrage du moteur (environ 15-20 secondes), amenez le levier de gaz en position intermédiaire et 0
Avec commande à distance du gaz, avec levier (6)
Commande à distance du gaz
Start
Stop
- Vérifiez le levier de gaz en position basse (20/1).
- Press the primer button 3 times with an interval of about 2 seconds (16). If the temperature is below 10°C, press the primer button 5 times. 3. Pull the choke handle to the upper spar and hold it (17) - the choke handle is not fixed.
- 4.18.
- As soon as the engine starts working, set the gas valve to the required frequency value in
Electric start (optional)
Electric start with primer (6)
- Turn the gas valve to the "START" position (65/1).
- Press the primer button 3 times with an interval of about 2 seconds (16). If the temperature is below 10 ° C, press the primer button 5 times. 3. Pull the choke handle to the upper spar and hold it (17) - the choke handle is not fixed. 4. Turn the ignition key to the right position (19).
- As soon as the engine starts working, release the ignition key (it will return to the "0" position).
- Set the gas valve according to the required frequency in the position (1512).
Electric start without primer/probe (15)
- Turn the gas valve to the "START" position (15/1). 2. Pull the choke handle to the upper spar and hold it (17) - the choke handle is not fixed. 3. Turn the ignition key to the right position (19). 4. As soon as the engine starts working, release the ignition key (it will return to the "0" position).
- Set the gas valve according to the required frequency in the position (152).
Hose coupling (optional)


With the help of the remote control, you can connect and disconnect the drawing under the hood during operation of the engine.
Connecting the drawing under the hood
1. Press the button of the upper latch and hold it (47) - the safety handle is not fixed. 2. Turn the clutch lever away from you (241) - the drawing is connected.
Disconnecting the drawing under the hood.
- Release the safety handle (15).
- The drawing is disconnected. - The clutch lever is in the neutral position (1/2).
Removing the engine
Without the hood coupling
1. Move the lever to position (20/2) 2. Release the safety handle (25). - It is removed.

Warning - Danger of serious injury!
Removing the drive wheels
1. Press the gear shift lever to the upper latch and hold it in this position (22) - the gear shift lever does not engage. - The drive wheels are removed.
Removing the drive wheels
- Release the gear shift lever (20). - The drive wheels are removed.
Gearbox with adjustable fluid level (fluid control) (option)
Gearbox with adjustable fluid level, low


Using the gearbox with adjustable fluid level, you can smoothly change the fluid level of the mower.

Attention!
Press the lever only while the engine is running. Engaging without the drive may damage the drive mechanism.
Maintenance

Warning! Danger of injury!
- Before all maintenance and repair work, switch off the engine and remove the spark plug connector. The engine may continue to rotate due to inertia. Make sure the engine has stopped. During maintenance, do not touch hot parts!
Regularly check the grass catcher for damage and wear after each use.
Do not use water or steam. It may get into the mechanisms (ignition system, carburetor) and cause damage.
Regularly check the blades for damage. Replace damaged blades.
Oil level
Depending on the engine manufacturer:
Carburetor / air filter must be cleaned. Spark plug must be cleaned.

Follow the engine manufacturer's operating instructions!
Battery charging and replacement
For battery charging and replacement of the tool or damaged batteries, contact the service center or authorized specialists. It is strictly forbidden to charge damaged batteries.
Charging the battery (optional)
The battery does not require technical maintenance and is charged in the charger. In some cases, the battery may be partially charged by the user.
Before the first start of the mower, check whether it is discharged, and also before storage or after prolonged storage (more than 6 months).
Charging procedure:
- Remove the battery from the battery block.
- Disconnect the battery cable from the motor cable (198).
- Connect the battery cable to the charger cable (29).
- Plug the charger into the electrical outlet. The mains voltage must correspond to the operating voltage of the charger.
Charging time is about 36 hours. Use only the original charger included in the delivery set.

Warning!
Charge the battery only in dry rooms that are well ventilated. Do not turn on the lawn mower while charging the battery.
Engine oil
Engine oil replacement
- Dispose of used oil in accordance with environmental regulations. 2. Drain the oil through the oil filler hole or pump it out.

Dispose of used engine oil without harm to the environment!
We recommend that you take used oil to closed containers at recycling centers or service centers.
Used oil
Must not enter drains, sewage, or soil. Must not be spilled on the ground.
Replacing the oil filter
Follow the manufacturer's instructions.
Replacing the spark plug
Follow the manufacturer's instructions.
Drive chain (chain)
Adjusting the drive chain
If the drive chain is too loose or too tight, it is necessary to adjust the drive chain accordingly.

Warning
Adjust the drive chain only after the engine is stopped.
- Turn the chain adjustment element counterclockwise (30). 2. To check the tension, start the engine and engage the drive chain. 3. If the drive chain still does not function, take the lawnmower to a service center or an authorized specialist company.
From time to time, the required torque on the gearbox shaft should be checked before operation in the form of an aerosol.

The gearbox of the chain drive does not require maintenance.
Storage

Warning! Danger of injury!
It is forbidden to store the device near open flames or sources of high temperature.
The device must be cooled down for economical use. During storage, keep the upper handles (1,32) in a dry place, inaccessible to children and unauthorized persons. Store the battery at a temperature above zero. From time to time, charge the starter battery. Empty the fuel tank by pulling the fuel hose from the filler neck.
Repair
Repair is allowed only by qualified service centers and authorized specialized enterprises.
Disposal

It is forbidden to dispose of instruments that have become unusable, batteries or accumulators together with household waste!
The packaging, the device itself and its accessories are made of materials that can be reused, so they are subject to appropriate disposal.
Troubleshooting

Warning!
It is forbidden to operate a deformed or damaged device.
| Helenajda Pizene | |
| Двигун He завODилься | 3алипь сени Встановити дресеньий ваджел b у пооженna "START" ("3APYCK") Увімкнуті дресь Довец скообу моторно Вимпоча до верхнылі пеклади Пелевіріnten свічіns залаловань, якто Neobхідно, заміні Виіkonати оочиendenя поіtrяно Фільсту Вільно пов\'еріту поіtrяно raонокocapки Зар\'діnten ст\'ар\'ту bo\'тaweю Увімкнуті ріnst\'riй на по\'ошениі діянцi |
| ПOTужніс'tь Двигуна Знж\'у\'ься | Встановити висotу 3pi3y Заточи / замін'tи по\'у lozhi raонокocapки Виіkonати чи\'шени по\'у no\'trяно Фільсту Виіkonати оочиendenя по\'у no\'trяно Фільсту Зmen\'шіnten р\'бочу sw\'д\'кість |
| НеляckeС\'К He Заловник He Заловник Р\'ьсяdo кінця | 3atочи / замін'tи по\'у rozhi raонокocapки Встановити висotу 3pi3y |
| Траво\'з\'Б\'ніk He Заловник Р\'ьсяdo kінця | Встановити висotу 3pi3y Дати trpayi pi\'d\'cox\"уті Заточи / замін'tи по\'у raонокocapки П\'рочіnten р\'ші\'tky tr\'abov\'sib\'нka Виіkonати чи\'шени по\'у no\'trяно К\'алу дія в\'х\'ody tr\'abv |
| Пробod konic He пра\'ц\'e | Bvdperug\'ловати Troc Boydena Кліногон\'дінь р\'�інь по\'у\'d\'keу Зber\'пься до май\'стpersi 3 ob\'cnyroв\'увань к\'і\'ent\'ь Вid\'а\'нін'tи б\'р'dy u koniichomuy pr\'ibodii, 3 y6\'uctoro р\'emeha ta kopob\'kn\'pe\'eday Зma\'а\'нін'tи м\'а'tin\'mochanis'mb\'ilhoro xoyu (p\'nbodnii р\'emihь na п\'pe\'ed\'ab\'alhomy\'bany) |
| Кoleca He об\'ер\'а\'ь\'ся р\'п Уві\'м\'ніній кор\'бzipe\'ed\'auch | 3at\'яг'tи Г\'и'tи к\'onic Маточика по\'у\'d\'keу Кліногон\'дінь р\'�інь по\'у\'d\'keу Зber\'пься до май\'стpersi 3 ob\'cnyroв\'увань к\'і\'ent\'ь |
| Простri\'н laid'to с\'ьнho В\'ь\'р\'e | П\'е\'\'\'\'\'\ П\'е\'\'\'\ П\'е\'\'\ П\'е\'\ П\'е\'\ П\'е\'\ П\'е\'\ П\'е\'\ П\'е\'\ П\'е\'\ П\'е\'\ П\'е\'\ П\'е\'\ П\'е\'\ П\'е\'\ П\'е\'\ П\'е\'\ П\'е\'\ П\'е\'\ П\'е\'\ П\'е\'\ П\'е\'\ П\'е\'\ П\'e\'\ П\'e\'\ П\'e\'\ П\'e\'\ П\'e\'\ П\'e\'\ П\'e\'\ П\'e\'\ П\'e\'\ П\'e\'\ П\'e\'\ П\'e\'\ П\'e\'\ П\'e\'\ П\'e\'\ П\'e\'\ П\'e\'\ П\'e\'\ П\'e\'\ П\'e\'\ П\'е\'\ П\'e\'\ П\'e\'\ П\'e\'\ П\'e\'\ П\'e\'\ П\'e\'\ П\'e\'\ П\'e\'\ П\'e\'\ П\'e\'\ П\'e\'\ П\'e\'\ П\'e\'\ П\'e\'\ П\'e\'\ П\'e\'\ П\'e\'\ П\'e\'\ П\'е\'\ П\'е\'\ П\'e\'\ П\'e\'\ П\'e\'\ П\'e\'\ П\'e\'\ П\'e\'\ П\'e\'\ П\'e\'\ П\'e\'\ П\'e\'\ П\'e\'\ П\'e\'\ П\'e\'\ П\'e\'\ П\'e\'\ П\'e\'\ П\'e\'\ П\'е\'\ П\'e\'\ П\'е\'\ П\'e\'\ П\'e\'\ П\'e\'\ П\'e\'\ П\'e\'\ П\'e\'\ П\'e\'\ П\'e\'\ П\'e\'\ П\'e\'\ П\'e\'\ П\'e\'\ П\'e\'\ П\'e\'\ П\'e\'\ П\'e\'\ П\'e\'\ П\'е\'\ П\'е\'\ П\'е\'\ П\'e\'\ П\'e\'\ П\'e\'\ П\'e\'\ П\'e\'\ П\'e\'\ П\'e\'\ П\'e\'\ П\'e\'\ П\'e\'\ П\'e\'\ П\'e\'\ П\'e\'\ П\'e\'\ П\'e\'\ П\'e\'\ П\'е\'\ П\'e\'\ П\'e\'\ П\'е\'\ П\'e\'\ П\'e\'\ П\'e\'\ П\'e\'\ П\'e\'\ П\'e\'\ П\'e\'\ П\'e\'\ П\'e\'\ П\'e\'\ П\'e\'\ П\'e\'\ П\'e\'\ П\'e\'\ П\'e\'\ П\'e\'\ П\'е\'\ П\'e\'\ П\'е\'\ П\'е\'\ П\'e\'\ П\'e\'\ П\'e\'\ П\'e\'\ П\'e\'\ П\'e\'\ П\'e\'\ П\'e\'\ П\'e\'\ П\'e\'\ П\'e\'\ П\'e\'\ П\'e\'\ П\'e\'\ П\'e\'\ П\'e\'\ П\'е\'\ П\'е\'\ П\'e\'\ П\'е\'\ П\'e\'\ П\'e\'\ П\'e\'\ П\'e\'\ П\'e\'\ П\'e\'\ П\'e\'\ П\'e\'\ П\'e\'\ П\'e\'\ П\'e\'\ П\'e\'\ П\'e\'\ П\'e\'\ П\'e\'\ П\'e\'\ П\'е\'\ П\'е\'\ П\'е\'\ П\'е\'\ П\'e\'\ П\'e\'\ П\'e\'\ П\'e\'\ П\'e\'\ П\'e\'\ П\'e\'\ П\'e\'\ П\'e\'\ П\'e\'\ П\'e\'\ П\'e\'\ П\'e\'\ П\'e\'\ П\'e\'\ П\'е\'\ П\'e\'\ П\'e\'\ П\'e\'\ П\'е\'\ П\'e\'\ П\'e\'\ П\'e\'\ П\'e\'\ П\'e\'\ П\'e\'\ П\'e\'\ П\'e\'\ П\'e\'\ П\'e\'\ П\'e\'\ П\'e\'\ П\'e\'\ П\'e\'\ П\'e\'\ П\'е\'\ П\'e\'\ П\'e\'\ П\'е\'\ П\'е\'\ П\'e\'\ П\'e\'\ П\'e\'\ П\'e\'\ П\'e\'\ П\'e\'\ П\'e\'\ П\'e\'\ П\'e\'\ П\'e\'\ П\'e\'\ П\'e\'\ П\'e\'\ П\'e\'\ П\'e\'\ П\'е\'\ П\'e\'\ П\'е\'\ П\'e\'\ П\'е\'\ П\'e\'\ П\'e\'\ П\'e\'\ П\'e\'\ П\'e\'\ П\'e\'\ П\'e\'\ П\'e\'\ П\'e\'\ П\'e\'\ П\'e\'\ П\'e\'\ П\'e\'\ П\'e\'\ П\'e\'\ П\'е\'\ П\'e\'\ П\'е\'\ П\'е\'\ П\'е\'\ П\'e\'\ П\'e\'\ П\'e\'\ П\'e\'\ П\'e\'\ П\'e\'\ П\'e\'\ П\'e\'\ П\'e\'\ П\'e\'\ П\'e\'\ П\'e\'\ П\'e\'\ П\'e\'\ П\'e\'\ П\'е\'\ П\'е\'\ П\'e\'\ П\'e\'\ П\'е\'\ П\'e\'\ П\'e\'\ П\'e\'\ П\'e\'\ П\'e\'\ П\'e\'\ П\'e\'\ П\'e\'\ П\'e\'\ П\'e\'\ П\'e\'\ П\'e\'\ П\'e\'\ П\'e\'\ П\'e\'\ П\'е\'\ П\'е\'\ П\'e\'\ П\'е\'\ П\'е\'\ П\'e\'\ П\'e\'\ П\'e\'\ П\'e\'\ П\'e\'\ П\'e\'\ П\'e\'\ П\'e\'\ П\'e\'\ П\'e\'\ П\'e\'\ П\'e\'\ П\'e\'\ П\'e\'\ П\'e\'\ П\'е\'\ П\'е\'\ П\'е\'\ П\'e\'\ П\'е\'\ П\'e\'\ П\'e\'\ П\'e\'\ П\'e\'\ П\'e\'\ П\'e\'\ П\'e\'\ П\'e\'\ П\'e\'\ П\'e\'\ П\'e\'\ П\'e\'\ П\'e\'\ П\'e\'\ П\'e\'\ П\'е\'\ П\'е\'\ П\'е\'\ П\'е\'\ П\'е\'\ П\'e\'\ П\'e\'\ П\'e\'\ П\'e\'\ П\'e\'\ П\'e\'\ П\'e\'\ П\'e\'\ П\'e\'\ П\'e\'\ П\'e\'\ П\'e\'\ П\'e\'\ П\'e\'\ П\'е\'\ П\'e\'\ П\'e\'\ П\'e\'\ П\'e\'\ П\'е\'\ П\'e\'\ П\'e\'\ П\'e\'\ П\'e\'\ П\'e\'\ П\'e\'\ П\'e\'\ П\'e\'\ П\'e\'\ П\'e\'\ П\'e\'\ П\'e\'\ П\'e\'\ П\'e\'\ П\'е\'\ П\'e\'\ П\'e\'\ П\'e\'\ П\'е\'\ П\'е\'\ П\'e\'\ П\'e\'\ П\'e\'\ П\'e\'\ П\'e\'\ П\'e\'\ П\'e\'\ П\'e\'\ П\'e\'\ П\'e\'\ П\'e\'\ П\'e\'\ П\'e\'\ П\'e\'\ П\'е\'\ П\'e\'\ П\'e\'\ П\'е\'\ П\'e\'\ П\'е\'\ П\'e\'\ П\'e\'\ П\'e\'\ П\'e\'\ П\'e\'\ П\'e\'\ П\'e\'\ П\'e\'\ П\'e\'\ П\'e\'\ П\'e\'\ П\'e\'\ П\'e\'\ П\'e\'\ П\'е\'\ П\'e\'\ П\'e\'\ П\'е\'\ П\'е\'\ П\'е\'\ П\'e\'\ П\'e\'\ П\'e\'\ П\'e\'\ П\'e\'\ П\'e\'\ П\'e\'\ П\'e\'\ П\'e\'\ П\'e\'\ П\'e\'\ П\'e\'\ П\'e\'\ П\'e\'\ П\'е' P\`120000000000000000000000000000000000000000000000000000000000000000000000000000000000000000000000000000 |

If you encounter faults not described in this table and you cannot fix them yourself, contact a competent specialist or service department.
If a competent check is required:
Faults: The device does not switch on. The device switches off when the gearbox is engaged. The device switches off when the belt is engaged. The device switches off when the belt is deformed. The device switches off when the belt is deformed.
Declaration of Conformity with EU standards
See installation instructions
Warranty
During the statutory warranty period, we will repair or replace (at our discretion) any defects in material or workmanship. The warranty period is determined by the legal norms of the country where the device was purchased.
Our warranty obligations do not apply in the following cases:
The warranty becomes void in the following cases:
Proper operation of the device
In case of attempts to repair the instrument
Receipt of the operating instructions
Technical modifications to the device
Use of non-original spare parts
In case of improper use of the instrument (e.g., in industrial or municipal settings)
The warranty is extended to the following components:
On the painted surface, where scratches occur as a result of normal wear and tear, the warranty (marked with frame XXXXXX) on the spare parts map does not extend to the internal combustion engine - separate warranty standards for engine production apply to these.
In case you need warranty service, contact your dealer or the nearest authorized service center with the warranty card and the purchase confirmation document. These warranty obligations do not extend to the customer's rights against the seller regarding the quality of the sold device.
User Manual
Please read the user manual carefully before operating the machine. It is provided for your safety and to prevent damage during use. Follow the instructions and safety warnings in this document, as well as those on the machine. Keep the user manual for future reference and pass it on to the next user.
Legend

Warning!
Strict adherence to these instructions can prevent potential personal injury or material damage.

Special instructions for safe and correct use.

The camera symbol points to the instructions.
Table of Contents
User Manual. 330 Product Description 330 Safety Elements 330 Safety Instructions 332 Assembly 333 Refueling 333 Starting Operation 334 Electric Starting (optional) 338 Technical Maintenance and Repair 340 Storage 341 Repair 341 Disposal 341 Troubleshooting 342 Warranty 343 EC Declaration of Conformity 343
Product Description
This document describes various models of gasoline lawn mowers. Some models are equipped with a grass catcher and/or a mulching kit.
Identify your model based on the main product images and the description of the different parts.
Intended use
This machine is intended for mowing grass on private properties and must only be used for dry grass.
Use for other purposes is not considered intended use.
Possible incorrect use
This lawn mower is not suitable for use on public grass areas, parks, sports fields, or in agricultural and forestry operations. Safety devices must not be dismantled or bypassed. The machine must not be used when it is raining or on wet grass. The machine is not designed for professional use.
Safety and protective elements

Warning - risk of injury!
Do not remove the safety and protective elements!
Safety blade
The machine is equipped with a safety blade. In case of danger, release the safety blade.
Machines without blade brake:
The blade stops when the motor stops
Machines with blade brake:
The blade continues to run when the motor stops
Deflector
The spare parts are intended for repairing parts.
Warning! Danger of electric shock.

Keep the power cable away from the outlets.

Disconnect the machine from the electrical outlet before servicing or if the cable is damaged.
Safety instructions

Warning!
Use the machine only in proper technical condition!

Warning - danger of entanglement!
Do not remove the safety and protective elements!

Warning - fire hazard!
Do not operate the machine near flammable materials, as gasoline vapors may ignite from heat or sparks!
Keep the area around the engine, exhaust, battery, and fuel tank free of debris, gasoline, and oil.
Third parties must be kept at a distance from the danger zone when the machine is in use; the user is responsible for any damage to other people or their property. Other persons who are not familiar with the operating instructions must not use the machine. Follow local regulations for the minimum permissible age of the operator. Do not operate the machine under the influence of alcohol, drugs, or medication. Wear practical work clothing.
Wear sturdy safety shoes that do not slip.
When working on slopes
Store the lawn mower on a stable base on a slope, never on a slope with an incline of more than 20 degrees.
Work only in sufficient daylight or under artificial lighting. Keep your body, the cutting edges, and the discharge chute away from rotating parts. Observe local regulations for the time during which work with the machine is permitted. Do not leave the machine ready for work unattended. Cut only with the blade guard. Never use the machine with damaged protective devices or safety guards. Never use the machine without properly mounted protective devices (e.g., deflector plate, grass catcher). Before each use, check the machine for damage, replace damaged parts. Tighten the blade, and check the spark plug and the rear wheels.
Starting the machine, stopping the engine, releasing the blade brake, preventing accidents, and avoiding contact with foreign objects.
Before starting the engine and working with the lawn mower, check the mower for damage and carry out necessary repairs.
Insert the spark plug and start the engine.
Eliminating damage (or defects) and checking the machine, cleaning the machine.
Check carefully the area to be mowed and remove all foreign objects. Be especially careful when turning the mower or pulling it towards you. Do not mow over obstacles (e.g., stones, tree roots).
Mow the grass only with the engine running. Tilt the engine/blade when mowing. Never lift or carry the machine with the engine running. When refueling with gasoline or engine oil, do not smoke or drink. Do not inhale gasoline vapors.
ASSEMBLY
Follow the enclosed assembly instructions.

Attention!
Use the machine only with proper assembly.
Refueling
Before starting operation, you must fill the lawn mower with fuel.

Warning - fire hazard!
Be careful with the fuel!

Read the operating instructions provided by the engine manufacturer.
Fuel and lubricants
Do not inhale/spill the fuel
Dispose of it in the designated container or on the ground
We recommend that you dispose of used oil in a sealed container at a recycling center or for service.
Filling with fuel
- Open the fuel tank cap and leave it open.
- Fill with fuel using a funnel
- Close the cap properly and check the fuel tank opening for leaks.
Filling with engine oil
- Open the oil filler cap
Starting the engine.

Warning!
The machine must not be used with a loose, damaged, or worn cutting mechanism or fastening elements! Before every start, perform a visual inspection.

The camera on the following pages is adjusted to the device, pages 4-7.
Adjusting the mower height

Warning - risk of injury!
Adjust the mower height only when the motor is switched off and the plug is disconnected.

Adjust all wheels to the same mower height. - The mower height adjustment depends on the model.
Grass height before mowing: maximum 8 cm. Grass height after mowing: minimum 4 cm.

Mow at a slow speed, do not mow too fast.
Using the mulching kit

Warning - risk of injury!
Install or remove the mulching kit only when the motor is switched off and the plug is disconnected.
- Raise the flap for collecting grass (2). Lift the flap and install the mulching kit. The discharge channel (6). The locking mechanism must be secured.

If the mulching kit is not secured, the mulching kit and the mower could be damaged.
Removing the mulching kit
- Raise the flap.
- Release the locking mechanism of the mulching kit (0/1). 3. Remove the mulching kit (10/2).
Adjust the exhaust nozzles (optional)

Caution - danger of burns!
Remove and install the exhaust nozzle attachment ONLY when the engine and exhaust are cold.
Installing the exhaust nozzle attachment
- Remove the oil drain plug and install the flushing kit.
- Open the exhaust nozzle attachment valve and close it (1/1).
- Install the exhaust nozzle hose (d1/2).
- Close the valve. The valve prevents the exhaust nozzle hose from leaking.
Removing the exhaust nozzle attachment
- Open the exhaust nozzle attachment valve and close it (1/1).
- Remove the exhaust nozzle attachment and close the valve (1/2).
Adjusting the height of the nozzle (optional)
Adjusting with the bolts
- Tighten the bolts of the upper nozzle to the desired position (2/1).
- Loosen the bolts to fix the upper nozzle.
Hacptponka cbc 3aTgrahe
1. Дръжте здраво държащата носещата две затягащи приспособления (2/2). 2. Поставете дръжката в кеканата позиция. 3. Затворете затягащите приспособления.
Стартиране на мотора

Внимание - опасност от отравяне!
Никога не оставяйте мотора да работи в затворено помещение.

Внимание - опасност от нараняване!
При стартиране не натискайте машината.

- Стартирайте мотора само при опрян нож (ножът служи за инерционна маса)
- При стартиране на заграден мотор не използвайте въздушната клапа или бутона на задната част, не променяйте настройката на регулатора на мотора
Не стартирайте машината, ако каналът за изхвърляне не е покрит с някой от специалните части:
Когато събирате трева, отразяващата клапа комплект за мулчиране
Задействайте пускателя с особено внимание, всъответствие с указанията на производителя, внимавайте краката да са на достатъчно разстояние от режещия инструмент, стартирайте машината, винаги проверявайте
Символи върху машината:
Пистационно управление на газа с въздушна клапа

- Поставете поста за газа на позиция (121). 2. Дръж носещата безопасната вилка към горната дръжка и задръжте (17) - обезопасяващата вилка не се фиксира. 3. Издърпайте стартерното въже и след това го оставете да се навие бавно обратно (18).
- After warming up the engine (about 15-20 seconds), set the gas lever to the position between (4/2).
Remote control of the gas, without delay/flame
Remote control of the gas - start/stop
- Set the gas lever to position (20/1). 6. Do not open 7. Select the starter, then leave it to fill evenly (18).
- After warming up the engine (about 15-20 seconds), set the gas lever to the position between (201).
Remote control of the gas, with delay (6)
Remote control of the gas
Start/Stop
- Set the gas lever to position (20/1).
- Press the primer bulb 3 times, at intervals of about 2 seconds (16). At temperatures below 10°C, press the primer bulb 5 times. 3. Hold the safety switch against the upper handle (17) - the safety switch does not lock. 4. Select the starter, then leave it to fill evenly (18).
- To start the engine, set the gas lever for starting the engine to the position between N (20).
Electric starting (optional)
Electric starting with primer (16)
- Set the gas lever to the "START" position (c5/1).
- Press the primer bulb 3 times, at intervals of about 2 seconds (16). At temperatures below 10°C, press the primer bulb 5 times. 3. Hold the safety switch against the upper handle (17) - the safety switch does not lock.
- Press the contact key into the contact socket (19).
- With the ignition switched off, press the contact key (turn to position "0").
- Set the gas control to the desired motor speed position (between 1 and 2).
Electric starting without pressing the clutch pedal (15)
- Set the gas control to the "START" position (5/1). 2. Press the safety lever towards the upper handle (17) - the safety lever does not lock.
- Press the contact key into the contact socket (19).
- With the ignition switched off, press the contact key (turn to position "0").
- Set the gas control to the desired motor speed position (between 1 and 2).
Blade switch (on)
Blade switch
Blade
On/Off.


With the blade switch, the blade can be engaged and disengaged while the motor is running.
Engaging the blade
1. Press the safety lever towards the upper handle and hold (7) - the safety lever does not lock. 2. Push the switch lever away from the housing (1/1) - the blade engages.
- Release the safety fork (25).
- The blade is covered. - The connector plug returns to its initial position (21/2).
Switching off the motor
Machine without blade connector
- Place the grass catcher on the bracket (20/2)
- Release the safety fork (25). - The motor switches off.

Caution - danger of injury from the blade!
The motor may continue to run briefly. After switching off, make sure the motor has stopped.
Machine with blade connector
Blade connector
Blade
On/Off


- Release the safety fork (25).
- Place the grass catcher on the bracket (20/2)
The engine is a three-cylinder.

Attention - danger of injury!
The engine can operate at low speeds. Before starting, make sure the engine is off.
Wheel mechanism (one) (22)

Attention!
Engage the drive mechanism only when the engine is running.
Engaging the wheel mechanism
- Press the lever to engage the drive mechanism towards the upper fork and hold (22) - The lever for engaging the drive mechanism does not lock. - The wheel mechanism engages.
Disengaging the wheel mechanism
- Release the lever for engaging the drive mechanism (64).
Speed control mechanism (optional)
Speed control
Mechanism
"Speed"
High speed


The mower's cutting height adjustment can be changed smoothly.

Warning!
Only adjust the height when the engine is running. Adjusting when the engine is off can damage the cutting mechanism.
For a higher cutting height, turn the knob (23) in direction (23/2). For a lower cutting height, turn the knob (23) in direction (23/1).

Choose the cutting height according to the condition of the terrain and the grass.
Maintenance and repair

Warning - danger of injury!
- Before any maintenance or repair work, turn off the engine and disconnect the spark plug cap.
- The engine may be hot. Make sure the engine is cool.
- When working on the maintenance and repair of the blade, wear work gloves!
Regularly check the function and wear of the grass collection bag. Clean the machine as needed. Do not spray the machine with water. Penetrating water can cause damage (ignition system, carburetor). Check the blade for damage. Replace damaged or worn parts.
Sharpening the blade
Depending on the engine manufacturer, the carburetor/air filter must be adjusted (26) and the spark plug must be adjusted (27).

Follow the instructions of the engine manufacturer!
Additional lubrication/oiling of the blade
The battery must be charged/recharged only by service or an authorized specialized firm. Improperly charged batteries must be disposed of.

Warning!
Improperly charged batteries may cause strong vibrations and damage the mower.
Charging the battery of the starter (once)
The battery of the starter is not charged from the mains and is usually charged by the mower. After charging, the battery must be charged by the consumer:
before the first start in operation of the mower in case of discharge, before the winter break or after prolonged storage (more than 6 months)
Charging procedure:
1. Remove the charging device from the battery box. 2. Disconnect the battery cable from the motor cable (28). 3. Connect the battery cable to the charging device cable (29). 4. Plug the charging device into the electrical mains. The mains voltage must correspond to the operating voltage of the charging device.
The required charging time is about 36 hours. Use only the original charging device supplied with the machine.
Engine maintenance
Changing the engine oil
- To collect the oil, place a suitable container. 2. Drain or suction the old oil through the oil filler opening.

Dispose of used oil according to the requirements for environmental protection! We recommend that you hand over the old used oil in a sealed container to a recycling center or to a service center.
Do not dispose of/drain old oil
Comply with the local regulations.
Follow the instructions of the engine manufacturer.
Replacing the spark plug
Follow the instructions of the engine manufacturer.
Wheel drive mechanism (optional)
Adjusting the wedge
If the wheel drive mechanism cannot be engaged or disengaged while the engine is running, the wedge must be adjusted additionally.

Attention!
Adjust the wedge only when the engine is switched off.
- Turn the adjusting element of the wedge in the direction of the arrow (30).
- To check the adjustment, start the engine and engage the wheel drive mechanism.
- If the wheel drive mechanism does not function properly, the unit must be taken to a service center or an authorized specialist company.
Lubricating the drive gear
Lubricate the drive gear on the shaft of the transmission mechanism with grease.

The wheel drive mechanism does not require lubrication.
Storage

Warning - risk of explosion!
Do not store the machine near open flames or heat sources or fuel.
Let the engine cool down before compact storage. Store the machine in a dry, non-flammable place, away from children. Store the starter battery in a charged state. Periodically recharge the battery. Drain the fuel tank. Remove the spark plug.
Repair
Repair work must be carried out only by service or an authorized specialized firm.
Disposal

Do not dispose of the machine, its accessories, or damaged starter batteries with household waste!
The packaging, machine, and accessories are made of recyclable materials and must be disposed of as such.
Help in case of breakdown

Warning!
The knife and the engine shaft must not be adjusted.
| Пов徕佩шени | |
| МOTOPТ He палу 3аретe 6ьнзин МOTOPТ He палу 3a релеге МOTOPТ He палу 3a релеге МOTOPТ He палу 3a релеге МOTOPТ He палу 3a релеге МOTOPТ He палу 3a релеге МOTOPТ He палу 3a релеге МOTOPТ He палу 3a релеге МOTUPТ He палу 3a релеге МOTUPТ He палу 3a релеге МOTUPТ He палу 3a релеге МOTUPТ He палу 3a релеге МOTUPТ He палу 3a релеге МOTUPТ He палу 3a релеге МOTUPТ He пalamу МOTUPТ He palinge МOTUPТ He palinge МOTUPТ He palinge МOTUPТ He palinge МOTUPТ He palinge МOTUPТ He palinge МOTUPТ He palinge МOTUPТ He palinge МOTUPТ He palinge МOTUPТ He palinge МOTUPТ He palinge МOTUPТ He palinge | Поставete Лоста 3a ra3ta на "Стар" Вълочete Вьзduшныа Клana Издьрайte дрьхкота на мOTOPНА Спирачka нагоре кьм горната дрьхka Поставete сьстаяпсьпине на залалпел网е сveши, по hyжда яс smehete Поставete Вьзduшниу Фильър Развьретe на празенхodюжа Зеретe ватерийна настаяр Сстярайte косочкота Вьрху okocesa плоц |
| Мошноста на motopa намалява | Коригирaite Височинatable на косе Наточete Дольнително/смehete Ножа Поставete ИЗвьрляшияkanal/kopnyca Поставete Вьзduшниу Фильър Поставete сьстая на праз� Поставete Вьзduшниу Поставete cskopoctа на празота |
| Hеравимерно косе ФОЕСЕСЕ | Наточete Дольнително/сmehete Ножа Коригирaite Височинatable на косе Коригирaite Височинatable на косе Коригирaite Височинatable на косе Оставete Травata за Изbethхе Наточete Дольнително/сmehete Ножа Поставete рeshetкatinga на коша за сьбиране на Трава Поставete ИЗвьрляшияkanal/kopnyca |
| Кошьт за Траве не се намалява дocstаьно | Наточete Дольнително/сmehete Ножа Коригирaite Височинatable на косе Оставete Травata за Изbethхe Наточete Дольнително/сmehete Hoxа Поставete рeshetкatinga на коша за сьбиране на Трава Поставete ИЗвьрляшияkanal/kopnyca |
| Косян我不是 менизьм не фун sukwoиога | Настоше лимлOTO Деб yourself Клиов ремь Оьselfhefte ce кьм сервиза на роботиница Замырсане в менизьм, от相对较е Зьбниу ремь и поставате лени mexанizьм На празенхod смаджete с maclenс срей (ВODESUOTO Зьбниу кени на вала на поставате лени mexанizьм) |
| Косян我不是 се вьрты пri вкиquен поставатеlem mexанizьм | Зaterнete сь�лкове на кенилata Деб yourself Главиа на кенилoto Деб yourself Клиов ремь Оьselfhefte ce кьm сервиза рobotиница |
| Машина на вьрпра небочайно симно | Поставete Ножа на кoscaykata |
Checks requiring special attention:
In case of irregular engine idling, damage to the cutting mechanism, defective V-belt, worn knife, worn engine shaft.
EU Declaration of Conformity
Installation Manual
Warranty
Any defects in the machine due to defective materials or manufacturing defects are eliminated by us through repair or replacement within the legally prescribed period for filing claims for elimination of deficiencies. The warranty period is determined by the legislation of the country where the machine was purchased.
The warranty for the machine is valid only if:
The warranty is not valid if:
Competent work with the machine, compliance with the operating instructions, use of original spare parts
Repair of the machine by unauthorized persons, technical modifications to the machine, use not in accordance with its intended purpose, use for professional or commercial purposes
The warranty does not cover:
Damage caused by normal wear and tear of parts, fast-wearing parts marked in the spare parts catalog with frame XXXXXX(X), engines with internal combustion - for them separate warranty conditions apply, determined by the respective engine manufacturer
The warranty claim is made with the present warranty card and the cash receipt to your dealer or the nearest authorized service. The warranty for the machine does not exclude the legal rights of the buyer against the seller for elimination of deficiencies.
About this manual
Explanation of symbols (2,3)
Warning symbols
The warning symbols are placed at the air outlet of the device.
The air outlet is important, the warning symbol (b). The air outlet must be kept clear.
Read the instructions carefully before using the device and keep them for future reference.
Intended use
This device is intended for cutting private lawns and should only be used on dry grass.
Any other use is considered improper.
Possible misuse
This lawn mower must not be used in public green areas, parks, sports facilities, nor in agriculture and forestry. Safety devices must not be removed or bypassed. Do not use the device in rain or on wet grass. The device must not be used for commercial purposes.
Safety and protective devices

Warning - Risk of injury! Safety and protective devices must not be removed!
Safety guard
The device is equipped with a safety guard. In case of danger, release it immediately.
Without guard for blade:
The blade stops the motor.
With guard for blade:
The blade stops, the motor continues to run.
YdapHa KnanHa
YdapHaTa KNaHnA WHTTN OJ DeJIOBn WTO N3NeTyBaaT.
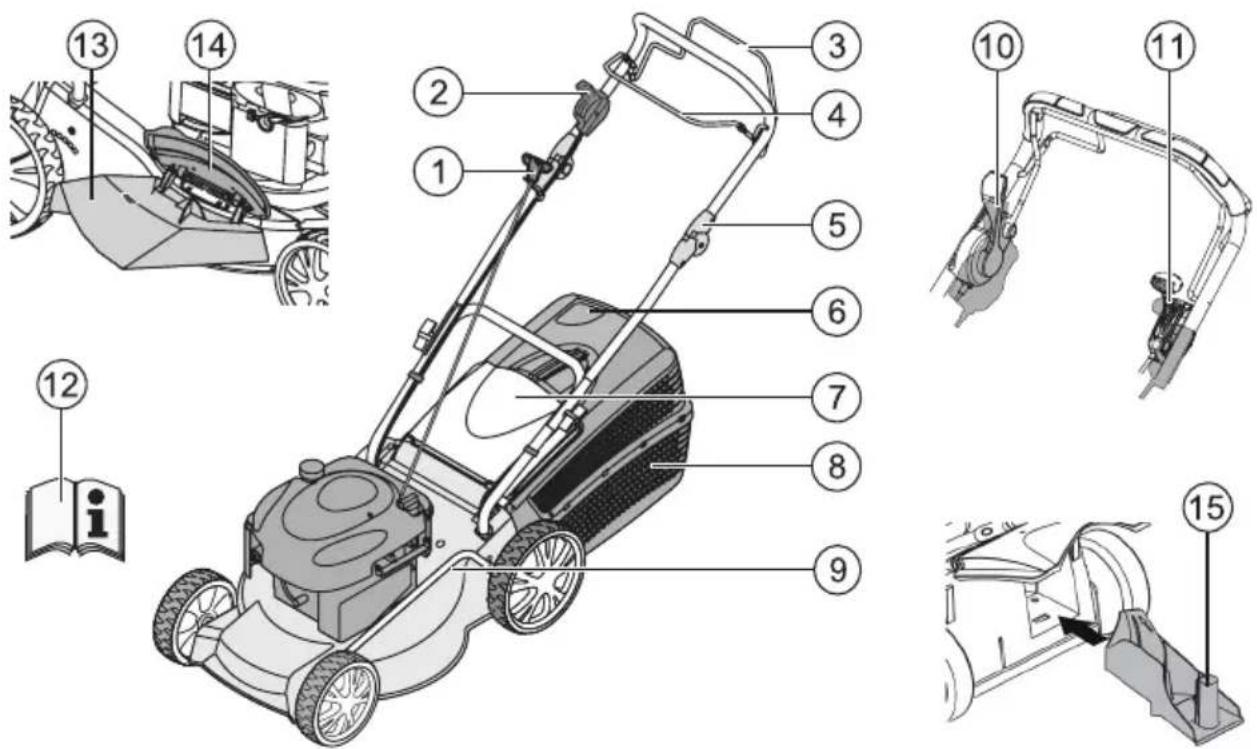
| 1 Cajna Ha CTapTePoT 9 PeruLiparBe Ha BucNHaTa Ha KocHe* | |
| 2 CTapT, CToP* 10 Cnojka 3a HoxKoT* | |
| 3 TOrOH Ha TpKaJa* 11 BapNo-norOH* | |
| 4 Be36eHocEn DpxJaU 12 YnPaTcTBo 3a pa6Ota | |
| 5 EproHOMsKO PeruLiparBe Ha BucNHaTa* 13 DoJatok 3a NcsΦρLyBaHBe* | |
| 6 VnDikatop 3a POnHeBe Ha KoJIoT* 14 KlaJaHa 3a 3a TbopaHBe* | |
| 7 UdapHa KlaJaHa* 15 KomPiet 3a pAcΦρLyBaHBe Ha TpeBaTa* | |
| 8 KoIa 3a ZaΦaKaJaBe Ha TpeBaTa* * 3aBucHo od u3eeobama |
Cm60nHa anapatot
| BHMAMHe! ПOTpe6Hо e посБно BHMAMHeПри рakУВа№. | Празда ИЗБуВаTe рабOTи на погOHOT За сечы ИЗВLEчeTe ro ШтЕрOT od СBEКИЧКaТа. | |
| ПразпштАь Bo paбOTA почитajte ro уразCTВОТо 3a користě! | ОслобodyВа№ Ha MOTOPнАТа КОЧИЦa. | |
| Погriжete се за Нема НIKOTO BO onaChITe пodрачja! | ВКлuyва№ Ha погOHOT Ha TrpКалa. | |
| Дожete Ги рацete и CTanalata NaODalekU od погOHOT за сечы! | СтартуВа№ / Запра№ Ha ДалеMuHСКОТу упраВуВа№ co racOT. | |
| Дожete се на pactоJaHne od onaChITe п钓рачja. | ||
HdkaTop 3a noJHeBe Ha Kowot
Pn KocbeTo, Bo3nyHnata ctpya ro Typka HnDKaTopoT 3a nonHeBe Ha KOoiT Harope (cTa).
Kora koot 3a 3aapaKahe Ha TpeBaTa Ke ce HanoJHn, INdkaTopoT Jexn Ha Koot (to). Toraw, Koot Mopa da ce ncpa3Hn.
Pp3HeBe Ha Kowot 3a 3paKahe TpeBa
- KpeheTe ja ydapHaTa KlaHa.
- OTKaUeTe ro KOUOT n 3BNeUeTe ro HaHa3aI (8).
- Празhevны КошOT 3a 3афakане Трев.
- KpeheTe ja ynapHaTaNanHa n nobToPno 3aKaueTe I KOoIOT BO npKaunTe (18).
Koche 6e3 kow 3a 3aKaHa He TaPebTa

BhimaHne!
Kocete 6es Kow 3a 3afoKaHe Ha TpeBaTa cAmo Kora yHKuHnPa BpTnBata npyKnHa Ha yDapHaTa KlaHa.
JaunhaTa Ha npyKHaTa ja dpxN ydapHaTa KnaHa npinnerHata 3a Kyknteto Ha KocnKata. Ha Toj HauHH OTKOCOT ce nCoppna Ha3ad Dony.
Triggering the alarm with the special key (optional)
When the alarm is triggered, the hook does not fold, it remains on the alarm device. The triggered alarm must send a signal to the user and provide food material.
The best results are achieved with regular mowing to about 2 cm. Only young grass with soft tissue decomposes quickly.
Height of the grass before mowing: maximum 8 cm. Height of the grass after mowing: minimum 4 cm.

Be careful that the mowing speed during mowing is not too fast.
Inserting the mowing key

Warning - Danger of injury!
Insert or remove the mowing key only when the engine is switched off and the blade is stationary.
- Remove the key for starting the mower (8).
- Press the start button and insert the mowing key into the opening for starting the mower (C). The lock must engage.

If the mowing key is not inserted, it may be damaged, as well as the blade.
Removing the mowing key
- Press the start button.
- Release the lock of the mowing key (0/1).
- Remove the mowing key (10/2).
Remove the element for page perforation (optional)

Attention - Danger of injury!
Install or remove the element for page perforation only when the motor is switched off and the plug is pulled out.
Installing the element for page perforation
- Remove the cover for the paper feed and place the complete unit for perforation.
- Disconnect the cap from the element for page perforation and hold it (1/1).
- Place the element for page perforation (1/2).
- Then close the cap. The cap guides the insertion of the channel for page perforation.
Removing the element for page perforation
- Disconnect the cap from the element for page perforation and hold it (1/1).
- Remove the element for page perforation and close the cap (1/2).
Adjusting the height of the arm (optional)
Adjustment with knob
1. Hold the upper handle with both hands and place it in the desired position (62/1). 2. Release the knobs so that the upper handle engages.
Adjustment with clamp
1. Hold the handle and place it on the base of the two terminals (2/2). 2. Place the handle in the desired position. 3. Close the terminals.
Starting the engine

Warning - Danger of injury!
Never let the engine run in enclosed spaces.

Warning - Danger of damage!
Do not start the device by pulling it.

- Start the engine only with the mounted blade (the blade serves as a mass for starting).
- When starting a warm engine, do not use the primer bulb for fuel. Do not change the throttle settings of the engine.
Do not start the device when it is tipped over or covered by something.
For cutting grass, the blade clutch lever is completely for spreading the grass*
Activate the starting lever carefully, in accordance with the manufacturer's instructions. Make sure there is enough distance between the stand and the blade. Start the device in low grass.
Position of the device:
| Придунница* Вкneysна Искneysна | |
| Далейнско у=npаввање co ragot* Старт Стог | |
| Далейнско у=npаввање co ragot, co пridesунца* | |
| Варно-noroh* Брзо Бавно | |
| Стояka за поожот* Вкneysна Искneysна |
*Replacement for the blade
Starting the device
Without remote control with gas, according to the instructions
Starting instructions Included Excluded


- Set the switch to position 1 (3/1).
- Pull the safety handle towards the handle and hold it (17) - the safety handle does not switch off.
- Press the start button and let it warm up (18).
- Once the engine has warmed up (about 15-20 seconds), set the switch to position 2 (13/2).

The engine has a fixed gas position. It is not possible to adjust the number of revolutions.
Without remote control with gas, with the stop cable (16)
- Press the stop cable 3 times, at intervals of about 2 seconds (16). At temperatures below 10°C, press the stop cable 5 times. 2. Pull the safety handle towards the upper handle and hold it (17) - the safety handle does not switch off.
- Press the start button and let it warm up (18).

The engine has a fixed gas position. It is not possible to adjust the number of revolutions.
Without gas control, without stop cable / switch
- Pull the safety handle towards the handle and hold it (17) - the safety handle does not switch off.
- Press the start button and let it warm up (18).

The engine is running on gas. It is not possible to regulate the gas flow.
with remote control of the gas, with the principle
Remote control of the gas, with the principle

- Set the gas lever to position (4/1). 2. Pull the safety handle up and hold it (17) - the safety handle is not activated.
- Pull the starter cord strongly and let it return until the engine starts (18).
- Once the engine has warmed up (about 15-20 seconds), set the gas lever to position 1
with gas control, without the choke for starting/principle
Remote control of the gas* Start position
- Set the gas lever to position (20/1). 6. Pull the safety handle up and hold it (17) - the safety handle is not activated.
- Pull the starter cord strongly and let it return until the engine starts (18).
- Once the engine has warmed up (about 15-20 seconds), set the gas lever to position between 1 and 20).
with remote control of the gas, with the choke for starting (6)
Remote.
control of
gas*
- Set the gas lever to the required position.
(0/1).
2. Pull the starter rope 3 times at intervals of about 2 seconds (16). At temperatures below 10°C, pull the starter rope 5 times. 3. Pull the safety handle toward the starter and hold it (17) - the safety handle does not engage. 4. Pull the starter cord and let it rewind (18). 5. When the engine starts to run, set the gas lever to a position between (20).
Electric starting (optional)
Electric starting with starter rope (6)
- Set the gas lever to the "START" position (5/1).
- Pull the starter rope 3 times at intervals of about 2 seconds (16). At temperatures below 10°C, pull the starter rope 5 times.
- Pull the safety handle toward the starter and hold it (17) - the safety handle does not engage.
- Turn the contact key to the right in the ignition switch (19).
- When the engine starts, turn the key to the "0" position.
- Set the gas lever to a position that corresponds to the current number of engine revolutions (5/2).
Electric starting without starter rope / with push button (15)
- Set the gas lever to the "START" position (5/1).
- Pull the safety switch towards the upper handle and hold it (17) - the safety switch is not activated.
- Turn the contact key clockwise to the right position (19).
- When the motor starts to work, release the key (it returns automatically to the "I" position).
- Check that the handle for gas is in a position that corresponds to the current number of motor revolutions (45/2).
Blade coupling (optional)
Blade coupling
On/Off


With the coupling, the blade can be engaged and disengaged while the motor is running.
Engaging the blade
- Pull the safety switch towards the upper handle and hold it (17) - the safety switch is not activated.
- Push the handle away from the coupling, away from the body (1/1)
- The blade engages.
Disengaging the blade.
- Release the safety switch (18).
- Disconnect from the power supply. - The switch is returned to the off position (1/2).
Turning off the motor
Device without a switch on the motor
- Set the switch to the off position (20/2).

- Release the safety switch (25). - The motor turns off.

Warning, dangerous voltage!
The motor may continue to run for some time. After you turn it off, make sure the motor has stopped.
Device with a switch on the motor
Switch for the motor on/off


- Release the safety switch (25).
- Set the switch to the off position (20/2).
- The motor turns off.

Warning, dangerous operation!
The engine may continue to run for some time. To stop it, make sure the engine is stopped.
Throttle trigger (12)

Warning!
Engage the throttle trigger only when the engine is running.
Engaging the throttle trigger
1. Press and hold the throttle trigger lock (22) and then press the throttle trigger. The throttle trigger is not engaged.
- The throttle trigger is engaged.
Disengaging the throttle trigger
- Release the throttle trigger lock (24).
- The throttle trigger is disengaged.
Variable speed trigger (speed control) (optional)
Variable speed trigger quickly



Possible to change the speed of the drive without steps.

Attention!
Engage the lever only when the motor is running.
Changing the speed without stopping the motor may damage the transmission mechanism.
For higher speed, move the lever (23) in direction (23/2); for lower speed, move the lever (23) in direction (23/1).

Always adjust the speed to the condition of the surface being mowed.
Maintenance and care

Warning - Danger of damage!
- Before maintenance and care, always turn off the engine and disconnect the spark plug. The engine may still run for a while. After turning it off, make sure the engine has stopped.
- When performing maintenance and care on the cutting blade, always wear protective gloves!
Regularly check and ensure the proper functioning of the grass catcher. Empty it after each use. Do not rinse it with water. Water ingress may lead to damage (carburetor, air filter). Regularly check that the blade is not damaged. Always replace the protective parts for sound.
Filling the oil
Depending on the engine manufacturer, additionally:
The carburetor / air filter should be on top (26). The spark plug should be on top (27).

Sharpening / replacing the blade
Replace the blade only at an AL-KO service center or at a specialized workshop. The blade must be balanced.

Warning!
The blade must be removed before any inspection or maintenance of the mower.
Charging the battery for starting (optional)
The starting battery does not require maintenance and is charged under normal conditions when the mower is running.
In special cases, the user must charge the battery themselves:
Before first use of the mower, when it is discharged, before a long pause, or after long periods of storage (>6 months).
Charging procedure:
- Remove the battery from the mower.
- Disconnect the battery cable from the motor cable (28).
- Connect the battery cable to the charger cable (29).
- Plug the charger into the mains. The mains voltage must match the rated voltage of the charger.
Charging time is approximately 36 hours. Use only the original charger supplied.

Warning!
- Charge the battery only in a dry, well-ventilated area. Do not operate the mower while charging is in progress.
Engine oil
Engine oil change
- To fill the oil, follow the instructions in section 2. Let the oil drain completely from the filler hole, then close it.

Dispose of the old engine oil in an environmentally friendly manner!
We recommend that you take the old oil to a closed container for recycling or to a waste disposal service.
Old oil is:
- pour it into the drain
- flush it into the sewer
- pour it on the ground
Air filter replacement
Follow the instructions of the engine manufacturer.
Spark plug replacement
Follow the instructions of the engine manufacturer.
Tension of the chain (optional)
Adjusting the throttle cable
Do not operate the engine without the potentiometer being connected. The engine must be disconnected before adjusting the potentiometer.

Warning!
Adjust the potentiometer only when the engine is disconnected.
- Turn the adjustment screw on the potentiometer in the direction of the arrow (30).
- To return the adjustment, start the engine and connect it to the drive. If the drive is still not functioning, the belt must be taken to a service center or
Replacing the drive belts
Periodically check the drive belts for the transmission.

The drive belt does not require lubrication.
Lubrication

Warning - Risk of explosion!
Do not place the device near open flames or heat sources.
Let the engine cool down to allow the area to air out, then check the oil level (1, 32). Store the device in a dry place, away from rain and moisture. Keep the battery in a place where it cannot freeze, and recharge it periodically. Empty the fuel tank and remove the spark plug.
Repairs
Repairs should only be carried out by AL-KO authorized service technicians.
Troubleshooting

Remove the device, battery or accumulator from the household waste!
The packaging, device and accessories are made of materials that can be recycled and must be disposed of in accordance with the regulations.
Help with malfunctions

Attention!
The motor and the rotating part must not be damaged.
| Преши Крашениe | |
| МOTOPОТ не палу · Всейсятete绛зни · Ставete ja рачкatingа за rac на „Start“ · Вklучete ja пinduyшниatinga · Рpitисныго држачot od пекинвачot за мOTOPТ кОн ratpнata paчka · Поверete Ги сveкчкite,[eveHTuayalno 3amehete Ги · Исuinstete Го Филтетот за bo3duyx · Oсноюдerte Го HOЖOT за косяе · Доронныго akumylatotot · Стартува对接а на IncKocseна поршни | |
| КалочптETOT на MOTOPOT ocla6нува | · Koprин�ajte ja виснatable на косяе · Haoystpe / заменete Го HOЖOT · Исuinstete Го калот за Incфprnybaile / kукштete · Исuinstete Го Филтетот за bo3duyx · Hamaletete ja pabotnata 6р3инa |
| Лошо косяе · Haoystpe / заменete Го HOЖOT · Koprин�ajte ja виснatable на косяе | |
| КошOT за зафakаные на trpebata не се пални дobолно | · Koprин�ajte ja виснatable на косяе · Почекajte trpeBHKOTда се Incyuli · Haoystpe / заменete Го HOЖOT · Исuinstete ja peшetkata на КУтNiJATA за зафakаные на Trpebata · Исuinstete Го калOT за Incфprnybaile / kукштete |
| ПогонOT на Trpкалу не функционира | · Peruginapte janotergHyBauckata cajla · Клиес'tnot ремен e оштeteH · Побapajte grabotnilniца od сplyжба за indochи CO copicschniцte · OстанеуJa HeuchstotniJAtOД NOrOHOT на Trpкалata, zanheCTNtOT ремен и Заганichiutte · Исрckajte Ги с macIo Cno sNoBn (NORONCKITE 3aPunahniцnHa npeshonata ocka) |
| Тралata не се bptat пri Вклучен погон | · 3aterhete Ги завrtkite на Trpкалata · Галчинатe oShTeteHa · Клиес'tnot ремen e oShTeteH · Пobapajte grabotnilniцa od сplyжба за indochи CO copicschniцte |
| Апарот вбрира небошьаedo симно | ·Проберete Ги HOЖOT |

For malfunctions that are not listed in this table or that you cannot fix yourself, please contact our customer service department.
A professional check is always necessary:
after filling the device, when the motor does not start, when the motor stops during operation, when the rotating part is blocked, when the motor's rotating part is blocked
EU Declaration of Conformity
Follow the installation instructions
Warranty
Any hidden defects in the material or in the production of the device will be repaired by us within the legal warranty period through repair or replacement of the part. The warranty period is always determined according to the law of the country where the device was purchased.
Our warranty is valid only if: The warranty is void if:
Improper handling of the device, repairs by unauthorized persons, use of non-original spare parts, technical modifications to the device, improper use
(e.g. commercial or municipal)
The device is placed on the boiler after the last normal operation.
Spare parts, for which the spare parts table is marked within [XXX XXX (X)], engines with internal combustion - for these there is a special warranty of the corresponding engine manufacturer.
In case of warranty, this warranty is provided with the invoice and the account at the seller or in the nearest authorized service for relations with customers. The warranty claim does not exclude the legal rights regarding the purchase contract in relation to the seller or the manufacturer.
About this manual


- BENZINRASENMAHER
- NOTICE
- ABOUT THIS MANUAL
- PICTOGRAM DESCRIPTION
- CAUTION
- CONTENTS
- PRODUCT DESCRIPTION
- PROPER USE
- INCORRECT USE
- SAFETY AND PROTECTION DEVICES
- CAUTION - RISK OF INJURY
- SAFETY BRAKE HANDLE
- DEFLECTOR PLATE
- SYMBOLS ON THE DEVICE
- ADDITIONAL SYMBOLS ON LAWNMOWERS WITH ELECTROSTART
- SAFETY INSTRUCTIONS
- CAUTION - RISK OF FIRE
- ASSEMBLY
- FUELLING
- WARNING - RISK OF FIRE
- OPERATING FLUIDS
- SAFETY
- WARNING
- ADDING PETROL
- ADDING MOTOR OIL
- INITIAL STARTUP
- ADJUSTING THE CUTTING HEIGHT
- CENTRAL ADJUSTMENT (3)
- AXLE ADJUSTMENT OR CENTRAL ADJUSTMENT (19), 3
- QUICK ADJUSTMENT OF INDIVIDUAL WHEELS OR AXLE ADJUSTMENT (4)
- INDIVIDUAL WHEEL ADJUSTMENT (C)
- CENTRAL AXLE ADJUSTMENT (36)
- MOWING WITH THE GRASS CATCHER
- FILL LEVEL INDICATOR
- EMPTYING THE GRASS CATCHER
- MOWING WITHOUT THE GRASS CATCHER
- MULCHING WITH THE MULCH KIT (OPTIONAL)
- INSERTING THE MULCH KIT
- REMOVING THE MULCH KIT
- MOWING WITH THE SIDE OUTLET DUCT (OPTIONAL)
- INSERTING THE SIDE OUTLET
- REMOVING THE SIDE OUTLET
- SETTING THE HANDLE HEIGHT (OPTIONAL)
- KNOB ADJUSTMENT
- CLAMP ADJUSTMENT
- STARTING THE MOTOR
- CAUTION - RISK OF POISONING
- POSITION SYMBOLS ON THE EQUIPMENT
- STARTING MANUALLY
- WITHOUT REMOTE THROTTLE CONTROL, WITH PRIMER (6)
- WITHOUT REMOTE THROTTLE CONTROL, WITHOUT PRIMER/CHOKE
- WITH REMOTE THROTTLE CONTROL, WITH CHOKE
- WITH REMOTE THROTTLE CONTROL, WITHOUT PRIMER/CHOKE
- WITH REMOTE THROTTLE CONTROL, WITH PRIMER (16)
- STARTING ELECTRICALLY (OPTIONAL)
- ELECTROSTART WITH PRIMER (6)
- ELECTROSTART WITHOUT PRIMER/CHOKE (15)
- BLADE COUPLING (OPTIONAL)
- ENGAGING THE BLADE COUPLING
- DISENGAGING THE BLADE COUPLING
- TURN THE MOTOR OFF
- LAWNMOWER WITHOUT BLADE COUPLING
- CAUTION - DANGER OF SERIOUS CUT INJURIES
- LAWNMOWER WITH BLADE COUPLING
- WHEEL DRIVE (OPTIONAL) (2)
- SWITCHING ON THE WHEEL DRIVE
- SWITCHING OFF THE WHEEL DRIVE
- VARIO TRANSMISSION (SPEED CONTROL) (OPTIONAL)
- MAINTENANCE AND CARE
- TILTING THE LAWNMOWER
- RESHARPENING/REPLACING THE MOWER BLADE
- CHARGING THE STARTER BATTERY (OPTIONAL)
- CHARGING PROCEDURE
- CARE OF THE MOTOR
- CHANGING THE MOTOR OIL
- USED OIL SHOULD NOT BE
- CHANGING THE AIR FILTER
- CHANGING THE SPARK PLUG
- WHEEL DRIVE (OPTIONAL)
- ADJUSTING THE BOWDEN CABLE
- LUBRICATING THE DRIVE PINION
- STORAGE
- CAUTION - RISK OF EXPLOSION
- REPAIRS
- DISPOSAL
- FAULTS AND REMEDIES
- EC DECLARATION OF CONFORMITY
- WARRANTY
- ADJUST THE MAIN OR CENTRAL HEIGHT (2,3)
- QUICK ADJUSTMENT OF INDIVIDUAL BLADES OR ADJUSTMENT OF THE MAIN (C)
- ADJUSTING THE INDIVIDUAL CUTTING HEIGHTS (1)
- CENTRAL ADJUSTMENT OF THE BASE PLATE (1)
- GRASS CATCHER BOX
- DANGER - RISK OF DAMAGE
- EMPTYING THE GRASS CATCHER BOX
- WITHOUT GRASS CATCHER BOX
- DANGER
- MULCHING WITH THE MULCHING KIT (OPTIONAL)
- YMETABE KOMNIETA 3A MANYOBAHE
- PAXHA - ONACHOCT OD NOBPEGA
- ODTPAHBBAHE KOMJIETA 3A MAIYOBABE
- WARNING - FIRE HAZARD
- CENTRAL INSTALLATION (2)
- OIL IN MOTOR GEAR
- WARNING - RISK OF INJURY
- INTENDED USE
- POSSIBLE VARIANTS OF IMPROPER USE
- PROTECTIVE AND SAFETY DEVICES
- PROTECTIVE HANDLE
- REFLECTOR FLAP
- REPLACEMENT PARTS
- USING THE MULCHING KIT
- REMOVING THE MULCHING KIT
- SIDE DISCHARGE (OPTIONAL)
- BHIMAHNE! ONACHOCTB NOJYEHNTPABM
- ICNOJB3OBAHNE 6OKOBORO BBI6POCA
- YDAENHE 60KOBORO BBI6POCA
- HACTPOIKA BBICOTBL PYKOTN (ONZNA)
- PERYNPOBKA C NOMOBIO KHONOK
- PERYNPOBKA C NOMOBBIO 3AXMOB
- STARTING THE ENGINE
- WARNING - DANGER OF POISONING
- WARNING! DANGER OF INJURY
- STARTING THE DEVICE
- ELECTRIC PRIMER WITH EXAMPLE (16)
- ELECTRIC START WITHOUT PRIMER/START (15)
- BLADE CLUTCH (ON)
- CONNECTING THE CUTTING BLADE
- DISCONNECTING THE CUTTING BLADE
- TURNING OFF THE ENGINE
- DEVICE FOR SAFE OPERATION
- WARNING - DANGER OF CUTS FROM SHARP BLADES
- PREFACE TO THE MANUAL
- SYMBOLS USED
- RULES FOR SAFE USE
- SAFETY DEVICES AND PROTECTIONS
- WARNING! RISK OF INJURY
- SAFETY HANDLE
- SAFETY GUARD
- WORKING MATERIALS
- INSTALLING THE TRIMMER HEAD
- MOWING WITHOUT THE TRIMMER HEAD
- ATTENTION
- INSTALLING THE MULCHING KIT
- WARNING! DANGER OF INJURY FROM THE BLADE
- INSTALLING THE SIDE DISCHARGE
- REMOVE THE SIDE OUTLET CHANNEL
- FILLING THE PRESSURE TANK (OPTION)
- ADJUSTMENT USING THE KNOB
- ADJUSTMENT USING THE LATCH
- WARNING! POISONING HAZARD
- ATTENTION! DANGER DE DÉMARRAGE
- SIGNE DE DÉCHARGE DE L'APPAREIL
- AVEC COMMANDE À DISTANCE DU GAZ, AVEC LEVIER (6)
- ELECTRIC START (OPTIONAL)
- ELECTRIC START WITH PRIMER (6)
- ELECTRIC START WITHOUT PRIMER/PROBE (15)
- HOSE COUPLING (OPTIONAL)
- CONNECTING THE DRAWING UNDER THE HOOD
- DISCONNECTING THE DRAWING UNDER THE HOOD
- REMOVING THE ENGINE
- WITHOUT THE HOOD COUPLING
- WARNING - DANGER OF SERIOUS INJURY
- REMOVING THE DRIVE WHEELS
- GEARBOX WITH ADJUSTABLE FLUID LEVEL (FLUID CONTROL) (OPTION)
- MAINTENANCE
- OIL LEVEL
- BATTERY CHARGING AND REPLACEMENT
- CHARGING THE BATTERY (OPTIONAL)
- ENGINE OIL
- ENGINE OIL REPLACEMENT
- USED OIL
- REPLACING THE OIL FILTER
- REPLACING THE SPARK PLUG
- DRIVE CHAIN (CHAIN)
- ADJUSTING THE DRIVE CHAIN
- REPAIR
- TROUBLESHOOTING
- DECLARATION OF CONFORMITY WITH EU STANDARDS
- USER MANUAL
- LEGEND
- TABLE OF CONTENTS
- POSSIBLE INCORRECT USE
- SAFETY AND PROTECTIVE ELEMENTS
- SAFETY BLADE
- DEFLECTOR
- WARNING - DANGER OF ENTANGLEMENT
- BEFORE STARTING THE ENGINE AND WORKING WITH THE LAWN MOWER, CHECK THE MOWER FOR DAMAGE AND CARRY OUT NECESSARY REPAIRS
- REFUELING
- FUEL AND LUBRICANTS
- FILLING WITH FUEL
- FILLING WITH ENGINE OIL
- ADJUSTING THE MOWER HEIGHT
- ADJUST THE EXHAUST NOZZLES (OPTIONAL)
- CAUTION - DANGER OF BURNS
- INSTALLING THE EXHAUST NOZZLE ATTACHMENT
- REMOVING THE EXHAUST NOZZLE ATTACHMENT
- ADJUSTING THE HEIGHT OF THE NOZZLE (OPTIONAL)
- ADJUSTING WITH THE BOLTS
- HACPTPONKA CBC 3ATGRAHE
- СТАРТИРАНЕ НА МОТОРА
- ВНИМАНИЕ - ОПАСНОСТ ОТ ОТРАВЯНЕ
- ВНИМАНИЕ - ОПАСНОСТ ОТ НАРАНЯВАНЕ
- СИМВОЛИ ВЪРХУ МАШИНАТА
- REMOTE CONTROL OF THE GAS, WITHOUT DELAY/FLAME
- REMOTE CONTROL OF THE GAS, WITH DELAY (6)
- ELECTRIC STARTING (OPTIONAL)
- ELECTRIC STARTING WITH PRIMER (16)
- ELECTRIC STARTING WITHOUT PRESSING THE CLUTCH PEDAL (15)
- BLADE SWITCH (ON)
- ENGAGING THE BLADE
- SWITCHING OFF THE MOTOR
- MACHINE WITHOUT BLADE CONNECTOR
- CAUTION - DANGER OF INJURY FROM THE BLADE
- MACHINE WITH BLADE CONNECTOR
- ATTENTION - DANGER OF INJURY
- WHEEL MECHANISM (ONE) (22)
- ENGAGING THE WHEEL MECHANISM
- DISENGAGING THE WHEEL MECHANISM
- SPEED CONTROL MECHANISM (OPTIONAL)
- MAINTENANCE AND REPAIR
- WARNING - DANGER OF INJURY
- SHARPENING THE BLADE
- ADDITIONAL LUBRICATION/OILING OF THE BLADE
- CHARGING THE BATTERY OF THE STARTER (ONCE)
- ENGINE MAINTENANCE
- CHANGING THE ENGINE OIL
- WHEEL DRIVE MECHANISM (OPTIONAL)
- ADJUSTING THE WEDGE
- LUBRICATING THE DRIVE GEAR
- WARNING - RISK OF EXPLOSION
- DO NOT DISPOSE OF THE MACHINE, ITS ACCESSORIES, OR DAMAGED STARTER BATTERIES WITH HOUSEHOLD WASTE
- HELP IN CASE OF BREAKDOWN
- EU DECLARATION OF CONFORMITY
- EXPLANATION OF SYMBOLS (2,3)
- WARNING SYMBOLS
- POSSIBLE MISUSE
- SAFETY AND PROTECTIVE DEVICES
- YDAPHA KNANHA
- HDKATOP 3A NOJHEBE HA KOWOT
- PP3HEBE HA KOWOT 3A 3PAKAHE TPEBA
- KOCHE 6E3 KOW 3A 3AKAHA HE TAPEBTA
- BHIMAHNE
- TRIGGERING THE ALARM WITH THE SPECIAL KEY (OPTIONAL)
- INSERTING THE MOWING KEY
- REMOVING THE MOWING KEY
- REMOVE THE ELEMENT FOR PAGE PERFORATION (OPTIONAL)
- INSTALLING THE ELEMENT FOR PAGE PERFORATION
- REMOVING THE ELEMENT FOR PAGE PERFORATION
- ADJUSTING THE HEIGHT OF THE ARM (OPTIONAL)
- ADJUSTMENT WITH KNOB
- ADJUSTMENT WITH CLAMP
- WARNING - DANGER OF DAMAGE
- POSITION OF THE DEVICE
- WITHOUT REMOTE CONTROL WITH GAS, WITH THE STOP CABLE (16)
- WITHOUT GAS CONTROL, WITHOUT STOP CABLE / SWITCH
- WITH REMOTE CONTROL OF THE GAS, WITH THE PRINCIPLE
- WITH GAS CONTROL, WITHOUT THE CHOKE FOR STARTING/PRINCIPLE
- ELECTRIC STARTING WITH STARTER ROPE (6)
- ELECTRIC STARTING WITHOUT STARTER ROPE / WITH PUSH BUTTON (15)
- DISENGAGING THE BLADE
- TURNING OFF THE MOTOR
- DEVICE WITHOUT A SWITCH ON THE MOTOR
- WARNING, DANGEROUS VOLTAGE
- DEVICE WITH A SWITCH ON THE MOTOR
- WARNING, DANGEROUS OPERATION
- THROTTLE TRIGGER (12)
- ENGAGING THE THROTTLE TRIGGER
- DISENGAGING THE THROTTLE TRIGGER
- VARIABLE SPEED TRIGGER (SPEED CONTROL) (OPTIONAL)
- FILLING THE OIL
- SHARPENING / REPLACING THE BLADE
- CHARGING THE BATTERY FOR STARTING (OPTIONAL)
- ENGINE OIL CHANGE
- AIR FILTER REPLACEMENT
- SPARK PLUG REPLACEMENT
- TENSION OF THE CHAIN (OPTIONAL)
- ADJUSTING THE THROTTLE CABLE
- REPLACING THE DRIVE BELTS
- LUBRICATION
- REMOVE THE DEVICE, BATTERY OR ACCUMULATOR FROM THE HOUSEHOLD WASTE
- HELP WITH MALFUNCTIONS
Brand : SOLO
Model : 4731 VSI-A
Category : Lawn mower