546-RT - Lawn mower SOLO - Free user manual and instructions
Find the device manual for free 546-RT SOLO in PDF.


| Product Type | Walk-Behind Push Lawn Mower |
| Model Number | 546-RT |
| Brand | Solo |
| Engine Type | 4-Stroke, Gasoline Engine |
| Displacement | 150 cc (approx.) |
| Power Output | 4.5 HP (approx.) |
| Fuel Tank Capacity | 0.6 liters |
| Cutting Width | 46 cm (18 inches) |
| Cutting Height Range | 25-75 mm, 6 positions |
| Cutting Deck Material | Steel, stamped |
| Grass Collection | Bag (60 L capacity) |
| Discharge Types | Side discharge, mulching plug |
| Starting System | Recoil start |
| Wheel Size (front/rear) | 7 inches / 8 inches |
| Drive Type | Push (non-self-propelled) |
| Handle Type | Ergonomic, folding |
| Dimensions (L x W x H) | 92 x 50 x 36 cm |
| Weight | 28 kg |
| Recommended Lawn Area | Up to 1000 m² |
| Oil Type | SAE 30 or 10W-30 |
| Oil Capacity | 0.5 liters |
| Safety Features | Blade brake, handlebar dead-man switch |
| Maintenance | Air filter cleaning, spark plug replacement, blade sharpening |
| Spare Parts Availability | Blades, belts, filters, wheels via Solo dealers |
| Warranty | 2 years (check local terms) |
Frequently Asked Questions - 546-RT SOLO
User questions about 546-RT SOLO
0 question about this device. Answer the ones you know or ask your own.
Ask a new question about this device
Download the instructions for your Lawn mower in PDF format for free! Find your manual 546-RT - SOLO and take your electronic device back in hand. On this page are published all the documents necessary for the use of your device. 546-RT by SOLO.
USER MANUAL 546-RT SOLO
Important: Thoroughly read the manual before operating this mower. It is imperative that all safety rules and regulations be observed!

546-HR
546-RT
D/GB
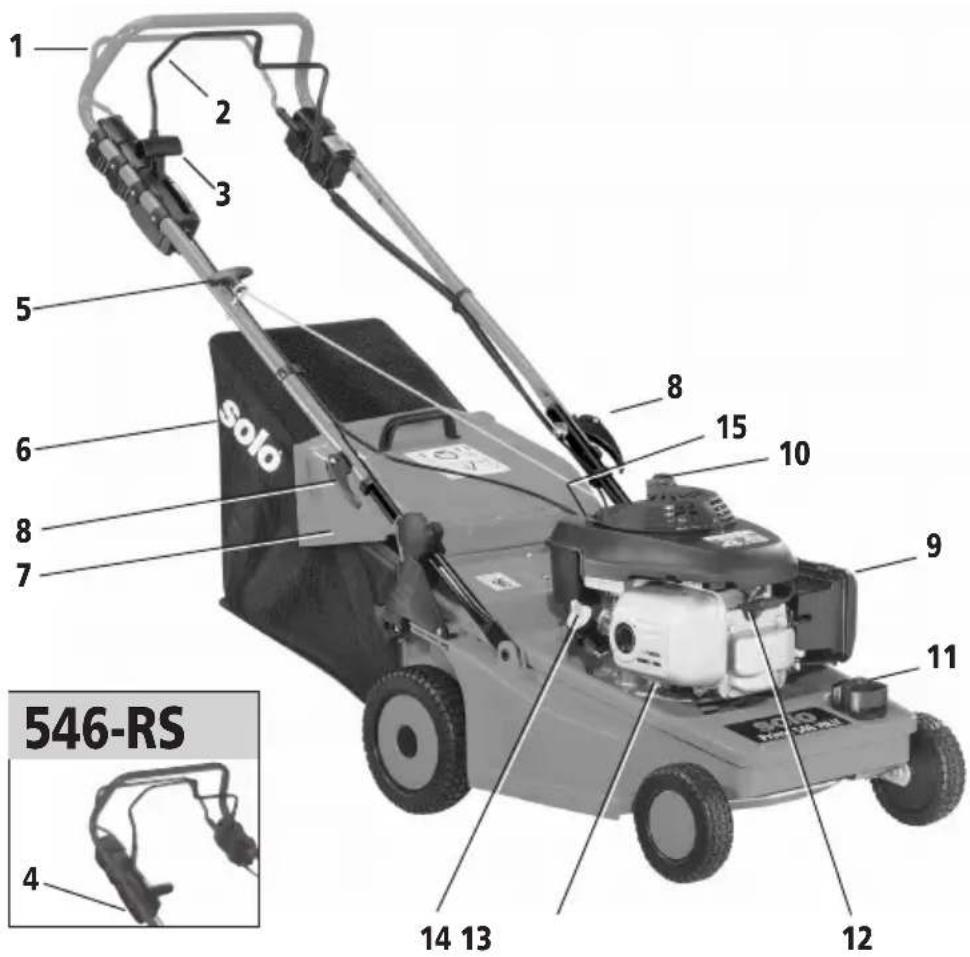
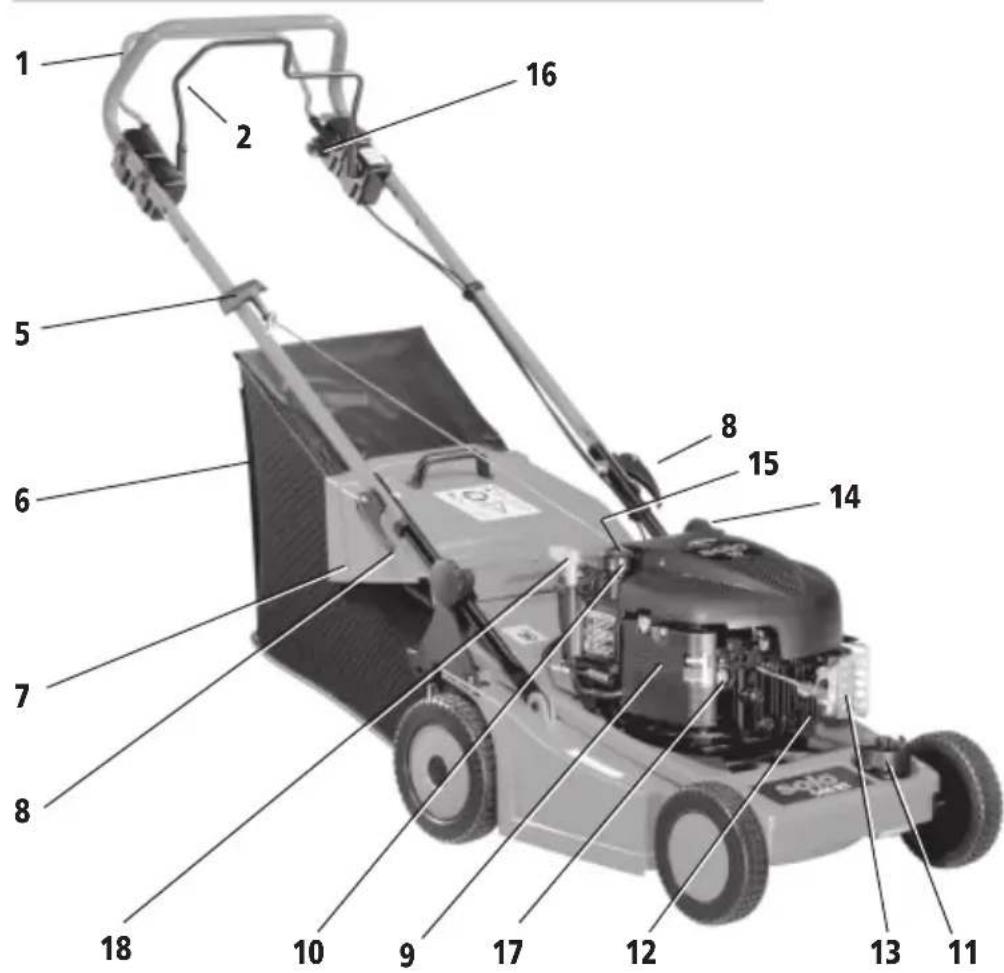
1 Bremsbügel A Motorbremse (546/546-R/546-HR/546RS) Brake lever, A, engine brake
1 Schaltbügel A Motor (546RT) Drive lever, A Engine
2 Schaltbügel B Fahrantrieb (546RT/546-R/546-RS/546-HR) Drive lever, B, self-propelled
3 Gas-Regulierhebel (546/546-R/546-HR/546RS) Throttle lever
4 Schlüssel für Elektro-Start (546-RS) Key for electrical start-up
5 Startergriff/ Starter grip
6 Grasfangeinrichtung/Grascatching device
9 Luftfilter/ Air filter


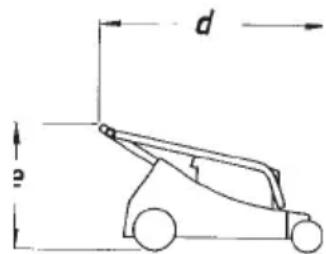
a: 140 cm
b: 105 cm
c: 51,5 cm
d: 92 cm
e: 40 cm

Maintenance and repair:
Maintenance and repair of modern motorized devices, as well as their safety-relevant assemblies, require qualified, specialized training and a workshop equipped with special tools and test devices.
Thus SOLO recommends that you have a specialized SOLO workshop carry out all work that is not described in these operating instructions. Your SOLO specialist has the required training, experience, and equipment at his disposal to provide you with the most cost-effective solution and can help you in many ways with advice and service.
Replacement parts:
Dependable operation and the safety of your device also depend on the quality of the replacement parts that you use. Use only original SOLO replacement parts.
Only original parts come from the production of the device and thus guarantee the highest possible material quality, dimensional accuracy, function, and safety. Original replacement parts and accessory parts are available from your dealer. He also maintains the requisite replacement part lists to determine the required replacement part numbers, and he is constantly provided with information concerning detail improvements and innovations in the replacement part offering.
Please note as well that guarantee performances from SOLO are not possible if parts other than SOLO original parts are used.
Guarantee:
SOLO guarantees problem-free quality and will assume the costs for defect remediation by replacing the defective parts in the case of material or manufacturing defects that occur within the guarantee period after the date of purchase.
Please note that specific guarantee conditions apply in some countries. Ask your sales person if you have any questions. As vendor of the products he is responsible for the guarantee.
We request your understanding that no guarantee can be assumed for damages due to the following:
- Non-compliance with the operating instructions. • Neglecting required maintenance and repair work. • Damages due to improper carburetor adjustment. • Normal wear and tear. • Obvious overload through persistently exceeding the upper performance limits. • Using non-approved tools and cutting fixtures. • Using non-approved cutting bar and chain lengths in the case of chain saws. • The use of force, improper handling, misuse, or accident. • Damages caused by overheating due to dirt build up on the ventilator casing. • Intervention by non-specialized persons, or improper repair attempts. • The use of unsuitable replacement parts or parts other than SOLO original parts to the extent that they cause damage. • Using unsuitable fuel or fuel that has been stored too long. • Damages that can be traced to implementation conditions from the rental business. Cleaning, care, and adjustment work are not recognized as guarantee performances. All guarantee work must be carried out by a SOLO dealer.
Description of Symbols


Caution!

Read owners manual prior to operating mower!

Wear protective gloves when servicing and for repair.

Wear protective head gear
Caution Fuel

Smoking prohibited

No open fires
Start-up


Do not allow third parties within the danger zone
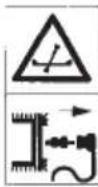
Detach spark plug wire prior to working on cutting device that the Touch-N-Mow® starter system has been released through an engine start without ignition, and that the safety key (item 18) has been removed.

Stop engine
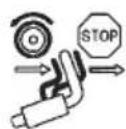
Stop engine and wheel drive
CE Declaration of Conformity
According to EG guide lines 98/37/EG, 2000/14/EG and 89/336/EWG (altered with 92/31/EWG).
SOLO Kleinmotoren GmbH, Stuttgarter Strasse 41, D-71069 Sindelfingen declares sole responsibility that the product covered by this declaration conforms with the machinery guide lines.
Guaranteed sound power level (DIN 45635) 96 dB(A) Measured sound power level (DIN 45635) 94 dB(A)
Sindelfingen, 1 st January 2002
Congratulations on the purchase of your new SOLO lawn mower. We sincerely hope that you will be satisfied with this modern machine.
The lawn mower is a high performance mower that will contribute to a well-cared for lawn.
The SOLO lawn mower is intended to be used only for private home or hobby gardens. The lawn mower is not to be used in public facilities, parks, sports centers or for agricultural and forestry purposes.

The owners manual comes with the appropriate engine owners manual which is an integral part of this owners manual.
Please read the owners manual carefully and familiarize yourself with the correct use of the SOLO lawn mower prior to operating the lawn mower for the first time. Please observe all instructions, recommendations and explanations. Adherence to the owners manual is essential for proper operation of the lawn mower. Do not operate the lawn mower while other persons, especially children or animals are within close proximity. The operator of the lawn mower is responsible for any personal or property damages to third parties.
General Safety Guidelines

Due to potential bodily harm, the SOLO lawn mower is not to be used for the following purposes:
- To trim bushes, hedges or shrubs,
- to cut or chop growing vines or lawns on roof-tops or balcony window boxes,
- to clean or suction-up walkways or to chop up trees and shrubbery debris and
- to cut up tree and shrubbery sections.
- Furthermore, the SOLO lawn mower is not to be used to level elevations on the ground, for instance mole hills or other similar elevations.
For safety reasons, the SOLO lawn mower is not to be used as:
- A drive aggregate for other work units,
- as a trailer,
- as a dynamo with a self-propelled drive roller mower (for example for carrying and transporting lawn debris), except with the intended grass catching bag. The warranty becomes invalid if these rules are not observed.

General Safety Guidelines for the hand-operated SOLO lawn mower with internal combustion engine.
- Do not allow children or other third parties who are not familiar with the functioning of the machine to operate the lawn mower. Juveniles under age 16 should not be permitted to operate the lawn mower.
- Please adhere to local ordinances which may determine the minimum age for operating the lawn mower.
- Loan the lawn mower only to individuals who are familiar with handling this model. Always make the owners manual available to them.
- Explain to the individual who is to use the lawn mower, how to avoid possible danger and accidents.
- Mow only during daylight hours or with proper artificial illumination.
- Individuals who have a pacemaker should stay clear off the electrical wires of the starter when engine is started or when engine is running.
- Mowers with 4-cycle engines are not suitable for inclines over 15 degrees.
- Lawnmowers equipped with HONDA OHC Engines can be used on slopes with an incline of max.20 degrees.
- Store the mower in a safe manner! Mowers should be stored in a dry and locked area that is inaccessible to children.
Special considerations for the use of Touch-N-Mow® starter system
PLEASE NOTE
The Touch-N-Mow® starter system is pre-tensioned by every engine shutdown. Therefore, the engine and consequently the blade can be subject to a powerful rotary movement, even if the cap has been pulled off the spark plug - for example, by unintentionally releasing the Touch-N-Mow® starter system. This represents a high risk of injury!
Ensure prior to
- all maintenance and repair work (particularly when clearing cuttings from underneath the cutting deck),
- transporting the lawnmower on vehicles, and
- when putting the lawnmower into storage, that the Touch-N-Mow® starter system has been released through an engine start without ignition, and that the safety key (item 18) has been removed.
To release the tension in the Touch-N-Mow® starter system, proceed as follows:
- With the engine stopped, remove the spark plug cap (Fig. 1, item 12).
- Position the safety key (Fig. 9, item 18) into the start position („Run“).
- Release the locking lever (Fig. 7, item 16), and press the control bar A (item 1) against the handle.
The Touch-N-Mow® starter system will then turn the engine over. However, because the cap has been removed from the spark plug, the engine will stop again, once the Touch-N-Mow® starter system has spent its energy.
- Position the safety key (Fig. 8, item 18) into the stop position ("Lock&Remove"), and remove the key.
Prior to Mowing
- Check the area completely prior to mowing and during mowing. Remove any foreign matter such as pebbles, stones, wooden pieces, bones, etc. prior to mowing.
- Never mow without sturdy shoes and without wearing long pants. Never mow bare-footed or with open-toe sandals.
- Attach the ejection shield and the grass catching device. Make certain that these are properly secured. It is prohibited to use the mower without the ejection shield or with a damaged shield.
- Check the mower for a) secure fit of fastening parts, b) damage or severe wear and tear
- Observe installation hints and specified torque when replacing parts
- Check the grass catching device frequently for wear and tear.
- Lawn mowers with 4-cycle engine need to be serviced with engine oil prior to first-time usage (observe the hints in the separate engine owners manual).
- Check the oil level prior to each mowing
Fuel



Handling of gasoline
Handling gasoline requires great care.
- Gasoline is highly flammable. Refuel only outdoors - never in enclosed areas.
- Smoking and open fires are prohibited.
- Do not spill any gasoline.
- If gasoline is spilled, clean lawn mower immediately, otherwise do not start engine!
- Avoid contact with gasoline. Change clothing if accidental spills occur!
- Be careful that fuel does not spill onto the ground (environmental protection!)
- Transport and store gasoline only in authorized and marked containers.
- If damages occur, replace fuel tank, cap and fuel lines.
- Check for any visible damage.
Fueling
Important: Lead-free, regular gasoline is to be used.
- Refuel only with the recommended fuels which are listed in the separate engine owners manuals.
- Let mower cool off prior to refueling.
- Thoroughly clean the surrounding areas of the fuel tank. Remove fuel tank cap and fill tank to the lower edge of the filler pipe. Firmly close fuel tank cap.
- Caution: Gasoline may contain solvent-like substances.

- Avoid hand and eye contact with gasoline.
-
Wear protective gloves when refueling.
-
Do not inhale gasoline fumes.
- Store fuel in areas inaccessible to children.
Handling
- Do not run the engine in enclosed areas where dangerous exhaust fumes may collect. Danger of poisoning!
- The engine/exhaust becomes very hot: Do not touch!
- Always position yourself firmly on the ground when mowing on a slope.
- Move at a walking pace when mowing.
- Mow diagonally on a slope, never in a straight upward or downward motion.
- Be especially careful when changing directions on a slope.
- Be especially careful when turning mower around or when pulling mower towards you.
- Do not walk backwards with the mower. Danger of stumbling. Avoid walking backwards.
- Avoid abnormal body positions. Assure solid positioning on the ground, and at all times, keep your balance.
- Always keep sufficient distance which is established by the length of the handle.
During Start-up
- The drive has to be disengaged when starting a self-propelled drive roller mower.
- The mower needs to be positioned on level ground when starting.
- Do not start-up in deep grass.
- When starting mower it is important that feet are away from the cutting unit.
- Never place hands or feet near moving parts. Be careful that neither hands nor feet will be caught below the deck.
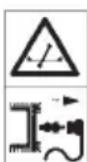
Turn off engine and remove spark plug cap, at Model 546 RT the Touch-N-Mow® starter system has been released through an engine start without ignition, and that the safety key (item 18) has been removed.
- Prior to checking the mower,
- or prior to cleaning the mower and for other maintenance work, and
- when you mount the Assembly mulching Set
- prior to removing blockages of ejected material.
- when the mower is temporarily left alone,
- when the mower is lifted or tilted during transport
Turn engine off when:
- Opening the ejection
shield and when removing grass catching device, - when removing the upper handle section from the

- when pushing mower outside the lawn,
- when the cutting height is to be adjusted,
- prior to refueling,
- when crossing areas other than grass,
- when transporting the mower to or from the grass area.
- Never lift or carry the mower when engine is running.
- Never use the mower when ejection shield is damaged or missing. Mow only with the proper grass catching device which has to be correctly installed, and with a completely closed ejection shield.
- Do not alter the engine's initial settings.
- If the mower becomes blocked, for example when running over an obstacle, the mower needs to be checked by a specialist to see if parts are damaged or deformed.
- Immediate checking is required if the mower vibrates at an unusual high level.
Service and Storage
Caution: Before every Service, Cleaning and Storage stop the engine and remove spark plug cap, at Model 546 RT the Touch-N-Mow® starter system has been released through an engine start without ignition, and that the safety key (item 18) has been removed.
- Take care that all screw connections are tightened.
- Never store the mower with gasoline in fuel tank in a building where gasoline vapors may come in contact with open fires or where sparks could ignite fumes.
- The fuel tank should be emptied outdoors. Use suitable containers for draining gasoline.
- Let the engine run until the gasoline remaining in the carburetor is depleted.
- Let the engine cool off prior to storage in an enclosed area.
- To avoid danger of fire, clean grass, leaves or escaping grease (oil) off engine, muffler, battery box, gear box (if existing), and fuel tank.
- On a regular basis, check the grass catching device and check the ejection shield for wear and tear and sound operation.
- For safety reasons, replace worn or damaged parts.
- Always wear protective gloves when working near the cutting device's vicinity.
- Servicing and repairs are only to be conducted when engine is turned off and when spark plug cap is removed.
- For warranty purposes and safety reasons only SOLO replacement parts should be used.
Inventory List
1 Lawn mower 546 or
1 Lawn mower 546-R or
1 Lawn mower 546-RS or
1 Lawn mower 546-RT or
1 Lawn mower 546-HR
1 Grass catching device complete with frame and carrying handle
1 Charger (only with 546-RS)
1 Plastic bag with following contents:
1 Owners manual
1 Owners manual for engine
1 Hex. wrench 5/16"
1 Holding pin 8 x 90 dia (for blocking blade)
1 Spark plug wrench
2 Ignition keys
(only for lawn mower with electrical starter)
2 clamping levers
2 wavy washers 8,4 mm ∅
2 M8 nuts
Important Information
Information for lawn mower with electrical starter!
- Note the battery-manufacturer's information which is included with each new machine.
Attention: To protect against battery discharging during shipping, the plug on the red cable of the battery connection is equipped with a protective hose. This hose is to be removed prior to connecting the battery. - Charge the battery 24 hours prior to operating the mower. It is possible that the batteries have become discharged due to extended storage.
- Never charge the battery with a charger intended for other purposes (such as a charger for an automobile) since the battery may become damaged.
The battery is located under the lid next to the ejection passageway of the lawn mower deck. Make certain that the charger is connected to the battery and not to the engine's main cable; otherwise the charger may become damaged. - Frequent starting and stopping may lead to a discharged battery (complete discharging is damaging to the battery). In this situation it is necessary to quickly charge the battery with the charger.
- Never store a discharged battery since the battery may become permanently damaged.
- Disconnect the battery from the main cable of the mower if the mower is not used for more than 14 days.
- Prior to storing the mower at the end of a season, charge the battery for 24 hours with the supplied
charger. Do not reconnect the battery, store in a cool and dry place (never above 23° C ( 73° F). The battery needs to be recharged within 6 months of the last charge.
- Recharge the battery for 24 hours with the supplied charger prior to operating the mower in the Spring.
- The battery is completely enclosed and does not require any additional servicing.
- Defective batteries need to be disposed off properly in accordance with local regulations. Some local shops may accept and dispose off defective batteries.
Assembly
Your lawnmower will be ready for use in only a few steps. Secure the lower handle with a clamping arrangement inside the lawnmower chassis. For this, release the M8 star-shaped knob on the lower handle, and insert the clamping pieces on the l.h. and r.h. side, flush with the lawnmower chassis. Then tighten the star-shaped knobs on both sides (Fig. 1). Position the upper handle on the lower handle and secure it on both sides with the two clamping levers. For this, insert the tensioning lever with threaded stud from the outside through the respective holes in both handle parts. From the inside, push the wavy washer (8.4 mm ∅) onto the stud of the tensioning lever, and loosely secure the M8 nuts by hand. Rotate the tensioning lever, so that the lever points downwards, parallel to the handle tubes. When folding the tensioning lever down, also adjust the position of the nut, so that both handle tube parts are securely attached to each other, after the tensioning levers have been fully closed. Secure the Bowden cables with their guides on the handle.
When folding the handle over, relax both tensioning levers upwards and tilt the handle up.
For lawn mowers with self-propelled drive roller: When folding the handle, the drive lever (position 2), has to be pushed to the handle so that the spark plug does not become damaged. Assure the run of the Bowden throttle cable and self-propelled cable with the cables on the handle.
Grass Catching Device

Caution! Assemble and disassemble grass catching device only when engine is shut off! To install grass catching device, lift ejection shield (position 7), with one hand.
With the other hand, hold grass catching device (position 8), at the carrying grip and link into mower deck (illustration 3) at an angle from above.
Adjusting cutting height
The mower is equipped with a continuously adjustable cutting height of approx. 30 - 75 mm (approx. 1 - 3 inches). The height adjustment for all wheels is accomplished by the central adjustment (position 11). Turning to the right reduces the cutting height, and turning to the left increases the height. The height can be read from the markings (illustration 4).
Attention: The cutting height is to be set so that the blade does not touch the ground when the ground is not level.
Only mow with the lowest cutting adjustment when lawns are flat.
Starter handle inserted in the cable guide
Release the engine brake by bushing brake lever, A (III. 5), to the handle, release the locking lever (Fig. 7, item 16), and press the control bar A (item 1) against the handle. Put the starter grip (illustration 5) in the cable guide which is located on the upper handle part.
Attention: When folding and unfolding the handle, pay special attention that the Bowden cables are not bent and run smoothly.
Caution! Assure that Bowden cables are not caught up anywhere and that they have not become damaged during transport.
Engine

Prior to start up, carefully read the engine operating manual and the following instructions. Adhere to all instructions to assure
the engine's long life and to keep the warranty valid.
Start up

During start up with self-propelled drive roller mower, the drive has to be disengaged.
When starting the mower, position yourself on the side or behind the mower. The safety distance which is given by the handle is always to be adhered to (illustration 5).
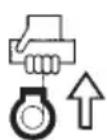
Caution! The cutter operates as soon as the engine starts! Never reach with your hands under the deck and never slide a foot under the deck!
Starting Model: 546/546R/546HR/546RS
Attention: To release the engine brake when starting the engine, the brake bar, A, needs to be pushed towards the handle (illustration 5).
Cold Start
Move the throttle lever to the choke symbol.

Start up with warm engine
Move the throttle lever to „MAX„ position (illustration 6)
- Pull out starter rope until resistance is felt - then pull rapidly and with force.
Attention: If the brake bar is not pushed to the handle during start, the electrical ignition is shorted and the engine brake is activated. In this situation, the engine cannot be started with manual start up and electric start (illustration 5).
Electrical Starter (546 RS)
Put the ignition key in the ignition (position 4) on the throttle lever and turn 1/4 clock-wise. After the engine starts, put throttle lever (position 3) on position maximum.
Starting Model: 546RT
- Position the safety key (Fig. 8, item 18) into the start position ("Run").
- Press the primer (Fig. 1 item 17) 3 times when starting from cold, to pump fuel into the carburettors
- During the first start and when the Touch-N-Mow® start system is in its relaxed state, you can pretension it via the recoil starter. For this, pull the starter handle several times (8 to 12 times), without activating the control bar (item 1).
- Pull straight, not at a slant
- Never pull the starter cord fully out
- Never let the starter cord snatch back; feed it back evenly.
- With the Touch-N-Mow® starter system pre-tensioned, release the locking lever (Fig. 7, item 16) and press the control bar A (item 1) against the handle. The tensioning spring of the Touch-N-Mow® starter system will then start the engine.
Note: When you start the engine for the first time, or when the Touch-N-Mow® starter system is relaxed, you can also start the engine using the recoil starter.
For this, proceed as follows:
- Release the locking lever (Fig.7, item 16), press the control bar A (item 1) against the handle and hold it there
- Slowly pull out the starter cord with the other hand, until you feel resistance
- Then start with one smooth, firm action
- Always pull the starter cord out in a straight line
- Never pull the starter cord fully out
- Never let the starter cord snatch back; feed it back evenly.
Self-propelled drive roller

On lawn mowers with self-propelled drive, the drive lever is located in front of the guide bar. The self-propelled drive can only be put into gear after the engine starts. To engage the drive, the drive lever, B, has to be pulled towards the grip bar. To stop the drive, release drive lever. In its released state, there is no drive and the lawn mower can be pushed forward or backward (illustration 7).
Attention: The switch point depends on the Bowden throttle cable's adjusted length. Ideally, the switch point should be 2 - 3 cm (approx. 1 inch) in front of the handle. Adjusting the Bowden drive cable can be done through the knurled nut when the drive is disengaged (illustration 8).
Turning upward = Bowden cable gets longer -
- = switch point later
Turning downward = Bowden cable becomes shorter -
+ = switch point earlier.
An additional adjustment is located on the side of the gear connection.
Shutting off engine Mod. 546/546R/546HR/546RS
Move the throttle lever (position 3) to "MIN", release brake lever and wait until engine shuts off.
Attention: When the brake lever is released (position 1), the electrical ignition of the engine is cut off. The engine RPM and the blade will stop within several seconds.

Shutting off engine Mod. 546RT
To stop the engine, release the control bar A (item 1) and wait until the engine has completely stopped. The final engine rotations pre-tension the Touch-N-Mow® starter system automatically for the next start. If you briefly leave your lawnmower (for example to empty the grass catcher) or if you want to stop the lawnmower, always turn the safety key (Fig. 9 item 18) into the stop position ("Lock&Remove"), and remove the key. Prior to maintenance or repair work (particularly when clearing cuttings from underneath the cutting deck), when transporting the mower on a vehicle or before putting the lawnmower into storage, release the tension of the Touch-N-Mow® starter system by implementing an engine start without ignition, before removing the safety key.
Mowing Hints

Attention: When mowing, please observe the safety recommendations which are part of this owners manual!
Mowing with Grass catching device
Short and dry grass can be easily blown in the grass catching device (position 6). This is made possible by blower-supported grass ejection (turbo effect).
Please be aware that:
- The shorter the cuttings are, the easier they can be collected in the grass catching device.
- Grass that is too long or wet may cause blockage.
Cutting Quality/Results
Grass height, density and grass dampness determine cutting results. Grass that is dry and not too long assures best cutting results. Wet grass may be cut and collected; however, the cutting results and the collection outcome are affected. A sharp blade is essential for best cutting results. A dull blade (grass stems become ragged during cutting and the lawn turns yellow) has to be resharpened (see chapter „Blade”). Mow in an even and gradual manner, if possible, mow in straight rows, overlap rows when mowing, which results in a neatly mowed lawn.
If the grass is very long, mow first in one direction with the cutting adjustment set high. Then mow in the opposite direction with the blade set at normal height (illustration 9).
Lawn Care
If possible, mow only when the lawn is dry and when the ground is dry. The lawn mower's wheels press into the wet ground and leave compression marks.
A lawn looks better and appears more uniform if cut often. Frequent cutting allows the lawn to become healthy since the growth goes into the stem.
Short cuttings up to 1 cm (approx. 1/2 inch) may be left on the ground, longer cuttings need to be collected with the grass catching device. At Spring time, the first mowing should take place approx. 2 to 3 weeks before the grass grows at its usual level. In order to achieve early greening of the lawn, cut only approx. 1.5 cm (3/4 inch) of the grass. Check lawn for foreign objects (rocks, glass, metal pieces etc.) prior to mowing lawn. The grass catching device can be used for any additional clean-up (leaves etc.).
Newly seeded or thin lawns must not be cut too short (leave 3 - 4 cm) (1 - 1 1/2 inches). Let the grass remain at that length for 4 to 5 weeks, so that the lawn increases in width and density.
Attention: SOLO Lawn mowers with rear eject are especially suited for the collection of leaves. The rear eject is only permitted to be used on lawns. Leaf collection on solid ground (for example, roads or walkways) is prohibited due to inherent safety risks.
Attention: For leaf collection, the cutting height is to be set to the middle or to the highest setting (position 11) (illustration 4).
Maintenance and Care
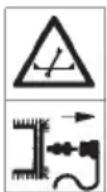
For your own safety, remove the spark plug cap from the spark plug prior to any maintenance work or cleaning (position 12). Any maintenance and care that go beyond the described explanations need to be left to an authorized Service Center.
Cleaning the Mower
After each use, the mower needs to be thoroughly cleaned. Special attention needs to be given to the lower side, the blade and the cutting area circle. For cleaning, the mower can be set on its rear wheels (after removing the star knobs) (illustration 10). The spark plug cap should be removed and the fuel tank's contents either used up or emptied. Gasoline, which may leak out of the carburetor, may be collected with a rag. Dirt and grass debris is removed easily immediately after mowing. Imbedded grass debris and dirt on the mower deck's lower section interrupt the grass collection and affect cutting results. Imbedded dirt on the blade and on the blower wheel lead to imbalance and consequently to vibration. Check also for cleanliness of the duct.
The ejection air duct can be cleaned with a small stick or with a screw driver.
Do not spray the mower with a hose or high pressure cleaning hose. The engine has to remain dry. The outer deck parts can simply be kept clean by wiping the unit off with a rag. Strong cleaning agents of any kind are not to be used.
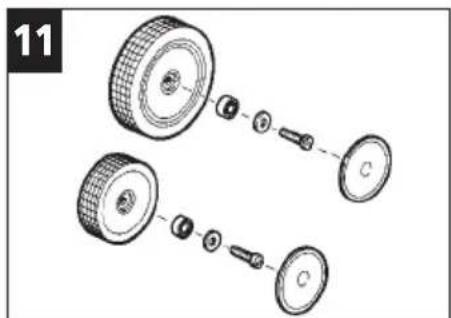
Wheel axles and wheel hubs
are to be lubricated occasionally (at least once a year). Remove wheel cap, release screw and remove wheel. During disassembly observe the sequence for the reassembly of the parts (illustration 11).
Maintenance of the rear wheel-self-propelled drive roller:
- After removing wheel caps and loosening fastening screws, remove drive wheels.
- Remove grass debris and dirt from all drive wheel areas.
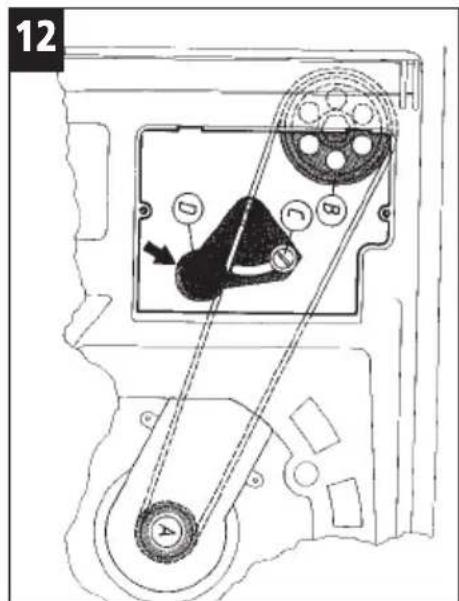
Attention: Do not remove neutral gear pinions from the gear shaft; however, check if they turn slightly counter-clockwise to the drive direction.
- Lubricate the pinion set (one-way drive pinion and
- Tighten V-belt as described above.
- Screw on cap tightly.
- Assemble blower wheel and blade. Observe sequence of assembly parts and observe the blade's torque. (illustration 13).
Mowing Blade

Special tools, such as a torque wrench for example, are required to mount the blade to the mower.
For safety easons we recommend that the mowing blade is sharpened, balanced and re-fitted by an authorized specialist workshop only. The following notes are therefore only intended for specialist repair shops.

Note: To obtain best mowing results we recommend to have the blade sharpened / balanced or at least once every year.
Replacement of Blade

Proper gloves are to be worn when replacing the blade. The spark plug cap has to be removed prior to any work, at the
Model 546RT release the tension of the Touch-N-Mow® starter system by implementing an engine start without ignition, and remove the safety key (item 18), When replacing any blade parts only SOLO spare parts are to be used. The identification No. on the blade has to agree with the Order No. for the replacement. Never install a different type of blade!
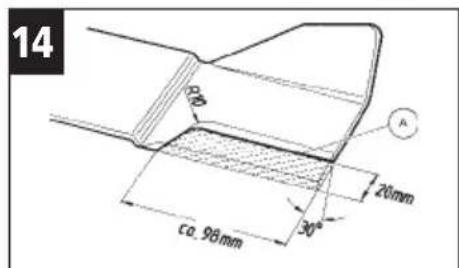
Use the holding pin as a blocking device for the blade. The blade fastening screw has a regular right-handed thread. To remove the screw we recommend using a socket wrench 21 mm (spark plug wrench) or hex. wrench 8 mm, 5/16". At re-assembly of the overload clutch be sure and observe the sequence in which these parts where previously assembled (illustration 14). The blade screw is to be tightened with the specified torque of 45Nm (4,5mkp).
Damaged Blade
The engine needs to be shut off and the spark plug cap has to be removed if the blade has come in contact with a foreign object or other obstacle. After the blade stops, tilt the mower and check the blade for damage (illustration 11). Deformed or bent blades are not to be re-aligned.
Damaged parts are to be replaced immediately. If the mower has been driven over a notable obstacle, the mower needs to be checked by an authorized Service Center. Prior to use make certain that blade and blade fastening parts are not damaged. If necessary, parts need to be checked or replaced. Never operate mower with an unbalanced blade - this would cause vibration and additional damage.
Sharpening of Blade

Attention: The blade may be sharpened with a metal file; however, we recommend that resharpening/sanding is done by an authorized Service Center who will pay attention that the same amount is sanded off on each side to avoid any imbalance. The cutting edge of the blade is only be resanded up to the imprinted markings (illustration 13).
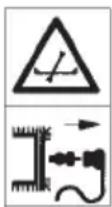
Oil level check

Attention: The engine oil affects the lawn mower's efficiency and life span. Never operate the engine without oil or with little oil. Major engine damage can occur. The optimum viscosity depends on where the lawn mower is used (air temperature and altitude) and can be found in the engine owners manual.
Checking Oil level
- Place lawn mower horizontally with all wheels on the ground.
- Turn oil tank cap counter-clock-wise (position 14), and remove. Wipe off dipstick.
- Place dipstick back into filler pipe.
- Remove dipstick, hold horizontally and read oil level. Oil level has to be between the "MAXIMUM" and "MINIMUM" markings (illustration 15).
Changing Oil (Briggs&Stratton 4-cycle engine)
The engine oil may be drained via the oil drain screw or the oil filler opening. Blade and blower wheel need to be removed to reach the oil drain screw (illustration 13). Observe especially the service instructions in the separate engine owners manual.

For the oil change with the HONDA OHC Engine, the used oil is removed by suction wich should only be done by a specialist workshop.
When draining via oil filler opening (position 14): Tilt the warm mower (with fuel tank empty and closed oil filler) slowly over the side of the filler opening. Remove oil filler cap and catch old oil in a container. Wait several minutes until oil is drained. Dispose off the old oil in accordance with local ordinances.
Gearbox Attention: The gear is equipped with a special permanent oil and operates completely maintenance-free. Technical faults that cannot be resolved by adjusting the Bowden throttle cable are only to be corrected by an authorized Service Center.

Attention! After changing oil, always wash hands with a scouring agent, soap and water.
Attention: Never simply throw away used engine oil and gear lubricant (environmental protection). Collect used oil in authorized containers and submit to the proper recycling facility.
Air filter Maintenance
Attention: Dirty air filters reduce the engine's efficiency
- the carburetor does not receive sufficient air flow. Routine inspection, especially in dusty conditions, is essential.

Attention: Never clean air filter parts with gasoline or flammable solvents. Danger of fire or explosion!
Observe all instructions in the respective engine owners manual.
Important Note:

The time and duration when lawn mowers can be operated may be subject to local ordinances. These ordinances usually vary from location to location. Noise is damaging. During extended mowing, we recommend wearing protective head gear to avoid possible hearing loss.
| Problem | Possible Cause | Solution |
| Mower runs rough, vibrates severely | - Loose screws on engine or fastening screws loose- Blade fastening loose- Blade not balanced or damaged- Overload clutch worn | - Tighten screws- Check blade fastening- Balance blade or replace- If needed, replace disks (in pairs) |
| Engine does not start | - Is brake lever A (DriveleverA) pushed against handle?- Is the throttle lever (only Mod. 546/546R/546HR/546RS) in the correct position?- Is the Bowden cable / the engine brake correctly set?- Spark plug or spark plug cap defect- Fuel tank empty | - Push brake lever- Select correct setting- Check if setting is correct- Clean or replace spark plug- Refuel |
| Engine runs irregular | - Air filter dirty- Gas Bowden cable bent- Spark plug sooty | - Clean or replace air filter- Adjust Gas B. cable or replace- Replace spark plug |
| Starter rope back-fires | - Blade fastening or overload clutch loose- Blade is dull | - Check blade fastening |
| Lawn turns yellow, cutting uneven | - Cutting set too high- RPMs too low- RPMs too low | - Sharpen blade- Adjust cutting height- Set throttle lever on high |
| Mower collects poorly | - Cutting height set too low when grass is too high- Blade worn out- Lining of catching device clogged- Gear lever not pulled | - Set throttle lever on high- Adjust cutting height- Replace blade- Clean or replace catching device |
| Self-propelled drive wheel does not run | - Bowden cable bent or obstructed- V-belt tension loose- Gear lever not released | - Pull gear lever to handle- Adjust Bowden cable- Adjust V-belt tension |
| Drive mower cannot be pulled backwards | - Bowden cable bent or obstructed- Drive wheels dirty inside or not lubricated | - Release gear lever- Adjust Bowden cable- Clean and lubricate wheels |
In conformance with the product liability law we want to clearly point out that we are not liable for any damages which may occur due to improper handling, or repair. Furthermore, we are not responsible for any damage that may occur if replacement parts other than SOLO replacement parts, or parts that were not authorized by SOLO, have been used. In addition we are not liable for any damage that may occur if repair work was performed by any source other than the Customer Service or an authorized Service Center. This liability exclusion applies also to accessories and supplemental parts.
Technical Data
MOWER Design 546 SM
Design 546 / 546-R / RS
Design 546-HR
Cutting width: 45 cm (approx. 18 inches)
Wheel Adjustment: continuous central adjustment from 30 - 75 mm (approx. 1 - 3")
Grass Catching device Vol.: 50 liters (approx. 13 U.S. gallons)
Blade: Blower-blade, one piece, mounted to overload clutch
Total weight with
grass catching device 34 kg (75 lbs) 28 / 31 / 34 kg (61.7/68.3/ 75 lbs) 34 kg (75 lbs)
H
Engine
| Design: | 1-cyl., 4-cycle engine, 190 ccm |
| Capacity: | 2.6 kW (3.5 HP-SAE at 3600 1 /min.) |
| RPM approx. 2700 | 1 /min. |
Fuel: Lead-free reg. gasoline
Engine Oil: SAE 30 approx. 0.6 liter
(0.158 U.S gallon)
Spark Plug: CHAMPION RJ19 LM
Electrode gap: 0.5 - 0.6 mm (0.02")
1-cyl., 4-cycle engine, 190 ccm
3.8 kW (5.0 HP-SAE at 3600 1/min.)
approx. 2700 1 /min.
Lead-free reg. gasoline
SAE 30 approx. 0.6 liter
(0.158 U.S. gallon)
CHAMPION RJ 19LM
0.5 - 0.6 mm (0.02")
1-cyl., HONDA-OHC 4-Cycle 135 ccm
3.3 kW (4.5 HP-SAE at 3600 1 /min.)
approx. 2900 1 /min.
Lead-free reg. gasoline
SAE 30 approx. 0.55 liter
(0.149 U.S. gallon)
BPRGES (NGK)
0.7 - 0.8 mm (0.03")
Gear: 50 ml (1.7 oz.) (Use only SOLO lubricant)
Noise level in work area (dBA) (DIN 45635) 80
Sound capacity level (dBA) (DIN 45635) measured/ garanted 94/ 96
Weighted acceleration value (dBA) (DIN 45635) (m/s 2 ) (DIN 45675) <2,5
Accessory
Mulch set Cutting deck insert and special blade, part no. 59 00 830
Deflector set to convert to side discharge mower, part no. 59 00 800
Measurements
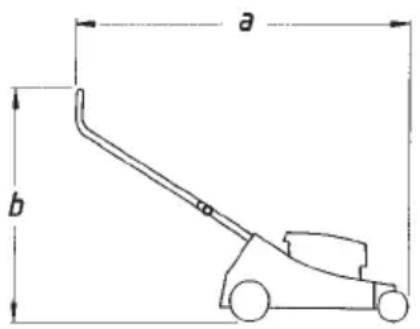
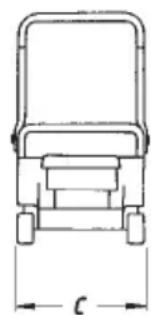
a: 140 cm (approx. 55 inches)
b: 105 - 110 cm (approx. 41 - 43 inches)
c: 51.5 cm (approx. 20 inches)
d: 92 cm (approx. 36 inches)
e: 40 cm (approx. 15 1/2 inches)
In the best interest of continued technological progress we reserve the right to change design and configuration of any product without prior or other notice. Therefore, please note that text and illustrations of this manu binding and do not constitute a basis for legal or other claims.



- 546-HR
- 546-RT
- D/GB
- MAINTENANCE AND REPAIR
- REPLACEMENT PARTS
- GUARANTEE
- DESCRIPTION OF SYMBOLS
- CE DECLARATION OF CONFORMITY
- GENERAL SAFETY GUIDELINES
- PLEASE NOTE
- ENSURE PRIOR TO
- TO RELEASE THE TENSION IN THE TOUCH-N-MOW® STARTER SYSTEM, PROCEED AS FOLLOWS
- PRIOR TO MOWING
- FUEL
- HANDLING OF GASOLINE
- FUELING
- HANDLING
- DURING START-UP
- TURN ENGINE OFF WHEN
- SERVICE AND STORAGE
- INVENTORY LIST
- IMPORTANT INFORMATION
- ASSEMBLY
- GRASS CATCHING DEVICE
- ADJUSTING CUTTING HEIGHT
- STARTER HANDLE INSERTED IN THE CABLE GUIDE
- ENGINE
- START UP
- STARTING MODEL: 546/546R/546HR/546RS
- COLD START
- START UP WITH WARM ENGINE
- ELECTRICAL STARTER (546 RS)
- STARTING MODEL: 546RT
- SELF-PROPELLED DRIVE ROLLER
- SHUTTING OFF ENGINE MOD. 546/546R/546HR/546RS
- SHUTTING OFF ENGINE MOD. 546RT
- MOWING HINTS
- MOWING WITH GRASS CATCHING DEVICE
- PLEASE BE AWARE THAT
- CUTTING QUALITY/RESULTS
- LAWN CARE
- MAINTENANCE AND CARE
- CLEANING THE MOWER
- WHEEL AXLES AND WHEEL HUBS
- MAINTENANCE OF THE REAR WHEEL-SELF-PROPELLED DRIVE ROLLER
- MOWING BLADE
- REPLACEMENT OF BLADE
- DAMAGED BLADE
- SHARPENING OF BLADE
- OIL LEVEL CHECK
- CHECKING OIL LEVEL
- CHANGING OIL (BRIGGS&STRATTON 4-CYCLE ENGINE)
- AIR FILTER MAINTENANCE
- IMPORTANT NOTE
- TECHNICAL DATA
- ACCESSORY
- MEASUREMENTS
Brand : SOLO
Model : 546-RT
Category : Lawn mower