
CR 7747 - Heating CAMRY - Free user manual and instructions
Find the device manual for free CR 7747 CAMRY in PDF.
| Product type | Bathroom heater |
| Brand | Camry |
| Model | CR 7747 |
| Power | 2000 W |
| Power supply | 220-240 V ~ 50 Hz |
| Protection rating | IPX2 |
| Installation | Wall-mounted, minimum height 1.8 m from floor |
| Towel rack | Yes, adjustable |
| Remote control | Yes (CR2025 battery not included) |
| Weekly programming | Up to 6 periods per day |
| Ventilation modes | Cool air, low heat, high heat |
| Timer | 1 to 12 hours, delayed start |
| Open window detection | Yes, automatic shut-off if temperature drop |
| Temperature range | 10 to 49 °C |
| Automatic shut-off | After 12 hours of continuous operation |
| Heating surface | May exceed 60 °C |
| Maintenance | Clean with a damp cloth, vacuum the grilles |
| Weight | Not provided |
| Dimensions (approx.) | Not provided |
Frequently Asked Questions - CR 7747 CAMRY
User questions about CR 7747 CAMRY
0 question about this device. Answer the ones you know or ask your own.
Ask a new question about this device
Download the instructions for your Heating in PDF format for free! Find your manual CR 7747 - CAMRY and take your electronic device back in hand. On this page are published all the documents necessary for the use of your device. CR 7747 by CAMRY.
USER MANUAL CR 7747 CAMRY
natural_image
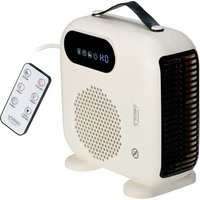
White and black QDYY air conditioner fan with digital display and control buttons (no text or symbols visible)CR 7747
Figure XXII.

ENGLISH
READ CAREFULLY AND KEEP FOR FUTURE REFERENCE
- Before using the device, read the user manual and follow the instructions contained therein. The manufacturer is not liable for damage caused by using the device contrary to its intended use or improper operation.
- The device is for home use only. Do not use it for other purposes that are inconsistent with its intended use.
- The device should only be connected to a 220-240V \~50/60Hz socket.
In order to increase the safety of use, many electrical devices should not be connected to one power circuit at the same time. - Be especially careful when using the device when children are around. Do not allow children to play with the device and do not allow children or people unfamiliar with the device to use it.
- WARNING: This equipment can be used by children over 8 years of age and persons with reduced physical, sensory or mental abilities, or persons without experience or knowledge of the equipment, if it is carried out under the supervision of a person responsible for their safety or they have been given instructions on the safe use of the device and are aware of the dangers associated with its use. Children should not play with the equipment. Cleaning and user maintenance should not be performed by children, unless they are over 8 years of age and are supervised.
- WARNING: The appliance is designed to dry fabrics washed in water only.
- WARNING: If the appliance is used in a bathroom, it should be located so that switches and other controls cannot be touched by persons in the bath or shower.
- WARNING: To avoid hazards to very young children, this appliance should be installed so that its lowest part is at least 600mm above the floor.
- WARNING: To avoid overheating, do not cover the device.
- Always remove the plug from the socket after use by holding the socket with your hand. DO NOT pull on the net cord.
- Do not immerse the cord, plug or the entire appliance in water or any other liquid. Do not expose the device to weather conditions (rain, sun, etc.)
- Periodically check the condition of the power cord. If the power cord is damaged, it should be replaced by a specialist repair facility in order to avoid a hazard.
- Do not use the appliance with a damaged power cord, or if it has been dropped or damaged in any way, or is not working properly. Do not repair the device yourself, as it may cause electric shock. Return the damaged device to the appropriate service center for inspection or repair. Any repairs may only be made by authorized service points.
Improperly performed repair may result in serious danger to the user. - Do not use the device near flammable materials.
- Do not leave the device connected to the socket unattended.
-
For additional protection, it is advisable to install a residual current device (RCD) in the electrical circuit with a rated residual current not exceeding 30 mA. Please consult an electrician for this.
-
When the appliance is used in the bathroom, remove the plug from the mains socket after use, as the proximity of water is dangerous even when the appliance is switched off.
- Do not allow the device to get wet. If the device falls into water, pull the plug out of the socket immediately. Do not put your hands into the water when the device is connected to the mains. It must be checked by a qualified electrician before being used again.
- Do not handle the device with wet hands.
- Always switch off the appliance before removing the plug from the socket.
- The operating device must be supervised and within sight at all times. When leaving the room where the device is operating, always turn it off. If the device is not working, always remove the plug from the mains socket.
- Do not connect the device to an automatic de-energizing device, such as a thermal control device or a timer.
- Keep flammable materials such as furniture, bedding, paper, clothes, curtains, etc. at least one meter away from the device.
- Do not cover the device during operation or place any objects on it.
- The power cord must not be laid above or below the heater, nor should it touch or lie near its hot surfaces. Do not place the device under an electrical outlet.
- Heating surfaces may heat up to more than 60^ C. The device should be installed in such a place that children and pets cannot reach it.
- The device may not be installed or used in vehicles.
- There are parts inside the appliance that may be hot or cause sparks. Do not operate the heater in areas where materials such as gasoline, paint or other flammable substances are used or stored.
- Always disconnect the device from the mains and disconnect the power cord from the device when it is not in use or you want to clean it.
BEFORE FIRST USE:
- After removing the packaging, make sure that the device is in good condition.
- The packaging materials may contain plastic, nails etc., which may be hazardous and therefore should not be left within the reach of children.
- Keep all objects at least 1 meter from the front and sides of the appliance.
- Do not use the device in next to a window as rain may cause the electric shock.
- Do not use the device outdoors, or on wet surfaces. Avoid spilling liquid on the device.
WALL INSTALLATION METHOD
- Installation MUST be carried out by a qualified electrician.
- Do not connect the device to the mains source until it has been installed in its final location and adjusted to the position it will be used in.
- Avoid installation behind a door.
- The device must not be located immediately below a socket-outlet.
- In order to avoid a hazard due to inadvertent resetting of the thermal cutout, this device must not be supplied through an external switching device, such as a timer, or connected to a circuit that is regularly switched on and off by the utility.
- On the wall at least 1.8 meters away from the ground, make two holes horizontally with a hole distance of about 176mm. Two metal screws and two plastic expansion screws are attached in box together with the device.
- Install expansion screws in the holes to keep the nail heads slightly up and project at least 4mm from the wall.
Place the device with the air outlet vent facing downwards, align the nail head with the two holes on the back of the fuselage, hang it on the screw, and move the device appropriately so that the wall-hanging hole of the product catches the nail so as to install it firmly. - After the installation is completed, check the montage stability first, and then turn on the power after it is completely stable.
-
Before use, make sure that the towel rack fixing nut (4) is tightened.
-
Rotate the towel rack (3) down or up according to your needs.
- Before use, make sure the device is well fixed on the wall.
WARNING:
* Do not cover or restrict airflow to the inlet or exhaust grilles in any manner as the device may overheat and become a fire risk.
* FIRE RISK EXISTS IF THE HEATER IS COVERED BY OR POSITIONED CLOSE TO CURTAINS OR OTHER COMBUTIBLE MATERIALS.
PRODUCT DESCRIPTION: Bathroom heater CR7747 – Figure I and II.
- Main power switch 2. Housing
- Rack for towel 4. Towel rack fixing nut
- Screen display 6. Air outlet 7. Air inlet
Control panel description - Figure III.
T – digital display K1 – weekly program icon “P”
R – timer icon F1 – warm air fan icon
F2 – hot air fan icon O1 – open-window detection mode icon
8 – Fan button 9 – Timer button
Remote control (4) description - Figure IV.
A – working status button 8 - Fan button
9 - Time button C - Setting button "SET"
E - temperature / time decrease button "-" F - temperature / time increase button "+"
G – desired setting confirmation button "OK" J – desired working day button for days "d1-d7"
K - weekly program button "P" L – time switching on button "TIME/on"
N - time turning off button "TIME/off" M – edit button for period P1-P6
O - open-window detection mode button
USAGE
- USAGE WITHOUT REMOTE CONTROL
1.1. STANDBY STATE - figure V
Plug in the power and turn on the main power switch (1) on the back of the device. The device enters the standby state. The display shows "S" – look at figure V.
1.2. FAN OPERATION – figure: VI, VII, VIII.
Press the fan button (8) on the device:
- once, the device flows cool air – the display looks like figure VI.
- twice, the device flows warm air – the display looks like figure VII.
- three times, the device flows hot air – the display looks like figure VIII.
- four times, the device enters the standby state. Before switch off the device is blowing cold air for 30 seconds – the display looks like figure VI.
1.3. TIMER OPERATION – figure: IX, X.
* DELAYED STOP - figure IX.
Press the button (9) to set timer in range from 1 – 12 hours. Pressing the button (9) one time increases one hour for timer. After setting time by repeated pressing the button (9) to desired time period, the display will show current setting time for 5 seconds, then resume to previous display, meanwhile the timer icon (R.) starts to be illuminated. After desired time pass, the device will switch off automatically. Figure IX. is an example of setting 8 hours.
* DELAYED START - figure X.
In standby mode, press the timer button (9), you can set the turn-on time in range from 1 to 12 hours. After setting time by repeated pressing the button (9), the display (5) shows the turn-on time and also the (R.) icon is illuminated. The display (5) automatically decreases 1 hour for each hour passed. When the power-on time arrived, the device will automatically turns on. The default setting temperature is 23 degree of Celsius during turn-on. Figure X. is an example to set turn-on time to 8 hours.
1.4. TEMPERATURE SETTING
There is no available temperature setting function if no use the remote control (4). The device will automatically turn off after 12 hours of continuous operation and enter into standby mode.
- USAGE WITH REMOTE CONTROL
FUNCTIONS OPERATE BY REMOTE CONTROL DESRIBED BELOW CANNOT BE SET UP WITHOUT USING THE REMOTE CONTROL
Note: During the operation of the remote control (4), the remote control transmitter must aim at remote control receiving area of device to avoid remote control ineffective. The remote controller (4) can be normally used within 3 meters in front of the product and in the left and
right angles of 60 degrees.
2.1. FAN OPERATION – figure: VI, VII, VIII.
Press the button (A) once, the device enters into working status, the device flows cool air – the display looks like figure VI. Press the fan button (8):
- again, the device flows the warm air – the display looks like figure VII.
- again, the device flows the hot air – the display looks like figure VIII.
- again, the device enters into working status, the device flows cool air – the display looks like figure VI.
Pressing the button (A) again cause the cool air starts to blow, the display looks like figure V. After 30 seconds the device stops to blow, the device enters into standby mode again.
2.2. TIMER OPERATION – figure: IX, X.
To operate timer function with remote control use the button (9). The operation is same as for buttons at device housing described in point 1.3.
2.3. CURRENT TIME / DAY SETTING – figure: XIII, XIV, XV.
It is obligatory to set up inside clock of the device by setting up the current hour and minutes and actual day od week, just to let the device operate properly with weekly program.
Weekly program can be set up by using the remote control ONLY.
NOTE: after the device is power off (plug off) or brake in electricity supplying happened, the device will reset, it is necessary to set the current time and day again because the device is not equipped in inside battery to support the memory of inside device clock. The current time (hour and minutes) and day of week can be set up both under standby mode and working status. Follow up next steps:
2.3.1. CURRENT TIME SETTING
Press SET button (C.) on the remote control (4)
- one time, the digital display (T) shows "12" that means 12:00 a.m. as default, then press the plus (F) or the minus (E) buttons repeatedly to set current hour in range from 00 to 23 according to local time
- press SET button (C.) button again, the display shows minutes "30" that means half an hour as default, then press the plus (F) or the minus (E) buttons repeatedly to set current minutes in range from 00 to 59. Continuous the setting procedure described in point 2.3.2 now.
2.3.2. CURRENT DAY SETTING
Just after complete current time setting (point 2.3.1) continue to set up the day setting, as below steps:
- press SET button (C) on the remote control (4) again to display the day of week,
- then press the plus (F) or the minus (E) buttons repeatedly to set current day.
The digital display (T) will show: d1=Monday, d2=Tuesday, d3=Wednesday, d4=Thursday, d5=Friday, d6=Saturday, d7=Sunday. - then press "OK" confirm button (G) to confirm the setting.
Example: setting to Wednesday, 9:30 a.m. – look at Figures: XIII, XIV, XV.
NOTE:
- After the device is power off (plug off) or brake in electricity supplying happened, the device will reset, it is necessary to set the current time and day again.
- In such case, press SET button (C) to check the current time & day in turn;
- The timer set up period is 00-23 for hours, 00-59 for minutes. To check the current time and setting temperature, press SET again.
2.4. TEMPERATURE SETTING – figure XVI.
During working status, press the plus (F) or the minus (E) buttons, the digital display (T) shows "23" that means default temperature 23 degree of Celsius. Then, then press the plus (F) or the minus (E) buttons repeatedly to set desired temperature in range from 10 to 49 degree of Celsius, press confirmation button (G) to confirm the setting.
For example: The current ambient temperature is 15 degree of Celsius, when set temperature to 25 degree of Celsius, the digital display (T) will show like at Figure XVI.
Principle of temperature control by the device:
- when the difference between desired temperature and the current room temperature is higher than 2 degree of Celsius, the device working with hot airflow, the icon (F2) is illuminated,
- when the difference between desired temperature and the current room temperature is lower than 2 degree of Celsius, the device working with warm airflow, the icon (F1) is illuminated,
- when desired temperature and the current room temperature are the same, the device blowing the cool airflow for 30 seconds to blow out warm air left inside, then the device will stop operate.
If you want to cancel the setting temperature, press the fan button (8) to choose the low or high heating level, the device will work without
setting temperature, so the digital display (T) will show “--”. After continuous heating for 12 hours, the fan will blow cool air fpr 30 seconds, then the device stops blowing and will enter into standby mode.
2.5. SETTING THE WEEKLY PROGRAM – available by the remote control (4) only. FigureS: XVII – XXI.
NOTE: Before turn on weekly program: it must set days of work and work time period (P1-P6), otherwise the weekly default state is "00", the product does not work.
After complete setting of current TIME / DAY (points 2.3.1 and 2.3.2), below are listed steps to set weekly program:
2.5.1 Press button (A) on remote control, the product enter into working status.
2.5.2 Press the weekly program button (K), the display (5) shows icon K1, the device enters into weekly program setting. Look at figure XVII.
2.5.3 Press day button (J), the digital display (T) shows "d1", then press repeatedly the day button (J) to set desired working day (Monday-Sunday: d1\~d7). Look at figure XVIII to see the example setting for Monday.
2.5.4. Press the edit button (M), the display (5) shows "P1"- period one - as default, press the edit button (M) to set time period (P1-P6). Note: It can be set maximum 6 time periods for each working day, while setting any time and adjust temperature.
Follow step 2.5.5 - 2.5.7 below to set: turn-on time / turn-off time / desired temperature for each time period (P1-P6). Setting P1 shown at figure XIX.
2.5.5. Press the time on button (L), the digital display (T) shows "00" by default. Press the timer on button (L) once in increments of one hour as many times as necessary to set the desired on time (00-24 hours). Example: set the on time to 7:00 am - see picture XX.
2.5.6. Press time-off button (N) to set up the stop of time period, the digital display (T) shows the previous turn-on time by default. Press time-off button (N), each one time pressing increases one hour to set the turn-off time in range: 00-24 hours. Example: setting the turn-off time 13:00 p.m. – look at figure XXI.
The desired time switch off hour cannot be earlier than desired time-on hour.
When the desired time-on (start of period) is the same as the desired time – off (stop of period), the device enters into standby mode.
2.5.7. Press the plus (F) or the minus (E) buttons repeatedly to setting the desired temperature in range from 10 to 49 degree of Celsius.
2.5.8. Repeat steps 2.5.3 - 2.5.7 described above to set the weekly program for all device working day you want.
2.5.9. Then press the confirmation button (G) to confirm the settings.
2.5.10 To cancel the weekly program function, press the button (K) again, the icon (K1) will go off. The weekly program is off.
Note: After the above setting are completed and weekly program is working, the icon K1 is illuminated on the display (5), then:
- press the day button (J) to check with set working day (d1-d7),
- press the edit button (M) to check with time period (P1-P6),
- press the time-on button (L) to check with the set turn-on time,
- press the time-off button (N) to check the set turn-off time.
2.6. OPEN WINDOW DETECTION MODE SETTING - available by the remote control (4) only.
2.6.1. Press the button (A) on your remote control (4), the device enters into working status. Let the device heating for a moment until operate stable.
2.6.2. Press the button (O) by remote control, the icon (O1) will be on display (5). The temperature display "23" by default. Press the plus (F) or the minus (E) buttons repeatedly to set target temperature. During open-window detection mode, once the ambient temperature drops 5-10 degree of Celsius within 10 minutes, then the device will stop working and enter into standby mode. Then press the button (A) to turn on the device.
Press the button (O) again to turn off the open-window detection mode, the icon (O1) will off at display (5) and the device will resume to previous working mode.
Below is an example to set 23 degree of Celsius during open-window detection mode. Look at figure XI.
2.6.3 When turn on at the same time for both open-window detection and weekly program, during the OFF period of weekly program, the device does not operate. During the working status of weekly program, the temperature is subject to the setting temperature of open-window detection mode. Look at figure XII.
2.7 REMOTE CONTROL
Follow the instructions of use and the recycle rules given on the battery packaging. The procedure of battery replacement is described below – look at figure XXII.
- Open the battery compartment by sliding the cover down.
- Insert the battery into the compartment. The remote control requires 1 CR2025 3V lithium battery (not included).
- Close the battery compartment.
CLEARING AND MAINTENANCE
- Before cleaning switch off the main power switch (1), plug out the device and let the device to cool down.
- A common cause of overheating is deposits of dust or fluff in the appliance. Ensure these deposits are removed regularly by unplugging the device and vacuum-cleaning air inlets (7) and air outlets (6), where available.
- Do not use abrasive cleaning products on this device. Clean with a damp cloth (not wet) rinsed in hot soapy water only.

To protect your environment: please separate carton boxes and plastic bags and dispose them in corresponding waste bins. Used appliance should be delivered to the dedicated collecting points due to hazarsous components, which may effect the environment. Do not dispose this appliance in the common waste bin.
DEUTSCH
\* ARRÊT DIFFÉRÉ - figure IX.
INNAN FÖRSTA ANVÄNDNING:
METOD FÖR VÄGGINSTALLATION
cdot should be done on the hotel jhez asstad among the airport in the airport.
natural_image
Black and red vacuum cleaner with attached hose (no visible text or symbols)VACUUM CLEANER CR 7045

natural_image
Exterior view of a black rectangular solar water heater with multiple cooling fans and wheels (no visible text or symbols)OIL FILLED RADIATOR CR 7814

Stand Fan
CR 7306

natural_image
Black and white photo of a modern kettle with a handle and side arm (no visible text or symbols)Electric Kettle CR 1169

natural_image
Vintage wooden radio with mesh back panel and two buttons (no visible text or labels)RETRO RADIO CR 1188

natural_image
Illustration of a pair of hair curling iron (no text or symbols)HAIR STRAIGHTENER
CR 2320

natural_image
Close-up of a person's legs using a white massage pressure stand (no text or symbols visible)FOOT SPA CR 2174
ELECTRIC SHAVER
CR 2925

natural_image
Black portable electronic device with ventilation grille and digital display (no visible text or symbols)INTERNET RADIO CR 1180
natural_image
White portable air conditioner unit with control panel and display (no visible text or symbols)AIR CONDITIONER CR 7926

natural_image
Exterior view of a modern stainless steel kettle with black handle and control knob (no visible text or symbols)ELECTRIC KETTLE CR 1291

natural_image
Exterior view of a modern stainless steel toaster with a black handle (no visible text or symbols)TOASTER 2 SLICES CR 3215

natural_image
White and black electric heater with control panel and remote control unit (no visible text or symbols)CONVECTION HEATER CERAMIC FAN HEATER
CR 7724 CR 7772
MOSQUITO KILLER
CR 7937

natural_image
Exterior view of a modern office building (no signage)
natural_image
Black electric shaver with three leads and a small diamond-shaped head (no visible text or symbols)ELECTRIC SHAVER CR 2927
camry
Premium

natural_image
Clear glass water heater with black handle and lid, no visible text or symbolsELECTRIC KETTLE CR 1290

natural_image
Exterior view of a modern coffee machine (no visible text or symbols)ESPRESSO MACHINE CR 4410

natural_image
Exterior view of a modern office building (no signage)SANDWICH MAKER CR 3054

natural_image
Black electronic device with a circular display and control buttons (no visible text or symbols)RETRO RADIO CR 1182

natural_image
White portable air conditioner unit with circular vent and grille (no visible text or symbols)AIR CONDITIONER CR 7925

natural_image
Modern kitchen mixer with digital display and control knob (no visible text or symbols)FOOD PROCESSOR CR 4223

natural_image
White hand mixer with whisk, no visible text or symbolsMIXER CR 4220

natural_image
Close-up of a black and silver meat processing tool (no visible text or symbols)MEAT MINCER CR 4812

natural_image
Exterior view of a modern air fryer with digital display (no visible text or symbols)AIR FRYER OVEN CR 6311

natural_image
Exterior view of a modern handheld vacuum cleaner with black handle and plastic casing (no text or symbols visible)BAGLESS VACUUM CLEANER CR 7046

natural_image
White portable air purifier with perforated grille and wheels (no visible text or symbols)AIR DEHUMIDIFIER CR 7851

Trimmer CR 2921

natural_image
White portable electronic device with a gray textured back cover and handle (no visible text or symbols)CERAMIC FAN HEATEROIL FILLED RADIATOR CR 7732 CR 7812

natural_image
Black cylindrical solar water heater with multiple cooling wheels and a digital display (no visible text or symbols)
natural_image
Exterior view of a modern office building (no signage)PORTABLE FRIDGE CR 8076

natural_image
A gray oval pet bed with a black cord and a small object inserted, no visible text or symbols.HEATED ANIMAL DEN CR 7431

AFTER SALE SERVICE NOTICE
| GB | If you want to buy spare parts or make any complaints, please contact the seller who issued the receipt directly. |
| DE | Wenn Sie Ersatzteile kaufen oder reklamieren möchten, wenden Sie sich bitte direkt an den Verkäufer, der die Quittung ausgestellt hat. |
| FR | Si vous souhaitez acheter des pièces de rechange ou faire des réclamations, veuillez contacter directement le vendeur qui a émis le reçu. |
| ES | Si desea comprar repuestos o presentar alguna queja, comuníquese directamente con el vendedor que emitió el recibo. |
| PT | Se você quiser comprar peças de reposição ou fazer alguma reclamação, entre em contato diretamente com o vendedor que emitiu o recibo. |
| LT | Jei norite ¡sigyti atsarginių dalių ar pateikti nusiskundimų, susisiekite tiesiogiai su kvitą išdavusiu pardavėju. |
| LV | Ja vēlaties iegādāties rezerves daļas vai izteikt pretenzijas, lūdzu, sazinieties tieši ar pārdevēju, kurš izsniedza čeku. |
| EST | Kui soovite osta varuosi või esitada pretensioone, võtke otse ühendust kviitungi väljastanud müūjaga. |
| HU | Ha pótalkatrészeket szeretne vásárolni, vagy panaszt szeretne tenni, forduljon közvetlenül a bizonylatot kiāllitó eladóhoz. |
| BS | Ako želite kupiti rezervne dijelove ili napraviti reklamaciju, obratite se direktno prodavaču koji je izdao račun. |
| RO | Если вы хотите купить запчасти или предъявить какие-либо претензии, пожалуйста, свяжитесь напрямую с продавцом, выдавшим чек. |
| CZ | Chcete-li zakoupit náhradní dily nebo uplatnit jakoukoli reklamaci, kontaktujte přimo prodejce, který účtenku vystavil. |
| RU | Dacă doriți să cumpārați piese de schimb sau să faceți vreo reclamație, vă rugăm să contactați direct vânzătorul care a emis chitanța. |
| GR | Eáv θέλετε να αγοράσετε ανταλλακτικά ή να κάνετε οποιαδήποτε παράπονα, επικοινωνήστε απευθείας με τον πωλητή που εξίδωσε την απόδειξη. |
| MK | Ako сакате да купите резервни делови или да поднесете какви било поплаки, контактирајте директно со продавачот koj ja издал сметката. |
| NL | Als u reserveonderdelen wilt kopen of een klacht wilt indienen, neem dan rechtstreeks contact op met de verkoper die de bon heeft afgegeven. |
| SL | Če želite kupiti nadomestne dele ali vložiti reklamacije, se obrnite neposredno na prodajalca, ki je izdal račun. |
| FI | Jos haluat ostaa varaosia tai tehdă valituksia, ota yhteyttă suoraan kuitin antaneeseen myyjään. |
| PL | W przypadku chęci zakupu części zamiennych lub zgłoszenia ewentualnych reklamacji należy kontaktować się bezpośrednio ze sprzedawcą, który wystawił paragon. |
| IT | Se desideri acquistare pezzi di ricambio o presentare reclami, contatta direttamente il venditore che ha emesso la ricevuta. |
| HR | Se desideri acquistare pezzi di ricambio o presentare reclami, contatta direttamente il venditore che ha emesso la ricevuta. |
| SV | Om du vill köpa reservdelar eller göra några reklamationer, vänligen kontakta säljaren som utfārdat kvittot direkt. |
| DK | Hvis du ønsker at købe reservedele eller reklamere, bedes du kontakte sælgeren, som har udstedt kvitteringen, direkte. |
| UA | Якщо ви хочете придбати запчастини або подати будь-які претензії, зверніться безпосередньо до продавця, який видав чек. |
| SR | Ako желите да купите резервне делове или да уложите рекламацију, обратите се директно продавцу који је издаю рачун. |
| SK | Ak si chcete kúpiť náhradné diely alebo uplatnit’ akúkoľvek reklamáciu, kontaktujte priamo predajcu, ktorý účtenku vystavil. |
| AR | إذا ként ترعب في شراء قطع عيار أو نقدم أي знакوي، فيرجي الاتصال بالبائع الذي أ typed الإ Mitsال مياشرة. |
| BG | Ako искате да закупите резервни части или да направите оплаквания, моля, свържете се директно с продавача, който е издал касовата бележка. |
| AZ | Ehtiyat hissələri almaq və ya hər hansı śikayat etmək istəyirsinizsə, qəbzi verən satici ilə birbaşa əlaqə saxlayın. |

- CR 7747
- ENGLISH
- READ CAREFULLY AND KEEP FOR FUTURE REFERENCE
- BEFORE FIRST USE:
- WALL INSTALLATION METHOD
- WARNING:
- USAGE
- FAN OPERATION – figure: VI, VII, VIII.
- TIMER OPERATION – figure: IX, X.
- CURRENT TIME / DAY SETTING – figure: XIII, XIV, XV.
- CURRENT TIME SETTING
- CURRENT DAY SETTING
- NOTE:
- TEMPERATURE SETTING – figure XVI.
- REMOTE CONTROL
- CLEARING AND MAINTENANCE
- DEUTSCH
- \* ARRÊT DIFFÉRÉ - figure IX.
- INNAN FÖRSTA ANVÄNDNING:
- METOD FÖR VÄGGINSTALLATION
- camry
- Premium
Brand : CAMRY
Model : CR 7747
Category : Heating