MX15 Pro - WiFi antenna Tenda - Free user manual and instructions
Find the device manual for free MX15 Pro Tenda in PDF.

User questions about MX15 Pro Tenda
0 question about this device. Answer the ones you know or ask your own.
Ask a new question about this device
Download the instructions for your WiFi antenna in PDF format for free! Find your manual MX15 Pro - Tenda and take your electronic device back in hand. On this page are published all the documents necessary for the use of your device. MX15 Pro by Tenda.
USER MANUAL MX15 Pro Tenda
Whole Home Mesh Wi-Fi 6/6E System

Download Tenda WiFi App
to remotely manage devices
Tenda
CONTENTS
01 / English
04 / Polski
07 / Deutsch
10 / Pycckn
13 / Français
16 / Netherlands
19 / Čestina
22 / Româna
25 / Português
28 / Espanol
31 / Magyar
34 / Italiano
37 /Бьлгарски
40/Svenska
43 / Slovenský
46 / Eληνικα
Package contents
Mesh device x3 (3-pack)/2 (2-pack)/1 (1-pack) Ethernet cablex1
Power adapters x 3 (3-pack)/2 (2-pack)/1(1-pack) Quickinstallation guidex1
Please read this guide before you start with the quick setup upon the first use. MX12 is used for illustration here unless otherwise specified. The actual product prevails.
Button/Interface
The buttons and interfaces may vary with models.
| Button/ Interface | Description |
| MESH | MESH button. - Networking: Press this button for about 1 to 3 seconds. The LED indicator blinks green fast. Within 2 minutes, press the MESH button of another device for 1 to 3 seconds to negotiate with this device. - De-networking (DO NOT operate unless necessary): Press this button for about 8 seconds and release it when the LED indicator blinks red fast. The node is reset and removed from the network and no longer automatically joins in again. |
| RESET RST | Reset button. When the device completes startup, hold down this button using a needle-like item (such as a pin) for about 8 seconds, and release it when the LED indicator blinks red fast. When the LED indicator lights solid green and then blinks slowly, the device is reset successfully. |
| LAN3/IPTV | LAN/IPTV multiplexing port, LAN port by default. |
| LAN2 | LAN port. |
| WAN/LAN WAN/LAN1 | WAN/LAN multiplexing port, WAN port by default. |
| 1 2 3 | WAN/LAN auto-adaptive port. |
| POWER PWR | Power jack. |
For initial internet connection with the Mesh device used as a router, see Ito II if you bought 1-pack and see I to III if you bought 2-pack or 3-pack.
For extending the WiFi network of existing Tenda devices that support the Mesh function, see III.
I Connect the node
*If you purchased a kit, choose one device from the kit to connect to the internet as the primary node in the network.

Tips
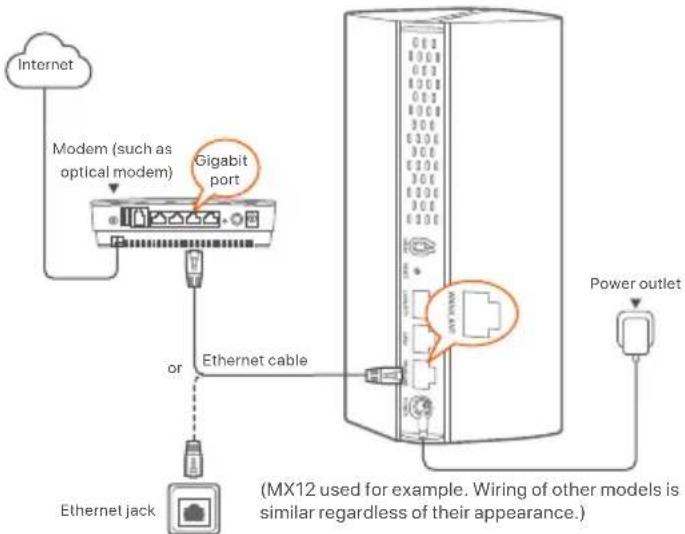
If you do not use a modem for internet access, skip steps 1 and 3.
- Power off your modem.
- Use the included Ethernet cable to connect the WAN port of the device to the LAN port of your modem or the Ethernet jack.
- Power on your modem.
- Power on the node, and wait until the LED indicator blinks green.
II Connect the node to the internet
*Smartphone used for example
1. Connect the smartphone to the WiFi network of the primary node, and you will be automatically redirected to the web UI of the device. The SSID and password can be found on the bottom label of the device.

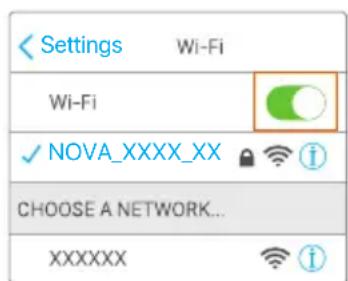
(MX12 used for example)
- Follow the onscreen instructions to connect the device to the internet. After the device is connected to the internet, its LED indicator lights solid green.

Tips
If the web UI is not displayed, open a browser on your smartphone and visit tendawifi.com in the address bar. If you still cannot log in to the web UI, see Q1 in FAQ.
If you use the device as a single router, now you have completed the settings and can access the internet with:
- Wireless devices: Connect to your WiFi network using the SSID and password you set.
- Wired devices: Connect to the LAN ports of your node.

Tips
If you cannot access the internet, see Q2 in FAQ.
III Extend network
Step 1: Networking
For 2-pack and 3-pack:
Place the other devices in the kit within 3 meters from the primary node and power them on. Wait for about 3 minutes. When the LED indicators of these devices light solid green, the networking is successful and these devices become secondary nodes in the network.
For 1-pack:

Tips
- Check that the primary node has been connected to internet with the MESH button function enabled and the new node has been restored to factory settings.
-
If the networking failed, contact Tenda's technical support.
-
Place the node in an elevated and open position within 3 meters from your existing node.
- Use the power adapter to connect the node to a power source. Wait about 40 seconds. The node completes startup when its LED indicator blinks green slowly.
- Press the MESH button of the node for about 1 to 3 seconds. The LED indicator blinks green fast. Within 2 minutes, press the MESH button of the node of the existing network for 1 to 3 seconds to negotiate with this node.
When the LED indicator of the node lights solid green, the networking is successful and the node becomes a secondary node in the network.
Step 2: Relocate the node
-
Refer to the following relocation tips to locate the secondary nodes to a proper position:
-
Ensure that the distance between any two nodes is less than 10 meters.
- Keep your nodes away from electronics with strong interference, such as microwave ovens, induction cookers, and refrigerators.
-
Place the nodes in a high position with few obstacles.
-
Power on the secondary nodes again till these LED indicators blink green slowly.

Tips
If the LED indicator of secondary node keeps blinking green slowly for more than 3 minutes, relocate the secondary node and move it closer to the primary node.
- Observe the LED indicator of the secondary nodes until the LED indicator lights one of the following colors:
| Solid green Excellent connection quality. | |
| Solid yellow Fair connection quality. | |
| Solid red | Poor connection quality. Relocate it according to step2 in III Extend network to get an optimal connection quality. |
Done.
To access the internet with:
- Wireless devices: Connect to your WiFi network using the SSID and password you set. (All nodes share the same SSID and password)
Wired devices: Connect to the LAN ports of your nodes.
LEDindicatorstatus
After the device is powered on for about 40 seconds, the system completes startup. The status of the LED indicator is shown in the following table.
| LED indicator status | Description |
| Solid green Connected to the internet. | |
| Solid yellow Networking succeeds. Fair connection quality. | |
| Solid red Networking succeeds. Poor connection quality. | |
| Blinking green slowly | Connecting to other nodes or waiting to connect to other nodes. |
| Blinking green fast Networking by MESH button. | |
| Blinking red slowly Failed to connect to the internet. | |
FAQ
Q1: I cannot log In to the web UI by visiting tendawfl.com. What should I do? A1: Try the following solutions:
- Ensure that your mobile device is connected to the WiFi network of the node.
- Ensure that the cellular network (mobile data) of the mobile device is disabled.
- Reset the node by referring to Button/Interface and try again.
Q2: I cannot access the internet after the configuration. What should I do?
A2: Try the following solutions first:
- Check whether the WAN port of the node is connected to a modem or Ethernet jack properly.
- Log in to the web UI of the node and navigate to the Internet Settings page. Follow the instructions on the page to solve the problem.
If the problem persists, try the following solutions:
- For wireless devices:
- Check whether your wireless device is connected to the WiFi network of the node.
-
Log in to the web UI and change your WiFi name and WiFi password on the WIFI Settings WIFI Name&Password page. Then try again.
-
For wired devices:
-
Check whether your wired device is connected to a LAN port properly.
- Check whether the wired device is set to Obtain an IP address automatically and Obtain DNS server address automatically.
CBeToOnoHbI HnDKaTOP
Iocne BKJIOUeHnY3na CBToNDnHb INHnKaTOp rOHT 3eNEHbIM HnpepbIBHbIMCBETOMOKo104cekyHddo3aBepSeHn3anycka.3aTeM CBToNDnHbINHnKaTOp 3arOpITcOOnHM n3 CNeIyoNx CBToB:
Q1:Я He Mory BoHTB Be6-nteppeic, nocetnb tendawlfl.com,TO MHe DeIaTb?
A1:nonpo6yntcne dyuoune peueHHa
- Y6eIntecb, yTo BaSe Mo6nIbHoe ycTpoIcTBo NOKIOueHO K cTeN Wi-Fi 6noka.
- Y6eIntecb, yTO cOTOBaCeTb (MOBnHbHbIe DaHHbIe) MOBnHbHorO yCTPOINCTBA OTKIOUHeHa.
C6pocbTe 6IOK c nOMOuB KONKn/INHTepeHca N NOBTOpNTne NOnblkY,
B2: Nocne hactpoikn KOHpyaun doctyn B INHTepHET OTCYTCTBye. To MHe DeIa?
02:Chauana nonpobyte cneyuoume pewehenr:
- PioBepbTe, npabInbNo nnoNpoknOeH nopT WAN y3na K moEmy nn Kaebeno Ethernet npobaipepa.
BoiBnTe BBe6-nteHepFeic y3na npeepiNte Ha cTpaHcy HacTpoek NHTepHeTa.CneyIte HcTpyKcIaM Ha cTpaHnce,HTo6bipewNTb np6nemy.
Ecn npo6nema He yctpHaHe, nonpo6yIte cneyuoune peweHna:
-ДябспpoBOnHbIx yctpoNCTB:
-Поверьт,поркюецл Ваш ecnpobodhoe yctpoicBo K cetn Wi-Fi 6noka.
-BoiTeB noIb3oBateBckn Be6-nHTepFeNc nImeHte NmWi-Fi nnapoBi Wi-Fi hactpaHnce HactpoKnWi-Fi>IMma npoB Wi-Fi 3aTEM nobTOPte nonblTKy.
-ДллпровдьхусгюCTВ:
- IpoBepbTe, npabnIbHO nBaue npoBoHoe yCTpOcTBO noDKNoeHO K npOty LAN.
- y6eintecb,уTOДЯ npOBoHOrO yCTpoNCTBa yCTaHO 3HaueHHe POnyatabIP-aDpec abTomatueeckn POnyatabadpec DNS-cebperaabTOMaTneckn.
Contenu du pack
DispositifMeshx3(3-pack)/2(2-pack)/1(1-pack) Cable Ethernetx1
Adaptateurs secteur x 3 (3-pack)/2 (2-pack)/1 (1-pack) Guided installation rapidx 1
AKOHMaTe DoCTbIDoHHTepHeT, BxKTeB.2B3B
III Pa3wnp8BaHe Na MpeXkaTa
CTbnka 1:Pa6oTa B MpeKaTa
3a2n3naKeTa:
IocTaBe TpyrTe yctPoJCTBa B kOMPNeKtB pAMKIne Ha 3 MeTp aOT OCHOBHnBb3eN I rN BkLIOHe. N3UaKaIe OKO NO MHNyTn. KOrAto LED HnDnKATOpHTe Ha Te3u YcTPOJCTBa CBETr NocToHNO B 3eNEHO, OCbSfCETBBAHTo HA MPexa e ycNeHNO n Te3u YcTpoCTBa CTABaT BTOpHn Hb3Nn B MPexaTa.
3a1 onakobka:

CbbETN
-Проветдд�ОСНВИТБбЕЛЕССВБп3нсИHTEPHETC
akTbnpaHa FyHKnIe MESH 6yToH N HOBnT Bb3eN E Bb3ctAHOBeHdo foabpnuHHe HaCTpoKn.
-AKcCbpb3BaHeToB MpeKa e HeycneuHo, CbpbXeTe ce cTexHueckaTa noDpBkKa Ha Tenda.
- Nocabepe pytepa Hbncoko nOTkpnto MrcTO Bpamknte Ha 3 metpa OBaunra CbuectByBaU, Bb3en.
2.Инольаite 3axpaHbuaaДаNTep,3aДа CBpJeTe B3eNaKbMnTOUHk Na 3axpaHbAne.ИчakateКоANO 40ceKHyd.NBzEJIbТprNKlIOuBa CTAPITIpaHETO,KORATOLED INHmKApOTb3ZAOHe DA MHaRbBOHb3eHNo.
3.HaHcHete6yToHa MESH HaBb3eHa 3a 0kO1o 1do 3cekyHn. LED HnHKaTOpBtMna 6bP3o 3eHeNo.BpAMKHe Ha2MHHTnHaHcHete 6yToHa MESH HaBb3eHaCbIec7bByBaUataMpexa 3a 1do3cekyHn,3a daCTapTnpa npoecbT no pnerOBapAne C To3n B3eN.
Korato LED INДИКАТОВТЯ NB3eHa 3aONUHe DA CBETN NOCTOHNB 3eJIeHO, CBp3BaHETO B MpeKa e yCneHNO H B3eJbT CTaba BTOPOCTeNEH Bb3eJI B MpeKaTa.
CTbnka 2: PpeMectete Bb3ena
-
BuxTe cneHnTe cBbEt n 3a npemecTbaHe, 3a da no3uohnpate pytepa npabnilho:
-
YBepete ce, ye pa3ctoHneTo MeXy BceKn DBa Bb3ena e No-MaNKo ot 10 MeTpa.
CbxpaHbBaTe CbONe B3nJaLeO tEKeKtpOnKa CcCnHcMyuHn KaTO MmKpOBbNHOu FyPHN, HnykUHOHH KOTNoHn XlaDJIHNi. - Noctabete Bb3JIte Ha BucOKO MRCTO C MaIKo NpeRtCTBn.
2.BKIOUyETe OTHOBBTOPNHHTE B3IN,DOKAToTe3nLED INNkATOpMNRat 6abHO B3eNEHO.

CbbETN
AkoLEDnndkaTOpbHaBToPunHb3eI npOdbJXkaba daMura6aBHO 3eJeHO 3aNoBHeOCTo 3 MHyTN, npEmecTeBTOpHnHb3eN NO-5nn3o DO OCHOBHn Bb3eI.
3.HaIIOaBaiTeLEDHINKKaTOpaHaBTOpuHHTeB3n,DOKaTOLED HINKAtOpbCTCBETHEBEHNOTcJeHNTeCBeTOBe:
Get support and services
For more information, please visit www.tendacn.com or scan the QR code.
You can see the product name and model on the product label.
Polski
Floor 6-8, Tower E3, No.1001, Zhongshanyuan Road, Nanshan District, Shenzhen, China. 518052
Website: www.tendacn.com
E-mail: support.nova@tenda.com.cn
support.uk@tenda.cn (United Kingdom)
support.us@tenda.cn (North America Support)
Copyright
© 2023 Shenzhen Tenda Technology Co., Ltd. All rights reserved.
Tenda is a registered trademark legally held by Shenzhen Tenda Technology Co., Ltd. Other brand and product names mentioned herein are trademarks or registered trademarks of their respective holders. Specifications are subject to change without notice.