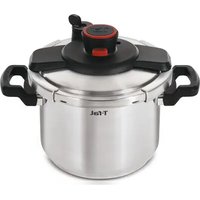
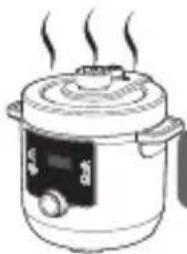
Turbo Cuisine Maxi CY777G - Saucepan TEFAL - Free user manual and instructions
Find the device manual for free Turbo Cuisine Maxi CY777G TEFAL in PDF.
| Product type | Electric multicooker pressure cooker |
| Brand | Tefal |
| Model | Turbo Cuisine Maxi CY777G |
| Cooking programs | 10 programs: Stew, Soup, Sear/Sauté, Steam, Cake, Slow cook/Sous-vide, Rice, Yogurt/Bread proofing, Oatmeal/Porridge, Manual mode |
| Cooking pressure | Up to 70 kPa |
| Temperature range | 22°C to 160°C depending on the program |
| Timer | Adjustable from 1 minute to 4 hours (up to 12 h for Slow cook/Sous-vide and Yogurt depending on program) |
| Delayed start | Yes, from 10 minutes to 12 hours |
| Keep warm | Up to 24 hours (depending on program) |
| Safety | Float valve, pressure limiter, pressure release button, lid lock |
| Cleaning | Lid and inner pot: hand wash; accessories (measuring cup, spatula, steam basket): dishwasher safe; do not immerse the appliance |
| Sealing gasket | Removable, washable; replace every 2 years or if damaged |
| Repairability | Spare parts available (gasket, valves, etc.); repair by authorized service center |
| Included accessories | Measuring cup, spatula, steam basket, steam rack (depending on model) |
| Inner pot coating | Non-stick |
| Power supply | 220-240 V (European standard); detachable power cord |
Frequently Asked Questions - Turbo Cuisine Maxi CY777G TEFAL
User questions about Turbo Cuisine Maxi CY777G TEFAL
0 question about this device. Answer the ones you know or ask your own.
Ask a new question about this device
Download the instructions for your Saucepan in PDF format for free! Find your manual Turbo Cuisine Maxi CY777G - TEFAL and take your electronic device back in hand. On this page are published all the documents necessary for the use of your device. Turbo Cuisine Maxi CY777G by TEFAL.
USER MANUAL Turbo Cuisine Maxi CY777G TEFAL
natural_image
Line drawing of a rice cooker with digital display and control buttons (no text or symbols on the device itself)Turbo Cuisine Maxi
THANKS FOR CHOOSING TEFAL
Welcome to the world of fast & delicious cooking!
With Turbo Cuisine, we took up the challenge of reinventing the pot: Easier. Tastier. Just better!
Designed with this guiding principle, Turbo Cuisine allows you to save time and cook homemade delicious meals in total simplicity and convenience.
Thanks again for welcoming us to your kitchen.
Now let's cook together!
CONTENTS
Quick Start Guide in Images 4
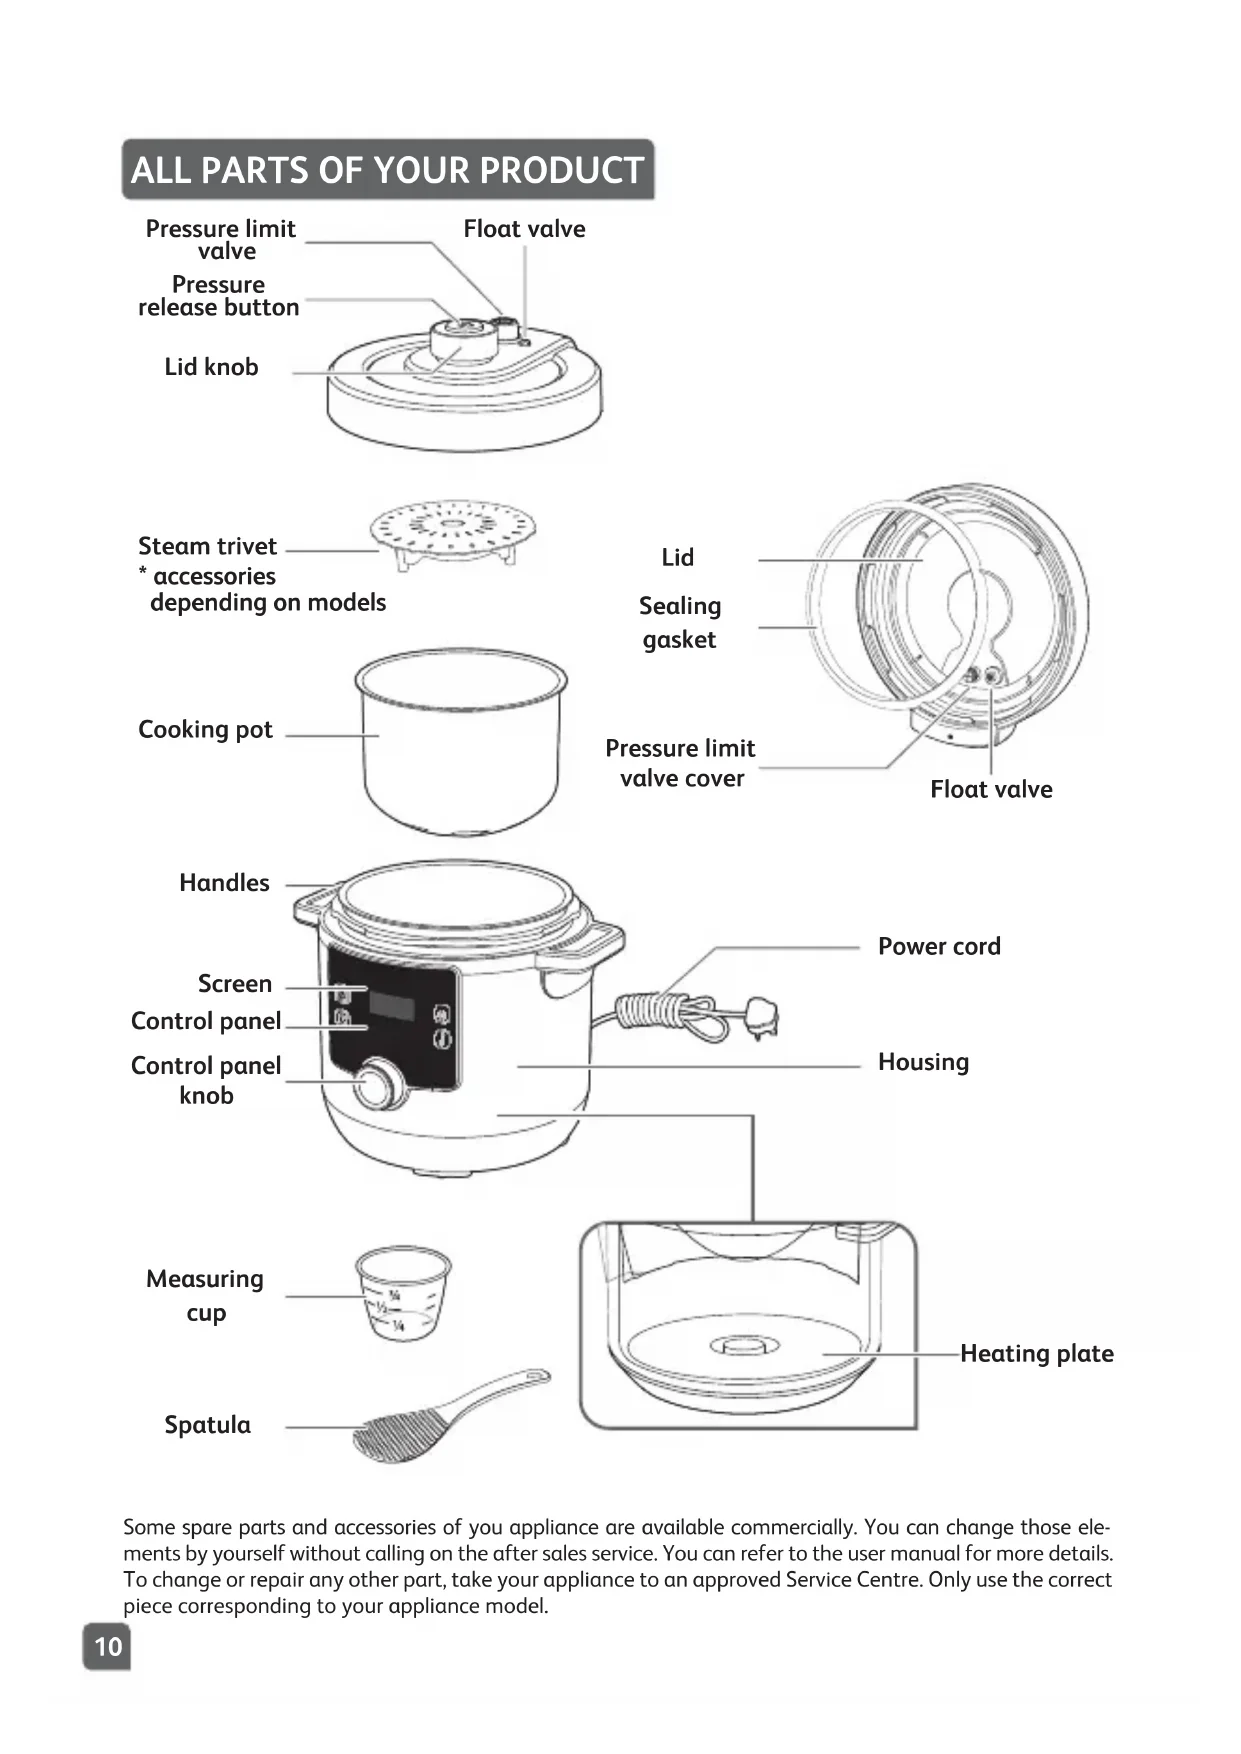
All Parts of Your Product 10
Getting Familiar with the Control Panel 11
How To Use & Clean Guide 12
Technical Troubleshooting Guide 28
Tefal International Limited Guarantee 31


natural_image
Diagram of a mechanical device with a cylindrical component and an upward arrow, no text or symbols present
natural_image
Line drawing of a kitchen sink with a pipe and soap bubble, no text or symbols present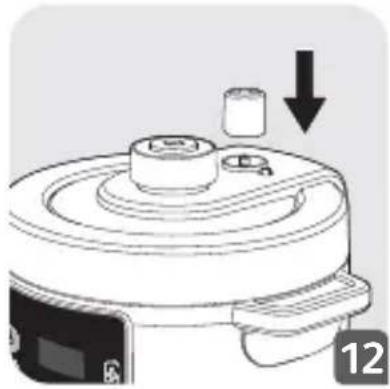
natural_image
Diagram of a kitchen appliance with a cylindrical component and a downward arrow indicating a drop (no text or symbols)
text_image
1 2 13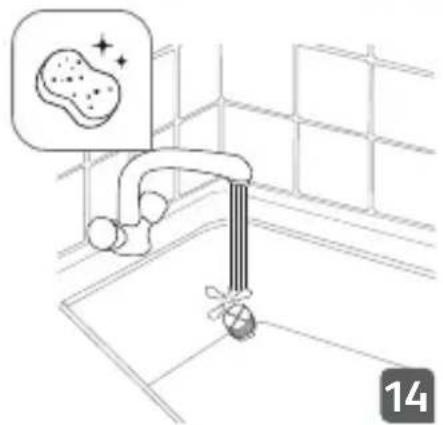
natural_image
Line drawing of a kitchen sink with a soap bubble and a small bowl, no text or symbols present
text_image
1 2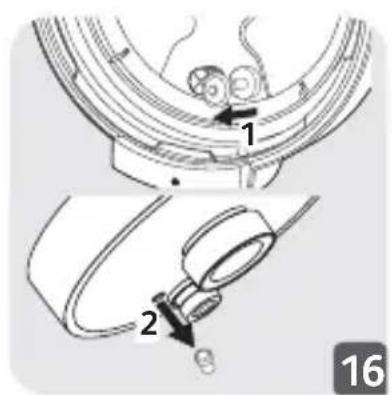
text_image
Technical diagram showing two mechanical assembly steps with labeled components and directional arrows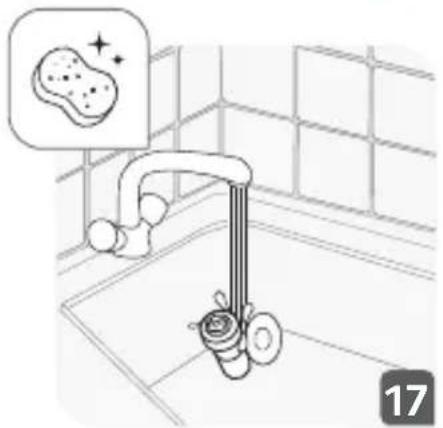
natural_image
Line drawing of a kitchen sink with a soap bubble and screw, no text or symbols present
text_image
Technical diagram showing mechanical components with labeled parts 1 and 2, likely illustrating a gear or bearing assembly.3
natural_image
Line drawing of a rice cooker with a lid and a digital display showing food (no text or symbols)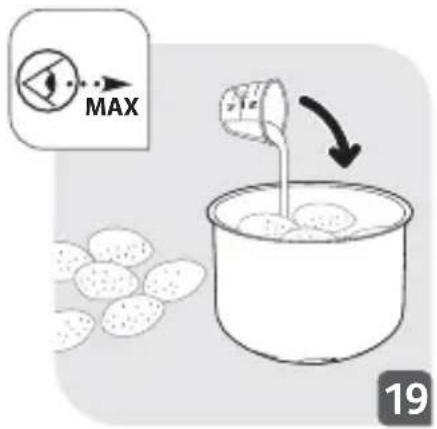
text_image
MAX 19
natural_image
Simple line drawing of a container with an X-shaped cross symbol inside, no text or symbols present.
natural_image
Illustration of a hand pressing down on a container with arrows indicating process flow (no text or symbols)

text_image
00:30 1 2 34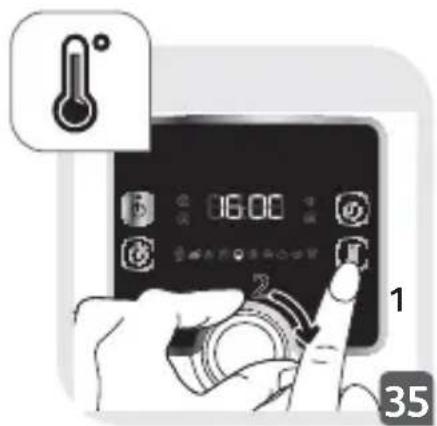
text_image
06:00 1 35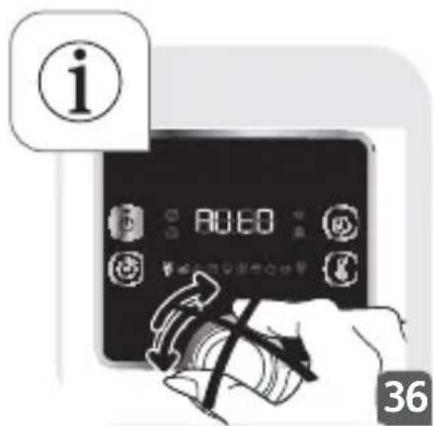
text_image
i 00:00 365

text_image
Warning symbol image with exclamation mark inside triangle
natural_image
Illustration of a hand placing a knob into a rice cooker (no text or symbols visible)
natural_image
Line drawing of a hand pressing down on a cooking pot (no text or symbols)
text_image
Bang! 39
text_image
Illustration showing a hand pouring liquid into a container with two warning signs: one with a sponge and spark, the other with a cross.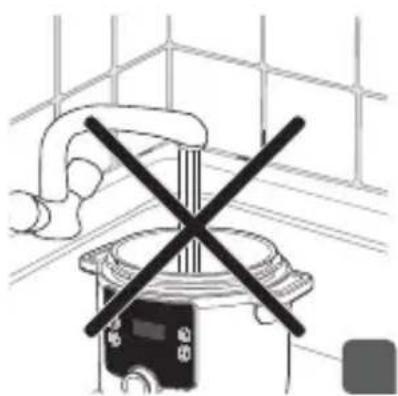
natural_image
Diagram of a mechanical device with a crossed X mark, set against a grid background (no text or symbols)
natural_image
Illustration of two cooking pots with crossed arrows indicating prohibition or resistance (no text or symbols)
natural_image
Diagram of a circular device with crosshair and internal components, no readable text or symbols present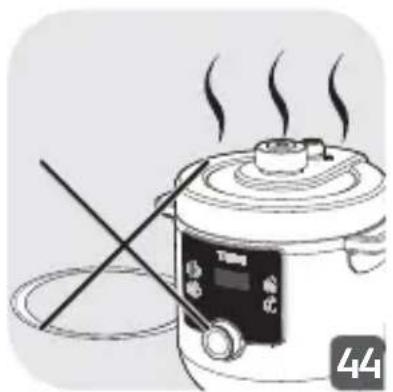
natural_image
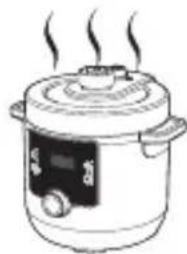
Illustration of a cooking pot with steam rising, no text or symbols present
natural_image
Illustration of a hand using a tool to press or adjust a small object on a cooking pot (no text or symbols visible)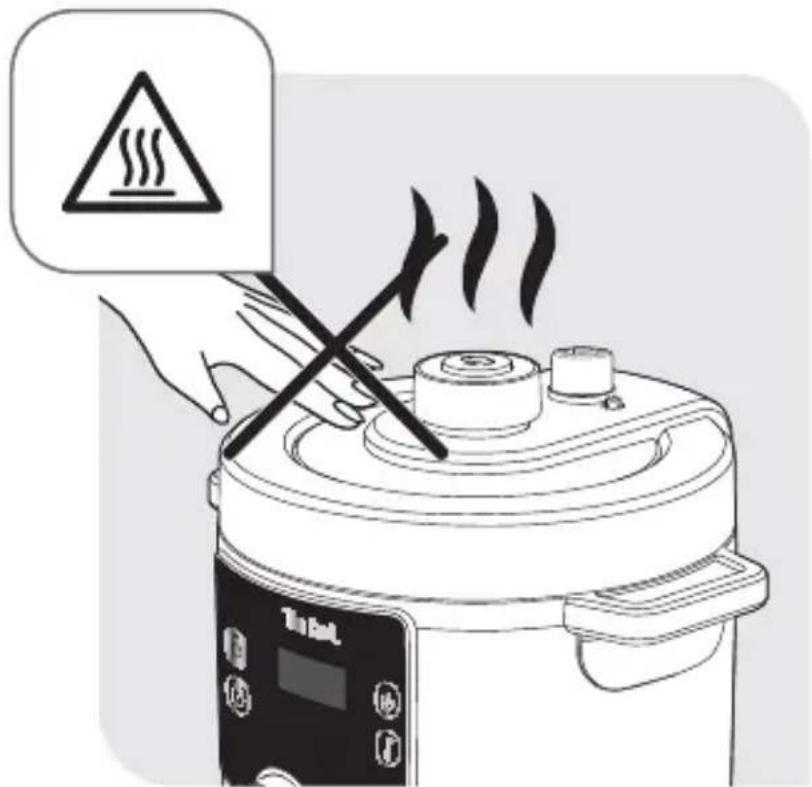
text_image
Illustration of a cooking pot with warning sign and heating instruction, showing a hand using a crossed tool to press the lid.
text_image
Illustration of a cooking pot with warning sign and heating instruction, showing a hand stirring a lid with a 'Bottled' control panel.5

text_image
Warning symbol image with exclamation mark inside triangle
text_image
OK TaRoel
text_image
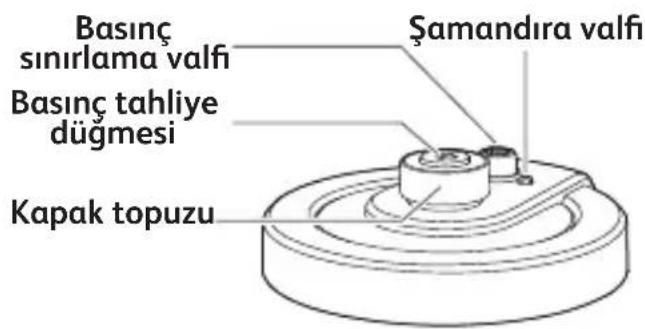
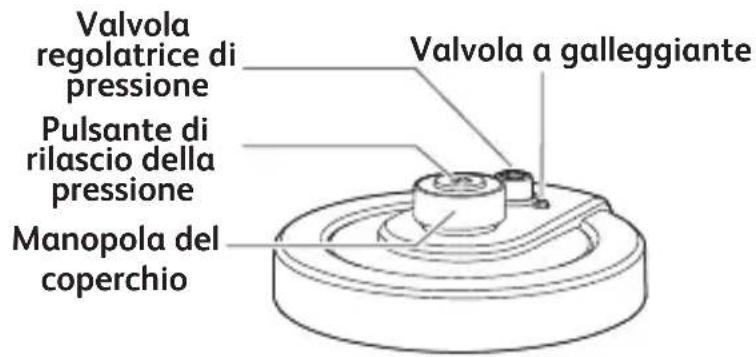
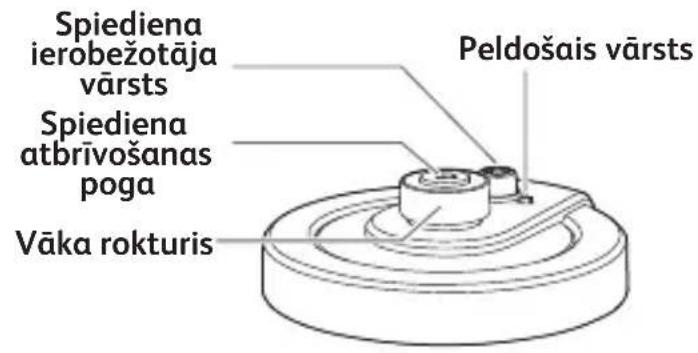
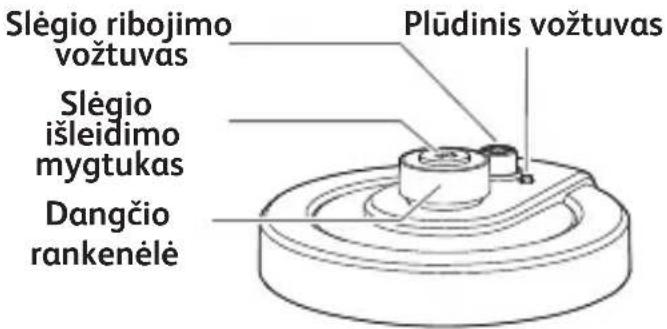
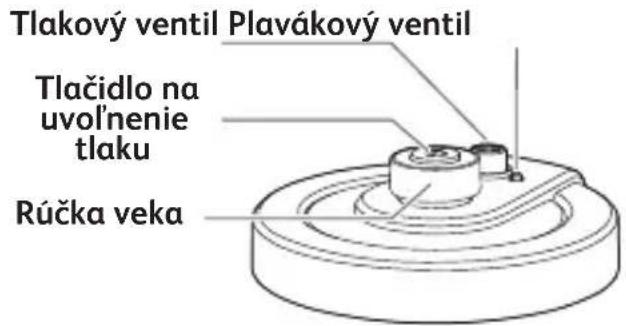
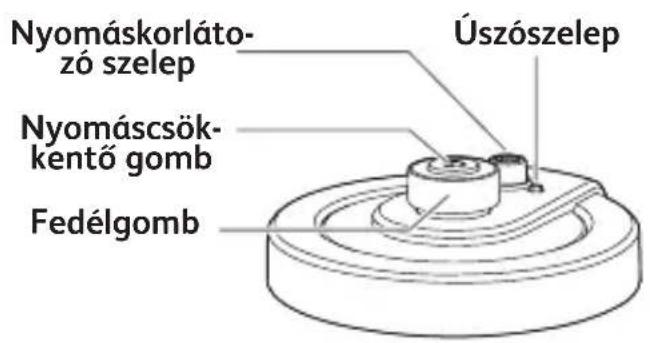
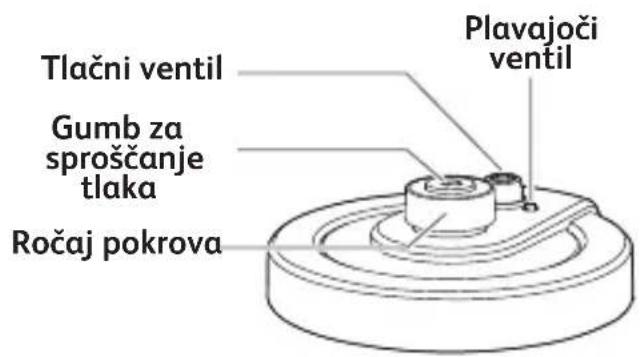
Diagram of a cooking pot with a label pointing to a steam rising from the lid, accompanied by a speech bubble icon containing a snow symbol.ALL PARTS OF YOUR PRODUCT

text_image
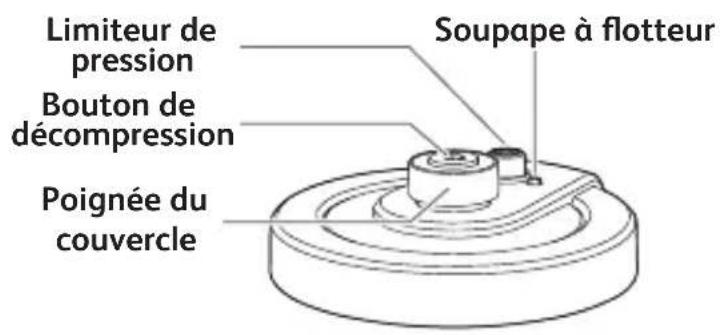
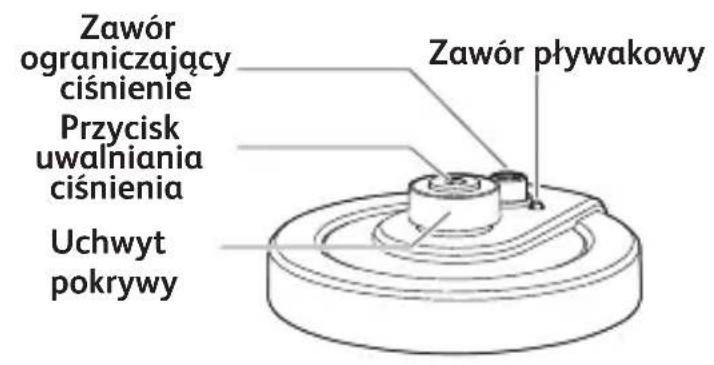
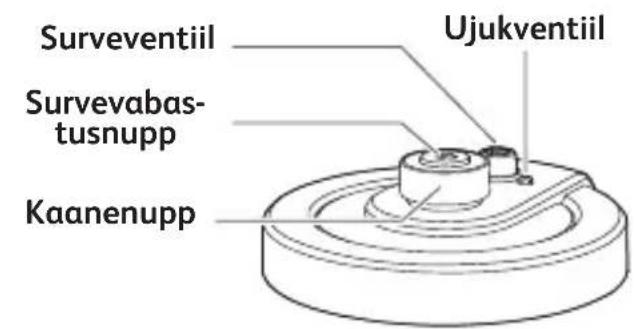
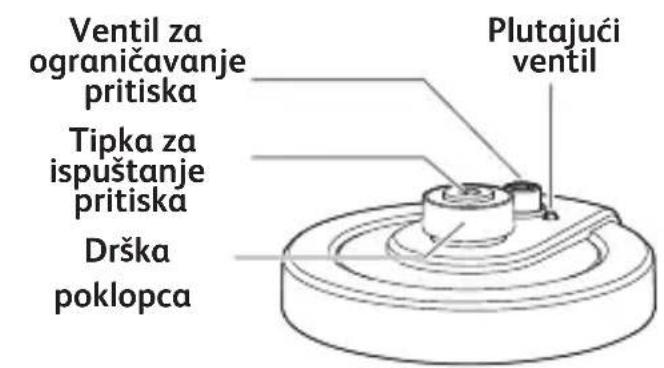
Pressure limit valve Pressure release button Lid knob Float valve Steam trivet * accessories depending on models Cooking pot Handles Screen Control panel Control panel knob Measuring cup Spatula Floating valve Lid Sealing gasket Pressure limit valve cover Power cord Housing Heating plateSome spare parts and accessories of you appliance are available commercially. You can change those elements by yourself without calling on the after sales service. You can refer to the user manual for more details. To change or repair any other part, take your appliance to an approved Service Centre. Only use the correct piece corresponding to your appliance model.
GETTING FAMILIAR WITH THE CONTROL PANEL
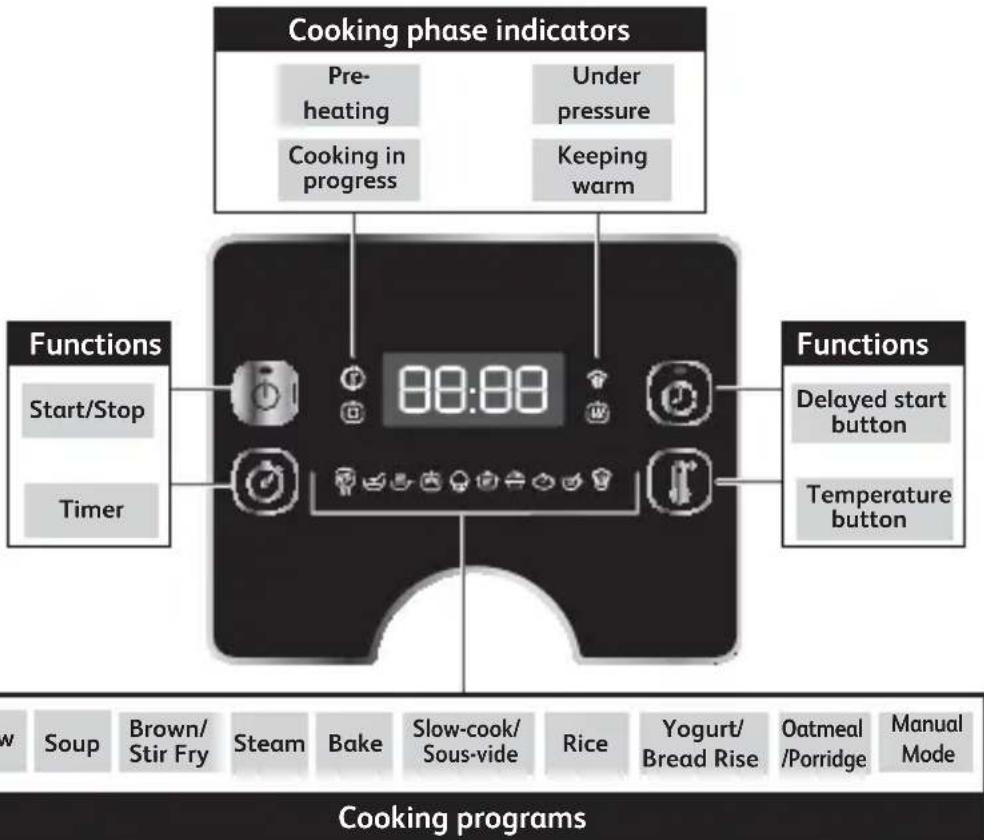
text_image
Cooking phase indicators Pre- heating Under pressure Cooking in progress Keeping warm Functions Start/Stop Timer 88:88 Functions Delayed start button Temperature button N Soup Brown/ Stir Fry Steam Bake Slow-cook/ Sous-vide Rice Yogurt/ Bread Rise Oatmeal /Porridge Manual Mode Cooking programsSTATUS MESSAGES


Welcome message when appliance is turned on.
Time display. In this example: 1 hour 30 minutes.
Temperature display. In this example: 114 degrees Celsius.
Indicates that the program has a default automatic temperature/time setting. It cannot be modified.
Indicates that temperature is rising during pre-heating phase.
Indicates that the appliance is pre-heating.
Indicates that the program is finished.
Indicates that the appliance is in keep warm phase.
Indicates that the program has been interrupted.
Indicates that the appliance is in standby mode.
Feel free to refer to the figures indicated as (Fig.x) from Quick Start Guide part.
BEFORE FIRST USE
1. Remove packaging
- Take your appliance out of its packaging and please take time to read the instruction manual before first use.
- Remove promotional stickers (if any) from your appliance before first use.
2. Open the lid
- To open the lid, take hold of the lid knob, turn anti-clockwise and lift the lid up (Fig.1 & 2).
Note: When lifting the lid, it can happen that the cooking pot remains attached to the lid. It is normal and simply demonstrates a good hermeticity of the product. To avoid that the cooking pot falls heavily on the product when opening the lid, always open the lid gently.
- Place your appliance on a flat surface. Remove all protective materials and accessories from the inside of the appliance (Fig.3).
3. Clean all parts of the appliance
3a. Clean the lid, the cooking pot and the accessories
- Clean the lid, the cooking pot and the accessories with a soft sponge and soapy hot water (Fig.4).
-
Dry off the lid, the cooking pot and the accessories (Fig.5)
-
Do not use a scourer or abrasive sponge to clean the cooking pot as it could damage the non-stick coating in the cooking pot (Fig.40).
- Do not immerse the appliance in water (Fig.41).
- If you inadvertently immerse your appliance in water or spill water directly on the heating plate, take it to an Approved Service Centre for repair.
- Do not put the lid and the cooking pot in the dishwasher (Fig.42).
- Be aware, only the accessories: ladle, measuring cup and steam basket are dishwasher safe.
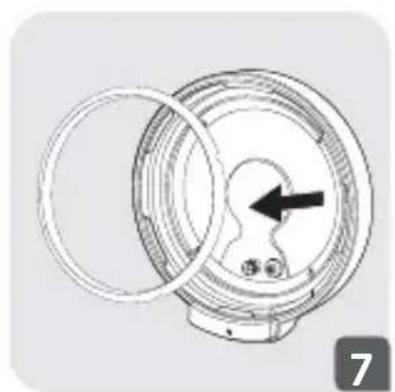
3b. Clean the sealing gasket
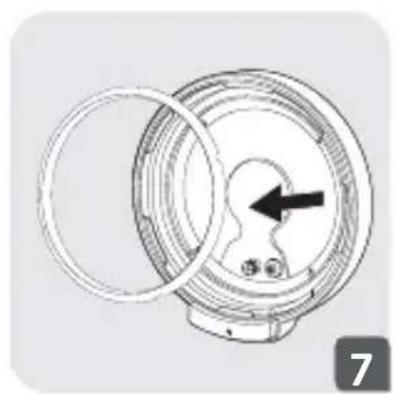
- Remove the sealing gasket from the lid and clean it with a soft sponge and soapy hot water (Fig.7 & 8).
- Dry it off thoroughly.
- Place the sealing gasket over the sealing gasket rack and press it into place (Fig.9). Press down firmly to ensure there is no puckering and that the sealing gasket is snug behind the sealing gasket rack.
- After placing the sealing gasket on the lid, if you open the lid too quickly, it can happen that the cooking pot remains attached to the lid (Fig.37 & 38). Wait few seconds for the cooking pot to free itself from the lid (Fig.39).
Note: It is normal and simply demonstrates a good hermeticity of the product. To avoid that the cooking pot falls heavily on the product when opening the lid, always open the lid gently.
WARNING: Never use your appliance without the sealing gasket (Fig.44)
3c. Clean the valves
- To clean the pressure limit valve, remove the pressure limit valve from the pipe on top of the lid (Fig.10). Clean it with a soft sponge and soapy hot water (Fig.11). Once dry, take care that the duct of the pipe is clean before plugging the pressure limit valve back on the pipe on top of the lid (Fig.12). Ensure that the pressure limit valve is well put in place, it must be able to move up and down.
- To clean the pressure limit valve cover, unscrew the limit valve cover from inside of the lid (Fig.13). Clean it with a soft sponge and soapy hot water (Fig.14). Once dry, take care that the duct of the pipe is clean before screwing the pressure limit valve cover back inside of the lid (Fig.15).
- To clean the float valve, remove the float valve gasket from inside of the lid, flip the lid so that the float valve can come out of the lid (Fig.16). Clean the float valve gasket and the float valve with a soft sponge and soapy hot water (Fig.17). Once dry, insert the float valve back on the lid and put the float valve gasket back in place (Fig.18). Ensure that the float valve is well put in place, it must be able to move up and down.
3d. Clean the housing of the appliance
- Clean the housing of the appliance using a damp cloth.
- Do not immerse the appliance in water (Fig.41).
- Wipe clean the heating plate using a dry cloth.
INSTRUCTIONS FOR USE
1. Place ingredients in the cooking pot
- Remove the cooking pot from the housing.
- Put ingredients into the cooking pot.
- Please note that the level of food and liquids should never exceed the max level marking on the cooking pot (Fig.19).
- When cooking food stuffs which expand during cooking in pressure mode, such as dehydrated vegetables or rice, do not fill the cooker to more than half of its capacity.
2. Place the cooking pot in the housing
- Ensure the bottom of the cooking pot is clean and dry; and remove any food residue from the heating plate (Fig.20).
- Place the cooking pot into the housing (Fig.21).
- Never use your appliance without the cooking pot.
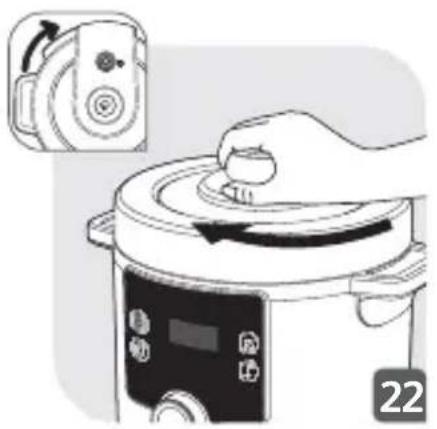
3. Close and lock the lid
- Check that the sealing gasket is securely placed on the lid (Fig.43).
- Take hold of the lid knob, place the lid on the appliance and turn it clockwise to lock it (Fig.22).
4. Attach the pressure limit valve
- Properly place the pressure limit valve on the lid (Fig.23). Please note that the valve will remain somewhat loose, it is normal.
5. Switch on the appliance
- Fully unwind the power cord and plug it into the mains (Fig.24).
- The appliance makes a ‘beep’ sound, the screen flashes and displays HE100.
6. Select and launch a cooking program
- Each program has a default time and temperature and requires a specific lid position, please have a look at the cooking programs table:
COOKING PROGRAMS TABLE
| Cooking program icon | Cooking program name | Default cooking time | Adjustable time | Default temperature | Adjustable temperature | Default pressure | Delayed start from 10min to 12h | Keep warm up to 24h | Lid status | ||
| Lid closed and locked | Lid closed but not locked | Lid open | |||||||||
 | Stew 30min | from 1min to 2h | 114C | No 70Kpa | Yes Yes | ● | |||||
 | Soup 12min | from 1min to 2h | 114C | No 70Kpa | Yes Yes | ● | |||||
 | Brown/ Stir Fry | 20min | from 1min to 1h | 160C | Yes from 100C to 160C | No No | No | ● | |||
 | Steam 10min | from 1min to 2h | 114C | No 70Kpa | Yes Yes | ● | |||||
 | Bake 40min | from 1min to 2h | 160C | Yes from 100C to 160C | No Yes | Yes | ● | ||||
 | Slow-cook/ Sous-vide | 4h | from 30min to 12h | 85C | Yes from 55C to 95C | No Yes | No | ● | ● | ||
 | Rice 12min | from 1min to 2h | 114C | No 70Kpa | Yes Yes | ● | |||||
 | Yogurt/ Bread Rise | 8h | from 30min to 12h | 30C | Yes from 22C to 40C | No No | No | ● | ● | ||
 — — | Oatmeal/ Porridge | 15min | from 1min to 2h | 100C | No No Yes | Yes | ● | ||||
 | Manual Mode | 30min | from 1min to 4h | 80C | Yes from 70C to 160C | No No | Yes | ● | ● | ● | |
Note: When cooking, you may notice slight steam leakage from the lid, especially from the pressure limit valve. This is normal and occurs when pressure builds up.
Please refer to the figures from Quick Start Guide (from Fig.25 to Fig.36)
Stew program
- Place the ingredients in the cooking pot and completely close and lock the lid.
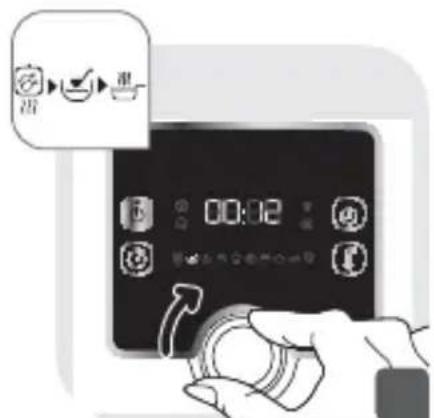
- Turn the control panel knob to the right to reach Stew program. The screen displays the default cooking time.
- Optional: Press and set the desired time by turning the control panel knob to the right (to increase time) or to the left (to decrease time).
- Press to start the cooking program.
- The appliance starts the pre-heating phase. The screen displays alternatively & and the pre-heating light indicator turns on.
- When the pre-heating phase is completed, the appliance switches automatically to cooking phase. The screen displays the count down and the cooking in progress light indicator turns on.
- During cooking process, pressure builds up in the appliance and pushes the float valve up. The under pressure light indicator turns on to notify that the lid cannot be opened without releasing the pressure first.
- At the end of the count down, the appliance beeps and the screen displays End.
- After a few seconds, the appliance will automatically switch to keep warm phase. The screen displays and the keeping warm light indicator turns on.
- Press ⏻ for 3 seconds to stop the program at any time.

Soup program
- Place the ingredients in the cooking pot and completely close and lock the lid.
- Turn the control panel knob to the right to reach Soup program. The screen displays the default cooking time.
- Optional: Press ⏻ and set the desired time by turning the control panel knob to the right (to increase time) or to the left (to decrease time).
- Press ⏻ to start the cooking program.
- The appliance starts the pre-heating phase. The screen displays alternatively & and the pre-heating light indicator turns on.
- When the pre-heating phase is completed, the appliance switches automatically to cooking phase. The screen displays the count down and the cooking in progress light indicator 📷 turns on.
- During cooking process, pressure builds up in the appliance and pushes the float valve up. The under pressure light indicator ⬇ turns on to notify that the lid cannot be opened without releasing the pressure first.
- At the end of the count down, the appliance beeps and the screen displays End.
- After a few seconds, the appliance will automatically switch to keep warm phase. The screen displays 🔊 and the keeping warm light indicator ☑ turns on.
- Press 📋 for 3 seconds to stop the program at any time.

Brown/Stir Fry program
- Turn the control panel knob to the right to reach Brown/Stir Fry program. The screen displays the default cooking time.
- Optional: Press and set the desired time by turning the control panel knob to the right (to increase time) or to the left (to decrease time).
- Optional: Press ⏻ and set the desired temperature by turning the control panel knob to the right (to increase temperature) or to the left (to decrease temperature).
- Press Ⓞ to start the cooking program.
- The appliance starts the pre-heating phase. The screen displays alternatively & and the pre-heating light indicator turns on.
- When the pre-heating phase is completed, the appliance switches automatically to cooking phase. The screen displays the count down and the cooking in progress light indicator 📋 turns on.
- Place the ingredients in the cooking pot and keep the lid open to stir-fry.
- At the end of the count down, the appliance beeps and the screen displays End.
- After a few seconds, the appliance will automatically switch to standby mode. The screen displays .
- Press 📄 for 3 seconds to stop the program at any time.

Steam program
- Place 150ml of water (3/4 cup) in the cooking pot, put your ingredients in the steam basket and place the steam basket on top of the cooking pot. Completely close and lock the lid.
- Turn the control panel knob to the right to reach Steam program 📋. The screen displays the default cooking time.
- Optional: Press ⏻ and set the desired time by turning the
control panel knob to the right (to increase time) or to the left (to decrease time).
- Press ⏻ to start the cooking program.
- The appliance starts the pre-heating phase. The screen displays alternatively & and the pre-heating light indicator turns on.
- When the pre-heating phase is completed, the appliance switches automatically to cooking phase. The screen displays the count down and the cooking in progress light indicator 📋 turns on.
- During cooking process, pressure builds up in the appliance and pushes the float valve up. The under pressure light indicator ⏻ turns on to notify that the lid cannot be opened without releasing the pressure first.
- At the end of the count down, the appliance beeps and the screen displays End.
- After a few seconds, the appliance will automatically switch to keep warm phase. The screen displays 🔊 and the keeping warm light indicator ☑️ turns on.
- Press ⏻ for 3 seconds to stop the program at any time.

Bake program
- Place the preparation in the cooking pot and close but don’t lock the lid.
- Turn the control panel knob to the right to reach Bake program 🌐. The screen displays the default cooking time.
-
Optional: Press ⏻ and set the desired time by turning the control panel knob to the right (to increase time) or to the left (to decrease time).
-
Optional: Press and set the desired temperature by turning the control panel knob to the right (to increase temperature) or to the left (to decrease temperature).
- Press ⏻ to start the cooking program.
- The appliance starts the pre-heating phase. The screen displays alternatively & and the pre-heating light indicator turns on.
- When the pre-heating phase is completed, the appliance switches automatically to cooking phase. The screen displays the count down and the cooking in progress light indicator 📋 turns on.
- At the end of the count down, the appliance beeps and the screen displays End.
- After a few seconds, the appliance will automatically switch to keep warm phase. The screen displays ⒽOE and the keeping warm light indicator 📄turns on.
- Press Ⓞ for 3 seconds to stop the program at any time.
Slow-cook/Sous-vide program
- Place the ingredients in the cooking pot and close the lid.
- Turn the control panel knob to the right to reach Slow-cook/Sous-vide program 📋The screen displays the default cooking time.
- Optional: Press ⏻ and set the desired time by turning the control panel knob to the right (to increase time) or to the left (to decrease time).
- Optional: Press ⏻ and set the desired temperature by turning the control panel knob to the right (to increase temperature) or to the left (to decrease temperature).
-
Press ⏻ to start the cooking program.
-
The appliance starts the pre-heating phase. The screen displays alternatively & and the pre-heating light indicator turns on.
- When the pre-heating phase is completed, the appliance switches automatically to cooking phase. The screen displays the count down and the cooking in progress light indicator turns on.
- At the end of the count down, the appliance beeps and the screen displays End
- After a few seconds, the appliance will automatically switch to standby mode. The screen displays 📄.
- Press ⏻ for 3 seconds to stop the program at any time.

Rice program
- Place the ingredients in the cooking pot and completely close and lock the lid.
- Turn the control panel knob to the right to reach Rice program 📋. The screen displays the default cooking time.
- Optional: Press and set the desired time by turning the control panel knob to the right (to increase time) or to the left (to decrease time).
- Press to start the cooking program.
- The appliance starts the pre-heating phase. The screen displays alternatively & HERE and the pre-heating light indicator turns on.
- When the pre-heating phase is completed, the appliance switches automatically to cooking phase. The screen displays the count down and the cooking in progress light indicator turns on.
-
During cooking process, pressure builds up in the appliance and pushes the float valve up. The under pressure light indicator ⏻ turns on to notify that the lid cannot be opened without releasing the pressure first.
-
At the end of the count down, the appliance beeps and the screen displays End
- After a few seconds, the appliance will automatically switch to keep warm phase. The screen displays and the keeping warm light indicator turns on.
- Press for 3 seconds to stop the program at any time.

Yogurt/Bread Rise program
Yogurt/Bread Rise program can be used to make yogurt or raise bread/pastry dough.
- Place the ingredients in the cooking pot and close the lid. When raising dough, you can knead the dough directly in the cooking pot then place the cooking pot in the housing and close the lid.
- Turn the control panel knob to the right to reach Yogurt/Bread Rise program ⚙The screen displays the default cooking time.
- Optional: Press ⏻ and set the desired time by turning the control panel knob to the right (to increase time) or to the left (to decrease time).
- Optional: Press ⏻ and set the desired temperature by turning the control panel knob to the right (to increase temperature) or to the left (to decrease temperature).
- Press Ⓞ to start the cooking program.
- The appliance starts the pre-heating phase. The screen displays alternatively & and the pre-heating light indicator turns on.
- When the pre-heating phase is completed, the appliance switches automatically to cooking phase. The screen displays the count down and the cooking in progress light indicator turns on.
- At the end of the count down, the appliance beeps and the screen displays End.
- After a few seconds, the appliance will automatically switch to standby mode. The screen displays
- Press ⏻ for 3 seconds to stop the program at any time.

Oatmeal/Porridge program
- Place the ingredients in the cooking pot and completely close and lock the lid.
- Turn the control panel knob to the right to reach Oatmeal/Porridge program 📂The screen displays the default cooking time.
- Optional: Press and set the desired time by turning the control panel knob to the right (to increase time) or to the left (to decrease time).
- Press ⏻ to start the cooking program.
- The appliance starts the pre-heating phase. The screen displays alternatively & and the pre-heating light indicator turns on.
- When the pre-heating phase is completed, the appliance switches automatically to cooking phase. The screen displays the count down and the cooking in progress light indicator 📋 turns on.
- At the end of the count down, the appliance beeps and the screen displays End.
- After a few seconds, the appliance will automatically switch to keep warm phase. The screen displays 🔊 and the keeping warm light indicator 📄 turns on.
- Press 📋 for 3 seconds to stop the program at any time

Manual Mode
- Place the ingredients in the cooking pot and close the lid or not depending on your recipe.
- Turn the control panel knob to the right to reach Manual Mode 📂. The screen displays the default cooking time.
- Optional: Press ⏻ and set the desired time by turning the control panel knob to the right (to increase time) or to the left (to decrease time).
- Optional: Press ⏻ and set the desired temperature by turning the control panel knob to the right (to increase temperature) or to the left (to decrease temperature).
- Press 📋 to start the cooking program.
- The appliance starts the pre-heating phase. The screen displays alternatively & and the pre-heating light indicator turns on.
- When the pre-heating phase is completed, the appliance switches automatically to cooking phase. The screen displays the count down and the cooking in progress light indicator 📷 turns on.
- At the end of the count down, the appliance beeps and the screen displays [End].
• After a few seconds, the appliance will automatically switch to standby mode. The screen displays .
- Press ⏻ for 3 seconds to stop the program at any time.
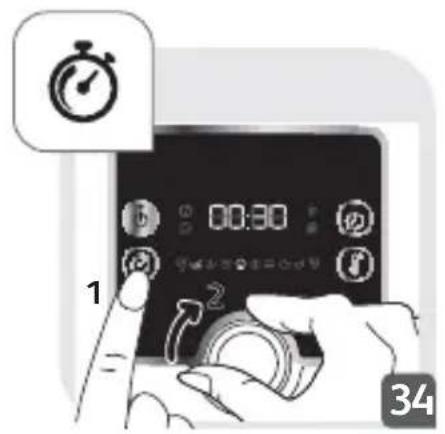
7. Use the delayed start function
Delayed start can be useful to preset the appliance to start cooking later.
- First select a program following the steps described above in part 6.
- Before starting the selected program, press ⏻ . The screen displays the default time for delayed start.
- Set the desired time by turning the control panel knob to the right (to increase time) or to the left (to decrease time).
- Press ⏻ . The screen displays the delayed start count down. When preset time is elapsed, the appliance will start cooking automatically.
8. Open the lid
- Do not attempt to open the lid if the float valve is up and if the under pressure light indicator ⏻ is turned on.
- The pressure can be release in 2 different ways at the end of the cooking:
Natural release: At the end of the cooking or after stopping the program, the appliance will cool down by itself, and the pressure will release naturally. During natural release, food might over-cook due to the remaining pressure in the pot. Use manual release to stop cooking process immediately.
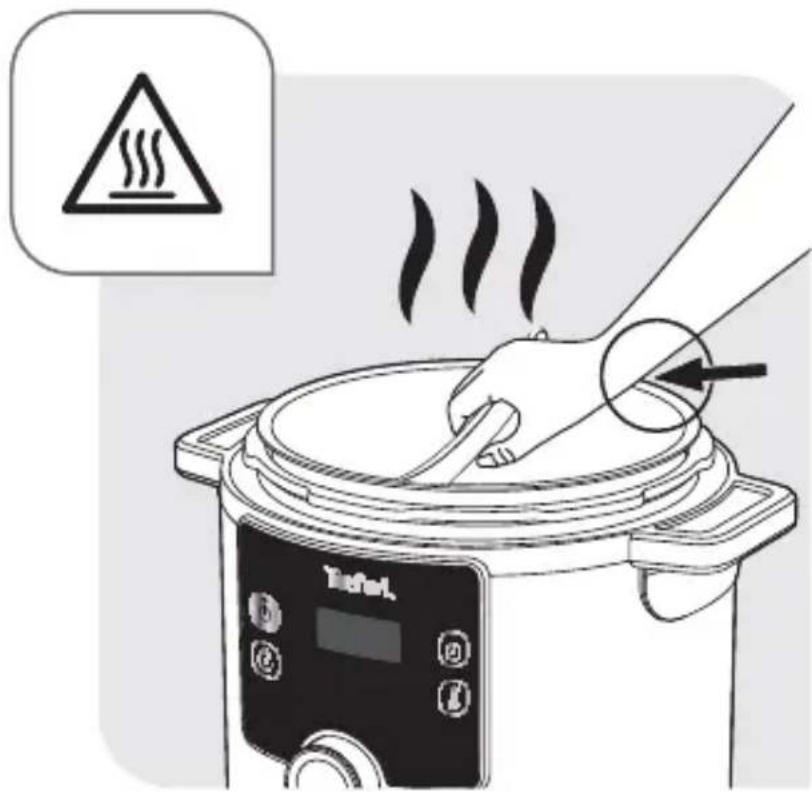
Manual release: Press the pressure release button, on top of the lid. It will take a few seconds to a few minutes depending on the amount of food inside of the cooking pot (Fig.34).
WARNING: Be careful of the hot steam coming out from the appliance. Keep your face and hands away from the steam output (Fig.45).
- To open the lid, position your arm parallel to the side handles, take hold of the lid knob, turn anti-clockwise and lift the lid up (Fig.35 & 36).
WARNING: Be careful of the hot steam coming out from the cooking pot.
9. Unplug the appliance
- After usage, unplug the appliance and let it cool down for at least 2 hours before cleaning.
10. Clean after use
- Clean your appliance after each use.
- Before cleaning, let your appliance cool down for at least 2 hours.
- For cleaning instructions, refer to part 3. Clean all parts of the appliance in BEFORE FIRST USE section.
11. Maintenance tips
- To ensure the durability of the cooking pot time over time, do not cut food in it.
- Use the provided accessories. Do not use any metallic utensil as it could damage the nonstick coating in the pot.
- After usage, the sealing gasket may keep the smell of your dish. It is normal; silicone has little pores that open up when exposed to high temperature and close back once temperature drops. To eliminate the smell from the sealing gasket, you can:
- Put the silicone ring in the dishwasher
- Add 1 cup of vinegar, 1 cup of water and 1 lemon cut in large pieces into the cooking pot and launch a steam program for 2 minutes, then let the steam release naturally.
- Change the sealing gasket every 2 years or earlier in case of damage.
TECHNICAL TROUBLESHOOTING GUIDE
| Problem Possible reasons Solutions | ||
| Unable to open lid | Unable to open because of pressure in the cooking pot. | Press continuously the pressure release button to remove the pressure inside of the cooking pot. It can take a few minutes until the pressure is fully released. |
| Pressure in the cooking pot is fully released but the float valve is stuck because it is too dirty and therefore unable to move down. | a. Be sure the pressure is totally released by letting the appliance cool down for at least 2 hours.b. Gently push the float valve down by inserting a skewer or a long object into the float valve opening. If this does not work, send the appliance to an Approved Service Centre.c. For next use, please clean and dry off the float valve thoroughly. | |
| Unable to close lid | The sealing gasket is not properly installed. | Install the sealing gasket properly. |
| The cooking pot contains hot ingredients generating steam. | Wait for the ingredients in the cooking pot to cool down before trying to close the lid again. | |
| The float valve is stuck because it is too dirty and therefore unable to move down. | a. Gently push the float valve down by inserting a skewer or a long object into the float valve opening. If this does not work, send the appliance to an Approved Service Centre.b. For next use, please clean and dry off the float valve thoroughly. | |
| Position and or direction at which the lid was closed is incorrect. | Close the lid in the correct direction according to the instruction manual. | |
| When opening the lid, the cooking pot remains attached to the lid. | The sealing gasket created a suction effect. | The cooking pot will free from the lid by itself. It is normal and simply demonstrates a good hermeticity of the product. To avoid that the cooking pot falls heavily on the product when opening the lid, always open the lid gently. |
| Problem Possible | reasons Solutions | |
| Intense release of pressure from the pressure limit valve. | The inner pressure exceeds working pressure, or the inner pressure exceeds the safety pressure. | Clean pressure limit valve, float valve and lid thoroughly. If float valve still has steam coming out, please return appliance to the nearest. Approved Service Center for inspecting, repairing or adjusting by authorized person. |
| The pressure limit valve is in an incorrect position. | Carefully rotate/press the pressure limit valve to make it fall into place. Be careful of the hot steam. Position yourself safely and wear oven mitts. | |
| Faulty pressure control resulted in release of pressure. | Send the appliance to an Approved Service Centre for repair. | |
| Continuous pressure release from the float valve. | Residue in the float valve. | a. Press continuously the pressure release button to remove the pressure inside of the cooking pot. It can take a few minutes until the pressure is fully released.b. Let the appliance cool down for at least 2 hours.c. Clean and dry off the float valve before restarting the cooking. |
| The float valve is stuck. | a. Press continuously the pressure release button to remove the pressure inside of the cooking pot. It can take a few minutes until the pressure is fully released.b. Let the appliance cool down for at least 2 hours.c. Clean and dry off the float valve before restarting the cooking. | |
| Steam leakage from lid. | The sealing gasket is not properly installed. | Remove the sealing gasket, clean it and reinstall it in the correct position. |
| The sealing gasket is dirty. | Remove the sealing gasket, clean it and reinstall it in the correct position. | |
| The sealing gasket is damaged, or the edge of the cooking pot is damaged. | Send the appliance to an Approved Service Centre for repair. | |
| Food is uncooked | Solid/liquid ingredients ratio is incorrect. | Try again by following precisely the quantities of the recipe. |
| No electricity from the power supply. | Check your home electric circuit. | |
| E0 displayed on the digital screen. | Pressure switch is faulty. | Send the appliance to an Approved Service Centre for repair. |
| E1 displayed on the digital screen. | The temperature sensor is faulty. | Send the appliance to an Approved Service Centre for repair. |
| E2 displayed on the digital screen. | The lid is not properly positioned for your cooking program. Each program requires a specific lid position. | Check and adjust the lid position required by your cooking program, refer to the cooking programs table in part 6 of this manual. Restart your program once the lid is correctly positioned. If the issue remains, send the appliance to an Approved Service Center for repair. |
TEFAL/T-FAL\* INTERNATIONAL LIMITED GUARANTEE
: www.tefal.com
This product is repairable by TEFAL/T-FAL*, during and after the guarantee period.
Accessories, consumables and end-user replaceable parts can be purchased, if locally available, as described on the TEFAL/T-FAL internet site www.tefal.com
The Guarantee\*\* :
TEFAL/T-FAL guarantees this product against any manufacturing defect in materials or workmanship during the guarantee period within those countries*** as stated in the attached country list, starting from the initial date of purchase or delivery date. The international manufacturer's guarantee covers all costs related to restoring the proven defective product so that it conforms to its original specifications, through the repair or replacement of any defective part and the necessary labour. At TEFAL/T-FAL's choice, an equivalent or superior replacement product may be provided instead of repairing a defective product. TEFAL/T-FAL's sole obligation and your exclusive resolution under this guarantee are limited to such repair or replacement.
TEFAL/T-FAL shall not be obliged to repair or replace any product which is not accompanied by a valid proof of purchase. The product can be taken directly in person or must be adequately packaged and returned, by recorded delivery (or equivalent method of postage), to a TEFAL/T-FAL authorised service centre. Full address details for each country's authorised service centres are listed on TEFAL/T-FAL website (www.tefal.com) or by calling the appropriate consumer Service centre set out in the attached country list. In order to offer the best possible after-sales service and constantly improve customer satisfaction, TEFAL/T-FAL may send a satisfaction survey to all customers who have had their product repaired or exchanged in a TEFAL/T-FAL authorised service centre. This guarantee applies only for products purchased and used for domestic purposes and will not cover any damage which occurs as a result of misuse, negligence, failure to follow TEFAL/T-FAL instructions, or a modification or unauthorised repair of the product, faulty packaging by the owner or mishandling by any carrier. It also does not cover normal wear and tear, maintenance or replacement of consumable parts, or the following:
- using the wrong type of water or consumable
- mechanical damages, overloading
- ingress of water, dust or insects into the product (excluding appliances with features specifically designed for insects)
- damage as a result of lightning or power surges
- scaling (any de-scaling must be carried out according to the instructions for use)
- accidents including fire, flood, etc
- damage to any glass or porcelain ware in the product
- professional or commercial use
- damages or poor results specifically due to wrong voltage or frequency as stamped on the product ID or specification
Consumer Statutory Rights :
This international TEFAL/T-FAL guarantee does not affect the Statutory Rights a consumer may have or those rights that cannot be excluded or limited, nor rights against the retailer from which the consumer purchased the product. This guarantee gives a consumer specific legal rights, and the consumer may also have other legal rights which vary from State to State or Country to Country. The consumer may assert any such rights at his sole discretion. ***Where a product purchased in a listed country and then used in another listed country, the international TEFAL/T-FAL guarantee duration is the period for the country of usage, even if the product was purchased in a listed country with a longer guarantee duration. The repair process may require a longer time if the product is not locally sold by TEFAL/T-FAL in the country of usage. If the product is not repairable in the new country of usage, the international TEFAL/T-FAL guarantee is limited to a replacement by a similar or alternative product at similar cost, where possible. *TEFAL household appliances appear under the T-FAL brand in some territories like America and Japan. TEFAL/T-FAL are registered trademarks of Groupe SEB.
Please keep this document for your reference should you wish to make a claim under the guarantee.
\*\*For Australia only:
Our goods come with guarantees that cannot be excluded under the Australian Consumer Law. You are entitled to a replacement or refund for a major failure and compensation for any other reasonably foreseeable loss or damage. You are also entitled to have the goods repaired or replaced if the goods fail to be of acceptable quality and the failure does not amount to a major failure.
\*\*For India only:
Your Tefal product is guaranteed for 2 years. The guarantee covers exclusively the repair of a defective product, but at TEFAL's choice, a replacement product may be provided instead of repairing a defective product. It is mandatory that the consumer, to have his product repaired, has to log a service request on the dedicated Smartphone application TEFAL SERVICE APP or by calling TEFAL Consumer Care Center at 1860-200-1232, Opening hours Mon-Sat 09 AM to 06 PM. Products returned by Post will not be covered by the guarantee. As a proof of purchase consumer needs to provide both this stamped guarantee card and tax invoice.
text_image
00:30 1 2 34
text_image
06:00 1 35
text_image
i 8:00 36DE

text_image
5
natural_image
Illustration of a hand operating a rice cooker with a control knob, next to an inset photo of a remote control unit (no text or symbols visible)
natural_image
Line drawing of a hand pressing down on a rice cooker (no text or symbols)
text_image
Bang! 39
text_image
Illustration showing a hand pouring liquid into a container with symbols indicating different types of substances: sponge, splash, and cross.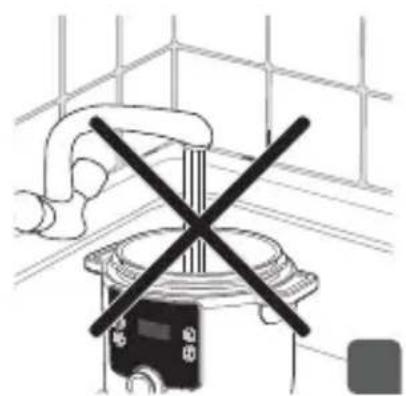
natural_image
Diagram of a device with a crossed X mark symbol, no text or labels present
natural_image
Illustration of cooking pots with crossed arrows indicating resistance or prohibition (no text or symbols)
natural_image
Diagram of a circular device with crosshair and internal components, no readable text or symbols present
natural_image
Illustration of a cooking pot with a steaming lid and a stirring rod (no text or symbols)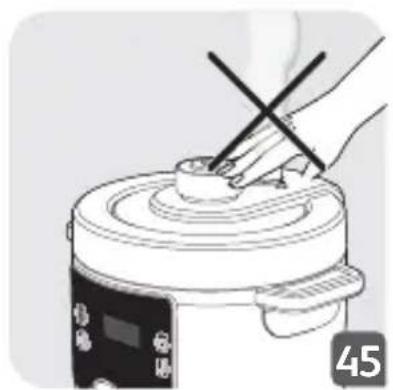
natural_image
Illustration of a hand using a tool to press or adjust a cylindrical object on a food processor (no text or symbols visible)
text_image
Illustration of a cooking pot with warning sign and heating instruction, showing a hand using a crossed tool to press the lid.
text_image
Illustration of a cooking pot with warning sign and heating instruction, showing a hand stirring a lid with a 'Bottled' control panel.
text_image
OK TaFed
text_image
Diagram of a cooking pot with a label pointing to a steam rising from the lid, accompanied by a speech bubble icon containing a snow symbol.ALLE TEILE IHRES PRODUKTS

text_image
HH:11 HH:31 HH:41 HH:61 HH:81 HH:121 HH:131 HH:141 HH:151 HH:161 HH:171 HH:181 HH:191 HH:211 HH:221 HH:231 HH:241 HH:251 HH:261 HH:271 HH:281 HH:291 HH:311 HH:321 HH:331 HH:341 HH:351 HH:361 HH:371 HH:381 HH:391 HH:411 HH:421 HH:431 HH:441 HH:451 HH:461 HH:471 HH:481 HH:491 HH:511 HH:521 HH:531 HH:541 HH:551 HH:561 HH:571 HH:581 HH:591 HH:611 HH:621 HH:631 HH:641 HH:651 HH:661 HH:671 HH:681 HH:691 HH:711 HH:721 HH:731 HH:741 HH:751 HH:761 HH:771 HH:781 HH:791 HH:811 HH:821 HH:831 HH:841 HH:851 HH:861 HH:871 HH:881 HH:891 HH:911 HH:921 HH:931 HH:941 HH:951 HH:961 HH:971 HH:981 HH:991 HH:A:::::::::::::::::::::::::::::::::::::::::::::::::::::::::::::::::::::::::::::::::::::::::::::::::::::::::::::::::::::::::::::::::::::::::::::::::::::::::::::::::::::::::::::::::::::::::::::::-,$$$$ HE:AEEEEEEEEEEEEEEEEEEEEEEEEEEEEEEEEEEEEEEEEEEEEEEEEEE EEEEEEEEEEEEEEEEEEEEEEEEEEEEEEEEEEEEEEEEE$ HA:A HB:A HC:A HD:A HF:A HG:A HH:A HI:A HJ:A HK:A HL:A HM:A HN:A HO:A HP:A HQ:A HR:A HS:A HT:A HU:A HV:A HW:A HX:A HY:A HZ:A HA:E HB:E HC:E HD:E HE:E HF:E HG:E HH:E HI:E HJ:E HK:E HL:E HM:E HN:E HO:E HP:E HQ:E HR:E HS:E HT:E HU:E HV:E HW:E HX:E HY:E HZ:E HA:E HB:E HC:E HD:E HF:E HG:E HH:E HI:E HJ:E HK:E HL:E HM:E HN:E HO:E HP:E HQ:E HR:E HS:E H $E:S:S:S:S:S:S:S:S:S:S:S:S:S:S:S:S:S:S:S:S:S:S:S:S:S:S:S:S:S:S:S:S:S:S:S:S:S:S:S:S:S:S:S:S:S:S:S:S:S:S:S:S:S:S:S:S:S:S:S:S:S:S:S:S:S:S:S:S:S:S:S:S:S:S:S:S:S:S:S:S:S:S:S:S:S:S:S:S:S:S:S:S:S:S:S:S:S:S:S:S:\n\n\n\n\n\n\n\n\n\n\n\n\n\n\n\n\n\n\n\n\n\n\n\n\n\n\n\n\n\n\n\n\n\n\n\n\n\n\n\n\n\n\n\n\n\n\n\n\n\n\n\n\n\n\n\n\n\n\n\n\n\n\n\n\n\n\n\n\n\n\n\n\n\n\n\n\n\n\n\n\n\n\n\n\n\n\n\n\n\n\n\n\n\n\n\n\n\n\n\n\nnatural_image
Line drawing of a rice cooker with a lid and a digital display showing its internal components (no text or symbols)
text_image
MAX 19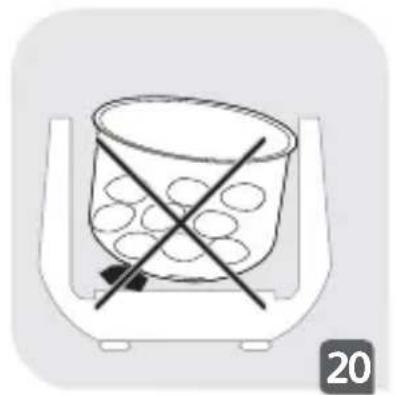
natural_image
Simple line drawing of a container with an X-shaped cross mark, containing scattered objects (no text or symbols)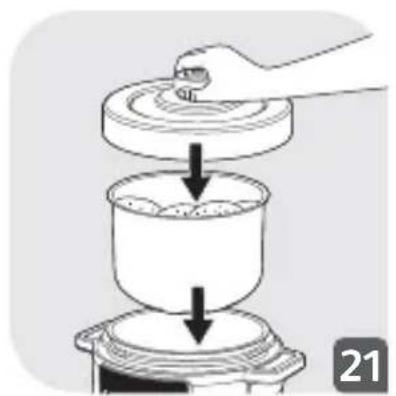
natural_image
Illustration of a hand pressing down on a container with arrows indicating downward motion (no text or symbols)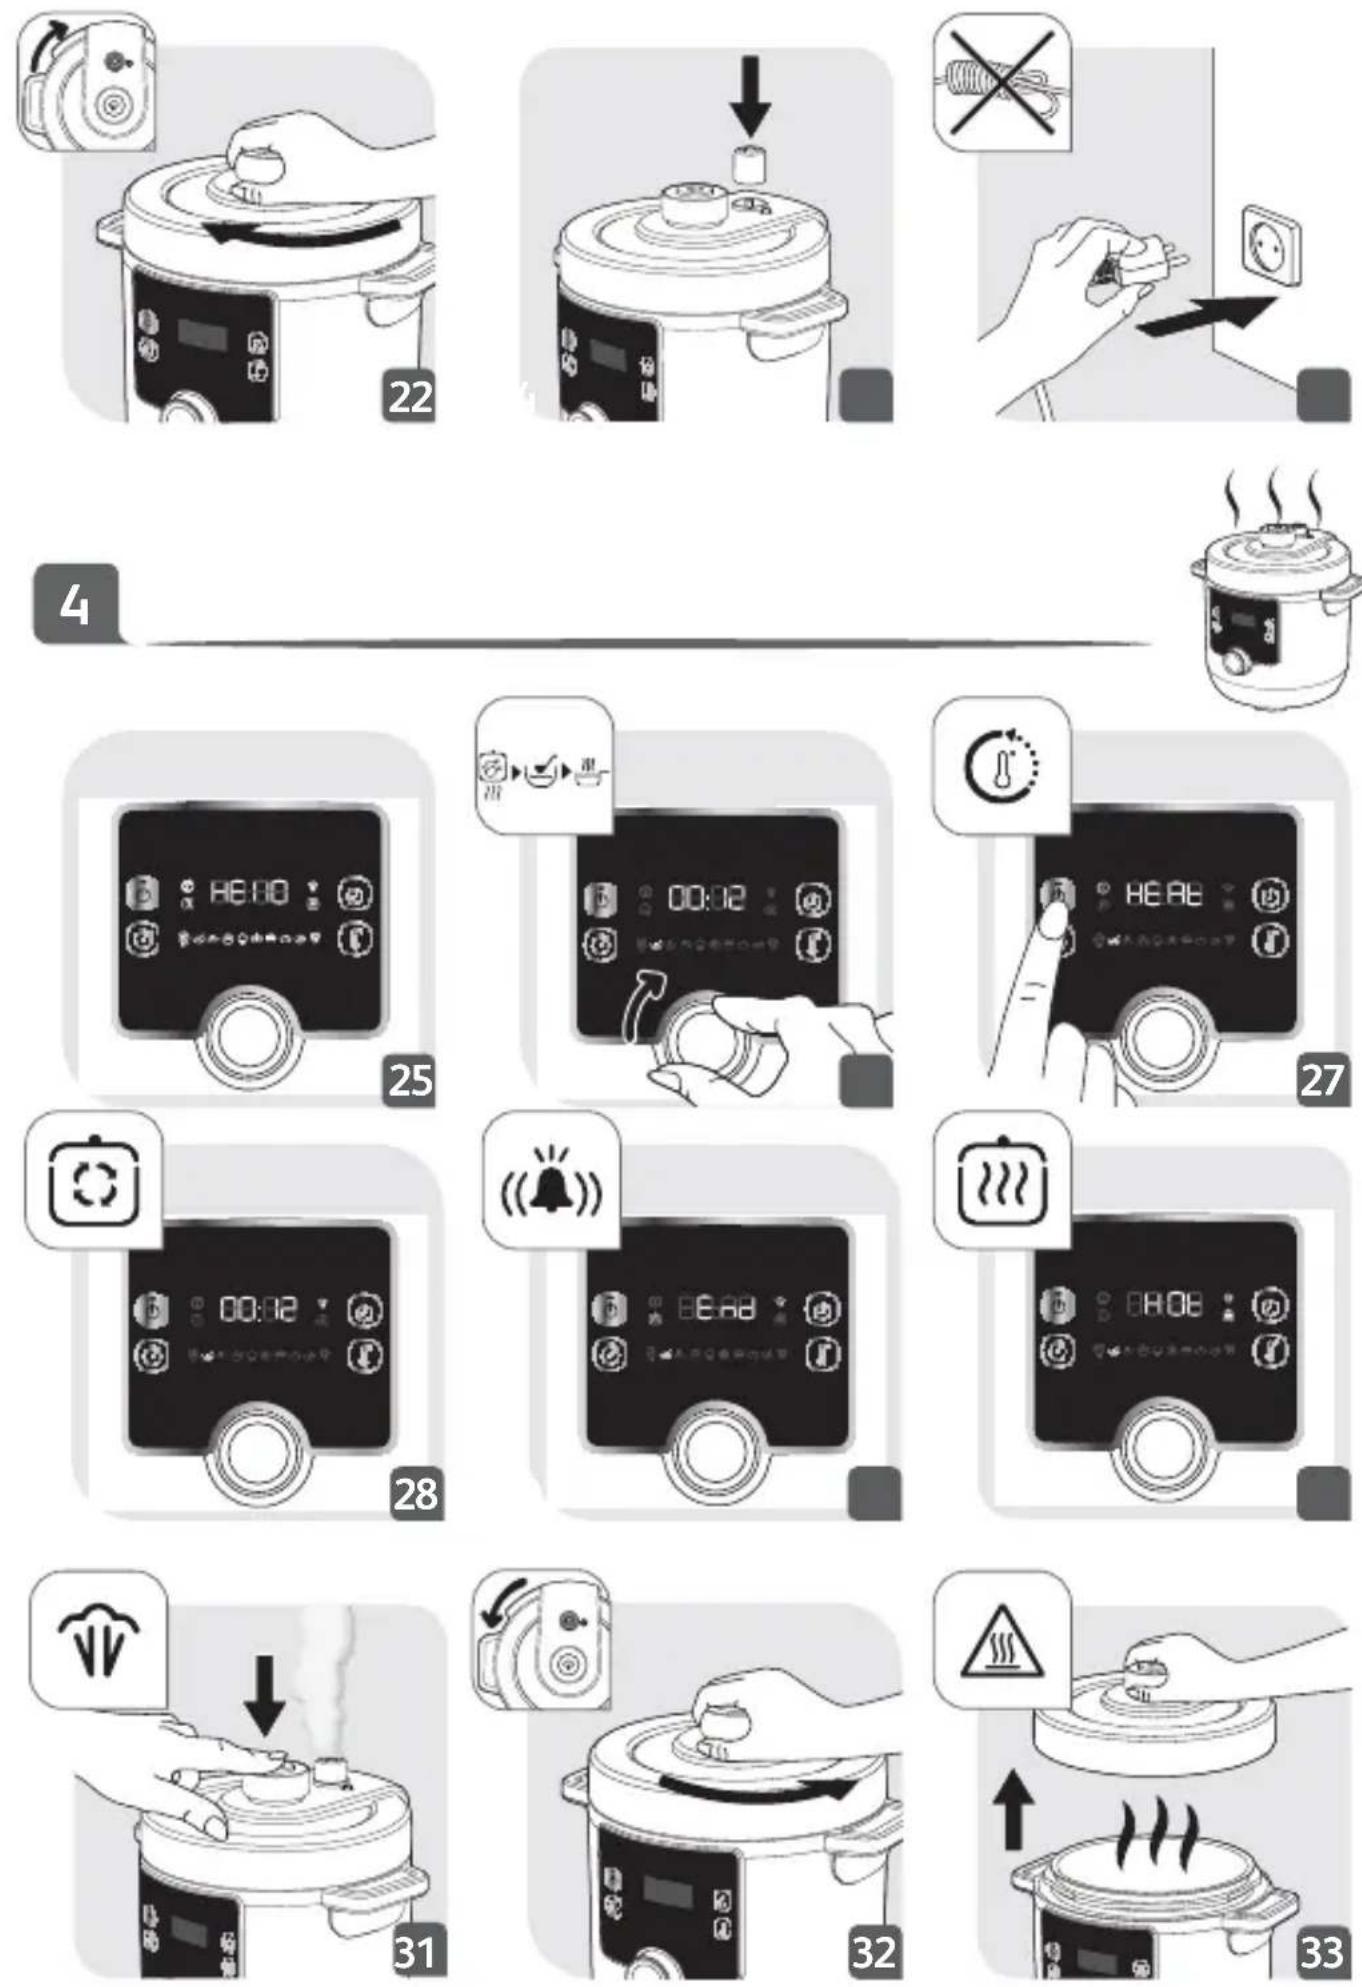
text_image
00:30 1 2 34
text_image
06:00 1 35
text_image
i 80:00 36NL

text_image
5
natural_image
Illustration of a hand operating a rice cooker with a control knob, next to an open remote control panel (no text or symbols visible)
natural_image
Line drawing of a hand pressing down on a cooking pot (no text or symbols)
text_image
Bang! 39
text_image
Diagram showing a hand holding a container with a straw and two warning signs: one with a splash, the other with a cross.
natural_image
Diagram of a hand holding a device with a crossed X symbol, against a grid background (no text or labels)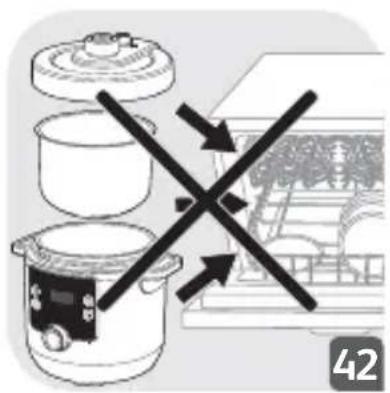
natural_image
Illustration of a cooking setup with two stacked cookware and a crossed-out kitchen pan (no text or symbols)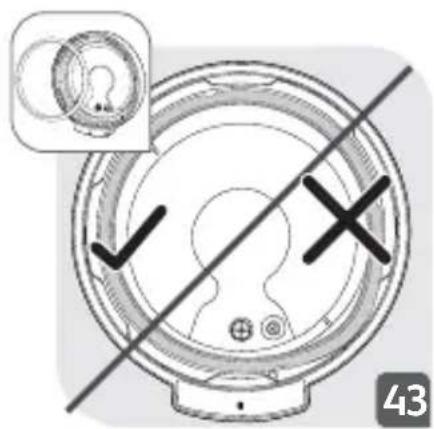
natural_image
Diagram of a circular device with crosshair and internal components, no readable text or symbols present
natural_image
Illustration of a cooking pot with steam rising, crossed by a diagonal rod (no text or symbols)
natural_image
Illustration of a hand using a tool to press or adjust a small object on a rice cooker (no text or symbols visible)
text_image
Illustration of a cooking pot with warning sign and heating instruction, showing a hand using a crossed tool to press the lid.
text_image
Illustration of a cooking pot with warning sign and heating instruction, showing a hand pressing a lid with steam rising.
text_image
OK TaFed
text_image
Diagram of a food cooker with a label pointing to a chimney icon and a cooking step indicator.ALLE ONDERDELEN VAN UW PRODUCT

text_image
00:30 1 2 34
text_image
06:00 1 35
text_image
i 8:00 365

text_image
Warning symbol image with exclamation mark inside triangle
natural_image
Illustration of a hand operating a rice cooker with a control panel, next to an inset photo of the device (no text or symbols visible)
natural_image
Illustration of a hand pressing down on a cooking pot with a digital control panel (no text or symbols)
text_image
Bang! 39
text_image
Illustration showing a hand pouring liquid into a container with two warning signs: one with a sponge and spark, the other with a crossed-out strip.
natural_image
Diagram of a mechanical device with a crossed X mark, set against a grid background (no text or symbols)
natural_image
Illustration of cooking pots with a crossed black arrow indicating prohibition (no text or symbols)
natural_image
Diagram of a circular device with crosshair and internal components, no readable text or symbols present
natural_image
Illustration of a cooking pot with steam rising, crossed by a diagonal rod (no text or symbols)
natural_image
Illustration of a hand using a tool to press or inspect a small object on a cooking pot (no text or symbols visible)FR

text_image
Illustration of a cooking pot with warning sign and heating instruction, showing a hand using a tool to press or smoke.
text_image
Illustration of a cooking pot with warning sign and heating instruction, showing a hand stirring a lid with steam rising.
text_image
OK Tæred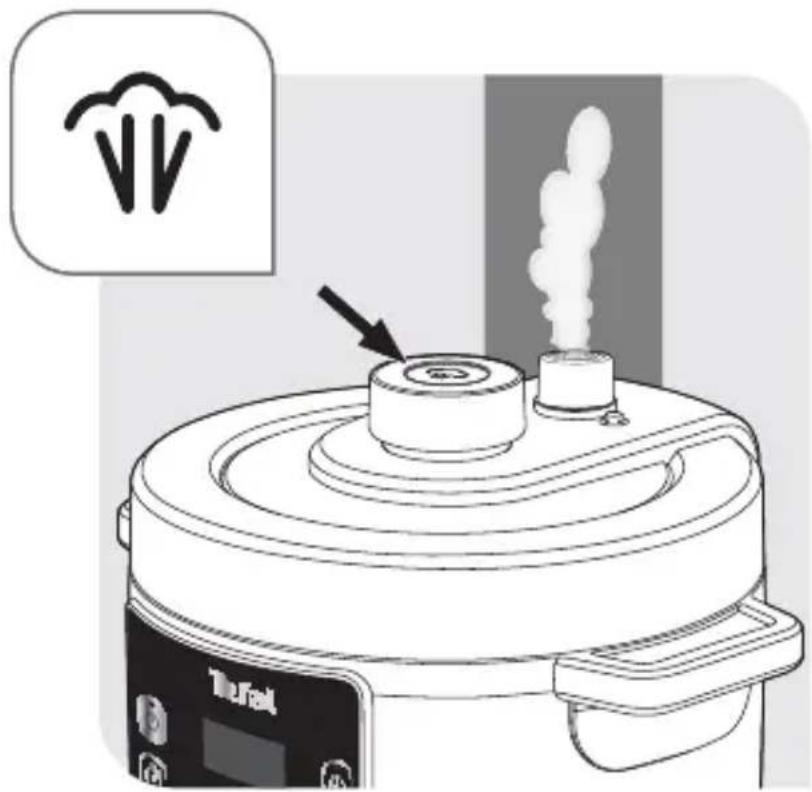
text_image
Diagram of a food microwave oven with a label pointing to a chimney icon and a cooking step indicator.TOUTES LES PIÈCES DE VOTRE PRODUIT
text_image
00:30 1 2 34
text_image
06:00 1 35
text_image
i 80:00 36IT
5

text_image
Warning symbol image with exclamation mark inside triangle
natural_image
Illustration of a hand operating a kitchen appliance with a control knob, next to an open remote control panel (no text or symbols visible)
natural_image
Illustration of a hand pressing down on a rice cooker with a digital display (no text or symbols)
text_image
Bang! 39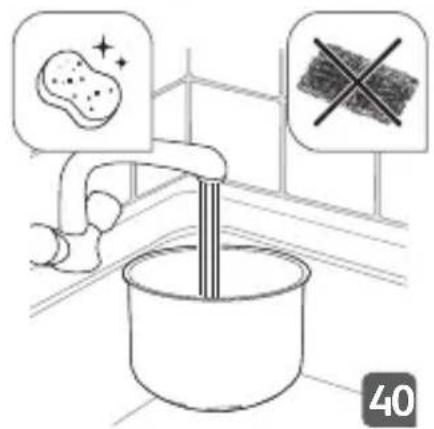
text_image
Illustration showing a hand washing a cup with a water bottle and two warning symbols: a sponge above and a cross on a surface.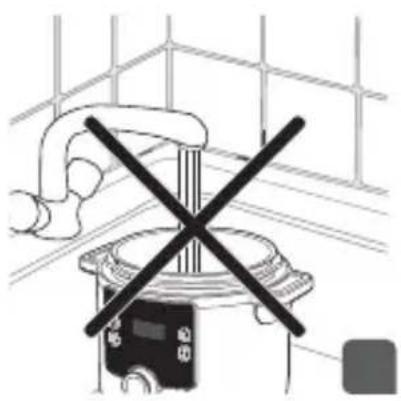
natural_image
Simple line drawing of a ceiling fixture with a double X mark symbol (no text or labels)
natural_image
Illustration of two cooking pots with crossed arrows indicating a cooking restriction (no text or symbols)
natural_image
Diagram of a circular device with crosshair and internal components, no readable text or symbols present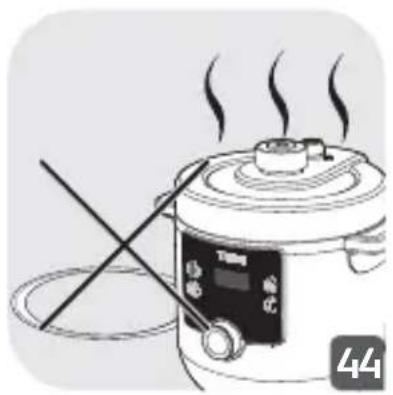
natural_image
Illustration of a cooking pot with steam rising, crossed by a diagonal rod (no text or symbols)
natural_image
Illustration of a hand using a tool to press or inspect a small object on a cooking pot (no text or symbols visible)
text_image
Illustration of a cooking pot with warning sign and heating instruction, showing a hand using a crossed tool to press the lid.
text_image
Illustration of a cooking pot with warning sign and heating instruction, showing a hand pressing a lid with steam rising.
text_image
OK TaFredIT

text_image
Diagram of a food cooker with a smokestack and a label pointing to the lid, accompanied by a speech bubble containing a snow symbol.TUTTE LE PARTI DEL PRODOTTO
text_image
00:30 1 2 34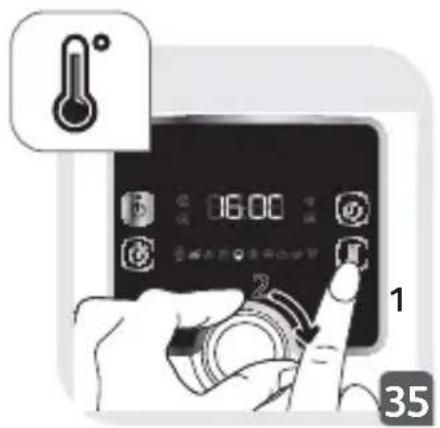
text_image
06:00 1 35
text_image
i A0:0 36PL

text_image
5
natural_image
Illustration of a hand operating a rice cooker with a control panel, next to an open camera (no text or symbols visible)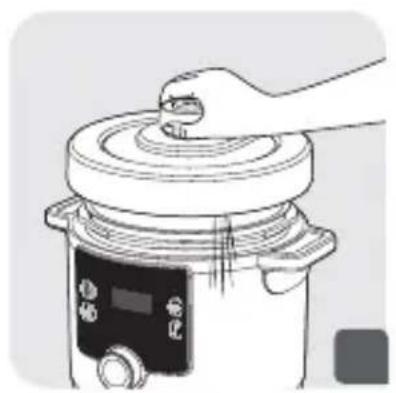
natural_image
Illustration of a hand pressing down on a cooking pot with a digital control panel (no text or symbols)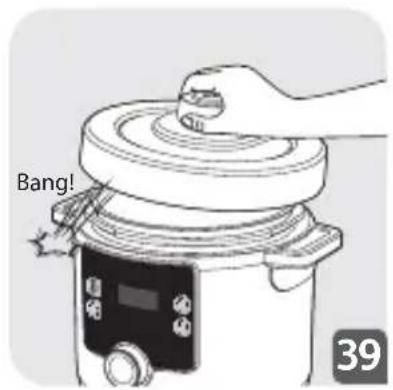
text_image
Bang! 39
text_image
Diagram illustrating food safety with labeled symbols: a bowl, a plate with a splash, and a crossed-out box, marked with number 40.
natural_image
Diagram of a hand holding a device with a crossed X symbol, against a grid background (no text or labels)
natural_image
Illustration of two cooking pots with crossed arrows indicating prohibition or resistance, no text or symbols present.
natural_image
Diagram of a circular device with crosshair and internal components, no readable text or symbols present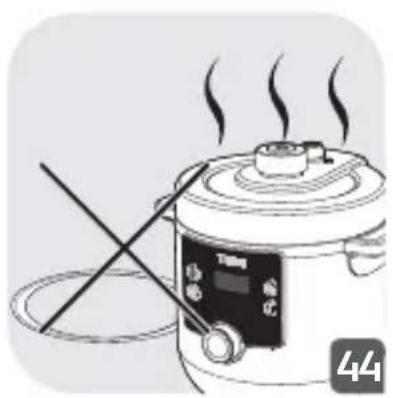
natural_image
Illustration of a cooking pot with steam rising, crossed by a diagonal rod (no text or symbols)
natural_image
Illustration of a hand using a tool to press or adjust a small object on a cooking pot (no text or symbols visible)
text_image
Illustration of a cooking pot with warning sign and heating instruction, showing a hand using a crossed tool to press the lid.
text_image
Illustration of a cooking pot with warning sign and heating instruction, showing a hand pressing a lid with steam rising.
text_image
OK TaFedPL

text_image
Diagram of a food cooker with a chimney icon and a label pointing to the lid, showing text 'Tufel' and a smokestack.WSZYSTKIE ELEMENTY URZĄDZENIA
text_image
1 00:30 2 34
text_image
06:00 1 35
text_image
i 80:00 365

text_image
Warning symbol image with exclamation mark inside triangle
natural_image
Illustration of a hand operating a rice cooker with a control panel, next to an inset photo of the device (no text or symbols visible)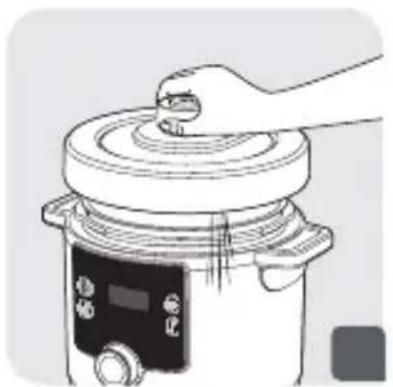
natural_image
Illustration of a hand pressing down on a cooking pot with a digital control panel (no text or symbols)
text_image
Bang! 39
text_image
Illustration showing a hand pouring liquid into a container with two warning signs: one with a sponge and sparkles, the other with a crossed-out rectangular block.
natural_image
Diagram of a mechanical device with a crossed X mark, no text or symbols present
text_image
Diagram showing cooking process with crossed arrows indicating removal or rejection of a cooking pot and a kitchen scene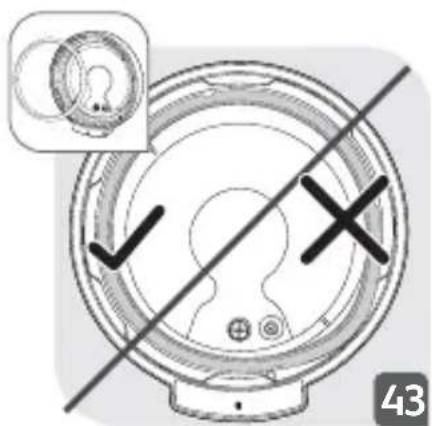
natural_image
Diagram of a circular device with crosshair and internal components, no readable text or symbols present
natural_image
Illustration of a cooking pot with steam rising, crossed by a diagonal rod (no text or symbols)
natural_image
Illustration of a cooking step showing a hand using a tool to press or adjust a pot on a rice cooker (no text or symbols visible)5

text_image
Warning symbol image with exclamation mark inside triangle
text_image
Illustration of a cooking pot with warning sign and heating instruction, showing a hand using a crossed tool to press the lid.ET

text_image
Illustration of a cooking pot with warning symbol and temperature indicator, showing steam rising from a pot.
text_image
OK Tæred
text_image
Diagram of a food microwave oven with a label pointing to a chimney icon and a cooking step indicator.KÕIK TOOTE OSAD
text_image
Surveventiil Ujukventiil Survevabastusnupp Kaanenupp
text_image
Aurutamis- alus * lisatarvikud, olenevalt mudelist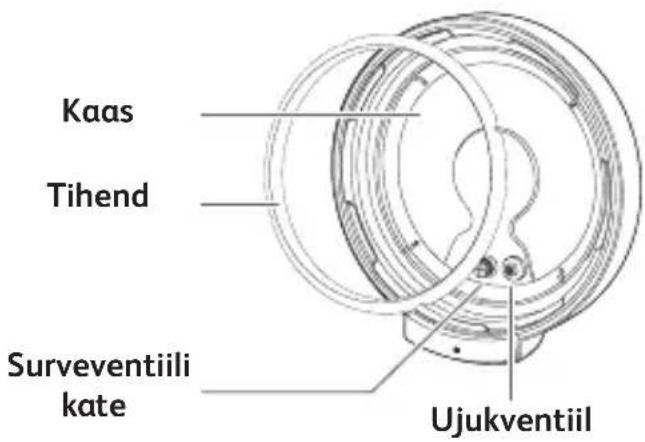
text_image
Kaas Tihend Surveventiili kate Ujukventiil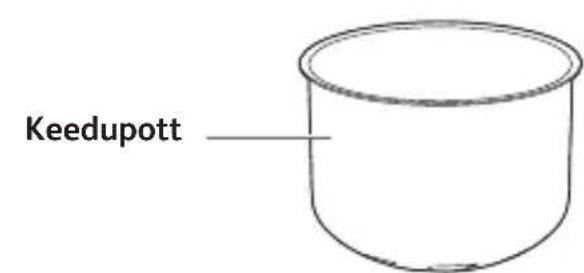
text_image
Keedupott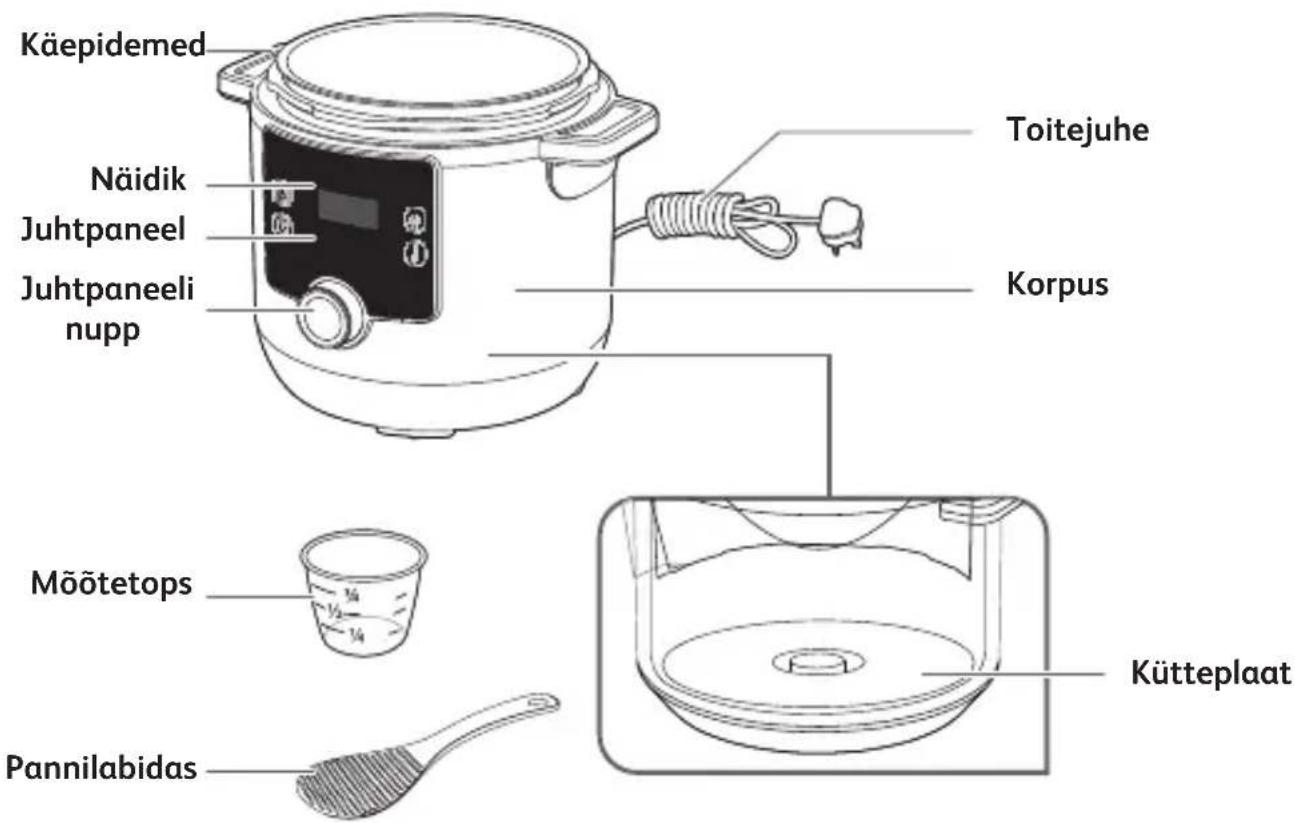
natural_image
Illustration of a hand pressing down on a rice cooker with a device inset showing the switch (no text or symbols)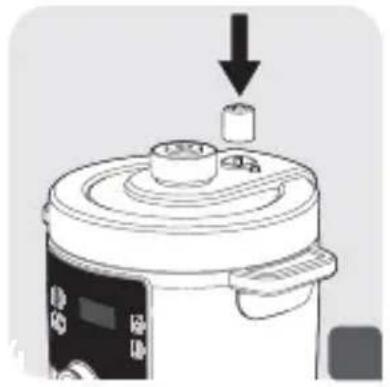
natural_image
Line drawing of a rice cooker with a downward arrow indicating a component (no text or symbols)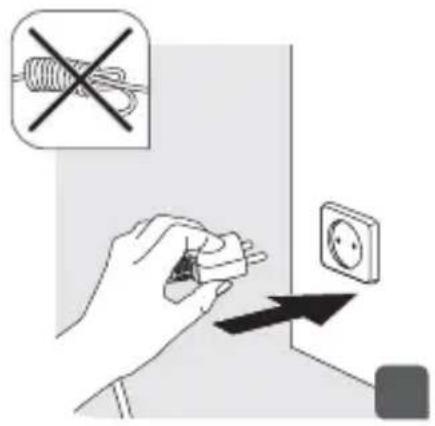
text_image
Diagram showing a hand using a power plug to switch an electrical socket, with a crossed-out wire symbol and a black arrow indicating the process.4
natural_image
Line drawing of a steaming rice cooker with a digital display (no text or symbols)LV

text_image
B HEL0 OK OK OK25

text_image
Digital camera control panel with icons and time display showing 00:02
text_image
BE BE 27
text_image
00:32 28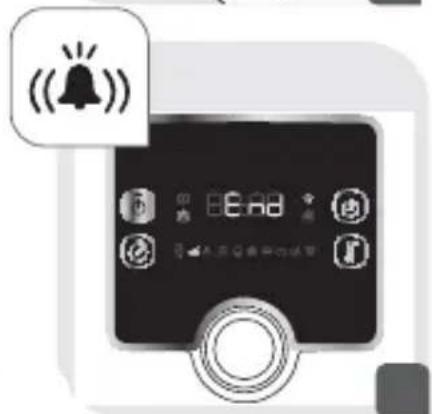
text_image
Digital kitchen control panel with alarm clock icon and status indicators
text_image
08:08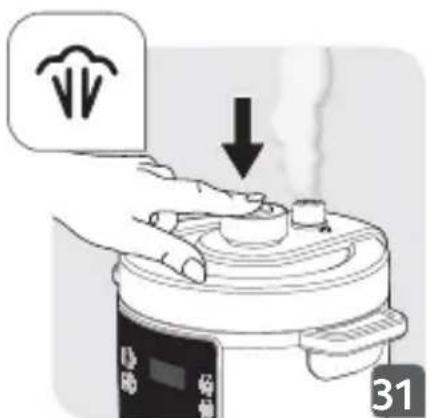
text_image
Illustration showing a hand pressing down on a cooking pot with a downward arrow and a trash bin icon above it.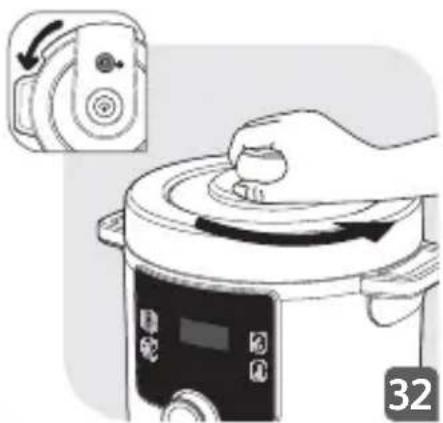
natural_image
Illustration of a hand placing a lid onto a rice cooker with a digital display (no text or symbols)
text_image
Diagram showing heating process with warning sign and temperature rise indicator
text_image
00:30 1 2 34
text_image
06:00 1 35
text_image
i 80:00 365

text_image
Warning symbol image with exclamation mark inside triangle
natural_image
Illustration of a hand operating a rice cooker with a control panel, next to an inset photo of the device (no text or symbols visible)
natural_image
Illustration of a hand pressing down on a cooking pot with a digital control panel (no text or symbols)
text_image
Bang! 39
text_image
Illustration showing a hand pouring liquid into a container with two warning signs: one with a sponge and spark, the other with a crossed-out pad.
natural_image
Diagram of a mechanical device with a crossed X mark, no text or symbols present
text_image
Diagram showing cooking process with crossed arrows indicating removal or rejection of a cooking pot and a kitchen scene
natural_image
Diagram of a circular device with crosshair and internal components, no readable text or symbols present
natural_image
Illustration of a cooking pot with steam rising, crossed by a diagonal rod (no text or symbols)
natural_image
Illustration of a hand using a tool to press or adjust a cooking pot (no text or symbols visible)5

text_image
Warning symbol image with exclamation mark inside triangle
text_image
Illustration of a cooking pot with warning sign and heating instruction, showing a hand using a crossed tool to press the lid.LV

text_image
Illustration of a cooking pot with warning sign and temperature warning symbol, showing heat transfer process
text_image
OK Tæred
text_image
Diagram of a food microwave oven with a label pointing to a chimney icon and a warning arrow.VISAS JÜSU IZSTRÄDÄJUMA DAŁAS
text_image
00:30 1 2 34
text_image
06:00 1 35
text_image
i A0:00 365

text_image
Warning symbol image with exclamation mark inside triangle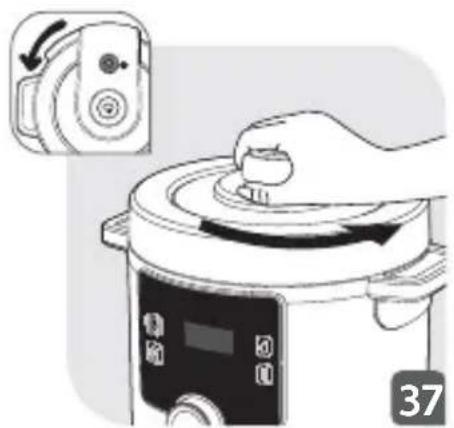
natural_image
Illustration of a hand operating a rice cooker with a control knob, next to an inset image of a remote control unit (no text or symbols visible)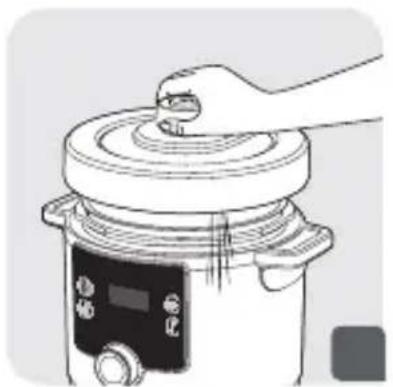
natural_image
Illustration of a hand pressing down on a cooking pot with a digital display (no text or symbols)
text_image
Bang! 39
text_image
Illustration showing a hand pouring liquid into a container with two warning signs: one with a sponge and spark, the other with a cross.
natural_image
Diagram of a mechanical device with a crossed X mark, no text or symbols present
natural_image
Illustration of a cooking pot with two stacked containers and a crossed-out black arrow, next to an architectural sketch (no text or symbols)
natural_image
Diagram of a circular device with crosshair and internal components, no readable text or symbols present
natural_image
Illustration of a cooking pot with steam rising, no text or symbols present
natural_image
Illustration of a hand using a tool to press or adjust a small object on a rice cooker (no text or symbols visible)
text_image
Illustration of a cooking pot with warning sign and heating instruction, showing a hand using a crossed tool to press the lid.
text_image
Illustration of a cooking pot with warning sign and heating instruction, showing a hand pressing a lid with steam rising.
text_image
OK TaFedLT

text_image
Diagram of a cooking pot with a label pointing to a steam rising from the lid, accompanied by a speech bubble icon containing a bird symbol.VISOS JÜSÜ GAMINIO DALYS
natural_image
Illustration of a rice cooker with a decorative spoon emitting sparkles (no text or symbols)SK

natural_image
Line drawing of a kitchen scene with a steamer, spatula, and a cup (no text or symbols)
natural_image
Illustration of a hand cleaning a cooking pot with a cloth, including a small pot, brush, and a measuring cup (no text or symbols)
natural_image
Simple line drawing of a container with an arrow pointing downward, no text or symbols present
natural_image
Diagram of a mechanical component with an arrow indicating direction, no text or symbols present
natural_image
Illustration of a bicycle wheel with a magnified inset showing a textured surface (no text or symbols)
natural_image
Diagram showing a hand holding a circular component with an arrow indicating direction, no text or symbols present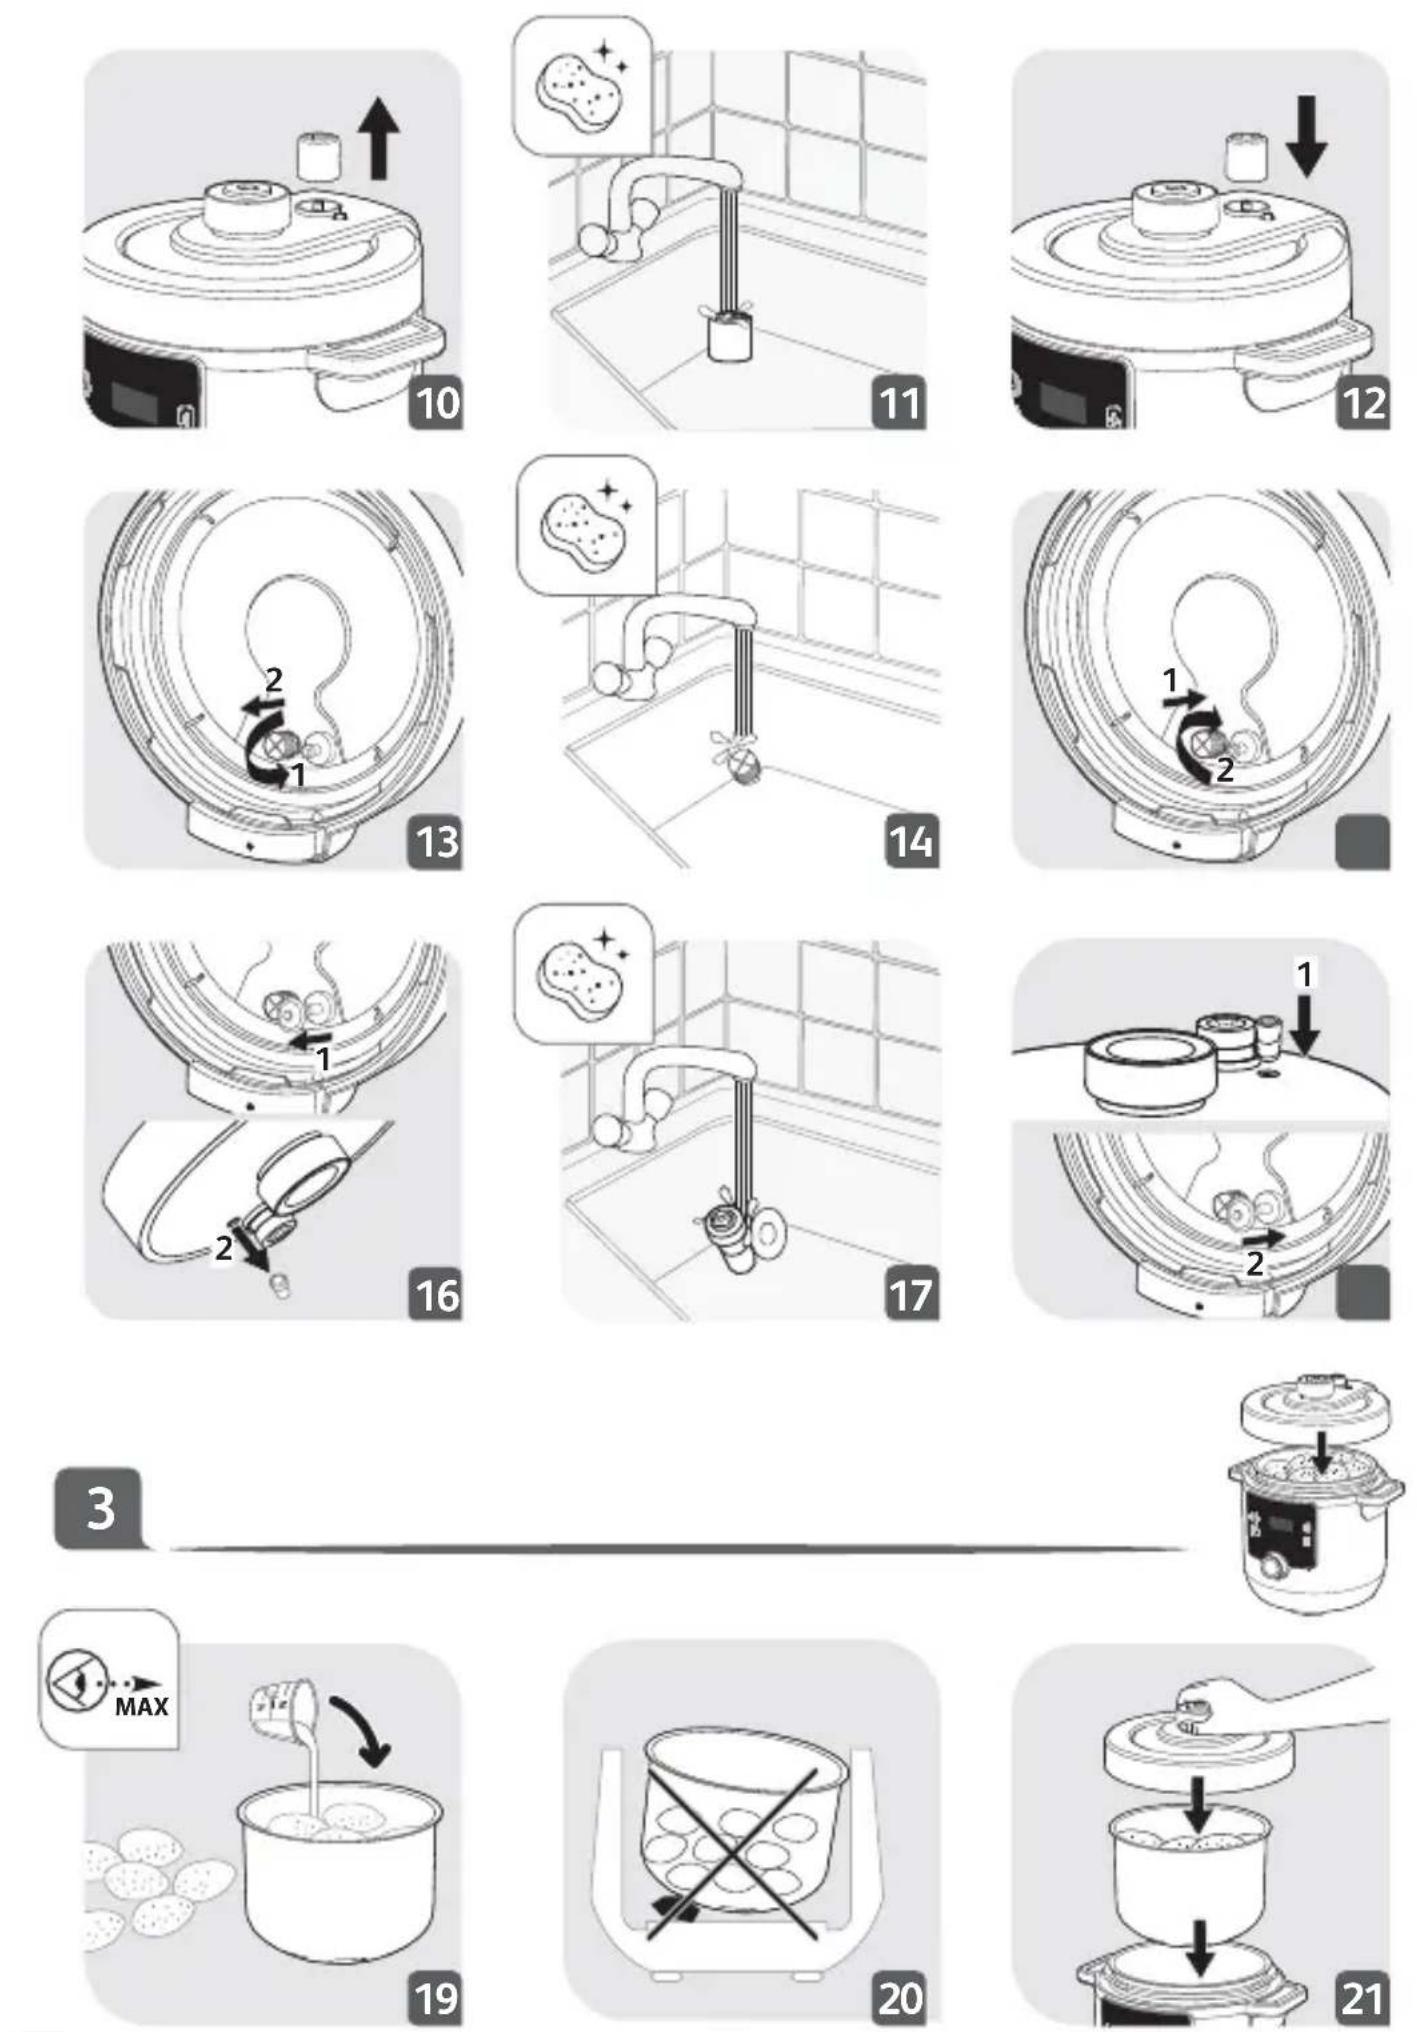


text_image
Illustration showing three steps of cooking a rice cooker: moving, adding a plug into a pot, and removing a switch to an electrical outlet.4
natural_image
Line drawing of a rice cooker with steam rising (no text or symbols)
text_image
H:10 25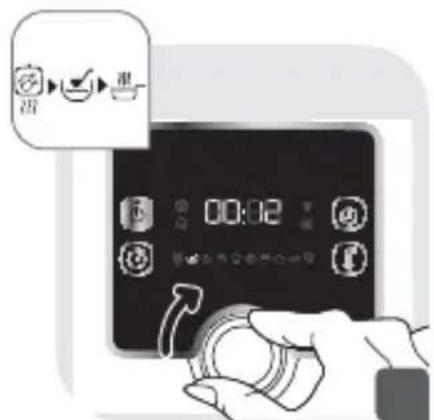
text_image
Diagram showing a hand pressing a button on a digital timer device with icons and time display
text_image
HE BE 27SK

text_image
00:02 28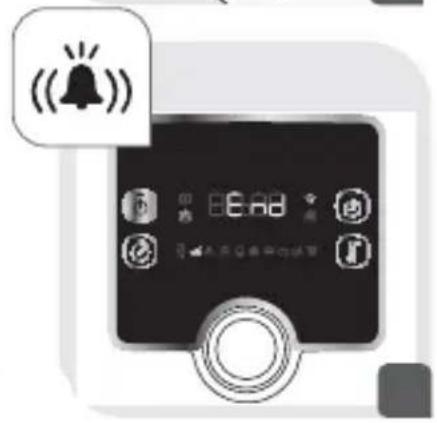
text_image
Digital kitchen control panel with digital display and alarm icons, showing time reading of 16:00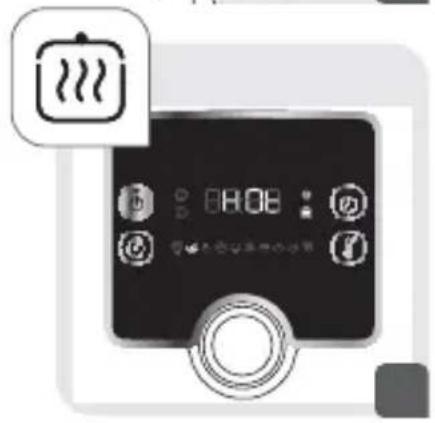
text_image
8:08
text_image
Illustration showing a hand pressing a lid on a cooking pot with a downward arrow, accompanied by a speech bubble icon with Chinese characters.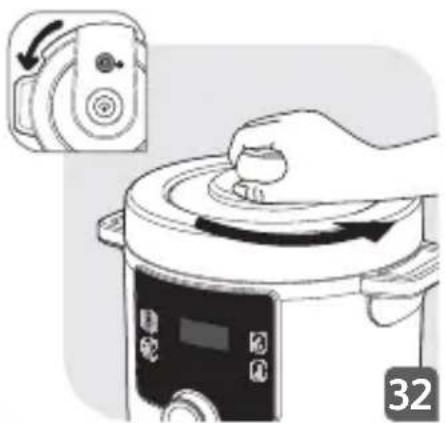
natural_image
Illustration of a hand placing a lid onto a rice cooker with a digital display (no text or symbols)
text_image
Illustration showing a hand pressing a heat exchanger above a steaming pot, with warning symbol and temperature label '33'
text_image
1 00:30 2 34
text_image
06:00 1 35
text_image
i 80:00 365

text_image
Warning symbol image with exclamation mark inside triangle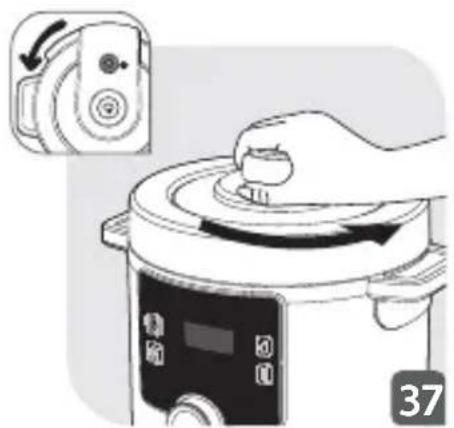
natural_image
Illustration of a hand operating a rice cooker with a control panel, next to an open remote control panel (no text or symbols visible)
natural_image
Illustration of a hand pressing down on a cooking pot with a digital control panel (no text or symbols)
text_image
Bang! 39
text_image
Illustration showing a hand pouring liquid into a container with two warning signs: one with a sponge and spark, the other with a crossed-out strip.
natural_image
Diagram of a mechanical device with a crossed X mark, no text or symbols present
natural_image
Illustration of cooking pots with a crossed black arrow indicating prohibition (no text or symbols)
natural_image
Diagram of a circular device with crosshair and internal components, no readable text or symbols present
natural_image
Illustration of a cooking pot with steam rising, crossed by a diagonal rod (no text or symbols)
natural_image
Illustration of a cooking step showing a hand using a tool to press or adjust a lid on a rice cooker (no text or symbols visible)5

text_image
Warning symbol image with exclamation mark inside triangle
text_image
Illustration of a cooking pot with warning sign and heating instruction, showing a hand using a crossed tool to press the lid.SK

text_image
Illustration of a cooking pot with warning sign and heating instruction, showing a hand pressing a lid with steam rising.
text_image
OK Tæred
text_image
Diagram of a food microwave oven with a label pointing to a chimney icon and a warning arrow.VŠETKY DIELY VÁŠHO VÝROBKU
text_image
Illustration showing three steps of cooking a rice cooker: moving, adding a plug into a pot, and removing a switch to an electrical outlet.4

natural_image
Line drawing of a rice cooker with steam rising (no text or symbols)
text_image
H:10 25
text_image
Diagram showing a hand pressing a button on a digital device with icons and time display, indicating a timer or function.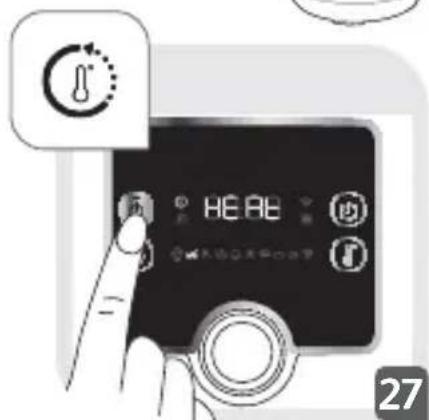
text_image
HE BE 27CS

text_image
00:02 28
text_image
Digital kitchen control panel with digital display and alarm icons, including a bell icon and status indicators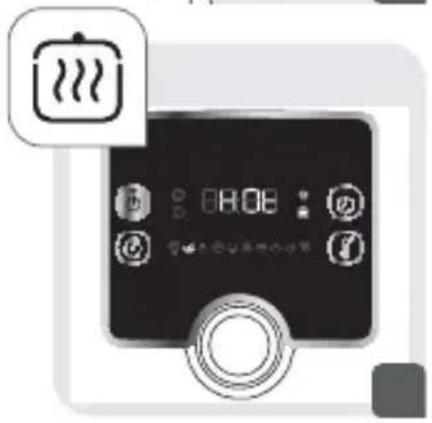
text_image
8:08
text_image
Illustration showing a hand pressing a cooking pot with a downward arrow, accompanied by a speech bubble containing a trash symbol.
natural_image
Illustration of a hand placing a lid onto a rice cooker with a digital display (no text or symbols)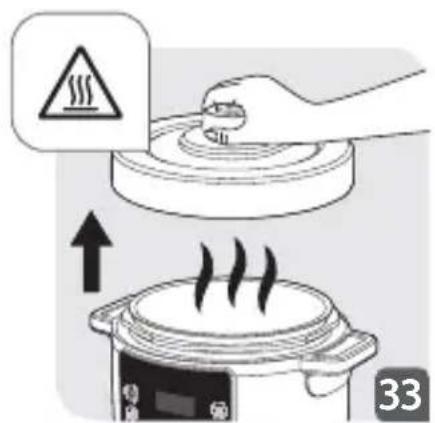
text_image
Illustration showing a cooking step with warning sign and upward arrow, likely for heating or cooking process.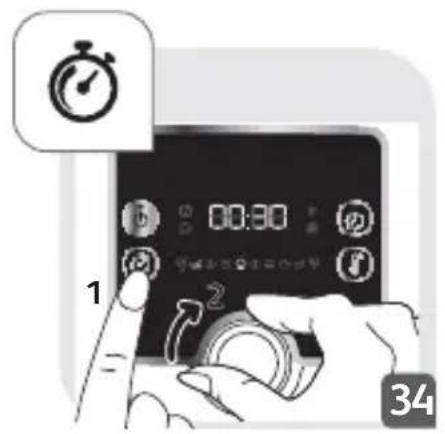
text_image
1 00:30 2 34
text_image
06:00 1 35
text_image
i 80:00 365

text_image
Warning symbol image with exclamation mark inside triangle
natural_image
Illustration of a hand operating a rice cooker with a control panel, next to an open remote control panel (no text or symbols visible)
natural_image
Illustration of a hand pressing down on a cooking pot with a digital control panel (no text or symbols)
text_image
Bang! 39
text_image
Illustration showing a hand pouring liquid into a container with two warning signs: one with a sponge and spark, the other with a crossed-out strip.
natural_image
Diagram of a mechanical device with a crossed X mark, no text or symbols present
natural_image
Illustration of cooking pots with a crossed black arrow indicating prohibition (no text or symbols)
natural_image
Diagram of a circular device with crosshair and internal components, no readable text or symbols present
natural_image
Illustration of a cooking pot with steam rising, crossed by a diagonal rod (no text or symbols)
natural_image
Illustration of a cooking step showing a hand using a tool to press or adjust a pot on a rice cooker (no text or symbols visible)5

text_image
Warning symbol image with exclamation mark inside triangle
text_image
Illustration of a cooking pot with warning sign and heating instruction, showing a hand using a crossed tool to press the pot.CS
text_image
Illustration of a cooking pot with warning sign and temperature warning symbol, showing heat transfer process
text_image
OK Tæred
text_image
Diagram of a food microwave oven with a label pointing to a chimney icon and a warning arrow.text_image
00:30 1 2 34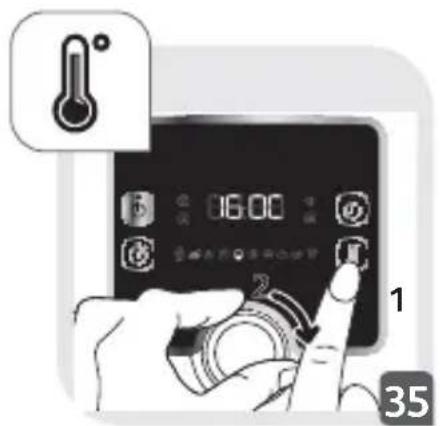
text_image
06:00 1 35
text_image
i A0:00 365

text_image
Warning symbol image with exclamation mark inside triangle
natural_image
Illustration of a hand operating a rice cooker with a control knob, next to an open remote control panel (no text or symbols visible)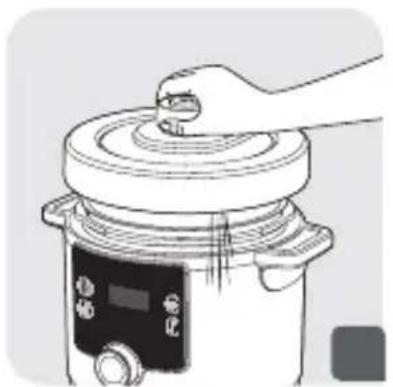
natural_image
Illustration of a hand pressing down on a cooking pot with a digital control panel (no text or symbols)
text_image
Bang! 39
text_image
Illustration showing a hand pouring liquid into a container with two warning signs: one with a sponge and spark, the other with a cross.
natural_image
Diagram of a mechanical device with a crossed X mark, no text or symbols present
natural_image
Illustration of two cooking pots with a crossed black arrow indicating prohibition (no text or symbols)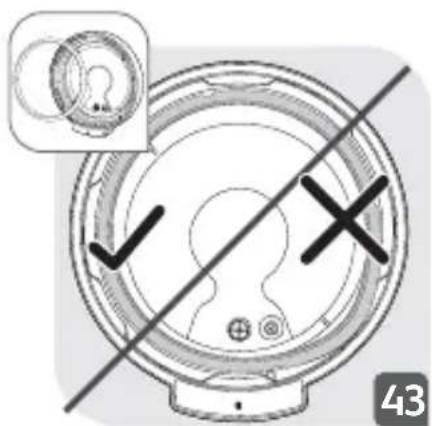
natural_image
Diagram of a circular device with crosshair and internal components, no readable text or symbols present
natural_image
Illustration of a cooking pot with steam rising, no text or symbols present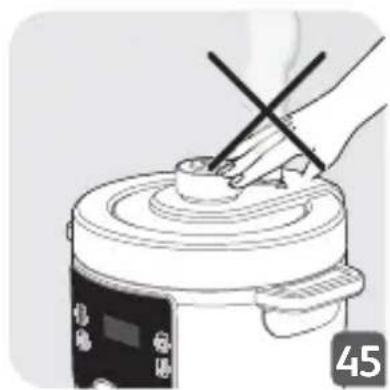
natural_image
Illustration of a hand using a tool to press or adjust a small object on a cooking pot (no text or symbols visible)5

text_image
Warning symbol image with exclamation mark inside triangle
text_image
Illustration of a cooking pot with warning sign and heating instruction, showing a hand using a crossed tool to press the lid.
text_image
Illustration of a cooking pot with warning sign and heating instruction, showing a hand stirring a lid with a 'Bottled' control panel.
text_image
OK TaFolHU

text_image
Diagram of a food microwave oven with a label pointing to a chimney icon and a cooking step indicator.A TERMÉK MINDEN ALKATRÉSZE
text_image
1 00:30 2 34
text_image
06:00 1 35
text_image
i 80:00 365

text_image
Warning symbol image with exclamation mark inside triangle
natural_image
Illustration of a hand placing a small component into a rice cooker (no text or symbols visible)
natural_image
Illustration of a hand pressing down on a cooking pot with a digital control panel (no text or symbols)
text_image
Bang! 39
text_image
Illustration showing a hand pouring liquid into a container with two warning signs: one with a sponge and spark, the other with a crossed-out strip.
natural_image
Diagram of a mechanical device with a crossed X mark, no text or symbols present
natural_image
Illustration of cooking pots with a crossed black arrow indicating prohibition (no text or symbols)
natural_image
Diagram of a circular device with crosshair and internal components, no readable text or symbols
natural_image
Illustration of a cooking pot with steam rising, crossed by a diagonal rod (no text or symbols)
natural_image
Illustration of a hand using a tool to press or install a small object on a cooking pot (no text or symbols visible)5

text_image
Warning symbol image with exclamation mark inside triangle
text_image
Illustration of a cooking pot with warning sign and heating instruction, showing a hand using a crossed tool to press the lid.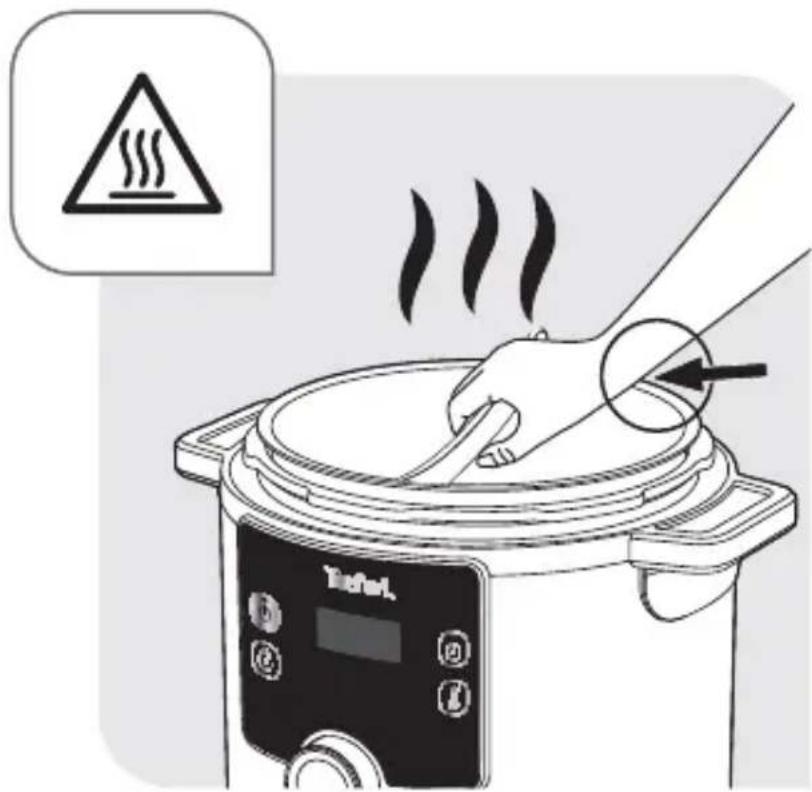
text_image
Illustration of a cooking pot with warning sign and heating instruction, showing a hand pressing a lid with steam rising.RO

text_image
OK Tæred
text_image
Diagram of a food microwave oven with a label pointing to a chimney icon and a warning arrow.TOATE COMPONENTELE PRODUSULUI
natural_image
Diagram of a kitchen appliance with a cylindrical component and an upward arrow, no text or symbols present
natural_image
Line drawing of a kitchen sink with a faucet and a magnified inset showing a textured surface (no text or symbols)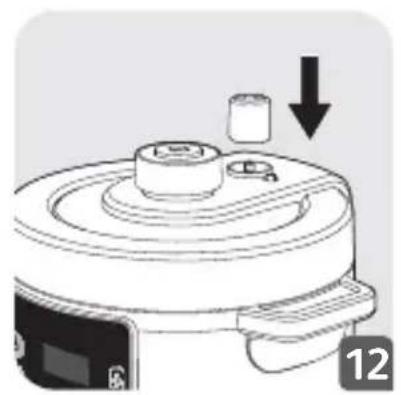
natural_image
Line drawing of a kitchen appliance with a downward arrow indicating a drop or change (no text or symbols present)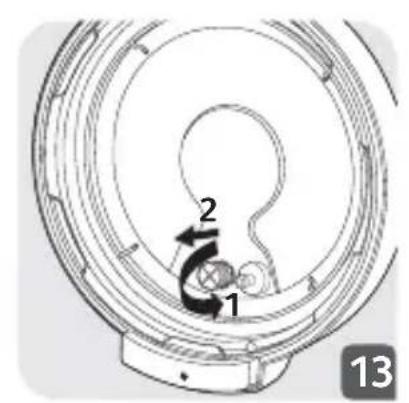
text_image
1 2 13
natural_image
Line drawing of a kitchen sink with a soap bubble and a plate, no text or symbols present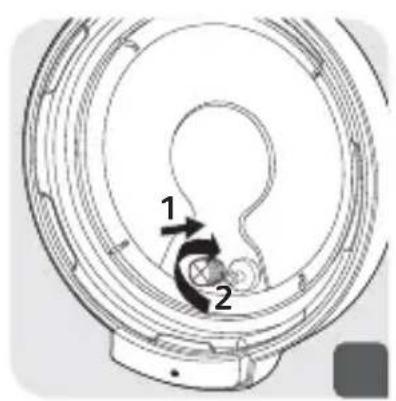
text_image
1 2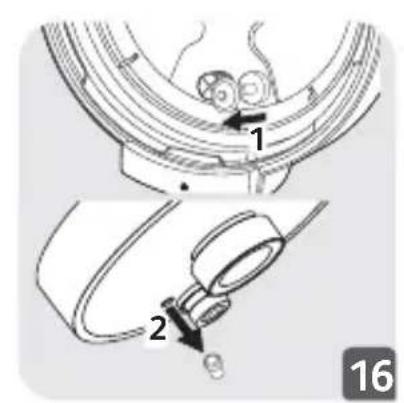
text_image
Technical diagram showing two mechanical components with numbered parts and directional arrows indicating assembly or alignment.
natural_image
Line drawing of a kitchen sink with a pipe and soap bubble, no text or symbols present
text_image
Technical diagram showing mechanical assembly with labeled parts 1 and 2, likely illustrating a gear or bearing mechanism.BG
3

natural_image
Line drawing of a rice cooker with a lid and a digital display showing its internal components (no text or symbols)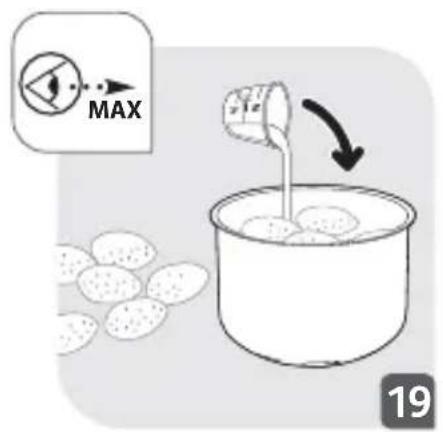
text_image
MAX 19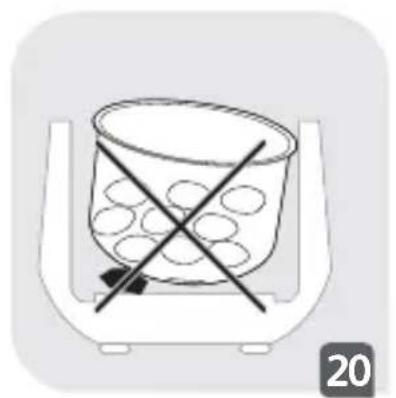
natural_image
Simple line drawing of a container with a cross mark and floating objects inside, no text or symbols present.
natural_image
Illustration of a hand pressing down on a container with arrows indicating process flow (no text or symbols)

text_image
00:30 1 2 34
text_image
06:00 1 35
text_image
i 00:00 365

text_image
Warning symbol image with exclamation mark inside triangle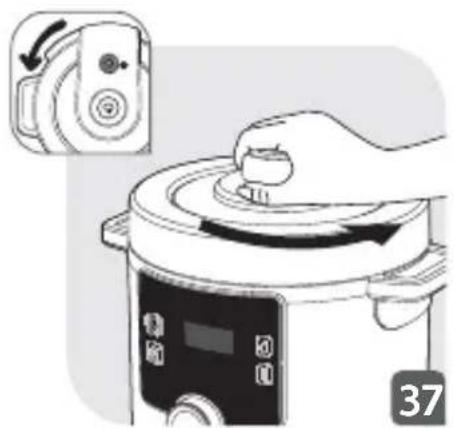
natural_image
Illustration of a hand operating a rice cooker with a control knob, next to an open remote control panel (no text or symbols visible)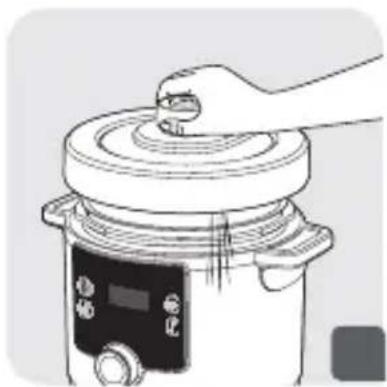
natural_image
Line drawing of a hand pressing down on a cooking pot (no text or symbols)
text_image
Bang! 39
text_image
Illustration showing a hand washing a cup with a water bottle, accompanied by two warning signs: one with a sponge and sparkles, the other with a cross.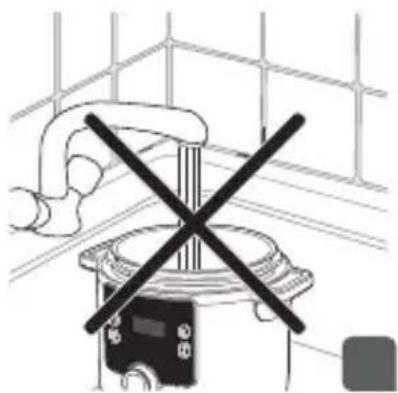
natural_image
Diagram of a mechanical device with a crossed X mark, no text or symbols present
natural_image
Illustration of cooking pots with a crossed arrow indicating resistance, no text or symbols present
natural_image
Diagram of a circular device with crosshair and internal components, no readable text or symbols present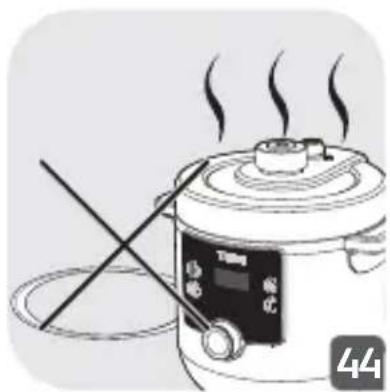
natural_image
Illustration of a cooking pot with steam rising, crossed by a diagonal rod (no text or symbols)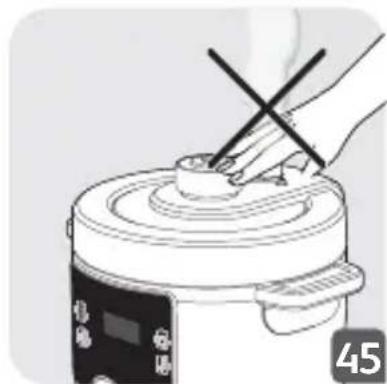
natural_image
Illustration of a hand using a tool to press or adjust a cylindrical object on a food processor (no text or symbols visible)
text_image
Illustration of a cooking pot with warning sign and heating instruction, showing a hand using a crossed tool to press the lid.
text_image
Illustration of a cooking pot with warning sign and heating instruction, showing a hand pressing a lid with steam rising.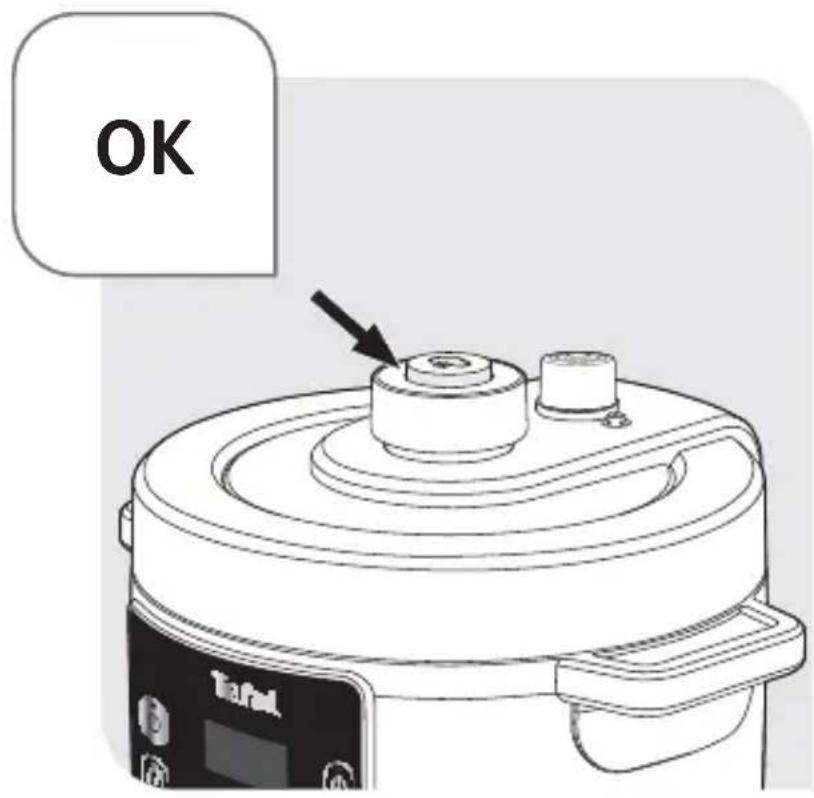
text_image
OK Tærdel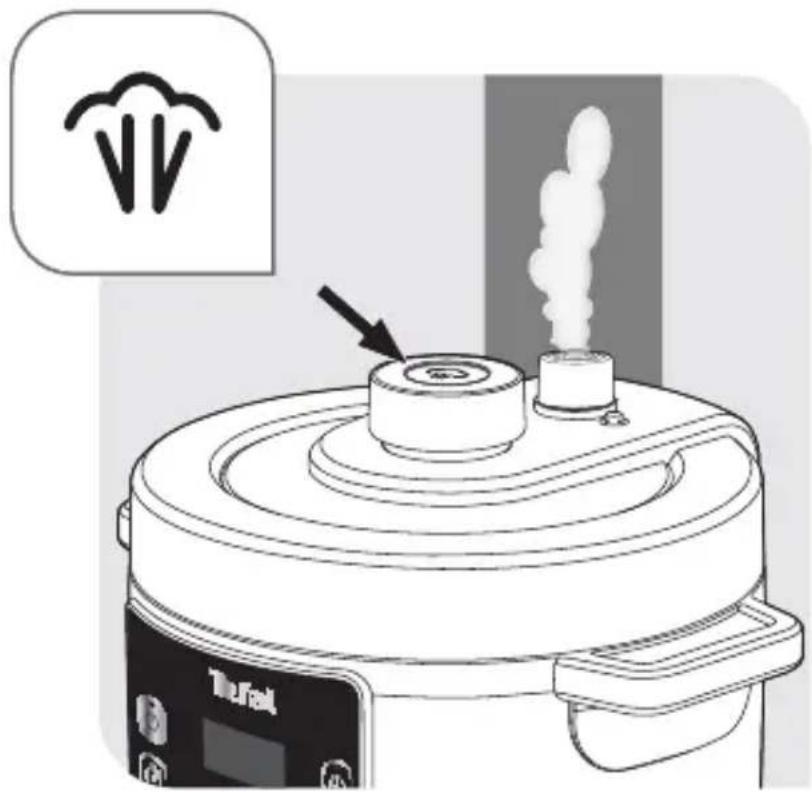
text_image
Diagram of a food cooker with a smokestack and a label pointing to the lid, accompanied by a speech bubble containing a bird icon.ВСИЧКИ ЧАСТИ НА ВАШИЯ ПРОДУКТ

natural_image
Illustration of a rice cooker with a decorative spoon emitting steam (no text or symbols)
natural_image
Line drawing of a kitchen scene with a steaming machine, a cup, and a sponge on a tiled wall (no text or symbols)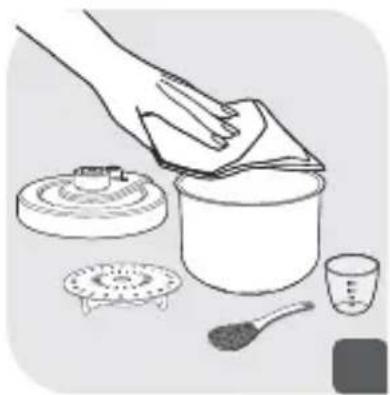
natural_image
Illustration of a hand cleaning a large pot with a cloth, accompanied by small containers and a brush (no text or symbols)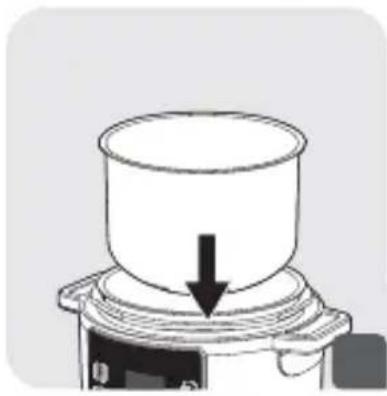
natural_image
Simple line drawing of a container with an arrow pointing downward, no text or symbols presentSL
natural_image
Diagram of a mechanical component with an arrow indicating direction, no text or symbols present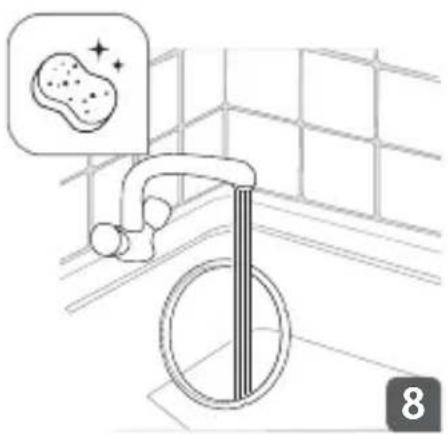
natural_image
Line drawing of a bicycle lane with a wheel and bucket, no text or symbols present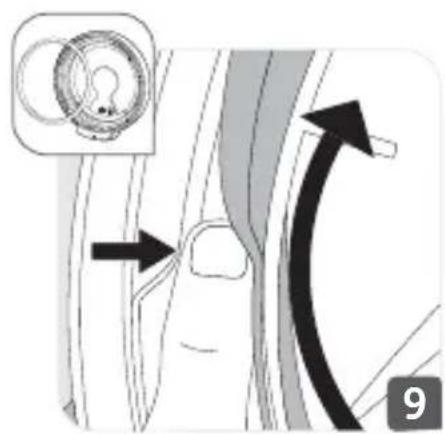
natural_image
Diagram showing a mechanical component with an inset view and directional arrows indicating motion (no text or symbols)

natural_image
Illustration of a hand pressing a cooking pot on a rice cooker, with an inset showing the device (no text or symbols)
natural_image
Line drawing of a rice cooker with a downward arrow indicating a component (no text or symbols)
text_image
Diagram showing a hand using a power plug to switch an electrical socket, with a crossed-out wire symbol and a black arrow indicating the process.4

natural_image
Line drawing of a rice cooker with steam rising (no text or symbols)
text_image
B HEL0 OK OK OK25
text_image
Digital camera control interface with Chinese UI icons and time display showing 00:02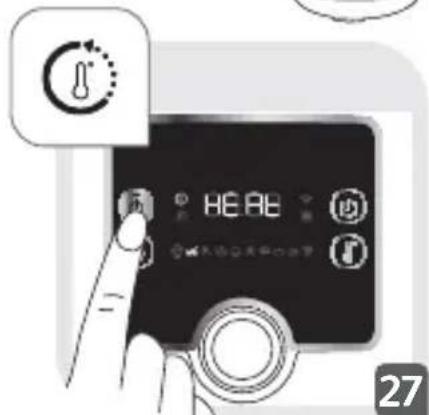
text_image
BE BE 27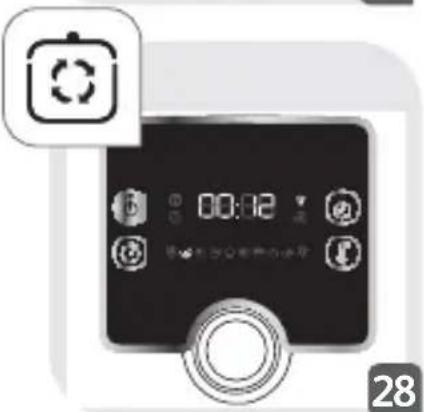
text_image
00:32 28
text_image
Digital kitchen control panel with digital clock, alarm buttons, and a bell icon indicating time
text_image
08:08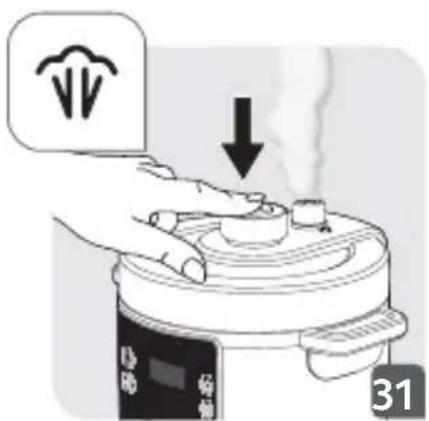
text_image
Illustration showing a hand pressing a cooking pot with a downward arrow, indicating a step to remove or press.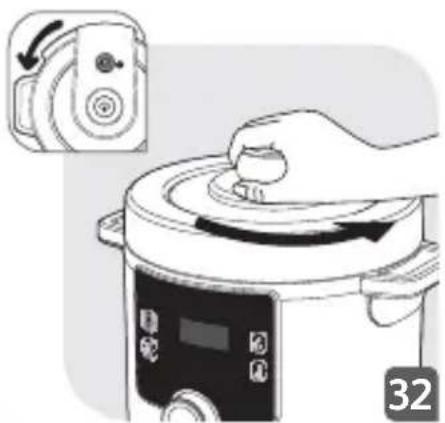
natural_image
Illustration of a hand placing a lid onto a rice cooker with a digital display (no text or symbols)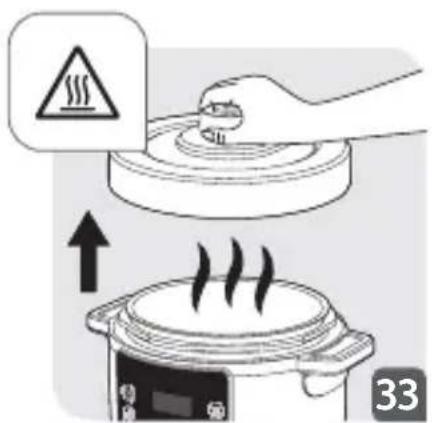
text_image
Illustration showing heating process with warning sign and upward arrow, likely from a cooking or heating context
text_image
00:30 1 2 34
text_image
06:00 1 35
text_image
i 80:00 36
text_image
5 !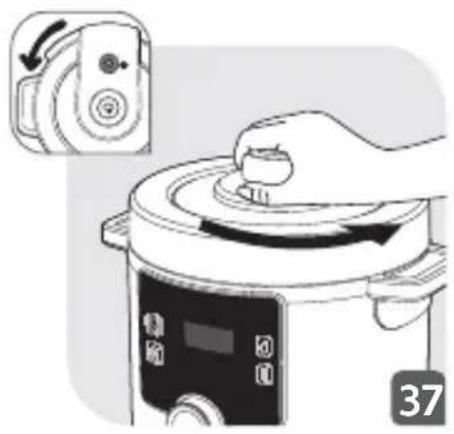
natural_image
Illustration of a hand operating a rice cooker with a control knob, next to an inset photo of the device (no text or symbols visible)
natural_image
Illustration of a hand pressing down on a cooking pot with a digital control panel (no text or symbols)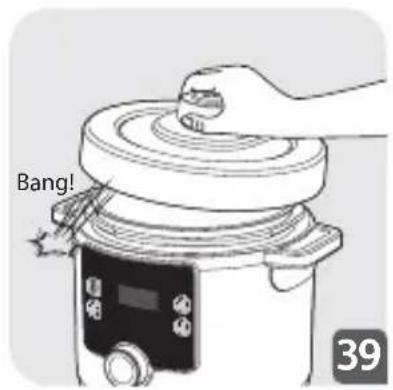
text_image
Bang! 39
text_image
Diagram illustrating food safety with labeled symbols: a bowl, a plate with a cross, and a sponge above it.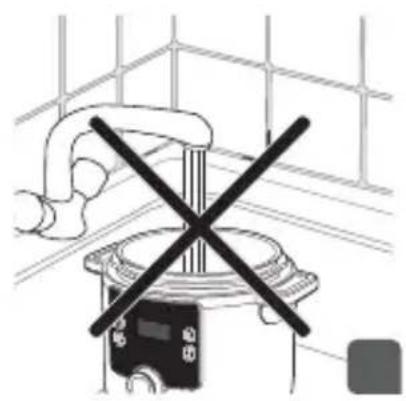
natural_image
Diagram of a hand holding a valve with a cross symbol crossed over it, against a grid background (no text or labels)
natural_image
Illustration of cooking pots with a crossed black arrow indicating prohibition (no text or symbols)
natural_image
Diagram of a circular device with crosshair and internal components, no readable text or symbols present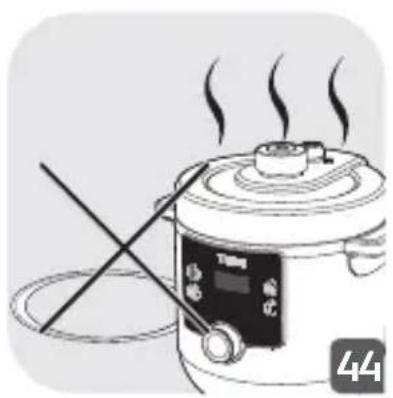
natural_image
Illustration of a cooking pot with steam rising, crossed by a diagonal rod (no text or symbols)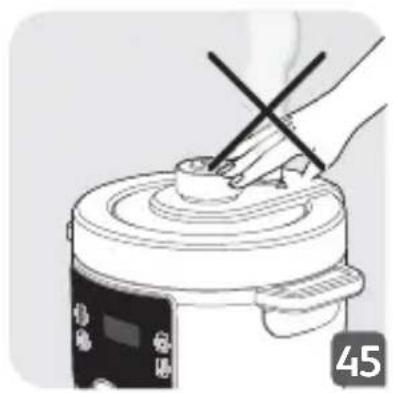
natural_image
Illustration of a hand using a tool to press or adjust a cylindrical object on a cooking pot (no text or symbols visible)5

text_image
Warning symbol image with exclamation mark inside triangle
text_image
Illustration of a cooking pot with warning sign and heating instruction, showing a hand using a crossed tool to press the lid.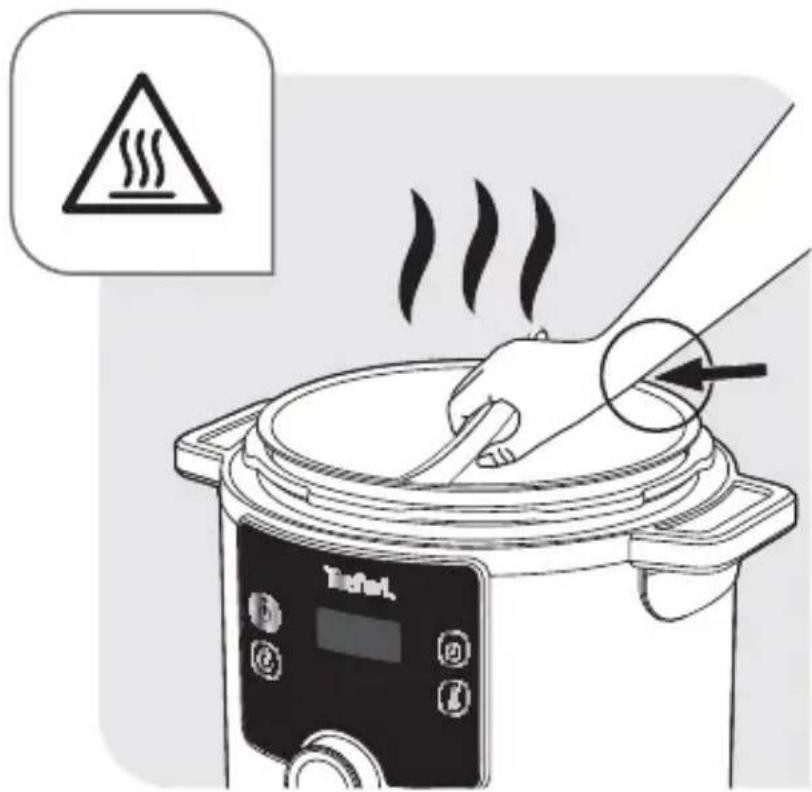
text_image
BottelSL

text_image
OK Tæred
text_image
Diagram of a food microwave oven with a label pointing to a chimney icon and a cooking step indicator.DELI IZDELKA
natural_image
Illustration of a rice cooker with a dumpling lid and steam rising above it (no text or symbols)
natural_image
Line drawing of a kitchen scene with a steaming pot, a cup, and a spoon (no text or symbols)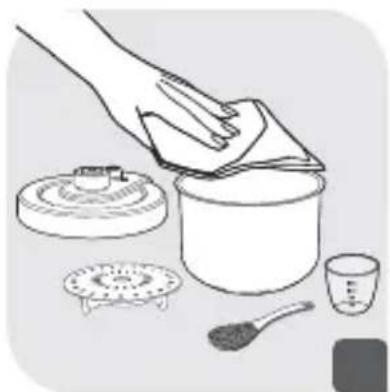
natural_image
Illustration of a hand cleaning a large pot with a cloth, accompanied by small containers and tools (no text or symbols)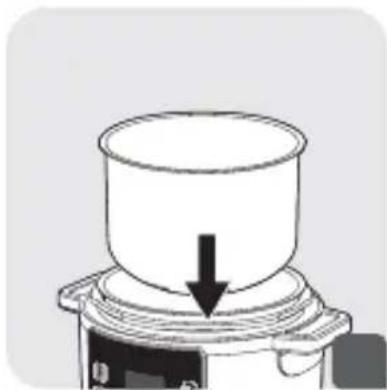
natural_image
Simple line drawing of a cylindrical container with an arrow pointing downward, mounted on a base (no text or symbols)BS
natural_image
Diagram of a mechanical component with an arrow indicating a specific part (no text or symbols present)
natural_image
Line drawing of a bathroom sink with a magnified inset showing a sponge bubble (no text or symbols)
natural_image
Diagram showing a mechanical component with an inset view and directional arrows indicating motion (no text or symbols)


text_image
Illustration showing three steps of cooking a rice cooker: moving, adding a plug into a pot, and removing a switch to an electrical outlet.
natural_image
Simple line drawing of a cooking pot and a steaming rice cooker (no text or symbols)
text_image
25 00:02 27 28
text_image
Illustration showing three-step cooking process: heat transfer, heating device, and boiling pot with warning symbol
text_image
00:30 1 2 34
text_image
06:00 1 35
text_image
i 80:00 365

text_image
Warning symbol image with exclamation mark inside triangle
natural_image
Illustration of a hand operating a rice cooker with a control panel, next to an inset photo of a remote control unit (no text or symbols visible)
natural_image
Illustration of a hand pressing down on a cooking pot with a digital control panel (no text or symbols)
text_image
Bang! 39
text_image
Illustration showing a hand pouring liquid into a container with two warning signs: one with a sponge and spark, the other with a crossed-out pad.
natural_image
Diagram of a mechanical device with a crossed X mark symbol, no text or labels present
natural_image
Illustration of cooking pots with a crossed black arrow indicating prohibition (no text or symbols)
natural_image
Diagram of a circular device with crosshair and internal components, no readable text or symbols
natural_image
Illustration of a cooking pot with steam rising, crossed by a diagonal rod (no text or symbols)
natural_image
Illustration of a hand using a tool to press or adjust a cooking pot (no text or symbols visible)5

text_image
Warning symbol image with exclamation mark inside triangle
text_image
Illustration of a cooking pot with warning sign and heating instruction, showing a hand using a crossed tool to press the lid.
text_image
Illustration of a cooking pot with warning symbol and label 'Boseli' on the deviceBS

text_image
OK Tæred
text_image
Diagram of a food microwave oven with a label pointing to a chimney icon and a cooking step indicator.SVI DIJELOVI APARATA
text_image
Ventil za ograničavanje pritiska Tipka za ispuštanje pritiska Drška poklopca Plutajući ventil
text_image
Podmetač za kuhanje na pari * dodaci ovisno o modelu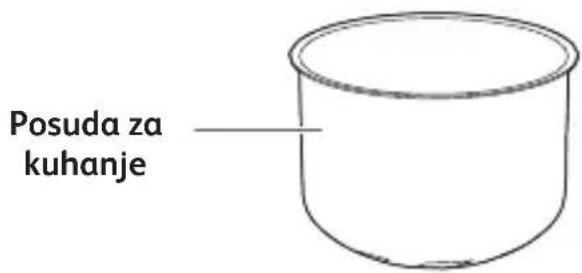
text_image
Posuda za kuhanje
text_image
Poklopac Gumica Poklopac ventila za ograničavanje pritiska Plutajući ventil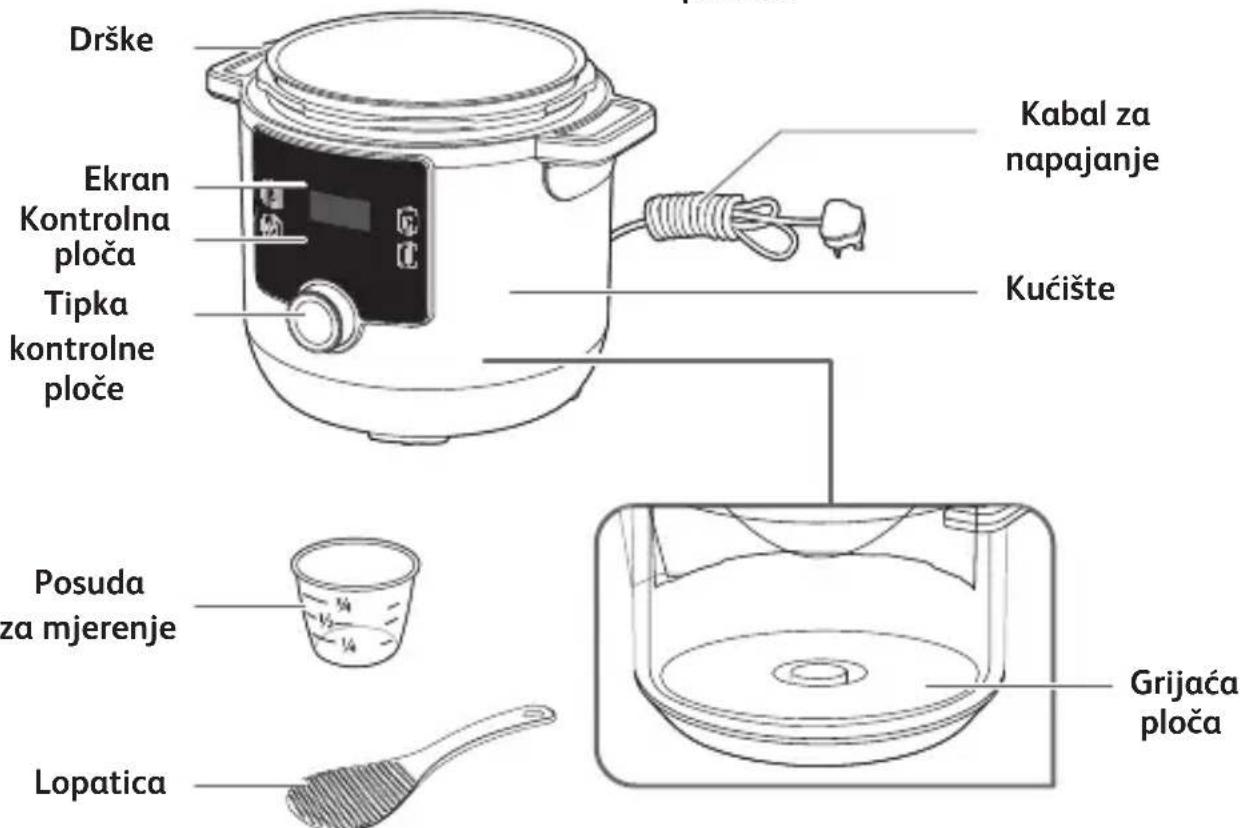
text_image
Drške Ekran Kontrolna ploča Tipka kontrolne ploče Kabal za napajanje Kućište Posuda za mjerenje Grijaća ploča LopaticaNeki rezervni dijelovi i pribor za aparat su dostupni komercijalno. Te elemente možete sami promijeniti bez pozivanja odjela za podršku nakon prodaje. Dodatne detalje možete potražiti u korisničkom priručniku. Da biste promijenili ili popravili bilo koji drugi dio, odnesite svoj aparat u ovlašteni servisni centar. Koristite samo one dijelove koji odgovaraju modelu vašeg aparata.
text_image
00:30 1 2 34
text_image
06:00 1 35
text_image
i A0:00 36
text_image
5 !
natural_image
Illustration of a hand operating a kitchen rice cooker with a control panel, next to an open remote device (no text or symbols visible)
natural_image
Illustration of a hand pressing down on a cooking pot with a digital control panel (no text or symbols)
text_image
Bang! 39
text_image
Diagram illustrating a food safety or cleaning procedure with labeled icons and a numbered label '40'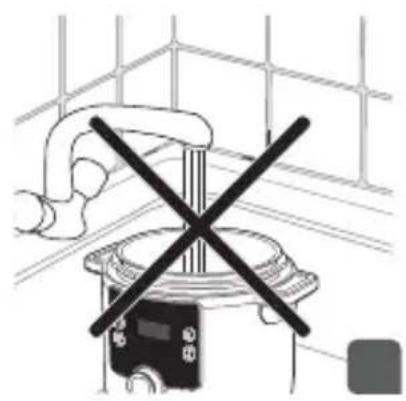
natural_image
Diagram showing a hand holding a valve with a crossed X symbol, against a grid background (no text or labels)
natural_image
Illustration of cooking pots with a crossed arrow indicating resistance or crossed-out (no text or symbols)
natural_image
Diagram of a circular device with crosshair and internal components, no readable text or symbols present
natural_image
Illustration of a cooking pot with steam rising, crossed by a diagonal rod (no text or symbols)
natural_image
Illustration of a cooking step with a hand using a tool to press or adjust a lid (no text or symbols visible)HR

text_image
Illustration of a cooking pot with warning sign and heating instruction, showing a hand using a crossed tool to press the lid.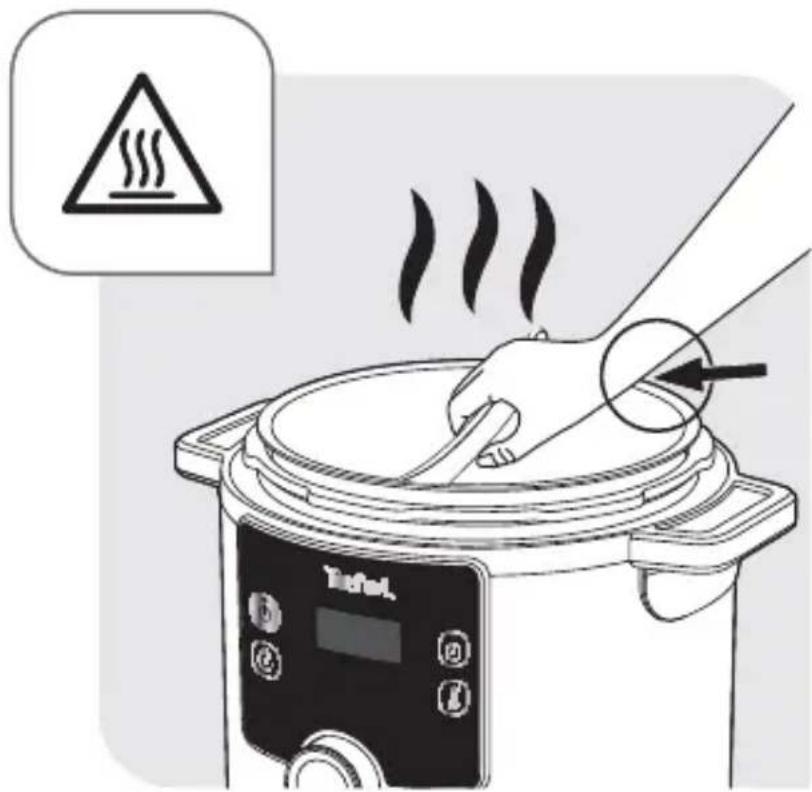
text_image
Illustration of a cooking pot with warning sign and heating instruction, showing a hand pressing a lid with steam rising.
text_image
OK Tærdel
text_image
Diagram of a food cooker with a smokestack and a label pointing to the lid, accompanied by a speech bubble containing a snow symbol.HR
SVI DIJELOVI APARATA
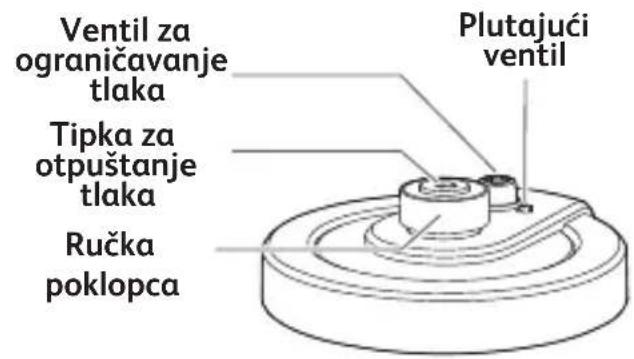
text_image
Ventil za ograničavanje tlaka Tipka za otpuštanje tlaka Ručka poklopca Plutajući ventil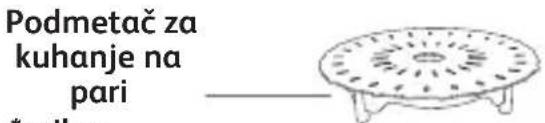
text_image
Podmetač za kuhanje na pari *ničihov"pribor ovisno o modelu

text_image
Lonac za pripremu hrane
text_image
Poklopac Brtva Poklopac ventila za ograničavanje tlaka Plutajući ventil
text_image
Illustration showing three steps of cooking a rice cooker: moving, adding a plug into a pot, and removing a plastic plug into an electrical outlet.4

natural_image
Line drawing of a rice cooker with steam rising (no text or symbols)
text_image
H:10 25
text_image
Diagram showing a hand pressing a button on a digital device with icons and time display, indicating a timer or function.
text_image
HEA 27
text_image
00:02 28
text_image
Digital kitchen appliance control panel with digital display and alarm icons, showing time and function labels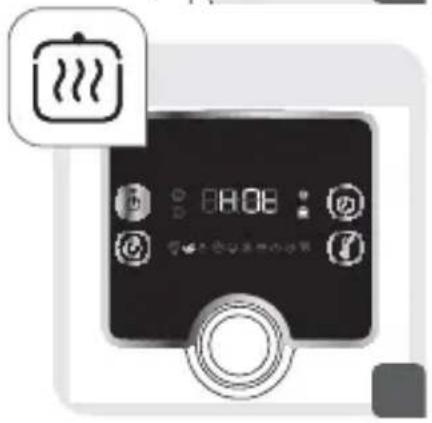
text_image
8:08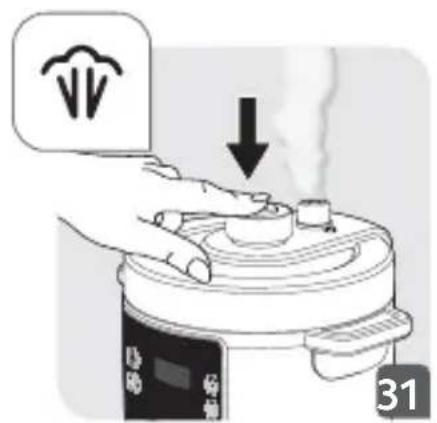
text_image
Illustration showing a hand pressing a cooking pot with a downward arrow, accompanied by a speech bubble icon with a trash symbol.
natural_image
Illustration of a hand using a rice cooker to press the lid, with a camera inset showing the device (no text or symbols present)
text_image
Illustration showing a hand pressing a hot pot with warning symbol and temperature rise, next to a cooking pot with visible steam rising.SR

text_image
00:30 1 2 34
text_image
06:00 1 35
text_image
i 80:00 365

text_image
Warning symbol image with exclamation mark inside triangle
natural_image
Illustration of a hand placing a small component into a rice cooker (no text or symbols visible)
natural_image
Illustration of a hand pressing down on a cooking pot with a digital control panel (no text or symbols)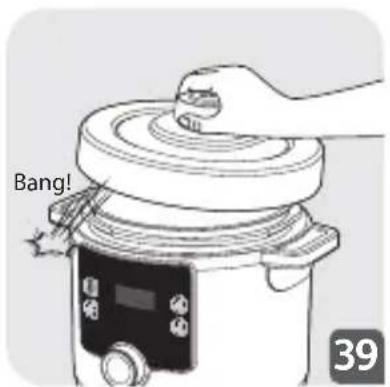
text_image
Bang! 39
text_image
Illustration showing a hand pouring liquid into a container with two warning signs: one with a sponge and spark, the other with a crossed-out pad.
natural_image
Diagram of a mechanical device with a crossed X mark, no text or symbols present
natural_image
Illustration of cooking pots with a crossed black arrow indicating prohibition (no text or symbols)
natural_image
Diagram of a circular device with crosshair and internal components, no readable text or symbols present
natural_image
Illustration of a cooking pot with steam rising, crossed by a diagonal rod (no text or symbols)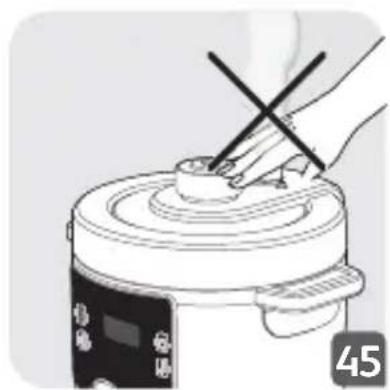
natural_image
Illustration of a hand using a tool to press or install a small object on a cooking pot (no text or symbols visible)5

text_image
Warning symbol image with exclamation mark inside triangle
text_image
Illustration of a cooking pot with warning sign and heating instruction, showing a hand using a crossed tool to press the pot.
text_image
Illustration of a cooking pot with warning symbol and label 'Baker' indicating heat dissipation or cooking stepSR

text_image
OK Tæred
text_image
Diagram of a food microwave oven with a label pointing to a chimney icon and a cooking step indicator.SVI DELOVI PROIZVODA

text_image
Ventil za ograničenje pritiska Taster za oslobađanje pritiska Taster poklopca Plutajući ventil
text_image
00:30 1 2 34
text_image
06:00 1 35
text_image
i A0:00 365

text_image
Warning symbol image with exclamation mark inside triangle
natural_image
Illustration of a hand operating a rice cooker with a control panel, next to an open remote device (no text or symbols visible)
natural_image
Illustration of a hand pressing down on a cooking pot with a digital control panel (no text or symbols)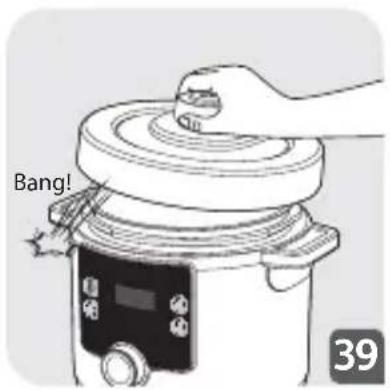
text_image
Bang! 39
text_image
Diagram illustrating a food safety or cleaning procedure with labeled items: a bowl, a sponge, and a cross symbol.
natural_image
Diagram of a ceiling-mounted device with a crossed X mark, no text or symbols present
natural_image
Illustration of two cooking pots with crossed arrows indicating prohibition or resistance (no text or symbols)
natural_image
Diagram of a circular device with crosshair and mechanical components, no readable text or symbols present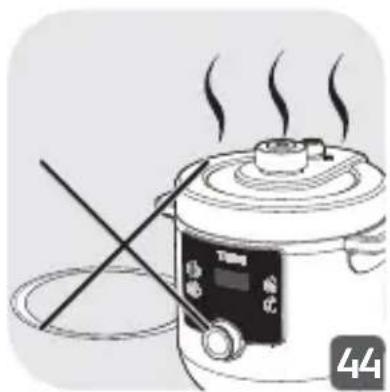
natural_image
Illustration of a cooking pot with steam rising, crossed by a diagonal rod (no text or symbols)
natural_image
Illustration of a hand using a tool to press or inspect a cylindrical object on a food processor (no text or symbols visible)RU

text_image
Illustration of a cooking pot with warning sign and heating instruction, showing a hand using a crossed tool to press the lid.
text_image
Illustration of a cooking pot with warning sign and heating instruction, showing a hand stirring a lid with steam rising.
text_image
OK Tærdel
text_image
Diagram of a food cooker with a smokestack and fan icon, showing a cooking step with an arrow pointing to the lid.RU
ВСЕ ДЕТАЛИ ПРОДУКТА

natural_image
Illustration of a rice cooker with a dumpling lid and steam rising above it (no text or symbols)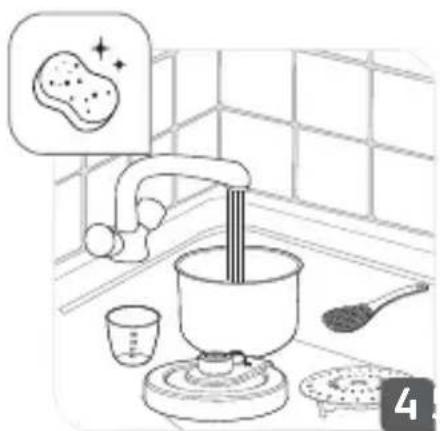
natural_image
Illustration of a kitchen scene with a steaming pot, a cup, and a bowl (no text or symbols)
natural_image
Illustration of a hand cleaning a large pot with a cloth, accompanied by small containers and a brush (no text or symbols)
natural_image
Simple line drawing of a cylindrical container with an arrow pointing downward, mounted on a base (no text or symbols)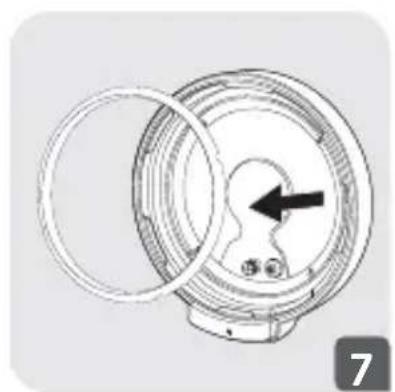
natural_image
Diagram of a mechanical component with an arrow indicating a specific part, no text or symbols present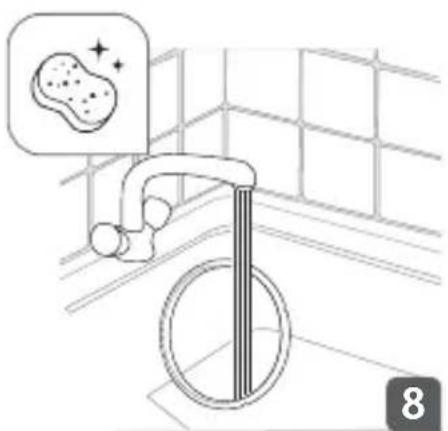
natural_image
Diagram of a bathroom sink with a pipe and circular base, showing a magnified view of a tooth (no text or symbols)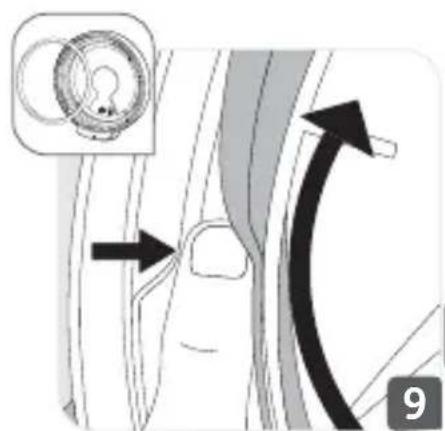
natural_image
Diagram showing a hand holding a device with an arrow indicating rotation or movement (no text or symbols present)KK


natural_image
Illustration of a hand pressing down on a rice cooker with a device inset showing the switch (no text or symbols)
natural_image
Line drawing of a rice cooker with a downward arrow indicating a component (no text or symbols)
text_image
Diagram showing a hand using a power plug to switch an electrical socket, with a crossed-out wire symbol and a black arrow indicating the process.4

natural_image
Line drawing of a rice cooker with steam rising (no text or symbols)
text_image
B HEL0 OK OK OK
text_image
Diagram showing a hand pressing a button on a digital device with icons and time display, indicating a timer or function.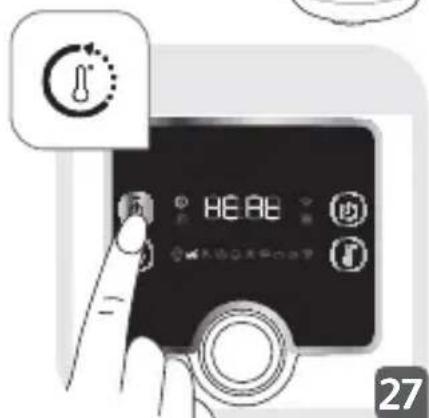
text_image
HEA 27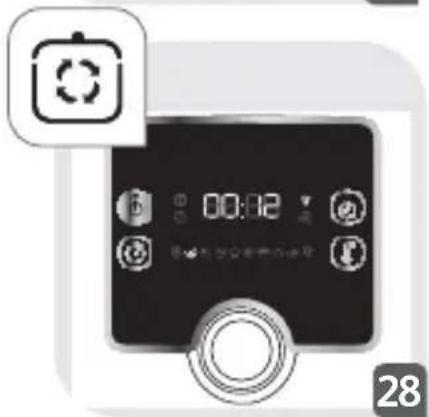
text_image
00:02 28
text_image
Digital kitchen control panel with digital clock, alarm buttons, and a bell icon indicating notification or alert.
text_image
08:08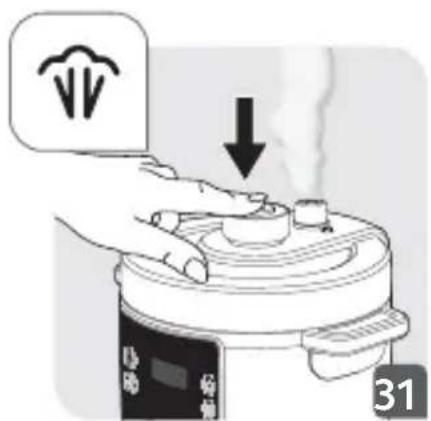
text_image
Illustration showing a hand pressing a cooking pot with a downward arrow, indicating a step to press or remove the lid.
natural_image
Illustration of a hand placing a lid onto a rice cooker with a digital display (no text or symbols)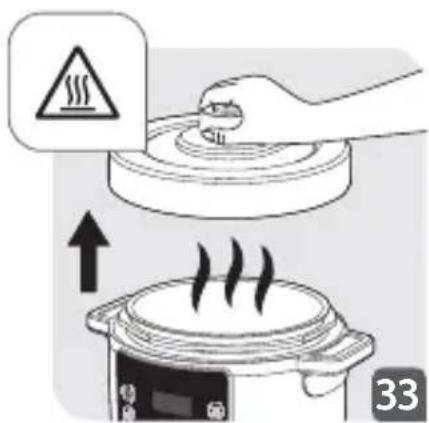
text_image
Diagram showing heating process with warning sign and upward arrow, likely for cooking or heating equipmentKK

text_image
00:30 1 2 34
text_image
06:00 1 35
text_image
i 80:00 365

text_image
Warning symbol image with exclamation mark inside triangle
natural_image
Illustration of a hand operating a rice cooker with a control knob, next to an inset photo of the device (no text or symbols visible)
natural_image
Illustration of a hand pressing down on a cooking pot with a digital control panel (no text or symbols)
text_image
Bang! 39
text_image
Illustration showing a hand pouring liquid into a container with two warning signs: one with a sponge and spark, the other with a crossed-out pad.
natural_image
Diagram of a mechanical device with a crossed X mark, no text or symbols present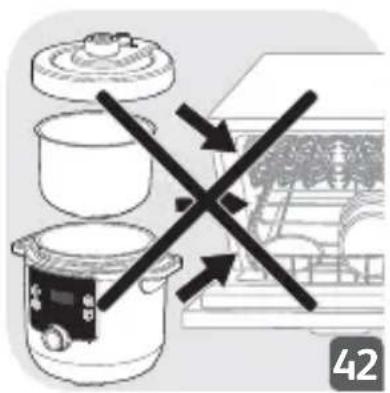
natural_image
Illustration of cooking pots with a crossed black arrow indicating prohibition (no text or symbols)
natural_image
Diagram of a circular device with crosshair and internal components, no readable text or symbols present
natural_image
Illustration of a cooking pot with steam rising, crossed by a diagonal rod (no text or symbols)
natural_image
Illustration of a hand using a tool to press or install a small object on a cooking pot (no text or symbols visible)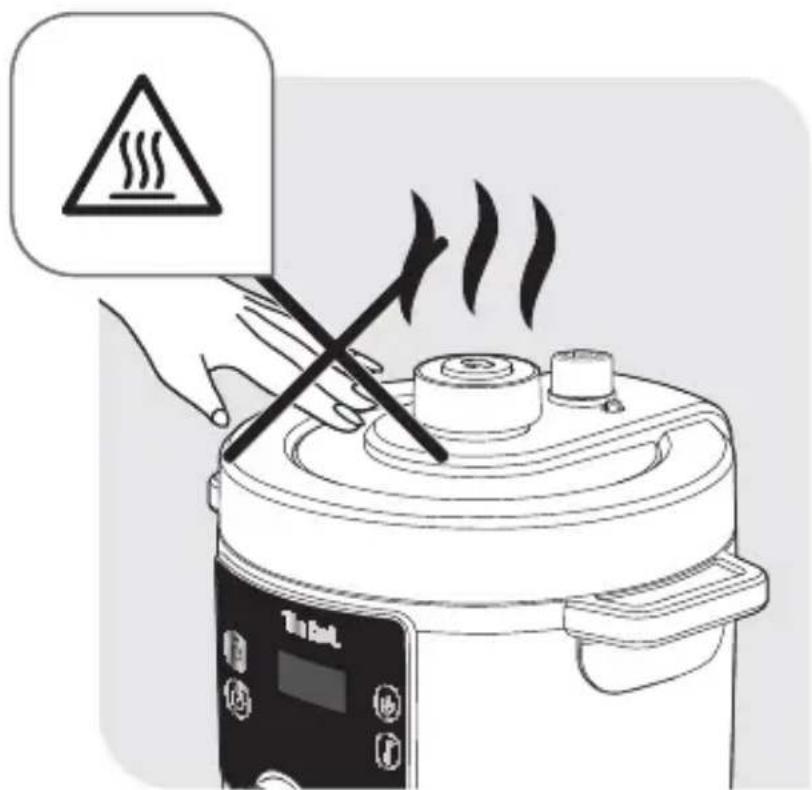
text_image
Illustration of a cooking pot with warning sign and heating instruction, showing a hand using a crossed tool to press the lid.
text_image
Illustration of a cooking pot with warning sign and heating instruction, showing a hand pressing a lid with steam rising.KK

text_image
OK Tæred
text_image
Diagram of a food microwave oven with a label pointing to a chimney icon and a cooking step indicator.ӨНІМНІН БАРЛЫК БӨЛІГІ
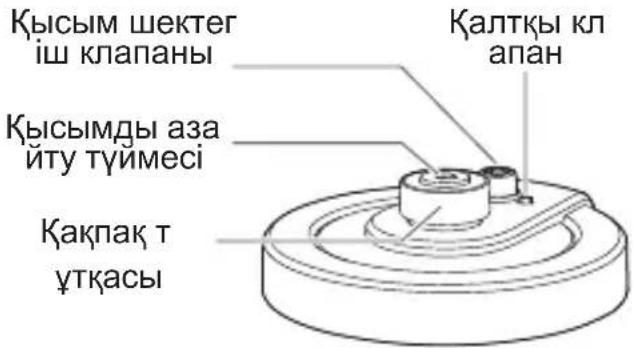
text_image
Кысым шектег іш клапаны Кысымды аза іту түймесі Какпак т үткасы Калтқы кл апанtext_image
00:30 1 2 34
text_image
06:00 1 35
text_image
i A0:00 365

text_image
Warning symbol image with exclamation mark inside triangle
natural_image
Illustration of a hand placing a small object into a rice cooker (no text or symbols visible)
natural_image
Illustration of a hand pressing down on a cooking pot with a digital control panel (no text or symbols)
text_image
Bang! 39
text_image
Illustration showing a hand washing a cup with a water bottle and two warning symbols: a sponge above and a cross on a surface.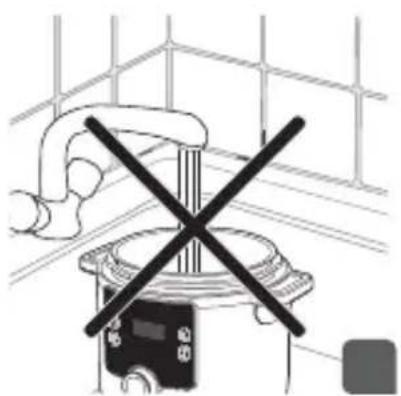
natural_image
Diagram of a ceiling-mounted device with a crossed X mark, no text or symbols present
natural_image
Illustration of two cooking pots with crossed arrows indicating resistance or prohibition (no text or symbols)
natural_image
Diagram of a circular device with crosshair and internal components, no readable text or symbols present
natural_image
Illustration of a cooking pot with steam rising, no text or symbols present
natural_image
Illustration of a hand using a tool to press or adjust a small object on a food processor (no text or symbols visible)UK

text_image
Illustration of a cooking pot with warning sign and heating instruction, showing a hand using a crossed tool to press the lid.
text_image
Illustration of a cooking pot with warning sign and heating instruction, showing a hand pressing a lid with steam rising.
text_image
OK TaFed
text_image
Diagram of a cooking pot with a label pointing to a steam rising from the lid, accompanied by a speech bubble icon containing a snow symbol.УСІ КОМПОНЕНТИ ВИРОБУ
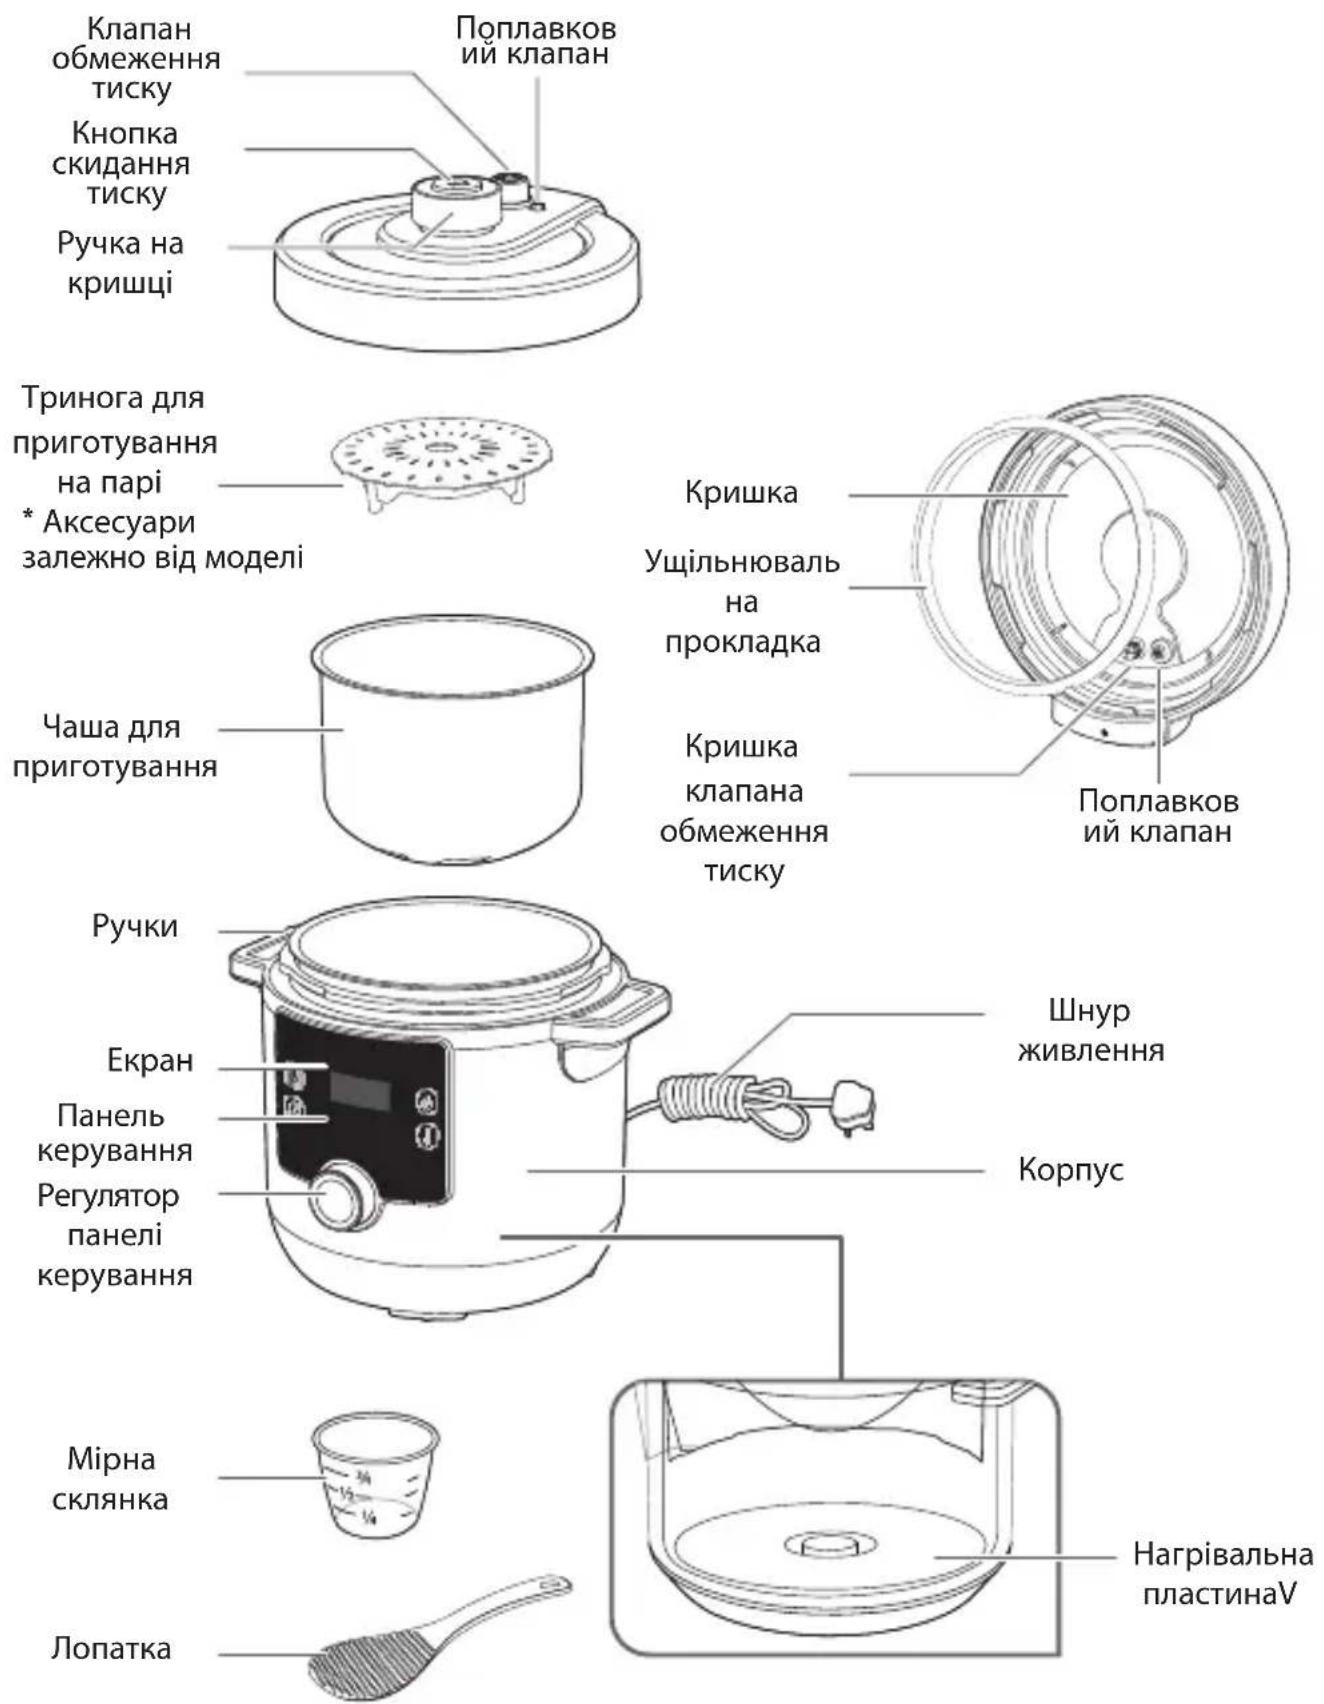
text_image
Illustration showing three steps of cooking a rice cooker: moving, adding a plug into a pot, and removing a switch to an electrical outlet.
natural_image
Simple line drawing of a cooking pot and a steaming rice cooker (no text or symbols)
text_image
25 00:02 27 28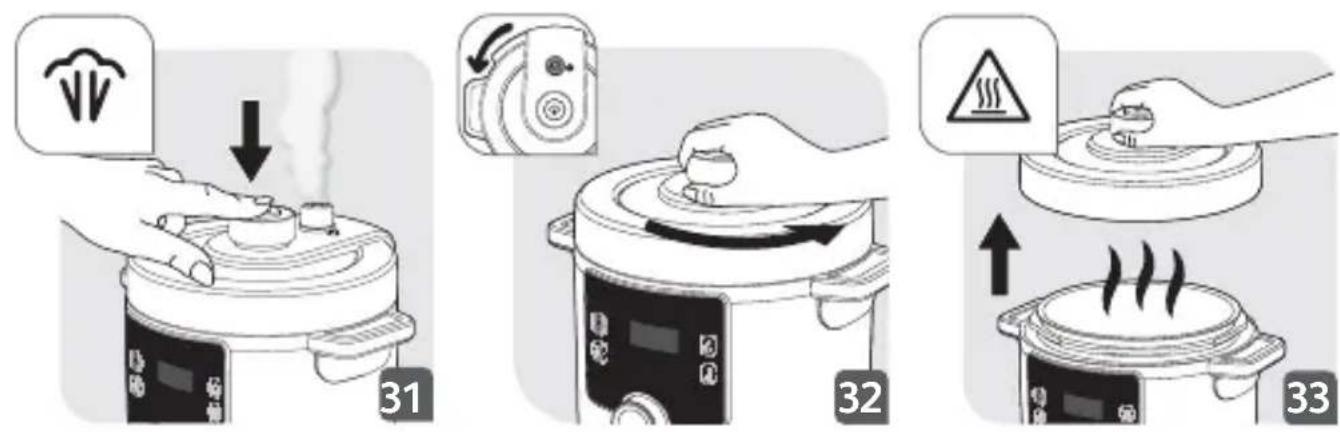
text_image
Illustration showing three-step cooking process: heating, pressing, and boiling with warning symbols
text_image
00:30 1 2 34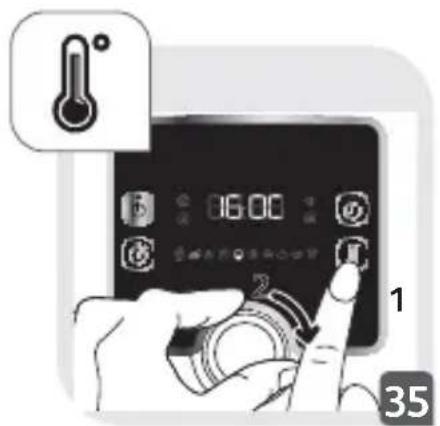
text_image
06:00 1 35
text_image
i 80:00 365

text_image
Warning symbol image with exclamation mark inside triangle
natural_image
Illustration of a hand placing a small component into a rice cooker (no text or symbols visible)
natural_image
Illustration of a hand pressing down on a cooking pot with a digital control panel (no text or symbols)
text_image
Bang! 39
text_image
Illustration showing a hand pouring liquid into a container with two warning signs: one with a sponge and spark, the other with a crossed-out pad.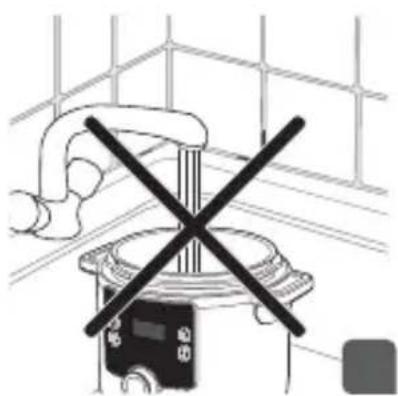
natural_image
Diagram of a mechanical device with a crossed X mark, no text or symbols present
text_image
Diagram showing cooking process with crossed arrows indicating removal or rejection of a cooking pot and a kitchen scene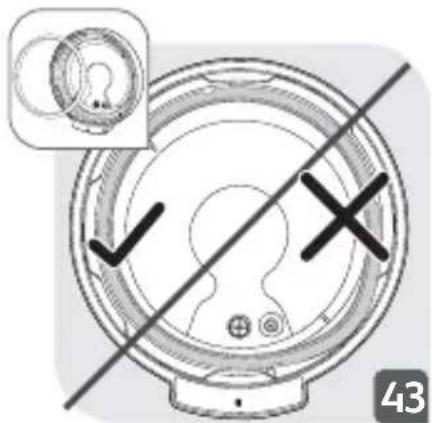
natural_image
Diagram of a circular device with crosshair and internal components, no readable text or symbols present
natural_image
Illustration of a cooking pot with steam rising, crossed by a diagonal rod (no text or symbols)
natural_image
Illustration of a hand using a tool to press or adjust a cooking pot (no text or symbols visible)
text_image
Illustration of a cooking pot with warning sign and heating instruction, showing a hand using a crossed tool to press the lid.
text_image
Illustration of a cooking pot with warning sign and heating instruction, showing a hand pressing a lid with steam rising.
text_image
OK Tæred
text_image
Diagram of a food cooker with a label pointing to a chimney icon and a cooking step indicator.ÜRÜNÜNÜZÜN TÜM PARÇALARI