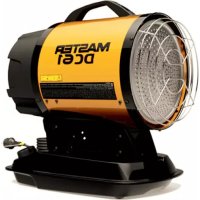
DC 61 - Heating Master - Free user manual and instructions
Find the device manual for free DC 61 Master in PDF.


| Product Type | Professional mobile air heater |
| Brand | Master |
| Model | DC 61 |
| Category | Heater |
| Fuel | Diesel or Kerosene |
| Power supply | Mains (cable) or rechargeable lithium-ion battery (optional) |
| Heating type | Infrared (heats objects, not air) |
| Ignition | Electronic with ON/OFF switch |
| Control | Optional room thermostat |
| Safety | Overheat protection, tilt sensor, photocell |
| Filter cleaning | Clean with clean fuel every 150-200 hours or as needed |
| Maintenance | Photocell, nozzle, filter: clean or replace as per indicated frequency |
| Battery (if present) | Lithium-ion, original charger required |
| Storage | Horizontal, in a dry place, tank emptied |
| Intended use | Professional mobile and temporary applications, not for domestic use |
Frequently Asked Questions - DC 61 Master
User questions about DC 61 Master
0 question about this device. Answer the ones you know or ask your own.
Ask a new question about this device
Download the instructions for your Heating in PDF format for free! Find your manual DC 61 - Master and take your electronic device back in hand. On this page are published all the documents necessary for the use of your device. DC 61 by Master.
USER MANUAL DC 61 Master
natural_image
Icon of an open book with an exclamation mark, enclosed in a diamond shape with a yellow diagonal stripe (no text or symbols)USER AND MAINTENANCE MANUAL
DC 61
| en | it | de | es | fr | nl | pt | da | fi | no | sv | pl | ru | cs | hu | sl | tr | hr | lt | | lv | et | ro | sk | bg | uk | bs | el | zh | kk |
NOTE:
TECHNICAL DATA TABLE - TABELLA DATI TECNICI - TECHNISCHE DATENTABELLE - TABLA DE DATOS TÉCNICOS - TABLEAU DES DONNÉES TECHNIQUES - TABEL TECHNISCHE GEGEVENS - TA- BELA DE DADOS TÉCNICOS - TEKNISK DATATABEL - TEKNISTEN TIETOJEN TAULUKKO - TABELL FOR TEKNISKE DATA - TABELL MED TEKNISKA EGENSKAPER - TABELA DANYCH TECHNICZ- NYCH - ТАБЛИЦЕ ТЕХНИЧЕСКИХ ДАННЫХ - TABULKA TE- CHNICKÝCH ÚDAJŮ - MŰSZAKI ADATOK TÁBLÁZATA - TEHNIČNI PODATKI - TEKNÍK VERÍLER TABLOSUNDA - TABLICI S TEHNIČ- KIM PODACIMA - TECHNINIŲ DUOMENŲ LENTELĖJE - TEHNIS- KO DATU TABULA - TEHNILISTE ANDMETE TABEL - TABELUL CU DATE TEHNICE - TABUL'KA TECHNICKÝCH ÚDAJOV - ТАБЛИЦА ТЕХНИЧЕСКИ ДАННИ - ТАБЛИЦІ ТЕХНІЧНИХ ДАНИХ - ТАВЕ- LI SA TEHNIČKIM PODACIMA - ΠΙΝΑΚΙΔΑ ΤΩΝ ΤΕΧΝΙΚΩΝ ΣΤΟΙΧΕΙΩΝ - 技术参数 - ΤΕΧΗΝΙΚΑΛΒΙΚ ΚΘΡСЕΤΚΙШТЕР ΚΕСΤΕСΙ
| MODEL DC 61 | |
 | 17 kW-кВт14.600 kcal/h-ккал/ч58.000 Btu/h-БТЕ/ч |
 | 1,35 kg/h-кг/ч |
 | DIESEL-KEROSENEDизель-керосин |
 | 11 l-л |
 | ~110-240 V-B (-15% ÷ +10%) 50-60 Hz-Гц 0,4-0,2 A |
| --12 V-B (-15% ÷ +10%) 1 A | |
 | 20 kg-кг |
 | 0,40 GpH 80°H LE DANFOSS |
 | 950 kPa-кПа9,5 bar-6ap |

IMPORTANT: In order to have a correct function you must use an electrical generator in class G3 or more (frequency variation ±1%, tension variation ±2%). The maximum power of electrical generator must be three time the nominal power of device that you must connect.
NOTE:
PICTURES - FIGURE - ABBILDUNGEN - FIGURAS - FIGURES - FIGUREN - FIGURAS - FIGURER - KUVAT - FIGURER - FIGUR - RYSUNKI - РИСУНКИ - OBRÁZKY - ÁBRÁK - SLIKE - ŞEKİLLER - SLIKE - PAVEIKSLÈLIAI - ATTËLI - JOONISED - IMAGINI - OBRÁZKY - ФИГУРА - МАЛЮНКИ - SLIKE - EIKONEΣ - 图 - СУРЕТТЕР

natural_image
Line drawing of an open cardboard box and its internal components including a washing machine, accessories, and a battery (no text or symbols)1

natural_image
Technical line drawing of a mechanical device with directional arrows and internal components (no text or symbols)2

3
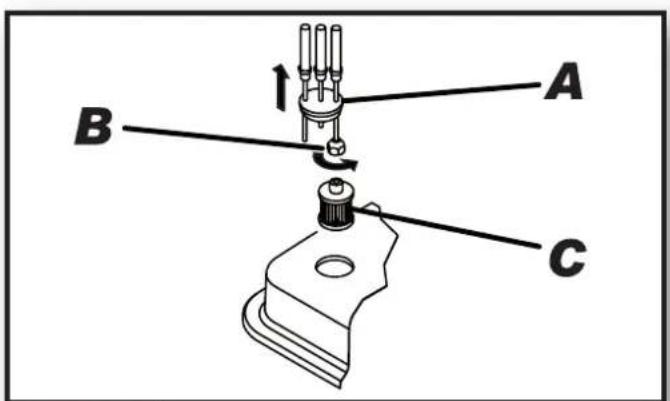
4

natural_image
Line drawing of a coiled cable with a connector (no text or symbols)5

natural_image
Line drawing of a mechanical component with no text or symbols6
PICTURES - FIGURE - ABBILDUNGEN - FIGURAS - FIGURES - FIGUREN - FIGURAS - FIGURER - KUVAT - FIGURER - FIGUR - RYSUNKI - РИСУНКИ - OBRÁZKY - ÁBRÁK - SLIKE - ŞEKİLLER - SLIKE - PAVEIKSLÉLIAI - ATTĚLI - JOONISED - IMAGINI - OBRÁZKY - ФИГУРА - МАЛЮНКИ - SLIKE - EIKONEΣ - 图 - СУРЕТТЕР

natural_image
Isometric line drawing of a 3D mechanical part with cutouts and mounting holes (no text or symbols)7

natural_image
Line drawing of a printer with a paper roll and a downward arrow, no text or symbols present8

9

natural_image
Line drawing of a person wearing a device with a cable, pointing to an attached plug (no text or symbols present)10

natural_image
Technical line drawing of a mechanical component with a highlighted section showing a black arrow pointing to a component (no text or symbols present)11
TECHNICAL DATA - DATI TECNICI - TECHNISCHE DATEN - DATOS TÉCNICOS - DONNÉES TECHNIQUES - TECHNISCHE GEGEVENS - DADOS TÉCNICOS - TEKNISKE DATA - TEKNISET TIEDOT - TEKNISKE DATA - TEKNISKA DATA - DANE TECHNICZNE - TEXНИЧЕСКИЕ ДАННЫЕ - TECHNICKÉ ÚDAJE - MŰSZAKI ADATOK - TEHNIČNI PODATKI - TEKNÍK VERÍLER - TEHNIČKI PODACI - TECHNINIAI DUOMENYS - TEHNISKIE DATI - TEHNILISED ANDMED - DATE TEHNICE - TECHNICKÉ ÚDAJE - TEXНИЧЕСКИ ДАННИ - TEXHIЧНІ ДАНІ - TEHNIČKI PODACI - TEXNIKA DEĐOMENA - 技术参数 - TEXНИКАЛЫК КОРСЕТКІШТЕР

natural_image
Line drawing of a mechanical device with no visible text or symbolsBATTERY: MCS BAT6BATTERY: MCS BAT6
Cell Type: Li-ion 18650 Cell Type: Li-ion 18650
Nominal Voltage: 14,4 V Nominal Voltage: 14,4 V
Nominal Capacity: 6,0 Ah Nominal Capacity: 6,0 Ah
Weight: 490 g Weight: 490 g
Charging: 0 °C ÷ 40 °C
Discharging: -20 °C ÷ 40 °C
TECHNICAL DATA - DATI TECNICI - TECHNISCHE DATEN - DATOS TÉCNICOS - DONNÉES TECHNIQUES - TECHNISCHE GEGEVENS - DADOS TÉCNICOS - TEKNISKE DATA - TEKNISET TIEDOT - TEKNISKE DATA - TEKNISKA DATA - DANE TECHNICZNE - TEXНИЧЕСКИЕ ДАННЫЕ - TECHNICKÉ ÚDAJE - MŰSZAKI ADATOK - TEHNIČNI PODATKI - TEKNÍK VERİLER - TEHNIČKI PODACI - TECHNINIAI DUOMENYS - TEHNISKIE DATI - TEHNILISED ANDMED - DATE TEHNICE - TECHNICKÉ ÚDAJE - TEXНИЧЕСКИ ДАННИ - TEXHIЧНІ ДАНІ - TEHNIČKI PODACI - TEXNIKA DEĐOMENA - 技术参数 - TEXНИКАЛЬК КОРСЕТКІШТЕР

natural_image
Isometric line drawing of a mechanical device with internal components and mounting holes (no text or symbols)CHARGER: MCS CHACHARGER: MCS CHA
Nominal Input Voltage: \~230 V AC 50-60 Hz
Max. Input Power: 75 WMax. Input Power: 75 W
Charging Volt.: 16,35 V ± 0,25 V
Charging Current: 3,5 A Charging Current: 3,5 A
Temperature Function: -20 °C ÷ 55 °C
CHARGER: MCS CHACHARGER: MCS CHA
Nominal Input Voltage: \~120 V AC 50-60 Hz
Max. Input Power: 75 WMax. Input Power: 75 W
Charging Volt.: 16,35 V ± 0,25 V
Charging Current: 3,5 A Charging Current: 3,5 A
Temperature Function: -20 °C ÷ 55 °C
IMPORTANT: READ AND UNDERSTAND THIS OPERATIONAL MANUAL BEFORE PERFORMING ASSEMBLY, COMMISSIONING OR MAINTENANCE ON THIS HEATER. INCORRECT USE OF THE HEATER CAN CAUSES SERIOUS INJURY. KEEP THIS MANUAL FOR FURTHER REFERENCE.
▶▶1. INFORMATION ON SAFETY (WARNINGS)

IMPORTANT: This air heater has been designed mobile and temporary professional applications. It not been designed for domestic use nor for ther-comfort of human.

IMPORTANT: This appliance is not suitable for use persons (including children) with reduced physical, story and mental capacities or with lack of experience or knowledge unless supervised by a person responsible for their safety. Children must be supervised to make sure they do not play with the appliance.

DANGER: Suffocation by carbon monoxide can tal.
The first symptoms of suffocation by carbon monoxide are similar to those of flu with headache, light-headedness and/or nausea. These symptoms could be caused by the faulty functioning of the heater. IF THESE SYMPTOMS OCCUR. GO OUTDOORS IMMEDIATELY and have the heater repaired by the technical support centre.
1.1. REFUELLING:
▶1.1.1. Personnel appointed to carry out refuelling must be qualified and fully familiar with the manufacturer's instructions and current regulations on how to refuel heaters safely.
▶1.1.2. Only use the type of fuel specified on the heater's identification plate.
▶1.1.3. Before refuelling, turn off the heater and wait for it to cool down.
▶1.1.4. The tanks used to store the fuel must be stored in a separate place.
▶1.1.5. Fuel tanks must be kept at a minimum distance from the heater, according to current standards.
▶1.1.6. The fuel must be stored in an area where the floor does not allow it to penetrate or drip onto flames underneath it, which may ignite the fuel.
▶1.1.7. The fuel must be stored in accordance with current regulations.
1.2. SAFETY:
▶1.2.1. Never use the heater in areas with petrol, paint solvents or other highly flammable vapours.
▶1.2.2. Comply with all local legislation and current regulations when using the heater.
▶1.2.3. Heaters used near tarpaulins, curtains or other similar covering materials must be a safe distance from them. It is advised to use fire-proof covering material.
▶1.2.4. Only use in well-ventilated areas. Set-up a suitable opening in line with current standards, with the purpose of introducing fresh air from outdoors.
▶1.2.5. Power on the heater only with a current which has the voltage and frequency values specified on the heater's identification plate.
▶1.2.6. Only use suitably earthed 3-wire extension leads.
▶1.2.7. Recommended safety distances between the heater and flammable substances: front output 2.5 m (8 ft); on the side, at the top and at the back = 1.5 m (5 ft).
▶1.2.8. Avoid fire hazards by placing the hot or functioning heater on a steady level surface.
▶1.2.9. Keep animals at a safe distance from the heater.
▶1.2.10. Disconnect the power supply or battery from the heater, when not in use.
▶1.2.11. When it is controlled by a thermostat, the heater can turn on at any time.
▶1.2.12. Never use the heater in frequently used rooms nor in bedrooms.
▶1.2.13. Never move, handle, refuel or conduct maintenance on the heater when it is hot, connected to the mains, battery-powered or in operation.
▶1.2.14. Keep the hot parts of the heater a suitable distance from inflammable or thermolabile materials (including the power supply cable).
▶1.2.15. If the power cable or battery is damaged, they must be replaced by a technical support centre to prevent any risk (dispose of the damaged material according to current regulations).
▶1.2.16. Make sure that the heater is turned off before connecting the power cable and/or inserting the rechargeable battery, in order to avoid risks.
▶1.2.17. Use only the original rechargeable batteries recommended by the manufacturer. The use of non-original rechargeable batteries can cause damage, injuries, burns, explosions, electric shocks, poisoning, or endanger life.
▶1.2.18. Keep the disconnected rechargeable battery at a safe distance from paper clips, coins, keys, nails, screws and any other small metal objects that could cause a short-circuit. A short-circuit between the contacts of the rechargeable battery can cause damage, injuries, burns, explosions or endanger life.
▶1.2.19. Incorrect use of the rechargeable battery can cause the battery fluid to leak. Avoid all contact with the battery. In the event of accidental contact, rinse yourself thoroughly with water. Seek immediate medical attention if the fluid comes into contact with your eyes. The fluid in the rechargeable battery can cause skin irritation or burns.
▶1.2.20. Incorrect use of the rechargeable battery can cause the battery to release fumes. Avoid inhaling these fumes at all costs. Ensure a good flow of fresh air and seek immediate medical attention in the event of accidental inhalation of fumes. The fumes can irritate the airways.
▶1.2.21. In order to avoid serious risk, do not attempt to open or disassemble the rechargeable battery.
▶1.2.22. In order to avoid serious risk, protect the rechargeable battery against heat (for example, constant direct sunlight or fire) water, humidity, etc.
▶1.2.23. Use the specific rechargeable battery only for this heater, in order to avoid hazardous overloading.
▶1.2.24. Use only original rechargeable batteries with the voltage rating indicated on the technical data plate affixed to the heater. The use of other types of rechargeable battery (like imitation batteries, regenerated batteries, batteries from other brands, etc.) poses the risk of injuries and/or explosions.
▶1.2.25. Use only original battery chargers to charge the rechargeable battery. Each battery must be charged
using its specific charger in order to avoid the risks of fire and explosion.
▶1.2.26. Use only the power supply methods recommended in this manual. It is prohibited to change the power supply method when the heater is running, in order to avoid serious damage.
▶1.2.27. When the heater is managed by the thermostat or switches from power supply to battery power cable, the heater may turn off and go in stand-by mode (the display shows “[]”), pay close attention because the heater may automatically turn on again at any time and may cause serious damage to property and people.
▶▶2. UNPACKING
See Fig. 1
▶2.1. Remove all packaging material used to deliver the heater and dispose of it in compliance with current standards.
▶2.2. Remove all items from the packaging.
▶2.3. Check for any damage incurred during transport. If the heater appears damaged, immediately inform the dealer from whom it was purchased.
▶▶3. DESCRIPTION OF ARTICLES
▶3.1. POWER CABLE (where present):
THE POWER SUPPLY CABLE DOES NOT CHARGE THE BATTERY.
(Pic. 5) The heater can be connected to the mains by the power supply cable. Check the cable regularly for wear, in order to avoid serious damage. Observe all the warning messages relating to the power cable in this manual.
▶3.2. BATTERY (when applicable):
(Pic. 6)
NOTES: DEPENDING ON THE BATTERY CAPACITY (MEASURED IN Ah), IT IS NECESSARY TO USE AN ORIGINAL BATTERY CHARGER AND OF ADEQUATE POWER.
The heater can operate autonomously using an original Li-ion rechargeable battery, without a mains connection. The rechargeable battery is provided only partially charged. It is advisable, therefore, to fully charge the battery before initial use. Use only original batteries to power the heater. Observe all the warning messages relating to the battery in this manual.
▶3.3. BATTERY CHARGER (when applicable):
(Pic. 7) The battery charger is designed to charge original lithium-batteries. The operating parameters for the battery charger (see the data plate affixed on the battery charger) must be observed. Use the battery charger in completely dry, dust-free environments to charge only the original rechargeable batteries used to power this heater. The battery charger is designed to automatically charge the rechargeable battery when connected (Pic. 8). A LED light on the battery charger provides detailed diagnostics during the charging phase (Pic. 9). Observe all the warning messages relating to the battery charger in this manual.
▶▶4. FUEL
WARNING: The heater only works with DIESEL or KEROSENE.
Only use diesel or kerosene to avoid any fire or explosion hazard. Never use petrol, naphtha, solvents for paints, alcohol or other highly inflammable fuels.
Use non-toxic, anti-freeze additives in case of very low temperatures.
▶▶5. OPERATING PRINCIPLE
See Pic. 2
The air needed to ensure proper combustion is produced by the rotation of a fan inside the burner. The air flow comes out from the burner sleeve and mixes with the fuel that is sprayed at a high pressure by a nozzle. The nozzle-sprayed fuel is guaranteed by an electric pump that sucks the fuel from the tank and pushes it at high pressure to the nozzle.
▶▶6. OPERATION
WARNING: Carefully read the "SAFETY INFORMATION" before switching on the heater.
IMPORTANT: After the first time the heater does not switch on, make sure there is fuel in the tank, make sure the fuel filter is clean and make sure that the heater is positioned on a flat, stable surface.
IMPORTANT: This is a target infrared heater. Heats objects, not air.
IMPORTANT: To change type of power supply from battery to cable and vice-versa, turn off the heater by strictly following the entire procedure to avoid serious damages.
▶6.1. IGNITING THE HEATER:
▶6.1.1. Follow all the safety instructions.
▶6.1.2. Check if there is any fuel in the tank.
▶6.1.3. Close the tank cap.
▶6.1.4. Connect the power plug to the mains or charged battery (SEE VOLTAGE IN "TECHNICAL DATA TABLE") (Pic. 10-11).
▶6.1.5. Turn the "ON/OFF" switch to "ON" (I) (A Pic. 3). The heater should turn on within a few seconds. If the heater does not start, see the troubleshooting paragraph (Par. 10).
PLEASE NOTE: IF THE HEATER SWITCHES OFF DUE TO LACK OF FUEL, TURN OFF THE HEATER, TOP UP THE TANK AND TURN IT ON AGAINST (SEE PAR. 5.1.).
▶6.2. TURNING OFF THE HEATER:
CAUTION: DO NOT REMOVE VOLTAGE OR DISCONNECT THE POWER CABLE OR REMOVE THE BATTERY UNTIL THE HEATER HAS COOLED COMPLETELY (approx. 5 min.).
▶6.2.1. Turn the "ON/OFF" switch to "OFF" (0) (A Pic. 3).
▶6.3. CONNECTING THE ROOM THERMOSTAT (optional):
CAUTION: THE ROOM THERMOSTAT (OPTIONAL) ONLY WORKS WHEN THE HEATER IS POWERED BY THE POWER CABLE.
CAUTION: WHEN THE HEATER IS MANAGED BY THE ROOM THERMOSTAT (OPTIONAL), THE HEATER'S SWITCH-OFF AND ON IS AUTOMATIC.
Remove the plug connected to the heater and connect the room thermostat (optional) (C Pic. 3).
▶▶8. STORAGE AND TRANSPORT
I ORDER TO KEEP AND/OR TRANSPORT THE HEATER IN THE BEST WAY, THE FOLLOWING PROCEDURE MUST BE FOLLOWED:
▶8.1. Empty the fuel from the tank.
▶8.2. If you notice any residue, pour clean fuel into the tank and rinse again.
▶8.3. Close the tank cap and dispose of the fuel appropriately according to the Standards in force.
▶8.4. in order to keep the heater in the best way possible, it must be kept on a level surface to prevent the escape of fuel and in a dry place away from any possible external threats.
▶▶7. FUEL FILTER CLEANING
See Pic. 4
THE FILTER MAY NEED TO BE CLEANED DEPENDING ON THE QUALITY OF THE FUEL USED.
▶7.1. Remove the plug positioned on the tank (A Pic. 4).
▶7.2. Remove the filter from the tank.
▶7.3. Loosen the nut (B Pic. 4).
▶7.4. Remove the filter (C Pic. 4).
▶7.5. Clean the filter with clean fuel; make sure you do not damage it.
▶7.6. Put the filter back in the tank.
▶▶9. DISPLAY ERRORS
See B Pic. 3
| ERROR CAUSE SOLUTION | ||
| F0 | OPERATION ERROR | |
| 1. The “ON/OFF” switch is turned “ON” (I) when the heater is plugged in | 1. After disconnecting the heater, see that the switch is in the “OFF” (0) position, plug the heater in and turn the switch “ON” (I) | |
| F1 | PHOTOCELL ERROR | |
| 1. No fuel2. Fuel is contaminated3. Photocell is dirty or damaged4. Fuel filter is dirty5. Ignition error | 1. Turn the switch “OFF” (0), refill the fuel tank2. Turn the switch “OFF” (0) empty and refill the fuel tank. Clean the filter using clean fuel, do not damage the filter (SEE PARA. 6)3. Contact the technical service center4. SEE PARA. 65. Contact the technical service center | |
| F2 | TEMPERATURE CONTROL SENSOR ERROR | |
| 1. Interrupted cable2. Sensor is damaged | 1. Contact the technical service center2. Contact the technical service center | |
| F3 | THERMOSTAT ERROR | |
| 1. Internal heater overheating2. Antitilting sensor intervent | 1. Turn the heater off, wait until it is cooled down2. Place the heater on a level and stable surface | |
| F4 | INCORRECT VOLTAGE | |
| 1. Incorrect voltage 1. Check voltage of your electric supply system | ||
| FF | NO SWITCH-ON AFTER THREE ATTEMPTS | |
| 1. No fuel2. Dirty fuel filter3. Dirty or defective photocell4. Dirty or defective nozzle5. Anti-tilting sensor trip | 1. Contact the technical service center2. Contact the technical service center3. Contact the technical service center4. Contact the technical service center5. Contact the technical service center | |
| PF | FLAT BATTERY | |
| 1. Flat battery 1. Recharge the battery | ||
| [ ] | HEATER IN STAND-BY | |
| 1. Thermostat connected2. Switching from cable to battery power supply | 1. Thermostat temperature set below the room temperature2. Automatic re-ignition | |
▶▶10. PREVENTIVE MAINTENANCE SCHEDULE
WARNING: BEFOR INITIATING ANY REPAIR OR MAINTENANCE PROCEDURE UNPLUG THE FEEDER CABLE AND MAKE SURE THAT THE HEATER IS COOLED DOWN.
IF THE HEATER IS USED IN PARTICULARLY DUSTY ENVIRONMENTS, MAINTENANCE AND CLEANING MUST BE CARRIED OUT MORE FREQUENTLY.
| Fuel tank Clean every 150-200 hours of operation or when necessary | Empty and rinse with fresh fuel |
| Nozzle Clean or replace once per season or when necessary | Contact the technical service center |
| Photocell Clean once per season or when necessary Contact the technical service center | |
| Fuel filter Clean or replace twice per season or when necessary | Clean the fuel filter with clean fuel |
| Ignition device Clean or replace every 1.000 hours of operation, or when necessary | Contact the technical service center |
| Fan blades Clean when necessary Contact the technical service center | |
▶▶11. PROBLEM IDENTIFICATION
| PROBLEM POSSIBLE CAUSE POSSIBLE SOLUTION | ||
| Heater doesn’t run 1. | Heater blocked2. The power switch is in the “OFF” (0) position3. No power4. Feeder cable unplugged5. Blocked control card6. Wrong thermostat setting7. Temperature sensor override8. Fuse damaged | 1. Restart the heater2. Turn the switch “ON” (I)3A. Plug the feeder cable properly into the socket3B. Check the power supply network3C. Contact the technical service center3D. Flat battery4. Contact the technical service center5A. Restart the heater5B. Identify the display error5C. Contact the technical service center6. Calibrate the thermostat by setting it higher than ambient temperature7A. Wait at least ten minutes then try to run ignition again7B. Contact the technical service center8. Contact the technical service center |
| Motor/pump runs but the flame does not start | 1. No fuel2. Ignition device is dirty3. Fuel filter is dirty4. Nozzle is dirty5. Photocell is dirty, damaged or installed improperly6. Foreign substances present in the tank7. Electrodes are used up or placed at an improper distance | 1. Turn off the heater, refill the fuel tank then restart the heater2. Contact the technical service center3. Clean the filter using clean fuel4. Contact the technical service center5. Contact the technical service center6. Empty and refill the fuel tank with clean fuel7. Contact the technical service center |
| Fan blocked or spins too slowly | 1. Engine damaged 1. Contact the technical service center | |
IMPORTANTE: LEGGERE E COMPRENDERE QUESTO MANUALE OPERATIVO PRIMA DI EFFETTUARE L'ASSEMBLAGGIO, LA MESSA IN FUNZIONE O LA MANUTENZIONE DI QUESTO RISCALDATORE. L'USO ERRATO DEL RISCALDATORE PUÒ CAUSARE LESIONI GRAVI. CONSERVARE QUESTO MANUALE A TITOLO DI FUTURO RIFERIMENTO.
▶6.1. ACCENSIONE DEL RISCALDATORE:
▶5. WERKINGSPRINCIPE
Zie Fig. 2
▶6.3. AANSLUITING OMGEVINGSTHERMOSTAAT (optie):
AANDACHT: DE OMGEVINGSTHERMOSTAAT (OPTIE) WERKT ALLEEN WANNEER DE VERWARMER GEVOED WORDT MET DE VOEDINGSKABEL.
AANDACHT: WANNEER DE VERWARMER GEREGELD WORDT DOOR DE OMGEVINGSTHERMOSTAAT (OPTIE), ZAL DE VERWARMER AUTOMATISCH UIT-EN WEER INSCHAKELEN.
▶▶11. PROBLEEMOPSPORING
PROBLEMA POSSÍVEL CAUSA POSSÍVEL SOLUÇÃO
▶▶2. PAKKAUKSEN PURKAMINEN
Katso Kuva 1
▶▶10. TIDSPLAN FOR VEDLIKEHOLD
VARSEL: F∅R MAN BEGYNNER HVILKE SOM HELST VEDLIKEHOLDSARBEIDER ELLER REPARASJONER, MÅ MAN KOBLE TILF∅RSELSKABELEN FRA ELEKTRISITET OG FORSIKRE SEG AT GENERATOREN ER NEDKJ∅LT.
HVIS LUFTVARMEREN BRUKES I SPESIELT ST∅VETE OMGIVELSER, ER DET N∅DVENDIG MED HYPPI-GERE VEDLIKEHOLD OG RENGJ∅RING.
ELEMENT HYPPIGHET AV VEDLIKEHOLD VEDLIKEHOLDSPROSEDYRE
▶6.1. WŁĄCZENIE NAGRZEWNICY:
▶6.2. WYŁĄCZENIE NAGRZEWNICY:
UWAGA: NIE ODCINAĆ NAPIĘCIA ANI NIE ODŁĄCZĄĆ KABLA ZASILAJĄCEGO LUB USUWAĆ AKUMULATORA, AŻ DO CAŁKOWITEGO SCHŁODZENIA NAGRZEWNICY (około 5 min).
▶▶11. IDENTYFIKACJA PROBLEMU
PROBLEM MOŻLIWA PRZYCZYNA MOŻLIWE ROZWIAZANIE
▶▶1. INFORMACE O BEZPEČNOSTI (UPOZORNĚNÍ)

▶6.1. ZAPNUTÍ OHŘÍVAČE:
▶▶11. PROBLEMİN SAPTANMASI
▶3.1. STRĀVAS VADS (ja tāds ir):
STRĀVAS VADAM NAV AKUMULATORA UZLĀDES FUN-KCIJAS.
▶▶11. PROBLEEMI TUVASTAMINE
▶▶9. GREŠKE NA DISPLEJU
Vidi B Sl. 3
| GREŠKA UZROK RJEŠENJE | ||
| F0 | RADNA GREŠKA | |
| 1. Prekidač “ON/OFF” je u položaju “ON” (I) kada se generator poveže na električnu mrežu | 1. Nakon što ste iskopčali generator sa električne mreže postavite prekidač u položaj “OFF” (0), po-novo ukopčajte utikač u električnu mrežu i stavite prekidač u položaj “ON” (I) | |
| F1 | GREŠKA FOTOĆELIJE | |
| 1. Nema goriva2. Gorivo je prljavo3. Fotoćelija je prljava ili defektna4. Filter goriva je prljav5. Greška uključivanja | 1. Postavite prekidač u položaj “OFF” (0) i ulijte gorivo u rezervoar2. Postavite prekidač u položaj “OFF” (0) ispraznite rezervoar i ulijte ponovo gorivo u isti (VIDI PARAG. 6)3. Obratite se serviseru4. VIDI PARAG. 65. Obratite se serviseru | |
| F2 | GREŠKA SENZORA ZA KONTROLU TEMPERATURE | |
| 1. Kabl prekinut2. Senzor je defektan | 1. Obratite se serviseru2. Obratite se serviseru | |
| F3 | GREŠKA TERMOSTATA | |
| 1. Generator ima previsoku unutrašnju temperaturu2. Senzor protiv prevrtanja | 1. Isključite generator i pričekajte da se potpuno ohladi2. Postavite peć na ravnu i stabilnu površinu | |
| F4 | NEPRAVILAN NAPON | |
| 1. Nepravilan napon 1. Provjerite pravilan napon vašeg uređaja | ||
| FF | IZOSTANAK UKLJUČIVANJA NAKON 3 POKUŠAJA | |
| 1. Nema goriva2. Filter za gorivo prljav3. Fotoćelija prljava ili neispravna4. Brizgaljka prljava ili neispravna5. Intervencija senzora protiv nagiba | 1. Obratite se serviseru2. Obratite se serviseru3. Obratite se serviseru4. Obratite se serviseru5. Obratite se serviseru | |
| PF | BATERIJA JE PRAZNA | |
| 1. Baterija je prazna 1. Napunite bateriju | ||
| [ ] | GRIJAČ JE U STANJU MIROVANJA | |
| 1. Termostat je iskopčan2. Prelazak sa napajanja kablom na ono baterijom | 1. Temperatura termostata je podešena ispod tempera-ture prostora2. Ponovno automatsko uključivanje | |
▶▶10. PROGRAM PREVENTIVNOG ODRŽAVANJA
UPOZORENJE: PRIJE NEGO ŠTO OBAVITE BILO KOJE ODRŽAVANJE ILI POPRAVKE, ISKOPČAJTE KABL ZA NAPAJANJE SA ELEKTRIČNE MREŽE I UVJERITE SE DA SE GENERATOR OHLADIO.
AKO SE GRIJAČ KORISTI U POSEBNO PRAŠNJAVIM SREDINAMA, POTREBNO JE ČEŠĆE ODRŽAVANJE I ČIŠĆENJE.
KOMPONENTA UČESTALOST ODRŽAVANJA PROCEDURA ODRŽAVANJA
| Rezervoar sa gorivom Očistite svako 150-200 sati rada zavisno od potreba | Ispraznite rezervoar i isperite ga čistim gorivom |
| Mlaznica Očistite ili zamijenite jedan put tokom radne sezone ili po potrebi | Obratite se serviseru |
| Fotoćelija Očistite ili zamijenite jedan put tokom radne sezone ili po potrebi | Obratite se serviseru |
| Filter goriva Očistite ili zamijenite dva puta tokom radne sezone ili po potrebi | Očistite filter čistim gorivom |
| Upaljač Očistite svako 1.000 sati rada ili po potrebi Obratite se serviseru | |
| Mahalice ventilatora Očistite po potrebi Obratite se serviseru |
▶▶11. PRONALAŽENJE PROBLEMA
| PROBLEM MO | GUĆI UZROK MOGUĆE RJEŠENJE | |
| Generator se ne pokreće | 1.Generator je blokiran2. Prekidač u položaju “OFF” (0)3. Nema napona4. Kabl za napajanje prekinut5. Aparatura kontrole u blokadi6. Pogrešno postavljanje ambijentalnog termo-stata7. Došlo je do intervencije senzora za tempe-raturu8. Osigurač je u kvaru | 1. Isključite i ponovo uključite generator2. Stavite prekidač u položaj "ON" (I)3A. Pravilno ukopčajte kabl za napajanje u električnu utičnicu3B. Provjerite mrežni uređaj3C. Obratite se serviseru3D. Baterija je prazna4. Obratite se serviseru5A. Isključite i ponovo uključite generator5B. Nadite grešku na displeju5C. Obratite se serviseru6. Na sigurnosnom termostatu postavite višu tempera-turu od one radnog prostora7A. Pričekajte barem 10 minuta i ponovo pokušajte sa fazom uključivanja7B. Obratite se serviseru8. Obratite se serviseru |
| Motor/pumpa se pokreće ali nema plamena | 1. Nema goriva2. Gorivo je prljavo3. Filter goriva je prljav4. Mlaznica je prljava5. Fotoćelija je prljava, defektna ili nije pravilno instalirana6. Postojanje stranih tijela u rezervoaru7. Elektrode istrošene ili na pogrešnoj udalje-nosti | 1. Isključite generator, ulijte gorivo u rezervoar i pono-vo ga uključite2. Obratite se serviseru3. Očistite filter čistim gorivom4. Obratite se serviseru5. Obratite se serviseru6. Ispraznite rezervoar i ponovo ga napunite čistim gorivom7. Obratite se serviseru |
| Ventilator je blokiran i sporo seokreće | 1. Motor je u kvaru 1. Obratite se serviseru |
▶6.1. ANAΦΛΕΞΗ TOY ΘΕΡΜΑΝΤΗΡΑ:
| FO | Photoresistance |
| AT | Antitilting switch |
| TS | Safety thermostat |
| IN | Switch |
| FU | Fuse |
| TA | Room thermostat |
| SV | Solenoid valve |
| IG | Igniter |
| TR | Transformer |
| PS | Power Supply |
| MF | Motor cooling |
| MC | Motor combustion |
| PM | Pump |
| RE | Reset |
| BAT | Battery |
NOTE:
| CE CONFORMITY CERTIFICATE | CE |
| CE CONFORMITY CERTIFICATE - DICHIARAZIONE DI CONFORMITÀ CE - EG-KONFORMITÄTSERKLÄRUNG - DECLARACIÓN DE CONFORMIDAD CE - DECLARATION DE CONFORMITE CE - EG-CONFORMITEITVERKLARING - DECLARAÇÃO DE CONFORMIDADE CE - EU-OVERENSSTEMMELSESERKLÆRING - EY-VAATIMUSTENMUKAISUUSVAKUUTUS - CE-SAMSVARSERKLÆRING - EG-FÖRSÄKRAN OM ÖVERENSSTÄMMELSE - DEKLARACJA ZGODNOŚCI WE - ДЕКЛАРАЦИЯ О COOTBETCTВИИ CE - PROHLÁŠENÍ O SHODĚ CE - EK MEGFELELŐSÉGI NYILATKOZAT - IZJAVA O SKLADNOSTI IN OZNAKA CE - CE UYGUNLUK BEYANI - IZJAVA CE O SUKLADNOSTI - ES ATITIKTIES DEKLARACIJA - EK ATBILSTĪBAS - DEKLARĀCIJA - EÜ VASTAVUSDEKLARATSIOON - DECLARAȚIE DE CONFORMITATE CE - PREHLÁŠENIE O ZHODE CE - ДЕКЛАРАЦИЯ ЗА СЪВМЕСТИМОСТ CE - ДЕКЛАРАЦІЯ ВІДПОВІДНОСТІ CE - IZJAVA CE O PRIKLADNOSTI ΔΗΛΩΣΗ ΣΥΜΜΟΡΦΩΣΗΣ CE - CE 符合性声明DANTHERM S.p.A. Via Gardesana 11, -37010- Pastrengo (VR), ITALYProduct: - Prodotto: - Produkt: - Produkt: - Produit: - Product: - Produkt: - Produkt: - Tuote: - Produkt: - Produkt: - Produkt: - Изделие: - Výrobek: - Termék: - Izdelek: - Ürün: - Proizvod: - Gaminys: - Ieríce: - Toode: - Produsul: - Výrobok: - Продукт: - Виріб: - Proizvod: - Проїїв: - 产品: | |
| DC 61 | |
We declare that it is compliant with: - Si dichiara che è conforme a: - Es wird als konform mit den folgenden Normen erklärt: - Se declara que está en conformidad con: - Nous déclarons sa conformité à: - Hierbij wordt verklaard dat het product conform is met: - Declara-se que está em conformidade com: - Vi erklærer at produktet er i overensstemmelse med: - Vakuutetaan olevan yhdenmukainen: - Man erklærer at apparatet er i overensstemmelse med: - Härmed intygas det att produkten är förenlig med följande: - Oświadczca się, że jest zgodny z: - Заявляем о соответствии требованиям: - Prohlašuje se, že je v souladu s: - Kijelentjük, hogy a termék me-gfelel az alábbiaknak: - Izpolnjuje zahteve: - Aşağıdaki standartlara uygun olduğunu beyan ederiz: - Izjavljuje se da je u skladu s: - Pareiškiame, kad atitinka: - Tiek deklarēts, ka atbilst: - Käesolevaga deklareeritakse, et toode vastab: - Declarăm că este conform următoarelor: - Prehlasuje sa, že je v súlade s: - Декларира се че отговаря на: - Відповідає вимогам: - Izjavljuje se da je u skladu s: - Δηλώνουμε ότι είναι σύμφωνο με: - 兹证明符合:2014/30/EU, 2014/35/EUEN 62233:2008, EN 61000-3-2:2014, EN 61000-3-3:2013, EN 55014-1:2006/A2:2011, EN 55014-2:2015, EN 60335-1:2012/A11:2014, EN 60335-2-102:2016 Pastrengo, 2023 Davide Besnati (CEO Dantherm S.p.A.) Pastrengo, 2023 Davide Besnati (CEO Dantherm S.p.A.) | |
| UKCA CONFORMITY CERTIFICATE | UKCA |
| UKCA CONFORMITY CERTIFICATE | |
| DANTHERM S.p.A. Via Gardesana 11, -37010- Pastrengo (VR), ITALY Product: | |
| DC 61 | |
We declare that it is compliant with:2014/30/EU, 2014/35/EUBS EN 62233:2008, BS EN 61000-3-2:2014, BS EN 61000-3-3:2013,BS EN 55014-1:2017+A11:2020, BS EN 55014-2:2015, BS EN 60335-1:2012+A2:2019, BS EN 60335-2-102:2006+A2:2016 Pastrengo, 2023 Davide Besnati (CEO Dantherm S.p.A.) Pastrengo, 2023 Davide Besnati (CEO Dantherm S.p.A.) | |
UKCA CONFORMITY CERTIFICATE
UK CA
DC 61
NOTE:
▶en - DISPOSAL OF THE PRODUCT
-This product has been designed and manufactured with top-quality materials and components, which can be re-cycled and reused.
-When a crossed-wheely bin symbol is attached to the product, it means that the product is protected by the, 2012/19/UE European Directive.
-Please obtain information regarding the local differentiated collection system for electrical and electronic products.
-Respect local Standards in force and do not dispose of old products as normal domestic waste. Correct disposal of the product helps to prevent possible negative consequences for health, the environment and mankind.
▶pl - UTYLIZACJA PRODUKTU
▶cs - LIKVIDACE VÝROBKU
▶lv - PRODUKTA IZNÍCINÁŠANA
natural_image
Abstract geometric composition with yellow and black blocks (no text or symbols)Dantherm S.p.A.
Via Gardesana 11
37010 Pastrengo (VR)
Italy
t.: +39 045 6770533
e.: info.it@danthermgroup.com

DOWNLOAD CATALOGUE
SEND US YOUR FEEDBACK

REGISTER FOR 3-YEAR WARRANTEE
- USER AND MAINTENANCE MANUAL
- NOTE:
- IMPORTANT: READ AND UNDERSTAND THIS OPERATIONAL MANUAL BEFORE PERFORMING ASSEMBLY, COMMISSIONING OR MAINTENANCE ON THIS HEATER. INCORRECT USE OF THE HEATER CAN CAUSES SERIOUS INJURY. KEEP THIS MANUAL FOR FURTHER REFERENCE.
- ▶▶1. INFORMATION ON SAFETY (WARNINGS)
- REFUELLING:
- SAFETY:
- ▶▶2. UNPACKING
- See Fig. 1
- ▶▶3. DESCRIPTION OF ARTICLES
- ▶3.1. POWER CABLE (where present):
- ▶3.2. BATTERY (when applicable):
- ▶3.3. BATTERY CHARGER (when applicable):
- ▶▶4. FUEL
- ▶▶5. OPERATING PRINCIPLE
- See Pic. 2
- ▶▶6. OPERATION
- ▶6.1. IGNITING THE HEATER:
- ▶6.2. TURNING OFF THE HEATER:
- ▶6.3. CONNECTING THE ROOM THERMOSTAT (optional):
- ▶▶8. STORAGE AND TRANSPORT
- I ORDER TO KEEP AND/OR TRANSPORT THE HEATER IN THE BEST WAY, THE FOLLOWING PROCEDURE MUST BE FOLLOWED:
- ▶▶7. FUEL FILTER CLEANING
- See Pic. 4
- THE FILTER MAY NEED TO BE CLEANED DEPENDING ON THE QUALITY OF THE FUEL USED.
- ▶▶9. DISPLAY ERRORS
- ▶▶10. PREVENTIVE MAINTENANCE SCHEDULE
- ▶▶11. PROBLEM IDENTIFICATION
- IMPORTANTE: LEGGERE E COMPRENDERE QUESTO MANUALE OPERATIVO PRIMA DI EFFETTUARE L'ASSEMBLAGGIO, LA MESSA IN FUNZIONE O LA MANUTENZIONE DI QUESTO RISCALDATORE. L'USO ERRATO DEL RISCALDATORE PUÒ CAUSARE LESIONI GRAVI. CONSERVARE QUESTO MANUALE A TITOLO DI FUTURO RIFERIMENTO.
- ▶6.1. ACCENSIONE DEL RISCALDATORE:
- ▶5. WERKINGSPRINCIPE
- Zie Fig. 2
- ▶6.3. AANSLUITING OMGEVINGSTHERMOSTAAT (optie):
- ▶▶11. PROBLEEMOPSPORING
- ▶▶2. PAKKAUKSEN PURKAMINEN
- Katso Kuva 1
- ▶▶10. TIDSPLAN FOR VEDLIKEHOLD
- ▶6.1. WŁĄCZENIE NAGRZEWNICY:
- ▶6.2. WYŁĄCZENIE NAGRZEWNICY:
- ▶▶11. IDENTYFIKACJA PROBLEMU
- ▶▶1. INFORMACE O BEZPEČNOSTI (UPOZORNĚNÍ)
- ▶6.1. ZAPNUTÍ OHŘÍVAČE:
- ▶▶11. PROBLEMİN SAPTANMASI
- ▶3.1. STRĀVAS VADS (ja tāds ir):
- ▶▶11. PROBLEEMI TUVASTAMINE
- ▶▶9. GREŠKE NA DISPLEJU
- ▶▶10. PROGRAM PREVENTIVNOG ODRŽAVANJA
- ▶▶11. PRONALAŽENJE PROBLEMA
- ▶6.1. ANAΦΛΕΞΗ TOY ΘΕΡΜΑΝΤΗΡΑ:
- UKCA CONFORMITY CERTIFICATE
- UK CA
- DC 61
- ▶en - DISPOSAL OF THE PRODUCT
- ▶pl - UTYLIZACJA PRODUKTU
- ▶cs - LIKVIDACE VÝROBKU
- ▶lv - PRODUKTA IZNÍCINÁŠANA
Brand : Master
Model : DC 61
Category : Heating