
EG1 - Grill plate AENO - Free user manual and instructions
Find the device manual for free EG1 AENO in PDF.
| Product type | Electric grill plate |
| Brand | AENO |
| Model | EG1 |
| Worktop dimensions | 320 × 220 mm |
| Power supply | AC 220–240 V, 50–60 Hz |
| Power | 2000 W |
| Cooking temperature | 80–230 °C |
| Opening angle | 40°–130° (free), 180° (full) |
| Cooking time (15 mm steak) | 5 min |
| Grease drip tray | Plastic, removable |
| Removable plates | 2 pieces, double-sided (ridged/flat), interchangeable |
| Plate coating | Non-stick |
| Display and controls | Digital display, temperature/time adjustment keys, mode selection (top/bottom/both) |
| Special functions | Automatic preheating, timer, standby after 30 min |
| Color | Black |
| Weight | 5.08 kg |
| Operating conditions | 0 to +40 °C, RH < 95 % |
| Storage conditions | 0 to +60 °C, RH < 60 % |
| Cleaning | Plates and tray dishwasher-safe; body with damp cloth |
| Warranty | 2 years |
| Support contact | support@aeno.com |
| Spare parts | Available from manufacturer |
Frequently Asked Questions - EG1 AENO
User questions about EG1 AENO
0 question about this device. Answer the ones you know or ask your own.
Ask a new question about this device
Download the instructions for your Grill plate in PDF format for free! Find your manual EG1 - AENO and take your electronic device back in hand. On this page are published all the documents necessary for the use of your device. EG1 by AENO.
USER MANUAL EG1 AENO
natural_image
Line drawing of a portable grater with heat exchanger and side-mounted grilles (no text or symbols)User Manual
Electric Grill EG1
(Models: AEG0001, AEG0001-UK)
v 2.7.7 | 16.04.2025
ENG Recipes here
ARA هنا وصفات
BOS Recepti ovdje
BUL Рецепти тук
CES Recepty zde
DEU Rezepte hier
ELL Συνταγές εδώ
EST Retseptid siin
FRA Recettes ici
HRV Recepti ovdje
HUN Receptek itt
HYE Puqwnpwnnuftn wjuuntn
ITA Ricette qui
ENG....8
ARA....13
BOS....17
BUL....22
CES 27
DEU....32
ELL....38
EST 43
FRA 48
HRV 53
HUN 58
HYE....63
ITA....68
KAT 73
KAZ....79
LAV 84
LIT 89
NLD....94
POL....99
POR....104
RON....109
RUS....114
SLK....119
SLV....124
SPA....129
SRP 134
UKR....139
UZB 144
A

aeno.com/documents 5
B

6 aeno.com/documents

C
D
natural_image
Technical line drawing of a multi-layer electric vehicle battery pack (no text or symbols)aeno.com/documents 7
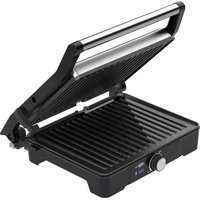
ENG The AENO™ Electric Grill is designed to cook various meat and fish dishes. Technical Specifications
Power supply voltage: 220–240 V (AC); frequency: 50–60 Hz. Power: 2,000.0 W. Cooking surface area (L×W): 320×220mm. Operating temperature of cooking plates: 80–230°C. Opening angle: 40°–130° (optional opening), 180° (full opening). Cooking time for a 15 mm thick steak: 5 min. Drip tray: plastic. Removable plates: reversible. Colour: black. Weight: 5.08 kg. Operating conditions: temperature 0...+40 °C, relative humidity < 95 % (non-condensing). Storage conditions: temperature 0...+60 °C, relative humidity < 60 % (non-condensing).
Scope of Supply
AENO™ Electric Grill, removable plates (2 pcs.), plastic drip tray, Quick Start Guide.
Limitations and Warnings
Children and people with disabilities may only use the grill under the supervision of adults or people with an adequate level of experience in using the device. Keep the grill out of the reach of children. The grill's surface becomes very hot during operation, and food products may emit steam or splashes of oil. The grill's cover panel ② shall only be opened by the handle ① (see Figure a). The plastic drip tray ⑧ (see Figure b) is installed inside the grill's body ⑤ on a special plate ⑨. You should move the grill carefully if there is hot grease in the drip tray. Do not remove the drip tray from the grill's body until the device is cooled down. Do not touch the grill's casing with hands; use heat-protective gloves when operating the grill. Do not use the grill outdoors, and keep it away from sources of heat, direct sunlight, open fire or high humidity, as well as never operate it with wet hands. Always unplug the grill when it's not used for cooking. Do not immerse the device in water or other liquids. If the
If you have any questions or difficulties with using your AENO device, please contact support by e-mail at support@aeno.com or online chat at aeno.com/service-and-warranty. The specialists will help you solve the problem, and you will not have to waste time and effort visiting the store
8 aeno.com/documents
grill falls into water, you must unplug it first, and only then remove it from water with gloved hands. Never use the grill if it's damaged or its power cord is broken. Do not try to repair the device on your own. Always install the grill on a flat and stable heat-resistant surface in a well-ventilated area. If the grill contains too many food products at once, so it can hardly be closed, never use force to close it as you may damage the device. To avoid fire hazard, never leave the switched-on device unattended. The grill's cover panel ② must be closed before connecting it to the mains. After cooking, the cooked food shall be removed from the grill using wooden or heat-resistant spatula only. Do not use a sharp fork or knife to remove food products from the grill as this may damage its non-stick coating.
Initial Setup
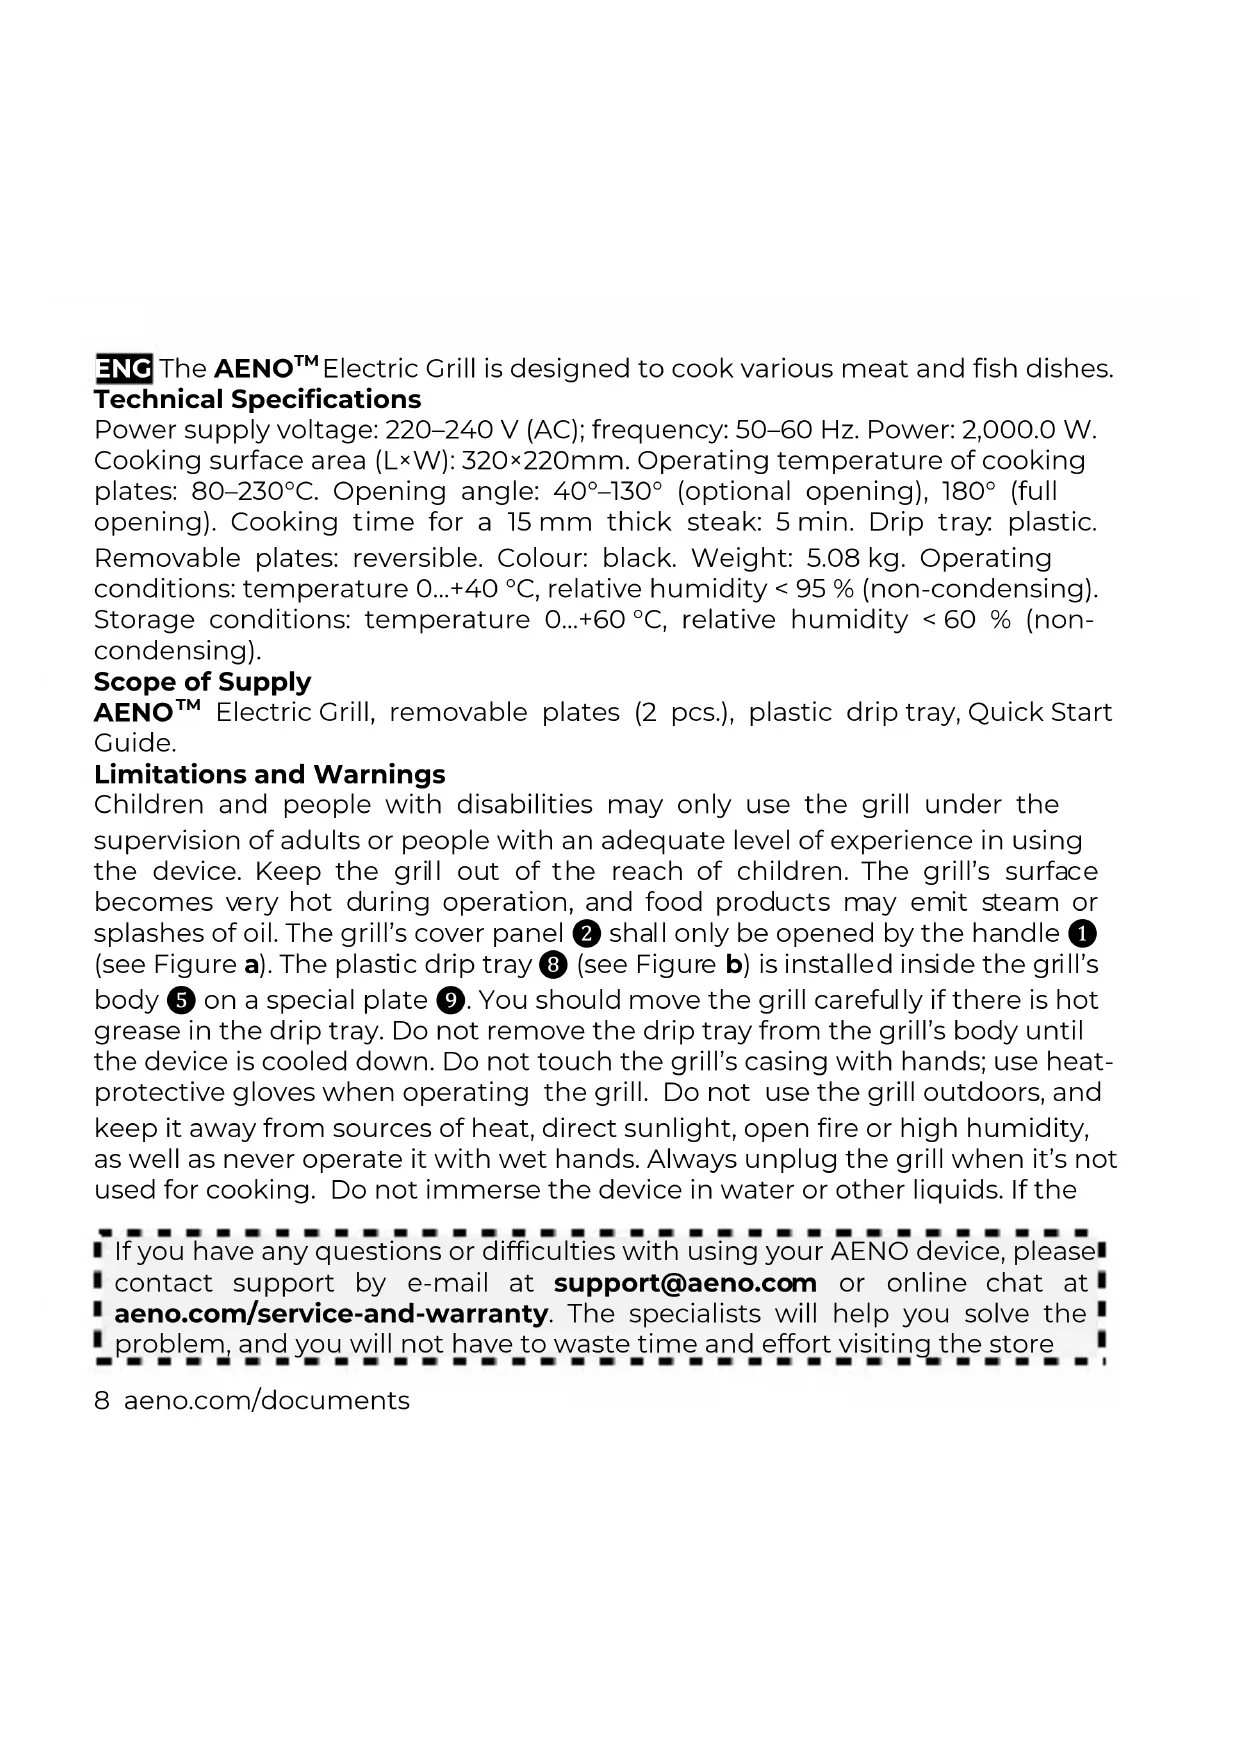
Unpack the grill and reel out its cable, but do not plug it into the mains socket. Make sure that the drip tray ⑧ is installed on the plate ⑨ (see Figure b) at the rear of the grill's body ⑤ (see Figure a). Press the upper lock button ④ to remove the upper removable plate ⑦, and then press the lower lock button ④ to remove the lower removable plate ⑥ by simply pulling it. Wash the removable plates in warm soapy water, and then wipe them dry with a soft cloth. These parts can also be washed in the dishwasher. Please note that plates should be washed and dried after each cooking operation. Install both the upper and the lower grill plates back in place before use. Put the grill on a flat and stable heat-resistant surface.
Note. Removable plates are interchangeable and reversible. One surface of the plate is ribbed, and the other is flat. Food products can be cooked on any of the above surfaces. While installing, make sure that the drip tray drain 10 is facing backwards, because the grease must be drained away into the drip tray 8. When used for the first time, removable plates shall be oiled with a thin layer of cooking oil using a paper towel. If necessary, oil the surface again to ensure proper operation of the non-stick coating. For the first time, the device shall be heat up without food products for about ten (10) minutes. A small amount of light smoke or odor is deemed to be normal and harmless.
Operation of the Device
Close the grill. Plug it into a mains socket. You will hear an audible signal, and all LEDs will flash and go out on the control panel ③. The “OFF” message will be displayed on the digital display (see Figure c) in the middle of the control panel. This means that the grill is in a stand-by mode, and that it is not heating up. Then, you should select one of the three heating modes with the buttons, namely: “Both Grill” meaning the use of both cooking plates, “Upper Grill” meaning the use of the upper cooking plate only, or “Lower Grill” meaning the use of the lower cooking plate only. The display will show the default temperature and the heating time, or the latest settings thereof. Such settings may be changed by pressing the respective “Up” and “Down” buttons on either side of the display next to the temperature and time indicators.
Note. You can change the temperature and the heating time right during the cooking by pressing "Up" and "Down" buttons. While in the stand-by mode, you may change the temperature scale from °C to °F by pressing these temperature adjustment buttons simultaneously.
Preheating. Press the "Start" button. The "PRE" message will be displayed. After preheating is done, an audible signal will sound for 5 times.
Note. Food products must not be put into the grill during preheating.
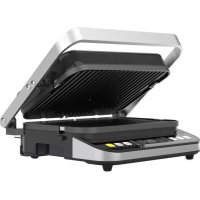
Cooking. Open the grill and place food products on the lower removable plate. Close the grill.
Note. You may cook pizza or fish on the open grill (see Figure d) so as to keep its shape intact, or you may cook steak or sausage in the closed grill.
Press the "Start" button. The current temperature will be displayed, and the countdown timer will be started.
Note. Do not press the "Start" button, the grill will be switched to the standby mode in 30 minutes, and the "OFF" message will be displayed.
At the end of the countdown, an audible signal will sound for 5 times. The "DONE" message will be displayed.
10 aeno.com/documents
See below the LED indication of the grill's modes (see Figure c)
| LED colour | Grill mode |
| Blue | Preheating is on |
| Green | Preheating is finishsec |
| Yellow | Cooking is on |
| Red | Cooking is finished |
When you finished with cooking, press the “Cancel” button and unplug the grill. Wait for the grill to cool down, then carefully remove the drip tray ⑧ and pour its contents down the drain. Don’t forget to wash the removable plates and the drip tray with warm soapy water.
Cleaning and Maintenance
Wait for the device to cool down, then carefully remove the grease drip tray (8) and remove its contents. Remove the removable plates. Wash the drip tray and the removable plates with a neutral detergent and dry them thoroughly before putting them back in. Repeat the procedure after each cooking operation. The tray and removable plates can be washed in a dishwasher. Do not use metal brushes or abrasive cleaning products. Clean the body of the appliance with a damp cloth and a little detergent. Then wipe the surface with a dry cloth.
Troubleshooting
- The grill does not turn on. Possible causes and solutions: make sure that there is no power supply failure in the mains socket (e.g. plug any known good device into it) and that the grill is correctly plugged into the mains socket.
- The grill is switched on, but removable plates do not heat up. Possible causes and solutions: make sure that you set both the operating time and the temperature and that the "Start" button was pressed.
- The control panel does not light up. Possible causes and solutions: unplug the grill, let it cool down, and plug it in again.
Table of error codes displayed on the display
| Error code | Value |
| E1 | Upper thermostat contact breakage |
aeno.com/documents 11
| Error code | Value |
| E2 | Upper thermostat short-circuit |
| E3 | Lower thermostat contact breakage |
| E4 | Lower thermostat short-circuit |
ATTENTION! If your problem persists, please contact your local supplier or the service center for support. Please do not disassemble the device or try to repair it on your own.
ASBISC reserves the right to modify the device and to make changes and additions to this document without prior notice to users. This device complies with applicable safety requirements. The warranty period and service life is 2 years from the date of retail sale of the product. For date of manufacture see package. Manufacturer's information: ASBISC Enterprises PLC, Iapetou, 1, Agios Athanasios, 4101, Limassol, Cyprus. Tel.: +48732080077, e-mail: info@asbis.com, asbis.com. Made in China. All trademarks and brands mentioned herein are the property of their respective owners. Up-to-date information and a detailed description of the device, as well as connection instructions, certificates, information about companies that accept quality claims and warranties, are available for download at aeno.com/documents.
RoHS Directive. The device complies with the requirements of the Directive 2011/65/EU on the Restriction of Hazardous Substances (RoHS), including the requirements of the RoHS Directive 2015/863/EU.
12 aeno.com/documents
.aeno.com/service-and-warranty Support@aeno.com
g y z d s g m o y d
support@aeno.com s6 m6mso6-hs000 lso8bg aeno.com/service-and-warranty.
natural_image
Simple line drawing of a trash bin with no text or symbolsENG Recycling information. This symbol indicates that you must follow the Waste Electrical and Electronic Equipment (WEEE) and Waste Battery and Battery Regulations when disposing of the device, its batteries and accumulators, and its electrical and electronic accessories. According to the rules, this equipment must be disposed of separately at the end of its service life. Do not dispose of the device, its batteries and accumulators, or its electrical and electronic accessories together with unsorted municipal waste, as this will harm the environment. To dispose of this equipment, it must be returned to the point of sale or turned in to a local recycling facility. You should contact your local household waste disposal service for details.
Please contact our online support team if you have any questions or issues with your AENO device.
This is a better option than visiting the store and will save you time and effort

Get support


aeno.com/service-and-warranty
UKR Отримати підтримку BOS Dobijte podršku BUL Получаване на поддръжка CES Ziskejte podporu DEU Support erhalten ELL Λήψη υποστήριξης EST Saama toetuse FRA Obtenir de l'aide HRV Tražite pomoć na HUN Támogatás megszerzése HYE Ugwlignipynbi uunwàwī ITA Ottieni supporto KAT Ābəfɪqədʒfɔnbi ānggðs KAZ Kɔnday any LAV Saņemt atbalstu LIT Gauti palaikymą NLD Ondersteuning krijgen POL Uzyskaj pomoc POR Obter apoio RON Obțineți asistentă RUS Получить поддержку SLK Ziskať podporu SLV Pridobite podporo SPA Obtener apoyo SRP Tražite pomoć na UZB Qe'llab quwatlash xizmatidan foydalanish


- Electric Grill EG1
- ENG The AENO™ Electric Grill is designed to cook various meat and fish dishes. Technical Specifications
- Scope of Supply
- Limitations and Warnings
- Initial Setup
- Operation of the Device
- Cleaning and Maintenance
- Troubleshooting
- Please contact our online support team if you have any questions or issues with your AENO device.
Brand : AENO
Model : EG1
Category : Grill plate