
La Specialista Maestro EC9865M - Coffee machine DELONGHI - Free user manual and instructions
Find the device manual for free La Specialista Maestro EC9865M DELONGHI in PDF.
User questions about La Specialista Maestro EC9865M DELONGHI
0 question about this device. Answer the ones you know or ask your own.
Ask a new question about this device
Download the instructions for your Coffee machine in PDF format for free! Find your manual La Specialista Maestro EC9865M - DELONGHI and take your electronic device back in hand. On this page are published all the documents necessary for the use of your device. La Specialista Maestro EC9865M by DELONGHI.
USER MANUAL La Specialista Maestro EC9865M DELONGHI
natural_image
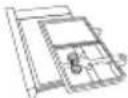
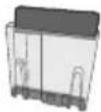
Exterior view of a modern espresso machine with dual control knobs and glass cups (no visible text or symbols)DēLonghi

text_image
IT EN FR DE NL ES PT ELtext_image
C1 C2 C3 Espresso Cool C4 C5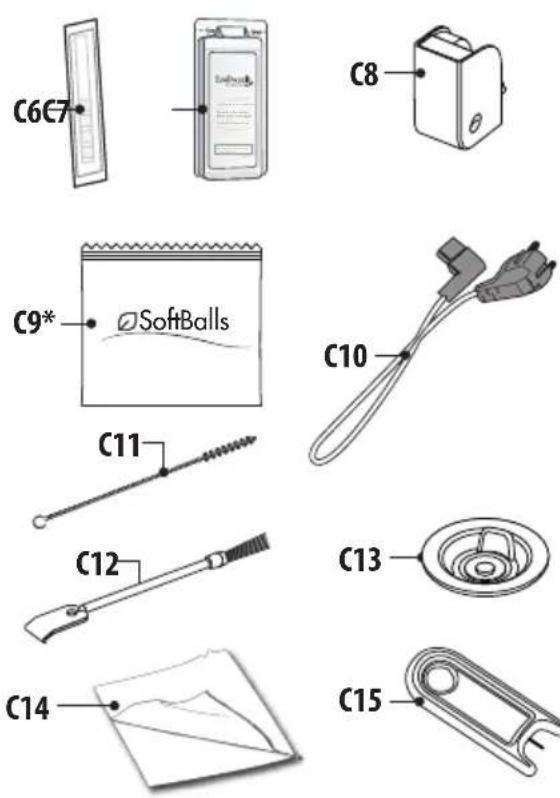
text_image
C6C7 C8 C9* SoftBalls C10 C11 C12 C13 C14 C15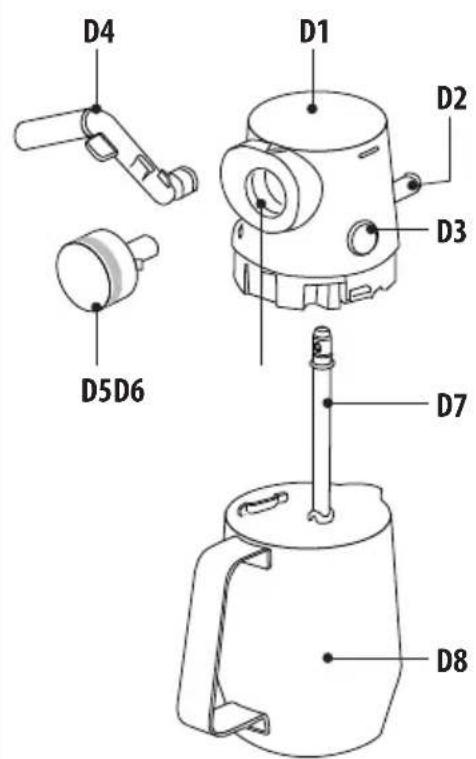
text_image
D4 D1 D2 D3 D5D6 D7 D8A20
A2 A3
A1
A4
A19
B
A5
A6
A18
A7
A8
A13
A11 A10
A14
A9
A15
A16
A17
A12
natural_image
Illustration of a vintage camera with a digital display and control buttons (no text or symbols)
natural_image
Diagram of a mechanical device with a propeller and directional arrows, no readable text or symbols present.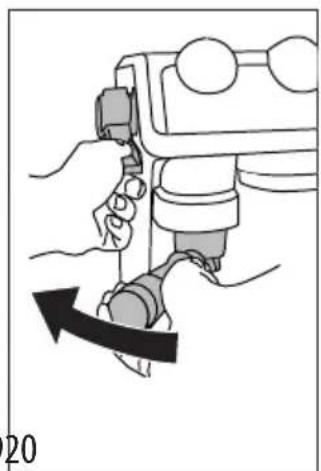
natural_image
Illustration of a hand operating a mechanical device with a black arrow indicating rotation (no text or symbols)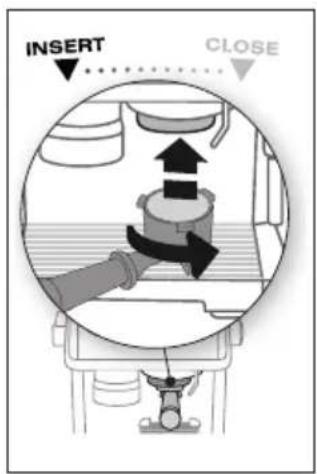
text_image
INSERT CLOSE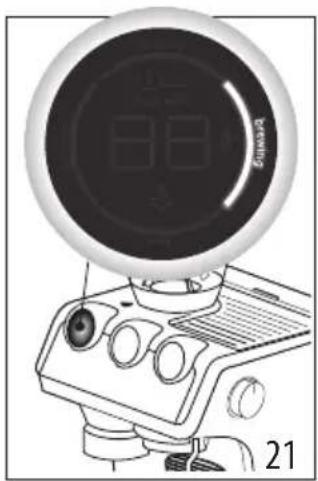
natural_image
Illustration of a vintage computer monitor with a circular head and control knobs (no visible text or symbols)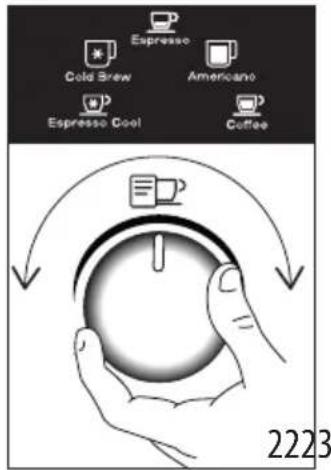
text_image
Espresso Cold Brew Americano Espresso Cool Coffee 2223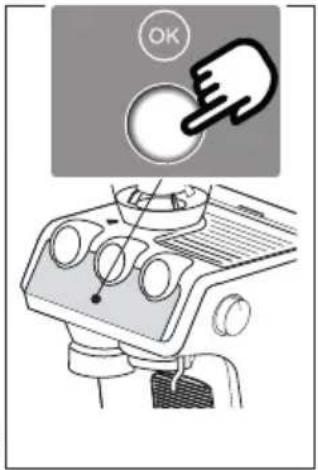
text_image
OK
text_image
Espresso Cool 24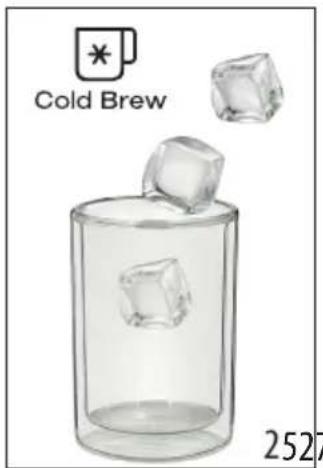
text_image
Cold Brew 2527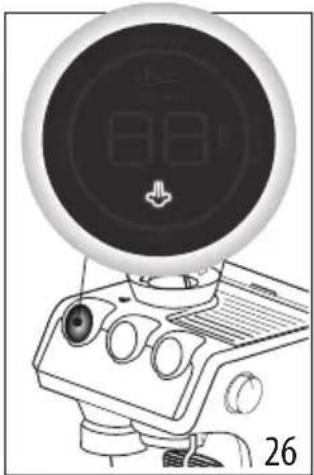
natural_image
Illustration of a digital camera with a circular dial and control buttons (no text or symbols)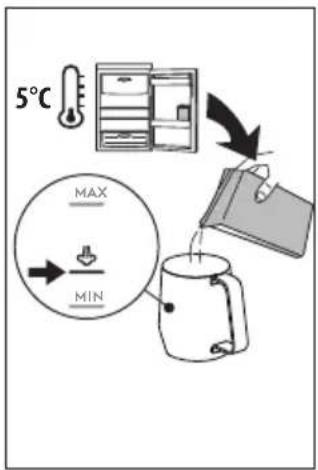
text_image
5°C MAX MIN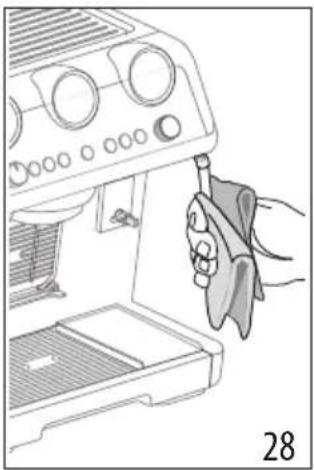
natural_image
Line drawing of a hand using a tool to press or adjust a device from an open box (no text or symbols visible)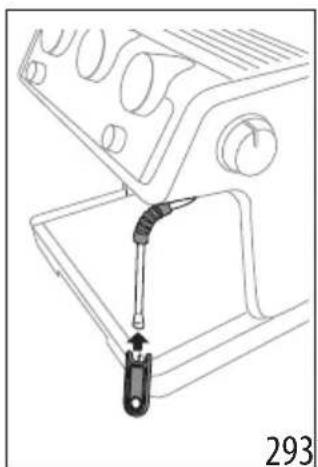
natural_image
Technical line drawing of a mechanical device with a lever and adjustment knob (no text or symbols)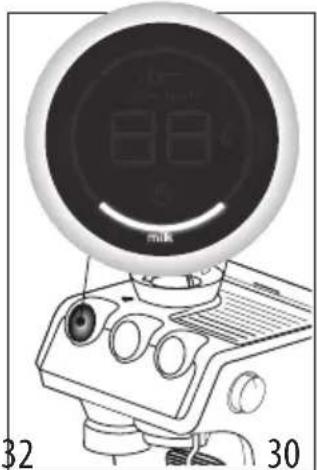
natural_image
Line drawing of a vintage computer monitor with dual dials and control knobs (no text or symbols)
flowchart
graph TD
    A["5°C"] --> B["Product Setup"]
    B --> C["Transfer to Paper"]
    C --> D["Balance/Storage"]
    D --> E["Max/Min Limit Cycle"]
    E --> F["Water Drop/Down"]
    F --> G["Mump"]
text_image
Clicktext_image
"Dose perfetta"text_image
My LatteArtnatural_image
Technical line drawing of a mechanical device with control panel and base block (no text or symbols)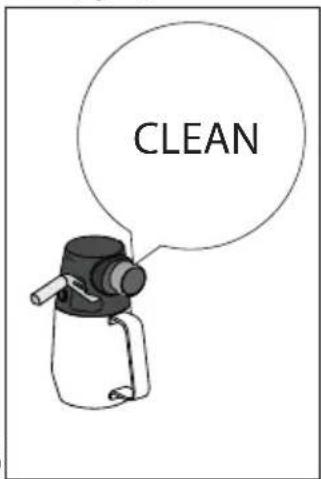
text_image
CLEAN| DISWASHER SAFE | DEco MultClean | ||||
 | × | √ | √ | × | × |
 | √ | × | × | √ | √ |
 | × | × | × | √ | √ |
 | × | × | × | √ | √ |
 | × | × | √ | √ | × |
 | × | × | × | √ | √ |
 | √ | √ | × | √ | √ |
 | × | √ | × | √ | √ |
text_image
Diagram showing a hand inserting a spiral into a target with arrows, accompanied by two circular diagrams above it.text_image
Diagram illustrating a food safety or cooking process with labeled steps and directional arrows, including a magnified view of the container.
natural_image
Illustration of a hand using a power tool to test a component on an automotive infotainment device (no text or symbols visible)natural_image
Illustration of a hand pressing down on a car dashboard with control knobs (no text or symbols)
text_image
Clicktext_image
REMOVE 484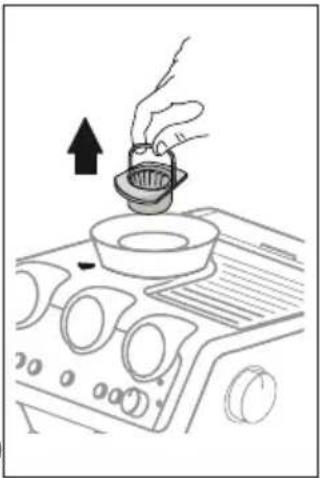
natural_image
Line drawing of a hand pouring liquid into a bowl on an air conditioner cover (no text or symbols)natural_image
Illustration of a brush applying paint to a square base, labeled '505' (no text or symbols on the diagram itself)
natural_image
Line drawing of a hand pouring liquid into a bowl on an air conditioner fan (no text or symbols)natural_image
Technical diagram of a mechanical component with arrows indicating direction (no text or symbols)
natural_image
Line drawing of a hand holding a faucet with liquid, no text or symbols presentPROBLEMA CAUSA SOLUZIONE
Before using the appliance, always read the safety warnings.
1. DESCRIPTION
1.1 Description of appliance - A
A1. Beans container
A2. Beans container lid
A3. Cup tray
A4. Steam dial
A5. Steam wand
A6. Lattecrema System connection
A7. Coffee outlet
A8. Cup grille for espresso
A9. Cup grille for glasses or mugs
A10. Drip tray grille
A11. Drip tray
A12. Drip tray water level indicator
A13. Water tank lid
A14. Water tank extraction handle
A15. Water tank
A16. Power cord connector socket
A17. Main switch (ON/OFF)
A18. Coffee mill outlet (tamping station)
A19. Cover to access the coffee mill coffee guide
A20. Presser lever
1.2 Description of control panel - B
B1. ON/Standby button
B2. Coffee dose dial
B3. "X2" button: to use the 2 coffees filter
B4. Coffee Temperature button
B5. "Active Rinse" button
B6. "OK" button: to deliver the drink/confirm
B7. Hot water button
B8. "Descaling" button
B9. "My" button: to customise drink quantity
B10. Drink selector dial
B11. Drink selected light:
Espresso based drinks
- Espresso
- Long Black
- Coffee
Cold coffee drinks
- Cold Brew
- Espresso Cool
Milk based drinks
• Cappuccino
- Flat White
- Latte
B12. "Milk clean" light
B13. "No beans container" light
B14. "General alarm" light
B15. Pressure gauge
B16. "No water" light
B17. Beans container empty light
B18. "Energy saving" light
B19. Led module process:
- Indicates the operation the appliance is running
• The setting of the dose level
• The infusion temperature setting
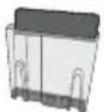
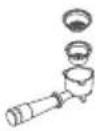
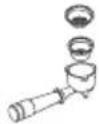
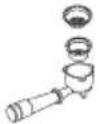
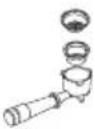
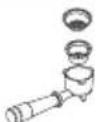
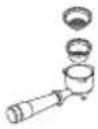
1.3 Description of accessories - C
C1. Portafilter
C2. 1-cup coffee filter
C3. 2-cups coffee filter
C4. 1-cup coffee filter
C5. 2-cups coffee filter
C6. "Water hardness test" indicator paper
C7. Descaler
C8. Descaling accessory
C9. Softballs (*some models only)
C10. Removable power cord
C11. Tube brush
C12. Coffee outlet cleaning disk accessory
C13. Cloth
C14. Cleaning needle for steam wand
Dedicated filters for Espresso Cool

1.4 Optional cleaning accessories
Visit Delonghi.com for more information.
Cleaning tab
(See "8.2 Cleaning of the coffee outlet")

Cleaner
EAN: 8004399333307
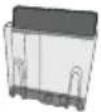
1.5 Description of LatteCrema System - D
D1. Milk container lid
D2. Milk container connector
D3. Lid release button
D4. Milk spout (adjustable height)
D5. Froth selection knob
D6. Knob housing
D7. Milk intake tube
D8. Milk container
2. PREPARING THE APPLIANCE
Wash all accessories with warm water and washing-up liquid, then proceed as follows:
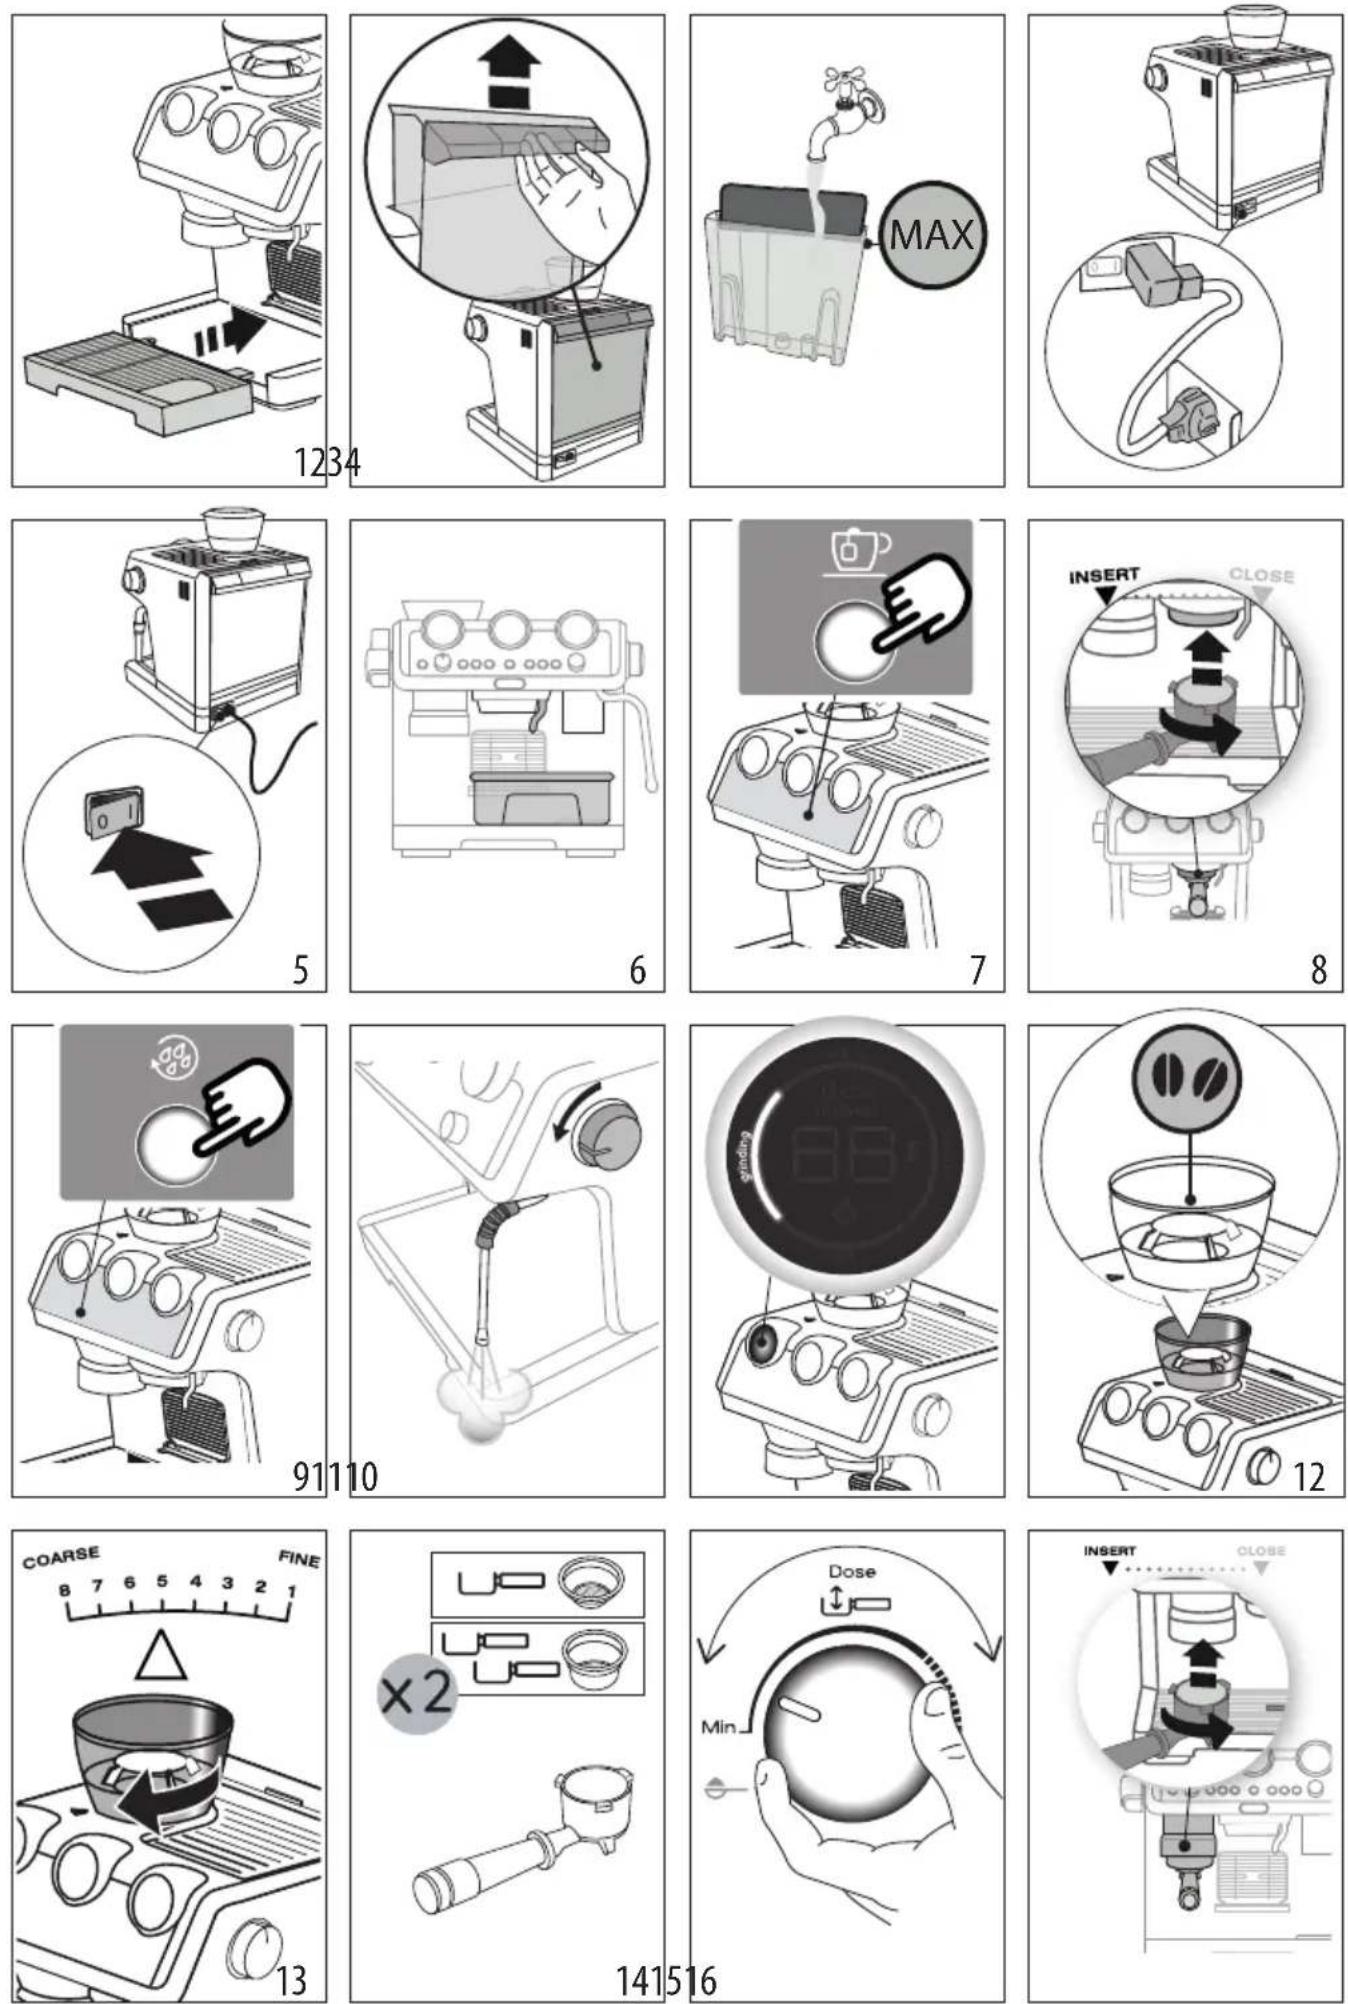
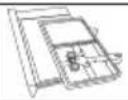
- Insert the drip tray (A11) complete with cup grill (A9) and drip tray grille (A10) (fig. 1);
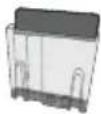
- Extract the water tank (A15) (fig. 2) and fill with fresh clean water, taking care not to exceed the MAX level (fig. 3).
- Put the tank back in the appliance.
Important: Never operate the appliance without water in the tank or without the tank.
Please note: You should customise water hardness as soon as possible following the instructions in section "7. Menu settings".
3. SETTING UP THE APPLIANCE
- Plug the power cord connector (C10) into the socket (A16) at the back of the appliance (fig. 4); then plug the plug into the mains socket. Make sure the main switch (A17), at the back of the appliance is pressed and in the I position (fig. 5);
- Place a container with a minimum capacity of 100 ml under the hot water spout (A7)) and cappuccino maker (fig. 6);
- Press the button (B7) corresponding to the light (fig. 7). Delivery begins and stops automatically. Empty the container.
Before using the machine, you must rinse the internal circuits. Proceed as follows:
- Attach the filter holder (C1) complete with filter to the appliance. To attach correctly, align the filter holder handle with "INSERT" (fig. 8), then turn the handle to the right until it is aligned in the "CLOSE" position;
- Place a recipient under the filter holder and cappuccino maker (A5);
- Press the button (B5) corresponding to the light Delivery begins (fig. 9);
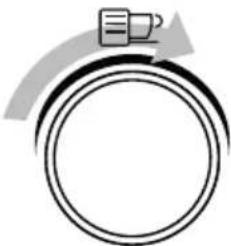
- When delivery is complete, turn the steam dial (A4) (fig. 10) and deliver steam for a few seconds to rinse the steam circuit; or optimal steam performance we recommend you repeat this action 3 or 4 times. This is to purge the steam arm before frothing or steaming your milk..
The appliance is ready for use.
Please note: We also recommend rinsing the internal circuits if the appliance is not used for a long period.
The first time you use the appliance, you need to make 4-5 cups of coffee before the appliance starts to give satisfactory results. Pay particular attention to the quantity of pre-ground coffee in the filter ((C2) or (C3)) (see instructions in section "4.1 Step 1 - grinding (fig. 11)").
Proceed as described in section "The „perfect dose"".
4. COFFEE DELIVERY
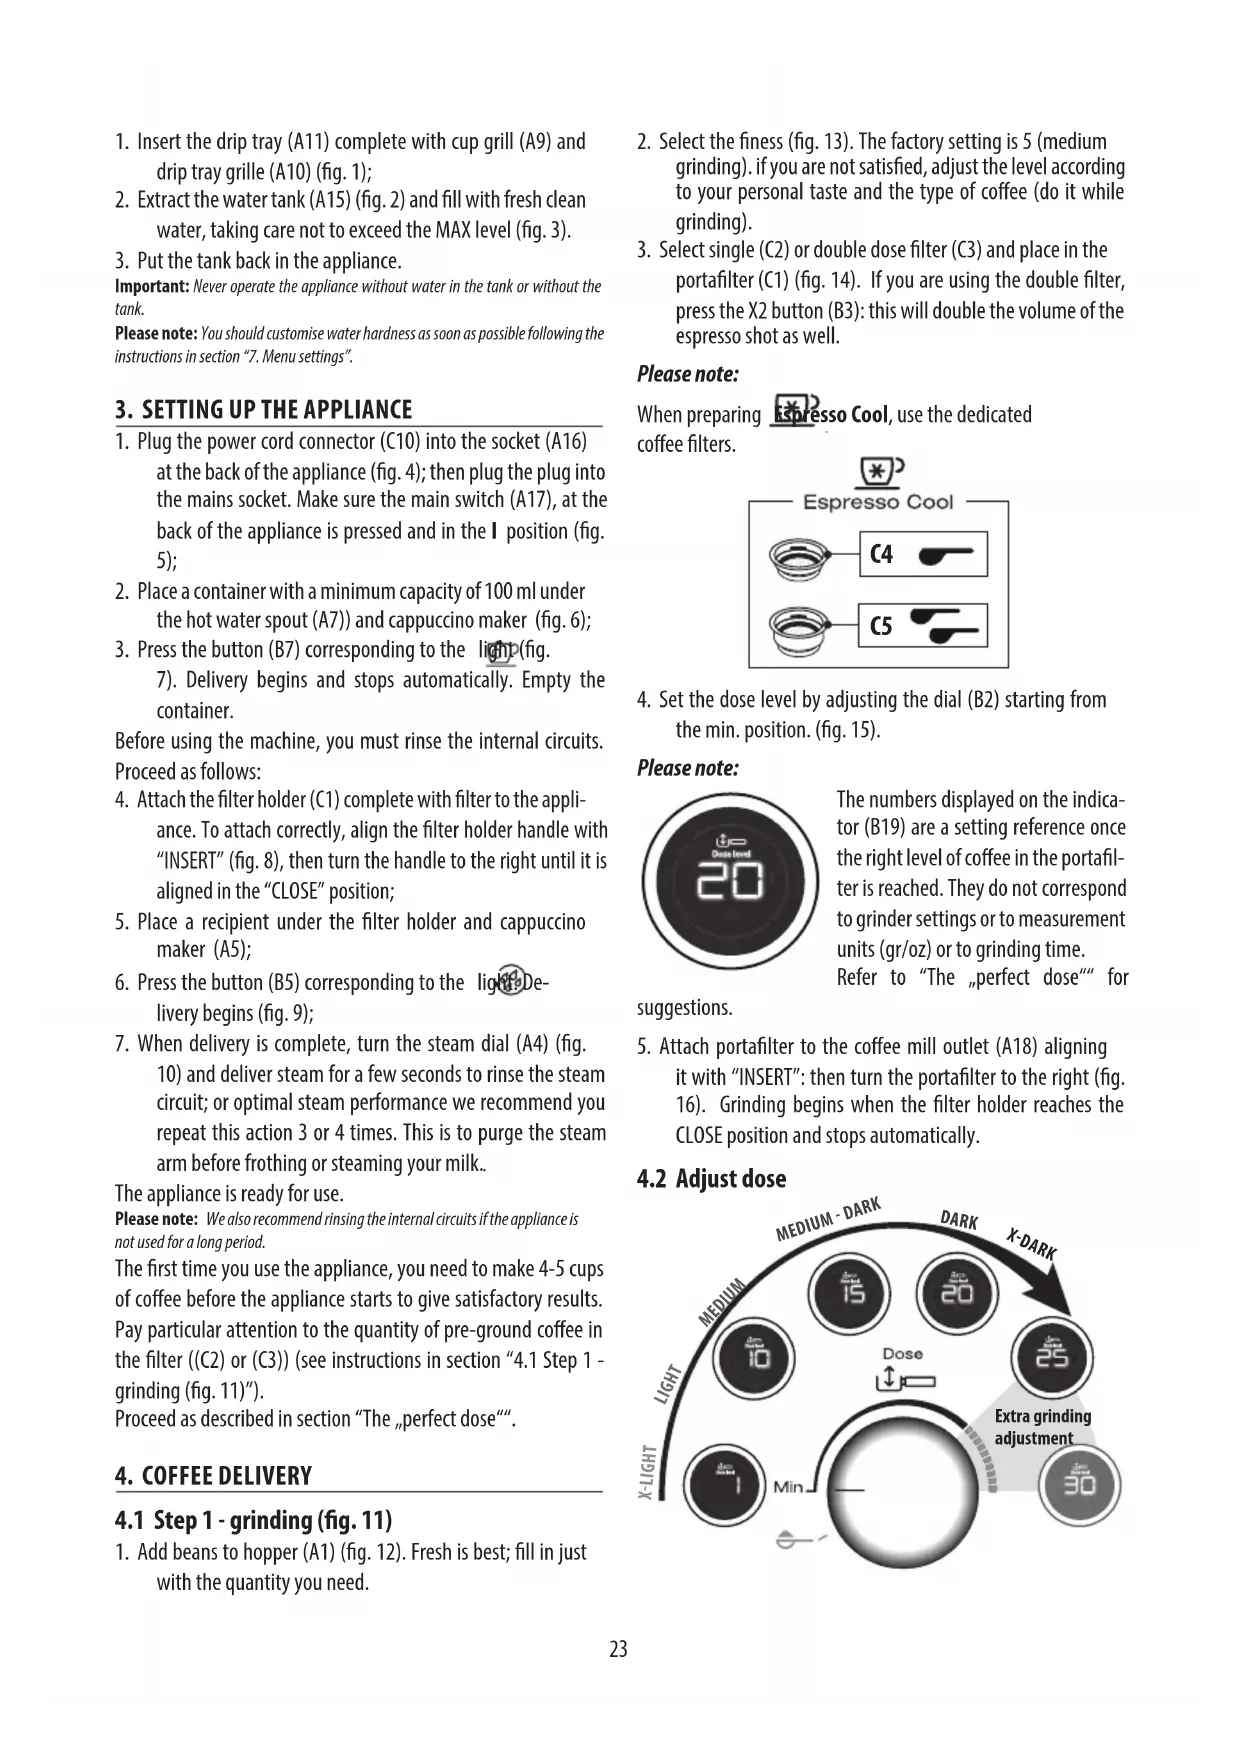
4.1 Step 1 - grinding (fig. 11)
-
Add beans to hopper (A1) (fig. 12). Fresh is best; fill in just with the quantity you need.
-
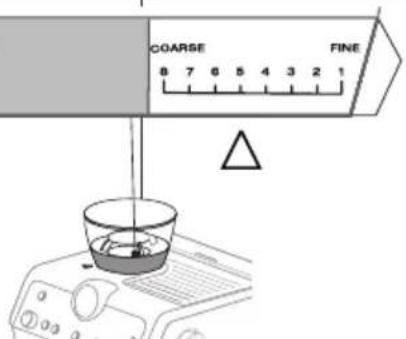
Select the finess (fig. 13). The factory setting is 5 (medium grinding). if you are not satisfied, adjust the level according to your personal taste and the type of coffee (do it while grinding).
- Select single (C2) or double dose filter (C3) and place in the portafilter (C1) (fig. 14). If you are using the double filter, press the X2 button (B3): this will double the volume of the espresso shot as well.
Please note:
When preparing Espresso Cool, use the dedicated coffee filters.
text_image
Espresso Cool C4 C5- Set the dose level by adjusting the dial (B2) starting from the min. position. (fig. 15).
Please note:
text_image
Data level 20The numbers displayed on the indicator (B19) are a setting reference once the right level of coffee in the portafilter is reached. They do not correspond to grinder settings or to measurement units (gr/oz) or to grinding time. Refer to "The "perfect dose" for
suggestions.
- Attach portafilter to the coffee mill outlet (A18) aligning it with "INSERT": then turn the portafilter to the right (fig. 16). Grinding begins when the filter holder reaches the CLOSE position and stops automatically.
4.2 Adjust dose
flowchart
graph TD
    A["X-LIGHT"] --> B["MEDIUM"]
    B --> C["10"]
    C --> D["Dose"]
    D --> E["25"]
    E --> F["30"]
    F --> G["Extra grinding adjustment"]
    G --> H["15"]
    H --> I["20"]
    I --> J["X-DARK"]
    J --> K["MEDIUM - DARK"]
    K --> L["Dose"]
    L --> M["10"]
    M --> N["25"]
    N --> O["30"]
Each variety of coffee beans can behave differently during grinding and this is the reason why setting the dose at the beginning might require extra care.
With this illustration we give you some indications on how to regulate the dose. Please note these suggested setting ranges, based on the roasting level, are certainly a good starting point, but they might slightly vary depending on specific composition of your coffee beans.
- Set the dose starting from the minimum position.
- Look at which roasting level your coffee is and based on that, turn the knob slowly, referencing the ranges.
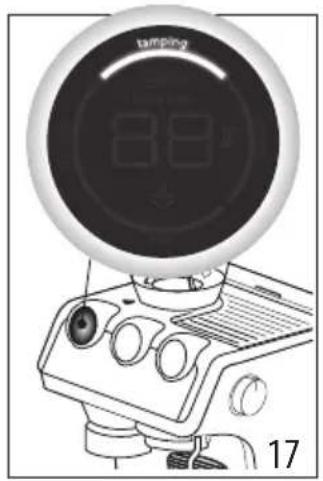
4.3 Step 2 - tamping (fig. 17)
- After grinding, pull the lever (A20) down fully (do not remove portafilter) (fig. 18). For a perfect result, you can do it twice.
- Keep the lever down while removing the portafilter (fig. 19). Once it is done, place back the lever in its original position.
- Check the dose (see "The „perfect dose"") and attach the portafilter to the brewing unit(A7) (fig. 20).
The „perfect dose“
- A reference mark inside the coffee filters identifies the perfect quantity.
text_image
The "perfect dose"the perfect quantity corresponds to the line in relief.
- Ensure the coffee is at the recommended dosage level after tamping. You may need to adjust the dosage dial (B2) more times before reaching the perfect dose.
- If your coffee is over or under extracted and the dose is within the perfect dose range, adjust the grinder settings finer or coarser (see "4.1 Step 1 - grinding (fig. 11)"). Over extracted coffee (pouring too slowly) needs coarser grind. Under extracted coffee (pouring too fast) needs finer grind.
- Barista tip: Pull the filter holder out while the tamper (A20) is still down for polished finish of coffee.
4.4 Rinse before brewing
When preparing a cold drink after an hot one or vice versa, the result in cup could not be at the ideal temperature. To avoid this, proceed as follows:
- Select the beverage you want to prepare;
- The OK lights up in the colour relative to the type of drink to brew: white if hot drink is selected or blue if cold drink is selected;
- Put a container under coffee outlet (A7);
- Press (B5d)
4.5 Step 3 - brewing hot coffee drinks (fig. 21)
- Select your drink (fig. 22).
- Press OK (B6) to start brewing (fig. 23) (preinfusion and infusion). Coffee delivery stops automatically.
4.6 Step 3 - brewing Cold Brew
- Select Cold Brew (fig. 22): the "OK" button turns blue to highlight that a cold drink is selected.
- Pour 1 or 2 ice cubes in the glass (fig. 24).
- Press the "OK" button to brew the drink. Delivery stops automatically.
Please note:
As no pressure is produced to brew this beverage, the manometer will not turn to a higher position
4.7 Step 3 - brewing Espresso Cool
When preparing Espresso Cool, use the dedicated coffee filters.
text_image
Espresso Cool C4 C5Then prepare the perfect dose as illustrated in"4.1 Step 1 - grinding (fig. 11)" and "4.3 Step 2 - tamping (fig. 17)".
Then proceed as follows:
- Select Espresso Cool (fig. 22): the "OK" button turns blue to highlight that a cold drink is selected.
- Pour 2 or 3 ice cubes in the glass (fig. 25).
- Press the "OK" button to brew the drink
5. MAKING MILK DRINKS
5.1 Manual frothing (fig. 26)
- Fill the milk jug (D8) with fresh cold milk. Milk will up to triple in volume (fig. 27). For a denser more even froth, you should ideally use whole cow's milk at refrigerator temperature (about 5°C)
text_image
My LatteArt-
To make the froth, put the nozzle (A5) on the surface of the milk and air will catch by the mixing of milk and steam.
-
Keep the steam nozzle just on the surface, careful not to make big bubbles by letting too much air in.
- Insert the steam nozzle just under the milk: this create a vortex. Once the desired temperature is reached turn the steam knob off and wait till steam stops completely before removing jug.
Barista tips:
- Fresh is best: Be sure to use fresh cold milk every time.
• Whole milk is recommended for best results. Dairy and Non Dairy alternatives will vary in ease of texturing depending on type.
• After foaming milk, eliminate unwanted bubbles by swirling the pitcher.
Cleaning the steam wand:
- After every use, remove with a soft damp cloth any milk residues from the steam wand (fig. 28). For perfect cleaning, we recommend Eco MultiClean: it ensures hygiene by removing milk proteins and fats and can be used to clean the whole machine.
- Use the steam for a deeper cleaning (fig. 10).
- Wait that the steam wand cool down and open the 3 holes of the nozzle with the Cleaning tool (C14) to maintain the better usability of the steam wand (fig. 29).
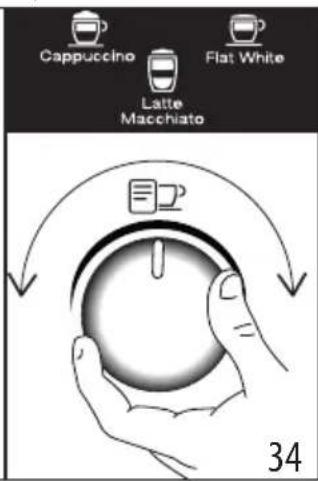
5.2 Making milk drinks with LatteCrema System (fig. 30)
- Fill the milk container (D8) with fresh cold milk from the refrigerator (5°C) (fig. 31).
- Close with the lid (D1) (fig. 32).
- Turn the knob (D5) to select the desired froth:
| Milk froth knob positions: | ||||
| CLEAN |  |  |  | INSERT |
| To clean LatteCrema System after each use | MAX froth | MED froth | MIN froth To extract or inser the knob | |
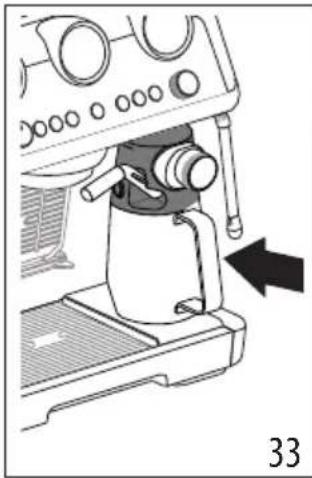
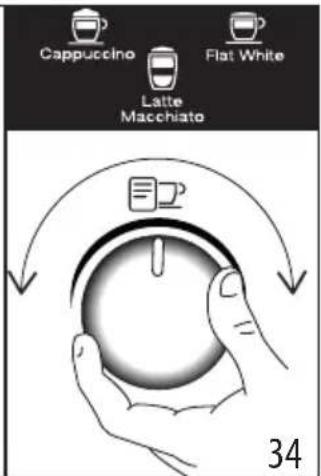
- Attach the milk container (fig. 33).
- Prepare the perfect dose (see "4.1 Step 1 - grinding (fig. 11)" and "4.3 Step 2 - tamping (fig. 17)") and attach the portafilter.
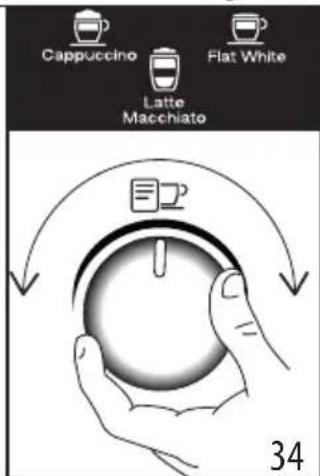
- Select your drink (fig. 34).
natural_image
Mechanical setup showing a coffee maker with a hand operating the cup, no visible text or symbols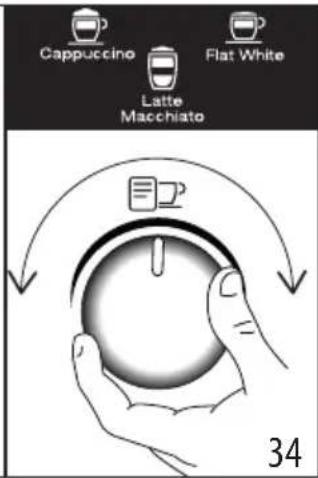
text_image
Cappuccino Flat White Latte Macchiato 34| Drink Espresso Milk Froth Quantity | (ml) | X2 (ml) | |||
| Cappuccino 1 | √ | √ | ≈150 ≈230 | ||
| Latte Macchiato | 1 | √ | × | ≈150 ≈230 | |
| Flat White 1 | √ | √ | ≈250 ≈330 | ||
- Double dose milk drinks (2x): Fill the milk container (D8) with a sufficient quantity of milk, not exceeding the MAX level marked on the container (fig. 31). Each mark on the side of the container corresponds to about 100ml of milk.
- Fresh is best. Using fresh cold full cream milk will achieve the best results.
- Press OK (B6) to start brewing (fig. 23). The appliance automatically brews coffee and milk in sequence.
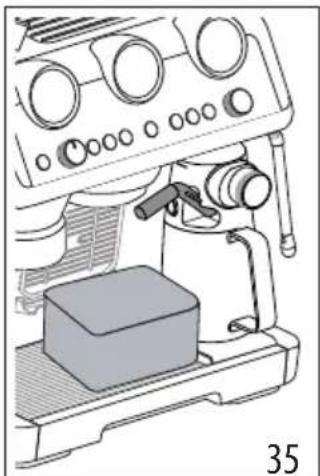
Cleaning Lattecrema System after every use:
- Leave the milk container in the machine (you do not need to empty it). Place a cup or other recipient under the frothed milk spout (D4) (fig. 35).
- Turn the knob (D5) to "Clean" (fig. 36).
natural_image
Line drawing of a mechanical device with control panel and base block (no text or symbols)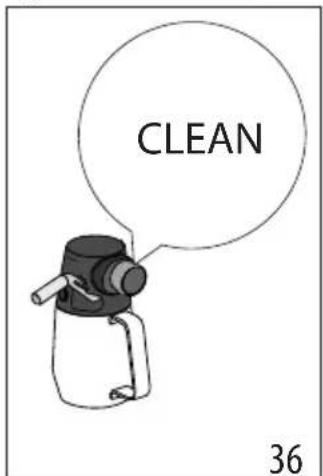
text_image
CLEAN 36-
Cleaning automatically starts and stops. Watch out: Remember, after cleaning, to turn the knob back on foam setting.
-
Remove the milk container and put it in the refrigerator and use soon.
For perfect cleaning, we recommend Eco MultiClean: it ensures hygiene by removing milk proteins and fats and can be used to clean the whole machine.
6. CUSTOMISING THE QUANTITY OF COFFEE DRINKS WITH THE BUTTON (B9)
- Prepare the appliance to deliver 1 or 2 cups of the coffee drink you want to make, as far as attaching the portafilter (C1) complete with the (C2) or (C3) filter and ground coffee. If you have to customise a milk based drink, prepare and also attach the Lattecrema System
- Turn the dial (B10) to select the drink to be programmed..
- Press the button: the light corresponding to the OK button (B6) comes on steadily and the light corresponding to the button flashes.
- Press the OK button to start delivering the drink. The lights corresponding to the OK and my buttons flash.
- When you have reached the desired quantity of the drink, press the OK button again. If the recipe includes another ingredient, it starts delivery: when you have reached the desired quantity, press the OK button again.
- Press the button to save the new setting. The appliance is ready for use again and the button remains on.
If you do not want to save the new setting, press any other button.
Please note:
- You can programme coffee drinks, but not steam and hot water.
- Programming changes the quantity of the drinks, but not the amount of coffee ground.
- "X2" drinks can be programmed separately.
• is not My LatteArt programmable. - To reset the default drink quantities, press and hold the my button until it goes off. The selected drink is reset to the default values.
| Coffee Recipe | Default quantity | Programmable quantity |
| 35 ml from 25 to 90 ml | ||
| 70 ml from 50 to 180 ml | ||
| 80 ml from 50 to 120 ml | ||
| 160 ml from 120 to 240 ml | ||
| Coffee Recipe | Default quantity | Programmable quantity |
| 120 ml | • espresso: from 25 to 60 ml• water: from 25 to 120 ml | |
| 240 ml | • espresso: from 50 to 120 ml• water: from 50 to 240 ml | |
| 110 ml from 90 to 130 ml | ||
| 180 ml from 160 to 220 ml | ||
| 40 ml from 30 to 50 ml | ||
| 80 ml from 60 to 110 ml | ||
7. MENU SETTINGS
| Enter the setting menu | |||
| Press both buttons for 5 seconds | x2 | my | |
| Select the setting | |||
 | |||
| Drink Corresponding setting | How to set | ||
 Espresso Espresso | Energy saving | ||
 Coffee Coffee | Auto off | ||
 Cappuccino Cappuccino | Beep | ||
 Latte Latte | Extra grinding adjustment | ||
| → | |||
| (GY06)Flat White | Default values | Keep pressedOKbuttonfor 5 seconds,until led stay fixed |
| (WZ4H)Americano | Water hardness | [XSTT] [SZZW]  |
| [GA68] [swat] [Swat]lium | ||
  [ZY3X]rd/very hard [ZY3X]rd/very hard | ||
| Save new settings by pressing the ON/Standby button(B1) | ||
8. CLEANING AND MAINTENANCE
Important!
- Do not use solvents, abrasive detergents or alcohol to clean the coffee machine.
- Do not use metal objects to remove encrustations or coffee deposits as they could scratch metal or plastic surfaces.
- If the appliance is not used for more than a week, before using it again, we recommend you perform a rinse cycle.
Danger!
- While cleaning, never immerse the coffee maker in water. It is an electrical appliance.
- Before cleaning the outside of the appliance, turn it off, unplug from the mains socket and allow to cool.
| DISHWASHER SAFE | ∅Tce-MuHClean | ||||
| × | √ | √ | × | × | |
| √ | × | × | √ | √ | |
| × | × | × | √ | √ | |
| → | |||||
| DISWASHER SAFE | @Eco MyHClean | ||||
| × | × | × | √ | √ | |
| × | × | √ | √ | × | |
| × | × | × | √ | √ | |
| √ | √ | × | √ | √ | |
| × | √ | × | √ | √ |
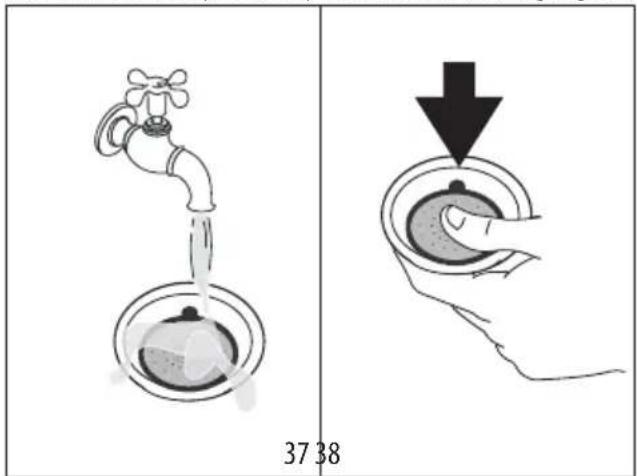
8.1 Cleaning the Espresso Cool filters
These filters have been developed to deliver optimal extraction results with this recipe. For best results, the filters must always be clean and free from all coffee residues.
After using the appliance, always rinse the filters under abundant running water (fig. 37), pushing the perforated filter to make sure it is always correctly inserted in its housing (fig.38);
text_image
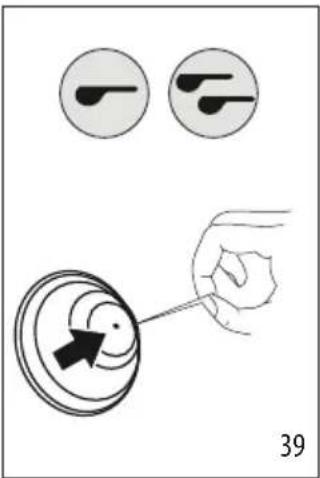
37 38make sure the hole underneath (shown in fig.39) is free from all residues.
text_image
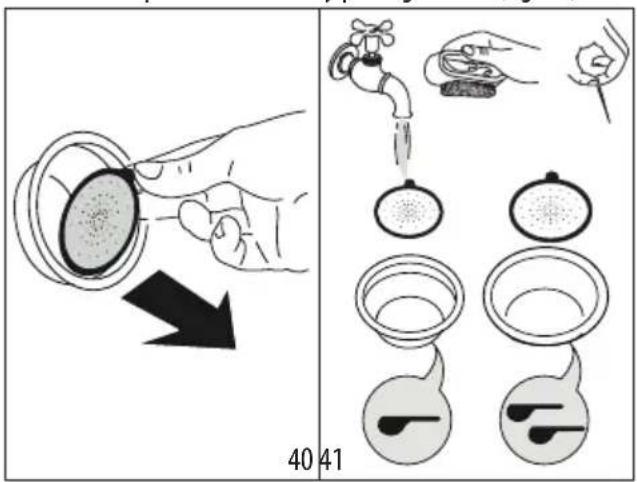
39If still dirty, and in any case always at least once a month, clean the coffee filters thoroughly:
- Extract the perforated filter by pulling the tab (fig. 40).
text_image
40 41- Rinse the filters under running water (fig. 37).
- Make sure the holes are not blocked. If necessary, clean with a pin (fig. 39-41).
- Dry all the components with a cloth.
- Put the perforated filter back in the housing and press as far as it will go (fig. 38).
8.2 Cleaning of the coffee outlet
When the light comes on (orange) (B5), you have to proceed cleaning the coffee circuit. To run the cleaning, you have to purchase dedicated cleaning tabs for coffee makers. For more info, please visit Delonghi.com.
- Insert the 1-cup coffee filter (C2) in the portafilter (C1) (fig. 42).
- Put on the coffee filter the special disk accessory (C12) (fig. 42) and press it to the bottom;
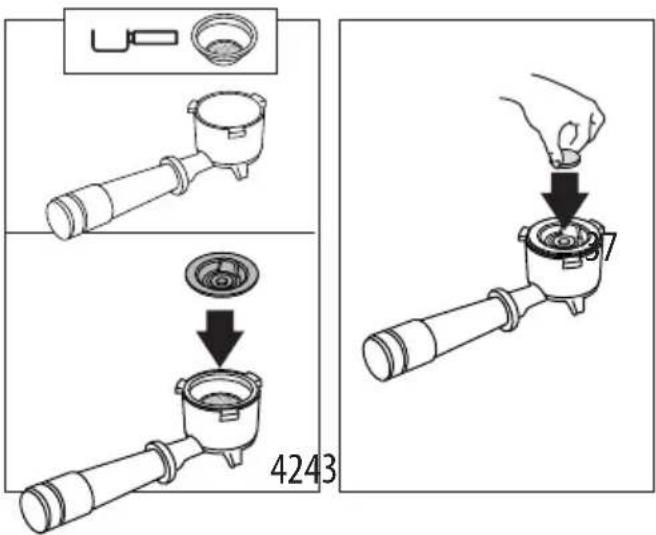
text_image
4243- Put on the accessory the cleaning tab (fig. 43).
- Attach the portafilter to the coffee outlet (A7).
- Fill the water tank (A15). Make sure the drip tray (A11) is empty.
- Keep pressed the button, until the related light start blinking (orange). After few minutes the cleaning stops automatically;
- Remove the portafilter and the cleaning disk accessory;
- Wash the portafilter and the filter under tap water;
- Insert the portafilter again and make a rinse by pressing the button (B5): we suggest to put a container under the portafilter;
- Remove and empty the drip tray.
Please note:
This procedure can start by pressing the button (B5) for some seconds. To delete this option, press the same button for 10 seconds.
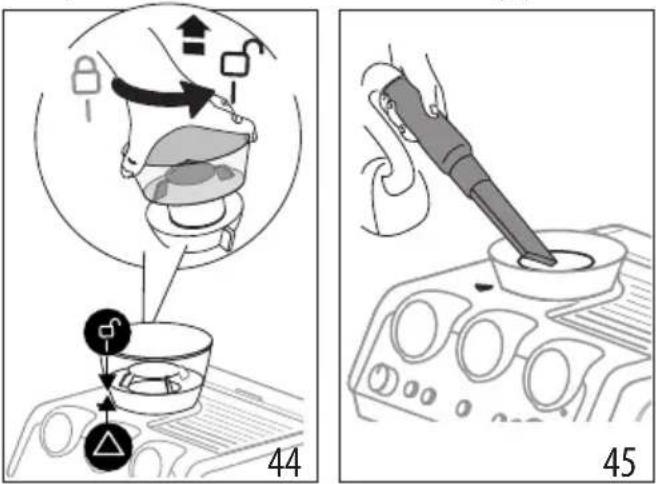
8.3 Cleaning the beans container housing
- Make sure the beans container (A1) is empty. If necessary, operate the coffee mill without beans to empty it:
text_image
Technical diagram showing a hand operating a device with labeled components and two views (44 and 45) of the device's internal structure.-
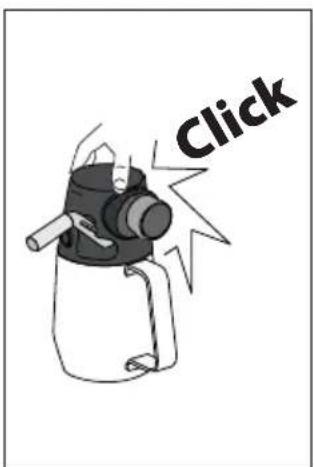
Release the beans container by turning it anticlockwise and extract from the appliance (fig. 44)
-
Remove coffee residues using a vacuum cleaner (fig. 45).
- Clean the beans container housing with a damp cloth and dry (fig. 46);
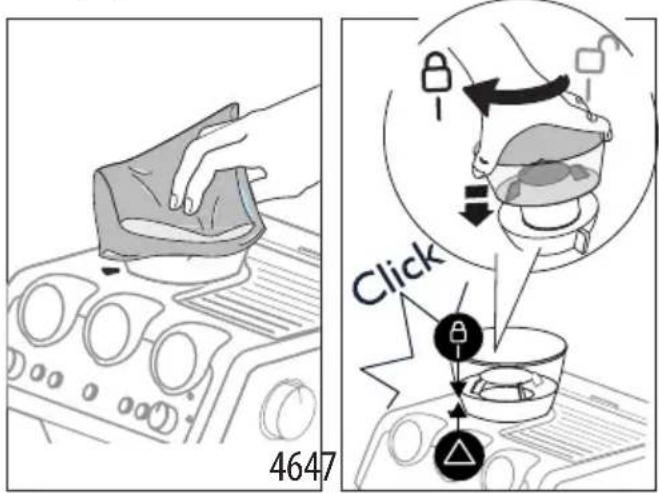
text_image
4647 Click- Put the container back inserting it in the coffee mill. The container is correctly inserted when the arrow ▲ is lined up with the symbol and you hear a "click" (fig. 47).
8.4 Cleaning the burr
When cleaning the beans container (A1), , clean the container housing and upper burr with a damp cloth. The burr can be removed and replaced by an authorised customer services centre.
You may also need to remove the burr if it becomes blocked with foreign matter. If this occurs, remove the beans container and clean as follows:
- Attach the portafilter (C1) and operate the mill without beans to free the coffee guide;
- Turn the appliance off;
- Turn the grinding selector anticlockwise as far as it will go to the "REMOVE" position(fig. 48).
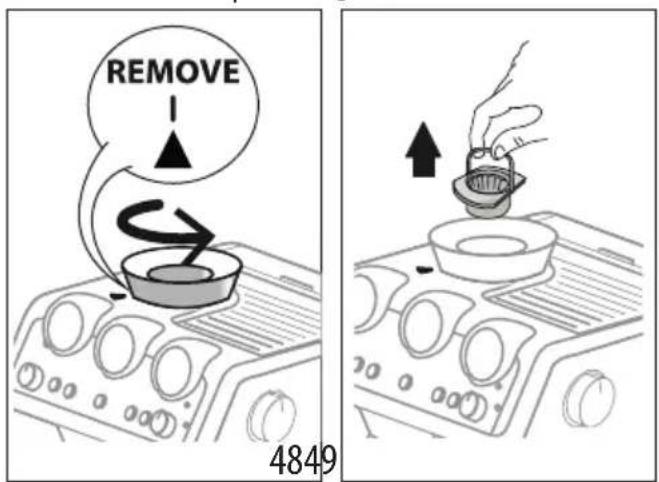
text_image
REMOVE 4849- Extract the upper burr, gripping it by the handle (fig.49).
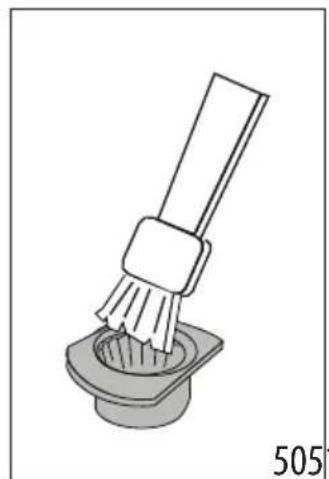
- Clean the burr with a brush (fig. 50) (not included) and remove the coffee residues using a vacuum cleaner (fig. 45).
text_image
5051- Put the upper burr back in place (fig. 51);
- Turn the selector to select the desired grinding level (fig. 13); Make sure the burr is inserted correctly by pulling it by the handle. If it is correctly inserted, it will not move.
8.5 Replacing the burrs
When the quantity of coffee becomes even less, contact a customer services centre to have the burrs replaced, then adjust the mill again as follows entering the setting menu ("7. Menu settings") and selecting the first range of the "Extra grinding adjustment". Then turn the ground coffee quantity dial (B2) to minimum position and set the dose like a first use (see "The "perfect dose").
8.6 Cleaning the "Smart tamping station"
- Clean the attachment area with a brush (fig. 52).
- Pull the lever (A20) as far as it will go and clean the presser cylinder with a brush (fig.53). Then release the lever.
- Use the tube brush (C11) to clean the coffee funnel.(fig. 54).
Smart TAMPING
text_image
STATION 5253548.7 Cleaning Lattecrema System
All components are dishwasher safe, placing them in the top basket. If you do not have a dishwasher, wash by hand as described in the note at the end of the section.
-
Push the release button (D3) and lift the milk container lid (D1);
-
Remove the milk spout (D4) and milk intake tube (D7) (fig. 55);
text_image
INSERT 5556- Turn the froth adjustment dial (D5) counter-clockwise to the "Insert" position (fig. 57) and pull;
- Make sure there are no milk residues on the hollow and groove under the dial (fig. 58): if necessary, scrape the groove with a toothpick;
text_image
5758- Rinse inside the froth adjustment dial seat with running water (fig. 53);
- Check that the intake tube and spout are not clogged with milk residues;
- Reassemble all the lid components;
- Carefully wash and rinse the milk container (D8);
- Attach the lid back on the milk container.
Please note: washing by hand
Washing the lid in a dishwasher guarantees the perfect hygiene of all the components. When washing by hand, wash all components of the milk container lid thoroughly with hot water and immerse them in a basin of hot water for 30 minutes before proceeding as described in point 4.
9. WATER HARDNESS
The 1 descale light (B8) comes on after a period of time established according to water hardness. The machine can also be programmed according to the actual hardness of the water
supply in the various regions, in which case descaling may be required less frequently.
- Remove the "TOTAL HARDNESS TEST" indicator paper (C6) from its pack.
- Immerse the paper completely in a glass of water for one second.
- Remove the paper from the water and shake lightly. After about a minute, 1, 2, 3, or 4 red squares form, depending on the hardness of the water. Each square corresponds to one level.
| Total Hardness Test result Button Level | ||
| x2 | 1soft water | |
| 2mediumwater | ||
| 3hard orvery hardwater | ||
- Set the appliance as indicated in section
10. USING THE SOFTBALLS
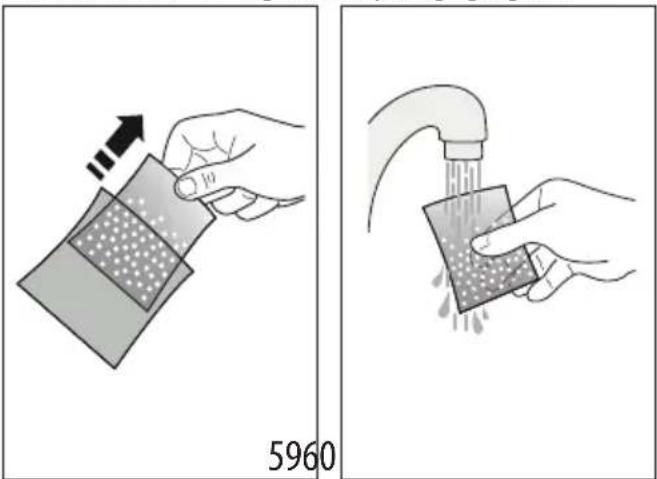
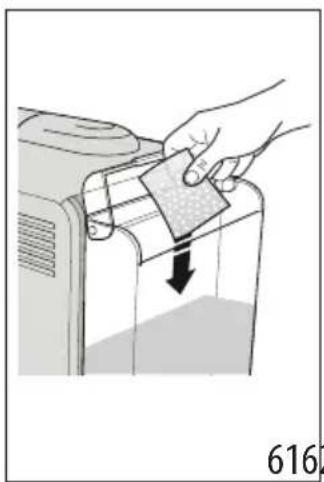
Softballs (C9) is an innovative system that extends the life of the machine, without altering the sensory properties of the water, guaranteeing consistently creamy and aromatic coffee.
- Extract the Softballs bag from the packaging (fig. 59).
text_image
5960- Rinse with tap water the Softballs bag (fig. 60).
- Deep the bag into the water tank (A15) (fig. 61).
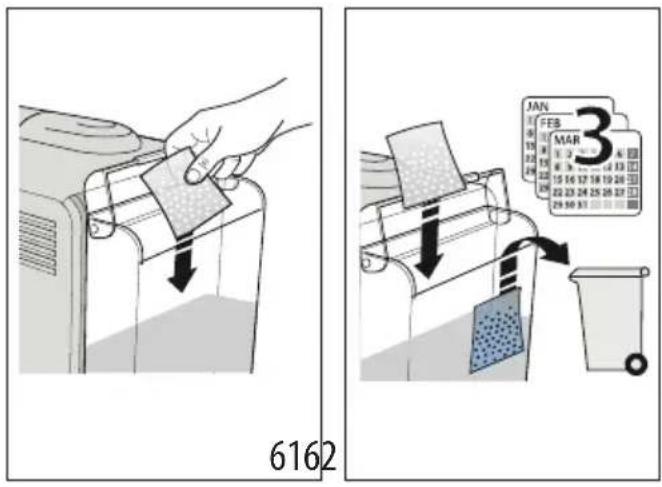
- Change the Softballs every 3 months (fig. 62).
text_image
6162 MAN FEB MAR 311. DESCALING
Please note
- Before use, read the instructions and the labelling on the descaler pack(C5).
- It is important to use De'Longhi descaler only. Using unsuitable descaler and/or performing descaling incorrectly may result in faults not covered by the manufacturer's guarantee.
- Descaler could damage delicate surfaces. If the product is accidentally spilt, dry immediately.
| To descale | |
| Descaler De’Longhi descaler | |
| Containers 2: Recommended capacity: 1 l each | |
| Time ~40min | |
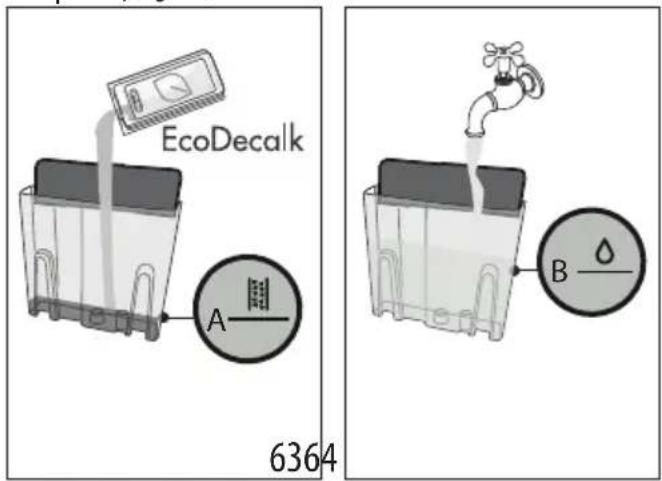
- (IF PRESENT, REMOVE SOFTBALLS AND WATER SOFTENER DEVICE). Pour the descaler into the tank (A15) up to the level A marked inside the tank (equal to one 100ml packet) (fig. 63).
text_image
EcoDecalk A 6364 B-
Add water up to the level B (Fig. 64). Then put the water tank back in the appliance.
-
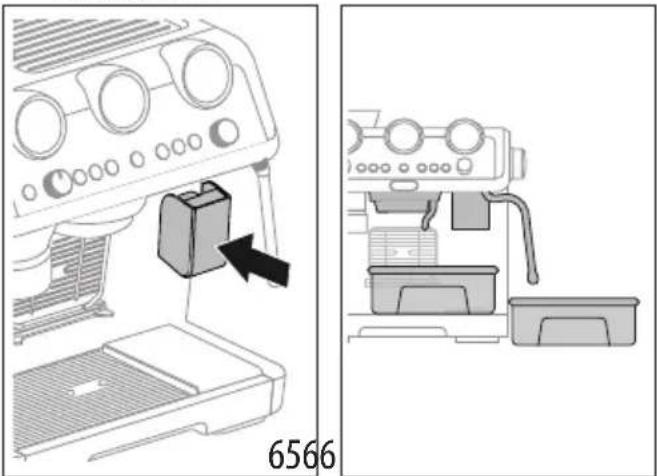
Insert the dedicated accessory (C6) to the Latte Crema connection (A6) (fig. 65).
natural_image
Diagram showing a coffee maker's side view and its internal components, no text or symbols present.- Make sure the portafilter (C1) is not attached and position a recipient under the coffee outlet, hot water spout (A7) and the other recipient under the steam wand (A5) (fig. 66).
- Keep pressed the (B8) button until the corresponding light begins to blink: descaling starts.
- The descale programme starts and the descaler liquid comes out of the steam wand and coffee outlet. The descale programme removes limescale deposits from inside the appliance by automatically performing a series of rinses and pauses until the tank is empty.
Delivery stops and the light turns to white. This indicates that it is necessary to proceed with rinsing: see next page.
- Empty the recipients used to collect the descaler solution and replace them empty.
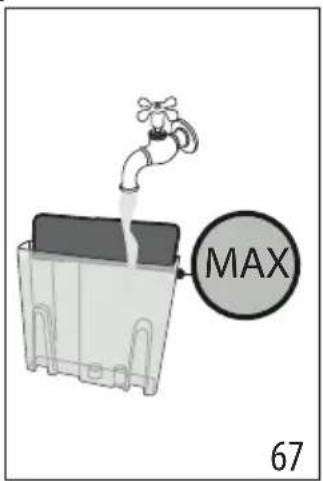
- Remove the water tank, empty any residues of descal-er solution, rinse with running water and fill with fresh water up to the MAX level (fig. 67). Put the tank back in its housing.
text_image
MAX 67- Keep pressed the | button until the corresponding light begins to blink: rinsing starts.
-
When rinsing is complete, delivery stops and the appliance prepares to be used again.
-
Empty the recipients used to collect the rinse water.
- Extract and empty the drip tray, then put back in the appliance.
Now the appliance is ready to use.
Please note
- If you want to anticipate the descaling cycle, keep pressed for 3 seconds.
-
If you start descaling by mistake, keep pressed the button for 10 seconds; the rinsing cycle cannot be interrupted.
-
EXPLANATION OF LIGHTS
| LIGHTS EXPLANATION OF LIGHTS OPERATION | ||
| All the lights flash briefly Turning | the machine on Self-diagnosis | |
 on on | The appliance is being turned on for the first time and the water circuit must be filled | Proceed as described in section “3. Setting up the appliance” |
 on (white) on (white) | The machine is ready to hot beverages delivery | Prepare the machine and proceed with delivery |
 on (blue) on (blue) | The machine is ready to cold beverage delivery | Prepare the machine and proceed with delivery |
 on on | Energy saving is enabled See section “7. | Menu settings” if you want to disable the function |
 | The beans container (A1) is empty | Fill the beans container |
 flashing flashing | Grinding is requested, but the beans container (A1) is empty | Fill the beans container |
 on on | Insufficient water in tank (A15) or the tank is not inserted correctly | Fill the tank or extract the tank and put it back correctly |
 flashing flashing | Brewing is requested, but the water tank (A15) is empty | Fill the water tank |
 on on | General alarm | Contact Customer Services |
 on on | The beans container is not inserted | Insert bean container or check that is completely locked. The container is correctly inserted when the arrow is lined up with the symbol and you hear a “click”. |
| flashing | The selector on the bottom of the container is not correctly positioned. | Move the selector within the 8 levels from coarse to fine, keeping in mind to:• Always adjust the coffee mill during the grinding• Adjust one grinding level at a time and make at  e adjusting again e adjusting again |
| OUT of correct range | Correct range | |
 | ||
| The coffee bean container (A1) is not completely insert: the machine does not work for safety reasons | Check that the bean container is completely locked | |
| on | After every use, the LatteCrema System must be cleaned | When all the milk drinks are ready, proceed with automatic cleaning turning the knob (D5) to Clea |
| or | The appliance is on and ready for use The | appliance is at the right temperature to deliver steam. To deliver steam, turn the steam dial (A4) |
| fashing | The appliance is on and energy saving is enabled. The steam dial (A4) is in the steam delivery position | The light flashes to indicate that the appliance is preparing to deliver steam. Delivery begins as soon as the appliance is at temperature |
| The appliance is heating up to be ready for use | The appliance is at temperature when the light remains on steadily | |
| The appliance is delivering steam | ||
| on (orange) | Descaling must be performed Descale the | the appliance as described in section “11. Descaling” |
| flashing (orange) | Descaling is underway Complete the operation as described in section “11. Descaling” | |
| on (white) | The rinsing cycle of descaling must be performed | |
| flashing (white) | The rinsing cycle of descaling is underway | |
| on (orange) | Cleaning of the coffee outlet must be performed | See section “8.2 Cleaning of the coffee outlet” |
| flashing (orange) | Cleaning of the coffee outlet is underway | |
| LIGHTS EXPLANATION OF LIGHTS OPERATION | |||
 | flashing (white) | The active rinse is underway | |
 + +  | If the water softener filter is present, an air bubble may have been released inside the circuit, obstructing delivery | Press the button (B7) corresponding to the light. Delivery begins and stops automatically. | |
| The grinding is too fine and the coffee is delivered too slowly or not at all | Extract the filter holder (C1) (see “4.1 Step 1 - grinding (fig. 11)” and “4.3 Step 2 - tamping (fig. 17)”) | ||
| The coffee filter (C2) or (C3) is blocked Rinse the filters under abundant running water or by Active Rinse function (B5). | |||
| The tank (A15) has been inserted incorrectly and the valves on the bottom are not open | Press the tank down lightly to open the valves on the bottom | ||
| Scale in the water circuit | Descale as described in section “11. Descaling” | ||
- TROUBLESHOOTING
| PROBLEM CAUSE SOLUTION | ||
| There is water in the drip tray (A11) It is normal: due to the internal water circuits operations | Regularly empty and clean the drip tray | |
| No espresso coffee is delivered No water in the tank (A15) Fill the tank | ||
| Press the button corresponding to the light to fill the circuit | ||
| the coffee filter (C2) or (C3) is blocked Rinse the filters under abundant running water or by Active Rinse function (B5) | ||
| Press the tank down lightly to open the valves on the bottom | ||
| Scale in the water circuit | ||
| Descale as described in section"11. Descaling" | ||
| Extract the filter holder (C1) and repeat grinding with new settings (see "4.1 Step 1 - grinding (fig. 11)"" and "4.3 Step 2 - tamping (fig. 17)") | ||
| The portafilter cannot be attached to the appliance | The ground coffee has not been pressed or is too much | Extract the filter holder (C1) and repeat grinding with new settings (see "4.1 Step 1 - grinding (fig. 11)"" and "4.3 Step 2 - tamping (fig. 17)") |
| → | ||
| The espresso coffee drips from the edges of the portafilter rather than the holes | The portafilter is inserted incorrectly Attach the portafilter correctly and rotate firmly as far as it will go | |
| The espresso boiler gasket has lost elast- ticity or is dirty | Have the espresso boiler gasket replaced by Customer Services | |
| The coffee filter (C2) or (C3) is clogged Rinse the filters under abundant running water or by Active Rinse function (B5) | ||
| The coffee crema is too light (delivered from the spout too fast) | The appliance settings need reviewing Extract the filter holder (C1) and repeat grinding with new settings (see “4.1 Step 1 - grinding (fig. 11)” and “4.3 Step 2 - tamping (fig. 17)”) | |
| The coffee crema is too dark (delivered from the spout too slowly) | The appliance settings need reviewing Extract the filter holder (C1) and repeat grinding with new settings (see “4.1 Step 1 - grinding (fig. 11)” and “4.3 Step 2 - tamping (fig. 17)”) | |
| No milk froth is formed when making cappuccino with LatteCrema System | Milk not cold enough Always use milk at refrigerator temperature | |
| The froth selection knob (D5) is not in the correct position | Check and turn to the right position the froth selection knob (max froth;med froth; min froth) | |
| The LatteCrema System is dirty Clean the cappuccino maker as described in section “8.7 Cleaning Lattecrema System” | ||
| Scale in the water circuit Descale as described in section “11. Descaling” | ||
| At the end of descaling, the appliance requests a further rinse | During the rinse cycle, the water tank has not been filled to the MAX level | Repeat the rinse (see “11. Descaling”) |
| The appliance does not grind the coffee There is foreign matter that cannot be ground in the coffee mill | Clean the burrs as described in section “8.4 Cleaning the burr”, making sure you remove all the beans from the beans container (A2) before extracting it. Before putting the burr back, vacuum all residues from the housing | |
| The container is correctly inserted when the arrow ▲ is lined up with the symbol and you hear a “click”. | ||
| → | ||
| If you want to change the type of coffee You must remove all the beans present in the machine | Empty the beans container (A1) (if necessary, operate the coffee mill without beans or use a vacuum cleaner to remove any remaining beans)Attach the filter holder (C1) and operate the coffee mill a number of times without beans to free the grinder. Attach the filter holder to the outlet of the grinder (A18), lining it up with "INSERT", then turning it to the right (fig. 22). Grinding begins when the filter holder reaches the CLOSE position and stops automatically. Repeat until the filter is emptyPlace the new coffee in the beans con-tainer (A1)If the amount of coffee ground is not enough to reach the perfect dose, proceed setting the appliance as for the first use | |
| After grinding, the coffee filter (C2) or (C3) is empty | The coffee grinder coffee funnel is clogged | Clean as described in section "8.6 Cle-aning the "Smart tamping station". If the problem persists, access the guide by opening the hatch (A19) and free it using the brush.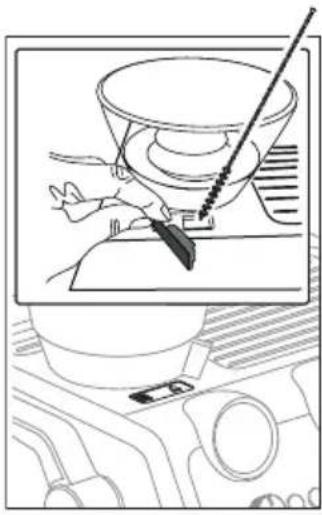 |
| After tamping, there is too much coffee in the filter | ||
| After grinding, the ground coffee in the filter (C2) or (C3) does not reach the "per-fect dose | The "Smart Tamping Station" needs cleaning | Clean as described in section "8.6 Cleaning the "Smart tamping station", then grind again |
| The quantity of ground coffee needs adjusting | Adjust the quantity of coffee with the dial (B2) referring to "The „perfect dose". If the dial is already in the max. position, select the second range of grin-ding adjustment, proceed as indicated in section "7. Menu settings". | |
| Over time the burrs wear down | Replace the burrs as described in section "8.5 Replacing the burrs" | |
text_image
Dose level 20text_image
My LatteArtnatural_image
Line drawing of a coffee maker with a cup and side arm, showing mechanical components without any text or symbols.33
text_image
Cappuccino Latte Macchiato Flat White 34| Boisson Espresso Lait | Mousse de lait | Quantité (ml) | X2 (ml) | ||
| Cappuccino | 1 | √ | √ | ≈150 | ≈230 |
| Latte Macchiato | 1 | √ | × | ≈150 | ≈230 |
natural_image
Technical line drawing of a mechanical device with control panel and base block (no text or symbols)
text_image
CLEAN| DISWASHER SAFE | DIco MultClean | ||||
 | × | √ | √ | × | × |
 | √ | × | × | √ | √ |
 | × | × | × | √ | √ |
 | × | × | × | √ | √ |
 | × | × | √ | √ | × |
 | × | × | × | √[zzyr] | √[xzcx] |
| √ | √ | × | √ | √ | |
| × | √ | × | √ | √ |
natural_image
Diagram of a hand using a tool to press a cylindrical component, showing a downward arrow indicating compression or disassembly (no text or symbols present)text_image
Diagram illustrating a medical procedure with labeled components and directional arrows, including a magnified view of the anatomical structure.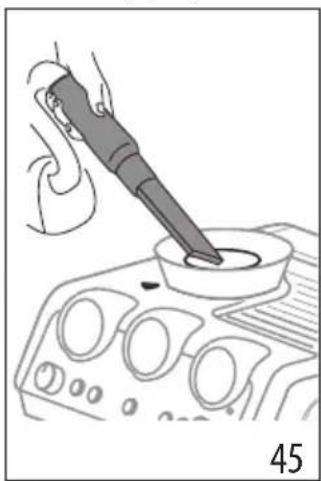
natural_image
Illustration of a hand using a power tool to press or inspect a component on an engine (no text or symbols visible)natural_image
Illustration of a hand cleaning a car interior with a cloth (no text or symbols)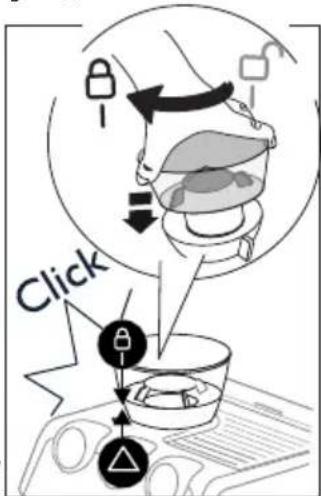
text_image
Clicktext_image
REMOVE 484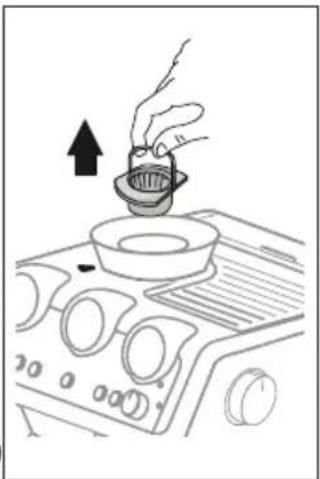
natural_image
Line drawing of a hand pouring liquid into a bowl on an air conditioner cover (no text or symbols)natural_image
Illustration of a brush applying paint to a square base, labeled '505' (no text or symbols on the diagram itself)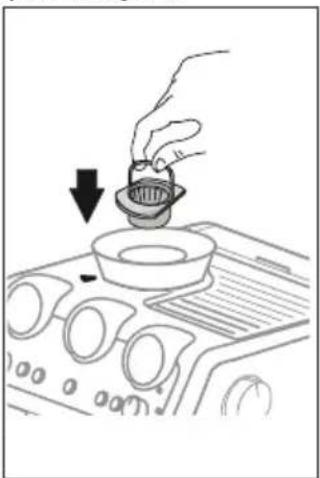
natural_image
Line drawing of a hand pouring liquid into a bowl on an air conditioner cover (no text or symbols)natural_image
Diagram showing a coffee maker's side view and its internal components, no text or symbols present.text_image
My LatteArtnatural_image
Technical line drawing of a mechanical device with control panel and base (no text or symbols)
text_image
CLEANnatural_image
Simple line drawing of a kitchen appliance with a power button and control panel (no text or symbols) |  |  |  |  | |
| × | √ | √ | × | × | |
| √ | × | × | √ | √ | |
| × | × | × | √ | √ | |
| × | × | × | √ | √ | |
| × | × | √ | √ | × | |
| × | × | × | √ | √ | |
| √ | √ | × | √ | √ | |
| × | √ | × | √ | √ |
text_image
Diagram showing a hand holding a pointer at a target with arrows indicating direction, alongside two circular icons with black dots and symbols.text_image
Illustration showing a hand using a tool to clean a small container, with accompanying diagrams illustrating the process and component details.text_image
Diagram illustrating a mechanical device operation with labeled parts and numbered sections 44 and 45text_image
4647 Clicktext_image
REMOVE 4849text_image
Dose level 20text_image
My LatteArtnatural_image
Mechanical device with lever and control panel, no visible text or symbols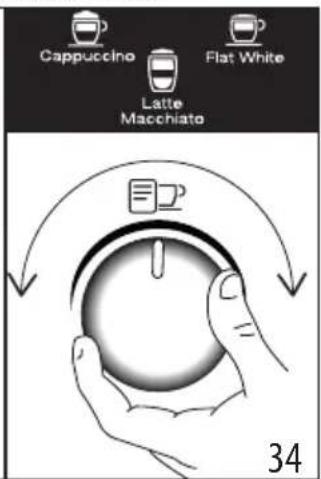
text_image
Cappuccino Flat White Latte Macchiato 34| Drank Espresso Melk | Schuim Hoe- | veelheid (ml) | X2 (ml) | ||
| Cappuccino 1 | √ √ | ≈150 | ≈230 | ||
| Drank Espresso Melk | Schuim Hoe- | veelheid (ml) | X2 (ml) | ||
| Latte Macchiato | 1 | √ | × | ≈150 ≈230 | |
| Flat White 1 | √ | √ | ≈250 ≈330 | ||
natural_image
Technical line drawing of a mechanical device with control panel and base block (no text or symbols)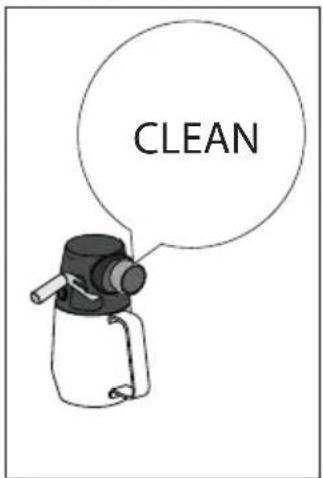
text_image
CLEAN| DIS=WASHER SAFE | DEco MultClean | ||||
 | × | √ | √ | × | × |
 | √ | × | × | √ | √ |
 | × | × | × | √ | √ |
 |  |  |  |  | |
 | × | × | × | √ | √ |
 | × | × | √ | √ | × |
 | × | × | × | √ | √ |
 | √ | √ | × | √ | √ |
 | × | √ | × | √ | √ |
text_image
Diagram illustrating a medical procedure with labeled components and directional arrows, including a magnified view of the anatomical structure.
natural_image
Line drawing of a hand using a pipette to test a component on an engine (no text or symbols)natural_image
Line drawing of a hand using a power tool to clean or install a fan on an air conditioner cover (no text or symbols)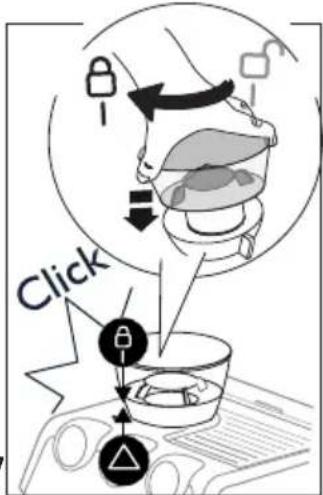
text_image
Clicktext_image
REMOVE 484
natural_image
Line drawing of a hand pouring liquid into a bowl on an air conditioner cover (no text or symbols)natural_image
Diagram showing a coffee maker's base with a coffee maker inserted into the machine, and its side view with a feeding container (no text or symbols present)text_image
Dose level 20text_image
"Dosis perfecta"text_image
My LatteArtnatural_image
Line drawing of a coffee maker with a cup and side arm, showing mechanical components without any text or symbols.33
text_image
Cappuccino Latte Macchiato Flat White 34| Bebida Espresso Leche Espuma Cantidad (ml) | X2 (ml) | ||||
| Cappuccino 1 | √ | √ | ≈150 ≈230 | ||
| Latte Macchiato | 1 | √ | × | ≈150 ≈230 | |
| Flat White | 1 | √ | √ | ≈250 ≈330 | |
natural_image
Technical line drawing of a mechanical device with control panel and base block (no text or symbols)
text_image
CLEANnatural_image
Illustration of a hand using a tool to press a component into a pot (no text or symbols present)text_image
Medical diagram illustrating surgical procedure with labeled components and directional arrows, including a magnified view of the anatomical structure.
natural_image
Illustration of a hand using a power tool to test a component on an automotive infotainment device (no text or symbols visible)natural_image
Line drawing of a hand pressing down on a car dashboard with control knobs (no text or symbols)
text_image
Clicktext_image
REMOVE 484
natural_image
Line drawing of a hand pouring liquid into a bowl on an air conditioner cover (no text or symbols)natural_image
Illustration of a brush applying paint to a square base, labeled '505' (no text or symbols on the diagram itself)
natural_image
Line drawing of a hand pouring liquid into a bowl on an air conditioner fan (no text or symbols)natural_image
Technical diagram of a mechanical component with labeled parts and dimension marker (no readable text or symbols)
natural_image
Line drawing of a hand holding a faucet with liquid, no text or symbols presentA17. Interruptor geral (ON/OFF)
A18. Saída do moinho de café (Tamping station)
A19. Portinhola para aceder à tremonha do moinho de café
text_image
"Dose perfeita"text_image
My LatteArt| DISWASHER SAFE | DIco MultClean | ||||
 | × | √ | √ | × | × |
| √ | × | × | √ | √ |
 | × | × | × | √ | √ |
 | × | × | × | √ | √ |
 | × | × | √ | √ | × |
| × | × | × | √ | √ |
| GEceMoHClean | |||||
 | √ | √ | × | √ | √ |
 | × | √ | × | √ | √ |
text_image
Diagram illustrating a medical procedure with labeled steps and directional arrows, including a magnified view of the anatomical structure.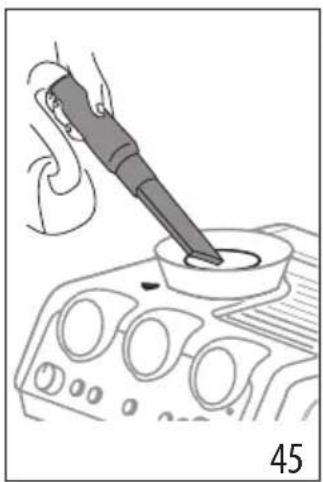
natural_image
Illustration of a hand using a pipette to test a component on a control panel (no text or symbols visible)natural_image
Illustration of a hand pressing down on a car air conditioner cover (no text or symbols)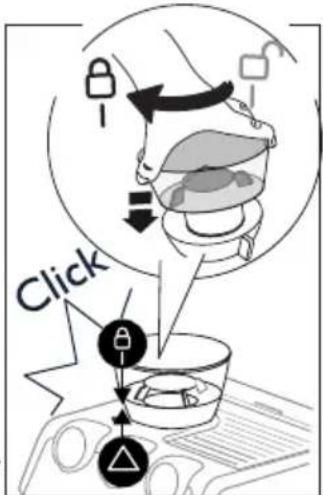
text_image
Clicktext_image
REMOVE 484
natural_image
Line drawing of a hand pouring liquid into a bowl on an air conditioner fan (no text or symbols)natural_image
Illustration of a brush applying material to a circular base, labeled '505' (no text or symbols on the diagram itself)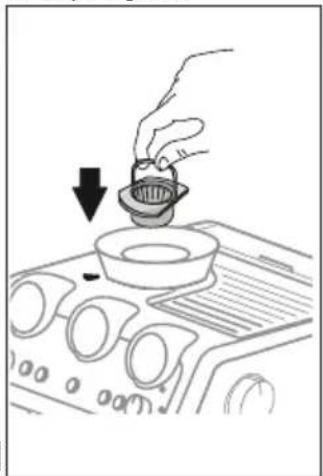
natural_image
Line drawing of a hand pouring liquid into a bowl on an air vent (no text or symbols)natural_image
Two technical diagrams showing a coffee machine setup with a control panel and a side-view view of its internal components (no text or symbols present)text_image
Dose level 20text_image
My LatteArtnatural_image
Technical line drawing of a mechanical device with control panel and base block (no text or symbols)
text_image
CLEAN | | |  | | |
| × | √ | √ | × | × | |
| √ | × | × | √ | √ | |
| × | × | × | √ | √ | |
| × | × | × | √ | √ | |
| × | × | √ | √ | × | |
| × | × | × | √ | √ | |
| √ | √ | × | √ | √ | |
| × | √ | × | √ | √ |
text_image
Diagram illustrating a food safety procedure with labeled steps and a magnified view of the container being processed.text_image
4647 Clicktext_image
REMOVE 4849natural_image
Diagram showing a coffee machine with control panel and side view of its internal components (no text or symbols)natural_image
Line drawing of a coffee maker with a cup and side arm, showing mechanical components without any text or symbols.33
text_image
Cappuccino Flat White Latte Macchiato 34| Drikk Espresso Melk | Skum Mengde | (ml) | X2 (ml) | ||
| Cappuccino 1 | √ | √ | ≈150 ≈230 | ||
| Latte Macchiato | 1 | √ | × | ≈150 ≈230 | |
| Flat White 1 | √ | √ | ≈250 ≈330 | ||
text_image
3536 CLEAN| DIS-WASHERSAFE | DEcoMultiClean | ||||
| × | √ | √ | × | × | |
| √ | × | × | √ | √ | |
| × | × | × | √ | √ | |
| × | × | × | √ | √ | |
| × | × | √ | √ | × | |
| × | × | × | √ | √ | |
| √ | √ | × | √ | √ | |
| × | √ | × | √ | √ |
text_image
Medical diagram illustrating surgical procedure with labeled steps and directional arrows, including a magnified view of the anatomical structure.
natural_image
Line drawing of a hand using a power tool to apply liquid into a container (no text or symbols)natural_image
Diagram showing a coffee machine with a bag being inserted, alongside its exterior view (no text or symbols present)4.6 Fas 3 - Dispensering Cold Brew
flowchart
graph LR
    A["Step 1: Initial material"] --> B["Step 2: Process"]
    B --> C["Step 3: Final product with wavy arrow"]
natural_image
Mechanical device with lever and control panel, no visible text or symbols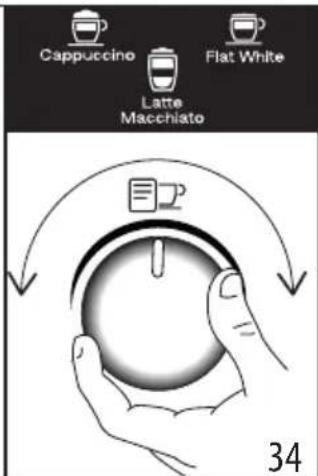
text_image
Cappuccino Flat White Latte Macchiato 34| Dryck Espresso Mjölk | Skum Mängd | (ml) | X2 (ml) | ||
| Cappuccino 1 | √ | √ | ≈150 ≈230 | ||
| Latte Macchiato | 1 | √ | × | ≈150 ≈230 | |
| Flat White | 1 | √ | √ | ≈250 ≈330 | |
text_image
3536 CLEAN| DIS-WASHER SAFE | ∅Co Multiclean | ||||
| × | √ | √ | × | × | |
| √ | × | × | √ | √ | |
| × | × | × | √ | √ | |
| × | × | × | √ | √ | |
| × | × | √ | √ | × | |
| × | × | × | √ | √ | |
| √ | √ | × | √ | √ | |
| × | √ | × | √ | √ |
| DIS-WASHER SAFE | ∅Co Multiclean | ||||
| × | √ | √ | × | × | |
| √ | × | × | √ | √ | |
| × | × | × | √ | √ | |
| × | × | × | √ | √ | |
| × | × | √ | √ | × | |
| × | × | × | √ | √ | |
| √ | √ | × | √ | √ | |
| × | √ | × | √ | √ |
text_image
Diagram illustrating food safety interventions with labeled arrows and a magnified view of a container with food items.
natural_image
Illustration of a hand using a power tool to test a component on an automotive infotainment device (no text or symbols visible)natural_image
Line drawing of a hand pressing down on a car dashboard with control knobs (no text or symbols)
text_image
Clicktext_image
REMOVE 484
natural_image
Line drawing of a hand pouring liquid into a bowl on an air conditioner cover (no text or symbols)natural_image
Illustration of a brush applying paint to a square base, labeled '505' (no text or symbols on the diagram itself)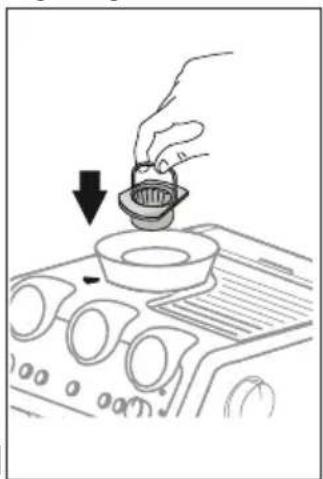
natural_image
Line drawing of a hand pouring liquid into a bowl on an air conditioner fan (no text or symbols)natural_image
Diagram showing a coffee maker's side view and its internal components, with no visible text or symbols.text_image
Dose level 20text_image
My LatteArtnatural_image
Mechanical setup showing a coffee maker with a lever and control panel, no visible text or symbols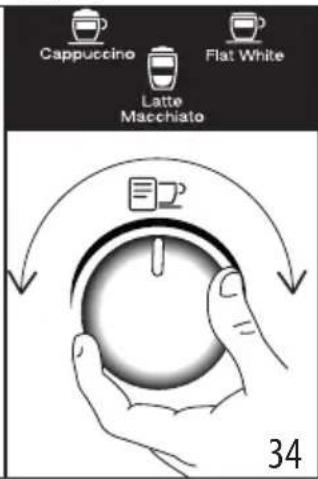
text_image
Cappuccino Flat White Latte Macchiato 34| Drikke-varer | Espresso | Mælk Skum | Mængde | (ml) | X2 (ml) |
| Cappuccino 1 | √ | √ | ≈150 | ≈230 | |
| Latte Macchiato | 1 | √ | × | ≈150 | ≈230 |
| Flat White | 1 | √ | √ | ≈250 | ≈330 |
text_image
3536 CLEAN| DESHWASHER SAFE | DEco MultClean | ||||
| × | √ | √ | × | × | |
| √ | × | × | √ | √ | |
| × | × | × | √ | √ | |
| × | × | × | √ | √ | |
| × | × | √ | √ | × | |
| × | × | × | √ | √ | |
| √ | √ | × | √ | √ | |
| × | √ | × | √ | √ |
text_image
Medical diagram illustrating surgical procedure with labeled components and directional arrows
natural_image
Line drawing of a hand using a power tool to test a component on a device (no text or symbols visible)text_image
4647 Clicktext_image
REMOVE 48498.6 Rengøring af "Smart tamping station"
natural_image
Diagram of a device with a box and control panel, showing a black arrow pointing to it (no text or symbols present)
natural_image
Line drawing of a coffee maker machine with no visible text or symbolstext_image
Dose level 20text_image
My LatteArtnatural_image
Mechanical setup showing a coffee maker with control panel and directional arrow (no text or symbols)
text_image
Cappuccino Flat White Latte Macchiato 34| Juoma Espresso Maito | Vaahto | Määrä | (ml) | X2 (ml) |
| Cappuccino 1 | √ | √ | ≈150 | |
| Latte Macchiato | 1 | √ | × | ≈150 |
| Flat White | 1 | √ | √ | ≈250 |
text_image
3536 CLEAN| DISHWASHER SAFE | ∅Eco MuHClean | ||||
| × | √ | √ | × | × |
| DIS-WASHER SAFE | DEco MuHClean | ||||
| √ | × | × | √ | √ | |
| × | × | × | √ | √ | |
| × | × | × | √ | √ | |
| × | × | √ | √ | × | |
| × | × | × | √ | √ | |
| √ | √ | × | √ | √ | |
| × | √ | × | √ | √ |
text_image
Diagram illustrating a food safety or health intervention process with labeled icons and directional arrows
natural_image
Line drawing of a hand using a pipette to test a component on a device (no text or symbols visible)text_image
4647 Clicktext_image
REMOVE 4849natural_image
Illustration of a hand inserting a card into a device (no text or symbols visible)
text_image
JAN 3 FEB MAR 12 2 3 4 5 6 7 8 9 10 11 12 13 14 15 16 17 18 19 20 21 22 23 24 25 26 27 28 29 30 31 32 33 34 35 36 37 38 39 40 41 42 43 44 45 46 47 48 49 50 51 52 53 54 55 56 57 58 59 60 61 62 63 64 65 66 67 68 69 70 71 72 73 74 75 76 77 78 79 806162
natural_image
Diagram of a device interior showing a control panel with a black arrow pointing to a component (no text or symbols present)
natural_image
Line drawing of a coffee maker machine with no visible text or symbolstext_image
My LatteArtnatural_image
Technical line drawing of a mechanical device with control panel and base block (no text or symbols)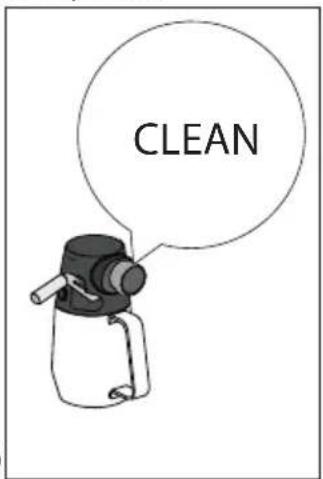
text_image
CLEAN | | | | | |
| × | √ | √ | × | × | |
| √ | × | × | √ | √ | |
| × | × | × | √ | √ | |
| × | × | × | √ | √ | |
| × | × | √ | √ | × | |
| × | × | × | √ | √ | |
| √ | √ | × | √ | √ | |
| × | √ | × | √ | √ |
text_image
Diagram illustrating a food safety procedure with labeled steps and a 44-step setup, showing hand positioning and tool application.text_image
4647 Clicktext_image
REMOVE 4849natural_image
Illustration of a hand placing a textured material into a device with a downward arrow (no text or symbols)
text_image
JAN FEB 3 MAR 12 13 14 15 16 17 18 19 20 21 22 23 24 25 26 27 28 29 30 31 32 33 34 35 36 37 38 39 40 41 42 43 44 45 46 47 48 49 50 51 52 53 54 55 56 57 58 59 60 61 62 63 64 65 66 67 68 69 70 71 72 73 74 75 76 77 78 79 80 81 82 83 84 85 86 87 88 89 90 91 92 93 94 95 96 97 98 99 100natural_image
Diagram of a device with a box inserted into a rack, showing airflow direction (no text or symbols)
natural_image
Line drawing of a coffee maker machine with no visible text or symbolstext_image
Close Level 20text_image
My LatteArtnatural_image
Line drawing of a coffee maker with a hand operating the cup (no text or symbols)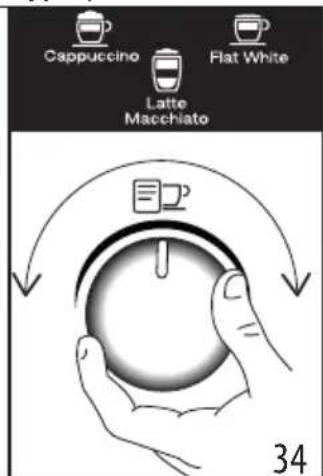
text_image
Cappuccino Flat White Latte Macchiato 34| Сусын | Espresso | Сүт | Көпіршік | Мөлшер (мл) | Х2 (мл) |
| Cappuccino | 1 | √ | √ | ≈150 | ≈230 |
| Latte Mac-chiato | 1 | √ | × | ≈150 | ≈230 |
| F I a t White | 1 | √ | √ | ≈250 | ≈330 |
natural_image
Technical line drawing of a mechanical device with control panel and base block (no text or symbols)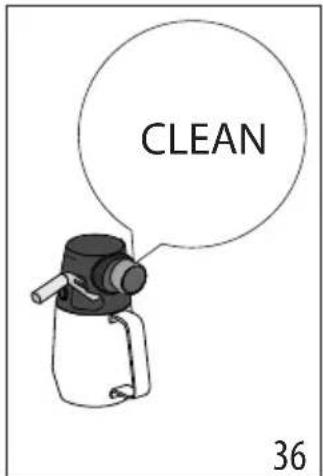
text_image
CLEAN 36| DISWASHERSAFE | OFCoMnHClen | ||||
 | × | √ | √ | × | × |
 | √ | × | × | √ | √ |
 | × | × | × | √ | √ |
 | × | × | × | √ | √ |
 | × | × | √ | √ | × |
 | × | × | × | √ | √ |
 | √ | √ | × | √ | √ |
 | × | √ | × | √ | √ |
text_image
Diagram showing a cooking process with labeled steps: mixing, pouring into a pot, and adding a lid to a final container.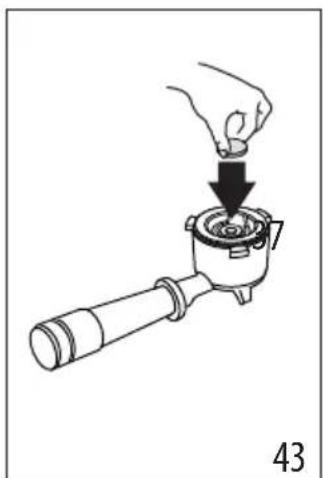
natural_image
Illustration of a hand using a tool to press a component into a pot, labeled with number 43 (no text or symbols on the diagram itself)text_image
Diagram illustrating a food safety or cooking process with labeled components and directional arrows indicating movement.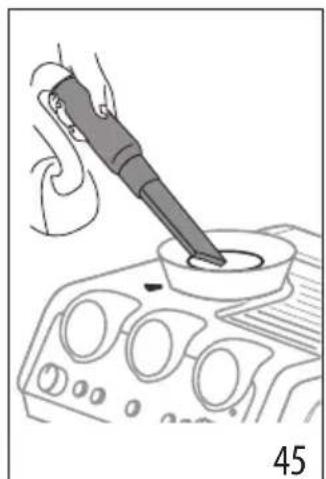
natural_image
Illustration of a hand using a soldering iron to apply liquid into a control panel (no text or symbols visible)natural_image
Illustration of a hand using a tool to clean or inspect a car interior (no text or symbols visible)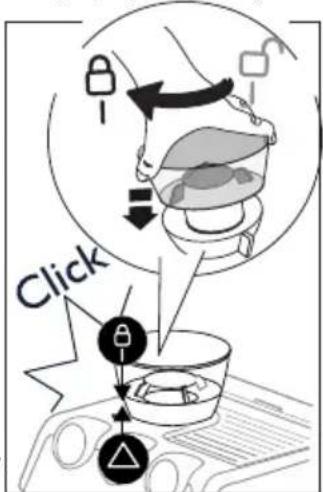
text_image
Clicktext_image
REMOVE 484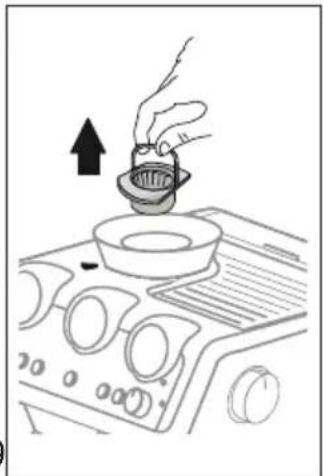
natural_image
Line drawing of a hand pouring liquid into a bowl on an air conditioner cover (no text or symbols)natural_image
Illustration of a brush applying paint to a square base, labeled '505' (no text or symbols on the diagram itself)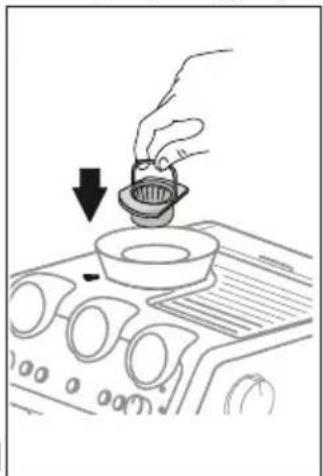
natural_image
Line drawing of a hand pouring liquid into a bowl on an air vent (no text or symbols)natural_image
Technical diagram of a mechanical component with directional arrows indicating movement or force (no text or symbols)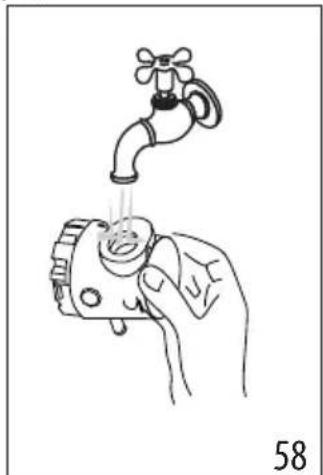
natural_image
Illustration of a hand holding a faucet above a mechanical device, with no visible text or symbols.natural_image
Hand holding a textured surface with directional arrow indicating movement (no text or symbols)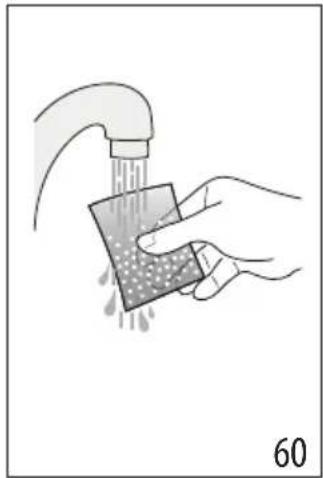
natural_image
Illustration of hands using a drain to clean a sponge or sponge (no text or symbols present)natural_image
Illustration of a hand placing a card into a machine with a downward arrow (no text or symbols)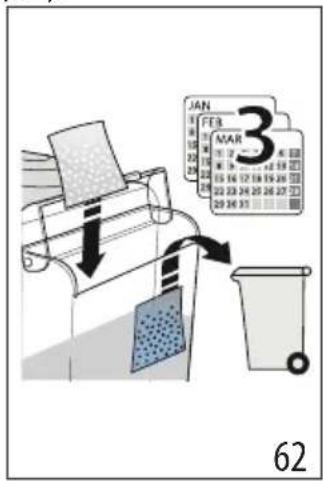
text_image
JAN FEB MAR 3 6211. КАК ТАЗАЛАУ
Есіңізде болсын
natural_image
Diagram of a coffee machine with a coffee container being inserted, showing control panel and fan (no text or symbols)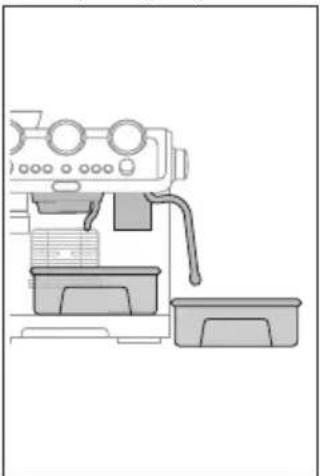
natural_image
Line drawing of a coffee maker machine with no visible text or symbolstext_image
Dose level 20text_image
My LatteArtnatural_image
Line drawing of a coffee maker with a hand operating the cup (no text or symbols)33
text_image
Cappuccino Latte Macchiato Flat White 34| Italok Espresso Tej Hab Meny- | nyiség (ml) | X2 (ml) | |||
| Cappuccino | 1 | √ | √ | ≈150 | ≈230 |
| Latte Macchiato | 1 | √ | × | ≈150 | ≈230 |
| Flat White | 1 | √ | √ | ≈250 | ≈330 |
natural_image
Line drawing of a mechanical device with control panel and base block (no text or symbols)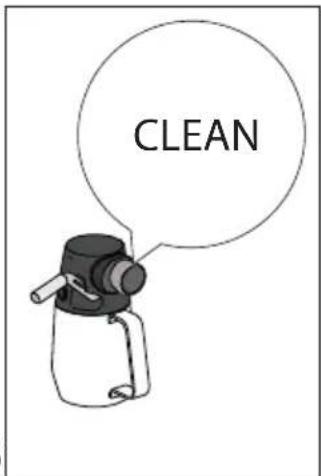
text_image
CLEAN| DIS-WASHER SAFE | ∅Co Multiclean | ||||
| × | √ | √ | × | × | |
| √ | × | × | √ | √ | |
| × | × | × | √ | √ | |
| × | × | × | √ | √ | |
| × | × | √ | √ | × | |
| × | × | × | √ | √ | |
| √ | √ | × | √ | √ | |
| × | √ | × | √ | √ |
text_image
Medical diagram illustrating surgical procedure with labeled components and directional arrows, including a magnified view of the anatomical structure.
natural_image
Illustration of a hand using a power tool to test a component on an automotive infotainment device (no text or symbols visible)natural_image
Line drawing of a hand pressing down on a car dashboard with control knobs (no text or symbols)
text_image
Clicktext_image
REMOVE 484
natural_image
Line drawing of a hand pouring liquid into a bowl on an air conditioner cover (no text or symbols)natural_image
Illustration of a brush applying paint to a square base, labeled '505' (no text or symbols on the diagram itself)
natural_image
Line drawing of a hand pouring liquid into a bowl on an air conditioner fan (no text or symbols)natural_image
Technical line drawing of a mechanical component with arrows indicating direction (no text or symbols)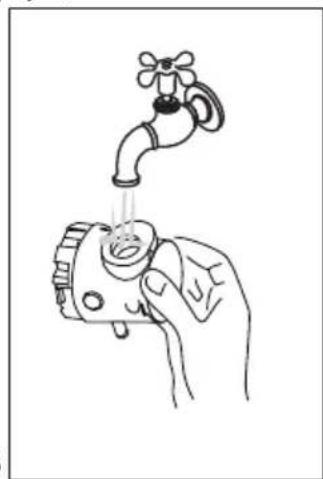
natural_image
Line drawing of a hand holding a faucet with a gear, no text or symbols presentnatural_image
Diagram showing a coffee maker's side view and its internal processing setup, with no visible text or symbols.text_image
Dose level 20text_image
"Dokonalá dávka"text_image
My LatteArtnatural_image
Mechanical setup showing a coffee maker with a lever and control panel, no visible text or symbols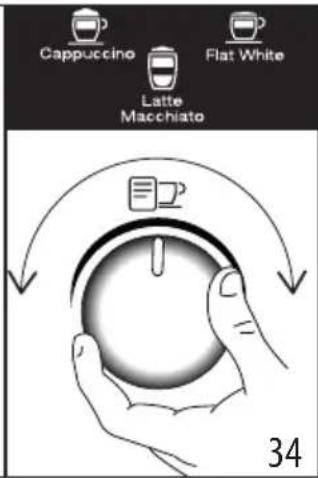
text_image
Cappuccino Flat White Latte Macchiato 34| Nápoj Espresso Mléko Pěna Množství | (ml) | X2 (ml) | |||
| Cappuccino 1 | √ | √ | ≈150 | ≈230 | |
| Latte Macchiato | 1 | √ | × | ≈150 | ≈230 |
| Flat White | 1 | √ | √ | ≈250 | ≈330 |
natural_image
Technical line drawing of a mechanical device with control panel and base block (no text or symbols)
text_image
CLEAN 36 |  |  |  | [2H80] | |
 | × | √ | √ | × | × |
| [KC70] | √ | × | × | √ | √ |
 | × | × × | × | √ | √ |
 | × | × × | × | √ | √ |
 | × | × | √ | √ | × |
| × | × | × | √ | √ |
| √ | √ | × | √ | √ |
| × | √ | × | √ | √ |


text_image
Diagram showing two circular icons with arrows pointing to a target, with a hand holding a pointer and number 39 below.text_image
Diagram illustrating a food safety or health intervention process with labeled icons and directional arrows
natural_image
Line drawing of a hand using a power tool to press or inspect a component on a device (no text or symbols visible)natural_image
Illustration of a hand using a power tool to press or clean a car interior (no text or symbols visible)
text_image
Clicktext_image
REMOVE 4849natural_image
Illustration of a hand using a faucet to lift water from a small valve (no text or symbols)natural_image
Diagram showing a coffee machine with a coffee maker and its side view of its base (no text or symbols present)text_image
Close level 20text_image
My LatteArtnatural_image
Mechanical device with lever and control panel, no visible text or symbols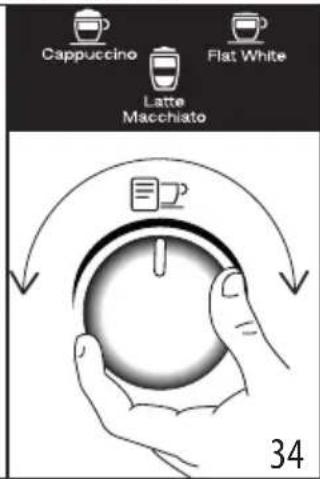
text_image
Cappuccino Flat White Latte Macchiato 34| Nápoj Espresso Mlieko Pena Množ- | stvo (ml) | X2 (ml) | |||
| Cappuccino 1 | √ | √ | ≈150 ≈230 | ||
| Latte Macchiato | 1 | √ | × | ≈150 ≈230 | |
| Flat White | 1 | √ | √ | ≈250 ≈330 | |
text_image
3536 CLEAN| DIS-WASHERSAFE | DEcoMultiClean | ||||
| × | √ | √ | × | × | |
| √ | × | × | √ | √ | |
| × | × | × | √ | √ | |
| × | × | × | √ | √ | |
| × | × | √ | √ | × | |
| × | × | × | √ | √ | |
| √ | √ | × | √ | √ | |
| × | √ | × | √ | √ |
text_image
Diagram illustrating a food safety or health intervention process with labeled icons and directional arrows
natural_image
Line drawing of a hand using a power tool to press or inspect a component on a device (no text or symbols visible)text_image
4647 Clicktext_image
REMOVE 4849natural_image
Diagram showing a coffee machine with a bag being inserted, alongside its interior view (no text or symbols)text_image
Dose level 20text_image
"Idealna dawka"text_image
My LatteArtnatural_image
Line drawing of a coffee maker with a hand operating the cup (no text or symbols)33
text_image
Cappuccino Flat White Latte Macchiato 34| Napój Espresso Mleko Pianka Ilość | (ml) | X2 (ml) | |||
| Cappuccino 1 | √ | √ | ≈150 ≈230 | ||
| Latte Macchiato | 1 | √ | × | ≈150 ≈230 | |
| Flat White | 1 | √ | √ | ≈250 ≈330 | |
natural_image
Line drawing of a mechanical device with control panel and base (no text or symbols)
text_image
CLEAN| DIS-WASHER SAFE | ∅Co Multiclean | ||||
| × | √ | √ | × | × | |
| √ | × | × | √ | √ | |
| × | × | × | √ | √ | |
| × | × | × | √ | √ | |
| × | × | √ | √ | × | |
| × | × | × | √ | √ | |
| √ | √ | × | √ | √ | |
| × | √ | × | √ | √ |
| DIS-WASHER SAFE | ∅Co Multiclean | ||||
| × | √ | √ | × | × | |
| √ | × | × | √ | √ | |
| × | × | × | √ | √ | |
| × | × | × | √ | √ | |
| × | × | √ | √ | × | |
| × | × | × | √ | √ | |
| √ | √ | × | √ | √ | |
| × | √ | × | √ | √ |
text_image
Diagram illustrating a food safety or cooking process with labeled steps and directional arrows, including a magnified view of the container.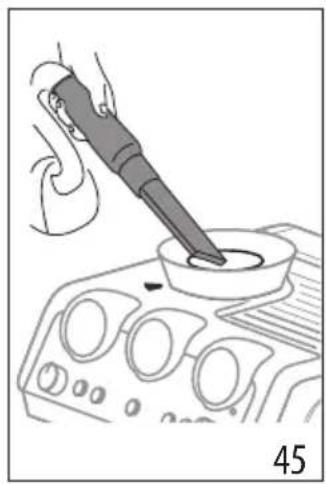
natural_image
Illustration of a hand using a power tool to test a component on an automotive infotainment device (no text or symbols visible)natural_image
Illustration of a hand pressing down on a car dashboard with control knobs and buttons (no text or symbols)
text_image
Clicktext_image
REMOVE 484
natural_image
Line drawing of a hand pouring liquid into a bowl on an air conditioner cover (no text or symbols)natural_image
Illustration of a brush applying paint to a square base, labeled '505' (no text or symbols on the diagram itself)
natural_image
Line drawing of a hand pouring liquid into a bowl on an air conditioner cover (no text or symbols)natural_image
Technical line drawing of a mechanical component with no visible text or symbols
natural_image
Line drawing of a hand holding a faucet with liquid, no text or symbols presentnatural_image
Diagram showing a coffee maker's side view and its internal processing setup, with no visible text or symbols.text_image
Dose level 20text_image
"Doza perfectă"text_image
My LatteArtnatural_image
Line drawing of a coffee maker with a hand operating the cup (no text or symbols)
text_image
Cappuccino Latte Macchiato Flat White 34| Băutură Espresso Lapte Spumă | Cantitate | (ml) | X2 (ml) | ||
| Cappuccino 1 | √ | √ | ≈150 | ≈230 | |
| Latte Macchiato | 1 | √ | × | ≈150 | ≈230 |
| Flat White | 1 | √ | √ | ≈250 | ≈330 |
natural_image
Line drawing of a mechanical device with control panel and base block (no text or symbols)
text_image
CLEAN| DISWASHER SAFE | DO MultClean | ||||
 | × | √ | √ | × | × |
 | √ | × | × | √ | √ |
 | × | × | × | √ | √ |
 | × | × | × | √ | √ |
 | × | × | √ | √ | × |
 | × | × | × | √ | √ |
 | √ | √ | × | √ | √ |
 | × | √ | × | √ | √ |
text_image
Diagram illustrating a food safety or cooking process with labeled steps and directional arrows, including a magnified view of the container.
natural_image
Illustration of a hand using a power tool to test a component on an automotive infotainment device (no text or symbols visible)natural_image
Line drawing of a hand pressing down on a car dashboard with control knobs (no text or symbols)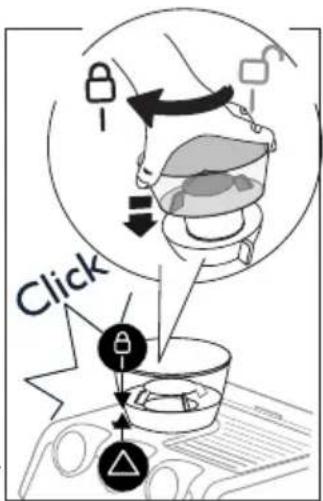
text_image
Clicktext_image
REMOVE 484
natural_image
Line drawing of a hand pouring liquid into a bowl on an air conditioner cover (no text or symbols)natural_image
Illustration of a brush applying paint to a square base, labeled '505' (no text or symbols on the diagram itself)
natural_image
Line drawing of a hand pouring liquid into a bowl on an air vent (no text or symbols)natural_image
Technical line drawing of a mechanical component with no visible text or symbols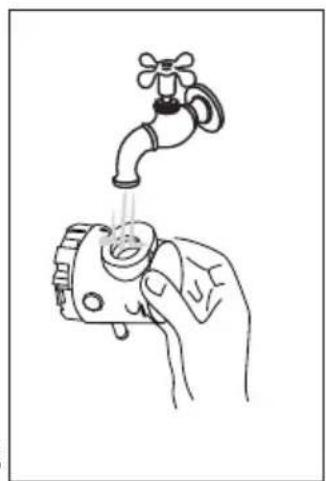
natural_image
Line drawing of a hand holding a faucet with liquid, no text or symbols presentnatural_image
Diagram showing a coffee maker's side view and its internal components, with no visible text or symbols.natural_image
Diagram of a coffee machine with a coffee container and directional arrow (no text or symbols)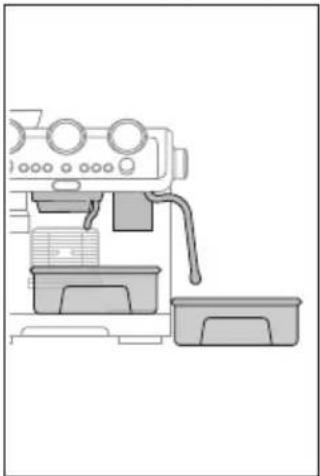
natural_image
Line drawing of a coffee maker machine with control panel and side dish (no text or symbols)natural_image
Hand holding a textured rectangular object with an arrow indicating upward motion (no text or symbols)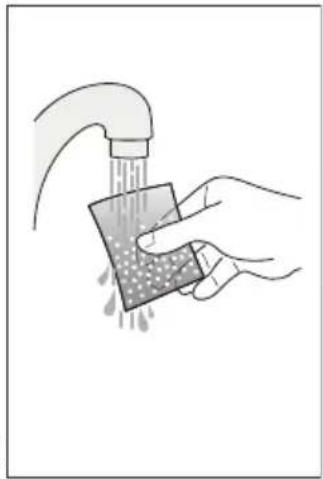
natural_image
Illustration of a hand washing a sponge with liquid, no text or symbols presentSoftballs 2 ..(60) اشّطُف علَبَة 3 ..(61) اغْمَسَ الَكِيْسِ فِي
natural_image
Illustration of a hand placing a small object into a device with a downward arrow (no text or symbols)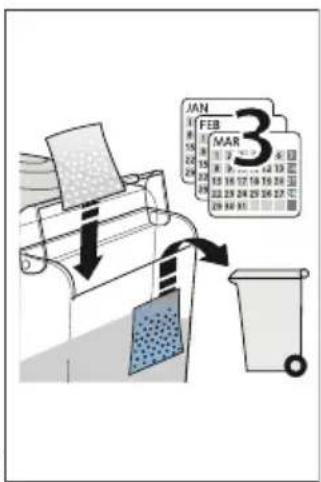
text_image
JAN FEB MAR 34 ..(62)
natural_image
Technical line drawing of a mechanical component with no visible text or symbols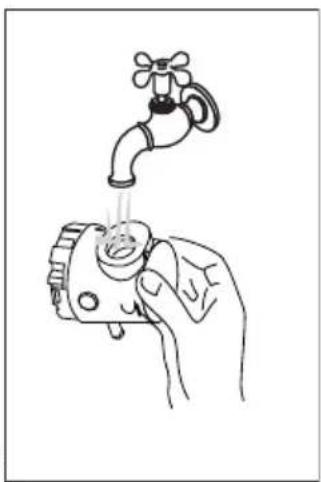
natural_image
Illustration of a hand holding a water tap above a pump, with no text or symbols present.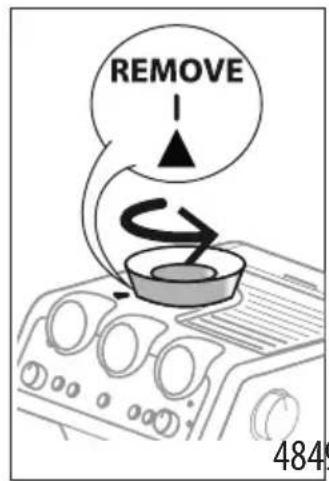
text_image
REMOVE 4849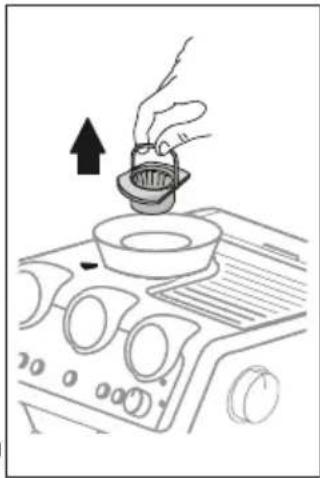
natural_image
Line drawing of a hand pouring liquid into a bowl on an air conditioner cover (no text or symbols)text_image
Diagram illustrating food safety interventions with labeled arrows and a magnified view of the container
natural_image
Line drawing of a hand using a power tool to test a component on a control panel (no text or symbols)3 ..(45 小)
4 استخدم بوة ثمر.
natural_image
Illustration of a brush applying paint to a square base, labeled '505' (no text or symbols on the diagram itself)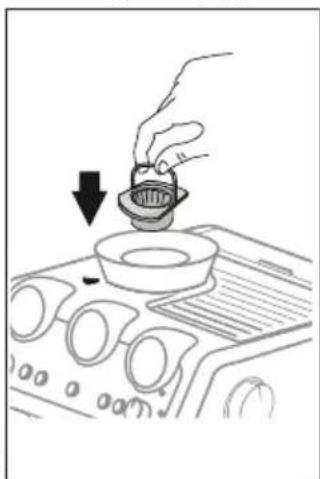
natural_image
Hand placing a small bowl into a fan on an air vent (no text or symbols visible)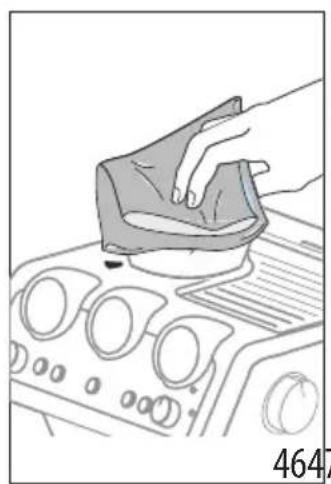
natural_image
Illustration of a hand pressing down on a car dashboard with control knobs and buttons (no text or symbols)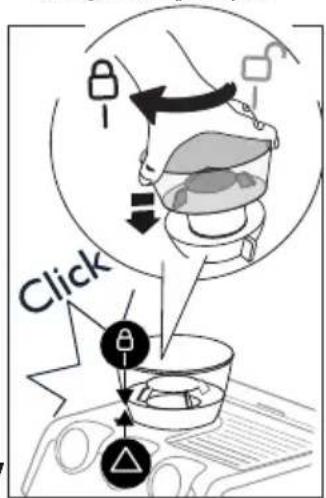
text_image
Click- لحاوية.
6.8 "Smart tamping station" تظيف
text_image
Diagram showing a cooking process with labeled components and a numbered step, likely for cooking or processing.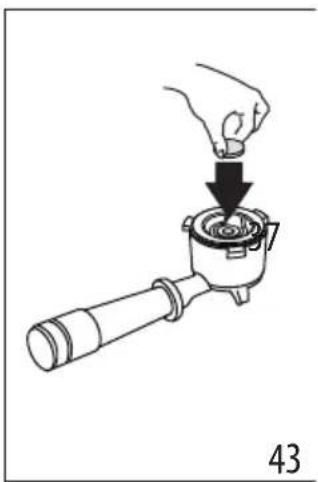
natural_image
Illustration of a hand using a tool to press a component into a pot (no text or symbols present)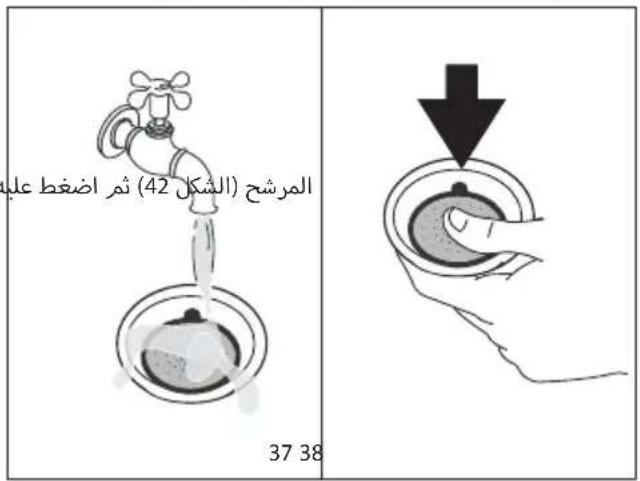
 |  |  |  |  | |
| × | × | √ | √ | × |  |
| √ | √ | × | × | √ |  |
| √ | √ | × | × | × |  |
| √ | √ | × | × | × |  |
| × | √ | √ | × | × |  |
| √ | √ | × | × | × |  |
| √ | √ | × | √ | √ |  |
| √ | √ | × | √ | × |  |
natural_image
Line drawing of a coffee machine with control panel and base (no text or symbols)
text_image
CLEANnatural_image
Diagram of a coffee maker with a hand operating the cup, showing mechanical components and a directional arrow (no text or symbols present)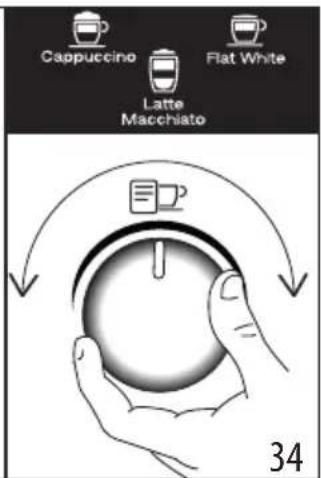
text_image
Cappuccino Latte Macchiato Flat White 34flowchart
graph LR
    A["Step 1: Initial material"] --> B["Step 2: Intermediate"]
    B --> C["Step 3: Final product with wavy arrow"]
    C --> D["Downward arrow"]
لتر 2. سطح
text_image
Register Now www.delonghi.com/registerDe'Longhi Appliances via Seitz, 47 31100 Treviso Italia www.delonghi.com

57132C7914_00_1122