82LM46 - Lawn mower Cramer - Free user manual and instructions
Find the device manual for free 82LM46 Cramer in PDF.
| Product type | Cordless lawn mower |
| Brand | Cramer |
| Model | 82LM46 |
| Cutting width | 46 cm |
| Cutting height | 25 - 80 mm (adjustable) |
| Blade rotation speed | 2800 rpm |
| Motor | 82 V brushless motor |
| Power supply | 82 V lithium-ion battery (not included) |
| Grass bag capacity | 55 L |
| Weight (without battery) | 28.5 kg |
| Self-propelled speed | 0.5 - 1.5 m/s |
| Guaranteed sound power level | 87.82 dB(A) |
| Vibration level | < 2.5 m/s² |
| Main functions | Mowing, mulching, side discharge, self-propelled |
| Cutting height adjustment | Central, 6 positions |
| Safety | Removable safety key, double lock, automatic stop |
| Maintenance | Clean with a dry cloth, no lubrication required |
| Blade replacement | Yes (recommended tightening torque 62.5-71.5 kgf·cm) |
| Compatible batteries | 82V220G, 82V430G, 82V220, 82V430 |
| Compatible chargers | 82C1G, 82C2, 82C6 |
| Operating temperature | -5 °C to 40 °C |
| Storage temperature | -10 °C to 60 °C |
Frequently Asked Questions - 82LM46 Cramer
User questions about 82LM46 Cramer
0 question about this device. Answer the ones you know or ask your own.
Ask a new question about this device
Download the instructions for your Lawn mower in PDF format for free! Find your manual 82LM46 - Cramer and take your electronic device back in hand. On this page are published all the documents necessary for the use of your device. 82LM46 by Cramer.
USER MANUAL 82LM46 Cramer
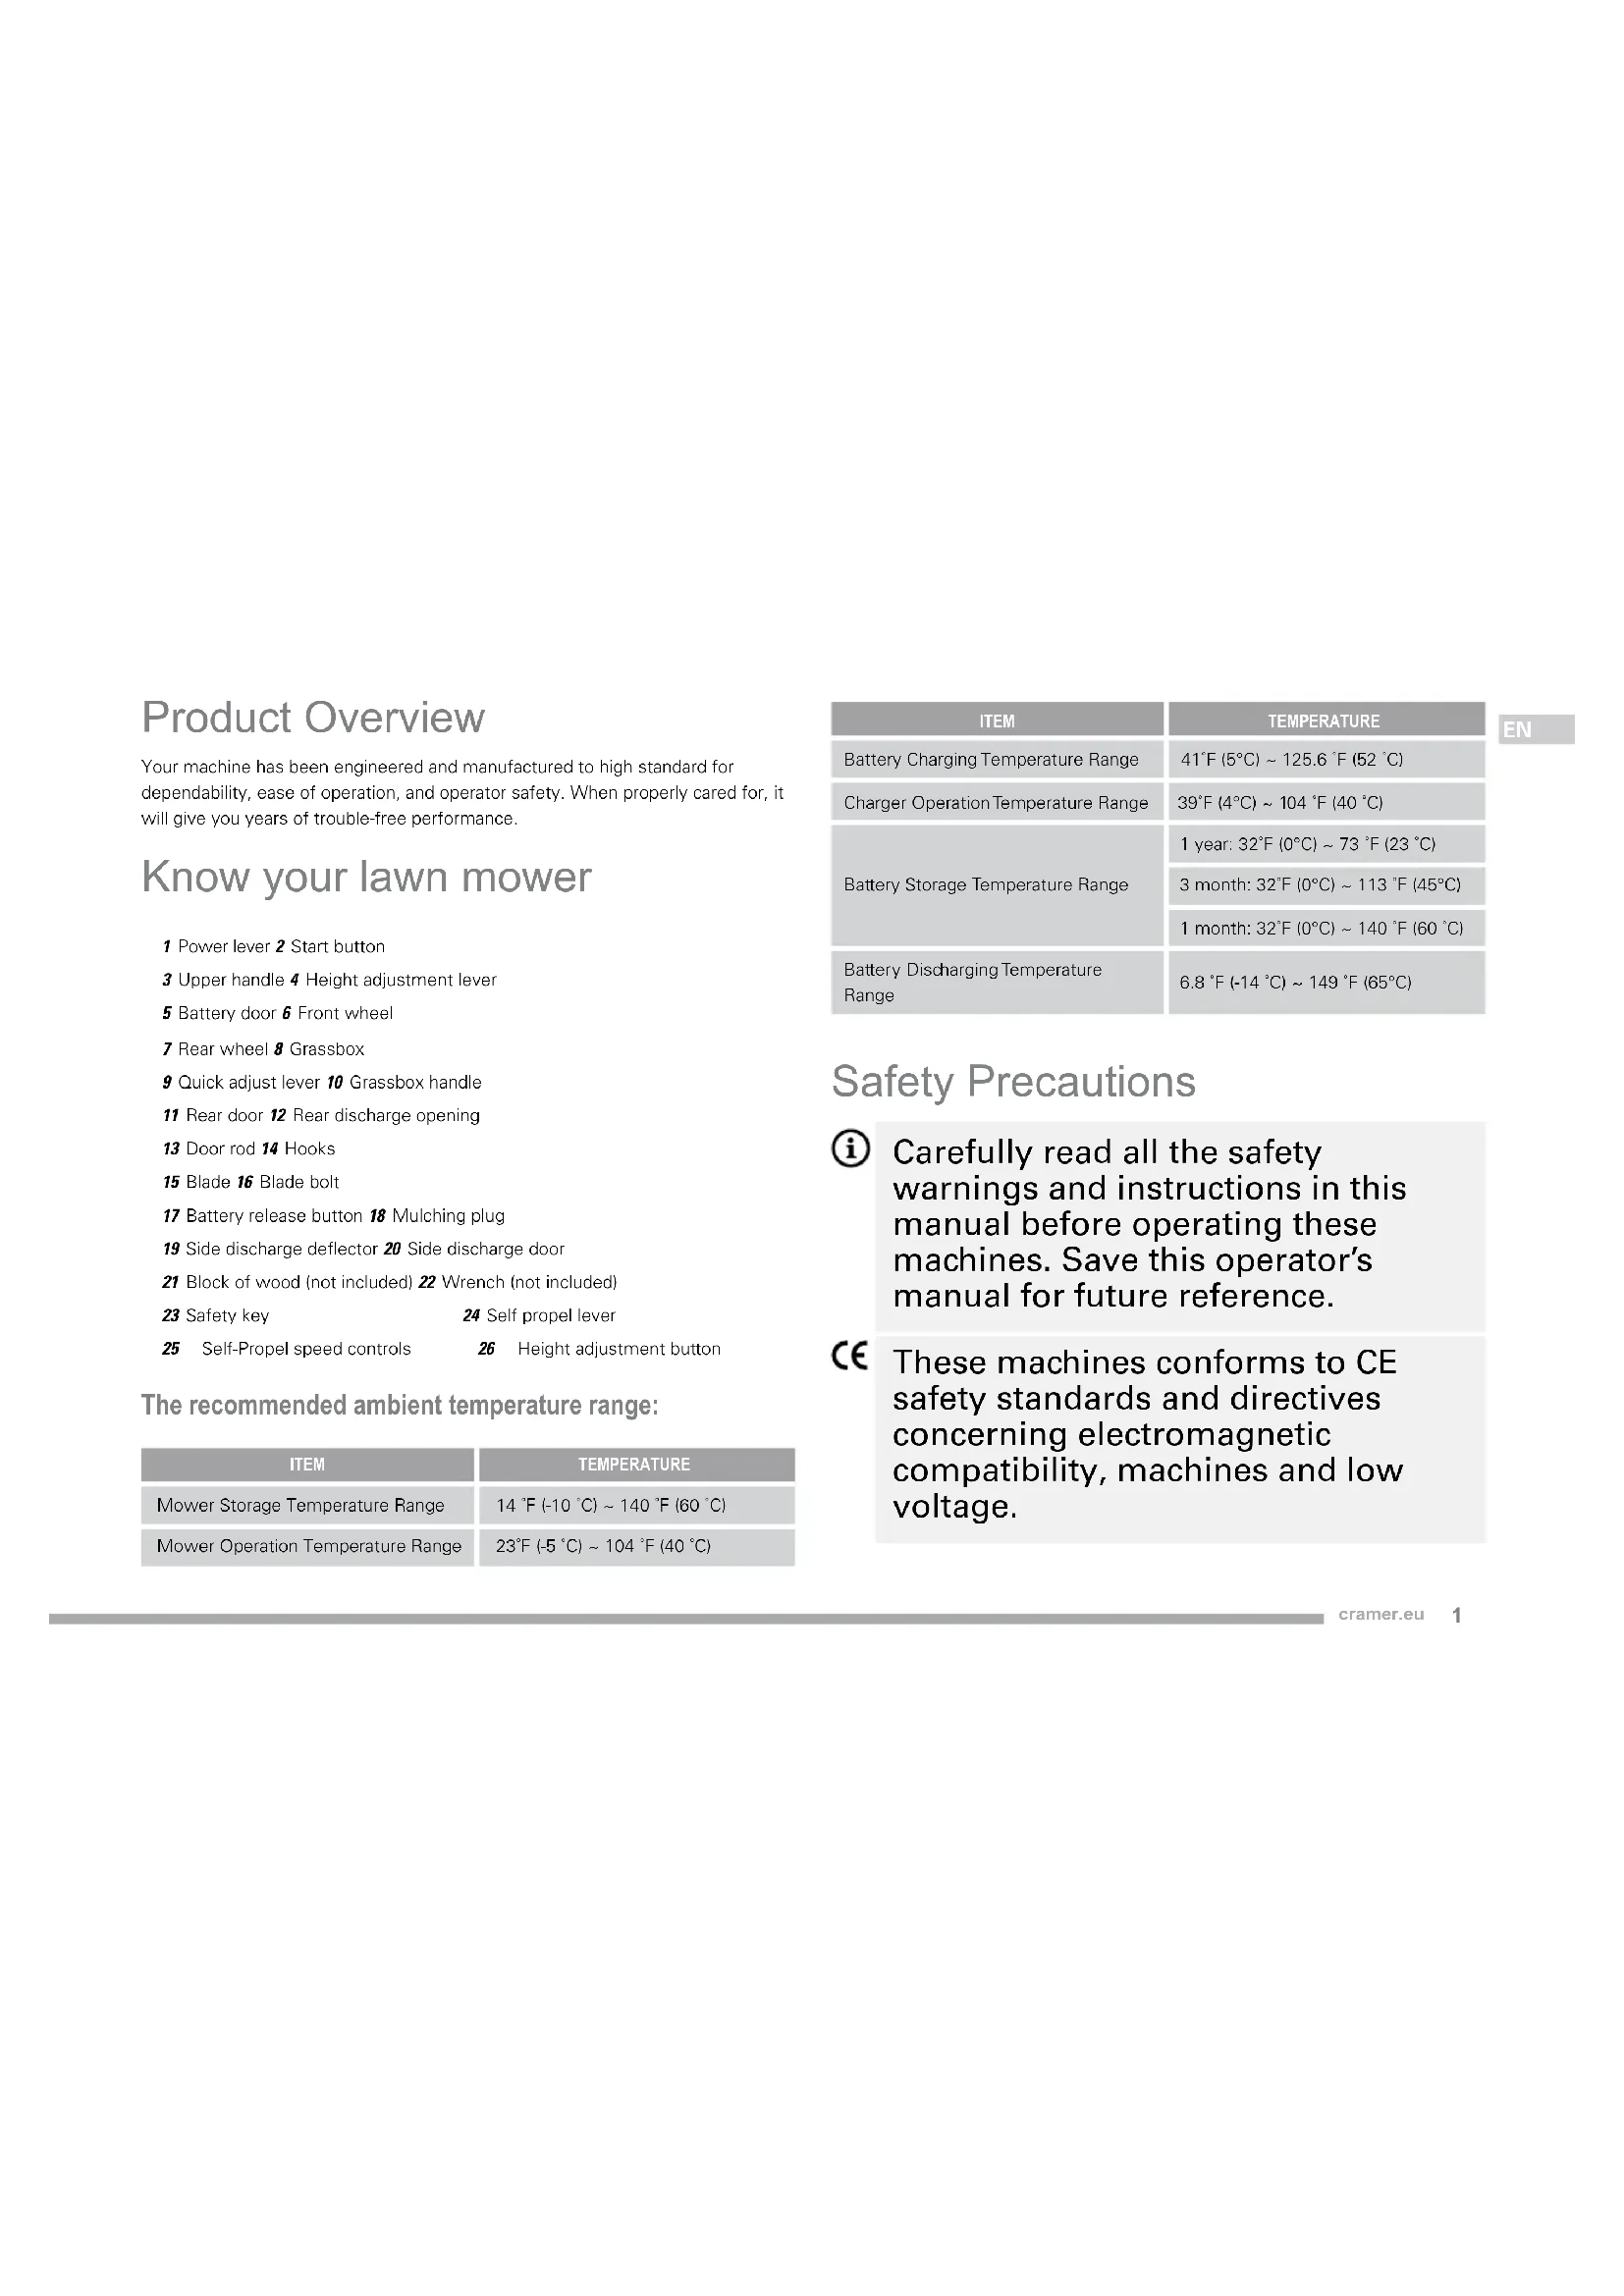
Your machine has been engineered and manufactured to high standard for dependability, ease of operation, and operator safety. When properly cared for, it will give you years of trouble-free performance.
Know your lawn mower
1 Power lever 2 Start button
3 Upper handle 4 Height adjustment lever
5 Battery door 6 Front wheel
7 Rear wheel 8 Grassbox
9 Quick adjust lever 10 Grassbox handle
11 Rear door 12 Rear discharge opening
13 Door rod 14 Hooks
15 Blade 16 Blade bolt
17 Battery release button 18 Mulching plug
19 Side discharge defector 20 Side discharge door
21 Block of wood (not included) 22 Wrench (not included)
23 Safety key
25 Self-Propel speed controls
The recommended ambient temperature range:
| ITEM | TEMPERATURE |
| Mower Storage Temperature Range | 14 °F (-10 °C) ~ 140 °F (60 °C) |
| Mower Operation Temperature Range | 23°F (-5 °C) ~ 104°F (40 °C) |
| ITEM | TEMPERATURE |
| Battery Charging Temperature Range | 41°F (5°C) ~ 125.6°F (52°C) |
| Charger Operation Temperature Range | 39°F (4°C) ~ 104°F (40°C) |
| Battery Storage Temperature Range | 1 year: 32°F (0°C) ~ 73°F (23°C) |
| 3 month: 32°F (0°C) ~ 113°F (45°C) | |
| 1 month: 32°F (0°C) ~ 140°F (60°C) | |
| Battery Discharging Temperature Range | 6.8°F (-14°C) ~ 149°F (65°C) |
Safety Precautions
Carefully read all the safety warnings and instructions in this manual before operating these machines. Save this operator's manual for future reference.
These machines conform to CE safety standards and directives concerning electromagnetic compatibility, machines and low voltage.
Training
- Read the instructions carefully. Be familiar with the controls and the correct use of the machine.
- Never allow children or people unfamiliar with these instructions to use the machine. Local regulations can restrict the age of the operator.
- Never operate the machine while people, especially children, or pets are nearby.
- Keep in mind that the operator or user is responsible for accidents or hazards occurring to other people or their property.
Preparation
While operating the machinel always wear substantial footwear and long trousers. Do not operate the machine when barefoot or wearing open sandals. Avoid wearing clothing that is loose fitting or that has hanging cords or ties.
Thoroughly inspect the area where the
machine is to be used and remove all objects which can be thrown by the machine.
Before using, always visually inspect to see that the blade, blade bolt and the blade assembly are not worn or damaged. Replace worn or damaged components in sets to preserve balance. Replace damaged or unreadable labels.
Operation
- Operate the machine only in daylight or in good artificial light.
- Avoid operating the machine in wet grass.
Always be sure of your footing on slopes. - Walk, never run.
- Mow across the face of slopes, never up and down.
Exercise extreme caution when changing direction on slopes. -
Do not mow excessively steep slopes.
-
Use extreme caution when reversing or pulling the machine towards you.
- Stop the blade(s) if the machine has to be tilted for transportation when crossing surfaces other than grass, and when transporting the machine to and from the area to be used.
- Never operate the machine with defective guards or shields, or without safety devices, for example deflectors and/or grass collector, in place.
- Switch on the motor carefully according to instructions and with feet well away from the blade(s).
- Do not tilt the machine when switching on the motor, except if the machine has to be tilted for starting. In this case, do not tilt it more than absolutely necessary and lift only the part, which is away from the operator.
- Do not start the machine when standing in front of the discharge opening.
- Do not put hands or feet near or
under rotating parts. Keep clear of the discharge opening at all times.
- Do not transport the machine while the power source is running.
- Stop the machine, remove the disabling device and battery pack. Make sure that all moving parts have come to a complete stop
whenever you leave the machine,
- before clearing blockages or unclogging chute,
- before checking, cleaning or working on the machine;
- after striking a foreign object. Inspect the machine for damage and make repairs before restarting and operating the machine;
If the machine starts to vibrate abnormally (check immediately),
- inspect for damage;
- replace or repair any damaged parts;
- check for and tighten any loose parts
Maintenance and Storage
- Keep all nuts, bolts and screws tight to be sure the appliance is in safe working condition.
- Check the grass collector frequently for wear or deterioration.
- On machines with multi blade, take care as rotating one blade can cause other blades to rotate.
- Be careful during adjustment of the machine to prevent entrapment of the fingers between moving blades and fixed parts of the machine.
Always allow the machine to cool down before storing. - When servicing the blades be aware that, even though the power source is switched off, the blades can still be moved.
- Replace worn or damaged parts for safety. Use only genuine replacement parts and accessories.
SAVE THESE INSTRUCTIONS. REFER TO THEM FREQUENTLY AND USE THEM TO INSTRUCT OTHERS WHO MAY USE THIS UNIT. IF YOU LOAN SOMEONE THIS UNIT, LOANTHEM THESE INSTRUCTIONS ALSO.
Disposal

Do not dispose of the power tool with other household waste. Dispose of power tool in return and collection systems designated for environmental safe recycling.

Separate collection of used products and packaging allows materials to be recycled and used again. Re-use of recycled materials helps prevent environmental pollution and reduces the demand for raw materials.

At the end of their useful life, discard batteries with due care for our environment. The battery contains material which is hazardous to you and the environment. It must be removed and disposed of separately at a facility that accepts lithium-ion batteries.
Symbol
| SYMBOL | DESCRIPTION/ EXPLANATION |
| Read operator's manual. | |
| Keep bystanders away. | |
| Beware of sharp blades. Blades continue to rotate after the motor is switched off. Remove safety key before maintenance. |
| Do not operate on inclines greater than 15°. Mow across the face of slopes, never up and down. | |
| Beware of electric shock hazard. | |
| Wait for all components of machine to have completely stopped before touching them. | |
| IPX4 All weather proof |
EN
Before Operation
The safe use of this product requires an understanding of the features on the product and the information in the operator's manual. Before use of this product, familiarize yourself with all operating features and safety rules.
1. Attach the grassbox
The grassbox collects grass clippings and prevents them from being discharged across your lawn as you mow.
2. Adjust the cutting height
The height adjustment button provides cutting height adjustments.
3. Safety key and battery
The battery and safety key must be inserted before the mower can be started.
Make sure the batteries are fully charged.
4. Mulching Plug
Your mower is equipped with a mulching plug that covers the rear discharge opening, which allows the mower blade to cut and recut for finer clippings.
5. Side Discharge Deflector
Use the side discharge deflector on your mower when the grass is too high to mulch or when side discharging is preferred. The grass clippings produced when using the side discharge deflector are noticeably larger than those produced when using the mulching plug and side mulching plate.
6. Side Discharge Door
Your mower is equipped with a door that covers the side discharge opening, which allows the mower blade to cut and recut the grass for finer clippings if the mulching plug is engaged, or otherwise sends the grass clippings to the collection bag.
Assembly

WARNING!
If any parts are damaged or missing do not operate this product until the parts are replaced. Using a product with damaged or missing parts could result in serious personal injury.

WARNING!
Do not attempt to modify this product or create accessories not recommended for use with this product. Any such alteration or modification is misuse and could result in a hazardous condition leading to possible serious personal injury.

WARNING!
Do not insert battery or safety key until assembly is complete and you are ready to mow. Failure to comply could result in accidental starting and possible serious personal injury.

WARNING!
To prevent accidental starting that could cause serious personal injury, always remove the battery pack and safety key from the product when assembling parts.

WARNING!
Never operate the mower without the proper safety devices in place and working. Never operate the mower with damaged safety devices. Operation of this product with damaged or missing parts could result in serious personal injury.
Unfolding and Adjusting Upper Handle (see Figure 2)
1 Press and hold the quick-adjust lever to release the handle from the locked storage position.
2 Move the upper handles to the operating position. You may raise or lower the handle to a position comfortable for you. There are 3 positions for you to choose. Release the quick-adjust levers to lock the upper handle into position.
NOTE: Ensure both sides are set at the same position for proper assembly.
Installing the Grassbox (see Figure 3)
7 Lift the rear discharge door.
2 Lift the grass catcher by its handle and place under the rear discharge door so that the hooks on the grass catcher are seated on the door rod.
3 Release the rear discharge door. When installed correctly, the hooks on the grass catcher will extend through the openings on the rear discharge door.
Installing the Mulching Plug (see Figure 4)
7 Lift and hold up the rear discharge door.
2 Grasp the mulching plug by its handle and insert it at a slight angle, as shown.
3 Push the mulching plug securely into place.
4 Lower the rear discharge door.
Installing Side Discharge Deflector (see Figure 5)
NOTE: When using the side discharge deflector, do not install the grassbox. The mulching plug should remain installed.
7 Lift the side discharge door.
2 Align the hooks on the deflector with the hinge rod on the underside of the door.
3 Lower the deflector until the hooks are secured on the mulch door hinge rod.
4 Release the deflector and side discharge door.
Setting Blade Height (see Figure 6)
When shipped, the wheels on the mower are set to a lowcutting position. Before using the mower for the first time, adjust the cutting position to the height best suited for your lawn. The average lawn should be between 38 mm and 51 mm during cool months and between 51 mm and 70 mm during hot months.
To adjust the blade height
To raise the blade height, press the height adjustment button and lift the mower.
2 To lower the blade height, press the height adjustment button and lower the mower.
Operation

WARNING!
Do not allow familiarity with products to make you careless. Remember that a careless fraction of a second is sufficient to inflict serious injury.

WARNING!
Always wear eye protection. Failure to do so could result in objects being thrown into your eyes resulting in possible serious injury.

WARNING!
Do not use any attachments or accessories not recommended by the manufacturer of this product. The use of attachments or accessories not recommended can result in serious personal injury.

WARNING!
Always inspect mower for missing or damaged parts and blade for damage, uneven, or excessive wear prior to use. Using a product with damaged or missing parts could result in serious personal injury.

WARNING!
For complete charging instructions, refer to the operator's manual for the battery packs and chargers listed in the specifications section.
To Install Battery Pack (see Figure 7)
1 Lift and hold up the battery door.
2 Align the battery with the mower's battery port.
3 Insert the batteries into the two battery compartments to start the mower. This mower is equipped with an automatic switch function which allows the second battery to work when the first battery has run down.
4 Make sure the battery release button snaps in place and that battery is fully seated and secure in the mower before beginning operation.
5 Insert the battery key.
If the machine is not going to be used immediately, do not insert the battery key.
7 Close the door.
To Remove Battery Pack (see Figure 7)
1 Release the power lever to stop the product.
2 Open the battery door to access the battery compartment.
3 Remove the safety key.
4 Press the battery release button on the mower. This will cause the battery to raise out of the tool slightly.
5 Remove battery pack from the product.
Starting/Stopping The Mower (see Figure 8)
1 Press and hold the safety lock-out button.
2 Pull the power lever upward to the handle to start the mower and release the safety lock-out button.
3 To stop the mower, release the power lever.
NOTE: A high-pitched noise and sparking may occur as the electric motor decelerates. This is normal.
Automatic boost function
When the mower encounter high grass the rpm is automatically increased in order to maintain a good cutting and collecting results. When going back to normal cutting conditions the rpm automatically goes back to the standard rpm to save run time.
Self-Propelled Mowing (see Figure 8)
To engage the self-propelled feature:
1 Start the mower.
2 Pull the self propel lever upward to meet the handle.
To disengage the self-propelled feature:
1 Release the self propel lever.
To adjust the speed of self-propelled feature:
1 Pull the variable speed control lever towards the Rabbit Symbol to increase speed.
2 Push the variable speed control lever towards the Turtle Symbol to decrease speed.
Mowing Tips
Make sure the lawn is clear of stones, sticks, wires, and other objects that could damage the lawn mower blades or motor. Do not mow over property stakes or other metal posts. Such objects could be accidentally thrown by the mower in any direction and cause serious personal injury to the operator and others.
For a healthy lawn, always cut off one-third or less of the total length of the grass.
New or thick grass may require a narrower cut or a higher cutting height.
Clean the underside of the mower deck after each use to remove grass clippings, leaves, dirt, and any other accumulated debris.
- When cutting long grass, reduce walking speed to allow for more effective cutting and a proper discharge of the clippings.
NOTE: Always stop mower, allow blades to completely stop, and remove the battery key before cleaning underneath the mower.
Slope Operation

WARNING!
Slopes are a major factor related to slip and fall accidents that can result in severe injury. Operation on slopes requires extra caution. If you feel uneasy on a slope, do not mow it. For your safety, do not attempt to mow slopes greater than 15 degrees.

WARNING!
Please keep self-propelled at low speed when mowing up to a slope.
- Watch for holes, ruts, rocks, hidden objects, or bumps which can cause you to slip or trip. Tall grass can hide obstacles. Remove all objects such as rocks, tree limbs, etc., which could be tripped over or thrown by the blade.
- A slip and fall can cause serious personal injury. If you feel you are losing your balance, release the power lever immediately.
Do not mow near drop-offs, ditches, or embankments; you could lose your footing or balance.
Emptying The Grassbox (see Figure 9)
7 Stop mower, allow blade to completely stop, and remove battery key.
2 Lift the rear door.
3 Lift the grassbox by its handle to remove from mower.
4 Empty grass clippings.
5 Lift the rear door and reinstall the grassbox as described earlier in this manual.
Maintenance

WARNING!
Before performing any maintenance, make sure the mower battery and battery key are removed to avoid accidental starting and possible serious personal injury.

WARNING!
To prevent accidental start-up or unauthorized use, the cordless lawn mower is equipped with a removable safety key. To completely disable the mower, the safety key should be removed and kept in a place away from the mower and out of the reach of children.

WARNING!
When servicing, use only authorised replacement parts. Use of any other parts may create a hazard or cause product damage.

WARNING!
Keep the motor and battery compartments free from grass, leaves or excessive grease. This will help reduce the risk of fire.
General Maintenance
Before each use, inspect the entire product for damaged, missing, or loose parts such as screws, nuts, bolts, caps, etc.
Tighten securely all fasteners and caps and do not operate this product until all missing or damaged parts are replaced. Please call Cramer customer service for assistance. Avoid using solvents when cleaning plastic parts. Most plastics are susceptible to damage from various types of commercial solvents and may be damaged by their use. Use clean cloths to remove dirt, dust, oil, grease, etc.

WARNING!
To reduce the risk of damage and danger, never clean the tool with pressure washer or under running water.

WARNING!
Store indoors only. Always remove the battery from mower and charger when cleaning or storing the tool.

WARNING!
Do not at any time let brake fluids, gasoline, petroleumbased products, penetrating oils, etc., come in contact with plastic parts. Chemicals can damage, weaken, or destroy plastic which may result in serious personal injury.
Periodically check all nuts and bolts for proper tightness to ensure safe operation of the mower.
Wipe the mower clean with a dry cloth occasionally. Do not use water.
Lubrication
All of the bearings in this product are lubricated with a sufficient amount of high grade lubricant for the life of the unit under normal operating conditions. Therefore, no further bearing lubrication is required.

WARNING!
Always protect hands by wearing heavy gloves and/or wrapping the cutting edges of the blade with rags and other material when performing blade maintenance. Contact with the blade could result in serious personal injury.

WARNING!
Do not lubricate any of the wheel components. Lubrication may cause the wheel components to fail during use, which could result in serious personal injury to the operator and/or mower or property damage.
Replacing The Cutting Blade (see Figure 10-11)
NOTE: Only use authorised replacement blades. Replace worn or damaged blades and bolts in sets to preserve balance.
1 Stop the motor and remove the safety key. Allow blade to come to a complete stop.
2 Remove the battery pack.
3 Turn the mower on its side.
4 Wedge a block of wood between the blade and mower deck to prevent the blade from turning.
5 Loosen the blade bolt by turning it counterclockwise (as viewed from bottom of mower) using a 27 mm wrench or socket (not provided).
6 Remove the blade bolt and blade.
7 Place the new blade on the shaft. Ensure blade is properly seated with shaft going through center blade hole and the two blade posts on the fan inserted into their respective holes on the blade. Make sure it is installed with the curved ends pointing up toward the mower deck and not down toward the ground. When seated properly, the blade should be flat against the fan.
Thread the blade bolt on the shaft and finger tighten.
9 Torque the blade bolt down clockwise using a torque wrench (not provided) to ensure the bolt is properly tightened. The recommended torque for the blade bolt is 62.5 71.5 kgfcm (350-400 in.-lb.).
Troubleshooting
| PROBLEM PROBABLE CAUSE SOLUTION | ||
| Handle is not in position. | Carriage bolts are not seated properly. | Adjust the height of the handle and make sure the carriage bolts are seated properly. |
| Mower is not starting. | Battery is low in charge. | Charge the battery. |
| Battery is either inoperable or will not take a charge. | Replace the battery. | |
| The safety key is not inserted. | Insert the safety key. | |
| Mower is cutting grass unevenly. | Lawn is rough or uneven or cutting height not set properly. | Move the wheels to a higher position. All wheels must be placed in the same cutting height for the mower to cut evenly. |
| Mower is not mulching properly. | Wet grass clippings are sticking to the underside of the deck. | Wait until the grass dries before mowing. |
| Mower is hard to push. | High grass, rear of mower housing and blade are dragging in heavy grass, or cutting height too low. | Raise the cutting height. |
| EN | PROBLEM | PROBABLE CAUSE | SOLUTION |
| Mower is not bagging properly. | Cutting height is set too low. | Raise the cutting height. | |
| Wet grass clippings are sticking to the underside of the deck. | Wait until the grass dries before mowing. | ||
| Mower is vibrating at higher speed. | Blade is unbalanced, excessively or unevenly worn. | Replace the blade. | |
| Motor shaft is bent. | Stop the motor, remove isolator key and battery, disconnect the power source, and inspect for damage. Have it repaired by an authorised service center before restarting. | ||
| Motor stops while cutting. | Cutting height is set too low. | Raise the cutting height. | |
| Battery has no power. | Charge the battery. |
Technical Data (82LM46S)
| PROPERTY VALUE | |
| Type Cordless, battery-operated | |
| Voltage 82V | |
| Width of cut 46 cm | |
| Height of cut 25 mm - 80 mm | |
| No-load speed 2800 rpm | |
| Self propelled speed 0.5-1.5 m/s | |
| Grassbox capacity 55 L | |
| Weight (Without Battery) 31.9 kg | |
| Battery Pack 82V220G/82V430G/82V220/82V430 | |
| Charger 82C1G/82C2/82C6 | |
| Sound pressure level 65.75 dB(A), K | pA: 2.10 dB(A) |
| Measured sound power level L | \(w_{\text{A}} = 85.72 \mathrm{~dB(A)}\) |
| Guaranteed sound power level | \(L_{\text{W}} = 87.82 \mathrm{~dB(A)}\) |
| Vibration level | < 2.5 m/s² |
- If the fault is not solved, you must go to your distributor and/or nearest Authorized Technical Service.
Technical Data (82LM51S)
| PROPERTY VALUE | |
| Type Cordless, battery-operated | |
| Voltage 82V | |
| Width of cut 51 cm | |
| Height of cut 25 mm - 80 mm | |
| No-load speed 2800 rpm | |
| Self propelled speed 0.5-1.5 m/s | |
| Grassbox capacity 60 L | |
| Weight (Without Battery) 34.2 kg | |
| Battery Pack 82V220G/82V430G/82V220/82V430 | |
| Charger 82C1G/82C2/82C6 | |
| Sound pressure level 68.19 dB(A), K | PA: 1.77 dB(A) |
| Measured sound power level L | \(L_{\text{WA}}=\) 88.19 dB(A) |
| Guaranteed sound power level | \(L_{\text{W}}=\) 89.96 dB(A) |
| Vibration level | < 2.5 m/s² |
Technical Data (82LM46)
| PROPERTY VALUE | |
| Type Cordless, battery-operated | |
| Voltage 82V | |
| Width of cut 46 cm | |
| Height of cut 25 mm - 80 mm | |
| No-load speed 2800 rpm | |
| Grassbox capacity 55 L | |
| Weight (Without Battery) 28.5 kg | |
| Battery Pack 82V220G/82V430G/82V220/82V430 | |
| Charger 82C1G/82C2/82C6 | |
| Sound pressure level 65.72 dB(A), K | pA: 2.10 dB(A) |
| Measured sound power level L | wA= 85.72 dB(A) |
| Guaranteed sound power level | LwA= 87.82 dB(A) |
| Vibration level | < 2.5 m/s² |
CE Declaration of Conformity
Manufacturer Name: Changzhou Globe Co., Ltd.
Address: No.65 Xinggang Road Zhonglou Zone Changzhou, Jiangsu 213000 P.R.China
Name and address of the person authorised to compile the technical file
Name: Peter Soderstrom
Address: Propellergatan 1, 211 15 Malmö, Sweden
WE HEREBY DECLARE UNDER OUR OWN RESPONSIBILITY THE MACHINE
Original Instruction
Type Cordless mower
Brand Cramer
Model 82LM46S/82LM51S/82LM46
Serial No See product rating label
Has been manufactured in accordance with the standards or regulatory documents:
European harmonised standards
EN 60335-1; EN60335-2-77; EN 62233, EN ISO 3744; EN 55014-1; EN 55014-2; ISO 11094
And conforms to the essential requirements of the following directives:
Machine Directive 2006/42/CE
EMC Directive 2014/30/EU
Noise Emission Directive 2000/14/EC amended by 2005/88/ EC)
Ted qu
Ted Qu Haichao
Quality Director
Changzhou, 22/07/2017
Produktüberblick
Indirizzo: No.65 Xinggang Road Zhonglou Zone Changzhou, Jiangsu
213000 P.R.China
Endereço: No.65 Xinggang Road Zhonglou Zone Changzhou, Jiangsu 213000 P.R.China
- MeB BVNDy, yTO ONepaTOp Nn INoJIb3OBaTeJIb OTBeTCTBeHHbl 3aHeCuaCTHbIe CnyuAn Nn ONaCHOCTN, BCTpeauOuNeecr DpyrIM JIOdAm Nn INXco6CTBEHHOCtN.
Iodrotobka
RU
Bo Bpem3KcIpyataun yctpoiCTBa BCErda Hocnte CneuNbHyIO oByBn DnHHbIe 6pIKN. 3aIpeuaetcR 3KcIpyatnpoBaTb yctpoiCTBO 6e3 yCTAHOBJIeHHbIX 3aUNTHbIX yCTPOICTB INn pa6OtaTB B OTKpbITbIX caHdajx. He Hocnte CnIshKom Cbo6oNDhyo ODeJy INn TaKyIO ODeJy, B KOTOpOI eCTb CBnCAHOUne UHypKn INN 3aBra3Kn.
BHNMaTeIbHo OCMOTpnte MeCTO, Ie 6yJeT NcNoJIb3OBaTbcra YcTPOiCTBO, n y6epnte npedMeTbI, KOtOpble MOryt BblneTeTb N3-NOd YcTPOiCTBa.
- Papepa60toBceRda npOBepaTe HnCTpyMeHT HaHaHnUHe n3HOca nn
noBpeKdHn peKyUeO Je3BnA,
6oJTOB dIa erO KpeJIeHn IOnOTHa
n peKyUeO y3na. 3aMeHnte
N3HOWeHHbIe NII IOBpeKdEHHbIe
DeTaIi DnI OBeCneHn ONTmAlbHOJ
PON3BODHTeJIbHOCTN. 3aMeHnte
IOBpeKdEHHbIe NII HeuNTaEMbIe
3TNKeTKI.
3Kcnpnyatauia
- PpOu3BOAnTe CtpnKky ToJIbKO dHem nn npx OpoWeM NCKyCCTBeHHOM OCBeUeHnn.
He ckaunBaTc cbipyTO TpaBy.
Bcerda cIeIte 3a TeM, yTO6bl Bbl yCTOuHBO CToJIN Ha CKIOHe. - PeredBnraItec b Iarom, He 6eraIte.
HeKocntb nonepek HaKJHOHOB, HNKOrda BBepx IV BHN3.
OcyuEcTBnayTb Upe3BbUaHoe npedeocTe-peXeHne pni N3MeHeHn
HanpaBneHna HaHaKnHOHaX.
He ckaunBaIte Ha KpytbIX CKNoHaX.
Будte npedeIbHo octopoKhbl npi DBnHexHn Ha3aI nIIN npn NOdTnBaHn yCTpoNCTBa K ce6e.
OcTaHOBnTepeKyUeJeIe3BVe, ecn Heo6xOdImoHaKJOnHt b ycTpoiCTBOДЯero TpaHCnOpTnPOBKn, npnpepeceHnn yuactkoB 6e3 TpaBraHOro NOKpbITnA TaKKe npn TpaHCnOpTnPOBKe yCTpoiCTBa Ha MeCTO cTpJkN n O6paTHo.
HnKOrda He noIb3yInTecb ycTePOINCTBOM C NOBpeXdEHHbIMN 3aUHTHBIMN npncno6beHnA Mm Nn UNTkAmn Nn 6e3 3aUHTbIX yCTPOINCTB, HApPImep, 6e3 OtpaxKaTeNe n/nn KOnTeHepOB dJa TpaBbl.
Co6IIOaOCTOpOXHocTb,3aNyCTnTe BnraTeJIbBCOTBcTcTBnC INHCTpyKUmaN NdePKeTe HOrn Ha
IOCTaTOUHOM paCCTOAHN OT Je3BnA (JIe3Bn).
He haknohnye yctpoicTBo npn BkIIOUeHnn DBNrAteTna 3a NCKJIIOUeHneM clyuaeb, KOrda yctpoiCTBO Tpe6yeTcra HAKHOHNb IIN 3aNyCKa B COOTBeTCTBnC pyKOBOdCTBOM IO 3KCIpyaTcuIN. B 3Tom clyuae He haknohnye yctpoiCTBO CINbHee, Yem Heo6xOIMo, IN POnHMaTe erO B CTOpOHy OT onepaTopa.
HnKOrda He cToIe nepeB bIXoOm n3 pa3rpy3oUHoro JeNo6a nepeD 3aNyckom ycTpoiCTBa.
He depxnte pykn nHn HOrn B6n3n BpaaioxxCa deTaneN nNn noD hmm. Bcerda depxnte BbIXoN n3 pa3rpy30uHoro JeNo6a YnCTbIM.
He nepeBO3nTe yCTpOInCTBO npnpab6oTaIOUcEM DBrGaTeNe.
OctaHOBNTe yCTPOINCTBO, CHIMNTE
6JIOKINPOBOUHoe yCTpOInCTBO n 6aTapeIO. Y6eIITecb, YTO BCE DBNKUINCeRA cactNI NOJIHOCTbIO OCTAHOBUNICb:
-KoTdaOCTaBnReTe yCtpoNcTBO
- npeq ydaJIeHHeM 3acopa nnu nuctkoJKeJIo6a;
-перд поверков, очирй Или
экплуатуше устороства
- nocne ydapa o noctopOHnI npeDMet. Ocmotpnte yCTpoiCTBO Ha hAnuHne NOBpeJdeHn I OTpeMOHTnpyTe nepeI NOBtOpHbIM 3aNyCKOM I 3KcPnyataCneYCTPOIcTba;
- Ecni yctpoiCTBO haunHaet Heo6bIuHO Bn6pnpOBAtB (npOBepbTe HEmeJNeHHO)
-OCMOTpTe Ha npedMeT NOBpeKdEHN;
-3aMeHInTe NJIOn OTpeMOHTnpuYTe NOBpeKdEHHbIe DeTaJI;
- npOBepbTe 3aTJkKy KpeNexHbIX DeTanei. NoTaNHTe ocna6JeHHbIe DeTANI, ecNI TaKOBblE HaNDyTCra.
TexobcnyxmbaHne H xpaHeHne
Bce raKn, 6oNTbI IN BnHTbI DOJXHbI 6bITb 3aTAYtbl, YTO6bl yCTPOINCTBO HaxOAnIOscB B 6e3ONaChOM pa6Ooyem COCTOHN.
-Держать МexанизВхоршем paбочem coctoryн.
- O6cnyxNBa yCTpoNCTBO C HeCKoJIbKIMN JIe3BnA M, 6yDbTe OCTopoXHbl, TaK KaK BpaUeHne OndHOr Oe3BnMoKeT Bbl3BaTb BpaUeHne Dpynx Je3Bn.
Будъte octopoхнь BO Времpeгулрови устpo-ИCTBA,чTOбы HeДОпунть 3aшемпеня пальцевМждУ DBИГАЮШМССЯЛeЗВИМИ ИНЕОДВИЖHBIMЧаCTМИ ySTPOICTBA.
-ДаTe yctpoiCTBy octbITb nepeI NOCTaHOBKOHa XpaHeHne.
- Пи обслужиBaHи ЛeЗВЯ ИмeітЕВ ВИДу,ЧTO Дже ecNi пNTаHи
BbIKIIOUeHO,JIe3BnB BCE eIe MOryT DBNrTaTbcra.
B ceJax 6e3oNaCHOCTn 3aMeHInTe n3HOweHHbIe INI NOBpeXdeHHbIe DeTaN. IcNoJIb3yIte TOJIbKO opINHaJIbHbIe 3aNaChbIe qactN aKCEccCyapbl.
COXPAHNTE DAHHbIE INHCTPYKcIN. PEYJIaRPHO O6PauAaTEcB K HIM N IcIIOJb3yIte INX, YTObbl OBUATb IPyTHX JInC, KOTOPbIE MOyT IcIIOJb3OBATb 3TO YCTPOIcTBO. ECII Bbl DA E T E 3TOUYCTPOIcTBODpyROMy IOJIb3OBATEJIIO, IPEINOCTABbTE EMY 3TN INHCTPYKcIN.
YTNIN3aun

Otpa6oTaHHbIe 3neKTPoINHCTpyMeHTbI He DoJIxHbI yTnJIn3NpOBaTbcra BMeCTe CdpyIMN 6bITOBbIMN OTXoJaMn. OTnpaBnIte nHa BTOpUHyo nepepa60Ky,rde 3TO BO3MOxHO. pOKOHcyJbTnpyITeCb C MeCTHbIMn opraHAMn BnaCTn INn BaAMm npOdaBcOM NO BONPOCY TnJIn3aCIN.

Pa3dJIbHbI c6Op OTPa6OtaHHbIX
n3dJIIM n NCNoJIb30 BaHHbIX
yNAKOBOUHbIX MaTePnaJIOB NO3BOJAEt
HX nepepa6aTbIBaTb N NOBTOpHO
NCNoJIb3OBaTb. IcNoJIb3OBaHHe
nepepa6oTaHHbIX MaTePnaJIOB
NOMORAET PpeDOTBpaTHTb
3aRpy3HeHne OKpykaIOUe CpeDbI N
CHNXaET CNPOC Ha cbIpbe.

B KOHcspoka cnyk6bl 6bapeyTIN3npyTe INx C NaJIeXaIe3a6To0Ib OKpykaIOUeI cpeIe. Batape CoepKNT BeIecTBA, KOTOpBIE YBnIOTcR ONaChbIMN DJIa Bac N OKpykaIOUeI cpeIb.IE cIeJyET CHrTB N OTnpaBnTb IJIa yTIN3aCmN B NYHKTI pInema OTpa6OtaHHbIX JNTNIHOHHbIX 6batape.
CnMBOJ
1OTnyCTNEpbiarynpabneHnCTaTePOM,TObO OCTaHOBTb yCTPOCTBO.
2 OTKpoTe DBepu 6aTapeHoro OTcKa, TTo6bl NOnyUHTb DocTyN K 6aTapeHOMy OTcKy.
3 N3BNEKNTpeDoxpaHHTeBbHKnIOU.
4 Haxmnte KhoNky fncatopa 6atape Ha raoHokocnke.3To npBedeT K TOMy,TO 6atape 6ydt CnEka BbCTynaTb NcYcTpoCTBA.
5 CHMMTE AKKMyTnTOpHy 6TaTapeO C yCTpoNCTBA.
CTapT/OctaHOBka KocnIKN (CM.pnc 8)
1 HaKMnTe n ydpexmbaTe KhoNkY 6JIOKpOBKn.
2 NotaHnTe pIyar ynpabHeHn DnBraTeIe BBepx Kpyke, YTObbl 3anyCTntb ra3OHOKoCNIky n OTNcyTne KONkY 6NOKuPOBKn.
3 To6bO octaHOOBnTb raoHOKoCNky,OTnycTnepeBHyar npnaBHeHnA.
PIMMEYAHVE.Bo epem mopmoeHua 3neKmpueeckoo 0eaamena Moym eo3HuKhymb bIcOKOyacmHbMyu uckpeHue.3mo HOpMaNo.
Функця abTomatnueckoro yckopeneria
Korda ha nytn ra3oHOKOcINKn nonadaeTcB blicokar TpaBa, o6oPoTB dbrfateNn ABOTMATueckn NOBbuaOTc, YTObbl coxpanaTb BbcIcKOy 3ΦΦKeTbHOCTb CKsWBAHn i c6p0a obpe3KOB. Korda ycNoBnCKaWBAHn BBOB ctaHOBJrTC HOPMAJIbHbIMn, o6oPoTB dBrATeNn ABOTMATueckn BO3BPAUHaOTc K CTaHdapTHOMy 3NaHeHIO DnIe 3KOHOMm pecypcoBra3oHOKOcINKn.
CkaunBaHne npncamoxoHOM dBnXeHN (CM.pnc 8)
BkHIOueHne camoxoHoro DBNXeHn:
1 3anyCTnTe raoHOKocNJky.
2 NotaHTe pIyar cAmoxOHOrO DnHexHnBBePx KpyKe.
BbIKIOueHHe caMOxOHOrO BoNXeHHa:
1 OTnyctnTe pbHar caMOxOHDHO DBNKeHna.
PeynipoBkA cKOpocTH caMOxOHDoro DBIXeHn:
1 NotaHTe pUar peryIIMPOBKN ckOpCTM B cTOpOHy 3HaKa C H06paKeHHeM KpOJIka, YTObIyYBEJIInHTb CKOpOCTb.
2 TonKHTe pIur par perynipOBKn CKOPoCTN B cTOpOhy 3aKa C H06paKeHempepeaxn, YTObI yMeHbWITb CKOPoCTb.
CkocBepxuyek
Y6eNTecb, Yto Ha ra3oHe HET KaMHe, nAnok, npOBONKn I dpynx npEmTeob, KOtOpBe MoNn 5bl npNBecTN K NOBpeXdHIO pExyUnx ne3Bnra3OHOKcUNKn INn DBnraTeJI. He npO3BODnte CTpNKkY OKono pa3DeIInTeBbIX CTOn6B 3emNeBlaAedHn IN dpynx MeTaNIIuecknx cToek. TaKeObEkbT MOrT 6bl T CnyaHNO BpoWeHb KocNIKO B NIObOM HapabLeHHn IN pPrnHHb T cepBe3Hb NepcoHaIbHb yuep6 onepaTopy IN dpyrHM.
-Дя полученя кpacивогу ra3oHa cpe3aKOT OndHy TpeTb OT OblcToBtpabbln MeHbIe.
Дястпжкс CBexeи rtyoT pabMoKet Notpe60BaTcBуMeHbWeHne WmPnHbI yBeJIuHHe BbcOTb CTpMxKn.
-CHNTb HnKHHO CTOpHy nany6bl KocuKn NoCne KaKdOro
NcNoIb3OBaHnry, YTO6bl ydaHt TpaBy OTCeueHnry, NcCTb, rpa3b, n IIO6bIe
DpyTHe HAKONNEHHBe pa3BaHnHbI.
- PnCOKpaUeHN nnHHoT PaBb, yMeHbWHTb CkOpocTb, YTObIyueCTb 60nee 396KTeKNBHeO cOKpaUeHne HnHaNKeJauSyio pa3rpy3ky OTCeHHe.
PIMMEUHNE.Obaamelbno ocmaHOBume a30HOKocunky,doxumecb nonho ocmaHOeKu ne38u u u3neKume npedoxpAHmEhbl KnOy nepo YucMKou HuxHeu cAcMu a30HOKocunku.
HaKNoHHoe DeIeCTBne

OCTOPOXHO!
HaKNoHbI -rnaBbHbI pKaTOp, npNbOaJnK npomaxm n naeHHIO, KOtOpBE MOrY KOuTaBcR cepBe3HbIM yuepe6oM. DeiCTBHe Ha KaHNoX Tpe6yET DonOnHnTeNbHoro npedocTepeXeHN. EcnB BbYbCTByTeCe6b HeNoBko Ha KaNoHc, He KocITE. JnBaWe bE0anacHOtN, He NItaTecb KocNTb HauNoHbI BoJIbWee Yem 15 rpaDycOB.

OCTOPOXHOI
Korda ckaunBaHne BbInoJHReTc npCaMOxOHDom DnBHXeHH BBepx no CkNoHy, ckOpocTb DnBXeHHdoJNIXHa 6bItb Hn3KoI.
OcmotpebHa haHnWne OTBepCTmKoJe, KaMHe, CkpbTbIX oBekTOB, HnN yIapOB,KOTOpBe MOrY 3aCTABnITb Bac CKoJIb3ITb HnN cnoTbKaTbC. Bbcokar TpaBa moKeTCKpBaTb npenrTcBnR.YaJInTb BCE oBekTb Tnna KAMHe, BetBe NdepeBa, n T.D., KOtOpB MOrY 6bITb 3axBaueHb, 3aKOHHeHb INN 6poWeHb Ie3BnEM.
- Ppomax n naeHne Moryt npuHnHb Cepbe3hbl nepcoHaHbH yuepe6. EcnBbl yUvCTByeTe, YTO TepReTe paBHOBecne, cpa3y Jx OTNyCTnTe pbuH ar ynpabHeHH CTapTepOM.
HeKocntbOKoIbBbOHH,KaHAB,IIINHaBepeKhbIX;BbMOKeTe TepTb Bawy onopy nn6anaHC.
OnopokHeHne KOHTeHepa Ira TpaBbl (Cm. pnc 9)
1 OctaHOBnTe raoHOKocNky,doxndTeCb nonHO octAHOBKn ne3BnI n3BNEKNTe hONMPyOuI KJIOU.
2IoHIMMTE3aHIOIbepuy.
3 POnHmmtKe KOHTeHepIa TpaBb 3a pyky N BbHbTe N3 Ra3OHOKOJIKN.
4OnyctOuImtBOTceHnTpaBbI.
5 POnHHMMTe 3aHIO IO DBePcU y cTaHOBnTe KOHTeHep TpaBbHa
MeTo, KaK bIIO OINCAHO paHee B daHHom pyKOBoDCTBe.
TexHnueckoe o6cIyJxNbAHne

OCTOPOXHOI
Ipeed npoBeHeHem TexHnueckoro 06cnyKbAHHy y6eHntEcB, cyto 6batape ra3oHOKocnKnN n npedeoxpaHTelbHbN klnou H3BneHb BO n36ExaHHe cNyauHOro 3aunycKa n cepbe3HbIX TpaBM.

OCTOPOXHO!
Ipea kaxdbim nCIOB3OBAHnEM npOBepbTe INCHPTyMeHT Ha OTCYCTBne NOBPexdHH, Heoctaouux HnN ocnaBux DeTaei (BNHTb, raKn, BoNTb,
KpbIJIJKN T.N.
Haedekho 3aTAHHTe BCE KpennnHn N KpbIuNn Hne NpIb3yItecb HcTpyMeHToD 3aMehb BCex YtepaHHbIX INN NOpeXdeHHbIX DeTaeN. 3a KOHCytBaueH 6oPaauTecB C lyK6y pa 60bI KIne HTacMN KOMPAHN Cramer. PnO uChTeKnNACTMACCOBX DEtaneH He DOnyCKAETCn IONOB3OBAbPACTBOHPTEIN.5oJIbUHNCTBO nIACTMACC BOCnpnIMnHBO, YoTObI NOBpeNDTCBc OT pAnmHbIX TNOB KOMMEpCeKnx PAcTBOPHTeNe m MoKeT 6bIT NoBPExDeHO INNCNOLIB3OBAHnEM. Jn OCHNTKn OT rP3N, PbNl, MaClA, CMA3KN nT.n.1CN0Jb3yIte npOTPOCHHy TpRnky.

OCTOPOXHO!
TObI CHN3nBt PNCK NOBPEXeHn I BO3HNIKHOBeHn OAnCHOH nTuaynI, HNKoTaI He OuHsAte YeCTpoHCTBO BODOn NoD DAJIeHNEM INI NIO pNOTOUHO BODOI.

OCTOPOXHO!
XpaHnTb TOnbko B Nomeuehenu. Bcerda H3BnekaTe aKKyMnyIaTOp n3ra3OHOKoCNKn 3apJdHOrO yCTpOeCTBa nepeD ouNcTKoN XpaHeHMe HnCtpyMeHaTa.

OCTOPOXHOI
He DonnyckaTe B3aHmOeJeCTBnR TopM03hBx XnKoCteTbe,BeH3nHa,HeFtnpoDyKToB,IpOnNtOuHbIX Macen I T.I.C nactMaccoBbIMn DeTaJIaMn. XmMkaTb MOrYt NobpeIITb, OcnaBbTN HnPazPyWbT PNaCTMaCCy, YTO MoXeT npNBecTNI TAKKM TeNeChbIM NoBpeXDeHnM.
PepnoDnueckn npoBepaB BCE 60ntbI n3adBnKKn dna HndnEkaeepnnoTHocTN, T06bI rapaHTnpoBaTb 6e3onacHoe deNCTBNE KOCNIK.
BbTnpaTbkocnky,ncToI n cyxOy TkaHbIO HOrda.He NcNoIb3oBaTb B0dy.
Cma3bibaHne
BceOTHOeHnB 3TOM n3dENIN - CMA3aHbC DocTaOHTbIM KOnIyEcTBOM CMA3KN BbICWero KaeeCTBa DnJ KN3HN EHNHcBIO ND HopMaJIbHbIMN 3KcIIpyaTuONHHbIMN
peKIMAMM. NTo3ToMy, HnKaKaJaIbHeHsAa CMa3Ka OTHoWeHn, He Tpe6yTeTc.

OCTOPOXHO!
Bcdera 3aunntb pykn, HadeBaT TaKBe IepaTk n-lln o6eptbIaBne3BnT PAnkAm npyum MaTePnAmOn pnp BblONHeHnOcbLyXnBaHnne3BnB. B pezyltate KOHTAKTa c pekyuHm ne3Bnem MoKHO nonyUHT cepE3Hy ToPbMy.

OCTOPOXHOI
Hcma3bIbTaBnHKAKOIN3KOMNOHETOB KONECA.CMa3KaMOXET pNBECTN K C600 BpaOte KOMNOHETOB KOJECA BO BPEM CTPNKNN, YTO MOKET pNBECTN K cepE3HO TpABMe ONepATOPa n/nn NOBpeXdEHNO Ra3OHOKOcIKNn nn DpyTOro NMyUeCTBa.
3aMeHa cokpaauoJero ne3Bn (Cm. pnc 10-11)
IINPMEUHHE: IcnoIb3yume monIko pa3peuHnble 3anaChble pexyuue ne38u. 3aMeHume u3HoWeHnble unu nopeXeHnble pexyuue ne38u u 6oJImb e KomnneKe, yMo6bl oecneumb balaHcupoeKy.
1 OctaHOBNTe DBrAteNBn H3BNeKTe NpeOxpaHNTeNBbHKn KIOH. DoXdntecb, NOHNO octaHOBKN yCTPOCTBA.
2 CHIMMTe aKMyTApOpHyIO 6aTapeIO.
3 NObepHyb KocnKy Ha ee CTopoHy.
4BTNCHyTB 6KOpDpeBecnHbMeKdyNe3BnEMnNaIy6oKocnKn,T06bl npedotBpataNb ne3BneOTnpebpaueHn.
5IcnoIb3yI KIOH Ha 27 MM (He BxOoIN B KOMPNEK NOCTABKN),OCaNbTe 60NT NIIbHOrO DnCKA NOBOPOTM npOTNB YACOBN CTpeKN,ecNI CMOTPeTb C HNKH ChAtnr RaOHOKOcnIKN.
6 CHIMMTE 60NT NINbHOrO DnCKa n Cam DnCK.
7 YctAHOBITE HOBbI NIIbHbI DNCK HA BAN. Y6eINTEcB, cTO NIIbHbI DNCK PnAaNbHO CNDIT HA BAYI, npOxOJIaEM PeYe3 cHTPaIbHoE OTBepCTne NIIbHorO DNCKa, IN DBA WtBpIra HBeHTINrTOpE BCTaBNeHb I COOTBETCTBYoUe NT OBIbHOM NcKc. Y6eINTEcB, cTO OH yCTaHOBNEH C 3aHTyblIM KOnCAmn BBePxB C TcPOHY OCHOBHn
ra3OHOKOcNkM, a He BHN3 K 3eMJI. PpI npaBnHOM pa3MeueHIN HAnpoTMB BEHTNIArTopa DoJNKA HaxoDnTbCRA NIOCKA YAcTb DmCKA.
8 Haxnbte 60nt nmbho Oucka Ha Bn 3atHnTe naIbuaM.
9 3aTnHte rayk pexuyuero ne3BraeYbIM KIOVOM (He npinaraetc), Bpaata no Yacobom CTpeK, QTObl o6ceNHTb NdeKxauyo 3aTAAKy 60nta.PekomeHydemyb KpyTuaim MOMET npi 3aTnBaHain raikn pexyuero ne3Bra coctabIeR 62,5-71,5 KcC:CM (350-400 dnoMoB/phiHT).
ПоисК HeиСправност
Address: No.65 Xinggang Road Zhonglou Zone Changzhou, Jiangsu
213000 P.R.China
Stille bladhoyden (Se figure 6)
Ved forsendelse blir hjulene pa gressklipperen stilt pa en lav klippehoyde. Fd dur tar i bruk gressklipperen for frste dag, bar du justere kuttehoyden sik at den passer dine behov. En gjennomsnittig plen skal vare melom 38 mm og 51 mm i kjelige maneder og mellom 51 mm og 70 mm i varme maneder.
Forajustere knivhoyden
4 Luk bagudkastdoren ned.
ToTnBuaatocKaUuys (3A 4
1Avaonkwate kai kpatnoe Tavw Tyn Tiaw Oupa Edoou.
2PiTeToBuaaKaauuncattoTnAaBtoukaiTTOTOEETHTOeEAAqpi Kaion,OTIWcpaivetai.
3Σπpωδετοβuσακαλuψηςγανακλειδωσει.
4Xaunwote TnyTiou Oupa Edoou.
ToTOnEeTnOg EKtpoTne IaepiKnc Egoou (Bxna 5)
EHMEIOZH:Orav xpaioaieite tov ktpoia nAeupikic esodou, mnu tontoetire to paoiaoi. To bua Kaawn npenei va napaeve rotoetnevo.
1Avaonkwate Tny Upa aepikjc Edoou.
2 Euypauiote Ta aykiotpa oTov ektpontea Tn paBdo eVTeOe OTNV KATU TLEUPa Tns Upuas.
3 Xaunawote TOV EKPToTea mexpi ta dykiotpa va aopaiotouv ot npabdo μeVTae Φupac kaluyns.
4 ApnoTe Tov EKPToTnKaai Tnu Thupa nAeupikicEgodou.
21 + 21 = 24
45 1 j
有 SE( 1 - x) = ( x - 1) x + 5
必须满足条件.
.
OE BC
y
-
a_i a j i
1
jill
451
i
31 42
a + b = 3
y j 1
| 15 | |
aie 1g aiaiial laiiial jao laiaial alil

1 111111111111111111111111111111

#
a
()
Xy
cbal 2
g 1
jlll jlll lll
4.1.2.1.9 Cio 3
Juslll 1
- x1 = -b - ^2 - 4ac2a,x2 = -b + ^2 - 4ac2a
y 1
leis xiege jie jie jie jie jie
#
(2gai jiaai jiaai bao
Ae 1
y j 1
2 1
aaii aaii iiaai ai iiaai iiaai iiaai
(3

1
- 1

1
2

1
jai aai dai jai 100000000000000000000000000000000000000000000000

- 5
- 1
- 4.5.6
- 1
1
J 1 J 1

1
j 1 j 1 j 1 j 1 j 1 j 1 j 1 j 1 j 1 j 1 j 1 j 1 j 1 j 1 j 1 j 1 j 1 j 1 j 1 j 1 j 1 j 1 j 1 j 1 j 1 j 1 j 1 j 1 j 1 j 1 j 1 j 1 j 1 j 1 j

1
y j 1 y

(7)
- 3
- 3
(5j
y j 1
S OBC = S COD + S BOC - S BOC
2.
3. 1
4.
(6jai) 8jai j
aai jai 150
a
jai jia jia jia jia jia jia jia jia jia jia jia jia jia jia jia jia jia jia jia jia jia jia jia jia jia jia jia jia jia jia jia jia jia jia jia jia jia jia jia jia jia jia jia jia jia jia jia jia jia jia j
jai jia 3.
jai jia jia jia jia jia jia jia jia jia jia jia jia jia jia jia jia jia jia jia jia jia jia jia jia jia jia jia jia jia jia jia jia jia jia jia jia jia jia jia jia jia jia
a 1 a
J 1
e 1
| 1### | 1### | |
| 1### | 1### | |
| 1### | 1### | |
| 1### | 1### | |
| 1### | 1### | |
| 1### | 1### | |
| 1### | 1### | |
| 1### | 1### | |
| 1### | 1### | |
| 1### | 1### | |
| 1### | 1### | |
| 1### | 1### | |
| 1### | 1### | |
| 1###1234567890123456789012345678901234567890123456789012345678901234567890123456789012345678901234567890123456789123456789012345678901234567890123456789012345678901234567890123456789012345678901234567890123456789 ### | 1###123456789012345678901234567890123456789012345678901234567890123456789012345678901234567890123456 ### | 1###1234567890123456789012345678901234567890123456789012345678901234567890123456789012345678901234 ### |
12xuolglb
a a a a a a a a a a a a a a a a a a a a a a a
(82LM46)
(82LM51S)
No.65 Xinggang Road Zhonglou Zone Changzhou, Jiangsu:
213000 P.R.China
Lue gai jiu Xua xia liang shi liuyi
Peter Soderstrom:
Propellergatan 1,211 15 Malmö,Sweden
y j 1j 1j
1
yj 1
E
Cramer
i
82LM46S/82LM51S/82LM46
gillaii
山
yaaaii gilg jyauaiit k
6. Yan Bo'saltma Kapaqi
Cim bime makineniz eger malcama tapas biaglamisa cim bime makinesi bacaginin da hce kirpintelde etmek icin kesilenleri tekrar ktesmesini saglayan, aksi takdirde cim kripintilarini toplama torbasina gonderen yan bosaltma agzini kapatan bir kapakla donatilmistr.
Montaj

UYARI!
Adrese: No.65 Xinggang Road Zhonglou Zone Changzhou, Jiangsu 213000 P.R.China
Personas, kas pilnvarota sastadit tehnisko dokumentaciju, vards, uzvards un adrese:
Vards: Peter Soderstrom
Adrese: Propellergatan 1, 211 15 Malmö, Sweden
AR SO UZ SAVU ATBILDIBU PAZINOJAM, KA IERICE
| Tulkojums no originala dokumentações | |
| Type | Zäles Plaujmašina |
| Zimols | Cramer |
| Model 82LM46S/ 82LM51S/ 82LM46 | |
| Sérijas numurs | Skatiet produkta dati plaksniti |
| ražota atbilstoşi standartiem un reglamenti jo欹iem Dokumentiem: | |
| European harmonised standards | EN 60335-1; EN60335-2-77; EN 62233, EN ISO 3744; EN 55014-1; EN 55014-2; ISO 11094 |
| Un atbilst turpın minete direktivu svarıgakajiem NOTEikumiem: | |
| Mašinu direktiva | 2006/42/CE |
| EMS direktiva | 2014/30/EU |
| Trokšpun emisijas direktiva | 2000/14/EC ar izmainljam 2005/88/EC |
Ted qu
Ted Qu Haichao
Kvalitates direktors
Changzhou, 22/07/2017