ET2210EUTS - All-in-One ASUS - Free user manual and instructions
Find the device manual for free ET2210EUTS ASUS in PDF.
| Brand | ASUS |
| Model | ET2210EUTS |
| Product type | All-in-one computer |
| Operating system | Windows 8 (ready for upgrade) |
| Screen size | 21.5 inches (diagonal) |
| Required processor | 1 GHz or faster |
| Minimum RAM | 1 GB (32-bit) or 2 GB (64-bit) |
| Required free disk space | 16 GB (32-bit) or 20 GB (64-bit) |
| Graphics card | DirectX9 compatible with WDDM driver |
| Supported screen resolution | 1024 x 768 (apps) / 1366 x 768 (Snap) |
| Wi-Fi connectivity | Yes, built-in wireless |
| Wired connectivity | RJ-45 Ethernet port |
| Audio output | HDMI, built-in speakers |
| Power supply | AC adapter |
| Maintenance and cleaning | Use a soft, dry cloth. Avoid liquids. |
| Security | Regular Windows updates, BIOS password |
| Parts and repairability | Contact ASUS support for assistance |
| General information | Manual available in multiple languages at support.asus.com |
Frequently Asked Questions - ET2210EUTS ASUS
User questions about ET2210EUTS ASUS
0 question about this device. Answer the ones you know or ask your own.
Ask a new question about this device
Download the instructions for your All-in-One in PDF format for free! Find your manual ET2210EUTS - ASUS and take your electronic device back in hand. On this page are published all the documents necessary for the use of your device. ET2210EUTS by ASUS.
USER MANUAL ET2210EUTS ASUS
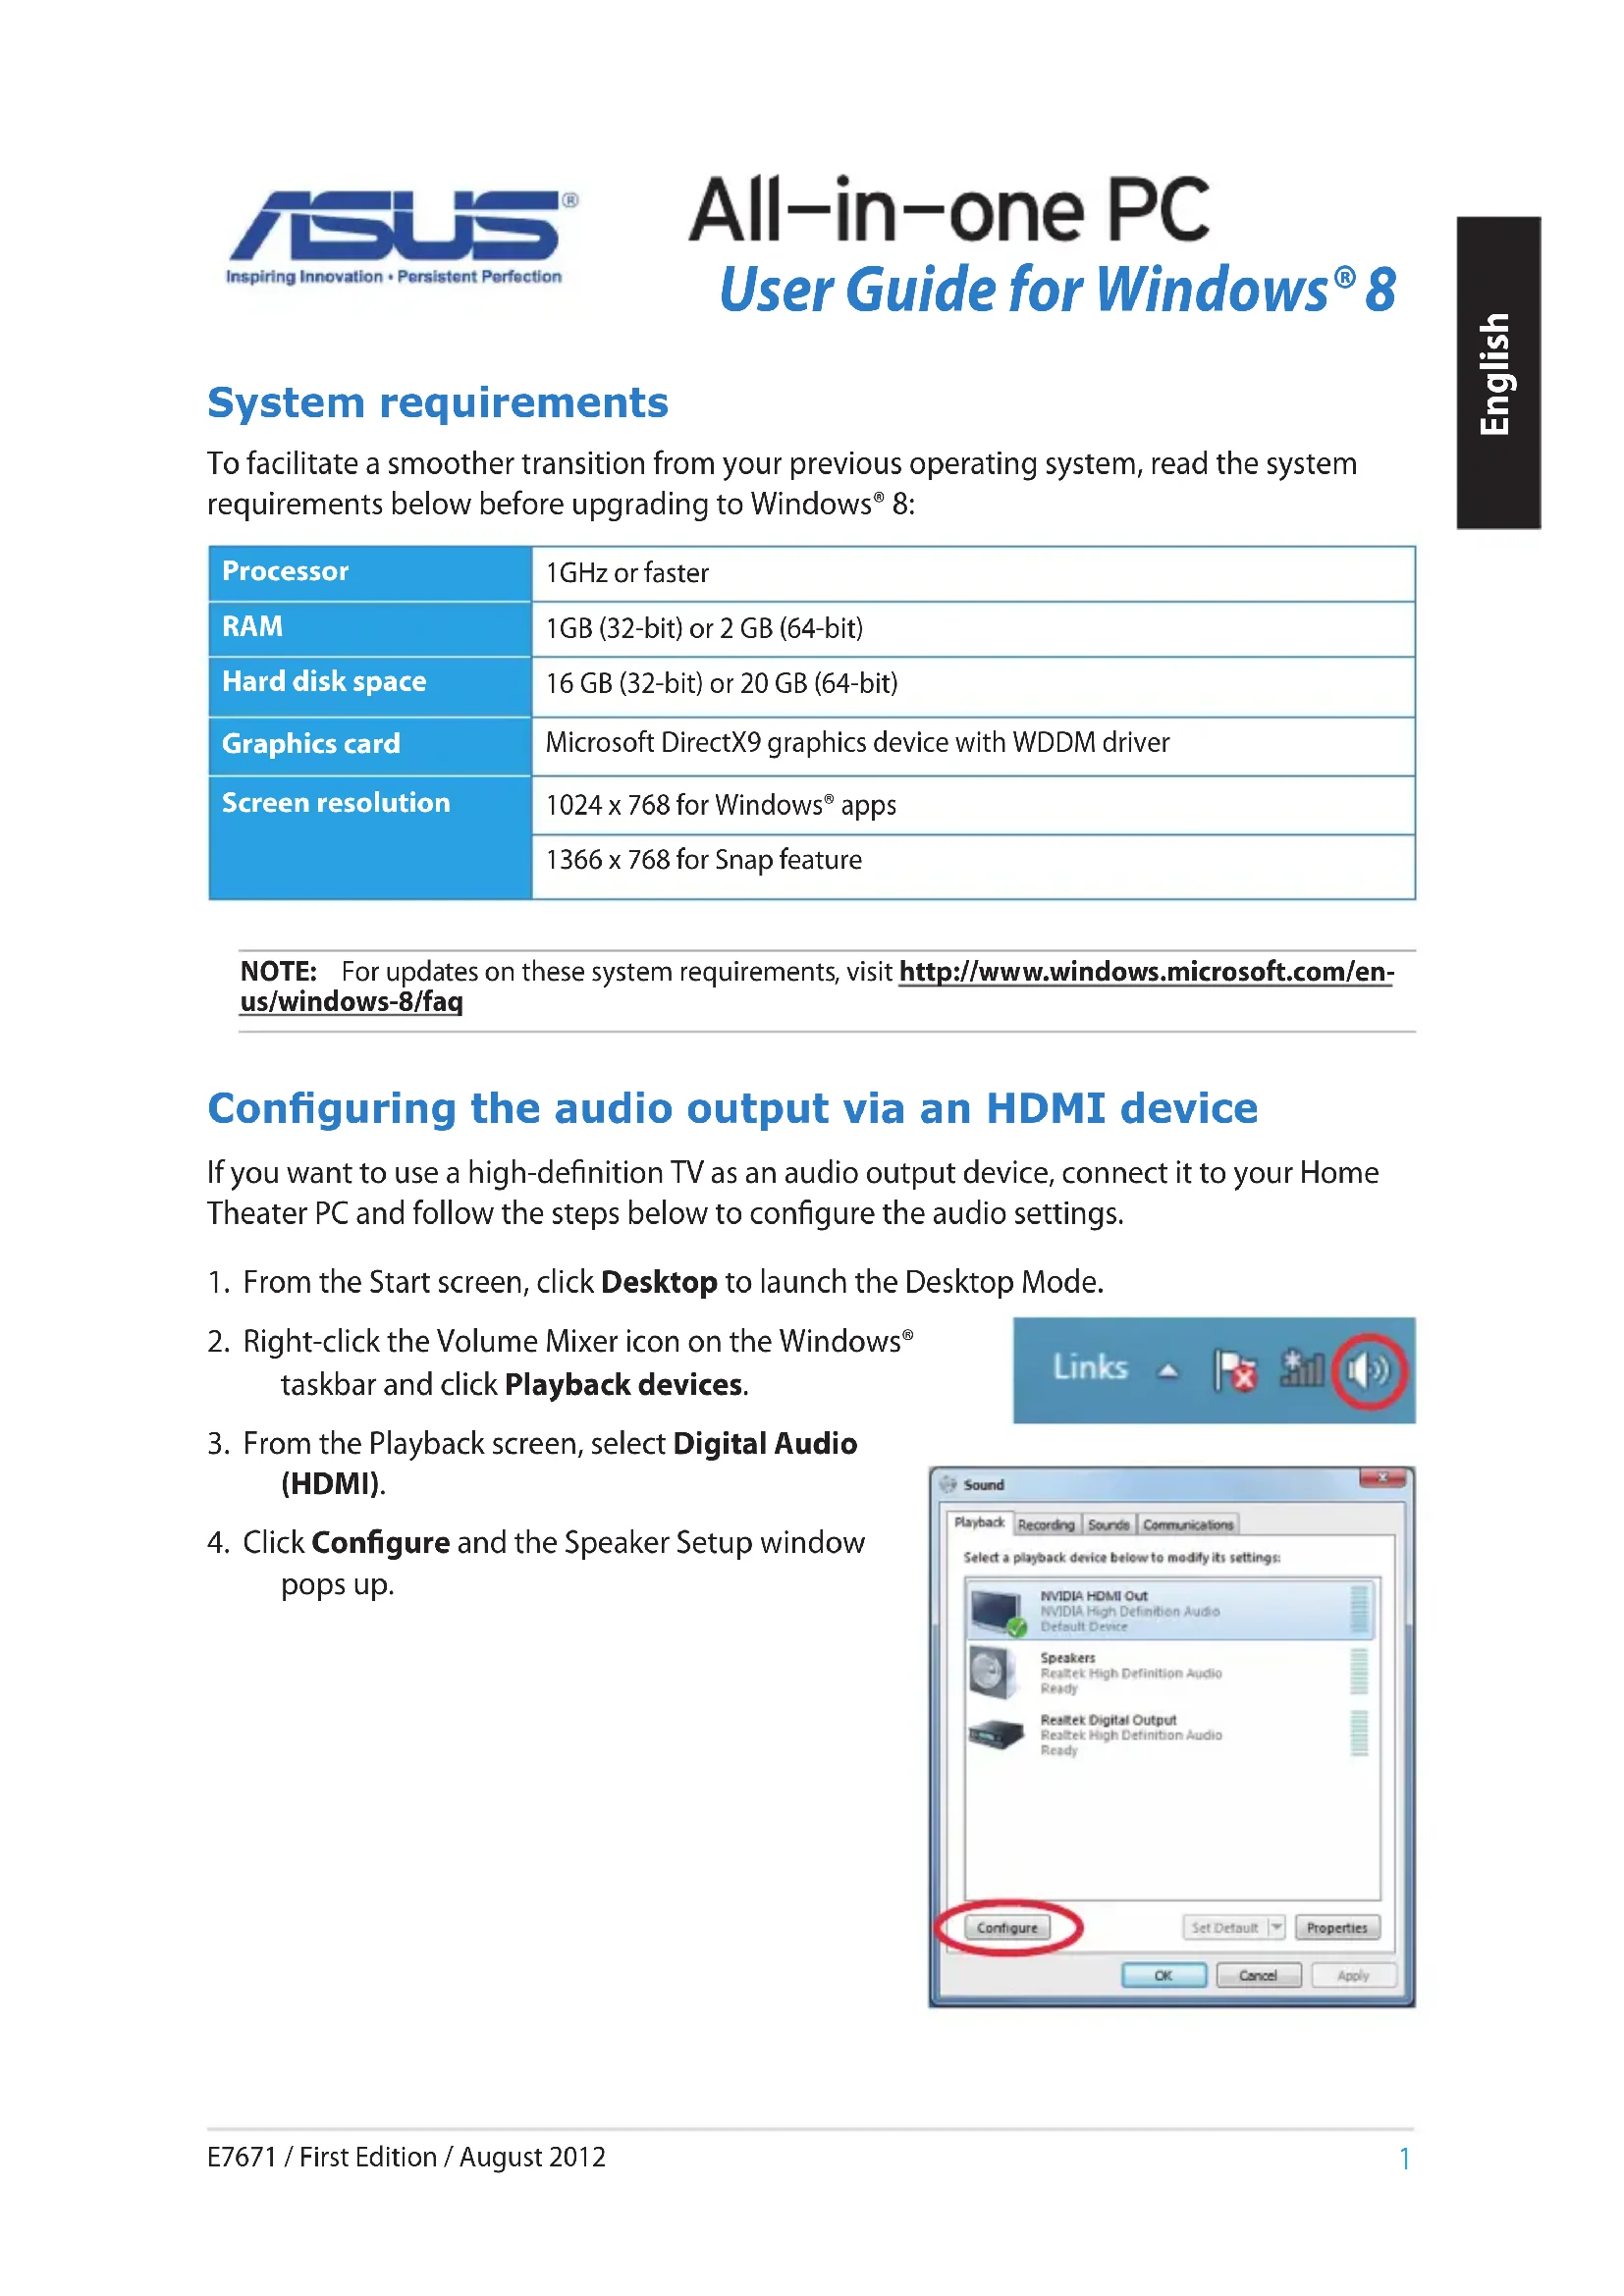
To facilitate a smoother transition from your previous operating system, read the system requirements below before upgrading to Windows® 8:
| Processor | 1GHz or faster |
| RAM | 1GB (32-bit) or 2 GB (64-bit) |
| Hard disk space | 16 GB (32-bit) or 20 GB (64-bit) |
| Graphics card | Microsoft DirectX9 graphics device with WDDM driver |
| Screen resolution | 1024 x 768 for Windows® apps |
| 1366 x 768 for Snap feature |
NOTE: For updates on these system requirements, visit http://www.windows.microsoft.com/en-us/windows-8/faq
Configuring the audio output via an HDMI device
If you want to use a high-definition TV as an audio output device, connect it to your Home Theater PC and follow the steps below to configure the audio settings.
- From the Start screen, click Desktop to launch the Desktop Mode.
- Right-click the Volume Mixer icon on the Windows® taskbar and click Playback devices.
- From the Playback screen, select Digital Audio (HDMI).
- Click Configure and the Speaker Setup window pops up.

text_image
Links
text_image
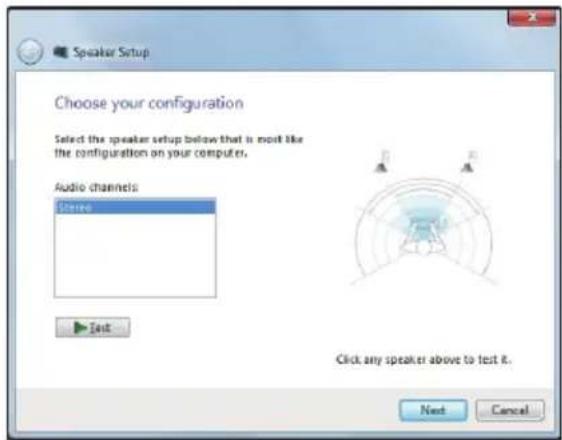
Sound Playback Recording Sounds Communications Select a playback device below to modify its settings: NVIDIA HDMI Out NVIDIA High Definition Audio Default Device Speakers Realtek High Definition Audio Ready Realtek Digital Output Realtek High Definition Audio Ready Configure Set Default Properties OK Cancel Apply- Select Stereo and click Next.
text_image
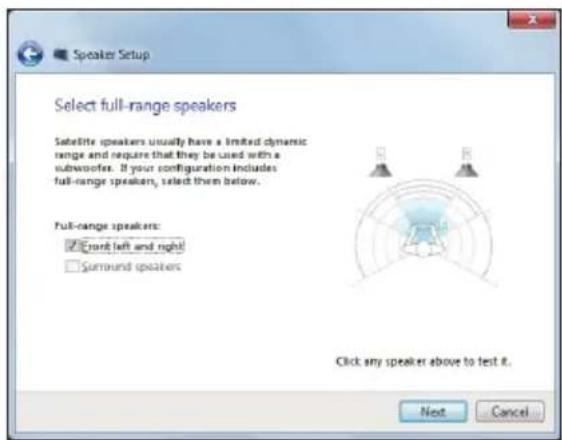
Speaker Setup Choose your configuration Select the speaker setup below that is most like the configuration on your computer. Audio channels: Stokes Text Click any speaker above to test R. Next Cancel- Tick the Front left and right option, and click Next.
- Click Finish to exit the speaker setup.
text_image
Speaker Setup Select full-range speakers Satellite speakers usually have a limited dynamic range and require that they be used with a subwoofer. If your configuration includes full-range speakers, select them below. Full-range speakers: ✓ turn left and right □ surround speakers Click any speaker above to test it. Next CancelTurning your All-in-one PC off
Do any of the following to shut down your All-in-one PC:


- Tap from the Setting bar then tap > Shut down to do a normal shutdown.

- From the log-in screen, tap >Shut down.
- If your All-in-one PC is unresponsive, press and hold the power button for at least four (4) seconds until your All-in-one PC turns off.
Entering the BIOS Setup
Windows ^® 8 boot time is quite fast, so we developed three ways for you to quickly access the BIOS (Basic Input and Output System), which stores system hardware settings that are needed for system startup in your All-in-one PC.
To quickly access the BIOS, do any of the following:
- When your All-in-one PC is off, press the power button for at least four (4) seconds to access the BIOS directly.
- Press the power button for at least four (4) seconds to shut down your All-in-one PC, then press the power button again to turn your All-in-one PC back on, and press
during POST. - When your All-in-one PC is off, disconnect the power cord from your All-in-one PC's power connector. Reconnect the power cord and press the power button to turn on your All-in-one PC. Press
during POST.
NOTE: POST (Power-On Self Test) is a series of software controlled diagnostic tests that run when you turn on your All-in-one PC.
WARNING! Inappropriate BIOS settings may result to instability or boot failure. We strongly recommend that you change the BIOS settings only with the help of a trained service personnel.
Connecting to the Internet
Access emails, surf the Internet, and share applications via social networking sites on or from your All-in-one PC using wireless/Wi-Fi or wired connection.
Wi-Fi connection
To set up your Wi-Fi connection:
- Do the following steps to activate Wi-Fi in your All-in-one PC:
a) Launch the Charm bar.


b) Tap and tap.
c) Select an access point from the list of available Wi-Fi connections.
- Tap Connect to start the network connection.
NOTE: You may be prompted to enter a security key to activate the Wi-Fi connection.
- If you want to enable sharing between your All-in-one PC and other wireless-enabled systems, tap Yes, turn on sharing and connect to devices. Tap No, don't turn on sharing or connect to devices if you do not want to enable the sharing function.
Wired connection
To set up your wired connection:
- Use a network (RJ-45) cable to connect your All-in-one PC to a DSL/cable modem or a local area network (LAN).
- Turn on your computer.
- Configure the necessary Internet connection settings.
NOTES:
- For more details, refer to the sections Configuring a dynamic IP/PPPoE network connection or Configuring a static IP network connection.
- Contact your Internet Service Provider (ISP) for details or assistance in setting up your Internet connection.
Configuring a dynamic IP/PPPoE network connection
To configure a dynamic IP/PPPoE or static IP network connection:
- From the Start screen, click Desktop to launch the Desktop mode.
- From the Windows * taskbar, right-click the network icon and click Open Network and Sharing Center.
- From the Open Network and Sharing Center screen, click Change Adapter settings.
- Right-click on your LAN and select Properties.
- Click Internet Protocol Version 4(TCP/IPv4) and click Properties.
- Click Obtain an IP address automatically and click OK.
NOTE: Continue to the next steps if you are using PPPoE connection.
- Return to the Network and Sharing Center and then click Set up a new connection or network.
- Select Connect to the Internet and click Next.
- Select Broadband (PPPoE) and click Next.
- Enter your User name, Password, and Connection name. Click Connect.
- Click Close to finish the configuration.
- Click the network icon in the taskbar and click the connection you just created.
- Enter your user name and password. Click Connect to connect to the Internet.
Configuring a static IP network connection
To configure a static IP network connection:
- Repeat steps 1 to 4 of the previous section Configuring a dynamic IP/PPPoE network connection.
2 Click Use the following IP address. - Enter the IP address, Subnet mask and Gateway from your service provider.
- If needed, enter the preferred DNS Server address and alternative address.
- When done, click OK.
Recovering your system
Resetting your All-in-one PC
The Reset your PC option restores your PC to its factory default settings.
IMPORTANT! Back up all your data before using this option.
To reset your All-in-one PC:
- Press
during bootup. - From the screen, click Troubleshoot.
- Select Reset your PC.
- Click Next.
- Select Only the drive where the Windows is installed.
- Select Just remove my files.
- Click Reset.
Recovering from a system image file
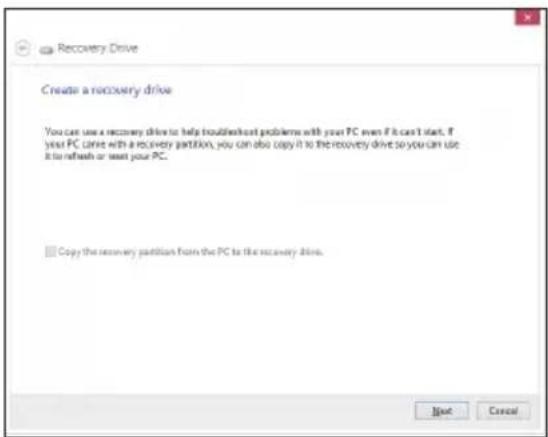
You can create a USB recovery drive and use this to recover your All-in-one PC's settings.
Creating a USB recovery drive
WARNING! All files on your USB storage device will be permanently deleted during the process. Before you proceed, ensure that you back up all your important data.
To create a USB recovery drive:
- Launch the Control Panel from the All Apps screen.
- From the Control Panel's System and Security, click Find and fix problems.
- Click Recovery > Create a recovery drive.
- Click Next.
text_image
Recovery Drive Create a recovery drive You can use a recovery drive to help troubleshoot problems with your PC even if it can't start. If your PC comes with a recovery partition, you can also copy it to the recovery drive so you can use it to refresh or restart your PC. Copy the recovery partition from the PC to the recovery drive. Next Cancel- Select the USB storage device where you want to copy the recovery files.
- Click Next.

text_image
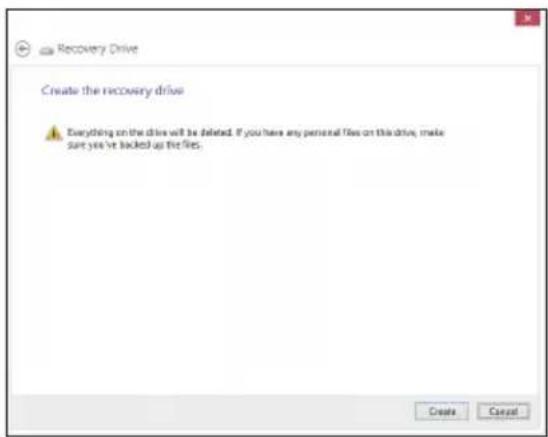
Recovery Drive Select the USB flash drive The drive must be able to hold at least 250 MB, and everything on the drive will be deleted. Available drive(s) M (Thousand) Next Cancel- Click Create. Wait for a while for the process to complete.
- When the process is completed, click Finish.
text_image
Recovery Drive Create the recovery drive Everything on the drive will be deleted. If you have any personal files on this drive, make sure you've backed up the files. Create CancelRemoving everything and reinstalling Windows
Restoring your All-in-one PC to its original factory settings can be done using the Remove everything and reinstall option in PC Settings. Refer to the steps below to use this option.
IMPORTANT! Back up all your data before using this option.
NOTE: This process may take a while to complete.
- Launch the Charm bar.
- Click Settings > Change PC Settings > General.
- Scroll down to view the Remove everything and reinstall Windows option. Under this option, click Get Started.
- Follow the onscreen instructions to complete the reinstallation and reset process.
NOTE: Download the multi-language versions of this user manual from the ASUS Support site at http://support.asus.com
Pré-requis système
text_image
Recovery Drive Create a recovery drive You can use a recovery drive to help troubleshoot problems with your PC even if it can't start. If your PC come with a recovery partition, you can also copy it to the recovery drive so you can use it to refresh or reset your PC. Copy the recovery partition from the PC to the recovery drive. Next Canceltext_image
Recovery Drive Select the USB flash drive The drive must be able to hold at least 250 MB, and everything on the drive will be deleted. Available drive(s) M. Transmitted Next Cancel
text_image
Recovery Drive Create the recovery drive Everything on the drive will be deleted. If you have any personal files on this drive, make sure you've locked up the files. Create Canceltext_image
Sound Playback Recording Sounds Communications Select a playback device below to modify its settings: NVIDIA HDMI Out NVIDIA High Definition Audio Default Device Speakers Realtek High Definition Audio Ready Realtek Digital Output Realtek High Definition Audio Ready Configure Set Default Properties OK Cancel Applytext_image
Speaker Setup Choose your configuration Select the speaker setup below that is most like the configuration on your computer. Audio channels: Stokes Text Click any speaker above to test R. Next Canceltext_image
Speaker Setup Select full-range speakers Satellite speakers usually have a limited dynamic range and require that they be used with a subwoofer. If your configuration includes full-range speakers, select them below. Full-range speakers: ✓ front left and right □ Surround speakers Click any speaker above to test it. Next Canceltext_image
Recovery Drive Create a recovery drive You can use a recovery drive to help troubleshoot problems with your PC even if it can't start. If your PC come with a recovery partition, you can also copy it to the recovery drive so you can use it to refresh or reset your PC. Copy the recovery partition from the PC to the recovery drive. Next Canceltext_image
Recovery Drive Select the USB flash drive The drive must be able to hold at least 250 MB, and everything on the drive will be deleted. Available drive(s) M (Tharpoons) Next Cancel
text_image
Recovery Drive Create the recovery drive Everything on the drive will be deleted. If you have any personal files on this drive, make sure you've backed up the files. Create Canceltext_image
Sound Playback Recording Sounds Communications Select a playback device below to modify its settings: NVIDIA HDMI Out NVIDIA High Definition Audio Default Device Speakers Realtek High Definition Audio Ready Realtek Digital Output Realtek High Definition Audio Ready Configure Set Default Properties OK Cancel Applytext_image
Speaker Setup Choose your configuration Select the speaker setup below that is most like the configuration on your computer. Audio channels: Stokes Text Click any speaker above to test R. Next Canceltext_image
Speaker Setup Select full-range speakers Satellite speakers usually have a limited dynamic range and require that they be used with a subwoofer. If your configuration includes full-range speakers, select them below. Full-range speakers: ✓ front left and right □ Surround speakers Click any speaker above to test it. Next Canceltext_image
Recovery Drive Create a recovery drive You can use a recovery drive to help troubleshoot problems with your PC even if it can't start. If your PC come with a recovery partition, you can also copy it to the recovery drive so you can use it to refresh or read your PC. Copy the recovery partition from the PC to the recovery drive. Next Canceltext_image
Recovery Drive Select the USB flash drive The drive must be able to hold at least 250 MB, and everything on the drive will be deleted. Available drive(s) M (Thousand) Next Canceltext_image
Recovery Drive Create the recovery drive Everything on the drive will be deleted. If you have any personal files on this drive, make sure you've backed up the files. Create Canceltext_image
Sound Playback Recording Sounds Communications Select a playback device below to modify its settings: NVIDIA HDMI Out NVIDIA High Definition Audio Default Device Speakers Realtek High Definition Audio Ready Realtek Digital Output Realtek High Definition Audio Ready Configure Set Default Properties OK Cancel Applytext_image
Speaker Setup Choose your configuration Select the speaker setup below that is most like the configuration on your computer. Audio channels: Stove Text Click any speaker above to test R. Next Canceltext_image
Speaker Setup Select full-range speakers Satellite speakers usually have a limited dynamic range and require that they be used with a subwoofer. If your configuration includes full-range speakers, select them below. Full-range speakers: ✓ Left and right □ Surround speakers Click any speaker above to test it. Next Canceltext_image
Recovery Drive Create a recovery drive You can use a recovery drive to help troubleshoot problems with your PC even if it can't start. If your PC comes with a recovery partition, you can also copy it to the recovery drive so you can use it to refresh or wait your PC. Copy the recovery partition from the PC to the recovery drive. Next Canceltext_image
Recovery Drive Select the USB flash drive The drive must be able to hold at least 250 MB, and everything on the drive will be deleted. Available drive(S) M (Transmit) Next Cancel
text_image
Recovery Drive Create the recovery drive Everything on the drive will be deleted. If you have any personal files on this drive, make sure you've locked up the files. Create Canceltext_image
Sound Playback Recording Sounds Communications Select a playback device below to modify its settings: NVIDIA HDMI Out NVIDIA High Definition Audio Default Device Speakers Realtek High Definition Audio Ready Realtek Digital Output Realtek High Definition Audio Ready Configure Set Default Properties OK Cancel Applytext_image
Speaker Setup Choose your configuration Select the speaker setup below that is most like the configuration on your computer. Audio channels: Stone Text Click any speaker above to test R. Next Canceltext_image
Speaker Setup Select full-range speakers Satellite speakers usually have a limited dynamic range and require that they be used with a subwoofer. If your configuration includes full-range speakers, select them below. Full-range speakers: ✓ front left and right! □ surround speakers Click any speaker above to test it. Next Canceltext_image
Recovery Drive Create a recovery drive You can use a recovery drive to help troubleshoot problems with your PC even if it can't start. If your PC came with a recovery partition, you can also copy it to the recovery drive so you can use it to refresh or restart your PC. Copy the recovery partition from the PC to the recovery drive. Next Canceltext_image
Recovery Drive Select the USB flash drive The drive must be able to hold at least 250 MB, and everything on the drive will be deleted. Available drive(s) M (Thousandts) Next Canceltext_image
Recovery Drive Create the recovery drive Everything on the drive will be deleted. If you have any personal files on this drive, make sure you've backed up the files. Create CancelRemover tudo e reinstalar o Windows
text_image
Sound Playback Recording Sounds Communications Select a playback device below to modify its settings: NVIDIA HDMI Out NVIDIA High Definition Audio Default Device Speakers Realtek High Definition Audio Ready Realtek Digital Output Realtek High Definition Audio Ready Configure Set Default Properties OK Cancel Applytext_image
Speaker Setup Choose your configuration Select the speaker setup below that is most like the configuration on your computer. Audio channels Stance Text Click any speaker above to test it. Next Canceltext_image
Speaker Setup Select full-range speakers Satellite speakers usually have a limited dynamic range and require that they be used with a subwoofer. If your configuration includes full-range speakers, select them below. Full-range speakers: ✓ Left and right □ Surround speakers Click any speaker above to test it. Next Canceltext_image
Recovery Drive Create a recovery drive You can use a recovery drive to help troubleshoot problems with your PC even if it can't start. If your PC come with a recovery partition, you can also copy it to the recovery drive so you can use it to refresh or reset your PC. Copy the recovery partition from the PC to the recovery drive. Next Canceltext_image
Recovery Drive Select the USB flash drive The drive must be able to hold at least 250 MB, and everything on the drive will be deleted. Available drive(s) All (Classconst) Next Canceltext_image
Recovery Drive Create the recovery drive Everything on the drive will be deleted. If you have any personal files on this drive, make sure you've backed up the files. Create Canceltext_image
Sound Playback Recording Sounds Communications Select a playback device below to modify its settings: NVIDIA HDMI Out NVIDIA High Definition Audio Default Device Speakers Realtek High Definition Audio Ready Realtek Digital Output Realtek High Definition Audio Ready Configure Set Default Properties OK Cancel Applytext_image
Speaker Setup Choose your configuration Select the speaker setup below that is most like the configuration on your computer. Audio channels: Stokes Text Click any speaker above to test R. Next Canceltext_image
Speaker Setup Select full-range speakers Satellite speakers usually have a limited dynamic range and require that they be used with a subwoofer. If your configuration includes full-range speakers, select them below. Full-range speakers: ✓ turn left and right! □ surround speakers Click any speaker above to test it. Next CancelVypnutí All-in-one PC
Obnova All-in-one PC
Obnova All-in-one PC:
text_image
Recovery Drive Create a recovery drive You can use a recovery drive to help troubleshoot problems with your PC even if it can't start. If your PC came with a recovery partition, you can also copy it to the recovery drive so you can use it to refresh or reset your PC. Copy the recovery partition from the PC to the recovery drive. Next Canceltext_image
Recovery Drive Select the USB flash drive The drive must be able to hold at least 250 MB, and everything on the drive will be deleted. Available drive(S) M (Transmit) Next Cancel
text_image
Recovery Drive Create the recovery drive Everything on the drive will be deleted. If you have any personal files on this drive, make sure you've locked up the files. Create Canceltext_image
Sound Playback Recording Sounds Communications Select a playback device below to modify its settings: NVIDIA HDMI Out NVIDIA High Definition Audio Default Device Speakers Realtek High Definition Audio Ready Realtek Digital Output Realtek High Definition Audio Ready Configure Set Default Properties OK Cancel Applytext_image
Speaker Setup Choose your configuration Select the speaker setup below that is most like the configuration on your computer. Audio channels: Stokes Text Click any speaker above to test R. Next Canceltext_image
Speaker Setup Select full-range speakers Satellite speakers usually have a limited dynamic range and require that they be used with a subwoofer. If your configuration includes full-range speakers, select them below. Full-range speakers: ✓ Left and right □ Surround speakers Click any speaker above to test it. Next CancelSådan slukker du for din alt-i-en pc
text_image
Recovery Drive Create a recovery drive You can use a recovery drive to help troubleshoot problems with your PC even if it can't start. If your PC come with a recovery partition, you can also copy it to the recovery drive so you can use it to refresh or read your PC. Copy the recovery partition from the PC to the recovery drive. Next Canceltext_image
Recovery Drive Select the USB flash drive The drive must be able to hold at least 250 MB, and everything on the drive will be deleted. Available drive(s) M (Thousand) Next Canceltext_image
Recovery Drive Create the recovery drive Everything on the drive will be deleted. If you have any personal files on this drive, make sure you've backed up the files. Create Canceltext_image
Sound Playback Recording Sounds Communications Select a playback device below to modify its settings: NVIDIA HDMI Out NVIDIA High Definition Audio Default Device Speakers Realtek High Definition Audio Ready Realtek Digital Output Realtek High Definition Audio Ready Configure Set Default Properties OK Cancel Applytext_image
Speaker Setup Choose your configuration Select the speaker setup below that is most like the configuration on your computer. Audio channels: Stokes Text Click any speaker above to test R. Next Canceltext_image
Speaker Setup Select full-range speakers Satellite speakers usually have a limited dynamic range and require that they be used with a subwoofer. If your configuration includes full-range speakers, select them below. Full-range speakers: ✓ turn left and right □ surround speakers Click any speaker above to test it. Next Cancela) Start de Charm bar (Emoticonbalk).

b) Tik op en tik op
text_image
Recovery Drive Create a recovery drive You can use a recovery drive to help troubleshoot problems with your PC even if it can't start. If your PC come with a recovery partition, you can also copy it to the recovery drive so you can use it to refresh or reset your PC. Copy the recovery partition from the PC to the recovery drive. Next Canceltext_image
Recovery Drive Select the USB flash drive The drive must be able to hold at least 250 MB, and everything on the drive will be deleted. Available drive(s) M (Thousand) Next Canceltext_image
Recovery Drive Create the recovery drive Everything on the drive will be deleted. If you have any personal files on this drive, make sure you've backed up the files. Create Canceltext_image
Sound Playback Recording Sounds Communications Select a playback device below to modify its settings: NVIDIA HDMI Out NVIDIA High Definition Audio Default Device Speakers Realtek High Definition Audio Ready Realtek Digital Output Realtek High Definition Audio Ready Configure Set Default Properties OK Cancel Applytext_image
Speaker Setup Choose your configuration Select the speaker setup below that is most like the configuration on your computer. Audio channels: Stokes Text Click any speaker above to test R. Next Canceltext_image
Speaker Setup Select full-range speakers Satellite speakers usually have a limited dynamic range and require that they be used with a subwoofer. If your configuration includes full-range speakers, select them below. Full-range speakers: ✓ Left and right □ Surround speakers Click any speaker above to test it. Next Cancel...text_image
Recovery Drive Create a recovery drive You can use a recovery drive to help troubleshoot problems with your PC even if it can't start. If your PC contains with a recovery partition, you can also copy it to the recovery drive so you can use it to refresh or read your PC. Copy the recovery partition from the PC to the recovery drive. Next Canceltext_image
Recovery Drive Select the USB flash drive The drive must be able to hold at least 250 MB, and everything on the drive will be deleted. Available drive(s) M (Thousand) Next Canceltext_image
Recovery Drive Create the recovery drive Everything on the drive will be deleted. If you have any personal files on this drive, make sure you've backed up the files. Create Canceltext_image
Sound Playback Recording Sounds Communications Select a playback device below to modify its settings: NVIDIA HDMI Out NVIDIA High Definition Audio Default Device Speakers Realtek High Definition Audio Ready Realtek Digital Output Realtek High Definition Audio Ready Configure Set Default Properties OK Cancel Applytext_image
Speaker Setup Choose your configuration Select the speaker setup below that is most like the configuration on your computer. Audio channels: Stokes Text Click any speaker above to test R. Next Canceltext_image
Speaker Setup Select full-range speakers Satellite speakers usually have a limited dynamic range and require that they be used with a subwoofer. If your configuration includes full-range speakers, select them below. Full-range speakers: ✓ turn left and right □ surround speakers Click any speaker above to test it. Next Canceltext_image
Recovery Drive Create a recovery drive You can use a recovery drive to help troubleshoot problems with your PC even if it can't start. If your PC starts with a recovery partition, you can also copy it to the recovery drive so you can use it to refresh or reuse your PC. Copy the recovery partition from the PC to the recovery drive. Next Canceltext_image
Recovery Drive Select the USB flash drive The drive must be able to hold at least 250 MB, and everything on the drive will be deleted. Available drive(s) M (Thousand) Next Canceltext_image
Recovery Drive Create the recovery drive Everything on the drive will be deleted. If you have any personal files on this drive, make sure you've backed up the files. Create Canceltext_image
Sound Playback Recording Sounds Communications Select a playback device below to modify its settings: NVIDIA HDMI Out NVIDIA High Definition Audio Default Device Speakers Realtek High Definition Audio Ready Realtek Digital Output Realtek High Definition Audio Ready Configure Set Default Properties OK Cancel Applytext_image
Speaker Setup Choose your configuration Select the speaker setup below that is most like the configuration on your computer. Audio channels: Stone Text Click any speaker above to test R. Next Canceltext_image
Speaker Setup Select full-range speakers Satellite speakers usually have a limited dynamic range and require that they be used with a subwoofer. If your configuration includes full-range speakers, select them below. Full-range speakers: ✓ front left and right! □ surround speakers Click any speaker above to test it. Next Canceltext_image
Recovery Drive Create a recovery drive You can use a recovery drive to help troubleshoot problems with your PC even if it can't start. If your PC came with a recovery partition, you can also copy it to the recovery drive so you can use it to refresh or restart your PC. Copy the recovery partition from the PC to the recovery drive. Next Canceltext_image
Recovery Drive Select the USB flash drive The drive must be able to hold at least 250 MB, and everything on the drive will be deleted. Available drive(s) M (Thousand) Next Cancel
text_image
Recovery Drive Create the recovery drive Everything on the drive will be deleted. If you have any personal files on this drive, make sure you've backed up the files. Create CancelRemoving everything and reinstalling Windows (Usuń wszystko i zainstaluj ponownie Windows)
text_image
Sound Playback Recording Sounds Communications Select a playback device below to modify its settings: NVIDIA HDMI Out NVIDIA High Definition Audio Default Device Speakers Realtek High Definition Audio Ready Realtek Digital Output Realtek High Definition Audio Ready Configure Set Default Properties OK Cancel Applytext_image
Speaker Setup Choose your configuration Select the speaker setup below that is most like the configuration on your computer. Audio channels: Stokes Text Click any speaker above to test R. Next Cancel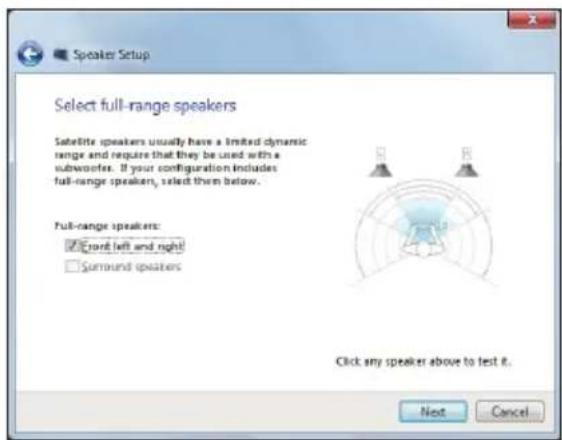
text_image
Speaker Setup Select full-range speakers Satellite speakers usually have a limited dynamic range and require that they be used with a subwoofer. If your configuration includes full-range speakers, select them below. Full-range speakers: ✓ turn left and right! ☐ surround speakers Click any speaker above to test it. Next Canceltext_image
Recovery Drive Create a recovery drive You can use a recovery drive to help troubleshoot problems with your PC even if it can't start. If your PC came with a recovery partition, you can also copy it to the recovery drive so you can use it to refresh or read your PC. Copy the recovery partition from the PC to the recovery drive. Next Canceltext_image
Recovery Drive Select the USB flash drive The drive must be able to hold at least 250 MB, and everything on the drive will be deleted. Available drive(S) M (Transmit) Next Cancel
text_image
Recovery Drive Create the recovery drive Everything on the drive will be deleted. If you have any personal files on this drive, make sure you've locked up the files. Create Canceltext_image
Sound Playback Recording Sounds Communications Select a playback device below to modify its settings: NVIDIA HDMI Out NVIDIA High Definition Audio Default Device Speakers Realtek High Definition Audio Ready Realtek Digital Output Realtek High Definition Audio Ready Configure Set Default Properties OK Cancel Applytext_image
Speaker Setup Choose your configuration Select the speaker setup below that is most like the configuration on your computer. Audio channels: Stereo Text Click any speaker above to test R. Next Canceltext_image
Speaker Setup Select full-range speakers Satellite speakers usually have a limited dynamic range and require that they be used with a subwoofer. If your configuration includes full-range speakers, select them below. Full-range speakers: ✓ front-left and right □ surround speakers Click any speaker above to test it. Next CancelMematikan PC All-in-one
text_image
Recovery Drive Create a recovery drive You can use a recovery drive to help troubleshoot problems with your PC even if it can't start. If your PC come with a recovery partition, you can also copy it to the recovery drive so you can use it to refresh or restart your PC. Copy the recovery partition from the PC to the recovery drive. Next Canceltext_image
Recovery Drive Select the USB flash drive The drive must be able to hold at least 250 MB, and everything on the drive will be deleted. Available drive(s) M (Thousandts) Next Cancel- Klik Create (Buat). Tunggu sementara proses diselesaikan.
- Klik Finish (Selesai) setelah proses selesai.

text_image
Recovery Drive Create the recovery drive Everything on the drive will be deleted. If you have any personal files on this drive, make sure you've backed up the files. Create Canceltext_image
Sound Playback Recording Sounds Communications Select a playback device below to modify its settings: NVIDIA HDMI Out NVIDIA High Definition Audio Default Device Speakers Realtek High Definition Audio Ready Realtek Digital Output Realtek High Definition Audio Ready Configure Set Default Properties OK Cancel Applytext_image
Speaker Setup Choose your configuration Select the speaker setup below that is most like the configuration on your computer. Audio channels Storing Text Click any speaker above to text it. Next Canceltext_image
粘選 Speaker Setup Select full-range speakers 以退出音效 Satellite speakers usually have a limited dynamic range and require that they be used with a subwoofer. If your configuration includes full-range speakers, select them below. Full-range speakers: ✓ Front left and right! □ Surround speakers Click any speaker above to test it. Next Cancel將 All-in-one 電腦關機
text_image
Recovery Drive Create a recovery drive You can use a recovery drive to help troubleshoot problems with your PC even if it can't start. If your PC come with a recovery partition, you can also copy it to the recovery drive so you can use it to refresh or next your PC. Copy the recovery partition from the PC to the recovery drive. Next Canceltext_image
欲存放映像檔的 USB 儲存裝置。。。 Recovery Drive Select the USB flash drive The drive must be able to hold at least 250 MB, and everything on the drive will be deleted. Available drive(s) H. (Classroom) Next Canceltext_image
Recovery Drive Create the recovery drive Everything on the drive will be deleted. If you have any personal files on this drive, make sure yes've locked up the files. Create Cancel移除所有檔案與重新安裝 Windows
text_image
Sound Playback Recording Sounds Communications Select a playback device below to modify its settings: NVIDIA HDMI Out NVIDIA High Definition Audio Default Device Speakers Realtek High Definition Audio Ready Realtek Digital Output Realtek High Definition Audio Ready Configure Set Default Properties OK Cancel Applytext_image
Speaker Setup Choose your configuration Select the speaker setup below that is most like the configuration on your computer. Audio channels Strive Text Click any speaker above to text it. Next Canceltext_image
点 Speaker Setup Select full-range speakers 成)以退出音 Satellite speakers usually have a limited dynamic range and require that they be used with a subworkers. If your configuration includes full-range speakers, select them below. Full-range speakers: ✓ Front left and right! □ Surround speakers Click any speaker above to test it. Next Cancel将 All-in-one 计算机关机
text_image
Recovery Drive Create a recovery drive You can use a recovery drive to help troubleshoot problems with your PC even if it can't start. If your PC come with a recovery partition, you can also copy it to the recovery drive so you can use it to refresh or wait your PC. Copy the recovery partition from the PC to the recovery drive. Next Canceltext_image
欲存放映像档的 USB 存储设备。。。 Recovery Drive Select the USB flash drive The drive must be able to hold at least 250 MB, and everything on the drive will be deleted. Available drive(s) H. (Classend) Next Canceltext_image
Recovery Drive Create the recovery drive Everything on the drive will be deleted. If you have any personal files on this drive, make sure yes've locked up the files. Create Cancel去除所有文件与重新安装 Windows
text_image
Sound Playback Recording Sounds Communications Select a playback device below to modify its settings: NVIDIA HDMI Out NVIDIA High Definition Audio Default Device Speakers Realtek High Definition Audio Ready Realtek Digital Output Realtek High Definition Audio Ready Configure Set Default Properties OK Cancel Applytext_image
Speaker Setup Choose your configuration Select the speaker setup below that is most like the configuration on your computer. Audio channels: Stokes Text Click any speaker above to test R. Next Canceltext_image
Speaker Setup Select full-range speakers Satellite speakers usually have a limited dynamic range and require that they be used with a subwoofer. If your configuration includes full-range speakers, select them below. Full-range speakers: ✓ front left and right! □ Surround speakers Click any speaker above to test it. Next Canceltext_image
Recovery Drive Create a recovery drive You can use a recovery drive to help troubleshoot problems with your PC even if it can't start. If your PC came with a recovery partition, you can also copy it to the recovery drive so you can use it to refresh or restart your PC. Copy the recovery partition from the PC to the recovery drive. Next Canceltext_image
Recovery Drive Select the USB flash drive The drive must be able to hold at least 250 MB, and everything on the drive will be deleted. Available drive(S) M (Transcend) Next Canceltext_image
Recovery Drive Create the recovery drive Everything on the drive will be deleted. If you have any personal files on this drive, make sure you've locked up the files. Create Canceltext_image
Sound Playback Recording Sounds Communications Select a playback device below to modify its settings: NVIDIA HDMI Out NVIDIA High Definition Audio Default Device Speakers Realtek High Definition Audio Ready Realtek Digital Output Realtek High Definition Audio Ready Configure Set Default Properties OK Cancel Applytext_image
Speaker Setup Choose your configuration Select the speaker setup below that is most like the configuration on your computer. Audio channels: Stokes Text Click any speaker above to test R. Next Cancel
text_image
Speaker Setup Select full-range speakers Satellite speakers usually have a limited dynamic range and require that they be used with a subwoofer. If your configuration includes full-range speakers, select them below. Full-range speakers: ✓ turn left and right! □ surround speakers Click any speaker above to test it. Next CancelAll-in-one PC'nizi kapatma
text_image
Recovery Drive Create a recovery drive You can use a recovery drive to help troubleshoot problems with your PC even if it can't start. If your PC come with a recovery partition, you can also copy it to the recovery drive so you can use it to refresh or wait your PC. Copy the recovery partition from the PC to the recovery drive. Next Canceltext_image
Recovery Drive Select the USB flash drive The drive must be able to hold at least 250 MB, and everything on the drive will be deleted. Available drive(S) M (Transcend) Next Cancel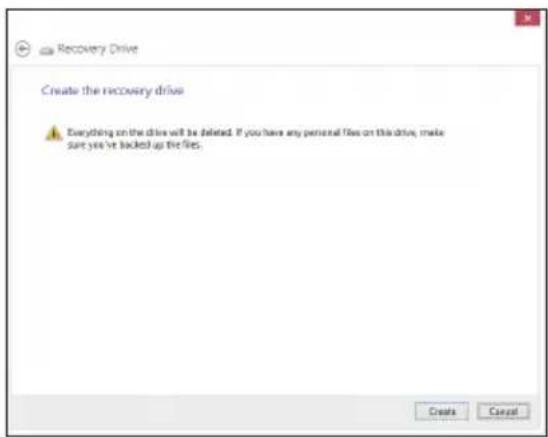
text_image
Recovery Drive Create the recovery drive Everything on the drive will be deleted. If you have any personal files on this drive, make sure you've locked up the files. Create CancelInspiring Innovation • Persistent Perfection
متطلبات النظام
text_image
Sound Playback Recording Sounds Communications Select a playback device below to modify its settings: NVIDIA HDMI Out NVIDIA High Definition Audio Default Device Speakers Realtek High Definition Audio Ready Realtek Digital Output Realtek High Definition Audio Ready Configure Set Default Properties OK Cancel Applytext_image
Speaker Setup Choose your configuration Select the speaker setup below that is most like the configuration on your computer. Audio channels: Stereo Text Click any speaker above to test it. Next Canceltext_image
Speaker Setup Select full-range speakers Satellite speakers usually have a limited dynamic range and require that they be used with a subwoofer. If your configuration includes full-range speakers, select them below. Full-range speakers: ✓ Front left and right ☐ Surround speakers Click any speaker above to test it. Next CancelOK Obtain an IP address automatically -7
text_image
Recovery Drive Create a recovery drive You can use a recovery drive to help troubleshoot problems with your PC even if it can't start. If your PC came with a recovery partition, you can also copy it to the recovery drive so you can use it to refresh or next your PC. Copy the recovery partition from the PC to the recovery drive. Next Cancel