
SpeediMo 360VC - Lawn mower FLYMO - Free user manual and instructions
Find the device manual for free SpeediMo 360VC FLYMO in PDF.
| Product Type | Electric Rotary Mower |
| Brand | Flymo |
| Model | SpeediMo 360VC |
| Cutting Width | 36 cm |
| Adjustable Cutting Height | 20 – 60 mm (5 positions) |
| Grass Catcher Volume | 30 litres |
| Weight | 11.8 kg |
| Rated Power | 1500 W |
| Mains Voltage | 230 V ~ 50 Hz |
| Blade Rotation Speed | 3600 tr/min |
| Sound Pressure Level | 87 dB(A) |
| Sound Power Level (measured/guaranteed) | 93 / 96 dB(A) |
| Hand/Arm Vibration | 2.3 m/s² (incertitude 1.5) |
| Blade Type | Metal blade (replacement recommended every 50 h or 2 years) |
| Spare Blade Part | Ref. 590605190 Art. FLY071 |
| Intended Use | Lawns of family gardens, slopes ≤ 20° |
| Safety | Automatic stop when releasing lever, protection against debris |
| Power Supply | Mains with suitable extension cable (1.5 mm² up to 20 m, 2.5 mm² up to 50 m) |
| Assembly | Adjustable handle in two positions, removable grass catcher |
| Maintenance | Brush cleaning (no water), check blade |
Frequently Asked Questions - SpeediMo 360VC FLYMO
User questions about SpeediMo 360VC FLYMO
0 question about this device. Answer the ones you know or ask your own.
Ask a new question about this device
Download the instructions for your Lawn mower in PDF format for free! Find your manual SpeediMo 360VC - FLYMO and take your electronic device back in hand. On this page are published all the documents necessary for the use of your device. SpeediMo 360VC by FLYMO.
USER MANUAL SpeediMo 360VC FLYMO
natural_image
Line drawing of a lawn mower with visible blades and handle (no text or symbols)Remark: "xx" stands for customer and country variants. The basic product number is before the hyphen.
1 Start / stop lever
2 Lock off button
3 Cable clip
4 Wing knob
5 Lower handle
6 Safety guard
7 Upper handle
8 Grassbox upper
9 Motor cover
10 Wheel
11 Deck
12 Grassbox lower
13 Height adjust lever
A1A2
B1
natural_image
Technical line drawing of a mechanical component with two arrows pointing to features (no text or symbols)B2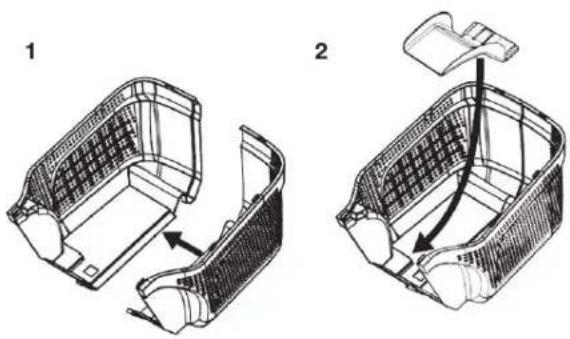 | B3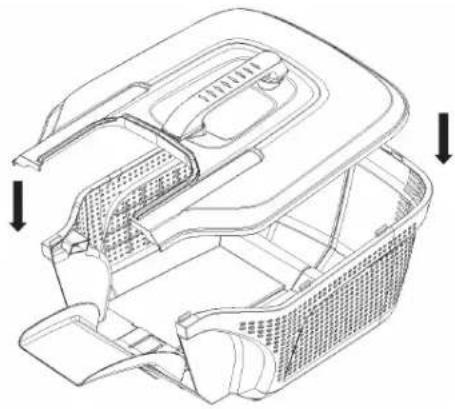 |
B4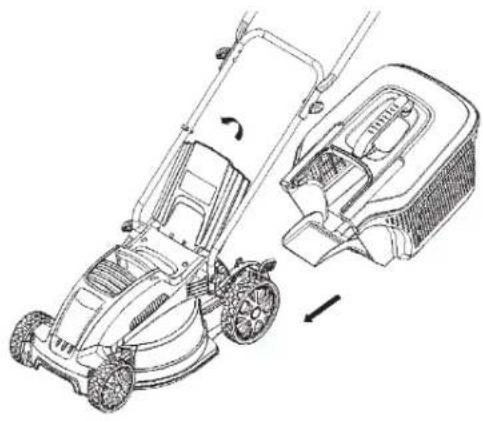 | C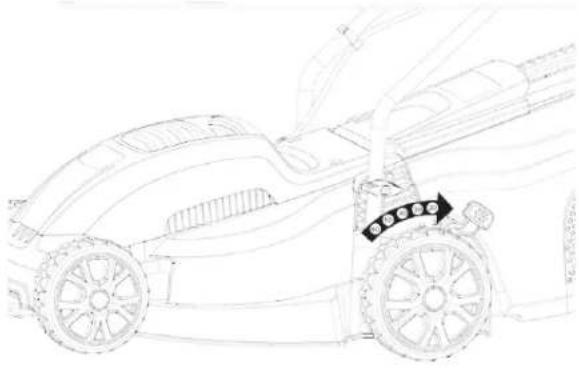 |
D1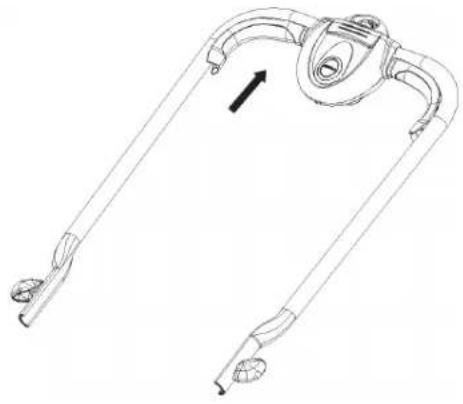 | D2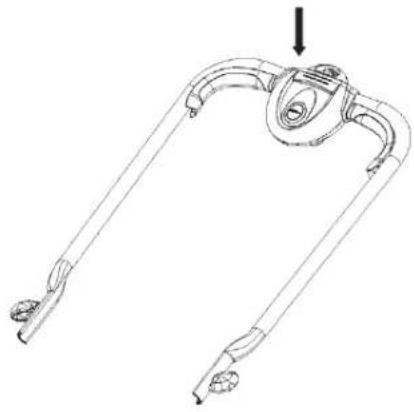 |
E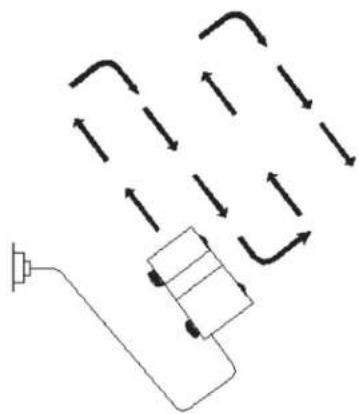 | F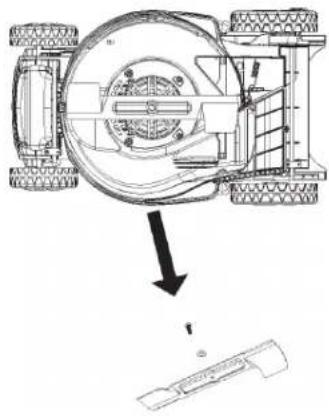 |
Measuring process complying with: 1) EN IEC 62841-4-3 2) RL 2000/14/EC / S.I. 2001 No.1701
https://www.flymo.com/uk/content/contact-us
10. ENTSORGUNG
Original instructions.
- SAFETY 8
- ASSEMBLY 9
- OPERATION....10
- MAINTENANCE....10
- STORAGE 11
- TROUBLESHOOTING 11
- TECHNICAL DATA 11
- ACCESSORIES / SPARE PARTS 11
- SERVICE 11
- DISPOSAL....11
This product may be used under supervision, or if instruction regarding the safe use of the product has been provided and the resulting dangers have been understood, by children aged 8 and above, as well as by persons with physical, sensory or mental disabilities or a lack of experience and knowledge. Children must not be allowed to play with the product. Cleaning and user maintenance must not be performed by children without supervision. The use of this product by young people under the age of 16 is not recommended.
1. SAFETY
1.1 Symbols on the product
→ Read operator's manual.

WARNING!
→ Be careful of parts being ejected—keep bystanders away.
WARNING!
→ Keep the mains cable away from the blades (not applicable to cordless mowers).

WARNING!
→ Keep hands and feet away from the blades.

WARNING!
→ Unplug the mains plug before maintenance or if the mains cable is damaged (not applicable to cordless mowers).

WARNING!
→ Disconnect the battery before maintenance.

WARNING!
→ Remove the locking device before maintenance (not applicable to cordless lawnmowers without locking device).
1.2 General safety instructions
1.2.1 General machine safety warnings

WARNING!
Read all safety warnings, instructions, illustrations and specifications provided with this machine.
Failure to follow all instructions listed below may result in electric shock, fire and/or serious injury.
Save all warnings and instructions for future reference.
The term "machine" in the warnings refers to your mains-operated (corded) machine or battery-operated (cordless) machine.
1) Work area safety
a) Keep work area clean and well lit. Cluttered or dark areas invite accidents.
b) Do not operate machines in explosive atmospheres, such as in the presence of flammable liquids, gases or dust. Machines create sparks which may ignite the dust or fumes.
c) Keep children and bystanders away while operating a machine. Distractions can cause you to lose control.
2) Electrical safety
a) Machine plugs must match the outlet. Never modify the plug in any way. Do not use any adaptor plugs with earthed (grounded) machines. Unmodified plugs and matching outlets will reduce risk of electric shock.
b) Avoid body contact with earthed or grounded surfaces, such as pipes, radiators, ranges and refrigerators. There is an increased risk of electric shock if your body is earthed or grounded.
c) Do not expose machines to rain or wet conditions. Water entering a machine will increase the risk of electric shock.
d) Do not abuse the cord. Never use the cord for carrying, pulling or unplugging the machine. Keep cord away from heat, oil, sharp edges or moving parts. Damaged or entangled cords increase the risk of electric shock.
e) When operating a machine outdoors, use an extension cord suitable for outdoor use. Use of a cord suitable for outdoor use reduces the risk of electric shock.
f) If operating a machine in a damp location is unavoidable, use a residual current device (RCD) protected supply. Use of an RCD reduces the risk of electric shock.
3) Personal safety
a) Stay alert, watch what you are doing and use common sense when operating a machine. Do not use a machine while you are tired or under the influence of drugs, alcohol or medication. A moment of inattention while operating machines may result in serious personal injury.
b) Use personal protective equipment. Always wear eye protection. Protective equipment such as dust mask, non-skid safety shoes, hard hat, or hearing protection used for appropriate conditions will reduce personal injuries.
c) Prevent unintentional starting. Ensure the switch is in the off-position before connecting to power source and/or battery pack, picking up or carrying the machine. Carrying machines with your finger on the switch or energising machines that have the switch on invites accidents.
d) Remove any adjusting key or wrench before turning the machine on. A wrench or a key left attached to a rotating part of the machine may result in personal injury.
e) Do not overreach. Keep proper footing and balance at all times. This enables better control of the machine in unexpected situations.
f) Dress properly. Do not wear loose clothing or jewellery. Keep your hair and clothing away from moving parts. Loose clothes, jewellery or long hair can be caught in moving parts.
g) If devices are provided for the connection of dust extraction and collection facilities, ensure these are connected and properly used. Use of dust collection can reduce dust-related hazards.
h) Do not let familiarity gained from frequent use of machines allow you to become complacent and ignore tool safety principles. A careless action can cause severe injury within a fraction of a second.
4) Machine use and care
a) Do not force the machine. Use the correct machine for your application. The correct machine will do the job better and safer at the rate for which it was designed.
b) Do not use the machine if the switch does not turn it on and off. Any machine that cannot be controlled with the switch is dangerous and must be repaired.
c) Disconnect the plug from the power source and/or remove the battery pack, if detachable, from the machine before making any adjustments, changing accessories, or storing machines. Such preventive safety measures reduce the risk of starting the machine accidentally.
d) Store idle machines out of the reach of children and do not allow persons unfamiliar with the machine or these instructions to operate the machine. Machines are dangerous in the hands of untrained users.
e) Maintain machines and accessories. Check for misalignment or binding of moving parts, breakage of parts and any other condition that may affect the machine's operation. If damaged, have the machine repaired before use. Many accidents are caused by poorly maintained machines.
f) Keep cutting tools sharp and clean. Properly maintained cutting tools with sharp cutting edges are less likely to bind and are easier to control.
g) Use the machine, accessories and tool bits etc. in accordance with these instructions, taking into account the working conditions and the work to be performed. Use of the machine for operations different from those intended could result in a hazardous situation.
h) Keep handles and grasping surfaces dry, clean and free from oil and grease. Slippery handles and grasping surfaces do not allow for safe handling and control of the machine in unexpected situations.
5) Service
a) Have your machine serviced by a qualified repair person using only identical replacement parts. This will ensure that the safety of the machine is maintained.
1.2.2 Lawnmower safety warnings
a) Do not use the lawnmower in bad weather conditions, especially when there is a risk of lightning. This decreases the risk of being struck by lightning.
b) Thoroughly inspect the area for wildlife where the lawnmower is to be used. Wildlife may be injured by the lawnmower during operation.
c) Thoroughly inspect the area where the lawnmower is to be used and remove all stones, sticks, wires, bones, and other foreign objects. Thrown objects can cause personal injury.
d) Before using the lawnmower, always visually inspect to see that the blade and the blade assembly are not worn or damaged. Worn or damaged parts increase the risk of injury.
e) Before use, check the supply cord and any extension cord for signs of damage or aging. Do not use the lawnmower if the cord is damaged or worn. If the cord is damaged or worn during use, switch off the lawnmower and do not touch the cord before disconnecting it from the supply. A damaged supply cord or extension cord may result in electric shock, fire and/or serious injury.
f) Check the grass catcher frequently for wear or deterioration. A worn or damaged grass catcher may increase the risk of personal injury.
g) Keep guards in place. Guards must be in working order and be properly mounted. A guard that is loose, damaged, oris not functioning correctly may result in personal injury.
h) Keep all cooling air inlets clear of debris. Blocked ait inlets and debris may result in overheating or risk of fire.
While operating the lawnmower, always wear non-slip and protective footwear. Do not operate the lawnmower when barefoot or wearing open sandals. This reduces the chance of injury to the feet from contact with the moving blade.
j) While operating the lawnmower, always wear long trousers. Exposed skin increases the likelihood of injury from thrown objects.
k) Do not operate the lawnmower in wet grass. Walk, never run. This reduces the risk of slipping and falling which may result in personal injury.
I) Do not operate the lawnmower on excessively steep slopes. This reduces the risk of loss of control, slipping and falling which may result in personal injury.
m) When working on slopes, always be sure of your footing, always work across the face of slopes, never up or down and exercise extreme caution when changing direction. This reduces the risk of loss of control, slipping and falling which may result in personal injury.
n) Use extreme caution when reversing or pulling the lawnmower towards you. Always be aware of your surroundings. This reduces the risk of tripping during operation.
o) Keep the supply cord away from the cutting blades. A damaged supply cord may result in electric shock, fire and/or serious injury.
p) Switch off and remove plug from mains if the cord is entangled or damaged. Entangled or damaged cords can increase the risk of electric shock.
q) Do not touch blades and other hazardous moving parts while they are still in motion. This reduces the risk of injury from moving parts.
When clearing jammed material or cleaning the lawnmower, make sure all power switches are off and the power cord is disconnected. Unexpected operation of the lawnmower may result in serious personal injury.
1.3 Additional safety instructions
1.3.1 Intended use
The FLYMO Lawnmower is intended to mow lawn in private domestic gardens and allotments. The product is not intended for long term use.

DANGER!
Risk of injury!
→Do not use the product to cut bushes, hedges, shrubs and perennials, to cut climbing plants or grass on roofs or on balconies, to crush branches and twigs, and to compensate for irregularities in the ground.
→Do not use the product on slopes with an inclination of more than 20^ .
1.3.2 Additional electrical safety instructions

DANGER!
Risk of cardiac arrest!
This product generates an electromagnetic field during operation. This electromagnetic field may affect the functionality of active or passive medical implants (e.g. pacemakers), which may result in serious injury or death.
→Consult your doctor and the manufacturer of your implant before using this product.
→Remove the plug when you are not using the product.
Cables
If extension cables are used, these must comply with the minimum cross-sections in the table below:
Voltage Cable length Cross section
220 - 240 V / 50 Hz Up to 20 m 1.5 mm²
220 - 240 V / 50 Hz 20 - 50 m 2.5 mm²
-
Mains cables and extensions are available from your local Approved ServiceCentre.
-
Only use extension cables specifically designed for outdoor use and which conform to one of the following specifications:
- Ordinary rubber (60245 IEC 53), Ordinary PVC (60227 IEC 53) or - Ordinary PCP (60245 IEC 57).
- If the connection lead is damaged, it must be replaced by the manufacturer, its service agent or similarly qualified persons in order to avoid a hazard.
1.3.3 Additional personal safety instructions

DANGER!
Risk of suffocation!
Smaller parts can be swallowed.
→Keep toddlers away when you assemble the product.
→ Stop the machine, remove the mains plug from the mains socket and wait for all moving parts to come to a complete stop.
If the machine hits a foreign object:
→ In this case, inspect the machine for damage and repair it before restarting and operating it again.
- If the machine begins to vibrate abnormally:
→ In this case, immediately inspect the machine for damage, replace or repair damaged parts and inspect and tighten any loose parts.
→Before mowing, check the area to be mowed for hidden objects such as branches and remove them. This will reduce the risk of the cutting tool becoming jammed.
→ Stop the cutting tool if the machine needs to be tilted for transport when crossing surfaces other than grass and when transporting the machine to and from the mowing area.
→Do not tilt the machine when the motor is switched on.
→Empty the grass catcher before storing.
→ Recommendation: Perform cleaning and maintenance work before storing.
→ Service the machine regularly. This increases the life span of the machine.
→ Use only FLYMO-approved spare parts. Inappropriate spare parts can cause injuries or damage the machine.
→ Do not modify any safety components. Modifying safety components increases the risk of injury.
→ Take care when adjusting the machine. This prevents fingers from being caught between the moving cutting tool and stationary parts of the machine.
→Always allow the machine to cool before storing.
→ When performing maintenance on the cutting tool, be aware that the cutting tool can still move after it has been switched off.
→Recommendation: Wear hearing protection.
→Danger of slipping:
- in wet grass
- on steep slopes
- during transport
→Do not overload the mower.
→Be careful while going backwards.
2. ASSEMBLY

DANGER!
Risk of cutting injury from the blade.
If the product starts unintentionally, people can be injured by the blades.
→Wait until the blade stops.
→Disconnect the product from the power supply.
→Wear protective gloves when assembling the product.
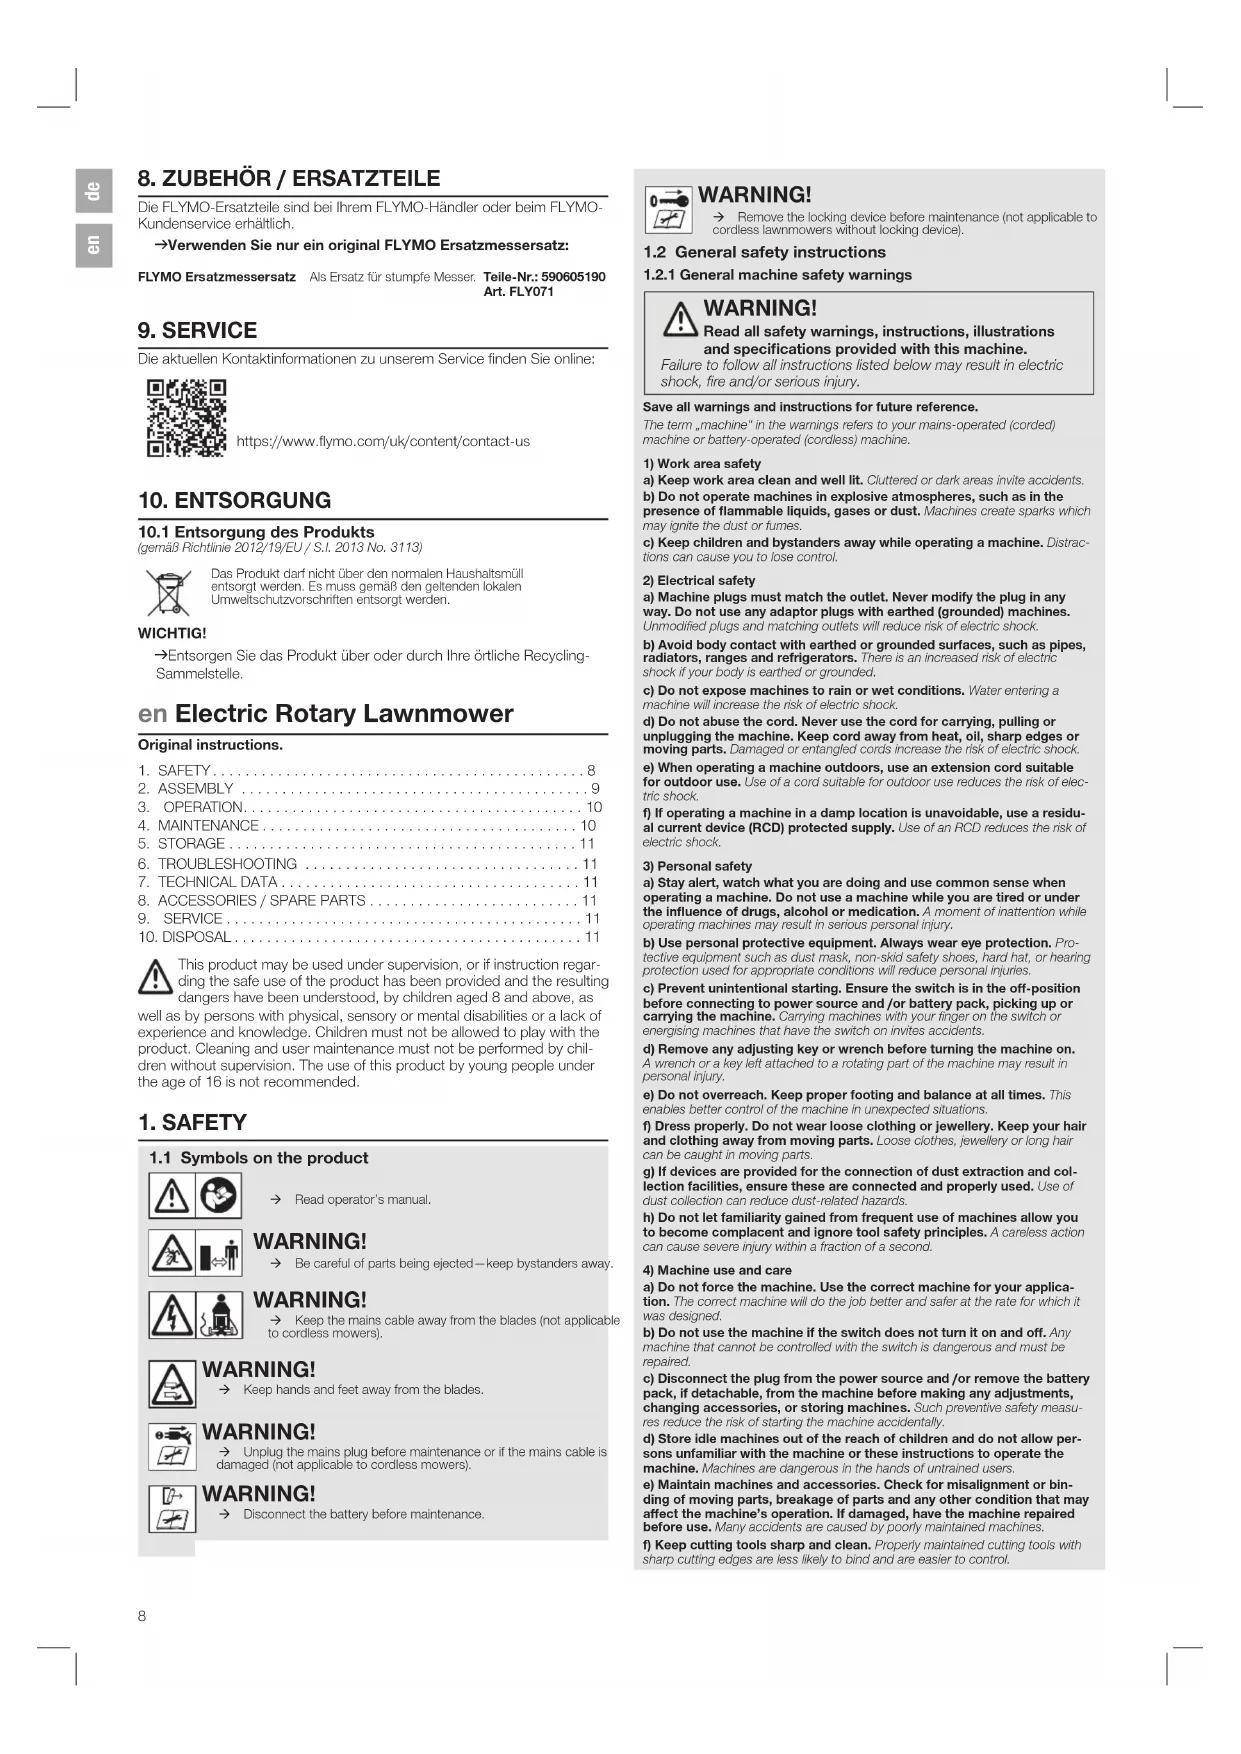
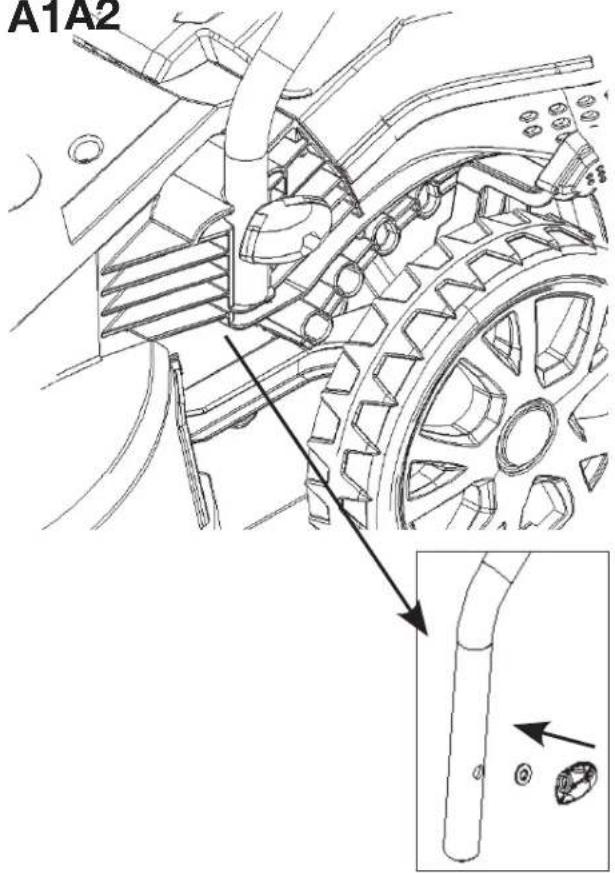
2.1 To assemble the handle [Fig. A1 / A2]:
- Insert the lower handles into the holes provided in the deck.
→Secure with the wing knob (Fig. A1).
- Attach the upper handle to the lower handles with the wing knob (Fig. A2).
The upper handle is height adjustable. The handles can be fixed in position I or II as desired (Fig. A2).
NOTE: Ensure that the cable clips are used to fix the cable to the handle.
Attach the cable to the cable hook ensuring that sufficient cable slack is available.
Ensure the cables are not trapped when folding and unfolding the top handles. Do not drop the handles.
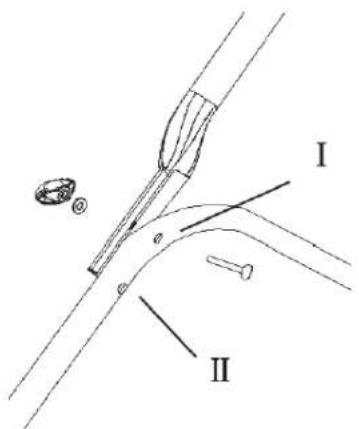
2.2 To assemble the grass box [Fig. B1 / B2 / B3 / B4]:
-
Push the grassbox handle into the slots in the grassbox upper until it clicks securely into position (Fig. B1).
-
Connect the two parts of the grassbox together, then install the tongue (Fig. B2).
-
Starting at the rear of the grassbox, install the grassbox cover into the grassbox with the clips.
→Ensure all clips are correctly located (Fig. B3).
- Attach the complete grassbox to the lawnmower (Fig. B4).
a. Lift the safety guard.
b. Make sure the discharge chute is clean and free from debris.
c. Install the fully assembled grassbox onto the location points at the rear of the deck as illustrated.
d. Place the safety flap on top of the grassbox.
NOTE: If you do not want to collect the grass, the lawnmower can be used without the grassbox. The safety guard must be in the down position.
2.3 To adjust the cutting height [Fig. C]:
![FLYMO SpeediMo 360VC - To adjust the cutting height [Fig. C]: - 1](/content/2026/04/621203/images/720c63852301fb03caeb2a54419d28103749fe34307ba26f2b2ea27f3ed1a790.jpg)
WARNING!
Risk of injury due to rotating blades.
The blades continue to rotate for a few seconds after the machine is switched off. A rotating blade can cause injury.
→Wait until the blade stops before you adjust the height.
Five cutting heights are available on this product.
→ Adjust the cutting height by moving the height adjustment handle (Fig. C).
NOTE: A medium height of cut is recommended for most lawns.
3. OPERATION

DANGER!
Risk of cutting injury from the blade.
If the product starts unintentionally, people can be injured by the blades.
→Wait until the blade stops.
→Disconnect the product from the power supply.
→Wear protective gloves when adjusting or transporting the product.
3.1 To start the mower [Fig. D1 / D2]:
![FLYMO SpeediMo 360VC - To start the mower [Fig. D1 / D2]: - 1](/content/2026/04/621203/images/0907b0285ac4dd04da2a18809be900b544e92e46f10737d19d10f928bba83b94.jpg)
DANGER!
Risk of injury
Risk of injury if the product does not stop when the start lever is released.
→Do not bypass the safety device or switches.
→For example, do not attach the start lever to the handle.
→Do not make any changes to the product that are not described in this manual.
3.1.1 To start
- Squeeze the start / stop lever (Fig. D1) towards the handle.
- Press and hold the safety button (Fig. D2).
- Release the safety button.
Important!
→Make sure the blade stops rotating before switching on again.
→Do not rapidly switch on and off.
3.1.2 To stop
→Release the pressure on the start / stop lever.
Grassbox full window:
As the grassbox fills up, grass will be visible through the window. When the window / grassbox is full it is time to empty the grassbox.
3.2 How to mow:
- Start mowing the edge of the lawn nearest to the power point so the cable is laid out on the lawn you have already cut (Fig. E).
- Mow twice a week during the growing season. Your lawn will suffer if more than a third of its length is cut at one time.
DO NOT OVERLOAD YOUR LAWNMOWER.
Mowing long thick grass may cause the motor speed to drop. You will hear a change in the motor sound. If the motor speed drops you may overload your lawnmower which may cause damage. When mowing in long thick grass a first cut with the cutting height set higher will help reduce the load. See Adjusting the cutting height.
4. MAINTENANCE

DANGER!
Risk of cutting injury from the blade.
If the product starts unintentionally, people can be injured by the blades.
→Wait until the blade stops.
→Disconnect the product from the power supply.
→Wear protective gloves when maintaining the product.
4.1 Service recommendations
Your product is uniquely identified by a silver and black product rating label.
We strongly recommend that your product is serviced at least every twelve months, preferably by a professional.
4.2 Removing and fitting the blade:

WARNING!
Risk of injure due to sharp edges.
→Always handle the blade with care.
→Wear protective gloves.
→Never use more than 3 cutting height spacers.
→Spacers must only be fitted between the blade and the fan and NEVER between the blade and the bolt.
- Switch off, wait until the blade has stopped rotating.
- Disconnect the product from the mains electricity supply.
- Remove or refit the blade.
4.2.1 Removing the blade:
- To remove the blade bolt, hold the blade firmly with a gloved hand and with a spanner, loosen the blade bolt by turning it anti-clockwise (Fig. F).
- Remove the blade bolt, washer and blade.
- Inspect for damage and clean as necessary.
→ Renew your metal blade after 50 hours mowing or 2 years, whichever is sooner, regardless of condition.
→If the blade is cracked or damaged replace it with a new one.
4.2.2 To fit the blade:
- Fit the blade to the shaft with the sharp edges of the blade pointing away from the shaft.
- Re-assemble blade bolt through the washer and the blade.
- Hold the blade firmly with a gloved hand and tighten the blade bolt firmly with a spanner. Do not over tighten.
4.3 To clean the mower

DANGER!
Risk of injury!
Risk of injury and risk of damage to the product.
→ Do not use water or a water jet (especially a high-pressure water jet) to clean the product. This can damage the product or allow water to penetrate the electrical components and cause corrosion or short circuits.
→ Do not clean with chemicals, including petrol or solvents. Some can destroy critical plastic parts.

WARNING!
Fire hazard due to blocked airflow slots
Grass clippings left in any of the air intakes or under the deck could become a potential fire hazard.
→The airflow slots must always be clean.
→After receiving your lawnmower from the manufacturer, it is very important that you keep your unit clean.
- Disconnect lawnmower from the mains electricity supply.
- Remove grass from under the deck with a brush.
- Using a soft brush, remove grass clippings from all air intakes, the discharge chute and the grassbox.
- Using a soft brush, remove grass clippings from the vision window (if equipped).
- Wipe over the surface of your lawnmower with a dry cloth.
5. STORAGE
5.1 To put into storage
The product must be stored away from children.
- Disconnect the mower from the mains.
- Clean the mower (see 4. MAINTENANCE).
- The cable hooks must both be on the upper handle. Wrap the cable in a figure of 8.
- Store the mower in a dry, enclosed and frost-free place.
5.2 Storing your cable:
→Your electric cable can be wrapped around hooks to enable tidy and safe storage.
5.3 Storing your lawnmower:
→Store in a dry place where your lawnmower is protected from damage.
→ Loosen the wing knobs to enable the handles to be folded over the product ensuring that the upper handle is supported.
5.4 At the end of the mowing season:
- Replace bolts, nuts or screws, if necessary.
- Clean your lawnmower thoroughly.
- Make sure that the electric cable is stored correctly to prevent damage.
6. TROUBLESHOOTING

DANGER!
Risk of cutting injury from the blade.
If the product starts unintentionally, people can be injured by the blades.
→Wait until the blade stops.
→Disconnect the product from the power supply.
→Wear protective gloves when troubleshooting the product.
6.1 Fails to operate:
- Is the correct starting procedure being followed?
→See To start the lawnmower. - Is the power turned on?
- Check the fuse in the plug. Replace if blown.
6.2 Poor grass collection:
- Disconnect from the mains electricity supply.
- Clean the outside of the air intakes, the discharge chute and the underside of the deck.
- Raise to a higher height of cut. See Adjusting the cutting height.
6.3 Excessive vibration:
- Disconnect from the mains electricity supply.
- Check that the blade is fitted correctly.
- If the blade is damaged or worn, replace it with a new one.
6.4 Lawnmower becomes heavy to push:
- Disconnect from the mains electricity supply.
- In long grass or uneven ground, the height of cut should be raised to a higher position. See Adjusting the cutting height.
- Check that the wheels and rollers can rotate freely.

NOTE: For any other malfunctions please contact the FLYMO customer service. Repairs must only be done by FLYMO customer service or specialist dealers approved by FLYMO.
7. TECHNICAL DATA
Electric Lawnmower Unit Value
Speedi-Mo 360VC
9676633-xx
| Rated power W 1500 | ||
| Mains voltage V (AC) 230 | ||
| Mains frequency | Hz | 50 |
| Speed of rotation cutting blade | R/min | 3600 |
| Cutting width | cm | 36 |
| Cutting height adjustment | mm | 20 – 60 |
| Volume of grass box | l | 30 |
| Weight | kg | 11.8 |
| Sound pressure level L_pA^1) | dB(A) | 87 |
| Uncertainty k_pA | dB(A) | 1.84 |
| Sound power level L_mA^2) measured / guaranteed | dB(A) | 93 / 96 |
| Hand / arm vibration a_vSW^1) | m/s ^2 | 2.3 |
| Uncertainty k_vSW | 1.5 | |
Measuring process complying with: 1) EN IEC 62841-4-3 2) RL 2000/14/EC / S.I. 2001 No.1701
NOTE: The stated vibration emission value has been measured according to a standardized test procedure and can be used for comparison of one electric power tool with another. It can also be used for preliminary evaluation of exposure. The vibration emission value can vary during actual use of the electric power tool.
8. ACCESSORIES / SPARE PARTS
The FLYMO spare parts are available from your FLYMO dealer or from the FLYMO service.
→Only use an original FLYMO blade:
FLYMO replacement blade As replacement for blunt blade. Part. no.: 590605190
Art. FLY071
9. SERVICE
Please find the current contact information of our service on the back page and online:

https://www.flymo.com/uk/content/contact-us
10. DISPOSAL
10.1 Disposal of the product
(in accordance with Directive 2012/19/EU/S.I.2013 No.3113)

The product must not be disposed of together with normal household waste. It must be disposed of in line with local environmental regulations.
IMPORTANT!
→ Dispose of the product through or via your local recycling collection centre.

6.3 Vibrations excessives :
https://www.flymo.com/uk/content/contact-us
10. MISE AU REBUT
https://www.flymo.com/uk/content/contact-us
10. ИЗХВЪРЛЯНЕ
https://www.flymo.com/uk/content/contact-us
10. LIKVIDACE
Likvidace výrobku
https://www.flymo.com/uk/content/contact-us
10. BORTSKAFFELSE
https://www.flymo.com/uk/content/contact-us
10. АПОРРІΨΗ
https://www.flymo.com/uk/content/contact-us
https://www.flymo.com/uk/content/contact-us
10. KASUTUSELT KÖRVALDAMINE
https://www.flymo.com/uk/content/contact-us
10. HÄVITTÄMINEN
https://www.flymo.com/uk/content/contact-us
10. ODLAGANJE U OTPAD
Odlaganje proizvoda
(sukladno Direktivi 2012/19/EU/S.I. 2013 br. 3113)

Proizvod nije dopušteno odlagati u običan komunalni otpad. Morate je odložiti u otpad u skladu s lokalnim zakonima za zaštitu okoliša.
VAŽNO!
https://www.flymo.com/uk/content/contact-us
10. HULLADÉKKEZELÉS
https://www.flymo.com/uk/content/contact-us
10. SMALTIMENTO
https://www.flymo.com/uk/content/contact-us
10. ŠALINIMAS
https://www.flymo.com/uk/content/contact-us
10. UTILIZÂCIJA
https://www.flymo.com/uk/content/contact-us
10. AFVOER
https://www.flymo.com/uk/content/contact-us
10. KASSERING
https://www.flymo.com/uk/content/contact-us
10. UTYLIZACJA
Utylizacja produktu
https://www.flymo.com/uk/content/contact-us
10. ELIMINAÇÃO
-
_0^* is a function of the linear combination of two variables, and
-
Cramford's pre-menture, Cramford's notal natal (in VIZB) (bacc exced),
-
Stergep supratața masinii de tuns gazonul cu o laveta uscata.
5. DEPOZITAREA
https://www.flymo.com/uk/content/contact-us
10. LIKVIDÁCIA
Likvidácia výrobku
https://www.flymo.com/uk/content/contact-us
10. ODLAGANJE
Odlaganje izdelka
(v skladu z Direktivo 2012/19/EU/S.I. 2013 št. 3113)

https://www.flymo.com/uk/content/contact-us
10. KASSERING
https://www.flymo.com/uk/content/contact-us
10. TASFIYE
Ürünün tasfiyesi
(2012/19/AB / S.I. 2013 No. 3113 Direktifi uyarınca)

Husqema Australia Pty. Ltd
LUCKSI 1905
Central Coast BC
R502252 Dange: (1,81) 101 243527406
-
- (1-2) [a] 2-43.27-7402 customers.service@burguate.com.au
Climmer Service Solutions Inc.
Alyar Alyos 212, Baku, Azibajan
Sales: +994 70 326 07 14
Alterselis -994 77 326 07 14
www.licogusa-garden.at info@postress.garden.at
Inco-progios gaderas
Bahrain
M.H.A. Mahruus
BUILDING 209, BLOCK 356
ROAD 320
Phone: +973 1740 8000
alrahroos@alrahroos.com
Belarus / Беларусь
СОО «Мастер Гардс
220118, 1. Миёск,
Fig.2 Investigator By
Belgium
Huspyama Belgium
Gardena Divakri
Louvres, 307ney 512
Pencite 1990 Toronto
19.93 (24)
Bogic
Bosnia / Herzegovina
Silk Trade d.u.v.
Pukbura Zoro, Via Br. 20
info@eilktwels.com
Brazil
Nordtec Maquinas e Matores Ltd
Averida Juscelino Kubilschek
de Oliveira Curitbe
3003 Brazil
Phone: (105) 41 3695-9600
Unit 3 5, 7F. Lval. Tower D, No. 786, Jin Zhong Rd., Chang
King Dist., Shanghai, PRC 200395
Colombia
Equipes de Toyama Colombia 545
Cra. 68 D No 25 B 96 Dt. 618
Pantels Fapadopouke S.A.
92 Athinon Avenue
Alhens
10442 61905
Phone: 1-30; 21 0519 3100
http://www.pepecopoeus.com/
Czech Republic
Gardena
Service Center
co Huscana
Manufacturing G2 6.1.3
Jescrioz, 146
79320 where poor Flaccourt Dorea: 50° 100.425
1319.202 100 423
35782013
Denmark
GARDENA DANMARK
Lejova 15, st
3500
III. (+45) 70 26 47 70
gardenade@nusqvartagroup.com
www.garcina.com/kr
Dominican Republic
BOSCHUSA, S.R.L.
Carrefera Santiago Licey
Kn, 5
Esquina Copel II.
Santiago De Los Caballeros 51026 Dominique Dubuhtio
STOCK: LEMON, HARRIANCE
- [ ] 802-052-0476 contact@libconvace.com.de
Ситайский с.р.
Egypt
Universal Agencies Co
20, ACuel Hamid Lolly St.
C128 Davon 4,06:27
120.12037
Estonia
Husqama Bosi OU
Valucku 132
EE-11216 Tailmn
info@gardana.eu
Finland
Су Н.Есцята 50
Juuralkutie 582
01510 Variana
www.garcurel
France
Нуытама France
info@transporter.com.gc
www.transporter.com.go
Service Address and
Importer to Great Britain
Huspana UK Ltd
Preston Road
Ayclific Industrial Park
Newton Aysilfe
County Durham
DILS ED
Phone: 1-41, 01 344 844 1556
customer.service@18jparma.50.16
Greece
ПАЛАДОПРОУЛОС АЕВЕ
### 92
A8iya
TX10442
E-mail:
In 11.30/21d 5193 10: Info@papacipules.com
http://sepetroptechs.com/
Hong Kong
Tung Ta Compe
131-153 Hor Bun Hal
Kaur Tong, Kevican
Hong Kong
Paine: [852] 3585 1602
2017年1月1日
Hungary
Pct No. 165, Industrial Area.
Peter 2. Bern Darbur
Chundigarh
160032 hdu
Phone: (+91) 98140 06530
raman@jaganhardware.com
Ivea
Iraq Akshivat Alakday Currera
Al Seouliceh, Woor Estate Pa
At 6:30:00:1925 London Bank Mood
Phone: 1964 78 18 18 46 75
Ireland
Lilley Distributors Ltd.
300 MW Business Park, Balycodon
15 Dublin
Phone: (353) 1 824 2600
info@lilicpv.com
Israel
HAGARN LTD
2 Nana Hori St
8122201 Yama
internet@hugarn.co.il
Phone: (1972) 8-932-0400
Italy
Huspana tala 5 pA
ossis13429.18(https://sccvarin.com
Japan
Husqama Zenan Co. Ltd. Japan
1-3 Maretica, Kawagoe
350 1165 Salama
Japan
gardena https://www.dongroup.com/
Kazakhstan
100 "Памад"
Russia
Salra Highway (Beirut - Tripoli Center
622 Meather Bldg.
P.O.Bax 215
Johlen Dewen (054) 5-250507
(1) 961-3.955481
1+5017503461
(2)
Lithuania