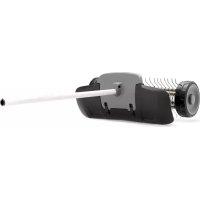
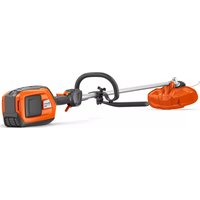
DT600 - Brush cutter HUSQVARNA - Free user manual and instructions
Find the device manual for free DT600 HUSQVARNA in PDF.



| Product type | Thatcher (accessory for brushcutter) |
| Brand | Husqvarna |
| Model | DT600 |
| Working width | 556 mm |
| Weight (accessory only) | 6.5 kg |
| Power source | Petrol or battery (depending on compatible power unit) |
| Intended use | Lawn thatching |
| Sound power level (petrol) | 105 dB(A) measured, 109 dB(A) guaranteed |
| Sound pressure level at operator's ear (petrol) | 95 dB(A) |
| Vibrations front/rear handles (petrol) | 6.2 / 4.3 m/s² |
| Sound power level (battery) | 89 dB(A) |
| Sound pressure level at operator's ear (battery) | 77 dB(A) |
| Vibrations front/rear handles (battery) | 1.9 / 2.6 m/s² |
| Safety distance | 15 m minimum from people and animals |
| Required protective equipment | Ear protection, safety glasses, gloves, boots, long clothing |
| Maintenance | Regular cleaning, check of bearings, air filter lubrication (petrol) |
| Spare parts | Original Husqvarna accessories recommended |
| Repairability | Hand over to a Husqvarna specialised workshop |
| Conformity standards | CE, UKCA, compliance with directives 2006/42/EC, 2000/14/EC, 2011/65/EU |
Frequently Asked Questions - DT600 HUSQVARNA
User questions about DT600 HUSQVARNA
0 question about this device. Answer the ones you know or ask your own.
Ask a new question about this device
Download the instructions for your Brush cutter in PDF format for free! Find your manual DT600 - HUSQVARNA and take your electronic device back in hand. On this page are published all the documents necessary for the use of your device. DT600 by HUSQVARNA.
USER MANUAL DT600 HUSQVARNA
EN Operator's manual 2-12
Transportation, storage and disposal.... 8
Technical data....9
Declaration of Conformity.... 11
Introduction
Product description
We have a policy of continuous product development and therefore reserve the right to modify the design and appearance of the products without prior notice.
Note: This manual cover both gasoline operated and battery operated power units.
Intended use

WARNING: This attachment may only be used together with the intended product, see the accessory chapter in the Operator's Manual of the product.
The attachment is designed only to dethatch lawns from moss.
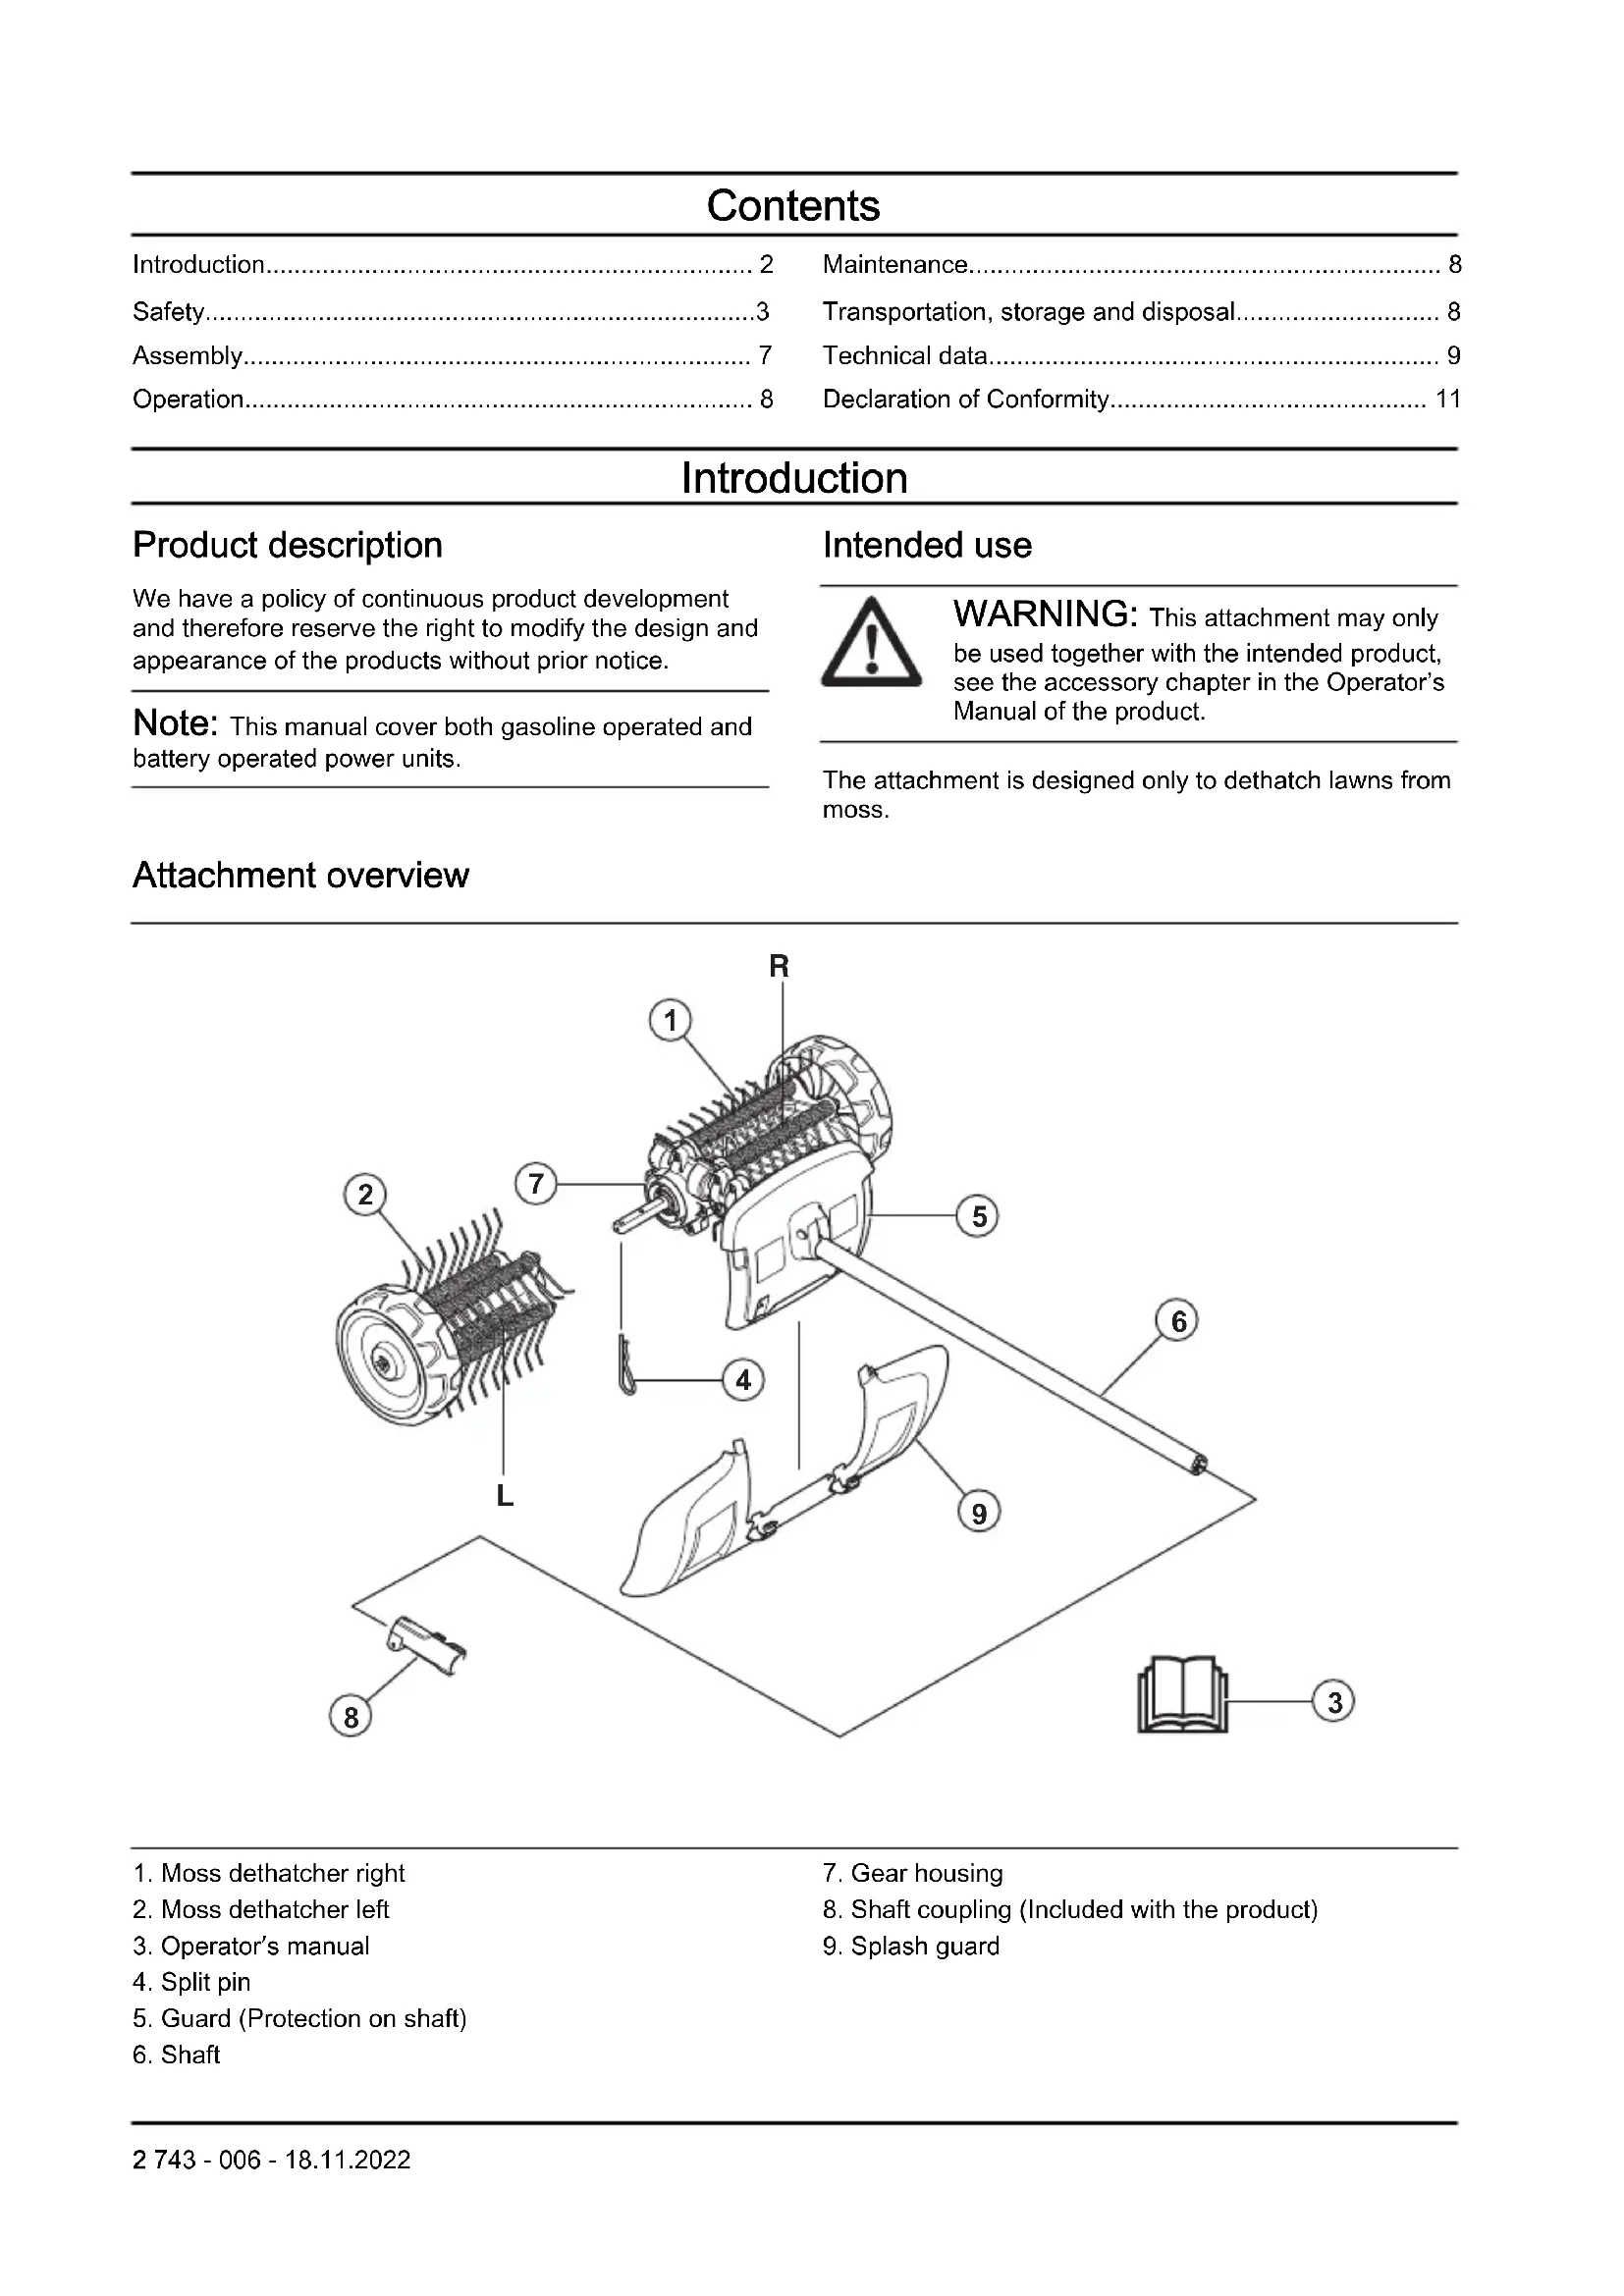
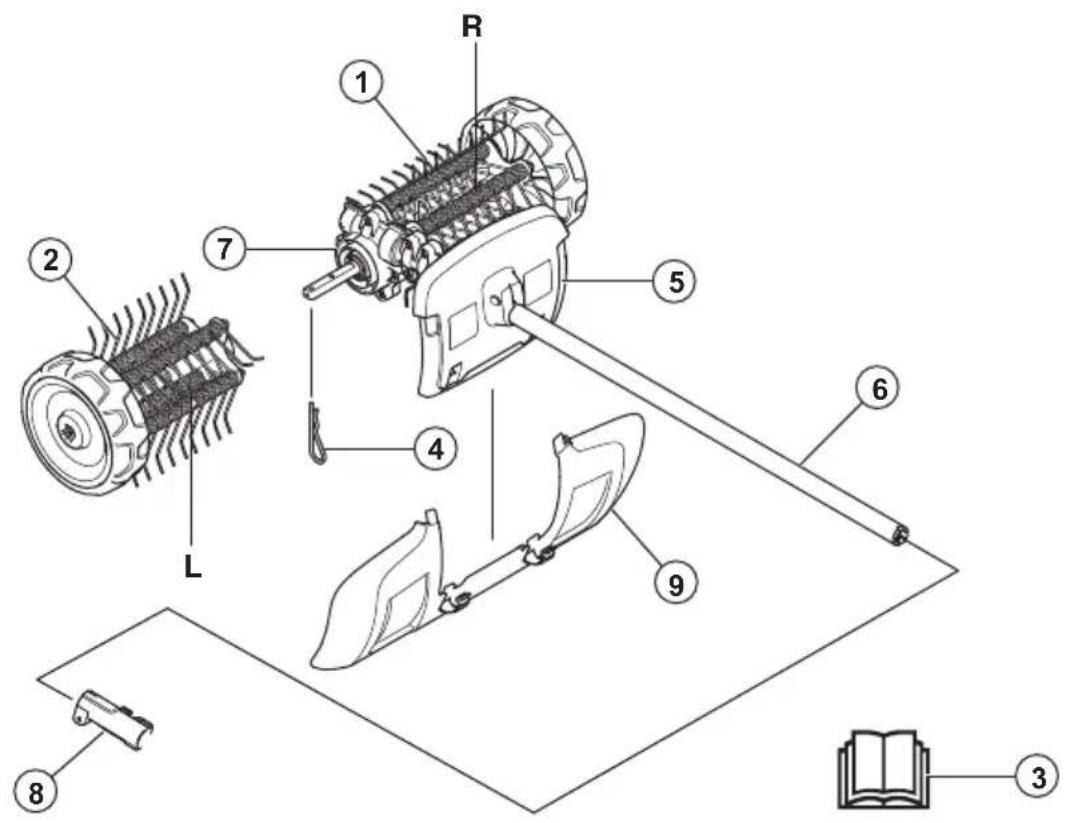
Attachment overview
-
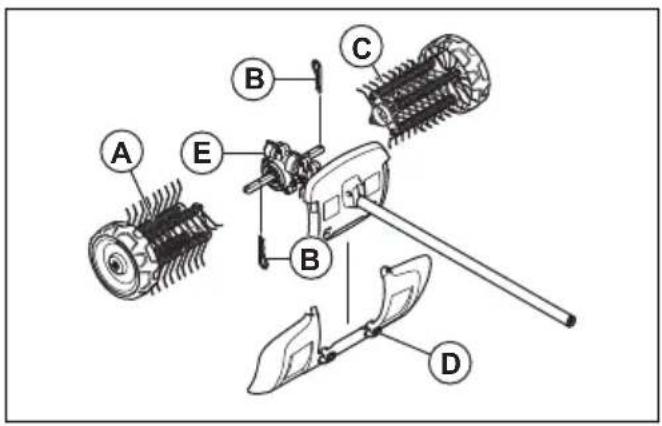
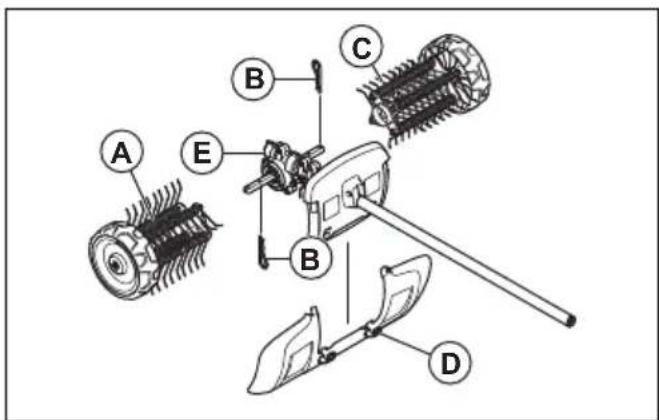
Moss dethatcher right
-
Moss dethatcher left
-
Operator's manual
-
Split pin
-
Guard (Protection on shaft)
-
Shaft
-
Gear housing
-
Shaft coupling (Included with the product)
-
Splash guard
Symbols on the attachment and on the power unit

Careless or incorrect use of this attachment can result in serious or fatal injury to the operator or others.

Read the operator's manual carefully and make sure you understand the instructions before you use the attachment.


Use approved hearing protection. Use approved eye protection. Use a breathing mask when there is a risk of dust.

This attachment is in accordance with applicable EC directives.

This product conforms to applicable UK regulations.
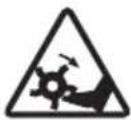
Rotating parts. Keep hands and feet clear. The arrow indicates the direction of rotation.

Always wear approved protective gloves.

Wear sturdy, non-slip boots.
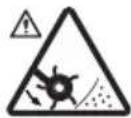
Watch out for thrown objects and ricochets.
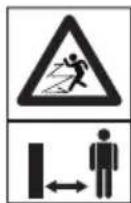
The operator must ensure that no people or animals come closer than 15 m. When several operators are working at the same site a safety distance of at least 15 m must be in effect. The attachment can forcibly throw objects that can bounce back. This can result in serious eye injuries if the recommended safety equipment is not used.
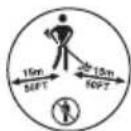
Keep a minimum of 15 m / 50 ft distance to persons and animals during operation of the product.
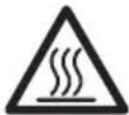
Keep all parts of your body away from the hot surfaces.

Noise emission to the environment label as per EU and UK directives and regulations, and New South Wales legislation "Protection of the Environment Operations (Noise Control) Regulation 2017". The guaranteed sound power level of the product is specified in Technical data on page 9 and on the label.
Note: Other symbols/decals on the attachment refer to special certification requirements for certain markets.
Safety
Safety definitions
Warnings, cautions and notes are used to point out specially important parts of the operator's manual.

WARNING: Used if there is a risk of injury or death for the operator or bystanders if the instructions in the manual are not obeyed.

CAUTION: Used if there is a risk of damage to the product and/or the attachment, other materials or the adjacent area if the instructions in the manual are not obeyed.
Note: Used to give more information that is necessary in a given situation.
General safety instructions

WARNING: Read the safety instructions that follow before you use the attachment.
- Please read the operator's manual carefully and make sure you understand the instructions before using the attachment.
• These instructions supplement the instructions that were included with the product. For other procedures, please refer to the operating instructions for the product. - Under no circumstances may the design of the attachment be modified without the permission of the manufacturer. Do not use an attachment that appears to have been modified by others and always use original accessories. Non-authorized modifications and/or accessories can result in serious personal injury or the death of the operator or others.
Read all instructions

WARNING: When using electric gardening appliances, basic safety precautions should always be followed to reduce the risk of fire, electric shock, and personal injury, including the following:
Detacher safety instructions
- Never allow children, persons with reduced physical, sensory or mental capabilities or lack of experience and knowledge or people unfamiliar with these instructions to use the product. Local regulations may restrict the age of the operator.
- Never operate the product while people, especially children, or pets are nearby.
- Do not overreach and keep the balance at all times. To always be sure of the footing on slopes, walk, never run.
- Do not touch moving hazardous parts before the machine is disconnected from the mains and the moving hazardous parts have come to a complete stop.
- Always wear substantial footwear and long trousers while operating the machine.
- Remove the battery from the product whenever the product is unattended, before clearing a blockage and before cleaning or working on the product.
- Remove the battery from the product before an examination for damages on the product is done when, for example, a foreign object is hit or if the product starts to vibrate abnormally.
- Do not connect a damaged cord to the supply and do not touch a damaged cord before it is disconnected from the power supply. A damaged
cord can lead to contact with live parts and can result in injury or death.
- Never operate the product with defective guards/shields, without safety devices, or if the cord is damaged or worn.
- Keep extension cords away from moving hazardous parts to avoid damages to the cords which can lead to contact with live parts.
- Only connect the product to a power supply circuit protected by a residual current device (RCD) with a tripping current of not more than 30 mA.
- Avoid using the product in bad weather conditions especially when there is a risk of lightning.
Safety instructions for operation

WARNING: Read the warning instructions that follow before you use the product.
- The stop switch automatically returns to the start position. Make sure to prevent unintentional starting when assembling, checking and/or performing maintenance. If you have a gasoline operated product, disconnect the spark plug cap from the spark plug. If you have a battery operated product, remove the battery.
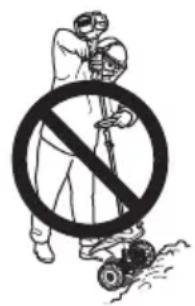
- Watch out for thrown objects. Always wear eye protection. Never lean over the moss dethatcher. Stones, rubbish, etc. can be thrown up into the eyes causing blindness or serious injury.
- The gear can get hot during use and may remain so for a while afterwards. You could get burnt if you touch it.
- Although the brush drums do not have the same force as lawn mower blades, for example, you should avoid working with materials that can cause personal injury or damage to property if thrown out.
- Do not use the machine unless you are able to call for help in the event of an accident.
- Only use the machine for the purpose it was intended for.
- Never use the machine if you are tired, if you have drunk alcohol, or if you are taking medication that could affect your vision, your judgement or your coordination.
- Never use the machine in extreme weather conditions such as severe cold, very hot and/or humid climates.
- Never use a machine that is faulty. Carry out the safety checks, maintenance and service instructions described in this manual. Some maintenance and service measures must be carried out by trained and qualified specialists. See instructions under the Maintenance heading.
- Never allow children to use the machine.
-
Never allow anyone else to use the machine without first ensuring that they have read and understood the contents of the operator's manual.
-
Keep unauthorised persons at a distance. Children, animals, onlookers and helpers should be kept outside the safety zone of 15 m while you work. Stop the machine immediately if anyone approaches.
- If you encounter a situation where you are uncertain how to proceed you should ask an expert. Contact your dealer or your service workshop.
- Avoid all usage which you consider to be beyond your capability.
- Observe your surroundings and make sure that there is no risk of people or animals coming in contact with or affect your control of the product.
- Listen out for warning signals or shouts when you are wearing hearing protection. Always remove your hearing protection as soon as the engine/motor stops.
- Do not use the machine in bad weather, such as dense fog, heavy rain, strong wind, intense cold, etc. Working in bad weather is tiring and often brings added risks, such as icy ground.
- Make sure you can move and stand safely. Check the area around you for possible obstacles (roots, rocks, branches, ditches, etc.) in case you have to move suddenly. Take great care when working on sloping ground.

natural_image
Person in protective gear using a lawn mower to trim a vehicle, with a black arrow indicating clockwise motion (no text or symbols)- The engine/motor must be switched off before moving.
- Never put the machine down with the engine/motor running unless you have it in clear sight.
• Always use both hands to hold the machine. Hold the machine at the side of your body.
• Make sure hands and feet do not come near the moss dethatcher when it is running. - When the engine/motor is switched off, keep your hands and feet away from the moss dethatcher until it has stopped completely.
- If heavy vibration occurs, stop the machine. If you have a gasoline operated product, disconnect the HT lead from the spark plug. If you have a battery operated product, remove the battery from the product. Make sure that the machine is not damaged. Repair any damage.
Personal protective equipment
WARNING: Read the warning instructions that follow before you use the product.
• Always use approved personal protective equipment when you use the product. Personal protective equipment cannot fully prevent injury but it decreases the degree of injury if an accident does occur. Let your dealer help you select the right equipment.
- Use approved hearing protection that provides adequate noise reduction. Long-term exposure to noise can result in permanent hearing impairment.

natural_image
Line drawing of a mechanical component or device (no text or symbols)- Use approved eye protection. If you use a visor, you must also use approved protective goggles. Approved protective goggles must comply with the ANSI Z87.1 standard in the USAs or EN 166 in EU countries.

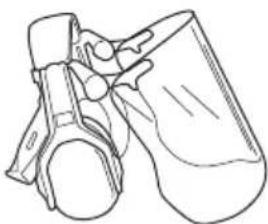
natural_image
Line drawing of a mechanical component or device (no text or symbols)- Use gloves when necessary, for example when you attach, examine or clean the cutting equipment.

natural_image
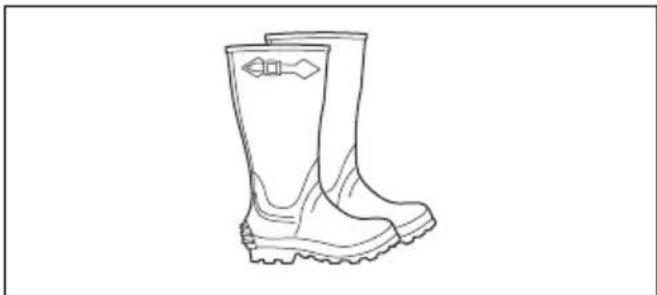
Line drawing of two types of gloves, one with bandages and the other with a curved handle (no text or symbols)- Use protective boots with steel toes and non-slip soles.

natural_image
Line drawing of a pair of boots with visible tread pattern and buckles (no text or symbols)- Use clothing made of a strong fabric. Always use heavy, long pants and long sleeves. Do not use loose clothing that can catch on twigs and branches. Do not wear jewelry, short pants, sandals or go with bare feet. Put your hair up safely above shoulder level.
- Keep first aid equipment close at hand.

Safety devices on the attachment

WARNING: Read the warning instructions that follow before you use the attachment.
This section contains the attachment's safety features, its purpose and how checks and maintenance should be carried out to ensure that it operates correctly. See instructions under the heading Attachment overview on page 2 to find where these parts are located on your attachment.
The life span of the attachment can be reduced and the risk of accidents can increase if attachment maintenance is not carried out correctly and if service and/or repairs are not carried out professionally. If you need further information please contact your nearest servicing dealer.

WARNING: Never use an attachment with defective safety components. The attachment's safety equipment must be inspected and maintained as described in this section. If your attachment fails any of these checks, contact your service agent to get it repaired.
WARNING: All servicing and repair work on the product requires special training. This is especially true of the product's safety equipment. If your product
fails any of the checks described below you must contact your service agent. When you buy any of our products we guarantee the availability of professional repairs and service. If the retailer who sells your product is not a servicing dealer, ask him for the address of your nearest service agent.
Safety instructions for maintenance
WARNING: Read the warning instructions that follow before you do maintenance.
WARNING: Always stop the product before you do maintenance on the attachment. Be careful, the attachment can continue to move after the power/throttle trigger is released. Make sure that the attachment has stopped fully. If you have a gasoline operated product, disconnect the HT lead from the spark plug. If you have a battery operated product, remove the battery.

WARNING: Always use protective gloves.
- Check the entire product before starting. Check that all guards and covers are complete and fastened securely. Check all nuts and screws.
- If you have a gasoline operated product, check that there are no fuel leaks.
- Replace damaged parts.

natural_image
Technical line drawing of a mechanical component with threaded ends and flanges (no text or symbols)Assembly
To assemble the attachment

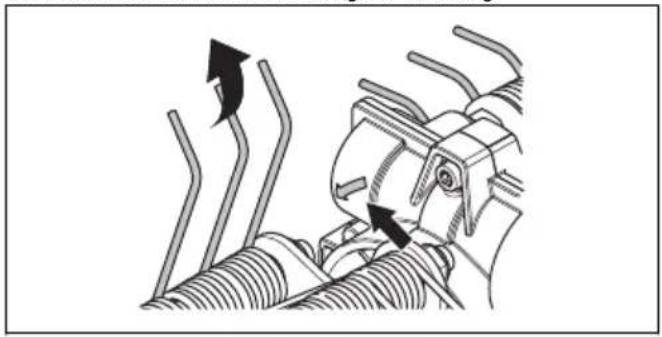
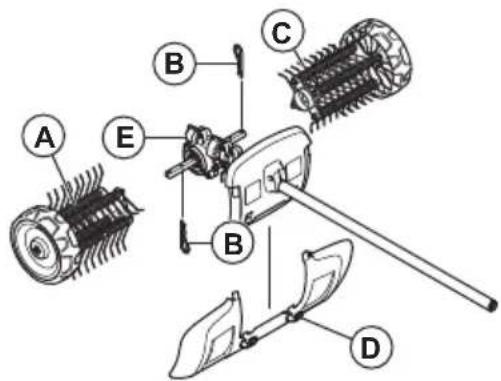
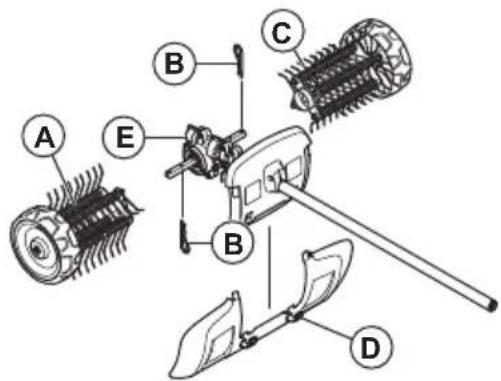
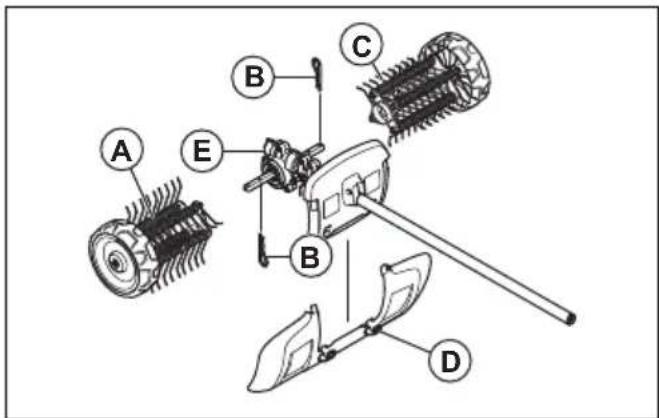
The arrow on the gear housing indicates the direction of rotation. The gear housing is to be placed as illustrated.
IMPORTANT:
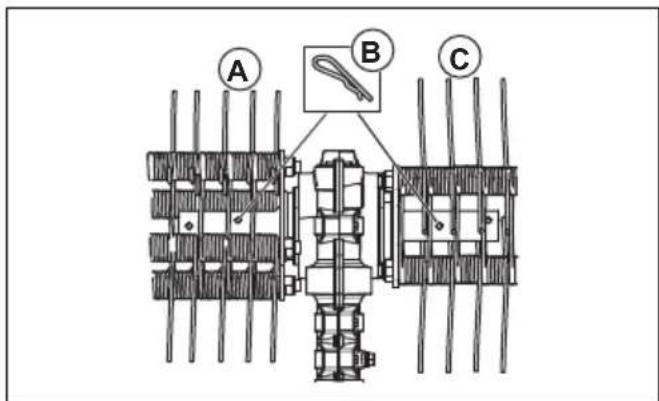
The moss dethatcher rollers are marked with arrows showing the direction of the rotation. Make sure the moss dethatcher rollers are fitted correctly.
The moss dethatcher rollers must be fitted slightly displaced in relation to each other. The moss dethatcher springs should point in the same direction as the rotation direction arrow shown on the gear housing.
natural_image
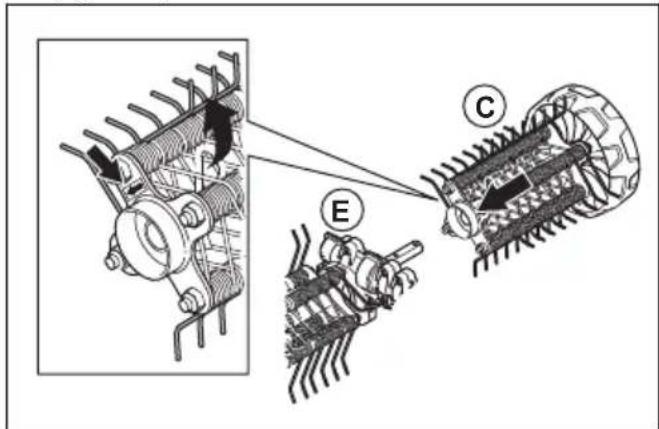
Mechanical assembly diagram showing pipe connection and motion arrows (no text or symbols)- Press the left moss dethatcher (A) onto the left drive shaft from the gear housing (E).
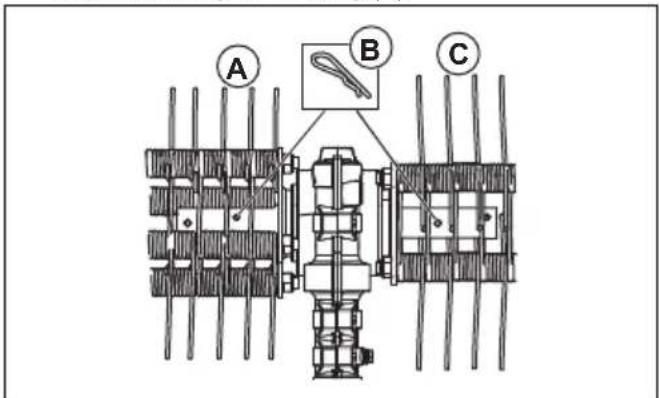
- Fasten the moss dethatcher roller with split pin (B) into the inner hole in the shaft.

- Press the right moss dethatcher (C) onto the right drive shaft from the gear housing (E).
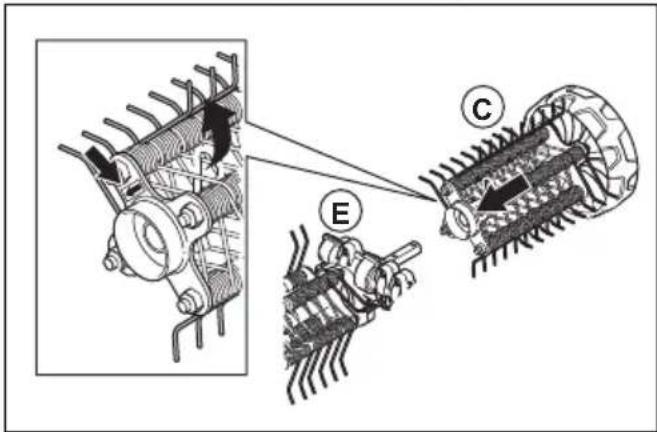
- Fasten the moss dethatcher roller with split pin (B) into the inner hole in the shaft.
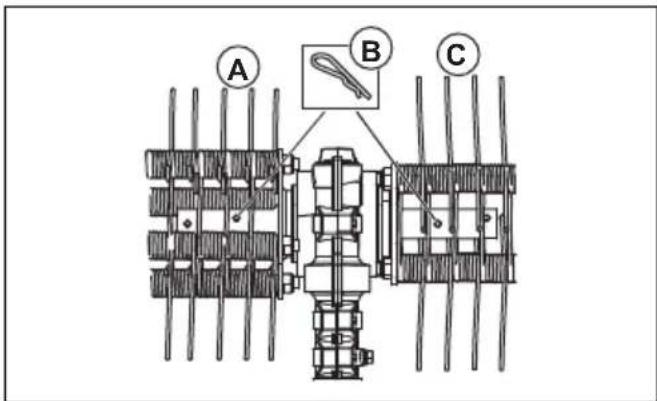
- Mount the splash guard with the snap-on fasteners (D).
Note: For assembling accessories on basic product, refer to the manual of the basic product.
Operation
To start the product with a cold engine
If you have a gasoline operated product, obey these instructions to start the product with a cold engine.
- Run the basic product warm and then shut down the product.
- Mount the attachment as per the assembly instructions.
- When adjusting the carburettor, make sure that the dethatcher is held against the ground and that no one else is in the vicinity.
- Keep the moss dethatcher idling.
- Make sure that the handle and safety features are in good working order. Never use a product that lacks a part or has been modified outside its specifications.
To use the attachment
- Run the moss dethatcher at full gas (or nearly full gas) with the wheels resting on the surface.
Note: It is both tiring and unnecessary to lift or hold the moss dethatcher above the surface when working.
- Keep an acute working angle to the surface. With a large working angle, the moss dethatcher tends to move towards you and you risk losing control of the product.
Maintenance
Introduction
Below you will find some general maintenance instructions. If you need further information please contact your service workshop.
To perform maintenance on the attachment
CAUTION: Much work on the moss dethatcher is often done in dusty conditions. If you have a gasoline operated product, it is extremely important that the air filter is inspected regularly, often daily, and oiled in order to work satisfactorily.
Refer to the operator's manual of the power unit for maintenance instructions.

WARNING: The gear housing gets hot when the product has been in use. To avoid burning yourself do not touch the gear housing.
- Make sure that the moss dethatcher does not rotate when the power/thottle trigger is released.
natural_image
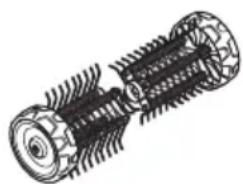
Technical line drawing of a mechanical component with threaded ends and grooves (no text or symbols)- Clean the wheels if they are not rotating freely.

WARNING: Always wear protective gloves when you perform maintenance on the attachment.
Transportation, storage and disposal
Transport and storage
If transporting the attachment on another vehicle always use approved securing devices and make sure that the attachment is securely held.
Ensure the attachment is cleaned and that a complete service is carried out before long-term storage.
Technical data
Technical data for gasoline operated products
| Moss dethatcher | DT600 |
| Width, mm 556 | |
| Weight | |
| Weight, kg 6.5 | |
| Noise emissions1 | |
| Sound power level, measured dB (A) 105 | |
| Sound power level, guaranteed LWA dB (A) 109 | |
| Sound levels2 | |
| Equivalent sound pressure level at the operator's ear, measured according to EN ISO 22868 , dB (A): | 95 |
| Vibrations3 | |
| Equivalent vibration levels (ahv,eq) at handles, measured according to EN ISO 22867, m/s2 | |
| Front/rear handles 6.2/4.3 | |
Technical data for battery operated products
| 325iLK + Dethatcher attachment DT600 | |
| Width, mm 556 | |
| Weight | |
| Weight, kg 2.3+6.5 | |
| Noise emissions4 | |
| Sound power level, measured dB (A) 89 | |
| Sound levels5 | |
| Sound pressure level at the operator's ear, measured according to EN ISO 22868 , dB (A): | 77 |
| Vibrations 6 | |
| Vibration levels at handles, measured according to EN 62841-1, m/s 2 | |
| Front/rear handles 1.9/2.6 | |
| Equipped with approved accessory (original), left/right 1.9/2.6 | |
Declaration of Conformity
EU Declaration of Conformity
We, Husqvarna AB, SE-561 82 Huskvarna, Sweden, tel: +46-36-146500, declare on our sole responsibility that the product:
| Description Moss dethatcher | |
| Brand Husqvarna | |
| Type / Model DT600 | |
| Identification Serial numbers dating from 2022 and onwards | |
complies fully with the following EU directives and regulations:
| Directive / Regulation Description | |
| 2006/42/EC "relating to machinery" | |
| 2000/14/EC "relating to the noise emissions in the environment" | |
| 2011/65/EU | “on the restriction of the use of certain hazardous substances in electrical and electronic equipment” |
and that the following standards and/or technical specifications are applied: EN ISO 12100:2010, EN IEC 63000:2018
RISE SMP Svenska Maskinprovning AB, Box 7035, SE-750 07 Uppsala, Sweden has performed voluntary type examination on behalf of Husqvarna AB.
Certificate number: SEC/15/2411
Huskvarna, 2022-03-14
Stefan Holmberg, R&D Director, Technology Management, Husqvarna AB
Responsible for technical documentation

UK Declaration of Conformity
We, Husqvarna AB, SE-561 82 Huskvarna, Sweden, tel:
+46-36-146500, declare on our sole responsibility that
the product:
| Description Moss dethatcher | |
| Brand Husqvarna | |
| Type / Model DT600 | |
| Identification Serial numbers dating from 2022 and onwards | |
complies fully with the following UK regulations:
| Description |
| The Supply of Machinery (Safety) Regulations 2008 |
| The Noise Emission in the Environment by Equipment for use Outdoors Regulations 2001 |
| The Restriction of the Use of Certain Hazardous Substances in Electrical and Electronic Equipment Regulations 2012 |
and that the following standards and/or technical
specifications are applied: EN ISO 12100:2010, EN IEC
63000:2018.
Huskvarna, 2022-03-14
Stefan Holmberg, R&D Director, Technology
Management, Husqvarna AB
Responsible for technical documentation

UK Importer:
Husqvarna UK Ltd
Preston Road, Co. Durham
DL5 6UP
Съдържание
Въведение.... 13
Безопасност....14
Монтаж....18
Операция.... 19
Поддръжка....20
natural_image
Illustration of a person in protective gear using a lawn mower to lift a vehicle (no text or symbols)natural_image
Line drawing of a pair of boots or boots with no text or symbolsnatural_image
Line drawing of a mechanical component or device (no text or symbols)natural_image
Line drawing of two different types of gloves, one with bandages and the other with banding (no text or symbols)natural_image
Line drawing of a pair of boots with visible branding and sole details (no text or symbols)natural_image
Technical line drawing of a mechanical component with threaded ends and flanges (no text or symbols)Монтаж
natural_image
Mechanical assembly diagram showing gear meshing with directional arrows indicating motion (no text or symbols)Поддръжка
Въведение
natural_image
Technical line drawing of a mechanical component with threaded ends and gear-like grooves (no text or symbols)natural_image
Illustration of a person in protective gear using a lawn power tool with a curved arrow indicating rotation (no text or symbols)natural_image
Line drawing of a mechanical component or device (no text or symbols)natural_image
Line drawing of a mechanical component or device with no visible text or symbolsnatural_image
Line drawing of two human gloves with bandages and shaded areas (no text or symbols)natural_image
Line drawing of a pair of boots with visible tread pattern and buckles (no text or symbols)natural_image
Technical line drawing of a mechanical component with threaded ends and grooves (no text or symbols)Montáž
Montáž nástavce

natural_image
Mechanical assembly diagram showing pipe connection and motion arrows (no text or symbols)Použití nástavce
natural_image
Technical line drawing of a mechanical component with threaded ends and grooves (no text or symbols)natural_image
Illustration of a person in protective gear using a lawn mower with a black arrow indicating clockwise motion (no text or symbols)natural_image
Line drawing of a mechanical device with no visible text or symbolsnatural_image
Line drawing of a mechanical component or device with no visible text or symbolsnatural_image
Line drawing of a pair of boots with visible tread pattern and buckles (no text or symbols)natural_image
Technical line drawing of a mechanical component with threaded ends and grooves (no text or symbols)Montering
natural_image
Mechanical assembly diagram showing pipe connection and motion arrows (no text or symbols)natural_image
Technical line drawing of a mechanical component with threaded ends and grooves (no text or symbols)Stefan Holmberg, R&D Director, Technology Management, Husqvarna AB
natural_image
Person in protective gear using a lawn pusher to cut a tire, with a curved arrow indicating motion (no text or symbols)natural_image
Line drawing of a mechanical component or bracket (no text or symbols)natural_image
Line drawing of a mechanical component or bracket (no text or symbols)natural_image
Line drawing of two human gloves with bandages and shaded areas (no text or symbols)natural_image
Line drawing of a rubber boots with visible tread pattern and sole (no text or symbols)natural_image
Technical line drawing of a mechanical component with threaded ends and gear-like grooves (no text or symbols)Montage
natural_image
Mechanical assembly diagram showing pipe connection and valve mechanism (no text or labels)Wartung
Einleitung
natural_image
Technical line drawing of a mechanical component with threaded ends and internal gear-like structure (no text or symbols)Stefan Holmberg, R&D Director, Technology Management, Husqvarna AB
natural_image
Person in protective gear using a lawn mower with a circular arrow indicating clockwise motion (no text or symbols)natural_image
Line drawing of a mechanical component or device with no visible text or symbolsnatural_image
Line drawing of a mechanical component or device (no text or symbols)natural_image
Line drawing of two gloves with bandages and straps (no text or symbols)natural_image
Line drawing of a pair of boots with visible branding and sole details (no text or symbols)natural_image
Technical line drawing of a mechanical component with threaded ends and flanges (no text or symbols)Συναρμολόγηση
natural_image
Mechanical assembly diagram showing a clamping mechanism with arrows indicating motion (no text or symbols)Συντήρηση
Εισαγωγή
natural_image
Technical line drawing of a mechanical component with threaded ends and grooves (no text or symbols)natural_image
Illustration of a person in protective gear using a lawn mower with a black arrow indicating clockwise motion (no text or symbols)natural_image
Line drawing of a vertebral implant (no text or labels)natural_image
Line drawing of a mechanical component or bracket (no text or symbols)natural_image
Line drawing of a pair of gloves with bandages and shaded areas (no text or symbols)natural_image
Line drawing of a pair of boots with visible tread pattern and buckles (no text or symbols)natural_image
Technical line drawing of a mechanical component with threaded ends and grooves (no text or symbols)Montaje
natural_image
Mechanical assembly diagram showing a tool interacting with a spring-loaded component (no text or symbols present)Mantenimiento
Introducción
natural_image
Technical line drawing of a mechanical component with threaded ends and internal grooves (no text or symbols)natural_image
Person in protective gear using a lawn mower to clean or manage equipment (no text or symbols visible)natural_image
Line drawing of a pair of athletic gloves (no text or symbols)natural_image
Line drawing of glasses and binoculars (no text or symbols)natural_image
Line drawing of a pair of gloves with bandages and shaded areas (no text or symbols)- Kandke terasest varbakatete ja libisemist takistavate taldadega kaitsesaapaid.
natural_image
Line drawing of a pair of boots with visible tread pattern and sole plate (no text or symbols)natural_image
Technical line drawing of a mechanical component with threaded ends and flanges (no text or symbols)Kokkupanek
Lisatarviku paigaldamine

natural_image
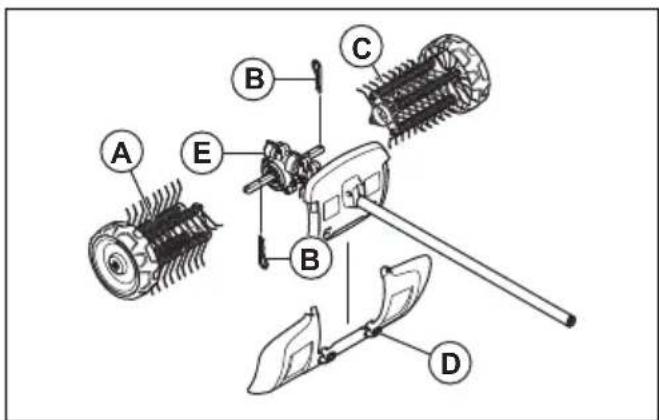
Mechanical assembly diagram showing two directional arrows indicating movement or force (no text or symbols present)- Suruge vasakpoolne samblaeemaldi (A) reduktori (E) vasakpoolse veovölli otsa.

- Kinnitage samblaeemaldi rull splindi (B) abil völli sisemisse avasse.
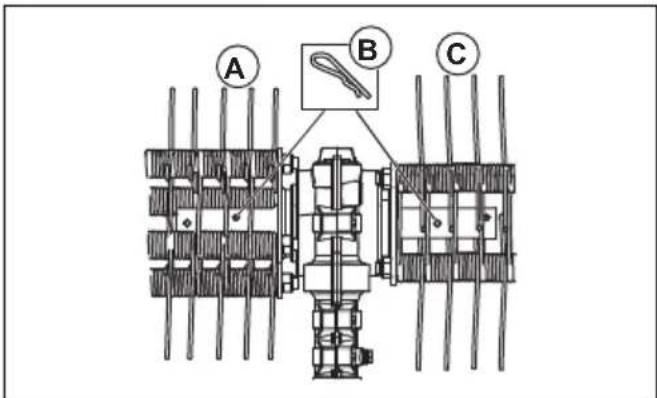
- Suruge parempoolne samblaeemaldi (C) reduktori (E) parempoolse veovölli otsa.
- Kinnitage samblaeemaldi rull splindi (B) abil võlli sisemisse avasse.
- Kinnitage pritsmekaitse klöpsklambrite (D) abil.
Hooldamine
Sissejuhatus
natural_image
Technical line drawing of a mechanical component with threaded ends and grooves (no text or symbols)natural_image
Illustration of a person in protective gear using a lawn mower to clean or manage equipment (no text or symbols visible)natural_image
Line drawing of a mechanical component or device (no text or symbols)natural_image
Line drawing of a mechanical component or bracket (no text or symbols)natural_image
Line drawing of two human gloves with bandages and shaded areas (no text or symbols)natural_image
Line drawing of a pair of boots with visible branding and sole details (no text or symbols)natural_image
Technical line drawing of a mechanical component with threaded ends and flanges (no text or symbols)Asentaminen
natural_image
Mechanical assembly diagram showing a motor with rotating blades and spring components (no text or labels)natural_image
Illustration of a person in protective gear holding a large 'no' symbol, next to a small vehicle (no text or symbols present)Huolto
Johdanto
natural_image
Technical line drawing of a mechanical component with threaded ends and internal gear-like structure (no text or symbols)Attention : projections et ricochets.

natural_image
Person in protective gear using a lawn mower to spread a tire, with a curved arrow indicating clockwise motion (no text or symbols)natural_image
Line drawing of a mechanical component or device with no visible text or symbolsnatural_image
Line drawing of glasses and a pair of binoculars (no text or symbols)natural_image
Line drawing of two human gloves showing different grip designs (no text or symbols)natural_image
Line drawing of a boots with visible tread pattern and buckles (no text or symbols)natural_image
Technical line drawing of a mechanical component with threaded ends and grooves (no text or symbols)Montage
natural_image
Mechanical assembly diagram showing a motor with rotating blades and guide rails (no text or symbols)Entretien
Introduction
natural_image
Technical line drawing of a mechanical component with threaded ends and textured surfaces (no text or symbols)natural_image
Person in protective gear using a lawn mower to cut the lawn with a black arrow indicating clockwise motion (no text or symbols)natural_image
Line drawing of a mechanical component or device (no text or symbols)natural_image
Line drawings of glasses and footshoes (no text or symbols)natural_image
Line drawing of two human gloves with bandages and fingers (no text or symbols)natural_image
Line drawing of a pair of boots with visible tread pattern and buckles (no text or symbols)natural_image
Technical line drawing of a mechanical component with threaded ends and grooves (no text or symbols)Összeszerelés
natural_image
Mechanical assembly diagram showing two directional arrows indicating movement or force (no text or symbols present)Karbantartás
Bevezető
natural_image
Technical line drawing of a mechanical component with threaded ends and grooves (no text or symbols)natural_image
Person in protective gear using a lawn mower to trim a vehicle, with a circular arrow indicating clockwise motion (no text or symbols)natural_image
Line drawing of a mechanical component or device with no visible text or symbolsnatural_image
Line drawing of a mechanical component or bracket (no text or symbols)natural_image
Line drawing of two human gloves with bandages and shaded areas (no text or symbols)natural_image
Line drawing of a pair of boots with visible sole and side branding (no text or symbols)natural_image
Technical line drawing of a mechanical component with threaded ends and grooves (no text or symbols)Surinkimas
Priedo surinkimas
natural_image
Mechanical assembly diagram showing pipe connection and valve mechanism (no text or labels)Priedo naudojimas
natural_image
Technical line drawing of a mechanical component with threaded ends and grooves (no text or symbols)- Jei jie nesisuka lengvai, ratus nuvalykite.

natural_image
Illustration of a person in protective gear using a lawn mower with a directional arrow (no text or symbols)natural_image
Line drawing of a mechanical component or device (no text or symbols)natural_image
Line drawing of a mechanical component or device (no text or symbols visible)natural_image
Line drawing of a boots with visible tread pattern and buckle (no text or symbols)natural_image
Technical line drawing of a mechanical component with threaded ends and gear-like grooves (no text or symbols)Montāža
lerīces montāža
natural_image
Mechanical assembly diagram showing pipe connection and motion arrows (no text or symbols)Ierīces lietošana
natural_image
Technical line drawing of a mechanical component with threaded ends and grooves (no text or symbols)Stefan Holmberg, R&D Director, Technology Management, Husqvarna AB
Atbildīgais par tehnisko dokumentāciju

Inhoud
Inleiding.... 132
Veiligheid.... 133
Montage....137
Werking....138
Onderhoud....138
WAARSCHUWING: Lees de
natural_image
Illustration of a person in protective gear using a lawn mower to clean or manage equipment (no text or symbols)natural_image
Line drawing of a mechanical component or device with no visible text or symbolsnatural_image
Line drawings of glasses and footshoes (no text or symbols)natural_image
Line drawing of two human gloves with bandages and fingers (no text or symbols)natural_image
Line drawing of a pair of boots with visible tread pattern and buckles (no text or symbols)natural_image
Technical line drawing of a mechanical component with threaded ends and internal gear-like structure (no text or symbols)Montage
natural_image
Mechanical assembly diagram showing a clamping mechanism with two arrows indicating motion (no text or symbols present)natural_image
Technical line drawing of a mechanical component with threaded ends and grooves (no text or symbols)natural_image
Person in protective gear using a lawn mower with a circular arrow indicating clockwise motion (no text or symbols)- Ved flytting av produktet skal motoren være slått av.
- Sett aldri maskinen ned med motoren i gang uten at du har det under oppsikt.
- Bruk alltid begge hendene til å holde i maskinen. Hold maskinen ved siden av kroppen.
- Påse at hender og føtter ikke kommer for nær vertikalskjæreren for mose når den er i gang.
- Når motoren er slått av, må du holde hender og føtter unna vertikalskjæreren for mose til den har stanset helt.
- Hvis kraftige vibrasjoner oppstår, må du stoppe maskinen. Hvis du har et bensindrevet produkt, kobler du tennpluggkabelen fra tennpluggen. Hvis du har et batteridrevet produkt, tar du batteriet ut av produktet. Kontroller at maskinen ikke er skadet. Reparer eventuelle skader.
natural_image
Line drawing of a mechanical component or device (no text or symbols)natural_image
Line drawing of a mechanical component or bracket (no text or symbols)natural_image
Line drawing of two human gloves showing different grip positions (no text or symbols)natural_image
Line drawing of a pair of boots with visible tread pattern and side clasp (no text or symbols)natural_image
Technical line drawing of a mechanical component with threaded ends and gear-like grooves (no text or symbols)Montering
natural_image
Mechanical assembly diagram showing a clamping mechanism with arrows indicating motion (no text or symbols present)- Fest rullen til vertikalskjæreren for mose med låsesplinten (B) i det indre hullet i akselen.
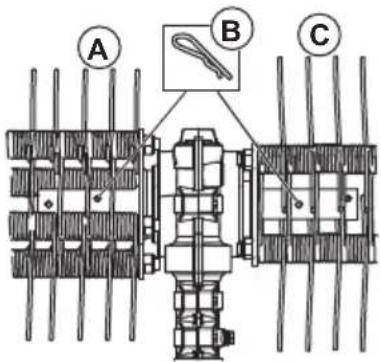
- Fest rullen til vertikalskjæreren for mose med läsesplinten (B) i det indre hullet i akselen.
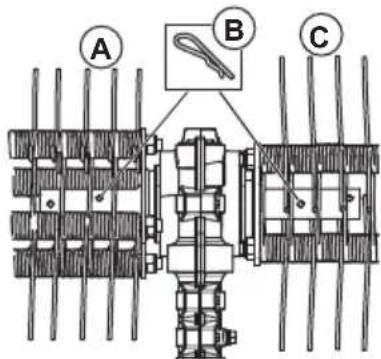
Vedlikehold
Innledning
natural_image
Technical line drawing of a mechanical component with threaded ends and grooves (no text or symbols)natural_image
Person in protective gear using a lawn mower with a black arrow indicating clockwise motion (no text or symbols)natural_image
Line drawing of a vertebral implant (no text or labels)natural_image
Line drawing of a mechanical component or bracket (no text or symbols)natural_image
Line drawing of two human gloves with bandages and straps (no text or symbols)natural_image
Line drawing of a pair of boots with visible branding and sole side (no text or symbols)natural_image
Technical line drawing of a mechanical component with threaded ends and grooves (no text or symbols)Montaż
Montaż osprzętu

natural_image
Mechanical assembly diagram showing pipe connection and valve mechanism (no text or labels)natural_image
Technical line drawing of a mechanical component with threaded ends and internal gear-like structure (no text or symbols)natural_image
Illustration of a person using a lawn power presser to trim a small vehicle, with no text or symbols present.natural_image
Line drawing of a mechanical component or device with no visible text or symbolsnatural_image
Line drawings of eyeglasses and footshoes (no text or symbols)natural_image
Line drawing of a pair of gloves with bandages and shaded areas (no text or symbols)natural_image
Line drawing of a pair of boots with visible tread pattern and buckles (no text or symbols)natural_image
Technical line drawing of a mechanical component with threaded ends and grooves (no text or symbols)Montagem
Montar o acessório
natural_image
Mechanical assembly diagram showing a clamping mechanism with rotating blades and spring (no text or labels)natural_image
Technical line drawing of a mechanical component with threaded ends and grooves (no text or symbols)natural_image
Illustration of a person in protective gear using a lawn mower to clean or manage equipment (no text or symbols)natural_image
Line drawing of a mechanical component or device (no text or symbols)natural_image
Line drawings of glasses and a pair of accessories (no text or symbols)natural_image
Line drawing of a pair of gloves with bandages and straps (no text or symbols)natural_image
Line drawing of a rubber boots with visible tread pattern and buckles (no text or symbols)natural_image
Technical line drawing of a mechanical component with threaded ends and grooves (no text or symbols)Asamblarea
Asamblarea accesoriiului
natural_image
Mechanical assembly diagram showing a clamping mechanism with rotating blades and spring (no text or labels)natural_image
Technical line drawing of a mechanical component with threaded ends and gear-like grooves (no text or symbols)natural_image
Person in protective gear using a lawn mower with a circular arrow indicating clockwise motion (no text or symbols)natural_image
Line drawing of a pair of sneakers (no text or symbols)natural_image
Line drawing of a mechanical component or device with no visible text or symbolsnatural_image
Line drawing of two types of gloves showing different grip positions (no text or symbols)natural_image
Line drawing of a pair of boots with visible tread pattern and buckles (no text or symbols)natural_image
Technical line drawing of a mechanical component with threaded ends and flanges (no text or symbols)Сборка
natural_image
Mechanical assembly diagram showing gear and cam mechanism (no text or labels)natural_image
Technical line drawing of a mechanical component with threaded ends and flanges (no text or symbols)natural_image
Illustration of a person using a lawn power presser to cut a lawn (no text or symbols present)natural_image
Line drawing of a mechanical component or device (no text or symbols)natural_image
Line drawings of eyeglasses and a helmet (no text or symbols)natural_image
Line drawing of a pair of gloves with bandages and palm, no text or symbols presentnatural_image
Line drawing of a pair of boots with textured soles (no text or symbols)natural_image
Technical line drawing of a mechanical component with threaded ends and gear-like grooves (no text or symbols)Montáž
Montáž nadstavca

natural_image
Mechanical assembly diagram showing pipe connection and motion arrows (no text or symbols)Údržba
Úvod
natural_image
Technical line drawing of a mechanical component with threaded ends and gear-like features (no text or symbols)natural_image
Person in protective gear using a lawn mower with a black arrow indicating clockwise motion (no text or symbols)natural_image
Line drawing of a mechanical component or device (no text or symbols)natural_image
Line drawing of a mechanical component or device with no visible text or symbolsnatural_image
Line drawing of two gloves showing different grip positions (no text or symbols)natural_image
Line drawing of a pair of boots with visible tread pattern and buckles (no text or symbols)natural_image
Technical line drawing of a mechanical component with threaded ends and flanges (no text or symbols)Montaža
Montaža priključka
natural_image
Mechanical assembly diagram showing two directional arrows indicating movement or force (no text or symbols present)Vzdrževanje
Uvod
natural_image
Technical line drawing of a mechanical component with threaded ends and gear-like grooves (no text or symbols)natural_image
Illustration of a person in protective gear using a lawn mower with a black arrow indicating clockwise motion (no text or symbols)natural_image
Line drawing of a mechanical component or device (no text or symbols)natural_image
Line drawing of a vertebra with visible bone structure (no text or labels)natural_image
Line drawing of two human gloves showing different grip positions (no text or symbols)natural_image
Line drawing of a pair of boots with visible tread pattern and buckles (no text or symbols)natural_image
Technical line drawing of a mechanical component with threaded ends and flanges (no text or symbols)Montering
Montera tillbehöret
natural_image
Mechanical assembly diagram showing pipe connection and motion arrows (no text or symbols)natural_image
Illustration of a person in protective gear holding a large 'no' symbol, next to a small vehicle (no text or symbols present)Underhåll
Introduktion
natural_image
Technical line drawing of a mechanical component with threaded ends and gear-like grooves (no text or symbols)Stefan Holmberg, R&D Director, Technology
Management, Husqvarna AB
natural_image
Illustration of a person in protective gear using a lawn power presser with a circular arrow indicating clockwise motion (no text or symbols)natural_image
Line drawing of a vehicle's front view and side profile (no text or symbols)natural_image
Line drawing of a mechanical component or bracket (no text or symbols)natural_image
Line drawing of a pair of boots with visible tread pattern and buckles (no text or symbols)natural_image
Technical line drawing of a mechanical component with threaded ends and textured surfaces (no text or symbols)Montaj
natural_image
Mechanical assembly diagram showing a tool interacting with a spring-loaded component (no text or symbols visible)natural_image
Illustration of a person in protective gear holding a large 'no' symbol, with a small vehicle nearby (no text or symbols present)Bakım
Giriş
natural_image
Technical line drawing of a mechanical component with threaded ends and grooves (no text or symbols)natural_image
Person in protective gear using a lawn mower to cut the lawn with a circular arrow indicating clockwise motion (no text or symbols)natural_image
Line drawing of a mechanical component or device (no text or symbols)natural_image
Line drawing of a vertebral implant (no text or labels)natural_image
Line drawing of a pair of gloves with bandages and fingers (no text or symbols)natural_image
Line drawing of a rubber boots with visible tread pattern and buckles (no text or symbols)natural_image
Technical line drawing of a mechanical component with threaded ends and flanges (no text or symbols)Montaggio
natural_image
Mechanical assembly diagram showing pipe connection and valve mechanism (no text or labels)Manutenzione
Introduzione
natural_image
Technical line drawing of a mechanical component with threaded ends and gear-like grooves (no text or symbols)Stefan Holmberg, Responsabile R&S, Technology Management, Husqvarna AB
natural_image
Person in protective gear using a lawn mower with a circular arrow indicating clockwise motion (no text or symbols)natural_image
Line drawing of a mechanical component or device (no text or symbols)natural_image
Line drawing of a mechanical component or device (no text or symbols)natural_image
Line drawing of a pair of gloves with bandages and straps (no text or symbols)- 穿上带有钢鞋头和防滑鞋底的防护靴。

natural_image
Line drawing of a pair of boots with visible tread pattern and side clasp (no text or symbols)natural_image
Technical line drawing of a mechanical component with threaded ends and flanges (no text or symbols)安装
装配附件
natural_image
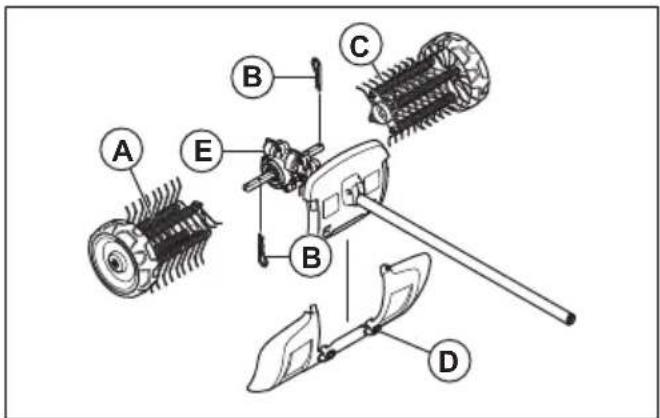
Mechanical assembly diagram showing pipe connection and motion arrows (no text or symbols)- 用扣合式紧固件 (D) 安装防溅罩。
维护
简介
natural_image
Technical line drawing of a mechanical component with threaded ends and grooves (no text or symbols)- 如果轮子无法自由旋转,则进行清洁。

Original instructions
Оригинални инструкции
Původní pokyny


- Introduction
- Product description
- Intended use
- Attachment overview
- Symbols on the attachment and on the power unit
- Safety
- Safety definitions
- General safety instructions
- Read all instructions
- Detacher safety instructions
- Safety instructions for operation
- Personal protective equipment
- Safety devices on the attachment
- Safety instructions for maintenance
- Assembly
- IMPORTANT:
- Operation
- To start the product with a cold engine
- To use the attachment
- Maintenance
- To perform maintenance on the attachment
- Transportation, storage and disposal
- Transport and storage
- Technical data
- Declaration of Conformity
- EU Declaration of Conformity
- UK Declaration of Conformity
- Съдържание
- Монтаж
- Поддръжка
- Въведение
- Montáž
- Montáž nástavce
- Použití nástavce
- Montering
- Montage
- Wartung
- Einleitung
- Συναρμολόγηση
- Συντήρηση
- Εισαγωγή
- Montaje
- Mantenimiento
- Introducción
- Kokkupanek
- Lisatarviku paigaldamine
- Hooldamine
- Sissejuhatus
- Asentaminen
- Huolto
- Johdanto
- Entretien
- Összeszerelés
- Karbantartás
- Bevezető
- Surinkimas
- Priedo naudojimas
- Montāža
- lerīces montāža
- Ierīces lietošana
- Inhoud
- WAARSCHUWING: Lees de
- Vedlikehold
- Innledning
- Montaż
- Montagem
- Asamblarea
- Сборка
- Údržba
- Úvod
- Montaža
- Montaža priključka
- Vzdrževanje
- Uvod
- Underhåll
- Introduktion
- Montaj
- Bakım
- Giriş
- Montaggio
- Manutenzione
- Introduzione
- 安装
- 装配附件
- 维护
- 简介
Brand : HUSQVARNA
Model : DT600
Category : Brush cutter