BR 4522 C Bp - Scrubber Kärcher - Free user manual and instructions
Find the device manual for free BR 4522 C Bp Kärcher in PDF.

User questions about BR 4522 C Bp Kärcher
0 question about this device. Answer the ones you know or ask your own.
Ask a new question about this device
Download the instructions for your Scrubber in PDF format for free! Find your manual BR 4522 C Bp - Kärcher and take your electronic device back in hand. On this page are published all the documents necessary for the use of your device. BR 4522 C Bp by Kärcher.
USER MANUAL BR 4522 C Bp Kärcher
natural_image
3D rendering of a black and yellow cleaning or cleaning tool with a mounted sensor (no text or symbols visible)Deutsch 2
English 14
Français 26
Italiano 39
Español 52
Português 66
Nederlands 79
Türkçe 91
Svenska 103
Suomi 115
Norsk 127
Dansk 139
Eesti 151
Latviešu 163
Lietuviškai 175
Polski 187
Magyar 201
Čeština 213
Slovenčina 225
Slovenščina 238
Română 250
Hrvatski 263
Srpski 275
Ελληνικά 287
Русский 301
Українська 316
Български 329
中文 344
日本語 354
العربية 367

001
EAC


59804190
(09/25)

Register your product
www.kaercher.com/register
Inhalt
text_image
Technical diagram of a cleaning or cleaning device with numbered parts labeled 13 to 20
text_image
Labeled diagram of a cleaning or cleaning machine with numbered parts for identificationtext_image
Labeled diagram of a vehicle head panel showing numbered components for identificationtext_image
Diagram of a device interior with labeled components and directional arrows indicating movement or flowtext_image
Technical diagram of a mechanical component with labeled parts 1 and 2, showing a downward force or force indicator.natural_image
3D rendered mechanical component with yellow and gray parts, no visible text or symbolsnatural_image
Mechanical assembly diagram showing a mounted device with wheels, springs, and a yellow component (no text or symbols visible)natural_image
Close-up of a cable being inserted into a device with a blue tip, showing mechanical components and arrows indicating motion (no text or symbols)natural_image
3D rendering of a black and yellow cleaning or cleaning machine with wheels and a handle (no text or symbols visible)text_image
Diagram of a device interior with labeled components and directional arrows indicating movement or flow①Verriegelung
②EPA-Filter

text_image
Technical diagram of a mechanical component with labeled parts 1 and 2, showing a striped top structure and directional arrow.natural_image
3D model of a robotic device with a yellow component and labeled part (1), no visible text or symbols beyond the label.natural_image
Mechanical assembly diagram showing internal components with arrows indicating movement or force (no text or symbols present)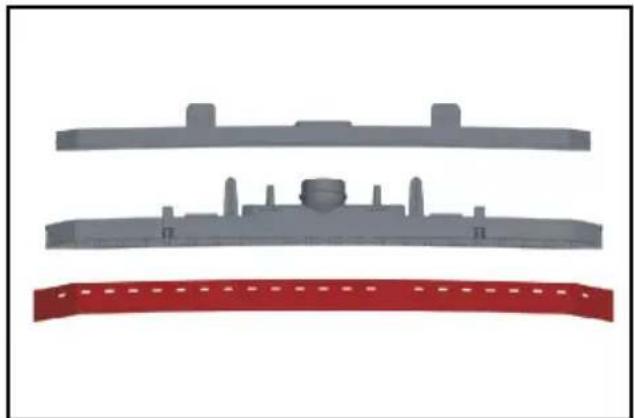
natural_image
Three gray plastic components with no visible text or symbols, including a red banner at the bottom (no text or symbols present)natural_image
Illustration of a robotic car with yellow accents and a close-up inset showing internal components (no text or symbols)
natural_image
3D model of a robotic device with yellow highlighted components and a numbered callout (no text or symbols)① Schraube
②Deckel
Chairman of the Board of Management

S. Reiser
Director Regulatory Affairs & Certification
71364 Winnenden (Germany)
Tel.: +49 7195 14-0
Fax: +49 7195 14-2212
Winnenden, 2021/02/01
Garantie
Safety instructions.... 14
Environmental protection 15
Scope of delivery 16
Overview of the device.... 16
Before start-up 17
Operation 17
Transport.... 20
Shutting down 20
Storage 20
Care and maintenance.... 21
Removing the battery.... 22
Malfunctions.... 23
Accessories and spare parts...... 24
Technical data.... 25
EU Declaration of Conformity 25
Warranty 26
General notes
Read these original operating instructions and the enclosed safety instructions before using the device for the first time. Proceed accordingly.
Keep both books for future reference or for future owners.
Safety instructions
Before using the device for the first time, read and observe these operating instructions and the accompanying brochure:
Safety instructions for brush cleaning devices, No. 5.956-251.0.
⚠ WARNING
The device can tip over
Danger of injury
Do not operate the device on sloping surfaces.
⚠ WARNING
Risk of accident due to incorrect operation
People can be injured.
Operators must be properly trained on how to use this machine.
The device may only be operated when the hood and all covers are closed.
Hazard levels
⚠️DANGER
- Indication of an imminent threat of danger that will lead to severe injuries or even death.
⚠ WARNING
- Indication of a potentially dangerous situation that may lead to severe injuries or even death.
△CAUTION
- Indication of a potentially dangerous situation that may lead to minor injuries.
ATTENTION
- Indication of a potentially dangerous situation that may lead to damage to property.
Battery
A lithium-ion battery is installed in this device, which is subject to special requirements. Removal, installation and testing of defective batteries may only be carried out
by Kärcher Customer Service or qualified staff.
Storage and transport instructions can be obtained from Kärcher Customer Service.
⚠️DANGER
Modifications and alterations to the device are not permitted.
You must not open the battery, there is a danger of a short circuit. Irritating vapours or corrosive liquids can also escape.
Do not expose the battery to strong sunlight, heat or fire. There is a danger of explosion.
Do not operate the charger in an explosion-hazard environment.
Do not use a dirty or wet charger.
Ensure sufficient ventilation during the charging process.
Danger of explosion. Keep naked flames away from the battery or the battery charging room, and do not generate sparks or smoke in the vicinity of a battery of a battery charging room.
Danger of explosion. Do not place any tools or objects on the battery, i.e. on the end poles and cell connectors.
⚠ WARNING
Check the device and the mains cable for damage before each use. Do not use damaged devices and have damaged parts repaired by qualified personnel only.
Keep children away from batteries and charger.
Do not charge damaged batteries. Have damaged batteries replaced by Kärcher customer service.
Do not throw a defective battery in the household rubbish. Inform Kärcher Customer Service.
Avoid contact with fluid leaking from defective batteries. In case of accidental contact, rinse the liquid with water. In case of contact with the eyes, consult a doctor as well.
△CAUTION
Be sure to observe these operating instructions. Adhere to the recommendations of the legislature regarding the handling of batteries.
The mains voltage must match the voltage indicated on the type plate of the device.
Operate the battery only with this device. It is forbidden and dangerous to use it for other purposes.
Safety switch
The brush drive switches off when the safety switch is released.
Intended use
Use the device only in accordance with the information in these operating instructions.
- This device is suitable for commercial use, e.g. in hotels, schools, hospitals, factories, shops, offices, and rental companies.
- Only use the device for cleaning hard surfaces that are not sensitive to moisture and polishing.
- Do not use the device for cleaning frozen floors (e.g. in cold stores).
- Only equip the device with original accessories and spare parts.
- Only use the device for cleaning indoor floors.
Environmental protection
The packing materials can be recycled. Please dispose of packaging in accordance with the environmental regulations.
Electrical and electronic devices contain valuable, recyclable materials and often components such as batteries,
rechargeable batteries or oil, which - if handled or disposed of incorrectly - can pose a potential danger to human health and the environment. However, these components are required for the correct operation of the device. Devices marked by this symbol are not allowed to be disposed of together with the household rubbish.
Notes on the content materials (REACH)
Current information on content materials can be found at: www.kaercher.de/REACH
Scope of delivery
The scope of delivery for the appliance is shown on the packaging. Check the contents for completeness when unpacking. If
any accessories are missing or in the event of any shipping damage, please notify your dealer.
Overview of the device
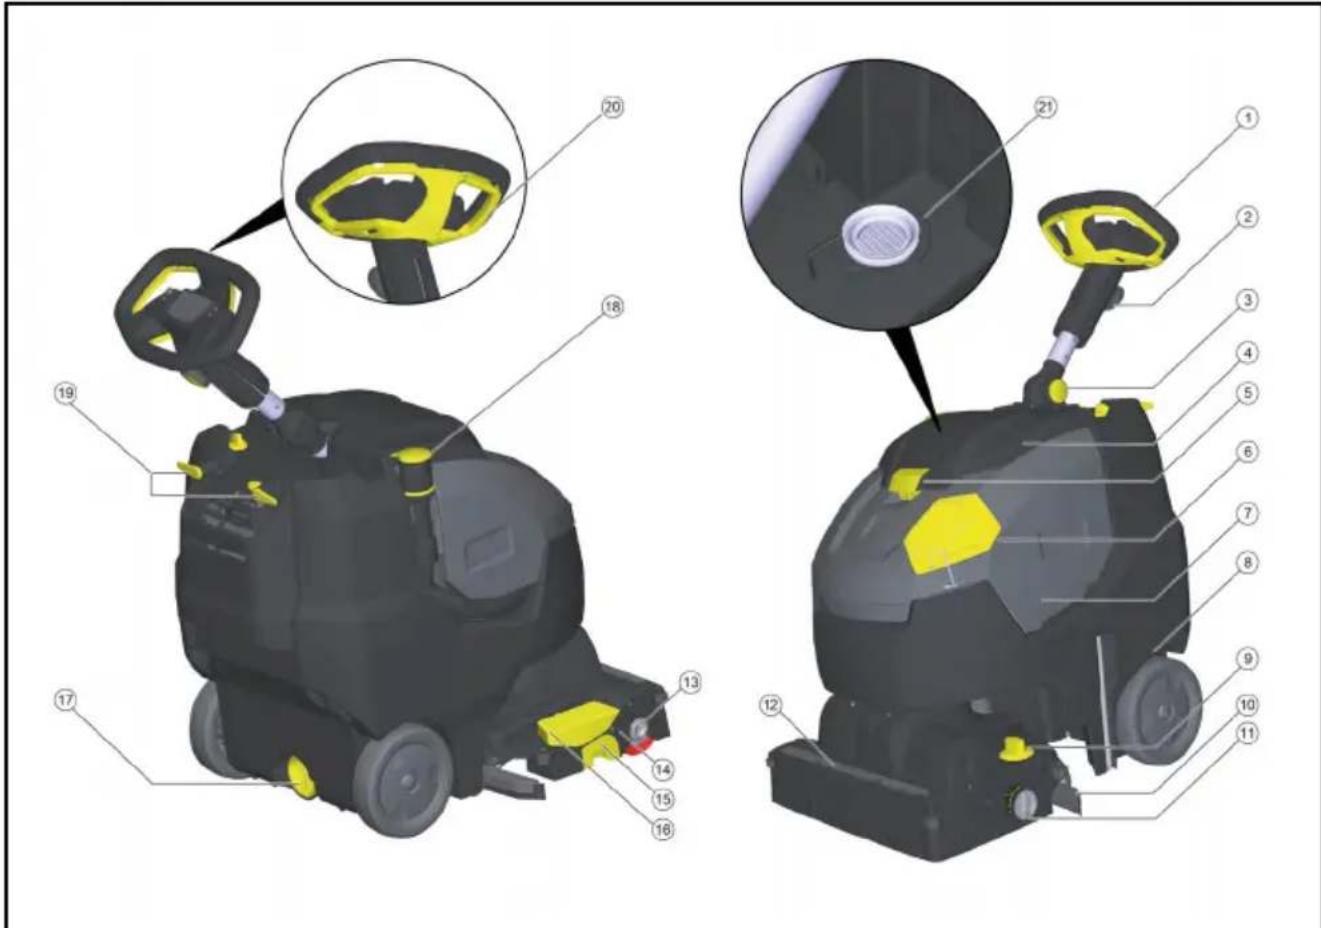
text_image
Technical diagram of a cleaning or cleaning device with numbered parts, highlighting a component with highlighted parts.①Steering wheel
②Star-knob for steering wheel height adjustment
③Star-knob for steering wheel transport position
④ Waste water tank cap
⑤ Waste water tank cap, latch
⑥Fresh water tank dosing cap
⑦Transport handle to lift the device
⑧ Waste water tank
⑨Brush contact pressure twist grip (1=min, 4=max)
⑩Suction bar
⑪ Transport chassis rotary knob
⑫Water distribution strip
⑬Roller brush unlocking button
⑭Roller brush
⑮Coarse dirt container
⑯Pedal for suction bar lifting device
⑰Fresh water tank drain opening
⑱ Waste water drain hose with dosing unit
⑲Cable hook, rotatable
20 Safety switch
21Fluff filter
Control elements
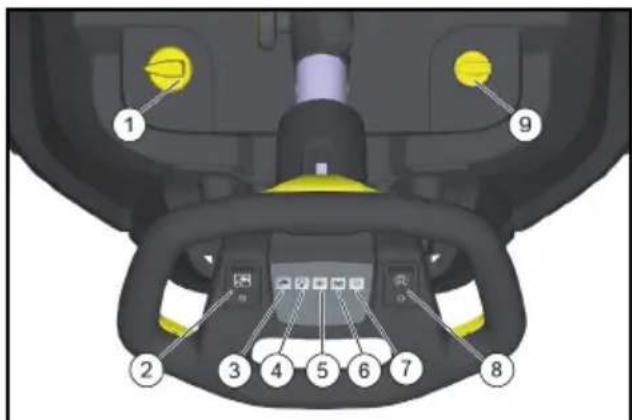
text_image
Labeled diagram of a vehicle head panel with numbered components and function buttons① Detergent solution dosing
②Cleaning solution switch
③Cleaning solution application indicator lamp
④Vacuuming indicator lamp Green: Suction turbine in operation Orange, flashing: Suction turbine overloaded
⑤Brush drive indicator lamp Green: Brush rotates Orange, flashing: Brush is overloaded
⑥Battery status indicator
In operation:
Green: Battery charged
Orange: Battery is almost flat
Red: Device switches off - charge battery
When charging the battery:
Flashing orange: Battery is being charged
Green: Charging is complete.
Red: Malfunction during charging process
⑦Indicator light for Eco mode
Blue: Eco mode
Off: full power
⑧ Eco mode switch
⑨ Power switch
Symbols on the device

Fresh water filling opening

Suction bar pedal

Transport chassis rotary knob

Guide for tie down strap during transport in vehicles

Contact pressure of the roller brush
Before start-up
Charging the battery
Note
The device has deep discharge protection, i.e. the device is switched off automatically when the permitted minimum capacity level is reached.
The charger ends the charging process automatically.
The charging time takes approx. 3.5 hours. If necessary, the device can also be used again before the battery has been fully charged.
● Plug the mains plug into a mains socket.
Operation
Aligning the steering column straight
- Release the star-knob for the transport position.
- Align the steering column straight.
- Tighten the star-knob.
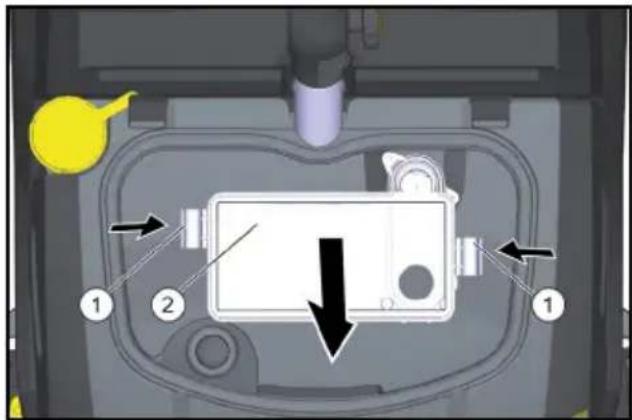
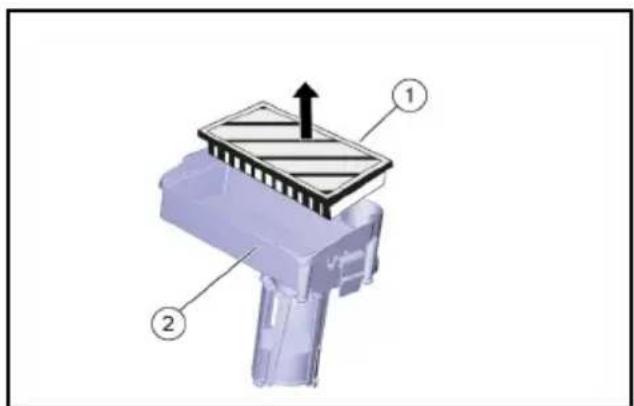
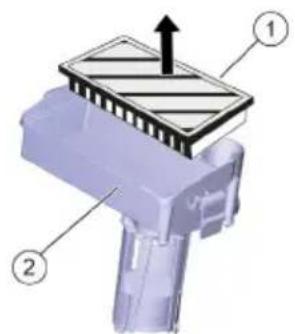
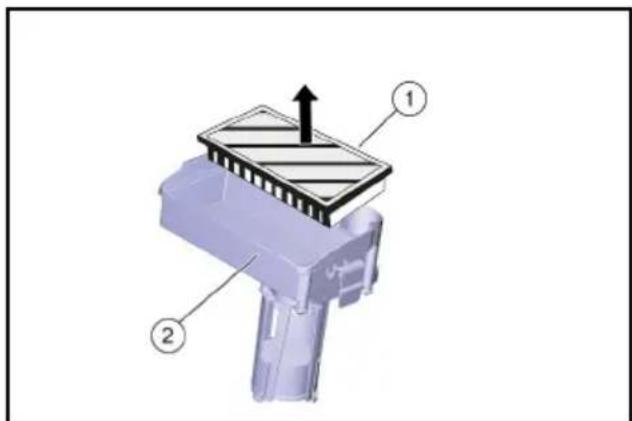
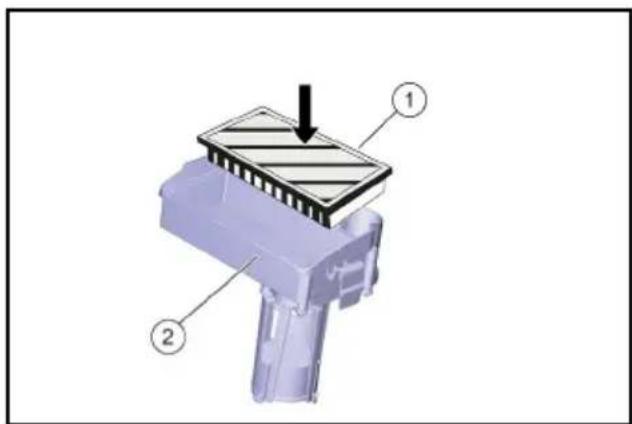
Inserting the EPA filter (optional)
- Open the waste water tank cover.
- Push in both locking mechanisms and remove the filter casing.
text_image
Diagram of a device interior with labeled components and directional arrows indicating movement or flow①Lock
②EPA filter
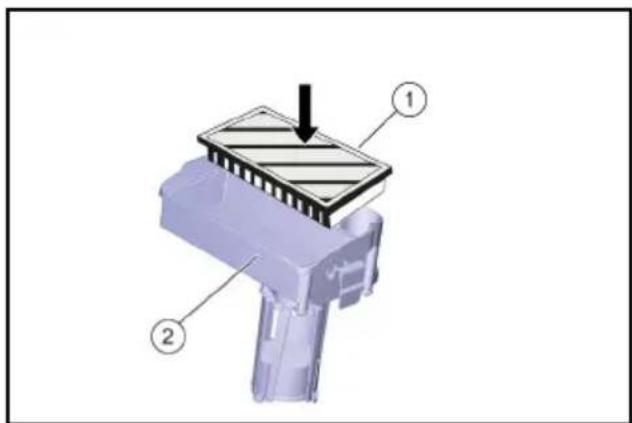
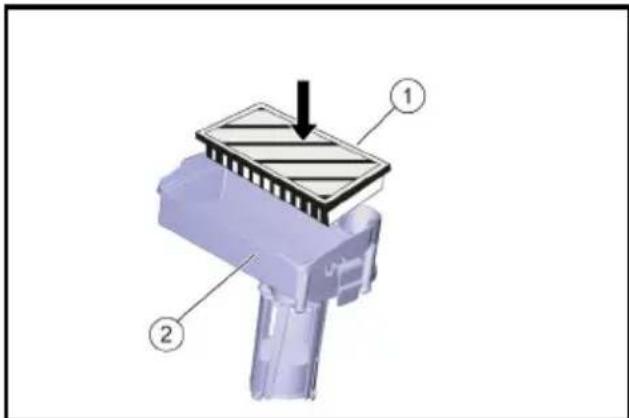
- Insert the EPA filter in the filter casing.
text_image
Technical diagram of a mechanical component with labeled parts ① and ②, showing a striped top section and directional arrow.①EPA filter
②Filter casing
- Attach the filter casing on the cover of the waste water tank and engage the locking mechanism.
- Close the cover of the waste water tank.
Filling with operating materials
△CAUTION
Risk of damage
Use only recommended detergents. With other detergents, you are liable for the increased risk in terms of operational safety, risk of accident and reduced service life of the device. Use only detergents free of solvents, salt and hydrofluoric acid. Adhere to the safety instructions stated on the detergent packaging.
Note
Do not use strong foaming detergents.
Observe dosing instructions.
- Remove dosing cap of the fresh water tank.
- Fill with fresh water (max. 50 °C) and use the filler hose (accessory) if necessary.
natural_image
3D rendered mechanical component with yellow and gray parts, no visible text or symbols- Add detergent using the dosing cap. One capful corresponds to a 1% application.
| Application Detergent | |
| Maintenance cleaning of tiles in sanitary areas | RM 751 |
| Maintenance cleaning and basic cleaning of industrial floors | RM 69 ASF |
| Coating removal on all alkaline-resistant floors (e.g. PVC) | RM 752 |
| Coating removal on linoleum floors | RM 754 |
| Intermediate cleaning of carpets | RM 768iCapsol |
| Crystallization agent for floors containing calcium | RM 749 |
Detergents are available from specialist shops.
- Close the dosing cap of the fresh water tank.
Settings
1 Loosen the star knob for height adjustment of the steering wheel.
2 Set the steering wheel to the desired height.
3 Tighten the star-knob.
- Adjust the dosage of the cleaning solution according to the contamination and type of floor covering.
- Set the twist grip for the brush contact pressure to the desired value.
Only set the brush contact pressure when the cleaning head is raised.
Note
If the device pulls forwards too much during operation, reduce the contact pressure.
- Move the Eco mode switch to the desired position.
Normal operation: The device operates at maximum brush speed and maximum suction performance.
Eco: The device works with reduced brush speed and suction performance.
This also reduces energy consumption.
The possible working time increases with one charging cycle.
Parking support
Lowering the parking support
- Press the steering wheel downward so that the device lifts up towards the front. The parking support swivels downwards.
- Release the steering wheel. The device is standing on the parking support. The roller brush is unloaded and is protected from deforming.
Lifting the parking support
- Push the device forwards. The parking support swivels upwards.
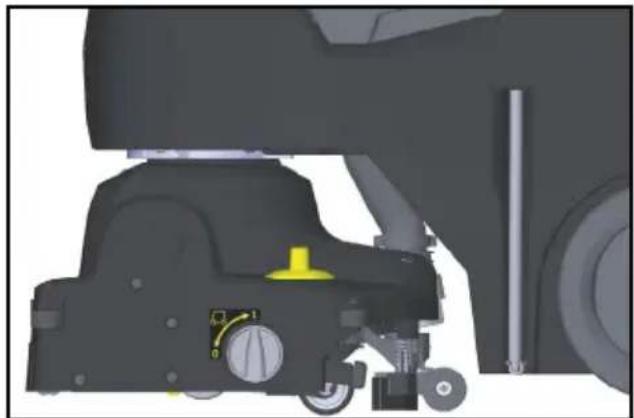
Transport chassis
natural_image
Mechanical assembly diagram showing a vehicle's lower body and suspension components (no text or labels visible)0 Transport chassis retracted 1 Transport chassis extended
Extending the transport chassis
- Lower the parking support.
- Turn the rotary knob to position 1 (transport chassis extended).
Retracting the transport chassis
- Lower the parking support.
- Turn the rotary knob to position 0 (transport chassis retracted).
Cleaning
ATTENTION
Risk of damage to the floor covering. Do not operate the device continuously at the same point.
Risk of damage. Lift the suction bar before pulling the device backwards for a longer distance.
Retract the transport chassis. Set the power switch to the "I" position. Turn on the cleaning solution switch.
Push down the pedal of the suction bar lifting device at the back to lower the suction bar and start suction.
Push the device forwards until the parking support folds in and the cleaning head touches the floor.
Move the device over the surface to be cleaned.
Note
If the steering wheel is turned 180^ , the device also reverses.
Standby mode
Standby mode goes off if the device is not used for 15 minutes with the power switch on.
Restoring standby mode:
- Set the power switch to "0".
- Wait for a short time.
- Set the power switch to the "I" position.
Stopping and parking
- Let go of the safety button.
- Move the device 1-2 metres forwards to suck out the residual water.
- Press the suction bar lift pedal downward to raise the front suction bar.
ATTENTION
The suction lips and brush can become permanently deformed.
Always set the device down with the parking support folded out. 4. Set the power switch to "0". 5. Press the steering wheel downward so that the device lifts up towards the front. The parking support swivels downwards.
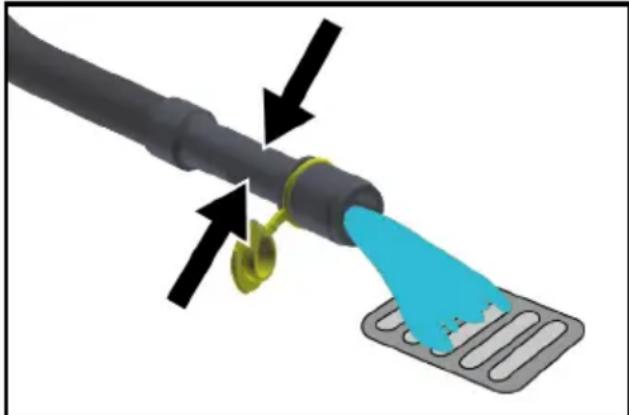
Emptying the waste water tank
⚠ WARNING
Environmental pollution!
Environmental pollution due to improper disposal in waste water.
Observe the local waste water treatment regulations.
- Retract the transport chassis.
- Lift the parking support.
- Remove the drain hose from the support and lower it over a suitable collecting device.
natural_image
Diagram of a cable being inserted into a device with a blue tip, showing mechanical components and arrows indicating motion (no text or symbols)- Press the dosing device together or kink the hose.
- Open the dosing device cover.
- Drain off the waste water - regulate the water quantity by pressing or bending.
- Rinse the wastewater container with clear water.
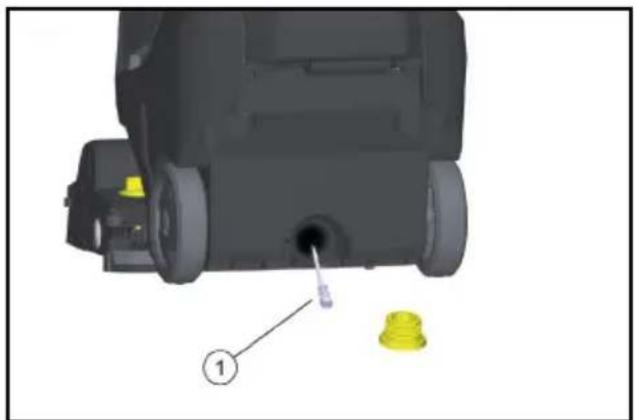
Emptying the fresh water tank
⚠ WARNING
Environmental pollution!
Environmental pollution due to improper disposal in waste water.
Observe the local waste water treatment regulations.
- Unscrew the cover from the drain opening of the fresh water tank and let the cleaning solution drain.
Frost protection
ATTENTION
Danger of frost
Incompletely emptied devices can be destroyed by frost.
Completely empty the device and accessories.
Protect the device from frost.
- Empty the fresh and dirt water tanks.
- Park the device in a frost-protected room.
Folding down the steering column
The steering column can be folded down to reduce the space required for transport and storage.
- Release the star-knob for the transport position.
- Pivot the steering wheel all the way forward.
- Tighten the star-knob.
Transport
△CAUTION
Risk of injury or damage due to the weight of the device!
Injury and damage.
Be aware of the weight of the device during transport and storage.
Transport
- Remove the brush to avoid damage to the brushes.
- Lift the device using the transport handles.
natural_image
3D rendering of a black and yellow cleaning or cleaning service vehicle with yellow accents (no visible text or symbols)- When transporting in vehicles, secure the device against slipping and tipping over according to the applicable guidelines.
Shutting down
- Completely charge the battery prior to longer operational breaks extending over several weeks.
- Set the power switch to "0".
ATTENTION
Risk of damage to the battery
Always switch the trigger to "0" during operation breaks.
Storage
△CAUTION
Risk of injury or damage due to the weight of the device!
Injury and damage.
Be aware of the weight of the device during transport and storage.
Care and maintenance
⚠️DANGER
Inadvertently starting up device
Risk of injury, electric shock
Set the power switch to "0" prior to all work on the device.
Pull out the charger mains plug.
ATTENTION
Risk of damage to the device due to leaking water.
Empty the waste water tank and the fresh water tank before working on the device.
- Park the device on a level surface.
Maintenance plan
After work
ATTENTION
Risk of damage.
Do not spray the device with water and do not use aggressive detergent.
- Drain the waste water.
- Open the waste water tank cover.
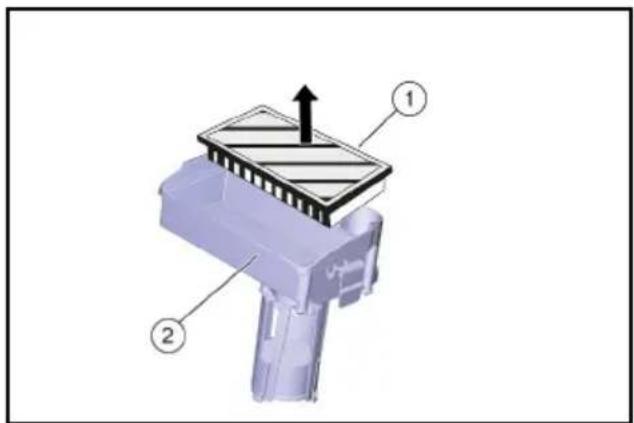
- Remove the EPA filter (optional) and allow it to dry outside of the device.

text_image
Diagram of a device interior with labeled components and directional arrows indicating movement or flow①Lock
②EPA filter
text_image
Technical diagram of a mechanical component with labeled parts 1 and 2, showing a structural assembly with an upward arrow.①EPA filter
②Filter casing
- Rinse the inside of the cover and the float with water.
- Rinse the waste water tank with clear water.
- Clean the suction bar.
- Remove and empty the coarse dirt receptacle.
- Clean the outside of the device with a damp cloth which has been soaked in mild washing lye.
- Clean the vacuum lips, check for wear and replace if required.
- Clean the brush.
- Check the brush for wear and tear, replace if required (see "Maintenance work").
- Charge the battery if required.
Weekly
- Pull the water distribution strip off the cleaning head and clean the water channel.
- Clean the fluff filter.
natural_image
3D model of a mechanical device with a yellow component and labeled part (1), no visible text or symbols① Fresh water filter
- Unscrew the cover from the drain opening of the fresh water tank.
- Take out the fresh water filter and rinse with clean water.
Monthly
- Check the condition of the seals between the waste water tank and cover, replace if required.
Annually
● Have the prescribed inspection carried out by the customer service.
Maintenance work
Replacing the suction lips
- Press the fastening elements together and pull the suction lips downwards out of the suction bar.
natural_image
Cross-sectional diagram of a mechanical assembly with highlighted components and arrows indicating movement (no text or symbols)
natural_image
Three gray plastic components with no visible text or symbols, arranged vertically on a white background (no text or symbols)- Remove the suction lips from the holder.
Note
The suction lips cannot be confused due to the hole pattern. They cannot be turned over and reinserted.
- Replace the suction lips.
- Insert the holder with suction lips into the suction bar and snap into place.
Replacing the roller brush
⚠ WARNING
Risk of crushing due to the parking support folding in during brush replacement.
Turn the steering wheel 45° to the left before commencing brush replacement.
- Press the roller brush unlocking button, swivel the roller brush downwards and pull it off the driver.
- Fit the new roller brush onto the driver and engage on the opposite side.
Service contract
To ensure a reliable operation of the device, maintenance contracts can be concluded with the competent Kärcher sales outlet.
Removing the battery
⚠️DANGER
Removing the battery
Electric shock
The removal of the battery may only be performed by Kärcher Customer Service or qualified staff.
Classification as whether the battery is damaged is done by an authorised Customer Service technician
Please refer to the chapter on handling rechargeable batteries at Battery.
- Unscrew the 2 screws.
natural_image
3D rendering of a robotic car with yellow sensor points and a close-up inset showing mechanical components (no text or symbols)
natural_image
3D model of a robotic device with yellow and gray components, showing a step labeled '②' (no text or symbols on the device itself)① Screw
② Cover
- Swing the cover downwards.
- Release and disconnect the battery plug connector.
- Remove the battery.
- Dispose of the used batteries in accordance with statutory provisions.
Malfunctions
⚠️DANGER
Inadvertently starting up device
Risk of injury, electric shock
Set the power switch to "0" prior to all work on the device.
Pull out the charger mains plug.
ATTENTION
Risk of damage to the device due to leaking water.
Empty the waste water tank and the fresh water tank before working on the device.
Contact Customer Service in the case of malfunctions that cannot be corrected using this table.
Malfunctions with information shown on the display
| Indicator | Malfunction | Rectification |
| The brush drive indicator light flashes orange | Control is overheated | Switch off the power switch, wait a few minutes, switch on the power switch again. |
| Blocked brush | Check if the roller brush is blocked by foreign bodies and remove the foreign bodies if necessary. | |
| The suction indicator light flashes orange | Control is overheated | Switch off the power switch, wait a few minutes, switch on the power switch again. |
| The battery status indicator flashes red | Malfunction during charging process | Unplug the mains plug of the charger. Wait 10 seconds. Reinsert the mains plug. If the malfunction is displayed again: contact customer service. |
| Indicator | Malfunction | Rectification |
| During the charging process, the charger flashes alternately between Charging and Error. | Temperature too high during charging. | Keep the mains plug of the charger plugged in. The charging process starts automatically as soon as the temperature has dropped. |
| Eco mode indicator light flashing blue | Battery capacity nearly exhausted, device working at reduced power. | Charge the battery. |
Malfunctions that are not displayed
| Malfunction | Rectification |
| Device does not start | Turn on the device switch, wait 3 seconds, check the battery charging state. |
| Low water quantity | Check fresh water level, top up tank if necessary. |
| Turn on the cleaning solution switch. | |
| Clean the fresh water filter. | |
| Pull the water distribution strip off the cleaning head and clean the water channel. | |
| Poor suction performance | Lower the suction bar. |
| Empty the waste water tank. | |
| Clean the seals between the waste water tank and cover and check for tightness, replace if required. | |
| Clean the vacuum lips on the suction bar, turn or replace if required. | |
| Check the suction hose and suction bar for clogging and remove any clogging if necessary. | |
| Check the suction hose for leaks; clean if necessary. | |
| EPA filter (optional) soiled, replace. | |
| Unsatisfactory cleaning result | Retract the transport chassis. |
| Check/set the brush contact pressure. | |
| Check the suitability of the brush type and detergent used. | |
| Check the brushes for wear and tear, replace if required. | |
| Brush does not rotate | Pull the safety button towards the steering wheel. |
| Check if the roller brush is blocked by foreign bodies and remove the foreign bodies if necessary.Turn off the brush drive switch, wait briefly, turn on the switch again. |
Accessories and spare parts
Only use original accessories and original spare parts. They ensure that the appliance will run fault-free and safely.
Information on accessories and spare parts can be found at www.kaercher.com.
| Descrip-tion | Part no. | Description |
| Roller brush, white (soft) | 4.762-405.0 | For polishing floors |
| Roller brush, red (me-dium, standard) | 4.762-392.0 | For cleaning lightly soiled or sensitive floors. |
| Roller brush, green (hard) | 4.762-407.0 | For cleaning heavily soiled floors. |
| Roller brush, orange (high / low) | 4.762-406.0 | For scrubbing struc-tural floors (safety tiles, etc.) |
| Microfib-er roller | 4.037-093.0 | Especially for fine stone tiles, microfibre cleaning brush with particularly high clean-ing performance |
| Pad roll-er shaft | 4.762-413.0 | For holding roller pads |
| Roller pad, red (medi-um) | 6.367-107.0 | For cleaning lightly soiled floors. |
| Roller pad, green (hard) | 6.367-106.0 | For cleaning normal to heavily soiled floors. |
| Roller pad, yel-low (soft) | 6.367-105.0 | For polishing floors |
| Filler hose | 6.680-124.0 | For filling the fresh wa-ter tank |
| Suction lip set | 4.037-094.0 | As a replacement |
| EPA filter | 6.414-631.0 |
Technical data
Device performance data
| Rated voltage V 25,2 | ||
| Battery capacity Ah | (5 h) | 30 |
| Battery type Li-ion | ||
| Mean power input (Power/Eco) | 650/350 | |
| Suction Turbine Power W 280 | ||
| Brush Drive Power W 185 | ||
| Protection Class IPX3 | ||
| Protection class 1 | ||
| Theoretical surface perfor- m2/h 1800 mance | ||
| Fresh water tank capacity I 22 | ||
| Waste water tank capacity I 22 | ||
| Water temperature max. °C | 50 | |
| Suction | ||
| Suction performance, air quantity Power/Eco | I/s | 20/15 |
| Suction performance, vac- kPa uum Power/Eco | kPa | 8/5 |
Cleaning Brushes
| Working Width | mm | 450 |
| Brush Diameter | mm | 96 |
| Brush speed Power/Eco | 1/min | 1050/750 |
Charger
| Mains voltage V 220... | ||
| 240 | ||
| Frequency | Hz | 50-60 |
| Power input | W 300 | |
Environmental conditions
| Permissible temperature range | °C | 2...40 |
Dimensions and weights
| Length x width x height (transport) | mm | 866x530x1061 |
| Approved total weight | kg | 65 |
| Net weight (transport weight) | lbs (kg) | 43 |
Determined values according to EN 60335-2-72
| Hand-arm vibration value (position 1) | m/s2 | 0,5 |
| Hand-arm vibration value (position 2) | m/s2 | 0,5 |
| Uncertainty K | m/s2 | 0,2 |
| Sound pressure level LpA | dB(A) | 63 |
| Uncertainty KpA | dB(A) | 2 |
| Sound power level LWA+ Uncertainty KWA | dB(A) | 85 |
Subject to technical modifications.
EU Declaration of Conformity
We hereby declare that the machine described below complies with the relevant basic safety and health requirements in the EU Directives, both in its basic design and construction as well as in the version placed in circulation by us. This declaration is invalidated by any changes made to the machine that are not approved by us.
Product: Scouring and vacuum machine
Type: 1.783-xxx
Currently applicable EU Directives
2006/42/EC (+2009/127/EC)
2014/30/EU
2011/65/EU
2014/53/EU (TCU)
Harmonised standards used
EN 60335-1
EN 60335-2-72
EN 60335-2-29
EN 55012: 2007 + A1: 2009
EN 55014-1: 2006+A1: 2009+A2: 2011
EN 55014-2: 1997+A1: 2001+A2: 2008
EN 61000-3-2: 2014
EN 61000-3-3: 2013
EN 61000-6-2: 2005
EN 62233: 2008
EN IEC 63000: 2018
National standards used
TCU
EN 301 511 V12.5.1
EN 300 440 V2.1.1
EN 300 328 V2.2.2
EN 300 330 V2.1.1
The signatories act on behalf of and with the authority of the company management.
H. Jenner
Chairman of the Board of Management

S. Reiser
Director Regulatory Affairs & Certification
Documentation supervisor:
S. Reiser
Alfred Kärcher SE & Co. KG
Alfred-Kärcher-Str. 28 - 40
71364 Winnenden (Germany)
Ph.: +49 7195 14-0
Fax: +49 7195 14-2212
Winnenden, 2021/02/01
Warranty
The warranty conditions issued by our relevant sales company apply in all countries. We shall remedy possible malfunctions on your appliance within the warranty period free of cost, provided that a material or manufacturing flaw is the cause. In a warranty case, please contact your dealer (with the purchase receipt) or the next authorised customer service site.
(See overleaf for the address)
Further warranty information (if available) can be found in the service area of your local Kärcher website under "Downloads".
Contenu
text_image
Technical diagram of a cleaning or cleaning device with numbered parts labeled 13 to 20
text_image
Labeled diagram of a cleaning or cleaning machine with numbered parts and an inset magnified view showing a circular component.text_image
Labeled diagram of a vehicle head panel with numbered components and control buttonstext_image
Diagram of a device interior with labeled parts and directional arrows indicating movement or flowtext_image
Technical diagram of a mechanical component with labeled parts ① and ②, showing a striped top section and directional arrow.①Filtre EPA
② Corps de filtre
natural_image
3D rendered mechanical component with yellow and black parts, no visible text or symbolsnatural_image
Mechanical assembly diagram showing a vehicle's front wheel, suspension components, and wheelbase (no text or labels visible)natural_image
Close-up of a black cable with yellow connectors and a blue tip, showing mechanical components (no text or symbols)natural_image
3D rendering of a black and yellow cleaning or cleaning service robot with a yellow accent (no text or symbols visible)text_image
Diagram of a device interior with labeled components and directional arrows indicating movement or flowtext_image
Technical diagram of a mechanical component with labeled parts 1 and 2, showing a striped top section and directional arrow.①Filtre EPA
② Corps de filtre
natural_image
3D mechanical component with a yellow plastic component and a numbered label (1), no readable text or symbols present.natural_image
Mechanical assembly diagram showing a component with highlighted parts and directional arrows (no text or symbols)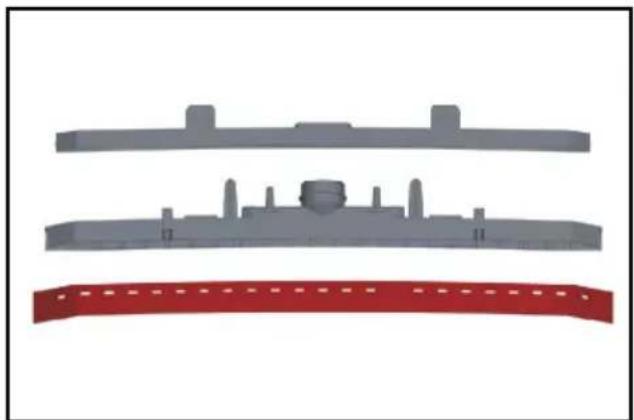
natural_image
Three gray plastic components with no visible text or symbols, arranged vertically on a white background (no text or symbols)natural_image
Illustration of a robotic cleaning robot with yellow and purple components, showing a close-up inset (no text or symbols)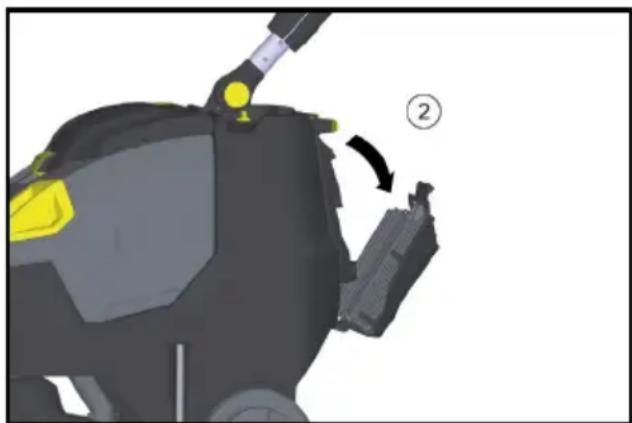
natural_image
3D model of a robotic device with yellow highlighted components and a numbered callout (no text or symbols)①Vis
② Couvercle
2006/42/CE (+2009/127/CE)
2014/30/UE
2011/65/UE
2014/53/EU (TCU)
Chairman of the Board of Management
S. Reiser
Director Regulatory Affairs & Certification
71364 Winnenden (Germany)
text_image
Technical diagram of a cleaning or cleaning device with numbered parts and an inset view showing a component detail.text_image
Labeled diagram of a vehicle head panel with numbered components and control buttonstext_image
Diagram of a device interior with labeled components and directional arrows indicating movement or flowtext_image
Technical diagram of a mechanical component with labeled parts ① and ②, showing a striped top section and directional arrow.①Filtro EPA
② Scatola del filtro
natural_image
3D rendered mechanical component with yellow and gray parts, no visible text or symbolsnatural_image
Mechanical assembly diagram showing a vehicle's front wheel, suspension components, and wheelbase (no text or labels visible)natural_image
Close-up of a black cable with yellow connectors and a blue tip, showing mechanical components (no text or symbols)natural_image
3D rendering of a black and yellow cleaning or cleaning service vehicle (no text or symbols visible)text_image
Diagram of a device interior with labeled components and directional arrows indicating movement or flowtext_image
Technical diagram of a mechanical component with numbered parts and an upward arrow indicating force or direction.①Filtro EPA
② Scatola del filtro
natural_image
3D mechanical component with a yellow plastic component inserted, labeled with number 1 (no text or symbols on the object itself)natural_image
Cross-sectional diagram of a mechanical assembly with highlighted components and arrows indicating movement (no text or symbols)
natural_image
Three gray plastic components with no visible text or symbols, arranged vertically on a white background (no text or symbols)natural_image
Illustration of a cleaning robot with yellow safety markings, showing a close-up view of the device (no text or symbols present)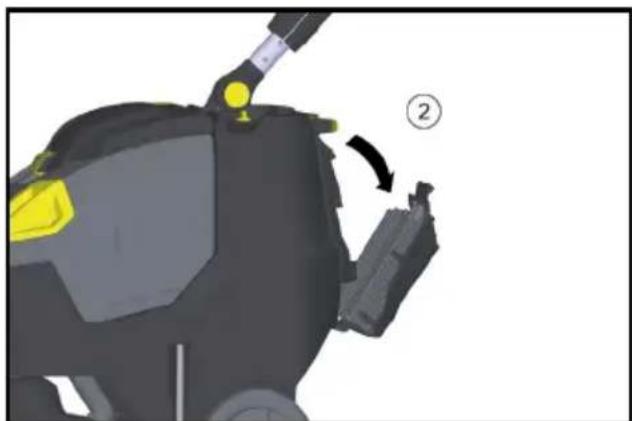
natural_image
3D model of a robotic device with yellow highlighted components and a numbered callout (no text or symbols)①Vite
②Coperchio

H. Jenner
Chairman of the Board of Management
S. Reiser
Director Regulatory Affairs & Certification
71364 Winnenden (Germany)
Tel.: +49 7195 14-0
Fax: +49 7195 14-2212
Winnenden, 01/02/2021
Garanzia
text_image
Technical diagram of a cleaning or cleaning device with numbered parts labeled for identification.
text_image
Labeled diagram of a cleaning or cleaning machine with numbered parts for identificationtext_image
Labeled diagram of a vehicle head panel showing numbered components for identificationtext_image
Diagram of a vehicle interior with labeled components and directional arrows indicating movement or flow① Cierre
②Filtro EPA
text_image
Technical diagram of a mechanical component with labeled parts 1 and 2, showing a striped top section and directional arrow.①Filtro EPA
② Carcasa del filtro
natural_image
3D rendered mechanical component with yellow component and black body, no visible text or symbolsnatural_image
Mechanical assembly diagram showing a vehicle's lower body with wheels, suspension components, and a yellow valve (no text or symbols visible)natural_image
Close-up of a cable being inserted into a tray with blue liquid, showing mechanical components and arrows indicating motion (no text or symbols)natural_image
3D rendering of a black and yellow cleaning or cleaning service robot with yellow accents (no text or symbols visible)text_image
Diagram of a device interior with labeled components and directional arrows indicating movement or flow① Cierre
②Filtro EPA

text_image
Technical diagram of a mechanical component with labeled parts 1 and 2, showing a structural assembly with an upward arrow indicating motion or force.①Filtro EPA
② Carcasa del filtro
natural_image
3D mechanical component with a yellow plastic component inserted into a housing, labeled with number 1 (no text or symbols on the object itself)natural_image
Cross-sectional diagram of a mechanical assembly with highlighted components and arrows indicating movement (no text or symbols)
natural_image
Three gray plastic components with no visible text or symbols, arranged vertically on a white background (no text or symbols)natural_image
3D rendering of a small industrial robot with yellow components, shown with a magnified inset highlighting internal features (no text or symbols visible)
natural_image
3D model of a robotic device with yellow highlighted components and a numbered callout (no text or symbols)①Tornillo
②Tapa
2006/42/CE (+2009/127/CE)
2014/30/UE
2011/65/UE
2014/53/EU (TCU)

H. Jenner
Chairman of the Board of Management
S. Reiser
Director Regulatory Affairs & Certification
71364 Winnenden (Germany)
Tel.: +49 7195 14-0
Fax: +49 7195 14-2212
Winnenden, 01/02/2021
Garantía
text_image
Technical diagram of a cleaning or cleaning device with numbered parts and an inset view showing a component detail.text_image
Labeled diagram of a vehicle head panel showing numbered components for navigation or system control.text_image
Diagram of a device interior with labeled components and directional arrows indicating movement or flowtext_image
Technical diagram of a mechanical component with labeled parts ① and ②, showing a structural assembly with an arrow indicating direction.natural_image
3D rendered mechanical component with yellow and gray parts, no visible text or symbolsnatural_image
Mechanical assembly diagram showing a vehicle's lower leg and wheel components (no text or symbols visible)natural_image
Close-up of a black cable with yellow connectors and a blue tip, showing mechanical components (no text or symbols)natural_image
3D rendering of a black and yellow cleaning or cleaning service robot with yellow accents (no text or symbols visible)text_image
Diagram of a device interior with labeled components and directional arrows indicating movement or flowtext_image
Technical diagram of a mechanical component with labeled parts 1 and 2, showing a structural assembly with an upward arrow.natural_image
Mechanical component with a yellow plastic component inserted into a housing, labeled with number 1 (no text or symbols on the object itself)natural_image
Cross-sectional diagram of a mechanical assembly with highlighted components and arrows indicating movement (no text or symbols)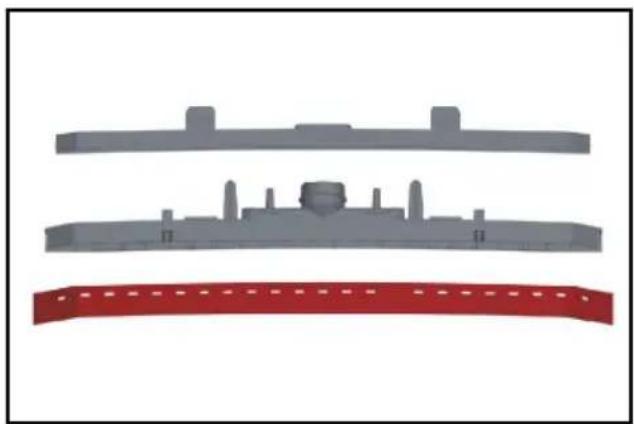
natural_image
Three gray plastic components with no visible text or symbols, arranged vertically on a white background (no text or symbols)natural_image
Illustration of a robotic car with yellow accents and a close-up inset showing a tool interacting with the engine (no text or symbols present)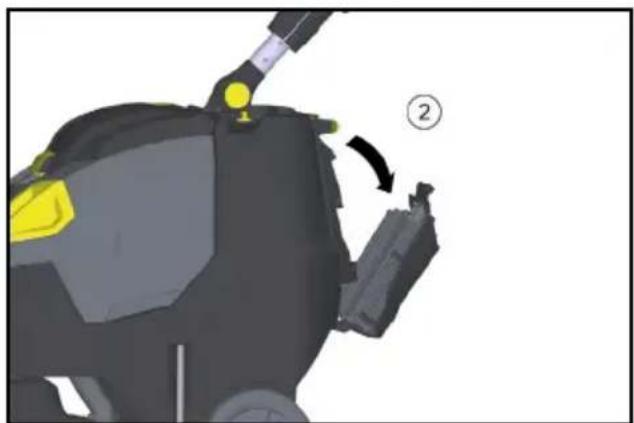
natural_image
3D model of a robotic device with yellow highlighted components and a numbered callout (no text or symbols)2006/42/CE (+2009/127/CE)
2014/30/UE
2011/65/UE
2014/53/EU (TCU)
Chairman of the Board of Management
S. Reiser
Director Regulatory Affairs & Certification
Winnenden, 01/02/2021
Garantia
text_image
Technical diagram of a cleaning or cleaning device with numbered parts, highlighting a component with yellow highlights and a magnified inset.text_image
Labeled diagram of a vehicle dashboard with numbered components for identificationtext_image
Diagram of a device interior with labeled components and directional arrows indicating movement or flow① Vergrendeling
②EPA-filter
- EPA-filter in de filterbehuizing leggen.
text_image
Technical diagram of a mechanical component with labeled parts ① and ②, showing a structural assembly with an arrow indicating direction.①EPA-filter
②Filterbehuizing
natural_image
3D rendered mechanical component with yellow and gray parts, no visible text or symbolsnatural_image
Mechanical assembly diagram showing a vehicle's lower body with attached components and a yellow valve (no text or symbols visible)natural_image
Close-up of a black cable with yellow connectors and a blue tip, showing mechanical components (no text or symbols)natural_image
3D rendering of a black and yellow cleaning or cleaning service robot with a yellow handle (no text or symbols visible)text_image
Diagram of a device interior with labeled components and directional arrows indicating movement or flow①Vergrendeling
②EPA-filter
text_image
Technical diagram of a mechanical component with labeled parts ① and ②, showing a structural assembly with an upward arrow.①EPA-filter
② Filterbehuizing
natural_image
3D model of a mechanical device with a yellow component and labeled part (1), no visible text or symbols beyond the label.natural_image
Mechanical assembly diagram showing internal components with arrows indicating movement or force (no text or symbols present)
natural_image
Three gray plastic components with no visible text or symbols, including a red curved band at the bottom (no text or symbols)natural_image
Illustration of a robotic car with yellow and black components, showing a close-up inset (no text or symbols)
natural_image
3D mechanical component diagram showing a yellow component with a numbered arrow indicating rotation (no text or symbols present)① Schroef
②Deksel
Chairman of the Board of Management

S. Reiser
Director Regulatory Affairs & Certification
71364 Winnenden (Germany)
Tel.: +49 7195 14-0
Fax: +49 7195 14-2212
Winnenden, 2021/02/01
Garantie
text_image
Technical diagram of a cleaning or cleaning device with numbered parts, highlighting a component with yellow highlights and a magnified inset.text_image
Labeled diagram of a mechanical or electronic component with numbered parts and yellow circular indicatorstext_image
Diagram of a device interior with labeled components and directional arrows indicating movement or flow①Kilit ②EPA filtre
text_image
Diagram of a mechanical component with labeled parts ① and ②, showing a striped top section and directional arrow.①EPA filtre
②Filtre gövdesi
natural_image
3D rendered mechanical component with yellow and black parts, no visible text or symbolsnatural_image
Mechanical assembly diagram showing a vehicle's lower leg and wheel assembly (no text or symbols visible)natural_image
Close-up of a black cable with yellow connectors and a blue tip, showing mechanical components (no text or symbols)natural_image
3D rendering of a black and yellow cleaning or cleaning machine with yellow accents (no text or symbols visible)text_image
Diagram of a device interior with labeled components and directional arrows indicating movement or flow①Kilit
②EPA filtre

text_image
Technical diagram of a mechanical component with labeled parts 1 and 2, showing a structural assembly with an upward arrow indicating motion or force.①EPA filtre
② Filtre gövdesi
natural_image
3D model of a mechanical device with a yellow plastic component and a numbered label (1), no readable text or symbols present.①Temiz su filtresi
natural_image
Cross-sectional diagram of a mechanical assembly with no visible text or symbols
natural_image
Three gray plastic components with no visible text or symbols, arranged vertically on a white background (no text or symbols)natural_image
Illustration of a robotic car with yellow accents and a close-up inset showing mechanical components (no text or symbols)
natural_image
3D mechanical component diagram showing a yellow highlighted part and a numbered callout (no text or symbols)①Civata
②Kapak
2006/42/AT (+2009/127/AT)
2014/30/AB
2011/65/AB
2014/53/EU (TCU)
Chairman of the Board of Management

S. Reiser
Director Regulatory Affairs & Certification
Winnenden, 2021/02/01
Garanti
text_image
Technical diagram of a cleaning or cleaning device with numbered parts and highlighted componentstext_image
Labeled diagram of a vehicle head panel showing numbered components for navigation or system control.text_image
Diagram of a device interior with labeled components and directional arrows indicating movement or flow① Spärr
②EPA-filter
text_image
Technical diagram of a mechanical component with labeled parts 1 and 2, showing a striped top section and directional arrow.①EPA-filter
②Filterkåpa
natural_image
3D rendered mechanical component with yellow and gray parts, no visible text or symbols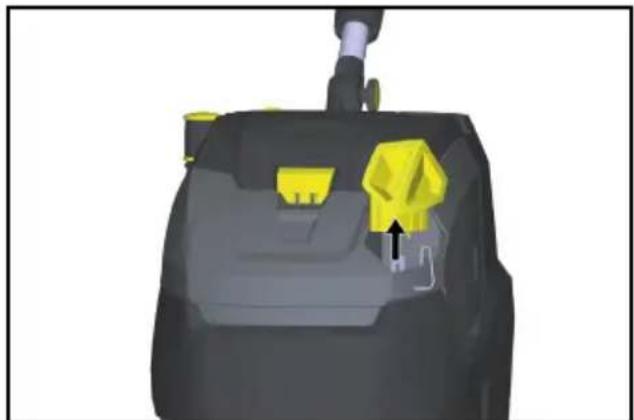
natural_image
3D rendered mechanical component with yellow and gray parts, no visible text or symbolsnatural_image
Mechanical assembly diagram showing a vehicle's lower leg and wheel assembly with no visible text or symbols0 Transportvagn inkörd
1 Transportvagn utkörd
natural_image
Close-up of a black cable with yellow connectors and a blue tip, showing mechanical components (no text or symbols)natural_image
3D rendering of a black and yellow cleaning or cleaning service robot with a yellow handle (no text or symbols visible)text_image
Diagram of a device interior with labeled components and directional arrows indicating movement or flowtext_image
Diagram of a mechanical component with labeled parts ① and ②, showing a structural assembly with an upward arrow indicating motion or force.①EPA-filter
②Filterkåpa
natural_image
3D model of a mechanical device with a yellow plastic component and a numbered label (1), no readable text or symbols present.①Filter färskvatten
natural_image
Cross-sectional diagram of a mechanical assembly with highlighted components and arrows indicating movement (no text or symbols)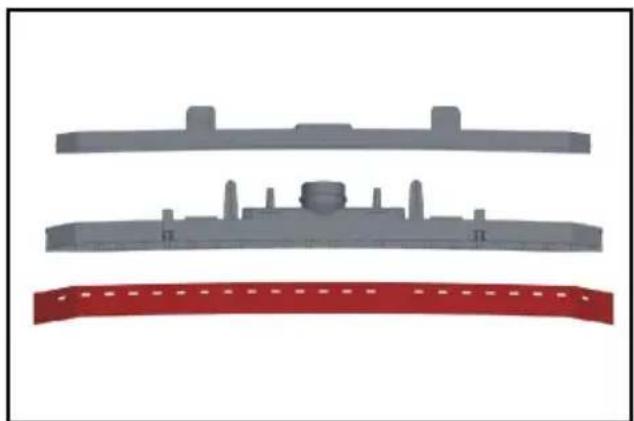
natural_image
Three gray plastic components with no visible text or symbols, including a red banner at the bottom (no text or symbols present)natural_image
3D rendering of a robotic car with yellow accents, showing internal components and a close-up inset (no text or symbols)
natural_image
3D model of a robotic device with yellow highlighted components and a numbered callout (no text or symbols)①Skruv
②Lock
H. Jenner
Chairman of the Board of Management
S. Reiser
Director Regulatory Affairs & Certification
D-71364 Winnenden (Germany)
Tfn: +49 7195 14-0
Fax: +49 7195 14-2212
Winnenden, 2021-02-01
Garanti
text_image
Technical diagram of a cleaning or cleaning device with numbered parts labeled for identification.
text_image
Labeled diagram of a cleaning or cleaning machine with numbered parts for identificationtext_image
Labeled diagram of a car dashboard with numbered components for navigation or system controltext_image
Diagram of a device interior with labeled components and directional arrows indicating movement or flow① Lukitus
②EPA-suodatin
- Aseta EPA-suodatin suodatinkoteloon.

text_image
Technical diagram of a mechanical component with labeled parts 1 and 2, showing a striped top section and directional arrow.①EPA-suodatin
② Suodatinkotelo
natural_image
3D rendered mechanical component with yellow and black parts, no visible text or symbolsnatural_image
Mechanical assembly diagram showing a vehicle's wheel and suspension components (no text or labels visible)natural_image
Diagram of a cable being inserted into a tray with a blue tip, showing force arrows (no text or symbols)natural_image
3D rendering of a black and yellow cleaning or dust cleaner with attached sensor array (no text or symbols visible)text_image
Diagram of a device interior with labeled components and directional arrows indicating movement or flow①Lukitus
②EPA-suodatin

text_image
Technical diagram of a mechanical component with labeled parts 1 and 2, showing a striped top layer and directional arrow.①EPA-suodatin
②Suodatinkotelo
natural_image
3D model of a mechanical device with a yellow plastic component and a numbered annotation (1), no visible text or symbols.natural_image
Mechanical assembly diagram showing internal components with arrows indicating movement or force (no readable text or symbols)
natural_image
Three gray plastic components with no visible text or symbols, arranged vertically on a white background (no text or symbols)natural_image
Illustration of a robotic car with yellow and black components, showing a close-up view of the motion (no text or symbols present)
natural_image
3D model of a robotic device with highlighted yellow components and a numbered callout (no text or symbols)①Ruvi
②Kansi
H. Jenner
Chairman of the Board of Management

S. Reiser
Director Regulatory Affairs & Certification
71364 Winnenden (Germany)
Puh.: +49 7195 14-0
text_image
Technical diagram of a cleaning or cleaning device with numbered parts labeled for identification.
text_image
Labeled diagram of a cleaning or cleaning machine with numbered parts for identificationtext_image
Labeled diagram of a vehicle head panel showing numbered components for identificationtext_image
Diagram of a device interior with labeled components and directional arrows indicating movement or flow①Lås
②EPA-filter
- Legg EPA-filteret inn i filterhuset.
text_image
Technical diagram of a mechanical component with labeled parts 1 and 2, showing a downward force or compression setup.①EPA-filter
②Filterhus
natural_image
3D rendered mechanical component with yellow and gray parts, no visible text or symbolsnatural_image
Mechanical assembly diagram showing a vehicle's wheel and suspension components (no text or labels)0 transportunderstell kjørt inn
natural_image
Close-up of a cable being inserted into a device with a blue tip, showing mechanical components and arrows indicating direction (no text or symbols)natural_image
3D rendering of a black and yellow cleaning or cleaning service vehicle (no text or symbols visible)text_image
Diagram of a vehicle interior with labeled components and directional arrows indicating movement or flow①Lås
②EPA-filter

text_image
Technical diagram of a mechanical component with labeled parts 1 and 2, showing a striped top structure and directional arrow.natural_image
3D mechanical component with a yellow plastic component inserted, labeled with number 1 (no text or symbols on the object itself)①Filter rent vann
natural_image
Cross-sectional diagram of a mechanical assembly with highlighted components and arrows indicating movement (no text or symbols)
natural_image
Three gray plastic components with no visible text or symbols, arranged vertically on a white background (no text or symbols)natural_image
Illustration of a robotic car with yellow accents and a close-up inset showing a mechanical component (no text or symbols)
natural_image
3D model of a robotic device with yellow highlighted joints and a numbered callout (no text or symbols)① Skrue
②Deksel
2006/42/EF (+2009/127/EF)
2014/30/EU
2011/65/EU
2014/53/EU (TCU)
Anvendte harmoniserte standarder
EN 60335-1
EN 60335-2-72
EN 60335-2-29
EN 55012: 2007 + A1: 2009
EN 55014-1: 2006+A1: 2009+A2: 2011
EN 55014-2: 1997+A1: 2001+A2: 2008
EN 61000-3-2: 2014
EN 61000-3-3: 2013
EN 61000-6-2: 2005
EN 62233: 2008
EN IEC 63000: 2018

H. Jenner
Chairman of the Board of Management
S. Reiser
Director Regulatory Affairs & Certification
71364 Winnenden (Germany)
Tlf.: +49 7195 14-0
Winnenden, 2021/02/01
Garanti
text_image
Technical diagram of a cleaning or cleaning device with numbered parts labeled for identification.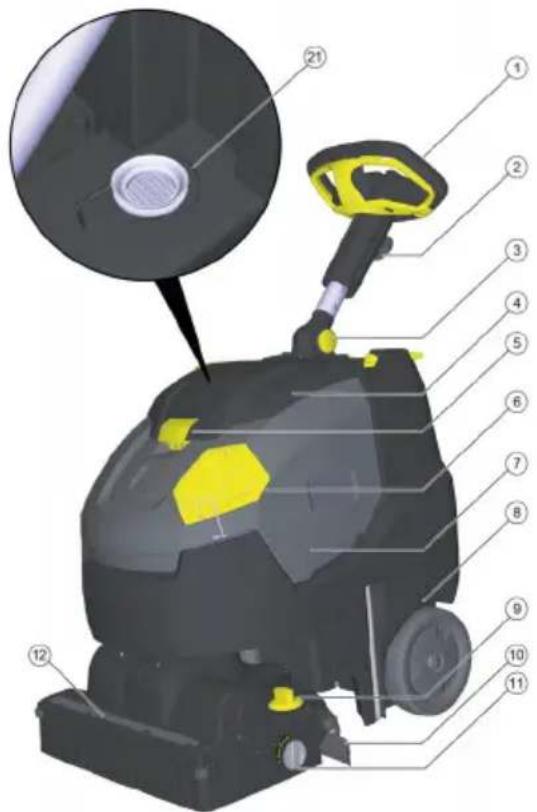
text_image
Labeled diagram of a cleaning or cleaning machine with numbered parts for identificationtext_image
Labeled diagram of a vehicle head panel showing numbered components for identification①Dosering af rengøringsopløsning
② Kontakt rengøringsopløsning
③Kontrollampe forespørgsel om rengø-
ringsopløsning
④Kontrollampe sugning
Grøn: Sugeturbine i drift
Orange, blinkende: Sugeturbine overbelastet
⑤ Kontrollampe børstedrev
Grøn: Børsten roterer
Orange, blinkende: Børste overbelastet
⑥Batteritilstandsvisning
Under drift:
Grøn: Batterierne opladet
text_image
Diagram of a device interior with labeled components and directional arrows indicating movement or flow①Lås
②EPA-filter
text_image
Technical diagram of a mechanical component with labeled parts ① and ②, showing a downward force or compression arrow.①EPA-filter
②Filterhus
natural_image
3D rendered mechanical component with yellow and gray parts, no visible text or symbolsnatural_image
Mechanical assembly diagram showing a vehicle's wheel and suspension components (no text or labels)natural_image
Close-up of a cable being inserted into a device, showing blue and yellow material (no text or symbols)natural_image
3D rendering of a black and yellow cleaning or cleaning service vehicle (no text or symbols visible)text_image
Diagram of a device interior with labeled components and directional arrows indicating movement or flow①Lås
②EPA-filter
text_image
Technical diagram of a mechanical component with numbered parts and an upward arrow indicating force or direction.①EPA-filter
②Filterhus
natural_image
3D model of a mechanical device with a yellow plastic component and a numbered label (1), no readable text or symbols present.natural_image
Cross-sectional diagram of a mechanical assembly with highlighted components and arrows indicating movement (no text or symbols)
natural_image
Three gray plastic components with no visible text or symbols, arranged vertically on a white background (no text or symbols)natural_image
Illustration of a robotic car with yellow and black components, showing a close-up of the interior (no text or symbols)
natural_image
3D model of a robotic device with highlighted components and directional arrow (no text or symbols)① Skrue
②Dæksel
2006/42/EF (+2009/127/EF)
2014/30/EU
2011/65/EU
2014/53/EU (TCU)
H. Jenner
Chairman of the Board of Management
S. Reiser
Director Regulatory Affairs & Certification
71364 Winnenden (Germany)
Tlf.: +49 7195 14-0
Fax: +49 7195 14-2212
Winnenden, 2021/02/01
Garanti
Üldised juhised.... 151
Ohutusjuhised 151
text_image
Technical diagram of a cleaning or cleaning device with numbered parts labeled for identification.
text_image
Labeled diagram of a cleaning or cleaning machine with numbered parts for identificationKäsitsemiselemendid
text_image
Labeled diagram of a vehicle head panel showing numbered components for identificationtext_image
Diagram of a device interior with labeled components and directional arrows indicating movement or flow① Lukusti
②EPA-filter
- Asetage EPA-filter filtrikorpusesse.

text_image
Technical diagram of a mechanical component with labeled parts 1 and 2, showing a downward arrow indicating a feature.①EPA-filter
② Filtrikorpus
natural_image
3D rendered mechanical component with yellow and gray parts, no visible text or symbolsnatural_image
Mechanical assembly diagram showing a vehicle's lower body with attached components and a yellow valve (no text or symbols visible)natural_image
Close-up of a cable being inserted into a device, showing blue and yellow material (no text or symbols)natural_image
3D rendering of a black and yellow cleaning or cleaning service robot with a yellow accent (no text or symbols visible)text_image
Diagram of a device interior with labeled components and directional arrows indicating movement or flow① Lukusti
②EPA-filter

text_image
Technical diagram of a mechanical component with numbered parts and an upward arrow indicating force or direction.①EPA-filter
②Filtrikorpus
natural_image
3D mechanical component with a yellow component and numbered annotation (no readable text or symbols)natural_image
Cross-sectional diagram of a mechanical assembly with highlighted components and arrows indicating movement (no text or symbols)
natural_image
Three gray plastic components with no visible text or symbols, arranged vertically on a white background (no text or symbols)natural_image
Illustration of a car carrier with yellow and black components, showing a close-up view of the component (no text or symbols present)
natural_image
3D model of a robotic device with highlighted yellow components and a numbered callout (no text or symbols)①Polt
②Kaas
2006/42/EÜ (+2009/127/EÜ)
2014/30/EL
2011/65/EL
2014/53/EU (TCU)
H. Jenner
Chairman of the Board of Management

S. Reiser
Director Regulatory Affairs & Certification
71364 Winnenden (Germany)
Tel: +49 7195 14-0
Winnenden, 2021/02/01
Garantii
text_image
Technical diagram of a cleaning or cleaning device with numbered parts labeled for identification.
text_image
Labeled diagram of a cleaning or cleaning machine with numbered parts for identification①Stüre
text_image
Labeled diagram of a vehicle head panel showing numbered components for identificationtext_image
Diagram of a device interior with labeled components and directional arrows indicating movement or flow① Fiksators
②EPA filtrs
text_image
Technical diagram of a mechanical component with labeled parts 1 and 2, showing a striped top section and directional arrow.①EPA filtrs
② Filtra korpuss
natural_image
3D rendered mechanical component with yellow and gray parts, no visible text or symbolsnatural_image
Mechanical assembly diagram showing a vehicle's lower leg and wheel assembly (no text or symbols visible)natural_image
3D diagram of a cable being inserted into a tray with a blue tip, showing mechanical components and arrows (no text or symbols)natural_image
3D rendering of a black and yellow cleaning or cleaning service robot with a yellow handle (no text or symbols visible)text_image
Diagram of a device interior with labeled components and directional arrows indicating movement or flow①Fiksators
②EPA filtrs
text_image
Technical diagram of a mechanical component with labeled parts 1 and 2, showing a structural assembly with an upward arrow.①EPA filtrs
② Filtra korpuss
natural_image
3D mechanical component with a yellow plastic component and a numbered label (1), no readable text or symbols present.①Tīrā ūdens filtrs
natural_image
Cross-sectional diagram of a mechanical assembly with no visible text or symbols
natural_image
Three gray plastic components with no visible text or symbols, arranged vertically on a white background (no text or symbols)natural_image
Illustration of a robotic car with yellow sensor points and a close-up inset showing mechanical components (no text or symbols)
natural_image
3D model of a robotic device with yellow highlighted components and a numbered callout (no text or symbols)① Skrūve
②Vāks

H. Jenner
Chairman of the Board of Management
S. Reiser
Director Regulatory Affairs & Certification
text_image
Labeled diagram of a cleaning or cleaning device with numbered parts, showing internal components and a magnified inset view.
text_image
Labeled diagram of a cleaning or cleaning device with numbered parts and a magnified inset showing a component.text_image
Diagram of a car dashboard with numbered components and control buttons, likely for navigation or system control.text_image
Diagram of a device interior with labeled components and directional arrows indicating movement or flow①Blokatorius
②EPA filtras
text_image
Technical diagram of a mechanical component with labeled parts ① and ②, showing a striped top section and directional arrow.①EPA filtras
②Filtro korpusas
natural_image
3D rendered mechanical component with yellow and gray parts, no visible text or symbolsnatural_image
Mechanical assembly diagram showing a vehicle's lower body, suspension lock, and wheel (no text or symbols visible)natural_image
Close-up of a cable being inserted into a tray with a blue tip, showing mechanical components and arrows indicating motion (no text or symbols)natural_image
3D rendering of a black and yellow cleaning or cleaning service robot with a yellow handle (no text or symbols visible)text_image
Diagram of a device interior with numbered components and directional arrows indicating movement or flow①Blokatorius
②EPA filtras

text_image
Technical diagram of a mechanical component with labeled parts 1 and 2, showing a structural assembly with an upward arrow.①EPA filtras
② Filtro korpusas
natural_image
3D rendering of a mechanical device with a yellow component and labeled part (1), no visible text or symbols beyond the label.① Švaraus vandens filtras
natural_image
Mechanical assembly diagram showing internal components with arrows indicating movement or force (no text or symbols present)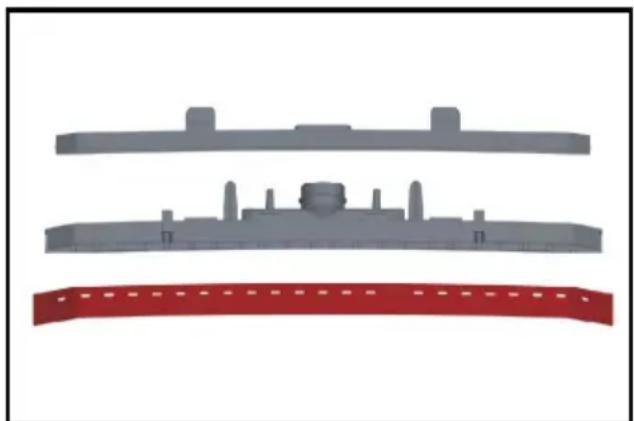
natural_image
Three gray plastic components with no visible text or symbols, arranged vertically on a white background (no text or symbols)natural_image
Illustration of a cleaning or inspection device with yellow components and a magnified inset showing internal components (no text or symbols)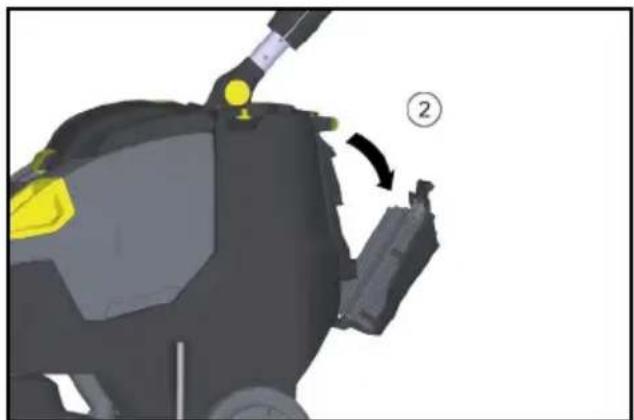
natural_image
3D mechanical component diagram showing a yellow component being adjusted to a black housing, with no visible text or symbols.①Varžtas
②Dangtelis
Chairman of the Board of Management
S. Reiser
Director Regulatory Affairs & Certification
text_image
Technical diagram of a cleaning or cleaning device with numbered parts labeled for identification.
text_image
Labeled diagram of a cleaning or cleaning machine with numbered parts for identificationtext_image
Labeled diagram of a vehicle head panel showing numbered components for identificationtext_image
Diagram of a vehicle interior with labeled components and directional arrows indicating movement or flow①Blokada
② Filtr EPA
text_image
Technical diagram of a mechanical component with labeled parts 1 and 2, showing a striped top section and directional arrow.natural_image
3D rendered mechanical component with yellow and black parts, no visible text or symbolsnatural_image
Mechanical assembly diagram showing a vehicle's front wheel, suspension components, and mounting bracket (no text or symbols visible)natural_image
Close-up of a cable being inserted into a component with a blue tip, showing black arrows indicating direction (no text or symbols)natural_image
3D rendering of a black and yellow cleaning or cleaning service robot with a handle (no text or symbols visible)text_image
Diagram of a device interior with labeled components and directional arrows indicating movement or flow①Blokada
② Filtr EPA

text_image
Technical diagram of a mechanical component with labeled parts 1 and 2, showing a structural assembly with an upward arrow.① Filtr EPA
② Obudowa filtra
natural_image
3D mechanical component with a yellow plastic component inserted, labeled with number 1 (no text or symbols on the object itself)natural_image
Mechanical assembly diagram showing internal components with arrows indicating movement or force (no text or symbols present)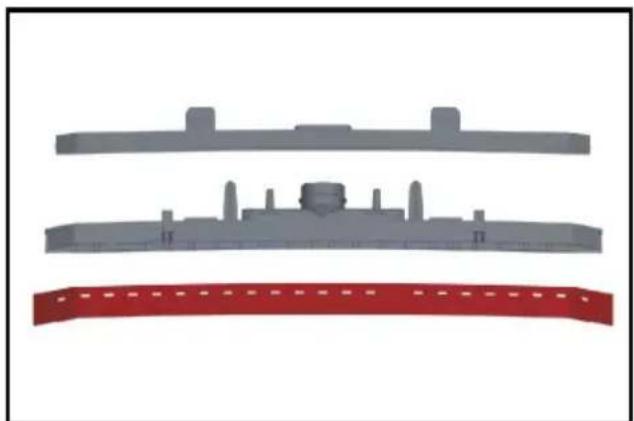
natural_image
Three gray plastic components with no visible text or symbols, arranged vertically on a white background (no text or symbols)natural_image
3D rendering of a robotic car with yellow and black components, shown with an inset close-up highlighting a specific area (no text or symbols present)
natural_image
3D model of a robotic device with yellow and gray components, showing a step labeled '②' (no text or symbols on the device itself)①Śruba
②Pokrywa
2006/42/WE (+2009/127/WE)
2014/30/UE
2011/65/UE
2014/53/EU (TCU)
H. Jenner
Chairman of the Board of Management
S. Reiser
Director Regulatory Affairs & Certification
71364 Winnenden (Germany)
Tel.: +49 7195 14-0
text_image
Technical diagram of a cleaning or cleaning device with numbered parts labeled for identification.
text_image
Labeled diagram of a cleaning or cleaning machine with numbered parts for identificationtext_image
Labeled diagram of a vehicle head panel showing numbered components for navigation or system control.text_image
Diagram of a device interior with labeled components and directional arrows indicating movement or flowtext_image
Technical diagram of a mechanical component with labeled parts 1 and 2, showing a striped top section and directional arrow.natural_image
3D rendered mechanical component with yellow and gray parts, no visible text or symbolsnatural_image
Mechanical assembly diagram showing a vehicle's lower body and wheel components (no text or symbols visible)natural_image
Close-up of a cable being inserted into a device with a blue tip, showing mechanical components and arrows indicating motion (no text or symbols)natural_image
3D rendering of a black and yellow cleaning or cleaning service robot with yellow accents (no text or symbols visible)text_image
Diagram of a device interior with labeled components and directional arrows indicating movement or flow①Reteszelés
②EPA szűrő

text_image
Diagram of a mechanical component with labeled parts 1 and 2, showing a striped top structure and directional arrow.①EPA szűrő
② Szüröház
natural_image
3D mechanical component with a yellow plastic component inserted, labeled with number 1 (no text or symbols on the object itself)①Frissvíz-szűrő
natural_image
Cross-sectional diagram of a mechanical assembly with highlighted components and arrows indicating movement (no text or symbols)
natural_image
Three gray plastic components with no visible text or symbols, arranged vertically on a white background (no text or symbols)natural_image
3D rendering of a robotic car with yellow accents and a close-up inset showing internal components (no text or symbols)
natural_image
3D model of a robotic device with yellow highlighted components and a numbered callout (no text or symbols)①Csavar
②Fedél
Chairman of the Board of Management
S. Reiser
Director Regulatory Affairs & Certification
Winnenden, 2021/02/01
Garancia
text_image
Technical diagram of a cleaning or cleaning device with numbered parts labeled 13 to 20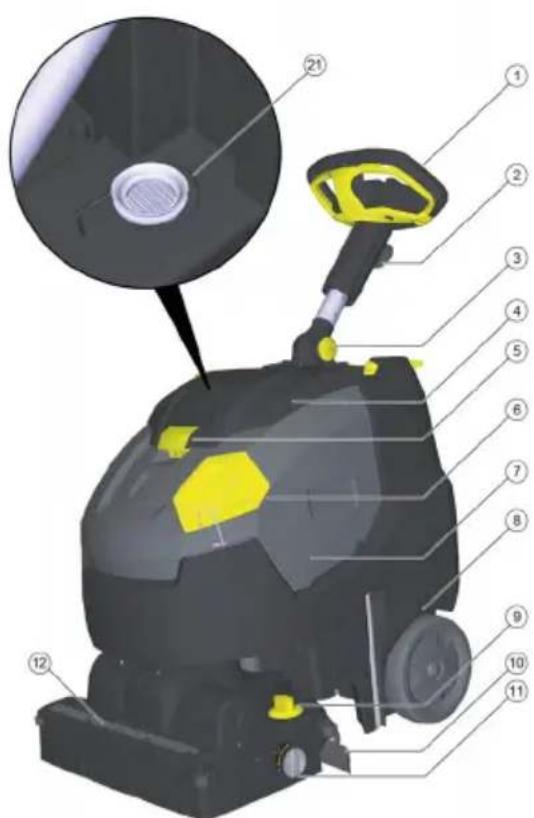
text_image
Labeled diagram of a cleaning or cleaning machine with numbered parts and an inset magnified view showing a circular component.text_image
Labeled diagram of a mechanical or automotive component with numbered parts and yellow circular indicatorstext_image
Diagram of a device interior with labeled components and directional arrows indicating movement or flow①Zámek
②EPA filtr
text_image
Technical diagram of a mechanical component with labeled parts ① and ②, showing a striped top layer and directional arrow.①EPA filtr
②Těleso filtru
natural_image
3D rendered mechanical component with yellow and black parts, no visible text or symbolsnatural_image
Mechanical assembly diagram showing a mounted device with wheels and a yellow knob (no text or symbols)natural_image
Close-up of a black cable being inserted into a blue plastic clip onto a metal tray (no text or symbols visible)natural_image
3D rendering of a black and yellow cleaning or cleaning service robot with attached lever (no text or symbols visible)text_image
Diagram of a vehicle engine compartment with labeled parts and directional arrows indicating movement or force①Zámek
②EPA filtr
text_image
Technical diagram of a mechanical component with labeled parts 1 and 2, showing a structural assembly with an upward arrow.①EPA filtr
②Těleso filtru
natural_image
3D rendering of a mechanical device with a yellow component and labeled part (1), no visible text or symbols beyond the label.natural_image
Mechanical component diagram showing internal structure with arrows indicating movement or force (no text or symbols present)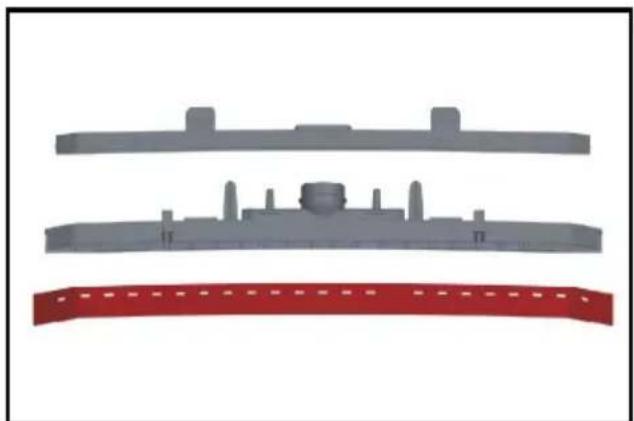
natural_image
Three gray plastic components with no visible text or symbols, including a red curved band at the bottom (no text or symbols)natural_image
Illustration of a robotic car with yellow and purple components, showing a close-up of the interior (no text or symbols)
natural_image
3D mechanical component diagram showing a lever mechanism with yellow and black parts, no visible text or symbols① Šroub
②Víko
2006/42/ES (+2009/127/ES)
2014/30/EU
2011/65/EU
2014/53/EU (TCU)
H. Jenner
Chairman of the Board of Management

S. Reiser
Director Regulatory Affairs & Certification
Winnenden, 2021/02/01
Záruka
text_image
Technical diagram of a cleaning or cleaning device with numbered parts labeled for identification.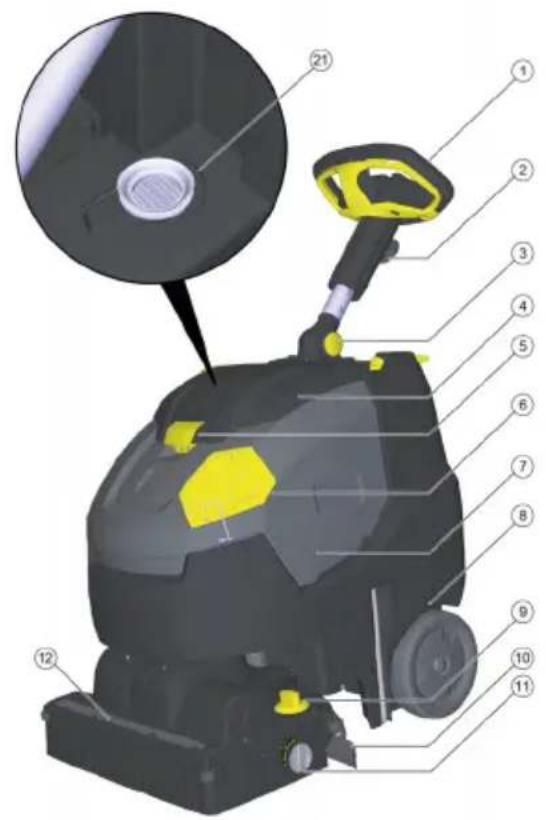
text_image
Labeled diagram of a cleaning or cleaning device with numbered parts for identificationtext_image
Labeled diagram of a vehicle head panel with numbered components and control buttonstext_image
Diagram of a device interior with labeled components and directional arrows indicating movement or flow① Zaistenie
②Filter EPA
- Vložte filter EPA do telesa filtra.
text_image
Technical diagram of a mechanical component with labeled parts 1 and 2, showing a structural assembly with a downward arrow indicating direction.①Filter EPA
②Teleso filtra
natural_image
3D rendered mechanical component with yellow and gray parts, no visible text or symbols- Pomocou dávkovacieho veka pridajte čistiaci prostriedok. Jedno naplnenie ve- ka zodpovedá 1 % použitiu.
natural_image
Mechanical assembly diagram showing a mounted component with wheels, gears, and a yellow valve (no text or symbols visible)natural_image
Close-up of a black cable with yellow connectors and a blue tip, showing mechanical components (no text or symbols)natural_image
3D rendering of a black and yellow cleaning or dust purifier with attached sensor array (no text or symbols visible)text_image
Diagram of a device interior with labeled components and directional arrows indicating movement or flow① Zaistenie
②Filter EPA

text_image
Technical diagram of a mechanical component with labeled parts 1 and 2, showing a structural assembly with an upward arrow indicating motion or force.①Filter EPA
②Teleso filtra
natural_image
3D model of a mechanical device with a yellow plastic component and a numbered label (1), no readable text or symbols present.①Filter čistej vody
natural_image
Mechanical assembly diagram showing a component with highlighted parts and directional arrows (no text or symbols)
natural_image
Three gray plastic components with no visible text or symbols, including a red curved band at the bottom (no text or symbols)- Stiahnite odsávacie stierky z držiaka.
Upozornenie
natural_image
Illustration of a robotic car with yellow accents and a close-up inset showing a mechanical component (no text or symbols)
natural_image
3D mechanical component diagram showing a yellow highlighted part and a numbered callout (no text or symbols)① Skrutka
②Veko
- Veko sklopte nadol.
- Uvol'nite a vytiahnite zástrčku batérie.
- Vyberte batériu.
- Použité batérie zlikvidujte podľa platných predpisov.
Poruchy
⚠ NEBEZPEČENSTVO
2006/42/ES (+2009/127/ES)
2014/30/EÚ
2011/65/EÚ
2014/53/EU (TCU)
Director Regulatory Affairs & Certification
71364 Winnenden (Germany)
Tel.: +49 7195 14-0
Fax: +49 7195 14-2212
Winnenden, 01.02.2021
Záruka
text_image
Technical diagram of a cleaning or cleaning device with numbered parts labeled for identification.
text_image
Labeled diagram of a cleaning or cleaning machine with numbered parts for identification①Krmilo
② Zvezdasti ročaj, sprememba višine kr-mila
③ Zvezdasti ročaj, položaj za transport kr-mila
④Pokrov rezervoarja za umazano vodo
text_image
Labeled diagram of a mechanical device interior with numbered components and control buttons①Odmerjanje raztopine čistila
② Stikalo raztopine čistila
③ Kontrolna lučka Nanesite raztopino čis- tila
④Kontrolna lučka za sesanje
Zelena: Delujoča sesalna turbina
Oranžna, utripa: Preobremenjena sesalna turbina
⑤Kontrolna lučka pogona krtač
Zelena: Krtača se vrti
Oranžna, utripa: Krtača preobremenje-
na
⑥Prikaz stanja baterije V obratovanju:
text_image
Diagram of a device interior with labeled components and directional arrows indicating movement or flow①Zapah ②Filter EPA
- Filter EPA vstavite v ohišje filtra.

text_image
Diagram of a mechanical component with labeled parts ① and ②, showing a striped top section and directional arrow.①Filter EPA
②Ohišje filtra
- Ohišje filtra namestite na pokrov rezervoarja za umazano vodo in ga zapahnite.
- Zaprite pokrov rezervoarja za umazano vodo.
natural_image
3D rendered mechanical component with yellow and black parts, no visible text or symbols- Dodajte čistilno sredstvo, pri tem uporabite dozirni pokrov. Napolnjen pokrov ustreza 1 % uporabe.
natural_image
Mechanical assembly diagram showing a vehicle's lower body with wheels, suspension components, and a yellow valve (no text or symbols visible)natural_image
Close-up of a cable being inserted into a tray with a blue tip, showing mechanical components and arrows indicating motion (no text or symbols)- Stisnite ali prepognite dozirno napravo.
- Odprite pokrov dozirne naprave.
- Izpustite umazano vodo - s stisnjenjem ali prepognjenjem regulirajte količino vo- de.
- Posodo za umazano vodo sperite s čisto vodo.
natural_image
3D rendering of a black and yellow cleaning or cleaning service robot with yellow accents (no text or symbols visible)text_image
Diagram of a device interior with labeled components and directional arrows indicating movement or flow① Zapah
②Filter EPA

text_image
Technical diagram of a mechanical component with labeled parts 1 and 2, showing a structural assembly with an upward arrow indicating motion or force.①Filter EPA
② Ohišje filtra
-
Notranjost pokrova in plovec sperite z vodo.
-
Rezervoar za umazano vodo sperite s čisto vodo.
-
Očistite sesalni prečnik
-
Posodo za grobo umazanijo vzemite ven in jo izpraznite.
-
Očistite zunanjost naprave z vlažno krpo, pomočeno v blag pralni lug.
-
Očistite sesalni nastavek, preverite obrabo in ga po potrebi zamenjajte.
-
Očistite krtačo.
-
Preverite obrabo krtače, po potrebi jo zamenjajte (glejte "Vzdrževana dela").
-
Napolnite baterijo po potrebi.
Tedensko
- Odstranite letev za razdelitev vode na či-stilni glavi in očistite vodni kanal.
- Očistite sito za kosme.
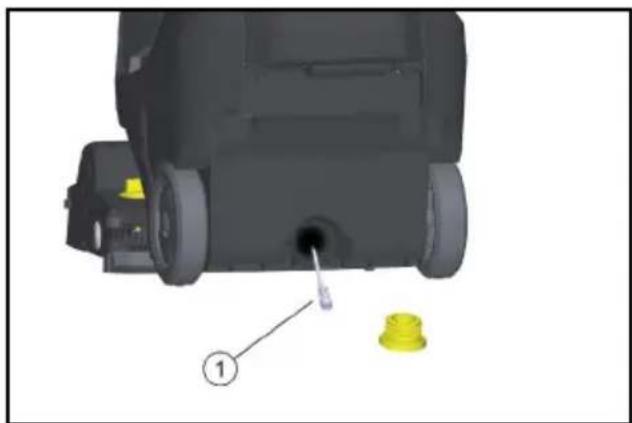
natural_image
3D mechanical component with a yellow plastic component inserted, labeled with number 1 (no text or symbols on the object itself)①Filter za svežo vodo
- Odvijte pokrov izpustne odprtine rezervoarja za svežo vodo.
- Izvlecite filter za svežo vodo in ga speri- te s čisto vodo.
Mesečno
- Preverite stanje tesnil med rezervoarjem za umazano vodo in pokrovom, po potrebi jih zamenjajte.
Letno
- Predpisan pregled naj izvaja servisna služba.
Vzdrževalna dela
natural_image
Mechanical assembly diagram showing internal components with arrows indicating movement or force (no text or symbols present)
natural_image
Three gray plastic components with no visible text or symbols, including a red banner at the bottom (no text or symbols on the main objects)- Odstranite sesalne nastavke z ročaja.
Napotek
natural_image
3D rendering of a robotic car with yellow sensor patches, shown in an inset view (no text or symbols)
natural_image
3D mechanical component diagram showing a yellow highlighted part and a numbered callout (no text or symbols)①Vijak
②Pokrov
2006/42/ES (+2009/127/ES)
2014/30/EU
2011/65/EU
2014/53/EU (TCU)
Chairman of the Board of Management

S. Reiser
Director Regulatory Affairs & Certification
Winnenden, 1. 2. 2021
Garancija
text_image
Technical diagram of a cleaning or cleaning device with numbered parts and an inset view showing a component with yellow highlights.text_image
Labeled diagram of a vehicle head panel showing numbered components and control buttonstext_image
Diagram of a device interior with labeled components and directional arrows indicating movement or flow①Blocare
② Filtru EPA
text_image
Technical diagram of a mechanical component with labeled parts ① and ②, showing a striped top section and directional arrow.① Filtru EPA
② Carcasa de filtru
natural_image
3D rendered mechanical component with yellow and gray parts, no visible text or symbolsnatural_image
Mechanical assembly diagram showing a vehicle's lower body and wheel components (no text or symbols visible)0 şasiu de transport retractat
1 şasiu de transport extins
natural_image
Close-up of a black cable being inserted into a device with a blue tip, showing mechanical components and arrows indicating direction (no text or symbols)natural_image
3D rendering of a black and yellow cleaning or cleaning service robot with a yellow handle (no text or symbols visible)text_image
Diagram of a device interior with labeled components and directional arrows indicating movement or flow①Blocare
② Filtru EPA
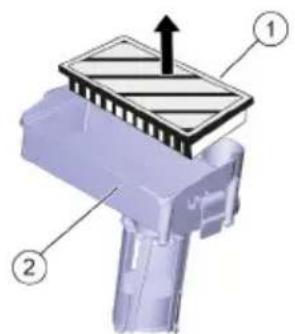
text_image
Technical diagram of a mechanical component with labeled parts 1 and 2, showing a striped top section and directional arrow.①Filtru EPA
② Carcasa de filtru
natural_image
3D mechanical component with a yellow plastic component inserted, labeled with number 1 (no text or symbols on the object itself)natural_image
Cross-sectional diagram of a mechanical assembly with highlighted components and arrows indicating movement (no text or symbols)
natural_image
Three gray plastic components with no visible text or symbols, arranged vertically on a white background (no text or symbols)natural_image
Illustration of a robotic car with yellow and black components, showing a close-up of the interior (no text or symbols)
natural_image
3D mechanical component diagram showing a highlighted part with yellow highlights and a numbered arrow indicating rotation (no text or symbols present)① Surub ② Capac
Directive UE relevante
2006/42/UE (+2009/127/UE)
2014/30/UE
2011/65/UE
2014/53/EU (TCU)
Norme armonizate aplicate
EN 60335-1
EN 60335-2-72
EN 60335-2-29
EN 55012: 2007 + A1: 2009
EN 55014-1: 2006+A1: 2009+A2: 2011
EN 55014-2: 1997+A1: 2001+A2: 2008
EN 61000-3-2: 2014
EN 61000-3-3: 2013
EN 61000-6-2: 2005
EN 62233: 2008
EN IEC 63000: 2018
Chairman of the Board of Management
S. Reiser
Director Regulatory Affairs & Certification
71364 Winnenden (Germania)
Tel.: +49 7195 14-0
Fax: +49 7195 14-2212
Winnenden, 2021/02/01
Garantie
text_image
Labeled diagram of a car cleaning or inspection device with numbered parts for identification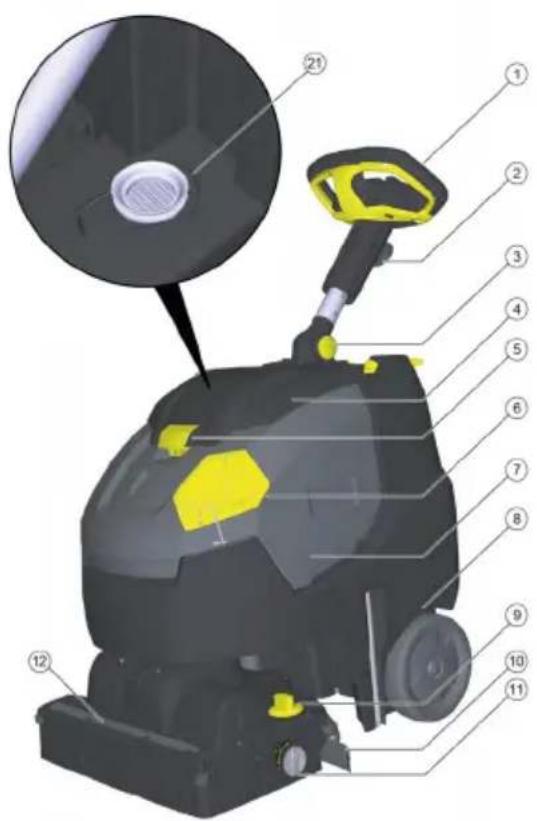
text_image
Labeled diagram of a cleaning or cleaning machine with numbered parts and an inset magnified view showing a component.text_image
Labeled diagram of a mechanical device interior with numbered components and control buttonstext_image
Diagram of a device interior with labeled components and directional arrows indicating movement or flow①Zapor
②EPA filtar
- Stavite EPA filtar u kućište filtra.
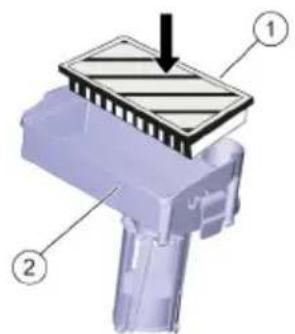
text_image
Technical diagram of a mechanical component with labeled parts 1 and 2, showing a striped top section and directional arrow.①EPA filtar
② Kućište filtra
- Kućište filtra postavite na poklopac spremnika prljave vode i uglavite zapor.
- Zatvorite poklopac spremnika prljave vode.
Punjenje pogonskih sredstava
△OPREZ
natural_image
3D rendered mechanical component with yellow and gray parts, no visible text or symbolsnatural_image
Mechanical assembly diagram showing a vehicle's lower leg and wheel components (no text or symbols visible)0 Transportni vozni mehanizam uvučen
1 Transportni vozni mehanizam izvučen
natural_image
Close-up of a cable being inserted into a device with a blue tip, showing mechanical components and arrows indicating motion (no text or symbols)- Stisnite ili savijte dozirni uređaj.
- Otvorite poklopac dozirnog uređaja.
- Ispustite prljavu vodu - pritiskanjem ili presavijanjem regulirajte količinu vode.
- Isperite spremnik prljave vode čistom vodom.
natural_image
3D rendering of a black and yellow cleaning or cleaning service vehicle (no visible text or symbols)text_image
Diagram of a device interior with labeled components and directional arrows indicating movement or flow①Zapor
②EPA filtar

text_image
Technical diagram of a mechanical component with labeled parts ① and ②, showing a structural assembly with an upward arrow.①EPA filtar
② Kućište filtra
- Isperite unutrašnjost poklopca i plovak vodom.
- Spremnik prljave vode isperite čistom vodom.
- Očistite usisnu konzolu.
- Izvadite spremnik grube prljavštine i ispraznite ga.
- Uređaj prebrišite izvana vlažnom krpom natopljenom u otopinu blagog sredstva za čišćenje.
-
Očistite gumice za usisavanje, provjerite istrošenost te ih po potrebi zamijenite.
-
Očistite četku.
-
Provjerite istrošenost četke, po potrebi je zamijenite (vidi „Radovi održavanja“).
- Po potrebi napunite akumulator.
Jedanput tjedno
natural_image
3D model of a mechanical device with a yellow component and labeled part (1), no visible text or symbols beyond the label.①Filtar svježe vode
natural_image
Cross-sectional diagram of a mechanical assembly with highlighted components and arrows indicating movement (no text or symbols)
natural_image
Three gray plastic components with no visible text or symbols, arranged vertically on white background (no text or symbols)- Skinite gumice za usisavanje s držača.
Napomena
Gumice za usisavanje se lako zamjenjuju zahvaljujući uzorku rupa. Ne mogu se okre-nuti i ponovno upotrijebiti.
natural_image
Illustration of a robotic car with yellow accents and a close-up inset showing a mechanical component (no text or symbols)
natural_image
3D model of a robotic device with yellow highlighted components and a numbered callout (no text or symbols)①Vijak
②Poklopac
- Zakrenite poklopac prema dolje.
- Otpustite i izvucite utikač akumulatora.
- Izvadite akumulator.
- Istrošene akumulatore zbrinite u otpad sukladno zakonskim odredbama.
Smetnje
⚠ OPASNOST
Nenamjerno pokrenut uređaj
2006/42/EZ (+2009/127/EZ)
2014/30/EU
2011/65/EU
2014/53/EU (TCU)
Chairman of the Board of Management

S. Reiser
Director Regulatory Affairs & Certification
Opunomoćenik za dokumentaciju:
S. Reiser
Alfred Kärcher SE & Co. KG
Alfred-Kärcher-Str. 28 - 40
71364 Winnenden (Njemačka)
Tel.: +49 7195 14-0
Telefaks: +49 7195 14-2212
Winnenden, 01.02.2021.
Jamstvo
text_image
Labeled diagram of a cleaning or cleaning device with numbered parts, showing mechanical components and a magnified inset view.
text_image
Labeled diagram of a cleaning or cleaning machine with numbered parts for identification①Upravljač
② Zvezdasta ručka, podešavanje visine upravljača
③ Zvezdasta ručka, položaj upravljača za transport
④Poklopac rezervoara za prljavu vodu
⑤Deblokada, poklopac rezervoara za prljavu vodu
⑥Poklopac za doziranje rezervoara za svežu vodu
⑦ Transportna ručka za podizanje uređaja
⑧Rezervoar za prljavu vodu
⑨ Obrtna ručka, kontaktni pritisak četke (1=min, 4=maks)
⑩Usisna konzola
⑪Obrtno dugme transportnog voznog mehanizma
⑫Traka za distribuciju vode
⑬ Dugme za deblokadu valjkaste četke
⑭Valjkasta četka
⑮Posuda za grubu prljavštinu
⑯Pedala za podizanje usisne konzole
⑰Ispusni otvor rezervoara za svežu vodu
⑱ Ispusno crevo prljave vode sa uređajem za doziranje
⑲Kuka za kabl, rotirajuća
⑳Sigurnosni prekidač
21 Mrežica za skupljanje vlakana
Komandni elementi
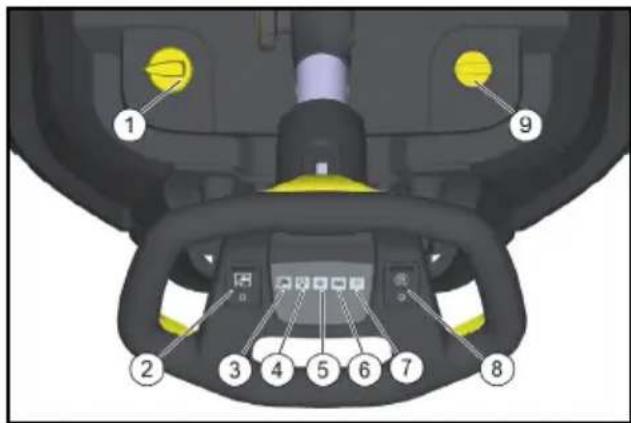
text_image
Labeled diagram of a mechanical device interior with numbered components and yellow circular indicators①Doziranje rastvora za čišćenje
② Prekidač za rastvor za čišćenje.
③Kontrolna lampica za nanošenje rastvora za čišćenje
④Kontrolna lampica za usisavanje
Zelena: Usisna turbina u pogonu
Narandžasta, treperi: Usisna turbina
preopterećena
⑤Kontrolna lampica pogona četki
Zelena: Četka se okreće
Narandžasta, treperi: Četka
preopterećena
⑥Prikaz stanja baterije U pogonu: Zelena: Baterija napunjena Narandžasta: Baterija skoro prazna Crvena: Uređaj se isključuje - napunite bateriju Prilikom punjenja baterije: Treperi narandžasto: Baterija se puni Zelena: Punjenje je završeno Crvena: Smetnja u postupku punjenja
⑦Kontrolna lampica Eco režim Plava: Eko režim Isključeno: puni kapacitet
text_image
Diagram of a device interior with labeled components and directional arrows indicating movement or flow①Blokada
②EPA filter
- Postavite EPA filter u kućište filtera.
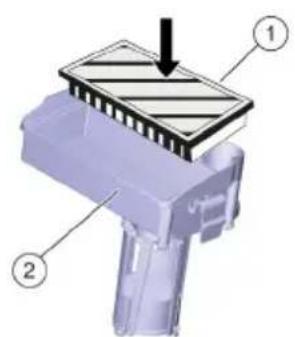
text_image
Technical diagram of a mechanical component with labeled parts 1 and 2, showing a structural assembly with an arrow indicating direction.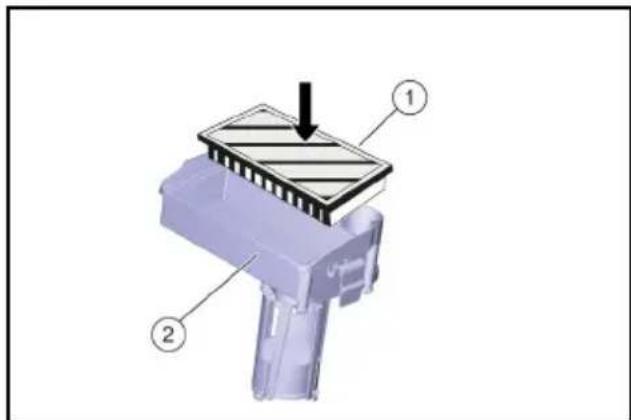
text_image
Technical diagram of a mechanical component with labeled parts 1 and 2, showing a striped top section and directional arrow.①EPA filter
② Kućište za filter
- Postavite kućište filtera na poklopac rezervoara za prljavu vodu i pustite neka bravica nalegne.
- Zatvorite poklopac rezervoara za prljavu vodu.
Punjenje pogonskih sredstava
△OPREZ
natural_image
3D rendered mechanical component with yellow and gray parts, no visible text or symbolsnatural_image
Mechanical assembly diagram showing a vehicle's lower body and wheel components (no text or symbols visible)0 Transportni vozni mehanizam uvučen 1 Transportni vozni mehanizam izvučen
natural_image
Close-up of a cable being inserted into a tray with a blue tip, showing mechanical components and arrows indicating motion (no text or symbols)- Uređaj za doziranje pritisnite ili savijte.
- Otvoriti poklopac uređaja za doziranje.
- Ispustite prljavu vodu –regulisati vodu pritiskom ili savijanjem.
- Isperite posudu za prljavu vodu čistom vodom.
natural_image
3D rendering of a black and yellow cleaning or cleaning service robot with a yellow handle (no text or symbols visible)- Prilikom transporta u vozilima, uređaj osigurajte od isklizavanja i prevrtanja u skladu sa važećim smernicama.
Stavljanje van pogona
text_image
Diagram of a device interior with labeled components and directional arrows indicating movement or flow①Blokada
②EPA filter
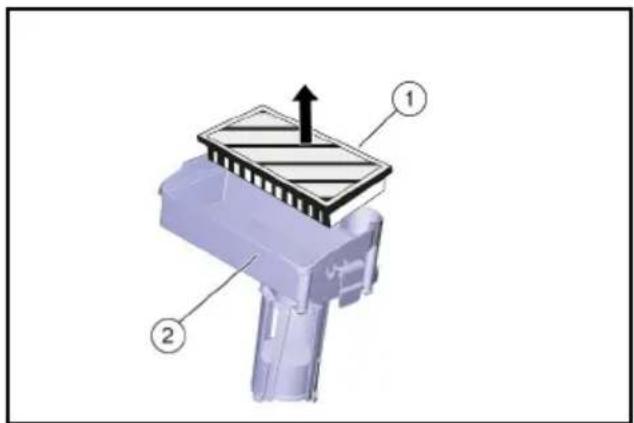
text_image
Diagram of a mechanical component with numbered parts and an upward arrow indicating direction①EPA filter
② Kućište za filter
- Isperite vodom unutrašnju stranu poklopca i plovak.
- Isperite čistom vodom rezervoar za prljavu vodu.
- Očistite usisnu konzolu.
- Izvadite i ispraznite posudu za grubu prljavštinu.
- Uređaj očistiti spolja vlažnom krpom koja je natopljena u blagi rastvor deterdženta.
- Očistite usisne gumice, proverite pohabanost i, po potrebi, zamenite.
- Očistite četku.
- Proveriti da li je četka istrošena, po potrebi zamenite (pogledajte „Radovi održavanja“).
- Po potrebi, napunite bateriju.
Nedeljno
- Skinite traku za raspodelu vode na glavi za čišćenje i očistite kanal za vodu.
- Očistite mrežicu za skupljanje vlakana.

natural_image
3D model of a mechanical device with a yellow component and labeled part (1), no visible text or symbols beyond the label.①Filter za svežu vodu
3. Odvijte poklopac na ispusnom otvoru rezervoara za svežu vodu.
4. Izvadite filter za svežu vodu i isperite ga čistom vodom.
Mesečno
● Proverite stanje zaptivki između rezervoara za prljavu vodu i poklopca, po potrebi zamenite.
Godišnje
natural_image
Cross-sectional diagram of a mechanical device showing internal components and highlighted areas (no text or symbols)
natural_image
Three gray plastic components with no visible text or symbols, including a red curved band at the bottom (no text or symbols present)- Skinite usisne gumice sa držača.
Napomena
natural_image
Illustration of a cleaning or inspection device with yellow components and a magnified inset showing internal components (no text or symbols)
natural_image
3D mechanical component diagram showing a yellow highlighted part and a black housing with a numbered arrow indicating a step (no text or symbols present)①Zavrtanj
②Poklopac
2. Zakrenite poklopac prema dole.
3. Otpustite i izvadite utikač baterije.
4. Izvadite bateriju.
5. Potrošene baterije odložiti u otpad u skladu sa važećim odredbama.
Smetnje
⚠ OPASNOST
Nenamerno pokrenut uređaj
Opasnost od povrede, strujni udar Pre svih radova na uređaju, prekidač uređaja postavite na „0“. Izvući strujni utikač punjača.
PAŽNJA
2006/42/EZ (+2009/127/EZ)
2014/30/EU
2011/65/EU
2014/53/EU (TCU)
Primenjene harmonizovane norme
EN 60335-1
EN 60335-2-72
EN 60335-2-29
EN 55012: 2007 + A1: 2009
EN 55014-1: 2006+A1: 2009+A2: 2011
EN 55014-2: 1997+A1: 2001+A2: 2008
EN 61000-3-2: 2014
EN 61000-3-3: 2013
EN 61000-6-2: 2005
EN 62233: 2008
EN IEC 63000: 2018
Primenjene nacionalne norme
TCU
EN 301 511 V12.5.1
EN 300 440 V2.1.1
EN 300 328 V2.2.2
EN 300 330 V2.1.1
Potpisnici deluju po nalogu i uz punomoć upravnog odbora.
H. Jenner
Chairman of the Board of Management
S. Reiser
Director Regulatory Affairs & Certification
Lice ovlašćeno za dokumentaciju:
S. Reiser
Alfred Kärcher SE & Co. KG
Alfred-Kärcher-Str. 28 - 40
71364 Winnenden (Germany)
Tel.: +49 7195 14-0
Winnenden, 2021/02/01
Garancija
text_image
Technical diagram of a cleaning or cleaning device with numbered parts labeled 13 to 20
text_image
Labeled diagram of a cleaning or cleaning machine with numbered parts for identificationtext_image
Labeled diagram of a vehicle head panel showing numbered components for navigation or system control.text_image
Diagram of a vehicle engine compartment with labeled parts and directional arrows indicating movement or forcetext_image
Technical diagram of a mechanical component with labeled parts ① and ②, showing a structural assembly.natural_image
3D rendered mechanical component with yellow and black parts, no visible text or symbolsnatural_image
Mechanical assembly diagram showing a vehicle's lower body and suspension components (no text or labels visible)natural_image
Diagram of a cable being inserted into a tray with a blue tip, showing force arrows (no text or symbols)natural_image
3D rendering of a black and yellow cleaning or cleaning service robot with a yellow accent (no text or symbols visible)text_image
Diagram of a device interior with labeled components and directional arrows indicating movement or flowtext_image
Technical diagram of a mechanical component with labeled parts ① and ②, showing a structural assembly with an upward arrow.natural_image
3D model of a mechanical device with a yellow component and labeled part (1), no visible text or symbols beyond the label.natural_image
Cross-sectional diagram of a mechanical assembly with highlighted components and arrows indicating movement (no text or symbols)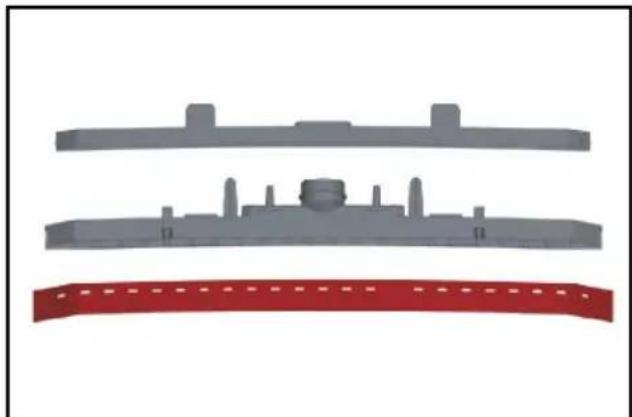
natural_image
Three gray plastic components with no visible text or symbols, arranged vertically on a white background (no text or symbols)natural_image
Illustration of a robotic car with yellow and black components, showing a close-up view of the engine (no text or symbols present)
natural_image
3D model of a robotic device with yellow highlighted components and a numbered callout (no text or symbols)① Bíða
②Καπάκι
text_image
H. Jenner Chairman of the Board of Management
71364 Winnenden (Germany)
Tηλ.: +49 7195 14-0
Φαξ: +49 7195 14-2212
Winnenden, 2021/02/01
Εγγύηση
text_image
Technical diagram of a cleaning or cleaning device with numbered parts labeled 13 to 20
text_image
Labeled diagram of a cleaning or cleaning machine with numbered parts for identificationtext_image
Labeled diagram of a vehicle head panel showing numbered components for navigation or system control.text_image
Diagram of a device interior with labeled parts and directional arrows indicating movement or flowtext_image
Technical diagram of a mechanical component with labeled parts 1 and 2, showing a striped top section and directional arrow.natural_image
3D rendered mechanical component with yellow and black parts, no visible text or symbolsnatural_image
Mechanical assembly diagram showing a vehicle's lower leg and wheel components (no text or symbols visible)natural_image
Diagram of a cable being inserted into a tray with a blue liquid, showing mechanical components and arrows indicating motion (no text or symbols)natural_image
3D rendering of a black and yellow cleaning or cleaning service robot with handle and wheels (no text or symbols visible)text_image
Diagram of a device interior with labeled components and directional arrows indicating movement or flowtext_image
Technical diagram of a mechanical component with labeled parts 1 and 2, showing a striped top section and directional arrow.natural_image
3D model of a mechanical device with a yellow component and labeled part (1), no visible text or symbolsnatural_image
Mechanical assembly diagram showing internal components with arrows indicating movement or force (no text or symbols present)
natural_image
Three gray plastic components with no visible text or symbols, arranged vertically on a white background (no text or symbols)natural_image
Illustration of a robotic car with yellow and black components, showing a close-up of the interior (no text or symbols present)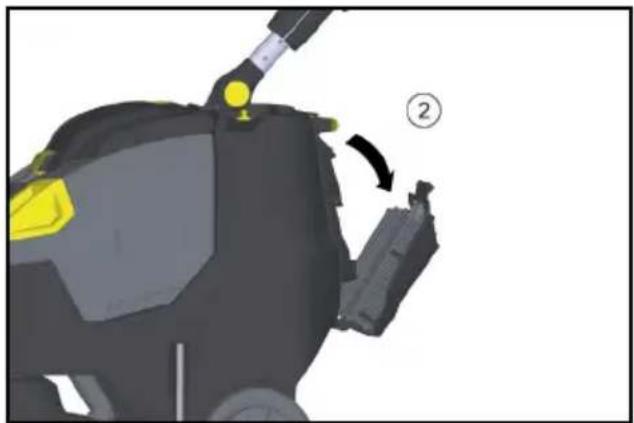
natural_image
3D model of a robotic device with yellow highlighted components and a numbered callout (no text or symbols)①ВИНТ
②Крышка
text_image
H. Jenner Chairman of the Board of Management
71364 Winnenden (Germany)
Тел.: +49 7195 14-0
Факс: +49 7195 14-2212
text_image
Technical diagram of a cleaning or cleaning device with numbered parts and a magnified inset showing the interior components.text_image
Labeled diagram of a vehicle dashboard with numbered components for navigation or system control.text_image
Diagram of a device interior with labeled components and directional arrows indicating movement or flowtext_image
Technical diagram of a mechanical component with labeled parts ① and ②, showing a striped top section and directional arrow.natural_image
3D rendered mechanical component with yellow and gray parts, no visible text or symbolsnatural_image
Mechanical assembly diagram showing a vehicle's lower body with wheels, suspension components, and a yellow valve (no text or symbols visible)natural_image
Close-up of a black cable with yellow connectors and a blue tip, showing mechanical components (no text or symbols)natural_image
3D rendering of a black and yellow cleaning or cleaning service vehicle (no visible text or symbols)text_image
Diagram of a device interior with labeled components and directional arrows indicating movement or flowtext_image
Technical diagram of a mechanical component with labeled parts ① and ②, showing a structural assembly with an upward arrow.①EPA-фільтр
②Корпус фільтру
natural_image
3D model of a mechanical device with a yellow component and a pin inserted, labeled with number 1 (no text or symbols on the device itself)natural_image
Cross-sectional diagram of a mechanical assembly with highlighted components and arrows indicating movement (no text or symbols)
natural_image
Three gray plastic components with no visible text or symbols, arranged vertically on a white background (no text or symbols)natural_image
Illustration of a car cleaning or maintenance device with yellow components and a close-up inset showing tool path (no text or symbols)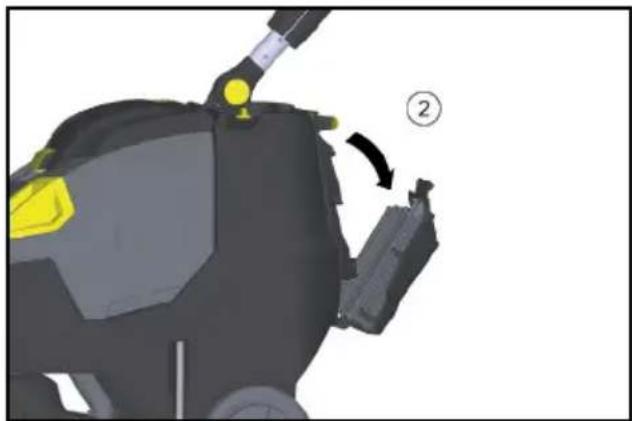
natural_image
3D model of a robotic device with yellow highlighted components and a numbered callout (no text or symbols)① ГВИНТ
②Кришка

H. Jenner
Chairman of the Board of Management
S. Reiser
Director Regulatory Affairs & Certification
71364 Winnenden (Germany)
Тел.: +49 7195 14-0
Факс: +49 7195 14-2212
text_image
Technical diagram of a cleaning or cleaning device with numbered parts labeled for identification.
text_image
Labeled diagram of a cleaning or cleaning device with numbered parts for identificationtext_image
Labeled diagram of a vehicle head panel showing numbered components for navigation or system control.text_image
Diagram of a device interior with labeled components and directional arrows indicating movement or flowtext_image
Technical diagram of a mechanical component with labeled parts 1 and 2, showing a sloped top layer and directional arrow.natural_image
3D rendered mechanical component with yellow and black parts, no visible text or symbolsnatural_image
Mechanical assembly diagram showing a vehicle's lower leg and wheel assembly (no text or symbols visible)natural_image
Close-up of a black cable with yellow connectors and a blue tip, showing mechanical components (no text or symbols)natural_image
3D rendering of a black and yellow cleaning or cleaning service robot with a yellow handle (no text or symbols visible)text_image
Diagram of a vehicle interior with labeled components and directional arrows indicating movement or flowtext_image
Technical diagram of a mechanical component with labeled parts 1 and 2, showing a structural assembly with an upward arrow.natural_image
3D model of a mechanical device with a yellow component and labeled part (1), no visible text or symbolsnatural_image
Mechanical assembly diagram showing internal components with arrows indicating movement or force (no text or symbols present)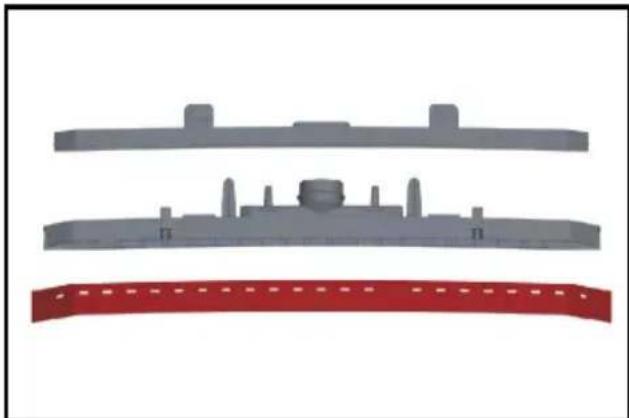
natural_image
Three gray plastic components with no visible text or symbols, arranged vertically on a white background (no text or symbols)natural_image
Illustration of a cleaning or inspection device with yellow and black components, showing a close-up view of the interior (no text or symbols present)
natural_image
3D model of a robotic device with yellow and black components, showing a joint and directional arrow (no text or symbols)①ВИНТ
②Капак
Chairman of the Board of Management

S. Reiser
Director Regulatory Affairs & Certification
71364 Winnenden (Germany)
Тел.: +49 7195 14-0
Факс: +49 7195 14-2212
Виненден, 2021/02/01
Гаранция
text_image
Technical diagram of a cleaning or cleaning device with numbered parts labeled 13 to 20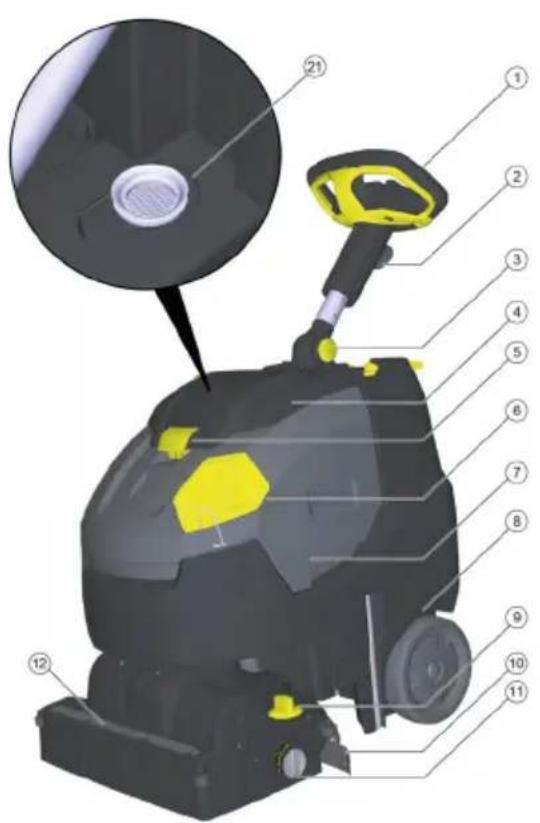
text_image
Labeled diagram of a cleaning or cleaning device with numbered parts and an inset magnified view showing a circular component.text_image
Labeled diagram of a vehicle head panel showing numbered components and control buttonstext_image
Diagram of a device interior with labeled components and directional arrows indicating movement or flow①锁定装置
②EPA 过滤器
- 将 EPA 过滤器放入过滤器外壳内。
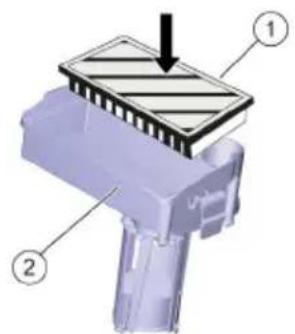
text_image
Technical diagram of a mechanical component with labeled parts 1 and 2, showing a striped top section and directional arrow.①EPA 过滤器
②过滤器外壳
natural_image
3D rendered mechanical component with yellow and black parts, no visible text or symbolsnatural_image
Mechanical assembly diagram showing a vehicle's lower body and wheel components (no text or symbols visible)0 运输行走机构已收回
1 运输行走机构已展开
展开运输行走机构
natural_image
Diagram of a cable being inserted into a grating with blue liquid, showing mechanical components and force arrows (no text or symbols)natural_image
3D rendering of a black and yellow cleaning or cleaning service robot with attached sensors (no text or symbols visible)text_image
Diagram of a vehicle interior with labeled components and directional arrows indicating movement or flow①锁定装置
②EPA 过滤器
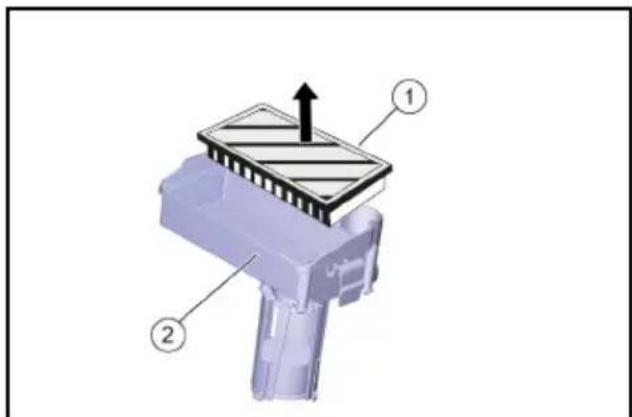
text_image
Technical diagram of a mechanical component with labeled parts ① and ②, showing a structural assembly with an upward arrow.①EPA 过滤器
②过滤器外壳
natural_image
3D mechanical component with a yellow plastic component inserted, labeled with number 1 (no text or symbols on the object itself)①清水过滤器
natural_image
Cross-sectional diagram of a mechanical assembly with highlighted components and arrows indicating movement (no text or symbols)
natural_image
Three gray plastic components with no visible text or symbols, arranged vertically on a white background (no text or symbols)- 从支架上取下吸唇。
提示
natural_image
3D rendering of a robotic car with yellow sensor dots and a close-up inset showing internal components (no text or symbols)
natural_image
3D mechanical component diagram showing a yellow component with a numbered arrow indicating rotation (no text or symbols present)①螺栓
②盖子

H. Jenner
Chairman of the Board of Management
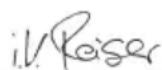
S. Reiser
Director Regulatory Affairs & Certification
文档全权代表:
S. Reiser
Alfred Kärcher SE & Co. KG
Alfred-Kärcher-Str. 28 - 40
Winnenden, 2021/02/01
质量保证
text_image
Technical diagram of a cleaning or cleaning device with numbered parts and an inset view showing the component layout.text_image
Diagram of a device interior with labeled parts and directional arrows indicating movement or flow①インターロック
②EPAフィルター
text_image
Technical diagram of a mechanical component with labeled parts 1 and 2, showing a striped top section and directional arrow.natural_image
3D rendered mechanical component with yellow and gray parts, no visible text or symbolsnatural_image
Mechanical assembly diagram showing a vehicle's lower body with wheels, suspension components, and a yellow component (no text or symbols visible)0 搬送用シャーシを格納する
1 搬送用シャーシを伸長する
搬送用シャーシを伸長する
natural_image
Close-up of a cable being inserted into a tray with a blue tip, showing mechanical components and arrows indicating motion (no text or symbols)natural_image
3D rendering of a black and yellow cleaning or cleaning service robot with handle and wheels (no text or symbols visible)text_image
Diagram of a vehicle engine compartment with labeled parts and directional arrows indicating movement or force①インターロック
②EPAフィルター
text_image
Technical diagram of a mechanical component with labeled parts ① and ②, showing a structural assembly with an upward arrow.natural_image
3D mechanical component with a yellow plastic component inserted, labeled with number 1 (no text or symbols on the object itself)①清水用フィルター
natural_image
Cross-sectional diagram of a vehicle showing internal components and structural elements (no text or symbols)
natural_image
Three gray plastic components with no visible text or symbols, including a red banner at the bottom (no text or symbols present)natural_image
Illustration of a robotic car with yellow accents and a close-up inset showing a mechanical component (no text or symbols)
natural_image
3D model of a robotic device with yellow highlighted components and a numbered callout (no text or symbols)①ネジ
②カバー
H. Jenner
Chairman of the Board of Management

S. Reiser
Director Regulatory Affairs & Certification
文書の全権委員:
S. Reiser
Alfred Kärcher SE & Co. KG
Alfred-Kärcher-Str. 28 - 40
71364 Winnenden (Germany)
電話番号:+49 7195 14-0
natural_image
3D mechanical component diagram showing a highlighted part with yellow highlights and a numbered arrow indicating rotation (no text or symbols present)برغي
غطاء 2
natural_image
Three gray plastic components with no visible text or symbols, arranged vertically on a white background (no text or symbols)natural_image
3D model of a mechanical device with a yellow plastic component and a numbered label (1), no readable text or symbols present.فلتر المياه النفية
10
natural_image
Mechanical assembly diagram showing internal components with arrows indicating movement or force (no text or symbols present)جدول الصيانة
بعد Tyndid العمل
تنیه
خطر التعرض للأضرار.
text_image
Diagram of a device interior with labeled components and directional arrows indicating movement or flowقفل
EPA فلتر
O
2
text_image
Technical diagram of a mechanical component with labeled parts 1 and 2, showing a hatched top section and directional arrow.EPA فلتر
مypeت الفلتر
1
2
natural_image
3D rendering of a black and yellow cleaning or cleaning service vehicle (no visible text or symbols)natural_image
Close-up of a cable being inserted into a tray with blue liquid, showing mechanical components and arrows indicating motion (no text or symbols)natural_image
Mechanical assembly diagram showing a vehicle's front wheel, suspension components, and mounting bracket (no text or labels visible)0 ضم نظام النقل
1 فرد نظام النقل
فرد نظام النقل
natural_image
3D rendered mechanical component with yellow and gray parts, no visible text or symbolstext_image
Diagram of a vehicle interior with labeled components and directional arrows indicating movement or flowقفل

EPA विल्तर

text_image
Diagram of a mechanical component with labeled parts ① and ②, showing a downward force or force indicator.EPA فلتر

مypeت الفلتر

text_image
Technical diagram of a cleaning or cleaning device with numbered parts labeled for identification.
text_image
Labeled diagram of a cleaning or cleaning machine with numbered parts for identificationعناصر الاستعمال
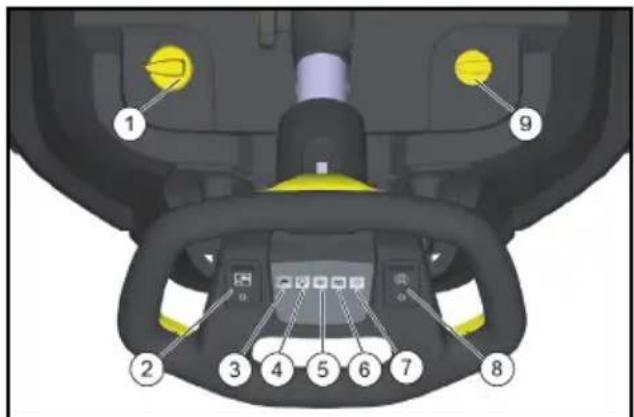
text_image
Labeled diagram of a vehicle head panel showing numbered components and control buttons③ retirement bounded by a 3-4-5 range
text_image
Technical diagram of a cleaning or inspection device with numbered parts labeled 13 to 20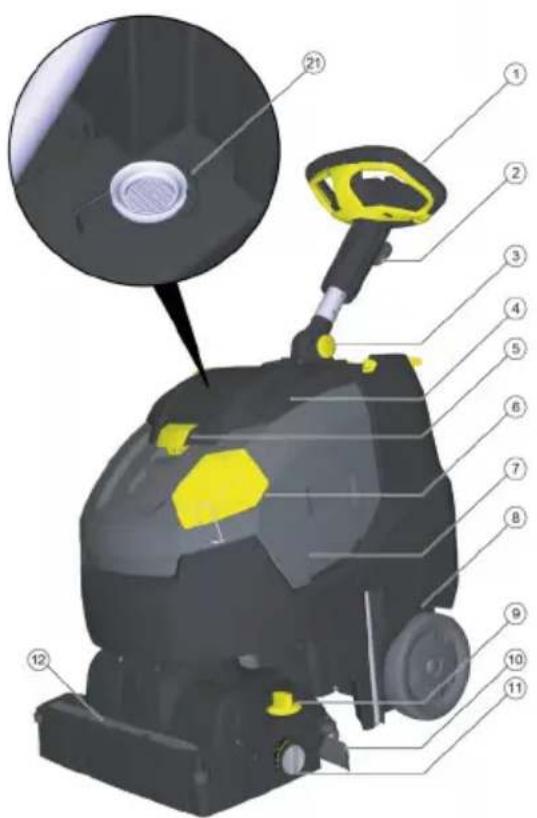
text_image
Labeled diagram of a cleaning or cleaning device with numbered parts and an inset magnified view showing a component.حماية ال Dyئة

natural_image
Black and white icon of a hand giving a thumbs-up gesture (no text or symbols)THANK YOU!
MERCI! DANKE! iGRACIAS!

Register your product and benefit from many advantages.
www.kaercher.com/welcome


Rate your product and tell us your opinion.
natural_image
Icon showing a gear and wrench inside a square frame (no text or symbols)www.kaercher.com/dealersearch
Alfred Kärcher SE & Co. KG
Alfred-Kärcher-Str. 28-40
71364 Winnenden (Germany)