ESM 50 - Blender Ritter - Free user manual and instructions
Find the device manual for free ESM 50 Ritter in PDF.
User questions about ESM 50 Ritter
0 question about this device. Answer the ones you know or ask your own.
Ask a new question about this device
Download the instructions for your Blender in PDF format for free! Find your manual ESM 50 - Ritter and take your electronic device back in hand. On this page are published all the documents necessary for the use of your device. ESM 50 by Ritter.
USER MANUAL ESM 50 Ritter
| de | Gebrauchs- und Montageanleitung | Einbau-Stabmixer |
| en | Operating and assembly instructions | Built-in hand blender |
| fr | Notice d’utilisation et de montage | Mixeur plongeant encastré |
| bg | Ръководство за употреба и монтаж | Пасатор за вграждане |
| cs | Návod k montáži a obsluze | Vestavný tyčový mixér |
| es | Instrucciones de montaje y de uso | Batidora integrable |
| hu | Használati és összeszerelési útmutató | Beépíthető botmixer |
| it | Istruzioni per l’utilizzo e il montaggio | Frullatore a immersione da incasso |
| nl | Gebruiks- en montageaanwijzing | Inbouw-staafmixer |
| no | Bruksanvisning og monteringsveiledning | Innbyggbar stavmikser |
| pl | Instrukcja obsługi i montażu | Blender do zabudowy |
| ro | Instrucțiuni de utilizare și montare | Mixer vertical incorporabil |
| ru | Руководство по эксплуатации и инструкция по сборке | Встраиваемый погружной блендер |
| sk | Návod na použitie a montáž | Zabudovaný tyčový mixér |
| sl | Navodila za uporabo in vgradnjo | Vgradnja paličnega mešalnika |
natural_image
Technical line drawing of a mechanical device with rotating shaft and mounting base (no text or symbols)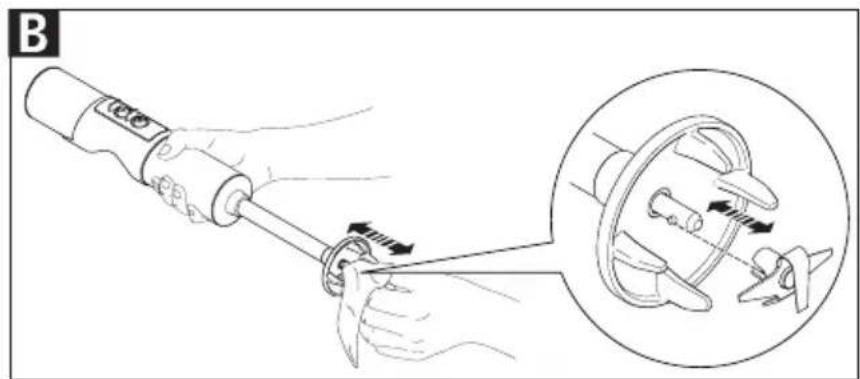
natural_image
Illustration of a hand using a tool to adjust a mechanical component, with an inset showing the close-up of the assembly (no text or symbols present)
natural_image
Technical line drawing of a mechanical assembly with cylindrical components and three vertical rods (no text or symbols)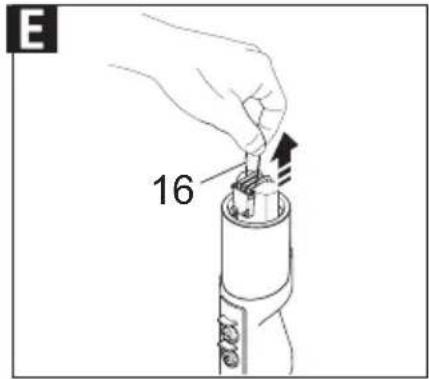
natural_image
Technical line drawing of a mechanical device with internal components and an arrow indicating a process (no text or symbols present)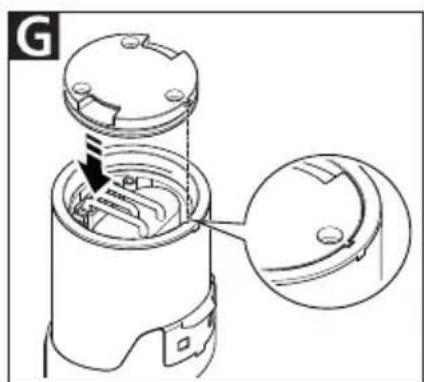
natural_image
Technical line drawing of a mechanical device with an arrow indicating a component (no text or symbols present)
K
L
natural_image
Technical line drawing of a mechanical device with no visible text or symbols| de | Gebrauchs- und Montageanleitung ...... 3 |
| en | Operating and assembly instructions ...... 11 |
| fr | Notice d’utilisation et de montage ...... 19 |
| bg | Ръководство за употреба и монтаж ......27 |
| cs | Návod k montáži a obsluze...... 35 |
| es | Instrucciones de montaje y de uso...... 43 |
| hu | Használati és összeszerelési útmutató ...... 51 |
| it | Istruzioni per l’utilizzo e il montaggio......59 |
| nl | Gebruiks- en montageaanwijzing ...... 67 |
| no | Bruksanvisning og monteringsveiledning..75 |
| pl | Instrukcja obsługi i montažu......83 |
| ro | Instrucțiuni de utilizare și montare......91 |
| ru | Руководство по эксплуатации и инструкция по сборке ......99 |
| sk | Návod na použitie a montáž ...... 107 |
| sl | Navodila za uporabo in vgradnjo...... 115 |
GENERAL SAFETY INSTRUCTIONS
To avoid personal injury or damage to the appliance, please observe the following safety instructions:
–The hand blender is to be used for domestic purposes only and must not be used commercially.
- Assembly (see page 18 or the QR code on the cover) must be performed by qualified personnel only. ritterwerk will not be held liable for the consequences of improper or incorrect assembly.
-Do not start using the hand blender until it has been assembled by a professional.
—The power cord must be routed in such a way that it is not pinched and can run directly and without obstruction from the built-in system to the socket to be installed in the floor cabinet.
-Route the power cord so that it does not come into contact with hot or sharp-edged objects. Do not bend it or wind it around the appliance. Do not allow the power cord to hang down over the edge of the worktop.
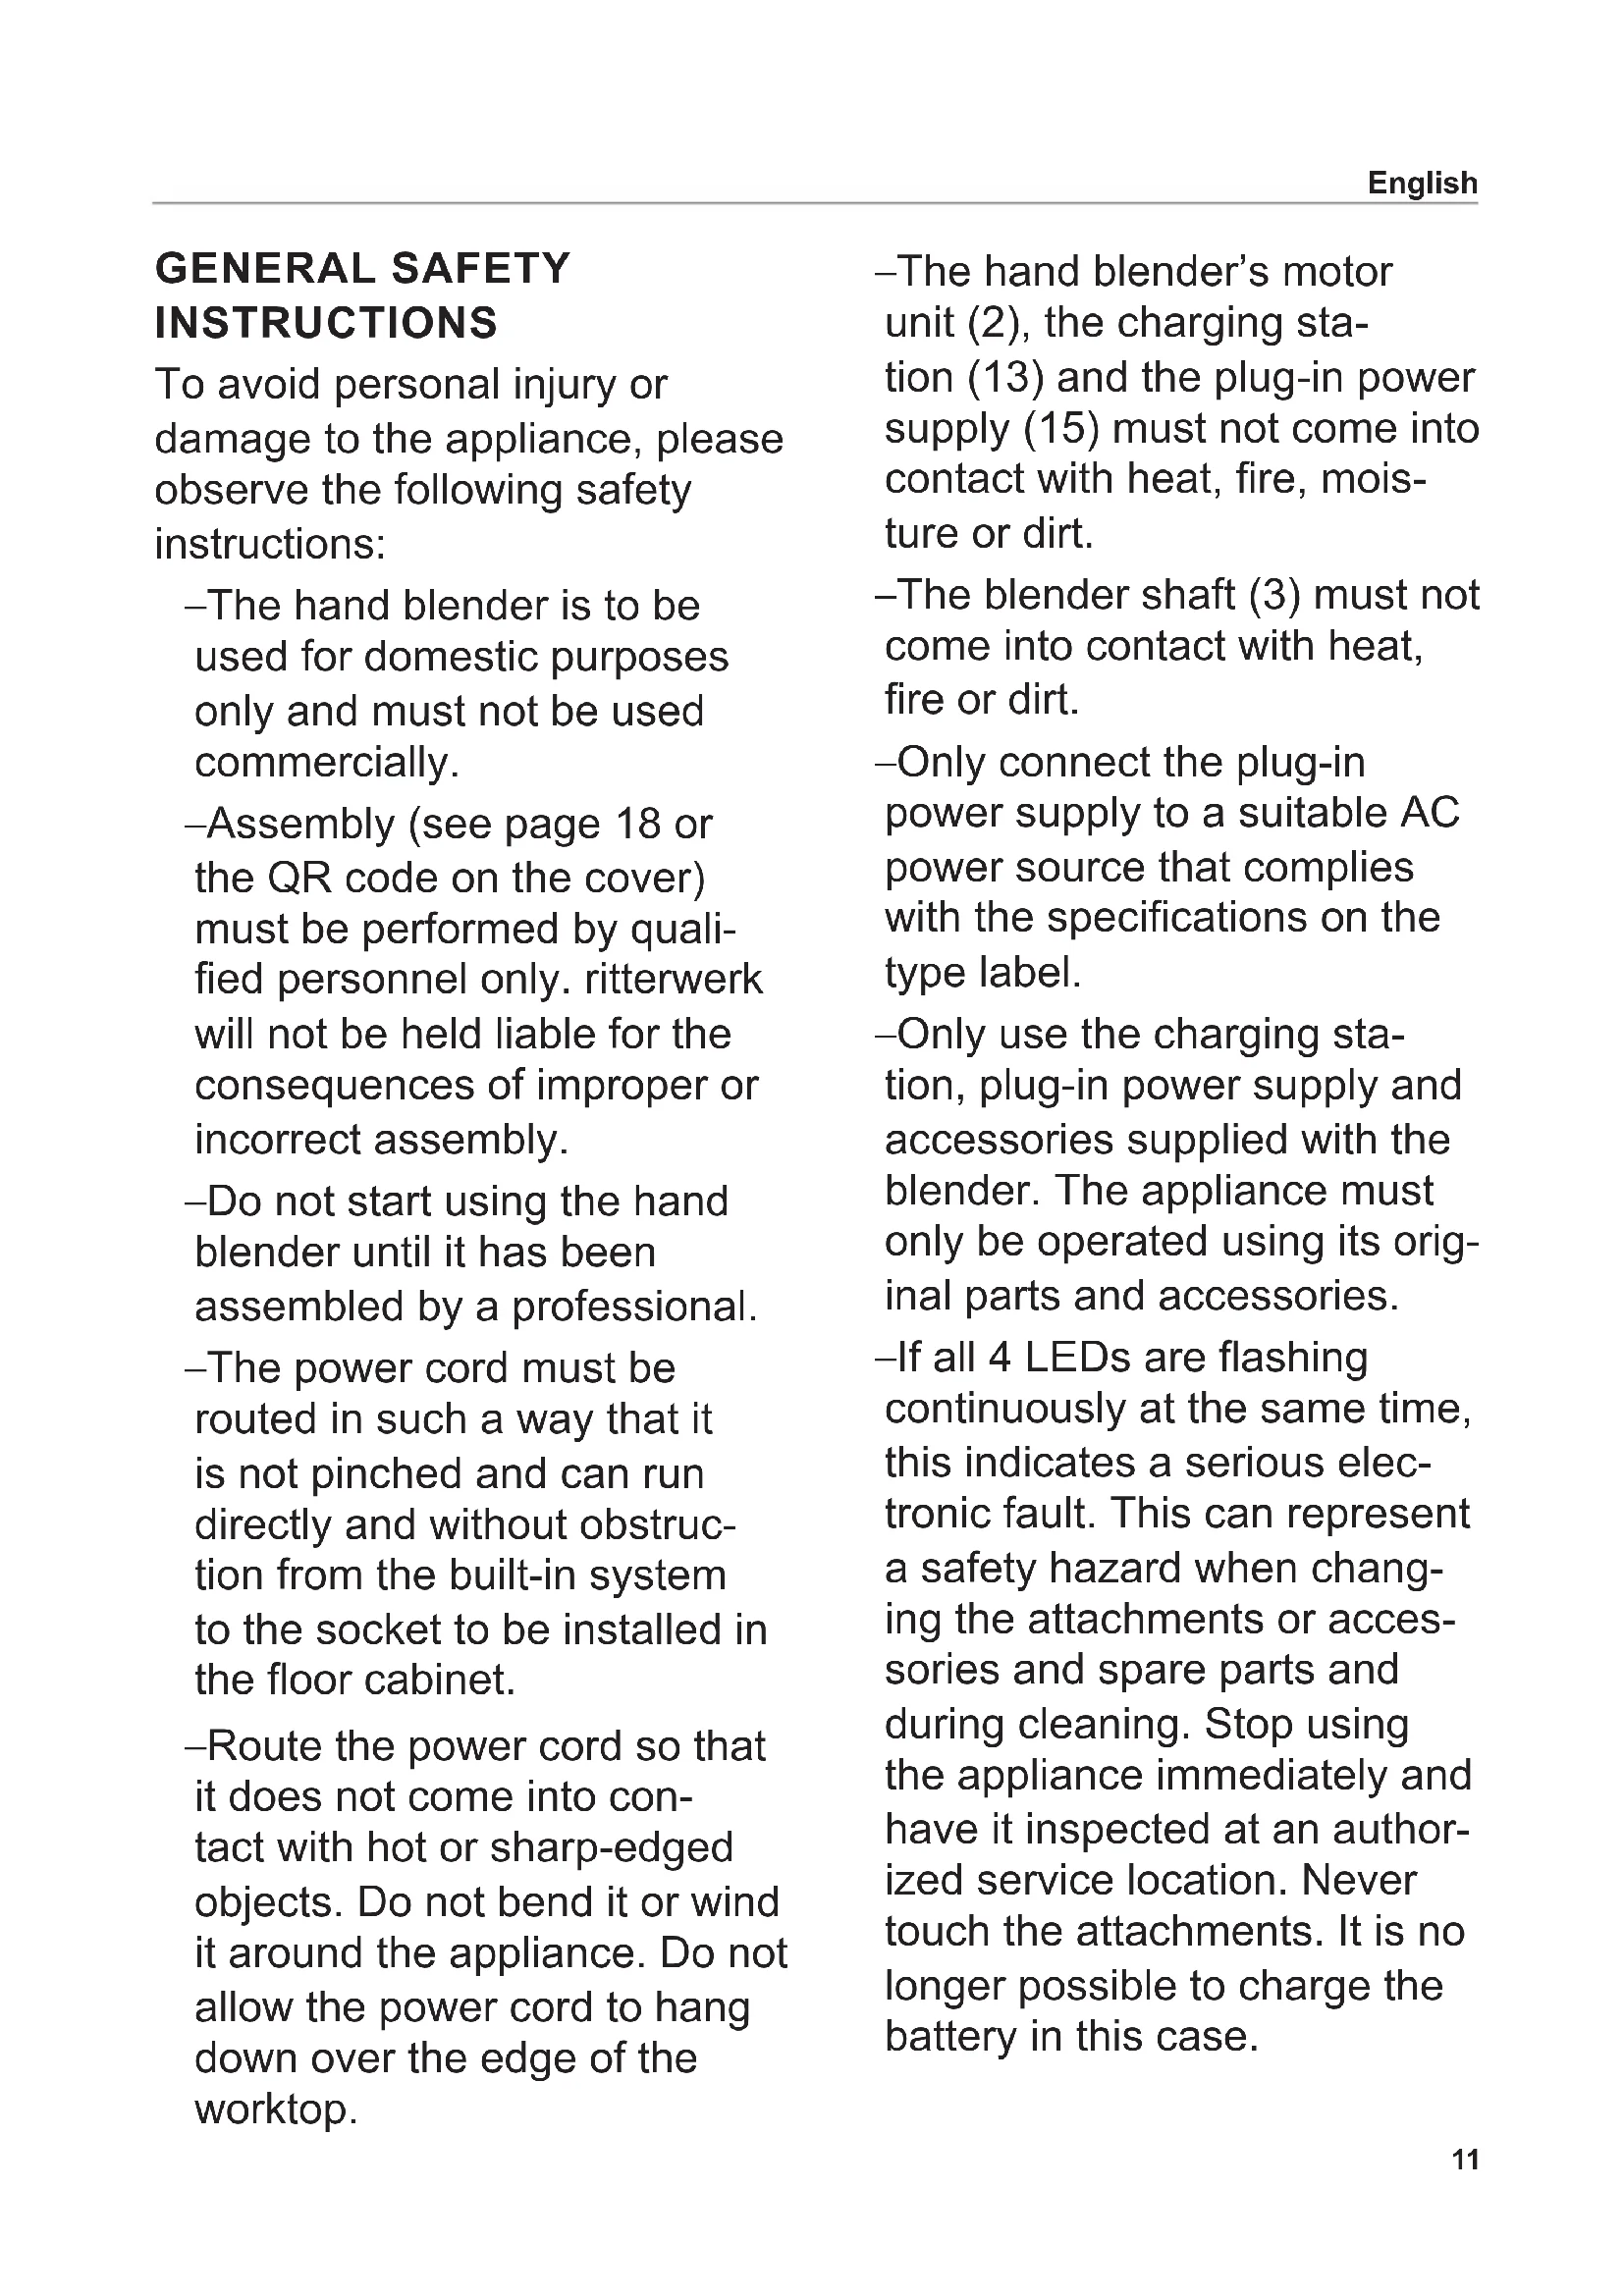
–The hand blender's motor unit (2), the charging station (13) and the plug-in power supply (15) must not come into contact with heat, fire, moisture or dirt.
—The blender shaft (3) must not come into contact with heat, fire or dirt.
-Only connect the plug-in power supply to a suitable AC power source that complies with the specifications on the type label.
-Only use the charging station, plug-in power supply and accessories supplied with the blender. The appliance must only be operated using its original parts and accessories.
-If all 4 LEDs are flashing continuously at the same time, this indicates a serious electronic fault. This can represent a safety hazard when changing the attachments or accessories and spare parts and during cleaning. Stop using the appliance immediately and have it inspected at an authorized service location. Never touch the attachments. It is no longer possible to charge the battery in this case.
-This appliance must not be used by children. Keep the appliance and its connection cable out of reach of children.
—Persons with reduced physical, sensory or intellectual capabilities or lacking in relevant experience and/or knowledge may only use this appliance if they do so under supervision or have been instructed in the safe use of the appliance and understand the potential risks associated with its use.
-Do not allow children to play with the appliance.
-Do not start using the hand blender until it is positioned inside a flat-bottomed container.
—The hand blender must not be immersed in the food being blended above the level on the blender where the blender shaft meets the motor unit.
—Never leave the appli- ance unattended while it is operating.
—Never immerse the entire hand blender, charging station and plug-in power supply in water or any other liquid.
Never expose the appliance to rain or any other form of moisture. If the appliance falls into water, first unplug the charging station's plug-in power supply from the mains socket before removing any of the appliance's components from the water. Have the complete appliance inspected at an authorized service location before using it again.
- Always ensure that your hands are completely dry before using the appliance. Do not use the appliance if it is wet or damp or while you are standing on a damp surface. Do not use the appliance outdoors.
–The hand blender and charging station are not suitable for washing in a dishwasher.
–Never touch any of the attachments while operating the hand blender and never insert any objects into the appliance while it is in use.
Risk of injury
- Always remove the plug-in power supply from the socket in the event of a charging station malfunction. When doing so, pull on the plug and not on the cable.
- To avoid the risk of personal injury, stop using the appliance immediately if any parts are damaged. Have the complete appliance inspected at an authorized service location before using it again.
-If the plug-in power supply or the power cord is damaged, it must be replaced by an original plug-in power supply or power cord, which is available from the manufacturer or the manufacturer's national after-sales service.
—Never switch the hand blender on when you are cleaning it, connecting or disconnecting its attachments or when replacing parts or accessories. Keep your fingers away from the buttons to prevent the appliance from switching on accidentally. Never touch the blades on the attachments, as these are very sharp.
–Food may splash out of the cup during processing. For this reason, allow hot food to cool before processing to avoid scalding.
-If using the hand blender in a saucepan, remove the saucepan from the hot plate before processing.
- Ensure that the slot on the attachment you are using is sitting squarely and firmly on the drive shaft pin. If attachments are loose or not firmly attached to the pin, they must not be used and must be replaced.
Risk of explosion
- Protect the battery from exposure to heat and fire.
Overview of LED display (6)
| LEDs Description | ||
| Hand blender in charging station | off Battery fully charged | |
| LEDs flash in sequence from left to right | Battery is charging; the last LED to flash indicates the current battery level | |
| All LEDs flash simultaneously Operator error (appliance is switched on in chargingstation) | ||
| Hand blender not in charging station | 1, 2, 3 or 4 LEDs light up Appliance is in use; number of LEDs indicates the current battery level | |
| LED 1 flashes slowly (1 s on/1 s off) Battery is dead | ||
| LED 1 flashes rapidly (0.1 s on/1 s off) Battery is defective (see „CHANGING THE BATTERY“) | ||
| All 4 LEDs flash slowly (1 s on/1 s off) Overload protection (see „FUNCTIONS“) | ||
Unfold the illustrations at the front and back of this manual.
Please read these instructions thoroughly before you start to use the appliance. Keep these operating instructions in a safe place and ensure that they are included with the appliance if passing it on to a third party.
Alternatively, the current operating instructions are available at www.ritterwerk.de.
INTENDED USE
The hand blender is used to purée, chop, whisk and mix suitable household foods.

The hand blender is suitable for contact with foodstuffs.
The hand blender is to be used for domestic purposes only and must not be used commercially. If the hand blender is used in a manner other than its intended use or if it is incorrectly operated, serious injuries may occur or the blender may be damaged. All warranty and liability claims will be rendered null and void in this case.
FUNCTIONS
With your battery-operated hand blender, you can purée, chop, whisk and mix both solid and liquid foods.
The hand blender (1) is supplied with a plastic blending cup (14) and the following attachments:
– Universal cutter (9): Standard attachment for chopping and puréeing most foods
- Cutting knife (10): For chopping meat and fibrous fruit and vegetables
- Whipping disk (11): For lightly beating and whipping foods (e.g. cream)
- Stirring disk (12): For mixing and blending thick, creamy foods
The hand blender has 3 speed settings.
An overload protection function with a safety switch-off mechanism is automatically triggered in the event of:
- Overheating
– A blade becoming jammed
– Continuous operation for more than 4 minutes
BEFORE USING THE APPLIANCE FOR THE FIRST TIME
- Before you use the appliance for the first time, have a specialist install it in a suitable drawer (see „ASSEMBLY AND INSTALLATION“).
- Clean the hand blender (1) and accessories before allowing them to come into contact with any food (see „CLEANING“).
A Place the contact surfaces of the hand blender onto the contact pin of the charging station (13).
When in the correct position, the hand blender will feel securely locked into place and the LEDs on the LED display (6) will flash.
- Leave the hand blender in the charging station until the battery is fully charged (see „CHARGING THE BATTERY“). The battery is partially charged upon delivery.
USING THE HAND BLENDER
Connecting/replacing an attachment
CAUTION, risk of injury:
- Switch the blender (1) off before connecting or removing attachments.
- Keep your fingers away from the buttons to prevent the appliance from switching on accidentally.
– The blades on the attachments are very sharp! Never touch these blades with your bare hands.
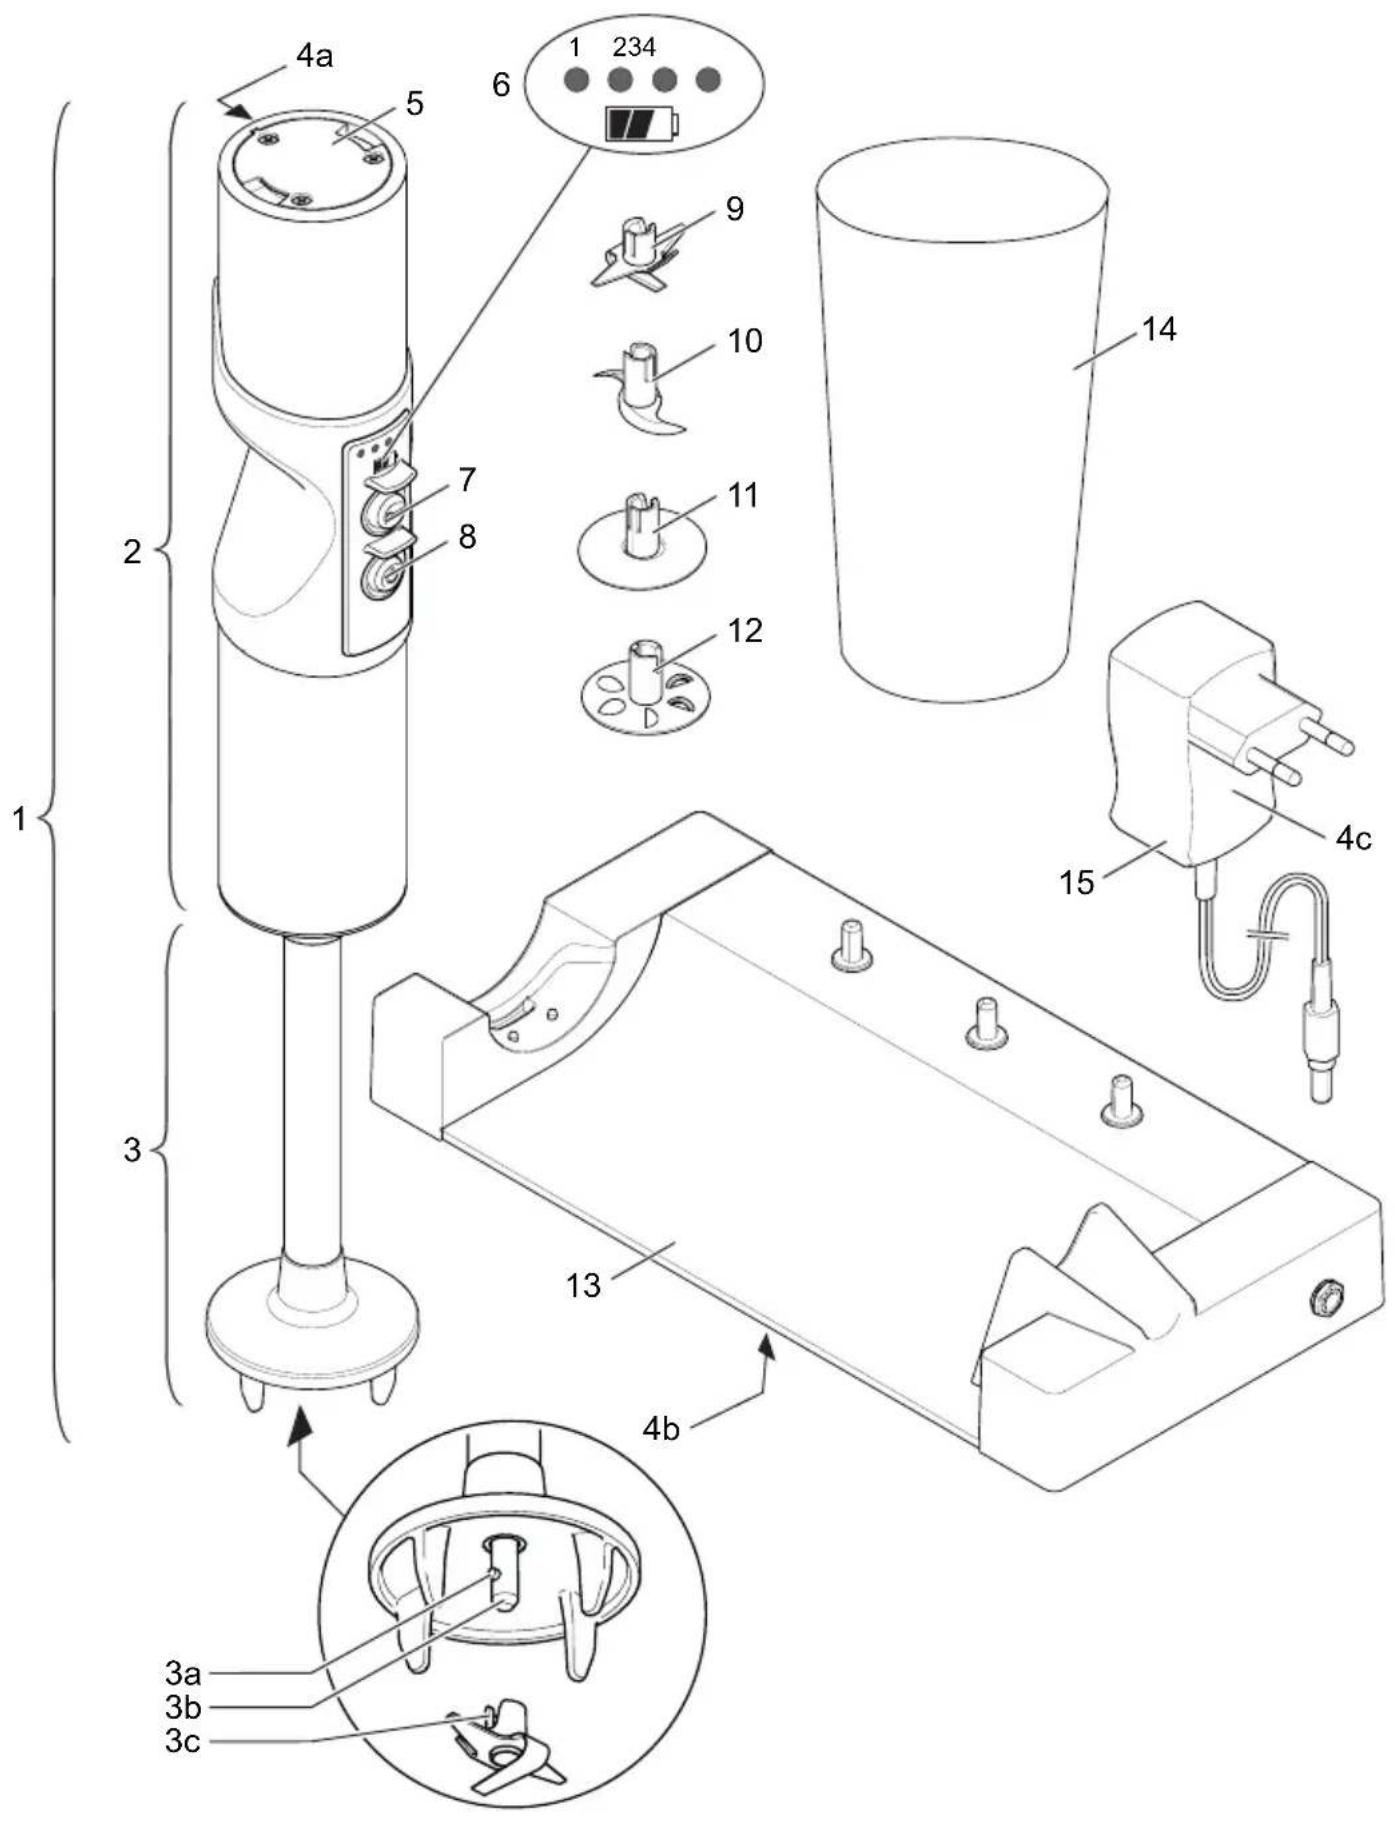
B To connect one of the attachments (9 – 12), hold the attachment with a tea towel to protect your hands and mount it on the drive shaft (3b). Make sure that the drive shaft pin (3a) fits snugly into the slot on the attachment (3c).
B To remove the attachment, hold it with a tea towel to protect your hands and pull it carefully off the drive shaft.
Using the hand blender
CAUTION, risk of injury:
Do not use your hands to remove any pieces of food that become jammed in the blades! Use a blunt object (e.g. a small wooden implement) to do this instead.
- Place the food in the blending cup (14) or another flat-bottomed container. Do not start using the hand blender (1) until it is positioned inside the container. Info:
- When using the blending cup: Do not fill the blending cup to the brim. During blending, the liquid in the cup will creep up the sides and may splash out.
- Tall, narrow containers are more suitable than flat, wide ones.
- If using a coated container, take care not to damage the coating during blending.
C To switch it on, first press and hold down the unlock button (7). Then, within 2 seconds, press the power button (8).
- Keep the unlock button pressed during operation.
The hand blender begins to operate at the highest speed setting. The LEDs on the LED display (6) light up (the number that light up depends on the current battery level).
Info:
To prevent the hand blender from overloading, the appliance will switch off automatically if it becomes overheated, if a blade becomes jammed or if the appliance is operated continuously for more than 4 minutes. After it switches off, all LEDs flash slowly. You can then switch the blender on again and continue using it.
- Adjust the speed if necessary: Briefly press the power button. This reduces the speed.
Info:
The next speed setting after the lowest speed setting is the highest speed setting.
- Release the unlock button to switch the appliance off.
Displaying the current battery level
- Briefly press the unlock button (7).
The number of LEDs that light up indicates the current battery level.
CLEANING
CAUTION, risk of injury:
- Keep your fingers away from the buttons to prevent the appliance from switching on accidentally.
– The blades on the attachments are very sharp! Never touch these blades with your bare hands.
To prevent the accumulation of food residue, clean the blender (1) thoroughly after each use:
- Immerse the blender shaft (3) of the hand blender in the blending cup (14) or another container filled with warm water and detergent.
- Switch the hand blender on. Allow it to operate for a short period in the detergent solution.
- Fill the blending cup or container with clean, clear water and allow the hand blender to operate in the water for a short period.
- To ensure that all food residue is removed, detach the blender attachment (see „Connecting/ replacing an attachment“) and clean it.
- Use a damp cloth to wipe down the motor unit (2), blender shaft and charging station (13) if necessary.
NOTE, risk of damage to the hand blender:
- Do not use any scouring agents, abrasive cleansers, sponges with rough surfaces or hard brushes.
– The hand blender is not suitable for washing in a dishwasher. - Do not leave the blender shaft (3) sitting in liquid for a long time, as this may cause discolouration.
- Dry all parts that you have washed.
CHARGING THE BATTERY
If the blender (1) is switched on, the number of LEDs that light up on the LED display (6) indicates the current battery level. LED 1 flashes slowly to indicate that the battery is dead.
Info:
Do not switch the blender on if the battery is dead. Otherwise, the battery may be damaged.
A Place the contact surfaces of the hand blender onto the contact pin of the charging station (13).
When in the correct position, the hand blender will feel securely locked into place and the LEDs on the LED display (6) will flash. The number of flashing LEDs indicates the current battery level.
Once the battery is fully charged, all LEDs go out.
STORAGE
Keep the appliance and the accessories out of the reach of children. If storing the appliance for a longer period of time (without use), ensure that the battery is fully charged first (see „CHARGING THE BATTERY“). Otherwise, the battery may be damaged.
The attachments can be stored on the pins provided on the charging station.
CHANGING THE BATTERY
CAUTION, risk of injury:
Keep your fingers away from the buttons to prevent the appliance from switching on accidentally.
If LED 1 flashes briefly, this indicates that the battery is defective (see „Overview of LED display (6)“) and must be replaced:
- Remove the hand blender (1) from the charging station (13).
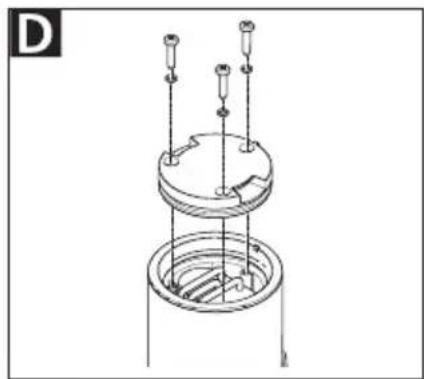
D Loosen the 3 screws on the battery cover (5) and lift it off.
E Take out the battery by pulling firmly on the battery tab (16).
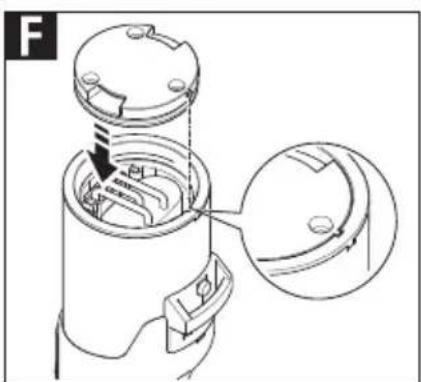
F Insert the new battery, including the battery tab. When doing so, ensure that you insert the battery plug (17) fully into the connector provided on the hand blender. A small amount of force is required for this purpose.
- Store the battery tab in such a way that it remains accessible.
G Put on the battery cover. When doing so, ensure that the lip on the battery cover fits exactly into the slot provided on the hand blender.
- Use the 3 screws provided to secure the cover.
- Leave the hand blender in the charging station until the battery is fully charged (see „CHARGING THE BATTERY“). The battery is partially charged upon delivery.
DISPOSAL
At the end of its service life this product must not be disposed of as part of normal domestic waste.
It must be taken to a dedicated collection point for recycling electrical and electronic devices. This is indicated by the symbol on the product, the operating instructions or the packaging.
The materials can be used again in accordance with their identification. The re-use, material-sensitive recycling or other forms of recycling of old appliances enables you to make a vital contribution to protecting our environment.
Please consult with the disposal office at your local authority.
Disposing of the hand blender
- Remove the battery (see „CHANGING THE BATTERY“).
- Dispose of the hand blender in accordance with the regulations.
- Dead batteries still contain some residual energy. To prevent short circuiting, you therefore need to insulate the poles prior to disposal, for example, with insulating tape.
- Dispose of the old battery at a battery collection point in accordance with local and national regulations.
REACH DIRECTIVE
SERVICE, REPAIRS AND SPARE PARTS
Please contact your local after-sales service for service, repairs and spare parts.
The appliance complies with the CE specifications.
Mains voltage/power consumption: Refer to the type labels (4a, 4b and 4c) on the relevant appliance parts.
WARRANTY
This hand blender comes with a 2-year manufacturer's warranty, calculated from the date of purchase and in accordance with EU warranty directives. Your legal warranty claims according to § 437 ff. BGB (German Civil Code) remain unaffected by this regulation. The manufacturer warranty applies to all devices sold within the European Union. For details of the warranty conditions, see www.ritterwerk.de/warranty. For any warranty claims or for customer service, the hand blender must always be sent to the customer service centre in your country.
EXPLANATION OF SYMBOLS
| Symbol Explanation | |
 | CE marking: The product complies with the applicable requirements of the European Union. |
 | The product was put on the market after 13 August 2005. It must not be disposed of as normal domestic waste. The crossed-out wheelie bin symbol indicates that separate collection is required. |
 | Suitable for contact with foodstuffs |
 | Switch mode power supply unit |
 | Safety isolating transformer, short-circuit proof |
 | For indoor use only |
 | Class II equipment |
 | Class III equipment |
 | Polarity of d.c. power connector |
 | IP20 rating; protection against access to hazardous parts with fingers |
 | Highest rated ambient temperature 40 °C |
ASSEMBLY AND INSTALLATION
Please also refer to the illustrations (I to L) provided at the front and back of this manual.
For more information about installation, see also www.ritterwerk.de/installation-notes.
Safety instructions
To avoid personal injury or damage to the appliance, please observe the following safety instructions:
- Assembly must be performed by qualified personnel only. ritterwerk will not be held liable for the consequences of improper and/or incorrect assembly.
- The power cord must be routed in such a way that it is not pinched and can run directly and without obstruction from the built-in system to the socket to be installed in the floor cabinet.
- Unplug the plug-in power supply from the socket before assembly.
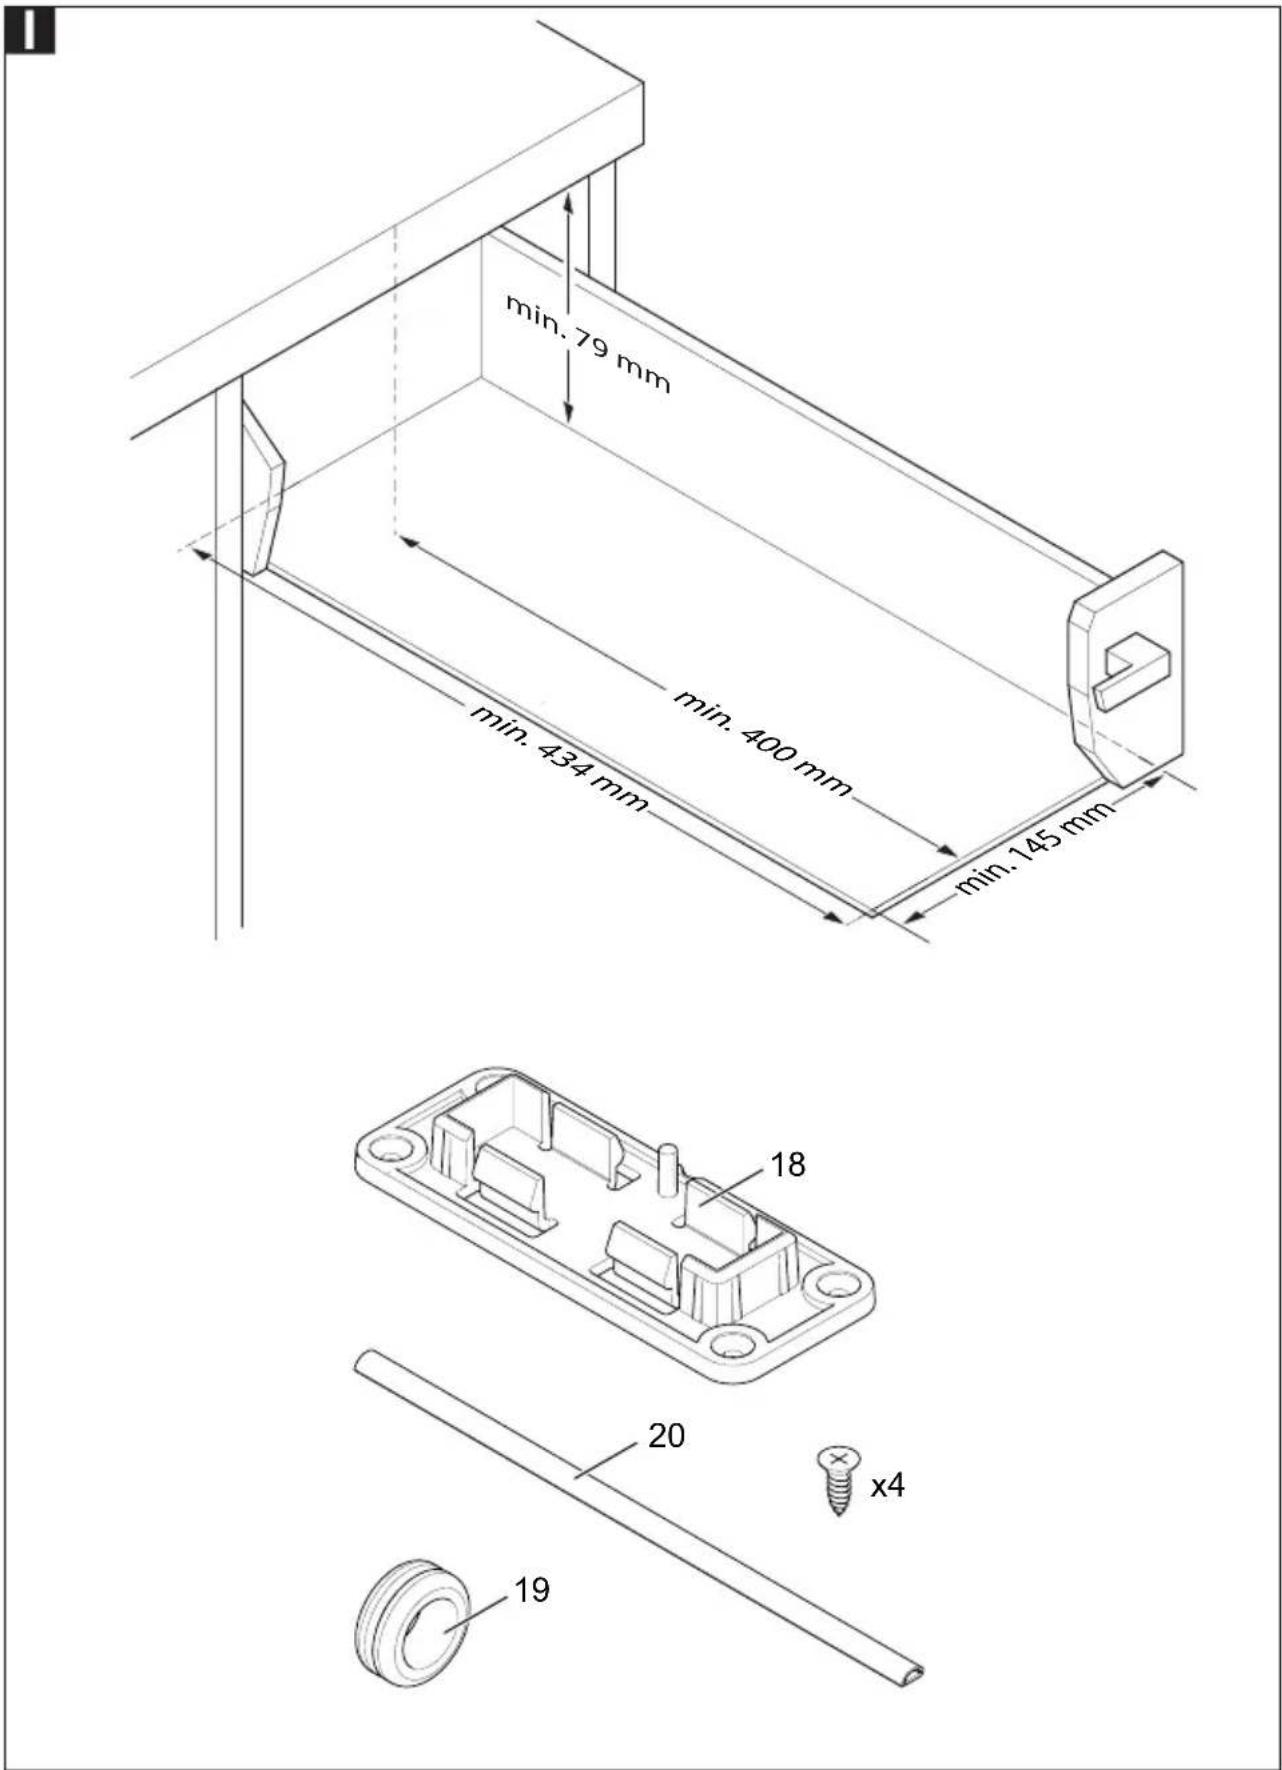
I Installation conditions
The following dimensions represent minimum values.
– Drawer clearance width: min. 145 mm
– Clearance height for drawer base/crossbeam: min. 79 mm
- Pullout clearance for front edge of worktop/inner edge of front drawer panel: min. 400 mm
- Depth of drawer base: min. 434 mm
– Appliance width: 138 mm
The drawer base should be at least 10 mm thick. The drawer should have a static load capacity of at least 30 kg.
Selecting a socket
Info:
A surface-mounted socket (that complies with VDE/DIN 49440, ÖVE, SEV) must be mounted either on or behind the rear panel at drawer height.
The power cord connection to the socket should be routed under the rear crossbeam or the underside of the work top and as high up as possible in the corner of the floor cabinet's rear panel.
It must be possible to slide the drawer in fully while the plug-in power supply is plugged into the socket.
The plug-in power supply must be easily accessible to the user to ensure that the appliance can be unplugged from the mains as required (for example, prior to cleaning).
Items for mounting included in the delivery
18 Mounting panel
19 Grommet
20 Self-adhesive cable duct
- 4 countersunk screws
(Phillips drive, PZ 3.5 x 12)
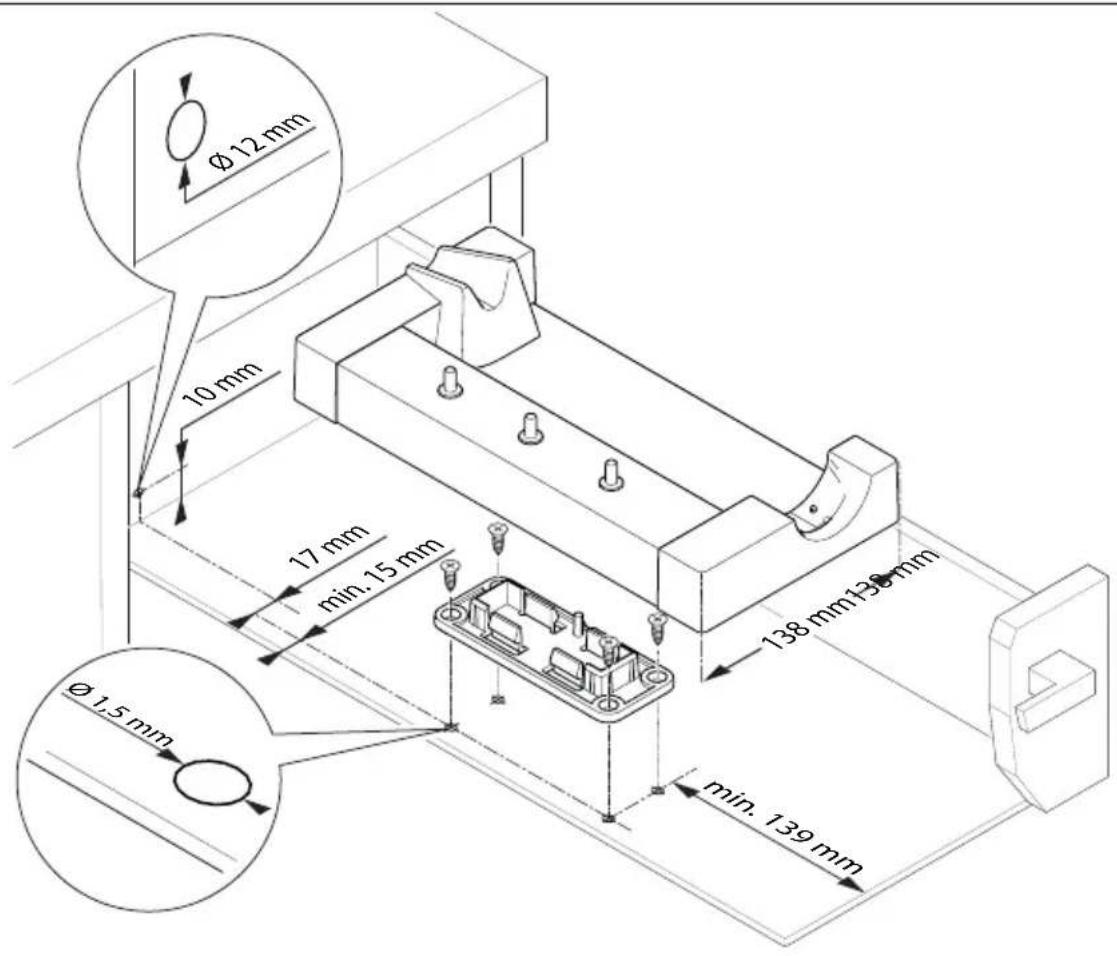
Mounting the hand blender
K Use a 1.5 mm drill to drill the holes for attaching the mounting panel (18).
- Use the screws provided to bolt down the mounting panel.
- Clip the charging station (13) onto the mounting panel.
- Use a metal drill (12 mm diameter) to drill a hole in the rear wall of the drawer. Make sure that the cable can run parallel to the side wall of the drawer from the charging station to the hole.
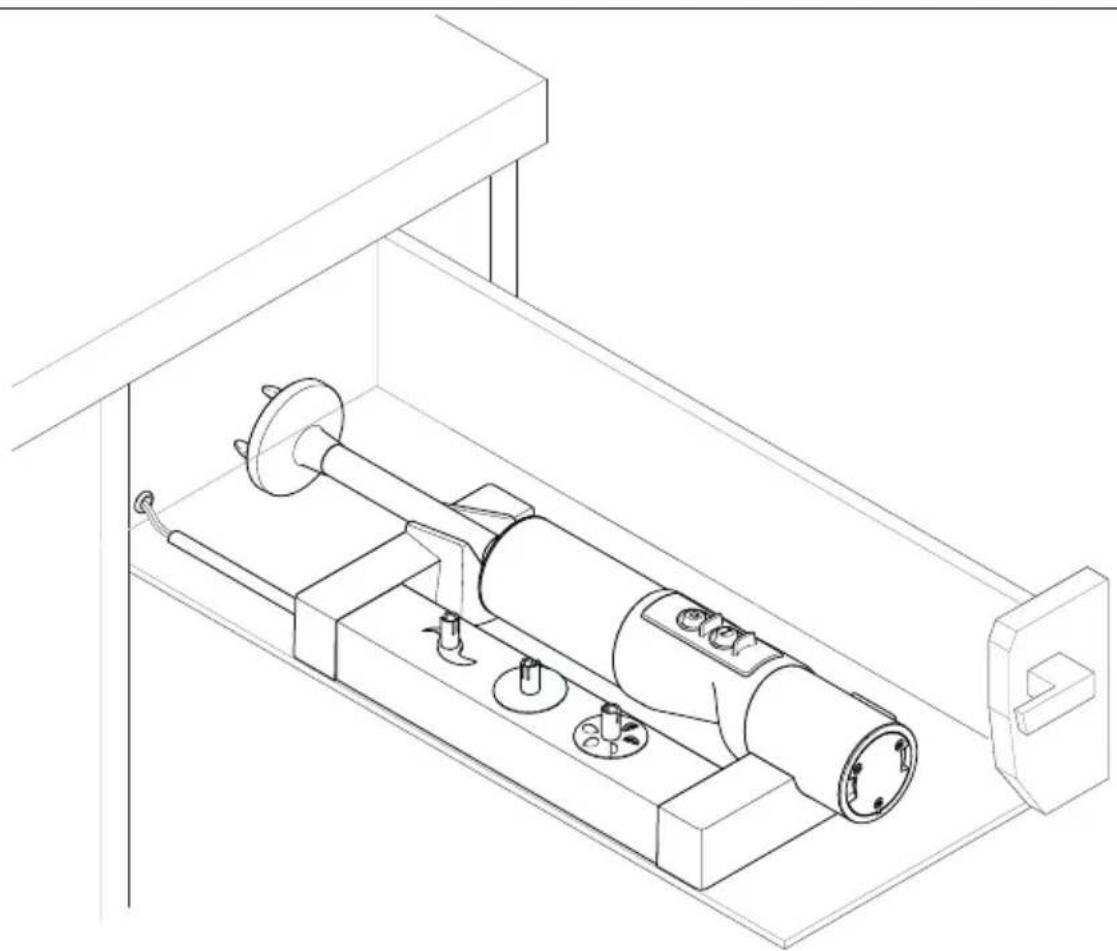
-
Insert the grommet (19) into the hole drilled in the rear wall of the drawer.
-
Guide the power cord through the grommet from the rear and connect it to the charging station.
- Shorten the cable duct (20) to the required length and stick it to the drawer base.
- Insert the power cord into the cable duct and close the cable duct.
- Connect the plug-in power supply (15) to the mains socket.
- Bind any excess length of power cord to the plug-in power supply.
A Place the contact surfaces of the hand blender (1) onto the contact pins of the charging station.
When in the correct position, the hand blender will feel securely locked into place and the LEDs on the LED display (6) will flash.
INSTRUCTIONS DE SÉCURITÉGÉNÉRALES
BESCHRIJVING VAN DE WERKING
MONTERING OG INNBYGGING
I Leveranse for montering
18 Monteringsplate