
MOtlx 625 - Multitools Fein - Free user manual and instructions
Find the device manual for free MOtlx 625 Fein in PDF.
| Product type | Multifunction pneumatic tool |
| Brand | Fein |
| Model | MOtlx 625 |
| Main use | Cutting polyurethane adhesive beads and removing automotive windows |
| Power supply | Compressed air |
| Recommended air pressure | Indicated on the tool's nameplate |
| Minimum hose diameter | 16 mm |
| Weight (according to EPTA 01) | Approximately 1.5 kg (estimation) |
| Periodic maintenance | Every 300 service hours or every 6 months |
| Cleaning | Blow out the hose before connection; clean the tool regularly |
| Spare parts | Use only original FEIN parts (available at www.fein.com) |
| Warranty | In accordance with legal regulations and the FEIN warranty declaration |
| Compliance | CE marking (EU/EFTA) and UKCA (Great Britain) depending on the market |
| Environmental protection | Recycle the packaging and used device at an approved center |
| Mandatory safety equipment | Safety goggles, gloves, hearing protection, dust mask |
| Usage instructions | Hold the tool with both hands, do not work with asbestos, avoid contact with the working tool |
| Vibrations | Respect the exposure limit values (5 m/s² over 8h according to directive 2002/44/EC) |
Frequently Asked Questions - MOtlx 625 Fein
User questions about MOtlx 625 Fein
0 question about this device. Answer the ones you know or ask your own.
Ask a new question about this device
Download the instructions for your Multitools in PDF format for free! Find your manual MOtlx 625 - Fein and take your electronic device back in hand. On this page are published all the documents necessary for the use of your device. MOtlx 625 by Fein.
USER MANUAL MOtlx 625 Fein
natural_image
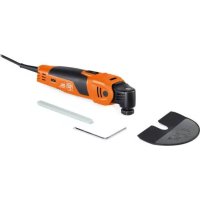
Illustration of a mechanical tool with a brand logo (Jeim) on its side, no text or symbols present.M0tlx 6-25 (**) 7 536 03
| MOtlx 6-25 | ||
| 7 536 03 | ||
| p | bar 6,3 | |
| _N | Nm3/min 0,6 | |
| n_S | 1/min 20000 | |
| kg 0,9 | ||
| L_pA | dB | 79,2 |
| K_pA | dB | 3 |
| I_wA | dB | 90,2 |
| K_wA | dB | 3 |
| I_pCpeak | dB | 90,9 |
| K_pCpeak | dB | 3 |
| Ka | m/s2 | 1,5 |


Translation of the Original Instructions.
Symbols, abbreviations and terms used.
| Symbol, character Explanation | |
  | Be absolutely sure to read the enclosed documentation such as the Instruction Manual and the General Safety Instructions. |
 | Observe the notes in the text aside! |
 | General prohibition sign. This action is prohibited! |
  | Do not touch the saw blade. Danger of sharp application tools moving back and forth. |
 | Disconnect the compressed-air supply prior to this workstep. Otherwise there may be danger of injury caused by unintentional starting of the pneumatic tool. |
   | Use eye-protection during operation. |
 | Use a dust mask during operation. |
  | Use ear protection during operation. |
 | Use protective gloves during operation. |
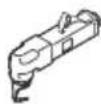
 | Switching on |
 | Switching off |
 | Confirms the conformity of the pneumatic tool with the directives of the European Community. |
 | Confirms the conformity of the power tool with the directives of Great Britain (England, Wales, Scotland). |
 WARNING WARNING | This sign indicates a possible dangerous situation that could cause severe or fatal injury. |
| Weight according to EPTA-Procedure 01 | |
| (###) May contain numbers and letters | |
| Character Unit of measure, international Unit of measure, national Explanation | |||
| p bar bar O | Operating pressure | ||
| [6425] | Nm3/min Nm | 3/min Air consumption | |
 | 1/min 1/min Rated oscillation rate | ||
| [1474X] A | dB dB Sound power level | ||
 A A | dB dB Sound pressure level | ||
| [14306] Peak | dB dB Peak sound pressure level | ||
| [5248] Uncertainty | |||
 [TCSA] [S3AY] [XAB8] [DB90E] [BAAA] [X4AR] [XZYR] [X80Z] [SOWA] [XXCT] [TCSA] [S3AY] [XAB8] [DB90E] [BAAA] [X4AR] [XZYR] [X80Z] [SOWA] [XXCT]  [OZYO] [DAHY] [OZYO] [DAHY]  [ATZY] [XWZQ] [ATZY] [XWZQ]  [DH5Z] [YTZT] [TZAC] [STZ2] [T00W] [OY3A] [DH5Z] [YTZT] [TZAC] [STZ2] [T00W] [OY3A]  [664K] [EZ20] [DCZA] [ACTRA] [SACE] [1204A] [Z70W] [76KZ] [3420] [HCXZ] [77AZ] [HSFT] [4036] [800A] [Y810] [7K5T] [607T] [664K] [EZ20] [DCZA] [ACTRA] [SACE] [1204A] [Z70W] [76KZ] [3420] [HCXZ] [77AZ] [HSFT] [4036] [800A] [Y810] [7K5T] [607T] | |||
| m, s, kg, A, mm, V, W, Hz, N, °C, dB, /min, m/s2 | m, s, kg, A, mm, V, W, Hz, N, °C, dB, rpm, m/s2 | Basic and derived units of measure from the international system of units SI. | |


For your safety.
WARNING
Read all safety warnings and all instructions. Failure to follow the warnings and instructions may result
in electric shock, fire and/or serious injury.
Save all warnings and instructions for future reference.

Do not use this pneumatic tool before you have thoroughly read and completely understood this Instruction Manual including the figures, specifications, safety regulations and the signs indicating DANGER, WARNING and CAUTION.
Please also observe the relevant national industrial safety regulations (e.g. in Germany: BGV A3).
Non-observance of the safety warnings in the specified documentation can lead to serious injury.
This Instruction Manual should be kept for later use and enclosed with the pneumatic tool when passing it on or selling it.
Safety instructions.
1) Work place
a) Keep your work place clean and tidy. Untidiness and bad lighting in the working area can lead to accidents.
b) Do not operate the pneumatic hacksaw in the vicinity of any flammable fluids, gases or dust particles where there is risk of explosion. Pneumatic hacksaws produce sparks that could ignite the dust or vapours.
c) When using the pneumatic tool, keep children and other persons at a safe distance away. If your mind is diverted, you could lose control over the pneumatic tool.
2) Safety when handling compressed air
a) Check the compressed-air supply at regular intervals. Protect the hose from bending, squeezing, heat and sharp edges. Tighten the hose clamps firmly. Make sure that damaged hoses and couplings are repaired immediately. If the air supply is defective, the compressed air hose could suddenly toss around and cause injuries. Dust and chippings flying up in the air can cause eye injuries.
3) Personal safety and safety of others
a) Pay particular attention, be sure of what you are doing and tackle the work you are going to do with your pneumatic tool in a sensible manner. Do not use the pneumatic tool if you are tired or under the influence of drugs, alcohol or medication. One minute of carelessness whilst using the pneumatic tool can cause severe personal injuries.
b) Wear your personal protective items and always wear protective glasses. Wearing protective personal items such as a dust mask, sturdy shoes that do not slip, a helmet or ear protection, depending on the type of job to be done using the pneumatic tool, reduces the risk of injuries.
c) Prevent the possibility of the machine starting accidentally. Make absolutely sure that the switch is in the "OFF" position before you connect the pneumatic tool to the compressed-air supply. If your finger is
on the switch whilst you are carrying the pneumatic tool or if you connect the pneumatic tool to the compressed-air supply whilst it is switched on, this could cause accidents.
d) Remove any adjusting tools and wrenches before you switch the pneumatic tool on. An adjusting tool or wrench that has been left in a rotating part of the pneumatic tool could cause injuries.
e) Do not over-estimate yourself. Make sure you have a firm stance and can keep your balance at all times. In this way you will have better control over the pneumatic tool if anything unexpected happens.
f) Wear suitable clothing. Do not wear any baggy clothes or jewellery. Keep your hair, clothing and gloves away from any moving parts. Loose clothing, jewellery or long hair could get caught in the moving parts.
a) Do not strain the pneumatic tool. Use the correct application tool intended for your work. With the correct application tool you can work better and more safely in the given power range.
b) Do not use a pneumatic tool with a defective switch. A pneumatic tool that can no longer be switched on or off is dangerous and must be repaired.
c) Disconnect the power supply before you undertake any adjustments on the pneumatic tool, change the accessories or place the pneumatic tool down somewhere. This precautionary measure prevents the pneumatic tool from actuating accidentally.
d) Keep unused pneumatic tools out of the reach of children. Do not allow anyone to use the pneumatic tool who is not familiar with it and has not read these instructions. Pneumatic tools are dangerous if they are used by inexperienced persons.
e) Look after the pneumatic tool with care. Check that the moving parts of the pneumatic tool are functioning perfectly and do not jam, that none of the parts are broken or damaged, and that the function of the pneumatic tool is not impaired. Any damaged parts should be repaired before using the pneumatic tool. Many an accident has been caused by pneumatic tools that have been badly kept.
f) Keep the cutting tools sharp and clean. Cutting tools with sharp cutters that have been carefully looked after are less likely to jam and are easier to guide.
g) Use the pneumatic tool, the accessories and the application tools, etc., in accordance with these instructions and in the manner stipulated for this special type of pneumatic tool. Take the working conditions and the operation to be carried out into consideration. Using pneumatic tools for applications other than those they are intended for, can lead to dangerous situations.
h) Hold the pneumatic tool firmly in both hands and make sure you have a firm stance. The pneumatic tool can be guided more safely using both hands.
i) Secure the workpiece firmly. A work piece that is gripped tightly in a clamping device or vice, is more secure than if held by hand.
4) Careful handling and use of pneumatic tools
j) Do not machine any material containing asbestos. Asbestos is cancerogenic.
k) Keep your hands away from the application tool. Do not reach in front of or below the application tool. Contact with the application tool can lead to injury. Application tools can become very hot while working.
I) Only position the pneumatic tool onto the workpiece when it is switched on. There is danger of kickback occurring or of losing control over the pneumatic tool.
m) It is forbidden to rivet or screw any name-plates or signs onto the pneumatic tool. Use adhesive labels.
n) Do not use any accessories that have not been specifically designed and recommended by the manufacturer of the pneumatic tool. Operation is not automatically safe because an accessory happens to fit your pneumatic tool.
o) Beware of any concealed electric cables, gas or water conduits; check the working area with a metal detector, for example, before commencing work.
5) Service
a) Your pneumatic tools should only be repaired by qualified specialists and only with original spare parts. This will ensure that the safety of the pneumatic tool is maintained.
Special safety instructions.
Secure the workpiece firmly. A work piece that is gripped tightly in a clamping device or vice, is more secure than if held by hand.
For all work or when changing application tools, always wear protective gloves. Danger of injury from the sharp edges of the application tools. Application tools can become very hot while working. Danger of burns!
Never direct the application tool against yourself. Hold the pneumatic tool in such a manner that the application tool cannot come into contact with your hand.
Hand/arm vibrations.
Whilst working with this power tool, hand/arm vibrations will occur.
Adopt the correct working practices in order to reduce the exposure to vibration:
– in the case of strong vibration, take the recommended work breaks or change your task more frequently,
- keep your hands warm,
– whilst working, only grip the power tool as firmly as necessary,
- work only with technically sound machines and application tools,
- wear vibration-damping work gloves,
If these recommendations are not observed, the exposure to strong vibration during daily work over a longer period of time can be detrimental to health.
The maximum exposure values stipulated in the industrial safety directives (e. g. in directive 2002/44/EC, a maximum daily exposure limit of 5 m/s ^2 relating to a normal duration of 8 hours) must not be exceeded.
The value of the estimated weighted acceleration obtained in the laboratory can serve for predicting the exposure to vibration. During work, weighted accelerations will be dependent on the particular application, and deviation from this laboratory value can occur.
Emission values for sound and vibration
(Two-figure - specifications as per ISO 4871)
| Vibration | |
| Classification of FEIN application tools according to vibration class | Weighted acceleration* |
| VC0 < 2.5 m/s | 2 |
| VC1 < 5 m/s | 2 |
| VC2 < 7 m/s | 2 |
| VC3 < 10 m/s | 2 |
| VC4 < 15 m/s | 2 |
| VC5 < 30 m/s | 2 |
| Ka 1.5 m/s | 2 |
* These values are based on a work cycle consisting of no-load and full-load operation of the same duration.
For information on the vibration class assigned to the application tool, please see the enclosed data sheet 3 41 30 562 06 0.
Intended use of the pneumatic tool.
hand-guided pneumatic tool for commercial use, for cutting plastic beads and similar materials, particularly for cutting out windscreens, rear and side window panes for the automobile workshop using the application tools and accessories recommended by FEIN.
Connection to air supply.
For trouble-free operation of the air tool, use a filter/regulator-lubricator consisting of water separator, oil lubricator and compressed-air regulator.
Check that the pressure in the compressed-air supply conforms with the pressure given on the rating plate on the pneumatic tool.
▶ Before connecting, blow through the hose.
The hose should have a minimum diameter of 16 mm. The opening of the valve and the coupling should have a diameter of at least 8 mm.
Operating instructions.
When uncoupling hose couplings, first shut the ball valve, then actuate the pneumatic tool, and then uncouple. Do not uncouple the hose coupling until after the compressed air has been completely relieved.
Repair and customer service.
Maintain and clean the pneumatic tool every 300 work hours or every 6 months.
When the pneumatic tool's hose is damaged, it must be replaced with a specially prepared hose, available from your FEIN customer service agent.
Products that have come into contact with asbestos may not be sent in for repair. Dispose of products contaminated with asbestos according to the applicable country-specific regulations for such disposal.
The spare parts list can be found on the Internet under www.fein.com.
Use only original spare parts.
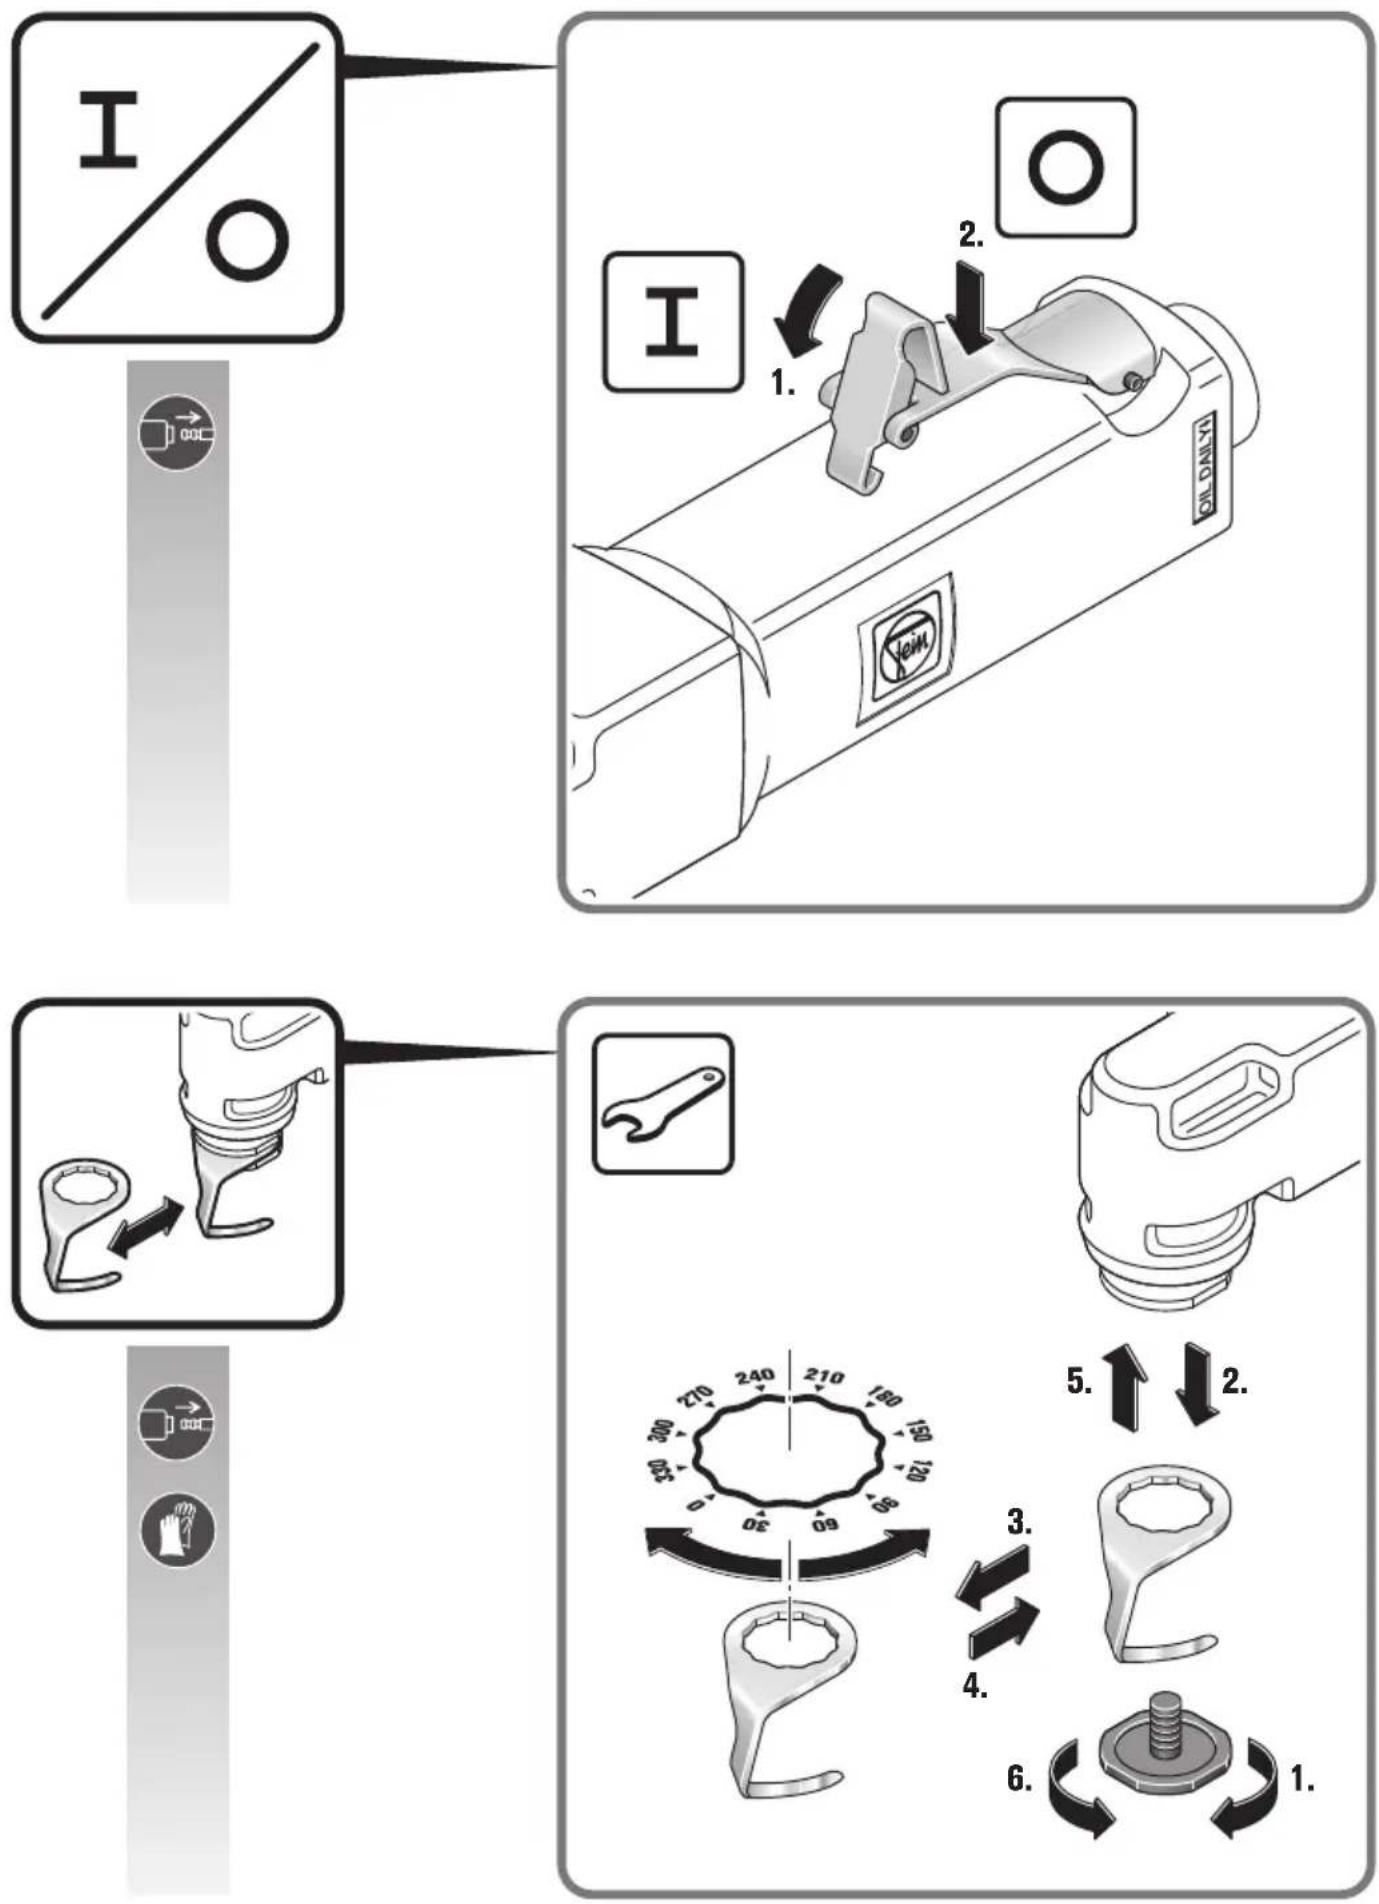
If required, you can change the following parts yourself: Application tools, Hose
Warranty and liability.
The warranty for the product is valid in accordance with the legal regulations in the country where it is marketed. In addition, FEIN also provides a guarantee in accordance with the FEIN manufacturer's warranty declaration.
The delivery scope of your pneumatic tool may include only a part of the accessories described or shown in this instruction manual.
Declaration of conformity.
This CE declaration is only valid for European Union and EFTA (European Free Trade Association) countries and only for products intended for the EU- or EFTA market. After placing the product on the EU market the UKCA mark loses its mark validity.
The UKCA declaration is only valid for the Great Britain market (England, Wales and Scotland) and only for products intended for the Great Britain market. After placing the product on the Great Britain market the CE mark loses its mark validity.
FEIN declares itself solely responsible for this product conforming with the documents and standards given on the last page of this Instruction Manual.
Technical documents at: C. & E. Fein GmbH, D-73529 Schwäbisch Gmünd
Environmental protection, disposal.
Packaging, worn out pneumatic tools and accessories should be sorted for environment-friendly recycling.
Miljøvern, deponering.
This CE declaration is only valid for European Union and EFTA (European Free Trade Association) countries and only for products intended for the EU- or EFTA market. After placing the product on the EU market the UKCA mark loses its mark validity.

DIN EN ISO 12100:2010 2006/42/EG
The UKCA declaration is only valid for the Great Britain market (England, Wales and Scotland) and only for products intended for the Great Britain market. After placing the product on the Great Britain market the CE mark loses its mark validity.

BS EN ISO 121000:2010 Supply of Machinery Regulations 2008
U. Hergosell
i. V. S. Böhm i. V. Dr. M. Hergesell Director of Quality Director of Product Management Development
i. V. S. Böhm i. V. Dr. M. Hergesell Director of Quality Director of Product Management Development
- Symbols, abbreviations and terms used.
- For your safety.
- WARNING
- Save all warnings and instructions for future reference.
- Safety instructions.
- 1) Work place
- 2) Safety when handling compressed air
- 3) Personal safety and safety of others
- 4) Careful handling and use of pneumatic tools
- 5) Service
- Special safety instructions.
- Hand/arm vibrations.
- Emission values for sound and vibration
- Intended use of the pneumatic tool.
- Connection to air supply.
- Operating instructions.
- Repair and customer service.
- Warranty and liability.
- Declaration of conformity.
- Environmental protection, disposal.
- Miljøvern, deponering.
Brand : Fein
Model : MOtlx 625
Category : Multitools