MM 4 - Multimeter BENNING - Free user manual and instructions
Find the device manual for free MM 4 BENNING in PDF.
| Product type | Digital multimeter with clamp meter |
| Brand | BENNING |
| Model | MM 4 |
| Dimensions (L×W×H) | Multimeter only: 145×52×34 mm With clamp attachment: 225×77×35 mm |
| Weight | Multimeter only: 100 g With clamp attachment: 230 g |
| Power supply | 2 x 1.5 V batteries (IEC LR03) |
| Display | LCD 3 3/4 digits, max 4200 |
| DC voltage | Ranges: 4.2 V / 42 V / 420 V / 600 V Accuracy: ±(0.5% + 2 digits) |
| AC voltage | Ranges: 4.2 V / 42 V / 420 V / 600 V Accuracy: ±(1.5% + 5 digits) |
| Resistance | Ranges: 420 Ω / 4.2 kΩ / 42 kΩ / 420 kΩ / 4.2 MΩ / 42 MΩ Accuracy: ±(0.9% to 3.0% + digits) |
| Diode test | Yes, threshold voltage displayed |
| Continuity test | With buzzer, threshold < 50 Ω |
| AC current measurement (clamp) | 0.1 A to 300 A, accuracy ±(1.9% + 0.5 A) |
| Overvoltage category | CAT II 600 V, CAT III 300 V |
| Protection | Double insulation (class II), IP30 |
| Auto power off | After approximately 30 minutes |
| Operating temperature | Multimeter: 0 °C to 50 °C Clamp: 0 °C to 45 °C |
| Storage temperature | -20 °C to +60 °C (batteries removed) |
| Included accessories | Clamp attachment, black measuring cable, 2 red probes, pouch, batteries, manual |
| Maintenance and cleaning | Clean with a dry cloth; replace batteries when battery symbol appears |
| Spare parts and repairability | Batteries, measuring cables; annual calibration recommended by Benning customer service |
| Safety | Max. voltage to earth: 600 V; use in dry environment only |
Frequently Asked Questions - MM 4 BENNING
User questions about MM 4 BENNING
0 question about this device. Answer the ones you know or ask your own.
Ask a new question about this device
Download the instructions for your Multimeter in PDF format for free! Find your manual MM 4 - BENNING and take your electronic device back in hand. On this page are published all the documents necessary for the use of your device. MM 4 by BENNING.
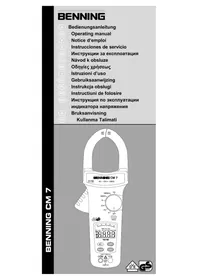
USER MANUAL MM 4 BENNING
Fig. 5: Continuity Testing with buzzer
Fig.6: Diode Testing
Fig. 7: AC current current measurement with current transducer
Fig. 8: Battery replacement
HOLD/ REL-Taste (Haltefungtion),
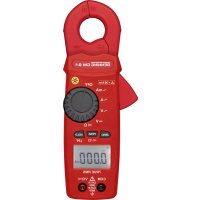
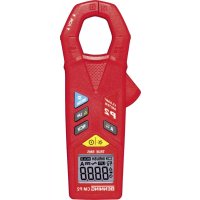
Digital Multimeter with current transducer clamp for:
- AC current measurement
- AC-voltage measurement
- DC-voltage measurement
- Resistance measurement
- Diode testing
- Continuity testing
Contents:
- Notes for the user
- Safety notes
- Scope of supply
- Description of unit
- General data
- Ambient conditions
- Electrical data
- Measuring with the BENNING MM 4
- Maintenance
- Technical data of the measuring accessories
11.Environmentalnotice
1. Notes for the user
This Operating Manual is intended for:
- electricians and
- persons possessing knowledge of electrical technology.
The BENNING MM 4 is designed for measurements in dry surroundings. It must not be used in circuits with rated voltages higher than 600V (for more details, see section 6 "Ambient conditions").
The following symbols are used in the Operating Manual and on the BENNING MM 4 itself:

Application around and removal from HAZARDOUS LIVE conductors is permitted.

This symbol indicates an electrical hazard.

This symbol indicates sources of danger when using the BENNING MM 4 (see documentation).

This symbol on the BENNING MM 4 indicates that the unit is protection insulated (safety class II).

This symbol appears in the display for a discharged battery.

This symbol indicates the "continuity-testing" application. The buzzer provides an audible signal.

This symbol indicates the "diode-testing" application.

(DC)-voltage.

(AC)-voltage or current.

Earth (voltage to earth).
Note
After unmark the adhesive label „Warnung...“ (on battery compartment lid) the English text appears.
2. Safety notes
The instrument is built and tested in accordance with
DIN VDE 0411 part 1/ EN 61010-1
and has left the factory in perfectly safe technical condition.
To maintain this condition and ensure safe operation of the multimeter, the user must observe the notes and warnings given in these instructions at all times.

The unit may be used only in power circuits within the overvoltage category II with a conductor for 600V max. to earth, or within overvoltage category III with a conductor for 300V against ground.
Remember that work on electrical components of all kinds is dangerous. Even low voltages of 30 V AC and 60 V DC may be dangerous to human life.

Before starting the multimeter up, always check it as well as all cables and wires for signs of damage.
Should it appear that safe operation of the multimeter is no longer possible, it should be shut down immediately and secured to prevent it being switched on accidentally.
It may be assumed that safe operation is no longer possible:
- if the instrument or the measuring leads show visible signs of damage, or
- if the multimeter no longer functions, or
- after long periods of storage under unfavourable conditions, or
- after being subjected to rough transport.

In order to avoid danger,
- do not touch the bare prod tips of the measuring leads,
- insert the measurement leads in the appropriately designated measuring sockets on the multimeter
3. Scope of supply
The following items make up the standard BENNING MM 4 package:
3.1 one Multimeter,
3.2 one current transducer clamp,
3.3 one safety test lead, black (length = 1.4 m, tip Ø 4 mm) with safety caps,
3.4 two test probes, red (tip 4mm
3.5 one compact protection case,
3.6 two 1.5V micro-batteries (in place in Multimeter on delivery),
3.7 the set Operating Instructions.
Note on consumable parts:
The BENNING MM 4 is supplied by two 1.5V batteries (2 x 1,5-V-IEC LR 03).
4. Description of unit
The BENNING MM 4 consists of two functional units:
- the Multimeter and
- the current transducer clamp.
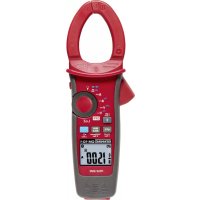
See fig.1: Front panel of unit
The operating and indicating elements shown in fig. 1 are as follows:
Housing
Sliding switch for selecting the desired functions.
Aus (OFF)
- Measurement of alternating voltage (AC) and direct voltage (DC). These functions alternate with one-another when the function button with the blue marking is pressed. When pressed longer (2 sec.) measurement of alternating current, etc. The digital display 3 indicates the function currently in effect.
- Resistance measurement, continuity test with buzzer and diode test. These functions alternate with one-another when the function button with the blue marking is pressed. The digital display 3 indicates the function currently in effect.
Digital display (liquid-crystal principle). The following are indicated:
- the measurement value with the max. indication 4200,
- the polarity indication,
- the decimal point,
- the symbol for discharged battery,
- the type of voltage selected (DC or AC voltage),
- the measurement value held (hold function),
the deviation from a measurement value stored in the unit memory
(REL 1
- the selected measuring range through display of extended / nonextended measuring units of voltage, current and resistance,
- the selected continuity test with buzzer,
- the selected diode test.
4 Blue function button: the following symbols appear for this in the digital display 3: "DC", "AC", "Ω", "V", , or ,
- Selection between DC-voltage and AC-voltage measurement or
- resistance measurement, continuity and diode test,
- or when button pressed for 2 sec. (in sliding-switch position ACV / DCV) alternating current (Amp).
Measurement of temperature (^,^) relative humidity (%) capacity ( F) carbon monoxide (ppm), wind speed (m / s) illumination intensity (k lux) are not possible with the BENNING MM 4.
- Repeat press for 2 sec. returns to voltage measurement
HOLD/REL button (hold function)
- First press of button causes indicated measuring value to be held (indicated by 'Hold' in digital display 3, no updating of measured value),
repeat press of button causes return to continuous measurement function.
- Relative-value function becomes effective when button pressed for 2 sec. The value currently being measured is stored and the difference (offset) between the next higher or lower value is displayed. A new reference value can be stored by pressing the button again. Return to normal mode by pressing button longer (2 sec).
6 RANGE button for manual selection of voltage, current and resistance-measuring ranges ('RANGE' appears in the digital display)
- The measuring ranges change when button pressed briefly,
Automatic range selection is set by pressing button longer (i.e. longer than 2 sec.).
COM socket, joint socket for voltage and resistance measurements, continuity and diode testing, colour black.
3 V-Ω socket (positive), joint socket for voltage and resistance measurements, continuity and diode testing, colour red.
9 Opening lever for opening and closing current clamp.
10 Current-clamp grip to guard against accidental conductor contact
1 Jaws for gripping the single-wire live AC conductor.
5. General data
5.1 General data on BENNING MM 4
5.1.1 The digital display is designed as a 3% digit liquid-crystal indicator with 11 mm digit height and decimal point. The highest value displayed is 4200.
5.1.2 The polarity indication functions automatically. Only a polarity contrary to the socket definition is indicated, as " -".
5.1.3 When the range is exceeded, this is indicated by "OL" or "-OL".
5.1.4 The nominal measuring rate of the digital display of the BENNING MM 4 is approx. 2 measurements per second.
5.1.5 The BENNING MM 4 switches off automatically after approx. 30min . It goes on again when the RANGE button is pressed. A buzzer sounds to indicate automatic switch off.
5.1.6 Temperature coefficient of measurement value: 0.15 × (stated measurement accuracy)/ ^ C < 18^ C or >28^ C , with reference to the value at a temperature of 23^ C .
5.1.7 The BENNING MM 4 is supplied by 2 × 1.5V batteries (IEC-LRO3 / Micro).
5.1.8 When the battery voltage drops beneath the specified operating voltage of the BENNING MM 4, the battery symbol appears in the display.
5.1.9 The life span of the batteries is approx. 800 hours (alkali battery).
5.1.10Dimensions:
(L × W × H) = 145 × 52 × 34 mm Multimeter without current transducer,
(L × W × H) = 225 × 77 × 35 mm Multimeter with current transducer Weight:
100 g without current transducer
230 g with current transducer
5.1.11 The safety test lead and the test probe are in 4mm plug-in design. The safety test lead and the test probe are suitable for the nominal voltage and nominal current of the BENNING MM 4. The test probe can be protected by caps.
5.2 General data on current transducer
5.2.1 Current-measuring range: from 0.1Aeff to 300Aeff (direct display, A)
5.2.2 Output voltage: the current transducer of the BENNING MM 4 produces an alternating voltage of 1mV when the single-wire conductor
which the current transducer is gripping is under an AC current of 0.1 A. 5.2.3 Sensor type: induction coil for alternating current.
5.2.4 Temperature coefficient of measurement value: 0.15 × (stated measurement accuracy)/ ^ C with reference to the value at a temperature of 23^ C .
5.2.5 Max. apparent resistance at output: 120 Ω
5.2.6 Widest angle of tongs: 30mm
5.2.7 Greatest conductor diameter 29 mm
5.2.8 Dimensions of current transducer (L × W × H) = 102 × 77 × 35 ~mm .
Weight of current transducer: 130g
Note:
The current transducer can only be used for measurements when it is plugged into the Multimeter.
6. Ambient conditions
- The BENNING MM 4 is designed only for measuring in dry surroundings,
Maximum barometric height during measurement: 2000m - Overvoltage category / set-up category: IEC 60664-1/ IEC 61010-1 300V category III, 600V category II,
- Degree of contamination: 2.
- Protection Class: IP 30 (DIN VDE 0470-1 IEC/ EN 60529)
IP 30 means: Protection against access to dangerous parts and protection against solid impurities of a diameter >2.5mm , (3 - first index). No protection against water, (0 - second index).
-
Operating temperature and relative humidity: Multimeter
-
At operating temperature of 0^ to 50^ : relative humidity under 80% .
-currenttransducer:
At operating temperature of 0^ to 45^ : relative humidity under 75% .
-Storagetemperature:
The BENNING MM 4 can be stored at temperatures from -20^ to +60^ . The batteries must be removed from the unit.
7. Electrical data
Note: The measurement accuracy is stated as the sum of
-
a relative proportion of the reading and
-
a number of digits (i.e. numerical steps of the last place).
This measurement accuracy applies for a temperature of 23^ and a relative humidity under 75% .
Sections 7.1 to 7.5 refer to the connection of the Multimeter to the circuit being measured (current transducer removed). Section 7.6 refers to the combination of Multimeter with current transducer in place.
7.1 DC voltage ranges
The input resistance is 9 MΩ
| Measuring range Resolution Accuracy | Accuracy overload protection | ||
| 4.2 V 1 mV ± (0,5 % of reading + 2 digits) | 600 Veff600 VDC | ||
| 42 V | 10 mV | ± (0,5 % of reading + 2 digits) | 600 Veff600 VDC |
| 420 V 100 mV | ± (0,5 % of reading + 2 digits) | 600 Veff600 VDC | |
| 600 V | 1 V | ± (0,5 % of reading + 2 digits) | 600 Veff600 VDC |
7.2 AC voltage ranges
The input resistance is 9M parallel 100pF . The reading is obtained by mean-value rectification and indicated as effective value
| Measuring range Resolution Accuracy | Accuracy overload protection | |
| 4.2 V 1 mV | ± (1.5 % of reading + 5 digits) in frequency range 40 Hz - 300 Hz | 600 Veff600 VDC |
| 42 V 10 mV | ± (1.5 % of reading + 5 digits) in frequency range 40 Hz - 500 Hz | 600 Veff600 VDC |
| 420 V 100 mV | ± (1.5 % of reading + 5 digits) in frequency range 40 Hz - 500 Hz | 600 Veff600 VDC |
| 600 V 1 V | ± (1.5 % of reading + 5 digits) in frequency range 40 Hz - 500 Hz | 600 Veff600 VDC |
7.3 Resistance ranges
No-load voltage: approx. 1.3V - 3.3V , max. test current 2.5mA .
42 MΩ-range, response time approx. 20 s
| Measuring range Resolution Accuracy | Accuracy overload protection |
| 420 Ω 0,1 Ω ± (1.2 % of reading + 8 digits) | 600 Veff600 VDC |
| 4,2 kΩ 1 Ω ± (0.9 % of reading + 4 digits) | 600 Veff600 VDC |
| 42 kΩ 10 Ω ± (0.9 % of reading + 4 digits) | 600 Veff600 VDC |
| 420 kΩ 100 Ω ± (1.2 % of reading + 4 digits) | 600 Veff600 VDC |
| 4,2 MΩ 1 kΩ ± (1.2 % of reading + 4 digits) | 600 Veff600 VDC |
| 42 MΩ 10 kΩ ± (3.0 % of reading + 8 digits) | 600 Veff600 VDC |
7.4 Diode testing
The stated measurement accuracy applies in the range between 0.4V and 0.8V .
Overload protection for diode testing: 600Veff / 600VDC
| Measuring range | Resolution Accuracy | max. meas. current | Max. no-load voltage | |
| → | 0.1 mV | ± (1.5 % of reading + 5 digits) | 1,5 mA | 3,3 V |
7.5 Continuity testing
The integrated buzzer sounds at resistances R < 50 .
7.6 AC ranges
(Multimeter with current transducer attachment. Current transducer grips single live conductor wire).
Measurement accuracy is ± (% of reading + number of digits) at a temperature of 23^ ± 5^ .
Max. current of enclosed current transducer 300 A!
| Measuring range | Resolution Output voltage | Accuracy |
| 300 A | 0.1 A 1 mV/ 0.1 A | ± (1.5 % of reading + 5 digits) in frequency range 40 Hz - 300 Hz |
8. Measuring with the BENNING MM 4
8.1 Preparation for measurement
Store and use the BENNING MM 4 only under the correct temperature conditions specified. Always avoid prolonged exposure to sunlight.
- Check nominal voltage and current data on the black safety test lead and red test probe. The black test lead and the red test probes supplied correspond to the BENNING MM 4 in nominal voltage and nominal current.
- Check insulation of the safety test lead and red test probe. If the insulation is damaged, discard the lead and test probes immediately.
- Check the continuity of the safety test lead. If the conductor in the safety test lead is interrupted, discard the safety test lead immediately.
Before selecting another function at the sliding switch 2 or function button 4, the safety test lead and red test probes must first be disconnected from the measurement point. - Strong sources of interference in the vicinity of the BENNING MM 4 may cause unstable or incorrect readings.
8.2 Voltage measurement

Always observe the maximum voltage to earth potential! Electrical hazard!
The maximum voltage which may be applied to the sockets of the Multimeter with
COM socket 7, marked black,
V-Ω socket (positive) ③ for voltage and resistance measurements, continuity and diode testing (marked red) of the BENNING MM 4 with reference to earth potential is 600V .
- Plug the black safety test lead into the COM socket (black).
- Plug the red test probe into the V-Ω socket 8 (red).
- With the slide switch 2, the function button 4 and the RANGE button 6 of the BENNING MM 4, select the desired range.
- Contact the measurement points with the black safety test lead and the red test probe. The measured value appears in the digital display ③.
Note:
In low voltage ranges, the zero volts display does not appear due to interference when the safety test leads are open. Check that the BENNING MM 4 is fully functional by short-circuiting the test probe.
See fig. 2: DC-voltage measurement
See fig. 3: AC-voltage measurement
8.3 Resistance measurement
- With the slide switch 2, the function button 4 and the RANGE button 6 of the BENNING MM 4, select the desired range.
- Plug the black safety test lead into the COM socket (black).
- Plug the red test probe into the V-Ω socket 8 (red).
- Contact the measurement points with the black safety test lead and the red test probe. The measured value appears in the digital display ③.
Important:
To obtain accurate measurements, ensure that no voltage is applied to the measuring point.
With smaller resistances, the result can be improved by measuring the resistance of the safety test lead beforehand by short-circuiting the test probe and subtracting this resistance figure from the result.
See fig. 4: Resistance measurement
8.4 Continuity test with buzzer
- With the slide switch 2 and the function button 4 select the range marked with the buzzer symbol , on the BENNING MM 4.
- Plug the black safety test lead into the COM socket (black).
- Plug the red test probe into the V-Ω socket 3 (red).
- Contact the measurement points with the black safety test lead and the red test probe. When the resistance between the measuring points drops below 50 , the buzzer integrated in the BENNING MM 4 sounds.
See fig. 5: Continuity test with buzzer
8.5 Diode testing
- With the slide switch 2 and the function button 4 select the range marked with the diode symbol , on the BENNING MM 4.
- Plug the black safety test lead into the COM socket (black).
- Plug the red test probe into the V-Ω socket ③ (red).
- Contact the diode connections with the black safety test lead and the red test probe. The value measured appears in the digital display ③.
- For Si diodes located in conducting direction, the flow voltage of 0.500V to 0.900V is indicated. The reading "000" indicates a short circuit in the diode, and the reading "OL" an interruption in the diode.
- For a diode located in the non-conducting direction "OL" appears. If the diode is defective, "000" or other figures appear.
See fig. 6: Diode testing
8.6 AC current measurement with the current transducer

Do not apply voltage to the output contacts of the current transducer. The current transducer should be applied to a live conductor only when it is connected with the Multimeter. Max. current of enclosed current transducer 300 A!
8.6.2 Current measurement
- Contact the current transducer firmly with the Multimeter.
- Switch on the voltage measurement on the Multimeter. Press the blue button 2 s and select the desired range with the RANGE button. (Amp CLAMP)
- Press the opening lever ⑨. With the current transducer, grip the single-wire conductor with the current to be measured.
- The reading appears in the digital display ③.
See fig. 7: AC current measurement with current transducer
9. Maintenance

Before opening the BENNING MM 4, always ensure that it is not connected to a source of voltage! Electrical hazard!
Any work required on the BENNING MM 4 when it is under voltage must be
done only by a qualified electrician. Special steps must be taken to prevent accidents.
Before opening the BENNING MM 4, remove it from all sources of voltage as follows:
- First remove the black safety test lead and the red test probe from the object being measured.
- Remove the black safety test lead and the red test probe from the BENNING MM 4.
- Switch the sliding switch ② to the "OFF" position.
9.1 Securing the unit
Under certain circumstances, the safety of the BENNING MM 4 can no longer be guaranteed. This may be the case if:
- there are visible signs of damage on the unit,
- errors occur in measurements,
- the unit has been stored for a long period of time under the wrong conditions, and
- if the unit has been subjected to rough handling during transport.
In these cases, the BENNING MM 4 must be switched off immediately, removed from the measuring points and secured to prevent it from being used again.
9.2 Cleaning
Clean the outside of the unit with a clean dry cloth. (Exception: any type of special cleaning cloth). Never use solvents or abrasives to clean the BENNING MM4. Always ensure that the battery compartment and the battery contacts have not been) contaminated by electrolyte leakage.
If any electrolyte or white deposits are seen near to the battery or in the battery compartment, remove them with a dry cloth, too.
9.3 Battery replacement

Before opening the BENNING MM 4, ensure that it is not connected to a source of voltage! Electrical hazard!
The BENNING MM 4 is supplied by two 1.5 volt batteries. The batteries must be changed (see Fig. 8) when the battery symbol appears in the display
To replace the battery, proceed as follows:
- Disconnect the black safety test lead and the red test probe from the circuit.
- Disconnect the black safety test lead and the red test probe from the BENNING MM 4.
- Lay the BENNING MM 4 on its front and release the screw in the base of the housing.
- Lift the housing base at the socket end and remove it from the front part close to the digital display 3.
- Remove the discharged batteries from the battery holder.
- Insert two fresh batteries correctly into the battery holder. Check polarity.
- Push the housing base back onto the front part and replace the screw.
See fig. 8: Battery replacement

Remember the environment! Do not dispose of used batteries with domestic waste. Dispose of them at a battery-collection point or as toxic waste. Your local authority will give you the information you need.
9.4 Calibration
To achieve the desired degree of accuracy in your measurement readings, the unit must be calibrated regularly by our field service. We recommend calibrating your Multimeter once per year. Send the appliance to the following address:
10. Technical data of the measuring accessories
- Standard: EN 61010-031,
Maximum rated voltage to earth (12) and measuring category: 1000 V CAT III, 600 V CAT IV,
Maximum rated current: 10 A, - Protective class II (回), continuous double or reinforced insulation,
- Contamination class: 2,
Length: 1.4m ,AWG 18,
-Environmental conditions:
Maximum barometric elevation for making measurements: 2000 m,
Temperatures: 0^ to +50^ , humidity 50% to 80%
- Only use the measuring cables if in perfect condition and according to this manual, since the protection provided could otherwise be impaired.
- Throw the measuring cable out if the insulation is damaged or if there is a break in the cable/ plug.
- Do not touch the bare contact tips of the measuring cable. Only grab the area appropriate for hands!
- Insert the angled terminals in the testing or measuring device.
11.Environmentalnotice

At the end of the product's useful life, please dispose of it at appropriate collection points provided in your country.
(DC) Tension continue.

7.1 Plages de tensions continues
To BENNING MM 4 aTOTeAeITa aTIO duo AeIToupyiKec movadE:
-TO TIOAUMETPO KAI
- TnV aTTEPOToIaTIDa.
BALTTE x.1 :Otn mTPOOTIVn Oyn Tns OOUKEUNG
Ta tμnμata aTó ta oToia aTtOTeλεiTai TO BENNING MM 4 kai paivovtai OTO Ωχ.1 KAI εiVai Ta Tnapakatω:
1 kαλuμα
2 1EIAKOTNSYIA EINIOYN TNS EITIOUUNTNS KAOpAc AIEI TOUPYiAs
5 HOLD/REL TAnKtpo (AeIoupyia HOLD):
To npwto natau taou anktpou divei evtoln va kpatnthetai otn pvun n metponon(paivetai ie tvv evdoiig "HOLD" otnypsiakn ofoyn 3 kaia n tiun autn tou kpatietai otnv pvunn dev evnpewetai aTTO TIC KAIVOUpies eptnoeic),
- ěava πατωντας to πλήκτρο επιστέρουμε στην λειούργία συνεχής μέτρησης,
H relative-value I oupyia evpyoioeitai,otav pieoue to PAnktpo yia 2 dutepa.Tote n tiun nou metpae Ekeivn tnv otiyu antoNkeueetai otyn vnuun kai n diaopopa metauc autnc kai ts Etnoevcns eyaalutepcn n ikpotepcntiun canteikoviciat otnv ofovn. Mia vea tuiu avaopac uTopei va atoOnkeutei pieovtac to PAnktpo gava. EtniTppeoue otny Kavovikn aeitoupia tiicovtac gava to PAnktpo TepiaoTepo anto 2 dutepa.
LHpOBoM MybTmMetc HacaKoT KTOBOrO KJIeEeBOr3axBaTa DnA
-ИЗМеренияперемEHHOrOТOKA;
- N3MepeHnHa npJxKeHn nepemEHoro TOka;
- I3MepeHnHa npJxKeHn NOCToHHOro Toka;
- N3MepeHnCOPOTNBJIeHn;
- npOBepKn DIOoDob;
-KoHTpOJI npOXoXKeHnToKa.
OrnabJeHne
- Yka3aHnI dnn noJb3OBaTeJIa
- Yukazannno TeXnKe 6e3onachOCTn
3.Obbem NOCTaBKN - Onicahne np6opa
5.Obune cBeDeHn - YcIobnI OkpykaIoUeI cpebl
- 3JIeKtpnueckne xapaKTePncTnKn
8.Измерени пибором BENNING MM 4 - TexHnueckoe 06cIyKnBaHne
- Texnueckne xapaKTePncTnKn npHaadJeXHoCTe
- 3aunra okpykaouei cpebl.
1. Yukazannia nno noIb3ObaTeNa
3To PykoBoCTBO no 06cnyKuBaHnIO npedHa3HaayeTcra I
-3JIeKTPNIKOBI
- 06yueHHoro 3JNeKtpoTeXHnueckOro nepcoHaJa.
Pn6op BENNING MM 4 npedymoTpeH nI3mepenB cyxO OKpykaioe cpeH He doJXeH npimeHra TbcB ceIax ToKa C npebbIaHOUM 600 B HOMHaJIbHbIM HapjXeHem (IOpO6Hee o6 3Tom B pa3dene 6: «YcIOBnOKpykaioe cpebl)
B PykoBoDCTBe no 06cnyKbAHnIO Ha npi6ope BENNING MM 4 nCnoIb3y- IOTCs CNeDuOuNE CmBOJIbI:

Pp60p MoXHO IcNoB3OBAbT dIy npoBeHn I3MepeHn Ha HEn3OIIPOBaHHbIX IpOBOaX.

3TOT CUMBOJ yka3bIbaet Ha onaCHOCTb nopaxeHnna 3neKtpueeCKM TOKOM.

3TOT CnMBOJ yka3bIbaet Ha yrpo3y npn noIb3OBAHn np6OpOM BENNING MM 4 (obpaNTb BHMaHne Ha DOkymeHTaunIO!)

3TOT CIMBOJHa npnbope BENNING MM 4 O3haaet, yTO npnbopBENNING MM 4 BbINOHeH n3OJInpoBaHHbIM dIg 3aunTbI OT npNKOCHOBeHn (Knacc 3aunTbI II).

3TOT CUMBOJ NOBJIETCA Ha INDINKAUIN DJIa pa3pJKeHHoB 6bataeKn.

3TOT CnMBOJ xapaKTePn3yET dnaana3OH «KoHTpoJIb npoxOxJeHnToKa». 3ymMep cnYkNT dIra akCyTnueCKo BbIaUn pe3ynbTaTata.

3TOT CnmboI 603NaaET dnaIa3On «PpOBepKa DIOOB

(DC)-HanpЯЖeHneNoCToHHOrToToka.

7.1 Dnana3oHbI HanpJxHeHH NoCTOHHORo Toka
BxOJHoe cOpOTnBJIeHne coCTaBJIeT 9 MOM.