OPD 700D - DVD player OK - Free user manual and instructions
Find the device manual for free OPD 700D OK in PDF.
User questions about OPD 700D OK
0 question about this device. Answer the ones you know or ask your own.
Ask a new question about this device
Download the instructions for your DVD player in PDF format for free! Find your manual OPD 700D - OK and take your electronic device back in hand. On this page are published all the documents necessary for the use of your device. OPD 700D by OK.
USER MANUAL OPD 700D OK
natural_image
Collection of electronic devices and accessories including batteries, capacitors, and connectors (no visible text or labels)

| General Setup Page | TV display |
| Angle mark | |
| OSD language | |
| Closed captions | |
| Screen saver | |
| Auto standby | |
| Audio Setup Page | Downmix |
| Dolby Digital | |
| Video Setup Page | Brightness |
| Sharpness | |
| Contrast | |
| Hue | |
| Saturation | |
| Preference Page | TV type |
| Audio | |
| Subtitles | |
| Disc menu | |
| Parental | |
| Default | |
| Password Setup Page | Password mode |
| Password * |
Thanks for your purchase of this ok. product.
IMPORTANT SAFETY INSTRUCTIONS. READ CAREFULLY AND KEEP FOR FUTURE REFERENCE.
-
Observe all safety instructions to avoid damage through improper use! Follow all safety warnings on the appliance and in this instruction manual.
-
Keep this instruction manual for future use. Should this appliance be passed on to a third party, then this instruction manual must be included.
-
No liability will be accepted for damage resulting from improper use or non-compliance with these instructions.
-
Only use this appliance for its intended use. The appliance is not suitable for commercial use. This appliance is only suitable for indoor and household use.
-
The appliance is only suitable for use at moderate degrees of latitude. Do not use it in the tropics or in particularly humid climates.
-
Do not attempt to repair the appliance yourself. In case of malfunction, repairs are to be conducted by qualified personnel only.
-
Regularly check the power plug and power cord for damage. If the supply cord is damaged, the adaptor cannot be used and need to be replaced.
-
Warning! During cleaning or operation do not immerse the electrical parts of the appliance in water or other liquids. Never hold the appliance under running water.
-
Do not open the appliance casing under any circumstances. Do not insert any foreign objects into the inside of the casing.
-
Keep the appliance away from any hot surfaces and open flames. Protect the appliance against heat, cold, and direct sunlight.
-
Caution! Do not leave the appliance in a closed vehicle on a sunny day exposed to a direct sunlight.
-
Do not place heavy objects on top of the appliance. Do not place objects with open flames, e.g. candles, on top of or beside the appliance. Do not place objects filled with water, e.g. vases, on or near the appliance.
-
To avoid damaging to the power cord, do not squeeze, bend or rub it on sharp edges. Keep it away from hot surfaces and open flames as well.
-
Place the cord in such a way that no unintentional pulling or tripping over it is possible.
-
Do not pull the power adaptor out of the electrical outlet by the cord and do not wrap the cord around the appliance.
-
Connect the power adaptor to an easily reachable electrical outlet so that in case of an emergency the appliance can be unplugged immediately. Pull the power adaptor out of the electrical outlet to completely switch off the appliance. Use the power adaptor as the disconnection device.
-
Disconnect the power adaptor from the electrical outlet when not in use and before cleaning.
-
Always switch the appliance off before disconnecting the power adaptor.
-
Only use this product with the supplied power adaptor.
-
Always insert batteries correctly with regard to the polarities (+ and −) marked on the battery and the battery compartment.
-
Replace batteries only with the same or equivalent type.
-
Do not allow children to replace batteries without adult supervision.
-
Exhausted batteries should be immediately removed from equipment and properly disposed of.
-
The ventilation pf the appliance should not be impeded by covering the ventilation opening with items, such as newspapers, table-cloths, curtains, etc.
-
Batteries shall not be exposed to excessive heat, such as sunshine, fire, or the like.
-
Please refer to the safety instructions provided by the battery manufacturer.
-
Warning! Excessive sound pressure from earphones and headphones can cause hearing loss. Ensure that children do not turn the volume too high.
-
Never use this appliance while driving a vehicle or operating other machinery.
-
The appliance is a class 1 laser product. This appliance works with a collimated laser beam. When the appliance is open and the safety breaker is disabled, this beam could be a danger to your eyes. The appliance has a protective measure that will prevent the beam from coming out. These safety measures must not be damaged.
-
If an USB or SD/MS/MMC card storage malfunctions as a result of electrostatic discharge and momentary electrical surges, disconnect the device from the appliance and connect again.
EN
INTENDED USE
The appliance is for audio and video entertainment only. Every other type of use can lead to damage to the appliance or personal injury.
BEFORE FIRST TIME USE
- Remove all packaging materials.
- Check for completeness and transport damage. In case of damages or incomplete delivery please contact your dealer.
• Before first time use: Remove the protective sheet from the disc compartment.
• Clean the appliance (→Cleaning and care).
COMPONENTS
Fold out front and rear page for product illustrations.
Monitor 1 (DVD Player)
- SD/MS/MMC card reader
- OPEN switch - open disc compartment
- 7" TFT LCD display
- Speaker
- VOL+ ▶ button
In menu: Move right.
During playback: Increase volume.
- SOURCE button - choose DVD, AV In or Media mode
- Navigation button / charging indicator
In menu: Move up.
During playback: Skip to previous.
In menu: Move down.
During playback: Skip to next chapter.

- ▶ VOL-button
In menu: Move left.
During playback: Decrease volume. - ENTER button - confirm item selection in menu
- Support stand (at the back)
- DC IN 9-12V socket - power monitor 1
- DC OUT socket - shared connection to power monitor 2
- USB port - connect USB storage
- AV IN socket - connect external A/V device
- AV OUT socket - send A/V signal to monitor 2
- Headphone jack
-
ON/OFF switch - switch monitor 1 on/off
-
-VOL+ - increase/decrease volume
- MODE button - enter video setup menu
- ▲▼ buttons - navigate up/down in system setup menu
- BACK LIGHT button - switch the back light on/off
Remote control
- SEARCH button
DVD Skip to desired time point, title or chapter number.
VCD/CD Skip to desired time point, track or chapter number.
MP3/WMA Skip to desired time point or track number.
JPG Skip to desired picture number.
-
STEP button - play video frame by frame
-
0-9 - numeric buttons to enter numeric data (e.g. chapter number)
-
ANGLE button - change view angle (only in DVD mode)
-
SUBTITLE button - display or change subtitles
-
TITLE button - return to DVD title menu
-
▲▼◀▶ buttons - navigate in menu
JPG
◀ ▶
Rotate picture
▲
Invert picture
▼
Mirror picture
-
ENTER button - confirm item selection in menu
-
SETUP button - enter system setup menu
-
REPEAT button - repeat playback sequences
DVD Repeat chapter/title or all.
VCD/CD Repeat track or all.
MP3/WMA Shuffle/Random/Single/Repeat one/Repeat folder.
JPG Same settings as for MP3/WMA.
- PROGRAM button - program playback sequences
JPG Change picture transition effect (15 effects).
-
ZOOM button - zoom video/picture in/out
-
Battery compartment
-
SLOW button - play video at different speeds
-
◀◀/▶buttons - fast reverse/forward
-
/buttons
DVD Skip to previous/next title or chapter.
VCD/CD Skip to previous/next track or chapter.
MP3/WMA In menu, scroll the song list up/down by 7 tracks.
JPG Skip to previous/next picture.
-
VOL+ / VOL- button - increase and decrease volume
-
MODE button - enter video setup menu
-
■ button - stop playback
JPG Enter thumbnail mode.
- ▶ button - play/pause playback
JPG Play/pause slideshow.
- MENU/PBC button
MENU Return to DVD root menu.
PBC Switch on/off VCD playback control.
- AUDIO button
DVD Change audio language or audio track.
VCD/CD Change audio channel (Stereo, Left Mono, Right Mono or Mix-Mono).
- DISPLAY button
DVD Display time elapsed/remain and chapter elapsed/remain.
VCD/CD Display total time elapsed/ remain and single elapsed/ remain.
JPG Display current/total number of pictures.
-
SOURCE button - choose DVD, AV In or Media mode
-
MUTE button - mute audio
SCOPE OF DELIVERY
-
DVD player (2 displays)
-
Remote control
-
AC adapter
-
AV-/Power cable
-
Earphones (x2)
-
12V car adapter
-
Carrying bag
-
Mounting straps
The product may be available in different colours.
EN
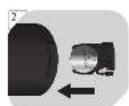
INSTALLING / REPLACING REMOTE CONTROL BATTERY
1 Push in direction of arrow and slide the battery holder out.
2 Insert 1x battery (type CR2025, 3 V) in the battery compartment. Make sure the polarity is correct as indicated.
CHARGING BATTERY
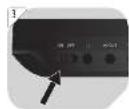
3 Set the ON/OFF switch to the OFF position.
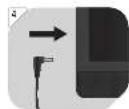
4 Plug the power adapter into the DC IN 9-12V socket.
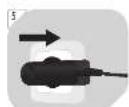
5 Connect the power adapter to a suitable electrical outlet or...
6 ... connect 12 V car adapter to vehicle's 12 V cigarette lighter socket.
This product can be powered by 12 V only. DO NOT connect to vehicles with 24 V circuit.
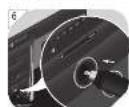
During charging:
Charging indicator lights up red.
After charging (battery full):
Charging indicator lights up green.
Note: Charge the battery at least 4 hours before using the appliance for the first time.
When built-in battery power is low: Low Battery message appears on the screen.
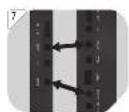
CONNECTING MONITOR 2
7 Use the provided AV/Power cable to connect monitor 2 to monitor 1.
A. Monitor 1 AV OUT → Monitor 2 AV IN
B. Monitor 1 DC OUT → Monitor 2 DC IN
Note: Both monitor 1 and monitor 2 can be also used to display A/V signals from external appliances via AV IN socket.
CONNECTING HEADPHONES
8 Connect provided earphones to the headphone jack of either monitor 1, monitor 2, or both.
ADJUSTING VOLUME
9 Set desired volume on either monitor or on the remote control using VOL+ and VOL- buttons.
DISC PLAYBACK
10 Set the ON/OFF switch to the ON position.
11 Slide the OPEN switch to open the disc compartment and insert a compatible disk (DVD, VCD, or CD).
12 Close disc compartment. Playback starts (in most cases) automatically.
Note – If the playback does not start automatically: Press SOURCE button and choose DVD mode. Confirm with ENTER. If no disc is inserted, the display shows NO DISC.
Use the navigation buttons ▲ to select the desired menu item and press ENTER to confirm.
USB PLAYBACK
13 Connect a USB device to the USB port. Do not use extended cable for USB connection.
14 If the playback does not start automatically: Press SOURCE button and choose Media → USB. Confirm with ENTER.
Note: This appliance supports USB devices up to 8 GB.
Use the navigation buttons ▲ to select the desired menu item. Press ENTER to confirm.
SD/MS/MMC CARD PLAYBACK
15 Connect a SD/MS/MMC card to the card reader.
16 If the playback does not start automatically: Press SOURCE button and choose Media → SD. Confirm with ENTER.
Note: This appliance supports only SD/MS/MMC cards up to 8 GB.
Use the navigation buttons ▲ to select the desired menu item. Press ENTER to confirm.
SETUP MENU
Press the SETUP button on the remote control to open system settings menu. Use the navigation buttons ▲▼◀▶ to select the desired menu item. Press ENTER to confirm. To exit: Press the SETUP button again.
| General Setup Page | TV display |
| Angle mark | |
| OSD language | |
| Closed captions | |
| Screen saver | |
| Auto standby | |
| Audio Setup Page | Downmix |
| Dolby Digital | |
| Video Setup Page | Brightness |
| Sharpness | |
| Contrast | |
| Hue | |
| Saturation | |
| Preference Page | TV type |
| Audio | |
| Subtitles | |
| Disc menu | |
| Parental | |
| Default | |
| Password Setup Page | Password mode |
| Password * * Default password: 7 |
Available languages: English (default), Dutch, French, German, Italian, Portuguese, Spanish.
EN
20
Note: The monitor 2 has its own independent system settings menu that can be accessed by pressing the MODE button directly on the monitor 2. Changes made here only takes effect on monitor 2.
CLEANING AND CARE
- WARNING! Before cleaning, always switch off the appliance and disconnect the plug from power.
• Never immerse the appliance in water or other liquids. - Clean the appliance with a soft, slightly damp cloth. Make sure that no moisture is entering the appliance during cleaning.
- Never use corrosive detergents, wire brushes, abrasive scourers, metal or sharp implements to clean your appliance.
• Dry the appliance thoroughly after cleaning.
• Store the appliance in a cool, dry location, away from children and pets.
TECHNICAL DATA
AC/DC power adaptor
Input: 100-240 V\~, 50/60 Hz
Output: 9 V 1.5 A
三
Audio
Audio out: 1.2 Vrms (1 KHz, 0 dB)
Frequency response: 20 Hz - 20 kHz
S/N ratio: 80 dB
Total harmonic distortion: < 3 %
Video
Video out: 1 Vp-p (75 Ω)
Signal system: PAL
Screen
Size: 7" widescreen TFT LCD
Resolution: 480 x 234 px
Discs compatibility: DVD (+R/+RW/-R/-RW) / CD (-R/-RW) / VCD / S-VCD / AUDIO CD
Format compatibility:
MP3 / MPEG-4 / XVID / JPEG
Remote control
Remote battery:
1 x 3 V button battery, type CR2025
DISPOSAL

The crossed-out wheeled bin logo requires the separate collection of waste electric and electronic equipment (WEEE). Electric and electronic equipment may contain dangerous and hazardous substances. Do not dispose of this appliance as unsorted municipal waste. Return it to a designated collection point for the recycling of WEEE. By doing so, you will help to conserve resources and protect the environment. Contact your retailer or local authorities for more information.

Please dispose of batteries in an environmentally friendly manner Do not put batteries into the household waste. Please use the return and collection system in your community or contact the dealer where you purchased the product.
FELICIDADES
Monitor 1 (DVD Player)
JPG Riproduci/metti in pausa diapositive.
- Pulsante MENU/PBC
MENU Ritorna al menu principale del DVD.
A. Monitor 1 AV OUT → Monitor 2 AV IN
B. Monitor 1 DC OUT → Monitor 2 DC IN
A. Monitor 1 AV OUT → Monitor 2 AV IN B. Monitor 1 DC OUT → Monitor 2 DC IN
A. Monitor 1 AV OUT → Monitor 2 AV IN
B. Monitor 1 DC OUT → Monitor 2 DC IN
A. Monitor 1 AV OUT → Monitor 2 AV IN B. Monitor 1 DC OUT → Monitor 2 DC IN
Tillgängliga språk English (default), Dutch, French, German, Italian, Portuguese, Spanish.
SV
68
Total harmonisk distorsion: < 3 %
Video
Video ut: 1 Vp-p (75 Ω)
Signalsystem:
PAL
Skärm
Storlek: 7" widescreen TFT LCD