OPD 260 - DVD player OK - Free user manual and instructions
Find the device manual for free OPD 260 OK in PDF.

| Product type | DVD player |
| Brand | OK |
| Model | OPD 260 |
| Power supply | 100-240 V~, 50/60 Hz, 8 W |
| Compatible disc formats | MPEG4, DVD, DVD+/-R/RW, VCD, JPEG, CD-DA, CD-R, CD-RW |
| Video outputs | HDMI, SCART, Composite video (1.0 V c-c / 75 Ω) |
| Audio outputs | Analog R/L (2 V RMS, 20 Hz - 20 kHz, SNR > 90 dB, THD < 0.025 %) |
| USB input | USB 1.1/2.0, FAT16/32, up to 32 GB |
| USB file formats | MP3, JPEG, MPEG4, XVID (max resolution 800x600) |
| Main functions | DVD, CD, VCD, MP3, JPEG, MPEG4 playback; zoom, angle, subtitles, repeat, program, time search |
| Remote control | Infrared, AAA 2×1.5 V batteries (included) |
| Display | NTSC/PAL, adjustable in 4:3 or 16:9 |
| Parental control | Yes, password changeable (universal password: 1369) |
| Screen saver | Yes, enable/disable |
| Auto standby | Configurable |
| Safety | Double insulation class II, laser class 1, overvoltage protection, automatic shutdown in case of fault |
| Cleaning and maintenance | Unplug before cleaning; use a soft dry cloth; do not use solvents |
| Repairability | Refer to qualified technician; no user-serviceable parts inside |
| Operating temperature | Moderate climate only, avoid humidity and excessive heat |
Frequently Asked Questions - OPD 260 OK
User questions about OPD 260 OK
0 question about this device. Answer the ones you know or ask your own.
Ask a new question about this device
Download the instructions for your DVD player in PDF format for free! Find your manual OPD 260 - OK and take your electronic device back in hand. On this page are published all the documents necessary for the use of your device. OPD 260 by OK.
USER MANUAL OPD 260 OK


HERZLICHEN GLÜCKWUNSCH!
- KID SAF
- G
- PG
- PG13
- PGR
- R
- NC17
- ADULT
WIEDERHOLTE WIEDERGABE
Thanks for your purchase of an ok. product. Please read this manual carefully and keep it for future reference.
IMPORTANT SAFETY INSTRUCTIONS. READ CAREFULLY AND KEEP FOR FUTURE REFERENCE.
-
Risk of electric shock! Do not open.
-
CAUTION: To prevent the risk of electric shock, do not remove cover (or back). No user-serviceable parts inside. Refer servicing to authorised service agent.
-
For safety reasons, this class II device is provided with double or reinforced insulation as indicated by this symbol.
-
The lightning flash with arrowhead within an equilateral triangle is intended to alert the user to the presence of uninsulated "dangerous voltage" inside the enclosure of this device, which may be of sufficient magnitude to constitute a risk of electric shock to persons.
-
The exclamation point within an equilateral triangle is intended to alert the user to the presence of important operating and maintenance instructions in the literature accompanying this device.
-
DANGER! Invisible laser radiation when open and safety interlock failed or defeated. Avoid direct exposure to the beam. Do not touch the lens.
-
Before connecting the device to a socket outlet, make sure the voltage indicated on the device corresponds to your local mains.
-
The mains plug or device coupler is the disconnecting device. It shall remain readily operable.
-
If the supply cord is damaged, it must be replaced by the manufacturer or its authorised service agent or similarly qualified person in order to avoid hazard.
-
WARNING! To reduce the risk of fire or electric shock, do not expose this device to rain or moisture. Protect from dripping or splashing. Do not place any objects filled with liquids, such as vases, on the device.
-
Regularly check if the supply cord, device or extension cable are defective. If found defective, do not put device into operation. Immediately pull the plug.
-
Place the supply cord and, if necessary, an extension cable in such a way that pulling or tripping over it is impossible. Do not allow the supply cord to hang down within easy reach.
-
Do not jam, bend or pull the supply cord over sharp edges.
-
Protect the supply cord from being walked on or pinched particularly at the plug, convenience receptacles and the point where it exits from the device.
-
Never pull the plug by the supply cord or with wet hands.
-
Disconnect the mains plug in case of faults during use, during lightening storms, before cleaning and when not using the device for a longer period of time.
-
In case of malfunction due to electrostatic discharge, reset the device by removing the mains plug from the socket outlet.
-
Refer all servicing to authorised service agent. Do not attempt to repair the device yourself. Servicing is required when the device has been damaged in any way, such as the supply cord or plug are damaged, liquid has been spilled, objects have fallen into the device, the enclosure is damaged, the device has been exposed to rain or moisture, does not operate normally, or has been dropped.
-
The product is only suitable for use at moderate degrees of latitude. Do not use in the tropics or in particularly humid climates.
-
When installing the device, leave sufficient space for ventilation. Do not install in bookcases, built-in cabinets or the like.
-
Do not impede ventilation by covering the ventilation openings with items, such as newspapers, table-cloths, curtains, etc. Do not insert any objects.
-
Do not place naked flame sources, such as lighted candles, on the device.
-
Do not place any electronic equipment or toys on the device. Such items could fall from the top and cause device damage and/or personal injury.
-
Do not install near any heat sources such as radiators, heat registers, stoves or other appliances (including amplifiers) that produce heat.
-
Do not apply excessive force to the front or top, as this could ultimately overturn the device.
-
Do not shift or move the device when powered on.
EN
- CAUTION! Danger of explosion if batteries are incorrectly replaced. Replace only with the same or equivalent type. Do not mix new and old batteries.
- Install batteries correctly, with + and - aligned as indicated on the device.
- Remove batteries when not using the device for a longer period of time.
- Do not expose batteries to excessive heat such as sunshine, fire or the like.
- In case of battery leakage, remove the batteries and clean the battery compartment thoroughly. Avoid contact with skin and eyes.
- Keep batteries out of reach of children. Seek medical advice immediately if batteries have been swallowed.
- Do not dismantle or shred batteries; do not throw into fire. Dispose of properly in accordance with the user manual. Do not dispose of in household waste.
- The batteries (battery pack or batteries installed) shall not be exposed to excessive heat such as sunshine, fire or the like.
- To prevent the spread or fire, keep candles or other open flames away from this device at all times.
- Figures and illustrations in this User Manual are provided for reference only and may differ from actual device appearance. Product design and specifications may be changed without notice.
- Excessive sound pressure from earphones and headphones can cause hearing loss.
INTENDED USE
This device is intended for playing audio and video signals. Any other use may result in damage to product or injuries.
The Imtron GmbH assumes no liability for damage to the product, for property damage or for personal injury due to careless or improper usage of the product, or usage of product which does not meet the manufacturer's specified purpose.
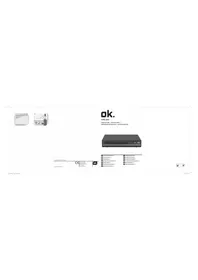
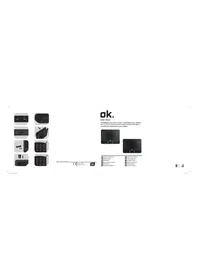
COMPONENTS
Main Unit
A. Tray door
B. Power indicator
C. IR-Sensor
D. USB-Port
E. ⏻ button
F. button
G. ▶|| button
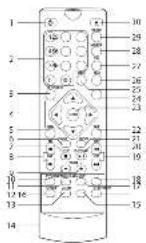
Remote Control
- button
Switch the DVD Player between on and standby mode
- 0-9/10+ Numerical button
Select a numbered item in the menu
- SETUP button
To enter the system set up menu
- ▲ button
Navigation key
- MENU button
Open menu
- SEARCH button
Jump to a certain time on a disc
- STOP button
Stop a playback
- FWD / REV button
Fast forward/ Fast reverse during playback
- VOLUME -/+ button
Decrease / increase volume
- TITLE button
Display the title menu
- RETURN button
Return to root menu during normal playback and vice versa
- ANGLE button
View action from 2 different angles
- ZOOM button
Zoom in or out the picture
-
Battery compartment
-
AUDIO button
Change audio mode
- STEP button
H. ▲button
I. R, L audio output
J. Video output
K. HDMI output
L. Power cord with plug
M. SCART output
-
A-B button
-
SLOW button
Selection of slow motion playback level
- PREV / NEXT button
Skip to previous/next chapter/track
- Play / Pause button
Play/pause a playback
- REPEAT button
Repeat playback
- MUTE button
Switch on/off the sound
- ENTER button
Confirm an entry
- SOURCE button
Select DVD/USB
- CLEAR button
Clear the input number in SEARCH and PROG mode
- PROG button
Program playback sequences
- OSD button
During playback, press repeatedly to show the elapsed playing time, languages, etc. depending on the disc inserted
- LANGUAGE button
Change language
- SUBTITLE button
Press during playback repeatedly to display or switch subtitles
- ▲ button
Open and close the disc tray
EN
BEFORE FIRST TIME USE
- Remove the product and accessories carefully from the original packaging. It is recommended to keep the original packaging for storage. If you wish to dispose of the original packaging, please observe applicable legal provisions. Should you have any questions regarding proper disposal, contact your local waste management center.
- Inspect the delivery contents for completeness and damages. Should the delivery contents be incomplete or damaged, contact your sales outlet immediately.
• After unpacking, please refer to chapter Cleaning and care.
OPERATION
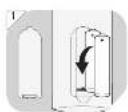
Installing remote control batteries
1 Open the battery cover on the back of the remote control. Insert 2 batteries (AAA, 1.5 V). Ensure the + and – polarities of the batteries line up with the markings inside the case. Close the cover.
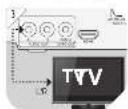
Connecting to TV
Caution: Disconnect the AC power cord before connecting any devices.
2 Connect the DVD player to the TV with an HDMI, Video or SCART cable. Note: If you would like to connect the DVD player to a TV set, a good quality shielded HDMI cable must be used, which ensures the electromagnetic compatibility of the player and the HDMI cable as a whole.
Audio
3 Connect the DVD player's R and L jack to the audio input jack on the TV. Note: Only necessary when connected via Video cable.
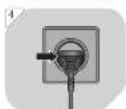
Plugging in the power cord
4 Connect the power plug to a suitable power outlet.
OSD
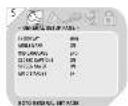
SETUP MENU
5 Press the SETUP button on the remote control. SETUP MENU will be displayed. After accessing the SETUP MENU, press ▲ or ▼ button to select an item desired, then press the ENTER button to confirm. Press ◀ button return to the next upper menu. To exit the setup, press the SETUP button again. In the SETUP MENU, you may choose any of the following options as you like.
• TV Display
Select TV Display in the SETUP MENU and confirm with ENTER button. Press ▲ or ▼ button to select a desired format, then press the ENTER button to confirm.
Note: The image display ratio is related to the recorded disc format. Some disc cannot display images in the aspect ratio you choose. If you play a disc recorded in 4:3 format on a wide screen TV, black bars will appear on the left and right side of the screen. You must adjust the screen setting depending on the type of the television you have.
- Angle Mark
Select Angle Mark in the SETUP MENU and confirm with ENTER button. Press ▲ or ▼ button to switch on or off the angle. Press the ENTER button to confirm.
- OSD Language
Select OSD Language in the SETUP MENU and confirm with ENTER button. Press ▲ or ▼ button to select a desired language. Press the ENTER button to confirm.
- Closed Captions
Closed captions are data that are hidden in the video signal of some discs.
Note: Before you select this function, please ensure that the disc contains closed captions information and your TV set also has this function.
- Screen saver
Activate /de-activate the screen saver.
Note: Not all player support this function.
• AUTO Standby
Set the auto standby time of the DVD Player.
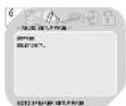
AUDIO SETUP PAGE
6 Select Audio in the Setup Menu. Press ▲ or ▼ button to select a desired item, then press the ENTER button to confirm.
- DOWNMIX
This option is used to set the R/L and Stereo Channel speakers.
• DOLBY DIGITAL
The option included Dual Mono and Dynamic.
VIDEO SETUP PAGE
7 Select Video in the SETUP MENU. Press ▲ or ▼ button to select a desired item, then press the ENTER button to confirm.
• VIDEO OUTPUT
Setting the options related to SCART.
- RESOLUTION
This option is used to set the resolution.
• COLOR SETTING
Here you can set different color setting:
- SHARPNESS
- BRIGHTNESS
- CONTRAST
- HUE
- SATURATION
- HDMI SETUP
Setting the options related to the HDMI.
- HDMI: ON or OFF
- AUDIO SOURCE: AUTO/PCM
- DEEP COLOR: 24 BIT / 30 BIT / 36 BIT
EN
PREFERENCE SETUP PAGE
8 Select PREFERENCE SETUP in the SETUP MENU. Press ▲ or ▼button to select a desired item, then press the ENTER button to confirm.
• TV TYPE
Selecting the color system that corresponds to your TV when AV outputs:
- PAL
- AUTO
- NTSC
AUDIO
Select a language for audio (if available).
- ENGLISH
- FRENCH
- GERMAN
- ITALIAN
- SPANISH
- SWEDISH
- DUTCH
- SUBTITLE
Select a language for subtitle (if available).
- ENGLISH
- FRENCH
- GERMAN
- ITALIAN
- SPANISH
- SWEDISH
- DUTCH
- OFF
• DISC MENU
Select a language for disc menu (if available).
- ENGLISH
- FRENCH
- GERMAN
- ITALIAN
- SPANISH
- SWEDISH
- DUTCH
- PARENTAL
Here you can set the Parental setting of the DVD Player.
- KID SAF
- G
- PG
- PG13
- PGR
- R
- NC17
- ADULT
Note: A password is required to set the parental setting.
- DEFAULT
Set the DVD player back to factory default.
PASSWORD SETUP PAGE

Select PASSWORD SETUP in the SETUP MENU. Press ▲ or ▼ button to select a desired item, then press the ENTER button to confirm.
- PASSWORD MODE
Here you can set on/off the password mode.
Note: If Password mode is set to off, the change of parental level will not check the password.
- PASSWORD
Here you can set or change the password.
Note: If you forget your password, please use the universal password 1369 to unlock.
DVD playback
Open the disc tray and insert a DVD. The DVD playback menu will appears.
OPEN/CLOSE Press
▲ to eject the CD/DVD.
STOP To stop the playback temporarily, press
completely, press twice.
■ once. To stop the playback
PLAY/PAUSE To pause the playback temporarily, press
▶II once. To resume, press
▶ll again.
SKIP FORWARD/BACKWARD During playback, press
▶▶I to skip to the next chapter or I to skip
to the previous chapter.
SEARCH FORWARD/BACKWARD During playback, press
▶▶ to fast forward current chapter or ◀◀
rewind current chapter.
REPEAT PLAYBACK
During playback, press REPEAT button repeatedly to activate the following repeat functions:
DVD Repeat Repeat Repeat Repeat Repeat
CD/VCD(PBC off) Repeat Track/Repeat All
MP3 Single/Repeat One/Repeat Folder/Folder/Shuffle/Random
MP4/MPEG4 Single/Repeat One/Repeat Folder/Shuffle/Random
ON-SCREEN INFORMATION
During playback, press OSD button repeatedly to show the disc information on titles, chapters, elapsed playing time, languages, etc. depending on the disc inserted.
SUBTITLE
Press SUBTITLE button repeatedly for changing subtitle language.
AUDIO
Press AUDIO button repeatedly for changing audio language.
TITLE
Press TITLE button to stop playing and to return to the disc menu.
ANGLE
Press ANGLE button to change angle.
PROGRAM
Press PROG button for setting the order of more titles or sections.
EN
20
MP3/JPEG/MPEG4 playback
Press ▲ or ▼ button to choose the root directory and then press ENTER button to enter into the sub directory.
Press ▲ or ▼ button to choose the desired track and then press ENTER or ▶II button to start the music or movie playback.
Repeat To switch different repeat playing mode.
REPEAT FOLDER
FOLDER
SHUFFLE
RANDOM
SINGLE
REPEAT ONE
PICTURE CD playback
Press ▲ or ▼ button to choose the root directory and then press ENTER button to enter into the sub directory.
- Playback Picture
-
Press ▲ or button to choose the desired picture.
-
Then press ENTER or PLAY button to show the picture on screen. If you want to return to the upper menu, press or button to choose and press ENTER button.
- Image rotation
In picture play state:
-
Press ▲ or ▼ button to rotate the picture,
-
Press PROG button to change the picture scan mode.
USB
10 Insert an USB Stick with MP3/MP4/MPEG4 files.
Note: Connect the USB device directly to the USB port of the unit. Using an extension cable is not recommended and may cause interference and failure of data transfer.
This product supports USB 1.1 and 2.0 up to 32GB with file system FAT16 and FAT32.
CLEANING AND CARE
• Unplug the DVD player before cleaning.
- Clean the DVD player with a soft cloth. Never use substances such as alcohol, chemicals or household cleaners on the DVD player.
• To avoid deformations and color fading, wipe off water drops as soon as possible.
TROUBLESHOOTING
If there are any problems during operation, please refer to the following table. If problems cannot be solved as indicated under Solution, please contact your manufacturer.
| Problem Possible causes | Solution | |
| No picture or sound | Interrupted power supply | Ensure the power button is on.Ensure the power outlet is operational.Ensure the power cord is not damaged.Ensure the power plug is connected firmly to the outlet. |
| Picture but no sound | Interrupted audio connection | Ensure the audio jacks are securely connected.Ensure the audio connector is not damaged.Ensure the volume is turned up in VOUCH setup.Ensure you have set the player's AUDIO settings correctly.Ensure you have entered the correct AV input for your TV.Ensure the audio is not set to mute. |
| Sound but no picture | Interrupted video connection | Ensure the video jacks are securely connected.Ensure you have entered the correct AV input for your TV.Ensure the video connector is not damaged.Ensure you have set the player's VIDEO settings correctly. |
| Poor picture or sound | Audio setting not correctPoor DVD qualityAV connector loosen | Ensure you have set the player's AUDIO settings correctly.Ensure the disc is not scratched or stained.Ensure the AV connector or the output terminal is not damaged. |
| BAD DISC displayed | Poor DVD quality | Ensure the disc is not warped, damaged or deformed.Ensure the disc is not badly stained or damaged.Ensure the disc format is compatible with the player.Please check whether you have tried to play a software CD. If so, please restart the player. |
| Remote not working | Interrupted power supplyBatterries are emptyObstacles between the remote control and DVD player | Make sure the Main units POWER button is on.Ensure the remote batteries are working.Point the remote control directly at the player's IR sensor.Remove any obstacles between the remote and the IR sensor. |
| Unit not working | Due to electrostatic discharge | Turn off the power, and then turn it on again. |
| NO DISC displayed | Poor DVD qualityDVD was insert wrongly | Ensure you have put the disc on the tray.Ensure the disc is not upside down.Ensure the disc is not distorted, stained or scratched. |
| No playback of ACC/WMA fi les | The product only support MP2/MP3/AC3 fi les. | Insert media source with MP2/MP3/AC3 fi les. |
| No playback of Divx3.11/4/5/6 fi les. | The product only support MPEG2/MPEG4/XVID fi les. | Insert media source with MPEG2 (not higher than 720 x 576)/ MPEG4 (not higher than 800 x 600) / XVID fi les |
EN
TECHNICAL DATA
| DISPLAY FEATURES | |
| Video standard NTSC/PAL | |
| Discs Compatibility MPEG4, DVD, | DVD+/-R/RW, VCD, JPEG. CD-DA, CD-R, CD-RW |
| VIDEO OUT | |
| Video out 1.0 V (p-p) / 75 Q, sync, | negative polarity |
| AUDIO OUT | |
| Audio out level 2 V rms -1/+0.2 | |
| Frequency response 20 Hz to 20 kHz | |
| S/N ratio >90 dB | |
| Total harmonic distortion < 0.025 % | |
| POWER REQUIREMENTS | |
| Power Input 100 - 240 V~, 50/60 Hz | |
| Power consumption 8 W | |
| CONNECTIONS | |
| Input | |
| USB 1 | |
| Output | |
| R/L 1 | |
| SCART 1 | |
| Video 1 | |
| HDMI 1 | |
DISPOSAL

Do not dispose of this product as unsorted municipal waste. Return it to a designated collection point for the recycling of WEEE. By doing so, you will help to conserve resources and protect the environment. Contact your retailer or local authorities for more information.

Please dispose of batteries in an environmentally friendly manner. Do not put batteries into the household waste. Please use the return and collection systems in your community or contact the dealer where you purchased the product.
ENHORABUENA
- KID SAF
- G
- PG
- PG13
- PGR
- R
- NC17
- ADULT
(BUSCAR HACIA ADELANTE/
ATRÁS)
CD/VCD(PBC off) Repeat Track/Repeat All
MP3 Single/Repeat One/Repeat Folder/Folder/Shuffle/Random
MP4/MPEG4 Single/Repeat One/Repeat Folder/Shuffle/Random
ON-SCREEN INFORMATION
- KID SAF
- G
- PG
- PG13
- PGR
- R
- NC17
- ADULT
- KID SAF
- G
- PG
- PG13
- PGR
- R
- NC17
- ADULT
CD/VCD(PBC off) Repeat Track/Repeat All
MP3 Single/Repeat One/Repeat Folder/Folder/Shuffle/Random
MP4/MPEG4 Single/Repeat One/Repeat Folder/Shuffle/Random
ON-SCREEN INFORMATION
- KID SAF
- G
- PG
- PG13
- PGR
- R
- NC17
- ADULT
CD/VCD(PBC off) Repeat Track/Repeat All
MP3 Single/Repeat One/Repeat Folder/Folder/Shuffle/Random
MP4/MPEG4 Single/Repeat One/Repeat Folder/Shuffle/Random
ON-SCREEN INFORMATION
Decrease / increase volume
- Tasto TITLE
- KID SAF
- G
- PG
- PG13
- PGR
- R
- NC17
- ADULT
CD/VCD(PBC off) Repeat Track/Repeat All
MP3 Single/Repeat One/Repeat Folder/Folder/Shuffle/Random
MP4/MPEG4 Single/Repeat One/Repeat Folder/Shuffle/Random
ON-SCREEN INFORMATION
- KID SAF
- G
- PG
- PG13
- PGR
- R
- NC17
- ADULT
- Przyciski VOLUME -/+
-
KID SAF
-
G
-
PG
-
PG13
-
PGR
-
R
-
NC17
-
ADULT
CD/VCD(PBC off) Repeat Track/Repeat All
MP3 Single/Repeat One/Repeat Folder/Folder/Shuffle/Random
MP4/MPEG4 Single/Repeat One/Repeat Folder/Shuffle/Random
ON-SCREEN INFORMATION
- KID SAF
- G
- PG
- PG13
- PGR
- R
- NC17
- ADULT
-
KID SAF
-
G
-
PG
-
PG13
-
PGR
-
R
-
NC17
-
ADULT
• Closed Captions (undertexter)
• SUBTITLE (undertext)
- KID SAF
- G
- PG
- PG13
- PGR
- R
- NC17
- ADULT
CD/VCD(PBC off) Repeat Track/Repeat All
MP3 Single/Repeat One/Repeat Folder/Folder/Shuffle/Random
MP4/MPEG4 Single/Repeat One/Repeat Folder/Shuffle/Random
ON-SCREEN INFORMATION
(PÅ-SKÄRM INFORMATION)
-
KID SAF
-
G
-
PG
-
PG13
-
PGR
-
R
-
NC17
-
ADULT
CD/VCD(PBC off) Repeat Track/Repeat All
MP3 Single/Repeat One/Repeat Folder/Folder/Shuffle/Random
MP4/MPEG4 Single/Repeat One/Repeat Folder/Shuffle/Random
ON-SCREEN INFORMATION
(EKRANDA BİLGİ)