
MH 350 - Milling machine AL-KO - Free user manual and instructions
Find the device manual for free MH 350 AL-KO in PDF.




| Product type | Tiller (cultivator) |
| Brand | AL-KO |
| Model | MH 350 |
| Power source | Unleaded petrol (oil-petrol mix for 2-stroke?) Separate engine oil (4-stroke) |
| Engine | 4-stroke, petrol |
| Starting system | Recoil starter |
| Transmission | Forward and reverse |
| Working width | Not specified (approx. 35 cm) |
| Working depth | Not specified (adjustable via handlebar height) |
| Safety devices | Protection guard, engine stop, clutch lever |
| Handlebar adjustment | Height adjustable (3 positions) and pivoting left/right |
| Transport wheel | Yes, for moving |
| Maintenance | Engine oil change, transmission oil change (SAE 80), air filter cleaning, spark plug maintenance |
| Intended use | Working previously loosened soil, private use only |
| Warranty | Manufacturer warranty, original spare parts required |
Frequently Asked Questions - MH 350 AL-KO
User questions about MH 350 AL-KO
0 question about this device. Answer the ones you know or ask your own.
Ask a new question about this device
Download the instructions for your Milling machine in PDF format for free! Find your manual MH 350 - AL-KO and take your electronic device back in hand. On this page are published all the documents necessary for the use of your device. MH 350 by AL-KO.
USER MANUAL MH 350 AL-KO
AL-KO KOBER GROUP Kottz, Germany
This documentation or excerpts therefrom may not be reproduced or disclosed to third parties without the express permission of the AL-KO KOBER GROUP.
01 MH 350-9 LM MH 350-4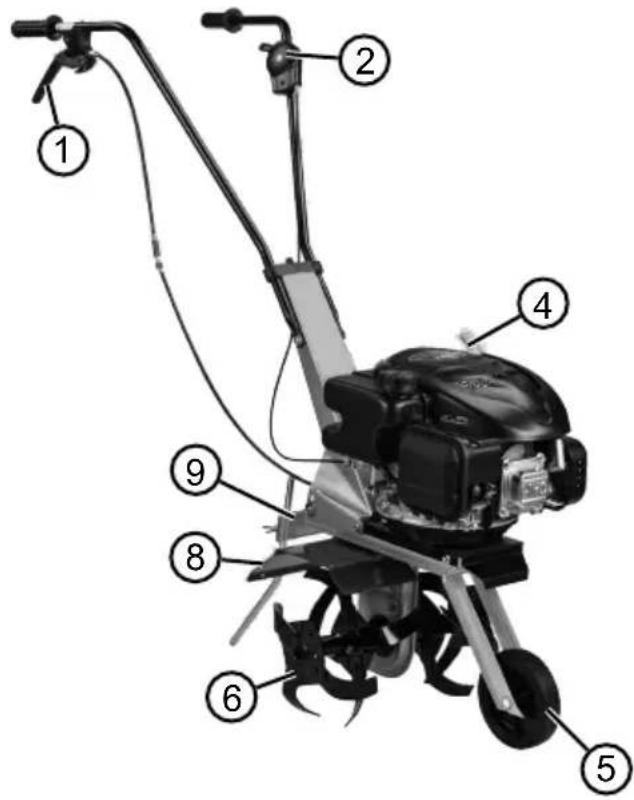
| ○i | MH 350-4 Art.-Nr. 112644 | MH 350-9 LM Art.-Nr. 113727 | MH 4001 R Art.-Nr. 112647 |
| ca. 64 x 38 x 45 cm ca. 64 x 38 x 45 cm ca. 79 x 53 x 49 cm | |||
| kg | ca. 27 kg ca. 28 kg ca. 44 kg | ||
| B & S E-Series 450 AL-KO OHV 139CC B & S E-Series 500 | |||
| 35 cm 35 cm 50 cm | |||
| max. 110 min-1 | max. 110 min-1 | max. 130 min-1 | |
| X | |||
| a_vhw = 5,5 m/s² EN 709, ISO 5349 | a_vhw = 5,5 m/s² EN 709, ISO 5349 | a_vhw = 8,64 m/s² EN 709e, ISO 5349 | |
| LpA = 77 dB(A) L | pA = 79,1 dB(A) L | pA = 80 dB(A) | |
| LWA = 93 dB(A) L | WA = 93 dB(A) L | WA = 93 dB(A) |
1 About these operating instructions 16
1.1 Symbols on the title page 16 1.2 Legends and signal words 16
2 Product description 17
2.1 Designated use 17 2.2 Possible foreseeable misuse 17 2.3 Residual risks 17 2.4 Safety and protective devices 17
2.4.1 Guard plate. 17
2.5 Symbols on the appliance 17 2.6 Product overview (01) 17
3 Safety instructions 18
3.1 Operator 18 3.2 Appliance safety 18 3.3 Safety of persons, animals and property 18
3.4 Safety in the workplace 19 3.5 Handling of petrol and oil 19 3.6 Personal protective equipment 19
4 Start-up 20
4.1 Adjusting the handlebars.. 20 4.2 Transport wheel 20
5 Operation 20
5.1 Stopping the motor and switching off . 20 5.1.1 Starting the motor 20 5.1.2 Switching off the motor 20 5.2 Cultivator blades 20 5.2.1 Switching on the cultivator blades 20 5.2.2 Switching off the cultivator blades 20
5.3 Reverse gear 20 5.3.1 Engaging reverse gear 20 5.3.2 Disengaging reverse gear 20
6 Maintenance and care 20
6.1 Maintaining the spark plug 21 6.2 Changing the gear oil 21 6.3 Air filters 21 6.4 Motor oil change 21
6.5 Adjusting Bowden cables 21
7 Help in case of malfunction 21 8 Transport 22 9 Storing the appliance. 22 10 Disposal 23 11 After-Sales / Service 23 12 Guarantee 23
1 ABOUT THESE OPERATING INSTRUCTIONS
The German version is the original operating instructions. All additional language versions are translations of the original operating instructions. Always safeguard these operating instructions so that they can be consulted if you need any information about the appliance. Only pass on the appliance to other persons together with these operating instructions. Comply with the safety and warning information in these operating instructions.
1.1 Symbols on the title page
Symbol Meaning

It is essential to read through these operating instructions carefully before start-up. This is essential for safe working and trouble-free handling.

Operating instructions

Never operate the petrol powered device in the vicinity of open flames or heat sources.
1.2 Legends and signal words
DANGER! Denotes an imminently dangerous situation which will result in fatal or serious injury if not avoided.
WARNING! Denotes a potentially dangerous situation which can result in fatal or serious injury if not avoided. CAUTION! Denotes a potentially dangerous situation which can result in minor or moderate injury if not avoided.
IMPORTANT! Denotes a situation which can result in material damage if not avoided.
NOTE: Special instructions for ease of understanding and handling.
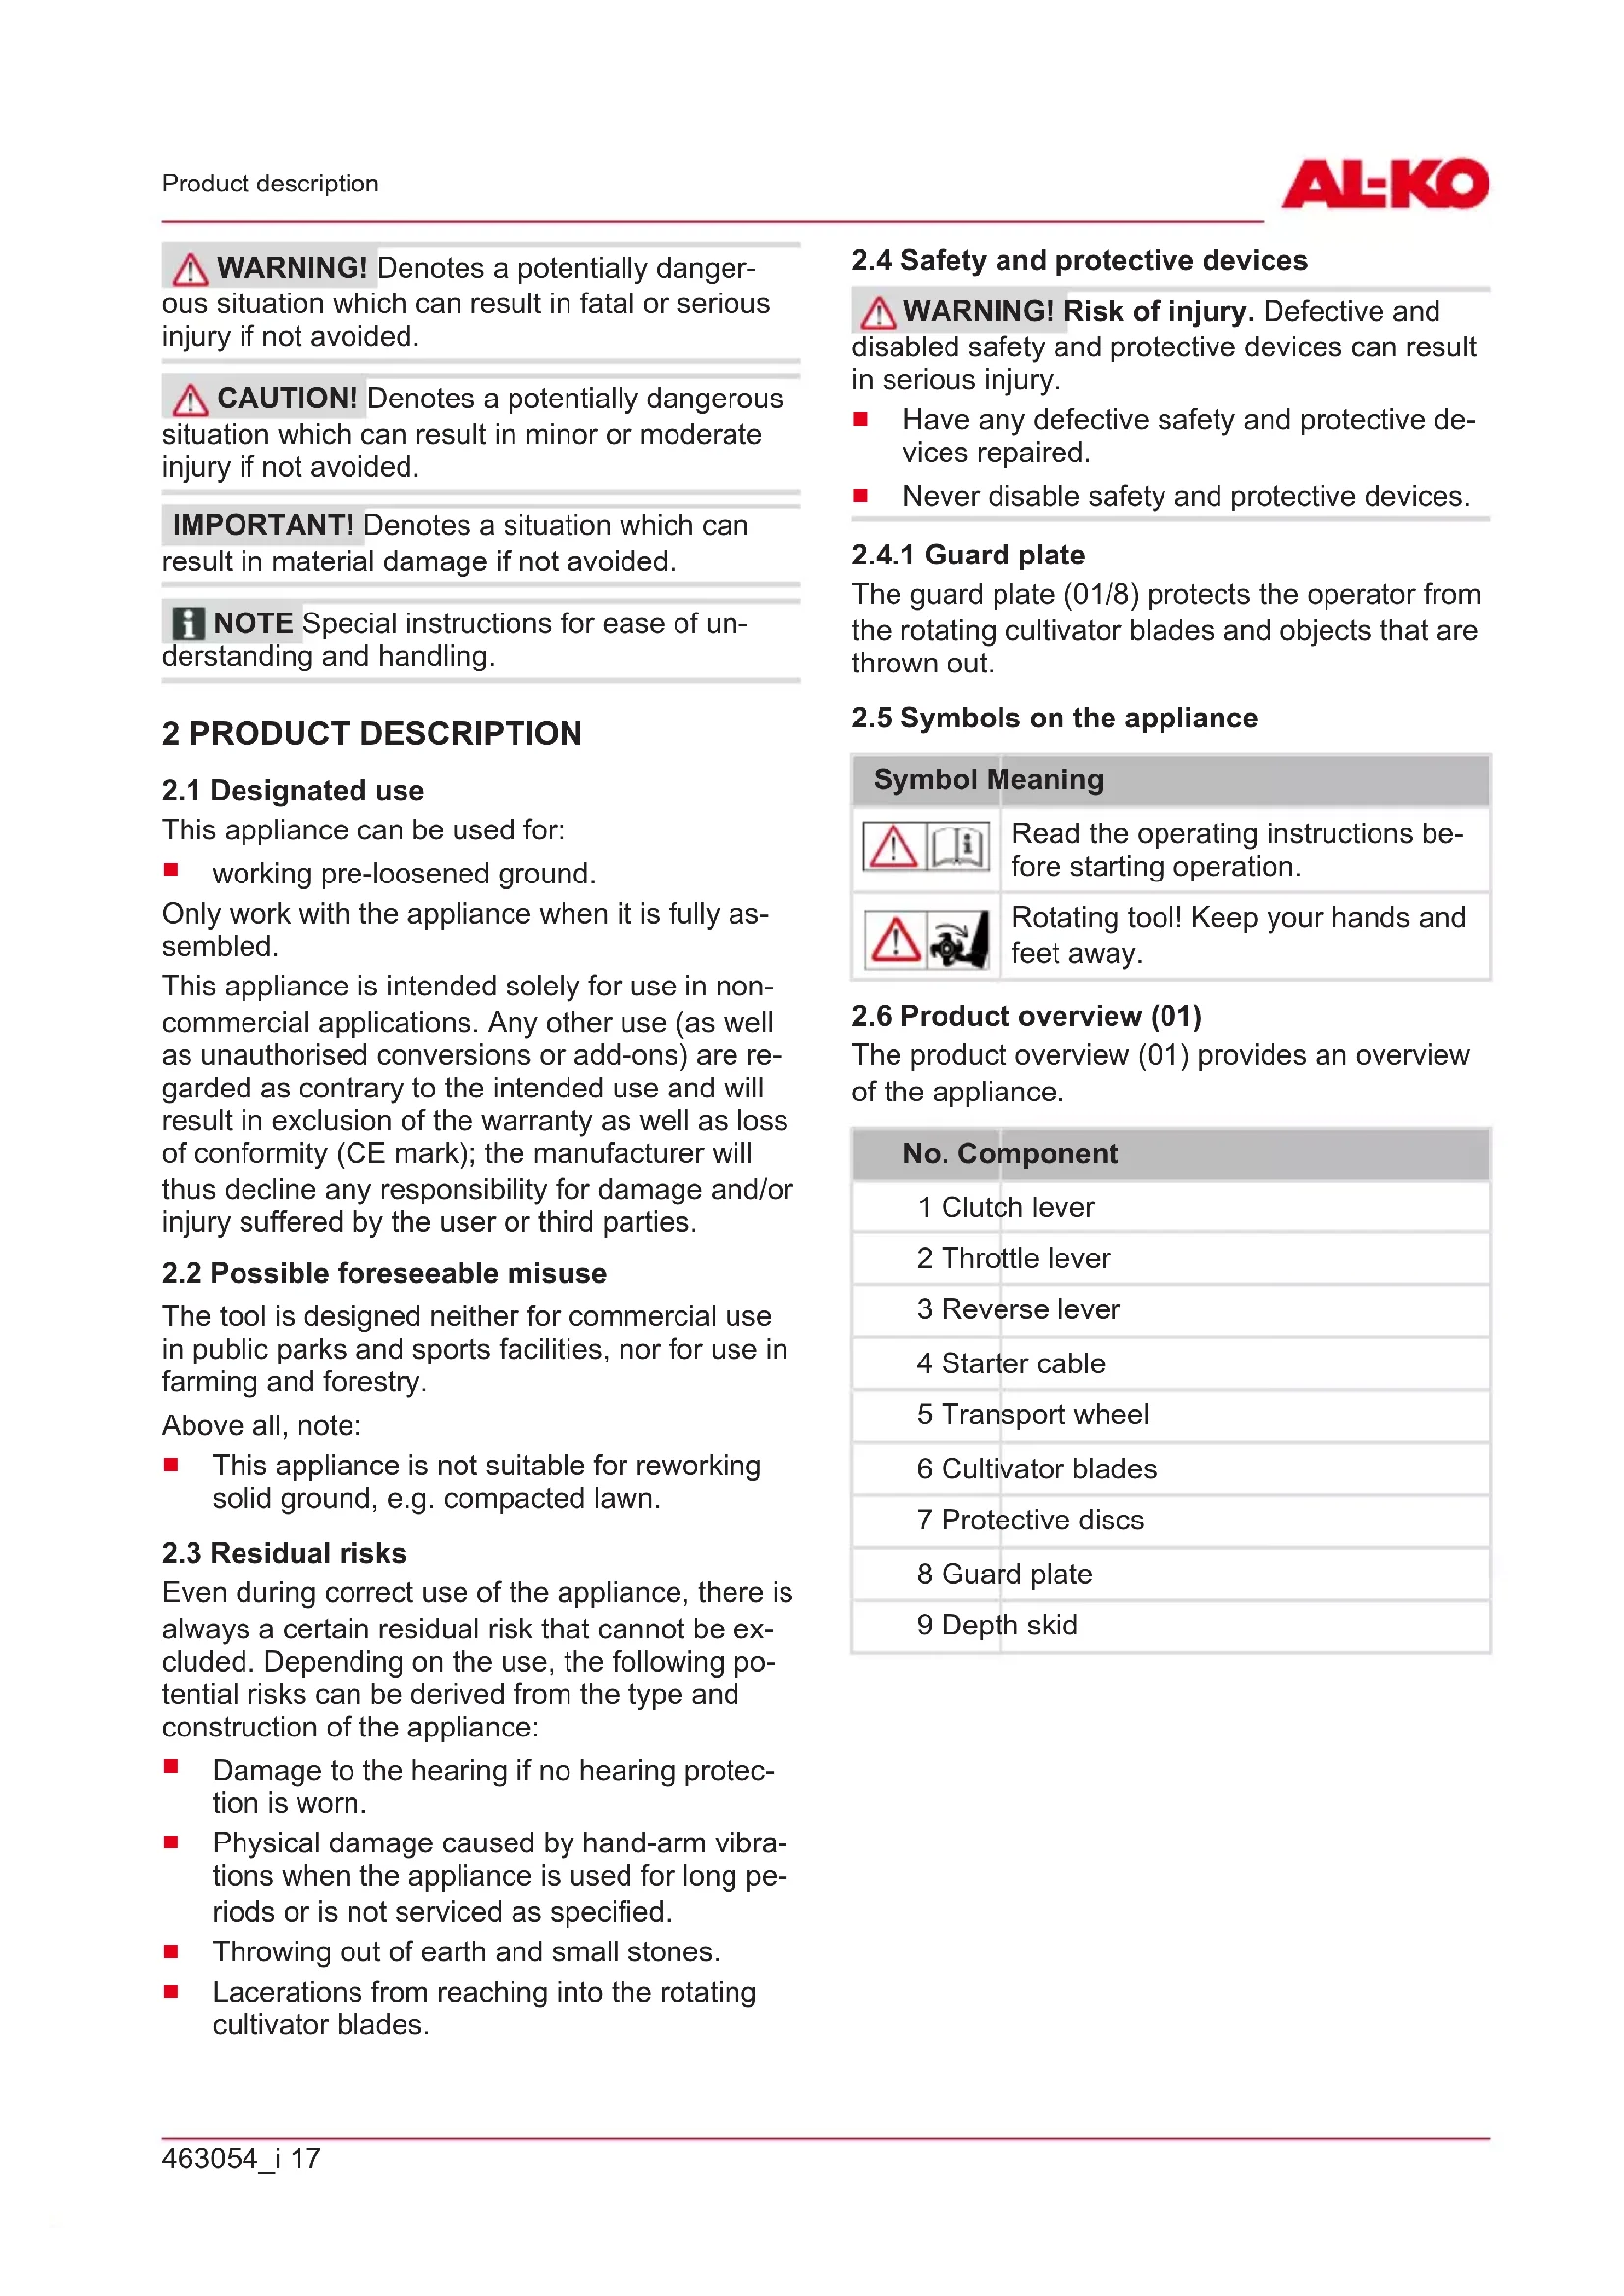
2 PRODUCT DESCRIPTION
2.1 Designated use
This appliance can be used for:
working pre-loosened ground.
Only work with the appliance when it is fully assembled.
This appliance is intended solely for use in non-commercial applications. Any other use (as well as unauthorised conversions or add-ons) are regarded as contrary to the intended use and will result in exclusion of the warranty as well as loss of conformity (CE mark); the manufacturer will thus decline any responsibility for damage and/or injury suffered by the user or third parties.
2.2 Possible foreseeable misuse
The tool is designed neither for commercial use in public parks and sports facilities, nor for use in farming and forestry.
Above all, note:
This appliance is not suitable for reworking solid ground, e.g. compacted lawn.
2.3 Residual risks
Even during correct use of the appliance, there is always a certain residual risk that cannot be excluded. Depending on the use, the following potential risks can be derived from the type and construction of the appliance:
Damage to hearing if no hearing protection is worn. Physical damage caused by hand-arm vibrations when the appliance is used for long periods or is not serviced as specified. - Throwing out of earth and small stones. Lacerations from reaching into the rotating cultivator blades.
2.4 Safety and protective devices
WARNING! Risk of injury. Defective and disabled safety and protective devices can result in serious injury.
Have any defective safety and protective devices repaired. Never disable safety and protective devices.
2.4.1 Guard plate
The guard plate (01/8) protects the operator from the rotating cultivator blades and objects that are thrown out.
2.5 Symbols on the appliance
| Symbol | Meaning |
| Read the operating instructions be- fore starting operation. | |
| Rotating tool! Keep your hands and feet away. |
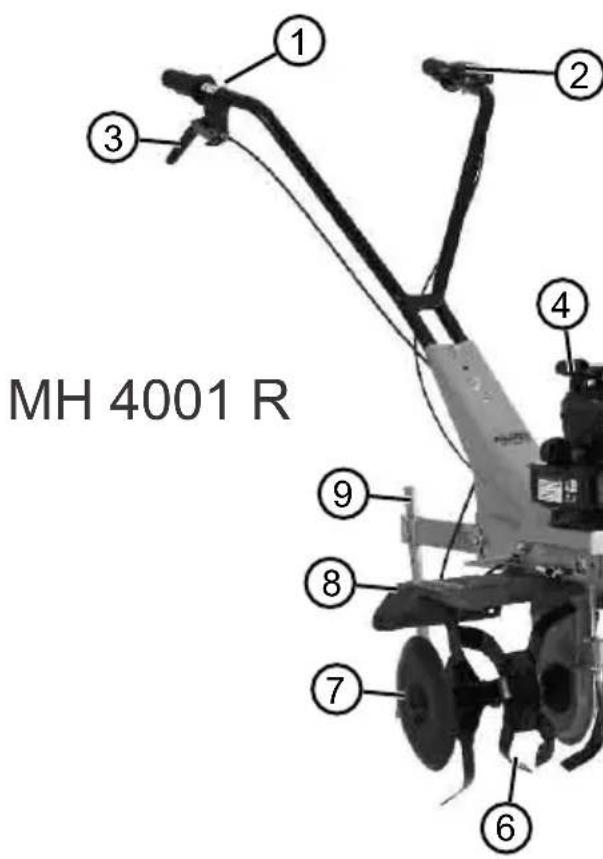
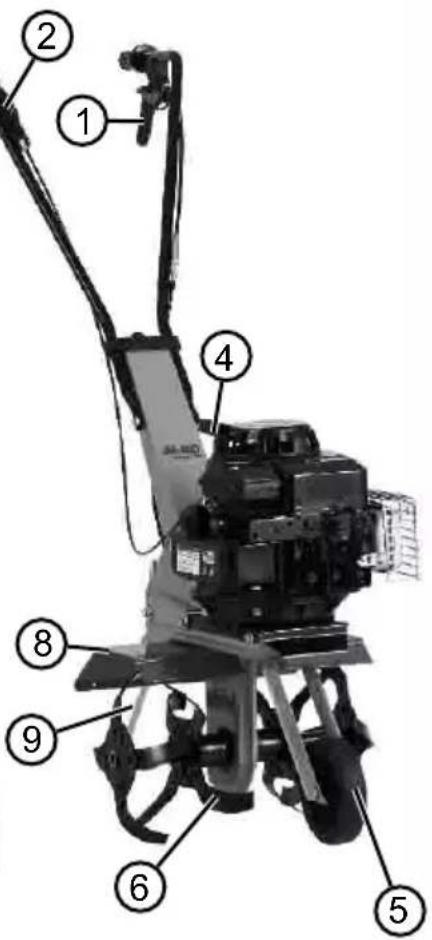
2.6 Product overview (01)
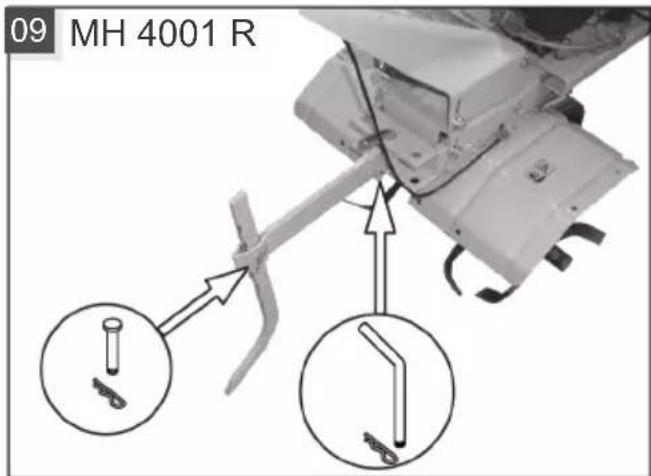
The product overview (01) provides an overview of the appliance.
| No. Component |
| 1 Clutch lever |
| 2 Throttle lever |
| 3 Reverse lever |
| 4 Starter cable |
| 5 Transport wheel |
| 6 Cultivator blades |
| 7 Protective discs |
| 8 Guard plate |
| 9 Depth skid |
3 SAFETY INSTRUCTIONS
DANGER! Danger of fatal injury and danger of extremely severe injury! Lack of knowledge of the safety instructions and operating instructions can lead to extremely serious and even fatal injury.
- Observe all safety instructions and instructions for use in these operating instructions as well the operating instructions which are referred to before you start using the appliance.
- Keep all supplied documents in a safe place for future reference. Danger of fatal injury from gas poisoning The exhaust fumes from the cultivator contain carbon monoxide which can kill a person in a few minutes. Observe the following before and during use:
Only operate the cultivator in the open air, never indoors. Do not inhale the motor exhaust gases. - Switch off the cultivator if feeling nauseous, dizzy, or weak while using this appliance.
Only use the cultivator if it is in perfect technical condition.
Do not disable safety and protective devices. Wear hearing protection. Carefully read and follow these operating instructions and the operating instructions for the motor. Learn how to stop the cultivator quickly. Do not use starter sprays or similar.
3.1 Operator
- Young people under 16 years of age and persons who are not familiar with the operating instructions are not allowed to use the cultivator. Observe any country-specific safety regulations regarding the minimum age of the user. Comply with any country-specific regulations or regulations on operating hours.
- Do not operate the cultivator when under the influence of alcohol, drugs or medication.
3.2 Appliance safety
Use the appliance only under the following conditions:
The appliance is not soiled. The appliance shows no signs of damage.
All controls function properly.
- Do not overload the device. It is intended for light work in the private sector. Overload can lead to damage to the appliance.
- Never operate the appliance with worn or defective parts. Always replace defective parts with original spare parts from the manufacturer. If the appliance is operated with worn or defective parts, guarantee claims against the manufacturer are excluded. Repair work is only allowed to be carried out by expert workshops or our service centres.
3.3 Safety of persons, animals and property
Only use the cultivator for its intended purpose. Any non-intended use can lead to injury and property damage. The user is responsible for accidents involving other people and their property. Keep third parties out of the danger area. Only switch on the cultivator if there are no persons or animals in the working area. Maintain a safe distance from persons or animals, or switch off the cultivator if persons or animals approach. Never direct the exhaust gas jet of the cultivator towards persons and animals or towards flammable products and objects. Do not reach into the vacuum and vent grilles when the cultivator is running. Injuries can occur due to rotating appliance parts. Always switch the cultivator off when not in use, e.g. when changing the work area, during service and maintenance, and when filling with the petrol/oil mixture. Do not operate the cultivator in poorly ventilated working areas (e.g. a garage). The exhaust gases contain poisonous carbon monoxide as well as other harmful substances. Immediately switch off the cultivator if there is an accident in order to avoid further injuries and/or property damage. Never operate the cultivator with worn or defective parts. Worn or defective parts can cause serious injuries. Only use genuine spare parts and genuine accessories. Keep the cultivator out of the reach of children. Do not allow children and adolescents to play with the cultivator.
Do not change the motor governor settings.
3.4 Safety in the workplace
Work only in daylight or under very bright artificial light. Only operate the appliance on solid and level ground and not on sharp inclines. The appliance should not be used on rocky terrain. Always operate parallel to the slope. Do not operate the appliance up or down the slope, as well as on slopes with a gradient of more than 10 degrees. Pay attention to stability. Remove foreign bodies from the working area. - Do not place your hands and feet close to any rotating parts. - Never lift or carry the appliance when the motor is running. No one should be standing in front of the appliance and/or cultivator blades when starting the motor - the drive of the cultivator blades must be turned off. - When attaching and removing the transport wheel and/or when adjusting the depth skid, the motor must be turned off and the cultivator blades must be upright. - When moving the appliance using the attached transport wheel, turn off the motor and wait for the cultivator blades to come to a standstill. The appliance may only be operated by maintaining the safety distance provided by the handlebar. - Keep the exhaust and motor clean. Renew the tank or tank cap if damaged.
3.5 Handling of petrol and oil
Risk of explosion and fire:
An escaping petrol/air mixture can cause an explosive atmosphere. Deflagration, explosion and fire can lead to serious and even fatal injuries if fuel is not handled properly. Observe the following:
Do not smoke when dealing with petrol. Only handle petrol out of doors and never in enclosed spaces. It is essential to heed the code of conduct stated below.
Only transport and store petrol and oil in containers approved for that purpose. Ensure that children have no access to stored petrol and oil. In order to avoid ground contamination (environmental protection) when filling, ensure that no petrol or oil enters the soil. Use a funnel for filling. - Never fill the appliance in enclosed spaces. Petrol vapours may gather at ground level, and thereby result in a deflagration or even an explosion. - Immediately wipe any spilled petrol off the appliance and the ground. Allow textiles used to wipe off petrol to dry in a well ventilated place before disposing of them. Otherwise, sudden self-ignition may occur. If petrol has been spilled, petrol vapours occur. For this reason, do not start the appliance at the same location but at least 3 m away. - Avoid skin contact with mineral oil products. Do not inhale petrol vapours. When filling, always wear protective gloves. Change and clean protective clothing regularly. Ensure that your clothing does not come into contact with petrol. If petrol has got onto your clothing, change it immediately. Never fill the appliance while the engine is running or hot.
3.6 Personal protective equipment
Wear clothing and protective equipment in accordance with the regulations in order to avoid injury to the head and limbs as well as to avoid hearing impairment. The clothing must be appropriate (tightly fitting) and must not restrict movements. If you have long hair, it is essential to wear a hair net. Never wear loose items of clothing or accessories that could be pulled into the appliance, e.g. scarves, loose-fitting shirts, long neck chains. The personal protective equipment comprises:
Hearing protection and protective eyewear, long trousers and sturdy shoes, protective gloves.
4 START-UP
NOTE Before starting up:
Always perform a visual check. Do not operate the cultivator with loose, damaged or worn operating and/or fastening parts. - Be sure to add motor oil. Fill with petrol.
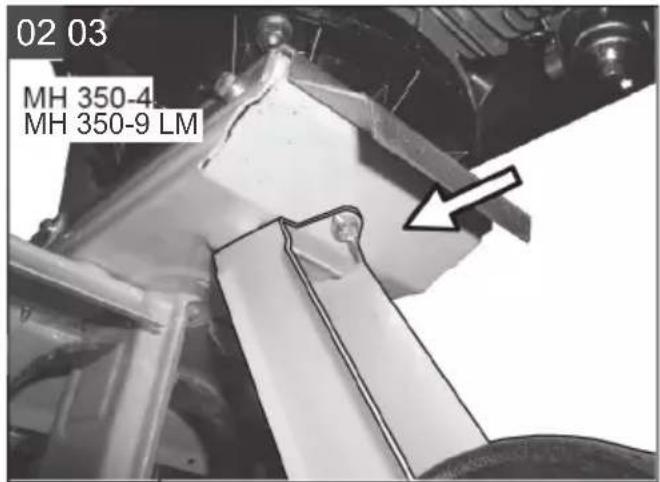
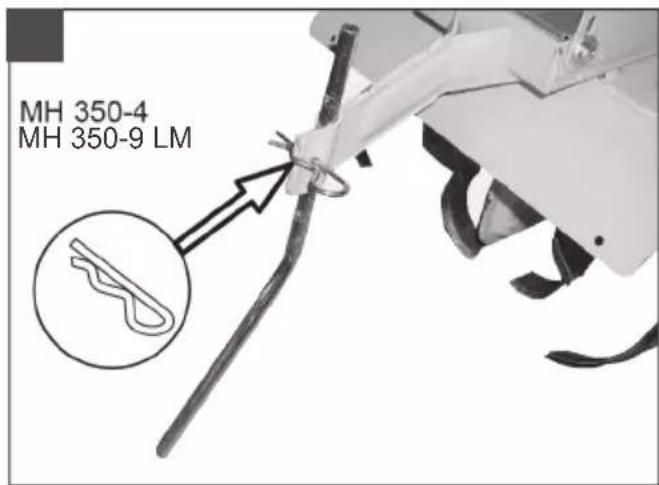
NOTE The appliance is not allowed to be operated unless it has been fully assembled.
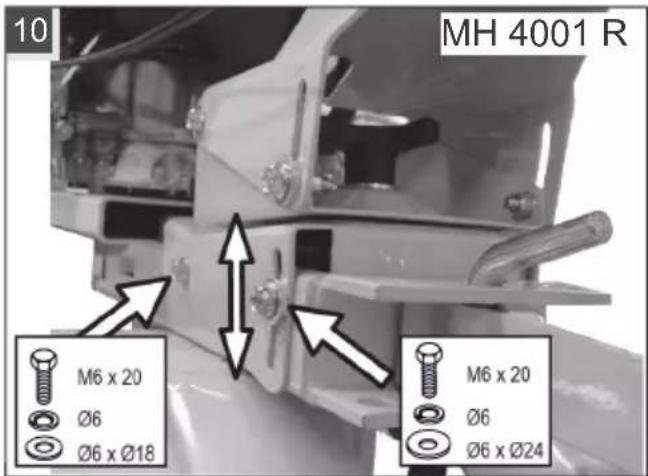
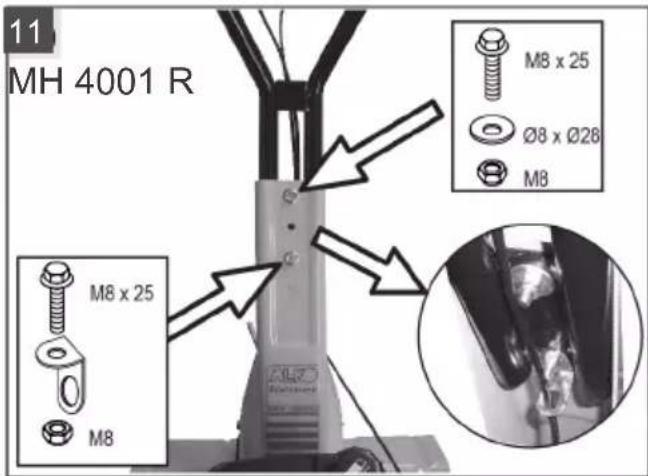
4.1 Adjusting the handlebars
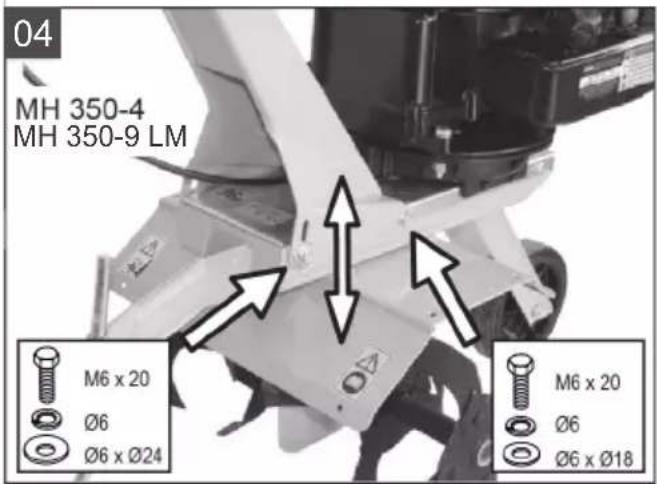
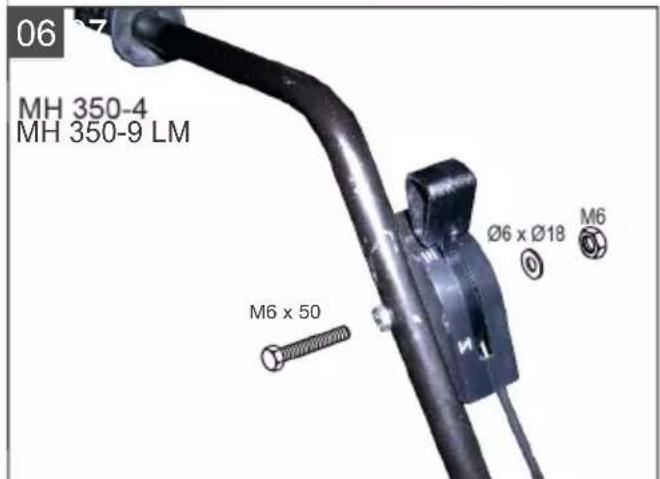
Adjust the height of the handlebar according to body height.
The normal height adjustment corresponds to hip height.
- Loosen the screws on the housing mount.
- Adjust the handlebars according to the slotted hole area.
- Tighten the screws again.
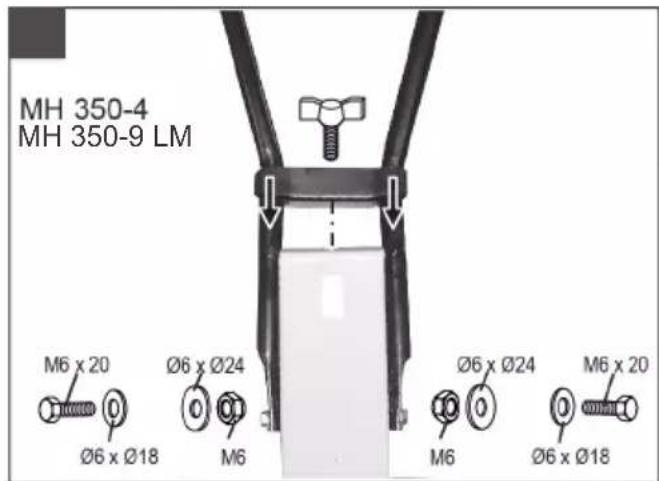
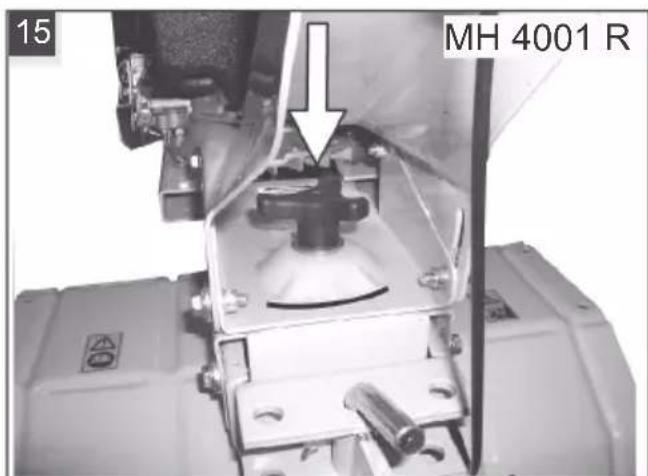
NOTE For models with reverse gear, the handlebar can be swivelled to the left and right.
- Loosen the star grip (image 15), swivel the handlebar to the side and tighten the star grip by hand.
4.2 Transport wheel
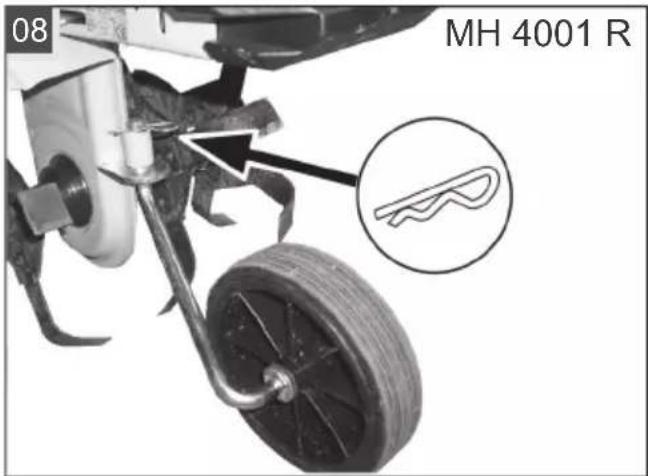
The cultivator can be easily rolled to the place of operation using the transport wheel.
To work with the cultivator, click the transport wheel into the upper notch.
5 OPERATION
5.1 Stopping the motor and switching off
5.1.1 Starting the motor
When starting the motor, do not activate the cultivator blade clutch lever.
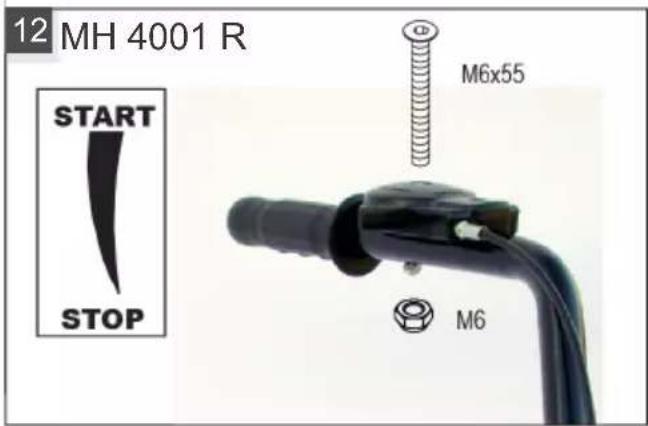
- Move the throttle lever to the "START" position.
- Pull out the cable starter briskly, and then allow it to wind back in slowly.
5.1.2 Switching off the motor
- Move the throttle lever to the "STOP" position.
5.2 Cultivator blades
5.2.1 Switching on the cultivator blades
- Push the clutch lever up fully and hold it there. The cultivator blades may begin to turn when the lever is only pressed halfway up.
5.2.2 Switching off the cultivator blades
WARNING! Danger from rotating appliance parts! Reaching into rotating appliance parts will result in serious injuries.
Never reach into rotating parts. The cultivator blades must not rotate when the clutch lever is released.
- Release the clutch lever.
5.3 Reverse gear
5.3.1 Engaging reverse gear
CAUTION! Danger of damage to the appliance. Never engage reverse gear during a forward movement.
- Pull the reverse gear lever up to the stop.
5.3.2 Disengaging reverse gear
- Release the reverse gear.
6 MAINTENANCE AND CARE
DANGER! Risk of injury or death due to improper maintenance. Maintenance work carried out by unqualified persons and the use of non-approved spare parts can result in serious injuries and even death during operation of the appliance.
- Do not remove or deactivate any safety installations. Use only approved OEM spare parts. Ensure through regular and proper maintenance that the appliance is in a clean and functional condition at all times.
DANGER! Danger of fatal injury and danger of extremely severe injury. Danger of fatal injury and danger of extremely severe injury when the engine is switched on. - Carry out all work with the engine switched off. CAUTION! Risk of injury. Sharp-edged and moving appliance parts can lead to injury. Always wear protective gloves during maintenance, care and cleaning work.
- Correct maintenance is essential to retain the original efficiency and working safety of the appliance. Make sure that all nuts and screws are firmly tightened so as to be certain that the appliance always operates under good conditions.
- Never use the appliance with worn or damaged parts. The damaged parts must be renewed and are never allowed to be repaired.
Prior to the maintenance work:
- Switch off the motor and let it cool down. Remove the spark plug connector. Wear protective gloves when working on the cultivator blades.
- Dispose of oils, petrol or other contaminating substances according to regulations.
6.1 Maintaining the spark plug
NOTE For more detailed information, please refer to the separate operating instructions for the engine.
6.2 Changing the gear oil
In general, the gear oil should also be changed every 100 working hours (oil viscosity SAE 80).
Oil change
Required amount of oil:
Types of 400, 500 series, approx. 0.5 l. Type MH 350-4, approx. 0.2 l.
- Remove the oil plug screw.
- Fill with new oil.
NOTE The oil must be visible at the filler opening.
- Close the filler opening with the screw plug.
6.3 Air filters
NOTE For more detailed information, please refer to the separate operating instructions for the engine.
6.4 Motor oil change
NOTE: For more detailed information, please refer to the separate operating instructions for the engine.
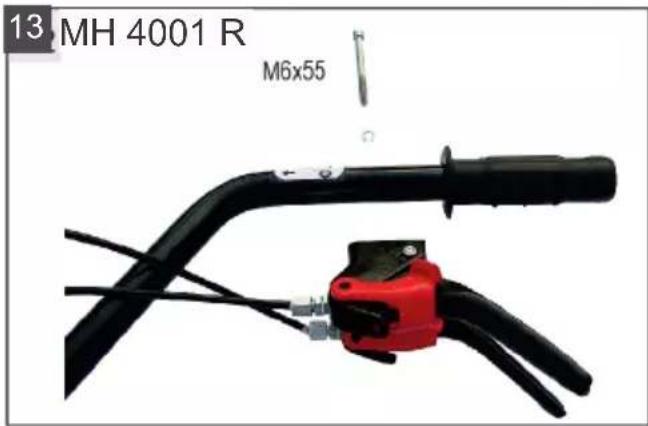
6.5 Adjusting Bowden cables
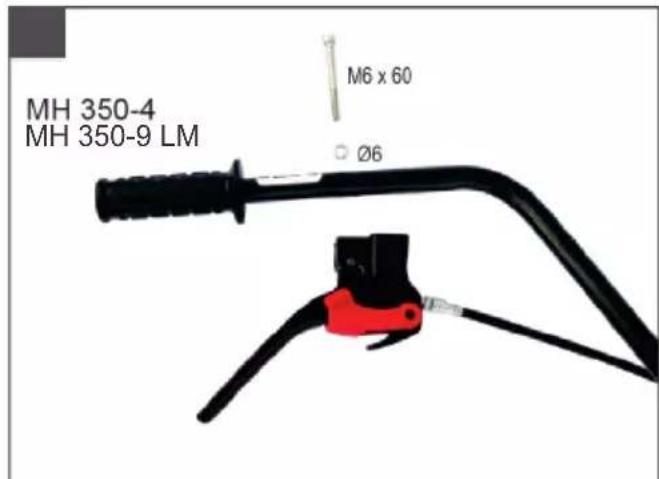
The fine adjustment is made using the adjusting screw on the upper handle and on the motor mount.
- Loosen the locknuts.
- Readjust with the adjusting screw.
NOTE: The cultivator blades may begin to turn when the lever is only pressed halfway up.
- Re-tighten the locknuts.
Throttle cable
NOTE: For more detailed information, please refer to the separate operating instructions for the engine.
7 HELP IN CASE OF MALFUNCTION
CAUTION! Risk of injury. Sharp-edged and moving appliance parts can lead to injury. Always wear protective gloves during maintenance, care and cleaning work.
NOTE: For malfunctions that are not listed in this table or that you cannot resolve yourself, please contact our customer service.
| Malfunction Cause Remedy | ||
| Motor is losing power. Air filter clogged. Check and clean the air filter. | ||
| Combustion problems Contact an AL-KO service centre. | ||
| Cultivator blades dirty Clean the cultivator blades. | ||
| Motor does not start. Lack of fuel Top up with fuel. | ||
| Poor quality, contaminated fuel, old fuel in tank | ||
| Incorrect starting procedure Execute the starting process correctly. | ||
| Spark plug not connected Check the spark plug connector, make sure that it is firmly seated on the spark plug. | ||
| Malfunction Cause Remedy | ||
| Throttle lever in the wrong position | Move the throttle lever to the "START" position. | |
| Spark plug wet Check the spark plug. | ||
| Dirty spark plug electrodes | ||
| Incorrect spark plug elec-trode gap | ||
| Air filter clogged Check and clean the air filter. | ||
| Unsuitable oil for the season Check the oil, replace if necessary. | ||
| Vapour bubbles forming with- in the carburettor due to high temperatures | Wait a few minutes, then try again. | |
| Combustion problems Contact an AL-KO service centre. | ||
| Ignition problems Contact an AL-KO service centre. | ||
| Cultivator blades do not turn | V-belt defective Contact an AL-KO service centre. | |
| Gearbox damage Contact an AL-KO service centre. | ||
| Cultivator blade loose Tighten the cultivator blade. | ||
| Bowden cable for tiller blades not adjusted correctly | Adjust the Bowden cable correctly. | |
8 TRANSPORT
Only transport the cultivator with an empty fuel tank. Always transport the cultivator horizontally, otherwise this can cause:
Leaking fuel and oil, generation of smoke, starting difficulties, soot on spark plug.
9 STORING THE APPLIANCE
Thoroughly clean the appliance after each use and, if present, attach all covers. Store the appliance in a dry, lockable place out of the reach of children.
If the appliance is not going to be used for longer than 2-3 months, the following work is necessary to avoid any damage:
- Empty the fuel tank:
- Allow the motor to run until it stops itself. Then there is no longer any petrol/oil mixture in the fuel tank or carburettor and deposits cannot form.
- Cleaning the appliance:
Wipe the entire appliance and accessory parts with a cleaning rag. Do not use petrol or other solvents! - Remove any dirt from all appliance openings (including cooling openings for the motor).
- Oiling the cylinder:
- Allow the appliance to cool down completely.
- Remove the spark plug connector and unscrew the spark plug.
- Drop a little oil into the spark plug opening. Slowly pull on the starter handle so the piston moves and the oil is distributed in the cylinder.
- Store the appliance in a cool, dry place.
10 DISPOSAL

Petrol and motor oil do not belong in household waste or the public sewer system, but should be collected and disposed of separately.
Before disposing of the device you must empty the fuel tank and the engine oil tank! Packaging, equipment and accessories are made from recyclable materials, and must be disposed of accordingly.
11 AFTER-SALES / SERVICE
In the event of questions of warranty, repair or spare parts, please contact your nearest AL-
KO Service Centre. These can be found on the Internet at:
www.al-ko.com/service-contacts
12 GUARANTEE
We will resolve any material or manufacturing faults on the appliance during the legal warranty period for claims relating to faults, in accordance with our choice either to repair or replace. The legal warranty period is determined by the legislation of the country in which the appliance was purchased.
Our warranty promise applies only if:
The warranty becomes void in the case of:
These operating instructions are heeded
Unauthorised repair attempts
The appliance is handled correctly
Unauthorised technical modifications
Original spare parts have been used
Non-intended use
The guarantee excludes:
Paint damage that can be attributed to normal wear and tear. Wear parts that are marked with a frame [boxed] on the spare parts card. Internal combustion engines (these are covered by the guarantee provisions of the corresponding engine manufacturers).
The guarantee period commences with purchase by the first end user. The date on the proof of purchase is decisive. In the event of a guarantee claim, please take this guarantee declaration and the original proof of purchase, and contact your dealer or the nearest authorised customer service centre. This statement does not affect the purchaser's statutory claims for defects against the vendor.
TRANSLATION OF THE ORIGINAL USER MANUAL
Table of contents
2 PRODUCT DESCRIPTION
2.1 Intended use
www.al-ko.com/service-contacts
12 WARRANTY
www.al-ko.com/service-contacts
12 WARRANTY
www.al-ko.com/service-contacts
12 WARRANTY
www.al-ko.com/service-contacts
12 WARRANTY
www.al-ko.com/service-contacts
12 WARRANTY
www.al-ko.com/service-contacts
12 WARRANTY
9 STORAGE OF THE DEVICE
www.al-ko.com/service-contacts
12 WARRANTY
6 MAINTENANCE AND CARE
www.al-ko.com/service-contacts
12 WARRANTY AND PRODUCT LIABILITY
WARNING! Indicates a situation that, if not avoided, may result in property damage.
NOTE Special instructions for better understanding and operation.
2 PRODUCT DESCRIPTION
2.1 Intended Use
This device is suitable for:
brushing previously sanded primer.
The device must only be used in fully assembled condition.
This device is intended for private use. Any other use or unauthorized modifications or additions are considered use not in accordance with the intended purpose and will lead to voiding of the warranty, as well as loss of conformity (CE mark) and release from any liability for damages caused to the user or third parties by the manufacturer.
2.2 Foreseeable misuse
The device is not intended for commercial use in public parks, sports facilities, or in agriculture and forestry.
Pay special attention to the following:
The device is not suitable for brushing hard surfaces, e.g., paved paths.
2.3 Residual risks
Even under proper operating conditions, there are always certain residual risks that cannot be excluded. Depending on the type of device, its design, and the conditions of use, it is impossible to exclude the following potential hazards:
Hearing damage or injury due to vibration of the upper limb skeleton during prolonged use or improper maintenance of the device. Ejection of soil and small stones. Cuts from contact with sharp edges of the shredder blades.
2.4 Protective and safety devices
WARNING! Risk of injury. Malfunction or failure of protective and safety devices can cause injury.
Faulty protective and safety devices must be repaired. Never disable protective and safety devices.
2.4.1 Protective guard
The protective guard (01/8) protects the user from rotating shredder blades and objects that may be thrown by the rotating cutting element.
2.5 Symbols on the device
Symbol Meaning

Read the operating instructions before commissioning!
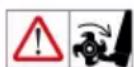
Caution - the tool is rotating! Keep hands and feet away.
3.6 Personal protective equipment
To avoid injury to the head and limbs, as well as damage to hearing, it is necessary to wear the prescribed clothing and protective equipment. Clothing should be close-fitting and not restrict movement. Long hair must be tucked under a net. Do not wear loose clothing or accessories
such as scarves, loose shirts, or long necklaces that could get caught in the device.
Personal protective equipment includes:
Protective goggles; long trousers and sturdy protective gloves
4 COMMISSIONING
NOTE Before commissioning:
Always perform a visual inspection. If working parts or fasteners are loose, damaged, or worn, use of the tiller is prohibited. Be sure to fill the engine oil. Add fuel.
NOTE Operation of the device is permitted only after complete assembly.
4.1 Installing the guide bar
Adjust the height of the guide bar to suit the user's height.
The normal adjustment of the height corresponds to the height at hip level.
1. Loosen the housing console screws. 2. Install the guide bar in accordance with the groove area of the support bracket. 3. Retighten the screws.
Note In models with a front guide bar, the guide bar can be turned left and right.
- Loosen the handle (Fig. 15), turn the guide bar to the side, and retighten the handle.
4.2 Transport wheel
With the transport wheel, the tiller can be easily and simply moved to the place of use.
For work with the tiller, insert the transport wheel into the upper grid.
5 CONTROLS
5.1 Starting and stopping the engine
5.1.1 Starting the engine
To start the engine, you must activate the cutting blades.
- Set the throttle lever to the “START” position. 2. Quickly pull the starter cord, then slowly let it rewind.
5.1.2 Stopping the engine
- Set the throttle lever to the “STOP” position.
5.2 Cutting blades
5.2.1 Engaging the cutting blade
1. Pull the clutch lever fully up and hold it. The cutting blades should start rotating only after the lever has passed halfway through its travel.
5.2.2 Disengaging the cutting blade
WARNING! Danger of injury from rotating parts! When the engine is running, the rotating parts can cause serious injury.
Never touch the rotating parts! When the clutch lever is released, the cutting blades must not rotate.
6.5 Adjusting the Bowden cables
Fine adjustment is made using the adjusting screw on the upper handle or on the engine console.
1. Loosen the locknuts. 2. Adjust the cable position using the adjusting screw.
WARNING: The moving parts must only start to rotate after the lever has been moved to the middle position.
- Retighten the coupling.
Cable tie
WARNING: Detailed information can be found in the separate engine operating manual.
7 TROUBLESHOOTING
CAUTION! Risk of injury. Rotating parts and parts with sharp edges can cause injury.
Always wear protective gloves during technical maintenance, care and cleaning!
WARNING: In the event of malfunctions that are not listed in this table or that you cannot fix yourself, contact our service department.
Used petrol and motor oil are not household waste. They must be collected and disposed of separately!
Before disposal, the fuel tank and engine oil tank must be emptied! Packaging, device and accessories are made of recyclable materials and must be disposed of accordingly.
11 SERVICE
If you have any questions regarding warranty, repair or spare parts, please contact
your nearest AL-KO service center. The address can be found on the Internet at the following address:
www.al-ko.com/service-contacts
12 WARRANTY
We eliminate possible defects of materials for production within the statute of limitations established by law regarding advertising of quality, by repairing or replacing the product. The limitation period is determined by the legislation of the country where the device was purchased.
Our warranty obligation is valid only when:
Follow this operating manual for careful handling; use only original spare parts.
The warranty is void when:
attempts at self-repair; unauthorized technical modifications; use not in accordance with the intended purpose.
The warranty does not cover:
damage to the paint coating caused by normal wear; wearing parts listed in the spare parts list for internal combustion engines (warranty provisions of the respective manufacturer apply to them).
The warranty period begins after the purchase by the first end user. The determining factor is the date on the document confirming the purchase. Contact your dealer or an authorized service center with this certificate and the purchase document. This certificate does not affect the statutory rights of the consumer against the seller.



- ABOUT THESE OPERATING INSTRUCTIONS
- SYMBOLS ON THE TITLE PAGE
- SYMBOL MEANING
- LEGENDS AND SIGNAL WORDS
- PRODUCT DESCRIPTION
- DESIGNATED USE
- POSSIBLE FORESEEABLE MISUSE
- RESIDUAL RISKS
- SAFETY AND PROTECTIVE DEVICES
- GUARD PLATE
- SYMBOLS ON THE APPLIANCE
- PRODUCT OVERVIEW (01)
- SAFETY INSTRUCTIONS
- OPERATOR
- APPLIANCE SAFETY
- SAFETY OF PERSONS, ANIMALS AND PROPERTY
- SAFETY IN THE WORKPLACE
- HANDLING OF PETROL AND OIL
- PERSONAL PROTECTIVE EQUIPMENT
- START-UP
- ADJUSTING THE HANDLEBARS
- TRANSPORT WHEEL
- OPERATION
- STOPPING THE MOTOR AND SWITCHING OFF
- STARTING THE MOTOR
- SWITCHING OFF THE MOTOR
- CULTIVATOR BLADES
- SWITCHING ON THE CULTIVATOR BLADES
- SWITCHING OFF THE CULTIVATOR BLADES
- REVERSE GEAR
- ENGAGING REVERSE GEAR
- DISENGAGING REVERSE GEAR
- MAINTENANCE AND CARE
- MAINTAINING THE SPARK PLUG
- CHANGING THE GEAR OIL
- OIL CHANGE
- AIR FILTERS
- MOTOR OIL CHANGE
- ADJUSTING BOWDEN CABLES
- THROTTLE CABLE
- HELP IN CASE OF MALFUNCTION
- TRANSPORT
- STORING THE APPLIANCE
- DISPOSAL
- AFTER-SALES / SERVICE
- GUARANTEE
- TRANSLATION OF THE ORIGINAL USER MANUAL
- TABLE OF CONTENTS
- INTENDED USE
- WARRANTY
- STORAGE OF THE DEVICE
- WARRANTY AND PRODUCT LIABILITY
- FORESEEABLE MISUSE
- PROTECTIVE AND SAFETY DEVICES
- PROTECTIVE GUARD
- SYMBOLS ON THE DEVICE
- COMMISSIONING
- INSTALLING THE GUIDE BAR
- CONTROLS
- STARTING AND STOPPING THE ENGINE
- STARTING THE ENGINE
- STOPPING THE ENGINE
- CUTTING BLADES
- ENGAGING THE CUTTING BLADE
- DISENGAGING THE CUTTING BLADE
- ADJUSTING THE BOWDEN CABLES
- CABLE TIE
- TROUBLESHOOTING
- SERVICE
Brand : AL-KO
Model : MH 350
Category : Milling machine