32.4 Basic Care - Milling machine AL-KO - Free user manual and instructions
Find the device manual for free 32.4 Basic Care AL-KO in PDF.

User questions about 32.4 Basic Care AL-KO
0 question about this device. Answer the ones you know or ask your own.
Ask a new question about this device
Download the instructions for your Milling machine in PDF format for free! Find your manual 32.4 Basic Care - AL-KO and take your electronic device back in hand. On this page are published all the documents necessary for the use of your device. 32.4 Basic Care by AL-KO.
USER MANUAL 32.4 Basic Care AL-KO
natural_image
Line drawing of two lawn lawn mower machines with attached blades and levers (no text or symbols)


Inhaltsverzeichnis
Deutsch 8
English....20
Nederlands 31
Français....44
Español 57
Italiano....70
Slovenščina 83
Hrvatski....95
Српски....107
Polski 120
Česky 133
Slovenská 145
Magyar 157
Dansk 170
Svensk....182
Norsk 194
Suomi 205
Eesti 217
Lietuvių 228
Latviešu 240
Român 252
български 264
Русский 277
Україна....291
© 2023
AL-KO KOBER GROUP Kötz, Germany
This documentation or excerpts therefrom may not be reproduced or disclosed to third parties without the express permission of the AL-KO KOBER GROUP.
01
02
03
flowchart
graph TD
    A["06"] --> B["9"]
    B --> C["e"]
    C --> D["a"]
    D --> E["e"]
    E --> F["b"]
    F --> G["a"]
    G --> H["1"]
    H --> I["2"]
    I --> J["b"]
    J --> K["a"]
    K --> L["d"]
    L --> M["3"]
    M --> N["4"]
    N --> O["5"]
    O --> P["6"]
    P --> Q["8"]
    Q --> R["3"]
    R --> S["4"]
    S --> T["5"]
    T --> U["6"]
    U --> V["7"]
    V --> W["c"]
    W --> X["4"]
    X --> Y["5"]
    Y --> Z["6"]
    Z --> AA["7"]
natural_image
Diagram showing a mechanical component being rotated into a 3D box, with an inset image of a wrench (no text or symbols)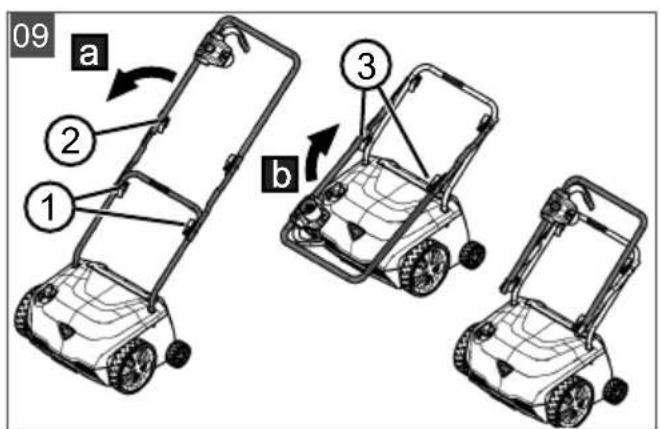


| 32.4 E Basic Care 38.4 E Combi Care | ||
 | 114039 114040 | |
 | 1060 x 1000 x 540 mm 1080 x 1000 x 590 mm | |
 | 10 kg ca. 12 kg | |
 | 32 cm 38 cm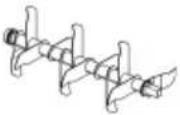 | 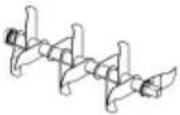 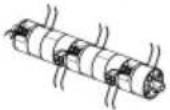 |
 | 230 V AC / 50 Hz | |
 | min. 10 A | |
 | II / IPX4 | |
 | 1200 W 1400 W | |
 | 3800 (+/-100) min ^-1 | 4000 (+/-100) min ^-1 |
 | L_pA = 83,6 dB(A), K = 3 dB(A) L | _pA = 85,2 dB(A), K = 3 dB(A) |
 | L_wA = 94,5 dB(A), K = 3 dB(A) L | _wA = 96,0 dB(A), K = 3 dB(A) |
 | 7,672 m/s ^2 (left) / 6,386 m/s ^2 (right), K = 1,5 m/s ^2 | 7,195 m/s ^2 (left) / 7,523 m/s ^2 (right), K = 1,5 m/s ^2 |
1 About these operating instructions...... 20
1.1 Symbols on the title page 20
1.2 Legends and signal words...... 21
2 Product description 21
2.1 Designated use.... 21
2.2 Possible foreseeable misuse.... 21
2.3 Safety and protective devices...... 21
2.4 Symbols on the appliance.... 21
2.5 Product overview (01).... 22
2.6 Scope of supply (02, 03).... 22
3 Safety instructions.... 22
3.1 General electrical machine safety warnings 22
3.1.1 Work area safety 22
3.1.2 Electrical safety 22
3.1.3 Personal safety.... 23
3.1.4 Electrical machine use and care . 23
3.1.5 Service 24
3.2 Lawn scarifier and lawn aerator safety warnings.... 24
3.3 Vibration load.... 24
3.4 Noise pollution 25
4 Assembly.... 25
4.1 Fitting the scarifier (04 - 06)...... 26
4.2 Installing the grass collector (07, 08). 26
5 Start-up 26
5.1 Carrying out visual inspection...... 26
5.2 Providing the mains cable and checking the mains connection.... 26
5.3 Adjusting the handlebar (06)...... 26
6 Operation 27
6.1 Folding the handlebar in and out (09) 27
6.2 Opening the baffle (10)...... 27
6.3 Attaching and removing the grass collector [optional] (11) 27
6.4 Setting the working depth (12)...... 27
6.5 Making the mains connection (13, 14, 15)....28
6.6 Starting and stopping the motor (16, 17) 28
7 Maintenance and care 28
7.1 Cleaning the blade system.... 28
7.2 Replacing the scarifier roller and aer-
ation roller (optional) (18) 29
8 Help in case of malfunction 29
9 Transport 29
10 Storage 30
11 Disposal.... 30
12 After-Sales/Service.... 30
13 Information on the Declaration of Confor-
mity 30
14 Warranty 30
1 ABOUT THESE OPERATING INSTRUCTIONS
The German version is the original operating instructions. All additional language versions are translations of the original operating instructions.
- Keep these operating instructions in a safe place at all times so that they can be consulted if you need any information about the appliance.
■ Only pass on the appliance to other persons together with these operating instructions.
■ Comply with the safety and warning information in these operating instructions.
1.1 Symbols on the title page
Symbol Meaning

It is essential to read through these operating instructions carefully before start-up. This is essential for safe working and trouble-free handling.

Operating instructions

To avoid electric shock, do not damage or cut the power cable!
1.2 Legends and signal words
⚠️ DANGER! Denotes an imminently dangerous situation which will result in fatal or serious injury if not avoided.
WARNING! Denotes a potentially dangerous situation which can result in fatal or serious injury if not avoided.
CAUTION! Denotes a potentially dangerous situation which can result in minor or moderate injury if not avoided.
IMPORTANT! Denotes a situation which can result in material damage if not avoided.
i NOTE Special instructions for ease of understanding and handling.
2 PRODUCT DESCRIPTION
This documentation describes several device models. Identify your model based on the product images and the description of the different options.
2.1 Designated use
This scarifier is intended for loosening and aerating a lawn (scarifying) in private applications, and is only allowed to be used on dried lawns which have been mown short.
Any other use, as well as unauthorised conversions or add-ons, are regarded as contrary to the intended use and will result in invalidation of the warranty as well as loss of conformity (CE mark); the manufacturer will thus decline any responsibility for damage and/or injury suffered by the user or third parties.
2.2 Possible foreseeable misuse
The appliance is not designed for commercial use in public parks and sports facilities or for use in farming and forestry. It must not be used for trimming bushes and hedges or for levelling the ground.
2.3 Safety and protective devices
WARNING! Risk of injury. Defective and disabled safety and protective devices can result in serious injury.
■ Have any defective safety and protective devices repaired.
■ Never disable safety and protective devices.
Motor switch lever/operator presence control
The appliance is equipped with a motor switch lever/operator presence control which stops the appliance when it is released.
Baffle
The appliance is equipped with a baffle that prevents grass and objects being thrown out during scarifying without grass collector.
2.4 Symbols on the appliance
| Symbol | Meaning |
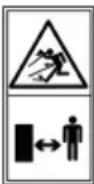 | Risk of objects being thrown out! Keep bystanders away! Maintain a safety distance! |
 | Read the operating instructions before starting maintenance, care and cleaning work! |
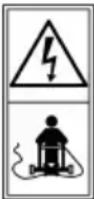 | Do not run over the mains cable! Danger of electric shock if the mains cable is damaged. |
 | Keep your hands and feet away from the blade system! Disconnect the appliance from the mains supply before starting maintenance, care and cleaning work! |
 | Not relevant. |
 | Procedure for starting the motor see chapter 6.6 "Starting and stopping the motor (16, 17)", page 28 |
 | Shallow scarifying |
 | Deep scarifying |
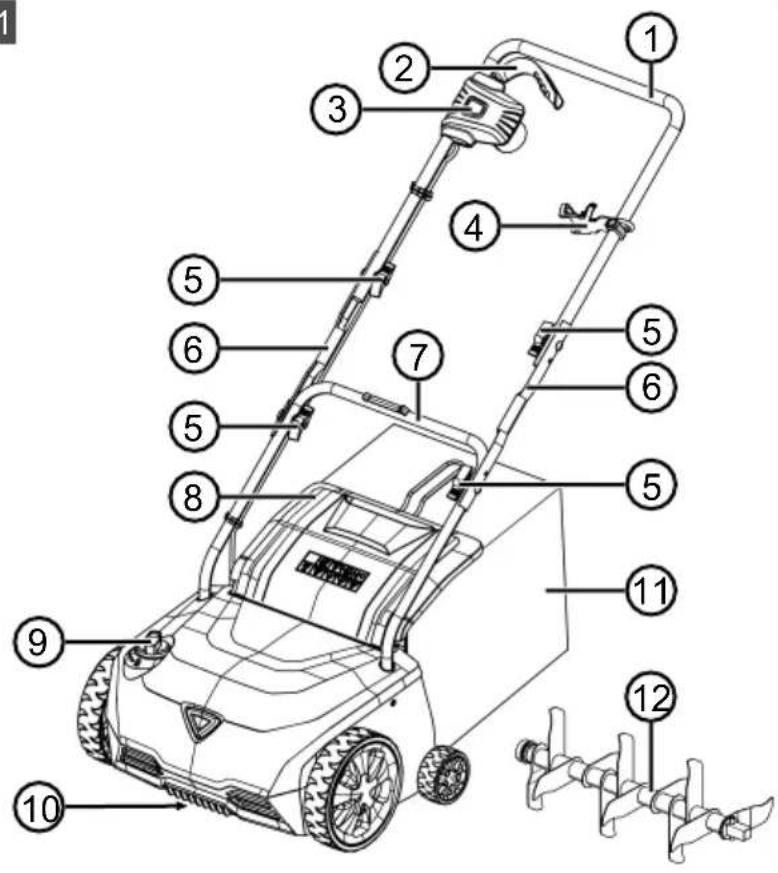
2.5 Product overview (01)
No. Component
| 1 Upper handlebar, folding |
| 2 32.4 E: Motor switch lever38.4 E: Operator presence control |
| 3 Motor switch with safety button and integrated mains plug |
| 4 Cable strain relief hook |
| 5 Wing bolts |
| 6 Intermediate brace |
| 7 Lower handlebar, height-adjustable |
| 8 Baffle |
| 9 Adjuster wheel for working depth |
| 10 Blade system with scarifier roller or aerator roller |
| 11 Grass collector |
| 12 Scarifier roller |
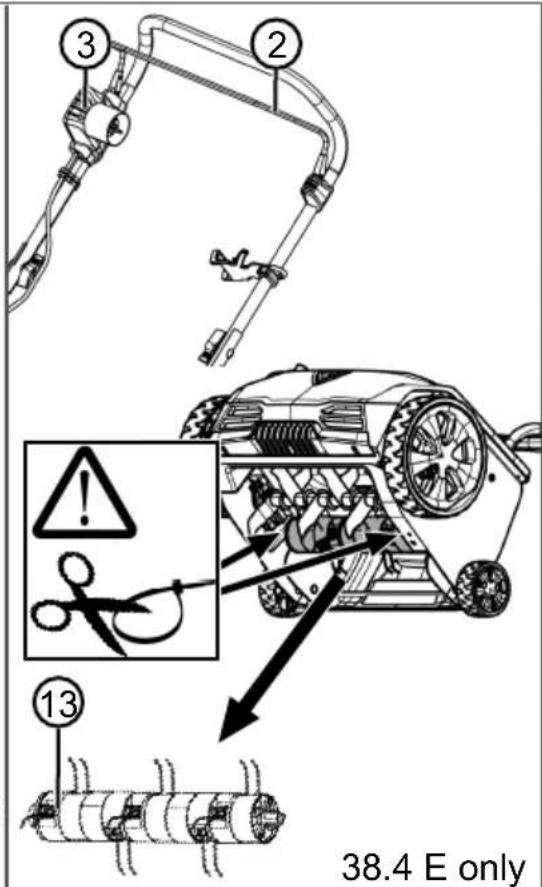
| 13 Aerator roller* |
* for 38.4 E only
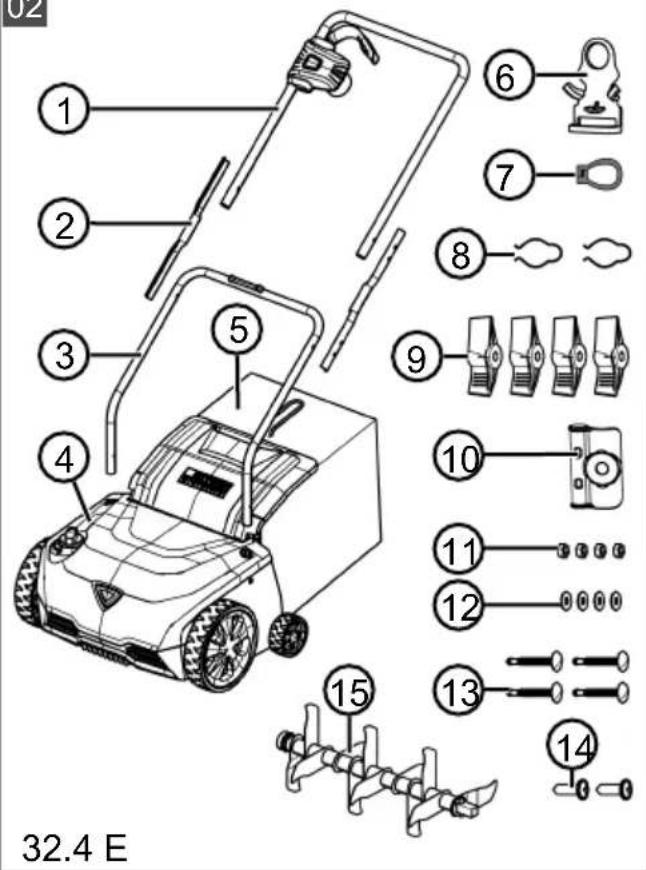
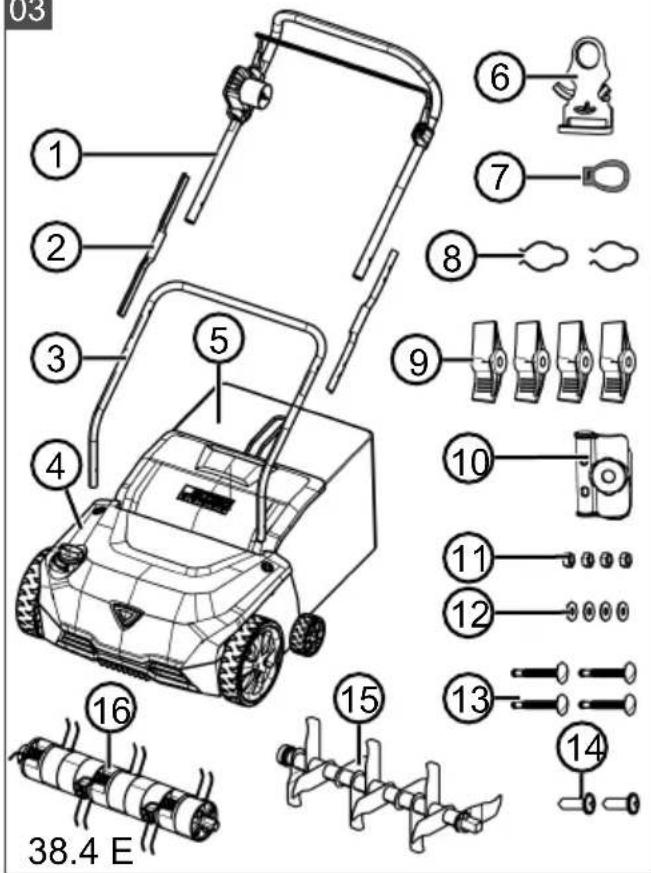
2.6 Scope of supply (02, 03)
The items listed here are included in the standard scope of supply. Check that all items are present:
No. Component
| 1 Upper handlebar |
| 2 Intermediate brace (x2) |
| 3 Lower handlebar |
| 4 Scarifier |
| 5 Grass collector |
| 6 Cable strain relief hook |
| 7 Cable strain relief clip |
| 8 Cable clips (x2) |
| 9 Wing nuts (x4) |
| 10 Cable clip on the cable |
| 11 Nuts (x4) |
| 12 Washers (x4) |
| 13 Screws for handlebar (x4) |
No. Component
| 14 Screws for lower handlebar (x2) |
| 15 Scarifier roller |
| 16 Aerator roller* | ** |
* for 38.4 E only
** Risk of damage to the appliance. Remove the aerator roller before switching on the appliance.
Available as optional accessories:
■ 32 cm aerator roller, Art. No.: 114049 (for 32.4 E Basic Care only)
3 SAFETY INSTRUCTIONS
3.1 General electrical machine safety warnings
WARNING! Read all safety warnings, instructions, illustrations and specifications provided with this machine. Failure to follow all instructions listed below may result in electric shock, fire and/or serious injury.
■ Save all warnings and instructions for future reference.
The term "machine" in the warnings refers to your mains-operated (corded) machine or battery-operated (cordless) machine.
3.1.1 Work area safety
- Keep work area clean and well lit. Cluttered or dark areas invite accidents.
- Do not operate machines in explosive atmospheres, such as in the presence of flammable liquids, gases or dust. Machines create sparks which may ignite the dust or fumes.
- Keep children and bystanders away while operating a machine. Distractions can cause you to lose control.
3.1.2 Electrical safety
The machine plug must fit into the plug socket. Never modify the plug in any way. Do not use adapter plugs with earthed (grounded) machines. Unmodified plugs and matching outlets will reduce risk of electric shock.
- Avoid body contact with earthed or grounded surfaces, such as pipes, radiators, ranges and refrigerators. There is an increased risk of electric shock if your body is earthed or grounded.
- Do not operate the machine in rain or wet conditions. This may increase the risk of electric shock.
- Do not abuse the mains cable. Never use the mains cable for carrying, pulling or unplugging the machine. Keep mains cable away from heat, oil, sharp edges or moving parts. Damaged or entangled mains cables increase the risk of electric shock.
- When operating a machine outdoors, use an extension lead suitable for outdoor use. Use of an extension lead suitable for outdoor use reduces the risk of electric shock.
If operating a machine in a damp location is unavoidable, use a residual current device (RCD) protected supply. Use of an RCD reduces the risk of electric shock.
3.1.3 Personal safety
■ Stay alert, watch what you are doing and use common sense when operating a machine. Do not use a machine while you are tired or under the influence of drugs, alcohol or medication. A moment of inattention while operating machines may result in serious personal injury.
■ Use personal protective equipment. Always wear eye protection. Protective equipment such as dust mask, non-skid safety shoes, hard hat or hearing protection used for appropriate conditions will reduce personal injuries.
■ Prevent unintentional starting. Ensure the switch is in the off-position before connecting to power source and/or battery pack, picking up or carrying the machine. Carrying machines with your finger on the switch or energising machines that have the switch on invites accidents.
■ Remove any adjusting key or wrench before turning the machine on. A wrench or a key left attached to a rotating part of the machine may result in personal injury.
- Do not overreach. Keep proper footing and balance at all times. This enables better control of the machine in unexpected situations.
■ Dress properly. Do not wear loose clothing or jewellery. Keep your hair and clothing away from moving parts. Loose clothes, jewellery or long hair can be caught in moving parts.
If devices are provided for the connection of dust extraction and collection facilities, ensure these are connected and properly used. Use of dust collection can reduce dust-related hazards.
- Do not let familiarity gained from frequent use of machines allow you to become complacent and ignore machine safety principles. A careless action can cause severe injury within a fraction of a second.
3.1.4 Electrical machine use and care
- Do not force the machine. Use the correct machine for your application. The correct machine will do the job better and safer at the rate for which it was designed.
- Do not use the machine if the switch does not turn it on and off. Any machine that cannot be controlled with the switch is dangerous and must be repaired.
■ Disconnect the plug from the power source and/or remove the battery pack, if detachable, from the machine before making any adjustments, changing accessories, or storing machines. Such preventive safety measures reduce the risk of starting the machine accidentally.
■ Store idle machines out of the reach of children and do not allow persons unfamiliar with the machine or these instructions to operate the machine. Machines are dangerous in the hands of untrained users. - Maintain machines and accessories. Check for misalignment or binding of moving parts, breakage of parts and any other condition that may affect the machine's operation. If damaged, have the machine repaired before use. Many accidents are caused by poorly maintained machines.
- Keep cutting tools sharp and clean. Properly maintained cutting tools with sharp cutting edges are less likely to bind and are easier to control.
■ Use the machine, accessories and tool bits etc. in accordance with these instructions, taking into account the working conditions and the work to be performed. Use of the machine for operations different from those intended could result in a hazardous situation. - Keep handles and grasping surfaces dry, clean and free from oil and grease. Slip-
pery handles and grasping surfaces do not allow for safe handling and control of the machine in unexpected situations.
3.1.5 Service
- Have your machine serviced by a qualified repair person using only identical replacement parts. This will ensure that the safety of the machine is maintained.
3.2 Lawn scarifier and lawn aerator safety warnings
- Do not use the machine in bad weather conditions, especially when there is a risk of lightning. This decreases the risk of being struck by lightning.
■ Thoroughly inspect the area for wildlife where the machine is to be used. Wildlife may be injured by the machine during operation.
■ Thoroughly inspect the area where the machine is to be used and remove all stones, sticks, wires, bones, and other foreign objects. Thrown objects can cause personal injury.
Before using the machine, always visually inspect to see that the tines and the tines assembly are not worn or damaged. Worn or damaged parts increase the risk of injury.
Before use, check the supply cord and any extension cord for signs of damage or aging. Do not use the machine if the cord is damaged or worn. If the cord is damaged or worn during use, switch off the machine and do not touch the cord before disconnecting it from the supply. A damaged supply cord or extension cord may result in electric shock, fire and/or serious injury. - Check the catcher frequently for wear or deterioration. A worn or damaged catcher may increase the risk of personal injury.
- Keep guards in place. Guards must be in working order and be properly mounted. A guard that is loose, damaged, or is not functioning correctly may result in personal injury.
- Keep all cooling air inlets clear of debris. Blocked air inlets and debris may result in overheating or risk of fire.
■ While operating the machine, always wear non-slip and protective footwear. Do not operate the machine when barefoot or wearing open sandals. This reduces the
chance of injury to the feet from contact with the moving tines.
■ While operating the machine, always wear long trousers. Exposed skin increases the likelihood of injury from thrown objects.
Do not operate the machine in wet grass. Walk, never run. This reduces the risk of slipping and falling which may result in personal injury.
- Do not operate the machine on excessively steep slopes. This reduces the risk of loss of control, slipping and falling which may result in personal injury.
When working on slopes, always be sure of your footing, always work across the face of slopes, never up or down and exercise extreme caution when changing direction. This reduces the risk of loss of control, slipping and falling which may result in personal injury.
■ Use extreme caution when reversing or pulling the machine towards you. Always be aware of your surroundings. This reduces the risk of tripping during operation.
- Keep the supply cord away from the tines. A damaged supply cord may result in electric shock, fire and/or serious injury.
■ Switch off and remove plug from mains if the cord is entangled or damaged. Entangled or damaged cords can increase the risk of electric shock.
- Hold the machine by insulated gripping surfaces only, because the tines may contact hidden wiring or its own cord. Tines contacting a "live" wire may make exposed metal parts of the machine "live" and could give the operator an electric shock.
- Do not touch tines and other hazardous moving parts while they are still in motion. This reduces the risk of injury from moving parts.
When clearing jammed material or cleaning the machine, make sure all power switches are off and the power cord is disconnected. Unexpected operation of the machine may result in serious personal injury.
3.3 Vibration load
Vibration total values and noise emission values
The declared vibration total values and noise emission values have been measured ac-
cording to a standardised test method and can be used to compare one power tool with another.
The declared vibration total values and noise emission values can also be used for an initial assessment of the exposure.
The vibration total values and noise emission values may differ from the given value during actual use of the power tool, depending on how the power tool is used.
Adhere the safety measures according to the safety chapter. Try to keep the vibration load as low as possible. Exemplary measures to reduce vibration are the wearing of gloves when using the tool and the limitation of working time. All parts of the operating cycle must be taken into account (e.g. times when the power tool is switched off and those in which it is switched on but runs without load).
Danger due to vibration
The actual magnitude of the vibration emissions during the use of the appliance may deviate from that stated by the manufacturer. Observe the following influencing factors before or during use:
Is the appliance being used as intended?
Is the material being cut or processed in the proper manner?
Is the appliance in a proper condition of use?
Is the cutting tool properly sharpened or is the correct cutting tool installed?
Are the handle grips and any optional vibration grips mounted, and are they firmly attached to the appliance?
■ Only operate the tool at the motor speed required for the respective work. Avoid using the maximum speed in order to reduce noise and vibrations.
The noise and vibrations of the tool may increase due to improper use and maintenance. This leads to health damage. In this case, immediately switch off the tool and have it repaired by an authorised service workshop.
The degree of stress due to vibration depends on the work to be performed or on the use of the tool. Estimate the stress and plan appropriate work breaks. This considerably reduces stress due to vibration over the entire working time.
■ Extensive use of the tool exposes the operator to vibrations, which can lead to circulatory issues ("white fingers"). To avoid this risk, wear gloves and keep your hands warm. If any symptoms of "white fingers" occur, immediately consult a physician. These symptoms include: Numbness, loss of feeling, tingling, itching, pain, reduced muscular strength, changes in the colour or condition of the skin. Normally these conditions affect the fingers, hands or pulse. The risk increases at low temperatures.
Take long breaks during your working day so you can recover from the noise and the vibrations. Plan your work in such a way that the use of appliances that generate strong vibrations is spread over several days.
If you notice an unpleasant sensation or discoloration of the skin on your hands when using the tool, stop work immediately. Take sufficient work breaks. Without sufficient breaks, a hand/arm vibration syndrome can occur.
- Minimise your risk of being exposed to vibrations. Maintain the tool according to the instructions in the operating instructions.
If the tool is used frequently, contact your dealer to purchase anti-vibration accessories (e.g. handles).
- Avoid working with the tool at temperatures below 10 °C. Define how the vibration load can be limited in a work plan.
3.4 Noise pollution
A certain level of noise exposure from this appliance is inevitable. Carry out noisy work at approved and specified time periods. Observe rest periods as necessary and restrict the duration of the work to a minimum. For your personal protection and protection of persons in the vicinity, appropriate hearing protection must be worn.
4 ASSEMBLY
WARNING! Danger if assembly is not carried out completely! Use of an incompletely assembled device can result in serious injury.
■ Only use the device when it is fully assembled!
■ Before switching on, check that all safety and protective devices are in place and functioning correctly!
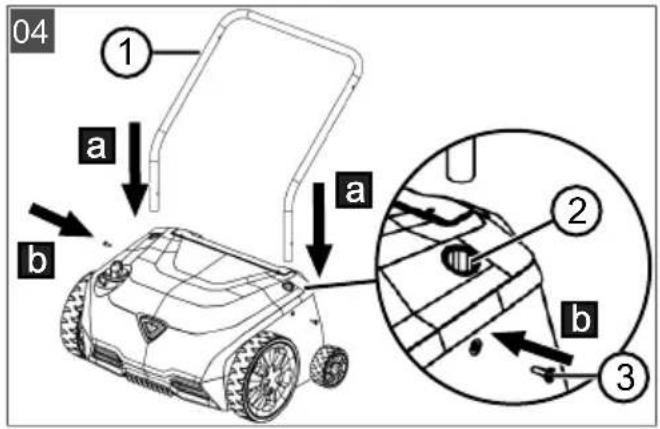
4.1 Fitting the scarifier (04 - 06)
Installing the lower handlebar (04)
- Insert the lower handlebar (04/1) into the openings (04/2) in the scarifier (04/a).
- Secure the lower handlebar by tightening the screws (02/14, 03/13, 04/3) for the lower handlebar finger-tight (04/b).
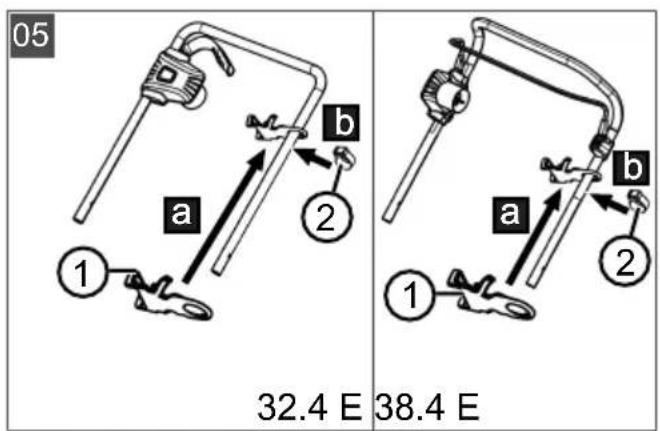
Fitting the cable strain relief hook (05)
- Thread the cable strain relief hook (05/1) on-to the upper handlebar from below (05/a).
- Attach the cable strain relief clip (05/2) below the cable strain relief hook on the upper handlebar (05/b).
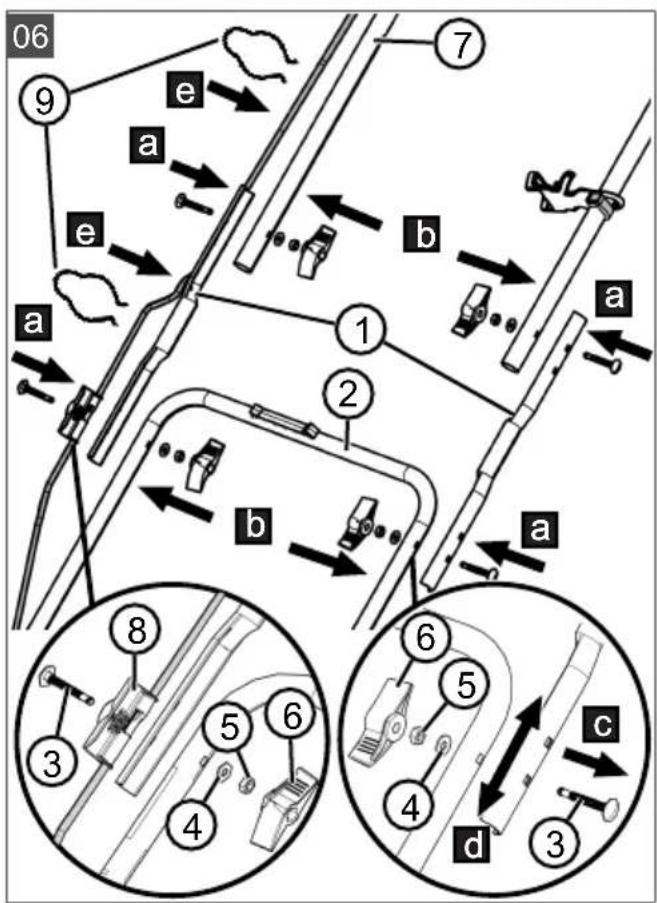
Installing the intermediate brace on the lower handlebar (06)
- Position the two intermediate braces (06/1) on the lower handlebar (06/2).
- Push the screws (06/3) through.
- On the left-hand side: Push screw (06/3) through cable clip (06/8) on the cable.
- Fit the washers (06/4), nuts (06/5) and wing nuts (06/6) and tighten.
Installing the upper handlebar on the intermediate brace (06)
i NOTE Fit the cable strain relief hook before installing the upper handlebar.
- Position the upper handlebar (06/7) on the intermediate brace (06/1).
- Push the screws (06/3) through.
- Fit the washers (06/4), nuts (06/5) and wing nuts (06/6) and tighten.
Fitting the cable clips (06)
- Fix the cable to the handlebar (06/e) with cable clips (06/9).
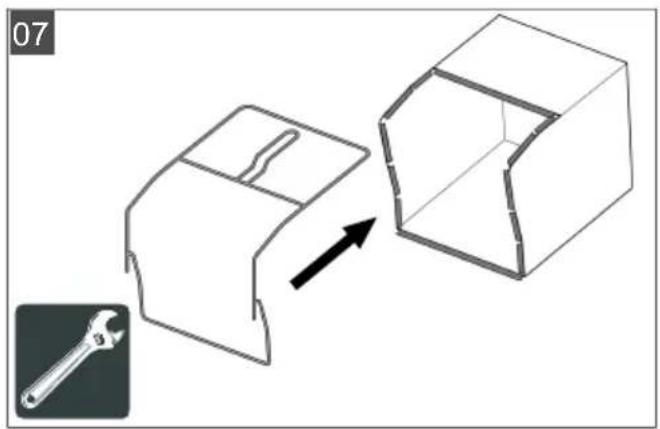
4.2 Installing the grass collector (07, 08)
See figures (07) to (08).
5 START-UP
IMPORTANT! Risk of damage to the appliance. The aerator roller screw is fastened to the underside of the scarifier.
■ Remove the aerator roller before switching on the appliance.
5.1 Carrying out visual inspection
- Check the appliance for damage and loose screws. Replace the defective appliance parts and tighten the screws.
- Check the mains cable for damage. Replace the defective mains cable.
- Check the appliance for coarse soiling. Remove soiling.
5.2 Providing the mains cable and checking the mains connection
Observe the safety instructions for the mains cable.
Demands on the mains cable
Obtain a mains cable that satisfies the following requirements:
■ 3 conductors with a minimum cross-section of 2.5 mm (i.e. with protective conductor)
■ Maximum length 40 m
■ Spray water protected (protection category IP44)
■ Suitable for outdoor use (H05RN-F quality, i.e. rubber sheathed cable)
Demands on the mains connection
Check that the mains connection satisfies the following requirements:
Min. 10 A fuse
■ Fault current circuit breaker with max. 30 mA trigger current
5.3 Adjusting the handlebar (06)
- On both sides of the upper and lower handlebar at the intermediate brace:
■ Loosen the wing nut (06/6) at the intermediate brace (06/1).
■ Remove nut (06/5) and washer (06/4) from the screw.
■ Pull out (06/c) the screw (06/3).
-
On the left-hand side: Pull out screw (06/3) with cable clip (06/8) on the cable.
-
Move the handlebar (06/2, 06/7) to the next hole in the intermediate brace (06/d).
-
Tighten the handlebar again in the reverse order.
6 OPERATION
NOTE Always mow the lawn before scarifying (max. grass height: 4 cm). Remove any foreign objects from the lawn surface. Stay in the operating position and grasp the handle to maintain stability during operation.
6.1 Folding the handlebar in and out (09)
CAUTION! Danger of crushing. Fingers or other parts of the body can be crushed between the loose parts of the handlebar.
- Hold the loose parts of the handlebar tightly.
- Do not hold any fingers or other parts of the body between the loose parts.
IMPORTANT! Danger of damaging the mains cable. The motor and mains cables can be crushed and damaged between the loose parts of the handlebar.
- Do not trap the cables when folding the handlebar in and out.
Folding in the handlebar
- Loosen the wing nuts (09/1) at the lower handlebar and fold the top handlebar (09/2) downwards (09/a).
- Loosen the wing nuts (09/3) at the upper handlebar until the whole folded upper handlebar can be folded upwards (09/b).
- Tighten all wing nuts slightly.
Folding out the handlebar
Proceed in the reverse order.
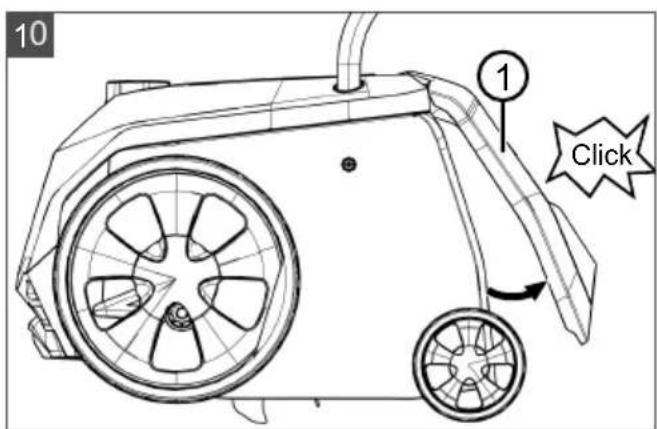
6.2 Opening the baffle (10)
The appliance can be operated with or without grass collector.
For scarifying without grass collector
NOTE The impact flap is closed on delivery. Always open the impact flap before scarifying so that the scarified material can be discharged at the impact flap.
- Fold the baffle (10/1) back until it audibly engages at an angle of approx. 30^ .
For scarifying with grass collector
Fold the baffle completely up. Using the grass collector: see chapter 6.3 "Attaching and removing the grass collector [optional] (11)", page 27.
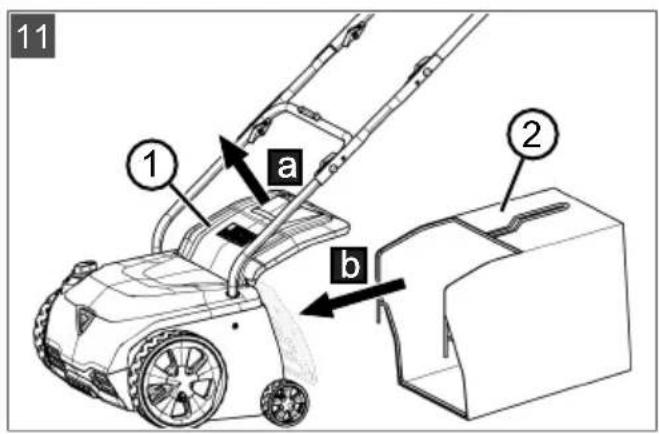
6.3 Attaching and removing the grass collector [optional] (11)
Attaching the grass collector
- Raise baffle (11/1) (11/a).
- Attach the grass collector (11/2) in the holders (11/b) from behind.
- Release the baffle.
Removing and emptying the grass collector
- Stop the appliance and wait until the blade system has come to a standstill.
- Raise the baffle (11/1).
- Lift the grass collector (11/2) out of the holders and take off to the rear.
- Empty the grass collector.
- Attach the grass collector (see above).
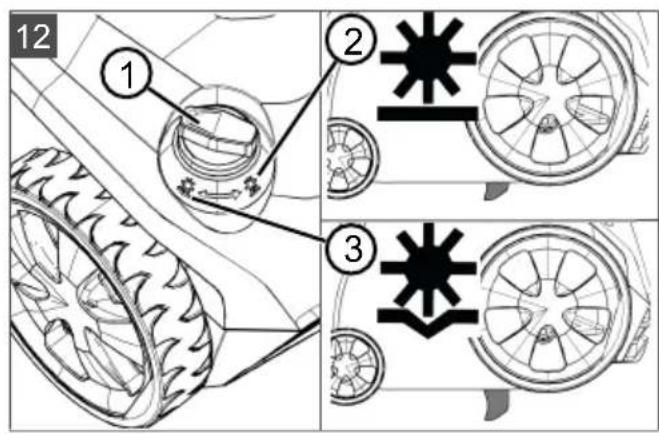
6.4 Setting the working depth (12)
CAUTION! Danger of cutting injuries.
There is danger of lacerations when reaching into the blade system while it is running on or the stopped blade system.
■ Stop the appliance and wait until the blade system has stopped.
■ Disconnect the mains plug to power down the appliance.
■ Wear protective gloves.
The setting of the working depth depends on:
Lawn condition:
■ well-kept: low working depth
■ Overgrown: high working depth
■ Ground to be scarified:
Initially 2 - 3 mm penetration depth into the lawn.
- Gradually increase the working depth until sufficient material is scarified from the ground.
Blade wear:
■ new blades: low working depth
■ worn blades: high working depth
If the working depth is too large: The appliance stops and the motor does not run.
IMPORTANT! Danger of damage to the appliance. Only set the working depth if the engine is switched off and the blade shaft is stopped.
-
Turn the setting wheel (12/1) to the right to scarify less deeply (12/2). The blade system is raised.
-
Checking the working depth:
■ Start the appliance (see chapter 6.6 "Starting and stopping the motor (16, 17)", page 28).
- Drive a short distance on the lawn and check the result. If the lawn is insufficiently or irregularly scarified, the blade system must be lowered.
- Stop the appliance and wait until the blade system has come to a standstill.
- Turn the setting wheel (12/1) slightly to the left to scarify more deeply (12/3). The blade system is lowered.
- Repeat the previous steps until the lawn is scarified uniformly.
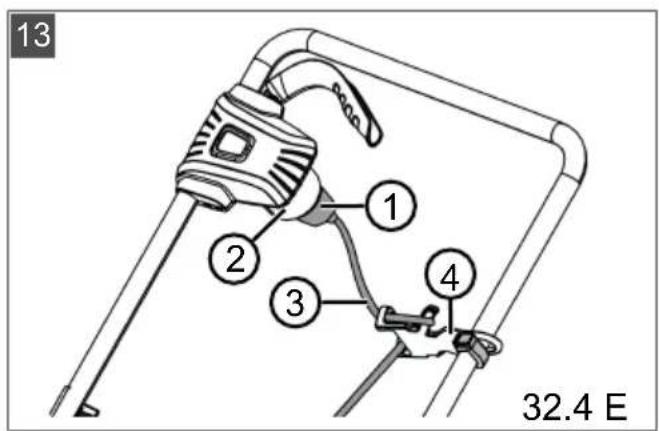
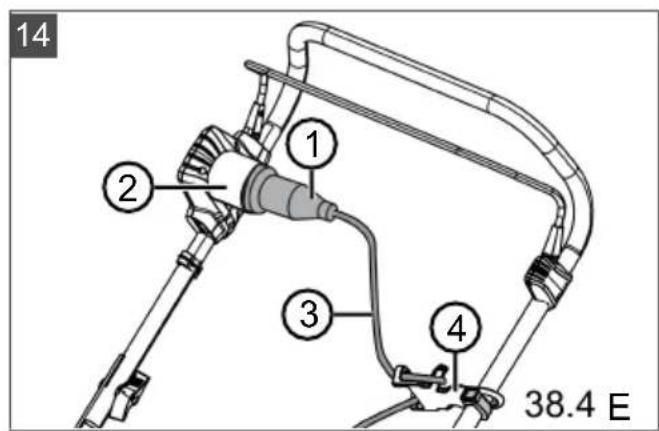
6.5 Making the mains connection (13, 14, 15)
- Firmly plug the socket (13/1, 14/1) of the mains cable into the plug (13/2, 14/2) on the motor switch.
- Clamp the mains cable (13/3, 14/3) into the cable strain relief hook (13/4, 14/4) (15/a) and (15/b) in such a way that it cannot be pulled off the motor switch.
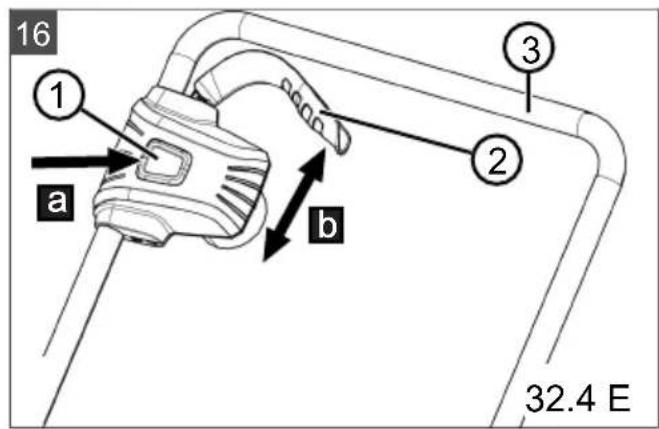
6.6 Starting and stopping the motor (16, 17)
IMPORTANT! Risk of damage to the appliance. The motor and blade system can be damaged by repeatedly switching on and off.
■ Switch the motor on only when the blade system is at a standstill.
Starting the motor 32.4 E
- Press the safety button (16/1) and hold (16/a).
- Pull motor switch lever (16/2) towards the handlebar (16/3) (16/b). Start the motor and blade system.
- Release the safety button (16/1) and hold the motor switch lever (16/2).
NOTE The motor switch lever does not latch. Hold it tight against the handlebar during the entire working period.
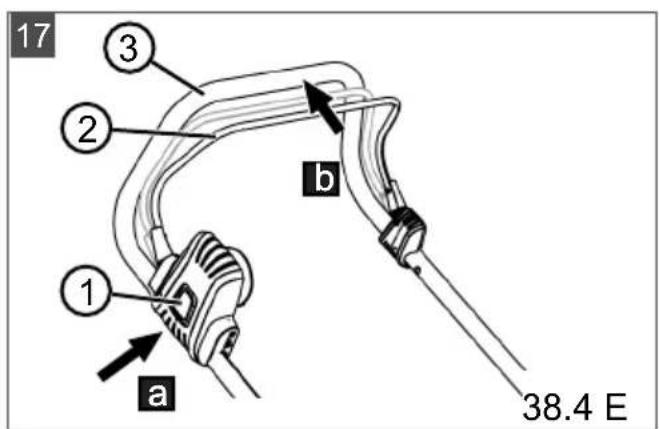
Starting the motor 38.4 E
- Press the safety button (17/1) and hold (17/a).
- Pull the operator presence control (17/2) towards the handlebar (17/3) (17/b). Start the motor and blade system.
- Release the safety button (17/1) and hold the motor switch lever (17/2).
NOTE The operator presence control does not latch. Hold it tight against the handlebar during the entire working period.
Stopping the motor 32.4 E
- Release the motor switch lever (16/2). It automatically returns to its initial position.
The motor stops immediately. The blade system runs down to a standstill.
Stopping the motor 38.4 E
- Release the operator presence control (17/2). It automatically returns to its initial position.
The motor stops immediately. The blade system runs down to a standstill.
CAUTION! Danger of cutting injuries.
There is danger of lacerations when reaching into the blade system while it is running on or the stopped blade system.
- Stop the appliance and wait until the blade system has stopped.
■ Disconnect the mains plug to power down the appliance.
■ Wear protective gloves.
7 MAINTENANCE AND CARE
CAUTION! Danger of cutting injuries.
There is danger of lacerations when reaching into the blade system while it is running on or the stopped blade system.
■ Stop the appliance and wait until the blade system has stopped.
■ Disconnect the mains plug to power down the appliance.
■ Wear protective gloves.
i NOTE Replace the defective mains cable only with an original mains cable (with plug and socket) from the manufacturer!
7.1 Cleaning the blade system
IMPORTANT! Danger from water. Water in the appliance causes short-circuits and destroys electrical components.
■ Do not spray the appliance with water.
■ Only use a broom or a brush for cleaning.
-
Stop the appliance and wait until the blade system has come to a standstill.
-
Disconnect the mains plug.
-
Remove the grass collector (see chapter 6.3 "Attaching and removing the grass collector [optional] (11)", page 27).
-
Tilt the appliance onto the side and clean the blade system with a broom or handbrush.
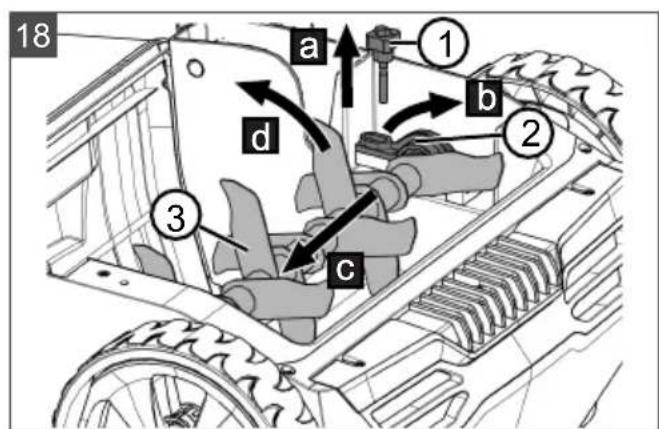
7.2 Replacing the scarifier roller and aeration roller (optional) (18)
The scarifier roller is intended for coarse scarifying work and the aeration roller (optional) for fine scarifying work (see chapter 2.6 "Scope of supply (02, 03)", page 22).
Removing the roller
- Stop the appliance and wait until the blade system has come to a standstill.
- Disconnect the mains plug.
- Turn the appliance over.
- Loosen and remove the screw (18/1) (18/a).
-
Fold the locking bar (18/2) upwards (18/b).
-
Gently push the roller (18/3) towards the housing (18/c).
- Remove the roller (18/d).
Proceed in the reverse order.
Installing the roller
8 HELP IN CASE OF MALFUNCTION
CAUTION! Risk of injury. Sharp-edged and moving appliance parts can lead to injury.
■ Always wear protective gloves during maintenance, care and cleaning work!
NOTE For malfunctions that are not listed in this table or that you cannot resolve yourself, please contact our customer service.
| Malfunction Cause Remedy | ||
| Motor does not start. No electric power | Check the mains cable and circuit breaker.Pull the motor switch lever/operator presence control completely up against the handlebar. | |
| Immediate short-circuit on inserting the mains plug | Defective electrical components in the appliance. | Set a lower working depth.Clean the blade system. |
| The blade system does not rotate. | The blade system is blocked by lawn thatch and moss. | Contact a customer service work-shop. |
| Motor and scarifier performance decreases. | The blade system is braked. | Set a lower working depth.Clean the blade system. |
| Scarifier blades are worn. | Set a lower working depth.Mow the lawn. | |
| Appliance vibrates and does not run smoothly. | Scarifier blades are damaged. | Replace scarifier roller.Contact a customer service workshop. |
9 TRANSPORT
IMPORTANT! Risk of damage to the appliance. The blade system will be damaged if the appliance is moved over a solid surface with the blade system lowered.
■ To raise the blade system, turn the adjuster wheel for the working depth to Shallow scari-fying.
-
Stop the motor and wait until the blade system has come to a standstill.
-
Turn the setting wheel for the working depth to the right to Shallow scarifying (12/2).
-
Remove the mains plug from the power socket, fold up the mains cable.
Transporting the appliance between two working areas
■ Move the appliance to the working area with the blade system raised.
■ To carry the appliance: Lift the appliance by the carrying handle.
Transporting the appliance in a vehicle
- Fold in the handlebar (see chapter 6.1 "Folding the handlebar in and out (09)", page 27).
- Secure the appliance in the vehicle against falling over and slipping.
■ Protect the appliance against collisions with loose objects.
■ Do not place objects on the appliance.
10 STORAGE
- Disconnect the mains plug.
- Turn the setting wheel for the working depth to the right to Shallow scarifying (12/2).
- Fold in the handlebar (see chapter 6.1 "Folding the handlebar in and out (09)", page 27).
- Thoroughly clean the spreader (see chapter 7.1 "Cleaning the blade system", page 28).
- Apply a thin coat of oil or silicon to all metal parts for corrosion protection.
- Store the appliance in a dry, clean location protected from frost. Cover with a breathable tarpaulin to protect against dust. Do not use plastic film in order to avoid the accumulation of moisture.
11 DISPOSAL
Information on the German Electrical and Electronic Equipment Act

Electrical and electronic appliances do not belong in household waste, but should be collected and disposed of separately!
- Owners or users of electrical and electronic appliances are obliged by law to return them after use.
14 WARRANTY
The symbol of the crossed-through rubbish bin means that electrical and electronic appliances may not be disposed of in the household rubbish.
Electrical and electronic appliances can be handed in at the following places at no charge:
■ Public service disposal or collection points (e.g. municipal building yards)
■ Points of sale of electrical appliances (stationary and online) if dealers are obliged to take them back or offer this voluntarily.
These statements only apply to appliances that are installed and sold in the countries of the European Union and are subject to European Directive 2012/19/EU. Different provisions may apply to the disposal of electrical and electronic appliances in countries outside the European Union.
12 AFTER-SALES/SERVICE
In the event of questions of warranty, repair or spare parts, please contact your nearest AL-KO Service Centre. These can be found on the Internet at:
www.alko-garden.com/service-contacts
Further information on spare parts can be found at: www.alko-garden.com/spareparts
13 INFORMATION ON THE DECLARATION OF CONFORMITY
We hereby declare, as the exclusively responsible party, that this product in its marketed form meets the requirements of the harmonised EU Directives, EU safety standards and the product-specific standards. The Declaration of Conformity forms part of the operating instructions and is included with the machine.
We will remedy any material or manufacturing defects discovered in the device during the statutory period of limitation for claims for defects by repair or replacement at our discretion. The period of limitation is determined in each case by the law of the country in which the device was purchased.
Our warranty promise applies only if:
■ These operating instructions are observed
■ The device is handled correctly
■ Original spare parts have been used
The warranty becomes void in the case of:
■ Unauthorised repair attempts
■ Unauthorised technical modifications
■ Use for other than the intended purpose
The warranty does not include:
■ Paint damage attributable to normal wear
■ Wear parts that are marked with a box xxxxxx (x) on the spare parts card
The warranty period commences with the purchase by the first end user. The date on the proof of purchase is decisive. In the event of a warranty claim, please contact your dealer or the nearest authorised customer service centre with this declaration and the original proof of purchase. This declaration does not affect the purchaser's statutory claims for defects against the vendor.
VERTALING VAN DE ORIGINELE GEBRUIKERSHANDLEIDING
Inhoudsopgave
2 PRODUCTOMSCHRIJVING
12 SERVISNA SLUŽBA/SERVIS
7 VEDLIKEHOLD OG PLEIE
9 Transportimine....226
10 Hoiulepanek....227
Imported by: AL-KO Gardentech UK Ltd, Murray way, Wincanton, Somerset, BA9 9RS / UK | +44 (0) 1963 828055
shop.uk@al-ko.com | www.alko-garden.uk
AL-KO Service: www.al-ko.com/service-contacts