
BCH5200PB - String Trimmer SCHEPPACH - Free user manual and instructions
Find the device manual for free BCH5200PB SCHEPPACH in PDF.
| Product type | Petrol grass trimmer / brushcutter |
| Brand | Scheppach |
| Model | BCH5200PB |
| Engine | 2-stroke, 51.7 cm³, 1.45 kW |
| Fuel type | Mixture unleaded petrol / 2-stroke oil (40:1) |
| Fuel tank capacity | 920 cm³ |
| Weight (without fuel) | 7.2 kg |
| Cutting diameter (line) | 450 mm |
| Cutting diameter (blade) | 255 mm |
| Cutting line thickness | 2 x 2.8 mm |
| Max. cutting speed (line) | 6900 min⁻¹ |
| Max. cutting speed (blade) | 7500 min⁻¹ |
| Sound power level | 108.4 dB(A) |
| Sound pressure level | 98.4 dB(A) |
| Vibrations (edger) | Left 4.20 m/s², right 4.07 m/s² |
| Vibrations (brushcutter) | Left 4.64 m/s², right 4.79 m/s² |
| Included accessories | Spool with line, 3-tooth cutting blade, guard, harness, mixing can, wrenches |
| Use | Cutting grass, weeds, undergrowth and small wood |
| Number of manual pages | 276 pages (multilingual) |
| Warranty | Legal warranty (defective parts replaced free of charge) |
Frequently Asked Questions - BCH5200PB SCHEPPACH
User questions about BCH5200PB SCHEPPACH
0 question about this device. Answer the ones you know or ask your own.
Ask a new question about this device
Download the instructions for your String Trimmer in PDF format for free! Find your manual BCH5200PB - SCHEPPACH and take your electronic device back in hand. On this page are published all the documents necessary for the use of your device. BCH5200PB by SCHEPPACH.
USER MANUAL BCH5200PB SCHEPPACH
natural_image
Black-and-white photo of a manual grassy tool with a mounted machine (no visible text or symbols)
BCH5200PB
| DE | Benzin-FreischneiderOriginalbetriebsanleitung | 9 |
| GB | Petrol brush cutterTranslation of original instruction manual | 26 |
| FR | Débroussailleuse thermiqueTraduction des instructions d'origine | 40 |
| IT | Decespugliatore a benzinaLa traduzione dal manuale di istruzioni originale | 55 |
| NL | Benzine bosmaaierVertaling van de originele gebruikshandleiding | 70 |
| ES | Desbrozadora de gasolinaTraducción del manual de instrucciones original | 85 |
| PT | Máquina corta-mato a gasolinaTradução do manual de operação original | 100 |
| CZ | Benzínový křovinořezPřeklad originálního návodu k obsluze | 115 |
| SK | Benzínový krovinorezPreklad originálneho návodu na obsluhu | 129 |
| HU | Benzines fūkaszaEredeti használati utasítás fordítása | 143 |
| PL | Wykaszarka benzynowaTłumaczenie oryginalnej instrukcji obsługi | 157 |
| SI | Bencinski rezalnik grmičevjaPrevod originalnih navodil za uporabo | 172 |
| EE | Bensiini-vōsalōikurOriginaalkāitusjuhendi tõlge | 186 |
| LT | Benzininė krūmapjovėOriginalios naudojimo instrukcijos vertimas | 200 |
| LV | Benzīna krūmgriezisOriginālās lietošanas instrukcijas tulkojums | 214 |
| SE | Bensindriven kanttrimmerÖversättning av original-bruksanvisning | 228 |
| FI | Bensiinikäyttöinen raivaussahaKäännös alkuperäisestä käyttöohjeesta | 242 |
| RS | Benzinska štapna kosaPrevod originalnog uputstva za upotrebu | 256 |


natural_image
Mechanical assembly diagram showing a pipe fitting with mounting holes and a lever mechanism (no text or symbols)
natural_image
Close-up of a metallic cable or connector with a black clip and arrow indicating a joint detail (no text or symbols)
natural_image
Close-up of a hand adjusting a metal pipe fitting with a bolted joint (no text or symbols visible)
natural_image
Mechanical assembly diagram showing a propeller with two blades and a central hub, labeled with numbers 8 and 23 (no text or symbols beyond labels)
natural_image
Close-up of hands using a mechanical tool to adjust a propeller (no text or symbols visible)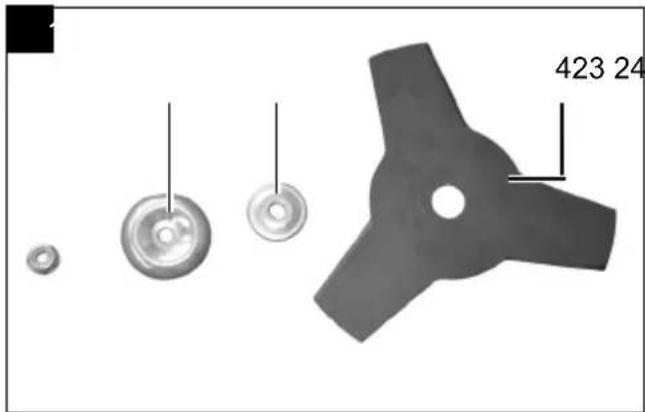
natural_image
Mechanical component diagram showing a three-blade impeller with four circular features and a labeled dimension (423, 24) on the right side.
natural_image
Close-up of a metallic pipe fitting with mounting bolts and a central clamping tool (no text or symbols visible)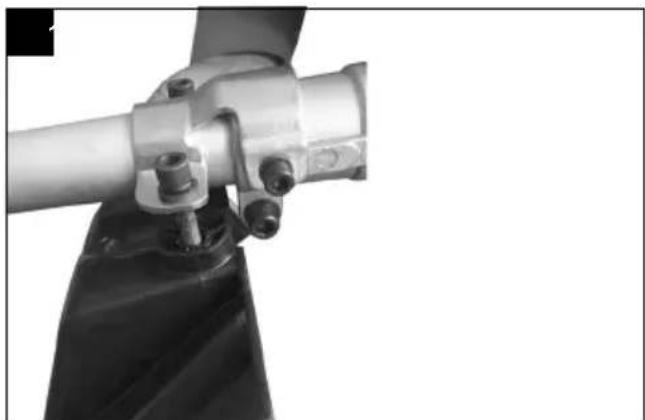
natural_image
Close-up of a mechanical assembly with a metallic pipe and black fabric base (no visible text or symbols)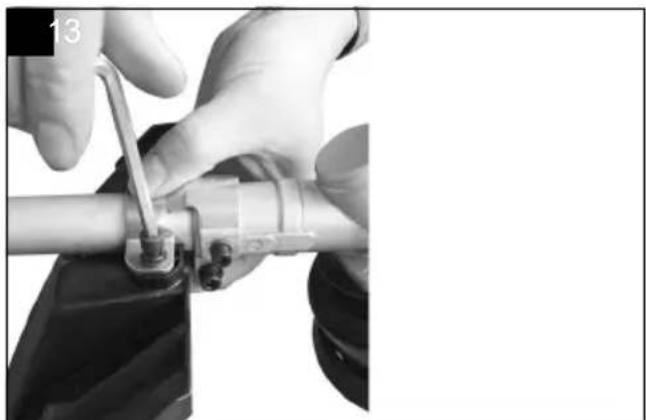
natural_image
Close-up of hands using a tool to adjust or install a pipe fitting (no visible text or symbols)
natural_image
Close-up of hands performing a mechanical assembly with a tool, no visible text or symbols
natural_image
Line drawing of a mechanical device with a handle and base mount (no text or symbols)
natural_image
Technical line drawing of a mechanical device with labeled component A (no text or symbols beyond label)
natural_image
Black-and-white photo of a person wearing a full-body harness and holding a small object (no text or symbols visible)
natural_image
Back view of a person wearing a T-shirt with a black overhead belt, shown from front and back angles (no text or symbols visible)
natural_image
Close-up of hands holding a mechanical clamp and metal bracket, no visible text or symbols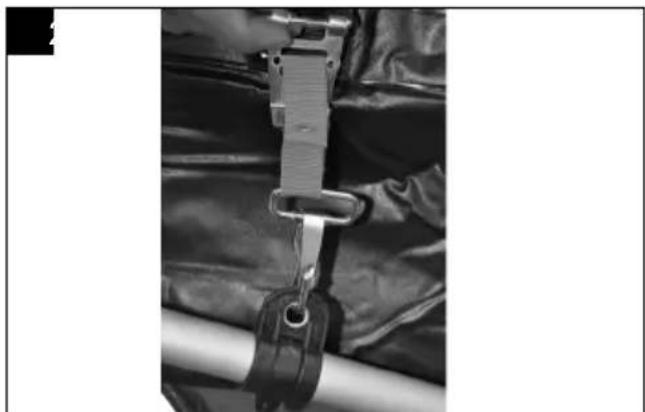
natural_image
Close-up of a metallic mechanical clamp securing a black circular component against a dark fabric background (no text or symbols visible)
natural_image
Close-up of a mechanical device with attached metal bracket and vertical shaft (no visible text or symbols)
natural_image
Close-up of a black handheld device with a white handle and control knob, no visible text or symbols

natural_image
Close-up of a mechanical component being adjusted, showing internal parts and a numbered scale indicator (16), with no visible text or symbols.
natural_image
Close-up of hands operating a mechanical device with an arrow indicating direction (no text or symbols visible)
natural_image
Close-up of a mechanical device with a black motor and white housing, showing a white arrow pointing to a component (no text or symbols visible)

natural_image
Close-up of a white plastic industrial device with internal components and directional arrows indicating flow or movement (no text or symbols visible)
natural_image
Close-up of a hand adjusting a small mechanical component with a key inserted, showing a circular opening (no text or symbols visible)
natural_image
Close-up of a hand operating a small white vacuum cleaner with control knobs and a black arrow pointing to the component (no visible text or symbols)
natural_image
Close-up of a mechanical device with a lever and fan assembly (no visible text or symbols)
natural_image
Close-up of a white plastic mechanical component with a circular opening and directional arrows indicating flow or movement (no text or symbols visible)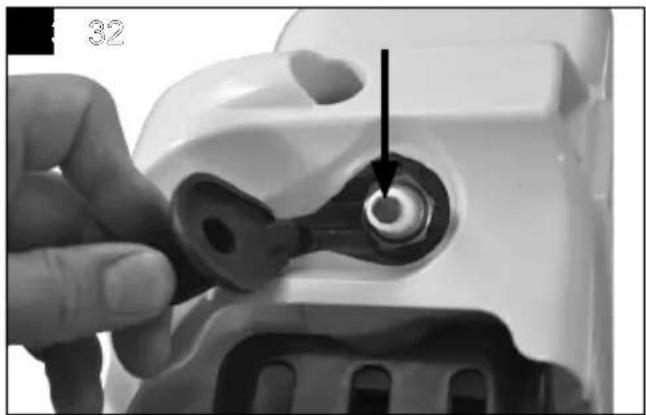
natural_image
Close-up of a hand adjusting a white mechanical component with a key inserted, showing a circular opening (no text or symbols visible)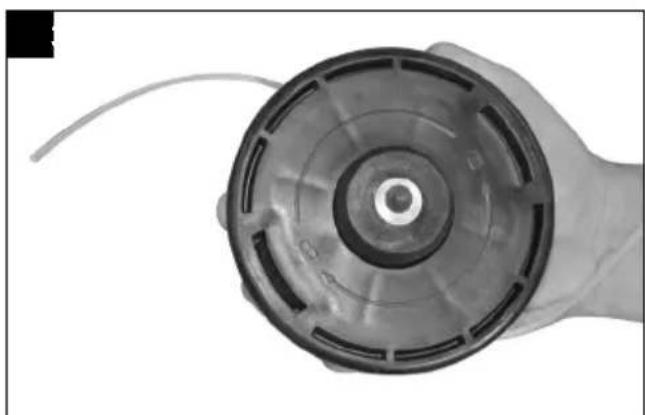
natural_image
Close-up of a hand holding a circular mechanical component with concentric rings and a cable (no visible text or symbols)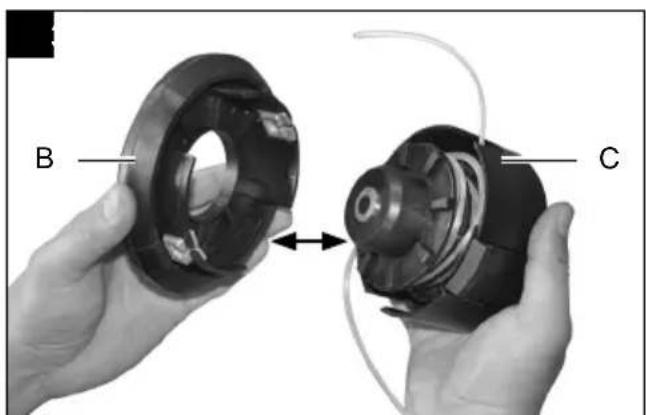
natural_image
Two hands holding a mechanical component, labeled B and C, with no visible text or symbols on the parts themselves.
natural_image
Two hands holding a mechanical component with coiled spring, showing internal structure (no text or symbols visible)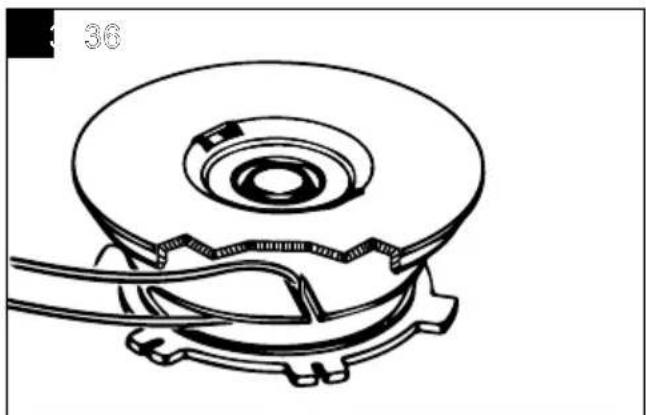
natural_image
Technical line drawing of a mechanical component with gears and a central hub (no text or symbols)
natural_image
Line drawing of a simple outdoor table with a circular top and four legs (no text or symbols)
natural_image
Close-up of a hand holding a small black object with a coiled tube inserted, next to a cylindrical device (no visible text or symbols)
natural_image
Diagram of a mechanical device with a downward arrow indicating motion or force, no text or symbols present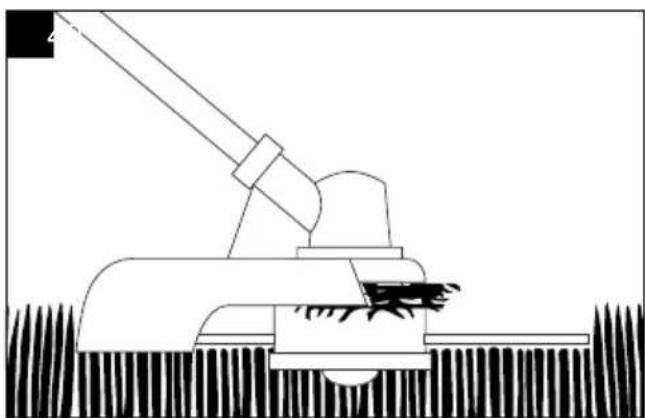
natural_image
Line drawing of a mechanical tool interacting with grass and rebar (no text or symbols)
natural_image
Illustration showing two scenarios: one of a person using a spray gun on grass, the other of a person using a pulley system to lift a weight (no text or symbols present)Günzburger Straße 69
D-89335 Ichenhausen
Verehrter Kunde,
Homepage: https://www.scheppach.com/de/service
Explanation of the symbols on the product
Symbols are used in this manual to draw your attention to potential hazards. The safety symbols and the accompanying explanations must be fully understood. The warnings themselves will not rectify a hazard and cannot replace proper accident prevention measures.
 | Before commissioning, read and observe the operating manual and safety instructions! |
 | Attention! Petrol is very easily flammable. Avoid smoking, naked flames or flying sparks near fuel. |
 | Warning! Disregard results in a risk of death or injury, or damage to the tool |
 | Attention: Risk of injury!Do not allow hands and feet to come into contact with the blade when the engine is running. |
 | Keep children, onlookers and helpers 15m away from the brush cutter! |
 | Wear sturdy footwear! |
 | Use safety helmet, hearing protection and safety goggles! |
 | Wear work gloves! |
 | Attention! The exhaust pipe and other parts of the engine become very hot during operation, do not touch! |
 | Symbol for the “Petrol/oil mixing ratio” to be filled in on the tank cover. |
 | Attention! Danger of injury due to objects being flung away |
 | The product complies with the applicable European directives. |
 | The product complies with the applicable Serbian directives. |
 | Pay attention to kick-back! |
 | Attention, do not use saw blades or multi-part metallic cutting tools! |
 | Brush cutter |
 | Grass trimmer |
 | Guaranteed sound power level |
 | Tank contents |
Table of contents: Page:
- Introduction....29
- Product description (fig. 1)....29
- Proper use 29
- General safety instructions.... 30
- Technical data....32
- Unpacking....32
- Before commissioning....33
- Assembly and operation....33
- Working instructions....35
- Cleaning and storage.... 36
- Maintenance 36
- Repair & ordering spare parts 37
- Disposal and recycling.... 38
- Troubleshooting 39
- Declaration of conformity 273
1. Introduction
Manufacturer:
Scheppach GmbH
Günzburger Straße 69
D-89335 Ichenhausen
Dear Customer,
We hope your new product brings you much enjoyment and success.
Note:
In accordance with the applicable product liability laws, the manufacturer of this product assumes no liability for damage to the product or caused by the product arising from:
- Improper handling
• Non-compliance with the operating manual
• Repairs carried out by third parties, unauthorised specialists
• Installing and replacing non-original spare parts - Improper use
- Failure of the electrical system in the event of the electrical regulations and VDE provisions 0100, DIN 57113 / VDE 0113 not being observed
Note:
The operating manual is part of this product. It includes important instructions for the safe, proper and economic operation of the product, for avoiding danger, for minimising repair costs and downtimes and for increasing the reliability and extending the service life of the product. In addition to the safety instructions in this operating manual, you must also observe the regulations applicable to the operation of the product in your country.
Familiarise yourself with all operating and safety instructions before using the product. Only operate the product as described and for the specified areas of application. Keep the operating manual in a good place and hand over all documents when passing the product on to third parties.
2. Product description (fig. 1)
Scope of delivery
- Thread coil with cutting thread
- Protection
- Guide bar with drive shaft
- Cutting blade
- Guide handle
-
On/off switch
-
Throttle interlock
- Throttle
- "Locking" throttle
- Choke lever
- Start pull cord
- Spark plug connector
- Fan housing cover
- Fuel tank
- Housing for engine cooling
- Fuel pump
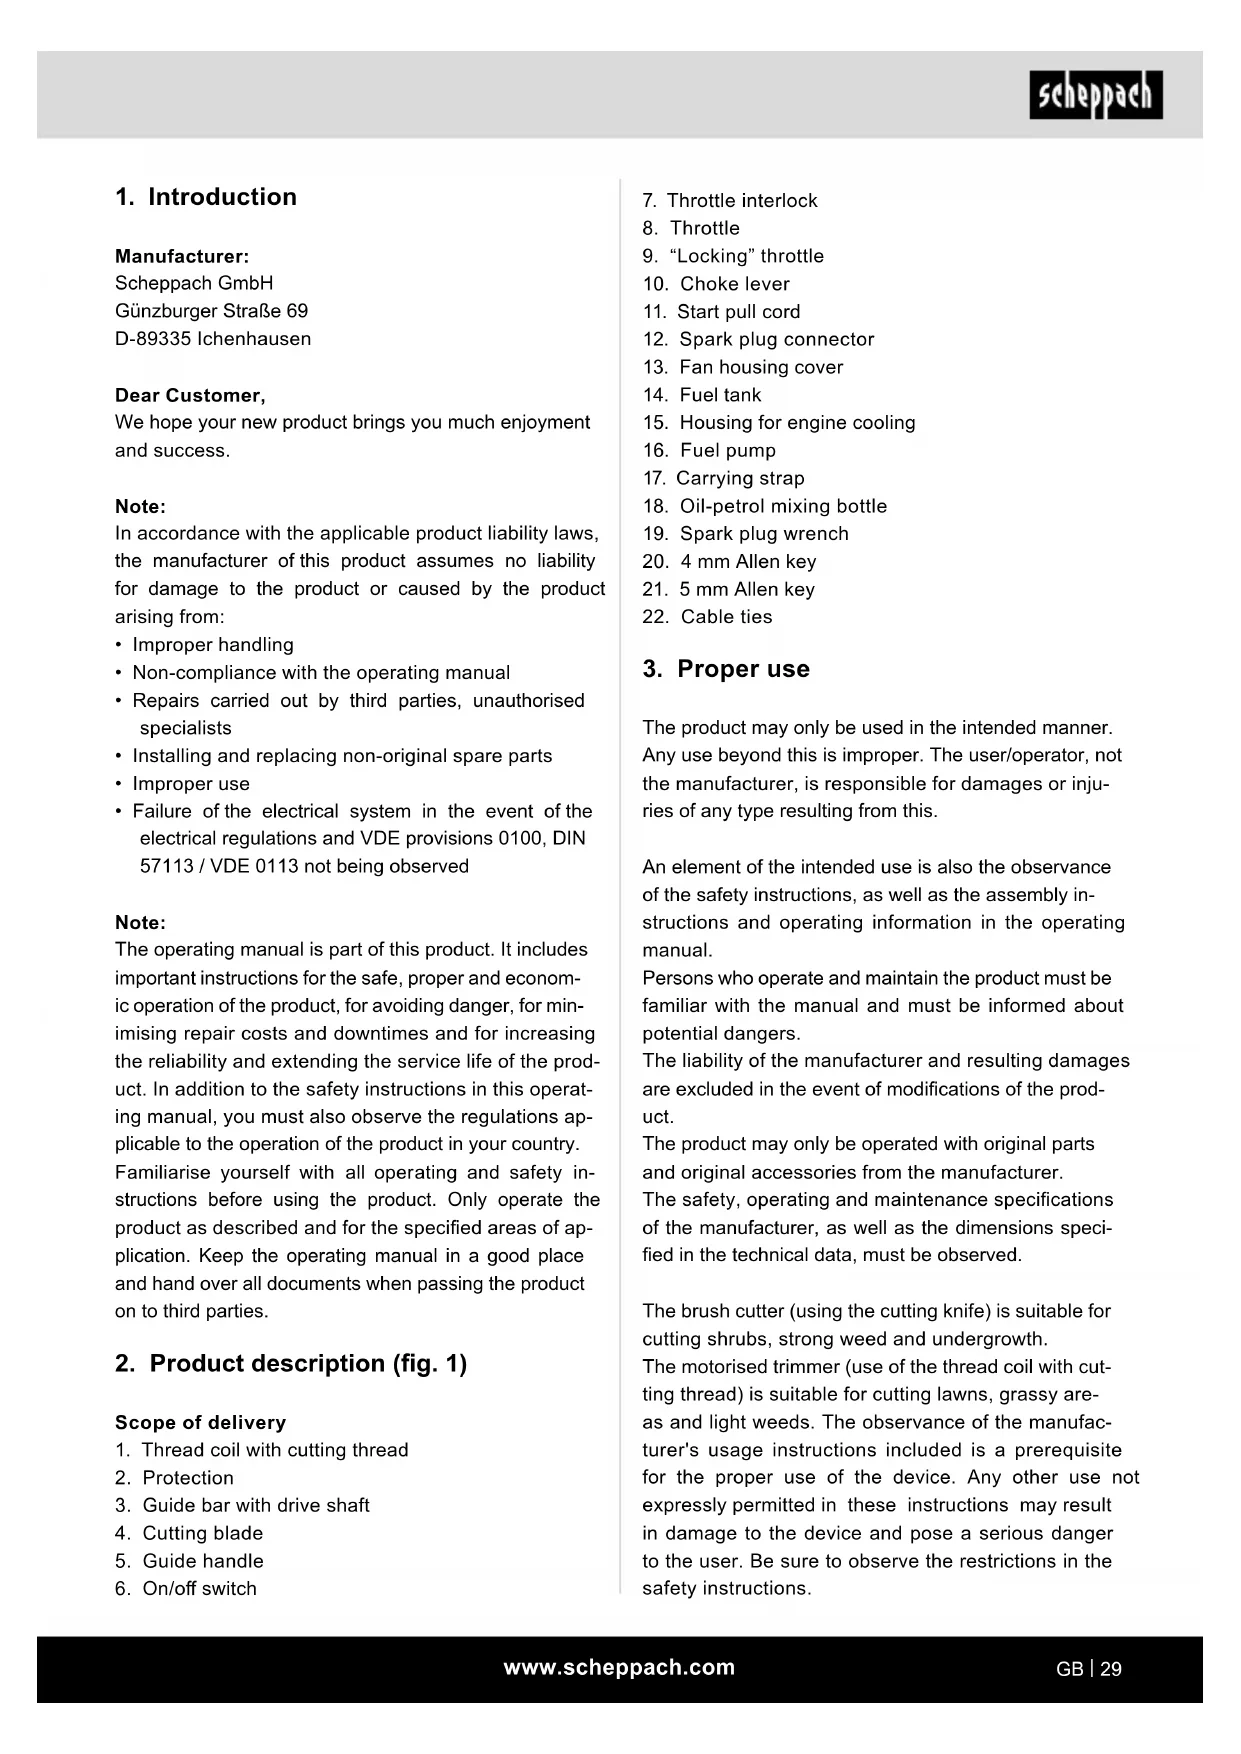
- Carrying strap
- Oil-petrol mixing bottle
- Spark plug wrench
- 4 mm Allen key
- 5 mm Allen key
- Cable ties
3. Proper use
The product may only be used in the intended manner. Any use beyond this is improper. The user/operator, not the manufacturer, is responsible for damages or injuries of any type resulting from this.
An element of the intended use is also the observance of the safety instructions, as well as the assembly instructions and operating information in the operating manual.
Persons who operate and maintain the product must be familiar with the manual and must be informed about potential dangers.
The liability of the manufacturer and resulting damages are excluded in the event of modifications of the product.
The product may only be operated with original parts and original accessories from the manufacturer.
The safety, operating and maintenance specifications of the manufacturer, as well as the dimensions specified in the technical data, must be observed.
The brush cutter (using the cutting knife) is suitable for cutting shrubs, strong weed and undergrowth.
The motorised trimmer (use of the thread coil with cutting thread) is suitable for cutting lawns, grassy areas and light weeds. The observance of the manufacturer's usage instructions included is a prerequisite for the proper use of the device. Any other use not expressly permitted in these instructions may result in damage to the device and pose a serious danger to the user. Be sure to observe the restrictions in the safety instructions.
Attention! Due to physical hazards to the user, the petrol trimmer must not be used for the following work: cleaning pavements and as a shredder for shredding tree and hedge cuttings. Furthermore, the petrol trimmer must not be used for levelling ground elevations, such as molehills. For safety reasons, the petrol trimmer must not be used as a drive unit for other working tools and tool sets of any type.
The machine may only be used in the intended manner. Any use beyond this is improper. The user/operator, not the manufacturer, is responsible for damages or injuries of any type resulting from this.
Who is not permitted to use the device:
People who are not familiar with the operating manual, children under the age of 16, people under the influence of alcohol, drugs or medication.
Petrol trimmer operating hours
Even though a trimmer may be used at any time, the operator should be considerate of the people around him.
Please note that our products were not designed with the intention of use for commercial or industrial purposes. We assume no guarantee if the product is used in commercial or industrial applications, or for equivalent work.
The manufacturer is not liable for damage caused by improper use or incorrect operation.
Explanation of the signal words in the operating manual
DANGER
Signal word to indicate an imminently hazardous situation which, if not avoided, will result in death or serious injury.
WARNING
Signal word to indicate a potentially hazardous situation which, if not avoided, could result in death or serious injury.
CAUTION
Signal word to indicate a potentially hazardous situation which, if not avoided, could result in minor or moderate injury.
ATTENTION
Signal word to indicate a potentially hazardous situation which, if not avoided, could result in product or property damage.
4. General safety instructions
⚠ WARNING - Read all safety information, instructions, illustrations and technical data for this product.
Failure to follow all instructions listed below may result in electric shock, fire and/or serious injury.
Save all warnings and instructions for future reference.
Safety instructions
This device is not intended for use by persons (including children) with reduced physical, sensory or mental capabilities, or who have insufficient experience and knowledge, unless they have been given supervision and instruction concerning use of the device by a person responsible for their safety.
Children must be supervised so that they do not play with the device.
1. Training
- Read through the instructions carefully. Familiarise yourself with the controls and the proper use of the unit.
- Never allow children or persons who are not familiar with these instructions to use the device. The relevant laws of a country may specify a minimum age for the operator.
- Never mow while people, especially children, or pets are nearby.
- The operator or user is responsible for the consequences of hazards to which other people or their property are exposed.
- Do not run the engine indoors. The exhaust gases contain harmful carbon monoxide.
2. Preparation
• Always wear suitable footwear and long trousers during cutting.
- Do not operate the device if barefoot or wearing sandals.
- Thoroughly check the area where the device is to be used; remove all stones, sticks, wires, bones and other objects.
- Check the blades, pins and cutter for visible damage or wear before each use. Replace worn or damaged blades and screws in pairs to ensure balance.
- Be careful with multi-cutting edge devices as one cutting edge may cause other cutting edges to rotate.
3. Operation
- Only use the device in daylight or with good artificial lighting.
- Do not use it on wet grass.
- Make sure of secure footing, especially on slopes.
- Walk; do not run.
• Take particular care when changing direction on a slope.
- Do not cut grass on excessively steep slopes.
• Take particular care when turning the device around or pulling it towards you.
- Never operate the device with faulty protective devices or shields or without protection for yourself.
- Switch on the engine as per the instructions and keep your feet away from the cutting edge(s).
- In this case, do not tilt it further than absolutely necessary and only lift the part that is away from the operator. Both hands must be in the operating position before moving the device back towards the ground.
- Keep hands and feet away from the rotating parts.
- Never pick up or carry the device while the engine is running.
- Pull the spark plug out of the base:
- when you are not working with the device,
– before removing a blockage,
– before checking, cleaning or working on the device,
- after touching an object. Check the device for damage and repair if necessary,
- if it starts to vibrate abnormally (check immediately).
4. Maintenance and storage
- Make sure that all nuts, pins and screws are securely tightened so that the device is in a safe working condition.
- Check the grass catcher regularly for wear and tear.
- Replace worn or damaged parts for safety reasons.
- On rotary mowers, only use replacement cutting devices of the appropriate type.
- Never store the device fuelled in a building where gases can reach an open flame or sparks.
- Allow the engine to cool down before storing it in a container.
- To reduce the risk of fire, keep the engine, silencer, battery compartment and fuel storage area free of grass, leaves and excessive grease.
- If the fuel tank needs to be emptied, do this outdoors.
Special safety warning
-
Hold the handles of the trimmer securely with both hands. When you stop work, move the throttle to the idle position.
-
Maintain a stable, even posture when working.
-
Keep the engine speed at the level required for cutting; never increase the engine speed above the required level.
-
If grass gets caught in the cutting edge during operation or you need to check or refuel the device, always switch off the engine.
-
If the cutting edge touches a hard object such as a stone, stop the engine immediately and check whether the cutting edge has been damaged. In this case, replace the cutting edge with a new one.
-
If someone calls for you while you are working, you must always switch off the engine before turning towards them.
-
Never touch the spark plug or cable while the engine is running. There is a risk of electric shock if disregarded.
-
Never touch the silencer, spark plug or other metal parts of the engine while the engine is running or immediately after the engine has been switched off. Failure to do so may result in severe burns.
-
When you have finished cutting in one place and want to continue cutting in another, switch off the engine and rotate the machine so that the cutting edge faces away from your body.
-
Check that the cutter has stopped rotating when the engine is idle before working with the device again.
Residual risks
The product has been built according to state-of-the-art and the recognised technical safety rules. However, individual residual risks can arise during operation.
• Furthermore, despite all precautions having been met, some non-obvious residual risks may still remain.
- Residual risks can be minimised if the "Safety Instructions" and the "Intended Use" together with the operating manual as a whole are observed.
- Avoid accidental start-ups of the product. Use the tool attachment that is recommended in this operating manual. This is how to ensure that your product provides optimum performance.
- Keep your hands and feet away from the working area when the product is in operation.
5. Technical data
| Grass trimmer cutting data | |
| Cutting diameter 450 mm | |
| Thread count 2 x 2.8 mm | |
| Thread length 4 m | |
| Max. cutting speed 6,900 rpm | |
| Brush cutter cutting data | |
| Cutting diameter 255 mm | |
| Cutting blade thickness 1.4 mm | |
| Number of teeth | 3 |
| Max. cutting speed | 7,500 rpm |
| Drive | |
| Displacement | 51.7 cm ^3 |
| Rated engine power | 1.45 kW |
| Fuel tank volume | 920 cm ^3 |
| CO _2 output | 1,069 g/kWh |
| Type of engine 2-stroke engine, air-cooled | |
| Weight | 7.2 kg |
Subject to technical changes!
Noise and vibration
⚠ Warning: Noise can have serious effects on your health. If the machine noise exceeds 85 dB, please wear suitable hearing protection.
Noise data
| Sound power level L_WA | 108.4 dB |
| Sound pressure level L_pA | 98.4 dB |
| Uncertainty K_WA/pA | 3 dB |
Vibration parameters
| Grass trimmer A_hv | left 4.20 m/s ^2 |
| right 4.07 m/s ^2 | |
| Brush cutter A_hv | left 4.64 m/s ^2 |
| right 4.79 m/s ^2 | |
| Measurement uncertainty K_hv | 1.5 m/s ^2 |
Keep the noise level and vibration to a minimum!
- Only use faultless devices.
- Maintain and clean the device at regular intervals.
- Adapt your working methods to the device.
- Do not overload the device.
- Have the device checked if necessary.
- Switch the device off if it is not in use.
- Wear gloves.
6. Unpacking
- Open the packaging and carefully remove the product.
- Remove the packaging material, as well as the packaging and transport safety devices (if present).
- Check whether the scope of delivery is complete.
- Check the product and accessory parts for transport damage. In the event of complaints the carrier must be informed immediately. Later claims will not be recognised.
- If possible, keep the packaging until the expiry of the warranty period.
- Familiarise yourself with the product by means of the operating manual before using for the first time.
- With accessories as well as wearing parts and replacement parts use only original parts. Spare parts can be obtained from your specialist dealer.
- When ordering please provide our article number as well as type and year of manufacture for the product.
⚠ WARNING!
The product and the packaging material are not children's toys! Do not let children play with plastic bags, films or small parts! There is a danger of choking or suffocating!
7. Before commissioning
Before each commissioning, check the device for the following:
- Check the fuel system for leakage
- Faultless condition and completeness of the guards and the cutting device
• All screw connections are tight - Smooth running of all moving parts
1. Fuel and oil
Recommended fuels
Use only a mixture of unleaded petrol and special 2-stroke engine oil. Mix the fuel mixture as per the fuel mixing table.
Attention: Do not use a fuel mixture that has been stored for more than 90 days.
Attention: Do not use 2-stroke oil that recommends a mixing ratio of 100:1. The engine guarantee of the manufacturer becomes invalid in the event of damage to the engine due to insufficient lubrication.
Attention: Use only designated and approved vessels for the transport and storage of fuel.
Put the correct amount of petrol and 2-stroke oil into the enclosed mixing bottle. Then shake the vessel well.
Never use oil for 4-stroke engines or water-cooled 2-stroke engines. This can cause the spark plug to become fouled, the exhaust part to become blocked or the piston ring to become stuck.
Fuel mixtures that have not been used for one month or longer can clog the carburettor or impair engine operation. Put unused fuel in an airtight vessel and store it in a dark, cool room.
2. Fuel mixing table
Mixing process: 40 parts petrol to 1 part oil Example:
1 | petrol: 0.025 | 2-stroke oil
5 | petrol: 0.125 | 2-stroke oil
Warning! Pay attention to the exhaust gases.
Always switch off the engine before refuelling. Never add petrol to the device while the engine is running or it is hot. There is a risk of fire!
8. Assembly and operation
⚠ Attention!
Always make sure the product is fully assembled before commissioning!
Assembly
When assembling this machine, please follow the specified assembly instructions.
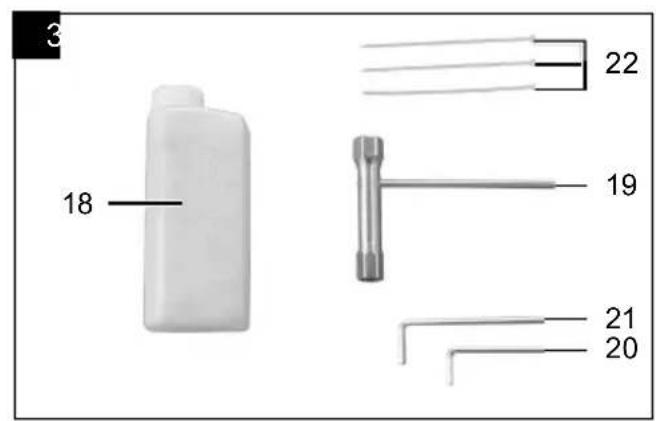
1. Fitting the handle on the machine (fig. 4 - 6)
- First loosen the hexagon socket screws and then bring the right and left handle into the centre of the handle holder.
- Then fit the handle holder and tighten the internal screws.
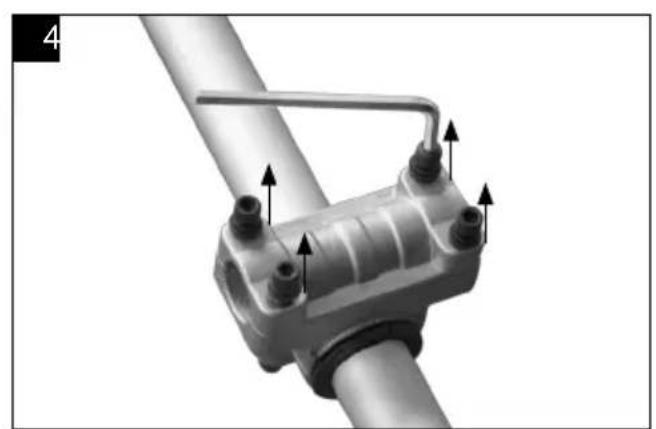
2. Fitting the shaft (fig. 7)
- Push the lower part of the shaft (b) down until the locking pin (a) engages in the hole (c) of the shaft. It is easier if you rotate the bottom of the shaft (b) slightly in both directions. The pin (a) is in the correct position when it is fully seated in the hole.
- Fix the guard using the spanner supplied as a standard accessory.
- Tighten the screws.
⚠ Warning! Only use original spare parts and accessories from the manufacturer. Failure to do so can reduce performance, result in injuries and void your warranty. Never use the machine without the protection assembled!
4. Assembling and disassembling the two cutting devices
Grass trimmer/thread coil (fig. 14 - 15)
- Release the nut.
Align the two holes of the flange and cover. Hold the flange with a screwdriver and rotate the socket spanner clockwise; the nut will loosen.
- Attach the nylon cutting head.
Remove the cover by loosening the nut. Continue to hold the flange, attach the nylon cutting head to the shaft and rotate it anti-clockwise; the nylon cutting head is attached. (fig. 15)
- Loosen the nylon cutting head.
Hold the flange with a screwdriver and then screw the nylon cutting head clockwise; now it can be replaced
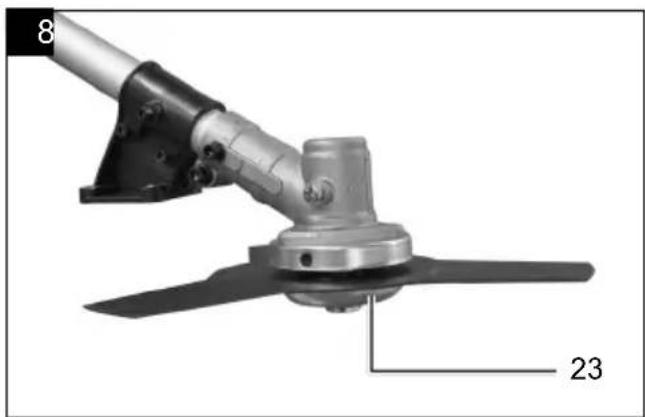
Brush cutter / cutting blade
- Fasten the cutting edge. (fig. 8 - 10) Remove the outer flange after loosening the nut. Then align the cutting edge (4), the outer flange (24), the cover (23) and the nut. Note that the direction of rotation of the cutting edge must match the direction of the arrow on the cutting edge. Hold the flange with a screwdriver and tighten the nut anti-clockwise; make sure the nut is securely fastened.
- Release the cutting edge. Hold the flange with a screwdriver and loosen the nut; then you can remove the cutting edge.
⚠ Warning!
Please ensure that the cutting head is fitted correctly before use!
Note: The packaging materials are made from recycled materials. Dispose of the packaging materials in accordance with the directives.
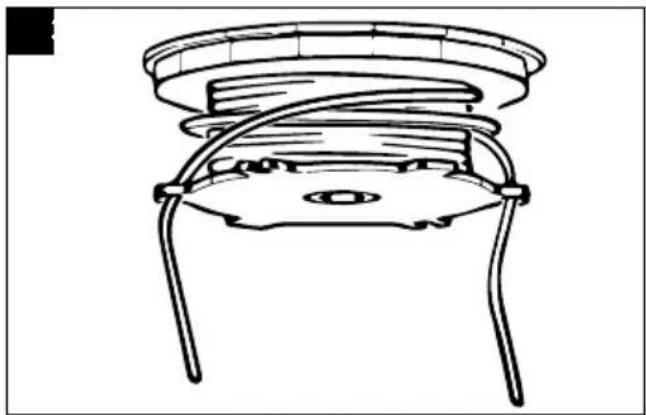
5. Attaching the strap (fig. 17 - 21)
- Attach the strap as shown.
Operation
When working with the device, the plastic protective cover for blade or thread operation must be fitted to prevent objects from being thrown away.
The integrated blade (A) in the cutting thread protective cover automatically cuts the thread to the optimum length. (fig. 16)
Filling up petrol
⚠️ Risk of injury! Petrol is explosive!
Before filling the tank with petrol, switch off the engine and allow it to cool down.
⚠ Danger of damage to the device!
The device is supplied without engine or gearbox oil.
ATTENTION! Before starting it up, you must fill in the petrol/oil mixture.
- Unscrew and remove the fuel cap (14). (fig. 1)
- Carefully pour in the petrol/oil mixture. Do not spill anything in the process!
- Screw the tank cap on by hand.
Draining the petrol (fig. 40)
- Hold a collection bucket under the petrol drain plug.
-
Unscrew the fuel cap and remove it.
-
Drain the petrol/oil mixture completely.
- Screw the tank cap back on by hand.
Starting the device
Do not start the device until you have fully assembled it.
⚠️ Risk of injury!
Do not use the device if you have discovered faults. If a part is damaged, you must replace it before using the device again.
Check before use!
- Check that the device is in a safe condition:
- Check the device for leaks.
- Check the device for visible damage.
- Check that all parts of the device are securely attached.
- Check that all safety devices are in good condition.
⚠️ Risk of injury!
Before starting work, always remove any objects lying on the ground that could be thrown away when operating the trimmer.
Starting (fig. 21 - 27)
Choke lever:
• Warm engine / choke closed:
• Cold engine / choke open:

Once the device is properly assembled, start the engine as follows:
- Place the device on a hard, level surface.
- Press the engine switch to the on position. (fig. 22)
- Open the choke lever (10). (fig. 23)
- Press the fuel pump (16) more than 5 times. (fig. 24)
- Pull the handle of the starter cable (11) 3 to 5 times to start the engine. (fig. 25)
-
Pull the rope until the engine starts. (fig. 25)
-
Wait a short time and then close the choke lever (10). (fig. 26)
-
When the engine is idling, first press the release lever (7) and then push the throttle (8). The device runs. If you want to lock the throttle at half throttle, press the lock button (9). (fig. 27)
-
Adjust the thread length when working: This device has a cutting head that works on the "tap and go" principle.
You can release more thread by tapping the pulley with the cutting head while the engine is running at maximum speed:
The nylon thread is automatically released and the cutting edge cuts off the protruding length. (fig. 41)
- If problems occur, switch off the engine; the device stops. If you want to stop the cutting head, release the throttle (8). (fig. 27)
- If a problem occurs, pull the pin of the safety belt and release the trimmer immediately. Switch off the engine (fig. 22)
- When the engine is warm, the throttle can be set directly to the on position when the machine is re-started.
Note: If the engine does not start up after several attempts, see the "Troubleshooting" section.
Note: Always pull the start pull cord out straight. If it is pulled out at an angle, friction will occur on the lug. This friction causes the cord to wear through and wear out faster. Always hold the starter handle when the cord retracts.
Never let the cord snap back from its extended state.
Note: Do not start the engine in tall grass.
△ Attention: If the motor has been switched off, the trimmer continues running for a few seconds; therefore keep away from the cutting head of the trimmer until it comes to a complete standstill!
9. Working instructions
Extension of the cutting thread
Warning! Do not use metal wire or any type of plastic-coated metal wire in the thread coil. This could seriously injure the user.
To lengthen the cutting thread, run the engine at full throttle and tap the thread coil on the ground. The thread is automatically lengthened. (fig. 41)
The blade on the shield shortens the thread to the permissible length. (fig. 16)
△ Caution: Regularly remove all lawn and weed debris to prevent the shaft tube from overheating. Lawn/grass/weed debris gets caught underneath the shield, this prevents sufficient cooling of the shaft tube. Carefully remove the residues with a screwdriver or similar. (fig. 42)
Different cutting techniques
If the device is assembled correctly, it cuts weeds and tall grass in hard-to-reach places, such as along fences, walls and foundations, and around trees. It can also be used for "mowing" to remove wild growth close to the ground for preparing a garden or for cleaning out a specific area. (fig. 43)
△ Attention: Even with careful use, cutting on foundations, stone or concrete walls, etc. will result in above-normal wear of the thread.
Trimming/mowing
Swing the trimmer from side to side in a sickle-like motion. Always keep the thread coil parallel to the ground. Check the terrain and set the desired cutting height. Guide and hold the thread coil at the desired height to get an even cut. (fig. 43)
Low trimming
Hold the trimmer with a slight inclination right in front of you so that the bottom of the thread coil is above the ground and the thread hits the correct intersection. Always cut away from yourself. Do not pull the trimmer towards you.
Cutting on fence/foundation
When cutting, slowly approach wire mesh fences, pick-et fences, natural stone walls and foundations to cut close to them, but without hitting the obstacle with the thread. If the thread comes into contact with stones, stone walls or foundations, for example, it wears out or frays. If the thread hits the fence mesh, it breaks off.
Trimming around trees
Trim around tree trunks, approaching slowly so that the thread does not touch the bark. Walk around the tree, cutting from left to right. Approach grass or weeds with the tip of the thread and tilt the thread coil slightly forward.
Warning: Be extremely careful when mowing it. Maintain a spacing of 30 metres between yourself and other persons or animals for any such tasks.
Mowing down
When mowing down, capture all vegetation down to the ground. To do this, tilt the thread coil to the right at a 30 degree angle. Set the handle to the desired position. Be aware of the increased danger of injury to the user, spectators and animals, as well as the risk of damage to property from objects being thrown (e.g. stones).
⚠ Warning: Do not remove objects from footpaths etc. with the device!
The device is a powerful tool and small stones or other objects can be thrown 15 metres or more away and cause injuries or damage to cars, houses and windows.
Jamming
If the cutting blade jams because the vegetation is too dense, stop the engine immediately. Clear the device of grass and undergrowth before operating it again. (fig. 42)
Avoidance of kick-back
When working with the cutting blade, there is a danger of kick-back if it hits solid obstacles (tree trunk, branch, tree stump, stone or the like). The device is thrown back against the direction of rotation of the tool. This can lead to loss of control over the device. Do not use the cutting blade near fences, metal posts, boundary stones or foundations.
10. Cleaning and storage
Cleaning
- Keep the handles free of oil so that you always have a secure grip.
- If necessary, clean the device with a damp cloth and, if necessary, with a mild flushing liquid.
- Keep protective devices, air vents and the engine housing as free of dust and dirt as possible. Rub the product clean with a clean cloth or blow it off with compressed air at low pressure.
• We recommend that you clean the product directly after every use. - Clean the product at regular intervals using a damp cloth and a little soft soap. Do not use any cleaning products or solvents; they could attack the plastic parts of the product. Make sure that no water can penetrate the interior of the product.
⚠ Attention!
- Disconnect the spark plug connector before cleaning.
- Never immerse the device in water or other liquids for cleaning.
- Store the trimmer in a secure and dry place and out of reach of children.
Storage
Caution: Never stow the device for longer than 30 days without carrying out the following steps:
Storing the device
If you stow the device for longer than 30 days, it must be prepared ahead of time. Otherwise, the remaining fuel in the carburettor will evaporate and leave a rubbery sediment behind. This could make it difficult to start and result in expensive repair work.
- Slowly remove the fuel tank cap to release any pressure in the tank. Carefully empty the tank.
- Start the engine and let it run until it stops in order to remove the fuel from the carburettor.
- Allow the engine to cool down (approx. 5 minutes).
- Remove the spark plug
- Add 1 teaspoon of clean 2-stroke oil to the combustion chamber. Pull the starter cord slowly several times to coat the internal components. Re-insert the spark plug.
Note: Store the device in a dry location, far away from potential sources of ignition, such as furnaces, hot water boilers with gas, gas dryers, etc.
Recommissioning
- Remove the spark plug.
- Pull the starter cord quickly to remove excess oil from the combustion chamber.
- Clean the spark plug and check that the electrode gap on the spark plug is correct is correctly set, or insert a new spark plug with the correct electrode gap.
- Prepare the device for operation.
- Fill the tank with the correct fuel/oil mixture. See fuel mixing table.
Transport
If you want to transport the device, empty the fuel tank as explained in chapter 8. Clean coarse dirt from the device using a brush or a hand brush.
11. Maintenance
Always shut the engine down and remove the spark plug connector before carrying out any maintenance and cleaning work.
- Do not spray the device with water. This damages the engine.
- Clean the device with a cloth, hand brush, etc.
| Maintenance plan | |||
| after 12 operating hours | after 24 operating hours | after 36 operating hours | |
| Air filter Clean | Clean Replace | ||
| Spark plug | Check Clean Replace | ||
Expert inspection required:
• if the trimmer hits an object.
• if the engine suddenly stops.
- if the cutting edge is bent (do not straighten it yourself!).
- if the transmission is damaged.
Replacing the thread coil/cutting thread
(fig. 35 - 39)
- Dismantle the thread coil (1) as described in Section 8.4. Press the coil together and remove one half of the housing (fig. 35).
- Remove the bobbin plate from the thread coil housing (fig. 36).
- Remove any remaining cutting thread.
- Fold the new cut thread in the centre and hook the resulting loop into the recess in the bobbin plate. (fig. 37)
- Wind the thread anti-clockwise under tension. The bobbin divider separates the two halves of the cut thread. (fig. 38)
- Hook the last 15 cm of the two thread ends into the opposite thread holders of the bobbin plate. (fig. 39)
- Pass the two thread ends through the metal lugs in the thread coil housing.
- Press the bobbin plate into the thread coil housing. (fig. 36)
- Pull briefly and firmly on both ends of the thread to release them from the thread holders.
- Put the housing halves back together. (fig. 35)
- Cut back the excess thread to about 13 cm. This reduces the load on the engine during starting and warming up.
- Refit the thread coil (see section 8.4). If the complete thread coil is replaced, skip points 3-6.
Grinding the cutting blade
The cutting blade can become blunt over time.
- If you notice this, loosen the screws securing the cutting blade to the protective cover.
- Fasten the blade in a bench vice.
- Grind all 3 cutting unit blades using a flat file and make sure to maintain the angle of the cutting edge. Only file in one direction.
Replace or sharpen the cutting edge at the end of each mowing season or as needed.
The brush cutter can vibrate excessively if the cutting edges are not balanced; therefore there is a danger of injury!
Replacing and cleaning the spark plug (fig. 32 - 33)
- Once the engine has cooled down, remove the spark plug with the supplied socket spanner.
- Clean the spark plug with a wire brush.
- Set the gap to 0.5 to 0.7 mm with a feeler gauge.
- Insert the spark plug carefully by hand so that the thread is not damaged.
- After the spark plug is inserted, tighten it with the spark plug wrench.
Cleaning the air filter (fig. 30 - 31)
Fouled air filters diminish the engine output due to reduced air supply to the carburettor. Regular inspection is therefore essential.
- Loosen the air filter cover and remove the sponge filter element.
- Replace the air filter cover so that nothing falls into the air duct.
- Wash the filter element in warm soapy water, rinse and allow to air dry.
Attention: Never clean the air filter with petrol or combustible solvents.
⚠ Warning!
Never leave the engine running if the air filter element is not inserted.
Lubricating the angular gear
Treat with lithium-based grease. Remove the screw and put in the grease, turn the shaft manually until the grease comes out; and then attach the screw again.
Storing the device
Clean the device thoroughly after use. Store the device in a dry place and allow the engine to cool down beforehand.
12. Repair & ordering spare parts
After repairs or maintenance, make sure that all safety-related parts are installed and are in perfect condition. All parts which may cause injury must be kept where they are inaccessible to children or others.
Attention: According to the German Product Liability Act, no liability is accepted for damage caused by improper repairs or by not using original spare parts.
Such work should be performed by a customer service centre or an authorised specialist. The same applies to accessory parts.
Spare parts and accessories can be obtained from our Service Centre. To do this, scan the QR code on the front page.
Connections and repairs
Connections and repair work on the electrical equipment may only be carried out by electricians.
Please provide the following information in the event of any queries:
• Type of current for the motor
• Machine data - type plate
- Motor data - type plate
Important note in the case of repairs:
For return delivery of the product for repair, please ensure for safety reasons that it is free of oil and fuel when it is sent to the service centre.
12.1 Ordering spare parts
Please provide the following information when ordering spare parts:
- Model designation
- Item number
- Type plate data
12.2 Service information
With this product, it is necessary to note that the following parts are subject to natural or usage-related wear, or that the following parts are required as consumables.
Wearing parts*: Thread coil, cutting blade, spark plug, air filter
* may not be included in the scope of delivery!
13. Disposal and recycling
Notes for packaging


The packaging materials are recyclable. Please dispose of packaging in an environmentally friendly manner.
You can find out how to dispose of the disused device from your local authority or city administration.
Fuels and oils
- Before disposing of the device, the fuel tank and the engine oil tank must be emptied!
- Fuel and engine oil do not belong in household waste or drains, but must be collected or disposed of separately!
- Empty oil and fuel tanks must be disposed of in an environmentally friendly manner.
14. Troubleshooting
The following table shows fault symptoms and describes remedial measures in the event of your product failing to work properly. If you cannot localise and rectify the problem with this, please contact your service workshop.
Important note in the case of repairs:
When returning the product for repair, for safety reasons, ensure that it is free of oil and fuel when it is sent to the service centre.
| Fault Possible cause Remedy | ||
| The device does not start up. Incorrect start-up procedure Follow the instructions for starting | ||
| The device starts up but does not have full power. | Incorrect choke lever setting Close the choke lever | |
| Contaminated air filter Clean the air filter | ||
| Incorrect carburettor setting Contact authorised customer service | ||
| Cutting blades blunt Sharpen or replace the cutting blade | ||
| The engine runs erratically. | Wrong spark plug electrode gap | Clean spark plug and adjust electrode gap or fit new spark plug |
| Incorrect carburettor setting Contact authorised customer service | ||
| The engine smokes excessively. | Incorrect fuel mixture | Use the correct fuel mixture (see fuel mixture table) |
| Incorrect carburettor setting Contact authorised customer service | ||
| The engine runs hot. | Motor is overloaded | Take regular breaks |
Günzburger Straße 69
D-89335 Ichenhausen
Cher client,
Günzburger Straße 69
D-89335 Ichenhausen, Germania
Egregio cliente,
Günzburger Straße 69
D-89335 Ichenhausen
Geachte klant,
2. As monteren (afb. 7)
Günzburger Straße 69
Günzburger Straße 69
Günzburger Straße 69
D-89335 Ichenhausen
Vážený zákazníku,
Günzburger Straße 69
D-89335 Ichenhausen
Vážený zákazník,
Günzburger Straße 69
D-89335 Ichenhausen
Kedves Ügyfelünk!
Günzburger Straße 69
D-89335 Ichenhausen
Szanowny Kliencie,
Günzburger Straße 69
D-89335 Ichenhausen
Spoštovani kupec,
želimo vam veliko veselja in uspeha pri delu z vašim novim izdelkom.
Napotek:
Proizvajalec tega izdelka skladno z veljavnim zakonom o odgovornosti za izdelke ne jamči za poškodbe na tem izdelku ali poškodbe s tem izdelkom, do katerih pride pri:
Günzburger Straße 69
D-89335 Ichenhausen
Austatud klient!
Günzburger Straße 69
D-89335 Ichenhausen
Gerbiamas kliente,
Günzburger Straße 69
Günzburger Straße 69
D-89335 Ichenhausen
Bästa kund!
Günzburger Straße 69
D-89335 Ichenhausen
Arvoisa asiakas,
Günzburger Straße 69
D-89335 Ichenhausen
Poštovani kupče,
B

Scheppach GmbH, Günzburger Str. 69, 89335 Ichenhausen
| DE | EU-KonformitätserklärungÜbersetzung der OriginalkonformitätserklärungWir erklären in alleiniger Verantwortung, dass das hier beschriebene Produkt mit den geltenden Richtlinien und Normen übereinstimmt. | Der hier beschriebene Gegenstand der Erklärung erfüllt die Vorschriften der Richtlinie 2011/65/EU des Europäischen Parlaments und des Rates vom 8. Juni 2011 zur Beschränkung der Verwendung bestimmter gefährlicher Stoffe in Elektro- und Elektronikgeräten.*Technische Unterlagen verfügbar bei: ** | ||
| Artikelnummer*** | Artikelbezeichnung: Benzin-Freischneider BCH5200PB | Marke**** | ||
| GB | EU Declaration of ConformityTranslation of the original Declaration of ConformityWe declare under our sole responsibility that the product described here complies with the applicable directives and standards. | The object of the declaration described here fulfils the regulations of the directive 2011/65/EU of the European Parliament and Council from 8th June 2011, on the restriction of the use of certain hazardous substances in electrical and electronic equipment.*Technical documentation available at: ** | ||
| Item number*** | Item designation: Petrol brush cutter BCH5200PB | Brand**** | ||
| FR | Déclaration UE de conformitéTraduction de la déclaration de conformité originaleNous déclarons, sous notre propre responsabilité, que le produit décrit ici est conforme aux directives et normes en vigueur. | L'appareil décrit ci-dessus dans la déclaration est conforme aux réglementations de la directive 2011/65/EU du Parlement Européen et du Conseil du 8 juin 2011 visant à limiter l'utilisation de substances dangereuses dans la fabrication des appareils électriques et électroniques.*Dossier technique auprès de:** | ||
| Référence *** | Désignation de l'article: Débroussailleuse thermique BCH5200PB | Marque **** | ||
| IT | Dichiarazione di conformità UETraduzione della dichiarazione di conformità originaleDichiariamo sotto la nostra esclusiva responsabilità che il prodotto qui descrito è conforme alle direttive e alle norme vigenti. | L'oggetto della dichiarazione, qui descritto, soddisfa le disposizioni della Direttiva 2011/65/UE del Parlamento Europeo e del Consiglio dell'8 giugno 2011, sulla restrizione nell'utilizzo di determinate sostanze pericolose negli apparecchi elettrici ed elettronici.*Documentazione tecnica disponibile presso: ** | ||
| Gaminio numeris *** | Nome articolo: Decespugilatore a benzina BCH5200PB | Marchio **** | ||
| NL | EU-conformiteitsverklaringVertaling van de originele conformiteitsverklaringWij verklaren onder eigen verantwoordelijkheid dat het hier beschreven product voldoet aan de geldende richtlijnen en normen. | Het hier beschreven onderwerp van deze verklaring voldoet aan de voorschriften van richtlijn 2011/65/EU van het Europese Parlement en de Raad van 8 juni 2011 omtrent de beperking van het gebruik van bepaalde gevaarlijke stoffen in elektrische en elektronische apparaten.*Technische documentatie verkrijgbaar bij: ** | ||
| Artikelnummer *** | Artikelnaam: Benzine bosmaaier BCH5200PB | Merk **** | ||
| ES | Declaración de conformidad UETraducción de la Declaración de conformidad originalDeclaramos, bajo nuestra exclusiva responsabilidad, que el producto aquí descrito cumple las directivas y normas aplicables. | El objeto de la declaración aquí descrito cumple las disposiciones de la Directiva 2011/65/UE del Parlamento Europeo y el Consejo del 8 de junio de 2011 sobre restricciones a la utilización de determinadas sustancias peligrosas en aparatos eléctricos y eletrónicos.*Documentación técnica disponible en:** | ||
| Núm. de artículo*** | Denominación del artículo: Desbrozadora de gasolina BCH5200PB | Marca**** | ||
| PT | Declaração de conformidade UETradução da declaração de conformidade originalDeclaramos, à nossa exclusiva responsabilidade, que o produto aquí descrito está em conformidade com as diretivas e normas aplicáveis. | O objeto da declaração aquí descrito cumpre com as normas da Diretiva 2011/65/UE do Parlamento Europeo e do Conselho de 8 de junho de 2011 relativamente à restrição da utilização de determinadas substâncias perigosas em equipamentos elétricos e eletrónicos.*Documentos técnicos disponíveis junto de:** | ||
| Número de artigo*** | Designação do artigo: Máquina corta-mato a gasolina BCH5200PB | Marca**** | ||
| CZ | EU prohlásení o shoděPřeklad originálního prohlásení o shoděProhlašujeme na svou výlučnou odpovědnost, že zde popsaný výrobek od-povídá platným směrnicím a normám. | Zde popsaný předmět prohlásení splňuje předpisy směrnice 2011/65/EU Evropského parlamentu a Rady ze dne 8. června 2011 pro omezení používání určitých nebezpečných látek v elektrických a elektronických zařízeních.*Technické podklady k dispozícii u:** | ||
| Číslo výrobku*** | Název výrobku: Benzínový křovlnořez BCH5200PB | Značka**** | ||
| SK | EÚ vyhlásenie o zhodePreklad originálneho vyhlásenia o zhodeNa vlastnú zodpovednost' vyhlasujeme, že tu popísaný výrobok je v súlade s platnými smernicami a normami. | Tu opísaný predmet vyhlásenia je v súlade s predpismi smernice Európskeho parlamentu a Rady 2011/65/EÚ z 8. júna 2011 o obmedzení používania určitých nebezpečných látok v elektrických a elektronických zariadeniach.*Technické podklady sú k dispozícii na:** | ||
| Číslo výrobku *** | Označenie výrobku: Benzínový krovinorez BCH5200PB | Značka**** | ||
| HU | EU megfelelőségi nyilatkozatAz eredeti megfelelőségi nyilatkozat fordításaSaját kizárólagos felelősségünkre kijelentjük, hogy az itt ismertetett termék megfelel az érvényes irányelveknek és szabványoknak. | A nyilatkozat ít megnevezelt tárgya teljesíti az Európai Parlament és Tanács 2011. június 8-i, egyes veszélyes anyagok elektromos és elektronikus berendezésekber való alkalmazásának korlátozásáról szóló 2011/65/EU irányelvének előírásait.*A műszaki dokumentáció elérhető:** | ||
| Cikkszám *** | Termék megnevezése: Benzines fűkasza BCH5200PB | Márka **** | ||
| PL | Deklaracja zgodności UETłumaczenie oryginalnej deklaracji zgodnościOświadczamy na własną odpowiedzialność, że opisany tutaj produkt jest zgodny z obowiązującymi dyrektywami i normami. | Wymieniony powyżej przedmiot niniejszej deklaracji jest zgodny z wymogami dyrektywy 2011/65/UE Parlamentu Europejskiego i Rady z 8 czerwca 2011 r. w sprawie ograniczenia stosowania niektórych niebezpiecznych substancji w sprzęcie elektrycznym i elektronicznym.*Dokumentacja techniczna dostępna na stronie:** | ||
| Numer artykułu *** | Nazwa artykułu: Wykaszarka benzynowa BCH5200PB | Marka **** | ||
| SI | EU izjava o skladnostiPrevod originalne izjave o skladnostis polno odgovornostjo izjavljamo, da je tukaj opisani izdelek v skladu z ve-ljavnimi smernicami in standardi. | Tukaj opisani predmet izjave izpolnjuje predpise Direktive 2011/65/EU Evropskega parlamenta in Sveta z dne 8. junij 2011 za omejevanje uporabe določenih nevarnih snovi v električnih in elektronskih napravah.*Tehnični dokumenti so na voljo pri: ** | ||
| Številka izdelka *** | Opis Izdelka: Bencinski rezalnik grmlčevja BCH5200PB | Znamka **** | ||
| EE | EL vastavusdeklaratsioonVastavusdeklaratsiooni originaali tõlgeMe deklareerimine ainuisikuliselt vastutades, et siin kirjeldatud toode ühtib esitatud direktiivide ja normidega. | Deklaratsiooni objektiks olev siin kirjeldatud ese vastab Euroopa Parlamendi ja nõukogu direktiivile 2011/65/EÜ kuupäevaga 8. juuni 2011 teatud ohtlike ainete kasutamispiirangu kohta elektri- ja elektroonikaseadmetes.*Tehnilised dokumendid on saadaval: ** | ||
| Artiklinumber *** | Art nimetus: Bensiini-võsalõikur BCH5200PB | Kaubamärk **** | ||
| LT | EB atitikties deklaracijaAtitikties deklaracijos originalo vertimasPrisiimdami išskirtinę atsakomybę deklaruojame, kad ĉia aprašytas gamí-nys atitinka galiojančias direktyvas ir standartus. | Čia aprašytas deklaracijos objektas atitinka 2011 m. birželio 8 d. Europos Parlamento ir Tarybos direktyvos 2011/65/ES dėl tam tikru pavojingų medžiagų nau-dojimo elektros ir elektroninėje jrangoje apribojimo reikalavimus.*Techninius dokumentus galima gauti iš: ** | ||
| Gaminio numeris *** | Gaminio pavadinimas: Benzininė krūmapjovė BCH5200PB | Prekės ženklas **** | ||
| LV | ES atbilstības deklarācijaOriginālās atbilstības deklarācijas tulkojumsMēs, uzņemoties pilnu atbildību, paziņojam, ka šeit aprakstītais ražojum s atbilst spēkā esošajām direktīvām un standartiem. | Šeit aprakstītais deklarācijas priekšmets atbilst Eiropas Parlamenta un Eiropas Padomes 2011. gada 8. jūnija Direktīvas 2011/65/ES noteikumiem par noteiktu bīstamo vielu izmantošanas ierobežošanu elektriskajās un elektroniskajās ie-rīcēs.*Tehniskā lieta ir pieejama pie: ** | ||
| Preces numurs *** | Preces apzīmējums: Benzīna krūmgriezis BCH5200PB | Prečzīme **** | ||
| SE | EU-försäkran om överensstämmelseÖversättning från försäkran om överensstämmelse i originalVi förklarar under eget ansvar att produkten som beskrivs här överensstämmer med gällande riktlinjer och standarder. | Föremålet för försäkran som beskrivs här överensstämmer med bestämmelserna i Europaparlamentets och rādets direktiv 2011/65/EU av den 8 juni 2011 om begränsning av användningen av vissa farliga ämnen i elektriska och elektroniska produkter.*Teknisk dokumentation tillgänglig hos: ** | ||
| Artikelnummer *** | Artikelbeteckning: Bensindriven kanttrimmer BCH5200PB | Märke **** | ||
| FI | EU-vaatimustenmukaisuusvakuutusAlkuperäisen vaatimustenmukaisuusvakuutuksen käännösVakuutamme omalla vastuullamme, että tässä kuvattu tuote täyttää voimassa olevien direktiivien ja standardien määräykset. | Tässä kuvattu vakuutuksen kohde täyttää tiettyjen vaarallisten aineiden käytön rajoittamisesta sähkö- ja elektroniikkalaitteissa 8. kesäkuuta 2011 annetun Eu-roopan parlamentin ja neuvoston direktiivin 2011/65/EU määräykset.*Tekniset asiakirjat saatavana: ** | ||
| Tuotenro *** | Tuotenimike: Bensiinikäyttöinen raivaussaha BCH5200PB | Merkki **** | ||
| RS | EU izjava o usaglašenostiPrevod originalne izjave o usklađenostiIzjavljujemo na našu isključivu odgovornost da je ovde opisani proizvod usklađen sa primenljivim smernicama i standardima. | Ovde opisani predmet ove izjave ispunjava odredbe Direktive 2011/65/EU Evropskog parlamenta i Saveta od 8. juna 2011. godine o ograničenju upotrebe određenih opasnih materija u električnoj i elektronskoj opremi.*Tehnička dokumentacija dostupna kod: ** | ||
| Broj artikla *** | Oznaka proizvoda: Benzinska štapna kosa BCH5200PB | Brend **** | ||
| ***59107059030169-39530 - 0169-52871 | ****SCHEPPACH | |||
**:Stefan HartingerGünzburger Str. 69D-89335 Ichenhauseni.V./Andreas Pecher /Head of Project Management i.V. Simon Schunk /Division Manager Product CenterIchenhausen, 02.07.2025 i.V. Simon Schunk /Division Manager Product CenterIchenhausen, 02.07.2025 | X 2011/65/EU*X 2014/30/EU□ 2016/1628/EU□ 2014/29/EU□ 2014/35/EU□ 2004/22/EG□ 2014/68/EU□ 89/686/EWG_96/58/EG□ 90/396/EWG | X 2006/42/EG□ Annex IVNotified Body:Notified Body No.:Certificate No.: | X 2000/14/EG; 2005/88/EGNoise:measured L_WA = 108,4 dBguaranteed L_WA = 117 dBX Annex V□ Annex VINotified Body:Notified Body No.: |
| X 2016/1628/EUEmission No.: e24*2016/1628*2021/1398SHB1/P*0533*00 | |||
| EN ISO 11806-1:2011; EN ISO 11806-1:2022; EN ISO 14982:2009 | |||
Garantie DE
Apparent defects must be notified within 8 days from the receipt of the goods. Otherwise, the buyer loses its rights of claim due to such defects are invalidated. We guarantee for our machines in case of proper treatment for the time of the statutory warranty period from delivery in such a way that we replace any machine part free of charge which provably becomes unusable due to faulty material or defects of fabrication within such period of time. With respect to parts not manufactured by us we only warrant insofar as we are entitled to warranty claims against the upstream suppliers. The costs for the installation of the new parts shall be borne by the buyer. The cancellation of sale or the reduction of purchase price as well as any other claims for damages shall be excluded.
Garantie FR


- BCH5200PB
- Verehrter Kunde,
- Explanation of the symbols on the product
- Table of contents: Page:
- Introduction
- Manufacturer:
- Dear Customer,
- Note:
- Product description (fig. 1)
- Scope of delivery
- Proper use
- Who is not permitted to use the device:
- Petrol trimmer operating hours
- Explanation of the signal words in the operating manual
- DANGER
- WARNING
- CAUTION
- ATTENTION
- General safety instructions
- ⚠ WARNING - Read all safety information, instructions, illustrations and technical data for this product.
- Safety instructions
- Training
- Preparation
- Operation
- Maintenance and storage
- Special safety warning
- Residual risks
- Technical data
- Subject to technical changes!
- Noise and vibration
- Unpacking
- ⚠ WARNING!
- Before commissioning
- Fuel and oil
- Fuel mixing table
- Assembly and operation
- ⚠ Attention!
- Assembly
- Fitting the handle on the machine (fig. 4 - 6)
- Fitting the shaft (fig. 7)
- Assembling and disassembling the two cutting devices
- Grass trimmer/thread coil (fig. 14 - 15)
- Brush cutter / cutting blade
- Attaching the strap (fig. 17 - 21)
- Operation
- Filling up petrol
- ⚠️ Risk of injury! Petrol is explosive!
- ⚠ Danger of damage to the device!
- ATTENTION! Before starting it up, you must fill in the petrol/oil mixture.
- Draining the petrol (fig. 40)
- Starting the device
- ⚠️ Risk of injury!
- Check before use!
- Starting (fig. 21 - 27)
- Choke lever:
- Working instructions
- Extension of the cutting thread
- Different cutting techniques
- Trimming/mowing
- Low trimming
- Cutting on fence/foundation
- Trimming around trees
- Mowing down
- Jamming
- Avoidance of kick-back
- Cleaning and storage
- Cleaning
- Storage
- Storing the device
- Recommissioning
- Transport
- Maintenance
- Expert inspection required:
- Replacing the thread coil/cutting thread
- (fig. 35 - 39)
- Grinding the cutting blade
- Replacing and cleaning the spark plug (fig. 32 - 33)
- Cleaning the air filter (fig. 30 - 31)
- Lubricating the angular gear
- Repair & ordering spare parts
- Connections and repairs
- Important note in the case of repairs:
- Ordering spare parts
- Service information
- Disposal and recycling
- Notes for packaging
- Fuels and oils
- Troubleshooting
- Cher client,
- Egregio cliente,
- Geachte klant,
- As monteren (afb. 7)
- Vážený zákazníku,
- Vážený zákazník,
- Kedves Ügyfelünk!
- Szanowny Kliencie,
- Spoštovani kupec,
- Napotek:
- Austatud klient!
- Gerbiamas kliente,
- Bästa kund!
- Arvoisa asiakas,
- Poštovani kupče,
- Garantie DE
- Garantie FR
Brand : SCHEPPACH
Model : BCH5200PB
Category : String Trimmer