BR 4735 Esc - Floor cleaner Kärcher - Free user manual and instructions
Find the device manual for free BR 4735 Esc Kärcher in PDF.
User questions about BR 4735 Esc Kärcher
0 question about this device. Answer the ones you know or ask your own.
Ask a new question about this device
Download the instructions for your Floor cleaner in PDF format for free! Find your manual BR 4735 Esc - Kärcher and take your electronic device back in hand. On this page are published all the documents necessary for the use of your device. BR 4735 Esc by Kärcher.
USER MANUAL BR 4735 Esc Kärcher
natural_image
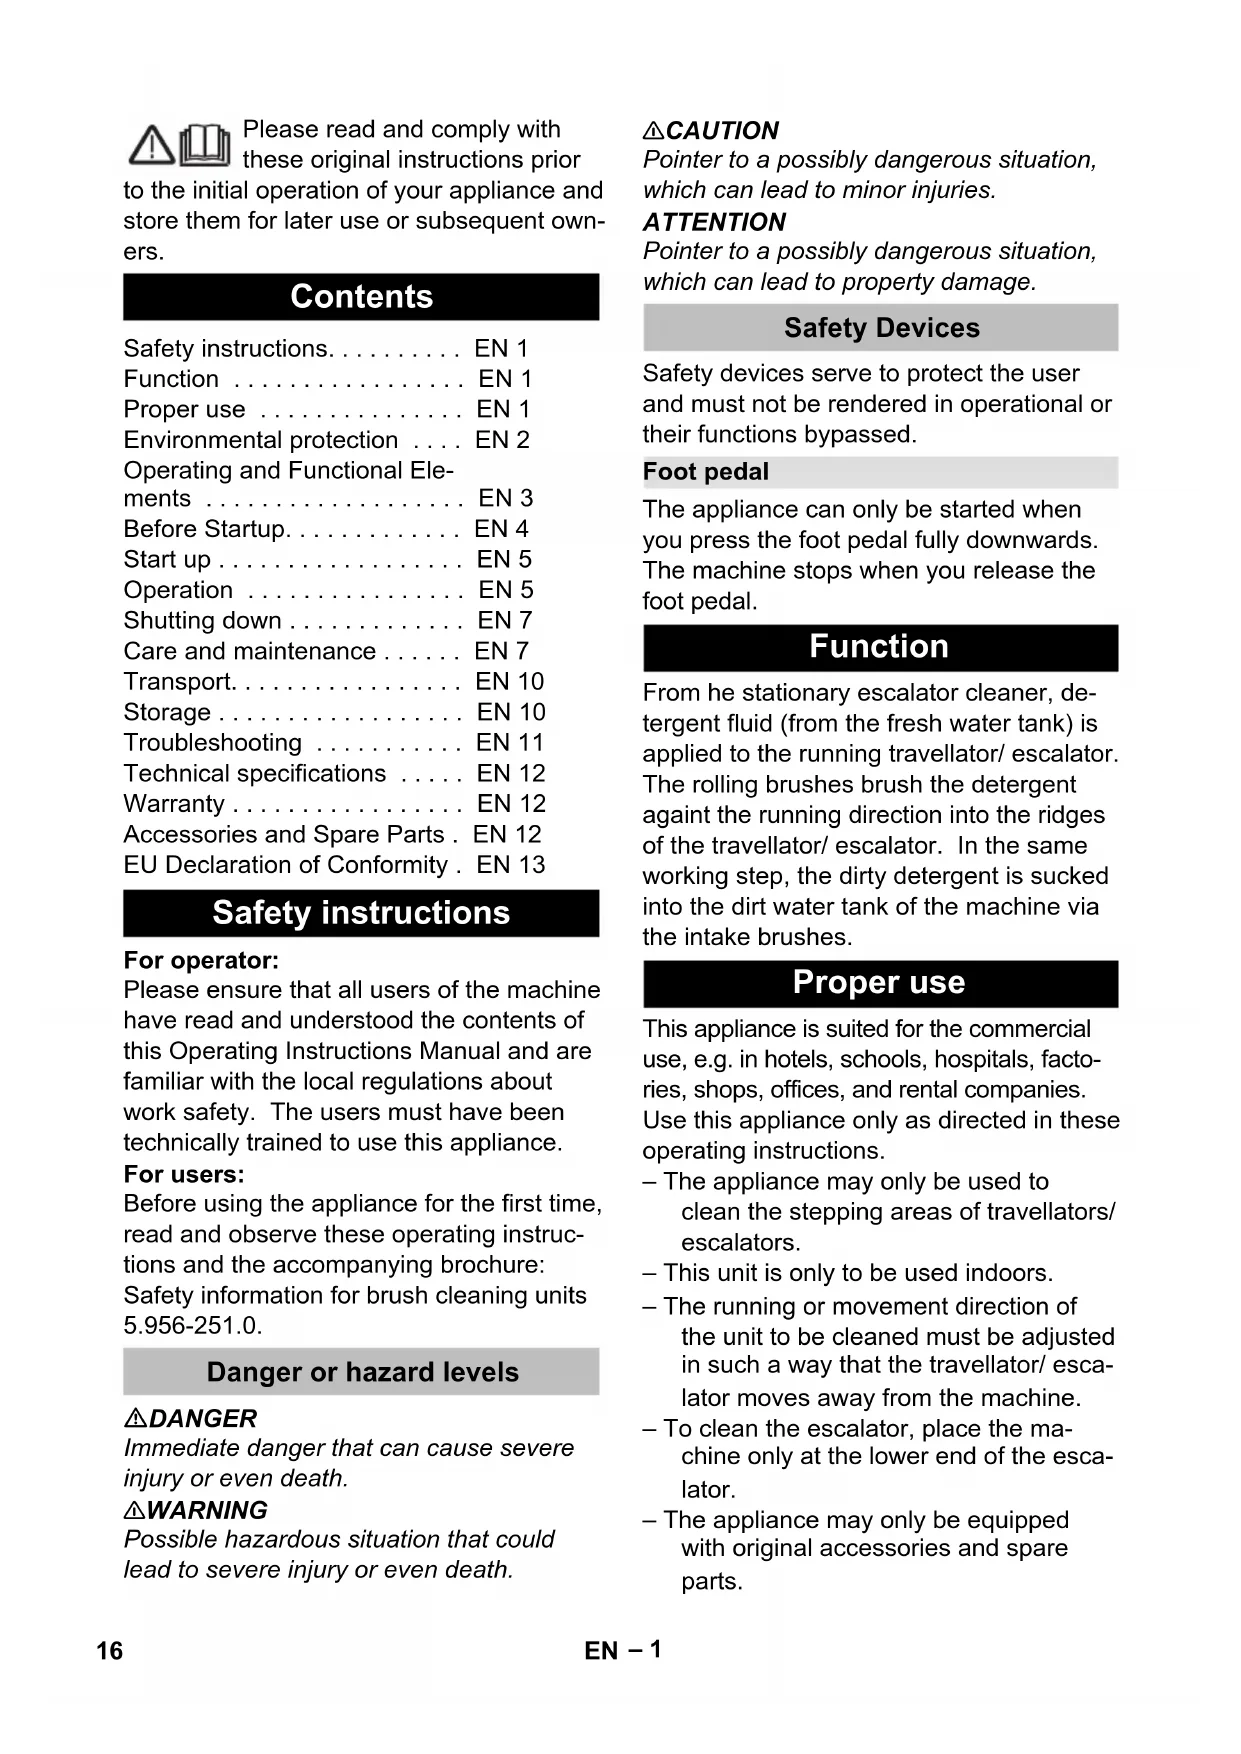
Line drawing of a cleaning or cleaning device with handle and control panel (no text or symbols)Deutsch 3
English 16
Français 29
Italiano 42
Nederlands 55
Español 68
Português 81
Dansk 94
Norsk 107
Svenska 120
Suomi 133
Ελληνικά 146
Türkçe 160
Русский 173
Magyar 186
Čeština 199
Polski 212
Slovenčina 226
Eesti 239
Latviešu 252
Lietuviškai 265
Українська 278
العربية 304

natural_image
Technical line drawing of an automotive electrical panel with hoses and connectors (no text or symbols)natural_image
Line drawing of a mechanical device with a lever and adjustment rod, mounted on a metal platform (no text or symbols)natural_image
Diagram of a car's side profile showing front and rear views with directional arrows indicating movement (no text or symbols)natural_image
Line drawing of a person using a cleaning machine to lift a floor (no text or symbols)natural_image
Diagram of a robotic arm connecting a flexible hose to a control panel (no text or symbols)
natural_image
Diagram of a mechanical device with a coiled cable and attached component, no visible text or symbolsnatural_image
Mechanical assembly diagram showing gear and shaft components (no text or labels)natural_image
Technical line drawing of a mechanical conveyor system with rollers and rollers (no text or symbols)Kämme austauschen
natural_image
Mechanical assembly diagram showing gear meshing and directional arrows (no text or symbols)natural_image
Technical line drawing of a mechanical assembly with rollers and a directional arrow (no text or symbols)natural_image
Mechanical assembly diagram showing a valve inserted into a housing, with a magnified inset highlighting the component detail (no text or symbols present)natural_image
Technical diagram of an electrical control panel with a magnified inset showing internal components (no text or symbols)Chairman of the Board of Management
S. Reiser
Director Regulatory Affairs & Certification
71364 Winnenden (Germany)
Tel.: +49 7195 14-0
Fax: +49 7195 14-2212
Winnenden, 2019/05/01

Please read and comply with these original instructions prior
to the initial operation of your appliance and store them for later use or subsequent owners.
Contents
| Safety instructions. | EN 1 |
| Function | EN 1 |
| Proper use | EN 1 |
| Environmental protection | EN 2 |
| Operating and Functional Elements | EN 3 |
| Before Startup. | EN 4 |
| Start up | EN 5 |
| Operation | EN 5 |
| Shutting down | EN 7 |
| Care and maintenance | EN 7 |
| Transport. | EN 10 |
| Storage | EN 10 |
| Troubleshooting | EN 11 |
| Technical specifications | EN 12 |
| Warranty | EN 12 |
| Accessories and Spare Parts | EN 12 |
| EU Declaration of Conformity | EN 13 |
Safety instructions
For operator:
Please ensure that all users of the machine have read and understood the contents of this Operating Instructions Manual and are familiar with the local regulations about work safety. The users must have been technically trained to use this appliance.
For users:
Before using the appliance for the first time, read and observe these operating instructions and the accompanying brochure: Safety information for brush cleaning units 5.956-251.0.
Danger or hazard levels
⚠️DANGER
Immediate danger that can cause severe injury or even death.
⚠ WARNING
Possible hazardous situation that could lead to severe injury or even death.
△CAUTION
Pointer to a possibly dangerous situation, which can lead to minor injuries.
ATTENTION
Pointer to a possibly dangerous situation, which can lead to property damage.
Safety Devices
Safety devices serve to protect the user and must not be rendered in operational or their functions bypassed.
Foot pedal
The appliance can only be started when you press the foot pedal fully downwards. The machine stops when you release the foot pedal.
Function
From he stationary escalator cleaner, detergent fluid (from the fresh water tank) is applied to the running traveller/ escalator. The rolling brushes brush the detergent against the running direction into the ridges of the traveller/ escalator. In the same working step, the dirty detergent is sucked into the dirt water tank of the machine via the intake brushes.
Proper use
This appliance is suited for the commercial use, e.g. in hotels, schools, hospitals, factories, shops, offices, and rental companies. Use this appliance only as directed in these operating instructions.
- The appliance may only be used to clean the stepping areas of travellers/escalators.
- This unit is only to be used indoors.
- The running or movement direction of the unit to be cleaned must be adjusted in such a way that the traveller/ escalator moves away from the machine.
- To clean the escalator, place the machine only at the lower end of the escalator.
- The appliance may only be equipped with original accessories and spare parts.
Environmental protection

The packaging material can be recycled. Please do not throw the packaging material into household waste; please send it for recycling.
Old appliances contain valuable materials that can be recycled; these should be sent for recycling. Batteries, oil, and similar substances must not enter the environment. Please dispose of your old appliances using appropriate collection systems.
Notes about the ingredients (REACH)
You will find current information about the ingredients at:
www.kaercher.com/REACH
Operating and Functional Elements
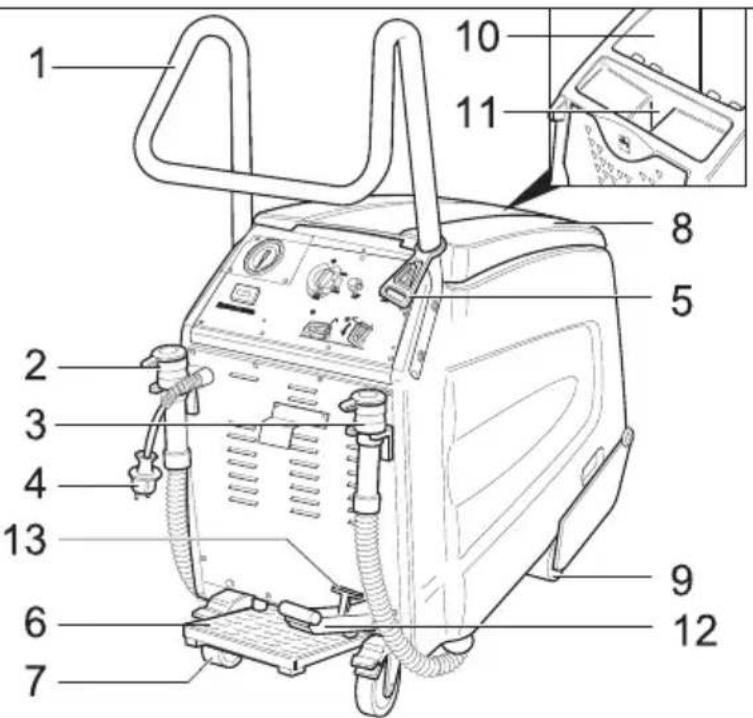
1 Push handle
2 Drainage hose for fresh water
3 Dirt water discharge hose
4 M a i n s p l u g
5 Strain relief clamp
6 Foot pedal
7 Rear wheels with stopping lever
8 Cover waste water tank
9 Front wheels
10 waste water tank
11 Fresh water reservoir filler neck
12 Pedal for raising/ lowering the brush head
13 Lever to lock the brush head
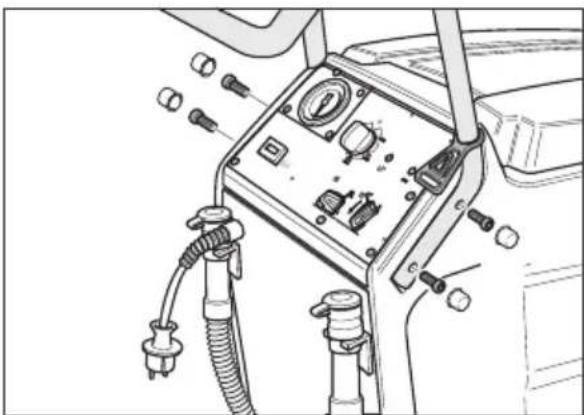
Operator console
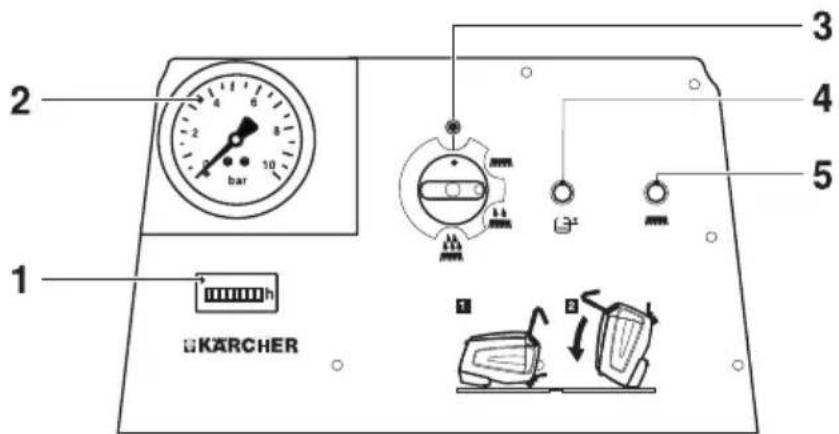
1 Operating hour counter
2 Display pump pressure
3 Power switch
4 Indicator lamp "Dirt water tank full"
5 Indicator lamp "Brush motor overload"
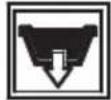
Symbols on the machine
 | Drain for waste water | |
 | Drain for fresh water | |
 | Fresh water reservoir filler neck | |
 | Parking brake | |
 | Foot pedal | |
 | Drain the fresh water tank and waste water tank prior to tipping the device. | |
Before Startup
→ Remove all packaging material except the wooden palette.
Installing the pushing handle
natural_image
Technical line drawing of an automotive electrical panel with hoses and connectors (no text or symbols)→ Insert the pushing handle in the grooves on the appliance.
→ Fasten the pushing handle with the 4 screws enclosed in the packet.
→ Fasten the covering flaps.
→ Hang in the strain relief clamp at the pushing handle.
Unloading
→ Lock the rear wheels; remove the wooden blocks used for stopping the wheels.
→ Four indicated floor boards of the pallet are fastened with screws. Unscrew these boards.
natural_image
Line drawing of a mechanical device on a platform with a pointer and lever (no text or symbols)→ Place the boards on the edge of the pallet. Place the boards in such a way that they lie in front of the four wheels of the machine. Fasten the boards with screws.
→ Slowly push the machine down from the ramp.
Removing anti-frost agents
Note:
The device has been flushed with anti-freeze during manufacturing. This anti-freeze must be removed before initial start-up.
→ Fill in 10 litres of fresh water in the fresh water reservoir.
→ Press the foot pedal.
→ Set the machine switch to basic cleaning.
→ Keep the machine running until the pressure on the manometer falls.
Start up
Preparing the traveller/ escalator
⚠️DANGER
Risk of injury! The device can become stuck to and carried away by moving walkways/escalators. Check the treads and groove profile for deformations before cleaning and remove any trapped objects found. In case of emergency, make sure that you know where the emergency stop button for the moving walkway/escalator is located.
→ Cordon off the traveller/ escalator as long as cleaning operations are on and the stepping areas are still wet.
→ Switch on the traveller/ escalator.
→ Ensure that the running direction of the traveller/ escalator is away from the machine.
Preparing the appliance
→ Check whether the combs and the guide rails of the machine match the make of the traveller/ escalator. Replace the combs and the guide rails, if required.

→ Open the cover of the fresh water reservoir.
→ Fill in fresh water.
ATTENTION
Risk of damage. Only use the recommended detergents. With other detergents, the operator bears the increased risk regarding the operational safety and danger of accident.
Only use detergents that are free from solvents, hydrochloric acid and hydrofluoric acid.
Follow the safety instructions for using detergents.
Note:
Do not use highly foaming detergents.
→ Pour in detergent.
→ Close the cover of the fresh water reservoir.
→ Drive the machine in front of the traveller/ escalator platform.
Operation
⚠️DANGER
Risk of injury!
- Do not use the appliance on inclines.
- Only use one foot to step on the foot pedal. The other foot must remain firmly and securely on the ground.
- Always hold the push handle firmly with at least one hand.
- Loose items of clothing or jewellery may be caught by moving parts of the moving walkway/escalator. Therefore, remove all jewellery and wear close-fitting clothing and sturdy footwear.
Cleaning types
The cleaning time depends on the level of dirt and is divided into three cleaning types.
Dry vacuum cleaning

Use dry vacuum clean on the travellers/escalators that have already been cleaned.
Regular cleaning

Cleaning slightly dirty travellers/ escalators (normally, at short regular intervals). At this setting, the appliance works with reduced quantity of water. The water pump works with regular strokes.
Basic cleaning

Cleaning very dirty travellers/ escalators (normally done when the escalator has not been cleaned for a long time). Areas with heavy dirt and stains should ideally be cleaned manually.
Tips for cleaning
- First clear off loose, coarse dust manually.
- Remove hard objects (such as stones) from the ridges of the steps.
– Clean the front side of the escalator steps manually. - Clean the stepping areas in overlapping strips. To do that, first move the appliance from the working position and place it on the side.
- Observe the steps while cleaning. They should be moist but not wet. There should not be any foam residue.
- First do moist cleaning (with detergent liquid) and then dry (by setting the appliance to dry vacuum cleaning).
- Then clean using clear water so as to remove detergent residues.
Cleaning operations
⚠️DANGER
Risk of injury and electric shock! Always route the extension cable so that it cannot be trapped or crushed and does not present a tripping hazard.
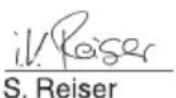
→ Plug in the mains plug.
→ Insert the end of the extension cable as a loop in the strain relief clamp.
→ Lock the rear wheels.
natural_image
Diagram of a car's front and side view showing steering wheel, dashboard, and gear mechanism (no text or labels)→ Place the machine on the platform in such a way that the front wheels do not touch the first step of the moving traveller/ escalator.
→ Press pedal for lowering the brush head. The brush head will be lowered and the lock lever will arrest in its position.

natural_image
Line drawing of a person using a lift lift machine on a track (no text or symbols)→ Press the foot pedal with one foot and while doing so move the machine a little back and forth towards the side. The machine will position itself centrally in the grooves of the steps; you will then hear a rustling sound.
⚠️DANGER
Risk of injury! The device must not be pushed any further onto the escalators than indicated. Otherwise there is a danger that the device will be carried away by the escalator. In the event of such a danger, push the escalator emergency stop button immediately.
The cleaning head must lie flat on the escalator.
→ Set the appliance switch to regular or basic cleaning.
The machine is started.
Note:
The device switches off when the waste water tank is full. To restart the device, empty the waste water tank and briefly set the power switch to "0".
→ Continue cleaning until the traveller/escalator has completed 1 or 2 rounds. Then move the machine towards the side and start a new cleaning process.
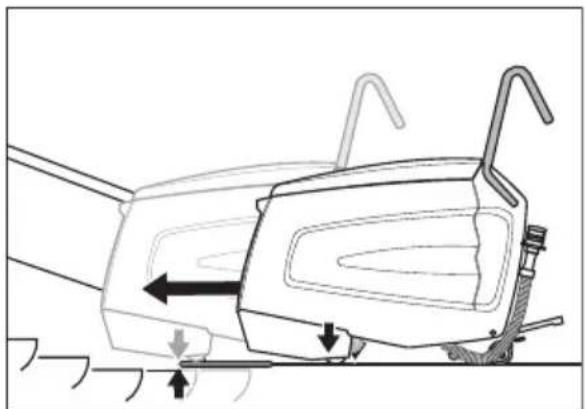
Moving the appliance to the side
→ Set the appliance switch to 'dry vacuum cleaning' position. Dry vacuum cleaning is activated.
→ Let the pump pressure fall to 0 bar.
→ Set the appliance switch to "0".
→ Release the foot pedal.
→ Press pedal for raising the brush head. Brush head is raised.
→ Move the appliance to the side.
→ Press pedal for lowering the brush head. The brush head will be lowered and the lock lever will arrest in its position.
→ Press the foot pedal and place the machine centrally in the ridges of the steps.
→ Set the appliance switch to regular or basic cleaning.
→ Then clean using clear water so as to remove detergent residues.
⚠️DANGER
Risk of injury! Upon refilling with cleaning fluid, always move the device away from the working position.
Shutting down
Complete cleaning
→ Set the appliance switch to 'dry vacuum cleaning' position. Dry vacuum cleaning is activated.
→ Let the pump pressure fall to 0 bar.
→ Set the appliance switch to "0".
→ Release the foot pedal.
→ Activate the lever to lock and the pedal to raise the brush head. Brush head is raised.
→ Release the rear wheels.
→ Drive out the machine from the working position and the podium until it is on firm ground.
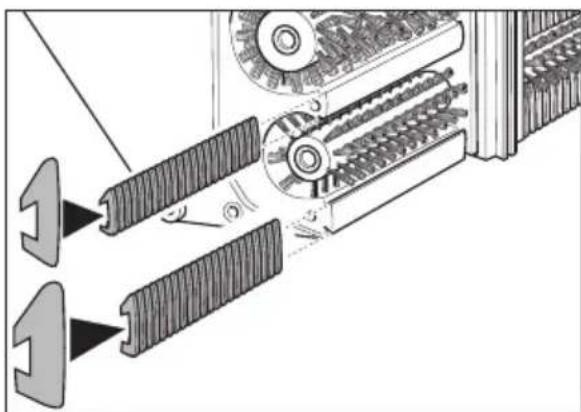
Turn off device
→ Pull out the mains plug.
natural_image
Diagram of a medical or laboratory procedure showing a coiled tube inserted into a device (no text or symbols visible)
natural_image
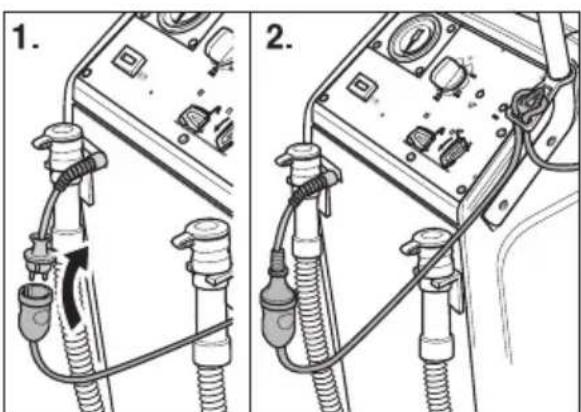
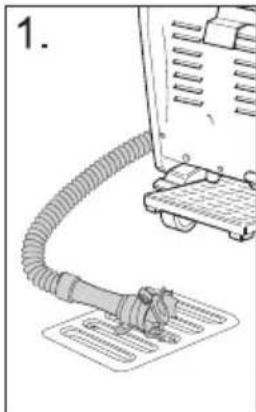
Diagram of a mechanical device with a coiled cable and attached paper sheet, no visible text or symbols→ Drain off and dispose the remaining detergent fluid.
→ Drain out the dirt water and dispose it off.
→ Clean the inside and outside of the machine. Rinse the tanks with clear water.
→ Store the machine in a frost-free room on an even and clean floor.
→ Lock the rear wheels.
→ Remove the cordon from the traveller/escalator only when the entire working area is dry again. There is risk of accident on account of slipping even if the traveller/ escalator is slightly moist.
Care and maintenance
⚠️DANGER
Risk of injury! Before performing any work on the device:
→ Set the appliance switch to "0".
→ Pull out the mains plug.
→ Lock the rear wheels.
→ Drain off and dispose the remaining detergent fluid.
→ Drain out the dirt water and dispose it off.
Cleaning the device
ATTENTION
Risk of damage! Do not spray the device with water and do not use aggressive detergents.
→ Clean the outside of the appliance with a damp cloth which has been soaked in mild detergent.
→ Wipe the insides of the dirt water reservoir.
→ Clean the fluff filter.
Maintenance intervals
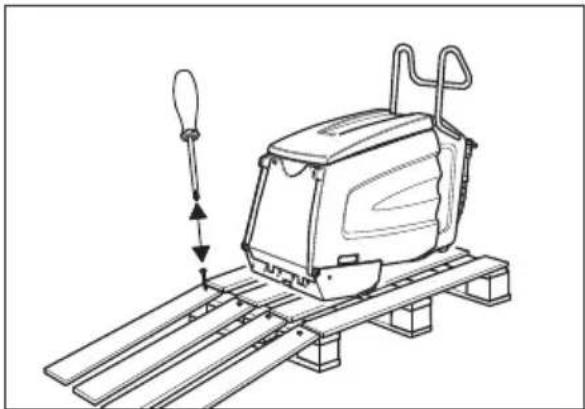
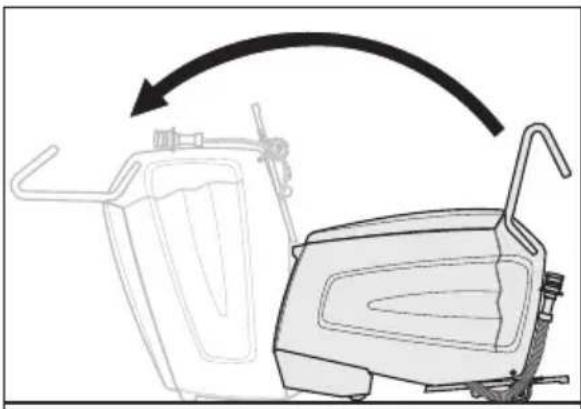
Tilt the machine in the maintenance position
The escalator cleaner must be accessible from the bottom side to perform any testing or maintenance jobs on the machine.
natural_image
Diagram showing a recycling bin and a trash bin with a straw, both rotating around it (no text or symbols present)→ Take the help of another person to tilt the machine forward until it stands on the front casing.
Daily before use
→ Check spray pattern of the nozzles.
→ Check if suction nozzles are dirty.
→ Check emergency stop function of the foot pedal.
Press the foot pedal, set the appliance switch to 'dry vacuum cleaning', the appliance must run. Release the foot pedal; the appliance must stop.
Get the machine repaired only by authorised customer service agents.
→ Check the locking of the rear wheels. Get the machine repaired only by authorised customer service agents.
→ Check for wear and tear: Roller brushes, intake brushes, combs, guide rails, hoses, stopper and front wheels. Replace stopper and front wheels, if required, only through authorised customer service agents.
→ Check mains cable and plug for damage or breakage. Get them replaced only through customer service agent or an electrician.
After 100 operating hours
→ Check if all fasteners are fastened tightly.
→ Check the drive belt for tension and wear (Customer Service).
Maintenance Works
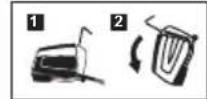
Clean the fluff filter

natural_image
Technical line drawing of a mechanical component with labeled part '1' (no text or symbols beyond label)→ Unscrew the tin cover plate using a torx spanner.
Note:
A hexalobular key (Torx) can be found in the waste water drain hose support.
natural_image
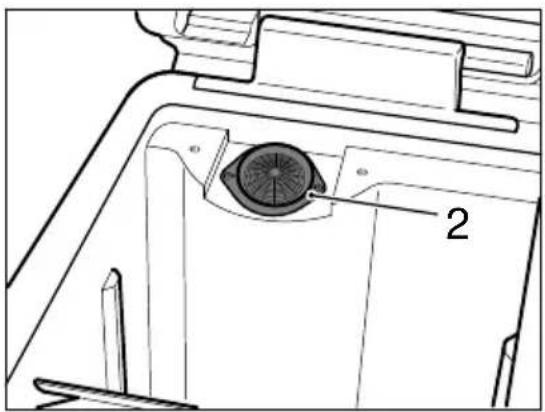
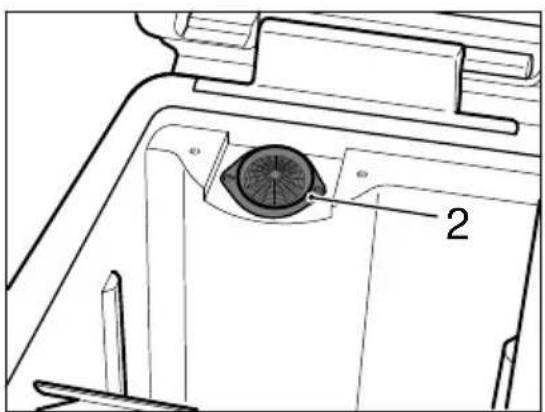
Technical line drawing of a mechanical component with labeled part '2' (no text or symbols beyond label)→ Clean the fluff filter.
→ Replace the tin plate.
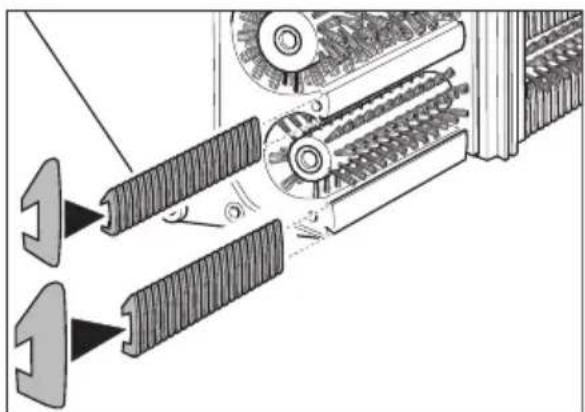
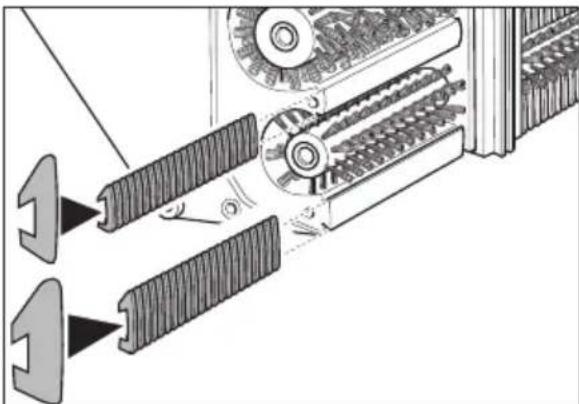
Replacing the roller brushes and the intake brushes
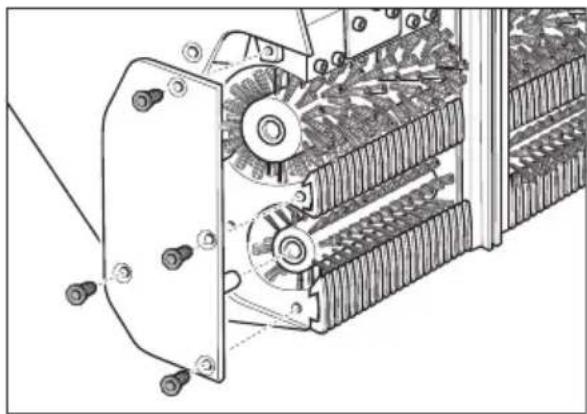
→ Loosen all the four screws and remove the bearing lid.
natural_image
Mechanical assembly diagram showing gear and shaft components (no text or labels)→ Remove the roller brushes (large) and intake brushes (small) and replace them (pay attention to the hexagonal intake of the brushes!).
Also check simultaneously the combs and the guide rails and replace or clean them as required.
natural_image
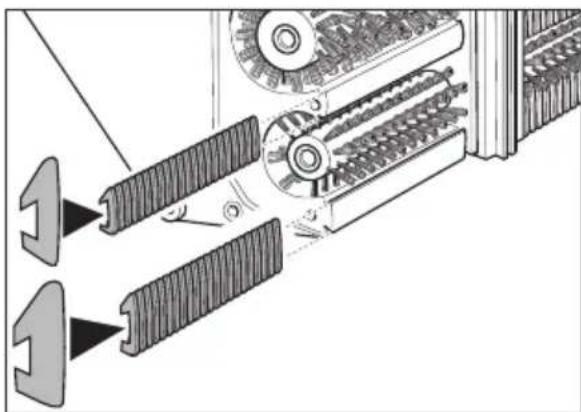
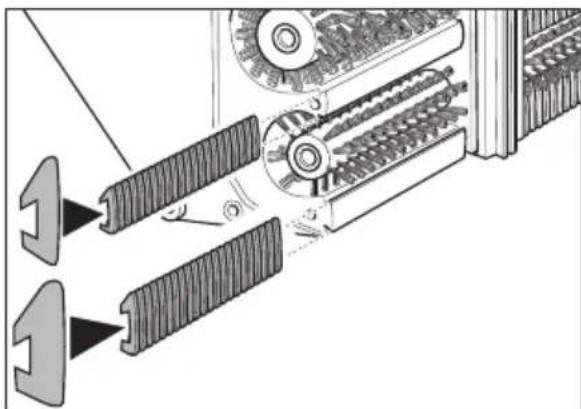
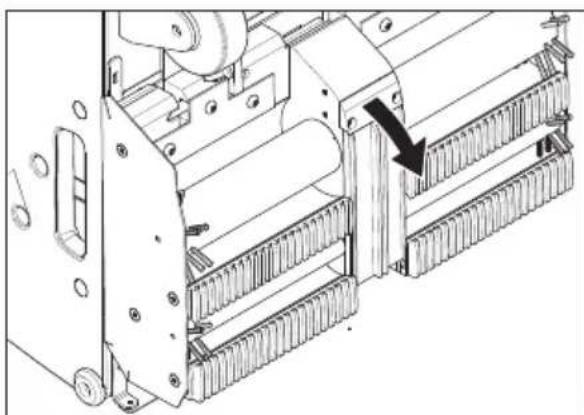
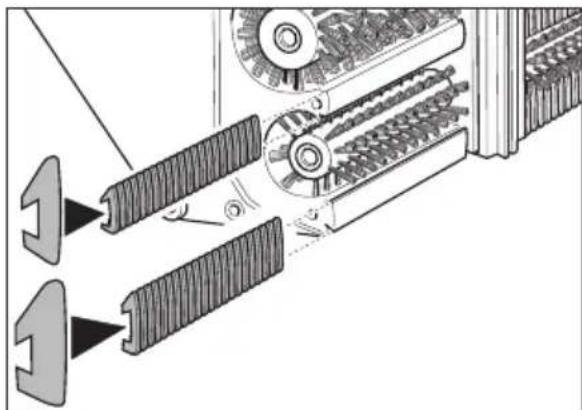
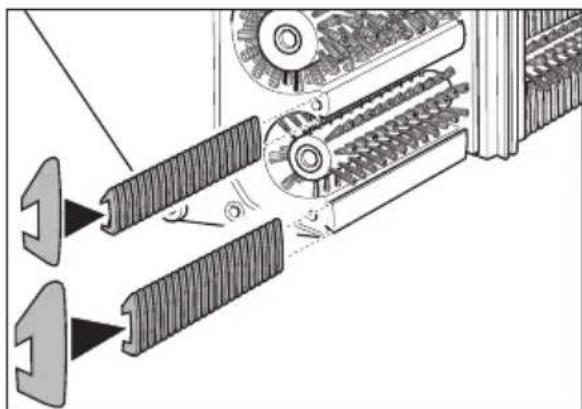
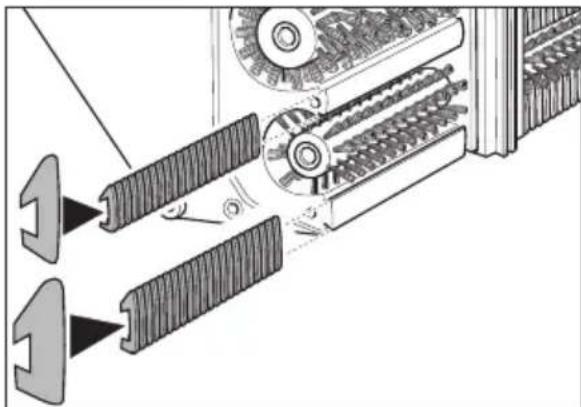
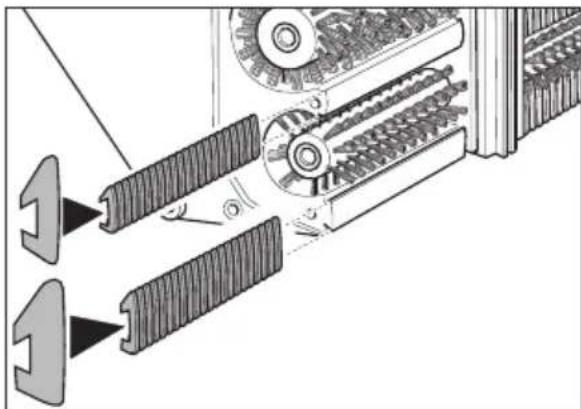
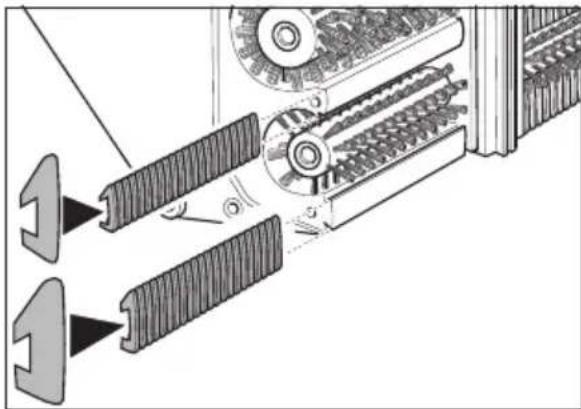
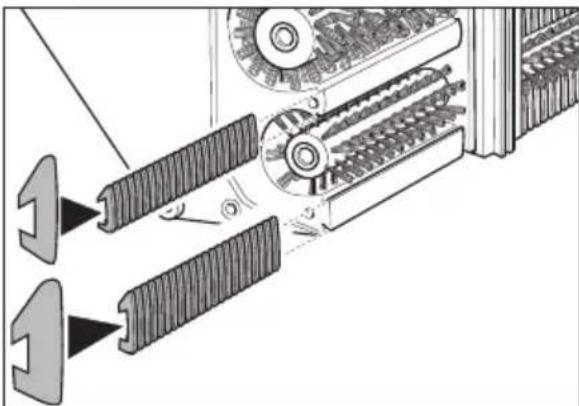
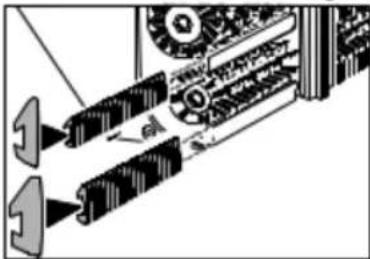
Technical illustration of a mechanical conveyor system with gear and rollers (no text or symbols)Replacing the combs
natural_image
Mechanical assembly diagram showing gear and shaft components (no text or labels)→ Remove the combs and replace them. To do this, slide the inlet combs on the narrow rails and the outlet combs on the wider rails.
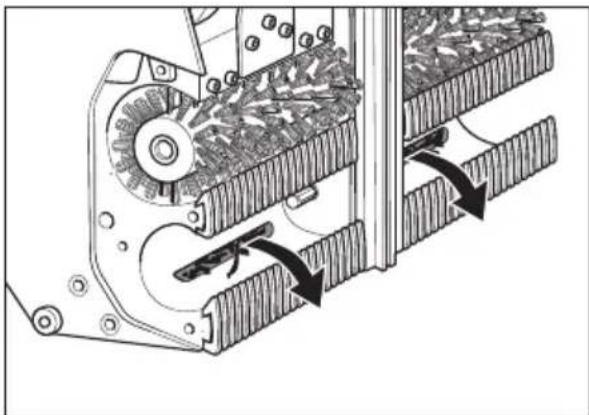
Cleaning the suction nozzles
natural_image
Mechanical assembly diagram showing gear meshing and directional arrows (no text or symbols)→ Pull out all dirt particles from the suction nozzles; do not push them in.
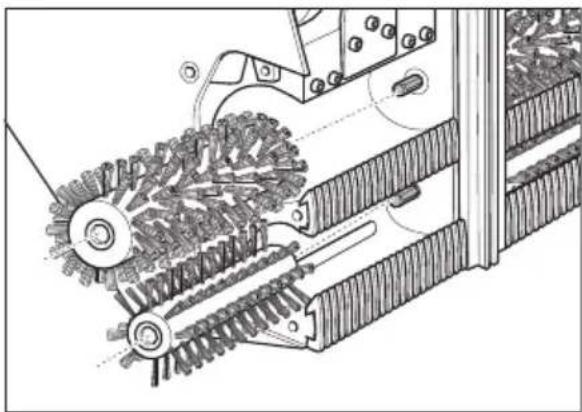
Replacing the guide rails
natural_image
Technical line drawing of a mechanical assembly with rollers and a directional arrow (no text or symbols)→ Loosen the fastening screws of the holder for the guide rails.
→ Dismantle the guide rails.
→ Insert the guide rails in reverse sequence. Ensure that they sit properly.
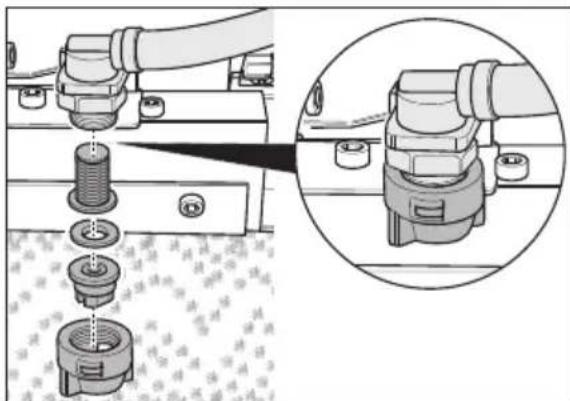
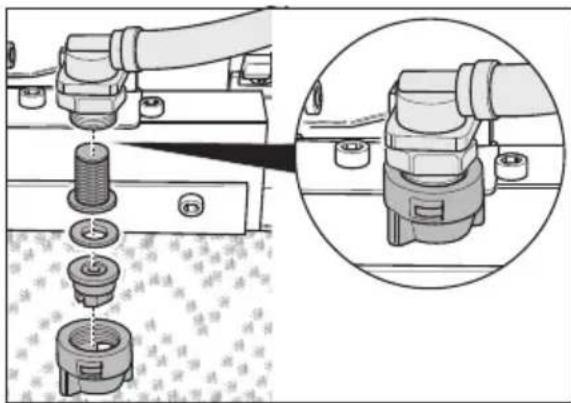
Check nozzles and filters for detergents
natural_image
Mechanical assembly diagram showing a threaded component inserted into a housing, with an inset close-up of the component detail (no text or symbols visible)→ Loosen the union joint. Remove nozzle, washer and sieve.
→ Clean the nozzle or insert a new nozzle in the union joint.
→ Insert washer and sieve and tighten the union joint by hand.
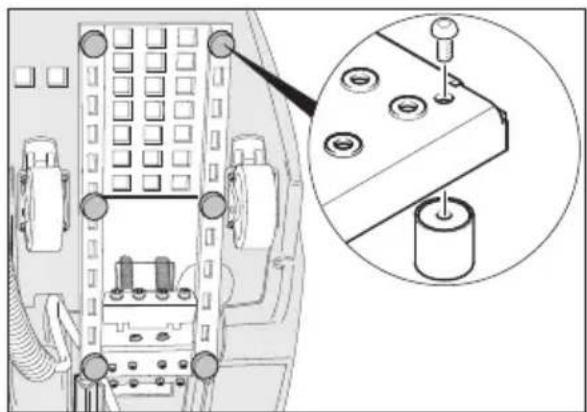
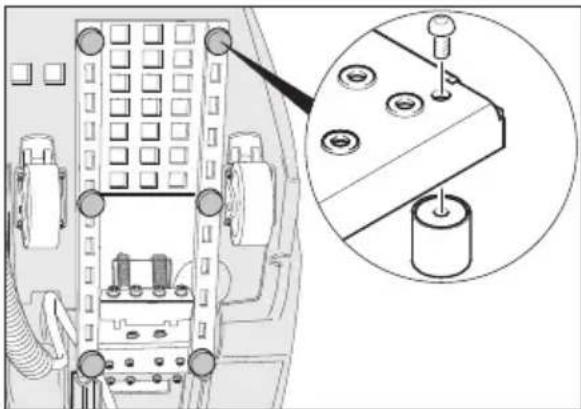
Replacing the pad
natural_image
Technical diagram of an electrical control panel with a magnified inset showing internal components (no text or symbols)→ Unscrew the pad with a screw-driver and replace it.
Transport
⚠️DANGER
Risk of injury! No driving on slopes over 5°. Never transport the device on escalators/moving walkways.
△CAUTION
Risk of personal injury or damage! Mind the weight of the appliance during transport.
→ Lock the rear wheels.
→ Secure the machine with clamping belts and ropes so that it doesn't slip off.
Storage
△CAUTION
Risk of personal injury or damage! Consider the weight of the appliance when storing it.
This appliance must only be stored in interior rooms.
Troubleshooting
⚠️DANGER
Risk of injury! Before performing any work on the device:
→ Set the appliance switch to "0".
→ Pull out the mains plug.
→ Lock the rear wheels.
→ Drain off and dispose the remaining detergent fluid.
→ Drain out the dirt water and dispose it off.
| Fault Remedy | |
| Motor/pump do not start or switch off automatically when the machine is on. | Dirt water reservoir is full; empty it. |
| Press the foot pedal. | |
| Indicator lamp "Dirt water tank full" is glowing. | Dirt water reservoir is full; empty it. |
| Working pressure of min. 3 bar is not building up. | If fresh water reservoir is empty, then fill it up (35 litres). |
| Check pipes to see if there are any leaks. If required, get it sealed by customer service. | |
| Check the nozzles. | |
| Get customer service to clean the pump. | |
| Cleaned steps are too wet. | Check the combs for wear, replace if required. |
| Check the condition of the seal of the dirt water reservoir for damages, replace if required. | |
| Check the intake brushes for wear, replace if required. | |
| Check suction nozzles and hose for blockages; clean if required. | |
| Check whether the waste water tank lid is completely closed. | |
| Check whether the correct combs have been installed. | |
| Washed steps are not clean. | Check detergent nozzles to see if they are blocked; clean or replace if required. |
| Check the condition of the seal of the dirt water reservoir for damages, replace if required. | |
| Check the brush rollers and intake brushes for wear, replace if required. | |
| Check detergent. Check the concentration of the detergent solution. | |
| Check the intake brushes for wear, replace if required. | |
| Check whether the waste water tank lid is completely closed. | |
| Check whether the correct combs have been installed. | |
| Indicator lamp "Brush motor overload" is glowing. | Set appliance switch to "0", then turn it back to the desired operating position. If the fault recurs often, call customer service. |
| Remove belts or cords from brushes. |
Technical specifications
| Performance data | ||
| Nominal voltage V 220-240 | ||
| Frequency Hz 50/60 | ||
| Control voltage V 12 | ||
| Rated power (max.) W 1400 | ||
| Suction engine output W 800 | ||
| Brush engine output W 600 | ||
| Protective class IPX4 | ||
| Pump pressure bar 3-4 | ||
| Water Consumption | l/h | 25-50 |
| Speed of roller brushes | rpm | 870 |
| Speed of intake brushes | rpm | 1090 |
| Dimensions and weights | ||
| Working width | mm | 470 |
| Width | mm | 480 |
| Length | mm | 1150 |
| Height with pushing handle | mm | 1050 |
| Height without pushing handle | mm | 760 |
| Fresh/waste water tank volume | l 35/35 | |
| Transport weight | kg | approx. 90 |
| Permissible overall weight | kg | approx. 125 |
| Values determined as per EN 60335-2-72 | ||
| Total oscillation value | m/s ^2 | 0.3 |
| Uncertainty K | m/s ^2 | 0.2 |
| Sound pressure level L _pA | dB(A) | <75 |
| Uncertainty K _pA | dB(A) | 2 |
| Sound power level L _WA + Uncertainty K _WA | dB(A) | 90 |
Warranty
The warranty terms published by the relevant sales company are applicable in each country. We will repair potential failures of your appliance within the warranty period free of charge, provided that such failure is caused by faulty material or defects in manufacturing. In the event of a warranty claim please contact your dealer or the nearest authorized Customer Service centre. Please submit the proof of purchase.
Accessories and Spare Parts
Only use original accessories and spare parts, they ensure the safe and trouble-free operation of the device.
For information about accessories and spare parts, please visit www.kaercher.com.
EU Declaration of Conformity
We hereby declare that the machine described below complies with the relevant basic safety and health requirements of the EU Directives, both in its basic design and construction as well as in the version put into circulation by us. This declaration shall cease to be valid if the machine is modified without our prior approval.
Product: escalator cleaner
Type: 1.310-xxx
Relevant EU Directives
2006/42/EC (+2009/127/EC)
2014/30/EU
Applied harmonized standards
EN 55014-1: 2006+A1: 2009+A2: 2011
EN 55014-2: 2015
EN 60335-1
EN 60335-2-72
EN 61000-3-2: 2014
EN 61000-3-3: 2013
EN 62233: 2008
Applied national standards
The signatories act on behalf of and with the authority of the company management.
H. Jenner
Chairman of the Board of Management
S. Reiser
Director Regulatory Affairs & Certification
Documentation supervisor:
S. Reiser
Alfred Kärcher SE & Co. KG
71364 Winnenden (Germany)
Tel.: +49 7195 14-0
Fax: +49 7195 14-2212
Winnenden, 2019-05-01

www.kaercher.com/REACH
natural_image
Technical line drawing of an automotive electrical panel with hoses and connectors (no text or symbols)natural_image
Line drawing of a mechanical device with a lever and adjustment knob, mounted on a platform (no text or symbols)natural_image
Diagram of a medical or laboratory setup with hoses and tubing, no visible text or symbols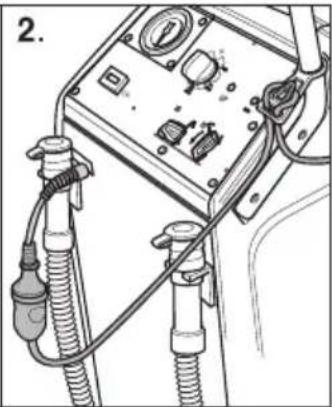
natural_image
Line drawing of a medical or electrical device with hoses and connectors (no text or symbols visible)natural_image
Diagram of a car's front and side view showing steering wheel, dashboard, and gear mechanism (no text or labels)natural_image
Line drawing of a person using a cleaning machine to lift a wall-mounted device (no text or symbols)natural_image
Diagram of a robotic arm connecting a flexible hose to a control panel (no text or symbols)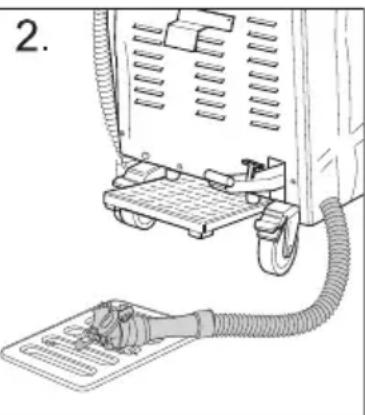
natural_image
Diagram of a mechanical device with a coiled cable and attached paper, no visible text or symbolsnatural_image
Diagram showing a recycling bin and a trash bin with a straw, both moving in opposite directions (no text or symbols)natural_image
Technical line drawing of a mechanical component with labeled parts (no text or symbols present)natural_image
Technical line drawing of a mechanical component with labeled part '2' (no text or symbols beyond label)natural_image
Mechanical assembly diagram showing gear and shaft components (no text or labels)natural_image
Technical line drawing of a mechanical conveyor system with rollers and gears (no text or symbols)natural_image
Mechanical assembly diagram showing gear meshing and cutting process (no text or symbols)natural_image
Mechanical assembly diagram showing gear meshing and directional arrows (no text or symbols)natural_image
Technical line drawing of a mechanical assembly with rollers and a directional arrow (no text or symbols)natural_image
Mechanical assembly diagram showing a bolted connection with a magnified inset of the component (no text or symbols)natural_image
Technical diagram of an electrical control panel with a magnified inset showing internal components (no text or symbols)2006/42/CE (+2009/127/CE)
2014/30/UE
Chairman of the Board of Management
Director Regulatory Affairs & Certification
71364 Winnenden (Germany)
Tel.: +49 7195 14-0
Fax: +49 7195 14-2212
Winnenden, le 01/05/2019

www.kaercher.com/REACH
natural_image
Technical line drawing of an automotive electrical panel with hoses and connectors (no text or symbols)natural_image
Line drawing of a mechanical device on a platform with a pointer and lever (no text or symbols)natural_image
Diagram of a medical or electrical device with hoses and connectors, no visible text or symbols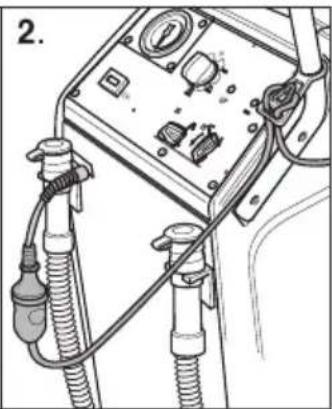
natural_image
Diagram of a medical or electrical device with hoses and connectors, no visible text or symbolsnatural_image
Diagram of a car's side profile showing front and rear views with directional arrows indicating movement (no text or symbols)natural_image
Line drawing of a person pushing a car on a slope (no text or symbols)natural_image
Diagram of a robotic arm connecting a flexible hose to a control panel (no text or symbols)
natural_image
Diagram of a medical device with tubing and a connector, no text or symbols presentnatural_image
Diagram showing a mechanical device with a lever and a motor, connected by an arrow indicating rotation (no text or symbols present)natural_image
Technical line drawing of a mechanical component with labeled parts (no text or symbols present)natural_image
Technical line drawing of a mechanical component with labeled parts (no readable text or symbols)natural_image
Mechanical assembly diagram showing gear meshing and mounting components (no text or labels)natural_image
Technical line drawing of a mechanical conveyor system with gear and rollers (no text or symbols)natural_image
Mechanical assembly diagram showing gear and motor components (no text or labels)natural_image
Mechanical assembly diagram showing gear and shaft components with directional arrows indicating motion (no text or labels)natural_image
Technical line drawing of a mechanical assembly with rollers and a directional arrow (no text or symbols)natural_image
Mechanical assembly diagram showing a valve inserted into a housing, with a magnified inset highlighting the component detail (no text or symbols present)natural_image
Technical diagram of an electronic control panel with a magnified inset showing internal components (no text or symbols)2006/42/CE (+2009/127/CE)
2014/30/UE
Chairman of the Board of Management

S. Reiser
Director Regulatory Affairs & Certification
71364 Winnenden (Germany)
Tel.: +49 7195 14-0
Fax: +49 7195 14-2212
Winnenden, 01/05/2019

www.kaercher.com/REACH
1 Duwbeugel
2 Aftapslang schoon water
3 Aftapslang vuil water
4 Netstekker
5 Snoerontlastingshaak
6 Voetpedaal
7 Achterste wielen met vastzethefboom
8 Deksel reservoir vuil water
natural_image
Technical line drawing of an automotive electrical panel with hoses and connectors (no text or symbols)natural_image
Line drawing of a mechanical device on a platform with a pointer and lever (no text or symbols)natural_image
Diagram of a medical or laboratory setup with hoses and connectors, no visible text or symbols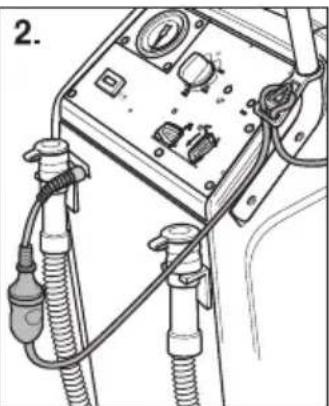
natural_image
Line drawing of a medical or laboratory equipment setup with hoses and control panels (no text or symbols visible)natural_image
Diagram of a car's side profile showing front and rear views with directional arrows indicating movement (no text or symbols)natural_image
Line drawing of a person pushing a car with a downward arrow indicating motion (no text or symbols)natural_image
Diagram of a robotic arm with a coiled cable and base plate, no text or symbols present
natural_image
Diagram of a mechanical device with a coiled cable and attached component, no visible text or symbolsnatural_image
Diagram showing a recycling bin and a trash bin with a straw, both rotating around it (no text or symbols present)natural_image
Technical line drawing of a mechanical component with labeled part '1' (no text or symbols beyond label)natural_image
Technical line drawing of a mechanical component with labeled part '2' (no text or symbols beyond label)natural_image
Mechanical assembly diagram showing gear and shaft components (no text or labels)natural_image
Technical line drawing of a mechanical conveyor system with rollers and shafts (no text or symbols)Kammen vervangen
natural_image
Mechanical assembly diagram showing gear meshing and directional arrows (no text or labels)natural_image
Technical line drawing of a mechanical assembly with rollers and a directional arrow (no text or symbols)natural_image
Mechanical assembly diagram showing a threaded component inserted into a housing, with an inset close-up of the component detail (no text or symbols visible)natural_image
Technical diagram of an electronic control panel with a magnified inset showing internal components (no text or symbols)Chairman of the Board of Management
Director Regulatory Affairs & Certification
71364 Winnenden (Germany)
Tel.: +49 7195 14-0
Fax: +49 7195 14-2212
Winnenden, 2019/05/01

www.kaercher.com/REACH
natural_image
Technical line drawing of an automotive electrical panel with hoses and connectors (no text or symbols)natural_image
Line drawing of a mechanical device on a platform with a tool, no text or symbols presentnatural_image
Diagram of a medical or laboratory setup with hoses and tubing, no visible text or symbols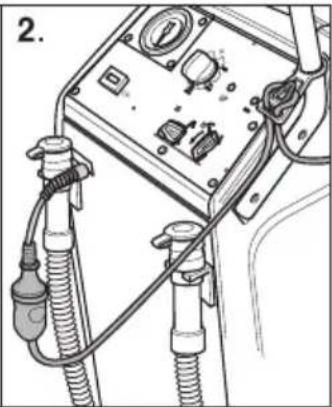
natural_image
Line drawing of a medical or electrical device with hoses and connectors (no text or symbols visible)natural_image
Diagram of a car's front and side view showing steering wheel, dashboard, and gear mechanism (no text or labels)natural_image
Line drawing of a person using a car lift device to lift a vehicle (no text or symbols)natural_image
Diagram of a robotic arm connecting a flexible hose to a control panel (no text or symbols present)
natural_image
Diagram of a mechanical device with a coiled cable and connector, no text or symbols presentnatural_image
Diagram showing a recycling bin and a trash bin with a straw, both moving in opposite directions (no text or symbols)natural_image
Technical line drawing of a mechanical component with labeled parts (no text or symbols present)natural_image
Technical line drawing of a mechanical component with labeled parts (no readable text or symbols)natural_image
Mechanical assembly diagram showing gear and shaft components (no text or labels)natural_image
Technical line drawing of a mechanical conveyor system with rollers and gears (no text or symbols)Cambiar los dientes
natural_image
Mechanical assembly diagram showing gear meshing and directional arrows (no text or labels)natural_image
Technical line drawing of a mechanical assembly with rollers and a directional arrow (no text or symbols)natural_image
Mechanical assembly diagram showing a valve inserted into a housing, with a magnified inset highlighting the component detail (no text or symbols present)natural_image
Technical diagram of an electrical control panel with a magnified inset showing internal components (no text or symbols)→ Desatornillar y sustituir la funda.
Transporte
⚠️ PELIGRO
2006/42/CE (+2009/127/CE)
2014/30/UE
Chairman of the Board of Management

S. Reiser
Director Regulatory Affairs & Certification
71364 Winnenden (Germany)
Tel.: +49 7195 14-0
Fax: +49 7195 14-2212
Winnenden (Alemania), 01/05/2019

Leia o manual de manual original antes de utilizar o seu apare-
www.kaercher.com/REACH
Elementos de comando e de funcionamento

natural_image
Technical line drawing of an automotive electrical panel with hoses and connectors (no text or symbols)natural_image
Line drawing of a mechanical device on a platform with a tool, no text or symbols presentnatural_image
Diagram of a car's side profile showing front and rear views with directional arrows indicating movement (no text or symbols)natural_image
Line drawing of a person pushing a car on a slope, showing mechanical components and motion (no text or symbols)natural_image
Diagram of a robotic arm connecting a cable to a control panel (no text or symbols present)
natural_image
Diagram of a mechanical device with a coiled cable and attached component, no visible text or symbolsnatural_image
Diagram showing a recycling bin and a trash bin with a straw, both moving in opposite directions (no text or symbols)natural_image
Technical line drawing of a mechanical component with labeled parts (no text or symbols present)natural_image
Technical line drawing of a mechanical component with a circular feature and numbered label (2), no readable text or symbols present.→ Limpar o crivo de lanugem.
→ Aparafusar a cobertura de chapa.
natural_image
Mechanical assembly diagram showing gear and shaft components (no text or labels)natural_image
Technical line drawing of a mechanical conveyor system with rollers and shafts (no text or symbols)natural_image
Mechanical assembly diagram showing gear meshing and directional arrows (no text or symbols)natural_image
Technical line drawing of a mechanical assembly with rollers and a directional arrow (no text or symbols)natural_image
Mechanical assembly diagram showing a valve assembly with a magnified inset of the component detail (no text or symbols)natural_image
Technical diagram of an electrical control panel with a magnified inset showing internal components (no text or symbols)2006/42/CE (+2009/127/CE)
2014/30/UE
Chairman of the Board of Management
S. Reiser
Director Regulatory Affairs & Certification
71364 Winnenden (Germany)
Tel.: +49 7195 14-0
Fax: +49 7195 14-2212
Winnenden, 01/05/2019

www.kaercher.com/REACH
natural_image
Technical line drawing of an internal vehicle or engine compartment with hoses and connectors (no text or symbols)natural_image
Line drawing of a mechanical device on a platform with a pointer and lever (no text or symbols)natural_image
Diagram of a medical or electrical device with hoses and connectors, no visible text or symbols
natural_image
Line drawing of a medical or industrial device with hoses and connectors (no text or symbols visible)natural_image
Diagram of a car's front and side view showing steering wheel, dashboard, and gear mechanism (no text or labels)natural_image
Line drawing of a person pushing a car with a downward arrow indicating motion (no text or symbols)natural_image
Diagram of a robotic arm connecting a flexible hose to a control panel (no text or symbols present)
natural_image
Diagram of a computer monitor with a cable and connector, no text or symbols presentnatural_image
Diagram showing a recycling bin and a trash bin with a straw, both moving in opposite directions (no text or symbols)natural_image
Technical line drawing of a mechanical component with labeled part '1' (no text or symbols beyond label)natural_image
Technical line drawing of a mechanical component with labeled parts (no readable text or symbols)natural_image
Mechanical assembly diagram showing gear and shaft components (no text or labels)natural_image
Technical illustration of a mechanical conveyor system with rollers and shafts (no text or symbols)Udskifte kam
natural_image
Mechanical assembly diagram showing gear and motor components (no text or labels)natural_image
Mechanical assembly diagram showing gear and conveyor components with directional arrows (no text or labels)natural_image
Technical line drawing of a mechanical assembly with rollers and a directional arrow (no text or symbols)natural_image
Mechanical assembly diagram showing a valve inserted into a housing, with a magnified inset highlighting the component detail (no text or symbols present)natural_image
Technical diagram of an electrical control panel with a magnified inset showing internal components (no text or labels)2006/42/EF (+2009/127/EF)
2014/30/EU
Chairman of the Board of Management
S. Reiser
Director Regulatory Affairs & Certification
71364 Winnenden (Germany)
Tel.: +49 7195 14-0
Fax: +49 7195 14-2212
Winnenden, 2019/05/01

www.kaercher.com/REACH
1 Skyvebøyle
2 Avløpsslange friskvann
3 Avløpsslange spillvann
4 Støpsel
5 Strekkavlastningskroker
6 Fotpedal
7 Bakhjul med läsehendel
natural_image
Technical line drawing of a vehicle's internal components, including hoses and connectors (no text or symbols)natural_image
Line drawing of a mechanical device on a platform with a tool, no text or symbols presentnatural_image
Diagram of a medical or electrical device with hoses and connectors, no visible text or symbols
natural_image
Line drawing of a medical or laboratory equipment setup with hoses and control panels (no text or symbols visible)→ Heng enden på skjøteledningen som en sløyfe i trekkeavlastningskroken.
→ Lås bakhjulene.

natural_image
Diagram of a car's front and side view showing steering wheel, dashboard, and gear mechanism (no text or symbols)natural_image
Line drawing of a person pushing a car with a downward arrow indicating motion (no text or symbols)natural_image
Diagram of a robotic arm with a coiled cable and base plate, no text or symbols present
natural_image
Diagram of a medical device with tubing and connector, no visible text or symbolsnatural_image
Diagram showing a recycling bin and a trash bin with a straw, both rotating around it (no text or symbols present)natural_image
Technical line drawing of a mechanical component with labeled part '1' (no text or symbols beyond label)→ Platedeksel skrus ut med en innvendig sekskantnøkkel (Torx).
Merknad:
Det er en torxnøkkel i holderen til tappe- slangen for bruktvann.
natural_image
Technical line drawing of a mechanical component with labeled parts (no text or symbols present)natural_image
Mechanical assembly diagram showing gear and shaft components (no text or labels)natural_image
Technical illustration of a mechanical conveyor system with gears and rollers (no text or symbols)Skifting av kammer

natural_image
Mechanical assembly diagram showing gear and shaft components (no text or labels)natural_image
Mechanical assembly diagram showing gear and shaft components with directional arrows indicating motion (no text or labels)natural_image
Technical line drawing of a mechanical assembly with rollers and a directional arrow (no text or symbols)natural_image
Technical diagram showing mechanical assembly with a magnified inset of a component detail (no text or symbols)natural_image
Technical diagram of an electrical control panel with a magnified inset showing internal components (no text or labels)→ Skru ut skåneren med en skrutrekker og sett på plass en ny.
Transport
⚠️FARE
2006/42/EF (+2009/127/EF)
2014/30/EU
Chairman of the Board of Management

S. Reiser
Director Regulatory Affairs & Certification
71364 Winnenden (Germany)
Tel.: +49 7195 14-0
Fax: +49 7195 14-2212
Winnenden, 2019/05/01

www.kaercher.com/REACH
natural_image
Technical line drawing of an internal vehicle or engine compartment with hoses and connectors (no text or symbols)natural_image
Line drawing of a mechanical device on a platform with a pointer and lever (no text or symbols)natural_image
Diagram of a medical or electrical device with hoses and connectors, no visible text or symbols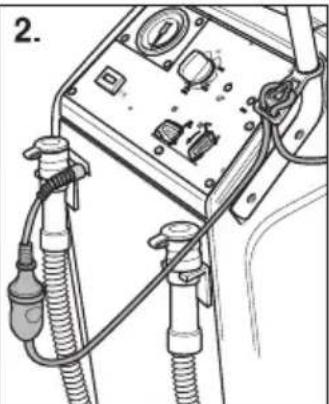
natural_image
Line drawing of a medical or laboratory equipment setup with hoses and control panels (no text or symbols visible)natural_image
Diagram of a car's front and side view showing steering wheel, dashboard, and gear mechanism (no text or symbols)natural_image
Line drawing of a person pushing a car with a downward arrow indicating motion (no text or symbols)natural_image
Diagram of a robotic arm connecting a flexible hose to a control panel (no text or symbols visible)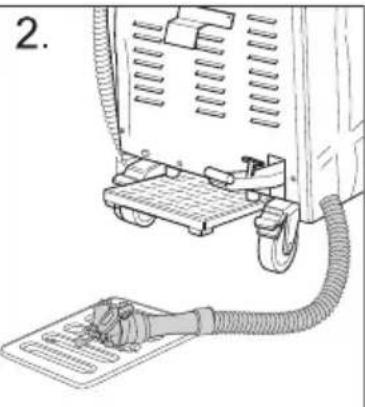
natural_image
Line drawing of a medical device with tubing and connector (no text or symbols)natural_image
Diagram showing a recycling bin and a trash bin with a straw, both moving in opposite directions (no text or symbols)natural_image
Technical line drawing of a mechanical component with labeled part '1' (no text or symbols beyond label)natural_image
Technical line drawing of a mechanical component with a circular feature and numbered label (2), no readable text or symbols present.natural_image
Mechanical assembly diagram showing gear and shaft components (no text or labels)natural_image
Technical illustration of a mechanical conveyor system with gears and rollers (no text or symbols)Byta ut kammar
natural_image
Mechanical assembly diagram showing gear and shaft components (no text or labels)natural_image
Mechanical assembly diagram showing gear and shaft components with directional arrows indicating motion (no text or labels)natural_image
Technical line drawing of a mechanical assembly with rollers and a directional arrow (no text or symbols)natural_image
Technical diagram showing mechanical assembly with a magnified inset of a component detail (no text or symbols)natural_image
Technical diagram of an electronic control panel with a magnified inset showing internal components (no text or symbols)Chairman of the Board of Management

S. Reiser
Director Regulatory Affairs & Certification
71364 Winnenden (Germany)
Tel.: +49 7195 14-0
Fax: +49 7195 14-2212
Winnenden, 2019/05/01

www.kaercher.com/REACH
natural_image
Technical line drawing of an internal vehicle or engine compartment with hoses and connectors (no text or symbols)natural_image
Line drawing of a mechanical device with a lever and adjustment lever (no text or symbols)natural_image
Diagram of a medical or electrical device with hoses and connectors, no visible text or symbols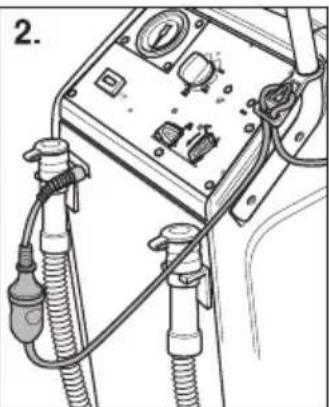
natural_image
Line drawing of a medical or laboratory equipment setup with hoses and tubing (no text or symbols visible)natural_image
Diagram of a car's front and side view showing steering wheel, dashboard, and seat components (no text or labels)natural_image
Line drawing of a person pushing a car with a downward arrow indicating motion (no text or symbols)natural_image
Diagram of a robotic arm with a coiled tube and base plate, no text or symbols present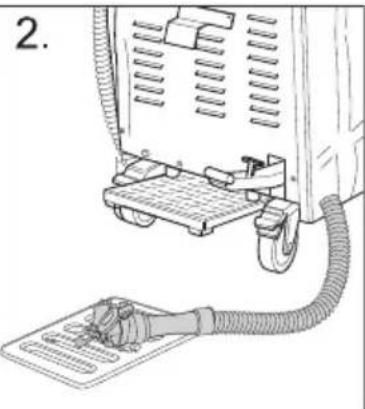
natural_image
Line drawing of a mechanical device with a coiled cable and attached panel (no text or symbols)natural_image
Diagram showing a recycling bin and a trash bin with a straw, both moving in opposite directions (no text or symbols)natural_image
Technical line drawing of a mechanical component with labeled part '1' (no text or symbols beyond label)natural_image
Technical line drawing of a mechanical component with a circular feature and numbered label (2), no readable text or symbols present.natural_image
Mechanical assembly diagram showing gear and shaft components (no text or labels)natural_image
Technical illustration of a mechanical conveyor system with rollers and shafts (no text or symbols)natural_image
Mechanical assembly diagram showing gear and shaft components (no text or labels)natural_image
Mechanical assembly diagram showing gear and motor components with directional arrows indicating motion (no text or labels)natural_image
Technical line drawing of a mechanical assembly with rollers and a directional arrow (no text or symbols)natural_image
Technical diagram showing mechanical assembly with a magnified inset of a component detail (no text or symbols)natural_image
Technical diagram of an electronic control panel with a magnified inset showing internal components (no text or symbols)Chairman of the Board of Management
S. Reiser
Director Regulatory Affairs & Certification
71364 Winnenden (Germany)
Tel.: +49 7195 14-0
Fax: +49 7195 14-2212
Winnenden, 1.5.2019

www.kaercher.com/REACH
natural_image
Technical diagram of an automotive electrical panel with connectors and wiring (no text or labels)natural_image
Line drawing of a mechanical device on a platform with a tool, no text or symbols presentnatural_image
Diagram of a medical or electrical device with hoses and connectors, no visible text or symbols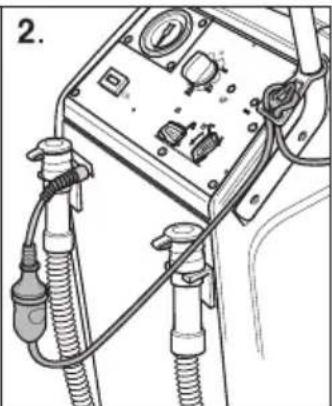
natural_image
Diagram of a vehicle electrical testing setup with hoses and components (no text or labels visible)natural_image
Diagram of a car's front and side view showing steering wheel, dashboard, and gear mechanism (no text or labels)natural_image
Line drawing of a person using a car lift device to lift a vehicle (no text or symbols)natural_image
Diagram showing a mechanical device with a lever and a motor, connected by an arrow indicating rotation (no text or symbols present)natural_image
Technical line drawing of a mechanical component with labeled parts (no text or symbols present)natural_image
Mechanical assembly diagram showing gear and shaft components (no text or labels)natural_image
Technical illustration of a mechanical conveyor system with gear and rollers (no text or symbols)natural_image
Mechanical assembly diagram showing gear and shaft components with directional arrows indicating motion (no text or labels)natural_image
Technical line drawing of a mechanical assembly with rollers and a directional arrow (no text or symbols)natural_image
Technical diagram showing mechanical assembly with a magnified inset of a component detail (no text or symbols)natural_image
Technical diagram of an electronic control panel with a magnified inset showing internal components (no text or symbols)Chairman of the Board of Management

S. Reiser
Director Regulatory Affairs & Certification
71364 Winnenden (Germany)
Tel.: +49 7195 14-0
Fax: +49 7195 14-2212
Winnenden, 2019/05/01

www.kaercher.com/REACH
natural_image
Technical line drawing of a vehicle's internal components with hoses and connectors (no text or symbols)natural_image
Line drawing of a mechanical device on a platform with a pointer and lever (no text or symbols)natural_image
Diagram of a car interior showing directional arrows and components (no text or symbols)natural_image
Line drawing of a person pushing a car with a downward arrow indicating motion (no text or symbols)natural_image
Diagram of a robotic arm connecting a flexible hose to a control panel (no text or symbols)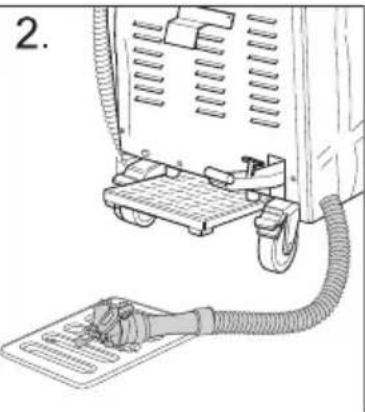
natural_image
Diagram of a computer monitor with a cable and paper clip, no text or symbols presentnatural_image
Diagram showing a recycling bin and a trash bin with a straw, both moving in opposite directions (no text or symbols)natural_image
Technical line drawing of a mechanical component with labeled part '1' (no text or symbols beyond label)natural_image
Technical line drawing of a mechanical component with labeled part '2' (no text or symbols beyond label)natural_image
Mechanical assembly diagram showing gear and mesh components (no text or labels)natural_image
Technical illustration of a mechanical conveyor system with gear and rollers (no text or symbols)natural_image
Mechanical assembly diagram showing gear and motor components (no text or labels)natural_image
Mechanical assembly diagram showing gear meshing and directional arrows (no text or symbols)natural_image
Technical line drawing of a mechanical assembly with rollers and a directional arrow (no text or symbols)natural_image
Technical diagram showing mechanical assembly with a magnified inset of a component detail (no text or symbols)natural_image
Technical diagram of an electronic control panel with a magnified inset showing internal components (no text or symbols)Chairman of the Board of Management

S. Reiser
Director Regulatory Affairs & Certification
71364 Winnenden (Germany)
Tel.: +49 7195 14-0
Fax: +49 7195 14-2212
Winnenden, 2019/05/01

www.kaercher.com/REACH
1 ведущая дуга
natural_image
Technical line drawing of a vehicle's internal components, including hoses and sensors (no text or symbols)natural_image
Line drawing of a mechanical device on a platform with a pointer and lever (no text or symbols)natural_image
Diagram of a medical or electrical device with tubing and connectors, no visible text or symbols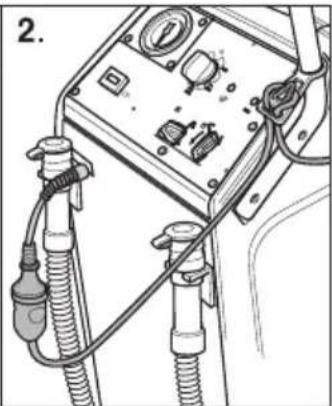
natural_image
Diagram of a vehicle electrical testing setup with hoses and control panel (no text or labels visible)natural_image
Diagram of a car's front and side view showing steering wheel, dashboard, and exhaust components (no text or labels)natural_image
Line drawing of a person using a cleaning machine on a tiled floor (no text or symbols)natural_image
Diagram of a robotic arm with a coiled cable and base plate, no text or symbols present
natural_image
Diagram of a mechanical device with a coiled cable and attached paper sheet, no visible text or symbolsnatural_image
Diagram showing a recycling bin and a motorized device with a handle, no text or symbols presentnatural_image
Technical line drawing of a mechanical component with labeled parts (no text or symbols present)natural_image
Mechanical assembly diagram showing gear meshing and mounting components (no text or labels)natural_image
Technical illustration of a mechanical conveyor belt system with gear distribution (no text or symbols)Заменить гребни
natural_image
Mechanical assembly diagram showing gear and shaft components (no text or labels)natural_image
Mechanical assembly diagram showing gear and rotor components with directional arrows indicating motion (no text or labels)natural_image
Technical line drawing of a mechanical assembly with rollers and a directional arrow (no text or symbols)natural_image
Mechanical assembly diagram showing a valve inserted into a housing, with a magnified inset highlighting the component detail (no text or symbols present)natural_image
Technical diagram of an electronic control panel with a magnified inset showing internal components (no text or symbols)Chairman of the Board of Management
S. Reiser
Director Regulatory Affairs & Certification
71364 Winnenden (Germany)
Tel.: +49 7195 14-0
Fax: +49 7195 14-2212
www.kaercher.com/REACH
natural_image
Technical line drawing of an automotive air conditioner unit with hoses and connectors (no text or symbols)natural_image
Line drawing of a mechanical device on a platform with a pointer and lever (no text or symbols)natural_image
Diagram of a medical or electrical device with hoses and connectors, no visible text or symbols
natural_image
Line drawing of a medical or laboratory setup with tubing and control panel (no text or symbols)natural_image
Diagram of a car's side profile showing steering wheel, dashboard, and seat (no text or labels)natural_image
Line drawing of a person using a car lift device to lift a vehicle (no text or symbols)natural_image
Diagram of a robotic arm connecting a flexible hose to a control panel (no text or symbols)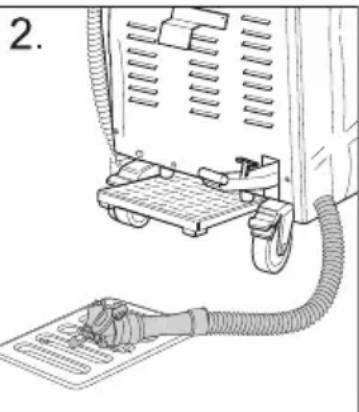
natural_image
Diagram of a medical device with tubing and connector, no visible text or symbolsnatural_image
Diagram showing a recycling bin and a hand mixer device with a curved arrow indicating rotation (no text or symbols)natural_image
Technical line drawing of a mechanical component with labeled part '1' (no text or symbols beyond label)natural_image
Technical line drawing of a mechanical component with labeled parts (no readable text or symbols)natural_image
Mechanical assembly diagram showing gear and shaft components (no text or labels)natural_image
Technical illustration of a mechanical conveyor system with gear and rollers (no text or symbols)natural_image
Mechanical assembly diagram showing gear meshing and directional arrows (no text or labels)natural_image
Technical line drawing of a mechanical assembly with rollers and a directional arrow (no text or symbols)natural_image
Technical diagram showing mechanical assembly with a magnified inset of a component detail (no text or symbols)natural_image
Technical diagram of an electrical control panel with a magnified inset showing internal components (no text or labels)Chairman of the Board of Management

S. Reiser
Director Regulatory Affairs & Certification
71364 Winnenden (Germany)
Tel.: +49 7195 14-0
Fax: +49 7195 14-2212
Winnenden, 2019/05/01

www.kaercher.com/REACH
natural_image
Technical line drawing of an automotive engine compartment with hoses and connectors (no text or symbols)natural_image
Line drawing of a mechanical device on a platform with a pointer and lever (no text or symbols)natural_image
Diagram of a vehicle's front and side views showing steering wheel, dashboard, and gear (no text or symbols)natural_image
Line drawing of a person using a car lift device to lift a vehicle (no text or symbols)natural_image
Diagram of a robotic arm connecting a flexible hose to a control panel (no text or symbols visible)
natural_image
Line drawing of a medical device with tubing and connector (no text or symbols)natural_image
Diagram showing a recycling bin and a trash bin with a straw, both rotating around it (no text or symbols present)natural_image
Technical line drawing of a mechanical component with labeled part '1' (no text or symbols beyond label)natural_image
Technical line drawing of a mechanical component with labeled parts (no readable text or symbols)natural_image
Mechanical assembly diagram showing gear and shaft components (no text or labels)natural_image
Technical line drawing of a mechanical conveyor system with gear and rollers (no text or symbols)Výměna hřebenů
natural_image
Mechanical assembly diagram showing gear and shaft components (no text or labels)natural_image
Mechanical assembly diagram showing gear meshing and directional arrows (no text or labels)natural_image
Technical line drawing of a mechanical assembly with rollers and a directional arrow (no text or symbols)natural_image
Technical diagram showing mechanical assembly with a magnified inset of a component detail (no text or symbols)natural_image
Technical diagram of an electronic control panel with a magnified inset showing internal components (no text or symbols)2006/42/ES (+2009/127/ES)
2014/30/EU
Chairman of the Board of Management
S. Reiser
Director Regulatory Affairs & Certification
71364 Winnenden (Germany)
Tel.: +49 7195 14-0
Fax: +49 7195 14-2212
Winnenden, 2019/05/01

www.kaercher.com/REACH
Elementy urządzenia

natural_image
Technical line drawing of an automotive electrical panel with hoses and connectors (no text or symbols)natural_image
Line drawing of a mechanical device on a platform with a tool, no text or symbols presentnatural_image
Diagram of a medical or electrical device with hoses and connectors, no visible text or symbols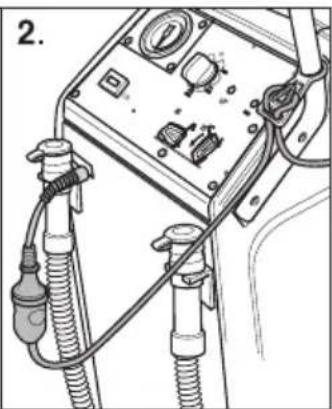
natural_image
Diagram of a vehicle electrical testing setup with hoses and components (no text or labels visible)natural_image
Diagram of a car's side profile showing steering wheel, dashboard, and gear mechanism (no text or labels)natural_image
Line drawing of a person using a car lift device to lift a vehicle (no text or symbols)natural_image
Diagram showing a recycling bin and a motorcyclist with an arrow indicating rotation (no text or symbols)natural_image
Technical line drawing of a mechanical component with labeled parts (no text or symbols present)natural_image
Technical line drawing of a mechanical assembly with gears and shafts (no text or symbols)natural_image
Technical line drawing of a mechanical conveyor system with gear-like components (no text or symbols)Wymiana grzebieni
natural_image
Mechanical assembly diagram showing gear and shaft components with directional arrows indicating motion (no text or labels)natural_image
Technical line drawing of a mechanical assembly with rollers and a directional arrow (no text or symbols)natural_image
Mechanical assembly diagram showing a valve inserted into a housing with a magnified inset detail (no text or symbols)natural_image
Technical diagram of an electrical control panel with a magnified inset showing internal components (no text or symbols)2006/42/WE (+2009/127/WE)
2014/30/UE
Chairman of the Board of Management

S. Reiser
Director Regulatory Affairs & Certification
71364 Winnenden (Germany)
Tel.: +49 7195 14-0
Fax: +49 7195 14-2212
Winnenden, 01.05.2019 r.

www.kaercher.com/REACH
natural_image
Technical line drawing of an automotive electrical panel with hoses and connectors (no text or symbols)natural_image
Line drawing of a mechanical device with a lever and adjustment lever (no text or symbols)→ Položte dosky na hranu palety. Položte dosky na hranu palety tak, aby ležali pred kolesami stroja. Upevnite dosky pomocou skrutiek.
→ Zariadenie pomaly zosuňte z rampy.
Odstráňte ochranný prostriedok proti mrazu
Upozornenie:
natural_image
Diagram of a medical or electrical device with hoses and connectors, no visible text or symbols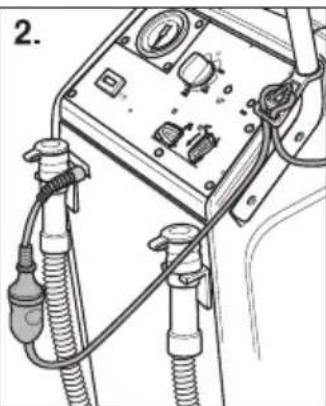
natural_image
Line drawing of a medical or laboratory equipment setup with hoses and control panels (no text or symbols visible)natural_image
Diagram of a car's front and side view showing steering wheel, dashboard, and gear mechanism (no text or labels)natural_image
Line drawing of a person using a car lift device to lift a vehicle (no text or symbols)natural_image
Diagram of a medical or laboratory procedure showing a coiled tube inserted into a device (no text or symbols visible)
natural_image
Diagram of a mechanical device with a coiled cable and attached paper, no visible text or symbolsnatural_image
Diagram showing a container being converted to a portable device, with no text or symbols present.natural_image
Technical line drawing of a mechanical component with labeled part '1' (no text or symbols beyond label)natural_image
Technical line drawing of a mechanical assembly with gears and shafts (no text or symbols)natural_image
Technical line drawing of a mechanical conveyor system with gears and rollers (no text or symbols)Výmena hrebeňov

natural_image
Mechanical assembly diagram showing gear meshing and directional arrows (no text or labels)natural_image
Technical line drawing of a mechanical assembly with rollers and a directional arrow (no text or symbols)→ Uvolnite upevňovacie skrutky držiaka pre vodiacu lištu.
→ Demontujte vodiacu lištu.
→ Montáž novej vodiacej lišty vykonajte v opačnom poradí. Dbajte na riadne upevnenie.
Skontrolujte hubice a filtre pre čistiacu kvapalinu.
natural_image
Technical diagram showing mechanical assembly with a magnified inset of a component detail (no text or symbols)→ Uvol'nite prevlečnú maticu. Odstráňte hubicu, tesniacu podložku a sitko.
→ Vyčistite hubicu alebo nasadte novú hubicu do prírubovej matice.
→ Nasadte tesniacu podložku a sitko a utiahnite ručne prírubovú maticu.
Vymeňte chránič
natural_image
Technical diagram of an electrical control panel with a magnified inset showing internal components (no text or labels)
Winnenden, 01. 05. 2019

www.kaercher.com/REACH
natural_image
Technical line drawing of an automotive electrical panel with hoses and connectors (no text or symbols)natural_image
Line drawing of a mechanical device on a platform with a pointer and lever (no text or symbols)→ Asetage aluse servale lauad. Seadke lauad nii, et need oleksid masina rataste ees. Kinnitage lauad kruvidega.
→ Lükake masin aeglaselt kaldteelt maha.
natural_image
Diagram of a car's side profile showing front and rear views with directional arrows indicating movement (no text or symbols)natural_image
Line drawing of a person using a car lift lift device on a track (no text or symbols)natural_image
Diagram of a robotic arm connecting a flexible hose to a control panel (no text or symbols)
natural_image
Diagram of a mechanical device with a coiled cable and attached component (no text or symbols visible)natural_image
Diagram showing a recycling bin with an arrow indicating rotation, alongside a smaller container with a handle (no text or symbols)natural_image
Technical line drawing of a mechanical component with labeled part '1' (no text or symbols beyond label)natural_image
Technical line drawing of a mechanical component with a circular feature and numbered label (2), no readable text or symbols present.→ Puhastage ebemesõela.
→ Kruvige plekikate maha.
natural_image
Mechanical assembly diagram showing gear and shaft components (no text or labels)natural_image
Technical illustration of a mechanical conveyor system with gear and rollers (no text or symbols)natural_image
Mechanical assembly diagram showing gear and shaft components (no text or labels)natural_image
Mechanical assembly diagram showing gear meshing and directional arrows (no text or labels)natural_image
Technical line drawing of a mechanical assembly with rollers and a directional arrow (no text or symbols)natural_image
Mechanical assembly diagram showing a valve inserted into a housing, with a magnified inset highlighting the component detail (no text or symbols present)natural_image
Technical diagram of an electrical control panel with a magnified inset showing internal components (no text or labels)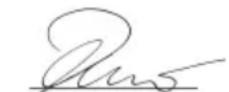
H. Jenner
Chairman of the Board of Management

S. Reiser
Director Regulatory Affairs & Certification
71364 Winnenden (Germany)
Tel.: +49 7195 14-0
Fax: +49 7195 14-2212
Winnenden, 2019/05/01

www.kaercher.com/REACH
natural_image
Technical line drawing of an automotive electrical panel with hoses and connectors (no text or symbols)natural_image
Line drawing of a mechanical device on a platform with a tool, no text or symbols presentnatural_image
Diagram of a car's front and side view showing steering wheel, dashboard, and gear mechanism (no text or labels)natural_image
Line drawing of a person pushing a car with a downward arrow indicating motion (no text or symbols)natural_image
Diagram of a mechanical device with a coiled hose and base plate, no text or symbols present
natural_image
Diagram of a mechanical device with a hand holding a sheet of paper, no visible text or symbolsnatural_image
Diagram showing a handover mechanism of a trash bin and a trash bin with a handle, no text or symbols present.natural_image
Technical line drawing of a mechanical component with labeled part '1' (no text or symbols beyond label)natural_image
Mechanical assembly diagram showing gear and shaft components (no text or labels)natural_image
Technical illustration of a mechanical conveyor system with gear and rollers (no text or symbols)Kemmīšu nomaina
natural_image
Mechanical assembly diagram showing gear and shaft components (no text or labels)natural_image
Mechanical assembly diagram showing gear meshing and directional arrows (no text or symbols)natural_image
Technical line drawing of a mechanical assembly with rollers and a directional arrow (no text or symbols)natural_image
Technical diagram showing mechanical assembly with a magnified inset of a component detail (no text or symbols)natural_image
Technical diagram of an electrical control panel with a magnified inset showing internal components (no text or labels)Chairman of the Board of Management

S. Reiser
Director Regulatory Affairs & Certification
71364 Winnenden (Germany)
Tel.: +49 7195 14-0
Fax: +49 7195 14-2212
Vinendene (Winnenden), 01.05.2019.

www.kaercher.com/REACH
natural_image
Technical line drawing of an automotive electrical panel with connectors and wiring (no text or symbols)natural_image
Line drawing of a mechanical device with a lever and adjustment knob, mounted on a platform (no text or symbols)natural_image
Diagram of a car's side profile showing steering wheel, dashboard, and seat (no text or labels)natural_image
Line drawing of a person pushing a car with a downward arrow indicating motion (no text or symbols)natural_image
Diagram of a robotic arm connecting a cable to a control panel (no text or symbols present)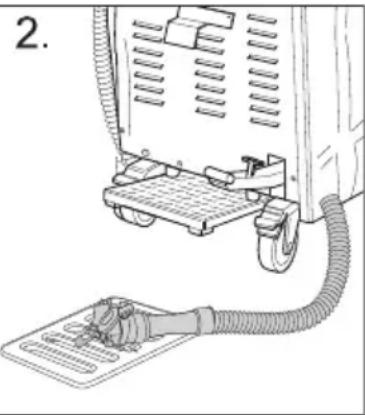
natural_image
Diagram of a mechanical device with a hand holding a paper, showing internal components and tubing (no text or symbols)natural_image
Diagram showing a handover mechanism between two containers, one with a handle and arrow indicating rotation (no text or symbols)natural_image
Technical line drawing of a mechanical component with labeled part '1' (no text or symbols beyond label)natural_image
Technical line drawing of a mechanical component with labeled parts (no readable text or symbols)natural_image
Mechanical assembly diagram showing gear and shaft components (no text or labels)natural_image
Technical illustration of a mechanical conveyor system with gear and rollers (no text or symbols)Šukų keitimas
natural_image
Mechanical assembly diagram showing gear and motor components (no text or labels)natural_image
Mechanical assembly diagram showing gear meshing and directional arrows (no text or labels)natural_image
Technical line drawing of a mechanical assembly with rollers and a directional arrow (no text or symbols)natural_image
Technical diagram showing mechanical assembly with a magnified inset of a component detail (no text or symbols)natural_image
Technical diagram of an electrical control panel with a magnified inset showing internal components (no text or labels)
Chairman of the Board of Management
Director Regulatory Affairs & Certification
71364 Winnenden (Germany)
Tel.: +49 7195 14-0
Fax: +49 7195 14-2212
www.kaercher.com/REACH
natural_image
Technical line drawing of an automotive electrical panel with hoses and connectors (no text or symbols)natural_image
Line drawing of a mechanical device on a platform with a pointer and lever (no text or symbols)natural_image
Diagram of a medical or laboratory setup with hoses and tubing, no visible text or symbols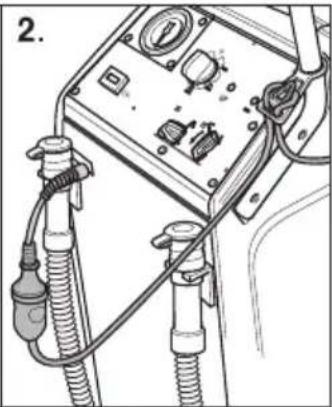
natural_image
Line drawing of a medical or electrical device with hoses and connectors (no text or symbols visible)natural_image
Diagram of a car's front and side view showing steering wheel, dashboard, and gear mechanism (no text or labels)natural_image
Diagram of a robotic arm connecting a flexible hose to a control panel (no text or symbols)
natural_image
Diagram of a robotic arm with a handle and connecting rod, no text or symbols presentnatural_image
Diagram showing a recycling bin and a trash bin with a straw, both rotating around it (no text or symbols present)natural_image
Technical line drawing of a mechanical component with labeled parts (no text or symbols present)natural_image
Technical line drawing of a mechanical component with labeled parts (no readable text or symbols)natural_image
Mechanical assembly diagram showing gear and shaft components (no text or labels)natural_image
Technical illustration of a mechanical conveyor system with gear and rollers (no text or symbols)Заміна гребенів
natural_image
Mechanical assembly diagram showing gear and shaft components (no text or labels)natural_image
Mechanical assembly diagram showing gear and shaft components with directional arrows indicating motion (no text or labels)natural_image
Technical line drawing of a mechanical assembly with rollers and a directional arrow (no text or symbols)natural_image
Mechanical assembly diagram showing a valve assembly with a magnified inset of the component (no text or symbols visible)natural_image
Technical diagram of an electronic control panel with a magnified inset showing internal components (no text or symbols)Chairman of the Board of Management
S. Reiser
Director Regulatory Affairs & Certification
71364 Winnenden (Germany)
Tel.: +49 7195 14-0
Fax: +49 7195 14-2212
natural_image
Diagram of an electronic circuit board with a magnified inset showing battery components (no text or labels)فم بفقERING وافي بmfك واستبده.
。
natural_image
Mechanical assembly diagram showing a hand operating a valve with a close-up inset of a mechanical component (no text or symbols visible)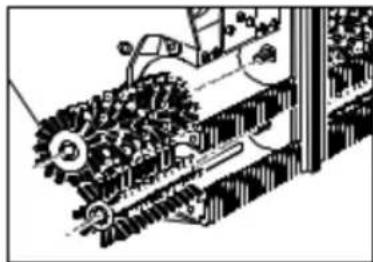
natural_image
Technical line drawing of a mechanical assembly with gears and shafts (no text or symbols)تغیرالأمشاط
natural_image
Technical line drawing of a mechanical component with labeled parts (no readable text or symbols)natural_image
Pure mechanical assembly diagram without any text, numbers, or symbolsnatural_image
Diagram showing a mechanical component with an arrow indicating rotational motion (no text or symbols)غلق الجهار
natural_image
Illustration of a mechanical device with a coiled cable and base, no visible text or symbols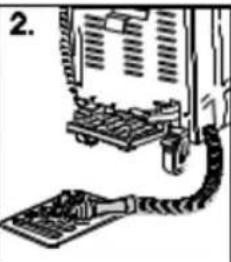
natural_image
Diagram of a computer monitor with a cable and keyboard, no text or symbols presentnatural_image
Line drawing of a car's front and side views showing engine, dashboard, and exhaust components (no text or symbols)natural_image
Line drawing of a vehicle front panel with no visible text or symbols
natural_image
Pure mechanical assembly diagram without any text, numbers, or symbolsتركيب莘ناده الدفعية
.9. عجلات أماسة
.1. سنادة دفعية
natural_image
Black silhouette of a hand giving a thumbs-up gesture (no text or symbols)THANK YOU!
MERCI! DANKE! iGRACIAS!

Register your product and benefit from many advantages.
www.kaercher.com/welcome


Rate your product and tell us your opinion.
natural_image
Icon showing a gear and wrench inside a square frame (no text or symbols)www.kaercher.com/dealersearch
Alfred Kärcher SE & Co. KG
Alfred-Kärcher-Str. 28-40
71364 Winnenden (Germany)
Tel.: +49 7195 14-0
Fax: +49 7195 14-2212