
BD 4335 C Classic Ep - Floor cleaner Kärcher - Free user manual and instructions
Find the device manual for free BD 4335 C Classic Ep Kärcher in PDF.
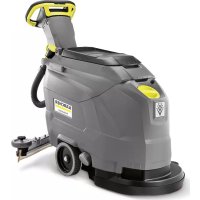



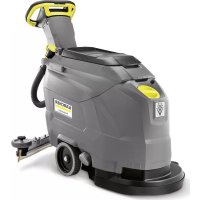
| Product Type | Floor cleaner (friction vacuum cleaner) for wet cleaning |
| Brand and model | Kärcher BD 4335 C Classic Ep |
| Dimensions (L × W × H) | Approx. 850 × 430 × 700 mm (estimate) |
| Empty weight / Operating weight | 56 kg / 91 kg |
| Power supply | 230 V, 50 Hz, 1400 W (average) |
| Capacity fresh water tank / dirty water tank | 35 L / 35 L |
| Working width | 430 mm |
| Brush rotation speed | 235 rpm |
| Maximum permissible incline | 2% |
| Maximum water temperature | 60 °C |
| Sound pressure level (LpA) | 70 dB(A) |
| Sound power level (LWA + K) | 86 dB(A) |
| Main functions | Wet cleaning, vacuuming, intensive mode (detergent action) |
| Safety devices | Circuit breaker (safety switch), brush stops if released |
| Routine maintenance | Cleaning lint filter, suction lips, brush disks |
| Included / optional accessories | Brush disks (red, natural, black), drive plate, pads, suction bar, Homebase kit |
| Warranty | Terms according to country, free repair of material and manufacturing defects |
| Compliance | EU directives 2006/42/EC, 2014/30/EU, 2011/65/EU |
| Intended use | Flat indoor floors, not sensitive to moisture or polishing (hotels, schools, hospitals, factories, etc.) |
Frequently Asked Questions - BD 4335 C Classic Ep Kärcher
User questions about BD 4335 C Classic Ep Kärcher
0 question about this device. Answer the ones you know or ask your own.
Ask a new question about this device
Download the instructions for your Floor cleaner in PDF format for free! Find your manual BD 4335 C Classic Ep - Kärcher and take your electronic device back in hand. On this page are published all the documents necessary for the use of your device. BD 4335 C Classic Ep by Kärcher.
USER MANUAL BD 4335 C Classic Ep Kärcher
Czech 98
Slovenian 104
Polish 110
Romanian 116
Slovak 122
Croatian 128
Serbian 134
Bulgarian 140
Estonian 147
Latvian 153
Lithuanian 159
Ukrainian 165
Indonesian 172
Chinese 178
Thai 184
Type: 1.127-xxx 1.515-xxx
71364 Winnenden (Germany)
Tel.: +49 7195 14-0
Fax: +49 7195 14-2212
Winnenden, 2021/09/01

Please read and comply with these original instructions prior
to the initial operation of your appliance and store them for later use or subsequent owners.
Contents
| Safety instructions | EN 1 |
| Function | EN 1 |
| Proper use | EN 1 |
| Environmental protection | EN 1 |
| Warranty | EN 1 |
| Operating and Functional Elements | EN 2 |
| Before Startup | EN 3 |
| Operation | EN 3 |
| Shutting Down the Appliance | EN 4 |
| Transport | EN 4 |
| Storage | EN 4 |
| Care and maintenance | EN 4 |
| Frost protection | EN 5 |
| Faults | EN 5 |
| Accessories | EN 6 |
| Technical specifications | EN 6 |
| Spare parts | EN 6 |
| EU Declaration of Conformity | EN 6 |
| Declaration of Conformity | EN 6 |
Safety instructions
Before using the appliance for the first time, read and observe these operating instructions and the accompanying brochure: Safety information for brush cleaning units and spray-extraction units, No. 5.956-251.0.
The device may only be operated when the cover and all lids are closed.
The appliance must only be operated on surfaces that do not exceed the max. permitted incline (see "Technical Specifications").
△WARNING
Do not use the appliance on inclines.
Safety Devices
Safety devices serve to protect the user and must not be rendered inoperational or their functions bypassed.
Safety Switch
If the safety switch is released, the brush drive shuts off.
Danger or hazard levels
DANGER
For an immediate danger which can lead to severe injuries or death.
WARNING
For a possibly dangerous situation which could lead to severe injuries or death.
CAUTION
Pointer to a possibly dangerous situation, which can lead to minor injuries.
ATTENTION
Pointer to a possibly dangerous situation, which can lead to property damage.
Function
The scrubbing vacuum cleaner is used for the wet cleaning of level floors.
- The device can be easily adjusted to the respective cleaning task by adjusting the water volume and the detergent volume. The detergent dosing unit can be adjusted via the addition in the tank.
- The device is equipped with a fresh water and a waste water tank (35 litres each). These allow an effective cleaning with a long usage life. – A working width of 430 mm allows for an effective use with long working times.
- Propulsion is accomplished by manually pushing the device and is supported by the rotation of the brushes.
- The power supply operation allows a high capacity without a restriction of the working time.
Note:
The appliance can be equipped with various accessories depending on the cleaning task.
Please request our catalogue or visit us on the Internet at www.kaercher.com.
Proper use
Use this appliance only as directed in these operating instructions.
- This appliance is suited for the commercial use, e.g. in hotels, schools, hospitals, factories, shops, offices, and rental companies.
- The appliance may only be used for the cleaning of hard surfaces that are not sensitive to moisture and polishing operations.
- The appliance was designed for the cleaning of floors inside or of covered surfaces.
- The appliance is not suited for the cleaning of frozen grounds (e.g. in cold stores).
- The appliance may only be equipped with original accessories and spare parts. – The appliance is not suited for the use in potentially explosive environments.
- The machine should not be used to suck in inflammable gases, undiluted acids or solvents.
This includes petrol, thinning agents or hot oil that can form an explosive mixture when it comes in contact with sucked air. Do not use acetone, undiluted acids and solvents as they are aggressive towards the materials from which the appliance is made.
- The machine has been approved for use on surfaces with max. gradients as listed under "Technical Specifications".
Environmental protection

The packaging material can be recycled. Please do not throw the packaging material into household waste; please send it for recycling.

Old appliances contain valuable materials that can be recycled. Please arrange for the proper recycling of old appliances. Please dispose your old appliances using appropriate collection systems.
Information on ingredients (REACH)
The latest information on ingredients can be found under:
The warranty terms published by our competent sales company are applicable in each country. We will repair potential failures of your accessory within the warranty period free of charge, provided that such failure is caused by faulty material or defects in fabrication. In the event of a warranty claim please contact your dealer or the nearest authorized Customer Service center. Please submit the proof of purchase.
Operating and Functional Elements
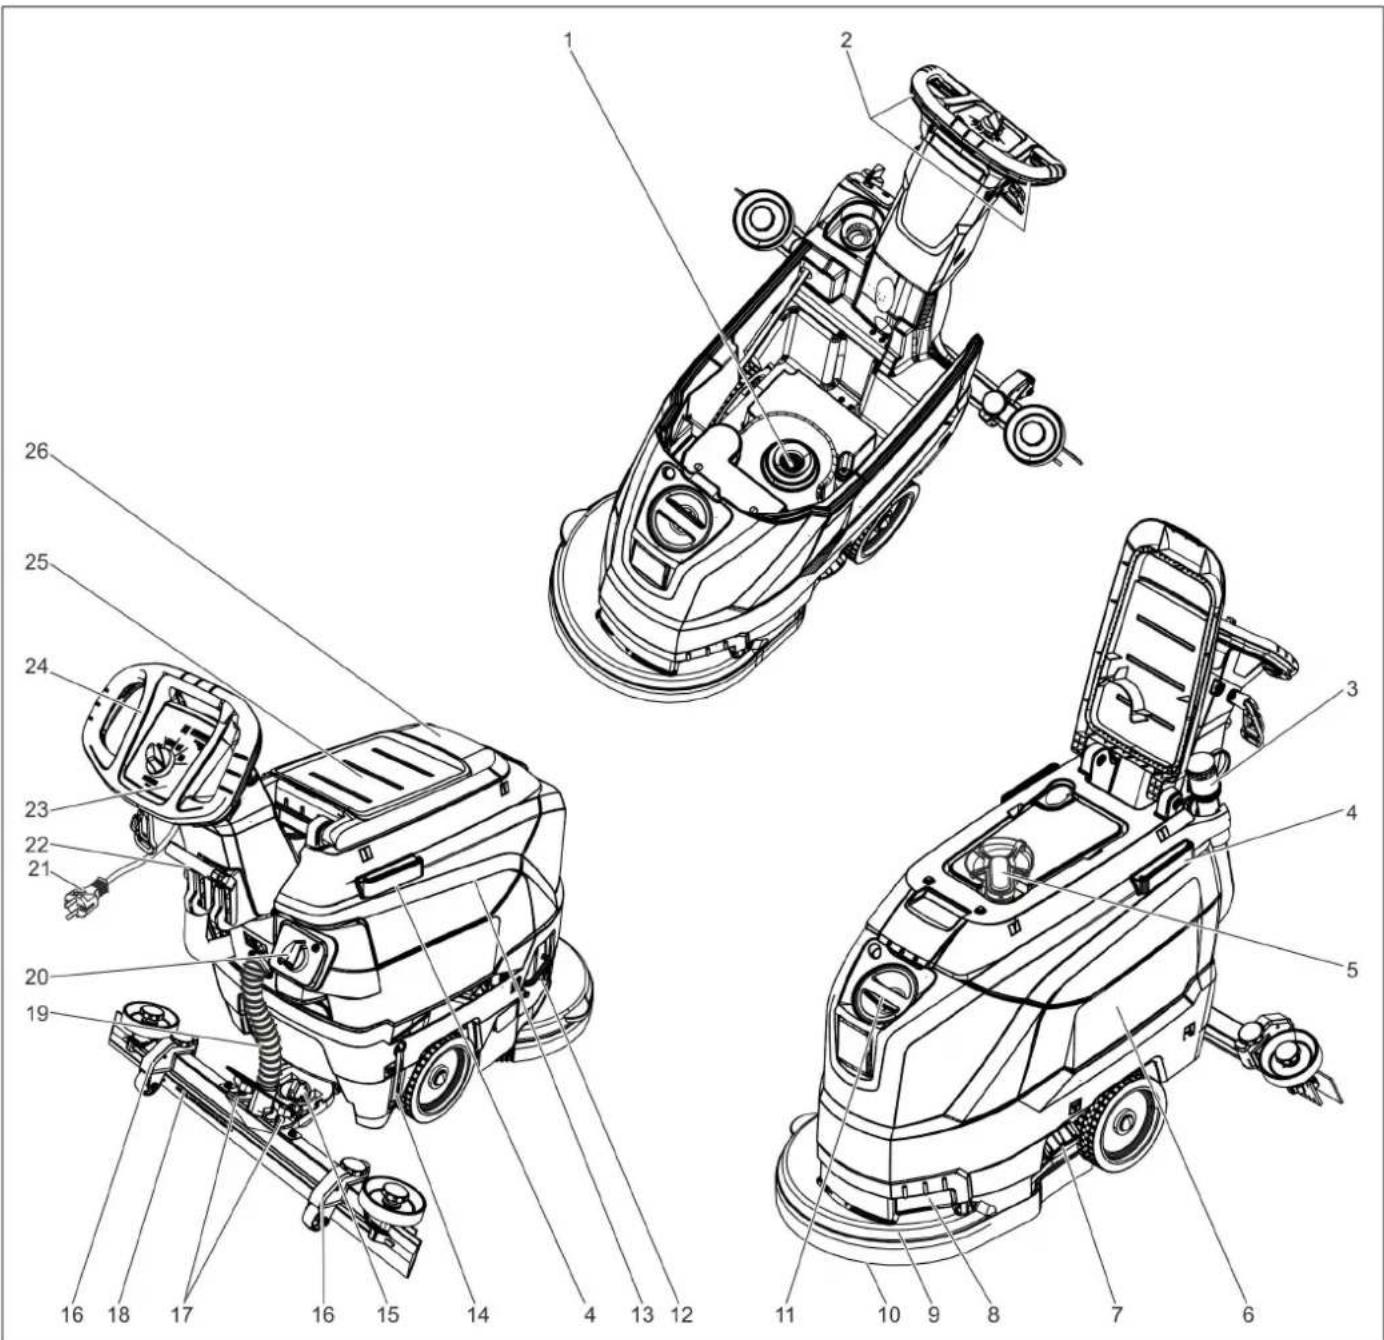
1 Fluff filter 2 Safety button 3 Drain hose for wastewater with dosing unit 4 Holding rail for home base 5 Float 6 Fresh water tank 7 Fresh water tank lock 8 Recessed grip 9 Cleaning head 10 Disc brush 11 Fresh water reservoir filler neck 12 Bow brush change 13 Waste water tank 14 Fresh water level display 15 Rotary handle to incline the vacuum bar 16 Height adjustment of suction bar * 17 Wing nuts for fastening the vacuum bar 18 Vacuum bar * 19 Suction hose 20 Water quantity regulator
21 Mains cable with mains plug 22 Vacuum bar lowering lever 23 Operator console 24 Push handle 25 Storage surface for cleaning set "Home base box" 26 Cover waste water tank
* not included in the delivery
Colour coding
- The operating elements for the cleaning process are yellow. – The controls for the maintenance and service are light gray.
Operator console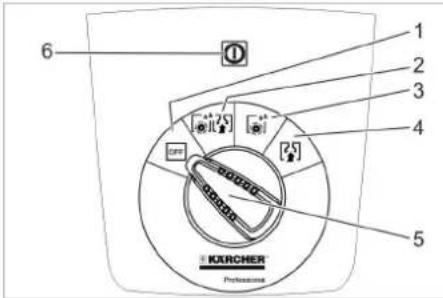
1 OFF
Device is switched off
2 Normal mode
Wet clean the floor and vacuum up dirt water.
3 Intense mode
Wet clean the floor and allow the detergent to react.
4 Vacuum mode
Suck in the dirt fleet.
5 Program selection switch
6 Indicator light voltage supply
Glows when the mains plug is inserted and when there is mains voltage.
Symbols on the machine
| Mains plug | |
| Lashing point | |
| Mop holder ** | |
| Filling level fresh water tank 25% | |
| Bow brush change | |
| Vacuum bar lowering lever | |
| Drain outlet fresh water tank | |
| Dirt water discharge hose |
** option
Before Startup
Unloading
→ Employ 2 persons to lift the device off the pallet and set it on the floor.
Installing the Vacuum Bar
Insert the vacuum bar into the vacuum bar suspension in such a manner that the profiled sheet is positioned above the suspension. Tighten the wing nuts.
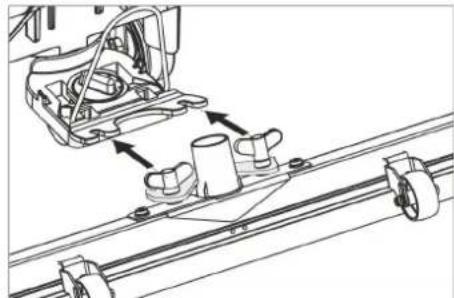
Insert the suction hose.
Operation
DANGER
Risk of injury!
In dangerous situations, release the safety switch/drive lever.
Filling in detergents
Fresh water
Open the lock of the fresh water reservoir. Fill fresh water (maximum 60 °C) until the lower edge of the filling nozzle. Close the lock of the fresh water reservoir.
Detergent
WARNING
Risk of damage. Only use the recommended detergents. With other detergents, the operator bears the increased risk regarding the operational safety and danger of accident. Only use detergents that are free from solvents, hydrochloric acid and hydrofluoric acid. Follow the safety instructions for using detergents.
Note:
Do not use highly foaming detergents.
Recommended detergents:
| Application Detergent | |
| Routine cleaning of all water resistant floors | RM 746RM 780 |
| Routine cleaning of glossy surfaces (e.g. granite) | RM 755 es |
| Routine cleaning and basic cleaning of industrial floors | RM 69 ASF |
| Routine cleaning and basic cleaning of fine stoneware tiles | RM 753 |
| Routine cleaning of tiles in sanitary areas | RM 751 |
| Cleaning and disinfection in sanitary areas | RM 732 |
| Removal of coating from all alkali-resistant floors (e.g. PVC) | RM 752 |
| Removal of coating from linoleum floors | RM 754 |
Add the detergent to the fresh water reservoir.
Note:
If the fresh water tank is empty, the cleaning head continues working without liquid supply.
Setting the water quantity
Adjust the water quantity using the regulating button according to the dirt on the floor covering.
Note:
Carry out initial cleaning attempts with low water volume. Increase water volume step-by-step until the desired cleaning result is achieved.
Setting the Vacuum Bar
Oblique position
To improve the vacuuming result on tiled floors the vacuum bar can be turned to an oblique position of up to 5°.
Loosen the wing nuts. Turn the vacuum bar.
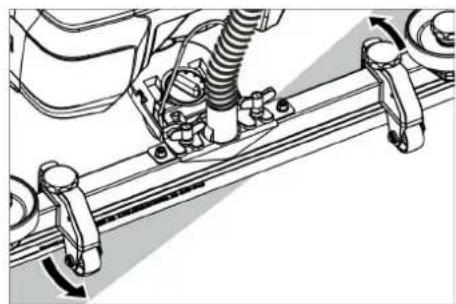
Tighten the wing screws.
Inclination
If the vacuum result is unsatisfactory the inclination of the straight vacuum bar can be modified.
→ Adjust the rotary handle to incline the suction bar.
Height
The bend of the suction lips upon contact with the floor is influenced by the height adjustment.
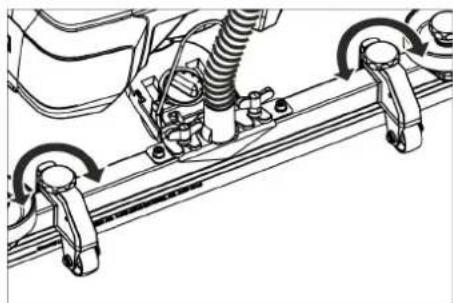
→ Try adjusting the twist handles of the height adjustment until the best vacuuming result is achieved.
Cleaning
ATTENTION
Risk of damage to the floor covering. Do not operate the appliance on the spot.
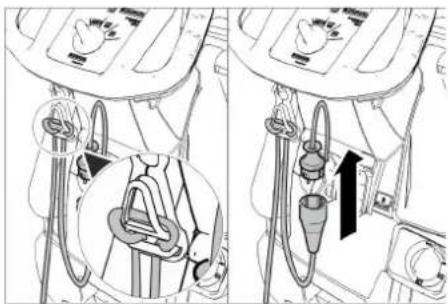
→ Insert the end of the extension cable as a loop in the strain relief clamp. → Connect the mains plug of the device to the extension cable. → Insert the mains plug of the extension cable into a socket. → Turn the program selection switch to the desired cleaning program. → Operate the safety switch.
Lower the vacuum bar
→ Pull the lever out and press it down; the vacuum bar is lowered.
Note:
- For cleaning tiled floors, adjust the straight suction bar in such a way that cleaning is not done at an angle of 90 degrees to the joints.
- The inclined position and the inclination of the suction bar can be adjusted to achieve better suction results (see "Adjusting the suction bar").
- If the waste water tank is full, the float closes the suction opening and the suction turbine runs at an increased speed. If this is the case, shut the vacuum off and drive to empty the waste water tank.
Shutting Down the Appliance
Set the program selection switch to suction or vacuuming. Briefly drive forward and suck up the remaining water. Raise the vacuum bar. Set the program selector switch to "OFF". Disconnect the mains plug from the socket.
Drain off dirty water
WARNING
Please observe local regulations regarding wastewater treatment.
Take the water discharge hose from its support and lower it above a suitable collection device.
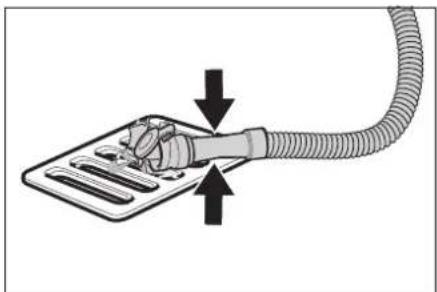
Crush or bend the dosing equipment. Open the lid of the dosing equipment. Drain off the dirty water, regulating the water quantity by pressing or bending. Rinse the waste water tank with clear water.
Drain off clean water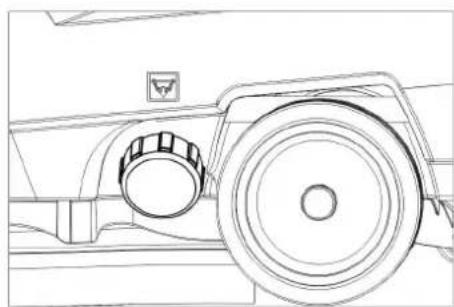
Unscrew the lock of the fresh water reservoir.
Transport
DANGER
Risk of injury! When loading or unloading the machine, it may only be operated on gradients up to the maximum value (see "Technical Specifications"). Drive slowly.
CAUTION
Risk of personal injury or damage! Mind the weight of the appliance during transport.
Press down and push the device using the push handle.
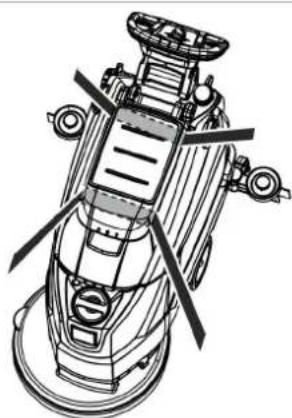
When transporting in vehicles, secure the appliance according to the guidelines to prevent slipping and tipping over.
Storage
CAUTION
Risk of personal injury or damage! Consider the weight of the appliance when storing it.
This appliance must only be stored in interior rooms.
Care and maintenance
DANGER
Risk of injury! Set the programme selector switch to "OFF" and disconnect the mains plug prior to performing any work on the device.
Drain and dispose of the dirt water and the residual fresh water.
Maintenance schedule
After each operation
ATTENTION
Risk of damage. Do not sluice the appliance with water and do not use aggressive detergents.
Drain off dirt water. Rinse the waste water tank with clear water. Clean the outside of the appliance with a damp cloth which has been soaked in mild detergent. Check the fluff filter, clean if required. Clean the vacuum lips and the wiping lips, check for wear and replace if required. Check the brush for wear and replace if required (see "Maintenance tasks").
Monthly
Clean the seals between waste water tank and cover and check for tightness, replace if required. Clean sieve.
Yearly
Have the prescribed inspection carried out by the customer service.
Maintenance Works
Cleaning the sieve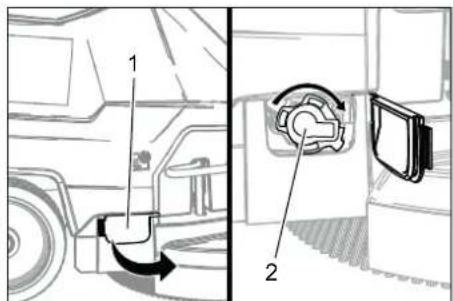
1 Cover 2 Cover
Open the cover. Turn the cover clockwise and remove it. Remove and clean the sieve lying beneath it. Insert the sieve. Replace the cover and lock it by turning it anti-clockwise. Close the cover.
Replace or turn vacuum lips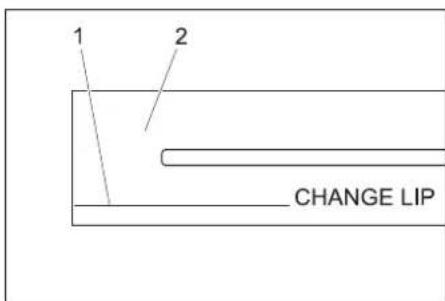
1 Wear indicator 2 Vacuum lip
The vacuum lips must be replaced or reversed if they are worn down to the wear indicator.
Remove the vacuum bar. Unscrew the star grips.
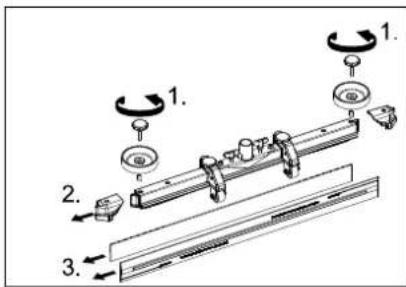
Remove the plastic parts. Remove the vacuum lips. Insert new or reversed vacuum lips. Insert the plastic parts. Screw in and tighten the star grips.
Replacing the disk brushes Removing the waste water tank
Push down the device holding the push handle so that the cleaning head is raised. Press the pedal for changing the brushes downward beyond its resistance.
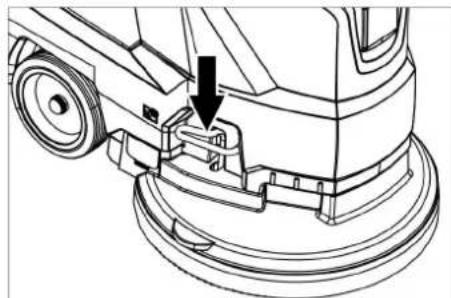
Pull the device towards the back so that the disc brush becomes accessible. Place a new disc brush on the floor in front of the device. Drive the device with the raised cleaning head over the new disc brush and lower the cleaning head. The brush locks into the drive.
Drain off dirt water.
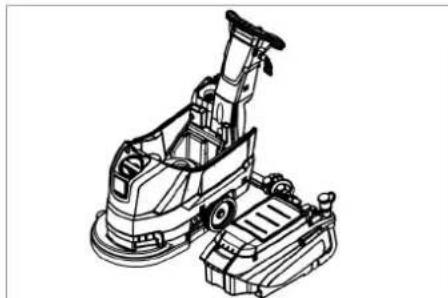
→ Lift up the waste water tank and put it aside.
Maintenance contract
To ensure a reliable operation of the appliance, maintenance contracts can be concluded with the competent Kärcher sales office.
Frost protection
In case of danger of frost:
→ Empty the fresh and waste water tank. → Store the appliance in a frost-protected room.
Faults
△DANGER
Risk of injury! Set the programme selector switch to "OFF" and disconnect the mains plug prior to performing any work on the device.
→ Drain and dispose of the dirt water and the residual fresh water.
| Failure Correction | |
| Appliance cannot be started | Turn the program selection switch to the desired programme. |
| Operate the safety switch. | |
| Insert the mains plug into the socket.Is the indicator light voltage supply on? | |
| Insufficient water quantity | Check fresh water level, refill tank if necessary. |
| Increase the water volume on the regulating knob for water volume. | |
| Clean sieve. | |
| Insufficient vacuum performance | Clean the seals between waste water tank and cover and check for tightness, replace if required. |
| Check the seals between waste water tank and fresh water tank for damage, replace if necessary. | |
| Wastewater reservoir is full; shut off the appliance and empty the wastewater reservoir | |
| Clean the fluff filter. | |
| Clean the vacuum lips on the vacuum bar, replace if required | |
| Check if the cover on the dirt water discharge hose is closed | |
| Check the setting of the vacuum bar. | |
| Check suction hose for blockages; clean if required. | |
| Check the suction hose for tightness; replace if required. | |
| Insufficient cleaning result | Check the brushes for wear, replace if required. |
| Suction turbine is running rough | Clean the swimmer. |
| Brush does not turn Check | ck if foreign objects block the brush; remove foreign object if required. |
| Release the safety switch.Wait for a while.Operate the safety switch. | |
| Vibrations during cleaning | You might need to use a softer brush. |
| In case of faults that cannot be remedied using the table below please contact the customer service. | |
Accessories
| Description Part no.: Description | ||
| Disk brush, red (medium, standard) 4.905-022.0 For the use with all common cleaning tasks. | ||
| Disk brush, natural (white) 4.905-023.0 Made of natural fibres for spot cleaning and polishing. | ||
| Disk brush, black (hard) 4.905-025.0 For heavy soiling and for deep cleaning. For robust floorings only. | ||
| Driver plate pad 4.762-533.0 For cleaning with pads. With quick change coupling and center lock. | ||
| Pad, white 6.369-469.0 For polishing floors. | ||
| Pad, red (medium soft) 6.369-470.0 For cleaning and cleaning of all floors. | ||
| Pad, green (medium hard) 6.369-472.0 For cleaning heavily soiled floors and for deep cleaning. | ||
| Pad, black (hard) 6.369-473.0 With stubborn soiling and for deep cleaning. | ||
| Pad, beige (natural hair proportion) 6.371-081.0 For polishing and refreshing of hard and flexible floorings. | ||
| Suction bar, 850 mm, straight 4.777-401.0 | ||
| Suction bar, 850 mm, bent 4.777-411.0 | ||
| Set homebase box | 4.035-406.0 | |
| Mop holder | 9.753-023.0 | |
Technical specifications
| Power | ||
| Nominal voltage | V | 230 |
| Frequency | Hz | 50 |
| Average power consumption | W | 1400 |
| Rated power suction turbine | W | 550 |
| Rated power brush drive | W | 850 |
| Vacuuming | ||
| Vacuum power, air volume (max.) | l/s 20 | |
| Vacuuming power, negative pressure (max.) | kPa (mbar) | 12,0 (120) |
| Cleaning brushes | ||
| Brush speed | 1/min | 235 |
| Brush diameter | mm | 430 |
| Dimensions and weights | ||
| Theoretical surface cleaning performance | m2/h | 1800 |
| Max. working range incline | % | 2 |
| Fresh/waste water tank volume | l | 35/35 |
| Max. water temperature | °C | 60 |
| Ambient temperature | °C | 5...40 |
| Net weight (transport weight) | kg 56 | |
| Total weight (ready to operate) | kg | 91 |
| Values determined as per EN 60335-2-72 | ||
| Total oscillation value | m/s2 | <1,3 |
| Uncertainty K | m/s2 | 0,2 |
| Sound pressure level LpA | dB(A) | 70 |
| Uncertainty KpA | dB(A) | 2 |
| Sound power level LWA + Uncertainty KWA | dB(A) | 86 |
| Exception according to Regulation (EU) 2019/1781 Annex I Section 2 (12): j) | ||
Spare parts
- Only use accessories and spare parts which have been approved by the manufacturer. The exclusive use of original accessories and original spare parts ensures that the appliance can be operated safely and trouble free.
- At the end of the operating instructions you will find a selected list of spare parts that are often required.
- For additional information about spare parts, please go to the Service section at www.kaercher.com.
EU Declaration of Conformity
We hereby declare that the machine described below complies with the relevant basic safety and health requirements of the EU Directives, both in its basic design and construction as well as in the version put into circulation by us. This declaration shall cease to be valid if the machine is modified without our prior approval.
Product: Floor cleaner
Type: 1.127-xxx
1.515-xxx
Relevant EU Directives
2006/42/EG (+2009/127/EG)
2014/30/EU
2011/65/EU
Commission regulation(s)
(EU) 2019/1781
Applied harmonized standards
EN 60335-1
EN 60335-2-72
EN 62233: 2008
EN 55014-1:2006 + A1: 2009 + A2:2011
EN 55014-2:1997 + A1: 2001 + A2: 2008
EN 61000-3-2:2014
EN 61000-3-3:2013
Applied national standards
The signatories act on behalf of and with the authority of the company management.
Chairman of the Board of Management
S. Reiser
Director Regulatory Affairs & Certification
Documentation supervisor:
S. Reiser
Alfred Kärcher SE & Co. KG
71364 Winnenden (Germany)
Tel.: +49 7195 14-0
Fax: +49 7195 14-2212
Winnenden, 2021/09/01
Declaration of Conformity
We hereby declare that the product described below complies with the relevant provisions of the following UK Regulations, both in its basic design and construction as well as in the version put into circulation by us. This declaration shall cease to be valid if the product is modified without our prior approval.
Product: Floor cleaner
Type: 1.127-xxx
1.515-xxx
Currently applicable UK Regulations
S.I. 2008/1597 (as amended)
S.I. 2016/1091 (as amended)
S.I. 2012/3032 (as amended)
Commission regulation(s)
(EU) 2019/1781
Designated standards used
EN 60335-1
EN 60335-2-72
EN 62233: 2008
EN 55014-1:2006 + A1: 2009 + A2:2011
EN 55014-2:1997 + A1: 2001 + A2: 2008
EN 61000-3-2:2014
EN 61000-3-3:2013
National standards used
The signatories act on behalf of and with the authority of the company management.
H. Jenner Chairman of the Board of Management
S. Reiser Director Regulatory Affairs & Certification
Documentation supervisor:
S. Reiser
Alfred Kärcher SE & Co. KG
71364 Winnenden (Germany)
Tel.: +49 7195 14-0
Fax: +49 7195 14-2212
Winnenden, 2021/02/01

Storage .... FR 4
1 Cover 2 Cover
Type: 1.127-xxx 1.515-xxx
S. Reiser Director Regulatory Affairs & Certification
71364 Winnenden (Germany)
Tel.: +49 7195 14-0
Fax: +49 7195 14-2212
Winnenden, 2021/09/01

Chairman of the Board of Management
S. Reiser Director Regulatory Affairs & Certification
71364 Winnenden (Germany)
Tel.: +49 7195 14-0
Fax: +49 7195 14-2212
Winnenden, 2021/09/01

1 Cover
2 Lid
→ Lift the dirty water reservoir and set it aside.
Maintenance contract
71364 Winnenden (Germany)
Tel.: +49 7195 14-0
Fax: +49 7195 14-2212
Winnenden, 2021/09/01

1 Cover 2 Lid
Chairman of the Board of Management
S. Reiser
Director Regulatory Affairs & Certification
71364 Winnenden (Germany)
Tel.: +49 7195 14-0
Fax: +49 7195 14-2212
Winnenden, 2021/09/01

Read the original manual before using your device.
1 Cover
2 Lid
71364 Winnenden (Germany)
Tel.: +49 7195 14-0
Fax: +49 7195 14-2212
Winnenden, 2021/09/01

→ Tighten the wing screws.
Inclination
→ Press the dosing device together or break it.
→ Unscrew the fresh water tank cap.
Transport
⚠️DANGER
S. Reiser Director Regulatory Affairs & Certification
71364 Winnenden (Germany)
Tel.: +49 7195 14-0
Fax: +49 7195 14-2212
Winnenden, 2021/09/01
→ Mount the hose.
Drift
△FARE
Danger of personal injury!
1 Cover 2 Cover
→ Remove the plastic parts. → Pull off the suction lip. → Push in the new or turned suction lips. → Put the plastic parts back on. → Replace the cross-head screw and tighten it well.
Replacing the disc brush
Chairman of the Board of Management
S. Reiser Director Regulatory Affairs & Certification
71364 Winnenden (Germany)
Tel.: +49 7195 14-0
Fax: +49 7195 14-2212
Winnenden, 2021/09/01

→ Tighten the wing screws.
Tilt
1 Guard 2 Cover
Chairman of the Board of Management
Director Regulatory Affairs & Certification
71364 Winnenden (Germany)
Tel.: +49 7195 14-0
Fax: +49 7195 14-2212
Winnenden, 2021/09/01

→ Connect the suction hose.
Use
⚠ DANGER
Risk of injury!
1 Cover
2 Cover
Chairman of the Board of Management
S. Reiser
Director Regulatory Affairs & Certification
71364 Winnenden (Germany)
Tel.: +49 7195 14-0
Fax: +49 7195 14-2212
Winnenden, 2021/09/01
1 Cover 2 Cover
Chairman of the Board of Management
Director Regulatory Affairs & Certification
71364 Winnenden (Germany)
Tel.: +49 7195 14-0
Fax: +49 7195 14-2212
Winnenden, 2021/09/01

→ Attach the suction hose.
Operation
DANGER
1 Cover 2 Cover
Chairman of the Board of Management
Director Regulatory Affairs & Certification
71364 Winnenden (Germany)
Tel.: +49 7195 14-0
Fax: +49 7195 14-2212
Winnenden, 2021/09/01

1 Casing 2 Cover
Chairman of the Board of Management
S. Reiser Director Regulatory Affairs & Certification
71364 Winnenden (Germany)
Tel.: +49 7195 14-0
Fax: +49 7195 14-2212
Winnenden, 2021/09/01

Chairman of the Board of Management
Director Regulatory Affairs & Certification
71364 Winnenden (Germany)
Tel.: +49 7195 14-0
Fax: +49 7195 14-2212
Winnenden, 2021/09/01

Attach the suction hose.
Operation
⚠DANGER
Danger of injury!
1 Cover
2 Cover
71364 Winnenden (Germany)
Tel.: +49 7195 14-0
Fax: +49 7195 14-2212
Winnenden, 2021/09/01

Before first use of your device, read these original instructions.
→ Attach the flexible suction hose.
Operation
⚠DANGER
Risk of injury!
→ Tighten the wing screws.
Tilt
→ Press the dosing device together or fold it. → Open the dosing device cover. → Drain dirty water - regulate the amount of water by pressing or folding. → Rinse the dirty water tank with clean water.
1 Cover 2 Cover
→ Open the cover. → Turn the cover clockwise and remove it. → Remove and clean the filter under the cover. → Insert the filter. → Replace the cover and screw it on counterclockwise. → Close the cover.
→ Remove the plastic parts. → Pull out the suction wipers. → Insert new or reversed suction nozzles. → Attach the plastic parts. → Tighten the star handles and secure them.
Replacing the disc brush
→ Press the push handle down to raise the cleaning head. → Press the brush replacement pedal down past the resistance.
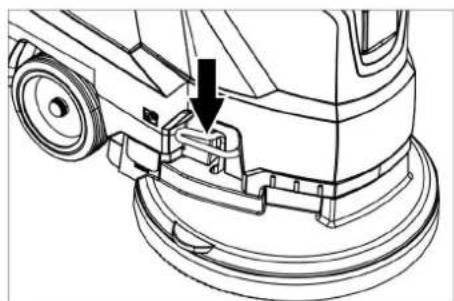
→ Pull the machine back so that the disc brush is accessible. → Place the new disc unit on the floor in front of the machine. → With the cleaning head raised, drive the machine over the new disc brush and lower the cleaning head. The brush clicks into the drive.
Removing the dirty water tank
→ Lift the dirty water tank and set it aside.
Maintenance contract
Chairman of the Board of Management
S. Reiser Director Regulatory Affairs & Certification
71364 Winnenden (Germany)
Tel.: +49 7195 14-0
Fax: +49 7195 14-2212
Winnenden, 2021/09/01

1 Ostona
2 Cover
Type: 1.127-xxx 1.515-xxx
71364 Winnenden (Germany)
Tel.: +49 7195 14-0
Fax: +49 7195 14-2212
Winnenden, 2021/09/01
→ Tighten the wing screws.
Inclination
1 Cover 2 Cover
EU Directives complied with:
2006/42/EG (+2009/127/EG)
2014/30/EU
2011/65/EU
Applicable regulations
(EU) 2019/1781
Harmonized standards used:
EN 60335-1
EN 60335-2-72
EN 62233: 2008
EN 55014-1:2006 + A1: 2009 + A2:2011
EN 55014-2:1997 + A1: 2001 + A2: 2008
EN 61000-3-2:2014
EN 61000-3-3:2013
Chairman of the Board of Management
S. Reiser
Director Regulatory Affairs & Certification
71364 Winnenden (Germany)
Tel.: +49 7195 14-0
Fax: +49 7195 14-2212
Winnenden, 2021/09/01

→ Fit the suction hose.
Operation
⚠DANGER
1 Cover 2 Lid
→ Open the cover. → Turn the cover clockwise and remove it. → Remove the filter underneath and clean it. → Insert the filter. → Fit the cover and lock it by turning counterclockwise → Close the cover.
Chairman of the Board of Management
S. Reiser
Director Regulatory Affairs & Certification
71364 Winnenden (Germany)
Tel.: +49 7195 14-0
Fax: +49 7195 14-2212
Winnenden, 2021/09/01

Before first use of your device, read these original
→ Attach the suction hose.
During operation
△DANGER
→ Tighten the wing screws.
Tilt
→ Move the height adjustment rotary handle to achieve the best suction result.
Cleaning
CAUTION
→ Hang the end of the extension cable as a loop on the strain relief hook. Connect the device's power plug to the extension cable. → Insert the extension cable plug into the socket. → Turn the program selector switch to the desired cleaning program. → Activate the safety switch.
Lowering the suction console
→ Pull out the lever and press it downwards; the suction console lowers.
Note:
– For cleaning tiled surfaces, adjust the flat suction console so that it does not clean at a right angle to the joints between tiles. - To improve the suction result, the suction console can be tilted or rotated to the appropriate position (see "Adjusting the suction console"). - If the dirty water tank is full, the float closes the suction opening and the suction turbine runs at increased speed. In that case, switch off suction and empty the dirty water tank.
→ Squeeze or fold the dispenser. → Open the dispenser lid. → Drain the dirty water - adjust the amount of water by pressing or folding. → Rinse the dirty water tank with clean water.
→ Unscrew the fresh water tank cap.
Transport
△DANGER
Risk of injury! For loading and unloading, the device may only be driven on slopes less than the permitted maximum (see "Technical data"). Drive slowly.
1 Cover 2 Cover
→ Pull the device backwards so that the disc brush is easily accessible. → Place the new disc brush on the floor in front of the device.
→ Guide the device with the raised squeegee block onto the new disc brush and then lower the squeegee block.
The brush engages in the drive.
Removing the dirty water tank
→ Drain the dirty water.
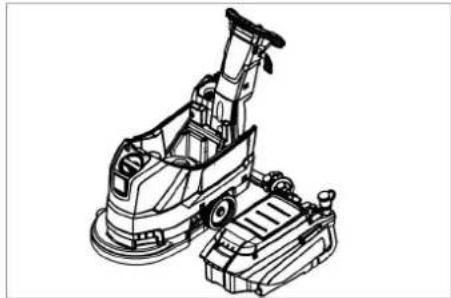
→ Lift the dirty water tank and set it aside.
Service contract
To ensure reliable operation of the machine, you can conclude a service contract with the responsible Kärcher sales office.
Chairman of the Board of Management
S. Reiser Director Regulatory Affairs & Certification
71364 Winnenden (Germany)
Tel.: +49 7195 14-0
Fax: +49 7195 14-2212
Winnenden, 2021/09/01

Before using your device for the first time, read these original instructions.
→ Attach the suction hose.
Operation
△DANGER
Risk of injury!
In case of danger, release the safety switch or the drive lever.
Filling operating media
Fresh water
→ Open the fresh water tank cap. → Fill with fresh water (max. 60°C) up to the lower edge of the filling neck. → Close the fresh water tank cap.
Detergent
⚠WARNING
Risk of damage. Use only recommended detergents. For other detergents, the user assumes an increased risk of accidents and safety disturbances during operation.
→ Tighten the wing screws.
Incline
If the suction result is unsatisfactory, it is possible to change the inclination of the flat suction nozzle. → Set the rotary handle for tilting the suction nozzle.
Height
The height adjustment affects the bending of the squeegee rubbers when in contact with the floor.
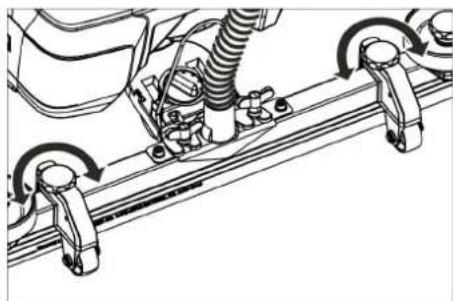
→ Move the rotary height adjustment handle to achieve the best suction result.
Cleaning
CAUTION
Hang the end of the extension cable as a loop on the strain relief hook. Connect the device plug to the extension cable. → Insert the extension cable plug into the socket. → Turn the program selector switch to the desired cleaning program. → Press the safety switch.
Lowering the suction nozzle
→ Pull the lever and press it down; the suction nozzle lowers.
Note:
- For cleaning tiled surfaces, set the flat suction nozzle so that it does not clean at a right angle to the joints between the tiles.
- To improve the suction result, the suction nozzle can be tilted or rotated into the appropriate position (see "Adjusting the suction nozzle").
- If the dirty water tank is full, the float closes the suction opening and the suction turbine runs at increased speed. In that case, switch off suction and empty the dirty water tank.
→ Squeeze or fold the dispenser. → Open the dispenser lid. → Drain the dirty water - adjust the amount of water by pressing or folding. → Rinse the dirty water tank with clean water.
Draining fresh water
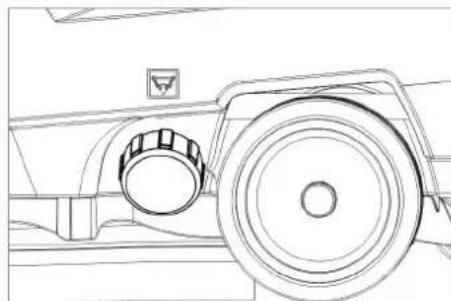
When transporting by vehicle, secure the device against slipping and tipping in accordance with the applicable regulations.
Storage
CAUTION
Risk of injury and damage! When storing, consider the weight of the device. This device may only be stored indoors.
Care and maintenance
DANGER
Risk of injury! Before any work on the device, set the program selector switch to "OFF" and unplug the power cord.
Drain and remove dirty and residual fresh water.
Maintenance schedule
After each use
ATTENTION
1 Squeegee 2 Cover
Remove the plastic parts. Remove the suction rubbers. Insert new or reversed suction rubbers. Attach the plastic parts. Screw on and tighten the star knobs.
Replacing the disc brush
Press the device down by the push handle to raise the cleaning head. Press the brush replacement pedal down while overcoming a noticeable resistance.
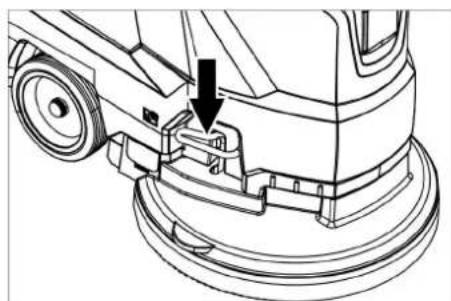
→ Pull the device backwards so that the disc brush is easily accessible. → Place the new disc brush on the floor in front of the device.
→ Guide the device with the raised squeegee block onto the new disc brush and then lower the squeegee block. The brush engages in the drive.
Removing the dirty water tank
→ Drain the dirty water.
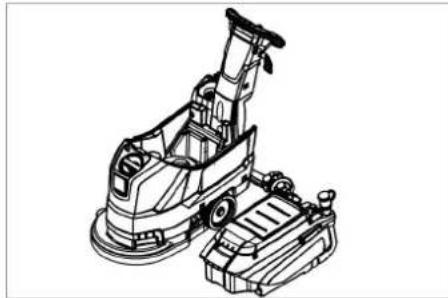
→ Lift the dirty water tank and set it aside.
Service contract
To ensure reliable operation of the machine, you can conclude a service contract with the responsible Kärcher sales center.
Type: 1.127-xxx 1.515-xxx
71364 Winnenden (Germany)
Tel.: +49 7195 14-0
Fax: +49 7195 14-2212
Winnenden, 2021/09/01

→ Tighten the wing screws.
Tilt
1 Cover 2 Cover
Chairman of the Board of Management
Director Regulatory Affairs & Certification
71364 Winnenden (Germany)
Tel.: +49 7195 14-0
Fax: +49 7195 14-2212
Winnenden, 2021/09/01

→ Attach the inlet hose.
Operation
A DANGER
Risk of injury!
→ Tighten the wing nuts.
Neck
→ Unscrew the cap of the fresh water tank.
Transport
△DANGER
Chairman of the Board of Management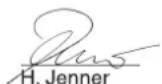
Director Regulatory Affairs & Certification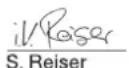
71364 Winnenden (Germany)
Tel.: +49 7195 14-0
Fax: +49 7195 14-2212
Winnenden, 2021/09/01

→ Tighten the wing screws.
Slope
1 Cover 2 Lid
Chairman of the Board of Management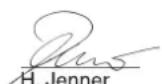
S. Reiser Director Regulatory Affairs & Certification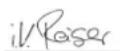
71364 Winnenden (Germany)
Tel.: +49 7195 14-0
Fax: +49 7195 14-2212
Winnenden, 2021/09/01

→ Loosen the wing nuts.
Tilting
→ Unscrew the clean water tank cap.
Transport
⚠DANGER
1 Cover 2 Cover
Chairman of the Board of Management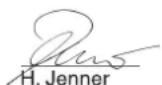
S. Reiser Director Regulatory Affairs & Certification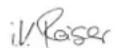
71364 Winnenden (Germany)
Tel.: +49 7195 14-0
Fax: +49 7195 14-2212
Winnenden, 2021/09/01

1 Cover
2 Cover
Chairman of the Board of Management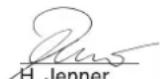
S. Reiser Director Regulatory Affairs & Certification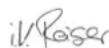
71364 Winnenden (Germany)
Tel.: +49 7195 14-0
Fax: +49 7195 14-2212
Winnenden, 2021/09/01

Read the original operating instructions before
→ Connect the suction hose.
Operation
⚠DANGER
Danger of accident!
Release the safety button/service crank in case of danger.
Filling operating fluid
Clean water
Clean water
→ Tighten the wing screw.
Inclination
1 Cover 2 Cover
→ Connect the suction hose.
Operation
DANGER
Risk of injury!
In case of danger, release the safety switch / lever.
Add working material
Fresh water
→ Open the lid of the fresh water tank.
→ Tighten the wing screw.
Inclination
→ Unscrew the lid of the fresh water tank.
Transport
Danger
1 Cover 2 Top cover
→ Lift the waste water tank and set it aside.
Maintenance contract
→ Connect the suction hose
Operation
Danger
→ Tighten the fishplate screw
Inclination
1 Open the cover
2 Cover
THANK YOU!
MERCI! DANKE! iGRACIAS!

Register your product and benefit from many advantages.
www.kaercher.com/welcome


Rate your product and tell us your opinion.
www.kaercher.com/dealersearch
Alfred Kärcher SE & Co. KG
Alfred-Kärcher-Str. 28-40
71364 Winnenden (Germany)
Tel.: +49 7195 14-0
Fax: +49 7195 14-2212
- SAFETY INSTRUCTIONS
- THE DEVICE MAY ONLY BE OPERATED WHEN THE COVER AND ALL LIDS ARE CLOSED
- △WARNING
- SAFETY DEVICES
- SAFETY SWITCH
- DANGER OR HAZARD LEVELS
- DANGER
- WARNING
- CAUTION
- ATTENTION
- FUNCTION
- NOTE
- PROPER USE
- ENVIRONMENTAL PROTECTION
- INFORMATION ON INGREDIENTS (REACH)
- OPERATING AND FUNCTIONAL ELEMENTS
- COLOUR CODING
- OFF
- NORMAL MODE
- INTENSE MODE
- VACUUM MODE
- BEFORE STARTUP
- UNLOADING
- INSTALLING THE VACUUM BAR
- OPERATION
- FILLING IN DETERGENTS
- FRESH WATER
- DETERGENT
- SETTING THE WATER QUANTITY
- SETTING THE VACUUM BAR
- OBLIQUE POSITION
- INCLINATION
- HEIGHT
- CLEANING
- LOWER THE VACUUM BAR
- SHUTTING DOWN THE APPLIANCE
- DRAIN OFF DIRTY WATER
- TRANSPORT
- STORAGE
- CARE AND MAINTENANCE
- MAINTENANCE SCHEDULE
- AFTER EACH OPERATION
- MONTHLY
- YEARLY
- MAINTENANCE WORKS
- REPLACING THE DISK BRUSHES REMOVING THE WASTE WATER TANK
- MAINTENANCE CONTRACT
- FROST PROTECTION
- FAULTS
- △DANGER
- SPARE PARTS
- EU DECLARATION OF CONFORMITY
- DECLARATION OF CONFORMITY
- ⚠️DANGER
- DRIFT
- △FARE
- REPLACING THE DISC BRUSH
- TILT
- USE
- ⚠ DANGER
- ⚠DANGER
- REMOVING THE DIRTY WATER TANK
- DURING OPERATION
- LOWERING THE SUCTION CONSOLE
- SERVICE CONTRACT
- FILLING OPERATING MEDIA
- ⚠WARNING
- INCLINE
- LOWERING THE SUCTION NOZZLE
- DRAINING FRESH WATER
- AFTER EACH USE
- A DANGER
- NECK
- SLOPE
- TILTING
- DANGER OF ACCIDENT
- CLEAN WATER
- ADD WORKING MATERIAL
- THANK YOU
- MERCI! DANKE! IGRACIAS
Brand : Kärcher
Model : BD 4335 C Classic Ep
Category : Floor cleaner