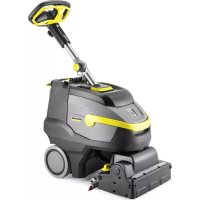
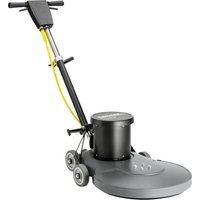
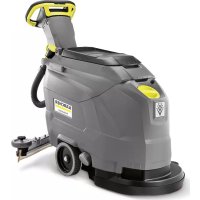
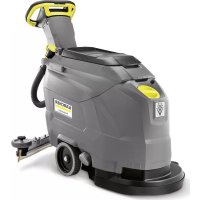
BR 3512 C Bp - Floor cleaner Kärcher - Free user manual and instructions
Find the device manual for free BR 3512 C Bp Kärcher in PDF.



| Product type | Walk-behind floor scrubber (floor cleaner) |
| Brand and model | Kärcher BR 3512 C Bp |
| Power supply | Lithium-ion battery 25.9 V / 22 Ah, charger 220-240 V ~ 50/60 Hz |
| Dimensions (L x l x h) | 930 x 420 x 1100 mm |
| Transport weight | 36 kg |
| Total weight with load | 48 kg |
| Capacity clean water tank / dirty water tank | 12 L / 12 L |
| Working width | 350 mm |
| Theoretical cleaning area | 1400 m²/h |
| Brush rotation speed | 1050 rpm |
| Brush pressure | Adjustable from 1 to 4 |
| Operating mode | Normal and Eco (energy saving) |
| Average power consumption | 500 W |
| Sound level (LpA) | 65 dB(A) |
| Vibrations | < 2.5 m/s² |
| Operating temperature | 0 to 40 °C |
| Safety equipment | Circuit breaker, safety stop, battery deep discharge protection |
| Accessories and spare parts | Brushes (white, red, green, orange), microfiber roller, squeegee blades, pads, filling hose |
| Routine maintenance | Cleaning filters, suction bar, brushes; emptying tanks |
| Intended use | Industrial and commercial use on level, non-frozen, moisture-resistant floors |
| Warranty | According to dealer conditions or Kärcher after-sales service |
| Repairability | Maintenance and repairs to be entrusted to authorized Kärcher service center |
Frequently Asked Questions - BR 3512 C Bp Kärcher
User questions about BR 3512 C Bp Kärcher
0 question about this device. Answer the ones you know or ask your own.
Ask a new question about this device
Download the instructions for your Floor cleaner in PDF format for free! Find your manual BR 3512 C Bp - Kärcher and take your electronic device back in hand. On this page are published all the documents necessary for the use of your device. BR 3512 C Bp by Kärcher.
USER MANUAL BR 3512 C Bp Kärcher
Deutsch 3
English 13
Français 24
Italiano 34
Nederlands 44
Español 54
Português 64
Dansk 75
Norsk 85
Svenska 94
Suomi 104
Ελληνικά 114
Türkçe 125
Русский 135
Magyar 147
Čeština 157
Slovenščina 167
Polski 177
Românește 188
Slovenčina 198
Hrvatski 208
Srpski 218
Български 228
Eesti 239
Latviešu 249
Lietuviškai 259
Українська 269
العربية 290

1 Schraube
2 Deckel

Chairman of the Board of Management
Director Regulatory Affairs & Certification
71364 Winnenden (Germany)
Tel.: +49 7195 14-0
Fax: +49 7195 14-2212
Winnenden, 2021/02/01

Please read and comply with these original instructions prior
to the initial operation of your appliance and store them for later use or subsequent owners.
Contents
Safety instructions..... EN 1
Function ...... EN 2
Proper use ...... EN 2
Environmental protection .... EN 2
Warranty ...... EN 2
Accessories and Spare Parts. EN 2
Operating elements..... EN 3
Before Startup..... EN 4
Operation ...... EN 4
Shutting down ..... EN 6
Transport..... EN 6
Storage ..... EN 6
Care and maintenance ..... EN 7
Disposal ...... EN 8
Faults ...... EN 8
Accessories..... EN 9
Technical specifications ..... EN 10
EU Declaration of Conformity. EN 10
Declaration of Conformity .... EN 11
Safety instructions
Before using the appliance for the first time, read and observe these operating instructions and the accompanying brochure:
Safety information for brush cleaning units, 5.956-251.0.
⚠ WARNING
Do not use the appliance on inclines.
The appliance may only be operated when the container and all lids are closed.
Hazard levels
⚠️DANGER
Pointer to immediate danger, which leads to severe injuries or death.
⚠ WARNING
Pointer to a possibly dangerous situation, which can lead to severe injuries or death.
△CAUTION
Pointer to a possibly dangerous situation, which can lead to minor injuries.
ATTENTION
Pointer to a possibly dangerous situation, which can lead to property damage.
Information on battery (accumulator) and charger
Lithium-ion batteries are installed in the appliance. These are subject to special criteria. The removal and the installation as well as the examination of defective batteries may only be performed by the Kärcher aftersales service or a specialist.
Information on storage and transport can be obtained from your Kärcher aftersales service.
⚠️DANGER
- Alterations and modifications on the appliance are prohibited.
- Do not open the battery, as there is a risk of an electrical shock; also, irritating or caustic vapors can escape.
Do not expose the battery to direct sunlight, heat or fire, there is a risk of explosion.
- Do not operate the charger in explosive environment.
- Ensure sufficient ventilation during the charging process.
- Do not use the charger if dirty or wet.
- Do not work with open flames, generate sparks or smoke in the vicinity of a battery or a battery charging room. Danger of explosion.
⚠ WARNING
- Check the appliance and the power cable for damage prior to every use. Do not use damaged appliances and have damaged parts repaired by specialists only.
Keep children away from batteries and charger.
Do not charge damaged batteries. Have damaged batteries replaced by the Kärcher aftersales service.
- Do not discard defective batteries in the domestic waste, inform Kärcher after-sales service.
- Avoid contact with liquids oozing out of defective battery packs. Rinse thor-
oughly if you accidentally come in contact with the fluid. Also consult a doctor if the fluid comes in contact with your eyes.
△CAUTION
- These operating instructions must be observed unconditionally. Observe recommendations of the lawmaker for handling batteries.
- The mains voltage must correspond with the voltage indicated on the type plate of the appliance.
- Use the charger only to charge approved battery packs.
- The accumulator may only be operated with this appliance. It is dangerous and prohibited to use it for other purposes.
Safety installations
If the safety switch is released, the brush drive shuts off.
Function
The scrubbing vacuum cleaner is used for the wet cleaning of level floors.
It can be easily adjusted to the cleaning task by setting the water quantity.
A working width of 350 mm and a capacity of 12 l in the fresh and wastewater tank each enable effective cleaning with long action times.
The battery can be charged on a 230V power outlet by means of the integrated charger.
Proper use
Use this appliance only as directed in these operating instructions.
- This appliance is suited for the commercial use, e.g. in hotels, schools, hospitals, factories, shops, offices, and rental companies.
- The appliance should only be used for cleaning level floors that are not affected by moisture.
-
This appliance is intended for inside use.
-
The appliance is not suited for the cleaning of frozen grounds (e.g. in cold stores).
- The appliance may only be equipped with original accessories and spare parts.
Environmental protection

The packaging material can be recycled. Please do not place the package to the ordinary refuse for disposal, but ge for the proper recycling.

Old appliances contain valuable materials that can be recycled. Please arrange for the proper recycling of old appliances. Please dispose your old appliances using appropriate collection systems.
Information on ingredients (REACH)
The latest information on ingredients can be found under:
The warranty terms published by our competent sales company are applicable in each country. We will repair potential failures of your accessory within the warranty period free of charge, provided that such failure is caused by faulty material or defects in fabrication. In the event of a warranty claim please contact your dealer or the nearest authorized Customer Service center. Please submit the proof of purchase.
Accessories and Spare Parts
Only use original accessories and spare parts, they ensure the safe and trouble-free operation of the device.
For information about accessories and spare parts, please visit www.kaercher.com.
Operating elements

1 Fresh water tank cover
2 Fluff filter
3 Steering wheel
4 Star knob, height adjustment of the steering wheel
5 Star knob, transport position of the steering wheel
6 Unlocking device, cover waste water tank
7 Cover dirt water reservoir
8 waste water tank
9 Carrying handle for waste water tank
10 Rotating handle for brush contact pressure
(1=min, 4=max)
11 Water distribution bar
12 Unlocking button for brush roller
13 Brush roller
14 Coarse dirt container
15 Vacuum bar lift pedal
16 Vacuum bar
17 Fresh water level display
18 Coupling for draining the fresh water
19 Step depression
20 Battery charging display
21 Cable hook, rotating
22 Safety button

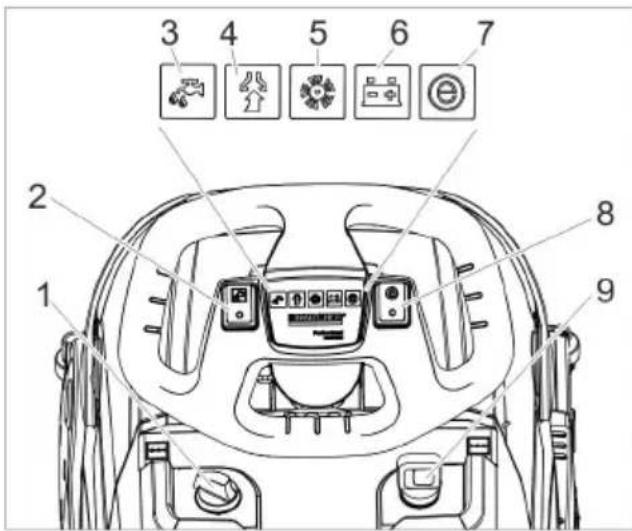
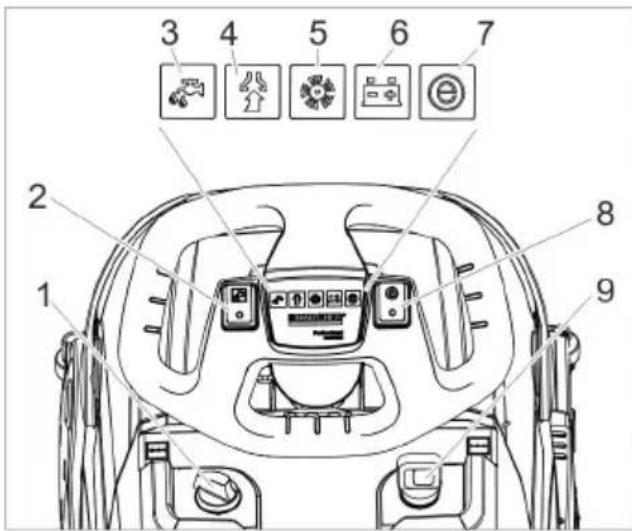
1 Dosage cleaning solution
2 Switch for detergent solution
3 Control lamp to apply detergent solution
4 Indicator lamp vacuuming
Green: Suction turbine in operation
Orange, flashing: Suction turbine overloaded
5 Indicator lamp brush drive
Green: Brush is rotating
Orange, flashing: Brush overloaded
6 Battery status display
Green Battery charged
Orange: Battery almost empty
Red Appliance swithces off: Load battery
7 Indicator lamp Eco mode
8 Switch Eco mode
9 Power switch
Before Startup
Charging battery
Note:
The device is equipped with a safety mechanism to prevent total discharge, i.e. when the permissible minimum capacity is reached, the machine will be shut off. The charging process takes approx. 3 hours.
The charger automatically switches off the charging process.
If necessary, the appliance can be used again before the battery has been fully charged.
→ Insert the mains plug into the socket.
Battery charging display

1 Battery is charged (green)
2 Battery is being charged (yellow, flashing)
3 Malfunction (red)
Operation
→ Release the star knob for the transport position.
→ Straighten the steering column.
→ Tighten the star handle.
Filling in detergents
⚠ WARNING
Risk of damage. Only use the recommended detergents. With other detergents, the operator bears the increased risk regarding the operational safety, risk of accident and reduced service life of the appliance. Only use detergents that are free of solvents, hydrochloric acid and hydrofluoric acid.
Follow the safety instructions for using detergents.
Note:
Do not use highly foaming detergents.
Observe the dosing notes.
→ Swivel up the carrying handle of the waste water tank.
→ Lift out the waste water tank and put it aside.
→ Remove the lid from the fresh water reservoir.
→ Fill in fresh water (maximum 50 °C).
→ Add detergent. Follow dosing instructions for detergent.
Recommended detergents:
| Application Detergent | |
| Regular cleaning (even for floors sensitive to alkalies) | RM 745RM 746 |
| Cleaning dirt from grease | RM 69 ES ASFRM 69 ASF |
| Basic cleaning (stripping) of alkali-resistant hard coatings | RM 752 |
| Basic cleaning (stripping) linoleum | RM 754 |
| Base cleaner, acidic RM | 751 |
| Disinfection cleaning RM | 732 |
Detergents are available in specialised stores.
→ Close the cover of the fresh water reservoir.
→ Place the waste water tank on the appliance.
Settings
→ Release the star knob for the height adjustment of the steering wheel.
→ Adjust the steering wheel to the desired height.
→ Tighten the star handle.
→ Adjust the dosing of the cleaning solution in accordance with the soiling and the type of the flooring material.
→ Adjust the rotary handle of the brush contact pressure to the desired value. Only adjust the brush contact pressure when the cleaning head is raised.
Note:
If the appliance pulls forwards too strongly during operation, reduce the contact pressure.
→ Bring the Eco mode switch into the desired position.
Normal operation: The appliance works at the maximum brush speed and the highest suction performance.
Eco: The appliance works at reduced brush speed and suction performance. This also reduces the energy consumption. The possible action time with one charging cycle increases.
Cleaning
ATTENTION
Risk of damage to the floor covering. Do not operate the appliance on the spot. Risk of damage. Lift the vacuum bar before pulling the appliance backwards over a longer distance.
→ Set the appliance switch to "I".
→ Switch on "Detergent" button.
→ Press the switch of the suction turbine; the vacuum process will start.
→ Push down the pedal of the vacuum bar lifting device at the back to lower the vacuum bar.
→ Pull the safety switch towards the steering wheel, the brush drive and the application of the cleaning solution are switched on (if preset).
→ Push the appliance forward until the parking stand folds up and the cleaning head touches the ground.
→ Move the appliance over the surface to be cleaned.
Note:
If the steering wheel is turned by 180° , the appliance also reverses.
Shutting Down the Appliance
→ Release the safety switch.
→ Drive the appliance forward for another 1-2 m to draw off residual water.
→ Push down the pedal of the vacuum bar lifting device at the front to raise the vacuum bar.
ATTENTION
Vacuum lips and brush can be deformed permanently. Always park the appliance with the parking stand folded out.
→ Set the appliance switch to "0".
→ Place one foot in the tread and lift the front of the appliance by pulling on the steering wheel until the parking stand folds out.
Emptying the waste Water tank
⚠ WARNING
Please observe the local provisions regarding the wastewater treatment.
→ Swivel the handle of the waste water tank up and let it snap into place.
→ Remove the waste water tank.

→ Remove the cover of the waste water tank.
→ Empty the waste water tank. Swivel the waste water tank sideways during emptying so that the tank is completely drained.
→ Rinse the dirt water reservoir with clear water.
→ Reattach the waste water tank to the appliance.
Emptying the Fresh Water Tank
⚠ WARNING
Please observe the local provisions regarding the wastewater treatment.
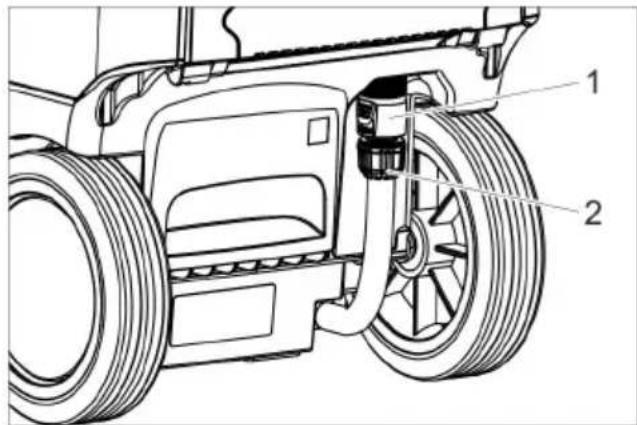
1 Coupling for draining the fresh water 2 Fresh water level display
→ Slide the coupling down.
→ Remove the hose of the level indicator and swivel it downwards.
Frost protection
In case of danger of frost:
→ Empty the fresh and dirt water reservoirs.
→ Store the appliance in a frost-protected room.
Folding down the steering column
To reduce the space requirements for transport and storage, the steering column can be folded down.
→ Release the star knob for the transport position.
→ Swivel the steering wheel forwards.
→ Tighten the star handle.
Shutting down
→ Completely charge the battery prior to longer operational breaks extending over several weeks.
→ Set the appliance switch to "0".
ATTENTION
Risk of damage to the battery due to total discharge.
Always switch the power switch to "0" during operational breaks.
Transport
△CAUTION
Risk of personal injury or damage! Mind the weight of the appliance during transport.
→ Remove the brush to avoid damage to the brushes.
→ When transporting in vehicles, secure the appliance according to the guidelines from slipping and tipping over.
Storage
△CAUTION
Risk of personal injury or damage! Consider the weight of the appliance when storing it.
This appliance must only be stored in interior rooms.
Care and maintenance
⚠️DANGER
Risk of injury. Turn the appliance switch to "0" and pull the mains plug of the charger prior to performing any work on the appliance.
ATTENTION
Risk of damage for the appliance due to leaking water. Drain the wastewater and remaining fresh water prior to performing tasks on the appliance.
→ Park the machine on an even surface.
Maintenance schedule
After the work
ATTENTION
Risk of damage. Do not sluice the appliance with water and do not use aggressive detergents.
→ Drain off dirt water.
→ Remove the lid of the waste water tank and wash the inside of the lid and the float with water.
→ Rinse the waste water tank with clear water.
→ Clean the vacuum bar.
→ Remove bulk waste container and empty it.
→ Clean the outside of the appliance with a damp cloth which has been soaked in mild detergent.
→ Clean the vacuum lips, check for wear and replace them if required.
→ Clean brush.
→ Check the brush for wear and replace if required (see "Maintenance tasks").
→ Charge battery if required.
Weekly
→ Remove the water distribution bar on the cleaning head and clean the water channel.
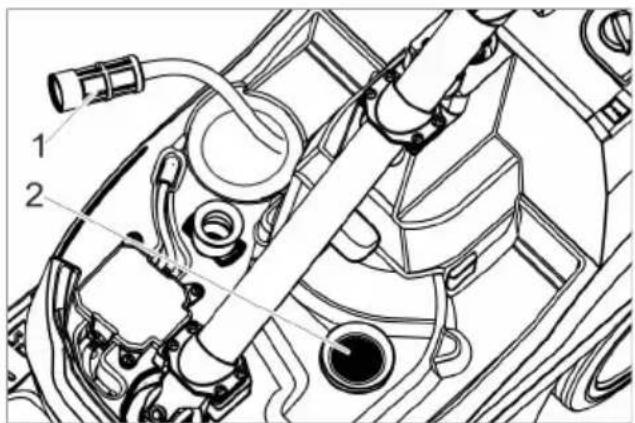
1 Fresh water filter
2 Fluff filter
→ Clean the fresh water filter.
→ Clean the fluff filter.
Monthly
→ Check the condition of the seals between waste water tank and cover, replace if required.
Yearly
→ Have the prescribed inspection carried out by the customer service.
Maintenance Works
Replacing the suction lips
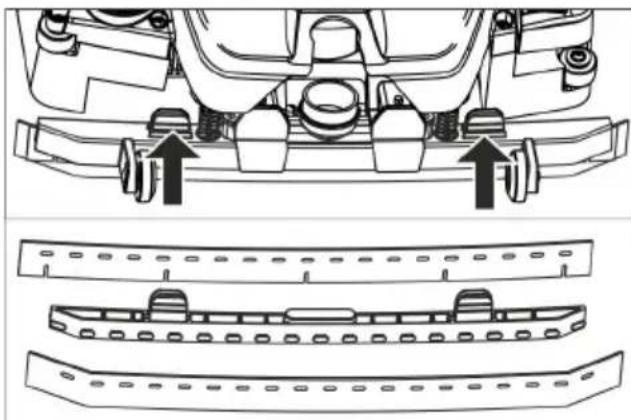
→ Compress the fastening devices and pull the vacuum lips out of the vacuum bar towards the bottom.
→ Remove the vacuum lips from the holder.
Note:
Thanks to the perforation pattern the vacuum lips cannot be mixed up. They cannot be turned and reinstalled.
→ Replace vacuum lips.
→ Insert the holder with the vacuum lips into the vacuum bar and snap into place.
Replacing the brush roller
⚠ WARNING
Risk of crushing due to the parking stand folding up during the brush replacement. Turn the steering wheel by 90° to the left prior to the brush replacement.
→ Press the release button for the brush roller and swivel the brush roller toward the bottom and pull it off the driver.
→ Place the new brush roller on the driver and lock into place on the opposite side.
Maintenance contract
To ensure a reliable operation of the appliance maintenance contracts can be concluded with the competent Kärcher sales office.
Disposal
Removing the battery
⚠️DANGER
The removal of the battery may only be performed by the Kärcher aftersales service or a specialist.
The evaluation, whether the battery is damaged or not, is done by an authorised after-sales technician
The Chapter "Safety instructions" for handling accumulators must be observed unconditionally.
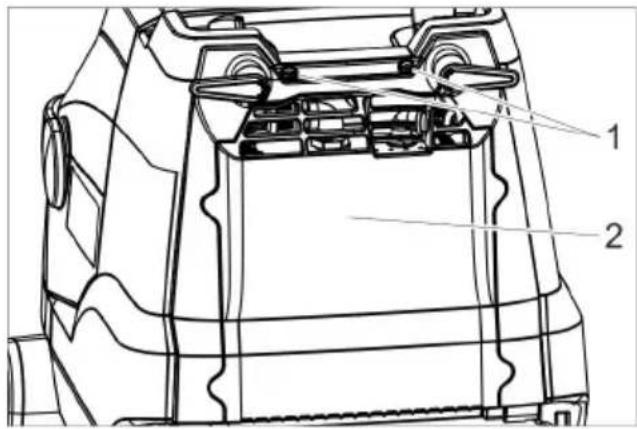
1 Screw
2 Cover
→ Unscrew 2 screws.
→ Swivel the lid downwards.
→ Loosen and remove the battery plug.
→ Remove the battery.
→ Dispose of used battery in accordance with the applicable provisions.
Faults
⚠️DANGER
Risk of injury. Turn the appliance switch to "0" and pull the mains plug of the charger prior to performing any work on the appliance.
ATTENTION
Risk of damage for the appliance due to leaking water. Drain the wastewater and remaining fresh water prior to performing tasks on the appliance.
In case of faults that cannot be remedied using the table below please contact the customer service.
| Fault Remedy | |
| Appliance cannot be started Switch on the appliance switch, wait 3 seconds, check charge condition of the battery. | |
| Insufficient water quantity Check fresh water level, refill tank if necessary. | |
| Insufficient vacuum performance | Lower the vacuum bar. |
| Empty the waste water tank. | |
| Clean the seals between waste water tank and cover and check for tightness, replace if required. | |
| Clean the vacuum lips on the vacuum bar, turn or replace if required | |
| Check if the suction hose and vacuum bar are chocked, clean if required | |
| Check the suction hose for tightness; replace if required. | |
| Insufficient cleaning result Check | k/set the brush contact pressure. |
| Check the brush type and the detergent for their suitability | |
| Check the brushes for wear, replace if required. | |
| Brush does not turn Pull the safety | ety switch towards the steering wheel. |
| Check if foreign matters are blocking the brush roller; remove foreign matter if required.Switch off the switch for the brush drive, wait for a short period of time, switch the switch back on. | |
Accessories
The appliance can be equipped with various accessories depending on the cleaning
task. Please request our catalogue or visit us on the Internet at www.kaercher.com.
| Description Part no.: Description | ||
| Brush roller, white (soft) 4.03 | 7-036.0 For polishing floors. | |
| Brush roller, red (medium, standard) | 4.037-031.0 For cleaning slightly dirtied or sensitive floors. | |
| Brush roller, green (hard) 4.0 | 37-038.0 For cleaning heavily dirtied floors. | |
| Brush roller, black (very hard) | 4.037-039.0 For cleaning heavily dirtied floors. | |
| Brush roller, orange (high/ low) | 4.037-037.0 For scrubbing structured floors (safety tiles, etc.). | |
| Microfibre roller 4.037-040.0 | Cleaning brush made of microfibres with especially high cleaning performance, especially for fine stone tiles. | |
| Pad roller shaft 4.762-009.0 | For intake of roller pads. | |
| Roller pad, red (medium) 6.3 | 69-047.0 For cleaning slightly dirtied floors. | |
| Roller pad, green (hard) 6.36 | 9-052.0 For cleaning normal to heavily dirtied floors. | |
| Roller pad, yellow (soft) | 6.369-053.0 For polishing floors. | |
| Fill hose | 6.680-124.0 For filling the fresh water tank | |
| Suction lip kit | 4.037-035.0 As replacement | |
Technical specifications
| Power | ||
| Nominal voltage V 25,9 | ||
| Battery capacity Ah (5h) | 22 | |
| Battery type Li-ion | ||
| Average power con-sumption | W 500 | |
| Protective class - 1 | ||
| Suction engine output W | 280 | |
| Brush engine output W | 185 | |
| Operating temperature range | °C 0...40 | |
| Vacuuming | ||
| Cleaning power, air quantity | l/s 20 | |
| Cleaning power, nega-tive pressure | kPa 8 | |
| Cleaning brushes | ||
| Working width mm | 350 | |
| Brush diameter | mm | 96 |
| Brush speed | 1/min | 1050 |
| Charger | ||
| Voltage | V/Hz | 220...240/50...60 |
| Power Input | W 300 | |
| Dimensions and weights | ||
| Theoretical surface cleaning performance | m2/h | 1400 |
| Fresh/waste water tank volume | l | 12 |
| Permissible overall weight | kg | 48 |
| Transport weight | kg | 36 |
| Length x width x height | mm | 930x420x1100 |
| Values determined as per EN 60335-2-72 | ||
| Total oscillation value | m/s2 | <2,5 |
| Uncertainty K | m/s2 | 0,2 |
| Sound pressure level LpA | dB(A) | 65 |
| Uncertainty KpA | dB(A) | 2 |
| Sound power level LWA + Uncertainty KWA | dB(A) | 84 |
EU Declaration of Conformity
We hereby declare that the machine described below complies with the relevant basic safety and health requirements of the EU Directives, both in its basic design and construction as well as in the version put into circulation by us. This declaration shall cease to be valid if the machine is modified without our prior approval.
Product: Scrubbing vacuum cleaner
Type: 1.783-xxx
Relevant EU Directives
2006/42/EC (+2009/127/EC)
2014/30/EU
2011/65/EU
2014/53/EU (TCU)
Applied harmonized standards
EN 60335-1
EN 60335-2-72
EN 60335-2-29
EN 55012: 2007 + A1: 2009
EN 55014-1:2006 + A1: 2009 + A2:2011
EN 55014-2: 1997 + A1: 2001 + A2: 2008
EN 61000-3-2: 2014
EN 61000-3-3: 2013
EN 61000-6-2: 2005
EN 62233: 2008
EN IEC 63000: 2018
Applied national standards
TCU
EN 301 511 V12.5.1
EN 300 440 V2.1.1
EN 300 328 V2.2.2
EN 300 330 V2.1.1
The undersigned act on behalf and under the power of attorney of the company management.

Director Regulatory Affairs & Certification
Documentation supervisor:
S. Reiser
Alfred Kärcher SE & Co. KG
71364 Winnenden (Germany)
Tel.: +49 7195 14-0
Fax: +49 7195 14-2212
Winnenden, 2021/02/01
Declaration of Conformity
We hereby declare that the product described below complies with the relevant provisions of the following UK Regulations, both in its basic design and construction as well as in the version put into circulation by us. This declaration shall cease to be valid if the product is modified without our prior approval.
Product: Scrubbing vacuum cleaner
Type: 1.783-xxx
Currently applicable UK Regulations
S.I. 2008/1597 (as amended)
S.I. 2016/1091 (as amended)
S.I. 2012/3032 (as amended)
2014/53/EU (TCU)
Applied designated standards
EN 60335-1
EN 60335-2-72
EN 60335-2-29
EN 55012: 2007 + A1: 2009
EN 55014-1:2006 + A1: 2009 + A2:2011
EN 55014-2: 1997 + A1: 2001 + A2: 2008
EN 61000-3-2: 2014
EN 61000-3-3: 2013
EN 61000-6-2: 2005
EN 62233: 2008
EN IEC 63000: 2018
Applied national standards
TCU
EN 301 511 V12.5.1
EN 300 440 V2.1.1
EN 300 328 V2.2.2
EN 300 330 V2.1.1
The undersigned act on behalf and under the power of attorney of the company management.
H. Jenner
Chairman of the Board of Management
S. Reiser
Director Regulatory Affairs & Certification
Documentation supervisor:
S. Reiser
Alfred Kärcher SE & Co. KG
71364 Winnenden (Germany)
Tel.: +49 7195 14-0
Fax: +49 7195 14-2212
Winnenden, 2021/02/01

1 Vis
2 Capot
2006/42/CE (+2009/127/CE)
2014/30/UE
2011/65/EU
2014/53/EU (TCU)
H. Jenner
Chairman of the Board of Management
S. Reiser
Director Regulatory Affairs & Certification
71364 Winnenden (Germany)
Tel.: +49 7195 14-0
Fax: +49 7195 14-2212
Winnenden, 2021/02/01

1 Vite
2 Coperchio
2006/42/CE (+2009/127/CE)
2014/30/UE
2011/65/EU
2014/53/EU (TCU)
Chairman of the Board of Management

Director Regulatory Affairs & Certification
71364 Winnenden (Germany)
Tel.: +49 7195 14-0
Fax: +49 7195 14-2212
Winnenden, 2021/02/01

1 Filter vers water
2 Pluizenzeef
→ Filter schoonwater reinigen.
1 Schroef
2 Deksel

Chairman of the Board of Management
Director Regulatory Affairs & Certification
71364 Winnenden (Germany)
Tel.: +49 7195 14-0
Fax: +49 7195 14-2212
Winnenden, 2021/02/01

1 Tornillo
2 Tapa
2006/42/CE (+2009/127/CE)
2014/30/UE
2011/65/EU
2014/53/EU (TCU)
Chairman of the Board of Management
S. Reiser
Director Regulatory Affairs & Certification
71364 Winnenden (Germany)
Tel.: +49 7195 14-0
Fax: +49 7195 14-2212
Winnenden, 2021/02/01

Leia o manual de manual original antes de utilizar o seu apare-
1 Parafuso
2 Tampa
2006/42/CE (+2009/127/CE)
2014/30/UE
2011/65/EU
2014/53/EU (TCU)
Chairman of the Board of Management
S. Reiser
Director Regulatory Affairs & Certification
71364 Winnenden (Germany)
Tel.: +49 7195 14-0
Fax: +49 7195 14-2212
Winnenden, 2021/02/01

1 Filter for friskvand
2 Fnugfilter
1 Skrue
2 Dæksel
→ Skru 2 skruer ud.
→ Drej låget nedad.
2006/42/EF (+2009/127/EF)
2014/30/EU
2011/65/EU
2014/53/EU (TCU)
Chairman of the Board of Management
S. Reiser
Director Regulatory Affairs & Certification
71364 Winnenden (Germany)
Tel.: +49 7195 14-0
Fax: +49 7195 14-2212
Winnenden, 2021/02/01

1 Deksel friskvanntank
2 Losil
3 Ratt
4 Stjernehåndtak, høyderegulering ratt
5 Stjernehåndtak, transportstilling ratt
6 Opplåsing, deksel spillvannstank
7 Deksel spillvanntank
8 Spillvannstank
9 Bærehåndtak bruktvannstank
10 Dreiehåndtak børstetrykk (1=min, 4=max)
11 Vannfordelingslist
12 Låseknapp, børstevalse
13 Børstevalse
14 Grovsmussbeholder
15 Pedal sugebomheving
16 Sugebom
17 Nivåanvisning rentvann
18 Kobling, avtapping av rent vann
19 Stigtrinn
20 Batterieladeindikator
21 Kabelkroker, dreibare
22 Sikkerhetsbryter
→ Ta av deksel på spillvannstanken.
→ Tøm bruktvannstanken.
1 Ferskvannsfilter
2 Losil
1 Skrue
2 Deksel
2006/42/EF (+2009/127/EF)
2014/30/EU
2011/65/EU
2014/53/EU (TCU)
H. Jenner
Chairman of the Board of Management
S. Reiser
Director Regulatory Affairs & Certification
71364 Winnenden (Germany)
Tel.: +49 7195 14-0
Fax: +49 7195 14-2212
Winnenden, 2021/02/01

1 Skruv
2 Lock
Chairman of the Board of Management
Director Regulatory Affairs & Certification
71364 Winnenden (Germany)
Tel.: +49 7195 14-0
Fax: +49 7195 14-2212
Winnenden, 2021/02/01

1 Ruuvi
2 Kansi
Chairman of the Board of Management

Director Regulatory Affairs & Certification
71364 Winnenden (Germany)
Tel.: +49 7195 14-0
Fax: +49 7195 14-2212
Winnenden, 2021/02/01

1 Κοχλίας
2 Κάλυμμα
Chairman of the Board of Management
S. Reiser
Director Regulatory Affairs & Certification
71364 Winnenden (Germany)
Tel.: +49 7195 14-0
Fax: +49 7195 14-2212
Winnenden, 2021/02/01

1 Temiz su filtresi
2 Toz süzgeci
1 Civata
2 Kapak
Chairman of the Board of Management
S. Reiser
Director Regulatory Affairs & Certification
71364 Winnenden (Germany)
Tel.: +49 7195 14-0
Fax: +49 7195 14-2212
Winnenden, 2021/02/01

1 Винт
2 Крышка
Chairman of the Board of Management

S. Reiser
Director Regulatory Affairs & Certification
71364 Winnenden (Germany)
Tel.: +49 7195 14-0
Fax: +49 7195 14-2212
Winnenden, 2021/02/01

1 Friss víz szűrő
2 Szálszűrő
1 Csavar
2 Fedél
Chairman of the Board of Management
Director Regulatory Affairs & Certification
71364 Winnenden (Germany)
Tel.: +49 7195 14-0
Fax: +49 7195 14-2212
Winnenden, 2021/02/01

1 Šroub
2 Kryt
2006/42/ES (+2009/127/ES)
2014/30/EU
2011/65/EU
2014/53/EU (TCU)
Chairman of the Board of Management
Director Regulatory Affairs & Certification
71364 Winnenden (Germany)
Tel.: +49 7195 14-0
Fax: +49 7195 14-2212
Winnenden, 2021/02/01

→ Snemite pokrov rezervoarja za umazano vodo.
→ Izpraznite rezervoar za umazano vodo. Rezervoar za umazano vodo pri praznjenju zasukajte na stran, da se rezervoar popolnoma izprazni.
→ Posodo za umazano vodo izperite s či-sto vodo.
→ Rezervoar za umazano vodo ponovno namestite na napravo.
1 Filter sveže vode
2 Sito za puh
→ Očistite filter za svežo vodo.
1 Vijak
2 Pokrov
2006/42/ES (+2009/127/ES)
2014/30/EU
2011/65/EU
2014/53/EU (TCU)
Chairman of the Board of Management
S. Reiser
Director Regulatory Affairs & Certification
71364 Winnenden (Germany)
Tel.: +49 7195 14-0
Fax: +49 7195 14-2212
Winnenden, 2021/02/01

1 Šruba
2 Pokrywa
2006/42/WE (+2009/127/WE)
2014/30/UE
2011/65/EU
2014/53/EU (TCU)
Chairman of the Board of Management

S. Reiser
Director Regulatory Affairs & Certification
71364 Winnenden (Germany)
Tel.: +49 7195 14-0
Fax: +49 7195 14-2212
Winnenden, 2021/02/01
1 Şurub
2 Capac
Directive UE respectate:
2006/42/CE (+2009/127/CE)
2014/30/UE
2011/65/EU
2014/53/EU (TCU)
Norme armonizate utilize:
EN 60335-1
EN 60335-2-72
EN 60335-2-29
EN 55012: 2007 + A1: 2009
EN 55014-1:2006 + A1: 2009 + A2:2011
EN 55014-2: 1997 + A1: 2001 + A2: 2008
EN 61000-3-2: 2014
EN 61000-3-3: 2013
EN 61000-6-2: 2005
EN 62233: 2008
EN IEC 63000: 2018
Chairman of the Board of Management

S. Reiser
Director Regulatory Affairs & Certification
71364 Winnenden (Germany)
Tel.: +49 7195 14-0
Fax: +49 7195 14-2212
Winnenden, 2021/02/01

1 Spojka na vypustenie čerstvej vody 2 Zobrazenie stavu naplnenia čistou vodou
→ Posuňte spojku smerom dole.
→ Vytiahnite hadicu na zobrazovanie stavu náplne a otočte ju smerom dole.
Ochrana proti zamrznutiu
Pri nebezpečenstve zamrznutia:
1 Skrutka
2 Veko
2006/42/ES (+2009/127/ES)
2014/30/EÚ
2011/65/EU
2014/53/EU (TCU)
Uplatňované harmonizované normy:
EN 60335-1
EN 60335-2-72
EN 60335-2-29
EN 55012: 2007 + A1: 2009
EN 55014-1:2006 + A1: 2009 + A2:2011
EN 55014-2: 1997 + A1: 2001 + A2: 2008
EN 61000-3-2: 2014
EN 61000-3-3: 2013
EN 61000-6-2: 2005
EN 62233: 2008
EN IEC 63000: 2018
Chairman of the Board of Management
Director Regulatory Affairs & Certification
71364 Winnenden (Germany)
Tel.: +49 7195 14-0
Fax: +49 7195 14-2212
Winnenden, 2021/02/01
Prije prve uporabe Vašeg uređaja pročitajte ove originalne radne upute, postupajte prema njima i sačuvajte ih za kasniju uporabu ili za sljedećeg vlasnika.
Pregled sadržaja
| Sigurnosni napuci | HR 1 |
| Funkcija. | HR 2 |
| Namjensko korištenje | HR 2 |
| Zaštita okoliša | HR 2 |
| Jamstvo. | HR 2 |
| Pribor i pričuvni dijelovi | HR 2 |
| Opslužni elementi | HR 3 |
| Prije prve uporabe. | HR 4 |
| U radu | HR 4 |
| Stavljanje izvan pogona | HR 6 |
| Transport. | HR 6 |
| Skladištenje. | HR 6 |
| Njega i održavanje | HR 7 |
| Odlaganje u otpad. | HR 8 |
| Smetnje. | HR 8 |
| Pribor | HR 9 |
| Tehnički podaci | HR 9 |
| EU izjava o usklađenosti. | HR 10 |
Sigurnosni napuci
Prije prve uporabe uređaja pročitajte i pridržavajte se ovih uputa za uporabu i priloženog prospekta sa sigurnosnim uputama za uređaje za čišćenje s četkama, 5.956-251.0
⚠UPOZORENJE
Ne rabite uređaj na površinama pod nagibom.
Stroj smije raditi samo ako su spremnik i svi poklopci zatvoreni.
Stupnjevi opasnosti
⚠ OPASNOST
1 Poklopac spremnika svježe vode
2 Mrežica za skupljanje vlakana
3 Upravljač
4 Zvjezdasti pričvrsnik, namještanje visine upravljača
5 Zvjezdasti pričvrsnik, transportni položaj upravljača
6 Bravica, poklopac spremnika prljave vode
7 Poklopac spremnika prljave vode
8 Spremnik prljave vode
9 Rukohvat spremnika prljave vode
10 Okretna ručka za tlak nalijeganja četki (1=min., 4=maks.)
11 Letvica za distribuciju vode
12 gumb za odglavljivanje, valjkasta četka
13 Valjkasta četka
14 Spremnik za grubu prljavštinu
15 Papučica dizača usisnih konzola
16 Usisna konzola
→ Skinite poklopac spremnika prljave vo-
de.
→ Ispraznite spremnik prljave vode.
Prilikom pražnjenja zakrenite spremnik
prljave vode u stranu kako bi se mogao
u potpunosti isprazniti.
→ Spremnik prljave vode isperite čistom vodom.
→ Spremnik prljave vode ponovo postavite na uređaj.
1 Vijak
2 Poklopac
→ Odvijte 2 vijka.
→ Zakrenite poklopac prema dolje.
→ Otpustite akumulatorski utikač i skinite ga.
→ Izvadite akumulator.
→ Praznu bateriju zbrinite u otpad sukladno zakonskim odredbama.
Smetnje
⚠ OPASNOST
2006/42/EZ (+2009/127/EZ)
2014/30/EU
2011/65/EU
2014/53/EU (TCU)
Chairman of the Board of Management

Director Regulatory Affairs & Certification
71364 Winnenden (Germany)
Tel.: +49 7195 14-0
Fax: +49 7195 14-2212
Winnenden, 2021/02/01

Pre prve upotrebe Vašeg uređaja pročitajte ove originalno
1 Poklopac rezervoara sveže vode
2 Mrežica za skupljanje vlakana
3 Upravljač
4 Zvezdasti pričvrsnik, podešavanje
visine upravljača
5 Zvezdasti pričvrsnik, transportni položaj upravljača
6 Bravica, poklopac rezervoara za prljavu vodu
7 Poklopac rezervoara za prljavu vodu
8 Rezervoar prljave vode
9 Ručka za nošenje rezervoara za prljavu vodu
10 Obrtna ručka pritiska naleganja četki (1=min., 4=maks.)
11 Letvica za distribuciju vode
12 dugme za odglavljivanje, valjkasta četka
13 Valjkasta četka
14 Rezervoar za grubu prljavštinu
15 Papučica dizača usisnih konzola
16 Usisna konzola
17 Indikator napunjenosti rezervoara sveže vode
18 Spojnica, ispuštanje sveže vode
19 Udubljenje za nogu
20 Indikator punjenja akumulatora
21 Obrtne kukice za kačenje kabla
22 Sigurnosni prekidač
1 Doziranje rastvora deterdženta
2 Prekidač za rastvor deterdženta
3 Indikator nanošenja rastvora deterdženta
4 Indikator usisavanja Zeleno: Usisna turbina radi Treperi narandžasto: Usisna turbina je preopterećena
5 Indikator pogona četki Zeleno: Četka se vrti Treperi narandžasto: Četka je preopterećena
6 Indikator stanja akumulatora Zeleno: Baterija je napunjena Narandžasto: Baterija je gotovo prazna Crveno: Uređaj se isključuje - napunite bateriju
7 Indikator "Eco mode"
8 Prekidač "Eco Mode"
9 Prekidač uređaja
Pre upotrebe
Punjenje akumulatora
Napomena:
Uređaj je opremljen zaštitom od potpunog pražnjenja akumulatora što znači da se isključuje pri dostizanju minimalnog kapaciteta. Vreme punjenja akumulatora iznosi oko 3 sata. Punjač samostalno završava postupak punjenja.
Ako je to potrebno, uređaj se može opet koristiti i pre nego što se baterija napuni do kraja.
→ Strujni utikač utaknite u utičnicu.
Indikator punjenja akumulatora

1 Akumulator je napunjen (zeleno)
2 Baterija se puni (žuto, treperi)
3 Smetnja (crveno)
Rad
→ Otpustite zvezdasti pričvrsnik za transportni položaj.
1 Spojnica, ispuštanje sveže vode
2 Indikator napunjenosti rezervoara sveže vode
→ Gurnite spojnicu na dole.
→ Skinite crevo na pokazivaču napunjenosti i zakrenite na dole.
Zaštita od mraza
U slučaju opasnosti od mraza:
2006/42/EZ (+2009/127/EZ)
2014/30/EU
2011/65/EU
2014/53/EU (TCU)
Chairman of the Board of Management
S. Reiser
Director Regulatory Affairs & Certification
Opunomoćeni za izradu dokumentacije: S. Reiser
Alfred Kärcher SE & Co. KG
71364 Winnenden (Germany)
Tel.: +49 7195 14-0
Fax: +49 7195 14-2212
Winnenden, 2021/02/01

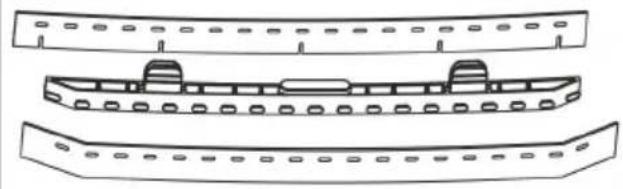
1 Винт
2 Капак
Chairman of the Board of Management
S. Reiser
Director Regulatory Affairs & Certification
71364 Winnenden (Germany)
Tel.: +49 7195 14-0
Fax: +49 7195 14-2212
Winnenden, 2021/02/01

1 Puhta vee filter
2 Ebemesõel
1 Puhta vee filter 2 Ebemesõel
1 Kruvi
2 Kaas
Chairman of the Board of Management
Director Regulatory Affairs & Certification
71364 Winnenden (Germany)
Tel.: +49 7195 14-0
Fax: +49 7195 14-2212
Winnenden, 2021/02/01

1 Tīrā ūdens filtrs
2 Škiedru filtrs
1 Skrūve
2 Vāks
Chairman of the Board of Management
Director Regulatory Affairs & Certification
71364 Winnenden (Germany)
Tel.: +49 7195 14-0
Fax: +49 7195 14-2212
Winnenden, 2021/02/01

1 Švaraus vandens filtras
2 Filtro tinklelis
1 Varžtas
2 Dangtis
Chairman of the Board of Management
Director Regulatory Affairs & Certification
71364 Winnenden (Germany)
Tel.: +49 7195 14-0
Fax: +49 7195 14-2212
Winnenden, 2021/02/01

1 Гвинт
2 Кришка
Chairman of the Board of Management
S. Reiser
Director Regulatory Affairs & Certification
71364 Winnenden (Germany)
Tel.: +49 7195 14-0
Fax: +49 7195 14-2212
Winnenden, 2021/02/01
اليانيات الفنية
1j
2c
←.
←.
←.
Achrij الطارية.
1 فلاتر المياه炎症
2 فلاتر الوير
←.
←.
1ä
2c
←,
←
إلى أسفل.
الënظيف
1
2
3.
4.
THANK YOU!
MERCI! DANKE! iGRACIAS!

Register your product and benefit from many advantages.
www.kaercher.com/welcome


Rate your product and tell us your opinion.
www.kaercher.com/dealersearch
Alfred Kärcher SE & Co. KG
Alfred-Kärcher-Str. 28-40
71364 Winnenden (Germany)
Tel.: +49 7195 14-0
Fax: +49 7195 14-2212

- CONTENTS
- SAFETY INSTRUCTIONS
- ⚠ WARNING
- HAZARD LEVELS
- ⚠️DANGER
- △CAUTION
- ATTENTION
- INFORMATION ON BATTERY (ACCUMULATOR) AND CHARGER
- SAFETY INSTALLATIONS
- FUNCTION
- PROPER USE
- ENVIRONMENTAL PROTECTION
- INFORMATION ON INGREDIENTS (REACH)
- ACCESSORIES AND SPARE PARTS
- OPERATING ELEMENTS
- BEFORE STARTUP
- CHARGING BATTERY
- NOTE
- BATTERY CHARGING DISPLAY
- OPERATION
- FILLING IN DETERGENTS
- SETTINGS
- CLEANING
- SHUTTING DOWN THE APPLIANCE
- EMPTYING THE WASTE WATER TANK
- EMPTYING THE FRESH WATER TANK
- FROST PROTECTION
- FOLDING DOWN THE STEERING COLUMN
- SHUTTING DOWN
- TRANSPORT
- STORAGE
- CARE AND MAINTENANCE
- MAINTENANCE SCHEDULE
- AFTER THE WORK
- WEEKLY
- MONTHLY
- YEARLY
- MAINTENANCE WORKS
- REPLACING THE SUCTION LIPS
- REPLACING THE BRUSH ROLLER
- MAINTENANCE CONTRACT
- DISPOSAL
- REMOVING THE BATTERY
- FAULTS
- ACCESSORIES
- TECHNICAL SPECIFICATIONS
- EU DECLARATION OF CONFORMITY
- RELEVANT EU DIRECTIVES
- APPLIED HARMONIZED STANDARDS
- APPLIED NATIONAL STANDARDS
- TCU
- DECLARATION OF CONFORMITY
- CURRENTLY APPLICABLE UK REGULATIONS
- APPLIED DESIGNATED STANDARDS
- NORME ARMONIZATE UTILIZE
- OCHRANA PROTI ZAMRZNUTIU
- PREGLED SADRŽAJA
- SIGURNOSNI NAPUCI
- ⚠UPOZORENJE
- STUPNJEVI OPASNOSTI
- ⚠ OPASNOST
- SMETNJE
- PRE UPOTREBE
- PUNJENJE AKUMULATORA
- NAPOMENA
- RAD
- ZAŠTITA OD MRAZA
- الËNظيف
- THANK YOU
- MERCI! DANKE! IGRACIAS
Brand : Kärcher
Model : BR 3512 C Bp
Category : Floor cleaner