AF 100 - Air purifier Kärcher - Free user manual and instructions
Find the device manual for free AF 100 Kärcher in PDF.
User questions about AF 100 Kärcher
0 question about this device. Answer the ones you know or ask your own.
Ask a new question about this device
Download the instructions for your Air purifier in PDF format for free! Find your manual AF 100 - Kärcher and take your electronic device back in hand. On this page are published all the documents necessary for the use of your device. AF 100 by Kärcher.
USER MANUAL AF 100 Kärcher
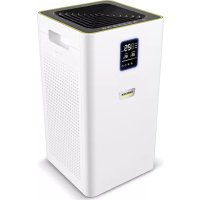
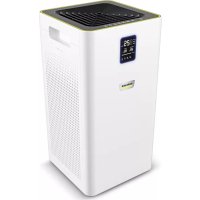
natural_image
Exterior view of a KARCHER air purifier with digital display and ventilation grille (no text or symbols on main body)Deutsch 5
English 9
Français 13
Italiano 17
Nederlands 21
Español 25
Português 29
Dansk 33
Norsk 37
Svenska 41
Suomi 45
Ελληνικά 49
Türkçe 53
Русский 57
Magyar 62
Čeština 66
Slovenščina 70
Polski 74
Românește 78
Slovenčina 82
Hrvatski 86
Srpski 90
Български 94
Eesti 98
Latviešu 102
Lietuviškai 106
Українська 110

flowchart
graph LR
    A["Step 1: Lifting down"] --> B["Step 2: Cutting down"]
    B --> C["Step 3: Cutting down"]
    C --> D["Step 4: Recycling into trash can be used"]
    D --> E["Step 5: Discharge into a bin with leaves"]
    E --> F["Step 6: Discharge into a bin with leaves"]
    F --> G["Step 7: Discharge into a bin with leaves"]
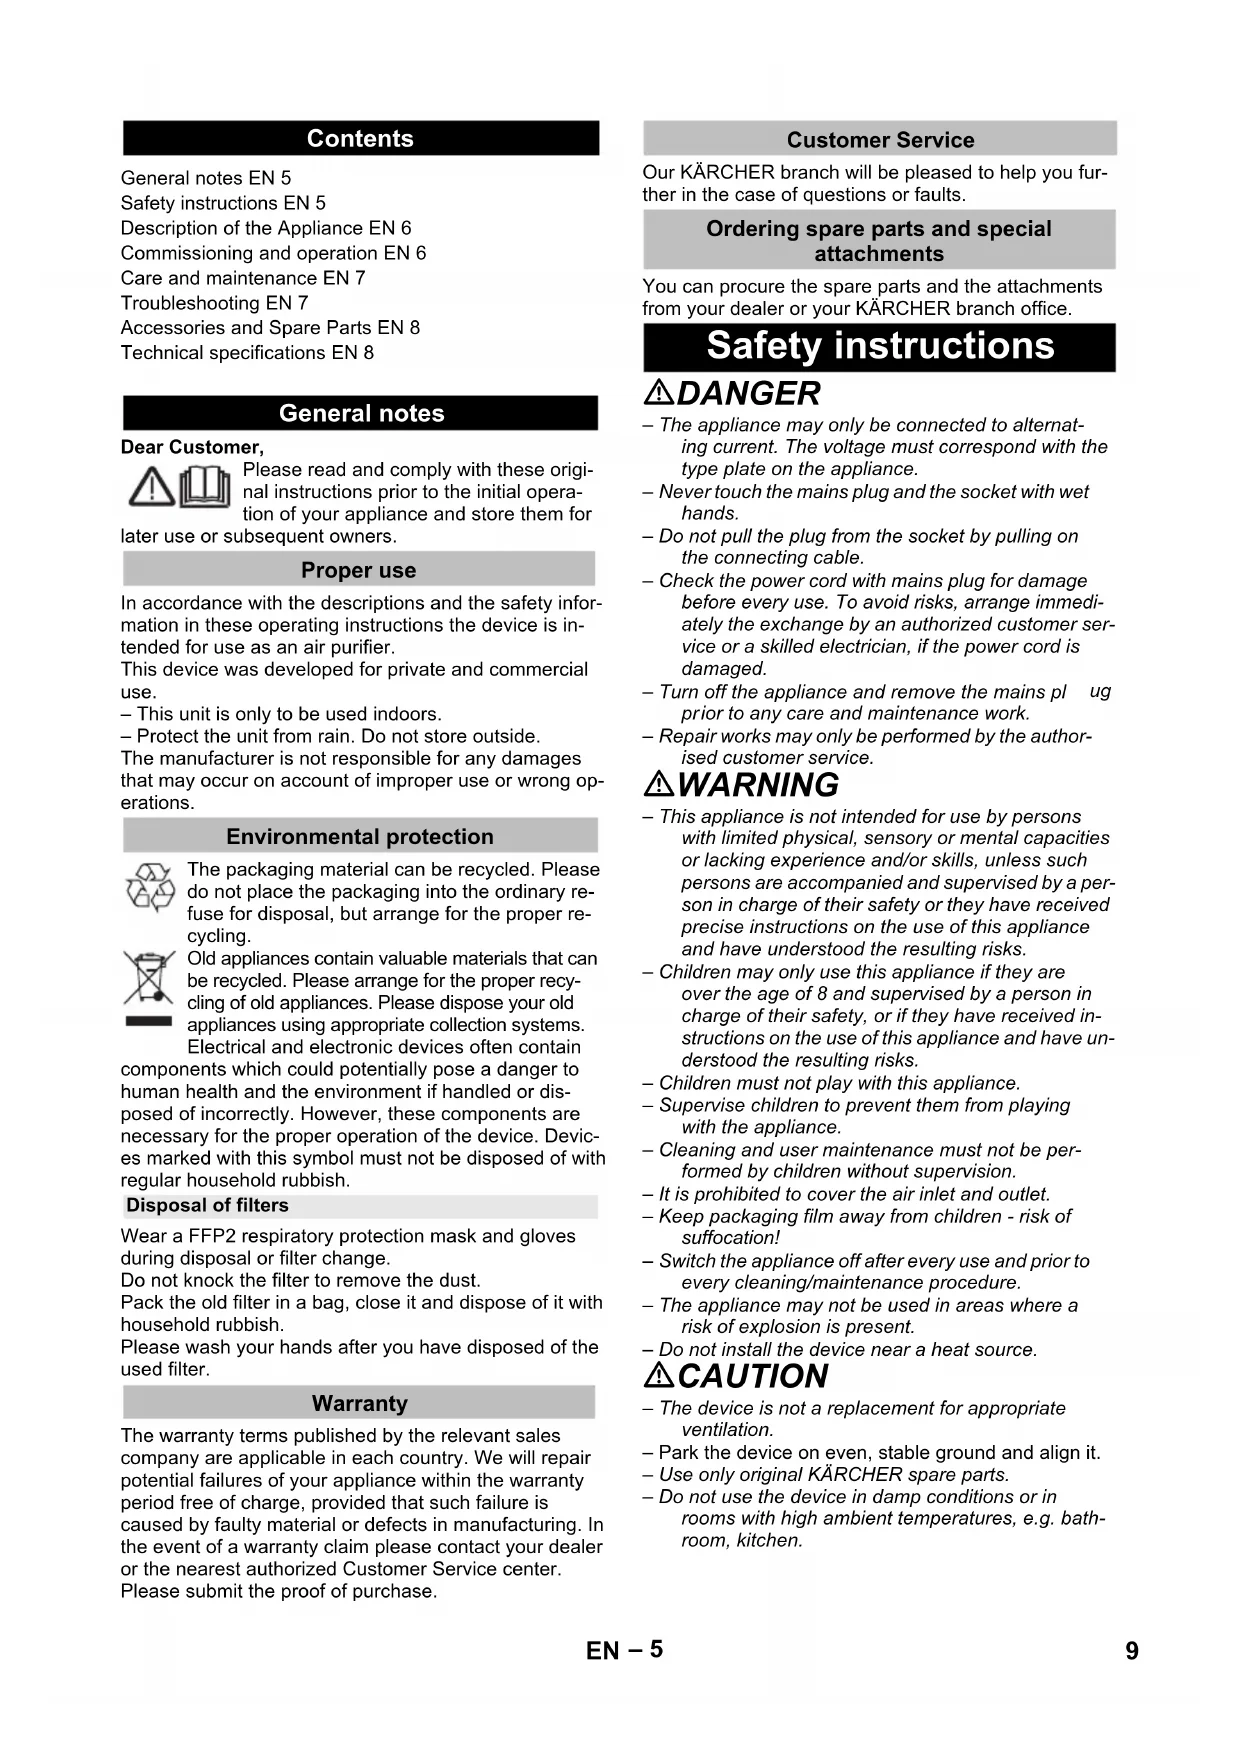
Inhaltsverzeichnis
Description of the Appliance EN 6
Commissioning and operation EN 6
Care and maintenance EN 7
Troubleshooting EN 7
Accessories and Spare Parts EN 8
Technical specifications EN 8
General notes
Dear Customer,
Please read and comply with these original instructions prior to the initial operation of your appliance and store them for
later use or subsequent owners.
Proper use
In accordance with the descriptions and the safety information in these operating instructions the device is intended for use as an air purifier.
This device was developed for private and commercial use.
- This unit is only to be used indoors.
- Protect the unit from rain. Do not store outside.
The manufacturer is not responsible for any damages that may occur on account of improper use or wrong operations.
Environmental protection

The packaging material can be recycled. Please do not place the packaging into the ordinary refuse for disposal, but arrange for the proper recycling.
Old appliances contain valuable materials that can be recycled. Please arrange for the proper recycling of old appliances. Please dispose your old appliances using appropriate collection systems.
Electrical and electronic devices often contain
components which could potentially pose a danger to human health and the environment if handled or disposed of incorrectly. However, these components are necessary for the proper operation of the device. Devices marked with this symbol must not be disposed of with regular household rubbish.
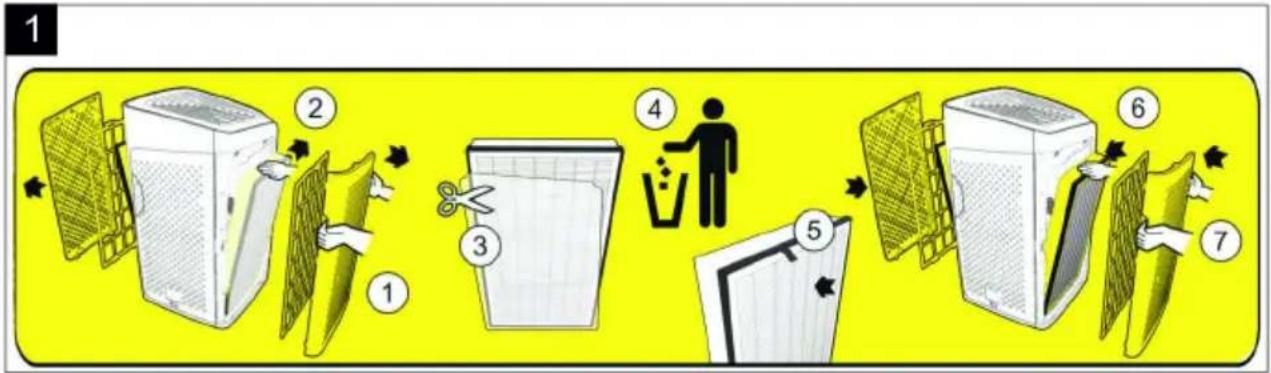
Disposal of filters
Wear a FFP2 respiratory protection mask and gloves during disposal or filter change.
Do not knock the filter to remove the dust.
Pack the old filter in a bag, close it and dispose of it with household rubbish.
Please wash your hands after you have disposed of the used filter.
Warranty
The warranty terms published by the relevant sales company are applicable in each country. We will repair potential failures of your appliance within the warranty period free of charge, provided that such failure is caused by faulty material or defects in manufacturing. In the event of a warranty claim please contact your dealer or the nearest authorized Customer Service center. Please submit the proof of purchase.
Customer Service
Our KÄRCHER branch will be pleased to help you further in the case of questions or faults.
Ordering spare parts and special attachments
You can procure the spare parts and the attachments from your dealer or your KÄRCHER branch office.
Safety instructions
⚠️DANGER
- The appliance may only be connected to alternating current. The voltage must correspond with the type plate on the appliance.
- Never touch the mains plug and the socket with wet hands.
- Do not pull the plug from the socket by pulling on the connecting cable.
- Check the power cord with mains plug for damage before every use. To avoid risks, arrange immediately the exchange by an authorized customer service or a skilled electrician, if the power cord is damaged.
- Turn off the appliance and remove the mains plug prior to any care and maintenance work.
– Repair works may only be performed by the authorised customer service.
⚠ WARNING
- This appliance is not intended for use by persons with limited physical, sensory or mental capacities or lacking experience and/or skills, unless such persons are accompanied and supervised by a person in charge of their safety or they have received precise instructions on the use of this appliance and have understood the resulting risks.
- Children may only use this appliance if they are over the age of 8 and supervised by a person in charge of their safety, or if they have received instructions on the use of this appliance and have understood the resulting risks.
– Children must not play with this appliance.
– Supervise children to prevent them from playing with the appliance. - Cleaning and user maintenance must not be performed by children without supervision.
- It is prohibited to cover the air inlet and outlet.
- Keep packaging film away from children - risk of suffocation!
- Switch the appliance off after every use and prior to every cleaning/maintenance procedure.
- The appliance may not be used in areas where a risk of explosion is present.
- Do not install the device near a heat source.
⚠️ CAUTION
- The device is not a replacement for appropriate ventilation.
– Park the device on even, stable ground and align it.
– Use only original KÄRCHER spare parts. - Do not use the device in damp conditions or in rooms with high ambient temperatures, e.g. bathroom, kitchen.
Hazard levels
⚠️DANGER
Pointer to immediate danger, which leads to severe injuries or death.
⚠ WARNING
Pointer to a possibly dangerous situation, which can lead to severe injuries or death.
⚠CAUTION
Pointer to a possibly dangerous situation, which can lead to minor injuries.
ATTENTION
Pointer to a possibly dangerous situation, which can lead to property damage.
Description of the Appliance
When unpacking the product, make sure that no accessories are missing and that none of the package contents have been damaged. If you detect any transport damages please contact your dealer.
Illustrations on fold-out page!
1 Filter cover, front
2 Pre-filter
3 Main filter
4 Filter cover, rear
5 Air outlet
6 Digital display
7 Operating field
8 Air quality display
9 Filter cover handle
10 Air quality sensor cover
11 Main Supply
12 On/off operation button
13 Manual mode operation button
14 Automatic mode operation button
15 Night mode operation button
16 Change filter indicator
Commissioning and operation
ATTENTION
Always operate the device with pre-filters and fine filters installed.
Initial startup
Illustration 1
→ Before initial start up, the fine filters already installed in the unit must be unpacked.
Start up
→ Plug the mains connection into the device
→ Insert the mains plug into a socket. All operation buttons on the control panel and the air quality display light up briefly and go out again.
→ Press the on/off operation button in order to switch the device on.
Note
- When the device is switched on, the integrated air quality sensor automatically measures the air quality in the room.
- Set the desired mode by pressing the appropriate operation button on the control panel.
Operating field
Automatic mode
When automatic mode is activated, the device selects the appropriate fan speed for the measured air quality.
→ Press the on/off operation button in order to switch the device on.
→ Press the automatic mode operation button.
→ The corresponding button lights up.
Note
- The integrated air quality sensor measures the air quality and automatically selects the right speed level to ensure the best possible air quality in the room.
- As soon the air is clean, the device switches to low fan speed.
Manual mode
When manual mode is activated, you can manually set the fan speed.
→ Press the on/off operation button in order to switch the device on.
→ Press the manual mode operation button.
→ The corresponding button lights up.
Note
- By pressing the button several times, the fan speed can be set in three speeds.
Control panel and display elements are switched off when night mode is activated.
The unit continues to operate and the fan speed switches to the lowest level.
The unit's lighting is re-activated by touching the control panel.
→ Press the on/off operation button in order to switch the device on.
→ Press the night mode operation button.
→ The corresponding button lights up.
→ Control panel and display elements switch off with a time delay.
Air quality display
→ Press the on/off operation button in order to switch the device on.
Air quality display is lit:
Blue: Very good air quality (PM2.5 under 60 g/m ^3 )
Yellow: Mediocre air quality (Pm2.5 between 60 and 160 g/m ^3 )
Red: Bad air quality (PM2.5 over 160 g/m ^3 )
Digital display
- Displays the current value of the fine dust content (PM2.5).
– Displays the remaining run time of the filter as a percentage.
Filter lifespan
Note
- The filter lifespan depends on daily usage pattern and the air quality.
- Regardless of the indicator, an annual filter change is recommended for reasons of hygiene.
Change filter indicator
If the filter change indicator lights up: see care and service.
Note
- The filter change indicator flashes at 2x per second if the filter remaining run time is less than 72 hours.
– The filter change indicator lights up continuously when the end of the filter service life is reached. The appliance continues to work.
– In areas with predominantly high humidity (> 60%), there may be odour generation on the filter. In such cases, we recommend replacing the filters sooner.
Finish operation
→ Press the on/off operation button to switch the device off.
Storing the appliance
→ Store the appliance in a dry room.
Care and maintenance
→ First remove the mains plug before doing any job on the device
→ Wipe off the device with a dry soft cloth.
→ If necessary, clean the pre-filter.
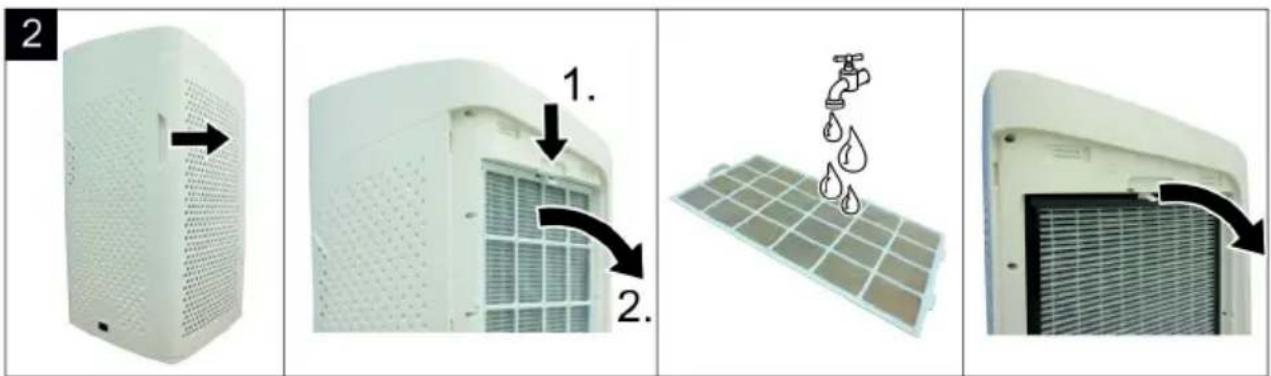
Filter replacement
If the filter change indicator lights up:
Illustration 2
→ Open and remove the filter covers with the handles.
→ Clean the pre-filter when installed (e.g. with a vacuum cleaner or suction brush).
→ Unlock and then remove the pre-filter.
→ Remove the main filter at the grab tab from the device.
Note
- Both pre-filters always have to be cleaned.
– The pre-filter is washable. - Both main filters always have to be renewed.
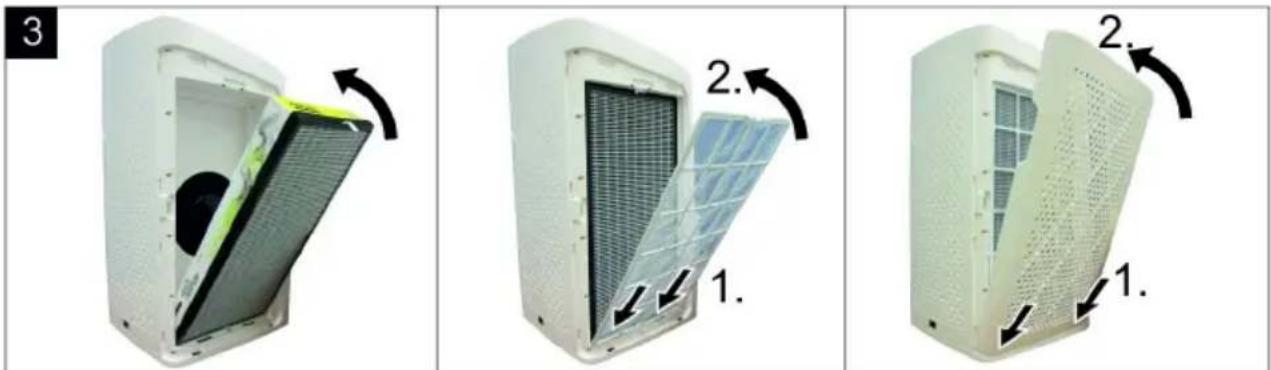
Illustration 3
→ Take the main filter out of the packaging.
→ Fit the main filter into the device. The grab tab should be visible from the outside.
→ Insert the guide noses of the pre-filter in the lower recesses.
→ Carefully lock the pre-filter at the top and at the sides.
→ Insert the guide noses of the filter cover in the lower recesses.
→ Close the filter cover from above.
Reset filter change indicator
To reset the filter change indicator to 100% filter lifespan after a filter change, the filter change indicator button must be pressed for 5 seconds in standby mode.
Note
- The filter change indicator button does not light up until the end of the calculated filter service life has been reached. To reset the filter runtime to 100% in advance, the filter change indicator button must be pressed for 5 seconds.
- Since the position of the unlit button is difficult to see, the position can be made visible by unplugging and plugging in the mains plug. The button lights up briefly so that you can remember the position.
Troubleshooting
Appliance is not running
→ Plug in the power cord.
→ Close the filter cover.
→ Should the error continue to exist:
Do not press the on/off operation button again.
Contact customer service.
Air quality does not improve
→ Make sure that all filters have been inserted correctly.
Airflow from the air outlet is no longer so strong
→ Clean pre-filter.
Accessories and Spare Parts
| Filter type Part number | Application | |
| Universal Solution(Standard equipment for 1.024-810.0) | 2.863-029.0 | Cleans all harmful substances from the air, improves indoor air quality comprehensively. |
| Allergy Solution | 2.863-030.0 | Effectively removes allergens such as pollen, mites, hair and smells suitable for people suffering from allergy. |
| TVOC Solution | 2.863-032.0 | Filters harmful gases, such as formaldehyde, effectively. Suitable for refurbished rooms, e.g. with new furniture and carpet. |
| Smog Solution | 2.863-033.0 | Effectively removes harmful particles from the air, applicable for indoor air quality improvement in smog weather. |
| Health Solution | 2.863-034.0 | Effectively withholds bacteria that lingers in the air and effectively prohibits bacteria from further spread and grow, suitable flue season or people with health problems. |
| High Protect 13 Solution(Standard equipment for 1.024-812.0) | 2.863-038.0 | Filters dust, fine dust, particles, aerosols, pathogens and viruses. Additional antibacterial silver ion coating of the filter material, eliminates germs and bacteria. Additionally with an activated carbon layer to filter odours, chemical vapours, VOCs and other harmful substances. The filter material of the HEPA filter corresponds to filter class H13 (HEPA 13). |
| HEPA 14 Solution | 2.863-035.0 | Filters dust, fine dust, particles, aerosols, pathogens and viruses. The H14 (HEPA 14) filter is individually tested and certified in accordance with DIN EN 1822. Suitable for particularly sensitive and vulnerable areas (medical sector, nursing, medical practices). |
Technical specifications
| Mains voltage 220 - 240 V~ | ||
| Frequency 50 - 60 Hz | ||
| Intake performance | ||
| Standby | <1 | W |
| Night mode | 5 | W |
| Level 1 | 12 | W |
| Level 2 | 30 | W |
| Level 3 | 80 | W |
| Dimensions | ||
| Depth | 380 | mm |
| Width | 380 | mm |
| Height | 713 | mm |
| Weight (including all attachments) 14 kg | ||
| Sound power level L_WA | ||
| Stage 1 / night mood | 44 | dB(A) |
| Level 2 | 55 | dB(A) |
| Level 3 | 66 | dB(A) |
Subject to technical modifications!
Table des matières
Contacter le service client.
Mult stimate client,
natural_image
Black thumbs-up icon on white background (no text or symbols)THANK YOU!
MERCI! DANKE! iGRACIAS!

Register your product and benefit from many advantages.
www.kaercher.com/welcome


Rate your product and tell us your opinion.
natural_image
Icon showing a gear and wrench inside a square frame (no text or symbols)www.kaercher.com/dealersearch
Alfred Kärcher SE & Co. KG
Alfred-Kärcher-Str. 28-40
71364 Winnenden (Germany)
Tel.: +49 7195 14-0
Fax: +49 7195 14-2212