
AF 100 H13 - Air purifier Kärcher - Free user manual and instructions
Find the device manual for free AF 100 H13 Kärcher in PDF.
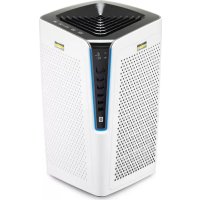



| Product type | Air purifier |
| Brand | Kärcher |
| Model | AF 100 H13 |
| Intended use | Indoor, private and industrial use |
| Filtration class | HEPA 13 (H13) |
| Dimensions (W x D x H) | 380 x 380 x 713 mm |
| Weight | 14 kg |
| Supply voltage | 220-240 V~, 50-60 Hz |
| Power consumption (standby) | < 1 W |
| Power consumption (night mode) | 5 W |
| Power consumption (level 1) | 12 W |
| Power consumption (level 2) | 30 W |
| Power consumption (level 3) | 80 W |
| Sound level (night mode / level 1) | 44 dB(A) |
| Sound level (level 2) | 55 dB(A) |
| Sound level (level 3) | 66 dB(A) |
| Operating modes | Automatic, Manual, Night |
| Display | Air quality (PM2.5) and filter life |
| Available filter types | Universal, Allergy, TVOC, Smog, Health, High Protect 13, HEPA 14 |
| Pre-filter maintenance | Vacuum cleaning or washable |
| Main filter replacement | Annually or according to indicator |
| Warranty | According to country conditions |
| After-sales service | Kärcher branch |
Frequently Asked Questions - AF 100 H13 Kärcher
User questions about AF 100 H13 Kärcher
0 question about this device. Answer the ones you know or ask your own.
Ask a new question about this device
Download the instructions for your Air purifier in PDF format for free! Find your manual AF 100 H13 - Kärcher and take your electronic device back in hand. On this page are published all the documents necessary for the use of your device. AF 100 H13 by Kärcher.
USER MANUAL AF 100 H13 Kärcher
Description of the Appliance EN 6
Commissioning and operation EN 6
Care and maintenance EN 7
Troubleshooting EN 7
Accessories and Spare Parts EN 8
Technical specifications EN 8
General notes
Dear Customer,

Please read and comply with these original instructions prior to the initial operation of your appliance and store them for later use or subsequent owners.
later use or subsequent owners.
Proper use
In accordance with the descriptions and the safety information in these operating instructions, the device is intended for use as an air purifier.
This device was developed for private and commercial use.
- This unit is only to be used indoors.
- Protect the unit from rain. Do not store outside.
The manufacturer is not responsible for any damages that may occur on account of improper use or wrong operations.
Environmental protection

The packaging material can be recycled. Please do not place the packaging into the ordinary refuse for disposal, but arrange for the proper recycling.
Old appliances contain valuable materials that can be recycled. Please arrange for the proper recycling of old appliances. Please dispose your old appliances using appropriate collection systems. Electrical and electronic devices often contain
components which could potentially pose a danger to human health and the environment if handled or disposed of incorrectly. However, these components are necessary for the proper operation of the device. Devices marked with this symbol must not be disposed of with regular household rubbish.
Disposal of filters
Wear a FFP2 respiratory protection mask and gloves during disposal or filter change.
Do not knock the filter to remove the dust.
Pack the old filter in a bag, close it and dispose of it with household rubbish.
Please wash your hands after you have disposed of the used filter.
Warranty
The warranty terms published by the relevant sales company are applicable in each country. We will repair potential failures of your appliance within the warranty period free of charge, provided that such failure is caused by faulty material or defects in manufacturing. In the event of a warranty claim please contact your dealer or the nearest authorized Customer Service center. Please submit the proof of purchase.
Customer Service
Our KÄRCHER branch will be pleased to help you further in the case of questions or faults.
Ordering spare parts and special attachments
You can procure the spare parts and the attachments from your dealer or your KÄRCHER branch office.
Safety instructions
DANGER
- The appliance may only be connected to alternating current. The voltage must correspond with the type plate on the appliance.
- Never touch the mains plug and the socket with wet hands.
- Do not pull the plug from the socket by pulling on the connecting cable.
- Check the power cord with mains plug for damage before every use. To avoid risks, arrange immediately the exchange by an authorized customer service or a skilled electrician, if the power cord is damaged.
- Turn off the appliance and remove the mains plug prior to any care and maintenance work.
- Repair works may only be performed by the authorised customer service.
WARNING
- This appliance is not intended for use by persons with limited physical, sensory or mental capacities or lacking experience and/or skills, unless such persons are accompanied and supervised by a person in charge of their safety or they have received precise instructions on the use of this appliance and have understood the resulting risks.
- Children may only use this appliance if they are over the age of 8 and supervised by a person in charge of their safety, or if they have received instructions on the use of this appliance and have understood the resulting risks.
- Children must not play with this appliance. Supervise children to prevent them from playing with the appliance.
- Cleaning and user maintenance must not be performed by children without supervision.
- It is prohibited to cover the air inlet and outlet.
- Keep packaging film away from children - risk of suffocation!
- Switch the appliance off after every use and prior to every cleaning/maintenance procedure.
- The appliance may not be used in areas where a risk of explosion is present.
- Do not install the device near a heat source.
CAUTION
- The device is not a replacement for appropriate ventilation.
- Park the device on even, stable ground and align it.
- Use only original KÄRCHER spare parts.
- Do not use the device in damp conditions or in rooms with high ambient temperatures, e.g. bathroom, kitchen.
Hazard levels
△DANGER
Pointer to immediate danger, which leads to severe injuries or death.
WARNING
Pointer to a possibly dangerous situation, which can lead to severe injuries or death.
CAUTION
Pointer to a possibly dangerous situation, which can lead to minor injuries.
ATTENTION
Pointer to a possibly dangerous situation, which can lead to property damage.
Description of the Appliance
When unpacking the product, make sure that no accessories are missing and that none of the package contents have been damaged. If you detect any transport damages please contact your dealer.
Illustrations on fold-out page!

1 Filter cover, front 2 Pre-filter 3 Main filter 4 Filter cover, rear 5 Air outlet 6 Digital display 7 Operating field 8 Air quality display 9 Filter cover handle 10 Air quality sensor cover 11 Main Supply 12 On/off operation button 13 Manual mode operation button 14 Automatic mode operation button 15 Night mode operation button 16 Change filter indicator
Commissioning and operation
ATTENTION
Always operate the device with pre-filters and fine filters installed.
Initial startup
Illustration 1
Before initial start up, the fine filters already installed in the unit must be unpacked.
Start up
Plug the mains connection into the device, then insert the mains plug into a socket. All operation buttons on the control panel and the air quality display light up briefly and go out again. Press the on/off operation button to switch the device on.
Note
- When the device is switched on, the integrated air quality sensor automatically measures the air quality in the room.
- Set the desired mode by pressing the appropriate operation button on the control panel.
Operating field
Automatic mode
When automatic mode is activated, the device selects the appropriate fan speed for the measured air quality.
Press the on/off operation button to switch the device on. Press the automatic mode operation button. The corresponding button lights up.
Note
- The integrated air quality sensor measures the air quality and automatically selects the right speed level to ensure the best possible air quality in the room.
- As soon as the air is clean, the device switches to low fan speed.
Manual mode
When manual mode is activated, you can manually set the fan speed.
Press the on/off operation button to switch the device on. Press the manual mode operation button. The corresponding button lights up.
Note
- By pressing the button several times, the fan speed can be set to one of three speeds.
Control panel and display elements are switched off when night mode is activated.
The unit continues to operate and the fan speed switches to the lowest level.
The unit's lighting is re-activated by touching the control panel.
Press the on/off operation button to switch the device on. Press the night mode operation button. The corresponding button lights up. Control panel and display elements switch off with a time delay.
Air quality display
Press the on/off operation button to switch the device on.
Air quality display is lit:
Blue: Very good air quality (PM2.5 under 60 μg/m³)
Yellow: Mediocre air quality (PM2.5 between 60 and 160 μg/m³)
Red: Bad air quality (PM2.5 over 160 μg/m³)
Digital display
- Displays the current value of the fine dust content (PM2.5).
- Displays the remaining run time of the filter as a percentage.
Filter lifespan
Note
- The filter lifespan depends on daily usage pattern and the air quality.
- Regardless of the indicator, an annual filter change is recommended for reasons of hygiene.
Change filter indicator
If the filter change indicator lights up: see care and service.
Note
- The filter change indicator flashes at 2 times per second if the filter remaining run time is less than 72 hours.
- The filter change indicator lights up continuously when the end of the filter service life is reached. The appliance continues to work.
- In areas with predominantly high humidity (>60%), there may be odour generation on the filter. In such cases, we recommend replacing the filters sooner.
Finish operation
Press the on/off operation button to switch the device off.
Storing the appliance
Store the appliance in a dry room.
Care and maintenance
First remove the mains plug before doing any job on the device. Wipe off the device with a dry soft cloth. If necessary, clean the pre-filter.
Filter replacement
If the filter change indicator lights up:
Illustration 2
Open and remove the filter covers with the handles. Clean the pre-filter when installed (e.g. with a vacuum cleaner or suction brush). Unlock and then remove the pre-filter. Remove the main filter at the grab tab from the device.
Note
- Both pre-filters always have to be cleaned.
- The pre-filter is washable.
- Both main filters always have to be renewed.
Illustration 3
Take the main filter out of the packaging. Fit the main filter into the device. The grab tab should be visible from the outside. Insert the guide noses of the pre-filter in the lower recesses. Carefully lock the pre-filter at the top and at the sides. Insert the guide noses of the filter cover in the lower recesses. Close the filter cover from above.
Reset filter change indicator
To reset the filter change indicator to 100% filter lifespan after a filter change, the filter change indicator button must be pressed for 5 seconds in standby mode.
Note
- The filter change indicator button does not light up until the end of the calculated filter service life has been reached. To reset the filter runtime to 100% in advance, the filter change indicator button must be pressed for 5 seconds.
- Since the position of the unlit button is difficult to see, the position can be made visible by unplugging and plugging in the mains plug. The button lights up briefly so that you can remember the position.
Troubleshooting
Appliance is not running
-> Plug in the power cord. -> Close the filter cover. -> Should the error continue to exist: Do not press the on/off operation button again. Contact customer service.
Air quality does not improve
-> Make sure that all filters have been inserted correctly.
Airflow from the air outlet is no longer so strong
-> Clean pre-filter.
Accessories and Spare Parts
| Filter type Part number | Application | |
| Universal Solution (Standard equipment for 1.024-810.0) | 2.863-029.0 C | Cleans all harmful substances from the air, improves indoor air quality comprehensively. |
| Allergy Solution | 2.863-030.0 | Effectively removes allergens such as pollen, mites, hair and smells suitable for people suffering from allergy. |
| TVOC Solution | 2.863-032.0 | Filters harmful gases, such as formaldehyde, effectively. Suitable for refurb-bished rooms, e.g. with new furniture and carpet. |
| Smog Solution | 2.863-033.0 | Effectively removes harmful particles from the air, applicable for indoor air quality improvement in smog weather. |
| Health Solution | 2.863-034.0 | Effectively withholds bacteria that lingers in the air and effectively prohibits bacteria from further spread and grow, suitable flue season or people with health problems. |
| High Protect 13 So-lution (Standard equipment for 1.024-812.0) | 2.863-038.0 F | Filters dust, fine dust, particles, aerosols, pathogens and viruses. Additional antibacterial silver ion coating of the filter material, eliminates germs and bacteria. Additionally with an activated carbon layer to filter odours, chemical vapours, VOCs and other harmful substances. The filter material of the HEPA filter corresponds to filter class H13 (HEPA 13). |
| HEPA 14 Solution | 2.863-035.0 | Filters dust, fine dust, particles, aerosols, pathogens and viruses. The H14 (HEPA 14) filter is individually tested and certified in accordance with DIN EN 1822. Suitable for particularly sensitive and vulnerable areas (medical sector, nursing, medical practices). |
Technical specifications
| Mains voltage 220 - 240 V~ | ||
| Frequency 50 - 60 Hz | ||
| Intake performance Standby | <1 | W |
| Night mode | 5 | W |
| Level 1 | 12 | W |
| Level 2 | 30 | W |
| Level 3 | 80 | W |
| Dimensions | ||
| Depth | 380 | mm |
| Width | 380 | mm |
| Height | 713 | mm |
| Weight (including all attachments) 14 kg | ||
| Sound power level LWA | ||
| Stage 1 / night mood | 44 | dB(A) |
| Level 2 | 55 | dB(A) |
| Level 3 | 66 | dB(A) |
Subject to technical modifications!
Environmental protection

Packaging materials are recyclable. Therefore, do not throw the packaging away with household waste, but take it to one of the collection points for recyclable materials.
Old devices contain recyclable materials that must be recycled. Therefore, dispose of old devices through the appropriate waste collection systems.
Electrical and electronic devices often contain components that, if handled incorrectly or disposed of improperly, can pose a potential hazard to people and the environment. Nevertheless, these components are necessary for the proper operation of the device. Devices marked with this symbol must not be disposed of with household waste.
Disposal of the device
When replacing the FFP2 filter, use a respirator.
Do not wash the filter.
Pack the old filter in a sealed bag and dispose of it with household waste.
After disposing of the used filter, wash your hands.
Warranty
In each country, the warranty conditions issued by our authorized sales organization in that country apply. We will repair any possible malfunctions of the device free of charge during the warranty period, if they are due to material defects or manufacturing errors. In the event of a claim during the warranty period, please contact the trade organization that sold you the device or the nearest authorized service center.
The date of manufacture is shown in the factory table in coded form.
The individual digits have the following meaning:
Example: 30190
3 year of manufacture 0 decade of manufacture 1 first half of the month of manufacture 9 second half of the month of manufacture 0 first half of the month of manufacture
Thus, in this device, the number 30190 indicates the date of manufacture 09/(2)013.
Customer service
If you have any questions or problems, our KARCHER branch will be happy to help you resolve them.
Ordering spare parts and special accessories
You can obtain spare parts and accessories from your dealer or from the KARCHER branch.
Safety instructions
DANGER
- The device must only be connected to an alternating current mains supply. The voltage must correspond to the specifications on the type plate of the device. Do not touch the mains plug or socket with wet hands. Do not pull the mains cable out of the socket by pulling on the cable.
- Before starting work with the device, check the mains cable and the extension cable for damage. A damaged mains cable must be replaced immediately by an authorized customer service technician/electrician.
- When carrying out any cleaning and maintenance work on the device, it must be switched off and the mains plug must be pulled out of the socket.
- Repair work and work on electrical components may only be carried out by the authorized customer service department.
WARNING
- This device is not intended for use by persons with limited physical, sensory or mental capabilities, or with a lack of experience and/or lack of necessary knowledge, unless they are under the supervision of a person responsible for their safety or receive instructions from them on how to use the device, and also understand the risks involved.
- The device may be used by children aged 8 and above if they are under the supervision of a person responsible for their safety or have received instructions on how to use the device from such a person, and also understand the risks involved. Do not allow children to play with the device. -Make sure that children do not play with the device. Do not allow children to clean or maintain the device without supervision. Do not block the air inlet and outlet openings.
- Keep the packaging film away from children, there is a risk of suffocation!
- Choose the device to turn off after each use and before cleaning/maintenance.
- Operation of the device in explosive atmospheres is prohibited. Do not install the device near heat sources.
CAUTION
- The device does not replace adequate ventilation.
- Install the device on a stable, flat surface and level it.
- Use only original KARCHER spare parts. Do not use the device in wet conditions or in rooms with high ambient temperature, for example, in a sauna or kitchen.
DANGER LEVEL
DANGER
Indication of an imminent danger that will result in serious injury or death.
WARNING
Indication of a potentially dangerous situation that could result in serious injury or death.
CAUTION
Indication of a potentially dangerous situation that may result in minor injury.
NOTE
Indication of a potentially dangerous situation that may cause material damage.
On/off button
When unpacking the device, check its completeness and integrity. If damage is found during transportation, notify the trade organization that supplied the device.
Images. On the spread!
1 Front cover of the filter 2 Pre-filter 3 Main filter 4 Rear cover of the filter 5 Air outlet opening 6 Power cord 7 Control panel 8 Air quality indicator 9 Filter cover handles 10 Air quality sensor cover 11 Power supply 12 Control button "On/Off" 13 Control button "Manual mode" 14 Control button "Automatic mode" 15 Control button "Night mode" 16 Filter replacement indicator
Commissioning / Maintenance of the device
WARNING
Always operate the device with the pre-filter and fine filter installed.
First commissioning
Figure
Before first commissioning, it is necessary to unpack the fine filter already installed in the device.
Commissioning
Insert the power cord into the device. Insert the plug into the socket. All control buttons and the control panel light up briefly and then go out. → To turn on the device, press the "On/Off" button.
Note
- When the device is turned on, the built-in air quality sensor automatically measures the air quality in the room. - Set the required mode by pressing the corresponding button on the control panel.
Control panel
Automatic mode
When automatic mode is enabled, the device selects the fan speed corresponding to the measured air quality.
→ To turn on the device, press the “ON/OFF” button → Press the “Automatic mode” button. The corresponding indicator lights up.
Note
- The built-in air quality sensor measures the air quality and automatically selects the correct speed to ensure optimal air quality in the room.
- As soon as the air becomes clean, the device switches to a lower fan speed.
Manual mode
When manual mode is enabled, the fan speed can be set manually.
→ To turn on the device, press the “ON/OFF” button → Press the “Manual mode” button. The corresponding indicator lights up.
Note
By pressing repeatedly, you can set 3 fan speeds.
The device continues to operate, and the fan speed decreases to the lowest level.
When the control panel is touched, the device backlight activates again.
→ To turn off the device, press the “ON/OFF” button → Press the “Manual mode” button. The corresponding indicator lights up. → The control elements are deactivated with a delay.
Air quality indicator
To turn on the device, press the "ON/OFF" button.
Air quality indicator lights up:
Blue: very good air quality (PM2.5 concentration does not exceed 60 µg/m³)
Yellow: average air quality (PM2.5 concentration between 60 and 160 µg/m³)
Red: poor air quality (PM2.5 concentration exceeds 160 µg/m³)
Particle concentration
- Shows the current value of fine dust (PM2.5) content.
- Shows the remaining filter service life as a percentage.
Filter service life
Note
- The filter service life depends on daily use and air quality. Regardless of the indicator, it is recommended to change the filter for hygiene reasons.
Filter replacement indicator
If the filter replacement indicator lights up, see "Maintenance and Servicing".
Note
- If the remaining filter life is less than 72 hours, the filter replacement indicator flashes twice per second. When the filter service life expires, the filter replacement indicator lights up continuously. The device continues to operate. In areas with predominantly high air humidity (>60%), odors may form on the filter. In such cases, we recommend early replacement of the filters.
Operation
→ To turn on the device, press the "On/Off" button.
Storage of the device
Store the device in dry rooms.
Care and maintenance
→ Before carrying out any work on the device, first pull the mains plug out of the socket. → Wipe the device with a dry, soft cloth. → If necessary, clean the pre-filter.
Replacing the filter
If the filter replacement indicator lights up:
Figure 2
→ Open the filter cover by the handles. Clean the pre-filter after its installation (e.g., with a vacuum cleaner or a suction brush). Unlock upwards and remove the pre-filter. → Pull the main filter by the handle out of the device and replace it.
Note
- Always clean both pre-filters. - The pre-filter can be washed. - Always replace both main filters.
Figure 3
→ Take the main filter out of the packaging. → Insert the main filter into the device. The handle must be visible from the outside. Insert the guide projections of the pre-filter into the lower recesses. → Carefully lock the pre-filter upwards to the side. Insert the guide projections of the filter cover into the lower recesses. Close the filter cover upwards.
Reset of the filter replacement indicator
→ To reset the filter replacement indicator, press and hold the filter replacement indicator button for 5 seconds after replacing the filter.
Note
- The filter replacement indicator button does not light up until the calculated filter service life has expired. For early reset of the filter service life to 100%, press the filter replacement indicator button and hold it for 5 seconds. - Since the position of the unlit button is difficult to see, the position can be made visible by disconnecting and reconnecting the power plug. The button lights up briefly so that the position can be memorized.
Troubleshooting
The device does not work
Insert the power cable. → Close the filter cover. → If the problem persists: Do not press the power button again. Contact customer service.
Air quality does not improve
→ Check the correct installation of all filters.
The airflow at the air outlet has decreased.
Clean the pre-filter.
Spare parts
Dear customer,

Clean the pre-filter.
Troubleshooting BG7
Spare parts BG 8
Dear customers,

Before starting to use your device, please read the original instruction manual for operation carefully.
Follow it and order for better use or for special accessories.
Intended use
The device is intended for use as an air purifier according to the instructions in this operating manual and safety instructions.
This device is designed for private and industrial use.
This device is intended only for use indoors.
- The device is not a toy. Do not store it outdoors.
The manufacturer does not assume any warranty for possible damages caused by use not in accordance with the intended purpose or by improper maintenance.
Environmental protection

The packaging materials can be recycled. Do not throw the packaging into household waste, but take it to a recycling center for reuse.
Old devices contain valuable materials that are subject to recycling and can be reused. Therefore, dispose of old devices using the appropriate collection system for recycling.
Electrical and electronic devices contain components that, if handled or disposed of incorrectly, can pose a potential hazard to human health and the environment. Despite this, for proper operation of the device, these components are necessary. Devices marked with this symbol must not be disposed of with household waste.
Dispose of the filter as household waste.
During removal, respectively. Removal of the FFP2 filter respirator and protective gloves.
Do not reuse.
Place the old filter in a bag, close it, and dispose of it in household waste.
Remove the respirator only after you have removed the filter.
Warranty
In every country, the warranty conditions published by our authorized distributor apply. Possible damage to your device will be repaired free of charge within the warranty period if it is due to a material or manufacturing defect. In the warranty case, please contact your distributor or the nearest authorized customer service, presenting the proof of purchase.
Customer Service
Questions and damage to your device will be gladly handled by KARCHER.
Spare parts and special accessories
Spare parts and accessories are available from your dealer or at KARCHER.
Safety instructions
DANGER
Connect the device only to properly installed sockets. The connection must comply with the specifications on the rating plate of the device. Never touch the mains plug and socket with wet hands. - The sockets must not be exposed to splashing water. - Before every connection of the cable to the mains socket, check the cable for damage. Immediately have damaged connection cables replaced by an authorized service/electrical technician. - Before any work on the device, switch it off and remove the mains plug from the socket. - Repair work and work on electrical components may only be carried out by an authorized service.
WARNING
This appliance is not intended for use by persons with reduced physical, sensory or mental capabilities, or lack of experience and/or knowledge, unless they have been given supervision or instruction concerning use of the appliance by a person responsible for their safety. Children should not use the appliance unless they are over 8 years of age and are supervised by a person responsible for their safety. Children should not play with the appliance. Children must be supervised to ensure that they do not play with the appliance. Cleaning and user maintenance must not be performed by children without supervision. Air inlet and outlet must not be covered.
- Risk of suffocation! Keep packaging film away from children.
- The appliance must be switched off after use or before cleaning/maintenance. Operation in potentially explosive rooms is prohibited. Do not place the appliance near sources of heat.
CAUTION
- The appliance is not a substitute for proper ventilation.
- Place the appliance on a level, stable surface and secure it.
- Only use original spare parts from KÄRCHER. Do not use the appliance in damp rooms or in rooms with high temperatures, e.g., bathrooms or kitchens.
DANGER
DANGER
Indicates an imminent danger that can lead to severe injuries or death.
WARNING
Indicates a potentially dangerous situation that can lead to severe injuries or death.
CAUTION
Indicates a potentially dangerous situation that can lead to minor injuries.
ATTENTION
Instructions for possible dangerous situations that could lead to material damage.
Description of the device
When unpacking, check that the packaging and accessories are complete and that no elements are damaged. If damaged during transport, notify the dealer from whom you purchased the device.
See the diagrams on the exploded view page!

1 Filter cover 2 Pre-filter 3 Main filter 4 Filter cover O3a 5 Air outlet 6 Digital display 7 Service field 8 Air quality indicator 9 Filter cover latch 10 Sensor cover for air quality 11 Connection to the mains 12 On/Off button 13 Manual mode button 14 Automatic mode button 15 Night mode button 16 Filter replacement indicator
Start-up / Operation
WARNING
Use the device only with pre-installed filters.
First start-up
Figure 1
Before first start-up, the filters installed in the device must be unpacked.
Start-up
Connect the power cord to the device and plug it into the socket. The service buttons and the air quality indicator light up briefly and then go out. Press the On/Off button to turn on the device.
Note
- When the device is turned on, the built-in air quality sensor automatically measures the air quality in the room. - Set the desired mode by pressing the corresponding service button.
When automatic mode is activated, the device selects the appropriate speed for the fan to achieve the measured air quality.
→ Press the button ON/OFF to turn on the device. → Press the button for automatic mode. → The corresponding button lights up.
Note
-The air quality sensor measures the air quality and automatically selects the correct speed level to ensure the best possible air quality in the room. -When the air is clean, the device switches to the lowest fan speed.
Manual mode
When manual mode is activated, you can manually adjust the fan speed.
→ Press the button ON/OFF to turn on the device. → Press the button for manual mode. → The corresponding button lights up.
Note
- By repeatedly pressing the fan speed button, it can be adjusted to 3 levels.
| Инданац Claire Скорoc_STа ВентлиаТора | |
| една перka на ВENTи-латора | нісяка |
| дve перки на ВENTи-латора | срedingо |
| Три перки на ВENTлиа-тора | ВИСОКА |
Standby mode
When standby mode is activated, the elements of the control panel and the indicator elements are turned off.
The device remains in operating mode and the fan speed switches to the lowest level.
The lighting of the device is activated again upon touching the control panel.
→ Press the button to turn on/off the device. → Press the button for night mode. → The corresponding light button. The control panel elements and indicator elements are turned off with a delay.
Air quality indicator
→ Press the button to turn on/off the device.
The air quality indicator lights up:
Blue: Very good air quality (PM2.5 below 60 µg / m3
Yellow: Average air quality (PM2.5 between 60 and 160 μg/m³)
Red: Poor air quality (PM2.5 above 160 µg / m3
DIGITAL INDICATOR
- Shows the current value of the fine dust concentration (PM2.5). The display remains on the filter percentage.
Filter operating time
Note
-The filter operating time depends on the daily usage and the air quality. - Regardless of the indicator reading, it is recommended to replace the filter every year.
Filter replacement indicator
To reset the filter replacement indicator: press and hold the button.
Note
If the filter has been in operation for less than 72 hours, the filter replacement indicator will flash at 2-second intervals. If the filter's service life has been reached, the filter replacement indicator will light continuously. The device will continue to operate. In case of high ambient humidity (>60%), the filter may become clogged prematurely. In such cases, we recommend replacing the filters earlier.
End of operation
Press the ON/OFF button to turn off the device.
Storing the device
Store the device in a dry place.
Filters and maintenance
Clean the device regularly and first remove the pre-filter. Clean the device with a dry cloth. If necessary, rinse the pre-filters.
Replacing the filter
When the filter replacement indicator lights up:
Figure 2
Open the filter cover using the tabs and pull it off. Remove the pre-filter from its installed position (e.g., with a vacuum cleaner or a soft brush). Release the pre-filter from the holder and then remove it. Remove the main filter from the device by pulling it by the handle and replace it with a new one.
Note
The pre-filter should be cleaned regularly. The pre-filter can be washed. The main filters should be replaced with new ones regularly.
Figure 3
Remove the main filter from the device by pulling it by the handle. Insert the new main filter into the device. The handle must be facing up. Press the protruding parts of the pre-filter into the slots. Insert the pre-filter into the device with the handle facing up and remove it. Press the protruding parts of the filter cover into the slots. Close the filter cover.
Press the filter replacement indicator button
To reset the filter replacement indicator based on 100% filter operating time, after replacing the filter, the filter replacement indicator button must be pressed and held for 5 seconds in Standby mode.
Note
-Until the exhaust air purification filter is replaced, the filter replacement indicator button does not light up. To reset the filter replacement indicator before the filter's operating time of 100% has elapsed, the filter replacement indicator button must be pressed and held for 5 seconds. -Since it is difficult to recognize the position of the unlit button, it can be visualized by switching the device off and on. The button then lights up briefly, so the position can be identified.
Troubleshooting
Device does not work
Plug in the mains cable. Close the filter flaps. If the error persists: Do not press any buttons. Contact service.
Air quality does not improve
→ Make sure all filters are correctly installed.
Air outlet flow is no longer as strong
Service and warranty
For any questions or problems, our KARCHER branch representatives will be happy to help you.
Spare parts and special accessories
You can obtain spare parts and special accessories from your dealer or from the KARCHER branch.
Safety instructions
- Connect the device only to an alternating current socket with a voltage of 220-240 V. The voltage must correspond to the specifications on the type plate of the device. Never touch the plug of the device with wet hands. Do not pull the plug out of the socket by the cable.
- Before each use, check the device and the power cord for damage. Have damaged cables replaced by an authorized customer service/electrician. Before carrying out any work on the device or its maintenance, switch it off and pull the plug out of the socket.
- Repair work and work on electrical components may only be carried out by an authorized customer service department.
This device is not intended for use by persons with reduced physical, sensory or mental capabilities or lack of experience and/or knowledge, unless they are supervised by a person responsible for their safety or have received instructions on how to use the device and understand the risks involved. Do not allow children to play with the device. Supervise children to ensure they do not play with the device. Do not allow children to perform cleaning or maintenance of the device without supervision. Do not leave the device unattended while it is switched on. Keep the packaging film away from children, there is a risk of suffocation!
- Switch off the device after each use and before cleaning/maintenance. Operation in potentially explosive atmospheres is not permitted. Do not use the device near heat sources.
- The device is not suitable for outdoor use.
- Place the device on a stable, flat surface and level it. Use only original spare parts from KÄRCHER. Do not use the device in wet conditions or in rooms with high humidity, for example, in bathrooms or kitchens.
Safety level
DANGER
Indicates an imminent danger that will lead to serious injuries or death.
Indicates a potentially dangerous situation that could lead to serious injuries or death.
Instructions for use in case of an emergency that may cause minor injuries.
WARNING
Instructions for use in case of an emergency that may cause material damage.
Device description
When unpacking, check the contents of the packaging for the presence of the complete set. In case of damage during transport, inform your dealer about it.
See figure. On the fold-out!

1 Filter cover front 2 Pre-filter 3 Main filter 4 Filter cover rear 5 Air outlet for purified air 6 Air inlet 7 Control panel
8 Indicator light
9 Filter cover handles 10 Cover of the filter compartment 11 Power cord 12 Control button «ON/OFF» 13 Control button «Speed mode» 14 Control button «Automatic mode» 15 Control button «Night mode» 16 Filter replacement indicator
Filter replacement indicator
When the filter replacement indicator lights up: see «Care and maintenance»
Instructions
- When the filter service life reaches 72 hours, the filter replacement indicator flashes every second. - When the filter service life expires, the filter replacement indicator lights up continuously. The device continues to operate. - In regions with predominantly high air humidity (>60%), a smell may appear on the filters. In such cases, we recommend replacing the filters in advance.
Shutdown
→ HATNCHyTN KONKy «YBIMK./BIMK.》,IO6 BIMKHyTN npnCTpi.
36epirahnn npnctpoio
36epiratnpncpiB cyxnx npmiueHHax.
DorraTaTexHicHe 06cnyroByBaHHa
→ Ipeep npoBeHnHm 6yIb-kaNX po6i H aI npnJaDOM cNoaTky CJI, BNTaRHyTu WTeNCeB 3 pOeTKN. → IpoTeptn npucpiin cyxO M'koCepBeTko. 3a Heo6xiHocTi ouHCTnTn fIbTp nonepedhborO OuHJeHHra.
3amHaΦIbTpα
JaKo 3aoropEbc iHdikaTOp 3aMiHn fInbTpA:
ManIOHOK 2
→ 3a pyuKN BiIDKpNTn Ta 3HrTn KpnuKn fiNbTpY. OuHCTHTn fIbTp nonepaHbOro OuHSeHHn iicna Ioro BCTaHOBHeHHa (HaPnKla, 3a DOnOMoHO nnloocca a6o BCMOKTyIOOHoi tIKn). → Po36nokybaTn Bropi Ta 3HraTn fInbTp nonepeHb- oro OuHueHH. → BntTn OCHOBHm fJIbTp 3a HAKJaDky pyKn 3 npNCtpoTO Ta 3amHHTN.
Bka3iBka
-OuunyBaTu n cni3aBKn ObuBa pInbTpnu nonepeHbOTo OUnueHHJ. -ΦIbTp nOpeHbOro OUHHe HMA MHTN. -3amHrtnC1iD3aBxuO6nDaOCHOBHXpinbtpn.
ManIOHOK 3
→ BnHrTn OCHOBHm fJIbTp 3 ynaKOBKn. BCTaBHTN OCHOBHNI pJIbTp B npIcTpi. HaknaKa pyuKn Mae 6yTu NOMiTHa 33OBHi. BBeTn HapmHi BnCTynn fijbtpy nonepeHboro Ounuehn y HxKHi BNIMKn. O6epexKHO 3aΦikcyBaTn φiNbTp nonpeqHboro OuHJENHRA 3BepxY Ta 360ky. BBeCTn HAnpMaHb BnCTyN KpnuKn φinbtpy y HnXHi BnIMKn. → 3akpnTn Bropi KpnuKy pfInbtpy.
CkndaHn iHdkaTopa 3mHn fInbTp
→ 6 cnHytn iHnKaTOp 3amHn fIbTpHa 100% TepMHy cnyK6n fIbTppa nicra 3amHn fIbTppy, KHOKNy IHNkAToPa 3amHn fIbTppa Heo6xIDHo HATnCHTy n yTpmyBaTu npotrrom 5 cekyHd y peXmIo OiyKaBaHH.
Do not press the filter replacement indicator button until the filter service life has been activated. To reset the filter service life to 100%, press the filter replacement indicator button and hold it for 5 seconds. Since the position of the unlit button is difficult to see, it can be made visible by pressing and holding the indicator button. The button lights up briefly so that the position can be detected.
Troubleshooting
Faults
Insert the power cable. → Close the filter cover. → The error is saved: Do not press the control button "ON / OFF".
Contact customer service.
The filter cover does not close
→ Check that all filters are installed correctly.
The suction power at the filter outlet has decreased.
Clean the pre-filter.
Spare parts and accessories
Register your product and benefit from many advantages.
www.kaercher.com/welcome


Rate your product and tell us your opinion.
www.kaercher.com/dealersearch
Alfred Kärcher SE & Co. KG
Alfred-Karcher-Str. 28-40
71364 Winnenden (Germany)
Tel.: +49 7195 14-0
Fax: +49 7195 14-2212
- GENERAL NOTES
- DEAR CUSTOMER
- PROPER USE
- ENVIRONMENTAL PROTECTION
- DISPOSAL OF FILTERS
- WARRANTY
- CUSTOMER SERVICE
- ORDERING SPARE PARTS AND SPECIAL ATTACHMENTS
- SAFETY INSTRUCTIONS
- DANGER
- WARNING
- CAUTION
- HAZARD LEVELS
- △DANGER
- ATTENTION
- DESCRIPTION OF THE APPLIANCE
- ILLUSTRATIONS ON FOLD-OUT PAGE
- COMMISSIONING AND OPERATION
- INITIAL STARTUP
- ILLUSTRATION
- START UP
- NOTE
- OPERATING FIELD
- AUTOMATIC MODE
- MANUAL MODE
- AIR QUALITY DISPLAY
- AIR QUALITY DISPLAY IS LIT
- DIGITAL DISPLAY
- FILTER LIFESPAN
- CHANGE FILTER INDICATOR
- FINISH OPERATION
- STORING THE APPLIANCE
- CARE AND MAINTENANCE
- FILTER REPLACEMENT
- RESET FILTER CHANGE INDICATOR
- TROUBLESHOOTING
- APPLIANCE IS NOT RUNNING
- AIR QUALITY DOES NOT IMPROVE
- AIRFLOW FROM THE AIR OUTLET IS NO LONGER SO STRONG
- DISPOSAL OF THE DEVICE
- THE DATE OF MANUFACTURE IS SHOWN IN THE FACTORY TABLE IN CODED FORM
- EXAMPLE
- ORDERING SPARE PARTS AND SPECIAL ACCESSORIES
- DANGER LEVEL
- ON/OFF BUTTON
- IMAGES. ON THE SPREAD
- COMMISSIONING / MAINTENANCE OF THE DEVICE
- FIRST COMMISSIONING
- FIGURE
- COMMISSIONING
- CONTROL PANEL
- AIR QUALITY INDICATOR
- AIR QUALITY INDICATOR LIGHTS UP
- PARTICLE CONCENTRATION
- FILTER SERVICE LIFE
- FILTER REPLACEMENT INDICATOR
- OPERATION
- STORAGE OF THE DEVICE
- REPLACING THE FILTER
- RESET OF THE FILTER REPLACEMENT INDICATOR
- THE DEVICE DOES NOT WORK
- THE AIRFLOW AT THE AIR OUTLET HAS DECREASED
- INTENDED USE
- DISPOSE OF THE FILTER AS HOUSEHOLD WASTE
- SPARE PARTS AND SPECIAL ACCESSORIES
- DESCRIPTION OF THE DEVICE
- START-UP / OPERATION
- FIRST START-UP
- START-UP
- STANDBY MODE
- THE AIR QUALITY INDICATOR LIGHTS UP
- DIGITAL INDICATOR
- FILTER OPERATING TIME
- END OF OPERATION
- STORING THE DEVICE
- FILTERS AND MAINTENANCE
- PRESS THE FILTER REPLACEMENT INDICATOR BUTTON
- DEVICE DOES NOT WORK
- AIR OUTLET FLOW IS NO LONGER AS STRONG
- SERVICE AND WARRANTY
- SAFETY LEVEL
- DEVICE DESCRIPTION
- SEE FIGURE. ON THE FOLD-OUT
- INSTRUCTIONS
- SHUTDOWN
- EPIRAHNN NPNCTPOIO
- DORRATATEXHICHE 06CNYROBYBAHHA
- AMHAΦIBTPΑ
- MANIOHOK
- BKA3IBKA
- CKNDAHN IHDKATOPA 3MHN FINBTP
- FAULTS
- THE FILTER COVER DOES NOT CLOSE
- THE SUCTION POWER AT THE FILTER OUTLET HAS DECREASED
Brand : Kärcher
Model : AF 100 H13
Category : Air purifier