
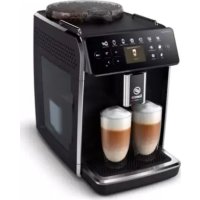
Saeco Granaroma SM6480 - Coffee maker PHILIPS - Free user manual and instructions
Find the device manual for free Saeco Granaroma SM6480 PHILIPS in PDF.
 FR
FR
 AZ
AZ
 BG
BG
 CS
CS
 DA
DA
 DE
DE
 EL
EL
 EN
EN
 ES
ES
 ET
ET
 FI
FI
 HU
HU
 HY
HY
 IT
IT
 KA
KA
 KK
KK
 KY
KY
 LT
LT
 LV
LV
 MK
MK
 NL
NL
 NO
NO
 PL
PL
 PT
PT
 RO
RO
 RU
RU
 SK
SK
 SL
SL
 SQ
SQ
 SV
SV
 TG
TG
 TK
TK
 UK
UK
 UZ
UZ
| Product type | Automatic coffee machine with built-in grinder |
| Brand | Philips |
| Model | Saeco Granaroma SM6480 |
| Water tank capacity | 1.8 liters |
| Bean hopper capacity | 300 g |
| Grounds container capacity | 12 servings |
| Milk tank capacity | 600 ml |
| Adjustable dispensing spout height | 87 to 147 mm |
| Power cord length | 1,200 mm |
| Grinder | Ceramic burr grinder with 12 adjustable grind settings |
| Water filter | AquaClean (scale reduction, manual activation) |
| Beverage functions | Whole bean, ground coffee, espresso, cappuccino, latte, hot water |
| Customization | CoffeeMaestro (taste profiles), intensity, temperature, quantity adjustment |
| Milk system | Internal cappuccinatore with steam-based HygieSteam cleaning |
| Cleaning programs | HygieSteam, Deep Milk Clean, descaling, brew group cleaning |
| Brew group | Removable, washable with water, lubrication recommended every 2 months |
| Auto-off | Adjustable: 15, 30, 60 or 180 minutes |
| Display | Icon display, navigation with arrow keys and OK button |
| User profile | Up to 5 customizable profiles + guest profile |
| Included accessories | AquaClean filter, water hardness test strip, brush, grease, measuring spoon |
Frequently Asked Questions - Saeco Granaroma SM6480 PHILIPS
User questions about Saeco Granaroma SM6480 PHILIPS
0 question about this device. Answer the ones you know or ask your own.
Ask a new question about this device
Download the instructions for your Coffee maker in PDF format for free! Find your manual Saeco Granaroma SM6480 - PHILIPS and take your electronic device back in hand. On this page are published all the documents necessary for the use of your device. Saeco Granaroma SM6480 by PHILIPS.
USER MANUAL Saeco Granaroma SM6480 PHILIPS
Personalizing drinks 10
Adjusting machine settings 11
AquaClean water filter 12
Removing and inserting the brew group 13
Cleaning and maintenance 14
Descaling procedure 16
Error codes 17
Ordering accessories 18
Troubleshooting 18
Technical specifications 23
Machine overview (Fig. A)
A1 Control panel
A2 Lid of pre-ground coffee compartment
A3 Lid of bean hopper
A4 Socket for cord
A5 Drip tray
A6 Drip tray release grip
A7 Adjustable coffee and milk dispensing spout
A8 HygieSteam container
A9 HygieSteam cover with milk tube holder
A10 Internal cappuccinatore
A11 Mains cord with plug
Accessories
A21 Milk container
A22 Milk tube
A23 Cleaning brush
A24 Grease tube
A12 Grind setting knob
A13 Bean hopper
A14 Brew group
A15 Service door
A16 Water tank
A17 Coffee grounds container
A18 Front panel of coffee grounds container
A19 Drip tray cover
A20 'Drip tray full' indicator
A25 AquaClean filter
A26 Measuring spoon
A27 Water hardness test strip
Control panel
There are two versions of this espresso machine. Their control panels look different, but all buttons and icons work in the same way. Refer to figure B for an overview of all buttons and icons. Below you find the description.
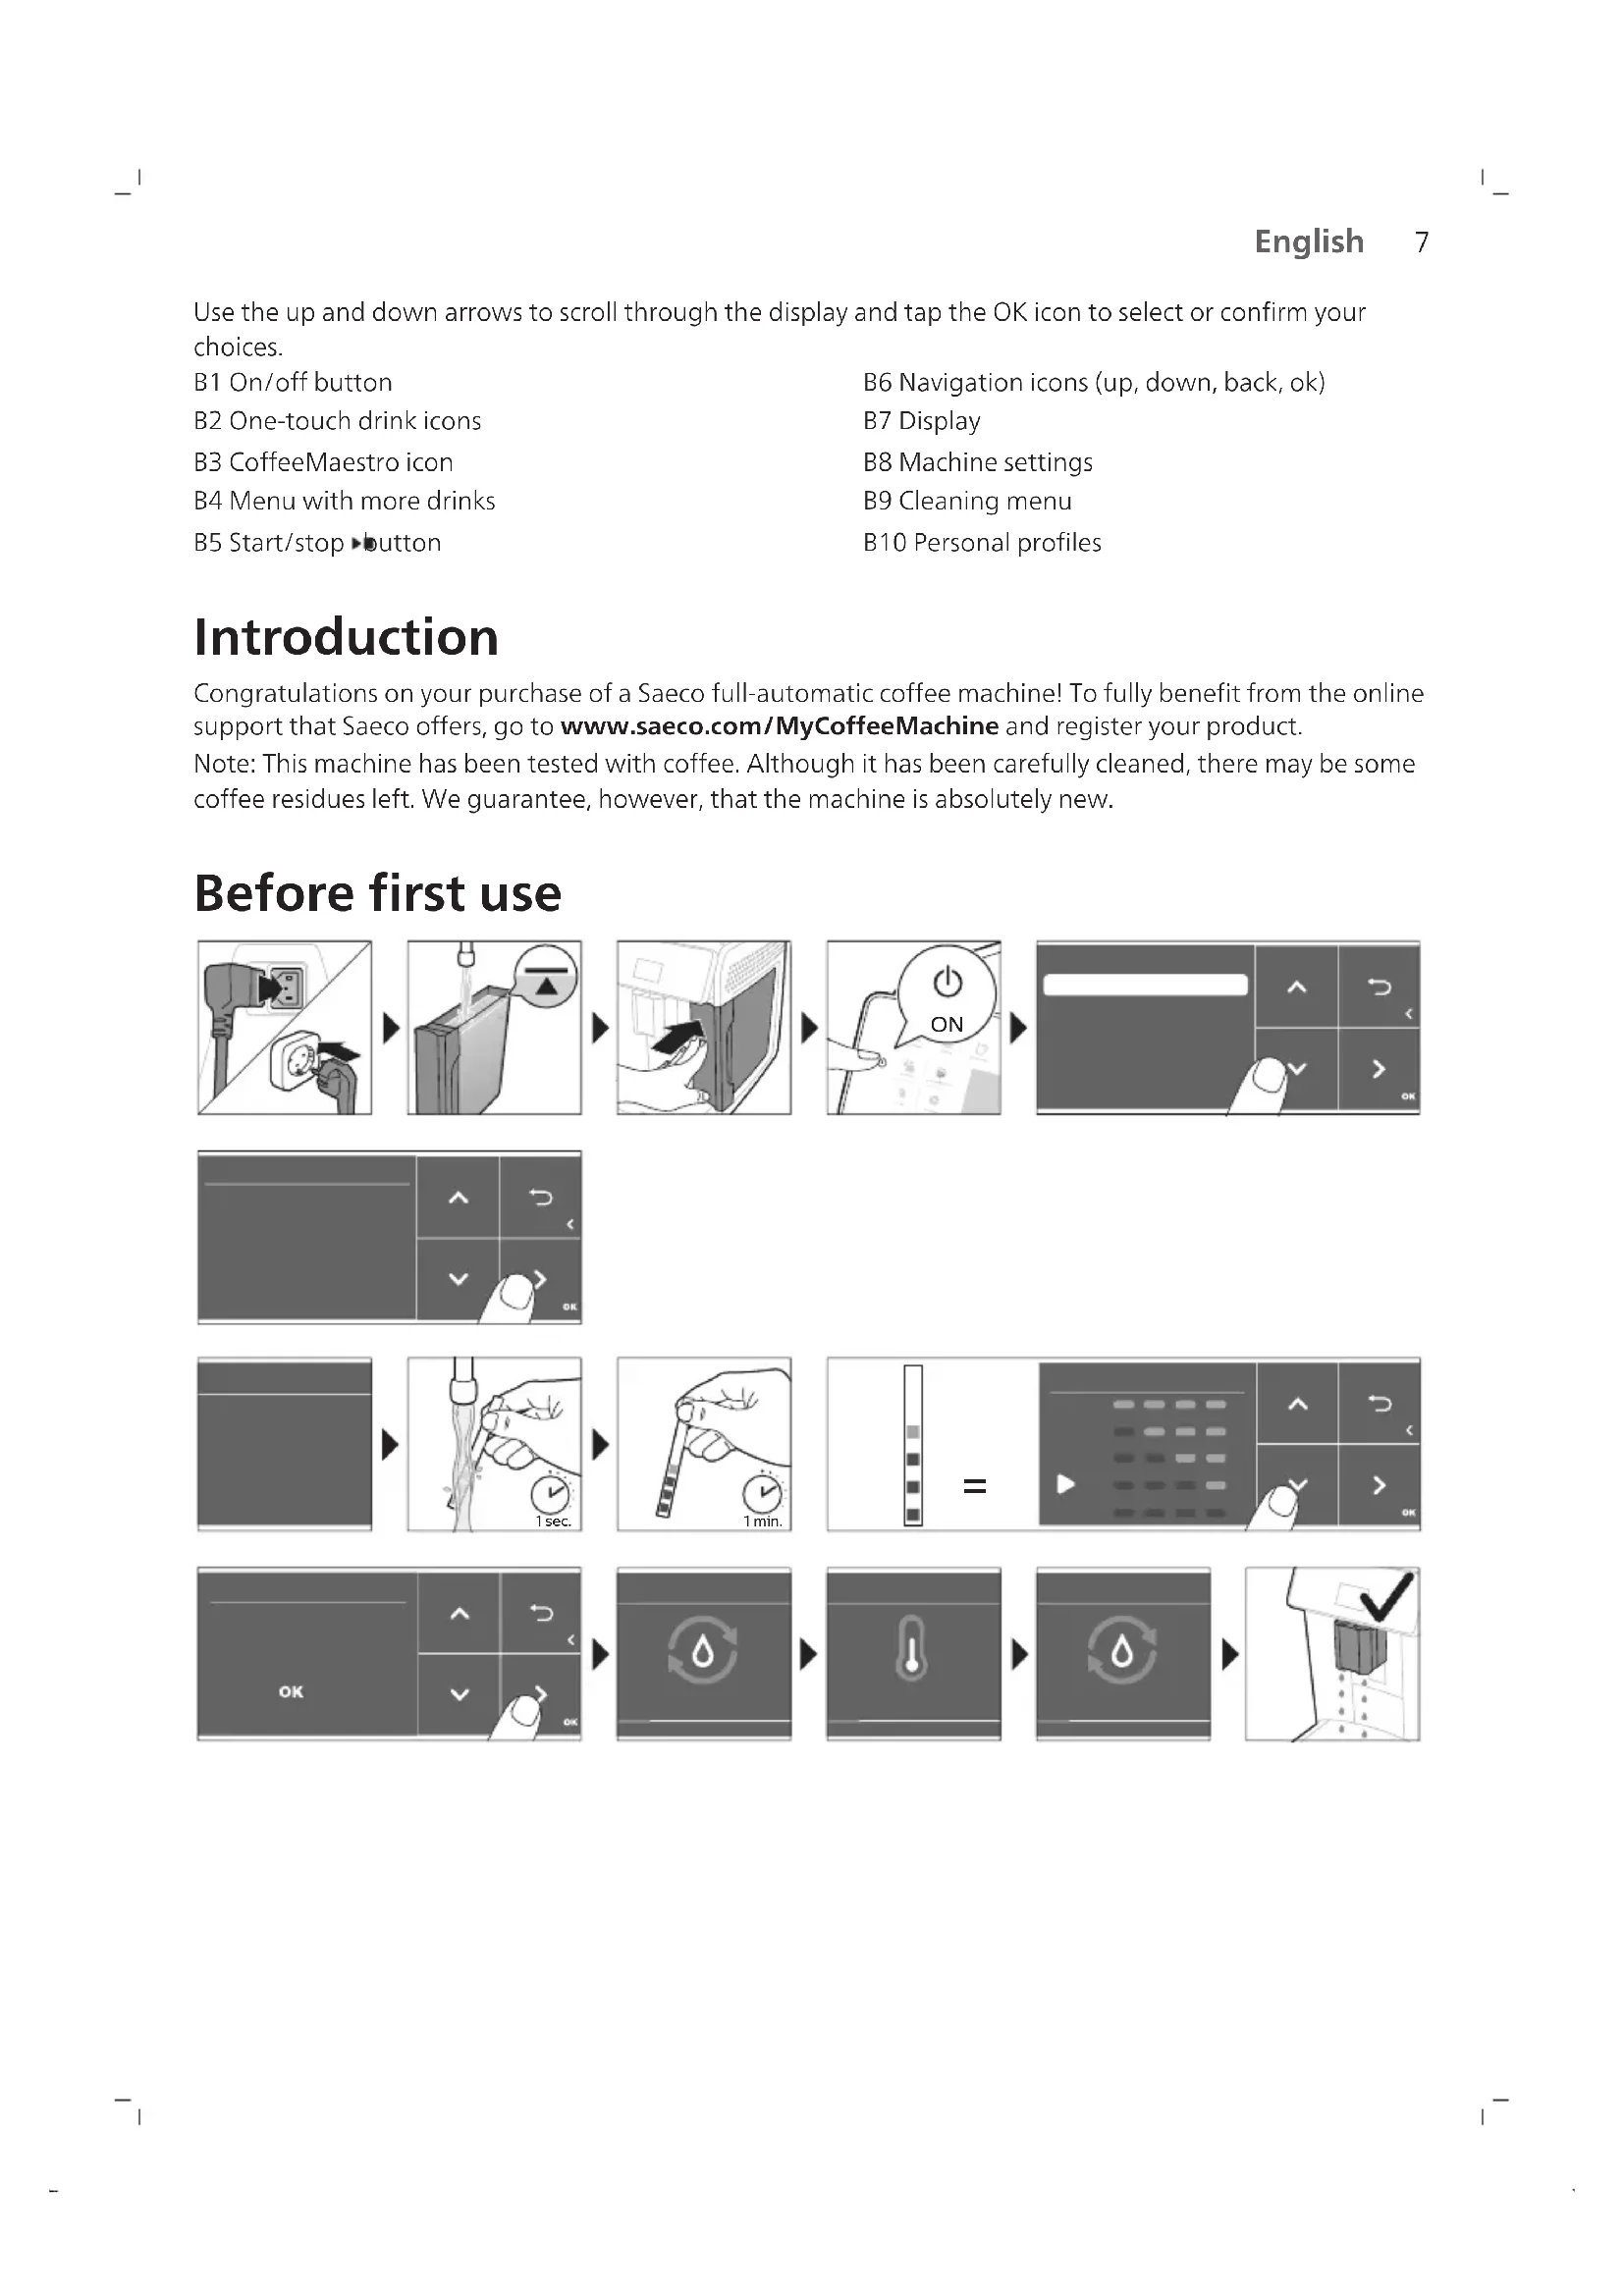
Use the up and down arrows to scroll through the display and tap the OK icon to select or confirm your choices.
B1 On/off button
B6 Navigation icons (up, down, back, ok)
B2 One-touch drink icons
B7 Display
B3 CoffeeMaestro icon
B8 Machine settings
B4 Menu with more drinks
B9 Cleaning menu
B5 Start/stop button
B10 Personal profiles
Introduction
Congratulations on your purchase of a Saeco full-automatic coffee machine! To fully benefit from the online support that Saeco offers, go to www.saeco.com/MyCoffeeMachine and register your product.
Note: This machine has been tested with coffee. Although it has been carefully cleaned, there may be some coffee residues left. We guarantee, however, that the machine is absolutely new.
Before first use


Special functions
Special function Purpose
| Coffee Maestro | With CoffeeMaestro you can personalize your coffee by selecting a pre-set taste profile (Delicato, Intenso, Forte) for your beverage instead of changing the settings yourself. |
| HygieSteam | HygieSteam function automatically cleans the milk system, removing microorganisms: use it after brewing cappuccino or other milk-based drinks. |
| Ceramic Grinder | Our durable grinder is made from 100% ceramic to be exceptionally hard and precise. It can be adjusted to your taste with 12-step levels. |
Brewing drinks
General steps
1 Fill the water tank with tap water and fill the bean hopper with coffee beans. 2 Insert the small plug into the socket located on the back of the machine. Insert the mains plug into the wall socket. 3 Press the on/off button to switch on the machine.
- The machine starts heating up and performs the automatic rinsing cycle.
- When all lights in the drink icons light up continuously, the machine is ready for use.
4 Place a cup under the coffee dispensing spout. Slide the coffee dispensing spout up or down to adjust its height to the size of the cup or glass you are using (Fig. 1).
Brewing coffee with beans
1 To brew a coffee, tap the drink icon of your choice (Fig. 2) or tap the 'More Drinks' icon (Fig. 3).
- You can now adjust the drink to your personal taste (Fig. 4). Use the up and down arrows (Fig. 5) to adjust the coffee strength. Tap the OK icon if you want to adjust more settings (Fig. 6).
2 Press the start/stop button at any time to start brewing the selected drink. 3 To stop dispensing coffee before the machine is finished, press the start/stop button again.
To brew 2 coffees at the same time, tap the drink icon twice or select the 2x icon scrolling the dedicated bar.
A Do not use caramelized or flavored coffee beans.
Brewing milk-based drinks
1 Fill the water tank with tap water and fill the bean hopper with beans. 2 Unscrew the lid of the milk container and fill the milk container with milk (Fig. 7). Then place the metal milk tube in the container.
Always use milk coming directly from the fridge for optimal results.
3 Connect the flexible milk tube to the cappuccinatore (Fig. 8). 4 Tap the milk-based drink icon of your choice (Fig. 9) or tap the 'More Drinks' icon to select a different drink (Fig. 3).
- You can now adjust the drink to your own preference (Fig. 10).
5 Press the start/stop button.
- For specific drinks, the machine first dispenses milk and then coffee. For a number of other drinks this is the other way around, the machine will first dispense coffee and then milk.
- To stop dispensing milk before the machine has dispensed the preset amount, press the start/stop button.
6 To stop dispensing the complete drink (milk and coffee) before the machine is finished, press and hold the start/stop button. 7 Directly after dispensing the milk, the 'HygieSteam Shot' is performed. The machine forces steam through the internal milk system to rinse it quickly.
Brewing coffee with pre-ground coffee
1 Tilt the lid and pour one measuring scoop of pre-ground coffee into the pre-ground coffee compartment (Fig. 11). 2 After selecting a drink, use the up and down arrows to select pre-ground coffee (Fig. 12). Then press the start/stop button.
Note: If you select pre-ground coffee, you cannot adjust the coffee strength and/or brew more than one drink at the same time.
Dispensing hot water
1 Make sure that the internal cappuccinatore is properly attached to the machine (Fig. 13). 2 Place a cup under the spout 3 Tap the 'More drinks' icon (Fig. 3) and scroll down to select 'Hot Water'. 4 Use the up and down arrows to adjust the hot water quantity or temperature to your preference (Fig. 14). 5 Press the start/stop button.
6 To stop dispensing hot water before machine is finished, press the start/stop button again.
Personalizing drinks
The machine allows you to adjust the settings of a drink to your own preference and to store the adjusted drink in a personal profile. The different profiles have different colors.
Brewing drinks with CoffeeMaestro function
Your machine offers the possibility to select taste profiles instead of adjusting all settings separately with the CoffeeEqualizer function. You can choose between Delicato, Intenso and Forte. To select a CoffeeMaestro taste profile:
1 Tap the drink icon of your choice (Fig. 2) or tap the 'More Drinks' icon to select a different drink (Fig. 3). 2 Tap the CoffeeMaestro icon repeatedly (Fig. 15). 3 Press OK to confirm your choice.
The main settings of the drink are now adjusted accordingly.
4 Press the start/stop button to start brewing the drink.
CoffeeEqualizer function
After selecting a drink, the CoffeeEqualizer function is activated automatically. You can use the up and down arrows to adjust the following settings:
1 Aroma strength 2 Coffee quantity 3 Milk quantity 4 Water quantity 5 Drink temperature
6 Foam amount 7 You can also decide to prepare 1 or 2 cups 8 Coffee quantity for travel mug (specific types only)
Note: It depends on the drink you choose which settings you can adjust.
Selecting a profile
You can select a profile and store a recipe using the profiles function.
1 Tap the profiles icon repeatedly to select one of the colored profiles (Fig. 16). All profiles have a different color. 2 Select a drink by tapping one of the one-touch drink icons or by tapping the 'More Drinks' icon. 3 Adjust the drink settings to your favorite taste. 4 Press the start/stop button to brew the drink you selected.
- Your new settings have now been stored in the colored profile you selected.
1 You can always restore the factory settings of the machine (see 'Restoring factory settings').
Guest profile
Your machine is equipped with a guest profile. When the guest profile is selected, the profile icon is off. When you select this profile, you can still personalize the settings to your own preference but the recipes you brew will not be stored.
Extra shot (ExtraShot)
Your machine offers you the possibility to add an extra shot of Ristretto to your coffee and milk drinks, for example if you want to have a stronger coffee.
1 Place a cup under the spout. 2 Tap one of the one-touch drinks icons to select a drink (Fig. 2) or tap the 'More Drinks' icon to select a different drink (Fig. 3). 3 Use the up arrow to set the strength to the top level and select the ExtraShot function (Fig. 17). 4 Tap the OK icon if you want to personalize the other settings. Then press the start/stop button to start brewing the drink. 5 To stop dispensing the drink before the machine has finished, press the start/stop button again.
1 When you have selected the ExtraShot function, you can only brew one coffee at a time.
Adjusting machine settings
Setting the water hardness
We advise you to adjust the water hardness setting to the water hardness level in your region for optimal performance and a longer lifetime of the machine. This also prevents you from having to descale the machine too often. The default water hardness setting is 4: hard water.
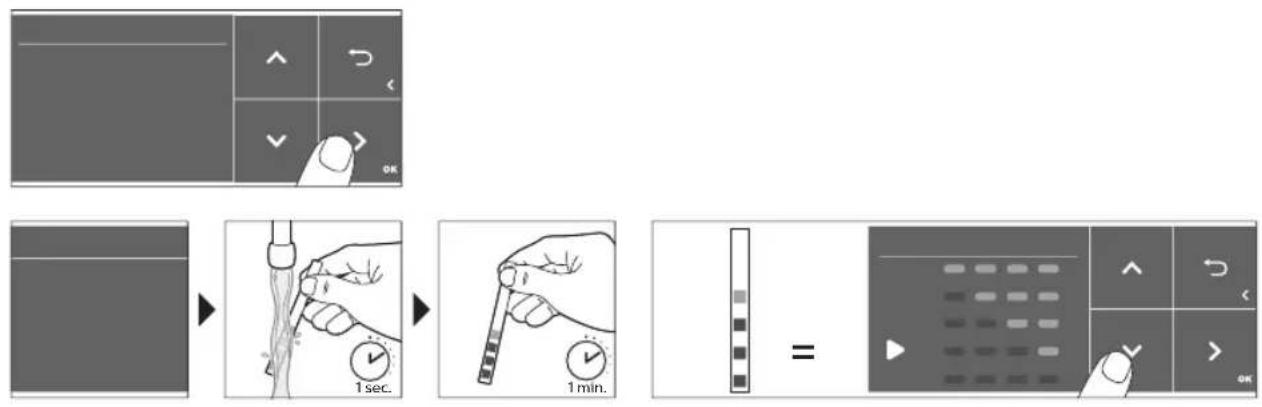
Use the water hardness test strip supplied in the box to determine the water hardness in your region:
1 Immerse the water hardness test strip in tap water or hold it under the tap for 1 second (Fig. 18). 2 Wait 1 minute. The number of squares on the test strip that turn red indicate the water hardness (Fig. 19).
Set the machine to the correct water hardness:
1 Tap the Settings icon and use the up and down arrows to select 'Water hardness'. Then press the OK icon to confirm. 2 Use the up and down arrows to select the water hardness level. The number of red squares selected on the display should be the same as the number of red squares on the test strip (Fig. 20). 3 When you have set the correct water hardness, tap the OK icon to confirm.
Adjusting the grind setting
You can change the coffee strength with the grind setting knob inside the bean container. The lower the grind setting, the finer the coffee beans are ground and the stronger the coffee becomes. There are 12 different grind settings you can choose from.
The machine has been set up to get the best taste out of your coffee beans. Therefore we advise you not to adjust the grind setting until you have brewed 100-150 cups (approx. 1 month of use).
i You can only adjust the grind setting when the machine is grinding coffee beans. You need to brew 2 to 3 drinks before you can taste the full difference. A Do not turn the grind setting knob more than one notch at a time to prevent damage to the grinder.
1 Place a cup under the coffee dispensing spout. 2 Remove the lid from the coffee bean hopper (Fig. 21).
3 Tap the Espresso icon and then press the start/stop button. 4 When the grinder starts grinding, press down the grind setting knob and turn it to the left or right (Fig. 22).
Adjusting other machine settings
By tapping the Settings on you can adjust the following machine settings:
Water hardness: you can choose between 5 levels according to the water hardness in your region. - Standby time: you can select 15, 30, 60 or 180 minutes. Display brightness: you can select low, medium and high. Language: you can select the display language of your preference. Sound: you can activate or deactivate the beeping sound of the machine. - Front illumination: you can choose 'always on', 'on during brewing' or 'always off'. - Measuring unit: you can choose between ml. or oz.
Restoring factory settings
The machine offers you the possibility to restore the factory settings at any moment.
1 Tap the Settings on. 2 Use the up and down arrows to select 'Factory settings'. Confirm by tapping the OK icon. 3 Press the start/stop button to confirm that you want to restore the settings.
The settings are now restored.
The following factory settings are restored to default: water hardness, standby time, display brightness, sound, front illumination, profiles.
Aquaclean water filter
Your machine is AquaClean enabled. You can place the AquaClean water filter in the water tank to preserve the taste of your coffee. It also diminishes the need for descaling by reducing limescale build-up in your machine. You can purchase an AquaClean water filter from your local or online retailer or authorized service centers.
Aquaclean filter status indication
When the AquaClean is active, the status of the AquaClean filter is always visible on the screen as a percentage.
If the status of the AquaClean filter is 10% or less, the screen shows a message for 2 seconds each time you switch on the machine. This message advises you to buy a new filter. If the status of the filter is 0%, the machine asks you to replace the AquaClean filter every time you switch on the machine.
Activating the AquaClean water filter (5 min.)
i The machine does not automatically detect that a filter has been placed in the water tank. Therefore you need to activate each new AquaClean water filter that you install in the 'Clean' menu.
When the machine stops showing the filter activation message, you can still activate an AquaClean water filter, but you will need to descale the machine first.
1 Your machine has to be completely limescale-free before you start using the AquaClean water filter.
Before activating the AquaClean water filter, it has to be prepared by soaking it in water as described below. If you don't do this, air might be drawn into the machine instead of water, which makes a lot of noise and prevents the machine from being able to brew coffee.
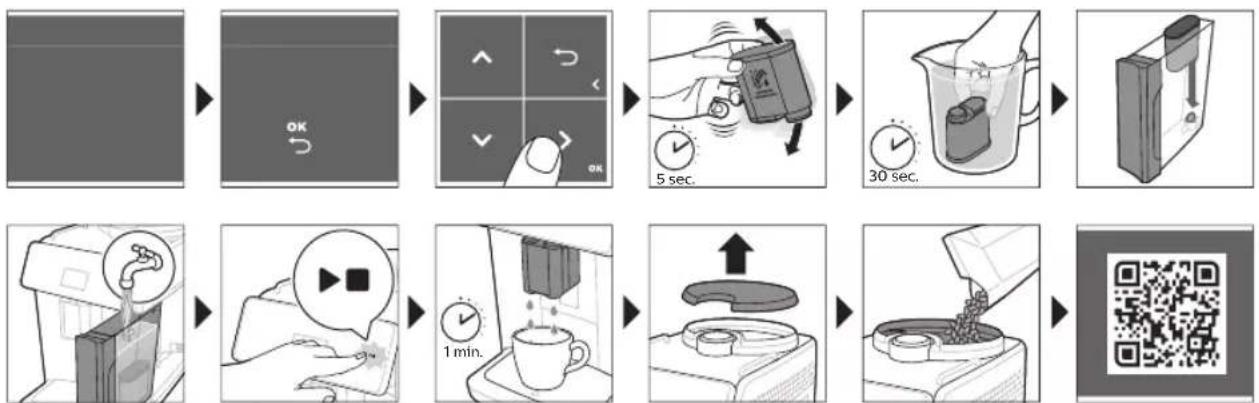
1 Tap the 'Clean' icon and use the up and down arrows to select 'AquaClean'. 2 Tap the OK icon to confirm. 3 Tap the OK icon again when the activation screen appears. Follow the instructions on the screen. 4 Shake the filter for about 5 seconds (Fig. 23). 5 Immerse the filter upside down in a jug with cold water and shake/press it (Fig. 24). 6 Insert the filter vertically onto the filter connection in the water tank. Press it down to the lowest possible point (Fig. 25). 7 Fill the water tank with fresh water and place it back into the machine. 8 Place a bowl under the spout. 9 Press the start/stop button to start the activation process. 10 Hot water will be dispensed from the spout during 1 minute. 11 The filter is now successfully activated.
Replacing the AquaClean water filter (5 min.)
After 95 liters of water have flowed through the filter, the filter will cease to work. The AquaClean status indicator drops to 0% to remind you to replace the filter. As long as the AquaClean status indicator is shown on the display, you can replace the filter without having to descale the machine first. If you do not replace the AquaClean water filter in time, the AquaClean indicator goes out after some time. In that case you can still replace the filter but you first need to descale the machine.
When the AquaClean status indicator drops to 0% or when the machine reminds you to replace the AquaClean filter:
1. Take out the old AquaClean water filter. 2. Install a new filter and activate it as described in chapter 'Activating the AquaClean water filter (5 min).'
1. Replace the AquaClean water filter at least every 3 months, even if the machine does not yet indicate that replacement is required.
Removing and inserting the brew group
Go to www.saeco.com/care for detailed video instructions on how to remove, insert and clean the brew group.
Removing the brew group from the machine
1. Switch off the machine. 2. Remove the water tank and open the service door (Fig. 26). 3. Press the PUSH handle (Fig. 27) and pull at the grip of the brew group to remove it from the machine (Fig. 28).
When you remove the brew group from the machine, make sure to empty the drip tray and the coffee grounds container.
Reinserting the brew group
Before you slide the brew group back into the machine, make sure it is in the correct position.
1. Check if the brew group is in the correct position. The arrow on the yellow cylinder on the side of the brew group has to be aligned with the black arrow and N (Fig. 29). - If they are not aligned, push down the lever until it is in contact with the base of the brew group (Fig. 30). 2. Slide the brew group back into the machine along the guiding rails on the sides (Fig. 31) until it locks into position with a click (Fig. 32). Do not press the PUSH button. 3. Close the service door and place back the water tank.
Cleaning and maintenance
Regular cleaning and maintenance keeps your machine in top condition and ensures good-tasting coffee for a long time with a steady coffee flow.
Consult the table below for a detailed description on when and how to clean all detachable parts of the machine. You can find more detailed information and video instructions on www.saeco.com/care. See figure C for an overview of which parts can be cleaned in the dishwasher.
Detachable parts When to clean How to clean
| Brew group Weekly Remove the brew group from the machine (see 'Removing and inserting the brew group'). Rinse it under the tap (see 'Cleaning the brew group under the tap')). | |
| Monthly Clean the brew group with the Philips coffee oil remover tablet (see 'Cleaning the brew group with the coffee oil remover tablets'). | |
| Milk system/internal cappuccinatore | After every day of use Perform the 'HygieSteam' program in the cleaning menu. Select 'HygieSteam' in the cleaning menu and follow the instructions on the screen. Wipe the outside of the metal milk tube with a damp cloth before placing it into the milk tube holder. |
| Weekly Remove and disassemble the internal cappuccinatore (see 'Cleaning the internal cappuccinatore under the tap')). Rinse all parts under the tap with some washing-up liquid. | |
| Monthly Perform the 'Deep Milk Clean' procedure with the Philips milk circuit cleaner. Select 'Deep Milk Clean' in the cleaning menu and follow the instructions on the screen. Go to www.saeco.com/care for detailed video instructions. | |
| Milk container Weekly Disassemble the milk container (Fig. 33) and push out the ball using the pin of the milk tube (Fig. 34). Clean all parts of the milk container under the tap or in the dishwasher | |
Detachable parts When to clean How to clean
| HygieSteam container (milk tube holder) | Weekly or when the machine reminds you | Remove the HygieSteam container from the machine (Fig. 35) and remove the HygieSteam cover (Fig. 36). Empty the HygieSteam container and clean the container and cover under the tap or in the dishwasher. Let the container and cover air-dry and place them back in the machine. |
| Pre-ground coffee compartment | Check the pre-ground coffee compartment weekly to see if it is clogged. | Unplug the machine and remove the brew group. Open the lid of the pre-ground coffee compartment and insert the spoon handle into it. Move the handle up and down until the clogged ground coffee falls down (Fig. 37). Go to www.saeco.com/care for detailed video instructions. |
| Coffee grounds container | Empty the coffee grounds container when prompted by the machine. Clean it weekly. | Remove the coffee grounds container while the machine is switched on. Rinse it under the tap with some washing-up liquid or clean it in the dishwasher. The front panel of the coffee grounds container (Fig. A18) is not dishwasher-safe. |
| Drip tray Empty the drip tray daily or as soon as the red 'drip tray full' indicator pops up through the drip tray (Fig. 38). Clean the drip tray weekly. | Remove the drip tray (Fig. 39) and rinse it under the tap with some washing-up liquid. You can also clean the drip tray and the drip tray cover in the dishwasher. The front panel of the coffee grounds container (Fig. A18) is not dishwasher-safe. | |
| Lubrication of the brew group | Every 2 months Lubricate the brew group with the by-packed grease (see 'Lubricating the brew group'). | |
| Water tank Weekly Rinse the water tank under the tap | ||
| Machine front Weekly Clean with a non-abrasive cloth | ||
Cleaning the brew group
Regular cleaning of the brew group prevents coffee residues from clogging up the internal circuits. Visit www.saeco.com/care for support videos on how to remove, insert and clean the brew group.
Cleaning the brew group under the tap
1 Remove the brew group (see 'Removing and inserting the brew group'). 2 Rinse the brew group thoroughly with water. Carefully clean the upper filter (Fig. 40) of the brew group. 3 Let the brew group air-dry before you place it back. Do not dry the brew group with a cloth to prevent fibers from collecting inside the brew group.
Cleaning the brew group with the coffee oil remover tablets
Only use Philips coffee oil remover tablets.
1 Tap the Clean icon and use the up and down arrows to select 'Brew group clean'. 2 Tap the OK icon to confirm and then follow the instructions on the screen.
Lubricating the brew group
To improve your machine's performance, we suggest that you lubricate the brew group every 2 months, to ensure that the moving parts continue to move smoothly.
1 Apply a thin layer of grease on the piston (grey part) of the brew group (Fig. 41). 2 Apply a thin layer of grease around the shaft (grey part) in the bottom of the brew group (Fig. 42). 3 Apply a thin layer of grease to the guiding rails on both sides (Fig. 43).
Cleaning programs for the internal cappuccinatore
The machines has three programs to clean the internal cappuccinatore:
'HygieSteam Shot': the machine shoots steam through the internal cappuccinatore to rinse it quickly. - 'HygieSteam': the machine thoroughly cleans the internal milk system with steam. Make sure that the HygieSteam container is correctly assembled (Fig. 44) and attached to the machine (Fig. 45). Place the milk tube in the milk tube holder (Fig. 46) and follow the instructions on the screen. - 'Deep Milk Clean': Perform the 'Deep Milk Clean' procedure with the Philips milk circuit cleaner for a thorough cleaning of the internal milk system.
Cleaning the internal cappuccinatore under the tap
1 Open the door of the internal cappuccinatore (Fig. 47). 2 Remove the internal cappuccinatore by pulling it down (Fig. 48). 3 Disassemble the internal cappuccinatore by pulling the bottom part off the top part (Fig. 49). 4 Disassemble all parts (Fig. 50) and clean them under the tap. 5 Reassemble the internal cappuccinatore. 6 To place back the internal cappuccinatore, put it in upright position and make sure the holes are aligned with the two tubes on the machine. Then move the internal cappuccinatore upwards until it locks into place (Fig. 13). 7 Close the door.
Visit www.saeco.com/care for detailed video instructions.
Descaling procedure
Please use Philips descaler only. Under no circumstances should you use a descaler based on sulfuric acid, hydrochloric acid, sulfamic or acetic acid (vinegar) as this may damage the water circuit in your machine and will not dissolve the limescale properly. Not using the Philips descaler will void your warranty. Failure to descale the appliance will also void your warranty. You can buy Philips descaler from your local or online retailer or from authorized service centers.
1 When the machine asks you to descale it, tap the OK icon to start. To start descending without being prompted by the machine, tap the Clean Icon and select 'Descale'. 2 Remove the drip tray, the coffee grounds container and the HygieSteam container (Fig. 35), empty them and put them back into place. 3 Remove the water tank and empty it. Then remove the AquaClean filter. 4 Pour the whole bottle of Philips descaler into the water tank and then fill it with water up to the CALC CLEAN level (Fig. 51). Then place it back into the machine. 5 Place a large container (1.5 l) under the coffee dispensing spout. 6 Make sure that the HygieSteam container is correctly assembled (Fig. 44) and attached to the machine (Fig. 45). Place the milk tube in the milk tube holder (Fig. 46). 7 Follow the instructions on the screen to start the descending procedure. The descending procedure lasts approx. 30 minutes and consists of a descending cycle and a rinsing cycle.
8 Once the descending cycle is finished, you need to rinse the water tank and water circuit. Follow the instructions on the screen. 9 Place a new AquaClean filter in the water tank and activate it (see 'Activating the AquaClean water filter (5 min.)').
Tip: Using the AquaClean filter reduces the need for descaling!
What to do if the descaling procedure is interrupted
You can exit the descaling procedure by pressing the on/off button on the control panel. If the descaling procedure is interrupted before it is completely finished, do the following:
1. Empty and rinse the water tank thoroughly. 2. Fill the water tank with fresh water up to the CALC CLEAN level indication and switch the machine back on. The machine will heat up and perform an automatic rinsing cycle. 3. Before brewing any drinks, perform a manual rinsing cycle. To perform a manual rinsing cycle, first dispense half a water tank of hot water and then brew 2 cups of pre-ground coffee without adding ground coffee.
Note: If the descaling procedure was not completed, the machine will require another descaling procedure as soon as possible.
Error codes
Below you find a list of the error codes showing problems that you can solve yourself. Video instructions are available on www.saeco.com/care. If another error code appears, please contact the Consumer Care Center in your country. For contact details, see the warranty leaflet.
Error Problem Possible solution code
| 01 The coffee funnel is clogged. | Switch off the machine and unplug it. Remove the brew group. Then open the lid of the pre-ground coffee compartment and insert the spoon handle. Move the handle up and down until the clogged ground coffee falls down (Fig. 37). Visit www.saeco.com/care for detailed video instructions. |
| 03 The brew group is dirty or not well-greased. | Switch off the machine. Rinse the brew group with fresh water, let it air-dry and then lubricate it (see 'Lubricating the brew group'). Consult chapter 'Cleaning the brew group' or visit www.saeco.com/care for detailed video instructions. Then switch the machine on again. |
| 04 The brew group is not positioned correctly. | Switch off the machine. Remove the brew group and reinsert it. Make sure that the brew group is in the correct position before you insert it. Consult chapter 'Handling the brew group' or visit www.saeco.com/care for detailed video instructions. Then switch the machine on again. |
| 05 There is air in the water circuit. | Restart the machine by switching it off and on again. If this works, dispense 2-3 cups of hot water. Descale the machine if you have not done so for a longer period of time. |
Error code Problem Possible solution
| The AquaClean filter was not prepared properly before installation or it is clogged. | Remove the AquaClean filter and try to brew a coffee again. If this works, make sure that the AquaClean filter is prepared properly before you place it back. Put the AquaClean filter back into the water tank. If this still does not work, the filter might be clogged and needs to be replaced. | |
| 11 The machine needs to adjust to room temperature | Allow some time for the machine to adjust from transport/outdoor temperature to room temperature. Switch off the machine for 30 minutes and switch it on again. If this does not work, contact the Consumer Care Center in your country. For contact details, see the warranty leaflet. | |
| 14 The machine is overheated. | Switch off the machine and switch it back on after 30 minutes. | |
| 19 The machine is not connected to the wall socket properly. | Make sure that the small plug of the power cord is properly connected to the socket on the back of the machine. |
Ordering accessories
To clean and descale the machine, only use the Philips maintenance products. These products can be purchased from your local or online retailer or authorized service centers. To find a full list of spare parts online, enter the model number of your machine. You can find the model number on the inside of the service door.
Maintenance products and type numbers:
- Descaling solution CA6700
- AquaClean filter CA6903 Brew group grease HD5061
- Coffee oil remover tablets CA6704 Milk circuit cleaner CA6705
- Maintenance kit CA6707
Troubleshooting
This chapter summarizes the most common problems you could encounter with the machine. Support videos and a complete list of frequently asked questions are available on www.saeco.com/care. If you are unable to solve the problem, contact the Consumer Care Center in your country. For contact details, see the warranty leaflet.
Problem Cause Solution
| There are some coffee residues inside my new coffee machine. | This machine has been tested with coffee. | Although it has been carefully cleaned, there may be some coffee residues left. However, the machine is absolutely new. |
Problem Cause Solution
| The drip tray fills up quickly / there is always some water in the drip tray. | This is normal. The machine uses water to rinse the internal circuit and brew group. Some water flows through the internal system directly into the drip tray. | Empty the drip tray daily or as soon as the red 'drip tray full' indicator pops up through the drip tray cover. Tip: place a cup under the dispensing spout to collect rinsing water that comes out of it. |
| The 'empty coffee grounds container' icon remains on. | You emptied the coffee grounds container while the machine was unplugged from the wall socket, or you placed it back too fast. | Remove the coffee grounds container, wait at least 5 seconds and then insert it again. |
| The machine prompts to empty the coffee grounds container even though the container is not full. | The machine did not reset the counter the last time you emptied the coffee grounds container. | Always wait approx. 5 seconds when you place back the coffee grounds container. In this way, the coffee pucks counter will be reset to zero and the number of coffee pucks is counted correctly. |
| The coffee grounds container is too full and the 'empty coffee grounds container' icon did not appear on the display. | You removed the drip tray without emptying the coffee grounds container. | When you remove the drip tray, also empty the coffee grounds container even if it contains only a few coffee pucks. This ensures that the coffee pucks counter is reset to zero and that the number of coffee pucks is counted correctly. |
| I cannot remove the brew group. | The brew group is not in the correct position. | Reset the machine in the following way: close the service door and place back the water tank. Switch the machine off and back on again and wait for the lights in the drink icons to come on. Try to remove the brew group again. See chapter 'Removing and inserting the brew group' for step-by-step instructions. |
| I cannot insert the brew group. | The brew group is not in the correct position. | Reset the machine in the following way: close the service door and place back the water tank. Leave the brew group out. Switch off the machine and unplug it. Wait for 30 seconds and then plug the machine back in, switch it on and wait for the lights in the drink icons to come on. Then put the brew group in the correct position and reinsert it into the machine. See chapter 'Removing and inserting the brew group' for step-by-step instructions. |
| The coffee is watery. The brew group is dirty or needs to be lubricated. | Remove the brew group, rinse it under the tap and leave it to dry. Then lubricate the moving parts (see 'Lubricating the brew group'). | |
Problem Cause Solution
| The machine is performing its self-adjustment procedure. This procedure is started automatically when you use the machine for the first time, when you change to another type of coffee beans or after a long period of non-use. | Brew 5 cups of coffee initially to allow the machine to complete its self-adjustment procedure. | |
| The grinder is set to a too coarse setting. | Set the grinder to a finer (lower) setting. Brew 2 to 3 drinks to be able to taste the full difference. | |
| The coffee is not hot enough. | The temperature is set too low. Set the temperature to the maximum setting (Fig. 52). | |
| A cold cup reduces the temperature of the drink. | Preheat the cups by rinsing them with hot water. | |
| Adding milk reduces the temperature of the drink. | Regardless of whether you add hot or cold milk, adding milk always reduces the temperature of the coffee. Preheat the cups by rinsing them with hot water. | |
| Coffee does not come out or coffee comes out slowly. | The AquaClean water filter was not prepared properly for installation. | Remove the AquaClean filter and dispense some hot water. If this works, the AquaClean filter was not installed properly. Reinstall and activate the AquaClean filter and follow all steps in chapter 'AquaClean water filter'. |
| After a long period of non-use, you need to prepare the AquaClean water filter for use again and dispense 2-3 cups of hot water. | ||
| The AquaClean water filter is clogged. | Replace the AquaClean water filter every 3 months. A filter that is older than 3 months can become clogged. | |
| The grinder is set to a too fine setting. | Set the grinder to a coarser (higher) setting. Note that this will impact the coffee taste. | |
| The brew group is dirty. Remove the brew group and rinse it under the tap (see 'Cleaning the brew group under the tap'). | ||
| The coffee dispensing spout is dirty. | Clean the coffee dispensing spout and its holes with a pipe cleaner or needle. | |
| The pre-ground coffee compartment is clogged | Switch off the machine and remove the brew group. Open the lid of the pre-ground coffee compartment and insert the spoon handle into it. Move the handle up and down until the clogged ground coffee falls down (Fig. 37). | |
Problem Cause Solution
| The machine circuit is blocked by limescale. | Descale the machine with Philips descaler (see 'Dscaling procedure'). Always descale when the machine prompts you. | |
| The milk does not froth. The internal cappuccinatore is dirty or not inserted correctly. | Clean the internal cappuccinatore and make sure that you position and insert it correctly (see 'Cleaning the internal cappuccinatore under the tap'). | |
| The type of milk used is not suitable for frothing. | Different types of milk result in different amounts of froth and different froth qualities. | |
| The milk is splashing. The milk you use is not cold enough. | Make sure you use cold milk coming directly from the fridge. | |
| The flexible milk tube is not connected properly. | Open the door of the coffee dispensing spout (Fig. 47) and check if the flexible milk tube is fully connected to the cappuccinatore. Note that the cappuccinatore and milk tubes may be hot. Let the cappuccinatore and the tubes cool down before you touch them. | |
| The cappuccinatore and milk tubes are not clean. | Remove and disassemble the internal cappuccinatore (see 'Cleaning the internal cappuccinatore under the tap'). Rinse all parts under the tap. For thorough cleaning, use Philips milk circuit cleaner and perform the Deep Milk Clean procedure via the cleaning ( menu. Note that if the parts have been cleaned in the dishwasher, they may have become clogged by food particles or detergent residues. A visual check that they are not obstructed is also recommended. | |
| We advise you to perform the HygieSteam program every day: 1) Press 'Clean' on the control panel. 2) Select 'HygieSteam'. 3) Press the start button to start the process. Then confirm all steps on the display. | ||
| The milk tubes are clogged. Always store the milk container without the milk tubes in the refrigerator. Leftover milk could accumulate inside the milk tubes and block the flow of milk through the tubes. Rinse the milk tubes before storage. | ||
22 English
Problem Cause Solution
| The machine seems to be leaking. | The machine uses water to rinse the internal circuit and brew group. This water flows through the internal system directly into the drip tray. This is normal. | Empty the drip tray every day or as soon as the 'drip tray full' indicator pops up through the drip tray cover. Tip: Place a cup under the dispensing spout to collect rinsing water and reduce the amount of water in the drip tray. |
| The drip tray is too full and has overflowed which makes it look like the machine is leaking. | Empty the drip tray every day or as soon as the 'drip tray full' indicator pops up through the drip tray cover. | |
| The water tank is not fully inserted, some water is leaking out of the water tank and air is drawn into the machine. | Make sure the water tank is in the correct position: remove it and reinsert it into the machine as far as possible. | |
| The brew group is dirty/clogged. Rinse the brew group. | ||
| The machine is not placed on a horizontal surface. | Place the machine on a horizontal surface so that the drip tray does not overflow and the 'drip tray full' indicator works properly. | |
| I cannot activate the AquaClean water filter and the machine asks for descaling. | The filter has not been installed or replaced in time after the screen shows the AquaClean reminder. This means your machine is not completely free of limescale anymore. | Descale your machine first and then install the AquaClean water filter. |
| The new water filter does not fit. | You are trying to install another filter than the AquaClean water filter. | Only the AquaClean water filter fits into the machine. |
| The rubber ring on the AquaClean water filter is not in place. | Place back the rubber ring on the AquaClean water filter. | |
| The machine is making a loud noise. | It is normal that your machine makes some noise during use. | If the machine starts to make a different kind of noise, clean the brew group and lubricate it (see 'Lubricating the brew group'). |
| The AquaClean water filter was not prepared properly and air is now drawn into the machine. | Remove the AquaClean water filter from the water tank and prepare it for use properly before you place it back. See chapter 'AquaClean water filter' for step-by-step instructions. | |
| The water tank is not fully inserted and air is drawn into the machine. | Make sure the water tank is in the correct position: remove it and reinsert it by pushing it into the machine as far as possible. | |
Technical specifications
The manufacturer reserves the right to improve the technical specifications of the product. All the preset quantities are approximate.
Description Value
| Size (w x h x d) 262 x 383 x 448 mm |
| Weight 8 - 8.5 kg |
| Power cord length 1200 mm |
| Water tank 1.8 litres |
| Coffee bean hopper capacity 300 g |
| Coffee grounds container capacity 12 pucks |
| Milk container capacity 600 ml |
| Adjustable spout height 87 - 147 mm |
| Nominal voltage - Power rating - Power supply See data label on inside of service door (Fig. A15) |
24 Azarbaycanca
Mündaricat
Maşina ümumi baxis (Şek. A) 24
Control panel 24
Introduction 25
Before first use 25
Special functions 26
Dispensing drinks 26
Differentiating drinks 28
B3 Icon for CoffeeMaestro
B8 Machine settings
CoffeeEqualizer function
A8 HygieSteam container
Dimensions (W x H x D) 262 x 383 x 448 mm
Weight 8 - 8.5 kg
Extra shot (ExtraShot)
A12 Switch for grind settings
A13 Bean hopper
A14 Brew unit
A15 Service door
A16 Water tank
A17 Coffee grounds container
B5 Start/stop button
B10 Personal profiles
Introduction
Congratulations on purchasing a fully automatic coffee machine from Saeco! Register your product at www.saeco.com/MyCoffeeMachine to get the most out of the online support that Saeco offers.
Note: This machine has been tested with coffee. It has been thoroughly cleaned, but coffee residue may still be present. However, we guarantee that the machine is completely new.
AquaClean water filter
Indicator for AquaClean filter status
When AquaClean is activated, the AquaClean filter status is shown as a percentage on the display.
A8 HygieSteam compartment
Order accessories
A8 HygieSteam container
B3 "CoffeeMaestro" icon
B8 Machine settings
B4 Menu with more drinks
B9 Cleaning menu
B5 On/off button
B10 Personal profiles
Introduction
AquaClean water filter
AquaClean 421 water filter
B3 CoffeeMaestro symbol
B8 Device settings
B4 Menu with additional drinks
B9 Cleaning menu
B5 Start/stop button
B10 Personal profiles
Introduction
A20 Full drip tray indicator
A25 AquaClean filter
A26 Coffee scoop
A27 Water hardness test strip
Control panel
B5 Start/stop button
B10 Personal profiles
Introduction
A7 Container for coffee beans and milk
A8 HygieSteam container
A9 HygieSteam milk tube holder with cap
A10 Internal cappuccinatore
A11 Electric milk frother
Accessories
A21 Milk container
A22 Milk suction tube
A23 Cleaning brush
Preparing the milk drink
1 Fill the water tank with fresh water, and the compartment for coffee beans with coffee beans. 2 Open the lid of the milk container and pour milk (Fig. 7) into it. Then place the milk suction tube into the container.
For optimal results, we recommend using milk that has just been taken out of the refrigerator.
3 Attach the milk suction tube to the connector (Fig. 8). 4 Select the desired milk drink by pressing the button (Fig. 9) or press the More Drinks button (other drinks) to select a different drink (Fig. 3).
- You can now adjust the drink settings according to your preferences (Fig. 10).
5 Press the start/stop button.
- For some specific drinks, the machine first dispenses milk, then coffee. For other drinks, it is the opposite: the machine first dispenses coffee, then milk. To stop the dispensing of coffee, before the machine has dispensed the preset amount, press the start/stop button again.
6 To stop the dispensing of the selected drink (milk and coffee), before the machine has finished, press and hold the start/stop button. 7 After dispensing the milk, the machine performs a Hygienic Steam Shot (hygienic steam release). The machine cleans the internal milk system to rinse it quickly.
Preparing coffee from pre-ground coffee
1 Tilt the funnel and add one measured spoon of pre-ground coffee into the appropriate compartment (Fig. 11) for coffee. 2 After selecting the drink, use the arrows up or down to select pre-ground coffee (Fig. 12). Then press the "start/stop" button.
Warning: If you have previously consumed strong coffee, you may not be able to adjust the coffee strength and/or drink more than one beverage at a time.
530 Bulgarian
Hot water dispensing
1 Make sure the internal water filter is correctly installed in the machine (Fig. 13). 2 Place a cup under the dispenser. 3 Touch the icon (Fig. 3) More Drinks (Additional drinks) and scroll through the menu to select Hot water (Hot water). 4 Use the up and down arrows to adjust the amount of hot water or the temperature according to your preferences (Fig. 14). 5 Press the START/STOP button. 6 To stop dispensing hot water, press the START/STOP button again.
Set the machine to the correct water hardness:
1 Press the settings icon and use the up and down arrows to select Water hardness (Water hardness). Then press the OK icon to confirm.
532 Bulgarian
2 Use the up and down arrows to select the water hardness level. The number of squares, selected on the display, must match the number of squares on the test strip (Fig. 20). 3 When you have set the correct water hardness level, press the OK icon to confirm.
Adjusting the grinder settings
You can change the coffee strength using the grinder adjustment dial, located inside the coffee bean container. The lower the grinder setting, the finer the coffee beans will be ground and the stronger the coffee will become. You can choose between 12 different grinder settings.
The machine is set to produce the best flavor from coffee beans. Therefore, we recommend that you do not adjust the grinder settings until you have prepared 100 - 150 cups (about 1 month of use).
1 You can adjust the grinder settings only while the machine is grinding coffee beans. You will need to prepare 2-3 drinks before you can notice the difference.
Do not turn the grinder adjustment dial more than one notch at a time, to prevent damage to the coffee grinder.
1 Place a cup under the coffee spout. 2 Remove the lid from the bean container (Fig. 21). 3 Touch the ESPRESSO icon, then press the START/STOP button. 4 When the coffee grinder starts grinding, press the grinder adjustment dial and turn it left or right (Fig. 22).
Adjusting other machine settings
You can adjust the machine settings using the settings icon:
Water hardness: You can choose between 5 levels of water hardness for your area. - Standby time: You can choose 15, 30, 60, or 180 minutes. - Display brightness: You can choose low, medium, or high. - Language: You can choose the preferred display language. - Sound: You can activate or deactivate the machine's sound signals. - Pre-heating: You can choose always on, on during brewing, or always off. - Unit of measure: You can choose between milliliters or ounces.
Restoring factory settings
The machine gives you the option to restore the factory settings at any time.
1 Press the settings icon. 2 Use the up and down arrows to select Factory settings. Confirm by pressing the OK icon. 3 Press the start/stop button to confirm if you want to restore the settings. - The settings have been restored.
i The factory settings are restored for: water hardness, standby time, display brightness, sound, pre-heating, and units.
AquaClean water filter
Your machine is activated for AquaClean. You can place the AquaClean water filter in the water reservoir to preserve the taste of your coffee. It also reduces the need for descaling, as it reduces the buildup of scale in the machine's boiler. You can purchase the AquaClean water filter from your local dealer or authorized service centers.
AquaClean filter status indicator
When AquaClean is active, the status of the AquaClean filter is shown on the display as a percentage.
If the AquaClean filter status is 10% or less, the display shows a message for a few seconds every time you turn on the machine. This message advises you to buy a new filter. - If the filter status is 0%, the machine will remind you to replace the AquaClean filter every time you turn on the machine.
Activating the AquaClean water filter (5 min.)
The machine does not automatically detect if a filter is placed in the water reservoir. You must activate every new AquaClean filter you install in the Clean menu.
When the machine stops showing the activation reminder for the filter, you can still activate the AquaClean filter, but first you will need to descale the machine.
The machine must be fully descaled before you start using the water filter.
Fill the water tank with fresh water, as described in the instructions. If you do not do this, air may enter the machine instead of water, which could cause damage to the machine and prevent it from working properly.
1. Press the cleaning button and use the arrow keys to select AquaClean. 2. Press the OK button to confirm. 3. Press the OK button again when the screen prompts you to activate. Follow the on-screen instructions. 4. Shake the filter for about 5 seconds (Fig. 23). 5. Immerse the filter upside down in a jug of cold water and shake/press it (Fig. 24). 6. Insert the filter vertically into the filter holder in the water tank. Press it down to the lowest possible point (Fig. 25). 7. Fill the water tank with fresh water and place it back into the machine. 8. Place the cup tray. 9. Press the start/stop button to start the activation process. 10. The filter will flush water for about 1 minute. 11. The filter is now activated.
534 Bulgarian
Replacement of the AquaClean water filter (5 mN)
After about 95 liters of water have passed through the filter, it will stop working. The AquaClean status indicator will drop to 0%, to remind you to replace the filter. While the AquaClean status indicator is shown on the display, you can replace the filter without having to descale the machine first. If you do not replace the AquaClean water filter in time, the AquaClean indicator will switch off after a certain time. In that case, you can still replace the filter, but you will need to descale the machine first.
When the AquaClean status indicator drops to 0% or when the machine reminds you to replace the AquaClean filter:
1. Remove the old AquaClean water filter. 2. Insert the new filter and activate it as described in the chapter "Activating the AquaClean water filter (5 mN)".
1. Replace the AquaClean water filter at least every 3 months, even if the machine does not indicate that it is necessary.
Removing and inserting the brewing unit
Visit www.saeco.com/care for detailed video instructions on how to remove, insert, and clean the brewing unit.
Removing the brewing unit from the machine
1. Turn off the machine. 2. Open the service door and remove the water tank (Fig. 26). 3. Press the PUSH button (Fig. 27) and pull the brewing unit out of its housing to detach it from the machine (Fig. 28).
When removing the brewing unit from the machine, make sure you have emptied the drip tray and the coffee grounds container.
Inserting the brewing unit back into the machine
Before inserting the brewing unit back into the machine, make sure it is in the correct position.
1. Place the brewing unit in the correct position. The arrow on the top of the brewing unit must be aligned with the reference arrow N (Fig. 29). - If they are not aligned, press the PUSH button until it comes into contact with the base of the brewing unit (Fig. 30). 2. Insert the brewing unit back into the machine until it clicks into place (Fig. 31), then fix it by turning the handle (Fig. 32). Do not press the PUSH button. 3. Close the service door and replace the water reservoir.
Cleaning and Maintenance
Regular cleaning and maintenance keep the machine in perfect condition and guarantee a long-lasting, excellent coffee taste with a constant flow of coffee.
Refer to the table below for a detailed description of when and how to clean all parts of the machine. You can find more detailed information and video instructions at www.saeco.com/care. Check the figure to see which parts can be cleaned in the dishwasher.
It indicates when to clean and how to clean.
Coffee grinder adjustment 557
According to the model 558
Brewing unit cleaning 559
Milk frother cleaning 560
Technical specifications 565
Coffee machine care (A cypher)
A1 Bean container lid A2 Coffee bean container A3 Pre-ground coffee funnel A4 Water tank lid A5 Drip tray A6 Drip tray grid A7 Coffee grounds container A8 Hygienic container A9 Water spout with Hygienic tank A10 Hot water spout A11 Steam wand
Accessories
A21 Water tank A22 Water tank lid A23 Cleaning brush A24 Measuring spoon
A12 Hot water spout A13 Water tank A14 Water tank lid A15 Heating element A16 Water reservoir A17 Coffee grounds container A18 Coffee grounds container lid A19 Drip tray A20 "Drip tray full" indicator
A25 AquaClean, A26 descaling, A27 water hardness setting, technical data
Control panel
This espresso machine's control panel is used to operate the appliance. All buttons are used for settings. The functions of all buttons are described in the following.
Press the button to select the desired setting and adjust the parameters.
B1 On/off button
B6 Setting the water hardness (level, low, medium, high)
B2 Press the button to open the water tank cover
B7 Dispenser
Settings
B8 Coffee machine cleaning
B3 CoffeeMaestro setting
B9 Descaling menu
B4 Water hardness setting menu
B10 Hot water dispenser
B5 Button for hot water
SaecoToIyry MeHHe ABOMaTbIK KoFe MaunHaCbIH CaTbIn aIraHbIHb3 MeHc KyTtYkTaIb3! SaecocuHyTuTaH OHnAin KOnIOODoH ToIyK naiDa aIyy UvH, www.saeco.com/MyCoffeeMachine dapeHneOTyn, npOdyKtUHy3dy KaTTaHbI3.
3ckeTME: Byn MaunHa KoPe caIbHbIn, cbHaIraH. An KbIJaTTbIK MeHeH Ta3aHaHraH 6oNco Da, aHbH uHHne KoPe KaIbIKTapbl KaIbIbMymKvH. Bnpok, MaunHa TaIbTaKbIp XaHbI 6oJroHyHa KeINlDnK 6epe6u3.
Kaayan Ta3aJoo Kepek KaHTnT Ta3aJoo KepeK
| Каиатучу топ Хуma сайын Кадуатучу топу кOFемашиадан ('Кадуатучу тонын салу ужANA opHOTу' kapaыз) чьгарынд. Аны кран ('Кадуатучу топту arын суу салында тазало' карыз) алдында жуун3. | ||
| Ай сайын Philips koфе майын тазалоу чун kapaxаattapды ('Кофe майларын тазалоу чунн karakжattapды пайдалиын кадуатучу топту тазало' карыз) калонуч мени Кадуатучу топту тазалоону atkapынд3. | ||
| Сут сисмасы/Ички Калунинатор | Ар бир кун калонгондд Кейн | Тазалоо менисунда "HygieSteam" пэрраммасын atkapынд. Тазалоо менocун "HygieSteam" napametрин Тандан, диславеги hyckамаларды жолону3. Temир сут тугун кармагынda орhotудан мурун, сын сыrtын Нымduу чуразк мени сурун3. |
| Жума сайын Ички калунинаторду chngar铂, чундд ("Ички калунинаторду крандд в acstыдд тазало" 6өлүмун карыз). bардik бөлүкөлөрүн жугүч каржаты пайдаличу menen arын суу салында жуун3. | ||
| Ай сайын Philips сут контун тазалучдд menen "Сутэн калддт тазало" proseурасын atkapынд. Тазалоо menюсун "Сутэн калддт тазало" napametрин тандан, диславеги hyckамаларды жолону3. Кени видао hyckаманы www.saeco.com/care be6- сайын суу табугда салу. Балдд | ||
| Сут контейнери Хума сайын Сут контейнери (33-cypET) чундд, Тугун'dу (34-cypET) иниени ќардмы menen Тугун'dу туртунчсгарынд. Сут Контейнеринн δарддк 6өлүхалерун arын суу салында яйдд жугүч машинда Тазалдд | ||
| HygieSteam Контейнери (сут Тугунун kapmarbuto) | Жума сайын яй кOFемашина эскертkende | HygieSteam контейнери кOFемашинад (35-cypET) салынчсгарын, HygieSteam kankaibin (36-cypET) чьгарынд. HygieSteam Контейнеринбожотун, контейнер мени kankaibin arын суу салу луш жуч машинда жуун3. Контейнери луш kankaibin озу кургавын кутUn, салдн Клии Кайра кOFемашинara opHOTун3. |
| Альунучу detалдар | Каан тазалоо кеек Кантут тазалоо кеек | |
| Алдын ода майданган кофе ууньк | Алдын ода майданган кофе ууньк 6ытелук калбаганын жуma сайнTekшерниз. | Кофемашины одахт рармагын оуурун3, кайатучу тонту чыогарын b13. Алдын ода майданган кофе ууньктун калkaагын aылл, аг Кагын сabledи сальb13. 6ытелун калган тешник тазаленгау, оны ожогору жан төмөн (37-cурет) xылдырын b13. Keирии вideонуckама олу уүүн www.saeco.com/care Be6-cайын кирииз. |
| Кофе тунмасы уун контейнер | Кофемашинадан тишелусую-tалantы олгандан кийн кофе тунмасы уун контейнерды тазалныз. Аны xумасы орху ta3alaanb13. | Кофе тунмасы уун контейнэрдп Кфемашина күйк 6ылгонdo уыогарын b13. Аны xуугчу karрахаштарды кошун aын суу олдында оны одш xуугчу машинада xууну3. |
| Тamчы aryyчу подочу кунду的老 Кызытambучу подочу (38-cурет) токлару ундikatotучыллканда boшотуу кеек. Тамчы aryyчу подочу xумасы орху ta3alaanb13. | Кофемашины уун контейнэрдп рыш xуугчу машинада xууну3. | |
| Кайатучу тонту майлло | Ap 2 ai сайн Тангakta 6иpresе калген майллоч karapaxын ('Кайатучу тонту майлло' kapaыз) пайдалиын, кайатучу тонту майллс. | |
| Суу pezerbyapыЖуma сайн Суу pezerbyapны arын суу мених уун3 | ||
| Кофемашинаньима ды | Жуma сайн Абразовду змес уурков мених тazalaanb13 | |
KañHaTyyy ToNTy Ta3aJoo
KaHaTyUyTu TOnTy y3rIyTNyKcy3 Ta3aIoo uNk KOHTypapbHbH Kofoe 6JyKuJepy MeHeH 6yTeJyn aIbIbIHa Jc0n 6ep6eere XapdAm 6epet. KaHaTyUy TuTpy KaHTIN YbIrapyy, opHOyy JaHa Ta3aIoo KepeKTnRn XeHNyDte KeHnpu BInDeo HycKaMaHbI aIyy UyH www.saeco.com/care Be6-caIbHa KpNHi3.
KaHaTyyu TOnTy aRbH cyy aIbHnda Ta3aJoo
1 KaHaTyyy ToTt YuIrapbHb3 ('KaHaTyyy To6yH aIbIn caIyy KaHa opHoTyy' KapaHb3). 2 KaHaTyyy TOnTy Cyy MeHen KaKbIaIaN KyyHy3. KaHaTyyy TOnTyH KorOpKy YbInKaCbIH (40-cypet) KaKbIaIaTa3aJaHaB3. 3 KaHaTyUyToTny KaIpa KofoemaunHara opHOTuYdaH Mypda aHbI KypraTbHbI3. KaHaTyUyToTny Ke3deme MeHen cyPTneHy3, 6o160co an 6yNa MeHen 6yTeyn KaIbIbMyMKvH.
Koiffe MaJIapbIH Ta3aIoo yUyH KApaxKaTTapDbI NaIdaIaNbIN KaIHaTyyu TOnTy Ta3aIoo
Philips KoΦe MaBHaHaT Ta3aJIOO Ta6JIeTKaJaIapbI MeHeH rHa Ta3aJAnHbI3.
1 Ta3aNoo cypTeChyH 6acbIn, XorOpny XaHa bIdbi Xe6eJepn apKbIyy "KaHaTyU To6yH Ta3aNoOHy" TaHdaHbI3. 2 OK cypetuycyn bacyu mehen bipacTaT, kpaHdaIbI HyckamaIapDbI aTKapblb3.
KañHaTyyy ToNTy MaJlOO
MaHb3BbH NHTee bIbH KAKbIbIpyra KbIMbIJaRaH 6JIyKTe p dae 6OJcKO JyMaK KIMbIJaRaHbH KaMbI3 KbIyyra ap 6np 2 aunHne 6blpyy To6yH MaJIOOH cyNyTaT 3JeK.
1 BbIbIpyy To6yHyh 6blkErnHe (603 6anyk) MaIdbI ap6bH 3MeC cyKohy3 (41-cypT). 2 5bIbIpyy To6yHyh TaMaHbIHdArbl TOnlromdy (6o3 6eNyK) 6oJIoTO ap6bIH mec MaCyKeHy3 (42-cypet). 3 3Kn KaKaTara6aBtTOOHy HkTapbHa ap6bH 3Mec MaJdaH cyKeHy3 (43-cypet).
Iykn kanyuHaTOp yUH Ta3aJoo nporpaMaJapbl
The coffee machine cleaning cycle for the descaling program:
"HygieSteam procedure": The coffee machine cleaning cycle will start. "HygieSteam procedure": The cleaning cycle will clean the system with hot water. Place the HygieSteam container under the steam wand (44) and the coffee dispensing spout (45). Remove the water tank, fill it with water, and start the descaling procedure as indicated on the display. "Milk cleaning": To clean the milk system, use the Philips milk cleaning container and start the "Milk cleaning" procedure.
Descaling the machine
1 Remove the brewing unit (47). 2 Rinse the brewing unit under running water (48). 3 Pull the locking lever on the brewing unit upwards until it stops (49). 4 Leave the brewing unit to dry in the shade (50). 5 Do not use the brewing unit in the dishwasher. 6 Place the brewing unit back into the machine, push it firmly until it clicks into place, and make sure it is correctly seated. If the brewing unit is not properly inserted, the machine will not work (13). 7 Close the door.
For video instructions, visit www.saeco.com/care.
Cleaning the grinder
Philips recommends cleaning the grinder regularly. If you use oily coffee beans, flavored coffee beans, or coffee beans with additives, the grinder may become clogged and the machine may not work properly. Philips recommends cleaning the grinder regularly. You can also clean the grinder with a brush. If you need to clean the grinder more thoroughly, contact the Philips Consumer Care Center.
1 To clean the coffee grinder, press the button for the grinder cleaning cycle. The grinder cleaning cycle will start. Press the "Grinder cleaning" button to start the cleaning cycle. 2 When the cycle is finished, remove the coffee bean container and the HygieSteam container (35), empty them, and then put them back into the coffee machine.
558 Kyrgyz
3 Rinse the water tank and fill it with fresh water. Then insert the AquaClean filter. 4 Fill the water tank with fresh water and insert the AquaClean filter. For descaling, use the Philips descaler CALC CLEAN (see figure 51). Follow the instructions on the packaging. 5 Place a container (1.5 L) under the coffee dispensing spout. 6 Remove the HygieSteam container from its holder (figure 44) and place it on the drip tray (figure 45). Close the steam wand and the steam knob (figure 46). 7 The descaling procedure starts automatically and the display shows the remaining time. The descaling procedure takes about 30 minutes and consists of a descaling cycle and a rinsing cycle. 8 When the descaling cycle is finished, the appliance will prompt you to rinse the water tank and fill it with fresh water. Follow the instructions on the display. 9 Remove the AquaClean filter from the water tank and follow the instructions in the leaflet 'AquaClean water filter replacement' (5 min.).
Note: The AquaClean filter must be replaced after the descaling procedure to ensure optimal performance.
The descaling procedure can be stopped at any time by pressing the standby button.
To stop the descaling procedure, press and hold the standby button for 3 seconds. If the descaling procedure is not stopped, the following message will appear:
1 Rinse the water tank and fill it with fresh water. 2 Pour the descaling solution CALC CLEAN into the water tank up to the indicated level, then close the lid and turn on the machine. The machine will start the automatic descaling cycle. 3 The descaling cycle will take about 30 minutes. During the cycle, the machine will pause and prompt you to rinse the water tank and fill it with fresh water. Follow the instructions on the display.
Note: If the descaling procedure is not performed regularly, the machine may not be able to descale properly and may need to be repaired.
Cleaning the coffee unit
The coffee unit should be cleaned regularly to ensure optimal performance. For detailed instructions, refer to the video on www.saeco.com/care. If the coffee unit is not cleaned properly, it may affect the taste of the coffee. For more information, refer to the user manual.
Cleaning the coffee unit
| 01 Koşpe kuyiyy tojyn kajraH. | MaùnHaHb éuypyn, po3eTKaJdAn cyypyn KoIoyHy3. bIiBipyy Tobvn YbIrapbIbI3. Andah coH aIbYbH aJa TaptbIbIraH KoΦe 6eIyIyHyN KaIkaTbH aUbI, aRa KaIbIKbH ca6bH KINrI3NHN3. TbIbIbI N KaJIraH TaptbIbIraKoΦe bIldbIra TyIckHe rYeInH caITbI eIe JxHa TEmH XbIbIPbIbI3 (37-cypET). bAù 6aγy www.saeco.com/care e3ReueJelTeKEn KcpctMeIepDy aIyy yUyH. |
Cleaning the coffee unit
| 03Бышырутубуун ини Кир яж сожаши Майалган змс. | Машинец учуриз. Бышьруту таза суу мени чайkan, андан сон сны майалны('Кайатучу топу майло' карыз). «Кайатучту табуллу» 6өлүмун карыз я www.saeco.com/care озгөдөлөн Көрөтмөлөрду ралу учн. Андан кейн машинец кайрадан күйгүхүз. | |
| 04Бышыруту орduна Тура за мес koюлган. | Машинец учуриз. Бышьруту таьгарын, кайрадан Кргизинiz. Бышьруту таьген Кргизгене чeyнaj ралу абалда океинн Төшеринiz. «Бышьруту Төшун каралшу» 6өлүмун карыз я www.saeco.com/care oзгөдөлөн Көрөтмөлөрду ралу учн. Андан кейн машинец кайрадан күйгүхүз. | |
| 05Суу chынжырbinga aba Турун калды. | Машиньts учурп, Күйгүхүmени кайрадан рштэн. Зэрдд на Тыллхасы Chыкca, 2-3 чeyчek bicsk cyy kүюну3. Кү убakытан бери сны Кынбай журсөн3, Машиньts күбэдрен Тааллхь. | |
| AquaClean суу чын��ы орhotулганга чeyн Тура за rapдалган Жe boлбoco рал Тыгылbing Калган. | AquaClean чын��ынчыгарын, кофе чын��угда rapы apaket Кын��ын13. Зэр с彦н на Тылхьда КааClean чын��ын Кayра орduна ковундам мүүүхүдүлүдүн Төшеринiz. AquaClean чын��ын кайрадан суу indиши Кoюнiz. Zэр с彦н на Тылхьда Күлүнлүлүдүн Бolyшу мүмкун, раллмашьрьлүлүуma Myktax. | |
| 11Машина Бөлөнүн Tempepa typacbina Чeийн Хылш кеpek | Машинага Trанспорт/эшк Temпета typacbinaнн Бөлө Temпета typacbina Көнш учн Бир раллүлүдүрөнiz. Машинeti 30 мүнөткөчурн, кayрдан Күйгүхү. Зэрдд на Тылхьда Chыкdөдүг 癜 Көрөтөчуг Кам көрү Борбopyна кayрынлүлbing. Байланын озгөдүлүдүрөн Көрлдikбapakчасын карыз. | |
| 14Машина отө bись КETTи. | Машинец учурп, кayрдан 30 минутдан кейнн Күйгүхү. Kү. Kү. Kү. Kү. Kү. Kү. Kү. Kү. Kү. Kү. Kү. Kү. Kү. Kү. Kү. Kү. Kү. Kү. Kү. Kү. Kү. Kү. Kү. Kү. Kү. Kү. Kү. Kү. Kү. Kү. Kү. Kү. Kү. Kucing Kү. Kucing Kucing Kucing Kucing Kucing Kucing Kucing Kucing Kucing Kucing Kucing Kucing Kucing Kucing Kucing Kucing Kucing Kucing Kucing Kucing Kucing Kucing Kucing Kucing Kucing Kucing Kucing Kucing Kucing Kucing Kucing Kucing Kucing Kucing Кү. Кү. Kү. Kү. Kү. Kү. Kү. Kү. Kү. Kү. Kү. Kү. Kү. Kү. Kү. Kү. Kү. Kү. Kү. Kү. Kү. Kү. Kү. Kү. Kү. Kү. Kү. Kү. Kү. Kү. Kү. Kү. Kү. Kү. K Cree K Cree K Cree K Cree K Cree K Cree K Cree K Cree K Cree K Cree K Cree K Cree K Cree K Cree K Cree K Cree K Cree K Cree K Cree K Cree K Cree K Cree K Cree K Cree K Cree K Cree K Cree K Cree K Cree K Cree K Cree K Cree K Cree K Cree Кү. Кү. Кү. Кү. Кү. Кү Кү Kү Kү Kү Kү Kү Kү Kү Kү Kү Kү Kү Kү Kү Kү Kү Kү Kү Kү Kү Kү Kү Kү Kү Kү Kү Kү Kү Kү Kү Kү Kү Kү Kү K Cree K Cree K Cree K Cree K Cree K Cree K Cree K Cree K Cree K Cree K Cree K Cree K Cree K Cree K Cree K Cree K Cree K Cree K Cree K Cree K Cree K Cree K Cree K Cree K Cree K Cree K Cree K Cree K Cree K Cree K Cree K Cree K Cree |
Ordering accessories
To descale the coffee machine and replace the AquaClean filter, contact Philips. The following numbers are available for your convenience. For more information, visit the Philips website or contact the authorized service center. To order accessories, please have the model number of your coffee machine ready. You can find the model number on the rating plate.
The following accessories are available for your coffee machine:
AquaClean filter CA6903 for descaling - HD5061 for cleaning the milk frother - CA6704 for descaling the water tank - CA6705 for cleaning the water tank
Disposal
By using the Saeco Care system, you can extend the life of your machine. For more information, visit www.saeco.com/care. If you need assistance, please contact our service department. For detailed instructions, refer to the user manual.
Control panel
1 Check the water hardness and the number of coffee beans supplied to the machine (see 'Water hardness').
Guest profile
The machine is set to the guest profile. When the guest profile is selected, the profile icon is hidden. When you select another profile, you can customize the settings to your own preferences, but the settings will not be saved.
Extra shot
The machine can add an extra shot of coffee to your drink. For example, if you want a stronger coffee.
1 Place a cup under the spout. 2 Press one of the coffee buttons to select the coffee (Fig. 2) or press the 'More Drinks' button to select another drink (Fig. 3). 3 Use the up arrow to set the coffee strength to the highest level and select the ExtraShot function (Fig. 17). 4 Press the OK button if you want to customize other settings. Then press the start/stop button to begin brewing. 5 To stop the dispensing of coffee before the machine finishes, press the start/stop button again.
1 When the ExtraShot function is selected, you can only brew one coffee at a time.
A27 Test the water hardness
Water hardness
Control panel
There are two versions of the espresso machine. They differ in the control panel, but all buttons and symbols work in the same way. For an overview of all buttons and symbols, see Fig. B. Below is a corresponding description.
To navigate between the elements on the screen, use the up and down arrows. Press the OK button to select or confirm the selected option.
B1 On/Off button
B6 3NaKn HABRaun (BBepx, Bn3, Ha3a,I, OK)
B23HaKn HAnrKOB, BbIbnpaembIX OdHm KacaHneM
B7 DnCnIeN
B3 3haokCoffeeMaestro
B8 HacpoKoKoemHbI
B4 3HaOK BblOBA MeHIO More Drinks (pyrne HanNTKN)
B9 MeHIO ouNCTKIN
KofoMaunHa NaHHT HArpeBaTbCn 3aNyCTNT LcNK aBTOMaTueeCKO npombibkn. Korda Bce INDkaTOpbI 3HaKOB HAnNTKOB 6yDyT ropeB HenpepbIBHO, KoemauHnHa rToBa KNCNoJIb3OBAHnIO.
4 Nocabte yawky noHocNK BbIXOa KoFe. CdbnHbTe HocNK BbIXOa KoFe BBePx nn BHN3, TTo6bl NaCTpOnTbe erO BbICOTy B 3aBNCIMOCtN OT pa3Mepa yawkn nn CTakaHa (Pnc.1).
PnroToBJIeHne KoFe n3 3epeH
1Дя npiroTOBHeHn KoFe KOCHNTecb 3HaUka HAnrKa NO BaWeMy Bbl6py (Pnc.2) nJIn KochHTecb 3HaUka Dpynx HAnrKOB More Drinks (Dpyrue HAnrTkU) (Pnc.3).
- Tenepb Bbl Moxe He Hactponb Hannitok C yyeTom CBOero JnHoro BKyca (Pnc. 4). IcnoJIb3yIte cTpeIkn BBepx n Bn3 (Pnc. 5) dIra HactpOikn KpeNoCTn Kofoe. KocHTecb 3HaUka «OK», ecIn xOTnte ckopkeTnpoBaT TaKxe n Dpyrue HactpoKn (Pnc. 6).
2 HaXMMTE KHOKNy «CTapT/CTON», 06bI B IIO6oe BpemHaayatb npouecc npiroTOBHeHnBbIpaHHoro HAnNTKa. 3 TTo6bI npepBaTb BbIaay Kofo 10 3aBepHnna npOeynpy, HaxMnte KhoNky «CTapT/cton» epe pa3.
iUTo6bI OJHOBpeMeHHo npiroTOBHTb 2 qaikn Kofoe, KocHITecb 3NaUka HaNTKa IBaXdbI INN BblBepnte 3HaOK 2x , npokpyTINB cneuaJIbHyIO NOLOCKy.
He nCnoB3yIe KapameJn3NPOBaHHbIe IJI apOMaTn3NPOBaHHbIe KoΦeHbIe 3epHa.
Preparing drinks on a milk basis
1 Fill the reservoir with water from the water supply and pour ground coffee beans into the container. 2 Open the milk container lid and fill the container with milk (Fig. 7). Then install the metal tube for milk supply into the container.
To achieve optimal results, always use milk straight from the refrigerator.
3 Connect the flexible tube for milk supply to the cappuccinatore (Fig. 8). 4 Touch the symbol of the selected milk-based drink (Fig. 9) or the More Drinks symbol (other drinks) (Fig. 3) to select another drink.
Now you can adjust the drink according to your preferences (Fig. 10).
Preparing a drink from ground coffee
1 Open the lid and pour one measuring spoon of ground coffee into the compartment for pre-ground coffee (Fig. 11). 2 After selecting a drink, use the up and down arrows to choose the mode with pre-ground coffee (Fig. 12). Then press the "Start/Stop" button.
Note: If pre-ground coffee is selected, the functions for adjusting coffee strength and/or simultaneous preparation of several drinks are unavailable.
Hot water dispensing
1 Check the correct connection of the internal cappuccinatore to the coffee machine (Fig. 13). 2 Place a cup under the spout. 3 Touch the More Drinks symbol (other drinks) (Fig. 3) and scroll down to select the "Hot water" item. 4 Using the buttons with up and down arrows, adjust the quantity and/or temperature of the water according to your preferences (Fig. 14). 5 Press the "Start/Stop" button. 6 To stop hot water dispensing before the coffee machine finishes its operation, press the "Start/Stop" button once.
Personalization of drinks
Using this coffee machine, you can adjust the preparation settings of a drink according to your preferences and save them in a personal profile. Different profiles have different settings.
Adjusting other parameters of the coffee machine
By touching the Settings symbol, you can adjust the following parameters of the coffee machine:
Water hardness: You can choose between 5 levels of hardness depending on the water hardness in your region. Standby time before switching to energy-saving mode: You can choose 15, 30, 60, or 180 minutes. Display brightness: You can choose low, medium, or high. Language: You can choose the language you prefer. Signal: You can enable or disable the acoustic signals of the coffee machine. Backlight: You can choose the setting "Always on", "During preparation", or "Always off".
594 Russian
- Units of measurement: You can choose ml or oz.
Restoring factory settings
The coffee machine gives you the possibility to restore factory settings at any time.
1 Touch the settings icon. 2 Use the up and down arrows to select Factory settings. Confirm by touching the OK icon. 3 Press the Start/Stop button to confirm your desire to restore the settings. - After this, the settings are restored.
The following factory settings are restored: water hardness, waiting time before switching to standby mode, display brightness, signal, backlight, and volume.
Installing the brew group
Before inserting the brew group, make sure it is in the correct position. 1 Check that the brew group is in the correct position. The arrow on the yellow cylinder on the side of the brew group must be aligned with the gray arrow with the letter N (Fig. 29).
- If they do not match, press the lever until it touches the base of the brew group (Fig. 30).
2 Insert the brew group back into the coffee machine along the side guides (Fig. 31) until it clicks (Fig. 32). Do not press the PUSH lever. 3 Close the service door and put the water reservoir back.
Cleaning and maintenance
Regular cleaning and maintenance will allow you to keep the coffee machine in excellent condition for a long time and enjoy tasty coffee with a consistent flow of the drink.
The table below provides a detailed description of the methods and frequency of cleaning all removable parts of the coffee machine. More detailed information and video instructions can be found on the website www.saeco.com/care. Fig. C shows which parts can be washed in a dishwasher.
Removable parts When to clean How to clean
Cleaning the brew group
The brewing unit can be rinsed to prevent clogging of the internal circuits with coffee residues. Visit the website www.saeco.com/care for video instructions on how to remove, install and rinse the brewing unit.
Rinsing the brewing unit under running water
1 Remove the brewing unit (see "Removing and installing the brewing unit"). 2 Rinse the brewing unit thoroughly with water. Clean the upper filter of the brewing unit thoroughly (Fig. 40). 3 Before placing the brewing unit back into the coffee machine, let it dry. Do not dry the brewing unit with a cloth, as this could clog it with fibers.
Cleaning the brewing unit with a coffee oil remover
Use only Philips tablets for removing coffee oil.
1 Press the cleaning symbol using the up and down arrows to select the "Clean brewing unit" item. 2 Press the OK symbol to confirm and follow the instructions on the display.
Lubricating the brewing unit
To improve the performance of the coffee machine, it is recommended to lubricate the brewing unit every 2 months so that its parts continue to move smoothly.
1 Apply a thin layer of lubricant to the piston (grey part) of the brewing unit (Fig. 41). 2 Apply a thin layer of lubricant to the surface of the shaft (grey part) and the lower part of the brewing unit (Fig. 42). 3 Apply lubricant generously to the guide grooves on both sides (Fig. 43).
Cleaning programs for the internal milk frother
The coffee machine has three cleaning programs for the internal milk frother:
HygieSteam Shot: The coffee machine passes steam through the internal milk frother for quick cleaning. HygieSteam: The coffee machine thoroughly cleans the internal milk system with steam. Make sure the HygieSteam container is correctly installed (Fig. 44) and connected to the coffee machine (Fig. 45). Place the milk tube in the tube holder (Fig. 46) and follow the instructions shown on the display. Deep Milk Clean: Perform the intensive milk cleaning program Deep Milk Clean using the special Philips agent for thorough cleaning of the internal milk system.
Cleaning the internal milk frother under running water
1 Open the lid of the internal milk frother (Fig. 47). 2 Remove the internal milk frother by pulling it downwards (Fig. 48). 3 Disassemble the internal milk frother by separating its lower part from the upper part (Fig. 49). 4 Disassemble all parts and rinse them under running water (Fig. 50). 5 Reassemble the internal milk frother. 6 To place the internal milk frother back, position it vertically and make sure the openings align with the two tubes on the coffee machine. Then push the internal milk frother upwards until it clicks into place (Fig. 13). 7 Close the lid.
Visit the website www.saeco.com/care for detailed video instructions.
Descaling process
Use only Philips descaling agent. Never use descaling agents based on sulfuric acid, hydrochloric acid, sulfamic acid or acetic acid (vinegar), as this may lead to damage to the water circuit of your coffee machine or dissolve the scale incompletely. Use of any other descaling agent will void the warranty. Failure to perform the descaling procedure will also void the warranty. You can purchase Philips descaling agent from local dealers or directly from us or from authorized service centers.
1 When the coffee machine prompts you to descale, touch the OK symbol to start the process. To start the descaling process without waiting for the coffee machine prompt, touch the “Descale” symbol and select the “Descale” option. 2 Remove the water tank and the coffee bean container or the HygienicSteam container (Fig. 35), empty them, and then place them back into the coffee machine. 3 Remove the water reservoir and empty the water. Then remove the AquaClean filter. 4 Pour the entire bottle of Philips descaling agent into the water reservoir and fill it with water up to the CALC CLEAN level (Descale) (Fig. 51). Then place it back into the coffee machine. 5 Place a large container (1.5 l) under the coffee outlet. 6 Make sure the HygienicSteam container is correctly installed (Fig. 44) and connected to the coffee machine (Fig. 45). Place the milk frothing tube into the tube holder (Fig. 46). 7 Follow the instructions on the screen to start the descaling procedure. The descaling procedure takes approximately 30 minutes and consists of a descaling cycle and a rinsing cycle. 8 After the descaling cycle is completed, it is necessary to rinse the water reservoir and the water supply circuit. Follow the instructions on the screen. 9 Install a new AquaClean filter in the water reservoir and activate it (see “Activation of AquaClean filter”).
Tip: Using the AquaClean filter helps to extend the interval between descaling cycles!
Actions in case of interruption of the descaling procedure
To interrupt the descaling procedure, press the on/off button on the control panel. If the descaling procedure is interrupted before it is completed, perform the following actions:
1 Empty the water and thoroughly rinse the water reservoir. 2 Fill the reservoir with fresh water up to the CALC CLEAN mark and switch on the coffee machine. The coffee machine will start heating up and will start an automatic rinsing cycle. 3 Before preparing drinks, perform a manual rinsing cycle. To perform a manual rinsing cycle, first run half of the water from the reservoir through the machine, and then prepare 2 cups of drink from pre-ground coffee without adding coffee.
Warning. If the descaling procedure has not been completed, it is necessary to perform these procedures again as soon as possible.
Error codes
Below is a list of error codes for problems that can be solved independently. Video instructions can be found on the website www.saeco.com/care. If other errors occur, contact the customer service center in your country. Contact details can be found on the warranty card.
Code
Error
Problem Possible solution
Coffee Equalizer
The Coffee Equalizer is a device that adjusts the coffee strength. It is used to adjust the coffee strength according to the type of coffee beans used.
O
②
4 ⑤ 86
7
O
O
O
O
1 Dapaayxuy6y 2XaMnKaXBa 3XaMnWnp 4Xaumo6 5Xapopatn HywoK
Tab3ex:Bo6acta a3 Hyyokn ymyo TaHmOTn dypyctpo nHTnxO6 Mekyne.i
6XaumKaΦK 7UmyuHcyHH MeTaBOHeJ uymopan nIeJaxOPO MyaH KyHe-1e2nnEJa 8Xaumn kaxBa 6apoun 3apn caenxu (TaHxo 6apoun Hamyhaxo MyaunH)
IHTnxo6n npoФи
Ulymo metaboHe npoФnIpo nHTnxO6 KyHeBa dAcTypePo TaBaccTy npoΦnIXo uroX,dopei.
1 HnOHN oofunxopo TaKpopaH 3ep KyHe, To TaBOHeJ AKe a3 npoofunxOn paHrapo nHTnxO6 HAMoeI (Pacm 16). Xamai npoofunxO dOpou paHrxOn rHyOry Me6oHaN. 2 Bo 3epkyHn HnwohXon HywokxO 6o k Jamc e 3epkyHn HnwoHn «More Drinks (HywokxOn nirap)», Hywoknepo nHTnxO6 HaMOeJ. 3 Hywokpo MyBoΦnKm Ma3an WaxcT TaH3m HAmOe. 4 TyrmaN «Ofo3/nt»-po Kxu KyHei, To TaiepkyHn KaXBa nHTnxo6yda Ofo3 Kapda Waban. TaH3mOTn HABn ymo nap npoqun paHrgn HHTnxo6yda Hroox DoWta wyD.
1 LMyo xamea MeTaBOHeT TaH3nMOTn NeuΦap3po TaHXO xaHROMN XOMyW 6ydaHn daCTRO, 6apkapop HAMoeI ('Bapkapopco3nn TaH3nMOTn acn'-po 6nHe).
PpOJIIMexMOH
MouHn Hymo 60 npoHm MEXMO MyaXa3 ydaact. BaTe KnpoHm MEXMO nHTxO6 Kapd a MeaBaA, HnHOHa npoHn Xomy act. BaTe Kn IN npoHpno nHTxO6 mekyed, Lymo xoLo xaM MetaboHeT TaH3mOTPO MyBOHKn XoxuHn Xyd nHTxO6 KyHe, AMMO daCTypxoE, Kn nCTnfoJa Me6apeD, HnFOX, Do7a HaMeaBaHd.
A8 KoHTeHep HygieSteam
A9 Kpnka HygieSteam i3 Tpmaem Tpy6kn dny MoIoka
A10 BHytpiUniKanyuHaTOp
Akkecsyapn
A21 KOnTeHepДЯ MoIoka
A22 Milk pipe
A23 Screw for cleaning
A24 Milk jug
A11 Steam pipe A12 Pressure regulator A13 Funnel for ground coffee A14 Brewing unit A15 Service door A16 Water reservoir A17 Coffee bean container A18 Coffee bean container lid A19 Drip tray cover A20 Drip tray full indicator
A25 AquaClean filter A26 Measuring spoon A27 Test strip for water hardness
Control panel
Different versions of the coffee machine are available. Their control panels differ, but all buttons and symbols are functionally identical. The location of all buttons and symbols is shown in fig. B. Their description is given below.
Press the arrows up or down to scroll through the data on the display. To select and confirm a choice, press the OK button.
B1 On/Off button
B6 Navigation buttons (up, down, back)
B23 Ready indicator
B7 Display
B3 CoffeeMaestro symbol
B8 Machine parameters
B43 Main menu symbol
B9 Maintenance
B5 Start/Stop button
B10 Special profiles
Introduction
Welcome to the world of automatic coffee machines from Saeco! To fully utilize all the possibilities that Saeco offers, please register your appliance at:
www.saeco.com/MyCoffeeMachine and register your product.
Note. During testing at the factory, coffee was brewed in your coffee machine. It was then thoroughly cleaned, but some coffee residue may remain. However, we guarantee that you have received a completely new coffee machine.
Do not use caramelized or flavored coffee beans.
Preparing drinks with milk
1 Fill the water reservoir with fresh water from the tap, and the bean container with coffee beans. 2 Unscrew the lid of the milk container and fill it with milk (Fig. 7). Then insert the metal milk tube into the container.
For optimal results, always use milk from the refrigerator.
3 Connect the milk tube to the cappuccinatore (Fig. 8). 4 Touch the icon of the desired drink (Fig. 9) with milk or the “Menu” icon to select another drink (Fig. 3).
The drink can now be customized according to your preferences (Fig. 10).
5 Press the Start/Stop button.
- For preparing certain drinks, the machine first dispenses milk, then coffee. For many other drinks, the order is reversed: the coffee maker first dispenses coffee, then milk. - To interrupt milk dispensing before the machine has delivered the preset amount, press the Start/Stop button.
6. Pour the hot water (with or without milk), the first machine will finish preparing, pour and hold the start/stop button 7. Immediately after the pour, the Hygienic Steam Shot (automatic steam) check will be performed. The machine will perform a steam cleaning cycle, if only the last one.
Preparing coffee with pre-ground beans
1. Open the lid and pour one level scoop of pre-ground coffee into the funnel (Fig. 11). 2. Select the pre-ground coffee by pressing the up or down arrow keys (Fig. 12). Then press the start/stop button.
Note. If you select pre-ground coffee, you will not be able to adjust the strength and/or prepare several cups of coffee at once.
Hot water dispensing
1. Check that the internal funnel is correctly attached to the machine (Fig. 13). 2. Place a cup under the dispensing spout. 3. Press the "Hot water" button (Fig. 3) and scroll through the menu to select "Hot water".
4. Use the up and down arrows to adjust the quantity or temperature of the water according to your preference (Fig. 14). 5. Press the start/stop button 6. To start dispensing hot water, the first machine will finish preparing, then press the start/stop button again.
Creating your own coffee profiles
The machine allows you to create your own coffee recipes according to your preferences and save them in a personal profile. Different profiles have different color markings.
Preparing coffee using the CoffeeMaestro function
Your coffee machine allows you to choose flavor profiles to record, so that you can set all settings individually using the CoffeeEqualizer function. You can choose between Delicato, Intenso, and Forte profiles. To select a CoffeeMaestro flavor profile:
1. Touch the symbol of the required coffee (Fig. 2) or the "Other coffees" symbol to select another coffee (Fig. 3). 2. Press the CoffeeMaestro symbol several times (Fig. 15). 3. Press the "OK" button to confirm the selection.
The basic coffee settings are then adjusted accordingly. 4. Press the start/stop button to start preparing the coffee.
CoffeeEqualizer function
The CoffeeEqualizer selection function is activated automatically. Using the up or down arrows, you can adjust the following parameters:
1 Quantity of dough 2 Quantity of water 3 Quantity of milk 4 Quantity of water 5 Temperature
6 Quantity of flour 7 You can also determine the number of pieces at once 8 Quantity of water for the main dough (only in some models)
Note. These same parameters can be set depending on the selected program.
Selecting a profile
You can select a profile and save the recipe using the profile symbol.
1 Press the "Profile" key to select one of the color profiles (Fig. 16). All profiles have different color markings. 2 Select the name by touching one of the symbols of the liquid ingredients or the "Add ingredients" symbol. 3 Set the ingredient properties according to taste. 4 Press the Start/Stop button to brew the selected drink.
- Your settings are now saved in the selected color profile.
It can be caused by factory settings (see 'Restoring factory settings').
Grinder profile
A grinder profile is installed on the machine. To select it, press the profile button. Having selected this profile, you can still personalize the settings according to your preferences, but your settings will not be saved.
Setting the grinder
Setting the water hardness
For optimal productivity and to extend the service life, we recommend setting the water hardness according to the indicator in your region. This also prevents scale buildup in the machine. The standard water hardness value is 4 (hard water).
Check the water hardness in your region using the test strip included in the packaging.
1 Immerse the test strip in the water for 1 second (Fig. 18). 2 Wait 1 minute. The number of squares on the test strip that turn red indicates the hardness (Fig. 19) of the water.
Set the correct water hardness in the machine.
1 Press the 'Settings' button, then press the arrows up or down to select 'Water hardness'. Then press 'OK' to confirm the selection. 2 Select the water hardness level using the up and down arrows. The number of red squares on the display must match the test strip (Fig. 20). After selecting the correct hardness, press 'OK' to confirm the selection.
Adjusting the grinder
The fineness of the grind can be changed using the grinder adjustment dial, located inside the coffee bean container. There are 12 different grind settings, from fine to coarse.
The grinder is factory-set to ensure the optimal taste of your preferred coffee type. Therefore, we recommend not adjusting the grind setting until you have brewed 100-150 cups of coffee (approximately 1 month of use).
The grind setting can only be adjusted while the machine is grinding coffee beans. The taste difference will only be noticeable after brewing 2-3 cups. Do not turn the grinder adjustment dial more than one notch at a time to avoid damaging the grinder.
1 Place a cup under the coffee spout. 2 Open the lid of the bean hopper (Fig. 21). 3 Press the 'Menu' button, then press the start/stop button. 4 While the grinder is grinding, press the grinder adjustment dial handle and turn it left or right (Fig. 22).
By pressing the «Start Pause» button, you can adjust the settings of the washing machine.
Water hardness: You can choose one of 5 levels, which corresponds to the water hardness in your region. - Delay start: You can choose 15, 30, 60 or 180 minutes. - Display brightness: You can choose low, medium or high. - Language: You can choose the desired interface language. - Sound: You can turn on or turn off the sound signals of the machine. - Default settings: You can choose «Always on», «During preparation» or «Always off». - Single rinse: You can choose extra 60 minutes.
Switching off the washing machine
The washing machine can be switched off at any time.
1 Press the «Start Pause» button. 2 Select the delayed start, press the arrows up and down. Confirm by pressing the «OK» button. After each start/stop, confirm the start of the delayed start. The delayed start is saved.
Such delayed starts are made according to standard: water hardness, delay time, display brightness, sound, default lighting, program.
AquaClean water filter
Your machine can use the AquaClean filter. The AquaClean water filter can be installed in the water reservoir to preserve the taste of coffee. It also reduces the need to descale
the machine, prolonging its service life. The AquaClean water filter can be purchased in local stores or in authorized service centers.
AquaClean filter status indication
If the AquaClean function is enabled, the AquaClean filter status is always displayed on the screen as a percentage.
- If the AquaClean filter status is 10% or less, a corresponding message will be displayed on the screen for 2 seconds each time the machine is switched on. In the message, you will be prompted to replace the filter. - If the filter status is 0%, the machine will prompt you to replace the AquaClean filter each time it is switched on. -бхьшд -псьхьшд -псьхьшд -псьхьшд -псьхьшд -псьхьшд -псьхьшд -псьхьшд -псьхьшд -псьхьшд -псьхьшд -псьхьшд -псьxьшд -псьхьшд -псьхьшд -псьхьшд -псьхьшд -псьхьшд -псьхьшд -псьхьшд -псьхьшд -псьхьшд -псьхвшд -псьхьшд -псьхьшд -псьхьшд -псьхьшд -псьхьшд -псьхьшд -псьхьшд -псьхьшд -псьхьшд -псьхьшд -псьхьшд -псьхьashd -псьхьashd -псьхьashd -псьхьashd -псьхьashd -псьхьashd -псьхьashd -псьхьashd -псьхьashd -псьхьashd -псьхьashd -псьхьashd
Activating the AquaClean water filter (5 min.)
The machine automatically detects that the filter is installed in the water reservoir. Therefore, as soon as you install a new AquaClean filter, it needs to be activated in the «Settings» menu. When the machine shows a message about filter activation, you can still turn off the AquaClean filter, but first you need to empty the machine. Before using the AquaClean filter again, make sure there is no scale in the machine.
To activate the AquaClean water filter, it is necessary to prepare the filter by soaking it in water, as described below. If you do not do this, the machine may be damaged by the water filter, and it will turn on the pump and not allow the machine to make coffee.
1 Press the «MENU» button, press the arrows up or down to select the AquaClean function. 2 Press the «OK» button to confirm. 3 On the display, activation appears, press the «OK» button again. Follow the instructions on the display. 4 Soak the filter for 5 seconds (Fig. 23). 5 Check the filter, immerse it in a container with cold water, shake or squeeze it (Fig. 24). 6 Insert the filter vertically into the filter seat and into the water reservoir. Push it down until it stops (Fig. 25). 7 Fill the water reservoir with fresh water and install it in the machine. 8 Place a cup under the hot water spout. 9 Press the start/rinse button to start the rinsing cycle. 10 Wait for the water to flow from the spout for about 1 minute. 11 Now the filter is successfully activated.
Replacing the AquaClean water filter (5 min.)
After filtering 95 liters of water through the filter, it stops working. The AquaClean status indicator drops to 0% to remind you to replace the filter. While the AquaClean status indicator is displayed on the screen, you can replace the filter, even if the machine does not require it. If you do not replace the AquaClean filter, the AquaClean indicator will appear later. You can still replace the filter, but first you must remove scale from the machine. When the AquaClean status indicator drops to 0% or the machine reminds you to replace the AquaClean filter, perform the steps below.
1 Remove the old AquaClean water filter.
2 Install the new filter and activate it, as described in the section «Activation of the water filter AquaClean (5 min.)».
1 Replace the AquaClean water filter every 3 months, even if the machine does not indicate the need for such a replacement.
Removing the brewing unit
Visit www.saeco.com/care to get detailed video instructions on how to remove and clean the brewing unit.
Removing the brewing unit from the machine
1 Turn off the machine. 2 Remove the water reservoir and open the service door (Fig. 26). 3 Press the button (Fig. 27) PUSH (PRESS) and pull the brewing unit by the handle to remove it from the machine (Fig. 28).
When you remove the brewing unit from the machine, rinse it under running water and clean the coffee container.
Installing the brewing unit in place
Before installing the brewing unit in the coffee machine, make sure it is in the correct position.
1. Place the brewing unit in the correct position. The arrow on the side of the brewing unit should align with the reference arrow and the N mark (Fig. 29). If not, lower the lever until it touches the base of the brewing unit (Fig. 30). 2. Insert the brewing unit into the machine with the handle (Fig. 31) on the side guides (Fig. 32). Do not press the PUSH button. 3. Close the service door and insert the water tank.
Maintenance
Warning: Before performing maintenance, make sure the machine is turned off and unplugged, and wait until it is stable.
The table below provides details on when to clean the removable parts of the machine. Visit www.saeco.com/care for detailed information and video instructions. For parts that can be washed in the dishwasher, see Fig. B.
Removable parts Cleaning frequency Cleaning method
Troubleshooting
This section describes the main problems that may occur during use of the machine. Videos and a complete list of spare parts are available at www.saeco.com/care. If you cannot resolve the problem, contact the customer service center in your country. Contact information is in the warranty booklet.
Problem Cause Solution
The milk carafe is dirty
1. If the milk carafe is dirty, clean it thoroughly. 2. If the milk carafe has been used and is dirty, clean it (Fig. 7). Also, clean the metal part of the carafe.
The cleaning needle may be clogged; clean it with the tool provided.
3. Remove the cleaning needle from its housing (Fig. 8). 4. If the milk carafe is dirty, clean the milk carafe thoroughly or replace it with a new one (Fig. 3) to clean the milk carafe.
- Clean the milk carafe (Fig. 10) with a soft cloth.
5. Rinse the cleaning tool under running water.
- For milk-based drinks, the machine will first dispense milk, then coffee. For coffee-based drinks, the machine will first dispense coffee, then milk. To ensure the machine is clean after dispensing milk, rinse the cleaning tool under running water.
6. When the machine has finished rinsing (the rinsing cycle is complete), press the steam/stop button to stop the machine. 7. After 7 days of use, the «HygieSteam Shot» function must be cleaned. To clean the machine, use only clean water.
Cleaning the milk frother
1. After each use, clean the milk frother by rinsing it under clean water (figure 11). 2. After cleaning, to remove the milk frother (figure 12), press the release buttons and pull it out. Then press the steam/stop button.
Expert: If the milk frother is removed, it is not possible to use the steam function or the hot water function at the same time.
Cleaning with hot water
1. Place a container under the steam wand (figure 13). 2. Fill the cup with water. 3. Select the «Hot Water» function (figure 3) and adjust the temperature for hot water.
4. Press the up and down buttons to adjust the hot water temperature (figure 14). 5. Press the steam/stop button. 6. To stop the hot water cleaning, press the steam/stop button again.
Adjusting the water hardness
The machine can be adjusted to the water hardness level and can be set to the correct water hardness. There are different levels of water hardness.
Cleaning with the CoffeeMaestro function
The machine can be adjusted to the water hardness level using the CoffeeEqualizer function. You can choose between Delicato, Intenso, and Forte. To select the water hardness with CoffeeMaestro:
1. Press the water hardness button (figure 2) or select another water hardness by pressing the «Water hardness» button (figure 3). 2. Press the CoffeeMaestro button (figure 15). 3. Press the OK button to confirm your selection. The water hardness is now set. 4. To start cleaning, press the steam/stop button.
CoffeeEqualizer function
After selecting the water hardness, the CoffeeEqualizer function is automatically activated. To adjust the parameters, press the up and down buttons:






1. Milk quantity 2. Coffee strength 3. Water quantity 4. Water temperature 5. Water temperature
6 Ke6ik mJIeepi 7 CoHbMeH KaTap 1 HeMece 2 cTaKaH daYbIHdaI aJaCbI3 8 Kon kpykkaHa apHaIFaH Kofe MeIepi (TeK Kei6ip TypJeppe)
Eckeptne:OnnapaMetpneipin ci3 peTten aIaNbIH ci3 TaHdaFah cycbHfa 6aINaHbICTbl.
PpOJIbI TaHdA
PnpnIbI TaHdAn, npOeNJIdep eJriWeCIN naIdaIaNbIn peeTITcakTaHb3.
1 TycTI npoHnIbepIN (cypET 16) 6ipIN TaHday ywiH npoHnIbep 6enriweciN kaTAtyptiH3. BapJIbIK npoHnIbepDe 6acka Tc 6ap. 2 Bip pet Tpytinetin Ccbih 6eJIiweIepHH 6ipH TpyHeme «KocbIMwa cycbHap» 6enriueciH TpyT apKblc CcbIHbTaHaHb3. 3 CycbH npaMeTpIepiH TaHdayIbI dAmiIzre peTTeH3. 4 C13 TaHdaFaH cybHdbi KaHaHTy yuH icKe Kocy/TOKTaTY TImecih 6acbHb3 -Ehdi jkaHa npaMeTpIep ci3 TaHaFaH tyCTI npoHnbde caKaTaNfAH.
654 Ka3aKwa
i C3 MaunHaBn (Keipi3 3aybTTbK npaMeTpIepre KaIIbHa KeTipy') 3aybTTbK npaMeTpIepin YHemi KaIIbHa KeTIpe aIacbl3.
KoHaK npoФиJI
MaunhaB3 KOHa, npoOpimEn Xa6bikTaNfAH. KoHa, npoOpnI TaHdAnca, npoOpnIb 6enriweci owei. OcbI npoOpnIbDi TaHdaCaHbI,napaMeTpnepi XeKe TeHWeJIIMiH3re Dep6cTeHNipe aIacbI3, 6ipak ci3 KaHaTaTBn peCenTTep caKtaImaNdbI.
KocbIMsa aty (ExtraShot)
MaunHaB3 KoΦemH cyTITc cybIHapFa pnCTpeTTOHbIH KocbIMwA ypbICbIH KOCy MymKINiH ycbHaBb (Mbicanbl, KyTIpeK KoΦe KaKet BoNca).
1 Ljmyek actbHa cTaKaH KOyblb3. 2 BaKa CysBnDy (cpeT 2) TaHday ywiH 6ip pet TyptiTeIH cybHnap 6enriWeciH TyptiH3 Hemece cycbHdbi (cpeT 3) TaHday ywiH «KocBmua CysBnap» 6enriWeciH TyptiH3. 3 Kywi eH xofapbI deHreire opHaTy yuiH xofapbI KepeTkiHi naJaIaHbIn, ExtraShot yHKcIacBn (cypet 17) TaHaIbI3. 4 BaKa npaMaTePnpIepe6ecTeHdpy KepeK 6oNca, OK 6enriWeecin TyptiH3. OdaH KeiH cycbHdbI KaHaTyDbI 6actay ywiH icke Kocy/ToKtaTpy ■YMeCih 6acbHbI3. 5 MaunHa ToKtaFaHwa TaMb3yDbI TOKtaTy ywiH, icke Kocy/TOKtaTy TmuMeciH kaTa 6acbHb3.
1ExtraShot cyHKcncsTaHaJca,6ip yaKaBITa TeK 6ip Kofo KaHata aJacbI3.
KypblfblnapaMeTppeH peTey
CytbIH KaTTbIJIbIFbIH TaHday
The machine is designed to operate with the water hardness parameters you have set, and it is used to adjust the water hardness level. Along with this, the machine's operation and maintenance are simplified. The main parameter of water hardness: water hardness.
To set the water hardness, follow the water hardness measurement procedure given below:
1. Immerse the water hardness test strip in water for 1 second (Figure 18) and remove it. Wait for 1 minute. The number of red squares on the test strip (Figure 19) indicates the hardness level.
Set the machine's water hardness:
1. Press the "Water hardness" parameter button to select the parameter, using the up and down arrows. Then press OK to confirm. 2. To set the water hardness level, use the up and down arrows. The number of selected squares should match the number of red squares on the test strip (Figure 20). 3. If the water hardness is set, press OK to confirm.
Adjusting the rinse aid parameters
The rinse aid parameter is adjusted in conjunction with the water hardness. The harder the water, the more rinse aid is needed, and the softer the water, the less rinse aid is needed. There are 12 rinse aid parameter levels to choose from.
The machine should be set to the lowest rinse aid setting. To do this, press the rinse aid parameter button 100-150 times (approximately 1 second each).
During the rinse aid adjustment, the rinse aid parameter can be set. To do this, turn the machine off and on, and wait 2-3 seconds. To avoid over-adjustment, the rinse aid parameter should be set one step at a time.
1. Open the detergent dispenser lid. 2. Pour the rinse aid into the dispenser (Figure 21). 3. Close the lid and press the start button. 4. When the rinse aid adjustment is started, the rinse aid parameter is set to the lowest level, and then it is increased or decreased (Figure 22).
Adjusting other machine parameters
To adjust other machine parameters, follow the steps below:
Water hardness: Set the water hardness to one of the 5 levels. Delay start: Choose 15, 30, 60, or 180 minutes. - Screen brightness: Select the low, medium, or high parameter. Language: Select the desired language. - Sound: The machine can be set to silent, low, or high volume. Additional settings: Select the "Intensive wash", "Rinse plus", or "Intensive dry" parameter. - Θινεμ δίρηπι: Mινεμεύνησα ἀραςθήτητης τοῦντης αἰλαςθή.
Resetting to factory settings
The machine can be reset to factory settings at any time.
1 Press the button to select the parameter. 2 To select the "forgotten parameters", press the up and down buttons. Press OK to confirm. 3 To enter the parameters, press the start/stop button.
The following parameters can be entered: water hardness, salt consumption, rinse aid dosage, temperature, drying, profile.
AquaClean water filter
The AquaClean filter must be installed in the water supply. To ensure proper operation, the AquaClean filter must be installed in the water inlet. The filter must be replaced when the appliance indicates that the filter needs to be replaced. The AquaClean filter can be purchased from a service center or an authorized dealer.
AquaClean filter indicator
If the AquaClean filter is empty, the AquaClean filter indicator will light up on the display.
If the AquaClean filter is 10% or less full, the appliance will show a warning on the display. This warning also reminds you to replace the filter. If the filter is 0% full, the appliance will ask you to replace the AquaClean filter.
Replacing the AquaClean filter (5 ml)
The appliance automatically detects when the filter needs to be replaced. After the replacement, the appliance must be reset. The appliance will show a message to replace the filter. After the replacement, the appliance must be reset. 1 Before replacing the AquaClean filter, the appliance must be switched off.
When replacing the AquaClean filter, the water supply must be turned off. If this is not done, the appliance may draw in air and cause damage to the appliance and the water supply.
1 Press the "Start" button to select the "AquaClean" parameter using the up and down buttons. 2 Press OK to confirm. 3 If the tap is open, press the OK button again. The tap must be closed. 4 Press the button for 5 seconds (figure 23). 5 Press the button to lower the filter into the water (figure 24). 6 Press the button to raise the filter to the water inlet. Press the button (figure 25). 7 Fill the water inlet with clean water and attach it to the appliance. 8 Press the button to open the water inlet. 9 Press the start/stop button to start the replacement process. 10 Wait 1 minute. 11 The filter is now replaced.
Replacing the AquaClean filter (5 ml)
After 95 liters of water have been used, the filter must be replaced. The AquaClean indicator will show 0%. The filter must be replaced. If the AquaClean indicator is displayed, the appliance must be reset before replacing the filter. If the AquaClean filter is not replaced, the AquaClean indicator will flash after the next use. If the filter must be replaced, the appliance must be reset first.
AquaClean filter expert tips for maintaining your AquaClean water filter:
1. Remove the AquaClean water filter. 2. To replace the filter, follow the instructions in the "Replacing the AquaClean water filter (5 min)" section.
If the machine indicates that the filter needs to be replaced, replace the AquaClean water filter every 3 months.
Removing and installing the water hardness test strip
For instructions on removing, installing, and cleaning the water hardness test strip, visit www.saeco.com/care.
Removing the water hardness test strip from the machine
1. Turn off the machine. 2. Remove the water tank and the drip tray (fig. 26). 3. Press the PUSH button (fig. 27), pull the water hardness test strip holder, and remove it from the machine (fig. 28).
When the water hardness test strip is removed from the machine, the water hardness and coffee settings are not affected.
Installing the water hardness test strip
When installing the water hardness test strip, make sure it is inserted correctly.
1. Insert the water hardness test strip correctly. The arrow on the yellow cylinder in the holder must align with the black arrow and the N (fig. 29) mark. If they do not align, press the water hardness test strip (fig. 30) until it is properly seated. 2. Insert the water hardness test strip holder (fig. 31) into the machine (fig. 32) until it clicks. Press the PUSH button. 3. Replace the drip tray and water tank.
Cleaning and technical maintenance
Regular cleaning and technical maintenance will keep the machine in good condition and ensure good coffee and a long, trouble-free service life.
Clean the removable parts with warm water and a mild detergent. Do not use abrasive cleaners or sharp objects. For accessories and spare parts, visit www.saeco.com/care. When cleaning the removable parts, refer to the figures.
Cleaning the removable parts with warm water
1. Remove the water tank (see 'Removing the water tank' section). 2. Rinse the water tank with fresh water. 3. Clean the inside of the water tank with a soft cloth (figure 40). 4. When replacing the water tank, push it down firmly. To prevent lime scale build-up in the water tank, wipe it with a dry cloth.
Cleaning the water tank with the milk carafe cleaning function
Place the Philips milk carafe cleaning tablets.
1. Turn the cleaning dial to select the 'Clean water tank' parameter. 2. Press the OK button to start the cleaning cycle.
Descaling the water tank
To ensure proper functioning and to prevent the water tank from becoming clogged, descale the water tank every 2 months.
1. Remove the water tank (figure 41) and empty it. 2. Fill the water tank (figure 42) with fresh water up to the MAX mark. 3. Add the descaling agent (figure 43) to the water tank.
Cleaning programs for the two milk carafes
The machine has two cleaning programs for the milk carafes:
'HygieSteam Shot': The machine uses steam to clean the inside of the milk carafe. 'HygieSteam': The machine cleans the milk carafe with hot water and steam. HygieSteam is indicated on the display (figure 44) and on the machine (figure 45). To use it, fill the water tank, then press the cleaning button on the display.
- 'Deep Milk Clean': To thoroughly clean the milk carafe, use the 'Deep Milk Clean' procedure with the Philips milk carafe cleaning tablets.
Cleaning the milk carafes in the dishwasher
1. Remove the milk carafe (figure 47). 2. Disassemble the milk carafe (figure 48). 3. Remove the upper part (figure 49) and the lower part of the milk carafe. 4. Place all parts (figure 50) in the dishwasher and clean them. 5. Rinse the milk carafe with clean water. 6. To reassemble the milk carafe, place it back in the correct position and ensure the parts are properly aligned. Then place the milk carafe back (figure 13). 7. Do not use abrasive cleaners.
For more information, visit www.saeco.com/care.
The descaling procedure
Use only Philips descaler. If you use other descaling agents, citric acid or vinegar-based descaling agents (acid water), this may damage your machine and may lead to the need for repairs that are not covered by the warranty. Philips descaler is available at many retailers. If you have difficulty finding it, contact the Philips Consumer Care Center in your country.
1 When the machine asks for descaling, press the OK button to start. If the machine does not ask for descaling, press the MENU button and select 'Descale'. 2 Remove the water tank, the drip tray and the HygieSteam wand (fig. 35), empty them and put them back. 3 Remove the water tank and empty it. Fill it with fresh AquaClean water. 4 Pour the Philips descaler into the water tank up to the CALC CLEAN level (fig. 51) and fill the rest with water. Then put the tank back. 5 Place a large container (1.5 L) under the coffee dispensing spout. 6 Insert the HygieSteam wand into the container (fig. 44) and turn the machine on (fig. 45). Place the steam wand in the steam position (fig. 46). 7 To start the descaling procedure, press the START button. The descaling procedure takes about 30 minutes and consists of a descaling cycle and a rinsing cycle. 8 When the descaling cycle is finished, empty the water tank and the container. Press the START button again. 9 Fill the water tank with fresh AquaClean water and replace it (see 'Replacing the AquaClean water filter (5 min)').
Note: Using the AquaClean water filter reduces the need for descaling!
If the descaling procedure is interrupted, the following actions are required
You can stop the descaling procedure by pressing the power button.
If the descaling procedure is interrupted, do the following:
1 Empty the water tank and fill it with fresh water.
2 Fill the water tank with fresh water and add the CALC CLEAN (descaling) solution. Put the machine back on. Replace the drip tray and the coffee grounds container. 3 Run a rinsing cycle with the water tank in place. To run a rinsing cycle, remove the water tank, empty it, fill it with fresh water, and put it back. Then run a rinsing cycle.
Tip: If the descaling procedure is interrupted, the machine will ask you to run the descaling procedure again from the beginning.
Error codes
The table below lists the error codes that may appear on the display. For more information, visit www.saeco.com/care. If you need further assistance, contact the Consumer Care Center in your country. Check the warranty for more details.
Error code Possible cause and solution
| 01 Koфeni shyfnbimacbi 6iteiIreH. | Maшинаы ewipin, pozetkaadan axbipatbH3. KaHataу kypalbH aIbIbI3. Odnai Keiin aIbIbH aIa yHTaKtIaH KaOfe 6eIiMi KaKNaFbH aIbIbN, KaCbIK ca6bH cIbIbH3. bIteRen yHTaKtIaH koFe TEmeH (cpeT 37) TycKeHne TyTkAhn JxOfarbJ xHe TEmeH XbIbXbIbH3. ToIbIK 6eHne HycayLapDbI aIy yUHIN www.saeco.com/care Topa6bHa KipiH3. |
| 03 KaHatau kypalbi JaCTaHFaH HeMece XaKcBi MaIIaHbSaFAn. | Maшинаы ewipiH3. KaHatau kypalbH ta3a cyMeH shaBIn, ayada KeTIpIin, onbI MaIIaHbI3 (KeiH3 'KaHatau kypalbH MaIIay!). «KaHatau kypalbH ta3aIay» TapaybH KapaHbI3 HeMece ToIbIK 6eHne HycayLapDbI aIy yUHIN www.saeco.com/care Topa6bHa KipiH3. Odnai Keiin MaShinaHbI KaIbTa KocBbH3. |
| 04 KaHatau kypalbi dIpybc opHaJIaCTbIPbJIIMaFAn. | Maшинаы ewipiH3. KaHatau kypalbH aIbIbN kaIbTa caIbHbI3. KaHatau kypalbH cany aIbIbHd aIpybc KIyde eKeHdiH TekcepH3. «KaHatau kypalbH KOJaHy» TapaybH KapaHbI3 Hemece keleci TopaIka KipiH3: www.saeco.com/care Topa6bHa KipiH3. Odnai Keiin MaShinaHbI KaIbTa KocBbH3. |
| 05 Cy ti36erHnde aya 6ap. Θwipin KaIta Kocumem MaShinaHbI KaIta icke KocBbH3. Erep 6yI icTece, 2-3 bICTbIK, shbHraYbH aftb3bHbI3. Erep MaShina KaFbH y3aK, yaKbIT KeTipMecH3, onbI KaKTaH Ta3aIaHbI3. | |
| AquaClean cy3rici opHAty aIbIbHda IpybIc daIbHdaJIaMafan Hemece 6iteIreH. | AquaClean cy3rici aIbIb, KofoHoi KaIbTa KaHatabHbI3. Erep ocbI icTece, AquaClean cy3rici Kepi cany aIbIbHda IpybIc daIbHdaIbI3. AquaClean cy3rici cy bIdbIbHa Kepi caJIbHbI3. Erep 6yI aJI de icTeMece, cy3ri 6iteJyI yMmKIn xJhe aybCTbpy kepeK. |
| 11 MaShinaHbI 6eIme tempepaTypaBHa peTTEy KepeK | MaShinaHbI N Kojik/cbIptKbI TempepaTypaHbI 6eIme tempepaTypaBHa DeiH peTTEyIe ShaMaJIy yakBt 6epiH3. MaShinaHbI 30 minHTa KaWipin, onbI KaIbTa KocBbHbI3. ByJ xMybIC icTeMece, eIiH3deri TybH YuHbIaPdI Kollay opTaJIbFbHa xa6apLacbHbI3. BaIIaHbIC mAlimetTepiH kenlndiknapaKsaCbHaH KapaHbI3. |
| 14 MaShina KaIbH JxTbIp. MaShinaHbI eWipin, 30 minHTaHn KeiH KaIbTa KocBbH3. | |
Error code
Possible cause and solution
19. The machine must be connected to a grounded socket.
Make sure the plug is inserted into the grounded socket correctly.
Using the machine for the first time
For maintenance and repair of the machine, contact the official Philips service center. You can buy original spare parts from these service centers or from authorized dealers. To avoid any problems, use the machine only with original parts. For service, contact the official service center.
Technical service and spare parts:
Descaling agent CA6700 - AquaClean water filter CA6903, milk frother HD5061, coffee bean container CA6704, water hardness test strip CA6705, technical service and repair CA6707
Cleaning and care
This chapter describes the cleaning and maintenance of the machine. For cleaning instructions, see the relevant sections in the user manual at www.saeco.com/care. If cleaning is not possible, contact the service center. Do not use abrasive cleaners or sharp objects.
Troubleshooting
| Мених онлайнkoфе машаимьн iшінда кофе калдыктары бap. | Бул машана koфемен сындан. Мужая тазалидан. Браз koфе Калдыктары Калуы мумки. Дereнmen, Машана мулда ќана. | |
| Тамшиhal hayасы кылдан Толады/Tamшы Hayasbнда у hemi шамалы cy boлды. | Бул калыntы жafдай. Машанада iшki ti36ekti жане калнату Куралын shaiofa cy пайдалин лады. iшki чуve аркын tikeл征 Тамшы Hayasвиha cy afaны. | Тамшиhal hayасы кун салын 텍ес Кызлл«Тамшы hayасы Толык» Инданутбы Тамшы hayасын, Каллары аркын чынллыктaffen calын босатунлб. Кени: уллары сydы xин hay ушin Тамызушуmerін Стakанды Коклны. |
| «Кофе унтakтары ыдысын бocatу» белriшеша кocулы Калады. | Кофе унтakтары bIDысын Машана кабирва розетахынан жырatableнллдан Kezeide босатунлб. H��есе оны Жылдан opнына салынлб. | Кофе унтakтары bIDысын alын, кени 5сякунд кут,在 оны салынлб. |
| Кофе унтakтары bIDысы Томаса дa, машана мafан bIDыICTыбocatуды Усынды. | Машана koфе унтakтары bIDысын bocatkaHHan KeINH ecenteriшт ka'ta opnatna'dы. | Кофе унтakтары bIDысын кени Kezeide ушamamen 5сякунд кутіз.Осы opайda, koфe пaketting ecenterіш Heл're opнотылды жэne koфe пakettingін, салы дурьс ecent\'elenidi. |
Troubleshooting
| Кофе унтakтары bIDICbI aprtbik toIfahnЖаHe dinspilneide «Кофe унтakтары bIDICbIHбocatuy» bclruiucesi naida 6oImaHAN. | Тамшь hayasbcn Kofo dAndepi bIDicbIH bocatycbI3 shIFapdbIbI3. | Тамшь hayasbcn any KeziHne Kofo yHTaKaparbIbIbIDcBnH, tiTt, a3 fana KaOpe naketi 6oJca da 6ocatbIbIbIbIbIbIbIbIbIbIbIbIbIbIbIbIbIbIbIbIbIbIbIbIbIbIbIbIbIbIbIbIbIbIbIbIbIbIbIbIbIbIbIbIbIbIbIbIbIbIbIB |
| Кайату куралын Any MymkIN emec. | Кайату Куралы дурс opbynda emec. | Машинаны keleci xolmeh kaiTa opHaTbIbIbI: Kbl3MeT Kepcety ecirih kaybI, cy bIDcBnH kepi calbIbIbI. Машинаны eupipin, kaiTa KocbI, «CycbH» 6eJIiWepeipInderi shamapdIbIh KocblnybIh KytIbI3. Кайату Куралы kaiTa albIn kapaNbI. KadaMbIK hcyckaynapdbI «KaiNaty KypalbIn any xhe cany» TapaybHaHn KapaNbI3. |
| Кайату Куралын Any MymkIN emec. | Кайату Куралы дурс opbynda emec. | Машинаны keleci xolmeh kaiTa opHaTbIbIbI: Kbl3MeT Kepcety ecirih kaybI, cy bIDcBnH kepi calbIbIbI. Машинаны eUPipin, po3ekadah axbIpaTbIbIbI. 30 cekund kytin, mашинаны kepi calbIbI, KocbI, «CycbH» 6eJIiWepeipInderi shamapdIbIh KocblnybIh KytIbI3. Odnan keiH kaiNaty KypalbIn Any pbcK Koye KoybIn, mашина KaYta calbIbI. KadaMbIK hyncaynapdbI «KaiNaty KypalbIn any xhe cany» TapaybHaHn KapaNbI3. |
| Кофe счык, Кайату Куралыл actanfahн hemec MaimaHaHbI kepek. | Кайату Куралы anbIyda. | Кайату Куралы anbI, onbI aFbIn cyda shaBIn, keptipyre kalDbipbIbIbI. Odnan keiH xblxblmaIb I6lweKteripin (kepiIbI3 'KaiNaty KypalbIn mailay') maiHaNbI3. |
| Машинада яжес peTtey proozdypacbs opbydailyda.Машинавы alfaW pet NaiaDalaHaHaDa, koFe dAndepinH, backa typine aybIcTbIPFaHda HeMece yzak, yaKbIT naiaDalaHaHaMaHaHaHaOcbI proozdypa ABTOMaTTb Tpyde 6actaIaDbI. | Машинага яжес peTtey proozdypacbIn aYkTayfa pyKcat ety yuIn, 5 kofe cTakahIn b6ipDeH kaiHaNbIbI3. | |
| TapTKbIIbTIbIM yLKeH napametprp opHaTbIbHaH. | TapTKbIIbTI duI (TeMeHipeK) napametprIne opHaTbIbIbI.ДамToIbIfbImen o3repreHne 2-3 cysbIn KaHAtbIbIbI3. | |
| Кофe яжерлікту bICTbIK, hemec. | Tempepatура Тыm Төmen DeHReRrE opHaTbIbHaH. | Tempepatура мakcimalduI napametprE (cypet 52) opHaTbIbIbI3. |
664 Kazakh
Troubleshooting
| Сыкстаан суби Temпературазьн Temе�тetei. | blctbikсумен shaio apkblibl шынайтарды щдын щалы кыздырьны3. | |
| Сут косу сухин Temпературазьн Теменитetei. | blctbik hemece symbik symt kockaынбila Карамостан, symt kocу kofoe Temпературазьн Teme�дertei. blctbik сumen shaio apkblibl swihajknapdln алдын щалы кыздырьны3. | |
| Кофе swыкайды hemece Кофе баяу swыfasл. | AquaClean cy suztici opnatуfa Дурbac дайындаимады. | AquaClean cyztricin albyin, swamalbly bcltbik cy aftb3bHbI3. Byl jymbic ictece, AquaClean cyztrici dypbc opnatbimafan. AquaClean cyztricin ka'ta opnatbIn, belecendpin, «AquaClean cy cyztici» Tapaybndaftb6aplbk kaadamapdln opbHdaHbI3. |
| YЗak yakbitt na'danabilmaca, AquaClean cy suztricin ka'ta na'danabnyfa da'yibnDan, 2-3 CTakah bICTbik cy afb3bHbI3. | ||
| AquaClean cy suztrici 6iteLreH. AquaClean cy suztricin 3 ai caibh aybictbipbHbI3. 3 ai'dan ecki cy3ri 6iteLiyi MymkiH. | ||
| Taptkbii tsbIM kiushkeHTa napametpre opnatbllfah. | Taptkbii tsbII yIken (xofapbI) napametpre opnatbHbI3. Byl kofoe dAmine tepic acep etetiniH eckepiH3. | |
| КaiHaTu KypaJIbIл ДостанFaH. Ka'HaTu KypaJIbH albIn, onbI aFbH CUMEN (көрінiz 'КaiHaTu KypaJIbH aFbH cy actbHda Ta3aJALY')ЖуbHbI3. | ||
| Кофе тamsby shymeri лactaHgan. Кофe тamsby shymeri xəne | ||
| caHbIayLapbH Ky6bIp Ta3aJALy KypaJIbIMeH hemece inHemeh Ta3aJALbI3. | ||
| Алдын олу ун��талган кофe Белimi 6iteLreH | Машинаны оширin, кaiHaTu KypaJIbH albHbI3. Алдын олу ун��талган кофe Бelimi кaknaftbH awbIn, ofan KaCbIK, cabHc calbHbI3. biteren yHTaKtaTalFah kofoe Təmen (cypet 37) tycKeHne TylKaHbI xofapbI xəHe TəMen XblXbITbHbI3. | |
| Машин taɪsberiн кak 6iteH TaCTaFah. | Машин kaftbH Philips кak ketipriiimeH (көрінiz 'Кak tucipy поцурасl' Ta3aJALbI3. Машин сizdeH cyphafH ke3de yHemi kaftbH ketipiH3. | |
| Сут көбіктелмeydi. lshi KaPPuChHaTOp lactaHgan Hemecse duþbIc calbHbSaFah. | lshi KaPPuChHaTOp dazalan, kuiH tekcepin, duþbIcTan (көрінiz 'lshi kaPPuChHaTOp dazal ta3aJALY') calbHbI3. | |
Troubleshooting
| Паиданынатын сут typi кеничесугаралmaфан. | Др турлі сут турлесугаралmaфан. | |
| Сутшашьогдь. Пайданынатын сут жжелikтiti Турдсалкын emec. | Тikелей тонашихштanh келетин сутп пайданынtsi. | |
| Илгий сут тутiri дурыс Жаллafнбafан. | Кофе тамызушmerгinh (сурет 47) ecirih ашын, млгштүхлүн калпунчинаторfa Толыfc们мен яаллafн falынka Желкizhi3. Калпунчинатор сут Тул�терь bICTbK bolyu bIM_MyMKIN ekeндigin eckepiiz3. Калпунчинатор сут тул�терdi Турту alдында оларды суытны. | |
| Калпунчинатор сут тул�тete Таэз emec. | Iшк калпунчинатор (көрінiz 'шк Калпунчинаторы aftbн суда тазалay') albyn 6әлшкөнiz. Барык, 6әлшкөнтрdi aftbн су actындашынbi. Дурьстан тazалay ушin Phillips сут ti3beriH тазалay Калын пайданыныз xэн Deep Milk Clean proшедурахьн тazалay ('мэзipi apkыл орьданыз.Ерр 6әлшкөн: ыdicхожыштэ тазаланca, оларfa тafam Баллөнтріnomes eaparkыш калыктары бiteлін kалы MMyMKIN ekendɪgin eckepiiz3. Соныmen katap, кedeprinHбap-жоын КөзбенTekcertу xsынылды. | |
| HygieSteam kaftарламасын кн сын opbдay xsынлды: 1)Backapy Тakтынан «Clean» (Tazалay) түмecin басынbi. 2)«HygieSteam» napametriH Тандаыз. 3)Прочeti вastay ушin icke Косу түмecinбасынbi.Одан кeиH Диспленde barык, кадamdarpы pacTaыз. | ||
| Сут тул�тeti 6iteлген. Сут bldicbigen yhemi cyt tUTikteripin TOHa3ытkiшka салмай сакtaнbi3. KaIIfah сут тул�тerte чиналын, тUTikterр apkылы otetiiH ctyt aftынынбогет solnyы MMyKIN. Сакту alдында сут тUTikterpiHшынbi3. | ||
| Машина afын жатkan сяяктbl. | Машинada iшк iizbekti xəнe Кайнату кралын shaюfa cy пайданынлды. Byl ny ciш Жуи epkылыtickeleт samы Hayasына afadbi. Byl kalibntbi Жаftдai. | Тамын hayасын кн сын hemece «Тамын hayасын тOTьк» ИndikaTopbi Тамын hayасынс KaKnaflыapkылы Жынылыктafan сын bi6ocaынbi3. Кени:Шаынfasн сdyi xiznay ушin Тамын hayasmerine stakanDi Konybln, Тамын hayasbndaftысу мелшеріn a3aityынbliz. |
Troubleshooting
| Tamшы hayasby Tbilm tolbik api tasyda, bylmaunhaibin kemy хаftдын ha укайды. | Tamшы hayasbih kyn caibin hemecce «Tamшы hayasbih tolbik» Иndikatopby Tamшы hayasbihn kaqnaftbapkblb Жылбытafan caibin 6ocatbiv3. | |
| Су bldbcbl tolbifbimeh caibinbip, су bldbcblahn shamalbci cy afbln, maunhaadn aya shbfapblalabdi. | Су bldbcbl duypbic opbihnda ekehdirin tekcepihiz: onbl albln, maunhafa 6apbhuza tepen etin kahta caibih3. | |
| Каиоту куралы laactanfah/6itejiren. | Каиоту куралышayibih3. | |
| Машина калdehenбетke орhalactbipbllmafahn. | Tamшы hayasbih tolmay, «Tamшы hayasbih tolbik» Иndikatopby duypbic kymblc icteitihne etin maunhaibk kaldehen 6etke orpahlactbipbih3. | |
| AquaClean cy cy3ricin белсану мушин emec жане машина кak тусipurdi cypardbi. | Зкранда AquaClean ecke caflbshki korectiilehen cy3ri ophaTbIImaDbHemece aybictbipbllmaDy. Byl maunhaHBH TOlbIFbIMeH wergindici3 emec ekehdirin 6ilipeidi. | Алдьимен, машина кafын тucipin, одан keiH AquaClean cy cy3ricin ophaTbIH3. |
| Жана сузгібекитлмeydi. | AquaClean cy cy3ricinienbacka cy3rini ophaTyfa alekete xacalnyda. | Tek AquaClean cy cy3rici kyyfbiffa сэйес кел徳i. |
| AquaClean cy cy3ricinideri pezehke calnHa opnbHda emec. | AquaClean cy cy3ricine pezehenke calnHa kepi calbHb3. | |
| Машидан кattыш шыfyda. | Падалану барында maunhaBnK Keibip shu shbFapby kaibntb jkaFdai 60bln ecentelende. | Еgre машидан ap typni shu shbIfa bactaca, кayHaTu kypaJIbH ta3aJAN, onbl maJlnaHb3 (kepiH3 'KaiHaTu kypaJIbH maJnay'). |
| AquaClean cy cy3rici duypbic daihydallmafahn xhe aya endi maunHaFa TaPbIaIbI. | AquaClean cy cy3ricin cy bldbcbln an blin, kepi calny aldbHda koJaNbBICka duypbCTan daibHdaHbI3. Kaadamblk, hyckaynapblb «AquaClean cy cy3rici» TapaybHaHn KapaHb3. | |
| Су bldbcbl tolbifbimeh caibinbip, maunhaadn aya shbFapblalabdi. | Су bldbcbl duypbic opbihda ekehdirin tekcepihiz: onbl albln, машина 6apbHsa terepen etin bcsbl kajta caibnbl3. |
Technical specifications
Spare parts for the specified models. The manufacturer reserves the right to make changes.
Spare parts
ωmi (e x 6 x d) 262 x 383 x 448 MM
Weight 8-8.5 kg
Cord length 1200 mm.
Water tank 1.8 liters
Coffee bean container capacity 300 g
Ground coffee container capacity 12 packets
Water tank capacity 600 ml
Adjustable spout height 87-147 mm
Nominal power - rated power - rated current measurement according to the characteristics indicated (see figure A15)
Fully automatic espresso machine
Manufacturer: "B.B." Gussenbauer GmbH, 9206 A.D., Grachten, Hnernand
Imported to the territory of the Customs Union by: "Technika I Doma FUnnc" LLC, Germany, 123022, Moscow, Serge Makeev K-st, 13 building, 5 office, XVII building, 31 belme, phone +7495961-1111
SM6585, SM6582, SM6580, SM6480: 230 V; 50 Hz; 1500 W, also 220-240 V; 50 Hz; 1500 W, with safety device
Temperature 0°C + 50°C
Humidity 20% -95%
Atmospheric pressure 85-109 kPa

Plastic parts are made of cardboard.

Plastic parts are made of LDPE, with a cardboard cassette.
Contents
Safety instructions 668 Safety instructions 668 General safety instructions 669 Intended use 669 Installation 670 Electrical connection 670 Operation 671 Maintenance and cleaning 672 Troubleshooting 673 AquaClean water filter 675 Cleaning the water tank 676 Replacing the water filter 677 Cleaning the drain pump 680 Cleaning the drum 681 Cleaning the detergent drawer 682 Cleaning the door seal 682 Technical data 687
Safety instructions (Type A)
A1 General safety instructions A2 Installation and connection A3 Electrical connection A4 Water connection A5 Operation A6 Maintenance and cleaning A7 Troubleshooting A8 HygieSteam function A9 HygieSteam function? Steam care A10 Detergent drawer A11 Water inlet filter
Installation
A21 Unpacking A22 Levelling A23 Water connection A24 Electrical connection
A12 Installation location A13 Electrical connection A14 Water connection A15 First use A16 Test run A17 Detergent drawer A18 Detergent drawer compartments A19 Steam function A20 «Steam care» button
The device is intended for the following use: to clean the water tank, it is necessary to remove the tank, then pour out the remaining water and rinse it.
A25 AquaClean filter A26 Water tank A27 Filter cover
Rjwnbntu 669
Warning: The appliance must not be used without the filter. The filter must be replaced regularly.
If the appliance is not working properly, check
B2 Water tank release button
Cleaning
B3 Coffee grounds container
88 Water level indicator
Cunpwulnnnub Saecogihuiuonnuunbuphapkaua qihuiquaugnpuaep:Saehunng wnuugpumn unonguagwugngng hunbpoganluydun wugbg www.sae.com/MyCoffeeMachine KngnD uuggud np
Lua 1u aepbuaa hnnnaua t ununn nua uua uuaanr daagpbyt b, shupwn np, np unnp
Luhugu unwohu wuquu oqnuqnodin

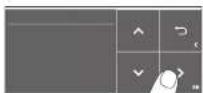

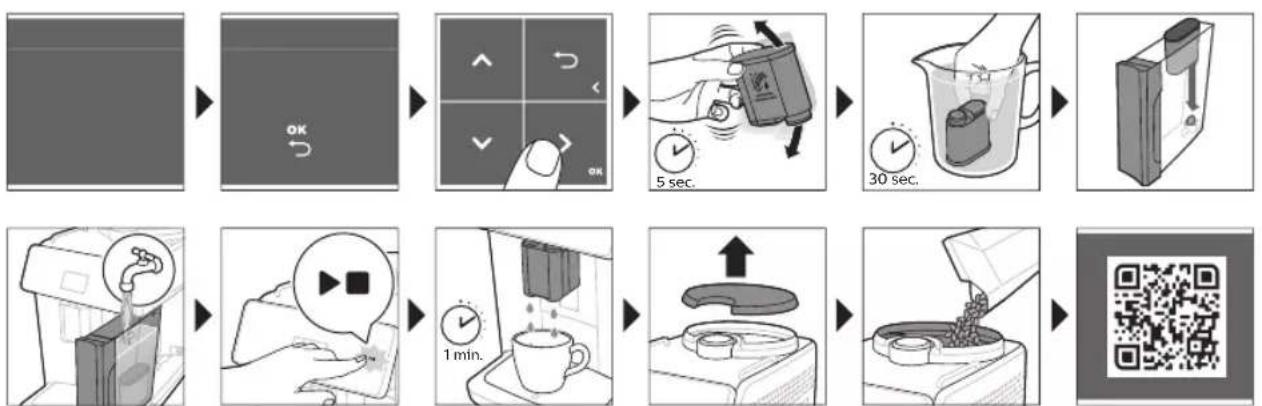
Rwnnqnnynpu
| Ruannu qnpwunnye | Luaunuul |
| Coffee Maestro | CoffeeMaestro qnpwunnuh oqunjwup lwnn bp wuhwnuwuugutl unoh ywnwnuwwu: Uju pnyl t unwhu ywnquwnnnubtu hupunnnju ywnuntni uhnuwntu punnptl uwhuwgtu uwhuwuulw hwuwwhu wnn$hl (Delicato, Intenso, Forte): |
| HygieSteam | HygieSteam $nulghwu wulunwu ln ywnwnu wwnnui t lwnah hwulwunqn htnugutnl uhnnonquwhuuttn: oqwnqnnbtg wju lwninghun lwnu lwn Unw hhuulw wjl nuwbihputn wwnnwnuanting hconn: |
| Ceramic Grinder | Utn nhuwglntu undwnwnu wwnwnwnuulw 100% utwnuuhlywg, nnuuqa wju luhpwunwubu lyn2n l2qphn: Uju lwnn t hunuwntgult atn aw2uylhu 12 uhnuug uwlwnwuluttnl: |
Cuihupn uunnuunn
Cunhuuin qnponnnipjntutn
12nhpwnpngbpognuh gnuhunoh hwnhyutn unnuh unndh wunhyutnnu: 2 Onnp hnngwup uungtpuhtunuh uwnu qunu npuh ub: Uhwgnbp hnuuph hnngwup uwnh uwnuhyu 3 Ungutuhuguwu/ugwnuunuynawynubpttuwhugutinhuwn:
- Uptuwulunui uupuwul uwnwnn wunnuw uunqwnghl:
- np nuubihpuh uyununwulutphn ninn niuwhu gnighubn uunlhu uunwnnni myunj, ubptwu wunwnwn t oqunwnn
4 Uninah ununununuun u npwuh unu unununpip wdu: Onnu uwhgntip utn uuw utnpu npwn pwnnnnup ounwqnnu nn puwuh gwhu hwuwunwuwubgwn hwiwn (U.1):
Sthuhyuwu funipawqntn
Ununwnnnn hnwnntup 1gwnwwhnwnpwnbwluwngh unhuhwuupu puniawqntnp: Lwhuwbu uwhuwuopinnpuwuyubn unwnuynbtu:
Uwnnnnnuu Untp
2wuh(xpxh)262x383x448u
Rujnttu
Pw28-8,5yq
| Rnuwugh lwnh bnyuunnjauni 1200 u | |
| 2nh pug 1,8 hnn | |
| Unipah hwunhyutph unnuh unwnnnnqajni 300 q | |
| Unipah 'tuunlqdph lnuunbgtph unwnnnnqajni 12 unwhonuw | |
| Uwah lnuunbgtph unwnnnnqajni 600 u | |
| Uwauwunlnuw hwuunwunnqjwup dnpuh pwnannpjt | |
| Uwauwunwuu wunni - wuwrwwu wu hqnnaqni - tblunwutngu wu wqnin | Stu unjuwutph uhnwl unwwuunlquw u nnuwuh utnuh lnnun (Uwn A15) |
| Uunnuwn unoh ubpttu wuwtungh whuwn | |
| Ununwnnn: «TU P.4», Snuutunhtbuwtu 4 w, 9206U7, Tnuhnttu, Uhnzuwuntnp | |
| Ubnynn Anwwunuth lu Uwpwuju uhnqjwu unwnwop: «Sjhuyu unthuhlw unu whuwun» UNC, Anwwunwuh Twzunqjntu, 123022, p. Unulquu, Utnqbj Uwyluh ch., un. 13, 5-pp hwnl, unwnwop XVII, ubjwul 31, hnzuhunuwuuwun +7 495 961-1111 | |
| SM6585, SM6582, SM6580, SM6480: 230 V; 50 Hz; 1500 W Lwui 220-240 V; 50 Hz; 1500 W | |
| Uwnp I nuwuh | |
| Utbugwunwuh yunhputph hwuwn | |
| Ununwnpduo f Anuwuhwunu | |
| Tuwwuuwuuw, 2wuwqnnduw u wunut | |
| 2bnuwunhawu 0 °C - +50 °C | |
| Rwnwptwnlquw hunwunlqnjntu 20% - 95% | |
| Upanwnnunwjuh duznui 85 - 109 kPa | |
| PAP | ηινυμυnhγ chwabjwunnμwι γuŋaŋp wunlgwδ bu pαŋgh μwui ununwjanagh: |
| 4 LDPE | ηινυμυhγ chwabjwunlμwι γuŋaŋp wunlgwδ bu LDPE-hg, βαβωι ωι ψι χι ψι ψι ψι ψι ψι ψι ψι ψι ψι ψι ψι ψι ψι ψι ψι ψι ψι ψι ψι ψι ψι ψι ψι ψι ψι ψι ψι ψι ψι ψι ψι ψι ψι ψ� |
B
689 aunn 36gmm 690 690 3nmgmgoaemyg6oao 690 866666666666666666666 691 a mbsgngoggnn bsbgngon 691 bbsgongnbbsgfoa gn agm36gonan m88gog 693 694 AquaClean 6yymnb gnnmfo h n 696 omgongn jmdmngd n dmgoos Bsgdo 697 698 600g0n86 868g60n6 3mG0y7 701 702 ogbgyomnab 3300ns 703 consgmbn 703 709
33mshnubndmbngm3s (bym. s)
A1 dəmngnbu 36gmn A2 6n6b6b6m wogd3nmo yognb 86ymgmo j0nb bygn A3 aomgcmngdamnb bygn A4 gmmmbggbb A5b630gmymub68mn A6 5830jmynmb58mnbgabmgon A7 magmngdoyn ygnb os mdnb Baaamubaggm Oybn A8 HygieSteam 3m6n6n A9 HygieSteam bogofn mdnb anmnl qdgfmon A10a003ybn6mnn A11 gmmmbg6nb 0030
GssdJgonn 6snggon
A21 mdnb 3m6ggn6gm A22 mdnb dnnn A23 b6d86gn 8mn A24 b3mbn6nnm
A12 aunnnn 8mnB aonnnn A13 yo3nb doymgongnbd A14 dmogongonb m3mgon A15 0d0g0n 0f0n A16 6ymnub38n A17 y3nlb 33mgdnl m6gngm A18 y3nbu 33mngnbu m6g6m6b6b6 366gn A19 630mgmub m63mub bs A20 n6gong3o4mnn "b68gongnmb 58a mbo b68go"
A25 AquaClean gngmghn A26 58m0n3m38n A27 6yynnbunbnbun b68b8m3mn0b0b- b8n
36gmo
www.saeco.com/MyCoffeeMachine-b 0000000000000000000000000000000000000000000000
The device is designed for use in a specific environment. It must be installed by qualified personnel, following the safety instructions provided. Before installation, check the device for any damage, and ensure that all components are included.
Safety instructions



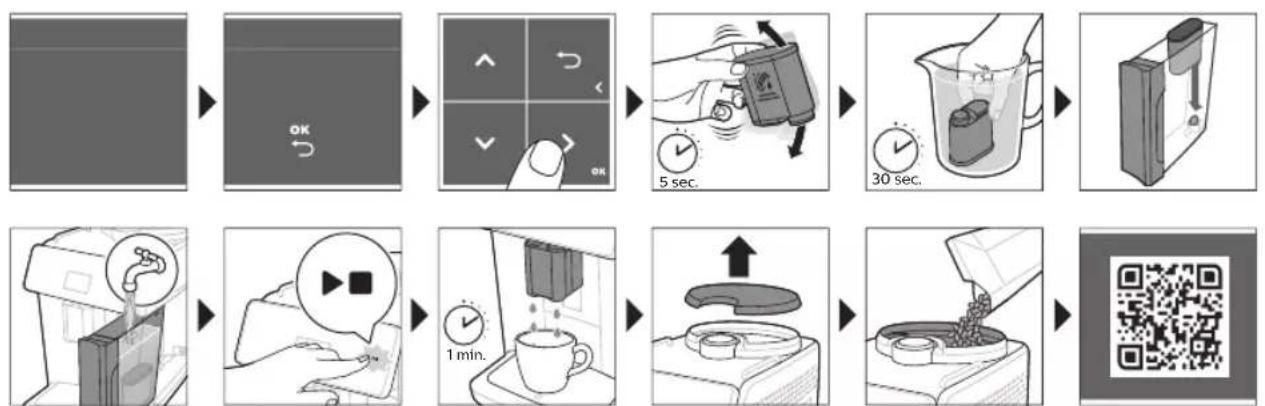
General information
| 632g | |
| CoFFEE Maestro | CoffeeMaestro-oo gandmnn ond308g oon dd8g mnn ond30y oo ond30n lubgannlunngn 6n5uugn gogfmn ngnml 3mnngmnol nnggnon (ogmn30g, no50bum, gmnff) nnd 603cmmg, mn d30bnn 003cmmn 3mddgongon. |
| HygieSteam | HygieSteam-nb g6gno 30mdo fynm 606gul mdnl bnu doo y os da mmdo anmmn608gob: gdmny6g no 303n6ml 6 mdnsn lubdaangdo ambmdn 008g. |
| Ceramic Grinder | B306n 00dmg bugd303n, mdoa mng 008cdoymn 100% 00mn306, asdmnhgmoq dyamn go 8ybdno. nu 00dmgdo yomgaanmgo 00d306 303g no 80d36gno 12 00gymn 006g. |
Intended use
Installation
The device must be installed on a stable surface, away from heat sources and direct sunlight. 2 00000000000000000000000000000000000000000000000000000000000000 3 000gnnnng Pmno/ogdmnoa n mmoa b ofoa n Babomno
- Ensure that the device is properly grounded to prevent electrical shock.
- Connect the power cord to a suitable power outlet, and ensure that the voltage matches the device's requirements.
4 Do not operate the device in areas with high humidity or dust. Do not operate the device in areas with flammable gases, as this may cause fire or explosion. Keep the device away from children and pets.
Maintenance
1 Clean the device regularly with a soft, dry cloth (Fig. 2) to remove dust and dirt (Fig. 3).
- Do not use abrasive cleaners or solvents. Use a slightly damp cloth (Fig. 4). For stubborn stains, use a mild detergent (Fig. 5) and then wipe dry with a clean cloth (Fig. 6).
2 200000000000000000000000000000000000000000000000000000 3 165d 3600000000000000000000000000000000000000000000000000000000000000000000000000
ng3g6n 30000000000000000000000000000000000000000000000000000000000000000000000000000
1 Ensure that the device is turned off. 2 Disconnect the power cord from the outlet (Fig. 2) and then disconnect the power cord from the device (Fig. 3). 3 Wait for the device to cool down before cleaning. 4 Press the OK button to confirm, and then remove the cover. 5 Use a soft, dry cloth to clean the interior, and then reassemble the device.
__SUPPIMER__
AquaClean filter
AquaClean filter replacement
- AquaClean filter 10% cleaning, 3 times a year, 2 liters of water, and a little detergent. For cleaning, remove the filter.
- Filter replacement 0%-no, with the AquaClean filter replacement, the water flow is 5 liters per minute, and the filter lasts longer.
AquaClean filter replacement (5 pcs.)
The filter should be cleaned regularly, and if the AquaClean filter is not cleaned, the water flow will be reduced.
To clean the AquaClean filter, remove it and rinse it under running water.
AquaClean filter replacement is easy, and it is recommended to replace it every 6 months. If the filter is damaged, replace it immediately with a new one.
AquaClean is designed for use with (5 min.)
For best results, use the AquaClean filter. The AquaClean filter reduces limescale, and the water hardness is reduced to 0%. The AquaClean filter also improves the taste of your coffee. The filter should be replaced every 2 months or after 100 liters of water.
To install the AquaClean filter, follow the instructions below. The AquaClean filter is easy to install.
1. Remove the AquaClean filter from its packaging. 2. Rinse the filter under running water for 5 seconds. Then, insert the filter into the water tank as shown in figure 5.
For more information, visit the website.
www.saeco.com/care-b
For more information, visit the website.
1. Remove the water tank. 2. Fill the water tank with fresh water. 3. Replace the water tank.
For more information, visit the website.
For more information, visit the website.
1. Press the button to start the descaling cycle. 2. The descaling cycle will start automatically. Follow the instructions on the display (fig. 40). 3. After the descaling cycle, rinse the water tank thoroughly. If the descaling cycle is interrupted, repeat the procedure.
The descaling solution is available at your local dealer or online.
1. Press the "ON/OFF" button to turn the device on or off. 2. 0000000000000000000000000000000000000000000000000000000000
1. (b) Connect the device to the power supply (see Fig. 41). 2. Connect the device to the network (see Fig. 42). 3. Connect the device to the computer (see Fig. 43).
HygieStam: 03m0n 00mngjmbmonngb ngs 33yBn6o0mn an b6moogoo HygieStam: 50000000000000000000000000000000000000000000000000000000000000000000000000000000000000
MIX Paper from responsible sources FSC ® C041324
- MACHINE OVERVIEW (FIG. A)
- ACCESSORIES
- CONTROL PANEL
- INTRODUCTION
- BEFORE FIRST USE
- SPECIAL FUNCTIONS
- SPECIAL FUNCTION PURPOSE
- BREWING DRINKS
- GENERAL STEPS
- BREWING COFFEE WITH BEANS
- BREWING MILK-BASED DRINKS
- BREWING COFFEE WITH PRE-GROUND COFFEE
- DISPENSING HOT WATER
- PERSONALIZING DRINKS
- BREWING DRINKS WITH COFFEEMAESTRO FUNCTION
- COFFEEEQUALIZER FUNCTION
- SELECTING A PROFILE
- GUEST PROFILE
- EXTRA SHOT (EXTRASHOT)
- ADJUSTING MACHINE SETTINGS
- SETTING THE WATER HARDNESS
- USE THE WATER HARDNESS TEST STRIP SUPPLIED IN THE BOX TO DETERMINE THE WATER HARDNESS IN YOUR REGION
- SET THE MACHINE TO THE CORRECT WATER HARDNESS
- ADJUSTING THE GRIND SETTING
- ADJUSTING OTHER MACHINE SETTINGS
- RESTORING FACTORY SETTINGS
- AQUACLEAN WATER FILTER
- AQUACLEAN FILTER STATUS INDICATION
- ACTIVATING THE AQUACLEAN WATER FILTER (5 MIN.)
- REPLACING THE AQUACLEAN WATER FILTER (5 MIN.)
- REMOVING AND INSERTING THE BREW GROUP
- REMOVING THE BREW GROUP FROM THE MACHINE
- REINSERTING THE BREW GROUP
- CLEANING AND MAINTENANCE
- CLEANING THE BREW GROUP
- CLEANING THE BREW GROUP UNDER THE TAP
- CLEANING THE BREW GROUP WITH THE COFFEE OIL REMOVER TABLETS
- LUBRICATING THE BREW GROUP
- CLEANING PROGRAMS FOR THE INTERNAL CAPPUCCINATORE
- CLEANING THE INTERNAL CAPPUCCINATORE UNDER THE TAP
- DESCALING PROCEDURE
- WHAT TO DO IF THE DESCALING PROCEDURE IS INTERRUPTED
- ERROR CODES
- ORDERING ACCESSORIES
- TROUBLESHOOTING
- ENGLISH
- TECHNICAL SPECIFICATIONS
- AZARBAYCANCA
- MÜNDARICAT
- INDICATOR FOR AQUACLEAN FILTER STATUS
- ORDER ACCESSORIES
- PREPARING THE MILK DRINK
- PREPARING COFFEE FROM PRE-GROUND COFFEE
- BULGARIAN
- HOT WATER DISPENSING
- ADJUSTING THE GRINDER SETTINGS
- AQUACLEAN FILTER STATUS INDICATOR
- REPLACEMENT OF THE AQUACLEAN WATER FILTER (5 MN)
- REMOVING AND INSERTING THE BREWING UNIT
- REMOVING THE BREWING UNIT FROM THE MACHINE
- INSERTING THE BREWING UNIT BACK INTO THE MACHINE
- COFFEE MACHINE CARE (A CYPHER)
- KAAYAN TA3AJOO KEPEK KAHTNT TA3AJOO KEPEK
- KAÑHATYYY TONTY TA3AJOO
- KAHATYYU TONTY ARBH CYY AIBHNDA TA3AJOO
- KOIFFE MAJIAPBIH TA3AIOO YUYH KAPAXKATTAPDBI NAIDAIANBIN KAIHATYYU TONTY TA3AIOO
- KAÑHATYYY TONTY MAJLOO
- IYKN KANYUHATOP YUH TA3AJOO NPORPAMAJAPBL
- DESCALING THE MACHINE
- CLEANING THE GRINDER
- KYRGYZ
- THE DESCALING PROCEDURE CAN BE STOPPED AT ANY TIME BY PRESSING THE STANDBY BUTTON
- CLEANING THE COFFEE UNIT
- DISPOSAL
- EXTRA SHOT
- PNROTOBJIEHNE KOFE N3 3EPEH
- PREPARING DRINKS ON A MILK BASIS
- PREPARING A DRINK FROM GROUND COFFEE
- PERSONALIZATION OF DRINKS
- ADJUSTING OTHER PARAMETERS OF THE COFFEE MACHINE
- RUSSIAN
- INSTALLING THE BREW GROUP
- RINSING THE BREWING UNIT UNDER RUNNING WATER
- CLEANING THE BREWING UNIT WITH A COFFEE OIL REMOVER
- LUBRICATING THE BREWING UNIT
- CLEANING PROGRAMS FOR THE INTERNAL MILK FROTHER
- CLEANING THE INTERNAL MILK FROTHER UNDER RUNNING WATER
- DESCALING PROCESS
- ACTIONS IN CASE OF INTERRUPTION OF THE DESCALING PROCEDURE
- CODE
- ERROR
- PROBLEM POSSIBLE SOLUTION
- COFFEE EQUALIZER
- IHTNXO6N NPOФИ
- PPOJIIMEXMOH
- AKKECSYAPN
- PREPARING DRINKS WITH MILK
- PREPARING COFFEE WITH PRE-GROUND BEANS
- CREATING YOUR OWN COFFEE PROFILES
- PREPARING COFFEE USING THE COFFEEMAESTRO FUNCTION
- GRINDER PROFILE
- SETTING THE GRINDER
- CHECK THE WATER HARDNESS IN YOUR REGION USING THE TEST STRIP INCLUDED IN THE PACKAGING
- SET THE CORRECT WATER HARDNESS IN THE MACHINE
- ADJUSTING THE GRINDER
- SWITCHING OFF THE WASHING MACHINE
- REMOVING THE BREWING UNIT
- INSTALLING THE BREWING UNIT IN PLACE
- MAINTENANCE
- REMOVABLE PARTS CLEANING FREQUENCY CLEANING METHOD
- THE MILK CARAFE IS DIRTY
- CLEANING THE MILK FROTHER
- CLEANING WITH HOT WATER
- ADJUSTING THE WATER HARDNESS
- CLEANING WITH THE COFFEEMAESTRO FUNCTION
- PPOJIBI TAHDA
- KA3AKWA
- KOHAK NPOФИJI
- KOCBIMSA ATY (EXTRASHOT)
- KYPBLFBLNAPAMETPPEH PETEY
- CYTBIH KATTBIJIBIFBIH TAHDAY
- TO SET THE WATER HARDNESS, FOLLOW THE WATER HARDNESS MEASUREMENT PROCEDURE GIVEN BELOW
- SET THE MACHINE'S WATER HARDNESS
- ADJUSTING THE RINSE AID PARAMETERS
- ADJUSTING OTHER MACHINE PARAMETERS
- RESETTING TO FACTORY SETTINGS
- AQUACLEAN FILTER INDICATOR
- REPLACING THE AQUACLEAN FILTER (5 ML)
- REMOVING AND INSTALLING THE WATER HARDNESS TEST STRIP
- REMOVING THE WATER HARDNESS TEST STRIP FROM THE MACHINE
- INSTALLING THE WATER HARDNESS TEST STRIP
- CLEANING AND TECHNICAL MAINTENANCE
- CLEANING THE WATER TANK WITH THE MILK CARAFE CLEANING FUNCTION
- DESCALING THE WATER TANK
- CLEANING PROGRAMS FOR THE TWO MILK CARAFES
- CLEANING THE MILK CARAFES IN THE DISHWASHER
- THE DESCALING PROCEDURE
- IF THE DESCALING PROCEDURE IS INTERRUPTED, THE FOLLOWING ACTIONS ARE REQUIRED
- ERROR CODE
- POSSIBLE CAUSE AND SOLUTION
- USING THE MACHINE FOR THE FIRST TIME
- CLEANING AND CARE
- KAZAKH
- CONTENTS
- SAFETY INSTRUCTIONS (TYPE A)
- INSTALLATION
- RJWNBNTU
- LUHUGU UNWOHU WUQUU OQNUQNODIN
- RWNNQNNYNPU
- CUIHUPN UUNNUUNN
- CUNHUUIN QNPONNNIPJNTUTN
- STHUHYUWU FUNIPAWQNTN
- RUJNTTU
- B
- MSHNUBNDMBNGM3S (BYM. S)
- GSSDJGONN 6SNGGON
- GMO
- SAFETY INSTRUCTIONS
- GENERAL INFORMATION
- INTENDED USE
- SUPPIMER
- AQUACLEAN FILTER
- AQUACLEAN FILTER REPLACEMENT
- AQUACLEAN FILTER REPLACEMENT (5 PCS.)
- AQUACLEAN IS DESIGNED FOR USE WITH (5 MIN.)
- FOR MORE INFORMATION, VISIT THE WEBSITE
- THE DESCALING SOLUTION IS AVAILABLE AT YOUR LOCAL DEALER OR ONLINE
Brand : PHILIPS
Model : Saeco Granaroma SM6480
Category : Coffee maker