
PLSA 20Li A1 - LED Lighting PARKSIDE - Free user manual and instructions
Find the device manual for free PLSA 20Li A1 PARKSIDE in PDF.

| Product type | Cordless rechargeable LED projector |
| Brand | Parkside |
| Model | PLSA 20Li A1 |
| Category | LED lighting |
| Power supply | Parkside X 12 V TEAM or X 20 V TEAM battery (not included) or mains via 18 V 1.5 A adapter |
| Rated power | 20 W |
| Max. luminous flux | 2000 lumens |
| Color temperature | 5700 K (daylight white) |
| Number of LEDs | 20 x 1 W |
| Lighting modes | 2000 lm, 1000 lm, flashing |
| Protection classes | III (device), II (power supply) |
| Protection rating | IP20 |
| Tripod thread | 1/4" and 5/8" |
| Battery life 20 V / 2 Ah | 85 min |
| Battery life 20 V / 4 Ah | 170 min |
| Battery life 12 V / 2 Ah | 50 min |
| Battery life 12 V / 4 Ah | 100 min |
| Max. adapter temperature | 90 °C |
| Weight | Approx. 0.8 kg (without battery) |
| Dimensions (L x W x H) | Approx. 150 x 100 x 200 mm |
| Housing color | Black and orange |
| Maintenance | Clean with a soft dry cloth. Do not use harsh chemicals or water. |
| Available spare parts | 12 V adapter (ref. 91105913), power supply (ref. 80001284) |
| Warranty | 3 years |
| Intended use | Indoor (workshop, garage, house), private non-commercial use |
Frequently Asked Questions - PLSA 20Li A1 PARKSIDE
User questions about PLSA 20Li A1 PARKSIDE
0 question about this device. Answer the ones you know or ask your own.
Ask a new question about this device
Download the instructions for your LED Lighting in PDF format for free! Find your manual PLSA 20Li A1 - PARKSIDE and take your electronic device back in hand. On this page are published all the documents necessary for the use of your device. PLSA 20Li A1 by PARKSIDE.
USER MANUAL PLSA 20Li A1 PARKSIDE


natural_image
Exterior view of a black Parkside lighting fixture with a central display and control panel (no visible text or symbols)Akku-LED-Strahler / Cordless LED Worklight / Projecteur LED sans fi | PLSA 20-Li A1
DE AT CH
Akku-LED-Strahler
Cordless LED Worklight
Translation of the original instructions
NL BE
Accu-led-schijnwerper
Before reading, unfold the page containing the illustrations and familiarise yourself with all functions of the device.
FR BE
GB / MT Translation of the original instructions Page

natural_image
3D rendering of a black industrial lamp with labeled components (no text or symbols visible)

Inhalt
Einleitung......4
Bestimmungsgemäße
Verwendung......4
Service-Center....14
Importeur 14
Original-EG-
Intended purpose......15
General description......16
Extent of the delivery 16
Functional description....16
Overview....16
Technical data....16
Charging times 17
Safety instructions......18
Symbols and icons 18
Safety notices for battery-powered lamps 19
Use and treatment of this battery-powered tool....19
Service 19
Special safety directions for battery-operated tools....20
Operation 20
Connecting the mains power supply .. 20
Removing/inserting the 20 V battery .. 20
Removing/inserting the 12 V battery .. 20
Switching on/off 21
Changing the illumination mode ..... 21
Working instructions......21
Swivelling the battery-powered LED flood lamp 21
Hanging the battery-powered LED f1 ood lamp 21
Tripod mount 22
Maintenance 22
Cleaning 22
Storage....22
Disposal and protection of the environment....22
Accessories 23
Repair Service....24
Service-Center......24
Importer 24
Translation of the original EC declaration of conformity...... 138
Exploded Drawing ......149
Introduction
Congratulations on the purchase of your new device. With it, you have chosen a high quality product. During production, this equipment has been checked for quality and subjected to a final inspection. The functionality of your equipment is therefore guaranteed.

The operating instructions constitute part of this product. They contain important information on safety, use and disposal. Before using the product, familiarise yourself with all of the operating and safety instructions. Use the product only as described and for the applications specified.
Keep this manual safely and in the event that the product is passed on, hand over all documents to the third party.
Intended purpose
The battery-powered LED flood lamp is suitable for use in workshops, garages or the home.
The battery-powered LED flood lamp is a special product and its design, like the built-in battery, withstands extreme physical strains (1.0 m²/s³; 200 - 2000 Hz) in the form of shocks.
The device is only intended for indoor use. This device is not suitable for commercial use. The warranty is void in the case of commercial use.
The device is part of the Parkside X 12 V TEAM and X 20 V TEAM series and can be operated using Parkside X 12 V TEAM or X 20 V TEAM series batteries. The batteries may only be charged using chargers from the Parkside X 12 V TEAM or X 20 V TEAM series.
General description
The illustrations can be found on the fold-out pages.
Extent of the delivery
Carefully unpack the appliance and check that it is complete.
- Cordless LED Worklight
- Instruction Manual
- 12V adapter
- Power plug

Battery and charger are not included.
Dispose of the packaging material correctly.
Functional description
The cordless LED worklight has a swivelling head and there are several options for placing or hanging it.
The device can also be operated without battery using the charger/power adapter.
Refer to the following descriptions for a functional description of the controls.
Overview
1 Switch
2 On/Off switch
3 Handle
4 Adjusting screw
5 Hook
6 Recess
7 Latch
8 12 V adapter
9 Power plug
10 Plug
11 Release buttons
12 Battery
A 13 Power connection
c 14 Guide
G 15 Keyhole bore
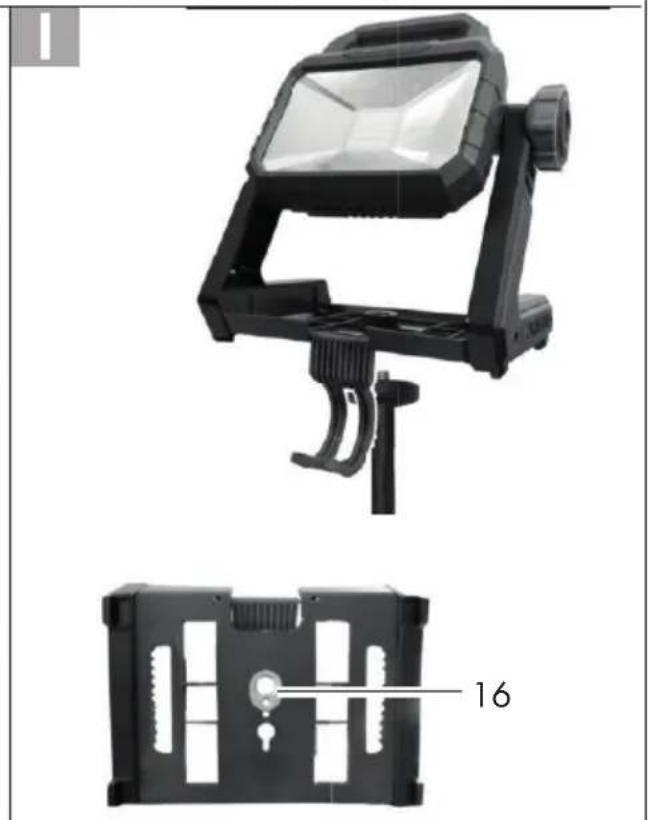
16 Internal thread
Technical data
Cordless LED Worklight.....PLSA 20-Li A1
Nominal voltage
U_1 20 V =
U_2 12 V =
Operation with power adapter
U_3 18 V = 1.5 A
Rated output P_max 20 W
Number of lamps (LED)....20 x 1 W
Light output....max. 2000 lm
Light colour ....Daylight white 5700K
Energy effi ciency class....F
Lighting duration in battery operation:
20 V/2 Ah....85 min
20 V/4 Ah....170 min
12 V/2 Ah....50 min
12 V/4 Ah....100 min
Internal thread 14 and 58
Protection class .... III ◇
Protection category.... IP20
Charger (power adapter) JLH341801500G
Input A C f frequency ..... .50-60 Hz
Power input....50 W
Rated output 18.0 V =
Output current 1.5 A
Output power 27.0 W
Average active effi ciency 88.3 %
Efficiency at low load (10%)......83.7%
Power consumption at zero load ...0.08 W
Energy efficiency class.... F
Protection class ....
Protection category...... IP20
Temperature ......max. 90°C
Mains connection only for LED devices
Charging times
The device is part of the Parkside X 20 V TEAM series and can be operated using Parkside X 20 V TEAM series batteries. Batteries of the Parkside X 20 V TEAM series may only be charged using chargers of the Parkside X 20 V TEAM series.
With the enclosed 12 V adapter, series X 12 V TEAM batteries may also be used.
We recommend that you operate this appliance with the following 20 V batteries only: PAP 20 A1, PAP 20 A3.
We recommend charging these batteries with the following chargers: PLG 20 A1, PLG 20 A3.
We recommend that you operate this appliance with the following 12 V batteries only: PAPK 12 A2, PAPK 12 B2.
We recommend charging these batteries with the following chargers: PAPK 12 A2, PAPK 12 B2.
An up-to-date list of battery compatibility can be found at: www.lidl.de/akku
| Charging times (min.) | PAP 20 A1 PAP 20 B1 | PAP 20 A2 | PAP 20 A3 PAP 20 B3 | Smart PAPS 204 A1 | Smart PAPS 208 A1 |
| PLG 20 A1 PLG 20 A4 PLG 20 C1 | 60 90 | 120 120 210 | |||
| PLG 20 A2 45 60 | 80 80 165 | ||||
| PLG 20 A3 PLG 20 C3 | 35 45 | 60 50 120 | |||
| PDSLG 20 A1 35 | 45 60 50 120 | ||||
| Smart PLGS 2012 A1 | 35 40 | 40 40 50 |
| Charging times (min.) | PAPK 12 A1 PAPK 12 A3 | PAPK 12 A2 | PAPK 12 B1 PAPK 12 B2 PAPK 12 B3 | PAPK 12 D1 |
| PLGK 12 A1 60 | 60 120 150 | |||
| PLGK 12 A2 60 | 60 120 150 | |||
| PLGK 12 B2 | 30 45 60 | 80 | ||
| PDSLG 12 A1 PDSLG 12 A2 | 60 45 60 | 80 |
GB MT
Safety instructions
Symbols and icons
Symbols on the appliance

On/Off switch

Level 1

Level 2

Flashing mode

Changing the illumination mode

Warning! Do not look into the light source!

Electrical appliances must not be disposed of with the domestic waste.

Protection class III

Direct voltage
Symbols on the power adapter

Read the instruction manual.

The charger is only suitable for use indoors.

Safety transformer

Independent transformer

Protection class II

Electrical appliances must not be disposed of with the domestic waste.

Polarity
Symbols on the packaging
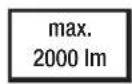
Light output: max. 2000 lu- mens

1 m cable length

Colour temperature: Day-light white 5700 kelvin

Disposal symbol for corrugated cardboard

Please dispose of waste in an environmentally friendly manner in the waste containers ided
Symbols in the manual

Warning symbols with information on damage and injury prevention.

Hazard symbol with information on the prevention of personal injury caused by electric shock.

Instruction symbols with information on preventing damage

Help symbols with information on improving tool handling.
Safety notices for battery-powered lamps
- Do not cover the battery-powered LED fl ood lamp when in use. The battery-powered LED fl ood lamp becomes hot during use and can cause burns.
- Do not look into the light beam. Do not aim the light beam at people or animals.
- Do not allow children to use the battery-powered LED flood lamp. They could inadvertently blind other people or themselves.
- Lamp not for children under 14 years of age!
- Check that the battery-powered LED fl ood lamp holder is stable. There is a risk of injury if the battery-powered LED fl ood lamp falls down. The light source in this lamp is not replaceable; if the light source has reached the end of its life, then the whole lamp must be replaced.
- The light sources cannot be replaced by the end user or qualified individuals without permanently damaging the surrounding product. If the light source has reached the end of its life, the entire LED flood lamp has to be replaced as a unit.
- The operating device (power adapter) can be replaced by the end user with an original spare part, which is available in our online shop under the article number 80001284.
Use and treatment of this battery-powered tool
- Only recharge the battery using chargers recommended by the manufacturer. If a charger that has been designed for a particular type of battery is used to charge other batteries, there is a risk of fire.
- Only use the battery that is intended in an electric tool. The use of other batteries may create a fi re hazard and lead to injury.
- When not in use, keep batteries away from paper clips, coins, keys, nails, screws or other small metal objects that could cause the contacts to be bridged. A short circuit between battery contacts can result in burns or a fie
- When misused, fl uid may leak from the battery. Avoid any contact with it. On accidental contact, wash in running water. If the fl uid comes into contact with the eyes, seek medical assistance also. Leaking battery fl uid can cause skin irritation or burns.
Service
- Have your power tool serviced by a qualified repair person using only identical replacement parts. This will ensure that the safety of the power tool is maintained.
Special safety directions for battery-operated tools
- Ensure that the device is switched off before inserting the battery. Inserting a battery into a power tool that is switched on may result in accidents.
- Recharge the batteries indoors only because the battery charger is designed for indoor use only.
- To reduce the electric shock hazard, unplug the battery charger from the mains before cleaning the charger.
- Do not subject the battery to strong sunlight over long periods and do not leave it on a heater. Heat damages the battery and there is a risk of explosion.
- Allow a hot battery to cool before charging.
- Do not open up the battery and avoid mechanical damage to the battery. Risk of short circuit and fumes may be emitted that irritate the respiratory tract. Ensure fresh air and seek medical assistance.
- Do not use non-rechargeable batteries!
- Do not use any accessories that are not recommended by PARK-SIDE. This can result in electric shock or fire.

Observe the safety information and notes on charging and proper use as shown in the instruction manual for your battery and charger from the Park-side X 20 V TEAM or X 12 V TEAM series.
A detailed description of the charging process and further information can be found in the separate operating instructions.
Operation
The device can either be connected to the mains power supply or optionally be operated with X 20 V Team or X 12 V Team batteries.

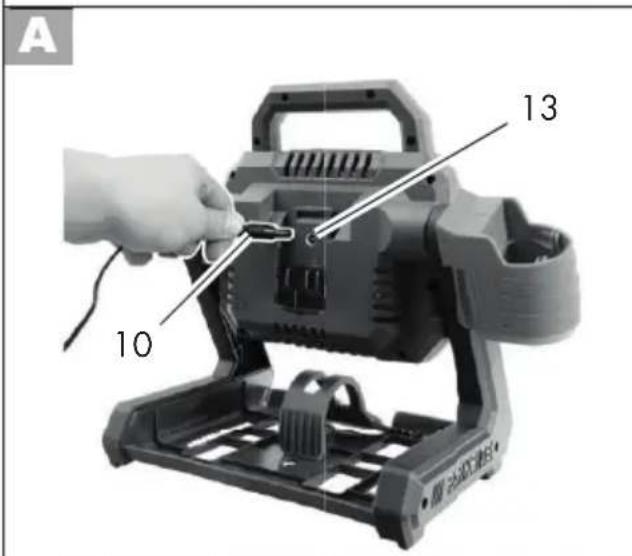
Connecting the mains power supply

Only operate the light with mains power with the enclosed power adapter JLH341801500G. Only use indoors.
- Plug the power adapter (9) into the socket.
- Insert the plug (10) into the power connection (13) on the device.

Removing/inserting the 20 V battery
- To insert the battery (12), push the battery along the guide on the back of the device. You will hear it click into place.
- To remove the battery (12) from the device, press the release buttons (11) on the battery and pull the battery out.

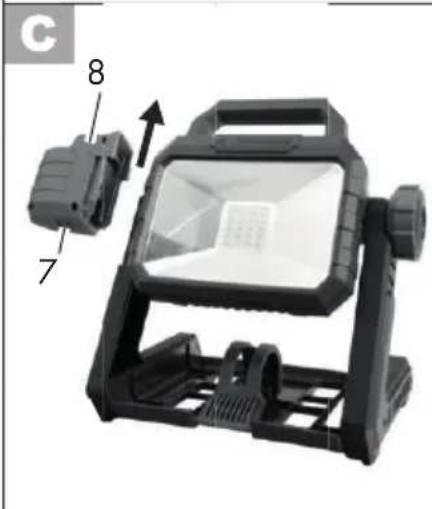
Removing/inserting the 12 V battery
To operate the device with 12 V batteries, first you will have to insert the 12 V adapter.
Inserting the 12 V adapter
- Remove the 12 V adapter (8) from the side of the device as necessary by
pushing the latch (7) on the bottom of the 12 V adapter away from the device and pulling up on the 12 V adapter.
Inserting the 12 V battery
- Slide the battery (12) into the 12 V adapter (8).
Removing the 12 V battery
- Press the release buttons (11) on the battery (12).
- Pull the battery (12) up and out of the 12 V adapter (8).
Removing the 12 V adapter
- Pull the latch (7) on the bottom of the 12 V adapter (8) towards you.
- Pull the 12 V adapter up and out.
- For storage, you can slide the 12 V adapter (8) onto the guide (14) on the side of the device.
D Switching on/off
- To switch the device on, press the On/Off switch (2). The LED lamp illuminates with maximum brightness.
- To switch the device off, press the On/Off switch (2).
D Changing the illumination mode
When you switch the device on, the LED lamp illuminates with maximum brightness. Switch the illumination mode by pressing the switch (1) next to the On/Off switch (2).
The repeating order of modes is: 2000 lm - 1000 lm - fl ashing
Working instructions
Do not stare into the battery-powered LED flood lamp while it is on.
E Swivelling the battery-powered LED flood lamp
- Loosen the adjusting screw (4).
- Rotate the handle (3) of the battery-powered LED flood lamp to the desired position.
- Tighten the adjusting screw (4).
Hanging the battery-powered LED flood lamp
F Hanging the battery-powered LED flood lamp on the hook
- Fold the hook (5) outwards.
- Hang the device horizontally.
G Hanging the battery-powered LED flood lamp using the key-hole bore
- Insert a screw or nail at the desired position on a wall.
- The screw/nail head can have a diameter of 7 - 10 mm.
- Leave the screw/nail head protruding at a distance of approx. 10 mm from the wall.
- Hang the device on the keyhole bore (15).
H Hanging the battery-powered LED flood lamp on the base-plate
- Insert a screw or nail at the desired position on a wall.
- The screw/nail head can have a diameter of 7 - 10 mm.
GB MT
- Leave the screw/nail head protruding at a distance of approx. 10 mm from the wall.
- Hang the device via the recess (6) on the baseplate with teeth. The teeth allow you to balance the device.
I
Tripod mount
Using the ^1/4 " or ^5/8 " internal thread (16), you can screw the battery-powered LED flood lamp to a tripod (not included in delivery).
Maintenance
The device is maintenance free.
Cleaning

Switch the device off before cleaning and remove the battery from the device. Risk of electric shock!
- Clean the device with a soft, dry cloth to avoid scratching the cover of the LED lamp.
- Do not use any abrasive cleaning agents or solvents. This could damage the device irreparably.
- Do not use water or metallic aids. There is a risk of a short circuit.
Storage
- For storage, you can slide the 12 V adapter (8) onto the guide (14) on the side of the device.
- Store the device in a dry and dustproof location and out of reach of children.
- Remove the battery from the device before storing it for a longer period.
Disposal and protection of the environment
Remove the battery from the device and recycle the device and packaging in an environmentally-friendly manner. Instruction on how to dispose of the rechargeable battery can be found in the separate instruction manual.

Electrical appliances must not be disposed of with the domestic waste.
Directive 2012/19/EU on waste electrical and electronic equipment: Used electrical devices must be collected separately for disposal and recycled in an environmentally sound manner.
Depending on the implementation in national law, you may have the following options:
- Return to a shop,
- Hand over to an offi cial collection point,
- Return to the manufacturer/distributor.
We will dispose of any defective devices that you send to us free of charge.
This does not affect accessories enclosed with the old devices or tools without any electrical components.
Hand the device and the power adapter in to a recycling point. The plastic and metal parts used on your device can be properly sorted according to materials and grades and efficiently recycled. Please contact our service centre for more information.
Accessories
Accessories can be obtained at www.grizzlytools.shop
If you have issues ordering, please use the contact form. If you have any other questions, contact the "Service-Center" (see page 24).
Item Description Product No.
8 20 V -> 12 V Adapter 91105913
9 Power adapter....80001284

The operating device (power adapter) can be replaced with the original.
Garantie
Dear Customer,
This device comes with a three-year warranty from the date of purchase. In case of defects, you have statutory rights against the seller of the product. These statutory rights are not restricted by our guarantee presented below.
Terms of Guarantee
The term of the guarantee begins on the date of purchase. Please retain the original receipt. This document is required as proof of purchase.
If a material or manufacturing defect occurs within three years of the date of purchase of this product, we will repair or replace – at our choice – the product for you free of charge. This guarantee requires the defective equipment and proof of purchase to be presented within the three-year period with a brief written description of what constitutes the defect and when it occurred.
If the defect is covered by our guarantee, you will receive either the repaired product or a new product. No new guarantee period begins on repair or replacement of the product.
Guarantee Period and Statutory Claims for Defects
The guarantee period is not extended by the guarantee service. This also applies for replaced or repaired parts. Any damages and defects already present at the time of purchase must be reported immediately after unpacking. Repairs arising after expiry of the guarantee period are chargeable.
Guarantee Cover
The equipment has been carefully produced in accordance with strict quality guidelines and conscientiously checked prior to delivery.
The warranty is only valid for material or manufacturing defects. This warranty does not extend to consumable parts exposed to normal wear and tear.
This guarantee shall be invalid if the product has been damaged, used incorrectly or not maintained. Neither does it extend to damage resulting from water, frost, lightning and fire or improper transport. Precise adherence to all of the instructions speci-
fi ed in the operating manual is required for proper use of the product. Intended uses and actions against which the operating manual advises or warns must be categorically avoided.
The product is designed only for private and not commercial use. The guarantee will be invalidated in case of misuse or improper handling, use of force, or interventions not undertaken by our authorised service branch.
Processing in Case of Guarantee
To ensure effi cient handling of your query, please follow the directions below:
- Please have the receipt and item number (IAN 410568_2110) ready as proof of purchase for all enquiries.
- Please find the item number on the rating plate.
- Should functional errors or other defects occur, please initially contact the service department specified below by telephone or by e-mail. You will then receive further information on the processing of your complaint.
- After consultation with our customer service, a product recorded as defective can be sent postage paid to the service address communicated to you, with the proof of purchase (receipt) and specification of what constitutes the defect and when it occurred. In order to avoid acceptance problems and additional costs, please be sure to use only the address communicated to you. Ensure that the consignment is not sent carriage forward or by bulky goods, express or other special freight. Please send the equipment inc. all accessories supplied at the time of purchase and ensure adequate, safe transport packaging.
Repair Service
For a charge, repairs not covered by the guarantee can be carried out by our service branch, which will be happy to issue a cost estimate for you. We can handle only equipment that has been sent with adequate packaging and postage.
Attention: Please send your equipment to our service branch in clean condition and with an indication of the defect.
Equipment sent carriage forward or by bulky goods, express or other special freight will not be accepted.
We will dispose of your defective devices free of charge when you send them to us.
Service-Center
GB Service Great Britain
Tel.: 0800 404 7657
E-Mail: grizzly@lidl.co.uk
IAN 410568_2110
MT Service Malta
Tel.: 800 622 30
E-Mail: grizzly@lidl.com.mt
IAN 410568_2110
Importer
Please note that the following address is not a service address. Please initially contact the service centre specified above.
Service Réparations ......36
Service-Center......37
Importateur 37
Accessoires ....37
Service-Center......49
Importeur 49
Service-Center......60
Importer 60
Akcesoria 60
Service-Center....70
Dovozce....70
Příslušenství....70
Počet svítidel (LED)....20 x 1 W
Service-Center......80
Dovozca....80
Príslušenstvo....80
Service-Center....91
Importør 91
Tilbehør 91
Service-Center....101
Importador 101
Accesorios....101
Foco led recargable.....PLSA 20-Li A1
Tensión nominal
$$ \begin{array}{l} U _ {1} \dots 2 0 \mathrm{V} = \ U _ {2} \dots 1 2 V = \ U _ {3} \dots 1 8 \mathrm{V} = 1, 5 \mathrm{A} \ \end{array} $$
Service-Center....111
Importatore ....111
Accessori....112
Pooblaščeni serviser:
Tel.: 080 080 917
E-Mail: grizzly@lidl.si
(Birotehnika, Hodošček Renata s.p., Lendavska ULICA 23, 9000 Murska Sobota)
Garancijski list
* The object of the declaration described above satisfies the provisions of Directive 2011/65/EU of the European Parliament and the Council of 8 June 2011 on limiting the use of certain harmful substances in electrical and electronic appliances.
** The last two digits of the year in which the CE marking was affi xed.
natural_image
Exterior view of a black 3D streetlight fixture with labeled component 'F' and number '5' (no text or symbols on the device itself)
natural_image
Exterior view of a black outdoor lighting device with a labeled component (15), no readable text or symbols beyond the label.
natural_image
Product photo of a black adjustable lighting fixture with a 16-pin connector, shown from two views (top: top view; bottom: front view)GRIZZLY TOOLS GMBH & CO. KG


- Akku-LED-Strahler / Cordless LED Worklight / Projecteur LED sans fi | PLSA 20-Li A1
- FR BE
- Inhalt
- Introduction
- Intended purpose
- General description
- Extent of the delivery
- Functional description
- Overview
- Technical data
- Charger (power adapter) JLH341801500G
- Charging times
- GB MT
- Safety instructions
- Symbols and icons
- Symbols on the appliance
- Symbols on the power adapter
- Symbols on the packaging
- Symbols in the manual
- Safety notices for battery-powered lamps
- Use and treatment of this battery-powered tool
- Service
- Special safety directions for battery-operated tools
- Operation
- Connecting the mains power supply
- Removing/inserting the 20 V battery
- Removing/inserting the 12 V battery
- Inserting the 12 V adapter
- Inserting the 12 V battery
- Removing the 12 V battery
- Removing the 12 V adapter
- D Switching on/off
- D Changing the illumination mode
- Working instructions
- E Swivelling the battery-powered LED flood lamp
- Hanging the battery-powered LED flood lamp
- I
- Tripod mount
- Maintenance
- Cleaning
- Storage
- Disposal and protection of the environment
- Accessories
- Accessories can be obtained at www.grizzlytools.shop
- Item Description Product No.
- Garantie
- Terms of Guarantee
- Guarantee Period and Statutory Claims for Defects
- Guarantee Cover
- Processing in Case of Guarantee
- Repair Service
- Service-Center
- GB Service Great Britain
- MT Service Malta
- Importer
- Foco led recargable.....PLSA 20-Li A1
- Garancijski list
Brand : PARKSIDE
Model : PLSA 20Li A1
Category : LED Lighting