
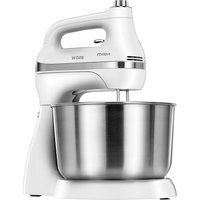
MMR12 - Food Processor MPM - Free user manual and instructions
Find the device manual for free MMR12 MPM in PDF.

| Product type | Food processor (stand mixer) |
| Brand | MPM |
| Model | MMR12 |
| Bowl capacity | 4.2 liters |
| Bowl material | Stainless steel (model 4) and plastic (model 4a) |
| Included accessories | Whisk for light mixtures (9), beater for heavy mixtures (8), dough hook (10), spatula (11) |
| Movement type | Planetary: rotation around its axis and around the bowl |
| Speed setting | Variable, multiple speed ranges |
| Maximum operating time | 10 minutes |
| Minimum rest time | 20 minutes |
| Noise level | 73 dB (Lwa) |
| Power cord length | 0.95 m |
| Care and cleaning | Housing: damp cloth; accessories (except whisk) dishwasher-safe; whisk by hand |
| Safety | Head lock, unplug before cleaning, do not immerse |
Frequently Asked Questions - MMR12 MPM
User questions about MMR12 MPM
0 question about this device. Answer the ones you know or ask your own.
Ask a new question about this device
Download the instructions for your Food Processor in PDF format for free! Find your manual MMR12 - MPM and take your electronic device back in hand. On this page are published all the documents necessary for the use of your device. MMR12 by MPM.
USER MANUAL MMR12 MPM
- Pernine villamite. As pueruginans naphosyno ybrobiu batae sporengium a zever. Vals in accretion: se's Srokut in Bifidus prudens malni. MPW
We wish you satisfaction from us. ing the product and invite you to check a wide range of other MPM / office accessories .
- Read carefully this manual before using the appliance.
-
Close supervision is necessary when using the appliance near children!
-
Do not use the appliance for the purposes different than it was designed for.
- To avoid the risk of damage, fire or injury, always use the attachments recommended by the manufacturer..
-
Do not immerse the appliance, its cord and plug in water or any other liquids.
-
Do not leave the appliance switched on when unattended
- Always unplug the appliance when it is not in use or before cleaning
- Do not use the appliance if it is damaged, also if the power cord or plug is damaged - return the appliance for repair to an authorized service centre.
- Do not use the appliance outdoors
- Do not place the cord over sharp edges and keep it away from hot surfaces.
- Do not touch the appliance with wet hands.
- This appliance has been designed for domestic use only.
- During operation keep your hands away from moving parts (mixer arm, rod, dough hook) !
-
Before cleaning the rod, mixer arm and dough hook, remove them form the appliance first!!
-
Do not place the appliance in vicinity of electric and gas cookers, burners, ovens, etc.
-
Before use always make sure that all the parts of appliance are properly installed.
- Take extreme caution when cleaning the cutting blades.
-
Do not place the appliance on hot surfaces.
-
This appliance is not intended for use by children under 8 years of age and individuals with reduced physical, sensory or mental capabilities, or lack of experience and knowledge, unless they have been given supervision or instruction concerning use of the appliance in a safe way and if they understand the hazards involved. Cleaning and user maintenance shall not be carried out by children without supervision.
-
Store the appliance and its cord out of reach of children under 8 years of age.
-
Children should be supervised to ensure that they do not play with the appliance.
-
Switch off the appliance before changing the attachments or approaching the moving parts.
-
Do not plug the power cord with wet hands.
- Do not unplug by pulling the cord.
-
Use on a flat, stable surface.
-
Keep your children safe: do not leave any parts of the pack aging readily accessible (i.e. plastic bags, cardboard boxes, polystyrene inserts, etc.).
-
WARNING! Never let children play with plastic film or bags. Choking/ asphyxiation hazard!
DESCRIPTION OF THE APPLIANCE
- Tilt motor head
- Speed control
- Drive shaft with bolt (attachments assembly point)
- Stainless steel bowl with a volume of 4,2L
4a. Additional bowl base a capacity 4,2L
- Motor head lock
- Bowl-locking base
- Splash guard with feeder
- Mixer arm
- Rod
- Dough hook
- Spatula
- Ensure that the speed control (2) is in The "Off" position ("0" position).
- Unplug the mixer from the power grid or disconnect the power supply.
- Unlock the motor head (1) with the button (5) and tilt it back.
- Place the mixing bowl (4) or (4a) in the bowl-locking base (6) and turn it clockwise
- To disassembly the mixing bowl (4) or (4a) repeat operations 1-3 and turn the mixing bowl anti clockwise.
WARNING! Unplug the mixer from the socket before any contact with the attachments!
ASSEMBLY/DISASSEMBLY OF MIXER ARM, ROD OR DOUGH HOOK
- Ensure that the speed control (2) is in turn-off position ("0" position).
- Unplug the mixer from the power grid or disconnect the power supply.
- Unlock the motor head (1) with the button (5) and tilt it back.
- Put any of the attachments (8, 9, 10) onto the drive shaft bolt (3) and push it upwards as firmly as possible.
-
Turn the installed attachment anticlockwise, hooking it on the drive shaft bolt.
-
To disassembly the installed attachment repeat operations 1-3, push the installed attachment upwards as firmly as possible and turn it clockwise.
- The attachment can now be removed from the drive shaft bolt (3).
- Ensure that the motor head (1) is in fully lowered position which enables the motor head lock (5).
- To unlock the motor head (1) press the motor head lock button (5). This will release the locking mechanism and allow to raise the motor head freely (1).
WARNING! The motor head of the mixer should always be locked when in operation!
ASSEMBLY/DISASSEMBLY OF THE SPLASH GUARD
- Ensure that the speed control (2) is in The "Off" position ("0" position).
- Unplug the mixer from the power grid or disconnect the power supply.
- Attach the mixer arm (8), dough hook (10) or rod (9) and the mixing bowl (4) or (4a). See: „Preparation for operation".
- Put the splash guard (7) onto the mixing bowl (4) or (4a) from the front, until it is in central position. Its inner edge should be properly aligned with the edge of the mixing bowl.
- To disassemble the splash guard (7) from the mixing bowl (4) or (4a) repeat operations 1 and 2, lift the splash guard (7) slightly up and move it to the front.
- Disassemble the mixer arm and the mixing bowl.
USING THE APPLIANCE
USING THE ATTACHMENTS
| Mixer arm (8) | Mixes light and medium-light dough like pastry, shortcrust, ground meat and fish, butter and blanc mange cream, cheese dough, mashed potatoes and other vegetables, bottom cakes, loose cake ingredients |
| Rod (9) | Whips dough that has to be well-aerated, such as eggs, egg whites, sponge cakes, whipped |
| Dough hook (10) | Kneads dough, particularly raised cakes, as well as dough for: bread, rolls, cakes, pies, pizza, choux pastry, pasta, cenci. |
WARNING! Do not leave knives, metal spoons or forks or similar elements in the mixing bowl when in operation.
WARNING! Maximum mixing time of the appliance is 10 minutes, minimum time of rest between two mixing cycles is 20 minutes. When mixing yeast dough it is recommended to set the speed control on low speed and only after a moment increase the mixing speed.
PLANETARY MOVEMENT OF THE ATTACHMENTS
During operation the tool of the planetary mixer is in complex circular motion: it is rotating around its own axis and round the mixing bowl at the same time. This makes the stirrer operate carefully over the whole mixing bowl during one complete rotation, which allows to shorten the mixing time and increases effectiveness. Thus it is recommended to reduce the mixing time given in most recipes.
The shape of the mixing bowl and the attachments was designed to eliminate the need of continuous scraping and removing ingredients off the sides of the mixing bowl when operating the mixer. There is no need to clean the sides of the mixing bowl more than once or twice during one mixing cycle. The mixer should be unplugged from the power supply before the cleaning!
The mixer may get warm while operating. The upper part of the mixer motor head may get very warm due to heavy load and long mixing cycle, which is normal
CLEANING AND MAINTENANCE
- Ensure that the speed control (2) is in The "Off" position ("0" position).
- Unplug the mixer from the power grid or disconnect the power supply.
- The mixer motor head may get warm as a result of a long operating time (1). Wait until the machine has cooled
- Clean the casing of the machine with a damp cloth.
- Clean the mixer arm (8), rod (9), dough hook (10) and spatula (11) under running water with addition of a detergent.
It is recommended to clean the accessories as soon as you have finished using the appliance. This will allow to remove deposited sediments. It prevents the leftovers from drying out, which makes cleaning more effective and easier, it also prevents bacteria from reproducing.
WARNING! Do not clean the rod (9) in a dishwasher as it may cause its damage. The mixer arm (8), dough hook (10) and spatula (11), you can be cleaned in the dishwasher.
OPERATION OF THE APPLIANCE AT PARTICULAR SPEED LEVELS
The mixer's gear control is stepless, by increasing the turnover rate we may allow for:
| Pre-mixing | Slow pre-mixing, blending and creaming of all dough and dry pastry ingredients. At this speed level flour and dry pastry ingredients should be added as well as liquid ingredients to the dry ones. Do not use this speed for yeast dough. |
| Slow mixing | Slow mixing and blending. This speed level is suitable for kneading yeast dough, shortcrust and creamed pastry. Also for the first stage of mashing potatoes and other vegetables, as well as to add liquid fat to flour or pastry |
| Mixing, whipping | Used for kneading of medium-heavy pastry – as shortcrust. At this speed level you may add sugar to egg whites when making meringue. It is a medium speed level for blending substances, such as ground meat, minced pâté meat or pastry. |
| Whipping | For medium-fast whipping, the initial stage of mayonnaise making, for blending ingredients of blancmange cream. Also used for final mixing of lighter substance that needs to be well-aerated. |
| Fast whipping For whipping cream and egg whites froth. | |
USING THE MIXER FOR ONE'S OWN RECIPES
This instruction includes several general practical tips concerning the specificity of operating mixer that may be found useful while making up one's own recipes. However, achieving an excellent effect and developing the right procedure will require your own observation and experience. You will need to watch the mixing process and finish it at the exact moment of achieving the required consistency given in the recipe (e.g. "smooth and elastic pastry"). To estimate the right mixing speed, see section "Preparation for operation."
COOKING TIPS
- Ingredients that are usually kept in refrigerator should reach room temperature first. Thus you will need to take them out of the fridge adequately earlier
- To avoid putting eggshells or addled eggs in your mixer it is best to break the eggs into a separate bowl before adding the rest of ingredients.
- Too long whipping may affect the final result. You should watch the mixing time given in the recipe. If you wish to add some dry ingredients to the mixed dough, you should use low mixing speed only and stop when it becomes homogeneous.
- Weather conditions. Seasonal temperature changes may affect the temperature and the texture of food depending on the region, which may result in differences in required mixing time and the effects of mixing.
- You should always start mixing with low speed and increase it gradually to reach the speed required by the recipe..
RECIPES
SIMPLE TWO-EGG PIE
- 2 cups of sifted cake flour
- 1 1/4 cup of refined sugar
- 2 1/2 teaspoon of banking powder
- 3/4 teaspoon of salt
- 1/2 cup of soft bakery fat
-3/4 cup of milk - 114 teaspoon of vanilla
-2 eggs
PREPARATION:
1) Put flour, bakery powder, sugar and salt into a big bowl. Add bakery fat; pour in the milk and add vanilla
2) Knead at the lowest speed for up to 5 min until the products are fully blended
3)Next mix for another 2 min at medium speed

4)Stop the mixer, scrape the pastry remains off the sides and the bottom of the bowl
5)Add the eggs and knead for the next 1 1/2 min at the highest speed
POTATO PUREE
- 1 1/5 pounds of potatoes
- 1/2 cup of hot milk
- 2 teaspoons of margarine
- 1 teaspoon of salt
PREPARATION:
1) Peel and boil the potatoes in salted water, try to keep them not too tender
2) As the potatoes get floury start kneading them in a saucepan or put them in the mixing bowl. Next, knead the so prepared potatoes in the mixer at the medium speed for about 1 min.
3) When you finish, scrape the potatoes off the sides of the pan or the bowl.
4) Mix together hot milk, butter and salt. Add them to the potatoes and knead at the top speed for 1 min
OATMEAL COOKIES
- 2 cups of sifted flour
- 1 teaspoon of baking soda
- 1 teaspoon of salt
- 1 1/2 teaspoon of cinnamon
- 2 cups of instant oatmeal
- 1 cup of bakery fat or margarine
- 1/2 cup of refined sugar
- 3/4 cup of brown sugar
-2 whole eggs - 1 1/2 teaspoon of vanilla
- 1/3 cup of milk
- 1 cup of chocolate flakes
- 3/4 cup of crumbled nuts
- 1 teaspoon of baking soda
- 1 teaspoon of salt
- 1 1/2 teaspoon of cinnamon

PREPARATION:
1) Mix flour, soda, salt and cinnamon with oatmeal and put them aside
2) Mix butter, sugar, eggs and vanilla in the mixing bowl
3) Beat at the highest speed for 2 min until it's creamy, when finished scrape the mixture off the sides of the bowl
4) Add milk and the half of the previously prepared mixture, half of the flour and other ingredients and mix it slowly while stirring the dough. Next, knead the dough at the highest speed for 1 min
5) Add the other half of the mixture of flour and other products and repeat the whole procedure. When done, scrape the blend off the sides of the bowl.
6) Add chocolate flakes and nuts, knead at the highest speed for 1 min)
BEATING EGG WHITES
-2eggs
1) Place the whites in the mixing bowl
2) Beat at the highest speed

TECHNICAL SPECIFICATION
Technical specifications are listed on the product rating plate.
KB MAX: 10 min
NOTE! MPM agd S.A. company reserves the right to technical changes.
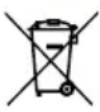
Proper disposal of the product (waste electrical and electronic equipment)

Marking on the product indicates that after the service-life of the product expires, it should not be disposed with other type of municipal waste. Used equipment may have a negative impact on the environment and health of people due to potentially containing hazardous substances, mixtures and components.
Mixing electric waste with other types of waste or disassembling those in an unprofessional manner may cause a release of substances that are hazardous to the environment and health. Used equipment should
be handed-over to a point for collection of electric waste. In order to obtain detailed information regarding the electric waste collection points, the user should contact the municipal point of electric waste collection or used equipment processing department.
PREPARATION AU FONCTIONNEMENT
MONTAGE/DEMONTAGE DU BOL
APPLICATION DES DIFFÉRENTS ACCESSOIRES
BISCUITS AUX FLOCONS D'AVOINE
BESCHRIJVING VAN HET APPARAAT
WERKING VAN HET APPARAAT OP BEPAALDE SNELHEIDSINTERVALLEN
m = 311 ;
PABOTA YCTPOICTBA HA OTДЕЛьны IX CKOPOCTYX
O6opOtbl MmKcepa yCTaHaBJIbAHTcI nlaBHO, NOdkpyuHBa o6opOtbl peYJrTopOM MOxHo yYeCTb:
TEXHINUCKA XAPAKTEPNUCTNKA
Texnueckne npaametpyka3aHbB HOMHaIbHOI Ta6nUKe npoNyKta.
KBT MAKC: 10MH
Lwa:73d5
Длина повоба: 0,95M

BHMMAHNE! Φирma MPM agd S.A. coxpaHЯET 3a co6oI npaBO Ha BVeDEHne TexHnueCKNX I3MeHeHn.
PpabnIbHaj yTIN3aunr npOdykTa (n3HOweHHoe 3eKtpueeckoe n 3eKtpoHHoe o6OpydoBaHne)

MapknpoBkaHa npOdykTe yka3bIaet Ha To, TTo npOdyKHe CJIeDyET Bbl6paCbIbTa BmecTe C dpYrMMn 6bITOBbIMN OTXoJAMN IIO OKOHuaHNN CpOKA ClyK6bl. N3HOUCHHC O6OpyIDOBAHNC MOKCT OKa3bIBaTB BPCdHOC BO3JeCTBNE Ha OKpyKaHOUcPcDy IN 3DopOBBe cEIOBEKA IN-3a NOTCHUNaHBOcoDEpKaHHNA ONaCHbIX BEuCEcTB, CMeCeIN KOMNoHETOB.CMeWnBaHne OTXoJDoB B VIne IN3HOUeHHOR0JNeKTPoHHORO IN JNeKTPpuueckoro O6OpyIOBaHnC DpyrMMn OTXoJAMN IN INx HEnpOpeCCNOHaJIbHa
pa360pka MoKET npBecT K Bb6pocy BeIeCTB, BpeHbIX IJIa 3IopOBBa IN OkpyKaIOUcI cpebl. N3HOWeHHoe YcTPOiCTBO HCO6XoDIMO CdaTb Ha IYHK T C6opa OTPa6OtaHHOrO 3JCKTpNcCKOrO IN JICKTPOHHORO 6OpdyoBAHnry.HTo6bl NOlyuHtB NOpO6Hy IO HfOpMaunIO MeTe CdaUn 3JIeKTPnuecknx IN JICKTPOHHbIX OTxOIOB, N0lb3OBaTeJIb DOJIkeH ObpaITbcra B MeCTHbI INyHK T C6opa 6OpOpyDoBaHnry IJIyTIN3aUNn IIN Ha 3ABOD nO nepepa60TKe I3HOWeHHOrO 6OpypDoBaHnry.
PRED PRVYMPOUZITIM
- Hikoli He cTaBTe npicTpI Ha rapyI nobepxHi.
-Пистpoem moKytb KOpNCTyBaTnCЯ JIOДи 3i 3HnJKeHIMn φi3nHIMn, ceHCOPHIMn a6o pO3yMOBIMn 3di6HOCTaMn, a TaKoJ Tl, XTO He MaE 3HaHb a6o DoCBiDy BnKOpNCTaHHa TboI OTo npNcTpoI0, 3a yMOBn, IIO BOHn Ipe6yBaOTb Pd HarIaIOM a6o npoiI
iHCTpykTaJxIoo6e3neuHOroKOpNCtYBaHHnIprNcTpoAMn Ta IoiHΦopMOBaHi npo nOteHciHi 3aIrp03n.
- Cπiδ 3BερTaTn yBaγ, οιοδ πιTiN He γραλίνη πριστροεM.
- Виимknить писстрий поед змioю обладнань аоб поед наближеним до рухомих частин пid час виковостань.
- He BCtabJIaIe BnIky B pO3eTKy MOKpIMN pyKaMn.
- He BnTjaIe BnIky 3 pO3eTKn, TЯHyu 3a Ka6eIb.
- BnKopncTobyIe npncTpIi Ha pIBHii i cTiIKiN nobepxHi.
-3aДя 6e3neKn DiTei He 3aIINaTn YactHn yNaKOBKn Y BiIbHOMy DoCTyni (noIietnleHObi NaKeTn, KapToHHi Kopo6Kn, noJIicTnpoJ ToUO).
-Пристрий He NOBHeH BnKOpNCTOBaTnCЯ DiTbMn.36epiraTeпристriй 3 Мержевм KaBeIem y HeNoctynHomy dIra DiTei Micci.
-BiD'edHaIe npicTpiB iD dJkepeJa KINBLeHnry, kUo 3aIIuHaTe Ioro 6e3 HaIy, a TaKoJ npeJ 3bnpaHnM, po3bnpaHnM a6O OUnIeHNm.
-He po3bnpaIte akcescyapn kombaHa nID yac po6OTn npncTpoJ.
-Перед пэршим ВИКОРИСТАНЯМ рeTeьно ВИМиTe Bci akcecyapи КOMбайна, які KOHTaKTYOTb 3 iЖeHo
-ПОЛЕРДЖЕHHЯ! He Д氧ЗВОЛЯТи ДiTЯМ ГраTNCSЯ ПЛIBКоJO. HE6E3ПЕKA YДУШЕHHЯ!
ONMC PPNCTPOH
1.Поворотна rolOBka 3ДигуHOM
2. PerylaTOp WbNdkocSti
3. Ппвовни вал 3i ШтунTom (mсце Крпльенна Habichoro обладання)
4. Yaisha 3 HepKabioi cTaJI o6'EMOM 4,2 J
4a. Пл actikobа уаша ob'emom 4,2 J
5.БлOKуВаHHЯ rolOBn.
- OchoBa 3 Miccem dIy KpInJIeHHa aIi
- Kpnska 3 roDIBHnuejo
- Miшалka Дли посяшувань 6araTOKOMNoHEThHx Mac
- Miwaika Дя 36иВаHHЯ Лergnx Mac
- RaOK,ДЯ TicTa
- ЛonaТka
BKA3IBKNI UOIO EKCNIYATAUJI 3MILUYBAU
OuHIIeHHI OBCJyTOBYBAHHI
- IpekehauTeca, 0o peryIaTOp wBnIKocTi (2) BmKHeHn (noLoXeHHra ,O").
- BiénHaIe Mikcep BiMpekxi abo BmKHi6 6IOK KINBHeHHa
3.ПдчacТрИВалоюpo6OTnMOKINBEHarpiBaHnIgOLOBKNDBNHyHa(1).ДaITe npicTpOIOxOJNo HHTN. - OuicTiTb Kopnyc npncTpOBOJIoHO raHupkoHO.
- Ouicitb miuaikn (8) i (9), rak (10) i IonaTb (11) nID npoTOUHO BOIOO 3 MInOUM 3acO6OM.
PekomeHdyETbca uKcecyapn BiDpa3y nicJ3aKiHcHnpo6OTn 3 npIcTpoem. Ue BndaJIHT b 6ydb-ja 3acTapiBiKlaJeHH, 3anobiraBncxHaHHo 3aIIuKIB, 10 po6ntb MTT8 6IbIe eKeTINBHm I JERKIM, a TAKOK 3ano6irae po3MHOKeHHIO 6akTepi.
YBATA! He MnTe MiwaIky (9) B nocydomnHi MaunHi, ockilbKn icHye pn3NK ii nookdoKeHn. Miawkky (8), rayok (10) i Ionoatky (11) moJHa MNTu B nocydomnHi MaunHi.
- DESCRIPTION OF THE APPLIANCE
- ASSEMBLY/DISASSEMBLY OF MIXER ARM, ROD OR DOUGH HOOK
- ASSEMBLY/DISASSEMBLY OF THE SPLASH GUARD
- USING THE APPLIANCE
- USING THE ATTACHMENTS
- PLANETARY MOVEMENT OF THE ATTACHMENTS
- CLEANING AND MAINTENANCE
- OPERATION OF THE APPLIANCE AT PARTICULAR SPEED LEVELS
- USING THE MIXER FOR ONE'S OWN RECIPES
- COOKING TIPS
- RECIPES
- SIMPLE TWO-EGG PIE
- PREPARATION:
- POTATO PUREE
- OATMEAL COOKIES
- BEATING EGG WHITES
- -2eggs
- TECHNICAL SPECIFICATION
- Proper disposal of the product (waste electrical and electronic equipment)
- PREPARATION AU FONCTIONNEMENT
- MONTAGE/DEMONTAGE DU BOL
- APPLICATION DES DIFFÉRENTS ACCESSOIRES
- BISCUITS AUX FLOCONS D'AVOINE
- BESCHRIJVING VAN HET APPARAAT
- WERKING VAN HET APPARAAT OP BEPAALDE SNELHEIDSINTERVALLEN
- PABOTA YCTPOICTBA HA OTДЕЛьны IX CKOPOCTYX
- PpabnIbHaj yTIN3aunr npOdykTa (n3HOweHHoe 3eKtpueeckoe n 3eKtpoHHoe o6OpydoBaHne)
- PRED PRVYMPOUZITIM
- ONMC PPNCTPOH
- BKA3IBKNI UOIO EKCNIYATAUJI 3MILUYBAU
- OuHIIeHHI OBCJyTOBYBAHHI
Brand : MPM
Model : MMR12
Category : Food Processor