
MRK18 - Food Processor MPM - Free user manual and instructions
Find the device manual for free MRK18 MPM in PDF.
| Brand | MPM |
| Model | MRK18 |
| Category | Food Processor |
| Appliance Type | Multifunction food processor with cooker, blender, kneader, grinder, grater, steamer and sous-vide |
| Bowl capacity | 3.5 L (max usable capacity 2.3 L) |
| Bowl material | Stainless steel |
| Power | 1200 W (estimated) |
| Power supply | 220-240 V ~ 50/60 Hz |
| Control screen | 5-inch touch screen |
| Number of speeds | 12 + Turbo (max approx. 12,000 rpm) |
| Integrated scale | 0-5000 g, precision 5 g, with tare function |
| Automatic programs | 9 (kneading, steam, sous-vide, cooking, grating, chopping, turbo, weighing, pre-wash) |
| Connectivity | Integrated Wi-Fi (recipe updates) |
| Included accessories | Knife, stirrer (butterfly), whisk, grating/slicing disc, basket, steam container with tray, 30 ml measuring cup, spatula |
| Cooking functions | Steam cooking, sous-vide cooking, direct cooking (up to 130 °C) |
| Safety | Bowl lock, overheat protection (resettable thermal fuse), automatic shutdown |
| Cleaning | Dishwasher-safe parts (except bowl and drive shaft) |
| Weight (approx.) | 8 kg |
| Dimensions (approx.) | 30 × 25 × 40 cm |
Frequently Asked Questions - MRK18 MPM
User questions about MRK18 MPM
0 question about this device. Answer the ones you know or ask your own.
Ask a new question about this device
Download the instructions for your Food Processor in PDF format for free! Find your manual MRK18 - MPM and take your electronic device back in hand. On this page are published all the documents necessary for the use of your device. MRK18 by MPM.
USER MANUAL MRK18 MPM
- Read the manual carefully before use.
- Be especially careful when children are near the appliance.
- Do not leave the appliance running unattended!
-
Do not use the appliance for purposes other than those intended.
-
Do not immerse the appliance, power cord and plug in water or other liquids.
-
Always unplug the appliance from the mains socket when not in use or before cleaning it.
-
Do not use a damaged appliance, also when the power cord or plug is damaged - in this case, have it repaired by an authorised service centre.
- Use of accessories not recommended by the manufacturer may damage the appliance or cause an accident.
- In the event of unusual sounds, smells or smoke coming out of the appliance, switch it off immediately and then contact an authorised service centre for repair.
- Do not use the appliance outdoors.
- Do not touch the appliance with wet hands.
- Do not hang the power cord on sharp edges and do not let it come into contact with hot surfaces.
- Make sure that the power cord is not hanging over the edge of the base on which the appliance stands. This will prevent the appliance from being accidentally pulled off this surface.
-
Store the appliance in a cool, shady and dry place.
-Avoid deformation of plastic parts, do not wash the device and accessories with hot water. -
Do not put your hands or objects in the tank during operation.
-
Do not place the appliance near other electrical appliances, burners, cookers, ovens, etc. or under suspended cabinets. Place the appliance away from the edge of the worktop.
- Always make sure that all components of the appliance are properly installed before starting work.
- Do not place the appliance near flammable materials, such as curtains, tablecloths and others, it may cause a fire.
-
The appliance is suitable for domestic use only.
-
The temperature of accessible surfaces may be higher when the equipment is in operation.
-
Connect the appliance to a mains socket with an earth pin!
-
The appliance may be used by persons with limited physical, sensory or mental capabilities, and who have no knowledge or experience of using such equipment, provided that they are supervised or instructed in the safe use of the appliance and are informed of potential hazards.
-
Children should be careful not to play with the equipment/appliance.
-
The equipment is not designed to operate with an external shutdown timer or separate remote control system.
-
Do not plug the plug into the mains socket with wet hands.
-
Do not pull the plug from the socket by the power cord.
-
Use the appliance on a smooth and stable surface.
-
For the safety of children, please do not leave any freely accessible parts of the packaging (plastic bags, cartons, polystyrene, etc.).
-
WARNING! Do not let the kids play with the foil. Danger of suffocation!
-
Be particularly careful when handling cutting blades, especially when removing them and when cleaning.
-
Do not place the appliance on hot surfaces.
-
Do not touch the blades, especially while working. The edges of the knives are very sharp. Always hold the blade by its upper part when installing and removing it.
-
Always wait for rotating parts to stop before removing any parts from the appliance.
-
Pull the plug out of the mains socket immediately after use.
-
Switch the appliance off and disconnect it from the power supply before replacing accessories or contacting moving parts during operation.
-
Wait until the engine has come to a complete standstill before proceeding with disassembly.
-
Do not use the "TURBO" button or increase the speed rapidly if the temperature is higher than 55^ C .
-
When working with hot food, do not touch the bowl, lid, measuring cup or steaming container directly. Use kitchen gloves.

ATTENTION! Hot surface!

ATTENTION! Danger of getting burned by steam!
- Check that the power supply parameters on the appliance's rating plate correspond to those of your mains supply.
- Never use the appliance in the cooking mode with an empty bowl.
-
Do not allow the food processor to run for more than one minute at "12" speed.
-
The appliance must not be used by children. Keep the appliance and power cord out of the reach of children.
-
Disconnect the appliance from the power supply if you leave it unattended and before installation, disassembly or cleaning.
DESCRIPTION OF THE APPLIANCE
- Tiltable bowl lid cap
- Bowl lid
- Bowl lid seal
- Lightweight pulp (butterfly) mixer
- Mixer
- Knife
- Strainer
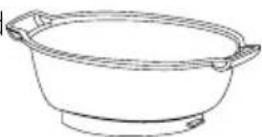
- 3.5 l bowl (MAX usable capacity 2.3 L)
- On/Off switch 0/1
- Power cord
- Housing of the appliance
- Touch control panel
-
Knob for changing the value of the selected parameter with START/ STOP button
-
Pusher
- Disc cover
- Disc cover seal
- Grating/slicing disc
- Disc mounting stem
- Spatula
- 30 ml measuring cup
- Steamer container lid
- Steamer container tray
- Steamer container
- Steamer container seal
- Drive shaft with seal
- Shaft lock
Bisphenol-free (BPA-free) food contact accessories.
EQUIPMENT FUNCTIONS AND FEATURES OF THE FOOD PROCESSOR
CONTROL PANEL WITH TOUCH SCREEN - the control panel is equipped with a 5-inch
touch screen. The food processor allows you to use the dedicated recipes in the food processor database and automatic programmes to operate the food processor equipment. It is also possible to define custom settings. With the WI-Fl module you can update your recipes database. Intuitive and easy operation allows you to enj


VIBRATION REDUCTION SYSTEM - an innovative flexible bowl mounting system in the
food processor reduces vibrations transmitted to the food processor housing during high speeds or heavy pulp kneading.
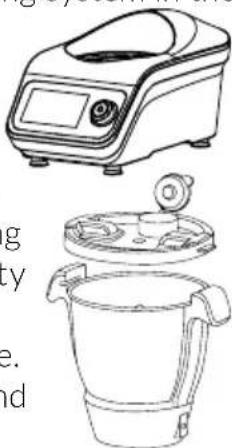
BOWL AND BOWL LID - the bowl (8) is made of high-grade stainless steel. In its bottom there is a hole for mounting the drive shaft (25). In the inner part of the bowl there are four horizontal lines denoting the following capacities - 600 ml, 1000 ml, 1500 and 2000 ml and MAX capacity (2300ml). The bowl is equipped with handles for easy adjustment. The lid of the bowl (2) is fitted with a seal to ensure that it is leak-proof during use. The tiltable lid cap (1) allows dosing of ingredients and spices. The bowl and lid are equipped with a system of interlocks and safety devices to prevent start-up in case of incorrect installation.
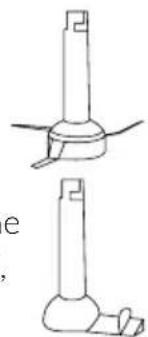
KNIFE - the knife blades (6) are made of stainless steel so selected that they retain their parameters for a very long service life. Its unique design provides the highest performance from the lowest speed.
MIXER - the shape of the mixer (5) has been designed so that the content of the bowl is only mixed, without shredding. It is suitable for slow and long cooking of, for example, soups. The mixer has different mixing characteristics depending on the direction of rotation.
ATTENTION! Do not set the speed higher than "3" when working with the mixer.
LIGHTWEIGHT PULP (BUTTERFLY) MIXER - the butterfly (4) allows to whisk light creams and pulps as well as egg whites. The design avoids the complete shredding of the whisked pulp.
ATTENTION! Do not set the speed higher than "4" when working with the butterfly.
GRATING/SLICING DISC - the disc (17) is used to grate fruit and vegetables or to slice them. The function of the disc depends on the side of its mounting. The drive to the disc is transmitted via the stem (18).

STEAM COOKING BOWL - thanks to the container (23) the food processor can act as a steamer. It is mounted on the bowl (8). The container has a tray (22) so you can increase the amount of cooked food. The whole is covered with a lid (21).
STRainer - the strainer (7) allows you to cook loose products such as rice, groats. The gaps in the strainer act as a sieve which drains water from the cooked products when the strainer is removed. The measuring cup (20) on the outside of the bottom has a special hook that helps to lift the strainer from the bowl. You can also use the strainer for steaming less food.
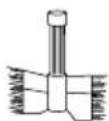
DRIVE SHAFT - the shaft (25) is mounted in the bottom of the bowl. It is equipped with a silicone seal ensuring tightness in the bottom of the bowl. Additional rotary accessories are mounted on the shaft. The drive is transmitted through the hexagonal shaft end.
SCALES FUNCTION - the robot is equipped with scales enabling measurement the range 0-5000g with the accuracy of 5g. The scales allow for precise dosing of ingredients, also while the programme is running. In addition, the built-in scales has a zero (tare) function. Access to the scales function is possible after selecting the appropriate function or after selecting the scales shortcut icon -

"TURBO" FUNCTION - allows you to obtain the maximum speed "12" of the installed knife - the food processor acts as a blender. The function only works if you hold down the "TURBO" button

ATTENTION! Do not exceed 60 seconds at a time when using the "TURBO" function.
REVERSE ENGINE REVOLUTIONS - the food processor has the ability to work at reverse engine revs at speeds from "1" to "3"). Properly used reverse revs improve the work of the knife and the mixer.
CONTROL PANEL DESCRIPTION
MAIN MENU


- Selecting the "Recipes" panel we go to the list of recipes available in the appliance.
The "Custom Settings" panel allows us to use individual operating modes of the appliance.
Using the "Automatic Programmes" panel we can select the programmes defined in the appliance.
"Update Appliance" gives us the opportunity to download the latest version of recipes and software.
A message about the available update will appear when you connect to the Internet.
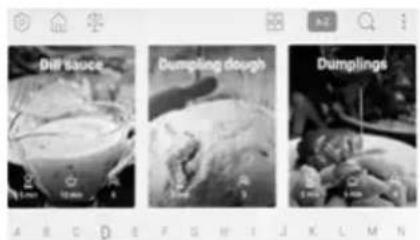
RECIPIES
The food processor has in its database recipes in the form of a cookbook, divided into groups:
-
Basic recipes
-
Sauces
-
Pastes, starters, snacks
-
Breadstuff
-
Salads
-
Drinks
-
Soups and creams
-
Cakes and desserts
-
Main flour dishes
-
Sous Vide
-
Main meat dishes
-
New Recipies
-
Main fish dishes
-
Xmas
-
Steamed dishes
-
Snacks for children
-
Vegetarian dishes
-
Fit Recipes
Each recipe includes:
- list of ingredients
- Instructions for preparation
- indicative preparation time
- accessories required
- information on how many people each dish is for
- difficulty level
Recipes in the category "Fit recipes" have a calculated caloric content.
You can sort the recipe database alphabetically or by group. You can also add selected recipes to the "FAVOURITES" tab. Working with ready-made recipes shortens time and makes it easier to prepare the food. The user will be informed about the possibility of updating the list of recipes through messages displayed on the control panel screen.
CUSTOM SETTINGS
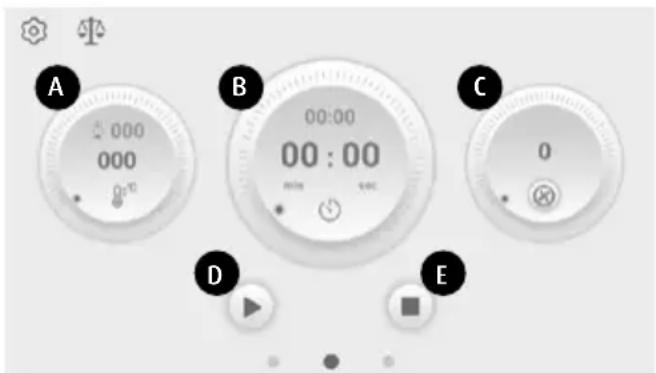
A - process temperature selection field
A temperature of 37^ to 130^ is available with a choice of 5^ intervals. The "000" indicates room temperature. The steaming bowl temperature indicator indicates the current temperature in the bowl displayed to the nearest 5^ .
B - process time selection field
A time of 1 second to 90 minutes is available with a choice every 1 second. Once the process is started, the timer counts down the time until the process is complete. The smaller time indicator above shows the originally set time during the process.
C - speed selection field for accessories
There are 12 speeds available, where "1" is the lowest speed (approx. 120 rpm) and "12" is the highest speed (approx. 5000 rpm). Pressing the knife icon changes direction of rotation which is indicated by the icon . Reverse rotation is only available for speeds "1", "2", "3".
D - process START/PAUSE button.
E - process STOP button.
AUTOMATIC PROGRAMMESE
There are 9 automatic programmes available to speed up and suggest the optimum processing time for the food. The programmes can be modified, but to a limited extent. In addition, a "TURBO" mode is available, which increases the engine speed to the maximum, as well as a product weight measurement mode.
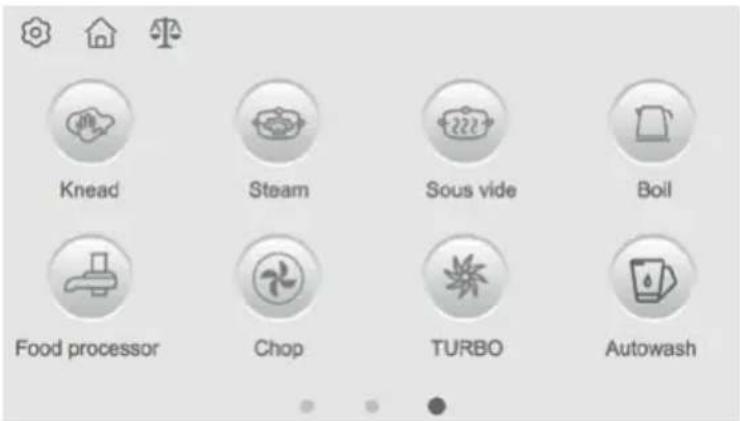
Automatic programme menu
| Programme/Icon Parameters (editing range) Equipment Notes | ||
| Dough kneading | Temp.: 0 (0-37°C) | knife Periodically reverse revs |
| Time: 3 minutes (2-3 minutes) | ||
| Speed: 1 (1-2) | ||
| Steaming | Temp.: gradually increasing | - Time starts to count when 95°C is exceeded |
| Time: 20 minutes (1-60 minutes) | ||
| Speed: not applicable | ||
| Sous vide | Temp.: 100°C (60-100°C) | - |
| Time: 20 minutes (1-90 minutes) | ||
| Speed: not applicable | ||
| Cooking | Temp.: 60°C (60-100°C) | - |
| Time: 0 to 90 minutes | ||
| Speed: not applicable | ||
Programme/Icon Parameters (editing range) Equipment Notes

Grating/slicing
Temp.: not applicable
Time: 30 seconds (10-59 seconds)
Speed: 4-6
grating/slicing
disc

Chopping
Temp.: not applicable
Time: 10 seconds (10 seconds - 4 minutes)
Speed: 6 (1-12)
knife -

TURBO
Temp.:not applicable
Time: up to 1 minute
Speed: 12
knife Only works while
holding down the
(TURBO) button

Scales
Scales up to 5000g, accurate to 5g. - Tare option available

Autowash
Temperature: 45^
Time: 2 min.
Speed: 3 and 6
knife Use a little washing
agent for better effect
RECIPE UPDATE
This function allows you to download the latest recipe database once the manufacturer has updated it. Before updating, it is necessary to establish a connection to an available Wi-Fi wireless network. In addition to the recipes, the food processor system software will be updated (if required)
DESCRIPTION AND MEANING OF OTHER ICONS IN THE CONTROL PANEL
Icon (button) Meaning Notes

START (start of process)

PAUSE (process interruption)

STOP (end of process)


Mixer, butterfly, knife (recommended accessories)
Icon displayed when using automatic programmes

Reverse revs Maximum speed: "3"

Correctly fitted bowl lid

Bowl lid missing or not correctly fitted

Entering the "settings" menu

Back to home page

Shortcut to the "scales" function

Sorting recipes

Alphabetical sorting

Recipe search
Pressing the panel in place of the text calls up the virtual keypad

Favourites Pressing the icon adds the recipe to favourites

Recipe details

Interface volume

Wi-Fi network parameters

Interface language

This device

Help

History

Product preparation time

Preparation time

Servings
INTENDED USE OF THE ACCESSORIES
| ACCESSORIES ACTIVITY SPEED TIME TEMPERATURE | MAXIMUM AMOUNT OF FOOD IN THE BOWL | |||
| knife | meat chopping 8-12 30-60 | seconds | -600g of boneless | meat |
| ice cube crushing 8-12 10-20 | seconds | -500g + possibly | 50-100g of water | |
| sugar milling 8-10 10-30 | seconds | -600g | ||
| blending 8-12 up to 60 | seconds | -2000 ml | ||
| chopping of onions, celery, etc. | 5-7 15-60 | -600g | ||
| beans, soya, nuts, coffee, almonds | 10 2-3 | minutes | -600g | |
| kneading light dough | 1 | 2-4 minutes | -750g | |
| lightweight pulp (butterfly) mixer | whisking of egg whites | 4 | 2-4 minutes | -2300 ml |
| cream whipping | 3 | 3-5 minutes | -2300 ml | |
| mixer | soup simmering | 1-2 1-90 | minutes | 100°C |
| other dishes requiring stirring | 1-2 as | required | as required | |
| strainer | steaming rice, groats | - | 15-35 minutes | 110°C |
| slicing/grating | 5-6 | 30-60 seconds | -500g | |
| Grating/slicing disc | steaming fish, vegetables | - | 10-60 minutes | 110-120°C |
| Steamer container (steamer) | ||||
PREPARATION FOR USE
- Unpack the appliance from the cardboard, remove all bags, labels, cardboard and fillers. Check the appliance for any damage that may have occurred during transport. In case of any doubts, please contact the seller.
- Make sure that the parameters of your mains supply correspond to the technical data on the product rating plate.
- Thoroughly wash and dry all parts in contact with food following the instructions in the section "CLEANING AND MAINTENANCE".
- Set the device on a dry, flat, stable and horizontal surface so that the rubber feet of the device suck to the surface.
- The appliance has a safety system - it can only be switched on if the jig (8) and the jig lid (2) are correctly fitted.
FITTING/REMOVING THE BOWL
ATTENTION! Never run an incompletely assembled appliance. Risk of injury!
- Check that the seal is correctly fitted on the drive shaft (25).
- Insert the drive shaft (25) into the bowl so that the sprocket goes through the hole in the bottom of the bowl and then lock the drive shaft by applying the lock (26) on it from the outside and turning it slightly clockwise (Fig.1)
- Place the bowl (8) on the housing of the appliance (11) so that the capacity marks inside the bowl face the rear of the housing (Fig. 2).
-
Put one of the accessories on the installed shaft (25) (Fig.3):
-
lightweight pulp- butterfly mixer (4)
-mixer (5) - knife (6)
strainer (7).
ATTENTION! The knife blades are sharp. Be careful not to get hurt!
- Make sure that the seal (3) is properly seated in the bowl lid (2). It must be properly seated in the groove for the seal around the entire circumference.
- Place the bowl lid (2) on the bowl (8) as shown in Fig. 4, press it down and turn it so that the handles of the bowl and the lid overlap (the tabs in the lid will take their places in the sockets of the bowl).
-
To remove the bowl from the appliance, follow these steps:
-
turn the lid (2) slightly counterclockwise so that the tabs in the lid slide out of the sockets in the bowl, carefully remove the lid
- remove the bowl from the base of the food processor
- remove the accessory (butterfly, mixer, knife) from the rotary shaft
- remove the strainer using the strainer holder in the bottom of the measuring cup (Fig.5).
FITTING/REMOVING THE STEAMER CONTAINER
- Follow the steps described in point 1-3 in the section FITTING/REMOVING THE BOWL.
- Make sure that the seal (24) is properly seated in the steamer container (23). It must evenly adhere around its entire circumference to the outside of the ring in the container.
- Place the steamer container (23) on the bowl (8) as shown in Fig. 6, and turn it so that the handles of the bowl and the lid overlap (the tabs in the lid will take their places in the sockets of the bowl). Place the tray (22) on the container (23) and cover the lid (21).
-
To remove the steamer container from the appliance, follow these steps:
-
remove the lid (21) and the tray (22)
- turn the container (23) slightly counterclockwise so that the tabs in the container slide out of the sockets in the bowl, carefully remove the container from the bowl
- remove the bowl from the base of the food processor
- remove the knife from the rotary shaft.
FITTING/REMOVING THE GRATING/SLICING DISC
- Follow the steps described in point 1-3 in the section FITTING/REMOVING THE BOWL. Install the disc mounting stem (18) on the drive shaft (25).
- Place the grating/slicing disc (17) with the appropriate side facing upwards on the stem (18), depending on the operation (grating/slicing).
- Make sure that the seal (16) is properly seated in the disc cover (15). It must be properly seated in the groove for the seal around the entire circumference.
- Place the disc cover (15) on the bowl (8) as shown in Fig. 7, press it down and turn it so that the handles of the bowl and the lid overlap (the tabs in the lid will take their places in the sockets of the bowl).
- Place the pusher (14) in the disc cover.
-
To remove the disc from the appliance, follow these steps:
-
turn the lid (15) slightly counterclockwise so that the tabs in the lid slide out of the sockets in the bowl, carefully remove the lid
- remove the bowl from the base of the food processor
- remove the disc (17) from the stem (18)
- remove the stem (18) from the rotary shaft (25).
USAGE
The following operating descriptions contain a diagram of how to work with the appliance. You will find detailed recipes for individual dishes, their ingredients, proportions and weight in the food processor recipe database.
- Install the drive shaft (25) in the bowl and install the bowl in the housing.
- Depending on the nature of the food to be prepared, install the appropriate accessory: knife (6), mixer (5), butterfly (4) or strainer (7).
ATTENTION! The knife blades are very sharp. Be careful not to get hurt.
- Put the food to be processed in the bowl. Do not exceed the maximum volume of the bowl marked with a horizontal line (upper line max - 2300 ml). If you are going to cook food in the strainer (7), pour enough water (broth, stock) into the bowl to cover the food in the strainer. When adding the products to the bowl, it is possible to dose them precisely thanks to the scales function (see: "SCALES FUNCTION"). If you will be preparing dishes from recipes, fill the bowl according to the instructions for the recipe.
ATTENTION! Do not fill the bowl over 2300 ml (MAX line inside the bowl) and over 2000 ml for liquids (water, soups, etc.).
ATTENTION! Be especially careful when cooking food. Do not run the appliance with an empty bowl. When cooking products in the strainer, take care of the right amount of water in the bowl.
ATTENTION! When inserting and pouring the ingredients into the bowl, take special care not to flood the base of the appliance. Danger of electrocution.
- Install the bowl lid (2) on the bowl (8).
- Connect the appliance to the mains and then switch it on using the button (9) on the left side of the appliance. If you do not take any action within 5 minutes, the appliance will go into sleep mode. Restarting is done by touching the control panel.
- After starting the food processor, select the appropriate mode from the touch control panel:


Recipes (example) Custom settings Automatic programmes
A red dot at the bottom of the display indicates the current operating mode.
Recipes - select the appropriate recipe, continue with the displayed instructions.
Custom settings - declare the temperature, time and speed from the touch panel respectively.
Automatic programmes - select the appropriate automatic programme, make possible parameter adjustments.
The selection of the range of a given value can be made directly on the touch control panel or by means of the knob (13) after the parameter has been indicated on the panel. Start the process by pressing the icon l . Pressing the knob will also start or stop the process. The green light of the knob indicates that the process is in progress.
ATTENTION! If you have declared a temperature greater than 60^ , do not set the speed greater than "3". Risk of burns!
ATTENTION! Do not set the mixing speed higher than "3" when using the mixer (5).
ATTENTION! Do not set the speed higher than "4" when working with the butterfly.
ATTENTION! Always use kitchen gloves when cooking or heating the contents of the bowl, adding ingredients and emptying it. RISK OF BURNING!!!
- Keep an eye on the process, or make adjustments to settings and quantities of ingredients after the food processor has stopped working. Smaller ingredients can be added through the hole in the lid when the cap is opened (1).
ATTENTION! If you notice that when making heavy pulps and doughs, the food processor significantly reduces the speed or the speed fluctuates, stop the process immediately. Reduce the amount of food processed. - When adding the products to the bowl, it is possible to dose them precisely thanks to the scales function (see: "SCALES FUNCTION") however, the set process must be interrupted earlier (PAUSE).
- After counting down the time to zero, the action will be completed. You can stop the action at any time using the "STOP" button. If the duration of the action is calculated from zero, it will automatically end after 90 minutes.
- After completing the process, check the condition of the food being prepared, or start a new process with appropriate adjustments to the parameters.
- Switch off the appliance with button (9), disconnect from the mains. Remove the bowl lid and the bowl. Use the spatula (19) to empty the contents of the bowl if the nature of the food requires it.
- Wait for the appliance and its accessories to cool down and then clean them immediately.
STEAMING
- Install the drive shaft (25) in the bowl and install the bowl in the housing.
- Pour about 600ml of water (to the line inside the bowl) into the bowl (8) - this is a dedicated amount of water for steaming in the automatic programme (no time adjustment). For longer cook - ing times, increase the amount of water.
ATTENTION! The steaming process uses about 500ml of water for 30 minutes of steaming. Do not steam for more than 1 hour. Keep an eye on the amount of water in the bowl. Boiling all the water out can lead to damage to the appliance, burns and even fire.
- Install the steamer container (23) on the bowl (8).
- Place the food in the steamer container (23). For more products, use the tray (22). Cover the whole thing with the lid (21).
- Connect the appliance to the mains and then switch it on using the button (9) on the left side of the appliance.
- When the food processor starts up, select the AUTOMATIC PROGRAMMES mode and then steam cooking (STEAM).
- Declare the intensity of steam production. There are three levels of intensity, indicated by the bowl icon flashing on the display. Also declare the duration of the process - the default is 20 minutes. For longer time, remember to pour more water into the bowl.
- Start the process by pressing the icon or by pressing the knob (13). The time will be counted from the moment the water exceeds 95^ .
- Keep an eye on the condition of the cooked food.
ATTENTION! All operations related to taking off and checking the condition of the cooked food should be carried out with kitchen gloves.
- Steam cooking can also be carried out in the strainer (7), by putting it inside the bowl beforehand. Remember that the water level in the bowl must be below the bottom of the strainer and at the same time the water volume must not be less than 600ml .
- To complete the food preparation process, press the key ⑤ at any time.
- When the cooking process is complete, turn off the appliance with the "ON/OFF" button (9), dis - connect from the mains, remove the container from the bowl and distribute the food.
13.Wait for the appliance and its accessories to cool down and then clean them immediately.
SOUS VIDE COOKING
The SOUS VIDE (in a vacuum) cooking method is based on a slow, precise process of cooking in water of dishes vacuum sealed in hermetic bags. This allows you to preserve a very large amount of nutrients, vitamins and minerals. The whole process takes place at a sufficiently low temperature and time.
- Follow the recipe instructions carefully (temperature and time).
- Care should be taken to ensure that the cooked food is consumed immediately after cooking according to the recipe or is properly preserved
GRATING AND SLICING
- Install the drive shaft (25) in the bowl and install the bowl in the housing.
- Mount the stem (18), disc (17) and disc cover (15) on the rotary shaft. Make sure to mount the disc with the correct side up depending on the nature of the operation.
ATTENTION! The grating and slicing disc is sharp. Be careful not to get hurt!
- Prepare the food to be processed. Cut the fruit and vegetables into smaller pieces so that they pass through the feed hole in the disc cover and remove the stones from them.
- Connect the appliance to the mains and then switch it on using the button (9) on the left side of the appliance.
- When the food processor starts up, select the AUTOMATIC PROGRAMMES mode and then select the grating/slicing mode (FOOD PROCESSOR), make possible time and speed adjustments.
- After selecting the parameters, start the process with the button . To stop the process, press the button .
- Slowly insert the products into the feed hole in the disc cover (15) and press down on them with the pusher (14). When working, do not let the bowl fill to the end with the processed food. Periodically turn off the appliance and empty the bowl of the processed food.
ATTENTION: The disc cover (15) is not used to cover the bowl during heat treatment and when using the knife and mixers.
- At the end of the programme, turn off the appliance with the switch (9), disconnect it from the mains, empty the bowl and clean the appliance.
PRACTICAL CULINARY TIPS
By following these guidelines you will be able to use your MRK-18 food processor in an optimal way and your work will bring the best results.
- always grind products (e.g. vegetables, nuts, dry rolls, coffee and even rice to very small parts or even powder) at higher speeds of the robot (8-12). It is advisable to start with a lower speed and gradually increase it.
- always perform powdering of products (grinding e.g. spices, chocolate, sugar to fine powder) at higher mixing speeds (9-12). It is advisable to start with a lower speed and gradually increase it.
- shredding of food (chopping of fruit and vegetables into small chips) is performed at medium mixing speeds (4-6). When shredding cabbage or lettuce it is advisable to add a small amount of water to the bowl.
- during the above operations, do not fill the bowl above half of its nominal volume. Carry out these operations using the knife (6). Suggested time is a dozen or so seconds, depending on the quality, hardness and quantity of the ingredients being chopped.
- food emulsification (bringing products to an emulsified state e.g. mayonnaise, sauces) can be carried out with the butterfly whisk (4) (stirring speed 1-4). The time depends on the ingredients of the dish (from 20 seconds to several minutes).
whisking (bringing cream or egg white to a firm consistency) is best done using the butterfly (4) at mixing speeds (2-4). Due to the freshness of eggs, their size or initial temperature, it is difficult to indicate a specific processing time. You can take 1 minute at the beginning, check the effect, then possibly resume the process. - it is best to knead dough using the "KNEAD" dough kneading programme, possibly slightly modifying its parameters. When kneading light pulps (pancake batter, sponge cake) we use the butterfly (4), while for hard pulps (pizza dough, yeast-based dough) we should work on the knife (6).
- fry by increasing the temperature to 120^ . Pour the olive oil and wait for it to heat up. For a uniform degree of frying, use the lowest mixing speed. After about 2 minutes, check the frying effect, or extend the process until the product is in the right form.
- for a better chopping or crushing effect with the knife (e.g. meat or vegetables) it is recommended to portion the ingredients. A smaller portion means a more precise chop.
CLEANING AND MAINTENANCE
ATTENTION! Before cleaning, unplug the power cord and wait for the appliance to cool down!
ATTENTION! Do not immerse the housing in water or other liquids.
ATTENTION! Before cleaning, dismantle all accessories of the appliance.
ATTENTION! The knife blades are sharp. Be careful not to get hurt.
- Clean the appliance and its accessories after each use. This will keep it fully operational.
- Do not use aggressive detergents, solvents or hard materials that could scratch the surface.
- Clean the housing of the appliance (Fig.8) by wiping it with a damp, delicate cloth and then wipe it dry. In case of heavy soiling, moisten a cloth with water and detergent.
- You can pre-wash the inside of the bowl by pouring about 0.6l of water with detergent into it and setting the knife speed to 6 for about 30 seconds. This operation allows you to clean the inside, but the jug still needs thorough washing, or you can use the automatic PRE-WASHING program. Be -fore pre-washing, make sure that the knife is properly placed on the drive shaft and that there are no food residues under the knife. In the pre-wash program, do not use a stirrer and butterfly.
- If there are signs of scorching at the bottom of the bowl, pour a little bit of a water solution of citric acid and wait a few minutes.
- Remove all accessories from the food processor and wash in warm water with detergent, rinse and dry thoroughly. You can also wash them in the dishwasher with the exception of the bowl (8) and drive shaft (25) - see Fig. 9.
- Pay attention to the cleanliness and correct positioning of the rubber seals (3), (16) and (24). You can dismantle and wash these seals separately, but remember to install them correctly where they belong. The seals have different dimensions and are not interchangeable with each other.
-
Store the appliance in a dry and sunny place. When storing for a long time, put it in a box.
-
The bowl is equipped with overheating protection. If the temperature in the bowl exceeds a dangerous level, the bowl heating function will not work until the thermal fuse is reset. The fuse reset button is located on the bottom of the bowl (Fig.10). Use a small screwdriver or pen to press the fuse button. Do not use a sharp tool. Resetting the fuse will cause a characteristic click.
But before you reset the fuse, remember some important points:
- a possible cause of overheating is not using the knife or stirrer, cooking after emptying the bowl or cooking the food at an inappropriate high temperature and for too long. Never let the food burn in the bowl. If the food starts to burn, lower the cooking temperature and add some water or fat
- empty and cool the bowl before resetting the fuse
- do not put the bowl in the fridge
ATTENTION! If the thermal fuse switches off the bowl heating very often it can mean a technical fault. Do not use a damaged bowl. Contact an authorised service centre.
ATTENTION! Do not use a bowl with a defective thermal fuse button.
ATTENTION! Do not use sharp objects, abrasive pastes, solvents and other strong chemicals - their use may damage the appliance.
PROBLEMS AND HOW TO SOLVE THEM
PROBLEM CAUSE SOLUTION
The appliance does not start or suddenly Incorrect assembly Assemble the appliance correctly stops
Blocking the knife or mixer Too many or too large pieces of the processed food
Do not exceed the permitted capacity of the bowl, cut the food into smaller pieces
Overheating smell Warming up of the parts during the first start-up
It is a normal phenomenon which will cease to exist in the future
Food processor overload
Turn off the appliance, wait for it to cool down Do not exceed the recommended operating times
The bowl does not heat up The bowl thermal fuse has tripped Reset the fuse
TECHNICAL DATA
The technical parameters are indicated on the appliance rating plate.
Length of the power cord: 0.90m

The manufacturer reserves the right to modify graphics (icons, photos) in the product software after the update. Any possible changes will not affect the functionality of the device.
The product may be slightly different from the photos/drawings contained in the instructions and other marketing materials.
NOTE! MPM agd S.A. company reserves the right to technical changes.
Proper disposal of the product (waste electrical and electronic equipment)

Marking on the product indicates that after the service-life of the product expires, it should not be disposed with other type of municipal waste. Used equipment may have a negative impact on the environment and health of people due to potentially containing hazardous substances, mixtures and components.
Mixing electric waste with other types of waste or disassembling those in an unprofessional manner may cause a release of substances that are hazardous to the environment and health. Used equipment should
be handed-over to a point for collection of electric waste. In order to obtain detailed information regarding the electric waste collection points, the user should contact the municipal point of electric waste collection or used equipment processing department.
PROBLEMA CAUSA SOLUZIONE
NOSLAUCISANA UN GRIESANA APMETUMA
- levietojiet piedzinas varpstu (25) kruzi un levietojiet kruzi ierices korpusa.
- Uzstadiet uz rotejosas varpstas serdi (18), disku (17) un diska vacinu (15). Parliecinieties, ka disks in uzstadits pareizo pusi uz augsu atkaribā no yeicamas daribbas veida.
UZMANIBU! Abrazivais un griesanas disks ir ass. Uzmanieties, lai sevi nesavainotu!
BESCHRIJVING VAN HET APPARAAT
PROBLEM OORZAAK OPLOSSING
PROBLEMÁ CAUZA SOLUTIE
Dispositivul nu porne ste sau se opre brusc
OBPATHbIE OBOPOTbI DBNFATEJI - yCTpoNCTBO IMeET BO3MOXHOCTb
pa6oTaTb Ha o6paTHbIX o6opOtax Ha ckopocTaux OT 1》do 3》.IpaBnIbHo
IcnoJIb3yEmbIe 6paTHbIe 6opOToI yLyUshaOT pa6OTo Hoxa I Me7aIKN .

ONINCAHNE PAHEJN UYPABJEHNA
TJABHOE MEHIO


BbI6paB nAHeB «PeuentbI», MblpeenEm K cnNCKy peeNTOB, OocTyHbIX B yCTPOINCTBE.
I NaHeJIb 《NoIb3OBaTeJIbckNe HAcTPOKn》N03BOJareHAM NcNoJIb3OBaTb INHdINBnDyAlhBipeXIMbl pa6OTbl YCTPOJCTBa.
IcnoJIb3yraNaHeJIb《ABTOMaTHueckne nporpaMMbl》,MbIMoKemBbIbpaTb nporpaMMbl,onpe-DeJIeHHbIE Ha YCTPOJCTBE.
«O6HOBJIeHne npaBnI JdaET HAM BO3MOXKHOCTb 3aRpy3NTb NocJIeHNIO BepCNIo peIeTTOB I nPpOgPaMMHOrO o6ecneueHn.
Coo6eHne o DocTyNHOM 6HOBHeHH NOBITcN OscIe NOKJIuOeHHa K INHTepHeTy.
PELIENTbI
Po60T nMeet B cBoe 6a3e daHHbIX peuNTbI B BVide NOBaPeHHoN KHN, pa3JeJIeHHbIe Ha rpynnbl:
-
Ba3OBbIe peuenTbI
-
Coycbl
-
NaCTa, 3aKcKn, XoJIoNbIe 3aKcKn
-
XIe6o6yUOuHbIe n3JeJIa
-
CaNaTbI
-
Hanntkn
-
Cynbln Kpembl
-
TopTbI n DecepTbI
5.OCHOBHbIe MyuHbIe 6JIOda
14.Блюда Sous Vide
-
OCHOBHbIe MChhBie 6JIIOda
-
HOBBIE npaBnla
7.OCHOBHbIe pbl6HbIe 6JIIOda
- PɔkjIecTBo
8.Бл�да на napу
17.3aKyscknIyIeTei
-
BeretapnHaNckne 6IIOda
-
Póngxóuànne peceπTbì
Kaizdbi peuent nmeet:
-cnncOK INHrgpeDneHTOB
- INHCTpyKUHO
-OPNEHTIPOBOUHoe BpeMIOJTOBOKN
-Heo6xoDnMbIe npncocO6JeHn
- INHΦOpMaTOnO TOM, CKOJIbKO YeJIOBeK paccHTaHO 6JIHO
-уровень сюжноctи
PeçentbI B KaTeOpn «ПоДхОДяшпe peцentbI» IMeIoT paCCHTaHHoe KoJIInYeCTBO KaJOpn.
BbIMoKeTe copTnpoBaTb 6a3y DaHhbIX peuNTOB no aIphiABTu nIi no rpynnam. Bbl TAKKHe MoKeTe IobabTb BbIBpaHHbIe peuNTb I BklaIky «N36paHHOe'. Pa6Ota c roTOBbIMn peuENTAMn COKpaUaet BpeMn O6JIeYaeT npriToTOBLeHne 6IIOd. Bbl 6yJeTe npOnHΦOpMnPOBaHbI O Bo3MOxHocTn O6HOBLeHnca peuNTOB c NOMouIbIO COo6- UeHn, OTo6paxKaembIX Ha 3KpaHe NaHeIy ynpaBLeHnra.
E-KHONkaOCTaHOBKn npoucecca(STOP).
ABTOMATUNECKNE IPOIPTAMMbI
CyüecTByeT 9 aBTOMaTHuecknX npoRpaMM, nO3BOJHOUx yCKOpNTb n IpeIIOXHTb ONTMaJIbHoe Bpemr o6pa60TKn dJIBaWei NIIu. IpoRpaMMbI MOyT 6bITb N3MeHeHbI, HO B OpraHneHHoCteeneH. Kpome TOrO, IMeetcpeKIM «TURBO», yBeJInuBaHOUsN O6OpOTb I DBnIaTeJI Do MaKcMymA, n peKIM I3MpeHnra Maccbl npOdykTOB.

MeHIO aBToMaTnuecknx IporpaMM
BHIMAHHE!Je3BnHOxOcTpIe. ByIbTe oCtOpOxHbI, UTo6bI He npaHITbcI
- Y6eIITecb, yTO B KpbIiKe KyBUnHa (2) npaBnIbHo ycTaHO pOKJaKa (3). OHa DoJxHa 6bITb HaJeKHO 3aKpeJIeHa B KaHAbKe nOД npOKJaKoI.
-
Ha KyBUnH (8) haJeHbTe KpbIuKy KyBUnHa (2), KaK noka3aHo Ha pnc. 4, HadaBnTe Ha Hee i no - BepHInTe TaK, UTo6bl pyUKN KyBUnHa u KpbIuKn COBnaJaII npyC dpYrOm (BbICTynB B KpbIuKe 3aMyT CBOIN MeCTa B rHe3Jax B KyBUnHe).
7.ДЯСТЯ KUВSHA c yCTPOINCTBA BbINOJIHIne CLEdYIOUIne DeIcTBIA: -
Clerka NOBepHnTe KpbIshky (2) npoTnB YacobOu CTpeKn TaK, YTObI BbICTynbI B KpbIshKe BbIXOJIIN N3 THe3D B KyBUnHe, OCTOpOJHO CHIMITE KpbIshKy
- CHIMITE KYBUNH C OCHOBAHNA YCTPOINCTBa
CHIMITE C BpaaHIOeOcBaIaOBpyoBaHnE (6a6Oka, MeIaIka, HOK)
-ИЗВLEЧИТЕКОР3ИНКУ,ИСПОЛБ3УДерЖаTeь ДЯКОР3ИHК,pacnoLOXKeHHbI B HINKHeJч actn Мерbl (pnc.5).
CБOPKA/PA3БOPKA EMKOCTN Для ППГOTOBЛЕнЯ HA ПAPY
- BbinoJHnTe DeiCTBn, OINcaHHbIe B n. 1-3 B pa3JeIe «C6Opka/pa36Opka KyBUnHa».
-
Y6eIITecb, yTO B eMKoCTn IJI npriToBHeHna napy (23) npaBnIbHO ycTaHOBHeHa npoklaKa (24). OHa doJnxHa paBHomepHo, nO BCeMy nepImeTpY npiJeRaTb K BHeUHei CTOpOHe KoIbuaB E MKoCTn.
-
Ha kyBshn (8) haJeHbTe emKocTb Iy npriroToBHeHna npay (23), kak noKa3aHo Ha pnc. 6, nIOBepHnte ee TaK, yTO6bl pyuK KByShHa N KpbIiKn COBnAaN dpyr C dpYROM (BbICTynbIB KpbIiKe 3aMyT cBoN MeCTa B KpbIiKe KyBShHa). PomeCTte 6JIoDcE (22) Ha emKocTb (23) n HAKpOHTe KpbIiKoN (21).
4.ДлгTOrOчTo6bI ChraTb emKoCTb ДЯ пriroTOBLeHnHa napy n3 yctpoiCTBa, BblnoHnTe CJIe -DyUoUne DeiCTBn:
-CHIMMTe KpbIuKy (21) n 6JIouCe (22)
-
CJIeRka NOBepHnTe EMKocTb (23) npoTnB YacoBOi CTpeJIKn TaK, YTO6bl BbICTynbl B EMKOCTN BbIXOINI IN3 THe3D B KYBUNHe, OCTOpOJKHO CHIMITE EMKocTb C KYBUNHa
-
CHIMITE KYBUNH C OCHOBAHNA YCTPOICTBa
- CHIMITE HOK C BpaUaIOUeROcBaJa.

PoiIb3OBaTeJIbCKne HAcTpoIKN

ABTomaTnueckne nporpaMMbl
KpacnaTo4KaB HnXHeY qactN dncIeR yka3bIbAet Tekyu npexkM pa60Tbl.
PeCNTbI - BbI6epnTe HxKhbl peCenT, npOdoJkaTe nO NOcka3KaM.
Iob3oBaTeBckne HacTpoKn - yCTaHOBNTe C ceHCOPHOn NaHeJI COOTBeTCTBeHHO: TemnepaTpy, BpeM n CKOpocTb.
A B T O M A T N U C E K N E I P O R P A M M B I - B bI6epNte COOTBETCTBYIOU yO aB T O M A T N U C E K Y O I P O- T P a M M Y, B H E C N T E B 03M O X H bI E K O P P E K T I N P O B K N I N a p a M e T P O B.
BbI6Op dnaH3OHa 3aHaHHoro 3HaueHn moKHO BblIOHNHTb HeNOCpeCTBeHHo Ha ceHc0pHoi nanei ynpaBHeHn iIc NOMOe bU cHep6LaTa (13) nocle npedBapntbHoro yka3aHn npaMeTpa Ha nanei. 3aynctnte pOceC, Haxab Ha 3NaOH. HaKaTne Ha zHep6Lat TaKke 3aynctnt pOceC nII ocTaHOBIT erO. 3eJeHaj noDCBeTKaZHep6LaTa O3Haayet, YTO pOceC npoJXaeTcra.
BHIMAHNE! EcIy yCTaHOBnIy Tempeatpy 6oJIe 60^ , He ycTaHaBnBaIte cKOpocTb BpaueHry 6oJIbIe «3». EcIb pIck oXkorOB!
BHIMAHHE!При Испобзовани Meшалки (5) He yctaHaBnBaTe ckopoCTb nepemeunBaHnЯ Bblwe 3.
BHHMAHNE!Приинспобзовань 6абочк (4) He yctaHaBnBaIte ckopocTb BpaueHna 6oJIb-шe,чem《4》.
BHIMAHNE! Bcerda nCloNoIb3yIe nepuATkn npn npnroTOBLeHnn nIi HarpeBaHn coepKmoR KUWBnHa, IobabLeHnn INHpeDneHTOB nOnopoxHeHN. ECTb PNCK OXKORA!!!
- KoHTpOJIpyIte npoecc Ha nocToHHO OCHOBE N, BO3MOxKHO, BHOCHTe KoppeKTnBbI B NaCTpoN KI IN KOJIInyeCTBO INHPeDnEHTOB NocLe TOrO, KaK yCTpoJcTBo npeKpaTIT pa6Oty. MaJIeHbKne KOMNoHEtbl MoXHO Do6aBJIbTb Yepe3 OTBepCTNe B KpbIuKe, KOrda KpbIuKa npnoTKnBtTa (1).
BHUMAHNE! EcIn Bbl 3aMeTnIn, YTO npn 3aMeuBaHn TjXeJbIX Macc N TecTa ycTpOciTBO 3aMeTHo yMeHbShaet O6OpOTbl INI O6OpOTbl «BOJIHyOTcra», TO HeMeJeHHO npeKpaTnte npo- cecc. YMeHbIHTe KOJIueCTBO 6pa6aTbIbAemoiN.
KybunH He harpeBaetc Cpa6oTal TeNoBn npedoxpaHntelb KyBwnHa
6pcoc npedoxpauHtena
TEXHINUeCKNE XAPAKTEPNCTUKN
TexHnueckne npaMeTpbl yka3aHbI Ha 3aBOdCKoT a6JIuChe.
ДиHa shHypa nHTaHn:0,90 m
CE
Ipn3BOiTeJIb ocTbIeT 3a cO6oI npaBO BHOcITb rpaΦnueckne n3MeHeHn (3HaUKN, oToIgpaΦn) B npOrpaMMHoe oBeCneHne npOyKta nocLe o6HOBleHn. JIO6bIe n3MeHn He NOBIIaIOT Ha ΦYHKUHOHaJIbHOCTb yCTpOJCTBa.
I3dJIeMe MoKET He3HaUHTeJIbHO OTJIuHaTbcra OT fOToTgpaΦn/pncyHkoB B pyKOBoJCTBe I dpyrNX MapKeTHHROBbIX MaTePnaJax.
BHMAHNE! MmPMA MPM agd S.A. coxpaHЯeT 3a co6oI npaBO Ha BVeDEHne TexHnueCKNX N3MeHeHn.
PpabnIbHna yTnIIN3aunna npOyKta (n3HOweHHoe 3NeKtpuueckoe n 3NeKtpoHHoe o6OpydoBaHne)

MapknpoBkaHa npOdykTe yka3bIaet Ha To, TTo npOdyKHe cJeDyET Bbl6paCbIbTaB MecTe C dpYrMMn 6bITOBbIMN OTXoJAMN IO OKOHuaHNN CpOKa ClyK6bl. N3HOUsCHNOc O60pyIOBaHNC MOKCT OKa3bIBaTB BpcdHOC BO3deJCTBNE Ha OKpyKaHOUcPcDy N3OpOBbc YcJOBcKa N3-3a NOTEHUNaHBOcoepKaHHN ONaChbIX BeueCTB, Cmeen N KOMNoHETOB.CMeuINBaHne OTXoJDoB B VIDe N3HOWeHHOROJIeKtpoHHOrO IN JIeKtpuueckoro O60pyIOBaHNA C DpyrMMn OTXoJAMN IIN INx HEnpOpeccnHOHaHBa
pa360pka moKET npBecTN K Bb16pocy BeIeCTB, BpeHbIX IJIa 3IopOBbI IN OkpyKaIOUe Cpebl. N3HOWeHHoe YcTPOiCTBO HcO6xOJIMo CdaTb Ha IYHK Tc6opa Otpa6oTaHHORO 3JIckTpueCKoro N JIckTpoHHOrO o6OpdyOBAHnry.HTo6bl NOlyuHtB NoPpO6HyIO HHOpMaUHO O MeCte CdaH NJIekTpueCKnx N JIckTPOHHix OTXIOB, N0lb3OBaTeIb DOJIkeH ObpaITbcra B MeCTbI INyHK Tc6opa O6OpdyOBAHnry DJIa YTIIN3aUNN IIN Ha 3ABOD nO nepepa60TKe I3HOWeHHOrO o6OpdyOBAHnry.
POKNY TYKAJUCE SA BEZPECNEHOPOUZIVANIA:
OuHIIeHHI TEXHIyHE OBCJyTOBYBAHHI
YBAGA! Npeed noaTkom ouHneHHaM BiD'EDHaTe Ka6eIb KINBHeHHa I daTe npncToIO oxoLohyTu!
YBAGA! He 3aHypioTe Kopnyc npncTroO y Boy a6o iHsi piDHH.
YBAR! Npeed ouHneHHa 3HiMItb Cbi akceCyap npncTpoI.
YBAGA! Je3a Hoxa roctpi. Bybte o6epekhi, 06 He npaHNTncr.
- OuHyIe npictri Ta Ioro akcescyapn nicra KOxHOro BnKOpncTaHHa. 3e Do3BoJntb 3a6e3ne-HTN HaleKHiPiBeH Myo TexHiUHOi CnpaBHOCTi.
2.Пиоишени He BnKOpNcTObYIte arpeCnBHi MInOci 3acO6n,po3HHNKn a6o TBepdi MaTepiia -Ji,so MoKyTb NopdprNaTI NOBepxHIO.
-
Ouicitb Kopnyc npnctroo (pnc. 8), npoTePn Noro BOIoroM M'koHO raHvipKOHO, a NotIM Bn - TpiTB Hacyxo. Y pa3i 6JIbXnx 3a6pydHeH hAmOHTb rAHvipKy BOIOHO 3 MInOUM 3acobom.
-
BnytpiHIO qactHy rleuKMOxHa nonepedHbO BVIMTu, HANBUN B HbOro 6JI3bKO O,6 J BOIN 3 MIOOH 3ACOBOM I BCTaHOBUBUN WBNIKCTb HOXA BiD 6do npn6n3HO 30 cekynd. Lg onepaizI IO3BOJAE OUCHTTN CaIOH, aJe rLeuNK BCE ODHO nOTpi6HO peTeJbHO BVIMTu a6o MOxHA CKOpNCtATNc ABTomaTHNO IporpaMoHO PRE-WASH. Npeed nonepedHim MTTTAM He 3a6yDbTe peTeJbHO nepeBipNTU, Y npabNtBuHO HIX CNIDITb HA npNBODHomY BAly i CH HeMae Ni, Hm 3aJIuKIB iKi. Y nporpami nonepedHbOro MTTTHe BHKOPNCTOByTe MiuaKky i Me - TeJnka.
5.ЯкшоHaДиЧашi E cnДи NiDroPraHHa,HaNITe Y HeI TPOxN BODHOro po3uHy JIMMOHHOI KICNo TNi 3aueKaIte KJIbka XBnInH.
-
Bci akcecyapn (pnc. 9) 3himiTb 3 kxyOHoi MaunH i BmNITE B TenIi BOJI 3 MIOUHM 3aco 6om, npomnTe Ta peTeBHO BucyItb. Bn Takox MoKTe NOMTN iX y NOcYdOmHnH MaunHi. PAm'raTae, 0o He MoxHa MNTu YaWy (8) Ta npNbOdHn BaI (25) BCTaHOBJeHn B aWi B no cydOmHmMaunHi (DVB. pnc. 9). Y awi e eJekTpnuH KOMNoHEHTN, rki MOxTy b NoWKoHnTcra nicra MTTB INocyDMnHi MaunHi.
-
3BepHitb yBaIy Ha uNCTOTy Ta npaBnIbHe po3TaUyBaHnry rymOBnx npoklaDOK (3), (16) i (24). Li npOKlaidKMOxHa 3HAti BIMHTu OKpeMo, Ondak NaM'atai Te npo ix npabInbHe BCTAHOBJIeHHa HcBoi Micz. PpoklaIkn MaObTb pi3Hi p03MpNi He E B3aEMO3aMHmN.
-
36epiraTe npictriY cyxomy i TemHomy mici. Pn TpnbAlomy 36epirHni nomictiTb Ioro y Kopo6ky.
-
Yasha ochaeta 3axnctom BiD neperpby. Jkso TemnepaTy a yaSi nepeBnntb He6e3neHn piBeH, yHKsia NiirpiBy awi He 3anyCTnTbc8 Do MOMHTy cKnDaHHaTeNLOBOrO 3an6iXnHa. KhoNka cKnDaHHa 3anobixnHa 3nao6ixnHa 3nao6ixnHa 3nao6ixnHa 3nao6ixnHa 3nao6ixnHa 3nao6ixnHa 3nao6ixnHa 3nao6ixnHa 3nao6ixnHa 3nao6ixnHa 3nao6ixnHa 3nao6ixnHa 3nao6ixnHa
Odnak, nepiH iK CKHyTN 3aNo6ixHnK, nam'taIte npo KJIbka BaJKNBnx acNeKTIB: MOxJIbBOU npuHNOIO nepeRpiBy e BiDcyTHicTb HOJa a60 MiJaIKN, roTyBaHHn cno- poXHeHHaI a60 3aHaTTO DOBRe rOtYBaHHa Ixi npu HaTTo BnCoki TemnepaTyPI. HikoJI He Do3BoJInTe Ixi NiDroPrtu y aUaII. JaKIo Ika NounHae NIDroPrtu - 3MeHHTb TemnepaTyPy npriOTyBaHHa Ta IdoaIte TPOxN BoDi a6o Jkpy
- Nepei cKnDaHHaM 3aNo6ixHnKa cNoopoxHtB YaUy Ta 3aueKaaiTe, NOKI BOHa OxOJHOe - He CTABTE Yauy y XoJOniNbHK.
YBAGA!Якшо Teлови 3anobixkHnK Biikloua€ Harpib yawi dyxke yacTo, ce moxe O3haatn Texhichy HecnpabHicTB. He BHKOpncTOByTe noWkoJKeHy yaSy. 3BepHiTbcrdo ABTopu3Oba-Horo cepbichoro ueHTpy.
YBAGA! He BnKOpncToByTe yawy 3 HecnpaBHOIO KHOpKOIO TeNIOBOrO 3aNo6iXnHa. YBAGA! IJra ouHHeHHa 3a6opOHReTbcra BnKOpncToByBaTu roCTpi npEaMeTu, a6pa3NBHi nactu, po3uHHNK Ta iHsi cnIbHoDiIOvi xIMiHy peOvBuHn - ix BnKOpncTaHHa MoKe npu3BeCTn Do noShkoJxHn PrnCtpoU.
ПОНБЛЕМТАСПОСОБИXВИРILSEHHA
ПОНБLEMA ПРУЧИHA PIWEHн
Ipnctpi He 3anyckaetbca a6o paantobO HenpaBnIbHe BcTaHOBneHHa 36epitb npctpi npabNbHO 3ynnHcTbc
BnokybaHHHOxa a6o MiwaJIkn 3aHaITo BeNka KInbKiCTb a6o 3aHaITo BENIKl WMaTKi
He nepeBnuyte donyctmy EMHICTb
aasi, nopixTe kxy Ha MeHsi IMaTOUKN
3anax npictpo, 10 neperpribaetbca Harpi DeTaneepn nepi npycky
HopMaIbHe AByuSe,3NkNe y noaIbIwOmy nepioDi ekCnnyatauBIMKnHtB npucTpi, daTe Nomy oxoNoHTu. He nepeBnuyute peKoMeHDoBaHm qac po60Tu
IpeBaHTaXeHHMaunHn
YaHa He Harpiraetbca
CnpaioBav TnnoBn 3anobixnK qaii
CkHbTe 3aNo6iXnK
TEXHIYHXAPAKTEPNUCTUKN
Texhihi napameTpni Bka3aHi Ha 3aBOcBki Ta6nuci npncTroIO. DobxHa Ka6eIIO XNBleHHe:0,90 m

Bnpo6HnK 3aJIuHae 3a co6oIO npaBO 3mIHOBaTH rpaΦiHi o6'ekTn (niKTOrpamN, fOTo- rpaΦii) B nporpaMHOMy 3a6e3neueHHI Bnpo6y nicra OHOBHeHH. MoKJIbI 3mHn He BnInHyTb HaФyHKUHaJIbHicTb npICrpoI0.
Tobap Moke Deo BiDiPI3HrTcB BiMaIHOHkIB/MaIHOHkIB, 0oMiCTaTBcB KepiBHnTBI Ta iHux MapKeTHROBx MaTepiJax.
YBAΓA! Φίρma MPM agd S.A. 3aJIημαε 3a co6oJ npaBo BVocHTn TexHiCyHi 3MiHn.
PpabnIbHna yTnIIN3aunr npOyKta (n3HOweHHoe 3JKeKtpuueckoe n 3JKeKtpoHHoe o6OpydoBaHne

MapKIpOBAHa npOdykTe yka3bIaBcT Ha To, YTO npOdyKT He CJIeJeYET Bbl6paCbIaTB BMecTe C DpyrMM 6blTOBBIM NOxOdaMn IIO OKOHuaHm Cpoka Cnyk6bl. N3HOUChHOC O6OpyIOBaHNC MOKCT OKa3bIBaTB BPCdHOE BO3deJCTBnE Ha OKpyKaHOuSyo CpeDy n 3doPobBe cJOLOBKe i3-3a NOTCHUNaJIbHORo COepKahnraOnachbIX BeueCTB, Cmeen KOMNoHEtOB. CMeuINBaHne OTXoOB B BVNe N3HOWeHHORO 3JIeKtpoHHOrO IN 3JIeKtpuYeCKOrO 6OpyIOBaHnC DpyrMM OxOdaMn NIN INx HEnpOpeccnHaJIbHa
pa360pka moKET npBecTN K Bb6pocy BeIeCTB, BpeHbIX IJIa 3IopOBbI IN OKpyKaIOUe Cpebl. N3HOWeHHoe YcTPOcTBo HcO6xoDIMO cdaTb Ha IYHK Tc6opa Otpa6oTaHHORO 3IckTpueCKoro IN 3IckTpoHHOrO o6OpdyoBAHnry.HTo6bl NOJyHTb NOIpo6HyIO IHOpMauIO MecTe CdaUN 3IckTpueCKNX IN 3IckTpoHHbIX OTXoIOB, N0lb3OBaTeJIb DOJIkeH ObpaITbcra B MeCTbI IN YHKT C6opa O6OpdyoBaHnry DInr yTININ3aUN INN Ha 3ABOD nO nepepa60tKe I3HOWeHHOrO o6OpdyoBaHnry.
Szanowy Kliencie!

- ATTENTION! Hot surface!
- ATTENTION! Danger of getting burned by steam!
- DESCRIPTION OF THE APPLIANCE
- EQUIPMENT FUNCTIONS AND FEATURES OF THE FOOD PROCESSOR
- CONTROL PANEL DESCRIPTION
- MAIN MENU
- RECIPIES
- CUSTOM SETTINGS
- AUTOMATIC PROGRAMMESE
- Automatic programme menu
- Programme/Icon Parameters (editing range) Equipment Notes
- RECIPE UPDATE
- DESCRIPTION AND MEANING OF OTHER ICONS IN THE CONTROL PANEL
- Icon (button) Meaning Notes
- PREPARATION FOR USE
- FITTING/REMOVING THE BOWL
- ATTENTION! Never run an incompletely assembled appliance. Risk of injury!
- ATTENTION! The knife blades are sharp. Be careful not to get hurt!
- FITTING/REMOVING THE STEAMER CONTAINER
- FITTING/REMOVING THE GRATING/SLICING DISC
- USAGE
- ATTENTION! The knife blades are very sharp. Be careful not to get hurt.
- STEAMING
- ATTENTION! The steaming process uses about 500ml of water for 30 minutes of steaming. Do not steam for more than 1 hour. Keep an eye on the amount of water in the bowl. Boiling all the water out can lead to damage to the appliance, burns and even fire.
- ATTENTION! All operations related to taking off and checking the condition of the cooked food should be carried out with kitchen gloves.
- SOUS VIDE COOKING
- GRATING AND SLICING
- ATTENTION! The grating and slicing disc is sharp. Be careful not to get hurt!
- ATTENTION: The disc cover (15) is not used to cover the bowl during heat treatment and when using the knife and mixers.
- PRACTICAL CULINARY TIPS
- CLEANING AND MAINTENANCE
- PROBLEMS AND HOW TO SOLVE THEM
- PROBLEM CAUSE SOLUTION
- TECHNICAL DATA
- The technical parameters are indicated on the appliance rating plate.
- Proper disposal of the product (waste electrical and electronic equipment)
- PROBLEMA CAUSA SOLUZIONE
- NOSLAUCISANA UN GRIESANA APMETUMA
- BESCHRIJVING VAN HET APPARAAT
- PROBLEM OORZAAK OPLOSSING
- PROBLEMÁ CAUZA SOLUTIE
- ONINCAHNE PAHEJN UYPABJEHNA
- TJABHOE MEHIO
- PELIENTbI
- ABTOMATUNECKNE IPOIPTAMMbI
- MeHIO aBToMaTnuecknx IporpaMM
- BHIMAHHE!Je3BnHOxOcTpIe. ByIbTe oCtOpOxHbI, UTo6bI He npaHITbcI
- CБOPKA/PA3БOPKA EMKOCTN Для ППГOTOBЛЕнЯ HA ПAPY
- TEXHINUeCKNE XAPAKTEPNCTUKN
- BHMAHNE! MmPMA MPM agd S.A. coxpaHЯeT 3a co6oI npaBO Ha BVeDEHne TexHnueCKNX N3MeHeHn.
- PpabnIbHna yTnIIN3aunna npOyKta (n3HOweHHoe 3NeKtpuueckoe n 3NeKtpoHHoe o6OpydoBaHne)
- POKNY TYKAJUCE SA BEZPECNEHOPOUZIVANIA:
- OuHIIeHHI TEXHIyHE OBCJyTOBYBAHHI
- ПОНБЛЕМТАСПОСОБИXВИРILSEHHA
- ПОНБLEMA ПРУЧИHA PIWEHн
- TEXHIYHXAPAKTEPNUCTUKN
- Texhihi napameTpni Bka3aHi Ha 3aBOcBki Ta6nuci npncTroIO. DobxHa Ka6eIIO XNBleHHe:0,90 m
- PpabnIbHna yTnIIN3aunr npOyKta (n3HOweHHoe 3JKeKtpuueckoe n 3JKeKtpoHHoe o6OpydoBaHne
- Szanowy Kliencie!
Brand : MPM
Model : MRK18
Category : Food Processor