
POWDPG80460 - Pressure washer PowerPlus - Free user manual and instructions
Find the device manual for free POWDPG80460 PowerPlus in PDF.
| Product Type | Cordless Backpack Sprayer |
| Brand | PowerPlus |
| Model | POWDPG80460 |
| Rated Voltage | 20 V |
| Battery Type | Lithium-ion (not included) |
| Tank Capacity | 16 L |
| Flow Rate | 1500 ml/min |
| Maximum Pressure | 6 bar |
| Included Nozzles | 4 nozzles (flat jet, rain jet, conical, dual) |
| Watering Lance Included | Yes |
| Intended Use | Spraying of consumer chemicals (insecticides, fungicides, herbicides, fertilizers) and watering |
| Power Supply | 20 V battery (not included) |
| Charger | Not included |
| Lock function | Yes (for continuous spraying) |
| Safety pictograms | Goggles, gloves, mask, do not expose to sun, etc. |
| Warranty | 36 months |
| Maintenance | Clean after each use, drain tank, clean nozzle |
| Charging temperature | 4 °C to 40 °C |
| Storage temperature | 5 °C to 20 °C (battery) |
| Weight | About 4-5 kg (without battery) |
Frequently Asked Questions - POWDPG80460 PowerPlus
User questions about POWDPG80460 PowerPlus
0 question about this device. Answer the ones you know or ask your own.
Ask a new question about this device
Download the instructions for your Pressure washer in PDF format for free! Find your manual POWDPG80460 - PowerPlus and take your electronic device back in hand. On this page are published all the documents necessary for the use of your device. POWDPG80460 by PowerPlus.
USER MANUAL POWDPG80460 PowerPlus
FI·EL·HR·CS·SK·RO·PL·HU·RU·BG
POWDPG80460
PRESSURE SPRAYER BACKPACK
RUGGEDRAGEN DRUKSPROEIER - PULVERISATEUR A PRESSION BACKPACK - DRUCKSPRUHER BACKPACK SULFATORA PREVIA PRESION BACKPACK - NEBULIZZATORE A PRESSION ZAINO

NL NEDERLANDS VERTAALDE VERSIE VAN DE ORIGINELE HANDLEIDING
FR FRANÇAIS TRADUCTION DU MODE D'EMPLOI D'ORIGINE
EN ENGLISH ORIGINAL INSTRUCTION MANUAL
2 BESCHRIJVING (FIG. A)
8.1 Batteries 8
8.2 Chargers 8
9 CHARGING AND INSERTION OR REMOVAL OF BATTERY.....8
9.1 Charger indications (Fig. 1). 8
9.2 Removal / insertion of battery (Fig. 2) 9
9.3 Battery capacity indicator (Fig. 3) 9
10 BEFORE USE 9
10.1 Mixing the spray solution 9
10.2 Filling the container.. 9
10.3 Application 9
10.4 Transportation and storage 10
11 ASSEMBLY 10
11.1 Assembling the strap 10
11.2 Assembling the spray nozzle 10
12 OPERATION 10
12.1 Turning the sprayer ON/OFF (Fig.6) 10
POWERPLUS HIGH QUALITY TOOLS
POWDPG80460 EN
12.2 Lock-on (Fig.7) 11
12.3 Filling the tank 11
12.4 Spraying home and garden chemicals 11
13 CLEANING AND MAINTENANCE 11
13.1 Cleaning 11
13.1.1 Draining the tank 11
13.1.2 Cleaning the tank 12
13.1.3 Cleaning the nozzle 12
13.2 Maintenance 12
14 TECHNICAL DETAILS 12
15 WARRANTY 13
16 ENVIRONMENT 13
POWDPG80460 EN
GARDEN SPRAYER BACKPACK 20V (NO ACCU) POWDPG80460
1 INTENDED USE
The cordless sprayer is intended for outdoor use in a well-ventilated area. The product is designed for spraying consumer-grade home and garden chemicals such as insecticides, fungicides, weed killers and fertilizers. The product may also be used to water plants. Not suitable for professional use.

WARNING! Read this manual and general safety instructions carefully before using the appliance, for your own safety. Your power tool should only be passed on together with these instructions.
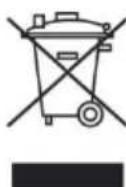
2 DESCRIPTION (FIG. A)
- Fan nozzle
- Shower nozzle
- Handle
- Lid
- Barrel body
- Pedestal
- Outlet
- Double nozzle
- Conical nozzle
- Outlet component
-
Gun bar
-
Gun switch
- Gun rack
- Outlet pipe
- Strap
- Power button
- Lock on switch
- Battery pack (not included)
- Battery release button
- Battery indicator
- Charger(not included)
3 PACKAGE CONTENT LIST
- Remove all packaging materials.
- Remove remaining packing and package inserts (if included).
- Check that the package contents are complete.
- Check the appliance, the power cord, the power plug and all accessories for transportation damage.
- Keep the packing materials as far as possible till the end of the warranty period. Dispos it into your local waste disposal system afterwards.

WARNING: Packaging materials are not toys! Children must not play with plastic bags! Danger of suffocation!
If any parts are missing or damaged, please contact your dealer.
POWDPG80460 EN
4 SYMBOLS
In this manual and/or on the machine the following symbols are used:
| ! | Denotes risk of personal injury or damage to the tool. | CE | In accordance with essential requirements of the European directive(s) |
| Read manual before use | "Class II - The machine is double insulated; Earthing wire is therefore not necessary (only for charger) | ||
| MAX. 40°C | Ambient temperature 40°C max. (only for battery) | Do not expose charger and battery pack to water | |
| Use battery and charger only in closed rooms | Do not incinerate battery pack or charger | ||
| Wear gloves. | Wear a mask In dusty conditions | ||
| Do not expose filled sprayer to direct sunlight. | Mandatory use of eye protection. |
5 GENERAL POWER TOOL SAFETY WARNINGS
Read all safety warnings and instructions. Failure to heed warnings and follow instructions may result in electric shock, fire and/or serious injury. Keep safety warnings and instructions for future reference. The term "power tool" in the safety warnings refers to your mains-operated (corded) power tool or battery- operated (cordless) power tool.
5.1 Working area
-
Keep working area clean and well lit. Untidy and dark areas can lead to accidents.
-
Do not operate power tools in potentially explosive surroundings, for example, in the presence of inflammable liquids, gases or dust. Power tools create sparks which may ignite the dust or fumes.
-
Keep children and bystanders at a distance when operating a power tool. Distractions can cause you to lose control of it.
5.2 Electrical safety
- Always check that the power supply corresponds to the voltage on the rating plate.
- Power tool plugs must match the outlet. Never modify the plug in any way. Do not use adapter plugs with earthed power tools. Unmodified plugs and matching outlets will reduce the risk of an electric shock.
- Avoid body contact with earthed surfaces such as pipes, radiators, kitchen ranges and refrigerators. There is an increased risk of an electric shock if your body is earthed.
- Do not expose power tools to rain or wet conditions. If water gets inside a power tool, it will increase the risk of an electric shock.
POWDPG80460 EN
- Do not damage the cord. Never use the cord for carrying, pulling or unplugging the power tool. Keep the cord away from heat, oil, sharp edges or moving parts. Damaged or entangled cords increase the risk of an electric shock.
- When operating a power tool outdoors, use an extension cable suitable for outdoor use. Using a cord suitable for outdoor use reduces the risk of an electric shock.
- If operating a power tool in a damp location is unavoidable, use a power supply protected by a residual current device (RCD). Using an RCD reduces the risk of an electric shock.
5.3 Personal safety
- Stay alert, watch what you are doing and use common sense when operating a power tool. Do not use a power tool when you are tired or under the influence of drugs, alcohol or medication. A moment of inattention when operating a power tool may result in serious personal injury.
- Use safety equipment. Always wear eye protection. Using safety equipment such as a dust mask, non-skid safety shoes, a hard hat, or hearing protection whenever it is needed will reduce the risk of personal injury.
- Avoid accidental starts. Ensure the switch is in the off position before inserting the plug. Carrying power tools with your finger on the switch or plugging in power tools when the switch is in the on position makes accidents more likely.
- Remove any adjusting keys or spanners before turning on the power tool. A spanner or key left attached to a rotating part of the power tool may result in personal injury.
- Do not reach out too far. Keep your feet firmly on the ground at all times. This will enable you retain control over the power tool in unexpected situations.
- Dress properly. Do not wear loose clothing or jewellery. Keep your hair, clothing and gloves away from the power tool. Loose clothes, jewellery or long hair can become entangled in the moving parts.
If there are devices for connecting dust extraction and collection facilities, please ensure that they are attached and used correctly. Using such devices can reduce dust-related hazards.
5.4 Power tool use and care
- Do not expect the power tool to do more than it can. Use the correct power tool for what you want to do. A power tool will achieve better results and be safer if used in the context for which it was designed.
- Do not use the power tool if the switch cannot turn it on and off. A power tool with a broken switch is dangerous and must be repaired.
- Disconnect the plug from the power source before making adjustments, changing accessories, or storing power tools. Such preventive safety measures reduce the risk of starting the power tool accidentally.
- Store power tools, when not in use, out of the reach of children and do not allow people who are not familiar with the power tool or these instructions to operate it. Power tools are potentially dangerous in the hands of untrained users.
- Maintain power tools. Check for misalignment or jammed moving parts, breakages or any other feature that might affect the operation of the power tool. If it is damaged, the power tool must be repaired. Many accidents are caused by using poorly maintained power tools.
- Keep cutting tools sharp and clean. Properly maintained cutting tools with sharp cutting edges are less likely to jam and are easier to control.
- Use the power tool, accessories and cutting tools, etc., in accordance with these instructions and in the manner intended for the particular type of power tool, taking into account the working conditions and the work which needs to be done. Using a power tool in ways for which it was not intended can lead to potentially hazardous situations.
POWDPG80460 EN
5.5 Service
- Your power tool should be serviced by a qualified specialist using only standard spare parts. This will ensure that it meets the required safety standards.
6 ADDITIONAL SAFETY INSTRUCTIONS FOR SPRAYER
- Never spray at people. Never aim the nozzle at another person or animal. Never allow the spray to come into direct contact with the skin.
- This spray gun must not be used for spraying flammable paints and solvents with a flash point of less than 21^ .
- Always make sure that there is adequate ventilation in the work area when spraying.
Always keep the spray basket nozzle in place during use. - Do not use spray guns where there is a risk of fire or explosion.
- Be aware of any hazard by the material being sprayed and consult the markings on the container or the information supplied by the manufacturer.
- Do not spray any material where the hazard is not known.
Always use appropriate eye protection to keep hazardous vapors or fumes out of the eyes. - Never operate a spray gun without wearing a face mask.
- Wear ear protector if the sound pressure exceeds 85dB(A).
- Keep your spray gun, paint container and nozzles clean. Do not clean with flammable liquids with a flash point less than 21^ . Inspect the mains leas periodically and if damaged have it replaced by a qualified person.
- Never spray near a naked flame or appliance pilot flame.
- Never smoke whilst spraying.
- Always read the paint manufacturers thinning recommendations or instructions before using pain or other materials.
- Always disconnect from the mains supply when filling the paint container or cleaning the spray gun.
- Avoid running the unit with the flow rate knob fully closed for any length of time.
- Never allow children, persons with reduced physical, sensory, or mental capabilities or lack of experience and knowledge, or people unfamiliar with these instructions to use the product.
- Be aware of any hazards presented by the spray materials. Before using any pesticide or other spray materials with the product, carefully read the label on the original container and follow the instructions.
- Keep the area clear of all bystanders, children, and pets while spraying.
- Ensure that the spray wand is securely connected to the spray wand handle before using the product. If necessary, use pliers to attach the spray wand to the spray wand handle.
- Remember to properly replace and tighten the spray tank cover after pouring liquid into the spray tank.
- Use only consumer-grade water-based lawn and garden chemicals.
- Do not use commercial-grade chemicals or chemicals for commercial or industrial purposes.
- Do not leave residue or spray material in the spray tank after using the product. Clean after each use.
- Do not pour hot or boiling liquids into the spray tank. These can weaken or damage the hose or spray tank.
- Do not overfill the tank.
- Always check for leaks. If any are found, correct them before using the product.
- Always inspect both the inside and outside of the product before each use.
- Liquids to be sprayed must be as thin as water. Thicker liquids will not spray properly.
- Spray materials may be premixed and poured into the spray tank using a funnel, if necessary.
POWDPG80460 EN
- NOTE: When using a measuring container other than the measuring cup, or when using a funnel to fill the tank, thoroughly clean and rinse these items after use. When premixing spray materials, rinse the container used for mixing.
- Do not spray where spark, flame, or other source of ignition is present.
- Do not spray in the direction of people or animals. Always spray downwind.
- Do not smoke, eat, or drink while using the product.
- Do not discharge directly against skin.
- Do not let the spray materials come in contact with skin. If contact does occur, wash immediately with soap and plenty of water.
- Aim the nozzle directly at the plants or objects you intend to spray.
- Ensure that the spray materials are directed at an area that will not be damaged by the spray materials.
- Avoid spraying on windy days. The spray materials can be accidentally blown onto plants or objects that should not be sprayed.
- Especially in warmer weather, spray in the early morning or late afternoon. Excessive heat can evaporate the spray before it settles.
- Keep spray materials away from eyes. If spray materials come in contact with the eyes, wash them immediately with clean water. If irritation is still present, immediately seek medical help.
- The product may be operated with the spray wand handle resting in the cradle, or may be removed from the cradle and be held by the operator.
Electric shock hazard. Do not spray towards electrical outlets. - After every use, thoroughly wash your hands and any area where skin has been exposed to the spray.
- Maintain the product. Thoroughly inspect both the inside and outside of the product and examine the components before each use. Check for cracked and deteriorated hoses, leaks, clogged nozzles, and missing or damaged parts. If damaged, have the product repaired before use. Many accidents are caused by poorly maintained products.
- Remove the battery from the product before draining, cleaning, or storing to avoid accidental starting.
7 RESIDUAL RISKS
Even when the power tool is used as prescribed it is not possible to eliminate all residual risk factors. The following hazards may arise in connection with the power tool's construction and design:
- Damage to lungs if an effective dust mask is not worn.
- Damage to hearing if effective hearing protection is not worn.
- Damages to health resulting from vibration emission if the power tool is being used over longer period of time or not adequately managed and properly maintained.

WARNING! This power tool produces an electromagnetic field during operation. This field may under some circumstances interfere with active or passive medical implants. To reduce the risk of serious or fatal injury, we recommend persons with medical implants to consult their physician and the medical implant manufacturer before operating this machine.

WARNING: Injuries may be caused or aggravated by prolonged use of a tool. When using any tool for prolonged periods, ensure you take regular breaks.
POWDPG80460 EN
8 ADDITIONAL SAFETY INSTRUCTIONS FOR BATTERIES AND CHARGERS
8.1 Batteries
- Never attempt to open for any reason.
- Do not store in locations where the temperature may exceed 40^ .
- Charge only at ambient temperatures between 4^ and 40^ .
- Store your batteries in a cool dry place (5 °C-20 °C). Never store batteries in discharged state
3 It is better for Li-ion batteries to discharge and reload them regularly (at least 4 times a year). The ideal charge for long-term storage of your Li-ion battery is 40% of capacity.
- When disposing of batteries, follow the instructions given in the section "Protecting the environment".
- Do not cause short circuits. If connection is made between the positive (+) and negative (-) terminal directly or via accidental contact with metallic objects, the battery is short circuited and an intense current will flow causing heat generation which may lead to casing rupture or fire.
- Do not heat. If batteries are heated to above 100^ , sealing and insulating separators and other polymer components may be damaged resulting in electrolyte leakage and/or internal short circuiting leading to heat generation causing rupture or file. Moreover do not dispose of the batteries in fire, explosion and/or intense burning may result.
-
Under extreme conditions, battery leakage may occur. When you notice liquid on the battery, proceed as follows:
-
Carefully wipe the liquid off using a cloth. Avoid skin contact.
- In case of skin or eye contact, follow the instructions below:
Immediately rinse with water. Neutralize with a mild acid such as lemon juice or vinegar.
In case of eye contact, rinse abundantly with clean water for at least 10 minutes. Consult a physician.

Fire hazard! Avoid short-circuiting the contacts of a detached battery. Do not incinerate the battery.
8.2 Chargers
- Never attempt to charge non-rechargeable batteries.
- Have defective cords replaced immediately.
- Do not expose to water.
- Do not open the charger.
- Do not probe the charger.
The charger is intended for indoor use only.
9 CHARGING AND INSERTION OR REMOVAL OF BATTERY
9.1 Charger indications (Fig. 1)
Connect the charger to the power outlet socket
Solid green: ready to charge
- Flickering red: charging
Solid green: charged
Solid green and red: battery or charger damaged
POWDPG80460 EN

Note: if the battery does not fit properly, disconnect it and confirm that the battery pack is the correct model for this charger as shown on the specification chart. Do not charge any other battery pack or any battery pack that does not securely fit the charger.
- Frequently monitor the charger and battery pack while connected
- Unplug the charger and disconnect it from the battery pack when finished.
- Allow the battery pack to cool completely before using it.
- Store the charger and battery pack indoors, out of reach of children.

NOTE: If battery is hot after continuous use in the tool, allow it to cool down to room temperature before charging. This will extend the life of your batteries.
9.2 Removal / insertion of battery (Fig. 2)

WARNING: Before making any adjustments ensure the hedge trimmer is switched off or remove the battery pack.
- Hold the tool with one hand and the battery pack (18) with the other.
- To install: push and slide battery pack into battery port, make sure the release latch on the rear side of the battery snaps into place and battery is secure before beginning operation.
- To remove: Press the battery release latch and pull the battery pack out at the same time.
9.3 Battery capacity indicator (Fig. 3)
There are battery capacity indicators on the battery pack, you can check the capacity status of the battery if you squeeze the button. Before using the machine, please press switch trigger to check if the battery is full enough for properly working.
Those 3 LED might show the status of the capacity level of the battery:
3 LED's are lit: Battery fully charged
2 LED's are lit: Battery 60% charged
1 LED is lit: Battery almost discharged
10 BEFORE USE
10.1 Mixing the spray solution
- Never spray liquid plant control chemicals undiluted.
- Prepare solution and fill the container outdoors only or in well-ventilated locations.
- Only prepare sufficient solution for the job in hand so that nothing is left over.
- Do not mix different chemicals unless such a mixture is approved by the manufacturer.
10.2 Filling the container
- Stand the sprayer on a level surface, do not fill the container above the maximum mark.
- When filling from central water supply, do not immerse the end of the hose in the solution. Sudden low pressure in the system may cause the solution to be sucked back into the water supply.
- Before filling the container with spray solution, carry out test run with fresh water and check all parts of the spraver for leaks.
After filling, fit the lid and tighten it firmly. - Hang a tag to the product to note what chemical is being used.
10.3 Application
- Work only in the open or in very well ventilated locations, e.g. open greenhouses.
POWDPG80460 EN
-
Never blow through nozzles or other components by mouth.
-
Avoid contact with plant control chemicals - immediately change clothing contaminated with plant control chemical.
-
Do not spray in windy conditions.
-
Too high or too low a pressure or unfavorable weather conditions can result in the wrong solution concentration. Overdosing may damage plants and the environment. Underdosing may result in unsuccessful plant treatment.
-
In order to reduce the risk of damage to the environment and plants, do not operate the sprayer:
i. pressure is too high or too low
ii. in windy conditions
iii. in direct sunlight
- In order to reduce the risk of accidents and damage to the sprayer, never operate the sprayer with:
i. flammable liquids
ii. viscous or sticky liquids
iii. caustic or corrosive chemicals
iv. liquids hotter than 50^
- Avoid use the product in cold winter since the solution may be freeze.
10.4 Transportation and storage
- Remove the battery pack.
- Ensure that all parts are clean and dry.
Clean all foreign materials from the product. - Drain all spray materials from the spray tank before storage and transportation.
- After each use, check all parts of the unit for leaks. Return the product to an authorized service center for repair if has any.
- The spray wand can be stored in the cradle.
- For transportation, secure the product against movement or falling to prevent injury to persons or damage to the product.
- Store the product in a cool, dry and well-ventilated place that is inaccessible to children. Keep away from corrosive agents such as garden chemicals and de-icing salts. Do not store outdoors.
11 ASSEMBLY

WARNING: Switch off and remove battery from machine before adjusting or cleaning!
11.1 Assembling the strap
- Attach the strap (15) to the sprayer as shown in fig.4.
11.2 Assembling the spray nozzle
- Install the gun bar and nozzle of choice on the gun handle as shown in fig.5.
12 OPERATION
12.1 Turning the sprayer ON/OFF (Fig.6)
- To turn the sprayer ON, depress the ON/OFF button (16).
- To start the flow of liquid at the spray wand, depress the trigger (12).
- To stop the flow of liquid at the spray wand, release the trigger (12).
To turn the sprayer OFF, depress the ON/OFF button again (16).
POWDPG80460 EN
12.2 Lock-on (Fig.7)
- The lock-on feature is convenient when spraying for an extended period of time or when covering a large area.
- To lock-on, press the trigger (12) and slide the lock on switch (17) forward.
To release the lock-on, press the trigger (12) and slide the lock on switch backward (17), release the trigger (12).
NOTE: make sure the trigger is not locked on before inserting the battery pack into the sprayer.
12.3 Filling the tank
- Liquids to be sprayed must be as thin as water. Thicker liquids will not spray properly.
- Do not overfill the tank.
- Remove the battery pack (18).
- Remove the lid (4). Fill the tank with the desired amount of water.
Measure the recommended amount of liquid. - Carefully pour the liquid into the tank.
- Reinstall the lid (4) and make sure it is fixed securely.
- Reinstall the battery pack (18).
Spray solutions may be premixed and poured into the sprayer, using a funnel if needed.
NOTE: be sure to thoroughly clean and rinse the measuring cup or funnel after use. If premixing the spray solution, rinse the container used for mixing.

NOTE: It is important to thoroughly clean the unit after each use. Allowing liquid to remain in an idle tool for an extended period may cause its moving pieces and connectors to seize up.
12.4 Spraying home and garden chemicals
- Install the battery pack (18) into the tool.
- Depress the ON/OFF button (16) to start the motor.
- Aim the sprayer nozzle directly at the plants or objects you wish to spray.
NOTE: Make sure to stand far enough from the object being sprayed to prevent the spray from splashing back onto you. - Depress the trigger (12) to start the spray. Release the trigger (12) to stop the spray.
- Always empty, clean, and drain the tank after every use as directed in the Maintenance section.
Thoroughly clean the chemical sprayer before storing or before switching to a different chemical. See Cleaning the Unit later in this manual. - When you are finished with the sprayer, thoroughly wash your hands and any area where skin has been exposed to the spray.
13 CLEANING AND MAINTENANCE
13.1 Cleaning
13.1.1 Draining the tank
- If there is any liquid left in the tank after spraying, the tank should be drained before cleaning.
- Remove the battery pack (18).
- Remove the lid (4).
- Drain the contents through the fill area.
NOTE: Drain the contents back into the original container. Do not store chemicals in the tank.
POWDPG80460 EN
- NOTE: Never dispose of residual chemicals or contaminated rinsing solutions in waterways, drains, sewers, street gutters, or manholes.
- Dispose of residual chemicals and used containers in accordance with local waste disposal regulations.
13.1.2 Cleaning the tank
-
Fill the tank about one-third full with clean water. A small amount of mild household detergent may be added.
NOTE: Never use flammable chemicals or abrasive cleaning agents to clean the tank. -
Wipe the outside of the tank with a clean, dry cloth.
-
Reinstall the lid (4).
- Reinstall the battery pack (18). Spray until the tank has been emptied. Make sure to direct the spray toward an area that will not be damaged by the spray solution.
- Refill and repeat the procedure with clean water. It may be necessary to rinse the tank more than once, then drain again as directed above.
- Allow all pieces to completely dry before reinstalling parts and storing the unit.
13.1.3 Cleaning the nozzle
- If the nozzle becomes plugged, use the steps below to clear.
- Remove the battery pack (18).
- Unscrew and remove the nozzle from the spray wand.
- Push a small wire through the cross holes to clear any debris. If necessary, rinse the cross holes and nozzle with clean water.
- Wipe the nozzle and cross holes with a clean dry cloth and reinstall the nozzle.
13.2 Maintenance
- Our machines have been designed to operate over a long period of time with a minimum of maintenance. Continuous satisfactory operation depends upon proper machine care and regular cleaning.
- In order to maintain battery capacity, we recommend the battery to be completely discharged every one month and fully recharged again. Only store with a fully charged battery and top-up the charge from time to time if stored for a long time. Store in a dry and frost-free place, the ambient temperature should not exceed 40^ .
14 TECHNICAL DETAILS
| Type | POWDPG80460 |
| Rated voltage | 20V |
| Flow speed | 1500ml/min. |
| Tank capacity | 16L |
| Pressure | 6 bar |
POWDPG80460 EN
15 WARRANTY
This product is warranted for a 36-month period effective from the date of purchase by the first user.
- This warranty covers all material or production flaws excluding : batteries, chargers, defective parts subject to normal wear & tear such as bearings, brushes, cables, and plugs, or accessories such as drills, drill bits, saw blades, etc. ; damage or defects resulting from maltreatment, accidents or alterations; nor the cost of transportation.
- Damage and/or defects resulting from inappropriate use also do not fall under the warranty provisions.
We also disclaim all liability for any bodily injury resulting from inappropriate use of the tool.
- Repairs may only be carried out by an authorised customer service centre for Powerplus tools.
- You can always obtain more information at the number 00 32 3 292 92 90.
- Any transportation costs shall always be borne by the customer, unless agreed otherwise in writing.
- At the same time, no claim can be made on the warranty if the damage of the device is the result of negligent maintenance or overload.
- Definitely excluded from the warranty is damage resulting from fluid permeation, excessive dust penetration, intentional damage (on purpose or by gross carelessness), inappropriate usage (use for purposes for which the device is not suitable), incompetent usage (e.g. not following the instructions given in the manual), inexpert assembly, lightning strike, erroneous net voltage. This list is not exhaustive.
- Acceptance of claims under warranty can never lead to the prolongation of the warranty period nor commencement of a new warranty period in case of a device replacement.
Devices or parts which are replaced under the warranty therefore remain the property of Varo NV.
- We reserve the right to reject a claim whenever the purchase cannot be verified or when it is clear that the product has not been properly maintained. (Clean ventilation slots, carbon brushes serviced regularly, etc.).
- Your purchase receipt must be kept as proof of date of purchase.
- Your appliance must be returned undismantled to your dealer in an acceptably clean state, (in its original blow-moulded case if applicable to the unit), accompanied by proof of purchase.
- Your tool must be charged at least 1x per month to ensure optimal operation of this tool.
16 ENVIRONMENT
Should your appliance need replacement after extended use, do not dispose of it with the household refuse, but in an environmentally safe way.
Waste produced by electrical machine items should not be handled like normal household rubbish. Please recycle where recycle facilities exist. Check with your Local Authority or retailer for recycling advice.
POWDPG80460 DE
13 RENGJØRING OG VEDLIKEHOLD
13.1 Rengjoring
11.1 Montering at remmen
13.1.2 Rengoring at tanken
10 IPIN ANO TH XPHSE
8.1 Akumulatory. 8
8.2 Nabiječky 8
9 NABIJENIA VKLADANI NEBO VYJIMANI AKUMULATORU.....8
9.1 Signalizace nabiječky (obrázek 1) 8
9.2 Vyjimani/vkladani akumulatoru (obrazek 2) 9
9.3 Kontrolky signalizace nabiti akumulatoru (obrazek 3) 9
10 PREDPOUZITIM 9
10.1 Michání roztoku postřiku 9
10.2 Plneni nadoby 9
10.3 Aplikace 10
10.4 Preprava a skladovani 10
11 MONTAZ 10
11.1 Sestaveni popruhu 10
11.2 Sestaveni trysky postrikovače 10
12 PROVOZ 10
POWERPLUS HIGH QUALITY TOOLS
POWDPG80460 CS
12.1 Zapnuti/vypnuti postrikovace (obrazek 6) 10
12.2 Zajisteni (obrazek 7) 11
12.3 Plneni nadrze 11
12.4 Pouzitis chemikaliemi k postriku doma a na zahrade 11
13 CISTENIA UDRZBA 11
13.1 Cišeni 11
13.1.1 Vyprázdněni nádrže 11
13.1.2 Cišění nádrže 12
13.1.3 Ciisteni trysky 12
13.2 Udrzba 12
14 TECHNICKÉ UDAJE 12
15 ZARUKA 13
16 OCHRANA ZIVOTNIHO PROSTREDI 13
ZÁDOVÍ ZAHRADNI POSTRIKOVAC 20 V (BEZ AKUMULÁTORU) POWDPG80460
1 URČENÉ POUžITÍ
12.3 A tartaly feltoltese
3 CODEPXMOE YNAKOBKN
- YdaJInte BCE ynaKOBOuHbIe MaTePnAbI.
- YdaJInte ocTaTKn yNaKOBKn n peKnaMhble JnCTKn-BkJaNbIiN (ecnn eCTb).
- Поверпе поноту komпькта постбк.
- Поберпе annapat, синоь кабь, wTeNCel b BCE npHaIeXHocTn Ha npeMet NOBpeKdEHH np TpaHCnpTupOBke.
XpaHnTe ynaKOBoHbIe MaTePnAJIbI NO BO3MOxHOCTN Do nCTeueHnraHTnHOrO cPOKa. Iocne 3Toro n36aBbTEcB OT HIX, nCNoJIb3yR MeCTHyIO CnCTeMy yTnIN3aunn 6bITOBbIX OTXODOB.

PPEyIeHHe:YnakoOuHbIe MaTePnaJIbI-3To He nrgyUKN! He NO3BOJrTe DeTm HrpaTb C NlactNKOBbIMn NaKeTaM! Ectb OnaChocTb ydyWeHn!
1 onpbicknbaTeJIb
1 pemehb dIJI nepehoCKN
1pykoBOIDTOIOKcnnyatauIN
4 conna
1pacnbIyIOaHacaKa
POWDPG80460 RU
EcnI DeTaN OTCyTCTBYOT NIN NOBpeXdHbI, 6paTNTecb K CBOemy dUlepy.
4 yCJIOBHBIE O6O3HauyEHHa
B daHOM pyKOBoIDCTBe n/nn Ha cAmo MaunHe NCNoJIb3yIOTc CNeDyUOuHe CNMBOJIb:
Obo3HaayaeT pck
POnyueHnra TpaBMbl Nnn
NOBpeKdEHH
NHCTpyMeHTa.
COOTBETCTBNE C OCHOHBIMN CTaHdapTaMn NO 6e3oNaChOcTHn PnpMeHmBIX Ebponecknx DnpeKtNB. KnaCC II - MaunHa nMeet DBOHyIO N3OJIaCIO; IO3TOMy npOBOD 3a3eMJIeHnI He Tpe6yEtCra (TOJbKO dIg 3apAHOrO yCTpOiCTBa).
IpoHTaIte pyKOBOdCTBO nepei nCNoJIb3OBAHNEM.
He noDBepraTe 3apAnHoe yCTPOINCTBO n aKKyMylTOpHbI 6JOK BO3DeNCTBnIO BODbl.
TemnepaTypa Okpykaioucei cpebl 40°C MaKc. (ToJbKO dna aKKymyIaTopa).
He cxnraaTe aKkymyJIaTOPHbI 6JIOK nJIN 3apAHOe yCTpOJcTBO.
IcnoJb3yUte aKKymyJIaTOp n 3apJHoe yCTpoIcTBO B 3aKpbITbIX NOMEueHnX.
Bcerda odebauTe pecnnapot npa6oTe B nbIbHoI cpeJe.
HaedeBaIte 3aIHTbIe nepuATkn.
Bcerda naeBaute ouKn dna 3aunblrna3.
He noDbepraTe 3aONHHeHbI OnpbICKNBaTeJIb BO3dEJCTBnIO PpMaBX COJHeuHbIX Jyuei.
5 OБцЯ ИНСТРУКЦЯ NO TEXHIKE BE3ОПАСHOCТИ ПИРAPABOTE C ЗЛЕКТPOINHCTPUMEHTOM
IpoHTte BCE yKa3aHnI INCTpyKcII NO TEXHKe 6e3OanachocTn. Heco6JIHOdeHne yKa3aHn IINCTpyKcII MOKeT npNBecTN K nopaxKeHIO 3JeKtpuYeCKIM TOKOM, noXapy N/nn cepBe3HO TpaBME. CoXpAHTE INCTpyKcII IOI NOCEyUoIero NCNoJb3OBaHnI. TepMHN «3JeKTPoIHNCTpyMeHT» B INCTpyKcII NO TEXHKe 6e3OanachocTn OTHOCNTcK BaWSeMy 3JeKTPoIHNCTpyMeHTy, pa6OtaUoIeMy OT 3JeKTPocetN (c Ka6eJIem) NII ON 6aTapen (6e3 Ka6eJIa).
5.1 Pa6oyee mecmo
- PoiDJIepKINBaIe YIcTOTy IxOpoUee OCBSeHne Ha pa6oYem MecTe. BeCnOpJIOK INIOXOE OCBSeHne MOrT pInBecTn K ONaChbIM CJIyuaM.
He nCnoJIb3yIte 3JKeKtpOnHCTpyMeHTbI BO B3pbIBOONaCHOkpyKaIOSeI cpeDe, HApnpMep,BnPcCyTCTBmOrHeONaCHbIX XnIDKOCTe,Ra3OB NII NblN. 3JKeKtpOnHCTpyMeHTbI NopOxJaOT NCKpbI,KOTOpBle MOryTBOCPiMaEHNTb NblN INcapaHEnia.
POWDPG80460 RU
- Ppi pa6ote 3neKtpoHCTpyMeHTa DeTn HabNIOdaTeJI NdoJXHbI HaxOHTbcra Ha 6e30nacHom paccToHH. OTBneueHne BHMaHna MoKeT npNBecTu K nOtepe ynpabHeHn.
5.2 3neKmpo6e3onacHocmb

Bcerda npOBepaTe, yTO6bI HApJxHne B CeTu COOTBeTCTBOBaNo HApJxHeHIO, yKa3aHHOMy Ha Ta6JIuYKe C TexHNueCKIMn DaHHbIMN.
- ⅢTencelen 3JektpoHCTpyMeHOBdoJXhBo COOTBeCTBOBaTb po3eTke. HNKOrda He BHOCITE n3MeHeHn B KOHCTpyKuHIO TTeNcelen. He nCNoB3yIte HnKaKne aAnTpEbl C 3a3EmHeHHbIMn 3JektpoHCTpyMeHTaMn. OpRHaJIbHbIe ⅢTencelen N COOTBeCTByUOuNe IM po3eTKn UMeHbSAt PnCK IopaxHeHra 3JekTPnueckm TokOM.
He npnkacaiTecb K 3a3eMJIeHHbIM NOBepXHocTAM, HApnpMeP, K Tpy6am, paNaTopam, KxOHbIM PNTAM IN XOJOnIbHNKAM. Pn3a3eMJIeHIn TeJa BO3paCTaET pNCK NopaxeHnA 3JIeKTPnuecknM TOKOM.
He noDBepraIte 3JIeKTPoHnCTpyMeHTbI BO3DeIcTBIO DOJxN IIN BnaxHoI cpebl. PpI nonaHaHH BObl B 3JIeKTPoHnHCTpyMeHT BO3paCTaeT pUCK NopaxHeHNA 3JIeKTPpuYeCKM TOKOM.
I36eAte NOBpeJdeHnKa6JIa. HNKOrda He noJb3yTeCb Ka6eJem IJInepeHoca, BbITraHBnna nn OTcoeDInHeHn 3NeKtpOnHCTpyMeHTa OT pO3eTKn. XpaHnTe Ka6eJIb NOaJIbWe OT nCToUHKnOB TEnJa, HeΦTePnoPyKTOB, OCTpbIX KpaEB nII IN DBNkUxXcR DeTaNen. NObpeJdeHHbIe nII 3anyTaHHbIe Ka6eJIu YBeJIuHBAOT pNCK nOpaxHeHn 3NEKTPnueckIM TOKOM.
Ipn pa6ote c 3neKtpOHCTpyMeHtOM BHe NOMEuHn NOb3yITecb Ka6elemUdInHTeLEM, PpeHa3NaueHHbIM dIa NcNoJIb3OBaHnB He NOMEuHn. IcNoJIb3OBaHne Ka6eIa, PpeHa3NaueHHoro dIpa6ToBb BHe NOMEuHn, YMeHbIIT pNCK IopaxeHn3NeKTPuyeckm TOKOM.
Ecn npabota c 3neKtpoHcTpymeHTOM BO BnaXbIX ycNoBnX Hen36exHa, noIb3yITecb yctpoiCTBOM 3aunTHoro OTKnUoyehn (Y3O) ToKa. IcnoJb3OBaHne Y3O yMeHbUnr pNCK npopaxeHn 3neKtpuueckm TOKOM.
5.3 Luyna 6e3oacHocmb
BybTe 6DnteBhl, cJeIte 3a CBOIM DeHCTBnMn pyKOBOCTByTEc b3paBBIM CmblcTOM npn pa6ote c 3neKTPoHnCTpyMeHToM. He noIb3yInTeCb 3neKTPoHnCTpyMeHToM, KOrDa Bbl yctaII NII NaXoINTEcB NOB BnNHaPKNueCKNX npeNaPATOB, aJIKOroJr IINI JekapCTB. IOTepR BnHMAnHn Pn pa6ote c 3neKTPoHnCTpyMeHtAmN JINsb Ha MRHOBeHHe MoKET pInBeCTN K cepbe3HoT TaPbMe.
IcnoB3yIte 3aunTHoe chapxkeHne. Bcerda HadeBaTe OCK nla 3aunTbI rna3. 3aunTHoe chapxkeHne, B qactHOCTn, npotuONblJeBOI pecnpaTop, obyb c npedoxpanHoue ot CKoJIbXeHn NOOwBOI, 3aunTHbI WJEM IIN CpeDCTBA 3aunTbIOprAHOB CJyxa, INcNoB3yEmble B COOTBeTCTByUOxN yCJIOBnX, yMeHbWAT PNC TpaBMbl.
He donyckaIte He npedHaMepeHHoro BkHoueHnMaunhbl. Ipeep noikHoueHem K cetu ybeintecb,TO BbIKHouaTeJIb HaxoITcB B BbIKHoueHHOM NoJoxeHn.Ipeehocka 3neKtpOHNCTpyMeHTOB, DePka naneC Ha BbIKHouaTeIe, INI NOCDoeINHeHne 3NEKtpOHNCTpyMeHTOB B Cetb, KOJa BbIKHouaTeJIb HaxoITcB BO BKHoueHHOM NoJoxeHn, MOrTy pInBecTn K HechactHBIM CnyaM.
- Y6epnte BCE perynpoBOHbIe IIN raeHbIe KJIouN Ipeed BKNIOueHNEM 3JIeKTPoIHcTpymEHTa. PerynpoBOHbI INr raeHbI KJIouC, OCTaBJeHHbI BO BpaUOSeIcraactn 3JIeKTPoIHcTpymEHTa, MoXET npNBecT N TpaBMam.
He TAHNTecb CnHsKOM DaNEKO. NocToHHo NOdepXNBaIe yCTOuHBOCtB Ha Horax. 3TO No3BOJNT Lyuwe ynpabTb 3NeKTponHcTpymeHTOM B HepeBnDeHHbIX CNTyaCnX.
POWDPG80460 RU
OdeBaITeCb COOTBeTCTByIOUIM o6pa3OM. He HadeBaIte npocToPHy ODeJy IIN IOBENHPbIe N3dJIa. JepKIne BOIOcbl, ODeJy IN nepuATKn NOaIbIe OT 3NeKTponHCTpymEtA. IpocToPNa IOnJda, IOBENHPbIE N3dJIa IIN DIIHHbIe BOIOcbl MOrY T 3actpTaB B DBNkUxxCra Yactx 3NeKTponHCTpymEtA.
- Ecni npedymOTpeHbI yCTpOcTBa IJRA OTB0a N c6op a IIIN, y6eINTecB TOM, YTO OHN NOdcoeINHeHbI INcNoJIb3yIOrTa HAnLeXaUIM o6pa3OM. INcNoJIb3OBaHne TaKnx yCTpOcTB MoKET UMeHbWNTb ONaCHOCTb, CBraHHyO C IIbIbIO.
5.4 3knnyamauua u yxod 3a 3neKmpouHcmpyMeHMOM
He neperpykaTe 3JIeKTPoHCTpymeHT. IcnoJIb3yIte 3JIeKTPoHCTpymeHT B COOTBETCTBnC eRO Ha3HaueHEm. IpaBnJIbHO IOIO6paHHbI INCTpymeHT BblNOJHNT pa6Oty IyuWe n HAdEJHHe B TOM pexmE, Ha KOTOpBIOh PaccHTaH.
He nCnoJIb3yIte 3JKeTPOHCTpyMeHT C HeNCpABHBIM BbIKIOUaTeJIeM. 3JKeTPOHCTpyMeHT C HeNCpABHBIM BbIKIOUaTeJIeM ONaceH I NOJNEXIT peMOHTy.
- OTCOEHNHTe WTeNCeBHyO BnIKy OT NcTOHnKa nITaHnIpePeYJInpOBKo, CMeHOI npHaADJIeXHOCTeI INx XpaHeHEm 3NeKTPoHnHCTpyMeHTOB. TAKne npEduynpeDnteHBle MEPbl 6e3OnaCHOCTu YMeHbWat PnCK HEnpeDHaMepeHHORO BKJIIOUeHnI 3NeKTPoHnHCTpyMeHTa.
XpaHnTe HEnCNoB3yEmbIe 3NeKtpOnHCTpyMeHTbIB HeNOCTynhIx DnA DeTeMecTAX HnO3BOJnTe JIOdAM, He 3HaKOMbIM C 3NeKtpOnHCTpyMeHTOM INN C DaHHbIMN IHCTpyKUmM, pa6oTaB C 3NeKtpOnHCTpyMeHTom. 3NeKtpOnHCTpyMeHTbl PpeDCTabJIaOT NOTEHuaNbHyIO NaCHOCTb B pykax HenoDROTOBHeHHbx NOnb3OBaTeNei.
Copejnte 3nKtpOHCTpymeHTb B nCnpaBHOCTN. CneIte 3a Tem, YTO6bI He 6blNO CmeueHn Hn 3aeDAnHn DnKxUxxCyAChTe, NOBpeJdeHn DeTaneHn KAKoro-Jn6o DpyrO o6ctOaTeNbCTBa, KOtOpoe MOKeT NOBJIaTB Ha FyHKuONHPOBaHne 3nKtpOHCTpymeHTa. Ecnn 3nKtpOHCTpymeHT NobpeJdeH, erO Heo6XoIMO OTPMOHTPOBaTb. MHOxEcTBO HeCuaCThBix CNyAeB Bb13BaHO nCNoJIb3OBAHNEM 3nKtpOHCTpymeHTOB, c KOTOpbIMn He ObaaJncb HaNDexKaUIm O6pa3OM.
CoepKHTe pexyune INHCTpyMeHTbIO OCTpbIMN uHcTBIMN. IpaBnIbHO 06cnyxNBaeMbIe pexyune INHCTpyMeHTbIC OCTpbIMN pexyunm KpOMkAmM Mehwe 3aedhot n Jerey ynpabJIOTcra.
IcnoIb3yIte 3JIeKtpOnHCTpyMeHT, npHaJdJIeXJHOCTpymEHTbI I.T.I. B COOTBeTCTBnC DaHHbIMN IHCTpyKUaMn I Ha3HaueHHeM KOHKpeTHORO TnPa 3JIeKtpOnHCTpyMeHTa, npHIMMa BO BHImaHne ycIOBn I XapaKTe BbINOJIHReMoI pa60tI. IcNoIb3OBAHHe 3JIeKtpOnHCTpyMeHTa He IIO Ha3HaueHIO MoKet npNBecTNI K NotEHuaJIbHO ONaCHbIM CNTyaUaM.
5.5 06cnykuhaue
BaW 3neKtpOnHCTpyMeHT DoJKeH 06cnyXnBaTbcra KBAInuPncuropOBaHHbIM CneuaJIncToM, KOtOpBm IcNoJIb3yeT ToJIbKO cTaHdapThbIe 3anachbIe qactN. 3TO oBeCneuNT COOTBETCTBHe Tpe6yEmbIM cTaHdApTam 6e3ONaCHocTn.
6 DOnOJIHNTeJIbHbIe NHCTPyKcIIN NO TEXHnke B3ONACHOCTN Pn PAbOTE C ONPbICKNBATEJEM
HnkOrda He pacnbIyraTe Ha IIOeH. HnkOrda He HanpaBJIaTe cOnNo Ha YelOBeka nn JKBOTHOe. He donyckaIte npramo KOtAKTa paCnblJeMoN cTpyu C KoxeJ.
-ДаHHьОпрбICиВATEЛь HeJIb3Я NcNoIb3OВaТь ДЯpacNbIeHnЯOrHeONaChbIX KpacOKИ pactBopUTeJel c TOnKo BCnbluKN Hnke 21 °C.
IpeepacnbileHnemob3aTeBbHO npOBepbTe,TOB30He BbINOJIHeHna pa6OT IMeetc cooTBETCTBYIOUaBEHTUNLAUI.
Bo BpemnnoB3OBaHnOnpBicKBaTeJem Kop3Hoo6pa3Hoe pacnbnteHbHOe cnoBCerdaD0JXHO 6bTb Ha MeCTe.
POWDPG80460 RU
He noIb3yItecB onpbicknBaTeJIem B MeCTax, rIe eCTb BepoTHOCTb BO3HNIKHOBeHnnoXapa NIN B3pblBa.
OcteperaTecb IIO6oONaCHOCTNOTpacnblraMOroBeIeCTBaN3yHTeMapKIpOBky Ha KOHTeHHepe NIN INHOpMaunHO, PpeOCTabIeHHyU N3ROTOBtEnEM.
He pacnbIyIe kaoe-lno Bo BuecTBO, O cTepeHn onaCHOCTN KOtOPOrHO HEN3BecTHo.
- IocToaHNOIb3yIeTcB COOTBeTCTByIOUIM CpeIDCTBOM IJIa3 3aIITbI rna3 BO n36exHaHe InonaHaHnOanChbIX napOB UIN DbIMA B rna3a.
Hikorda He pa6oTaTe c onpbicknBaTeJeM, He HaDeB pecnnpaTop.
Hocnte cpeicTBa 3aunitbI opraHOB cnlyxa, ecn 3BykoBoe daBneHne npebblaaet 85 d6(A).
CoepKnte paCblnteB, KOHTeHep dIg Kpackn u conla B uNCTOte. He npoBoNTe OcNCTky BOCPNaMeHIOUIMMUCRA XNDKOCTaMn C TOUKoB BCbluKN Hxke 21 ^ C IepnoDnueckn npOBepnTe cNoBOB npOBn, B cnyae nobpejdeHna, npoyuTe er0 3ameHy KBaJIuΦnUnpOBaHHOMy cneuaNtcty.
Hikorda He npoBOnTe paCnblneHne B6Jn3n OTKpbIToO ORHa 3aJaJIbHOr OIIaMeHN npncnoc6JeHn.
He kypnte BO BpempaCbIeHn.
IpeenncnoB3ObaHnem Kpackn nn Dpynn MaTePnaIOB 68aTeJIbHO O3HaKOMbTecb C peKOMeHdaqyMaNn HnHCTpyKUmaNn PPOu3BOdnteJn PO pa36abJeHnIO.
- Pn HAnOnHeHn KOHTeHepa dIy Kpackn IIN YNCTKe paCbIInTeJRA Bcerda OToCoEduHnTe NoaUy 3JeKtpoNTaHn.
- I36eraIte pa60tby yctpoiCBA c nonHocTbIO 3akpbIToy pykoyn ynpaBJeHnpaXoDom B TeueHne IIO6oro nepnoa BpeMeHn.
He pa3pe7aIte noJIb3OBaTbcra ONpbicknBaTeJem DeTAM, NlUaM C NOHIXeHHbIMN 3n3nuecknMn, CeHCOPHBIMN IIN yMCTBeHHbIMn CNOco6HOCTaTOHbIMN OITOM n 3HaHnA, INI JIOdAm, He3HaKombim C daHHbIMn IHCTpyKcIyAMN.
- YUHTbIBAaIte BO3MOXHbIe ONaCHOCTN, NcXOJaIe NeOT paCnblIeMbIX MaTePnaIOB. Ipeed NCNoJIb3OBAHHeM C ONpbickBaTeIeM NeCTNuIDOB ININ DpyuX paCnblIaeMbIX MaTePnaIOB BHIMATEJIbHO IpOHTITE 3TKeTKy Ha OPUNHaJIbHOM KOHTeHepE INCJeDyIte HNCTpyKcIyAM.
BoBpeMa paCnblneHn He doynckaTe nonaDaHn B pa6oyu 3OHy nocToPOHHx Niu, DeTei I DomaunHX XNBOTbIX.
- Ipeed nCnoIb3OBAHHeM OnpbicknBaTeYy6eInTecb, YTO paCnbIINTeJbHaT py6Ka HAdexKHO NOcOeDInHeHa KpyKoTKe paCnbIINTeJbHoN Tpy6Kn. Ppr Heo6xOdImocTn, NcNoJIb3yIte PnOcKOry6CuI DnKpEnIeHn paCnbIINTeJbHoN Tpy6Kn KpyKoTKe.
He 3a6yDbTe npabnBHO NOCTaBnTb Ha MeCTo N 3aTAYb KpbIiKy 6aka OnpbicknBaTeJr nocJe 3aINBKn XnIDKOCTN B 6ak.
IcnoJIb3yIte TOnbKO 6bITOBBIE XUMNKaTbI DnA 3aUHTbI CaIOBO-OROpOdHbIX KylbTyp HAOHOOCHOBe.
He nCNoJIb3yIte npOMblJHHeHbIe XUMKAtbI INn XUMKaTbI JJIa KOMMepueCKOro INn IpOMblJHHeHHOrO nCNoJIb3OBaHn.
He nCnoJIb3yIe C onpblicknBaTeIem eKne (UeIoHbIe) cMoHaIpeBaIOuIuecra IIN arpeccNBbIe (KNCJIOTHbIe) KNDKOCTN. OHN MOrY T Bbl3BaTb Koppo3HmO MetaJIInuecknx DeTaIe NII pa3ynpoHHTb 6ak N UPhAr.
- Nocne nCnoJb3ObaHn onpblcknBaTeJn He octabTnE B 6ake oCTaTKn nn pacnbIyembl MaTePnaI. OuncaJte 6ak nocJe kaxdOro nCNOJb3ObaHn.
He 3aIbAteB 6ak onpbicknBaTeI ropyne nIN KINrIe JNIOKcT.N OH mOrytpa3ynpoHHTb INI NOpeNTb WJNaHr INI 6ak onpbicknBaTeJI.
He nepenonHnTse 6ak.
Bcerda BbInonHnIe Te npOBepky Ha repMeTuHocTb. Ppn Hauuyn yTeuek ycTaHnTe nx nepei nCNoJb3OBAHnem OnpbicknBaTeIa.
- IpeE K aKdIbIM nCNOJIb3OBAHnEM BceIa OCMOTpnte BHyTpENHne HApyKHbIe NOBepxHOCTn ONpbICKNBaTeJIa.
POWDPG80460 RU
PaCnblraembIe KNDKOCTN DOJXHbI 6bITb XNDKIMN KAK BOa. Bonee rcytble KNDKOCTN He 6vDyT PaCnblraTbcrDOJXHbIM O6pa3OM.
- Pn Heo6xOaMocTn paCnblnteNbHbIe MaTePnaIbI MOrTy npeBaPteNbHO CMeuBaTbcN 3aunBaTbcB B 6ak ONpbicknbATEnI C NOMOuB BOPOHKn.
- IPNIMEUYAHNE: Pn nCnoJb3OBAHm MepHO EMKoCTN, OTJNUHOOT MEPHO TcKaHa, INI BOPOHKn DnA 3aONHeHg 6aka TuaTeJbHO OuchTne N IpOMoHTe 3TN IpedMeTbI NOcNe IcNoJb3OBAHn. Pn npEdBaPteJbHOM CMeuBaHm paCnbJIInTeJbHbIX MaTepnaIOB IPOMOHTe IcNoJb3VEmyIO EMKOCTb DnA CMeuBaHn.
He BbINOHnIte paCnblJeHne B MeCTax, rDe HMeIoTc NckpbI, PnAmr nn DpyrIne
He BbINOJIHnTe paCnblIeHne B HAnpaBJIeHnn JIOdeN JxNBOThbIX. Bcerda paCnblJrTe NO BETPV.
He Kypnte, He eBte Hn He NeTe BO BpeM nOJb3OBaHn OnpbICKBaTeJI.
He npolnBaIte MaTePnaJIbI HeNOCpeIcTBeHNO Ha KOxy. B Cnyyae KOHTaKTA HemeJNeHHO POMOITe 60JIbUIM KOnNUeCTBOM BOJbICMbIOM.
HaPpABnIe CoIIO npraMo Ha pAcTeHnI nn ObBeKtbl, KOToPbIE Bbl co6npaTeCb OOpBICKuBaTb.
- Y6eIITecb, yTO paCnblIaMble MaTePnaJIbI HAnpaBJIaTcR Ha 3OHy, KOtOpaR He 6yDet NOBpeJdeHa paCnblIaMblu MaTeOnaIaMn.
- 136eraTe onpcknBaHn B Betpehle dHn. PaCtbIraembIe MaepnaIbI Moryr CnyaHOn nonactb Ha pactehn Hnn ObkeTbI, KOTOpBIE He DOJKNbI ONDbickNBAtbcR.
Oc6eHbB Tennyo noroNy BblonHnTe onpbickBaHne paHO yTpOM mNo3dHO Beepom. Pn H3bItoHOM Tennpe pacnbIReMa JxNdkocTb MoKeT nCnapntbcrdo ee ocaKJIeHn.
He onyckaIte nonadaHn paCbInreMbx MaTePnaIOB B rna3a. Ppi nonadHn pacbliremo MaTePnaIaN B rna3a HEmeJeHHo npomOte nx uCTOn BOdo. Ecn pa3dpaxKeHne BCE eue npucytCTByeT, HeMeJeHHO o6paTntecb 3a MeDnUHcKo IOMouh
OnpbicknBaTeIem MOxHO ynpaBnTb C NOMOu bpyKoTKn paCnbInTeJbHOn Tpy6Kn, KOTopA HaxODITcB DepXaTeIe IIN MoXeTb ChrTa C DepXaTeJIy UdepXnBaTbcr ONepaTOPOM.
Onachoctb nopaxeHn 3neKtpnuyecknM TOKOM. He BbINOJHrTe paCnbJIeHne B HapDaBHeHn 3neKTPnuyecknx PO3eTOK.
IocJIe KaXdOro HcNoIb3OBaHn TuaTeJbHO BbIMOnTe pyKn IIObIe yAcTKN KOKn, NOBvepuMeC8 BO3DeIcTBNIO PaCbIINrEMOrMaTePnAna.
IopndepKbAte OnpbickBaTeBpa6oemcoCTOHN.IpeedKaJdbIM NCnONb3OBaHHeMTaTeNbHOOCMOTPte BHyTpeHHne HapyKhbIe NOBepxHOCTN IKOMNOHEtBI ONpbickBaTeJI.POBepbTe Ha HAnuHne NOTpeckabuxxCnN3HOWeHHbIX UHaHRO, yTeueK, 3acopeHHbIXcOneI, a TaKke OTCYCTByUxN ININ NOBpeJDeHHbIX Detanei. Pn HAnuHnIOBpeJdeHn ONpbickBaTeJI Heo6xoDmO OTPMOHTnpOBaTBpeEIN CNOBJ3OBaHHeM.MHOKeCTBO HeCuaCThBix CnyaEB BbI3BaHO HeHaIeXaUM M6cnKbAHHeM ONpbickBaTeJIe.
Ipeed cInBOM, ONUCTKoHJIN XpaHeHEm ONpBICKNBATEJr N3BNEKITe N3 Hero AKKVMYJTAOP. YTO6bI H36exKaTb CNYaHORO 3aNvCKa.
7 OCTATOUHbIE PNCKN
JaXe ecn 3JektpOHCTpymeHT nCNOJIb3yETcno Ha3NaueHIno, HeBO3MOxHO NCKIIOHTb BCE octaTOUHbIe cakTopbI pNcKa. Moryt BO3HkAcb CJeDyUOuHne ICTOCHNk ONaCHOCTN, CB3aHHbIe C KOHCTpyKUnE u YCTPOINCTBOM 3JIekTPOHHCTpymeHTa:
- Повржденье Лergи, ecNi He HaDeBaTb 3ффektNtBHyI npOTnBOJIneBOI peCnnpaTop.
-Поврждени opraHOB cnyxa npn OTCyTCTBUN 3ФФeKTHBbIX CpeIcTB 3aIITbI opraHOB cnyxa.
POWDPG80460 RU
Ipo6IeMbI CO 3dOpOBbEM, Bbl3BaHHbIe Bn6paCneI npN nCNoJIb3OBAHIN 3NeKTPoIHcTpymEHTa B TeueHHe IInTeNbHO nepNoJa BpeMeHN, a TaKKe HEnpaBnIbHbIM NcNoJIb3OBAHHeM INI TexO6cnyJKBaHHeM IHCTpyMeHTa.

ПРЕДУПЕХДЕHИЕ! Пп рабоTe Данного элктponнсчрмента co3daeTЯнктpoMaHRHThoe noJe. Пп опpeДeЛeHHbIX o6ctOЯТьCTВAX 3TO NOIe MOKeT CO3daBaTb NOMEXN B pa6Ote AKTNBbIX NII NaCCNBbIX MeINUHcKNX IMnlaHTaTOB.ДЯ снжehня риcka cepbe3HbIX NII CMEpTeJIbHbIX TpaBM,пeped pa6OToJ c daHHbIM yCTpoiCTBOM JInZamC MeINUHcKIMN IMnlaHTaTM peKOMeHdyeTcI pOKOHcyJIbTnpOBaTbcS COBOIM BpaYOM N C H3ROTOBHTeJIaMNI IMnlaHTaTOB.

IPEyIeHHeT: TpaBMBIOrty 6bITb Bbl3BaHbI NnN yCyry6JeHbI dInTeJIbHbIM nCNoJIb3OBAHem INcTpymeHTa. PpN dInTeJbHom nCNoJIb3OBAHm IIO6Oro INcTpymeHTa 68aTeJIbHO DeNaIte peRyIapHbIe nepepbIBbl.
8ДОПОЛНТЕЛБHbIE INHCTPYKcNl NO TEXHnke BE3OПАСHOCTNДЯAKKUMYJIATOPOBИЗAPrIhblx YCTPOINCTB
8.1 AkkymyJamopbl
HnB KOem cIyuea He nbTaIteCb BCKpbBaTb aKKMyJrTOpbl.
He xpaHnTe akKymyIaTOpbI B MecTax, Ie TempeaTypa MoKeT npeBbIaTaB 40 ^ C
3apjkaTe aKKymyTOpbl TOnbko npn TemnepaTypax Okpykaioe cpebl ot 4 ^ C do 40 C.
XpaHnTe Baun aKymyIaTOPbI B cyxom npoxnaHOM mecTe (5^ - 20^) . HnkOrda He XpaHnTe aKKymyIaTOPbIB pa3pJxEHOM COCTOAHIN.
-
IInTn-HoHbIe AkKymJrTopbI lyuWe BCero peryIaRHO pa3pIaTb N nepe3apJXaTb (MInHMym 4 pa3a B roD). Ppr dInTeJIbHOM XpaHeHN JInTn-NOHOrO akKymJrTopa NdealbHOn YBnErcr erO 3apJka Do 40% MoUHOCTN.
-
Ipn yTnH3aunn aKkymyIaTOPOB, pyKOBOIDCTByITEcB IHCTpyKUaMn, npNBedeHHbIMN B pa3dene «3aunTa OkpykaIouei cpebl|.
-
He BB3bBAIte KopoTKe 3aMbIkaHn. EcNn Co3daeTc coEiHHeHne MExdy NOIOXHTeJIbHOJ (+) n OTPuCaTeJIbHOJ (-) KJIeMMoH HAnpMyU NII YpeE3 CnyaHbIKOHTAKT C MetaJIINueCKUMn PpeDMTaMn, BO3HKAeT KOpOTKoe 3aMbIkaHne AKKyMylrTopa, n 6byET npoteKaTb 60JIbWoR TOK, Bbl3bBaB BIdJeHne TeIINa, KOTOpoe MOKeT pInBeCTn K pa3pbIBy KOpNyca NII BO3rOpAHIO.
He harpeBaIte aKKymJrTopbI. EcIn aKKymJrTopbI HarpeBaOTcDo TemnepaTpybl Bbiue 100 ^ C MoryT NOBpeiNTbcra yNIOtHeHna, I3OINpyUoIe cenapaTOpbl Ndpyrne IOnIMepHbIe KOMHOHeHTbl, Bbl3bBAra yTeUY 3JeKTPoJINa Tn/IIIN BHyTpEHHee KOPOTKoe 3aMbIKaHne, PnIBOJaUe K BbldeJeHNU ToNla C NocNeDuOuIm pa3pbIbOM nIN BO3rOpAHnEM. Kpome TORo, He 6pocaTe aKKymJrTopbI B OROh - MoXET pON3OHTN B3pbIB n/IIIN cINbHoe rOpHne.
B 3KCTpeMaJIbHbIX yCNOBmX MOKeT npOn3OHTn yTeUka AkkymJrToPA. EcIn BBi 3aMeTtE XIKIOCTb Ha aKKyMjIrTOpe, cJeNaIte CNeDyUoSee:
-Octopoxho cotpnte XnDkoCTb C NOMOUB BO BetoUN. 36eainTe KOHTaTc KOXeN.
-Пи КОТаКTe C Kokeиллгla3amn, cJeDyIte yka3aHnma HnXe:
HemeIeHNO npomOte BDOJ. HeITpapan3yTe cna6o KncnToT, TAKO KaK JIMMOHHBcOK nnn yKCyc.
POWDPG80460 RU
8.2 3apnHbIycmpoucmea
Hikorda He nbitaTecb 3apjkaTb Henepe3apjkaeMbIe aKKMyJrTopbl.
HemeJeHHo 3aMeHnTe JepeKThbIe HHypbI.
He noDBepraTe DeiCTBnIO BObl.
- He BCKpbIbAaTe 3apAnHoe yCTpOInCTBO.
He BCTabnIte HnKaKnx npEdMeTOB 3apAHOYcTPOINCTBO.
3apndHoe yctpoNCTBO npedHa3HaueHO TOnbKO dIy IcNoB3ObaHn BHyTp nomeuHn.
9 3APЯДКA N YCTAHOBKA ИЛN CHYТNE AKKUMЛЯTOPHО BATAPEN
9.1 INdukamopby 3apdno ycmpoucmea (Puc. 1)
IopKJIIOHTe 3apdHoe yCTPOINCTBO K 3JNEKTPnuecko pO3ETke:
- TOpNT NIOCTOARHH 3eJIeHbIM CBETOM: TOTOB K 3apJKe.
-「Topnt NOCTOARHNO KpaChbIM CBETOM:3aprka. - TOpNT NOCTOARHHO 3eJIeHbIM CBETOM: 3apJxKeHO.
- TopHT NOCTOARHNO 3eJIeHBIM IN KpaCHbIM CBETOM: aKKyMyJrTOp INN 3apRdHOe yCTpOYCTBO NOBpeKdEhl.

PpimMeaHHe: ecn aKKymyIaTOP HeBO3MOxHO NOKJIIOHTb DJIa 3apAKn, OTCoeHNHTe erO u y6eINTeCb, YTO MoJeB aKKymyIaTOPa COOTBeTcTByeT MoeN 3apAnHO rYCTPOiCtBa, KaN poka3aHO B Ta6Jnue TexHnuecknx XapaKTEpncTnK. He 3apXaIte aKKymyIaTOPhIE 6JOKn dpynX moJeN IIN aKKymyIaTOPhIE 6JOKN, KOToPbIE HeBO3MOxHO HaDeXHO 3akpeNTb B 3apADHom yCTPOiCTBe.
- IepnoDnueeckn npOBepaTe COCToHne 3apdHoro ycTpoiCTBa n aKKymyIaTOPHO6Joka npn noDKNIOUeHN.
- OTKJIIOUaIte 3apAIDHOe yCTPOINCTBO OT cETN IOTCOEINHnTe erO OT aKKyMylrTOPHO6Joka nocne OKOHuaHn 3apAkn.
- Ipeed nCnoJb3ObaHnem aKkymyIaTOPHO 6NoKa daIte emOCTbITb.
- XpaHnTe 3apAidHOe yCtpoNCTBO n aKKyMnyTOpHbI 6JIOK B NOMEueHn, B HeOCTynHom JINr DeTeN MeCTe.

PpmeHne. EcIn aKymyIaTOp cTaHOBITcR ropYIM nocJe npOIOXHTeJIbHOro IcNoJIb3OBaHNr B INHCTpyMeHTe, daIte emy OxJaNTbcra DO KOMHaTHOH TeMnepaTypbI nepeD 3apAdkoN. 3To npOJaNT cPok cnyk6bl aKymyIaTopa.
9.2 Chmue/ycmaHO6ka akkymyarnopa (Puc. 2)

IpeynpejxHHeH! Npea BbInOnHeHem IIO6bIX perynpoBOK y6eHTecb, 7TO IHCTpyMeHT OTKIOUeH, INI CHIMITE aKKyMylrTopHbI 6NOK.
POWDPG80460 RU
-Держinte ИНСТРУМЕТ OДΗΟ руΚΟ,а AkКУМЛЯТОПΗБΙ έΝΟ (18)ДPy罗 pуΚΟ.
Jy yctaHOBKn: HaxMnte N BCTaBbTe aKKymIaTOpHbN 6JOK B aKKymIaTOpHbN OTceK. IpeqHaayanom pa6oTbI y6eIntecb, YTO 3aUeJIka Ha 3aDHei CTopoHe aKKymIaTopa BCTana Ha MeTo N aKKymVnTOp HaJeXHo 3aKePnJIeH.
-ДяСЯТЯ:ODHOBpeMeHHO HaxMITE 3aUeJIky aKKymyIaTOPa Nn3BNeKITe aKKVMYJTAOPbIb6JOK.
9.3 HdukamopbI 3apra daakymyarnopa (Puc. 3)
Ha akKymyIaTOPHom 6IIOKe npedyCMOTpeHbI INDnKaTOpbl 3apra aKKymyIaTopa, 6IarOdaPRA KOtOpbIM MOxHO npOBepNTb yPOBeHb 3apra aKKymyIaTopa, Haxab KHOpy. Npei NCNoJIb3OBAHHeM IHCTpymeHTa HAXMITE KHOKNy BbIKNouaTeIa N y6eINTEcB, YTO 3apra aKKymyIaTopa DOCTaTOH DoIra HopMaJIbHOJ pa6oTbI.
YpOBeHb 3apraa akKymyIaTopa noka3bIbAeTCr TpeMra CBETODIOIDhbIMN HdNKATOPaMn:
TPTnCBETOIOHa:AKKYMUTOPNOHOCb3apxKeH.
TOpT DBA CBETOДNODa: aKKyMnyTOp 3apJxH eHa 60%.
TOpNT ODNH CBETODIOI: aKKYMJYrTOPOUHT pa3pJxEHI.
10 IPEEd NcIb3OBAHnEM
10.1 Cmeueaue pacmbopa onpbckuaHua
HnkOrda He pacnbIyIe Hepa36abJIeHHbIe XnIDKne XUMKaTbI dIg 6Op6bI c BpeNTeJMaPacTeHn.
- IOnIOTABINBAITE pACTBOP HAnOJIHnTE 6aK TOJIbKO Ha OTKpbITOM BO3dyXe INN B XDOOIO IPOBETPUBaEMbIX MecTAX.
TOTOBbTe TOnbKO TaKoe KOInuYeCTBO pAcTBopa, KOTOpoe DoCTaTOUHO IINBbINOJHReMOI pa60bl.HTO6bl He OCTaBAIOcB INuHrero pAcTBopa.
He CMeuBaIe pa3JIuHbIe XIMKAtbl, ecNI TaKaJ CMEcB He ODo6peHa N3rOToBtTeJeM.
10.2 HanoJIHeHue 6aka
PacnoJIOKInTe OnpbICKNBATeIb Ha POBHO NOBepxHOCTH, He HANOJIHnTe 6aK Bblue MAKCIMAbHOY OTMETKN
- Ipn HanoHHeHH 6aka n3 ueHTpaHn3OBaHHo CnCTembl BOIOCha6xeHna He norgyKaIte KOHeu WJHaHra B pactBOp, TAK KAc BHe3aHHOe NaDeHne DaBJIeHnB CnCTeMe MoKet npINBeCTN K O6paTHOMV BCaCbIBaHHo pactBOPa B BOONPOBOD.
- Ipeed HanoJIHeHnem 6aKa pactBopom dIra ONpbickBaHnB BbIOJHnTe np6hBn Nyck CBeKeB OBOO IN POBepbTe BCE DeTaII ONpbickBaTeJI Ha TepMeTNUHOCTb.
IocJe HAnoJIHeHnY YCTaHOBInTe KpbIiKy N KpeNko ee 3aTaNHe.
IIOBeCbTe Ha yCTpOInCTBO 6nPKy, YTO6bl OTMeTnTB, KaKoINcNoJIb3yeTcR XIMUeCKN INPOdVKT.
10.3 NpumHeHue
Pa6oTaIe TOnbKO Ha OTKpBITOM Bo3DyXe IIN B OueHb XopoOIO npoBeTpNBaEMbIX MeCTax, HApOIMep. B OTKpBITbIX TeNIIuax.
Hikorda He npOvBaIte cOpIa IIN dpyHe KOMNoHEtbl PTOM.
- H36eraTe KOHTaTa c XUMKaTaMn dIg 6Opb6blc BpeHntJeMaM pAcTeHn - HEmdJIeHHO 3aMeHrTe OeXyD, 3aqr3HeHHVIO XUMKaTaMn.
He BbINOJIHЯTe OnpbICKNBAHne B BeTpeHyIOIoroDy.
CnIbKOM BbICOKOE HIN CnIbKOM Hn3KOE DaBHeHne NIn He6NaTOnpNtHbIe NOrOHBie YcIOBm MOyT npIBecTN K HEnpaBnIbHOKoHcHTpaun pAcTBopa. NpeDo3npOBKa MOxET HaHECTN BPeD paCTeHnM N OkpyXaUoSe cpe. HeoCTaTOuHaJ Do3npOBKa MOxET PnIBecTN K HeYDaUHO OBpa6OTke paCTeHn.
POWDPG80460 RU
- UTo6bl CHn3NTb pNCK HaHeceHna yUepe6a OkpykaIOuee cpeDe n paTeHNm, He pa6oTaIte C onPbICKNBATElem:
i. ecn daBJIeHHe CNIuKOM BbICOKoe HJN CNIuKOM Hn3KOE;
ii. B BetpeHnyo noroDy;
iii. NOd pRmbln COJIHeHbIM JIyamn.
- UTo6bl CHn3NTb PNCK HecuactHbIX CnyuaEB N NOBpeJdeHnO npbickBaTeIa, HNKoTda He pa6oTaIte c:
i. BOCnIaMeHraUIOUMNCSKINDKOCTaMNI;
ii. B83KIMN INI IyCTbIMN KIDKOCTaMn;
iii. eKIMN JIn aRpeCCNBbIMN XIMKaTaMn;
iv. XnDkoCTaMn C TempepatypoB BbIwe 50^
- 136e9aTe nCnoJIb3OBAHnO npbICKnBaTeJb BXoIoNDHyO 3mMy, TAK KaK pAcTBOp MoKeT 3aMep3HyTb.
10.4 TpaHcnOpmuObaHue u xpaHeHue
- CHIMITE aKKyMyJrTOpHbI 6JIOK.
- Y6eIntecb, yTO BCE DeTaJIH NcCTbIe n cyxne.
OuICTnTe ONpbickBaTeJIb OT BCEX NOCTOPOHHx MaTePnaJIOB.
Ipeed xpaehnem n TpaHcnpTnpOBkO CneTe BCE paCnbIraeMbIe MaepnaJIb I3 6aKa onpbickNBATEJI. - Iocne KaXdOTo HcNoIb3OBaHnI npOBepbTe BCE DeTaIIy yCTpoNCTBa Ha repMeTuHOCtB. PnHaIuYn yTeueK BepHIne OnpbICKINBaTeJIb B aBTOpN3OBaHHbI cepBnCHbI cEPHTp dIpeMOHTa.
PacnbilnteIbHaTpy6ka MoKeT xpaHntbcB B DepeKaTeNe. - Pn TpaHcnpOpOBKe 3akpenIte OnpbICKNBateJIb OT nepMeueHnNn naDeHn, YTO6bl npedOTBpATNTb TpaBMbl IIOdeN NIN NOBpeXdHne ONpbickNBATEJIa.
XpaHnTe OnpbicknBaTeJIb B npoxJaHOM, cyxom H xopoWo npOBetpnaEMOM MecTe, HeoocTyHOM dIa DeTei. XpaHnTe Ha ydaJeHHN OT arpeccNBbIX BeueCTB, TaKnx KaCaoBbIe XmNKaTbI N cOnI dIy ydaJeHHa. He xpaHnTe Ha oTKpbITOM Bo3dyxe.
11 C6OPKA

12.3 HanoJIHeHue 6aka
PaCnblIaembIe KxNIOKCTn DOJXHbI 6bITb XNIOKIMn KaK BOda. BoJe e rctbIe KxNIOKCTn He 6byT paCnblIaTbcra DoJXHbIM O6pa3OM.
He nepenonHnIte 6ak.
CHIMnTe aKKymyTOpHbI 6Jok (18).
- CHINMTE KpbIuKy (4). HanoJIHnTe 6aK JKeJaEMbIM KOJINuYeCTBOM BObl.
OTmepbTe peKOMeHDoBaHHoe KOJIuYeCTBO XnIDKOCTN.
OcToPOxHnHaJeNTe XnIDKoCTb B 6aK.
- Choba yctaHOBITE KpbIiKy (4) n y6eINTEcB, YTO OHa HaJeXHo 3aKpePnneHa.
- CHOBA yCTaHOBnTe aKKymyIaTOpHbI 6JIOK.
- Pn Heo6xOUMOCIn pactBopblIy ONpbickBaHnM OryT npEdbapnteJIbHO CMeWNBaTbcN 3aJIbTaBcB 6ak ONpbickBaTeIeC NOMOuBO BOPOHKn.
- IPNMEUAHNE: 683aTeIbHO TuaTeIbHO ONUCTnTE IN POMOITe MEPbIy CTaKaH INN BOPOHky Nocne INCIOJIb3OBaHry. Ipr npEiBapITeJIbHOM CMeuINBaHIn PaCTBOpA dJa ONpbICKBaHry IpOMOIte INCIOJIb3YEMyO EMKoCTb dJa CMeuINBaHry.

14 TEXHnueCKne DAHHbIE
He npbckaTe KbdeTo mHa HanuHne Ha NCKpn, PnAmbk INN dpyr n3TOUHK Ha Bb3PnMaMeHraHe.
He npbckaTe no nocoka Ha xopa nn JIN KINBOTHN. BnHar npbckaTe no nocoka Ha BAYbpa
He nywete, jkTe uHn nnTe, DokaTo n3noJ3BaTe npodykTa.
He n3nyckaTeprako cpeuy koxa.
He no3BONRAIte npbckaHITe MaTePnAaN Da Bnra3aT B KOHTAKT C KOKata. Ako ce noJyKoHTAKT, n3MnITE He3a6abHO cbc CanyH mHOrO BOda.
Hacouete IIO3ata DnpeKTHO KbM pacteHnra nn O6eKTITE, KONTO Bb3HaMEpBaTe da npbcKeTae.
POWDPG80460 BG
YbepTe ce, ye MaTePnAInTe 3a npbckaHe ca HacOueHn KbM 3oHa, KOrTo HMa da 6bde NOBpeHa OT T8X
I36raBaiTe npbckaHe BvB BetpOHTn dHn. Pa3npbckBaHnte MaTePnaHn MOrat HnUeHTHO da 6bDat HaCOueHn KbM paCTeHn nn o6eKTH, KOHTo He Tpr6Ba da 6bDaT PbCKaHn.
Oco6eHO B no-ropeuIN dH, npbckaTe paHO cyTpH IN NkCHO cneo6eI. PpeKaJeHaTa ropeuHa MoKe Da H3npu IN pBCKnTe, PpeN da ce VtAnoxaT.
-ДрьжTe MaTePnaHnTe 3a npbckaHe daneu OT OChte. Ako npbckaHnTe MaTePnaHn Bnra3aT B KOHTaKT C OUHTe, He3a6abHo rN n3MnIte C uHCTa BOda. Ako BCE oSe npncbctBa Pa3Dpa3HeHne, He3a6abHO NOTbPCeTe MednHnHcKa NOMOu.
IpoodykTbT MoKe Da 6bDe ekCnNoaTnpaH, KOraTo pbKoXBaTkata Ha 7aHraTa 3a npbckaHe e octabeHa B rHe3dOTo nN KOrato pbKoXBaTkata e n3BaJeHa OT rHe3dOTo n Da 6bDe DbpXkaHa OT onepaTopa.
PICKOTOKOByap.He npbckaite cpeuy eJeKtpnueckn KOHTaTNI.
CneB BcKa yIOTpe6a, CTapaTeHNO I3MnIte pIeTe N BCa 3OHa, KbTeTO KOkata e 6nna n3IOKeHa Ha cnpra.
Iopdbpkaite npodykta. HnCneKtnpaite cTapaTeHNO npodykta OTbTppe nOTbHN npereJaite KOMnoHEHTITE npedn BcraKa ynotpe6a. PpOBepete 3a HanykaHn IIN NOBpeHn Mapkyu, TeOBe, 3anyeHn IIO3N IINCBaUHn NIN NOBpeHn Yactn. Pnp NobpeHa, daite npodykta 3a peMOHT npedeN ynotpe6a. Mhoro INCuJeHTn ca npunHeHn OT JIoOIO pddpbkaHn pOdykTu.
- 3BaTe 6aTeepraTa OT npOdykTa npEi Ni3ToUbaHe, NOHCTBaHe NnCbXpaHeHne 3a Da n36BerHeTe CnyauHO CTapTnpaHe.
7 OCTATbUHN PNCKOBE
Dopn KOrato eNeKtpnuecknT INHcTpymeHT ce n3noJ3Ba no npedHa3NaeHne, He e Bb3MOxHO da eNIMHnpaTe BCNUKoOCTaTbUHn PNCKOBn fakTopn. CneHNte onaHocTN Morat Da BB3NKHat BBB Bp3Ka C KOHcTpkyuNra T Nn3aHa Ha eNeKtpnuEckn INHcTpymeHT:
- IopaxhenHa ha 6eInTe npobObe, aKo He 6bJe HOceHa efoekTnBHa npaxoBa macka.
- Iopaxhenno cnyxa, ako He 6bnde Hoceha efeKTHBHa 3auNTa 3a yuHTe.
Iopaxhenno 3dpabeto B pe3yntaHa Bn6paunOHn emncn, ako eNektpuecknHT HCTpyMeHT ce n3non3Ba 3a no-dbIbI nepnoD ot BpeMe IJIH He e aadeKBaTHO ynpablaBaH IIN npabUNHO NOdBpKaH.

IPEyPPEKDEHNE! To3n eNeKtpnueckn HNCTpyMeHT npOn3Bexda
eNeKTPomarHHTHO NOJe NO BpeMe Ha pa6Ota. TOBa NOJI npOnpdeJeH N
OBCToRrTeJCTBA MOKe Da B3aMmOeJcTBA C aKTNBHN N NaChBHN
MeINuHCKN IMnJaHTN. 3a Da HamaJIte PNCKa OT cepNo3HO INI PhaTJHO
HaPaHraBaHe, Hne IpeOpbYBaMe Xopa C MeINuHCKN IMnJaHTN Da ce
KOHcyTTupat C TexHn Jekap n Ipn03BOdnteJIra Ha MeINuHCKNTe
IMnJaHTN, IpeDN da pa6OTr C MaunHaTa.

IPEyPEXKDEHNE: HapaHbAHnMa Morat Da 6bDaT npuHHeH nn da ce BLOwAt npn npoBjXkTeHa ynotpe6a Ha nHcTpymeHa. Korato N3NoJ3BaTe HAKO INCTpymeHT 3a npoBjXkTeJeH nepno, yBepTe ce Ye npaBNTe peoOBHN NOUBKN.
8ДОПьЛНTEЛНИНСТРУКЦИ 3ABE3ОПАСHОCT3A AKUMYЛATOPHN BATEPиN 3APДнU YCTPOICTBA
8.1 Bamepuu
He ce onntBaIte da IIN OTBaprTe NO HnKaKbB IOBOJ.
POWDPG80460 BG
He cBxpaHbAaTe Ha MeCTa. KbIeTO TempePaTpata MoKe Ja npeBnH 40 ^ C
3apeKdaiTe cAmO pR N OKoJHn TEMpePaTyPm MeKdy 4°C n 40°C.
CbxpahraBae CBOATE 6aTePN Ha cyxo, xnaHOMrTo (5 ^ C - 20^) . He cbxpahraBaTe HNKORA 6aTePnTE B pa3peDeHO cCTOARHe.
Ha-Do6pe 3a JntneBO-IOHHTe 6atepn n da rna pa3pekdaTe n ppe3apeKdATE npepnoDnH0 (Ha-MAJIko 4 nbTn roDnHo).IdeaHOTo 3apeKdaHe 3a DblroCPOHO cbxpaHeHne Ha Baata JNTneBO-IOHHa 6atepn e 40 % OT KanaHTeTa.
- Ipn n3xBbprnHe Ha 6aTeepnte cna3BaIte IHcTpyKuInTe nocouHn B pa3deJa "3aunTa Ha OKoJHaTa CpeJa".
He n3BpWBaIte cBbP3BaHe Ha KbCo. Ako 6bJe HnPaBeHO CbP3BaHe MeJy NOJIKTeHata (+) n OTPuataeHata (-) KIema DnpeKTHo Nn npn cnlyaeH KOHTAKT C MeTaNn PpeMEn, batepya ige 6bJe cBbP3Ha Ha KbCo n ige npoteye CNJIeH TO, KOJTO ige npuHHn rHeepnpaHe Ha TOnnHa, KOrTO MOKe Da nobpeDN KOpnyca Nn da npuHHN IOXap.
He 3aepBaIte. Ako 6atepuTe ce 3aepTdo Tempeatypn ha100°C, yIbTHehneTo n3OlauOHnTe cenapatOpn I dpytn noJImePHn CbCTabKn MOrat da 6bDaT NOBpeHn OT n3TuHa He aEeKtpoJnt N/INn BbTpewHO CBp3BaHe Ha KbCo, KOEtO BoNn Do rHeepnpaHe Ha TOnnHa, npUHHaSQ IOBpeDa NnNoxap. B doNbJHeHne He XbPnIte 6atepuTe B OrBn, 3aIoTO MOKe Da Bb3HnKHe EKcPiO3Nn N/INn INHTeH3NBHO n3rapAHe.
- Ipn ektpemHn ycnoBna MoKe da Bb3HnKHe Teu ot 6aTePnra. Ako 3a6eJKeTte TeuHOCT Bboxy 6aTePnra, NoctbneTe no CneHnHaHH:
-BHIMATEJHO N36bPwTe TeuHOCTTa C Kbpna. N36raBte KOHTaTc KOkata.
-BcnyaHa KOHTaKTC KOKaTa NIN OUnTe CJIeBaIte DOJHInTe INHCTpyKlunn:
He3a6abHOr nI n3nPaKHeTe C BODa. HeyTpapan3npaTe C MeKa KnceJInHa KaTO JIMMOHO BOK NIN OUET.
B cnyuha Ha KOHTaKT C OUHTe IIN PpOMnTE C 06uHNO KOJInueCTBO YnCTa BOJa 3a Hau-Majko 10 MmHyTu. KoHCyTnpaIte Ce c Jekap.

OnachocT OT noXap! N36aRbaTe CBbp3BaHeTo Ha KbCo HA KOHTaKTnTe Ha Chetata akymyNatopHa 6aTepeHr. He n3rapaTe akymyNatopHata 6aTepeHr.
8.2 3apadHu ycmpoucmea
He ce onntBaIte da 3apeXdaTe Hepe3apeXdaun ce 6aTepn.
Ako Ka6eIHTe ca DeEeKTHn. 3aMeHeTe rBdHaRa.
He n3parayte Ha Bb3nejCTBnETo Ha BOJa
HeOTbApTe3apHHTOvCTPOYCTBO
He npobuBaiTe 3apdHOTO VCTPOJCTBO.
3apdHOTO VCTPOJCTBO e npedHa3HaueHo cmo 3a pa6Ota Ha 3akpTO.
9 3APEXДАНЕ, NOCTABЯнЕ И CBAJЯнЕ HA AKUMYЛATOPHATA BATEРЯ
9.1 INHoukauuu npu 3apekdahe (Uz.1)
Cbpxte 3apHOTO yCTPOINCTBO KbM KOHTaKTa:
- Постаянно 3eЛeHo: rToOBHocT 3a 3apeЖдаHe.
Muraio YepBeHo:3apeXdane. - NOCTOHHO 3eJIeHO: 3apeJeHO.
- IocToaHNo 3eNeHO u cepBeHo: nobpeDeHa akymyIaTopHa 6aTePnI nn 3apAHO yCTpOInCTBO.
POWDPG80460 BG

BeNexka: ako akymylaTOPHaTa 6aTePnH He Ira Do6pe B rHe3doTo Ha 3apdHOTO yCTPOcTBO, H3BaTeE n npOBepeB Ta6ncaTa CbC cneuΦnKaun, daTTOBa e npabUNnMa Moen 3a TOBa 3aprAno yCTPOcTBO. He 3apeKdaIte dpyn akymylaTOPn 6aTePn nn aKymylaTOPn 6aTePn, KOtO He OTROBaprT Ha 3apdHOTO yCTPOcTBO.
- PpOBepBaIe YecTo BkIIOeHOTo 3apJHOto yCTPOIcTBO n AkymyIaTOPHaTa 6aTepeia
- CnE npKlHbAHe Ha 3apeXHaHTo n3BaJeTe 3apJHOTO yCTPOINCTBO OT KOHTaT aKymyIaTOPHaTa 6aTePnIaOT 3apJHOTO yCTPOINCTBO.
- Octabete akymyataophata 6aTepeHna H3CTnHe, npedn da y n3noJ3BaTe.
- CbXpaHraBaIte 3apdHTo yCTpoiCTBO B 3aTBopeHo NOMEueHne I n3BbH o6cera Ha deua.

БЕLEЖKA: Ако akумлалopнаТа 6atepyce 3arpee npn npodbIxntHa pa6Ota c nHcTpymeHTa, octaBeTeЯ n3CTnHe Do CTaHnA TeMnpaTpya, npedn daя BKIOUHTe 3a 3apeKdAne. TOba ue yIbIxN JxIBOTA Ha akymlyaTOpHATA 6atepyra.
9.2 NocmaaHe / ceaJIne Ha akymyIamOpHama 6amepu (Fua. 2)

ПЕДУПЕЖDEHNE: Ппдда паВITE рулровк ce ybepeTe,ЧИСТРУМЕNTБе n3КЛЮЧEN nIN n3BaTe ekymулatOPHaTа 6aTePЯ.
XbaHeTe INHCTpyMeHTa c eHaTa pbKa n akymyNaTOPHaTa 6aTepeTn (18) c npyrata.
IocTabaHe Ha akymlyaTopHaTa 6aTePn: HATUCHEte n Nb3HeTe akymyIaTopHaTa 6aTePnB CnTo Ha yCTpoiCTBOTo, YBepTe ce, Ye OTKnIOuBaUaTa PnactInHa OT 3aHaTa cTpaHa Ha 6aTePnTa UpaKbHa Ha MAcTO n AkymyIaTopHaTa 6aTePnE e cnrypHo 3aKpeNeHa npEn 3aNoYBaHe Ha pa6Ota.
- 3BaXdaHe Ha akymyIaTOPHaTa 6aTePn: EJHOBpeMeHHO HATNCHe OTKJIIOuBaUaTa PnactnHa N 3DbpaNte akymyIaTOPHaTa 6aTePn.
9.3 NHDukamop Ha 3apekdaHemo (Fua. 3)
AkyMnyaTopHaTa 6aTepeHnMa INDkaTOpn Ha 3apeXdaHeTo n MoKe da npOBepnte CbCToHneTo n KaTo HATncHete 6byToHa. Ppei Da n3NoJ3BaTe nHcTpymeHTa, MoJn, HATncHete 6yToHa, 3a Da npOBepnte dann akymyIaTopHaTa 6aTepeHn e DoCTaTbUHO 3apeHeHa 3a HopMaJNa pa6Ota.
Tpnte CBeToDnOda NOKa3BaT HNBOTO Ha 3apeXdaHe Ha akymyNaTophata 6atepna:
CBETTPTNE CBEToNDoA: AkyMvNaTOpHaTa 6aTePnE e HnblH0 3apeDeHa.
CBETT DBA CBeToDnOda: AkymyIaTopHaTa 6aTePnE e 3apeDeHa Ha 60%.
CBeTN eINH cBeToDnO: AkymyIaTOpHaTa 6aTePnE nOuTH pa3peDeHa.
10 INPEIN YNOTPEBA
10.1 CmeceaHe Ha pa3meopa 3a npbckaHe
Hnkora He npckaTe 6e3 pa3peXdaHe TeuHN XmNKaJIIN 3a TpeTnpaHe Ha pacteHnraTa.
- IopIOTBnTe pa3Tbopa n HantbIbaIe KOHTe Hepa eINHCTBeHO Ha OTkpNTn nn Do6pe npOBETpNB MeCTa.
- PnroTBAIte eHCTBeHO DOCTaTBuHO pa3TBOp 3a TeKyuata pa6ota, Taka ye da HMaOCTaTBK.
He cmecBaIe pa3JIuHn XIMUKaJI,OCBeH aKO TaKaBa CmEc e Odo6peHa OT PPOUN3BOUNTeJI.
POWDPG80460 BG
10.2 ΠbJIHeHe Ha KOHmEuHepa
OCTaBeTe npbckaykata Ha paBHa NOBbpXHOCT, He NbJIHete KOHTeHepa HaDMAKcImaHaTAt MapKIpOBka.
Korato nblnhte ot ceHTpaHNO BOIOOcH6IbAHe, He NotaTnTe KpaHa Mapkya B pa3TBopa, BHe3aHNO HNCKO HAIraHe B CnCTeMaT, MOKe Da IpeDn3BnKa BCMykBaHe Ha pa3TBOP 6paTHo BB BOHNr N3TOuHnK.
- Прди Да HanьлнITE KOHTeHepa c pa3TBOP 3a npbckaHe, ИЗБpшeTe TECTOBO nYcKaHe Cnpcha BODa InpOBepTe BCuKN Yactn Ha npbckayKaTa 3a TeyObe.
CneHnBbBaHe NoctaBeTe Kanaka ITo 3aTeHHeTe NtBTHO.
OCTaBeTe Ta6eNa Bbpxv npOvkyTa 3a Da OT6eJxte KaBn XUMKajn Ce N3PON3BaT.
10.3 PpuJoxKeHue
Pa6oTeTe eINHCTBeHO B OTKpTN IIN B Do6pe npOBETPNB MecTa, pIMepHO OTKpTN OpaHXepN.
Hukora He duXaIte c ycta npe3 IIO3nte nn dpyn KOMHOHTN.
- 1368BaTe KOtAaTc CXUMKaJI Na KOHTpoJ Ha pAcTeHnraTa - He3a6aBHO CMeHeTe dpexn 3aMbPceHn C XUMKaJI Na KOHTPOJ Ha pAcTeHnraTa.
He npbckaIte npn BETPOBHTN YCNOBNA.
Tbbpde BncoKo HnTBpHe Hncko HaJraHe nn He6JarOpnpyTHn KImMaTuHn ycIOBn, MORaT Da DOBeDaT Do rpeuHa KOHcHTpaunr Ha pa3Tbopa. IpeO3npaHTo MOKe da NOBpei n pacteHnraTa n OKonHaTa CpeJa. HeoctaTbUHOTo O3npaHm OMe Ja DOBeDe Do HEVCNEuHO TpeTnpaHe Ha pacteHnraTa.
3a da hama nte pncka OT uetn no OKonhata cpea n paCTeHnra He pa6oTe c npckaykata KORATO:
i. HAnraHeTo e TBbpDe BUCOKO NIN TBbpDe HNCKO;
ii. HMA BETPOBUTN YCJIOBNA;
iii. IMA DNPEKTHa CbHYeBa CBETnHa.
3a Da HamaJIte PNCKa OT INHcIeHTN N 8ETN NO PpbckayKaTa, HNKora He EKcIIpoaTupaTe NPbckayKaTa C:
i. 3anaJIMN TeUHOCTN:
ii. TbCTN INN JENKABN TeYHOCTN:
iii. pa3aJdaun nn Kopo3NBn XmMkaJN;
iv. TEUHOCTN NO-ROPEUN OT 50 °C.
I36yBaIte n3non3BaHe Ha npOdyKta B CtydeHa 3IMa, TbN KaTO pa3TBOpbT MoKe Da 3ampb3He.
10.4 TpaHcnpmupaHe u cbxpaHeHue
- ɪnbaɪte bætɪpɪyaɪta.
- YBepTe ce, Ye BCnUKN yAcTn ca YnCTN n CyXn.
-Почисте BCИЧКУжд MaTeРиан OТ порукта.
I3TOUeTe BCnKMaTePnaJIaN 3a npbCKaHe OT pe3epBoapa, npdN cbxpaHeHne IN TpaHCnOPTnPaHe.
CneB Bcya ynoTpe6a, npOBepTe BCnKu Yactn Ha ypea 3a TeOBe. DaIte npOyKta 3a peMOHT B OTOpN3UpaH CEPBn3eH UeHTbp, aKO 6bDaT OTKPUN TaKNBa. - ШаHRATAЗИЕ МОЖЕ ДБДЕ CBXPAHEHAВ ГНЕЗДOTO.
- Pn TpaHcnpTupane Oe3oNacete npOyKta cpeu y DvnKeHne nI naHaHe, 3a da npedOTbpaNTe HapaHbAHna Ha Iua a nnu uetn no npOyKta.
CbXpaHete npOdykTa B XnaIHO, cyxo n do6pe npOBETpNBO MRCTO, KOeTO e HeIOCTbIHO 3a Deca. DpbXte daJeU OT Kopo3nBHN BeueCTBa, KaTO rpaIHcKIN XmHKaJI NII COJ 3a oBe3neJaBaHe. He cbXpaHraBaIte Ha OTKPNTO.
11 CΓΙΟΥBAHΕ

PNEyPEXKDEHNE: N3KnIOye He OTCpaHeTe aKymyNaTopHaTa 6aTepyoT MaunHata npedn perynipane Hnn noocTbahe!
11.1 MohmaK Ha pemblaKa
3aknenetepebka(15)KbM npbckaykaTakko e noka3aHOHaΦn.4.
11.2 MoHmax Ha dO3ama 3a npbckaHe
HCTaInpaIte Nocta 3a npbckaHe n IIO3a no n36op KbM pbkoXBaTKaTa 3a npbckaKe KaKTo e NOKa3aHO Ha qnr.5.
12 PABOTA
12.1 BKJI/ɪN3KJI Ha npbckaaykama (fue. 6)
3a da BKN npbckaukata,HaTncHeTe 6yToHa 3a BKN/IM3K1 (16).
3a da cTaptnape nToKa TeuHocB 7aHaRaTa 3a npbckaHe HATnCHe TcNcybka (12).
3a da cnpete noToKa TeuHocB UaHaTa 3a npbckaHe ocbo6oTe cnycbka (12).
3a da N3KJI npbckaukaTa haTnchete OTHOBo 6yToHa 3a BKJI/N3KJI (16).
12.2 3aKnIOyBaHe (fua.7)
-Функцята 3a 3aklnuoyBaHe e ydo6ha, KOrato npbckate 3a npoDbJnxTeH nepnoD OT BpeMe nIIN KOrato NOKpNBATE TOnMa 3OHa.
3a 3aknoubaHe HaTnCHTe CnycbKa (12) n nnb3HeTe npeBkIIOyBaTeJra 3a 3aknOBAHe (17) Hanpei.
3a ocbo6oxdaBaHe Ha 3aknOuBaHTo HaTncHete cnycbka (12) nIpb3HeTe npEbkNIOUbaTeJra 3a 3aknOuBaHe Ha3aD (17), ocbo6oJeTe cnycbka (12).
3ABEJIEXKKA: yBepTe ce, ye cnycbKbT He e 3aknoueH npedn da nocTabte 6aTeprnaB npbckaykata.
12.3 IbIHeHe Ha pe3epeoapa
TeuHOCTte, KOnTo 6bDat npbckAn Tp8Ba Da 6bDat C BuCKo3HTe Ha BoDaTa. NnBTHTE TeuHOCTn HMa Da ce pa3npbchat npabNJHO.
He npenbIbaIte pe3epBoapa.
- 13BaTe 6aTeepnTa (18).
- Chemete kanaka (4).HanbHeTe pe3epBoapa cKeJaHOTo KOJnueCTBO BOda.
-ИзмеретпpenopьаноКолисесТВО TeuHOCT.
BHHMaTeHNO n3CnneTe TeuHOCTTa B pe3epBoapa.
-Инсталпайт OTHOBKanaka(4)и ce ybepeTe,у cTe roФиксuarinCnrypHo.
- NocTaBeTe o6paTHo 6aTepeHraTa.
Pa3TbOpBt 3a npbckAHe MOKe Da 6bDe npedBapntHo CmecEH n3JnH B npbckAkaTa, n3non3BaIte yHn np Heo6xOIMocT.
3A6EENKKA: nouCTe Te n3aNo n 3nPaKHeTe n3MepBaTeHHaTa YaHa uNn FyHnra Ta CneI yNtpe6a. Ako cMeCBate npedBapntHo pa3TBopa 3a npbckaHe, n3nPaKHeTe KOHTeHepa n3NOJ3BAH 3a cMEcBAHe.

3A6EENKKA: Baxho e cTapaTeHNO da nouHcTne ypeDa cNei BCaKa ynoTppe6a. I03BOJRABaHe Ha TeuHOCT Da ocTaHe B Hepa6Oteu NHCTpyMeHT 3a npoDbJnxHtJeH nepNoD OT BpeMe, MoXe Da npuHHN 6IoknpaHe Ha HerOBNTe DnHexeU qactn N KOHeKTOpn.
12.4 NpbcKaHe Ha domaHn u epaDuHcKu xumkaJU
HCTaIpaTe 6aTePnraTa (18) B INHCTpyMeHTa.
POWDPG80460 BG
HaTnCHeTe 6yToHa 3a BKJN/IN3KJN (16) 3a da cTapTnpaTe MOTopa.
Hacouete du3ata Ha npbckaKaTa dIpeKTHO KbM pacteHnra nn o6eKTITE, KOUTO nCKaTe da npbckaTe.
3ABELEKKA: YBepete ce, ye cTOnTe DoCTaTbUHO daneu OT npbckaHna 06eK, 3a da PpeDTbpaNTe pckn OT cnpra O6paTHO KbM Bac.
HaTnCHHeTe cnycbka (12) 3a da cTapTnpate cnpe. Ocbo6oTe cnycbka (12) 3a da cnpeTe cnpej.
BnHa n3npa3BaIte, nouchBaIte n 3toBaIte pe3epBoapa cneD Bcra ynoTpe6a KaKTo e nocOueHO b pa3deN "POndpbXka".
-Почисте стапаелно пьсkaчкага нахимкал,在педи сьхранени ил прддлпрмнгета наразишенихимкал.Вижт"Почicstbahe Ha ypeda"no-donyв ToBa DkoBoJCTBO.
Korato cTe npknHouHn C npbckauKaTa, n3MnTe CTapaTeHNO pbcTe CN I BCra Ka 30Ha, KbDeTo Koxata e 6nla n3IOKeHa Ha npbCKn.
13 NOUHCTBAHE I IOIDPbJKA
13.1 Nocmeane
13.1.1 N3ToUbaHe Ha pe3epBoapa
Ako mma octaHana TeuHocB pe3epBoapa cneI npbckaHe,pe3epBoapbT pr6Ba da 6bde H3TOUeH PDEI NOYCTBaHe.
- N3BaTe 6aTepyTa (18).
- CHEMeTe Kanaka (4).
I3TOyETe CbIbPkaHneTo Ipe3 3OHaTa 3a IIJIHeHe.
3ABEJEXKKA: N3ToyeTe CbIbpxaHneTo o6paTHO KbM opnHaHnKa KOHTeHep. He cbXpaHraBaxTe XmMkaJI N B pe3epBOapa.
3ABELEKKA: Hikora He n3xBpIyTe ocTaTbUH XIMNKaIIu INI 3aMbpcEH pa3TBOpN npn I3PNaKBaHe BvB BODH Ntua, OTBODHNTeIN, KaHaIN3aUra, KaHaBKn UINu XaXTN.
- 3XBpIeTe OCTaTBHn XUMKaN IN 3N0NJ3BaHN KOHTeHepn B CbOTBeTCTBNE C MecTHNTpe pa3Nope6n 3a n3XBbpJHHe Ha OTnaDbu.
13.1.2 NocTbHe Ha pe3epBoapa
HAnbJnHeTe eHa TpeTa ot pe3epBoapa c uHcTa BOda. MoKe da 6bJe Do6aBeHo MaNKo KOINueCTBO OT MEK DOMAKHNCKN IOUYNCBaU INPeNaPaT.
3A6EJEXKKA: HnKora He n3no13BaIte 3aIaIIMN XmMkaJI INa6pa3NBH NOUCTBaIIN PpeIapATN 3a Da IOYNCITE pe3epBOapa.
- ɪəbɒpʌte BbHʌHaTa CtpaHa Ha pe3epBoapac yIcT. cyx nlaT
-Инстаюразе OTHOBOKanaka (4).
MoHTnpaIte 6paTHo 6aTePnraT (18). PpbckaiTe, dOKaTo pe3epBoapbCT ce n3npa3H. YBepeTe ce, ye cTe HacOuJIn CnpEe KbM 30Ha, KOrTO HMa da 6bJe NOBpeDeHa oT pckAHy Pa3TBOp.
Hnblhete n nobTope Te npoueypata c uhcTa BOda. Moke da e Heo6xoImo da n3nnakHepe3epBOapa NOBue OT eINH PbT, CJeT TOBa IN3TOUeTe OTHOBO, KaKTo e YKa3aHO OTROpe.
- IIO3BOJIeTe Ha BCNUKn eJIeMeHTn Da n3CbXHaT HAnbJHo, Ipei Da MOHTnpaTe o6paTHO YACTnte N da OCTaBtTe ypeDa Ha CbXpaHeHne.
13.1.3ПочисванеHaДиэзаТa(ФИr.14)
AkoIIO3aTaCe 3aNYuH N3IOJ3BaJIe IOJHNTe CTbIKN 3a IOUNCtBAHe.
- 13BaTe 6aTeepnTa (18).
POWDPG80460 BG
Pa3BnHTeTe n 3BaTeTe I03aTa OT uHaHraTa 3a npbckaHe.
BkapaIte MaIka TeI npE3 KpbCTaTInTe OTBOpN 3a Da NOUcHITe BCuKN HaTpynBaHnA. AKe e Heo6xOdmo, n3JIaKHeTe KpbCTaTInTe OTBOpN IIO3aTa C UcTaN B0Da.
- 136bpseTe dio3ata n Kpbctatnte OTBOPn C uHCTa cyxa Kbpna N noCTabete o6paTHO duo3ata.
13.2 Nooepbka
HaunTe MexaHn3npaHn IHCTpyMeHTn Ca KOHCTpyuPaHn Taka, Ye da pa6oTAT npOdbJxHnTEJIHO BpeMe npi MNHMaJIHO TexHnuecko ObcnyXBaHe. HenpeKbchataTa 3aIOBOHNTeHnHa pa6ToA 3aBnCn OT ppaBUNHnTe rpxKn 3a MexaHn3npaHn INHCTpyMeHT n peIOBHO IOUHCTBaHe.
3a da noDbpxkate kanauTeHa akyMylatopHata 6aTepy, npenOpBvBaMe Ta da 6bde Hnblno pa3peDeHa BeiHbX MeceHo n 3apeHe OTHOB .CbxpaHraBaTe cmo C HanblHO 3apeDeHa akyMylatopHa 6aTepy n Do3apeJdaTe OT BpeMe Ha BpeMe npi npoDbJIxxTEnHO cbxpaHene. CbxpaHraBaTe Ha cyxo n 3aUHTeHO OT 3ampb3BaHe MRCTO, OKOIHaTa TemnepaTypa He Tpr6Ba Da npebuwa40 ^ C
14 TEXHnueCKN DAHHN
| Вид | POWDPG80460 |
| Номинално нарөгөнө | 20 B |
| Скорост на потoka | 1500 мл/мен. |
| Кацитet на peэрьогаа | 16 п |
| Налгане | 6 баа |
POWDPG80460 BG
15 TAPAHUN
To3n npOdyKT nMa rapaHcnoHeH cpoK 36 Meceua, KOITo BnHa BCnla O T daTata Ha NOKynKa Ha nbpBnA Notpe6nten.
Ta3n rapaHnna NOKPnBA BCnKn DepeKTn Ha MaTePnAIn n IpOn3BOODCTBeHN DepeKTn, HO He BKnIOUyBa: BaTePN, 3apAnu yCtPOINCTBa, DepeKTn YactN BCNECDTBne Ha HOpMaJnHO n3HOCBaHe n3TpNBaHe KaTo NaRePN, YeTK, KaBEn n UenCeENn nn AkcecoApn KaTO CBpeDnA, HApKaInu 3a npoBnHn INHCTpyMeHTn, pexeUn DNCKOBe n T.H., NOBPeDN n DepeKTn PpOIN3TuHa uONTpe6a, 3JIONoIyKn nJIn HApPaBeHn IpnOMeHN, HHTO TpaHCnOPTHNTe pa3XODn.
Iobpei n/nnn deepekn npon3nuaun ot He npabnno ynoTpe6a He ce 0xbaaat OT Te3n rapaHNOHN YCNOBna.
OcBeH TOBa He HOCIM HnKaKBA OTROBOPHOCT 3a TeIeCHN HapaHbAHn Ipon3TuAun OTHenpaBUNHaTa VNOTpe6a Ha IHCTPYMEnTa.
PemOHn MOrat da 6bdaT n3BbpBaHc cAmO OT yNbJIHOMoUeH NOTpe6ntckn cepBn3EH UeHTbD 3a eNEKTPOnHCTDPMeHTn.
MoxTe Da noJyUte IOnbIHTeHa HOpMaun Ha Homep 00 32 292 92 90.
BcnuK TpaHcnpTH pa3xOAn 1e 6bDaT noEtN OT nOtpe6nte,OCBeH aKO nncMeHO He e dorobopeHo dpVro.
BcbuTo BpeMe, He Morat Da ce npeJRABaT npeTeHcNn NO rapaHcNra, aKo NOBpeDaTa Ha ypea e BCJeDCTBHe OT npeHe6perBaHe Ha TexHnueCKOTO 06CnyXbaHe nn npetOBapBaHe.
- Ot rapaunra KaTeOpuHc e n3KJIOUba NOBpeJa, KOrTO e B pe3yITaT OT npOHKBaHe Ha TeuHOCT, MHOro npax, PpeHaMepeHa IOBpeJa (ymnIeHa nnnpaDN TotAnHO 6e3rpNkne), HeNoXoJauO n3noJ3BaHe (n3noJ3BaHe 3a ceJI, 3a KOnTO ypeDbT He e IooXoJus), HeKOMNeTeHTHO n3noJ3BaHe (HAp. Hecna3BaHe Ha IHCTpyKUnTE B pboBOdCTBOTo), HeKOMNeTeHTeMOThAq, rpbMOTeBuYeH yap, HeppaBUNHO HanpexKeHne. To3n cncbK He e n3yePNaTeJIeH.
-Приемано Ha rapaционнпретсин HNKORA He MoKe Ддове До удьжаве Ha rapaционнсpoK, HTO Do 3anOuBaHe Ha HOB rapaционнсpoK B CnyaH Ha 3amHa Ha VCTPOIcTBQ.
- YcTpoiCTbata HnIeTaJInTe, KOnTO ca 3aMeHEn CbO6pa3HO rapaHcIOHHnte ycNoBna, cJeIOBaTeJIHO OCTaBAT CO6CTBeHOCT Ha Varo NV.
Hne cn 3ana3BaMe npaboto Da OTXBpImm BcKa npeTeHnry, B cnuyaaye nokykata He MoKe da 6bJe npOBepHa nn, KOrato e rCHO, Ye npOdyKTBHe e NODbpxaH npabuHNO. (NouchBaHe Ha BeHTnlaunOHnTe OTBOp, peoBHa NOdprBXka Ha KapboHOBnTe YETKN....)
CbXpaHbAaTeΦakTypaTa3a NOKyPkata KaTO DOKa3aTeJIcTB0 3a DaTata,Ha KOrTo e HApBaBeHa T.
Tp6Ba Da BbPHeTe HeEmoHTnpaHn HNCTpyMeH Na npOdaBa a B npneMJIBO YnCTO cbCTOHN, BOpINHaHnTO My JIto Kyapue, aKO yCTpoiCTBOTO mTaKOBa, PNDPVKaBAHO OT DOKa3aTeJCTBOTO 3a NOKVnKaTa.
BaunrHnCtpymeHT Tp6Ba Da 6bDe 3apeKdaH Ha-MaJIko BeHbX MeceHo 3a OcNryPraBaHe Ha ONTUMaJIHaTa My pa6Ota.
16 OKOJIHA CPEDA
Korato ypeBbT Bn Tp6Ba Da 6bJe 3aMeHeH CneI npOdbJXHTeHa ynoTppe6a, He ro n3XBbPnIte CDOMAKINHCKNTE OTNaIDbU, a no HauHH cbo6pa3EH C ONa3BaHTo Ha OKoHNHATA cpeJa.
OTnabuIte OT eNeKtpueckn npOdykTu He Tp8Ba Da 6bDaT n3XBbpHn 3aEDHO CDOMAKINCKNTe OTnabu. MoJ, npOuyTe KbDe mMa Bb3MOXHOCTN 3a peuKInpaHe. POnsKaIte OT MeCTHnte BnaCTn IIn OT npOdaBau cBBETn OTHOCHOpeuKNIPAHeTo.
DISCOVER THE ENTIRE PRODUCT RANGE AT
WWW.DUAL-POWER.COM


- PRESSURE SPRAYER BACKPACK
- BESCHRIJVING (FIG. A)
- POWERPLUS HIGH QUALITY TOOLS
- POWDPG80460 EN
- GARDEN SPRAYER BACKPACK 20V (NO ACCU) POWDPG80460
- INTENDED USE
- DESCRIPTION (FIG. A)
- PACKAGE CONTENT LIST
- SYMBOLS
- GENERAL POWER TOOL SAFETY WARNINGS
- Working area
- Electrical safety
- Personal safety
- Power tool use and care
- Service
- ADDITIONAL SAFETY INSTRUCTIONS FOR SPRAYER
- RESIDUAL RISKS
- ADDITIONAL SAFETY INSTRUCTIONS FOR BATTERIES AND CHARGERS
- Batteries
- Chargers
- CHARGING AND INSERTION OR REMOVAL OF BATTERY
- Charger indications (Fig. 1)
- Removal / insertion of battery (Fig. 2)
- Battery capacity indicator (Fig. 3)
- BEFORE USE
- Mixing the spray solution
- Filling the container
- Application
- Transportation and storage
- ASSEMBLY
- WARNING: Switch off and remove battery from machine before adjusting or cleaning!
- Assembling the strap
- Assembling the spray nozzle
- OPERATION
- Turning the sprayer ON/OFF (Fig.6)
- Lock-on (Fig.7)
- Filling the tank
- Spraying home and garden chemicals
- CLEANING AND MAINTENANCE
- Cleaning
- Draining the tank
- Cleaning the tank
- Cleaning the nozzle
- Maintenance
- TECHNICAL DETAILS
- WARRANTY
- ENVIRONMENT
- POWDPG80460 DE
- RENGJØRING OG VEDLIKEHOLD
- Rengjoring
- Montering at remmen
- Rengoring at tanken
- IPIN ANO TH XPHSE
- POWDPG80460 CS
- ZÁDOVÍ ZAHRADNI POSTRIKOVAC 20 V (BEZ AKUMULÁTORU) POWDPG80460
- URČENÉ POUžITÍ
- A tartaly feltoltese
- CODEPXMOE YNAKOBKN
- POWDPG80460 RU
- yCJIOBHBIE O6O3HauyEHHa
- OБцЯ ИНСТРУКЦЯ NO TEXHIKE BE3ОПАСHOCТИ ПИРAPABOTE C ЗЛЕКТPOINHCTPUMEHTOM
- Pa6oyee mecmo
- 3neKmpo6e3onacHocmb
- Bcerda npOBepaTe, yTO6bI HApJxHne B CeTu COOTBeTCTBOBaNo HApJxHeHIO, yKa3aHHOMy Ha Ta6JIuYKe C TexHNueCKIMn DaHHbIMN.
- Luyna 6e3oacHocmb
- 3knnyamauua u yxod 3a 3neKmpouHcmpyMeHMOM
- 06cnykuhaue
- DOnOJIHNTeJIbHbIe NHCTPyKcIIN NO TEXHnke B3ONACHOCTN Pn PAbOTE C ONPbICKNBATEJEM
- OCTATOUHbIE PNCKN
- 8ДОПОЛНТЕЛБHbIE INHCTPYKcNl NO TEXHnke BE3OПАСHOCTNДЯAKKUMYJIATOPOBИЗAPrIhblx YCTPOINCTB
- AkkymyJamopbl
- 3apnHbIycmpoucmea
- 3APЯДКA N YCTAHOBKA ИЛN CHYТNE AKKUMЛЯTOPHО BATAPEN
- INdukamopby 3apdno ycmpoucmea (Puc. 1)
- Chmue/ycmaHO6ka akkymyarnopa (Puc. 2)
- HdukamopbI 3apra daakymyarnopa (Puc. 3)
- IPEEd NcIb3OBAHnEM
- Cmeueaue pacmbopa onpbckuaHua
- HanoJIHeHue 6aka
- NpumHeHue
- TpaHcnOpmuObaHue u xpaHeHue
- C6OPKA
- HanoJIHeHue 6aka
- TEXHnueCKne DAHHbIE
- POWDPG80460 BG
- OCTATbUHN PNCKOBE
- 8ДОПьЛНTEЛНИНСТРУКЦИ 3ABE3ОПАСHОCT3A AKUMYЛATOPHN BATEPиN 3APДнU YCTPOICTBA
- Bamepuu
- 3apadHu ycmpoucmea
- 3APEXДАНЕ, NOCTABЯнЕ И CBAJЯнЕ HA AKUMYЛATOPHATA BATEРЯ
- INHoukauuu npu 3apekdahe (Uz.1)
- NocmaaHe / ceaJIne Ha akymyIamOpHama 6amepu (Fua. 2)
- NHDukamop Ha 3apekdaHemo (Fua. 3)
- INPEIN YNOTPEBA
- CmeceaHe Ha pa3meopa 3a npbckaHe
- ΠbJIHeHe Ha KOHmEuHepa
- PpuJoxKeHue
- TpaHcnpmupaHe u cbxpaHeHue
- CΓΙΟΥBAHΕ
- MohmaK Ha pemblaKa
- MoHmax Ha dO3ama 3a npbckaHe
- PABOTA
- BKJI/ɪN3KJI Ha npbckaaykama (fue. 6)
- 3aKnIOyBaHe (fua.7)
- IbIHeHe Ha pe3epeoapa
- NpbcKaHe Ha domaHn u epaDuHcKu xumkaJU
- NOUHCTBAHE I IOIDPbJKA
- Nocmeane
- N3ToUbaHe Ha pe3epBoapa
- NocTbHe Ha pe3epBoapa
- 13.1.3ПочисванеHaДиэзаТa(ФИr.14)
- Nooepbka
- TEXHnueCKN DAHHN
- TAPAHUN
- OKOJIHA CPEDA
Brand : PowerPlus
Model : POWDPG80460
Category : Pressure washer