
AFFIX - Car seat GRACO - Free user manual and instructions
Find the device manual for free AFFIX GRACO in PDF.
| Product Type | i-Size Child Booster Seat |
| Brand | Graco |
| Model | AFFIX |
| Category | Car seat |
| Standard | ECE R129/03 (i-Size) |
| Child height | 100 cm to 150 cm (reference age 3.5 to 12 years) |
| Installation | Forward-facing only |
| Attachment | ISOFIX or 3-point seat belt |
| Materials | Plastic, metal, fabric |
| Headrest adjustment | 10 positions, adjustment lever |
| Cup holders | Integrated, usable with child installed |
| Armrests | Integrated |
| Shoulder belt guide | Integrated for correct positioning |
| ISOFIX indicators | Green when correctly connected |
| Soft parts maintenance | Wash in cold water (≤30°C), dry in shade, no bleach or dry cleaning |
| Replacement of soft parts | Manufacturer-recommended parts only |
| Storage | Dry place, away from sunlight |
| Important note | Replace after an accident or fall |
Frequently Asked Questions - AFFIX GRACO
User questions about AFFIX GRACO
0 question about this device. Answer the ones you know or ask your own.
Ask a new question about this device
Download the instructions for your Car seat in PDF format for free! Find your manual AFFIX - GRACO and take your electronic device back in hand. On this page are published all the documents necessary for the use of your device. AFFIX by GRACO.
USER MANUAL AFFIX GRACO
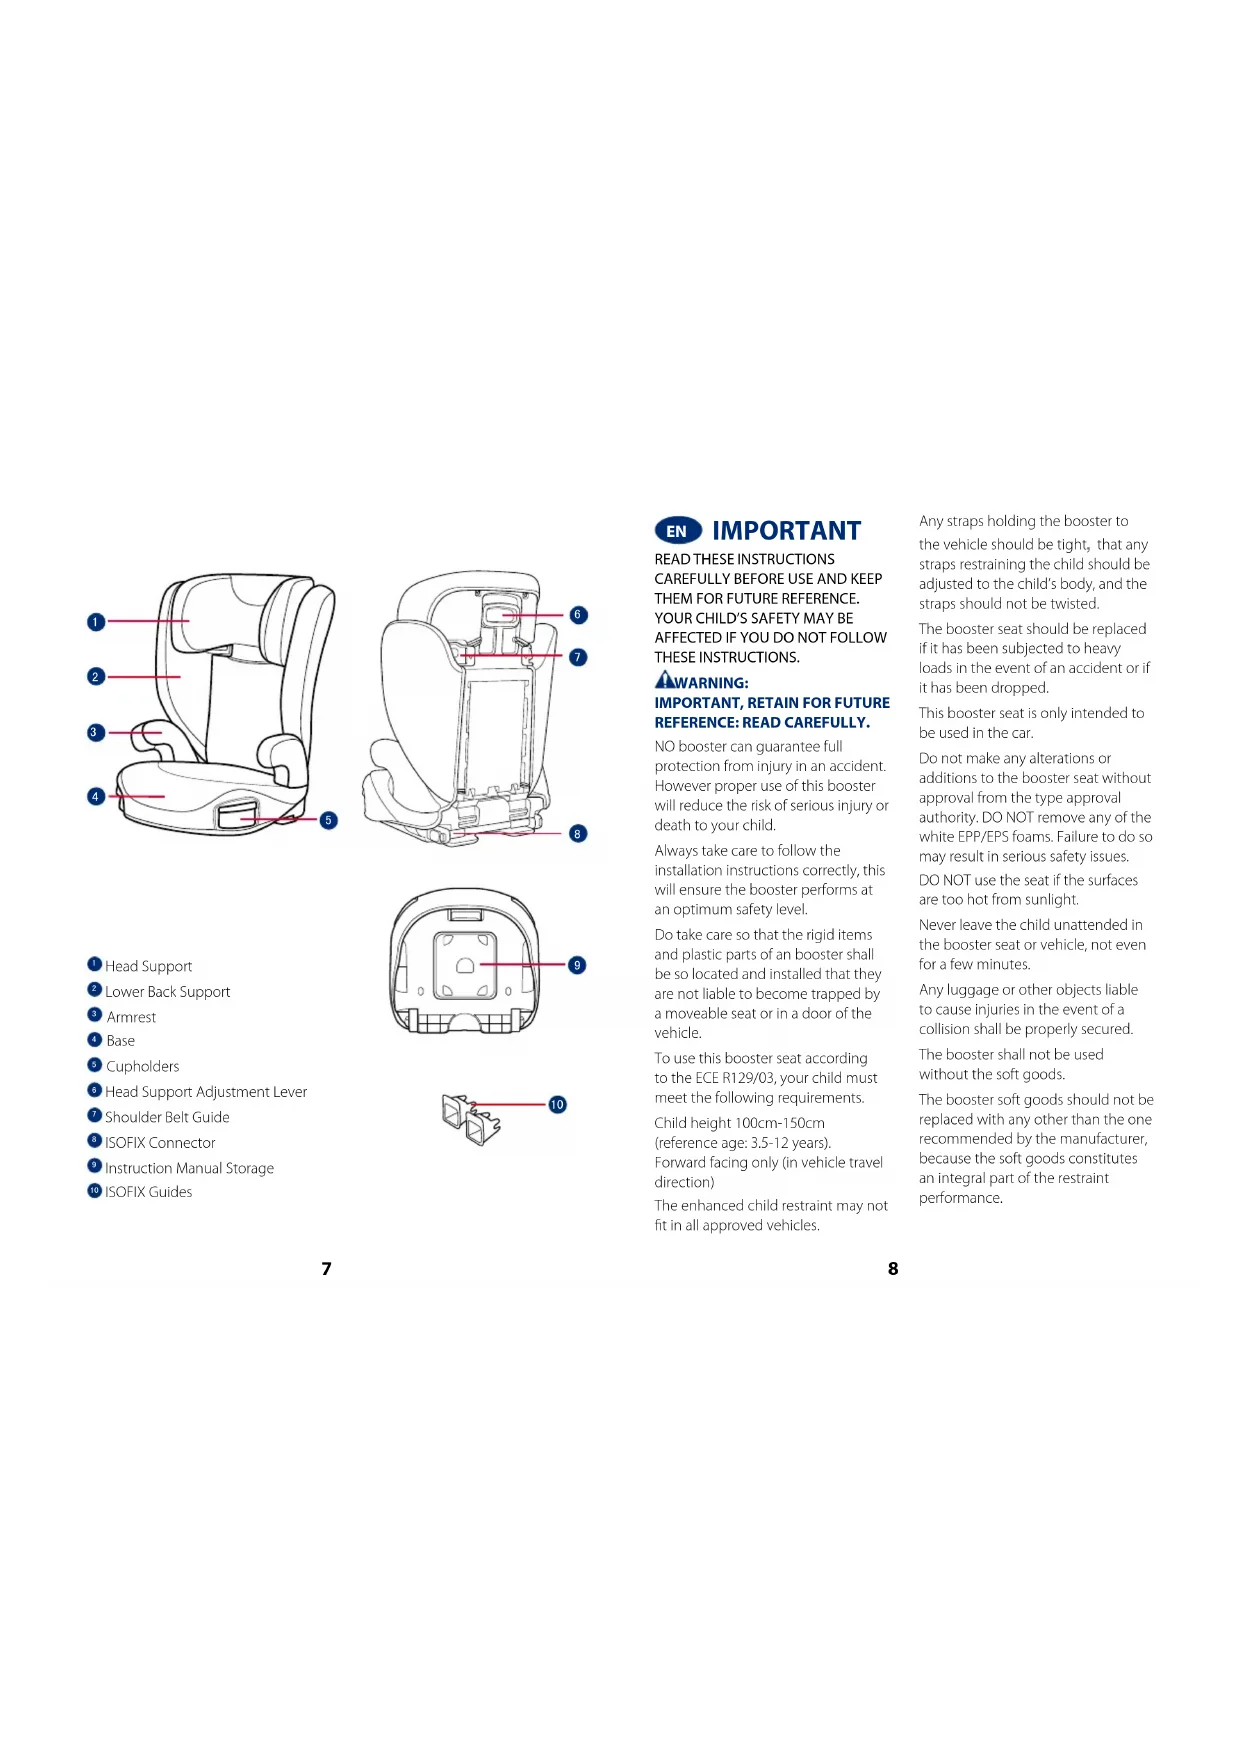
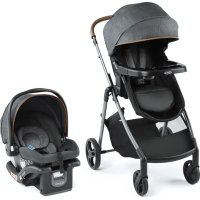
i-Size High Back Booster Car Seat
IMPORTANT! KEEP FOR FUTURE REFERENCE.
natural_image
Line drawing of a car comfort seat with seatbelt and seat, set against a solid blue background (no text or symbols)EN
Owner's Manual Parts List Fitting Guide
FR
natural_image
Anatomical illustration of a human hip joint with a red arrow indicating a specific area (no text or labels present)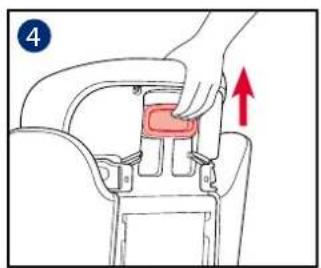
natural_image
Line drawing of a car seat with a green checkmark indicating selection (no text or symbols on the diagram itself)
natural_image
Illustration of a hand pressing down on a car seatbelt with a red arrow indicating the force (no text or symbols present)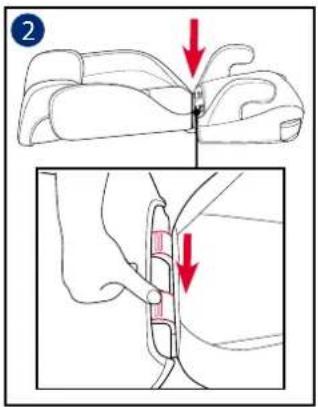
natural_image
Diagram of a robotic device with red arrows indicating force or movement (no text or symbols)
natural_image
Line drawing of a seat with a red arrow indicating clockwise motion (no text or symbols)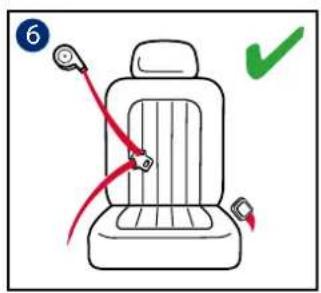
natural_image
Line drawing of a car seat with a green checkmark indicating selection (no text or symbols on the diagram itself)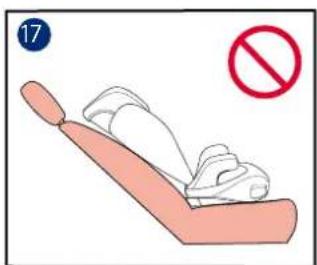
natural_image
Diagram of a car seatbelt with red directional arrows indicating movement (no text or symbols)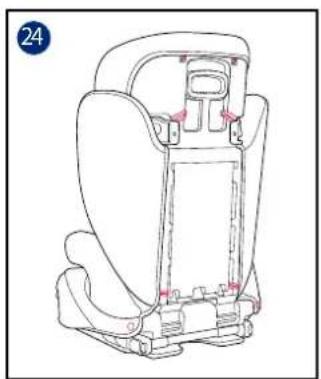
natural_image
Line drawing of a car seat assembly with no text or symbolsEN English – see pages 9-12
FR Français – voir pages.... 13-19
DE Deutsch – siehe Seite 20-26
NL Nederlands – zie pagina's 27-32
IT Italiano – vedere alle pagine 33-38
ES Español – consulte las páginas 39-45
PT Português – ver páginas.... 46-52
PL Polski – patrz strony 53-59
cz Česky – viz strany 60-65
SK Slovenčina – pozrite si strany 66-71
HR Hrvatski – pogledajte stranice 72-77
SR Srpski – pogledajte stranice 78-83
SL Slovenščina – glejte strani ....84-89
RU Русский – см. стр. 90-96
DA Dansk – se siderne 97-102
NO Norsk – se sider 103-108
SV Svenska – se sidorna 109-114
FI Suomi – katso sivut 115-120
HU Magyar – lásd oldal 121-126
RO Română – consultați paginile 127-132
EL Ελληνικά – βλ. σελίδες 133-139
TR Türkçe - bkz. sayfa 140-145

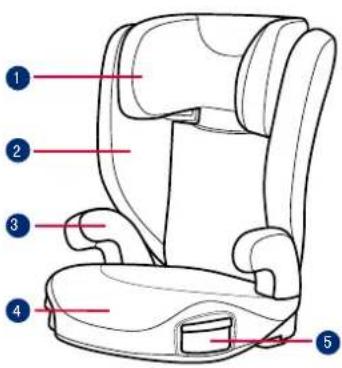
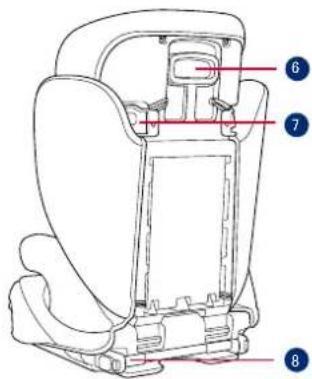
1 Head Support
2 Lower Back Support
3 Armrest
4 Base
5 Cupholders
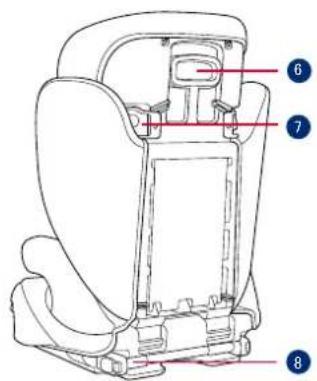
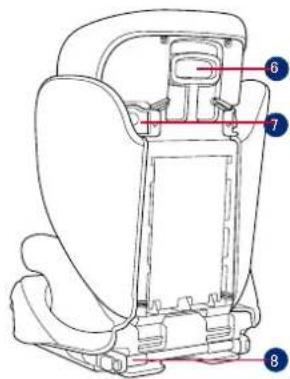
6 Head Support Adjustment Lever
7 Shoulder Belt Guide
8 ISOFIX Connector
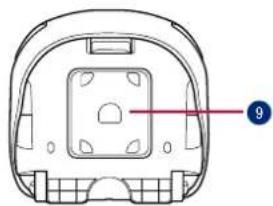
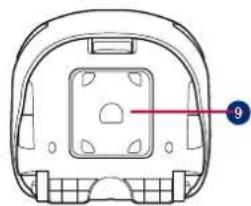
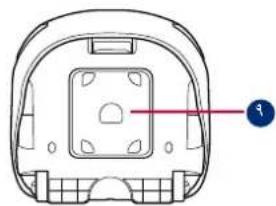
Instruction Manual Storage
10 ISOFIX Guides
natural_image
Technical line drawing of a mechanical component with no visible text or symbols
EN IMPORTANT
READ THESE INSTRUCTIONS CAREFULLY BEFORE USE AND KEEP THEM FOR FUTURE REFERENCE. YOUR CHILD'S SAFETY MAY BE AFFECTED IF YOU DO NOT FOLLOW THESE INSTRUCTIONS.
WARNING:
IMPORTANT, RETAIN FOR FUTURE REFERENCE: READ CAREFULLY.
NO booster can guarantee full protection from injury in an accident. However proper use of this booster will reduce the risk of serious injury or death to your child.
Always take care to follow the installation instructions correctly, this will ensure the booster performs at an optimum safety level.
Do take care so that the rigid items and plastic parts of an booster shall be so located and installed that they are not liable to become trapped by a moveable seat or in a door of the vehicle.
To use this booster seat according to the ECE R129/03, your child must meet the following requirements.
Child height 100cm-150cm (reference age: 3.5-12 years). Forward facing only (in vehicle travel direction)
The enhanced child restraint may not fit in all approved vehicles.
Any straps holding the booster to the vehicle should be tight, that any straps restraining the child should be adjusted to the child's body, and the straps should not be twisted.
The booster seat should be replaced if it has been subjected to heavy loads in the event of an accident or if it has been dropped.
This booster seat is only intended to be used in the car.
Do not make any alterations or additions to the booster seat without approval from the type approval authority. DO NOT remove any of the white EPP/EPS foams. Failure to do so may result in serious safety issues. DO NOT use the seat if the surfaces are too hot from sunlight.
Never leave the child unattended in the booster seat or vehicle, not even for a few minutes.
Any luggage or other objects liable to cause injuries in the event of a collision shall be properly secured.
The booster shall not be used without the soft goods.
The booster soft goods should not be replaced with any other than the one recommended by the manufacturer, because the soft goods constitutes an integral part of the restraint performance.
Always secure child in booster, even on short trips, as this is when most accidents occur.
DO NOT leave this booster, or other items unbelted or unsecured in your vehicle. Remove the booster seat from the car if not regular used and store in a dry, sun-protected surrounding.
It's recommended not to use a second-hand booster seat whose history is not known. It may have invisible structural damages or defects due to incorrect usage/storage.
DO NOT use any load bearing contact points other than those described in the instructions and marked on the booster.
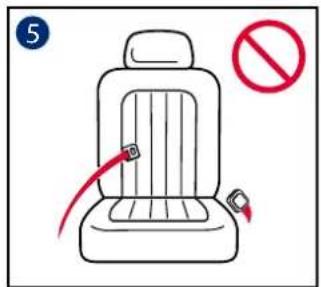
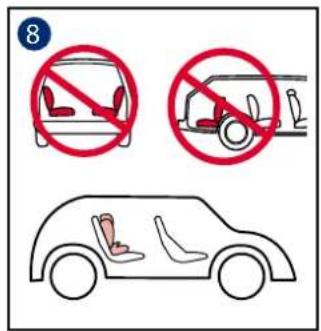
DO NOT install this booster under the following conditions:
-
Vehicle seats facing sideways or rearward with respect to the vehicle's direction of travel.
-
Vehicle seats movable during installation.
Consult the retailer for issues concerning maintenance repair and part replacement.
To avoid burns, never put hot liquids in your booster's cupholders.
Product Information
-
This is an i-Size booster seat Enhanced Child Restraint System. It is approved according to UN Regulation No.129, for use primarily in "i-Size seating positions" as indicated by vehicle manufacturers in the vehicle user's manual.
-
If in doubt, consult either the Enhanced Child Restraint System manufacturer or the retailer.
Product Booster seat
Materials Plastics, Metal, Fabrics
Patent No. Patents pending
Suitable for Child height 100cm-150cm (Reference age 3.5-12 years).
Installation Forward facing (in vehicle travel direction)
Booster Assembly See images 1 - 3
1 Squeeze the head support adjustment lever first and then slide in lower back support under the fabric cover to connect them together.
! CHECK to make sure two pieces are securely snapped together by pulling on them.
2 To attach the lower back support to the base, hook the lower back support over the seat bar hinge on the base.
3 Rotate the lower back support up while holding the booster seat until it clicks into an upright position.
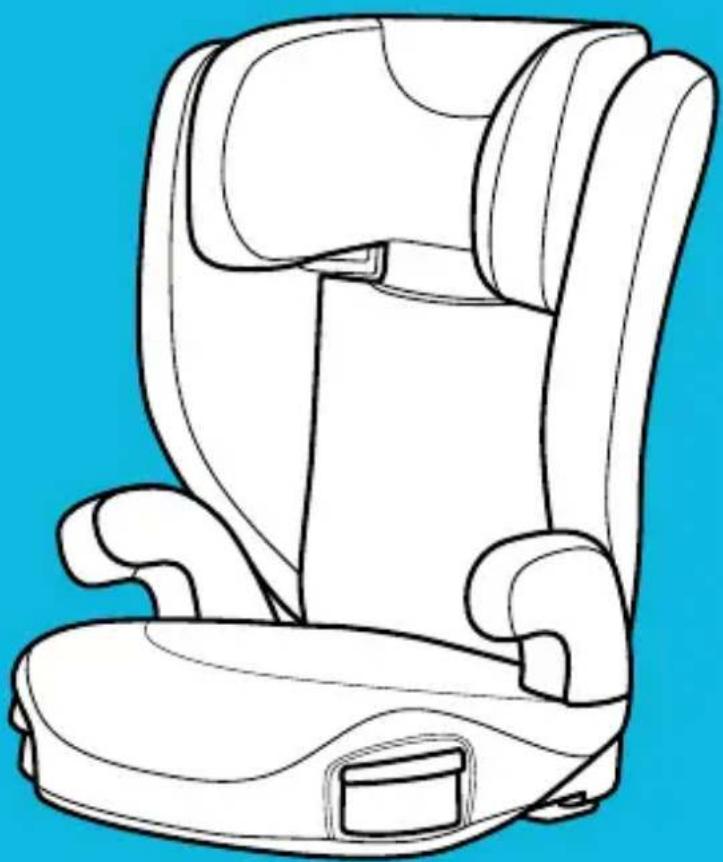
Height Adjustment – for Head Support See image 4
4 Squeeze the head support adjustment lever while pulling up or down on the head support until it snaps into one of the 10 positions.
Concerns on Installation See images 5 - 8
Installation using ISOFIX System and 3-point belt or using 3-point belt only
See images 9 - 23
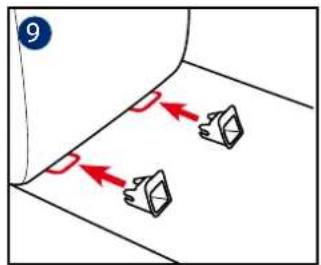
9 Fit the ISOFIX guides with the ISOFIX anchor points. The ISOFIX guides can protect the surface of
the vehicle seat from being torn. They can also guide the ISOFIX connectors.
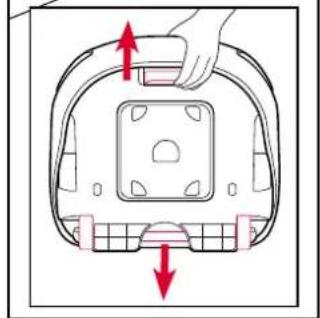
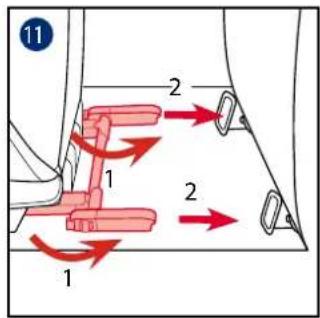
10 Press the ISOFIX adjusting button to pull out the ISOFIX connectors.
11 Rotate the ISOFIX connectors 180 degrees until they are pointing in the direction of the ISOFIX guides.
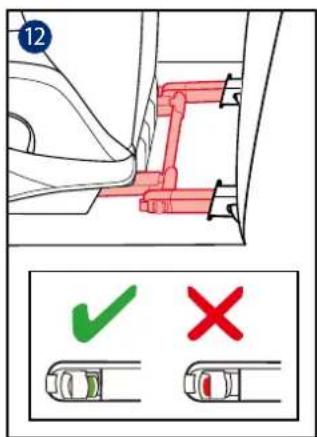
12 Line up the ISOFIX connectors with the ISOFIX anchor points, and then click both ISOFIX connectors into the ISOFIX anchor points.
! Make sure that both ISOFIX connectors are securely attached to their ISOFIX anchor points. The colors of the indicators on the both ISOFIX connectors should be completely green.
! Check to make sure the booster is securely installed by pulling on the both ISOFIX connectors.
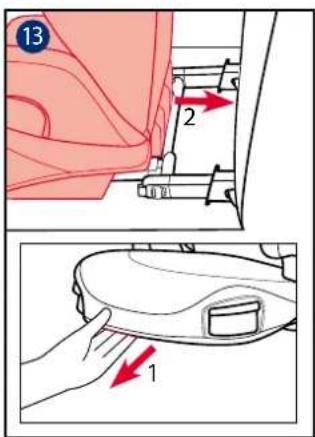
13 Press the ISOFIX adjustment button to retract the seat back to desired position.
To remove the booster:
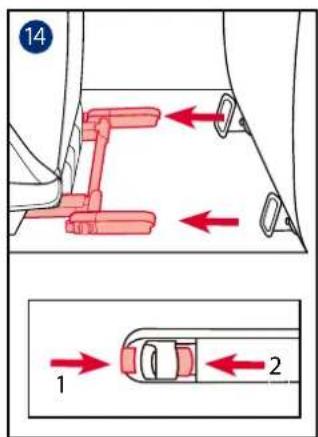
14 Press the secondary lock button first and then the button on the ISOFIX connectors before removing the booster from the vehicle seat.
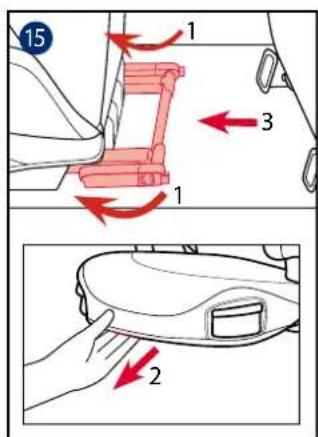
15 Rotate the ISOFIX connectors by 180 degrees, then press the ISOFIX adjusting button to fold the ISOFIX connectors.
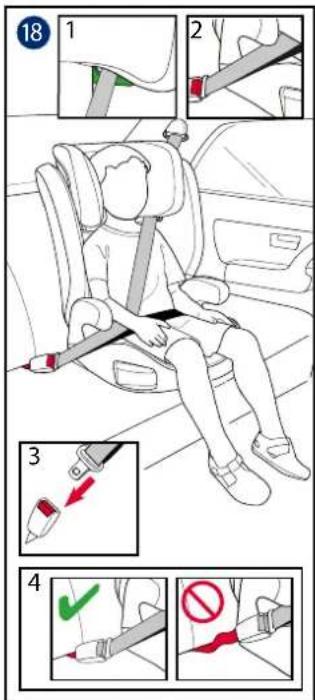
! Pull the vehicle safety belt and pass through the belt path 18, and then buckle it up. 18 -3
! Could also be installed by using 3-point belt only. 18 - 22
! Position shoulder belt through the shoulder belt guide shown in 18 -1
! DO NOT position vehicle belt over top of the armrests. It must pass underneath the armrests.
18 -2
! The booster can not be used if the vehicle safety belt buckle (female buckle end) is too long to anchor the booster securely.
18 -4
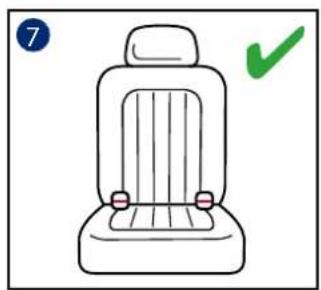
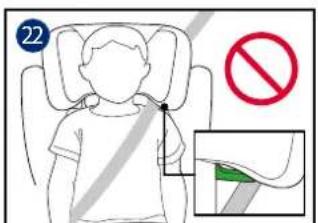
! After your child is placed in this booster, the safety belt must be used correctly, and ensure that any lap strap is worn low down, so that the pelvis is firmly engaged. 18
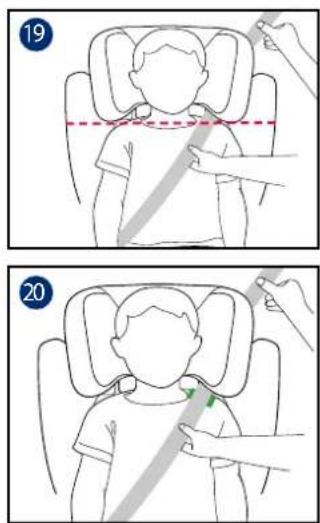
! To ensure the correct head support height is obtained, the bottom of the headrest MUST be even with the top of child's shoulders as shown in 19 and the shoulder belt must be positioned in the green zone as shown in 20
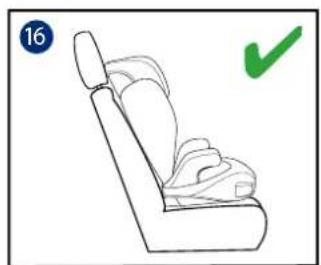
! Place a booster firmly against the back of a forward-facing vehicle seat equipped with a lap/shoulder belt.
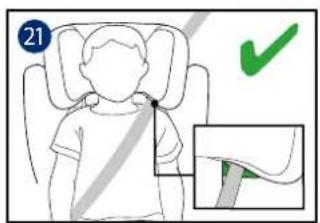
! Make sure, that the shoulder belt portion of the vehicle belt goes straight through the shoulder belt guide as shown in 21
! Tighten the vehicle belt by pulling the shoulder strap until all belt slack is removed.
! If the belt lays across child neck, head or face, readjust head support height.
! Any straps holding the booster to the vehicle should be tight and the straps should not be twisted.
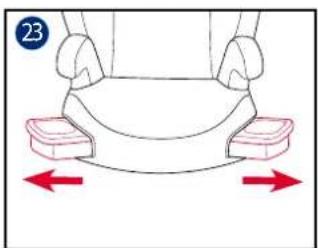
Use Cupholders
See image 23
Detach Soft Goods
See image 24
Open buttons and elastics on the back of soft goods to remove it. To refit the seat pad simply reverse the steps above.
Care and Maintenance
Please wash the seat cover and inner padding with cold water under 30°C.
Do not iron the soft goods.
Do not bleach or dry clean the soft goods.
Do not use undiluted detergents, gasoline or other organic solvent to wash the child restraint. It may cause damage to the child restraint.
Do not wring out the seat cover and inner padding to dry. It may leave the seat cover and inner padding with wrinkles.
Please hang dry the seat cover and inner padding in the shade.
Please remove the child restraint from the vehicle seat if not in use for a long period of time. Put the child restraint in a cool, dry place where your child cannot access it.
Do not tamper with the harness connectors during cleaning.
gracobaby.eu
www.gracobaby.pl

natural_image
Technical line drawing of a mechanical component with no visible text or symbols
FR IMPORTANT
LISEZ ATTENTIVEMENT CES INSTRUCTIONS AVANT LA PREMIÈRE UTILISATION ET CONSERVEZ-LES. LA SÉCURITÉ DE VOTRE ENFANT POURRAIT ÊTRE COMPROMISE SI VOUS NE SUIVEZ PAS CES INSTRUCTIONS.
AVERTISSEMENT : IMPORTANT, CONSERVER POUR CONSULTATION ULTÉRIEURE : LIRE ATTENTIVEMENT.
(1) San Diego Surgey Institute.

natural_image
Technical line drawing of a mechanical component with no visible text or symbols
NL BELANGRIJK
LEES DEZE INSTRUCTIES VÓÓR HET GEBRUIK EN BEWAAR ZE OM ZE LATER TE KUNNEN RAADPLEGEN. HET NIET VOLGEN VAN DEZE INSTRUCTIES KAN GEVOLGEN HEBBEN VOOR DE VEILIGHEID VAN UW KIND.
AWAARSCHUWING: BELANGRIJK, BEWAREN VOOR LATER GEBRUIK: AANDACHTIG LEZEN.

natural_image
Technical line drawing of a mechanical component with no visible text or symbols
IT IMPORTANTE
LEGGERE ATTENTAMENTE QUESTE ISTRUZIONI E CONSERVARLE PER USO FUTURO. LA MANCATA OSSERVANZA DI QUESTE ISTRUZIONI PUÒ METTERE A REPENTAGLIO LA SICUREZZA DEI BAMBINI.
AVVERTENZA:
natural_image
Technical line drawing of a mechanical component with labeled part (9), no readable text or symbols present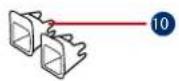
ES IMPORTANTE
natural_image
Technical diagram of a mechanical component with labeled parts (no text or symbols present)
PT IMPORTANTE LEIA ATENTAMENTE ESTAS INSTRUÇÕES ANTES DE UTILIZAR O PRODUTO E GUARDE-AS PARA REFERÊNCIA FUTURA. A SEGURANÇA DA CRIANÇA PODE SER AFETADA SE NÃO SEGUIR ESTAS INSTRUÇÕES.
AVISO: IMPORTANTE, GUARDAR PARA REFERÊNCIA FUTURA: LER ATENTAMENTE.

natural_image
Technical line drawing of a mechanical component with no visible text or symbols
PL WAŻNE
PRZED UŻYCIEM FOTELIKA PROSIMY ZAPOZNAĆ SIĘ Z ZAWIERAJĄCĄ WAŻNE INFORMACJE INSTRUKCJĄ I ZACHOWAĆ JĄ NA PRZYSZŁY UŻYTEK. CZYTAJ UWAŻNIE. NIEPRZESTRZEGANIE TYCH INSTRUKCJI MOŻE SPOWODOWAĆ NARAŻENIE BEZPIECZEŃSTWA TWOJEGO DZIECKA.
natural_image
Technical diagram of a mechanical component with labeled part (9), no readable text or symbols present

DŮLEŽITÉ
PŘED POUŽITÍM SI POZORNĚ PŘEČTĚTE TYTO POKYNY A USCHOVEJTE JE PRO BUDOUCÍ POUŽITÍ. V PŘÍPADĚNEDODRŽENÍ TĚCHTO POKYNŮ MŮŽE DOJÍT K OHROŽENÍ BEZPEČNOSTI VAŠEHO DÍTĚTE.
AVAROVÁNÍ:
DŮLEŽITÉ, USCHOVEJTE PRO BUDOUCÍ POUŽITÍ: POZORNĚ ČTĚTE.
natural_image
Top-down view of a mechanical component with labeled part 9 (no text or symbols beyond label)
SK DÔLEŽITÉ PRED POUŽITÍM SI POZORNE PREČÍTAJTE TIETO POKYNY A UCHOVAJTE ICH PRE NESKORŠIE POUŽITIE. AK NEBUDETE DODRŽIAVAŤ TIETO POKYNY, MÓŽE TO MAŤ VPLYV NA BEZPEČNOST VÁŠHO DIĚTÁTĚ.
AVÝSTRAHA: DÔLEŽITÉ UPOZORNENIE, ULOŽTE PRE BUDÚCE POUŽITIE: POZORNE SI PREČÍTAJTE.
1 Oslonac za glavu
2 Donji oslonac naslona
3 Naslon za ruke
Podnožje
Držači za času
6 Ručkica za podešavanje oslonca za glavu
7 Vodilica pojasa preko ramena
ISOFIX priključak
9 Utor za priručnik s uputama
10 ISOFIX vodilice
natural_image
Top-down view of a mechanical component with labeled part 9 (no text or symbols beyond label)
HR
VAŽNO
PRIJE UPORABE PAŽLJIVO PROČITAJTE OVE UPUTE I ZADRŽITE IH ZA BUDUĆU UPORABU. SIGURNOST VAŠEG DJETETA MOŽE BITI UGROŽENA AKO SE NE PRIDRŽAVATE OVIH UPUTA.
UPOZORENJE:
VAŽNO, SAČUVAJTE ZA BUDUĆU UPORABU: PAŽLJIVO PROČITAJTE.
natural_image
Technical line drawing of a mechanical component with no visible text or symbols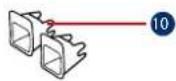
SL POMEMBNO
PRED UPORABO SKRBNO PREBERITE NAVODILA IN JIH SHRANITE ZA POZNEJŠO UPORABO. Z NEUPOŠTEVANJEM TEH NAVODIL LAHKO OGROZITE VARNOST VAŠEGA OTROKA.
APOZORILO: POMEMBNO, SHRANITE ZA KASNEJŠO UPORABO: NATANČNO PREBERITE!
natural_image
Technical diagram of a mechanical component with labeled part (no text or symbols present)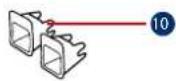
RU BAXHO!

natural_image
Technical line drawing of a mechanical component with no visible text or symbols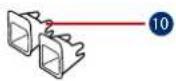
DA VIGTIGT
LÆS DISSE VEJLEDNINGER OMHYGGELIGT F∅R BRUG BEHOLD DEM TIL SENERE REFERENCE. HVIS DISSE VEJLEDNINGER IKKE F∅LGES, KAN DET GÅ UD OVER DIT BARNS SIKKERHED.
ADVARSEL: VIGTIGT, BEHOLD TIL SENERE REFERENCE: LÆS DENNE VEJLEDNING OMHYGGELIGT.

natural_image
Technical line drawing of a mechanical component with no visible text or symbols
NO VIKTIG
LES DISSE INSTRUKSJONENE N∅YE F∅R BRUK, OG BEHOLD DEM FOR FREMTIDIG OPPSLAG. DER SOM DU IKKE F∅LGER DISSE INSTRUKSJONENE, KAN DET GÅ UT OVER SIKKERHETEN TIL BARNET DITT.
ADVARSEL:
VIKTIG, BEHOLD FOR FREMTIDIG OPPSLAG: LES N∅YE.
IKKE bruk beltestolen med:

natural_image
Technical line drawing of a mechanical component with no visible text or symbols
sv VIKTIGT
LÄS NOGA IGENOM DESSA INSTRUKTIONER INNAN ANVÄNDNING OCH SPARA DEM FÖR FRAMTIDA BRUK. BARNETS SÄKERHET KAN PÅVERKAS OM DU INTE FÖLJER DESSA INSTRUKTIONER.
AVARNING:
VIKTIGT, SPARA FÖR FRAMTIDA BEHOV: LÄS IGENOM NOGA.
Angående installation
Se bilder Π - Π

natural_image
Technical line drawing of a mechanical component with no visible text or symbols
FI TÄRKEÄÄ
LUE NÄMÄ OHJEET HUOLELLISESTI ENNEN KÄYTTÖÄ JA SÄILYTÄ NE TULEVAA KÄYTTÖÄ VARTEN. LAPSESI TURVALLISUUS VOI OLLA UHATTUNA, JOS ET NOUDATA NÄITÄ OHJEITA.
AVAROITUS:
TÄRKEÄÄ, SÄILYTÄ TULEVAA KÄYTTÖÄ VARTEN: LUE HUOLELLISESTI.
natural_image
Technical line drawing of a mechanical component with no visible text or symbols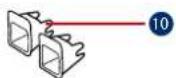
HU FONTOS
HASZNÁLAT ELŐTT OLVASSA EL FIGYELMESEN EZEKET AZ UTASÍTÁSOKAT ÉS TARTSA MEG A JÖVŐBENI HASZNÁLATRA. AMENNYIBEN NEM KÖVETI EZEKET AZ UTASÍTÁSOKAT, EZ BEFOLYÁSOLHATJA A GYEREK BIZTONSÁGÁT.
FIGYELEM:
FONTOS, ÓRIZZE MEG A KÉSÓBBIEKRE: FIGYELMESEN OLVASSA EL.

natural_image
Technical line drawing of a mechanical component with no visible text or symbols
RO IMPORTANT
CITIȚI ACESTE INSTRUCTIUNI CU ATENTIE ÎNAINTE DE UTILIZARE ȘI PĂSTRAȚI-LE PENTRU CONSULTARE ULTERIOARĂ. SIGURANȚA COPILULUI POATE FI AFECTATĂ DACĂ NU RESPECTAȚI ACESTE INSTRUCTIUNI.
AATENTIE:
IMPORTANT, PÄSTRAȚI PENTRU CONSULTARE ULTERIOARĂ: CITIȚI CU ATENȚIE.
Materiale Plastic, metal, textile

natural_image
Technical line drawing of a mechanical component with no visible text or symbols
EL ΣΗΜΑΝΤΙΚΟ
natural_image
Technical line drawing of a mechanical component with no visible text or symbols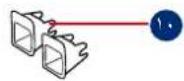
مständ الراس
مستد الظهر الس Düلي
مسند ال dorsal
الlbrace
حرامل الأكواب
Venture Point, Towers Business Park Rugeley, Staffordshire, WS15 1UZ
NUNA International B.V.
Van der Valk Bourmanweg 178 C, 2352 JD Leiderdorp, The Netherlands
Customer Service
gracobaby.eu www.gracobaby.pl

- EN IMPORTANT
- WARNING:
- IMPORTANT, RETAIN FOR FUTURE REFERENCE: READ CAREFULLY.
- Product Information
- Booster Assembly See images 1 - 3
- Height Adjustment – for Head Support See image 4
- Concerns on Installation See images 5 - 8
- Installation using ISOFIX System and 3-point belt or using 3-point belt only
- Use Cupholders
- Detach Soft Goods
- Care and Maintenance
- FR IMPORTANT
- AVERTISSEMENT : IMPORTANT, CONSERVER POUR CONSULTATION ULTÉRIEURE : LIRE ATTENTIVEMENT.
- NL BELANGRIJK
- AWAARSCHUWING: BELANGRIJK, BEWAREN VOOR LATER GEBRUIK: AANDACHTIG LEZEN.
- IT IMPORTANTE
- AVVERTENZA:
- ES IMPORTANTE
- PT IMPORTANTE LEIA ATENTAMENTE ESTAS INSTRUÇÕES ANTES DE UTILIZAR O PRODUTO E GUARDE-AS PARA REFERÊNCIA FUTURA. A SEGURANÇA DA CRIANÇA PODE SER AFETADA SE NÃO SEGUIR ESTAS INSTRUÇÕES.
- AVISO: IMPORTANTE, GUARDAR PARA REFERÊNCIA FUTURA: LER ATENTAMENTE.
- PL WAŻNE
- DŮLEŽITÉ
- AVAROVÁNÍ:
- DŮLEŽITÉ, USCHOVEJTE PRO BUDOUCÍ POUŽITÍ: POZORNĚ ČTĚTE.
- SK DÔLEŽITÉ PRED POUŽITÍM SI POZORNE PREČÍTAJTE TIETO POKYNY A UCHOVAJTE ICH PRE NESKORŠIE POUŽITIE. AK NEBUDETE DODRŽIAVAŤ TIETO POKYNY, MÓŽE TO MAŤ VPLYV NA BEZPEČNOST VÁŠHO DIĚTÁTĚ.
- AVÝSTRAHA: DÔLEŽITÉ UPOZORNENIE, ULOŽTE PRE BUDÚCE POUŽITIE: POZORNE SI PREČÍTAJTE.
- HR
- VAŽNO
- UPOZORENJE:
- SL POMEMBNO
- APOZORILO: POMEMBNO, SHRANITE ZA KASNEJŠO UPORABO: NATANČNO PREBERITE!
- RU BAXHO!
- DA VIGTIGT
- ADVARSEL: VIGTIGT, BEHOLD TIL SENERE REFERENCE: LÆS DENNE VEJLEDNING OMHYGGELIGT.
- NO VIKTIG
- ADVARSEL:
- VIKTIG, BEHOLD FOR FREMTIDIG OPPSLAG: LES N∅YE.
- sv VIKTIGT
- AVARNING:
- VIKTIGT, SPARA FÖR FRAMTIDA BEHOV: LÄS IGENOM NOGA.
- Angående installation
- FI TÄRKEÄÄ
- AVAROITUS:
- TÄRKEÄÄ, SÄILYTÄ TULEVAA KÄYTTÖÄ VARTEN: LUE HUOLELLISESTI.
- HU FONTOS
- FIGYELEM:
- FONTOS, ÓRIZZE MEG A KÉSÓBBIEKRE: FIGYELMESEN OLVASSA EL.
- RO IMPORTANT
- AATENTIE:
- EL ΣΗΜΑΝΤΙΚΟ
- NUNA International B.V.
- Customer Service
Brand : GRACO
Model : AFFIX
Category : Car seat