EverSure i-Size - Car seat GRACO - Free user manual and instructions
Find the device manual for free EverSure i-Size GRACO in PDF.

| Product type | High-back booster car seat |
| Brand | Graco |
| Model | EverSure i-Size |
| Standard | ECE R129/03 (i-Size) |
| Child height | 100 cm – 150 cm (approx. 3.5 to 12 years) |
| Orientation | Forward-facing only |
| Installation | ISOFIX with connectors + 3-point seat belt |
| Headrest adjustment | 10 positions, adjustable height |
| Side protection | Removable, adjustable |
| Armrests | Integrated, belt passes underneath |
| Bottle holder | Yes, removable |
| Materials | Plastics, metals, fabrics |
| Cover care | Wash at 30°C, dry in shade, do not iron |
| Approximate weight | 6.5 kg |
| Dimensions (H x W x D) | 68 x 45 x 45 cm (estimated) |
| Repairability | Contact retailer for spare parts |
| Warranty | Refer to manufacturer |
| Country of manufacture | Not specified |
Frequently Asked Questions - EverSure i-Size GRACO
User questions about EverSure i-Size GRACO
0 question about this device. Answer the ones you know or ask your own.
Ask a new question about this device
Download the instructions for your Car seat in PDF format for free! Find your manual EverSure i-Size - GRACO and take your electronic device back in hand. On this page are published all the documents necessary for the use of your device. EverSure i-Size by GRACO.
USER MANUAL EverSure i-Size GRACO
IMPORTANT! KEEP FOR FUTURE REFERENCE.

natural_image
Line drawing of a car comfort seat with mesh pattern and seat covers (no text or symbols)EN
Owner's Manual Parts List Fitting Guide
IT
natural_image
Anatomical illustration of a human head and neck with a red arrow indicating a specific area (no text or labels present)
natural_image
Line drawing of a baby car seat with a red arrow indicating direction (no text or symbols)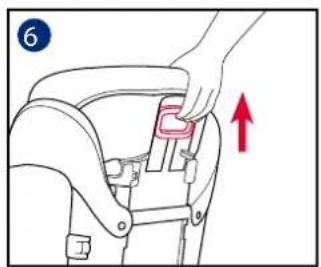
natural_image
Simple line drawing of a car seat with a green checkmark indicating selection (no text or symbols)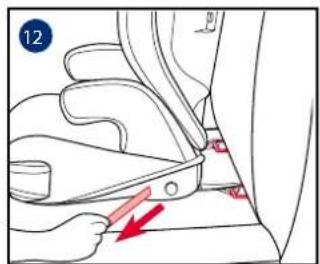


natural_image
Line drawing of a car seat with a green checkmark indicating selection (no text or symbols present)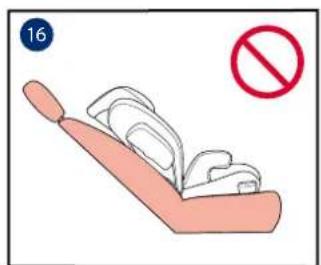


natural_image
Diagram of a seated seat with red directional arrows indicating movement or force (no text or symbols)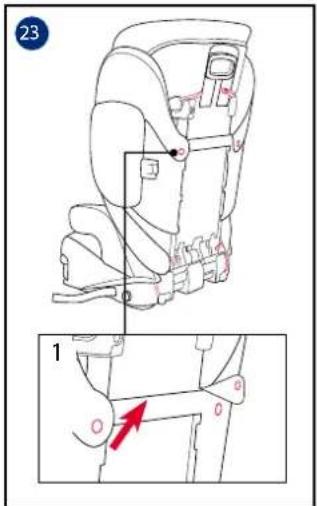
EN English – see pages 6-12
FR Français – voir pages.... 13-18
DE Deutsch – siehe Seite 19-25
NL Nederlands – zie pagina's 26-31
IT Italiano – vedere alle pagine 32-37
ES Español – consulte las páginas.... 38-43
PT Português – ver páginas....44-49
PL Polski – patrz strony 50-56
cz Česky – viz strany 57-62
SK Slovenčina – pozrite si strany.... 63-68
HR Hrvatski – pogledajte stranice 69-74
SR Srpski – pogledajte stranice 75-80
natural_image
Technical line drawing of a mechanical component with no visible text or symbolsEN IMPORTANT
READ THESE INSTRUCTIONS CAREFULLY BEFORE USE AND KEEP THEM FOR FUTURE REFERENCE. YOUR CHILD'S SAFETY MAY BE AFFECTED IF YOU DO NOT FOLLOW THESE INSTRUCTIONS.
WARNING: IMPORTANT, RETAIN FOR FUTURE REFERENCE: READ CAREFULLY.
NO booster can guarantee full protection from injury in an accident. However proper use of this booster will reduce the risk of serious injury or death to your child.
Always take care to follow the installation instructions correctly, this will ensure the booster performs at an optimum safety level.
Do take care so that the rigid items and plastic parts of an booster shall be so located and installed that they are not liable to become trapped by a moveable seat or in a door of the vehicle.
To use this booster seat according to the ECE R129/03, your child must meet the following requirements.
Child height 100cm-150cm (reference age: 3.5-12 years). Forward facing only (in vehicle travel direction)
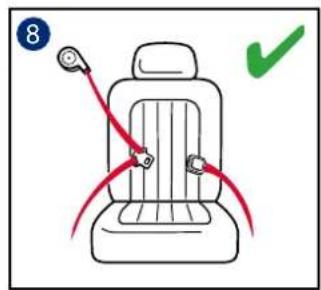
The booster may not fit to all vehicles for the usage from 135cm-150cm. Any straps holding the booster to the vehicle should be tight and the straps should not be twisted.
The booster seat should be replaced if it has been subjected to heavy loads in the event of an accident or if it has been dropped.
This booster seat is only intended to be used in the car.
Do not make any alterations or additions to the booster seat without approval from the type approval authority. DO NOT remove any of the white EPP/EPS foams. Failure to do so may result in serious safety issues.
DO NOT use the seat if the surfaces are too hot from sunlight.
Never leave the child unattended in the booster seat or vehicle, not even for a few minutes.
Any luggage or other objects liable to cause injuries in the event of a collision shall be properly secured.
The booster shall not be used without the soft goods.
The booster soft goods should not be replaced with any other than the one recommended by the manufacturer, because the soft goods constitutes an integral part of the restraint performance.
Always secure child in booster, even on short trips, as this is when most accidents occur. DO NOT leave this booster, or other items unbelted or unsecured in your vehicle. Remove the booster seat from the car if not regular used and store in a dry, sun-protected surrounding.
It's recommended not to use a second-hand booster seat whose history is not known. It may have invisible structural damages or defects due to incorrect usage/storage.
DO NOT use any load bearing contact points other than those described in the instructions and marked on the booster.
DO NOT install this booster under the following conditions:
-
Vehicle seats facing sideways or rearward with respect to the vehicle's direction of travel.
-
Vehicle seats movable during installation.
Consult the retailer for issues concerning maintenance repair and part replacement.
To avoid burns, never put hot liquids in your booster's cupholders.
Product Information
-
This is an Enhanced Child Restraint System, intended to use as a Non-integral Universal Enhanced Child Restraint System (i-Size booster seat) from 100-150cm.
-
It is approved to the latest UN Regulation R129/03.
Product Booster seat
Materials Plastics, Metal, Fabrics
Patent No. Patents pending
Suitable for Child height 100cm-150cm (Reference age 3.5-12 years).
Installation Forward facing (in vehicle travel direction)
Booster Assembly
See images 1 - 5
1 Squeeze the head support adjustment lever first and then slide in lower back support under the fabric cover to connect them together.
! CHECK to make sure two pieces are securely snapped together by pulling on them.
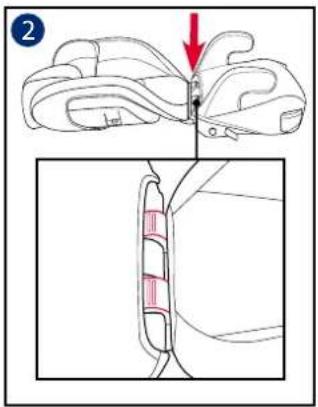
2 To attach the lower back support to the base, hook the lower back support over the seat bar hinge on the base.
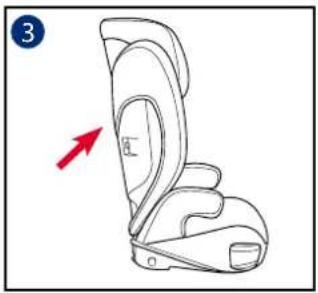
3 Rotate the lower back support up while holding the booster seat until it clicks into an upright position.
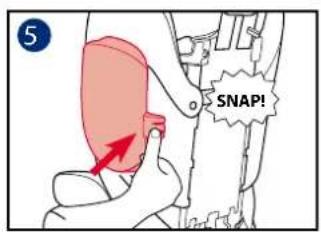
4 Align the side impact shield with the slot of lower back support plastics mounts, and then insert to lock. 5
! Please choose whether to install the side impact shield according to the size of the car.
Height Adjustment – for Head Support
See images 6
6 Squeeze the head support adjustment lever while pulling up or down on the head support until it snaps into one of the 10 positions.
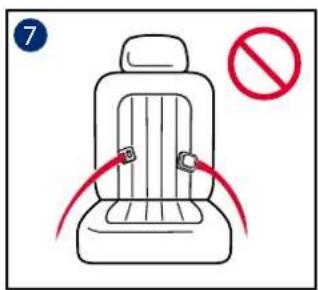
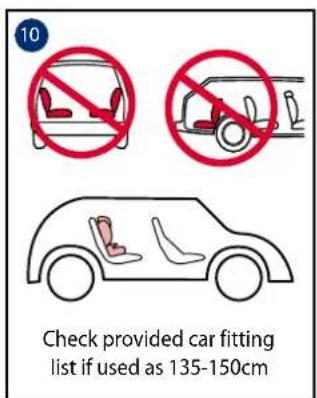
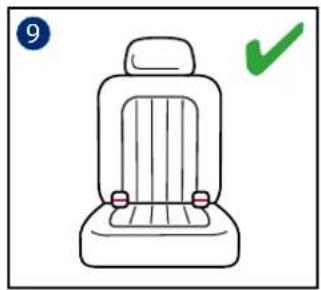
Concerns on Installation
See images 7 - 10
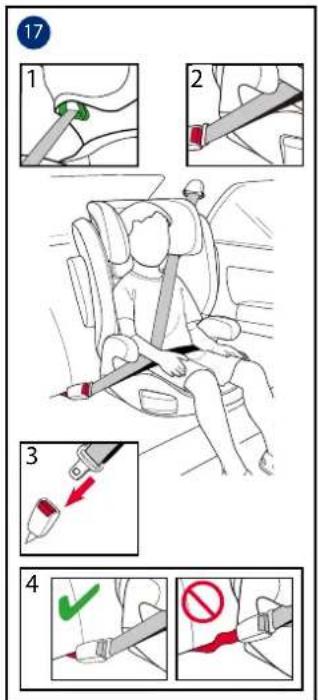
Installation with 3-point-belt
See images 11 - 21
If vehicle is equipped with ISOFIX, the vehicle lower anchor points may be visible at the vehicle seat crease. See
your vehicle owner's manual for exact locations, anchor identification, and requirements for use.
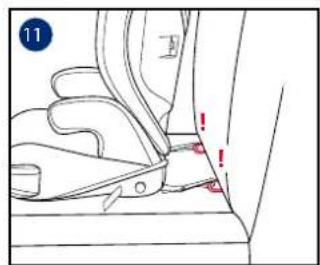
11 Place the booster in forward-facing position on a forward facing vehicle seat with anchors, hook latch connectors to vehicle anchors.
! NEVER put two latch connectors on one vehicle ISOFIX anchor unless specifically allowed by the vehicle manufacturer.
12 Secure the booster firmly by pushing it downward with knee or hand while pulling the adjustment belt.
13 For ease of unhooking, extend the adjustment belt to its maximum length while pressing the adjustment button.
! The latch connectors can be detached for use from the compartment on the bottom where it is stored.
! Pull the vehicle safety belt and pass through the belt path, 17 and then buckle it up. 17 -3
! Could also be installed by using 3-point belt only. (See images 17 - 21)
! Position shoulder belt through the shoulder belt guide shown in 17 -1
! DO NOT position vehicle belt over top of the armrests. It must pass underneath the armrests.
17 -2
! The booster can not be used if the vehicle safety belt buckle (female buckle end) is too long to anchor the booster securely. 17 -4
! After your child is placed in this booster, the safety belt must be used correctly, and ensure that any lap strap is worn low down, so that the pelvis is firmly engaged. 17
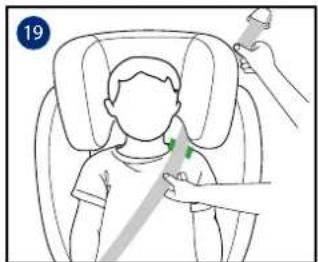
! To ensure the correct head support height is obtained, the bottom of the headrest MUST be even with the top of child's shoulders as shown in 18 and the shoulder belt must be positioned in the green zone as shown in 19
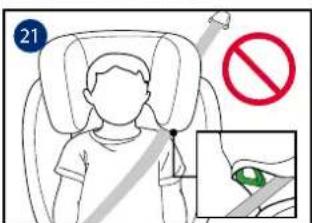
! Place a booster firmly against the back of a forward-facing vehicle seat equipped with a lap/shoulder belt. ! Make sure, that the shoulder belt portion of the vehicle belt goes straight through the shoulder belt guide as shown in 20
! Tighten the vehicle belt by pulling the shoulder strap until all belt slack is removed.
! If the belt lays across child neck, head or face, readjust head support height.
! Any straps holding the booster to the vehicle should be tight and the straps should not be twisted.
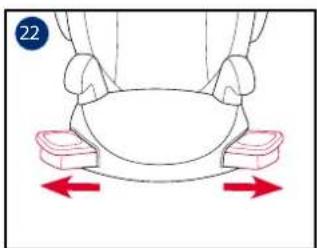
Use Cupholders
See images 22
Detach Soft Goods
See images 23
Open 2 pairs of buttons and 6 pairs of elastics on the back of soft goods to remove it. 23
To refit the seat pad simply reverse the steps above.
Care and Maintenance
Please wash the seat cover and inner padding with cold water under 30°C. Do not iron the soft goods.
Do not bleach or dry clean the soft goods.
Do not use undiluted detergents, gasoline or other organic solvent to wash the child restraint. It may cause damage to the child restraint.
Do not wring out the seat cover and inner padding to dry. It may leave the seat cover and inner padding with wrinkles.
Please hang dry the seat cover and inner padding in the shade.
Please remove the child restraint from the vehicle seat if not in use for a long period of time. Put the child restraint in a cool, dry place where your child cannot access it.
Do not tamper with the harness connectors during cleaning.
gracobaby.eu
www.gracobaby.pl
natural_image
Technical line drawing of a mechanical component with no visible text or symbolsFR IMPORTANT
LISEZ ATTENTIVEMENT CES INSTRUCTIONS AVANT LA PREMIÈRE UTILISATION ET CONSERVEZ-LES. LA SÉCURITÉ DE VOTRE ENFANT POURRAIT ÊTRE COMPROMISE SI VOUS NE SUIVEZ PAS CES INSTRUCTIONS.
AVERTISSEMENT : IMPORTANT, CONSERVER POUR CONSULTATION ULTÉRIEURE : LIRE ATTENTIVEMENT.

natural_image
Technical line drawing of a mechanical component with no visible text or symbols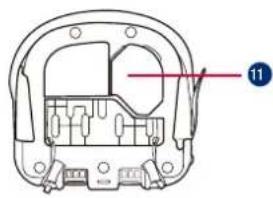
natural_image
Technical diagram of a mechanical component with no visible text or symbolsConcerns on Installation
natural_image
Technical line drawing of a mechanical component with no visible text or symbols
natural_image
Technical line drawing of a mechanical component with no visible text or symbols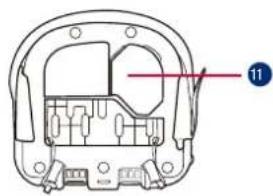
natural_image
Technical line drawing of a mechanical component with no visible text or symbols
natural_image
Technical line drawing of a mechanical component with no visible text or symbols
natural_image
Technical line drawing of a mechanical component with no visible text or symbols
natural_image
Technical line drawing of a mechanical component with no visible text or symbols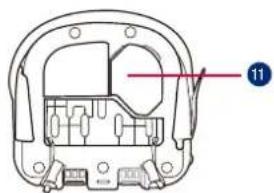
natural_image
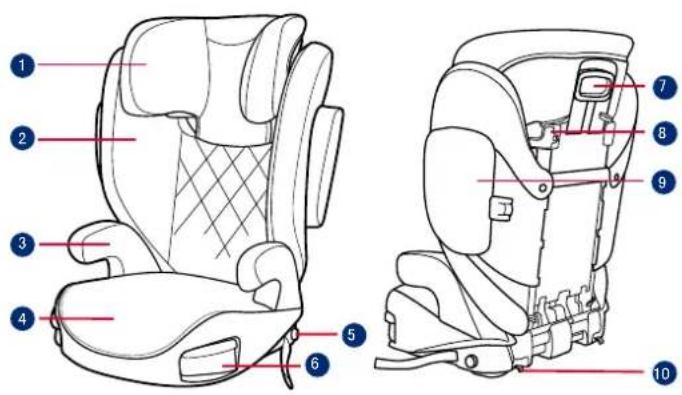
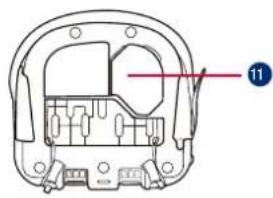
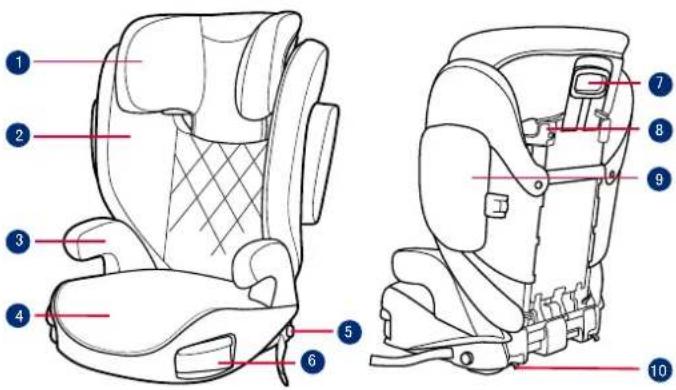
Technical line drawing of a mechanical component with no visible text or symbols1 Oslonac za glavu
2 Donji oslonac naslona
3 Naslon za ruke
Podnožje
5 Gumb za podešavanje
Držači za času
7 Ručkica za podešavanje oslonca za glavu
Vodilica pojasa preko ramena
9 Bočni štitnik od udaraca
10 Poluga spojnice
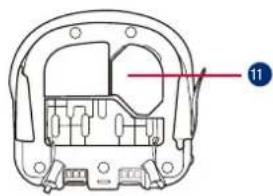
11 Odjeljak za priručnik s uputama
HR VAŽNO
PRIJE UPORABE PAŽLIVO PROČITAJTE OVE UPUTE I ZADRŽITE IH ZA BUDUĆU UPORABU. SIGURNOST VAŠEG DJETETA MOŽE BITI UGROŽENA AKO SE NE PRIDRŽAVATE OVIH UPUTA.
AUPOZORENJE: VAŽNO, SAČUVAJTE ZA BUDUĆU UPORABU: PAŽLJIVO PROČITAJTE.
1 Potpora za glavu
2 Potpora za donji deo leda
3 Naslon za ruke
4 Baza
5 Dugme za podešavanje
Držači za čaše
7 Ručica za podešavanje potpore za glavu
Vodica za pojas preko ramena
9 Štitnik od bočnog udara
10 Konektor zasuna
11 Skladište za uputstvo za upotrebu

natural_image
Technical line drawing of a mechanical component with no visible text or symbolsSR VAŽNO
PAŽLJIVO PROČITAJTE OVA UPUTSTVA PRE UPOTREBE I SAČUVAJTE IH ZA BUDUĆU UPOTREBU. BEZBEDNOST VAŠEG DETETA MOŽE BITI UGROŽENA AKO NE PRATITE OVA UPUTSTVA.
AUPOZORENJE:
VAŽNO, ZADRŽITE ZA BUDUĆU UPOTREBU: PAŽLJIVO PROČITAJTE.
Wonder Brands Limited
FLAT/RM 1501, 15/F, Capital Centre,
151 Gloucester Road,
Wan Chai, Hong Kong
Customer Service
gracobaby.eu
www.gracobaby.pl