kMix HMP34 - Blender KENWOOD - Free user manual and instructions
Find the device manual for free kMix HMP34 KENWOOD in PDF.
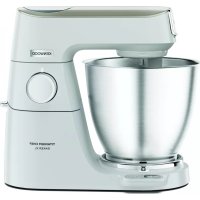
| Product type | Electric mixer with stand and bowl |
| Model | Kenwood kMix HMP34 |
| Use | Mix, whisk, knead |
| Included accessories | Whisks (2), dough hooks (2), metal mixing bowl, stand, base |
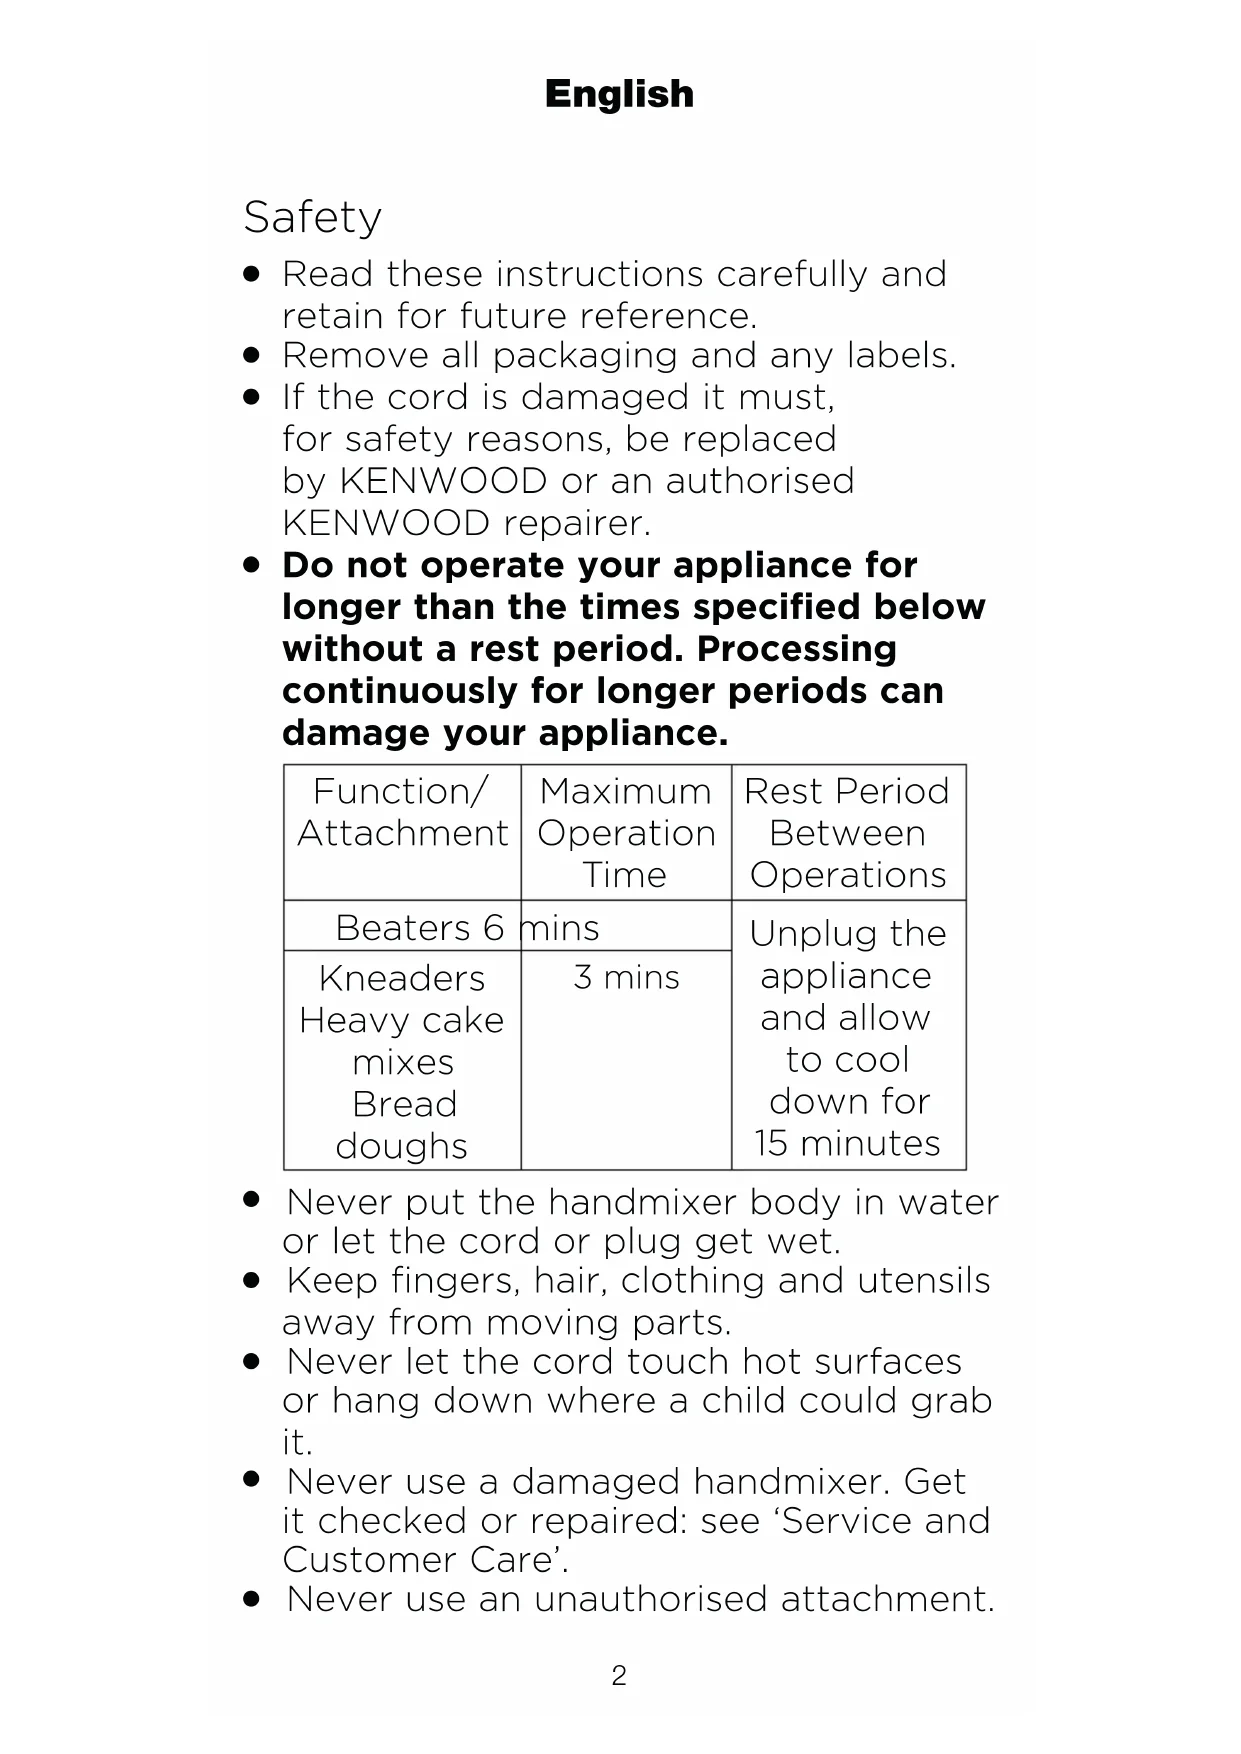
| Max. use time (whisks) | 6 minutes |
| Rest time between uses (whisks) | 15 minutes |
| Max. use time (dough hooks) | 3 minutes |
| Rest time between uses (hooks) | 15 minutes |
| Speeds | Variable with selector + Pulse function (P) |
| Bowl capacity | Approximately 1.5 L (estimated based on recipes) |
| Bowl material | Stainless steel |
| Motor body cleaning | Wipe with a damp cloth |
| Accessories cleaning | Hand wash or dishwasher safe |
| Bowl cleaning | Hand wash (avoid metal brushes, vinegar for limescale) |
| Safety | Motor stop if overloaded (thermal protection) |
| Power supply | See voltage on back of appliance (not specified in manual) |
| After-sales service | Kenwood authorized center, www.kenwoodworld.com |
| Warranty | In accordance with legal provisions |
| Country of manufacture | China |
| Design | Kenwood, United Kingdom |
Frequently Asked Questions - kMix HMP34 KENWOOD
User questions about kMix HMP34 KENWOOD
0 question about this device. Answer the ones you know or ask your own.
Ask a new question about this device
Download the instructions for your Blender in PDF format for free! Find your manual kMix HMP34 - KENWOOD and take your electronic device back in hand. On this page are published all the documents necessary for the use of your device. kMix HMP34 by KENWOOD.
USER MANUAL kMix HMP34 KENWOOD
- Read these instructions carefully and retain for future reference.
- Remove all packaging and any labels.
- If the cord is damaged it must, for safety reasons, be replaced by KENWOOD or an authorised KENWOOD repairer.
- Do not operate your appliance for longer than the times specified below without a rest period. Processing continuously for longer periods can damage your appliance.
| Function/ Attachment | Maximum Operation Time | Rest Period Between Operations |
| Beaters 6 | mins | Unplug the appliance and allow to cool down for 15 minutes |
| Kneaders Heavy cake mixes Bread doughs | 3 mins |
- Never put the handmixer body in water or let the cord or plug get wet.
- Keep fingers, hair, clothing and utensils away from moving parts.
- Never let the cord touch hot surfaces or hang down where a child could grab it.
- Never use a damaged handmixer. Get it checked or repaired: see 'Service and Customer Care'.
-
Never use an unauthorised attachment
-
Always unplug the appliance when not in use, before fitting or removing parts or before cleaning.
- Appliances can be used by persons with reduced physical, sensory or mental capabilities or lack of experience and knowledge if they have been given supervision or instruction concerning use of the appliance in a safe way and if they understand the hazards involved.
- Misuse of your appliance can result in injury.
- The maximum rating is based on the attachment that draws the greatest load. Other attachments may draw less power.
- Children should be supervised to ensure that they do not play with the appliance.
- This appliance shall not be used by children. Keep the appliance and its cord out of reach of children.
- Only use the appliance for its intended domestic use. Kenwood will not accept any liability if the appliance is subject to improper use, or failure to comply with these instructions.
Before plugging in
- Make sure your electricity supply is the same as the one shown on the rear of your Handmixer.
- This appliance conforms to EC Regulation 1935/2004 on materials and articles intended to come into contact with food.
Before using your Handmixer for the first time
- Wash the parts (see 'Care and cleaning').
Key
① Tool release button
② Speed selector
(3) Pulse button
④ Mixer
⑤ Beater
⑥ Beater with gear
⑦ Kneader
8 Kneader with gear
⑨ Mixing bowl

Cradle

Mixer release button

Cradle release button

Stand
Note: they can only be removed when the mixer is released from the cradle and the speed selector is in the 'O' OFF position.
To Use your Handmixer
Refer to illustration A
Fitting the beaters/kneaders
Insert the beater/kneader with the plastic gear in the socket.
Setting Up the Bowl & Stand
Refer to illustrations A - E
1 Fit the beaters/kneaders to the Handmixer.
2 Hold the front of the cradle and raise by pressing the cradle release button.
3 Place the bowl onto the stand.
4 Fit the mixer to the cradle and push down to secure. Note: Check that the beater/ kneader with the plastic gear aligns with the drive gear on the cradle.
5 Lower the cradle by holding the Handmixer handle whilst pressing the cradle release button at the same time.
6 Plug in and select a speed (Refer to the recommend usage chart)
After Use
Refer to illustrations F - H
1 Switch the speed selector to the 'O' OFF position.
2 Hold by the handle and lift up the cradle by pressing the cradle release button.
3 Remove the mixer from the cradle by pressing the mixer release button and lifting off.
4 Remove the beaters/kneaders - hold by the shafts and press the tool release button.
Hints and Tips
- As the mixture thickens, increase the speed.
- If the machine starts to slow or labour, increase the speed.
- Press the 'P' pulse button to operate the motor at maximum speed. The motor will operate for as long as the pulse is held in position.
Note: the 'P' pulse button will only operate if a speed is selected first.
- Scrape down the sides and bottom of the bowl at regular intervals to assist the mixing operation
- When creaming for cake mixtures, use butter or margarine at room temperature or soften before use.
- For best results with small quantities, use the handmixer without the stand.
Large quantities and thick mixtures may require a longer mixing time. - If you wish to mix larger quantities or heavier mixes, remove the mixer from the stand and use a bowl of an appropriate size.
- To re-knead bread doughs remove the mixer from the stand and use hand held.
Recommended Usage Chart
| Please note that these are recommendations for using the stand and supplied mixing bowl. If using the mixer by hand, the speed you select may depend upon the bowl size (if not using the bowl supplied), quantities, the ingredients you are mixing and personal preference. Gradually increase to the recommended speeds below. | |||
| Food type | (L (Mins) | ||
| Beaters | |||
| Egg whites 3 - 10 4 - 5 1 | - 3 | ||
| Cream 200 - 500 ml 1 - 5 2 - 3 | |||
| All-in-one cake mixes 1kg | Total weight 1 - 5 1 | - 2 | |
| Batter 1 litre 5 1 | |||
| Rubbing fat into flour | 250g Flour weight | 1 - 2 | 4 |
| Adding water to combine pastry ingredients | 2 | 1 | |
| Fruit cake | 900g Total weight 5 | 3 - 4 | |
| Creaming fat and sugar folding in flour, fruit, etc. | 1 - 2 | 1 | |
| Kneaders | |||
| Bread | 450g Flour weight | 4 - 5 | 2 - 3 |
| 750g Total weight | |||
Optional attachment (not supplied in pack)
Mini chopper - refer to 'Service and Customer Care' section to order.
Care and Cleaning
Always switch off, unplug and remove the beaters or kneaders before cleaning.
- Never put the handmixer body in water or let the cord or plug get wet.
- Never use abrasives to clean parts.
Handmixer body/Cradle/stand
- Wipe with a damp cloth, then dry.
- Never immerse in water or use abrasives.
All other parts
- Wash by hand, then dry.
- Alternatively they can be washed in your dishwasher.
Metal Bowl (TYPE HMP34 only)
- Never use a wire brush, steel wool or bleach to clean your stainless steel bowl. Use vinegar to remove limescale. Keep away from heat (cooker tops, ovens, microwaves).
Service and Customer Care
- If you experience any problems with the operation of your appliance, before requesting assistance refer to the 'Troubleshooting Guide' section in the manual or visit www.kenwoodworld.com.
-
Please note that your product is covered by a warranty, which complies with all legal provisions concerning any existing warranty and consumer rights in the country where the product was purchased.
If your Kenwood product malfunctions or you find any defects, please send it or bring it to an authorised KENWOOD Service Centre. To find up to date details of your nearest authorised KENWOOD Service centre visit www.kenwoodworld.com or the website specific to your Country. -
Designed and engineered by Kenwood in the UK.
Made in China.
IMPORTANT INFORMATION FOR CORRECT DISPOSAL OF THE PRODUCT IN ACCORDANCE WITH THE EUROPEAN DIRECTIVE ON WASTE ELECTRICAL AND ELECTRONIC EQUIPMENT (WEEE)
At the end of its working life, the product must not be disposed of as urban waste. It must be taken to a special local authority differentiated waste collection centre or to a dealer providing this service.
Recipe
White bread dough
10ml/2 tsp dried yeast (the type that requires reconstituting)
5ml/1 tsp sugar
250ml warm water
450g bread flour
5ml/1 tsp salt
15g lard
1 Place the dried yeast, with the sugar and water, in a mixing bowl and leave to froth. The correct water temperature should be 43^ and can be achieved by mixing one third boiling water with two thirds cold water.
2 Add the remaining ingredients. Fit the kneaders to the handmixer, then combine the ingredients together on a low speed until the flour is incorporated. Then increase the speed and knead for approximately 2-3 minutes, until the dough is smooth and elastic. Cover with oiled cling film and leave the dough to rise in a warm place for 45-60 minutes.
3 Re-knead the dough on maximum speed for 30-45 seconds, keeping the kneaders in the mix.
4 Shape the dough into a loaf, or rolls, and place on greased baking trays. Cover with oiled cling film and leave somewhere warm until it has doubled in size.
Troubleshooting Guide
| Problem | Cause | Solution |
| Handmixer does not operate. | No power. Check applience is plugged in. | |
| Kneader with plastic gear cannot be inserted into the socket. | Fitting kneader to wrong socket | The kneader with the collar will only fit into the O socket. |
| Handmixer starts to slow or labour during processing. | Speed selected too low.Recommended quantity exceeded. | Increase speed.Refer to recommended usage chart for speeds and quantities to process.Do not operate for longer than 3 minutes without a 15 minute rest period with doughs or heavy cake mixes. |
| Excessive splashing or flour spray during processing. | Speed selected too high.Bowl too shallow or too small for ingredients being processed. | Select a lower speed initially and increase as the mixture thickens.Select an appropriate sized mixing bowl. |
| Unable to remove tools from sockets. | Speed selector not in ‘O’ position. | To remove the tools, make sure the speed selector is in the OFF “O” position and unplug the handmixer.Press the tool release button. |
| Pulse button does not operate | Speed not selected first. | The Pulse function will only operate if a speed has been selected first.Select a speed and then press the ‘P’ pulse button. |
Nederlands
He BnKOpNCToBvIe HacaKn, 1o He np3HaueHi ABy Iy BoTO npAa.
3aBxdi BIDKIAOHTe PnAA, BiMepeki eAekTPONoCTaHnHa, KIOBn Hm He KopNCTyETecr, NpeAdYCTaHO bO 3HImaHHm DeTaIe, a TaKoJ NpeD YnUeHNrM.
He pekomeHdyETbCJ KOpNCyBaTnCJ
ZIM npAaOM oc6am i3 06MeJcHmN
Oi3nHmna6o MeNTaBHMn
MOKANBOCTaMn a6o TtM, XTO
MaE HeoCTaTHbO dOCBiAdy B NOrO
eKcIayataui. BnueHa3BaHm oc6am
DO3BOBAAETbcj KOpNCyBaTnCJ
PpAaOM TiBKnPiCJ npOXoJcHnR
IHCTpykTaKy Ta NiD HaTIAOM
DOCBiDuHeHOI AIOHN I JAKUO BOHn
PO3ymIoTB NOB'3aHI 3 ZIM pN3nKn.
HeBipHe BnKOpncTaHnY cboOro npnaAdy MoKe npNBecTn Do TpaBM.
MaKcImaIbHe CNoXnBaHnHa eAeKtpoeHepriBkA3aHO dA Hau6iIbI NOTyXhOi HaCaKn. IHsi HAcAdKn MoKyTb CNoXnBaTn MeHsE eHeprii.
He 3aIiShaTe dITEe 6e3 HaIy i He O3BOAJaTe iM rpaTnca i3 npIaIaOM.
-
Κeɪ npɪʌaɪ He npɪn3HaueHn ἀλ BɪKOpɪncTahHЯ ἀTiBmɪ. TpɪmaɪTe npɪʌaɪ i ψHyp πoʌaɪ BiD ἀITEŋ.
-
Zei npnaad npn3haeHn BnKauHOn
- AY BnKOpncTaHHy NObTyI.
KoMaHia Kenwood He Hece BiIOBIAaIbHOCTi 3a HeBIIOBIDHe BnKOpNCTaHHraPnAaMy a6O NopUWeHHra PpaBnEKCnAyaTauii, BnKlaDeHnx y ciI iHcTpkyu.
Ipea iAIOueHHm Do MepeXe eAekTponocTauHH
- IpekehauTeca, 10 npaMeTpneKtpnHoi Mepeki 36iraotbcra 3 daHmN, 3a3HaueHmB Ta6AnuCi Ha 3aDiHn NOBepxHi pyHoro Mikcepa.
- Léen npnlaB BiIIOBIAe BIMoRam AnpeKtNB E C 1935/2004 CTOCOBHO MaTepiAIB, 6o 6e3NocepEhBO KOHTaKTyIOb 3 iKeH.
Ipea nepuBnKOpncTaHHa pyHoro mikcepa
BIMnTe Bci DeTaI, (nB. po3di'OOrAa Ta uHneHHa
NokaXuNK
1 KhoNka po36AOKyBaHHaHaCaKn
② PeryAraTOp WbNdkocTi
(3) (P) Khonka imNyAchoro peXkUMy
Mikcep
5 36иBaчka
6 36nBaUka 3 wecTipHeIO
⑦ Γaκι Αλατις
8 MiwaAka 3 wecTipHeIO
9 Yaawa nnpepeiWyBaHHa
10 PyuKa
11 KhoNka po36AoKyBaHHa Mikcepa
12 Khonka po36oKyBaHHa onopn
13 CTiKa
BcTaHOBaEHnHaawi iPiAcTaBKn
AaHKn
1 BCTaBTe 36nBaUKN/MiuaAkn B pyuHni miKcep.
2 Bi3bMiTbcra 3a nepeHc HcToPOHy ONOpN Ta NiHiMItb II,HaTNCyBwN KHOKNpO36AoKvBaHHr ONOpN.
3 YcTaHOBIb YaWy Ha niCTaBky.
4 YcTaHOBiTb MIKcep Ha onopy TaHaTNCHTb NOro Bn3 AIA ikcaui.
Примитka: Перавіпг, 36ивачka/Miшакa 3 Пл actNKOBIOU wecTepeHKOIO Буla BCTaBLaHa y npNbiHni peyKTop Ha onopi.
5 OnycTiB onopy, yTpmyuyn pyuHn MiKcep 3a pyuky Ta OAnOchHO HaTnCKaUOn KhoNk y po36AoKyBaHHa ONOpN.
6 HaTnCHiTb Ha peryAraTOp WBnDKoCTi Ta BnBepiTb nOTpi6Hy WBNaKiCTb (AnB. TaBnIIO peKOMeHdaui 3 BNkOpNCtAHHa).
Пись застocуваши.
AIB.MaHIOHKn F-H
1 NpebeAdItb peryAryTop WBNKoCTi By BmKHeH e NOAOxehnra 0
2 Bi3bMItbcra 3a pyuKy Ta NiHIMiTb ONOpy,HaTnCHyBwn Ha KHOJky PO36AOKyBaHHa ONOpN.
3 3HIMITb MIKcep 3 onopn, HATNCHYBUN KHONKy PO36LOKYBaHHa MIKcep Ta NiADHBWNI NOrO.
4 BnIMiTb 36NBaayKn/ Miwaakn - yTpMaIte ix 3a BaT Ta HaTNCHITb KHOKNy
po36oKyBaHHHaHacdoK.
PnmiTka:HaCaKnMoKHa BnHrTnAImeTOdi,KoAn MikcepBndaaHeHO3OOnOp TapeYrTopWBnDKoCTi NepeBeDeHo y BmKHeHe NOoXKeHHA 0
PiKa3Kn Ta nopapn
- YKUcMIuIyCtIe, 36iABuTe WBNkICTb.
- RaKU npua ynoBIAhO Temn po6To, 36iABTe WbNkICTb.
HaTnCKaIe KHOJky IMnyAChoro peKIMy «P», 063a6e3neuHTn po6Ory eAleKtpOMToPA 3 MaKcImaHbHOU WbNAdKICTIO. EaleKtpOMToP 6yde npauOBaTN DOtN, 6yde HaTnCHyTa KHOJka IMnyAChoro peKIMy. PpIMITka: KhoNka imnyAChoro peKIMy «P» 6yde npauOBaTN, kkuo cNoVaTKy Bn6paHa WbNAdKICTb. - Lio6 noerwnn onepaizio 3miuyybaHH 3icko6IoHTe TICTO 3 6okIB Ta dHa yawi 3 peryAarpHmN iHTepBaamn.
- Пи пиготуванні креміВ ВИКОпсТовіte MacLo a6o Мар grapин кIMhaTHоI TemnéраТури, a6o po3imHITbix nepeД 3MiшУВаHHЯM.
- AIAOcIHHeHH ONTMaAIBHO rpeMiUyBaHHr HeBeAIKoKiABKocTi iHpeDiEHTiB, BnKOpNCtOBuYTe pyHn Mikcep 6e3CTiKN.
- Beiika kiIbkiCtB iHrpeiEHTIB a6o rycTi cyMiWi BImaraHO TB 6iMbTuPbAloi o6pO6Kn.
- RaKuo Bam notpi6Ho 3MiwaTn 6iAby KIAbKicTB npOaKy a6o rYcTiSy cyMi, 3HIMiTb MlKcep 3 NiCTaBKn i BnKOpncTaIte NOrO y EMHOCTi BiNObiHOro po3Mipy.
- Κιοδ 3amicntn Bxe 3amiuehe xai6ne ticTo ue pa3, 3himiTb Mikcep 3 niAcTabKn i TpmaTe horo y puci.
Ta6AnzmaKcMaMbHO 3aBaHTaXeHH
| Зевсань увагу на тe, сию pekomendeць вдосяты сд остicken i чаш i компалекту поставки. якто ви ви в megсер биз остicken,швадимость сад ви в розмір ch ch ch ch ch ch ch ch ch ch ch ch ch ch ch ch ch ch ch ch ch ch ch ch ch ch ch ch ch ch ch ch ch ch ch ch ch ch ch ch ch ch ch ch ch ch ch ch ch ch ch ch ch ch ch ch ch ch ch ch ch ch ch ch ch ch ch ch ch ch ch ch ch ch ch ch ch ch ch ch ch ch ch ch ch ch ch ch ch ch ch ch ch ch ch ch ch ch ch ch ch Ти п подукут | |||||
| 36ивачки | |||||
| Яши 北дддддддддддддддддддддддддддддддддддддддддддддддддддддддддддддддддддддддддддддддддддддддддддддддддддд徳 Вершки 200 - 500 ml 1 - 5 2 - 3 | - 3 | ||||
| Унічeredальни сухш сухш сухш сухш сухш сухш сухш сухш сухш сухш сухш сухш сухш сухш сухш сухш сухш сухш сухш сухш сухш сухш сухш сухш сухш сухш ch Ддг TOTIB | 1kg 3а 3a 3a 3a | - 51 - 2 | |||
| Tic'tо 1 Атр 5 1 | |||||
| Розтуарни жиру з сухш сухш сухш сухш сухш сухш сухш сухш сухш сухш сухш сухш c Ддг 3miiyyba n 478 Инг佩di'eNTiB dA 478 Виpopib i3 6000 | 250g Bara Бороча | 1 - 2 2 | 4 1 | ||
| Сухш д 478 Фухтoboro п рога Жирни кр em 3 Чу pom Перemiiyyba n 478 Бороча,peyktib i T.D. | 900g 3a 478 Bara 5 | 1 - 2 | 3 - 4 1 | ||
| Гак д 478 Х d 478 | 450g Bara Бороча 750g 3a 478 Bara | 4 - 5 2 - | 3 | ||
AoataKoBA HacaKa (He BXoAHTb AO KOMnAeKTy noCTaHaHH)
MiHIM'acopy6ka (AIA 3aMOBAAEHNAIB. PO3AI «O6cAYROByBaHHra Ta NiIATpUMKa KJIeHTIB').
OgAra Ta YnueHna
- Npea YnueHHa 3aBxAn BmkaTe npnaA, BiKAUaTe Noo Bi MepeKi eEeKtpoNocTaaHn Ta 3HImaTe 3bBaKn Yu rakn.
He onyckaite Kopnyc pyuHoro mikcepa y BoaY i He dOnyckaite nonaHaHHBaOAn Ha unyp a6o BnAky.
He BnKOpncToBvnte abpa3nBHi MaTepiAn DAnyHneHHaTeTaeN.
Kopnyc pyuHoro miKcepa / onopa / niAcTabka
- PnotpiTB BOANOIO TKaHINHO, a NOTIM npocywiTb.
HikoAn He onyckaIte y BOaY i He BnKOpNCTOByTe a6pa3nBHi MaTepiAaN.
Ihui deTaai
- PpomnIte BpyHy, noTIm npocyuItb.
IX TAKOK MOKHA MNTU y NOCYOMNHi MaUNHi.
MetaVeBa yawa (TiIbKn AIA moAeI HMP34)
HikoAn He BnKOpncToBynte ApOTaHy 1tKy, MeTaAebn BixOb a6o BiD6IIOBaAusbn 3aci6 AAn YNuJehn YaWi i3 HepXkAbIOOci TaIi 3i 3OMHM 3axINCHM KOMIpOM.
AIA BIAaENHaBOTy
BVKOpNCTOByIte OueT. He
BCTaHOBAIOHTe npAAd
NOPaID3XKepeAMn
TeIIa (KoHΦOpKaMn
PANTi, eAEKTpOpeaMn,
MIkPOXBnABOBUMn NeaMn).
O6cAγROByBaHHa Ta peMOHT
-ЯкutoВpo6oti npuAaY BnHnKAn 6yDb-яki HeNoAaKn,nepe3BepHeHHaMdoCayx6n NiIaTpIMKn npouHTaTe po3di «UcyHeHHa HecnpaBHOCTe» B CbOMy Noci6Hnky a6o 3aIITbHa caNT www.kenwoodworld.com.
- Nam'raTae, 0o Ha npuAAd
NOUnpIOeTbcra rapaHTi, 0o
BIaONbIaE BCIM 3aKOHMM
NIOXKeHHaM 0oO iChyUOoi
rapaHTi Ta npab CnoJnBaVa
B Ti KpaHl, De npuAAd 6yB
PnAbaHn.
- Пи Вини Кени
HecправноCTI в робті
приладу Kenwood abo
при ВияВаehнi 6удь-якnx
deфekti, 6удь ласka,
надшть abo пинecить
прилад B abTOpN3OBaHHN
сервicnii ceHTp
KENWOOD. Aktyальni
КонтakтHi ДaHI cepbichnx
цentpiB KENWOOD
Ви 3найдeTe Ha calTi
www.kenwoodworld.com
abo Ha calTi ДАЯ BaWoI
Крайн.
CnpoeKToBaHo Ta po3po6AeHO KOMnHaHcIo Kenwood,06'edHaHe KopoaiBCTBO.
3po6AeHO B Kntai.
BAKANBA IHΦOPMAUCTOCOBHO HAAEXKHOYTNAI3AUII NPOADYKTY3IADHO13 ANPEKTOBOIONPO YTNIAUHOEAEKTPNUHOROTAEKTPOHORO6AADAHNN (WEEE)
Iicra 3akihueHHa TepmHy
ekcnyaataui He BnKaaTe
ue npuaad 3 iHsMMN
no6yTOBUMn BiXoDAMn.
BiHeciTb npuaad o
micceBOrO cneiaAboHO
abTopn3OBaHOrO ceHTpy
3bnpaHHra BiXoDAIB a6o AO
dHaepa, knn MoKe HaDaTn
Taki nocayr.
Peçent
TicToAIAIaOTo xAi6a
10Ma/2u.A.cyuxxApixkXkIB
(8ki BImaraIOb BiATBOpEHnH)
5Ma/1u.A.uyKpy
250Ma/9yHui TeNIoI BOH
450r/1fuyHT6oOsha
5Ma/1u.A.coi
15r/ 12 yHui Knpy
1 POKaIb cyxI ApjKdKi, UyKOp B MnCKy, HAniTe BOuN i 3aNiwiTb NiXoAHTN. Tempepatya BOaN NOBHHa 6yTN 43 ^ C ABy CuBOrO MoKHs 3MiWATN OAnHy TpeTHy OKpony i ABi TpeTHH XOAODHOI BOaN.
2 OdaIte iHsi iHrpeiEHTN. BcTaHOBITb MiHaKn Ha Mikcep i nepemiwaIte iHrpeiEHTN Ha Hn3bKi I WBnKoCTi, 06 po3MiWATn bOpOsho. Notim 36iAusbTb WBNkICTb i npoAOBkyTe MiWATn np6An3Ho 2-3 XB, NOKn Ticto He cTaHe OAnHopiADHM Ta npyKHM. HApKNr 3amiwane Ticto xapuOBOIO NIAIBKOIO i 3aAnste NOro NiHImatncy y TeNlOMy Micci Ha 45-60 XBNH.
3 NOBTOPHO BIMICHTiCTO Ha MaKcMaAaBHiu WbNkOcTi npOTAROM 30-45 cekyH, TaK, uo6MiwaKa 3aBxKn 6yAa B Ticti.
4 CΦopMyIe TicTo B 6yXaHKn a6o 6yAouKn, i NOKlaIb Ha 3Ma3aHn OAIeIO ANCT. HApknTe xapOBOIO NIAIBKOIO i 3aAnIte TeNIO, NOKI BOHO He NiIDImetbcR B DBa pa3N.
5 BnikaTe B nonepaHbO
po3irpiTiy dYxOBci npi
tempeTpyi 230 ^ C /
450 F/ no3haCti ra3y 8
npotraGM 20-25 xBvAnH (A
6yxahok) a6o 10-15 XBvAnH
(AA 6yAoK).KoAn BCE
6yde roTOBO, TicTo nOBHHo
3ByuATN, k nyCTe, npi
noCTykyBaHHi o6 OCHOBY.
YcyHeHH HeCnpaBHOCTeI
1 = AO
jz jz 1jz 0
L0s
10
Soll
LgJgblallaLul
aJrll J.
aannn
jie lue jguanl jao aggio
cfo 1ofofofofofofofofofofofofofofofofofofofofofofofofofofofofofofofofofofofofofofofofofofofofofofofofofofo
JyL J
S OBC = S COD + S BOC - S BOC
b1i
iLi
e 1
jla y 1y jal jol
Lilag Lcll 1
1 1
-
- ,, (24)
4a + b = 5
aall acjll jn jnnl
15 1
.
K
j 1
jia 1
1 1
i
1 0
40le - 2.
a0y. 1 y. 1 - j[
10 11. g(a)
Lojic. (aIall a..ll) a
jolé jao cuo aou
J 1
.8c[0]
1
palee Laii dka, gaiy
L
HMP34 (gill) aiiuai iil
Loo gao y, aSLuSdai jpaiauiy
Jusuullll 10g 2auiu 20
jglal j. jil j. jil j. jil j. jil j. jil j. jil j. jil j. jil j. jil j. jil j. jil j. jil j. jil j. jil j. jil j. jil j. jil j. jil j. jil j. jil j. jil j. jil j. jil j. jil j. jil j. jili
0000 2
()
(wll)pssgj-aaalao
Lg(xlo)
ii
J 1
y
jLall g aal lal j
111111111
jaiil aibikl 1gop jia
j
Jolal/1b
aal lal alal aal alal alal alal alal alal alal alal alal alal alal alal alal alal alal alal alal alal alal alal alal alal alal alal alal alal alal alal alal alal alal alal alal alal alal alal alal alal alal
法一:
a

J 1


pabg
r - 1 0 - 1. -r
- 1-0 J_0( a^2 + 1) = - b^2 + 1
- 1 0 - 1 JlllJJJLLp5 ( a + b) = c^2 + d^2 + e^2
1 0
3 1
- | x - 2| = | x - 4| .
a1 < 0,2a2 < 0,3a3 < 0,4a4 < 0
2-4 0 jjglal9..
1 1
- 0-8
| x - 3| = | x + 6| .


Jolalglilblalll 1
E A


J
1 1
aegull ②
J (P) ⑤
山
5
6
8
bIJI ⑨
Jolal 10
11
12
aai ⑬
i
Jiai
女性先
KENWOOD
.KENWOOD
1 1 1 1 1 1 1 1 1 1 1 1 1 1 1 1 1 1 1 1
JgJg
假设 SU = 1
Kenwood Ltd
New Lane
Havant
Hampshire
PO9 2NH
kenwoodworld.com