SS10615 - Flower pot Sogo - Free user manual and instructions
Find the device manual for free SS10615 Sogo in PDF.

| Product type | Multi-cooker (pressure cooker) |
| Brand | Sogo |
| Model | SS10615 |
| Voltage | 220-240 V |
| Frequency | 50-60 Hz |
| Power | 900 W |
| Capacity | 5 L |
| Bowl material | Ceramic non-stick coating |
| Included accessories | 5L bowl, steam container, measuring cup, spoon, ladle, power cord |
| Number of automatic programs | 14 |
| Cooking functions | Meat, Beef, Vegetables, Chicken, Baking, Soup, Steam, Stew, Fry, Grain, Cook, Pilaf, Yogurt, Bread, Pasta, Porridge, Express, Multicook |
| Display | Digital with temperature and time display |
| Timer | Adjustable from 1 min to 12 h depending on program |
| Keep warm | Automatic or manual, up to 12 hours at 70-75 °C |
| Delayed start | Up to 24 hours (except fry, pasta, express) |
| Temperature range | 35 °C to 180 °C (adjustable in 1 °C increments) |
| Reheat function | Yes, up to 12 hours |
| Maintenance and cleaning | Bowl dishwasher safe; outer body cleaned with a damp cloth; steam valve removable and washable |
| Safety devices | Overheat protection, lockable lid, automatic shut-off in case of error (E1-E7) |
| Compliance | CE, Low Voltage Directive 2014/35/EU, EMC 2014/30/EU, RoHS 2015/863/EU, Ecodesign 2009/125/EC |
Frequently Asked Questions - SS10615 Sogo
User questions about SS10615 Sogo
0 question about this device. Answer the ones you know or ask your own.
Ask a new question about this device
Download the instructions for your Flower pot in PDF format for free! Find your manual SS10615 - Sogo and take your electronic device back in hand. On this page are published all the documents necessary for the use of your device. SS10615 by Sogo.
USER MANUAL SS10615 Sogo
-
IMPORTANT:
-
Always read the instruction book carefully before using.
This manual can be downloaded from our web page www.sogo.es -
Keep these instructions for future reference.
-
Safety instructions for the user
GENERAL PRECAUTIONS
General precautions during the use of electrical equipment
- Do not use the appliance for any other purpose than described in this manual.
- Do not use or store the appliance outdoors.
Always place the appliance on to the flat an even surface. - This product is intended for indoor, non-industrial, non-commercial and only for household use. Do not use the item outdoors or for any other purpose. Misuse or improper handling may cause problems in the appliance and cause injury to the user.
- The unit must be used only for the intended purposes. No liability is accepted for damages arising from improper use or wrong handling.
- Ensure that the voltage indicated on the name-plate matches the mains voltage before plugging in the appliance.
- Always remove the plug from the power socket when the appliance is not in use. Do not leave the appliance unattended when switched on.
- Close supervision is necessary when any appliance is being used by or near children.
- Before cleaning or storing your appliance, always unplug the appliance from the power supply and let it cool down.
- The device is not completely disconnected from the power source, even after it has been turned off. To disconnect it completely, disconnect it from the mains plug.
- The appliances are not intended to be operated by means of an external timer or separate remote-control system.
- This appliance is intended to be used in household and similar applications such as:
- Staff kitchen areas in shops, offices and other working environments;
-
Farm houses and by clients in hotels, motels and other residential type environments;
-
Bed and breakfast type environments;
- Catering and similar non-retail applications.
- Avoid spillage on the connector

Restrictions on use to avoid personal injury
- Do not place or operate this appliance near water sources.
- Do not place or operate the appliance and its power cord on or near hot surfaces (e.g., stove plates) or open flames.
- Do not leave the power cord hanging from sharp edges and keep away from hot objects and flames. Do not wind the cord around the appliance and do not bend it.
- Neither immerse the housing, which contains electrical components and the heating elements in water, nor rinse it under the tap.
- Never use accessories that are not recommended by the manufacturer.
- The use of accessories not recommended or sold by the appliance manufacturer may result in fire, electric shock or injury to persons.
- When you want to remove the plug from the wall contact, please do this at the plug itself and not by pulling on the cable or the appliance itself.
- To avoid electric shock, make sure your hands are dry before plugging or unplugging.
- Do not use the device with wet hands, on damp floors or when the atmosphere is humid there is a risk of electric shock.
- While using the appliance, make sure that the power cord must not be caught or crushed.
- Do not let the motor unit, cord or plug get wet to protect against risk of electric shock.
- Be careful, while handling electrical appliances, as the surface of the heating element is subject to residual heat after use. Any misuse may cause potential injury to the user and may damage the appliance.
- Do not touch the outer surface of the appliance as it can get very hot during operation. Instead, use the handle or mitts.
- Never immerse the appliance or the plug-in water or any other liquid. In the event of the appliance falling in water, disconnect immediately from the mains supply and take it to an authorized service agent for repair before reusing.
-
Do not use the appliance if it has fallen on the floor, if there are visible signs of damage or if it has a leak.
-
Do not use the appliance if the cable or plug is damaged. In case of the cord be damaged, it must be replaced only by the manufacturer, its service agent or similarly qualified persons in order to avoid Hazard.
- In case of appliance malfunction, or if it has been damaged in any manner, return the appliance to the nearest authorized service facility for examination, repair or adjustment.

Restrictions on use when used with children and elders
- The appliance is not to be used by persons (including children) with reduced physical, sensory or mental capabilities, or lack of experience and knowledge, unless they have been given supervision or instruction.
- This appliance can be used by children aged from 8 years and above and persons with reduced physical, sensory or mental capabilities or lack of experience and knowledge if they have been given supervision or instruction concerning use of the appliance in a safe way and understand the hazards involved.
Children should be supervised to ensure that they do not play with the appliance. - Cleaning and user maintenance shall not be made by children unless they are older than 8 and supervised.
- Keep the appliance and its cord out of reach of children less than 8 years.
- Do not allow the children to use the appliance without supervision.

Instructions to follow when using the appliance
- Keep hands and face away from the VENT knob when releasing the pressure. Always use in a well-ventilated area. DO NOT cover the pressure valve with anything.
- While the Multi cooker is in operation, never remove the lid. Extreme caution must be taken after cooking while removing the lid as serious burns can occur from the releasing steam. Always make sure the steam has been completely released. Let the appliance cool down and always use oven mitts while disassembling or removing accessories.
DO NOT use this Multi cooker without the removable cooking pot in place. -
Do not attempt to dislodge food while the Multi cooker is plugged in
-
Do not fill the Multi cooker more than 1/full with food or 2/3 full with liquid. Do not fill more than 1/2 full, while cooking foods that expand during cooking.
- When cooking foods under pressure at least 1 cup (8 oz /230 ml) of liquid / water must be used.
- Foods such as apple sauce, cranberries, pearl barley, oatmeal or other cereals, split peas, noodles or pasta, or rhubarb should not be cooked under pressure. They can foam, froth or sputter and may block the floating valve Use different cooking function for these items
- If smoke is observed, turn the Multi cooker off immediately and unplug it from the power outlet.
DO NOT use this unit for canning purposes. - The Multi cooker must be unplugged:
A. After each use,
B. If it appears to be faulty,
C. Before cleaning or maintenance.
- Do not touch the outer surface of the appliance as it can get very hot during operation. Instead, use the handle or mitts.
- Never touch the internal part of the appliance while in use.
- The temperature of accessible surfaces may be high when the appliance is operating
WARNING: Do not touch hot surfaces. - WARNING: This equipment shall be used with CAUTION as this electrical appliance contains a heating function. Surface of this appliance is also different from other functional surfaces which can produce high temperatures. Since temperatures are differently perceived by different persons. The equipment must be touch only at intended handles and gripping surfaces with the help of heat protectors like gloves or similar type of clothing. Otherwise let it for sufficient time to cool down before touching the hot surfaces.
- The ducts in the pressure regulators allowing the escape of steam should be checked regularly to ensure that they are not blocked.
- The appliance must not be immersed for cleaning; the connector must be removed in case need to clean thoroughly with water.
- The appliance must be dried well before using again.
- Ensure the heating element, temperature sensor and pot are clean and dried before connecting the plug to the power socket.
- On the pressure limiting valve do not add any heavy object.
After cooking make sure to switch of before opening lid. -
Do not use metallic spoons or scorchers to remove the food or cleaning the pot, to avoid any scratches of non-stick coating. It is recommended to use the wooden or silicone spoons.
-
Keeping warm time should not be more than 6 hours, to not to influence cooking effect.
- Make sure to hold it by handle in case need to move the Multi cooker from one place to another.
- Do not open the lid forcibly, if the floating valve fell down.
- The outer body and stainless steel is hot after cooking, make sure not to touch it to avoid any type of scalding.
- Do not place the inner pot directly on to the kitchen hob, only use it with Multi cooker.
- Do not expose the cooker to the high temperatures and place the cooker directly on to the kitchen hob.
- Neither touch or hold the Multi cooker as the outer surface is hot. Do not move it while working.
- To avoid a circuit overload when using this product, do not operate another high-wattage product on the same electrical circuit.
- A short power supply cord is provided with this product. An extension cord is not recommended for use with this product, but if one must be used:
- The marked electrical rating of the cord must be at least as great as that of the product.
- Arrange the extension cord so that it does not hang where it can be tripped over or pulled unintentionally.
CLEANING AND MAINTENANCE
Kindly refer to the cleaning and maintenance section for details on how to clean surfaces which comes in the contact of food.
3. TECHNICAL SPECIFICATIONS
| Voltage Frequency Power Capacity | |||
| 220-240V 50-60Hz 900W 5L | |||
| This product complies with EU regulation 2023/826 under directive 2009/125/EC on the Eco design requirements. |
| Power consumption in off mode: 0.0 |
| Power consumption in standby mode: 0.5W |
| Time after which the product enters into off mode: 0 min |
Accesories : Ceramic coated Bowl of 5L, Steam container, Measuring cup, Spoon, Ladle, Power cord.
4. PARTS DESCRIPTION
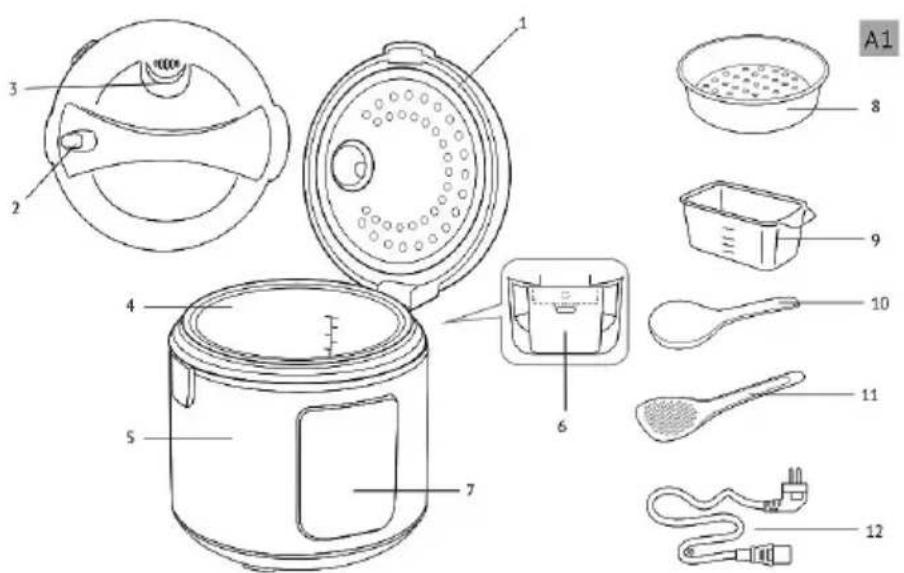
- Lid
- Lid Release Button
- Removable Steam Valve
- Ceramic coated Bowl
- Body
- Condensation Collector
- Control Panel
- Steaming Container
- Measuring Cup
- Ladle
- Spoon
- Power Cord
5. CONTROL PANEL DESCRIPTION
- Digital Display with Temperature, Cooking Time, and Delayed Start Indicator:
This Multi use Multi cooker is provided with digital display to display real time temperature cooking time. Also, it indicates remaining time while using delayed cooking function.
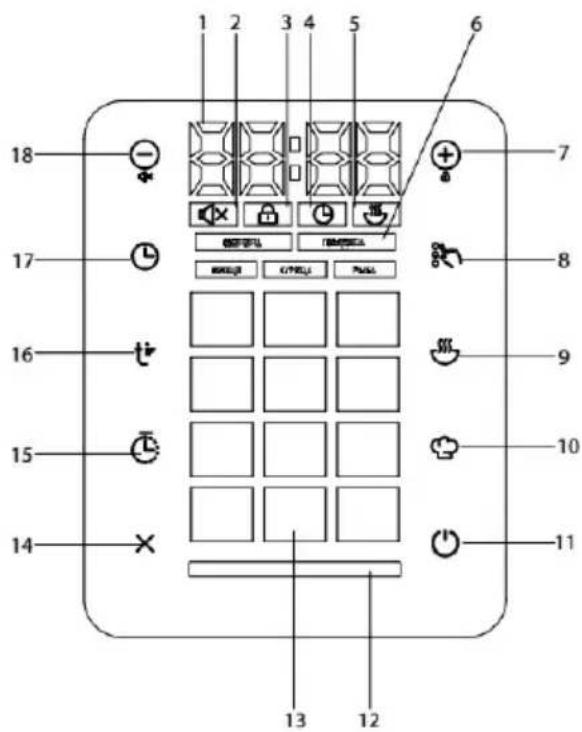

2. Sound Off Indicator: Shows
whether the sound alerts are turned off, ensuring silent operation. To turn off the sound press (-) Button for 3 seconds and sound will turn off and to turn it on again press the same button.
3. Control Panel Lock Indicator:
Lights up when the control panel is locked to prevent any kind of changes in the cooking menu. To lock the control panel press (+) button for 3 seconds and your control panel will be locked. In locked mode, pressing any button will display "[ ]" on the screen. In order to unlock the control panel press (+) button again; the indicator will turn off, and "[ ]" will briefly display to confirm the unlock.
-
Timer Indicator: This indicator display remaining cooking time during cooking process.
-
Keep Warm Indicator: This indicator display, that the appliance is in Keep Warm mode. In this mode unit maintains cooked food warm. All the menu functions have auto keep warm function activated. Just in case if this function is not activated, then to bring the unit into Keep warm mode / turn on keep warm function, press Auto Keep warm button and unit enters into keep warm mode and keep warm indicator appears in screen panel.
-
Selected Product Indicators: These indicators help in highlighting chosen cooking mode or food type for certain menu functions. This Multi cooker has some menu functions, that can be selected to cook wide variety of food. The type of foods selection is, Meat, Beef, Vegetables, Chicken and Fish.
-
Increase Value / Lock Panel Button: this button can be used to increase time or temperature settings. Also, with this button we can lock the panel. With short press we can change time and temperature setting and with long press we can lock the screen panel.
-
Product Type Selection Button: This button allows users to choose the type of food for certain menu functions. With the help of these menu functions, we can select and cook wide variety of food. Ex. Frying function can be used to fry Meat, Beef, Vegetables, Chicken and fish. The same way we can cook, make soups, Steam, Stew selecting same food products with the help of this button.
-
Auto Keep Warm / Reheat Button: This button allows to activate, keep warm / reheat function. All the menu functions have auto kept warm function activated, which activates automatically and keep warm the food once cooking finishes. To turn off this function press the button and keep warm indicator disappears.
Note: I. In this function food can be kept warm at 70 - 75^ temperature and up to 12 hours. II. this function automatically activates at the end of cooking program to keep the food warm. III. Keep warm function can be turn off at any time, before or after cooking in any menu function and delayed start cooking function. To disable this function, press any menu function followed by pressing keep warm function and keep warm indicator light disappears. IV. In the event of set cooking temperature below 80^ or below, Auto keep warm function will automatically be disabled
Reheat function: To reheat already cooked food, press this button and hold it for few seconds and unit enters into reheat mode. Multi cooker indicator light up Red and Keep warm indicator light display on the panel along with countdown timer. To turn off reheat function press and hold (Long press) this button again.
Note: I. cooked food can be reheated at the temperature of 70 - 75^ up to 12 hours. When the temperature reaches 70^ , a beep signal will indicate that the reheat process is complete and status indictor light will turn Green. The temperature can be maintained up to 12hrs.
II. this unit can keep the food warm to 12 hrs, but it is advised to not to leave food in the reheat mode for more than 2-3 hours, as this might affect the taste and texture of dish.

10. Marti Cook Mode Button:
With the help of Multi cook mode button, we can adjust the cooking settings during the cooking process. This button allows us to change default menu setting to customize setting according to the requirement and need.
Note: This function is unavailable for the Express cooking program.
Multicook Pro is especially useful for complex recipes that require various cooking programs in succession, such as stuffed cabbage, beef stroganoff, soups, pasta, jam, and similar dishes.
Note: In Multicook mode the time and temperature can be adjusted before cooking.

- Express Program Start Button : Quickly starts a pre-set cooking program without additional settings.
Note: this function doesn't allow any changes in time and temperature setting.

Multi cooker Status Indicator: this Indicator displays current operation mode of this multi cooker.

- Automatic Program Indicators: This multi cooker is provided with 14 different menu functions. To activate any available automatic menu function and start cooking, press the menu function directly and that menu function start blinking and unit start cooking with default time and temperature. In case of any need, with the help of time adjustment button, we can change the time.
Note: in all the automatic menu functions temperature can be changed during cooking and not before.

- Cancel Button : This button can be used to interrupt any menu function during cooking.
This same button can be used to switch the menu function as well.
To cancel any menu function press this button and hold it for few seconds. Unit stops cooking and back to its original factory setting.

- Delayed Start Button : Delayed Start Function
With the help of this button, we can configure our Multi cooker for delayed start cooking. This function is quite useful for all the persons who are having busy schedule with very little time spare for cooking.
- To Execute this function, press the delayed start button; the hour indicator will blink, and the status indicator starts flashing in yellow colour.
- Use (+) and (-) buttons to set the hours.
- Press the delayed start button again to set minutes setting by using the same buttons.
- Changes will be saved automatically if no buttons are pressed. To return to hour settings before saving, press the delayed start button again.
- Press the start button; the countdown to the program's start time will begin.
While the delayed start is active, the display shows a countdown, and the delayed start indicator lights up in purple. If the keep warm function is on, its indicator will also be active.
Important: The delayed start function is not recommended for dishes containing perishable ingredients like eggs, fresh milk, meat, or cheese.
- Temperature Setting Button: Temperature adjustment in Multi cook mode and rest of the menu functions:
This option is available for all programs except Express. The temperature can be adjusted within a range of 35^ to 180^ with 1^ increments.
- During any cooking program, press the temperature setting button. The current temperature indicator on the display will begin to blink.
Note: Temperature can be adjusted in all the menu functions including Multi cook mode button. In Multi cook mode the temperature can be adjusted before cooking. In rest of menu functions temperature can be adjusted during cooking. - To increase the temperature, press the (+) button and to decrease, press the (-) button. The display will reset to the start of the range once the maximum or minimum temperature is reached. For quick temperature adjustments, press and hold the button down.
- If no button is pressed for five seconds, the changes will be saved automatically, and the display will stop blinking, reverting to show the remaining cooking time.
Note: To prevent overheating and if the temperature is set above 150^ , the maximum program time will automatically be limited to two hours.
Note: In all the menu functions temperature setting can be changed only during cooking. On the other hand Multicook mode, allows change of temperature settings before cooking as well.
- Program Time Setting Button: with the help of time setting button we can set the time in all the menu functions including multicook pro mode and delayed cooking function.
Time can be adjusted as detailed below:
Adjusting cooking time before start cooking:
- Press any menu function and press the time setting button. The hour indicator on the display will start blinking.
- Use (+) or (-) buttons to set the desired time. To increase time, press the (+) button and to reduce, press the (-) button. For quicker adjustments, press and hold the button. When the maximum or minimum value is reached, the display will loop to the opposite end of the range
- Press the time setting button again to adjust the minutes with the help of (+) and (-) buttons. To return to the hour settings, press the time setting button once more.
Adjusting Cooking Time During Use
Available for all programs except Express, the adjustment range and increments depend on the selected cooking program (Below you can see the summary table of automatic programs).
- During the cooking program, press the time setting button. The hour indicator on the display will start blinking.
- Use (+) or (-) buttons to set the desired time. To increase time, press the (+) button and to reduce, press the (-) button. For quicker adjustments, press and hold the button. When the maximum or minimum value is reached, the display will loop to the opposite end of the range.
- Press the time setting button again to adjust the minutes with the help of (+) and (-) buttons. To return to the hour settings, press the time setting button once more.
Note: Setting the cooking time to 00:00 will stop the program.
In Delayed Start function, Multicook Pro adjustments are unavailable.
Cooking time can be adjusted during or before cooking in any menu function.

- Decrease Value / Sound Off Button : This button can be used to decrease the value while adjusting time and temperature. This same button also can be used to Mute the sound. With short press we can change the time and temperature values and to mute the sound press this button and hold for few seconds (long press).
6. INSTRUCTIONS FOR USE:
BEFORE FIRST USE
- Carefully remove the appliance and its components from the box. Remove all packaging materials and promotional stickers.
- Allow the appliance to sit at room temperature for at least two hours if it was stored or transported at low temperatures before use.
- Wipe the appliance's body with a damp cloth and wash the bowl with warm soapy water, then dry it thoroughly.
- On initial use, there may be a slight odour, which is normal and does not indicate a defect. In this case, clean the appliance thoroughly.
- Place the appliance on a flat, stable, and dry surface so that the steam venting from under the lid does not damage wallpaper, electronic devices, or materials sensitive to heat and moisture.
- Before use, ensure the appliance and bowl have no visible damage, chips, or other defects. Ensure there are no foreign objects between the bowl and the heating element.
- Warning: Do not operate the appliance without the bowl in place or with an empty bowl, as this may cause critical overheating or damage the non-stick coating. Add a small amount of vegetable oil to the bowl before frying.
- Only connect the appliance to grounded outlets; using ungrounded outlets can result in electrical hazards
TURNING THE DEVICE ON
- Plug the appliance into a compatible power outlet. You will hear a beep, and the display will light up and then turn off, except power button.
- Press the power button to activate the control panel display. If no actions are taken within one minute, the display will turn off again. To turn it off manually, press the power button again.
AUTOMATIC COOKING PROGRAMS
Important: When using the multi-cooker to boil water (e.g., for boiling ingredients), do not set the temperature above 100^ , as this may lead to overheating and damage. Likewise, avoid using Baking or Frying programs for boiling water.
1. Prepare Ingredients
Prepare ingredients according to the recipe and place them in the bowl. Ensure all ingredients, including any liquids, stay below the maximum marking on the inner scale of the bowl.
Note: Only use the bowl included with the multi-cooker or a compatible one with this model. Using any other type of bowl is prohibited.
2. Place the Bowl Correctly
Insert the bowl into the multi-cooker's body, make sure it rests evenly and makes good contact with the heating element.
Caution: Do not prepare food directly in the bowl using sharp utensils, as this can damage the non-stick coating, deform the bowl, or cause the appliance to malfunction.
3. Close the Lid
Close the lid securely until you hear a click sound. Only some programs are allowed to cook with open lid. Follow the recipe book instructions for guidance.
Warning: Always keep the lid open, while cooking or frying at high temperatures with a significant amount of oil.
4. Connect to Power
Insert the power cord into the port on the appliance body and plug it into wall outlet. The appliance will beep and enter into standby mode (the display start showing "— —").
5. Turn on the Multi-Cooker
Press the power button to activate the control panel.
6. Select Cooking Program
Use the program selection buttons to choose the desired cooking program.
7. Adjust Cooking Time and Temperature (if needed)
Adjust the default cooking time and temperature in case necessary. Please check time and temperature settings as detailed above. Use (+) and (-) value to change settings.
8. Set Delayed Start (if needed)
If you wish to delay the start of cooking, use the Delayed Start function (see Delayed Start Function).
During parameter setting, the modified values will start blinking on the display. After five seconds of inactivity, the changes will save automatically. If there is no input for two minutes during program setup, the appliance will return to standby mode. Pressing the cancel button during setup will reset all adjustments.
To start cooking with the current settings, press the start button at any point. Any parameters that were not changed will default to their original settings.
9. Start the Cooking Program
Press the start button to begin cooking.
10. Cooking Progress
During cooking, the display shows a countdown of the remaining cooking time, minute by minute. The status indicator will turn orange. If the program requires preheating, the indicator will initially glow red and turn orange when cooking begins. If the Keep Warm function is active, its indicator will also be displayed.
Note: Some programs only begin counting down once the appliance reaches optimal cooking parameters. For instance, the Steam program's countdown begins only after water boils and sufficient steam has formed in the bowl. In the Pasta program, the countdown starts once the water boils and the ingredients are added following an initial beep.
11. End of Cooking Program
At the end of a program, the appliance will beep, and the display will show "End." The appliance will then enter into standby mode, and the status indicator will glow green. If Keep Warm is active, it will automatically start.
To interrupt a program at any point, reset all settings, or turn off Keep Warm, press and hold the cancel button for three seconds.
For optimal results, we recommend using the recipes in the multi-cooker's recipe book, specially designed for this model.
| Program | Default cooking time | Default Tempe rature | Adjustable Cooking Time / Step | Preheat Required | Adjustable temperature | ||||
| Meat Beef Vegetable Chicken Fish | |||||||||
| Cook 1:20 | 1:30 0:40 1:00 0:50 100 | 00:01-6:00/1min | -35- | 180 | |||||
| Soup 1:00 | 1:30 0:40 0:50 0:45 100 | 00:01-8:00/1min | -35- | 180 | |||||
| Steam 0:30 | 0:25 0:15 0:17 0:20 100 | 00:01-2:00/1min | + | 35-180 | |||||
| Stew 1:00 | 1:10 0:40 1:00 0:50 100 | 00:01-12:00/1min | -35- | 180 | |||||
| Fry 0:25 0:18 0:13 0:20 0:15 160 | 00:01-2:00/1min | + | 35-180 | ||||||
| Grain | 0:25 | 100 | 00:01-4:00/1min | -35- | 180 | ||||
| Bake | 1:00 | 120 | 00:01-4:00/1min | -35- | 180 | ||||
| Pilaf | 1:00 | 105 | 00:01-2:00/1min | -35- | 180 | ||||
| Yoghurt | 8:00 | 38 | 00:01-12:00/1min | -35- | 180 | ||||
| Bread | 3:00 | 120 | 00:01-6:00/1min | -35- | 180 | ||||
| Pasta | 0:08 | 100 | 00:01-1:00/1min | + | 35- | 180 | |||
| Porridge | 0:25 | 97 | 00:01-4:00/1min | -35- | 180 | ||||
| Express | - | - | - | ||||||
| Multicook | 0:30 | 00:01-12:00/1min00:01-2:00(t>150C) | -35- | 180 | |||||
Note: Delayed start cooking is available in all the menu functions except, Fry, Pasta and express cooking. Max. delayed start cooking time is 24 hrs.
Keep warm function is available in all the menu functions except yogurt, Pasta and Express cooking. Max keep warm time is 12 hrs for all the menu functions.
8. COOKING TIPS
General Recommendations
- Steaming Vegetables and Other Foods: Pour 500–600 ml of water into the bowl. Place the steaming container inside the bowl. Measure and prepare ingredients as per the recipe, then spread them evenly in the steaming container. Follow the recipe instructions.
Milk-Based Porridges: Use low-fat pasteurized milk, or dilute whole milk with drinking water in a 1:1 ratio. Grease the bowl with butter before cooking. Adhere to the proportions in the recipes provided in the recipe book, and adjust ingredient quantities proportionally if needed. - Foaming Foods (e.g., Pasta, Dumplings): Some foods may generate foam during cooking. To prevent foam from spilling out, do not close the lid for several minutes after adding these foods to boiling water.
- Baking Bread, Pastries, and Yogurt: Ensure that initial ingredients do not fill more than half of the bowl's volume.
- Dough Proofing: Do not open the lid during dough proofing stages to maintain the quality of the baked product.
- Frying: Place foods in preheated oil. Use only refined vegetable oils for frying, and cook with the lid open. Be cautious, as oil becomes extremely hot. Use kitchen mitts and avoid leaning over the device to prevent burns. Avoid reusing the same oil for frying multiple times.
- Repeat Frying: Allow the appliance to cool completely before starting another frying session.
9. COMMON COOKING ERRORS AND SOLUTIONS
This table provides solutions to common cooking errors:
| Issue Possible Cause Solution | |
| Dish is Undercooked | The lid wasn't closed tightly, causing insufficient cooking temperature |
| Poor contact between the bowl and heating element | |
| Incorrect choice of ingredients or cooking program | |
| Burnt Taste | Excess oil or moisture in the bowl |
| Boiling Over | High-acid foods can cause broth to foam |
10. CLEANING AND MAINTENANCE
Warning: Before cleaning, ensure the appliance is unplugged and has completely cool down.
General Guidelines and Recommendations
- Initial Cleaning: Before first use and to remove food odors after cooking, run the appliance for 15 minutes with half a sliced lemon in the Steam program, filling the bowl with 0.5 liters of water.
- Food Storage: Do not store water or cooked food in the bowl for more than 24 hours. Transfer food to the refrigerator if needed and reheat in the appliance later using the reheat function.
Important: Never immerse the appliance body in water or place it under running water! Avoid using abrasive sponges or cleaning agents, as well as any chemically aggressive substances not intended for food-contact surfaces.
- Be gentle when cleaning rubber components, as damage or deformation may cause the appliance to malfunction.
Cleaning the Appliance Exterior
- Clean the body of the appliance as needed with a soft, damp cloth or sponge. You may use mild cleaners. To prevent water spots, wipe the surface dry after cleaning.
Cleaning the Bowl
- Clean the bowl after each use. You may wash it by hand with a soft sponge and dish soap or in the dishwasher, following dishwasher manufacturer instructions.
- For tough stains, fill the bowl with warm water and let it soak before washing.
- Dry the outer surface of the bowl completely before placing it back in the appliance.
Note: Regular use may cause slight discoloration of the bowl's non-stick coating over time. This does not affect performance and is not considered a defect.
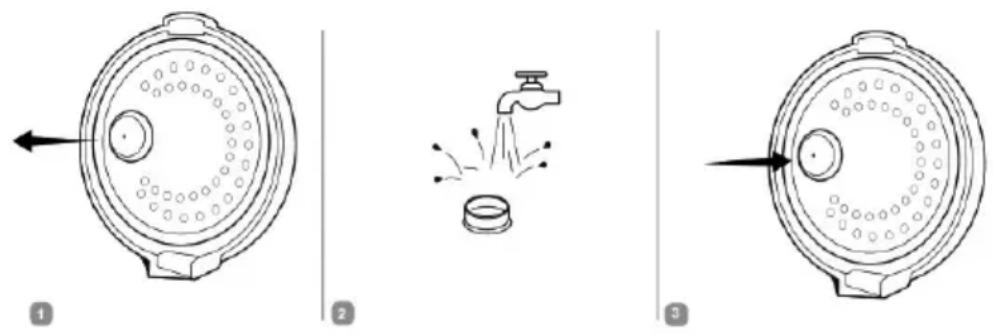
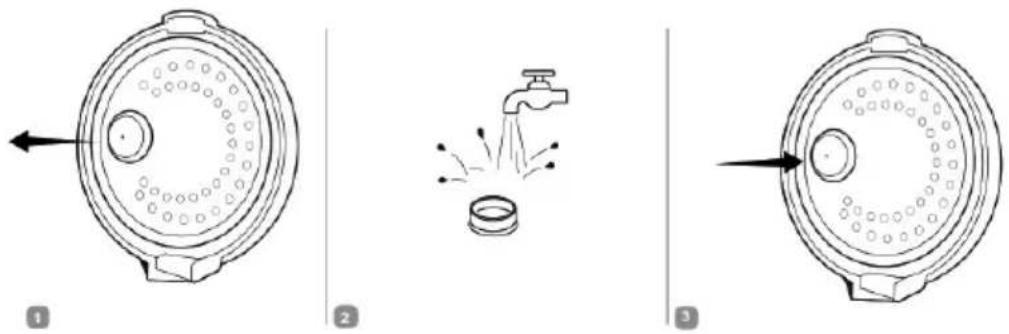
Cleaning the Steam Valve
- The steam valve should be cleaned after each use. Remove the steam valve, disassemble it, wash all parts with water, reassemble, and replace it in the appliance.
Condensation Removal
- After each use, empty the condensation collector located on the right side of the appliance body. Remove, empty, wash, and replace it. Any excess condensation around the bowl can be removed with a towel.
Cleaning the Cooking Chamber
When properly used, the risk of liquid or food particles entering the cooking chamber is minimal. However, if contamination occurs, clean it to avoid malfunctions.
Important: Ensure the appliance is unplugged and fully cooled before cleaning the cooking chamber.
- Clean the cooking chamber walls, heating disc surface, and the central thermostat cover (located in the middle of the heating disc) with a slightly damp (not wet) sponge or cloth. If a cleaning agent is used, thoroughly wipe away any residue to avoid odours during the next use.
- Remove any foreign objects near the thermostat carefully with tweezers, avoiding pressure on the thermostat cover.
- For the heating disc, use a medium-soft sponge or synthetic brush if needed.
Note: Regular use may lead to slight discoloration of the heating disc. This does not indicate a malfunction.
Storage and Transportation
- Before storing the appliance, clean and thoroughly dry all parts. Store the appliance in a dry, ventilated area, away from heat sources and direct sunlight.
- During transport and storage, avoid any mechanical impacts that could damage the appliance or its packaging. Keep the packaging dry and away from liquids.
11. BEFORE CONTACTING SERVICE CENTER
If an issue arises with the multi-cooker, refer to the troubleshooting guide below before contacting a service center.
| Problem Possible | Causes Solutions | |
| Error Message:E1-E4 | System error (could be a fault in the electronic board or sensors) or lid not properly closed | Ensure the lid is fully closed. If the issue persists, contact an authorized service center. |
| Error Message:E5-E7 | Automatic overheat protection activated | Do not operate the appliance with an empty bowl. Unplug the appliance, open the lid, and allow it to cool for 10-15 minutes before resuming cooking. Do not add water to the bowl during high-temperature programs such as Multicook (set above 100°C) and Frying. For temperatures above 120°C (Frying) or 130°C (Multicook), cook with the lid open. |
| Extended Cooking Time | Foreign objects (e.g., food particles, grains) between the bowl and heating element, or uneven bowl placement, or dirty heating disc | Unplug and allow the appliance to cool. Remove any objects, ensure the bowl is flat and secure, and clean the heating disc if necessary. |
| Steam Leaking from Lid | Improper seal between bowl and lid, uneven bowl placement, lid not fully closed, or foreign object obstructing the lid | Ensure the bowl is properly aligned and fully sealed. Check for any debris and make sure the lid closes tightly. Clean or replace the lid's seal if it is damaged or deformed. |

PORTANT:
Important: Whenever you use this equipment, please ensure that the device is properly installed and functioning.
1. Preparar os ingredientes
5. NADZORNA PLOŠCA OPIS

1. Digitamirzaslon s temperaturo, casom kuhanja in indicatorjem odlozenega
zacetka:
| Multicook 0:30 | 00:01-12:00/1min00:01-2:00(t>150C) | - | 35-180 |
11. Gumb "Express Program Start":
6. Odaberite program kuhanja
Koristite gumbe za odabir programa kako biste odabrali zeIjeni program kuhanja.
7. Podesite vrijeme i temperaturu (ako je potrebno)
Pnmitka: yHkui He Do3B0JIe 3MiHOBaTu Yac i TemnepaTy.
- IHdNkaTOp cTaHy MyIbTnBapKn: uei HndNkaTOp BiO6paXaE IOTouHn peKm po60tn

- IHdkaTopn aBtOMaTHHnx nporpam: LMyIbTnBapka Mae 14 pi3Hx yHKui MeHIO. Ioo6 akTbByBatn 6ydb-ky DocTyHny aBtOMaTHHy yHKciIO MeHIO i NOATN npriROyBaHH, HATNCiTB 6e3nocepEnhBO Ha BiINOBiHy yHKciIO MeHIO, NICRA YORO BOHA NOHc 6JIMaTI, a npuiaD noUHe roTyBatn 3i BCTAHOBneHmN 3a 3AMOBvBaHHM YacOM i TempepatoHO. Y pasi Notpe6n, 3a DOnOMoROIO KHOKN peRyJIIOBaHHY acy, MM MOKeMo 3MiHHTN Yac.
Pnmitka: y BCix aBtOMaTHuHx fHyKcIax MeHIO TeMIIepaTpy MoXHa 3MiHOBaTu NiJ qac npriOTyBaHHra, ane He paHiwe.

- KhONKa BiDmiH: Lg KHONKa MoKe 6yTu BNKOpNCTaHa dIg nepePbAHHa 6yDb-koI fYHKiMeHIO nIac npuroTyBaHHa. Lg J KhoNka MoKe 6yTu BNKOpNCTaHa dIg nepemKaHHa fYHKiMeHIO.
Ioo6 cKacyBaTn 6yDb-ky yHKuio MeHIO, HATNCiTB zuHO KHONky i yTpmyTe ii npOTaROM
deKINbKOx cekHyd. Ppnilad npinnHtB npiroTyBaHHra I NOBepHeTbcra Do noaTKOBHX 3aBOcBKNX
HaNaSTyBaHb.

- Khonka BiDknaeHoro CTapTy: yHKsia BiDknaeHoro CTapTy
3a donomoroio uei KHONK MIMoXeMo HanaWtYBaTN Hauy MybTnBapKy Ha npiroToyBaHHa 3 BIDknaedeHm cTApTom. Lg yHKci Ja dyke KopncHa IJRA Tnx, XTO Maec iINbHn rpaqik i Dyke MaIIO Yacy Ha npiroToyBaHHaIXi.
Yac MoXHa HalaWtBuTaN, RaONcaHO HIXKYe:
HaiauTyBaHHaCy npiroTuBaHHapeD noaTkom roTyBaHHa:
- Bn6epiB 6yNb-ky fynKcIIO MeHIO Ta HATNCHTb KNONKy HajaWtYbaHHa cacy. IInkKaTOp cacy
Ha dncnnei noyne 6nmaTn.
- 3a donomoro kHONOK (+) a6o (-) BCTaHOItb 6axaHn yac. 5o6 36iJbWHTn yac, HATNCIb KONky (+), a 3MeHUnTI - KONky (-).ДЯ WBNJUoro HaJaWtBuHHa HATNCITb i yTpmyTe KONky. Koln 6yde DoCgHyTo MaKcImaJIbHOrO a6o MiHimaJIbHOrO 3HaueHHa, DiCnnne 3auKnITbcra do npotIneJxHOrO KINcaDiana3ohy.
- Hatncihb KhoNky HanaTuBaHHa cay ue pa3, 0o6 BiDperyIHOBAtn XBUNHn 3a DonomoroIO KhoNOK (+) i (-). 106 nobepHyTnCra do HanaTuBaHHraOnIH, HataChiB KhoNky HanaTuBaHHa cay ue pa3.
PeryIIOBaHHaCy npiroTyBaHHaN iD qac BnKOpncTaHHa
OocTyHNO dIy Bcix nporpam, OKpIM « Ekncpec», iiana3OH peryIIOBaHH Ta KpOKN 3aIeXaTb BiD o6paHOI nporpamn npiroTOyBaHH (HIXKHe HabeDeHo 3BeDeHy TabNIuO aBToMaTHHINx nporpam).
4.ПдчасвИКОнHaHЯпгампpriroToYBaHHЯHaTиСHTb KHOнKy BCTaHOBJIeHHЯЧacy.IHДИКaTOp Chacy HaДиСплеI NOUHe 6nMaTu.
5. 3a donomoro kHONOK (+) a6o (-) BCTaHOItb 6axaHn yac. Uo6 36iJbWHTn yac, HATNCIb KONky (+), a 3MeHUnTI - KONky (-).ДЯ WBNUwOHaJaWtBuHHaHATNCITb i yTpmyTe KONky. Kolny Byde DoCgHyTo MaKcImaJIbHOro a6o MiHIMaJIbHOrO 3HaueHHa, Dicnne 3auKNlntbcra do npotIneXHOrO KINcaDiana3ohy.
6. HATNCiB KONky HanaTuBaHHa cay ue pa3, 06 BiDpeRyIHObAtn XBNHn 3a DonomoroIO KHONOK (+) i (-). 06 nobepHyTncrdo HanaTuBaHHraOnH, HATNCiTB KONky HanaTuBaHHa cay ue pa3.
Ppimitka:BctaHOBHeHHaCy npiroToyBaHHa 00:00 npin3BeJe do 3ynHKn nporpaMn.
Y pekimi BiiknaeHoro cTapTu hanaTuBaHHa Multicook Pro HeDocTynHi.
Yac npirotoyBaHH MoXHa BiDperyIIOBAtn Ni d Yac a6o nepei npirotoyBaHHm y 6ydb-akii FyHKui MeHIO.

- Ksna 3MeHweHHaueHHBMMKHeHH 3Byky:
Ley KhoNka MoKe 6yTu BnKOpNCtHa dJa 3MeHWeHHa 3HaueHHa iJ cac HaJaWtYBaHHa Yacy Ta Tempepatyn. Ljx KhoNka TakoK MoKe 6yTu BnKOpNCtHa dJa BmKHeHHa 3ByKy.
3a donomoroKoPOTKOHaTnCKaHnMaMOxMeO 3mIHOBaTH 3HaueHHaCy i TeMnepaTyPi, a 06 BmMKHyTu 3ByK, HATNCHTb cIO KHOKNy i yTpmyTe npotrrom DeKiNbKOx CekyHd (TpBaJe HaTnCKaHHa).
6. IHCTPYKlIg NO 3ACTOCYBAHHIO
NEPEI NEPIIM BIKOPNUCTAHHAM
1.ObepexHo BnIMtB npnlaT Ta Noro KOMnoHEHTN 3 Kopo6Kn.BuaJIiTb yci naKyBaJIbHi MaTepiAIn Ta peKlAmHI NaKJIeKN.
2.ДаиTe npnnaIy BiIcTOnrIe npi KIMHaTHHm TeMnepaTypi npHaAHMI DiI RoDHH,Якso BIn 36epirabc a60 TpaHCnOpTyBaBCPnp Hn3bKnx TeMnepaTypax nepeD BHKOpNCaHHaM.
3. PpOtpitb Kopnyc npnilady BONoroIO raHcipKOIO, a qaSy BmNITe TepNO MInbHO IO BOIOIO, nicJy OTO peTeJIbHO BucywiTb.
4.ПдчаспспогвИКОPGИСТАнгМоKE3'ЯВИNTСЯлERКIN3aPAX,IIOeHOPMaJIbHIMЯВицemIHe CBIDHTB pO DeФeKT.Y TAKOMy BUNaIky peTeNbHO OYNCITb npUJaD.
5. BctahOBt b npnlaHa pibHy, cTiky i cyxy nobepxHIO, 0o6 napa, kA BVXoNTb 3-niK KpuiKn, He nowkoDnna wnaneprn, eNeKTpoHNI npncTrooi a6o MaTepiAi, yUtnBi do Tenna i BOJorN.
6. Npeed BnKOpncTaHnM nepekoHaTeC, 10 npuad i yaa He MaToB BnIMNX NOxKOJKeHb, BiKoJIb a6o IHnx DepeKTIB. PepekoHaTeC, 10 mix qaueo Ta HarpBaIbHm eJeMeHTOM Hema c TcopoHHix npeMetTib.
7. NonepeJxHnHe BmkaIe npnaI 6e3 BCTaHOJI yawi a6o 3 nopoXHbIOU yaweIO, OckInbKu ce MoKe npN3BecTn Do KpNTuHoro neperpiBy a6o nowKOxHnAHTUNpHApHOrO nOKpnTTra. IpeD cMaxKeHHam DoaaiTe B uay HeBeInky KInbKiCtB pocnnHHoi OnII.
8.Пдкчаite npnlaJ nIwe do 3a3eMneHnx po3eTOK; BnKOpNCtAHN He3a3eMneHnx po3eTOK MOKe npn3BecTu Do ypaXeHHeJIeKTPnUHM CTpyMOM.
YBIMKHEHHI INPNCPTPOIO
1.Пдкнчсппсгпддсусмсьи роэтк.Ви поуеTe 3ByKOBи сгнан,Дисплел 3aropntbcra,а NOTIM BUMKHETbCRA,3a BUNHRTKOM KHOKN JKNBJIeHHJ.
2. HATNCHTb KONky XINBHeHHa, 06 aKTNByBaTn DcNne n aHeni KepyBaHHa. Kaio npotraom Ondie XBNHN He 6yde BnKOHaHO KOHNx Di, Dncnpe 3HOBy BUMKHeTbcra. 06 BumKHyTu NOro BpyHy, HATNCHTb KONky XINBHeHHa 1e pa3.
ABTOMATNUHI IPOPGAMN IPIIOTYBAHH
BaxKnBO: BnKOpNCTOByOuH MybTnBapKy dny KIn'rIHn BOHy (Ha npNKlaD, dny BiDabpOBaHHIhrpeiEHTIB), He BCTaHOBNIHOte TemepaTyP Bnue 100°C, ockINbK nCe MOKe np3BecTN Do neperpiBy Ta noWKoJXeHHa. TakoK He BnKOpNCTOByTe dny KIn'rIHn BOHy nporpaMn « BuniuKa " a6o" CmaxeHHA".
1.Пд罗туйTeiHредиentu
PiIroTuIte IHRpeiEHTn 3riIDHO 3peeTOM i NOKJaIDITbix y aWy. NepeKoHaTeCra, 0c Bci IHRpeiEHTN, BKJIIOUHO 3 pIDINAMN, 3HAXOJTBcR HIXKYe MaKcIMaJIbHOI NO3HaUKN Ha BHyTpIuHi IwKaJI YauSi.
Pnmitka:BnKOpNCToBnyTe Jnue yawy, 0o BXoNTb DO KOMNKeTMyIbTnBapKn, a6o cymicHy 3iEo moeJnHb. BnKOpNCaHn8 6yNb-koRTO HwOro Tnhy aWl 3a6OponeHo.
2.ПаьньноВстановышу
BCTaTe yauy B Kopnyc MyIbTnBapKn, nepeKoHaITeCra, 0o BOHa pIBHomipHo IeXntb i do6pe KOHTaKTye 3 HarpBaIbHmE enMeHTOM.
Ybara! He rotynte ixy 63nocepEnbO b awi, BnKOpNCTOBHyOnrOCTpN NocyD, OCKJIbKn.
ce MoKe NOsKOJNTn aHTUNpNarapHe NOKPITT, DeΦopMyBaTN aWsy abo npnsBeCTn Do
HecnpaBHOcti npnilady.
3. 3aKpTTT KpnuKn
IiInbHo 3aKpnIte KpnIky, DOKn He noUyeTe KnaauHn. Nnue DeeKi nporpaMn Do3BOnraTb roTyBaTu 3 BiDkpntoTO KpnIkoIO. DToPmYTEc b IHCTpykui y KNH3i peuenttB.
PonepeJxHn: 3aBKn TpmaTe KpuKky BiKpnToIO niD yac roTyBaHHa6o CmaKeHH npn BucOKnx Temnepatypax 3i 3HaHNO kInbKicTIO onll.
4.Пдкluоннгdo eNeKtpomepeksi
BctaTe shyp jnBneHH B po3'em Ha Kopnyci npuJady Ta yBIMKHiTb Noro B po3eTk. PpuaI pOdaCTb 3BykoBm CnHAn i nepeJe B peKIM OUYBaHHa (Ha DnCnJIe I NOHe BiIObpaXaTncs
5. YbimkhItb MyIbTnBapky
HaTnCHITb KhoNkY XINBLeHnR, 106 aKTnByBaTN naHeNB KepyBaHHr.
6. Bn6epitb nporpamy npnroTyBaHHa
3a donomoroio Khoonok Bv6bopy nporpam Bn6epiB noTpiHy nporpamy npiroTybaHHa.
7. BldperyIIOteuc i TemnepaTy npriroTyBaHHa (3a noTpe6n)
3a noTpe6n BiDperyIIOte yac i TeMnepaTy pnproTyBaHHra, BCTaHOBNeHi 3a 3aMObUyBaHHm.
Будляста, посяпгел Налштуваим уасу та Temператури, як onиcaHo BИш. Викоростовит e (+) ta (-) дя 3MiHн Hanaштуваь.
8. BctaHObitb BiKnaeHn cTAP (3a notpe6n)
YKIO BV 6axaete Biiknactn noaTOK npiroTybaHH, CKOpncTaItecra yHKciEO BiiknaeHOrO cTapTy (INB. FyHKci BIDKNaDeHoro cTapTy).
IiD yac HanaTyBaHn npaMeTpB Ha dncnnei noHytb 6JImaTu 3MiHeHi 3aueHH. Nicn n'ATN cekyHd 6e3dIaNbHOCTI 3mHN aBTOMaTuHIO 36epexyTbcra. JkUO niD qac HanaStyBaHH nporpam npotarom DBOX XBUNH He 6yde BBeDeHO JoDHnx DaHnx, npuJaNOBepHeBcB pexm OuyKaBHn. HATNCaHH KONKn CKacyBaHH NiD qac HanaStyBaHH npn3BeDe Do CKndaHH BCIX HanaSTyBaHb.
Ioo6 po3nooyatnpiroTyBaHHra 3 noToCHHMn HaJauTByBaHHaMn,HaTNCHTb KhoNky CtaPrt y 6ydb-aynn MOMeH. Byd-aki npametpn, kri He 6yni 3miHeHi, 6ydyTB BiHOBJIeHi Do noataKOBnx 3HaueHb 3a 3amOByBaHHaM.
9. 3anyck nporpamn npnroTybaHHa
10. XID npnroTyBaHHa
Плд ус npirotoybaHHа Диспгii BiOobpaKaeTbC3BOPOTHm BiDnik Yacy, lo 3aNINBcdo KINr npirotoYbaHHxBUNHa 3a XBUNHOIO. INdkaTOp Ctany CTae nomapAHueBM. RaKo nporpama BImarae NonepeDHBoro HarpIBaHH, INdkaTOp CNoATky CBITNBcA YepBOHM KOJIbOpOM, a KOnI NOUHeTBcR npiroToYbaHH, cTaNe NOMapAHueBM. RaKo aKTINBaФyHKciA «ПлдТрIMaHH TENNa », II INdkaTOp TAKOX BiOobpaKaTUMetbCra.
Ppimtka: DeaKi nporpaMn NOUHaOTb 3BOPTHN BiDlK NlWe nicna DoocrHeHH npuJaOM ONTmAbhnx napameTpib npiroToyBaHn. HanpiKnad, 3BOPTHN BiDlK nporpaMn « Papa » NOUHaETbcra Nlwe nicna TOrO, Ra BODa 3aknniNb i B qaWi yTBOpNTbcra DOCTaTHra KJIbKicTB napu. Y nporpaMn « NaCTa » 3BOPTHN BiDlK NOUHaETbcra nicna 3aknnaHHB ODo Ta DODaBaHHn IHpeieHtIB nicna nepworo 3BykoBOrO CnHany.
11. 3aBepueHHnporpamn
Pn 3aBepenHi nporpaM npnaI nd noactb 3ByKOBn cnHaJI, a Ha dncnnei 3'BAHTbcra HAnc «End» (KiHeCb). Picra zbo rnpnaI nepeJe B pexm OuyBaHHa, a iHnkaTOp cTaHy 3aropntbcra 3eJehm KOnbOpom. Raio yHKci IirpiBaHHa kTNbHa, BOHa 3anyCTNTbcra ABTomatnuHO.
Ioo6 nepepbatn nporpamy B 6ydb-ram MomeH, cKHyTn Bci HaaHTyBaHHa6o BmKHyTN cyHKUIOPiirpiBaHHaHTNCHTb i yTpmyTe KONky CKacyBaHH npOTAROM Tpbox CeKyHd.
Дяdoягногону ONTmaJIbHnx pe3yIbTaTIB Mn peKOMeHdyEm BOKOpNCTOBaTn peCenTn 3 KHNr peCenTIB MyIbTNBapKn, cneiaJIbHo po3po6JIeHi dЯцie MoJei.
| Порогама | Час п riготуваимma 3a замочьваимя | Темпес-разура за замочь- Уваим | Рerg lybo- Вань час / крок приrotу- ваим | ПOTriбен- порер- едni- posirрiv | Perg lybo- Вань tempe- paтура | ||||
| Мясоя | Повшина | Овчевий Күрka | Риба | ||||||
| Кухарka 1:30 | 0:40 | 1:00 | 0:50 | 100 | 00:01- 6:00/1min | -35- | 80 | ||
| Сун 1:00 | 0:40 | 0:50 | 0:45 | 100 | 00:01- 8:00/1min | -35- | 80 | ||
| На napу 0:30 | 0:25 | 0:15 | 0:17 | 0:20 | 100 | 00:01- 2:00/1min | +35- | 180 | |
| Тушку- Вати | 1:00 | 1:10 | 0:40 | 1:00 | 0:50 | 100 | 00:01- 12:00/1min | -35- | 80 |
| Смажи: Баун | 0:25 | 0:18 | 0:13 | 0:20 | 15 | 160 | 00:01- 2:00/1min | +35- | 180 |
| Зерноы | 0:25 | 100 | 00:01- 4:00/1min | -35- | 80 | ||||
| Запікати | 1:00 | 120 | 00:01- 4:00/1min | -35- | 80 | ||||
| Плов | 1:00 | 105 | 00:01- 2:00/1min | -35- | 80 | ||||
| Иогурт | 8:00 | 38 | 00:01- 12:00/1min | -35- | 80 | ||||
| Хлиб | 3:00 | 120 | 00:01- 6:00/1min | -35- | 80 | ||||
| Мakаронни Вироби | 0:08 | 100 | 00:01- 1:00/1min | +35- | 80 | ||||
| Кашi | 0:25 | 97 | 00:01- 4:00/1min | -35- | 80 | ||||
| Експrec | - | - | - | ||||||
| Мел'tи- Варka | 0:30 | 00:01- 12:00/1min 00:01-2:00 (t>150C) | -35- | 80 | |||||
Ipnmtka: BiKnaede He npirotoybaHHa DoCTynHe dJa BCix fYHKui MeHIO, Okpim Jkapka, NaCTa Ta EKcnpec-npirotoybaHHa. MakcImaJIbHn Yac BiKnaDeHoro NoayTKy roTyBaHHa - 24 rOHN. FyHKciA «PiirpiBaHH» DoCTynHa dJa BCix fYHKui MeHIO, OKPIM «NOrypT», «Piacta» Ta «Ekcnpec-pnpirotoybaHHa. MakcImaJIbHn Yac NiIDTpMaHHa B TeNlOMy cTaHi cTahOBHTb 12 rOHN dJa BCix fYHKui MeHIO.
8. NOPADN3PNIFGOTYBAHNA
3araJIbHI peKOMeHdaucii
- PnroTyBaHH OBOHb Ta iHmNx npOdyKtIB Ha napy: HannIe B yawy 500-600 M n BoHn. IomictiB KOHTeHep dIg PnroTyBaHH Ha napy BCEpeDHy cawi. BiMiprYe Ta niROTuTe IHrpeJeHTn BiIDNoBIDHO do peCenTy, a NotIM pIBHomipHo po3noDinItb ix y KOHTeHepi dIg PnroTyBaHH Ha napy. DToPmMyTecb IHCTpykui peCenTa.
Kawi Ha MOnoCi: BnKOpNCTOByIte HeXnIPHe NaCTepn3OBAHe MoNOKo a6o po3BcIb He3bnpaHe MONOKo NHTHO BOIOY y cnIBiDHOUeHHi 1:1. IpeEpiRTOyBaHHM 3MaCtITb YauBy BepIKOBm Macnom. DToPmUInTeCb nponopuiy peuentax, HabeJeHx y KHN3i peuentTib, i 3a noTpe6n nponopuiHo 3MiHoiTe KINbKiCt b IHrpeDiHtB. - PpOdyKTn, 0i NiHrTbc (HaPnKlAd, MaKApOnH, neJbMeHi): DeAki npOdyKTn MoKyTb yTBOpIOBAtn NiHy nd aac npriroTyBaHHa. 063anobirn BuTIkaHHIO nIH, He 3akpNBaHTe KpnUky npOTAROM dekJIbKOx XBUNNH nicra doDaBAHH uX npOdyKTIB y KINNHY BDOy
BunikaHna xla6, BnuiK Ta norypTy: IpekoHaTecra, 10 noaTKoBi iHrpdiEHTn He 3anOBHIOb 6ilbwe noobHHn o6'emy yawi.
BnCToOBaHH Ticta: He BiKpNBaIe KpuKy niD qac BnCTOBOHnTicTa, 36epertn kicTB BnPiKn.
CmaKeHHa: Nomicitb npOdykTu B po3irpy Onilo. Dnra CmaKeHHBnKOpNCToByTe Tlkbu paHOBaHi pocnnHHi oii i roTyIe 3 BiDpNTOIO KpnUkoHO. ByIte oBepeXHI, OckInbKn OIIyKe cnIbHo HarpBaEcTbc. BnKOpNCToByTe KxOHNi pyKaBnCi i He HaxJIAI TeCra HaI npuaDom, Uo6 yHnKHytn OnikIB. He BnKOpNCToByTe Ondy N Ty camy Onilo Dnra CmaKeHHa KInbKa pa3iB. - NOBTOPHe CMAKeHHa: 3aueKaITe, nokn npuJaad nobHicTIO OxOIOHe, nepu HIX po3noaTH NaCTyINHc CeAHc CMAKeHHa.
9. NOUINPEHI NOMNIKNA CNOCOBIX YCYEHHA
U ciu Ta6nui HabeNo cno6b uyHenHaHnOupenix NmIOK nIac npiroTybaHH i:
DECLARATION OF CONFORMITY
This device complies with EU Low Voltage Directive 2014/35/EC.
Electromagnetic Compatibility Directive 2014/30/EU. Directive 2015/863/EU on the restriction of the use of certain hazardous substances in electrical.
Directive 2009/125/EC on the eco-design requirements applicable to energy-related products.

This symbol on the product or on the packaging indicates that this product can't be disposed as normal rubbish or household waste. All the electrical, electronic equipment's and battery-operated units must recycle in proper manner and according to the local municipal laws. You can recycle them by taking them to government authorized disposal centres or specialized bins which you can find in any nearby big super markets, electronics or electro domestics products stores or malls who have these types of facilities available.
Designed by: SOGO based on European quality standards
Imported by: Sanysan Appliances S.L, NIF: B98753056, C/ Barcas 2, 2, 46002 Valencia, Spain
Product manufactured in CHINA. After-sales service: www.sogosat.com sogosat@sogosat.com / 0034 902 222 161