
SS-10610 - Flower pot Sogo - Free user manual and instructions
Find the device manual for free SS-10610 Sogo in PDF.

| Product type | Electric pressure cooker |
| Brand | Sogo |
| Model | SS-10610 |
| Power supply | 220-240 V, 50/60 Hz, 1000 W |
| Capacity | 6 liters |
| Operating pressure | 40-70 kPa |
| Main materials | Aluminum pot with non-stick coating, steel lid with silicone gasket |
| Cooking functions | Multi-cook, fry, cake, slow cook, jam, yogurt, rice, porridge, omelette, beans, pasta, soup, stew, steam (14 preset programs) |
| Special features | Delay timer up to 24h, keep warm, food type selection (meat, fish, vegetable) for some functions |
| Display | Digital display with touch keys |
| Safety | Safety valve, lid lock, overheat protection, auto shut-off |
| Included accessories | Removable pot, plastic spoon, measuring cup, stainless steel steam tray (22 cm), condensation collector |
| Maintenance and cleaning | Pot and steam tray washable with soapy water; wipe housing with damp cloth; do not immerse housing |
| Spare parts and repairability | Silicone gasket, floating valve, replacement pot available via after-sales service |
| Weight (estimated) | Approximately 5 kg |
| Dimensions (estimated) | Approximately 30 x 30 x 30 cm |
| General information | Household use only; complies with EU directives; made in China; imported by Sanysan Appliances |
Frequently Asked Questions - SS-10610 Sogo
User questions about SS-10610 Sogo
0 question about this device. Answer the ones you know or ask your own.
Ask a new question about this device
Download the instructions for your Flower pot in PDF format for free! Find your manual SS-10610 - Sogo and take your electronic device back in hand. On this page are published all the documents necessary for the use of your device. SS-10610 by Sogo.
USER MANUAL SS-10610 Sogo
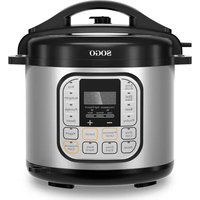
natural_image
Exterior view of a modern rice cooker with digital display and control buttons (no visible text or symbols on the device itself)
Descarga tu manual
Download your manual
Téléchargez votre manuel
Baixe seu manual
Laden Sie Ihr Handbuch herunter
Scarica il tuo manuale
Stáhněte si manuál
Download din manual
Prenesite svoj priročnik
Preuzmite svoj priručnik
Pobierz swoją instrukcję
Descărcati manualul dvs
Завантажте посібник
Descàrrega el teu manual
OLLA A PRESIÓN MULTIFUNCIÓN MULTIFUNCTION PRESSURE COOKER AUTOCUISEUR MULTIFONCTIONS PANELA DE PRESSÃO MULTIFUNÇÕES MULTIFUNKTIONS-SCHNELLKOCHTOPF PENTOLA A PRESSIONE MULTIFUNZIONE MULTIFUNKČNÍ TLAKOVÝ HRNEC MULTIFUNKTIONEL TRYKKOGER VEČNAMENSKI LONEC POD PRITISKOM MULTIFUNKCIJSKI PRESS LONK WIELOFUNKCYJNY SZYBKOWAR OALĂ SUB PRESIUNE MULTIFUNCTIONALĂ БАГАТОФУНКЦИОНАЛЬНА СКОРОВАРКА OLLA DE PRESSIÓ MULTIFUNCIÓ
ref. SS-10610

ESPAÑOL P. 3
ENGLISH P. 16
FRANÇAIS P. 29
PORTUGUESE P. 42
DEUTSCH P. 55
ITALIANO P. 68
ČEŠTINA P. 81
DANSK P. 94
SLOVENSKI P. 107
HRVATSKI P. 120
POLSKI P. 132
ROMÂNĂ P. 145
УКРАЇНСЬКА P. 158
CATALÀ P. 171
Declaration of conformity, Responsibility of Electronic products disposal, Importers Details and After-sales service on the last pages.
natural_image
Simple line drawing of a hand pressing down on a cooking pot with an arrow indicating rotation (no text or symbols)
natural_image
Illustration of a hand pouring liquid into a pot with an upward arrow, labeled P2 (no text or symbols on the diagram itself)natural_image
Illustration of hands pressing a button on a cooking pot (no text or symbols)
natural_image
Illustration of a hand pouring liquid into a pot with an arrow indicating downward motion (no text or symbols)
natural_image
Simple line drawing of a hand pressing down on a cooking pot (no text or symbols)natural_image
Line drawing of a cooking pot with a handle and label P9-a (no text or symbols on the diagram itself)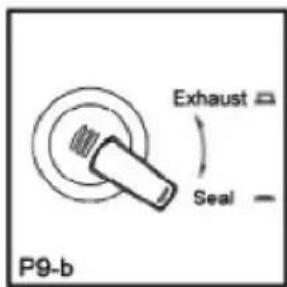
• Always read the instruction book carefully before using.
- This manual can be downloaded from our web page www.sogo.es
- Keep these instructions for future reference.
2. Safety instructions for the user
GENERAL
PRECAUTIONS
General precautions during the use of electrical
equipment
- Do not use the appliance for any other purpose than described in this manual.
- Do not use or store the appliance outdoors.
• Always place the appliance on to the flat an even surface. - This product is intended for indoor, non-industrial, non-commercial and only for household use. Do not use the item outdoors or for any other purpose. Misuse or improper handling may cause problems in the appliance and cause injury to the user.
- The unit must be used only for the intended purposes. No liability is accepted for damages arising from improper use or wrong handling.
- Ensure that the voltage indicated on the name-plate matches the mains voltage before plugging in the appliance.
- Always remove the plug from the power socket when the appliance is not in use. Do not leave the appliance unattended when switched on.
- Close supervision is necessary when any appliance is being used by or near children.
- Before cleaning or storing your appliance, always unplug the appliance from the power supply and let it cool down.
- The device is not completely disconnected from the power source, even after it has been turned off. To disconnect it completely, disconnect it from the mains plug.
- The appliances are not intended to be operated by means of an external timer or separate remote-control system.
- This appliance is intended to be used in household and similar applications such as:
- Staff kitchen areas in shops, offices and other working environments;
- Farm houses and by clients in hotels, motels and other residential type environments;
-
Bed and breakfast type environments;
-
Catering and similar non-retail applications.
- Avoid spillage on the connector

Restrictions on use to avoid personal injury
- Do not place or operate this appliance near water sources.
- Do not place or operate the appliance and its power cord on or near hot surfaces (e.g., stove plates) or open flames.
- Do not leave the power cord hanging from sharp edges and keep away from hot objects and flames. Do not wind the cord around the appliance and do not bend it.
- Neither immerse the housing, which contains electrical components and the heating elements in water, nor rinse it under the tap.
- Never use accessories that are not recommended by the manufacturer.
- The use of accessories not recommended or sold by the appliance manufacturer may result in fire, electric shock or injury to persons.
- When you want to remove the plug from the wall contact, please do this at the plug itself and not by pulling on the cable or the appliance itself.
- To avoid electric shock, make sure your hands are dry before plugging or unplugging.
- Do not use the device with wet hands, on damp floors or when the atmosphere is humid there is a risk of electric shock.
- While using the appliance, make sure that the power cord must not be caught or crushed.
- Do not let the motor unit, cord or plug get wet to protect against risk of electric shock.
- Be careful, while handling electrical appliances, as the surface of the heating element is subject to residual heat after use. Any misuse may cause potential injury to the user and may damage the appliance.
- Do not touch the outer surface of the appliance as it can get very hot during operation. Instead, use the handle or mitts.
- Never immerse the appliance or the plug-in water or any other liquid. In the event of the appliance falling in water, disconnect immediately from the mains supply and take it to an authorized service agent for repair before reusing.
- Do not use the appliance if it has fallen on the floor, if there are visible signs of damage or if it has a leak.
- Do not use the appliance if the cable or plug is damaged. In
case of the cord be damaged, it must be replaced only by the manufacturer, its service agent or similarly qualified persons in order to avoid Hazard.
- In case of appliance malfunction, or if it has been damaged in any manner, return the appliance to the nearest authorized service facility for examination, repair or adjustment.

Restrictions on use when used with children and rs
- The appliance is not to be used by persons (including children) with reduced physical, sensory or mental capabilities, or lack of experience and knowledge, unless they have been given supervision or instruction.
- This appliance can be used by children aged from 8 years and above and persons with reduced physical, sensory or mental capabilities or lack of experience and knowledge if they have been given supervision or instruction concerning use of the appliance in a safe way and understand the hazards involved.
- Children should be supervised to ensure that they do not play with the appliance.
- Cleaning and user maintenance shall not be made by children unless they are older than 8 and supervised.
- Keep the appliance and its cord out of reach of children less than 8 years.
- Do not allow the children to use the appliance without supervision.

Instructions to follow when using the appliance
- Keep hands and face away from the VENT knob when releasing the pressure. Always use in a well-ventilated area. DO NOT cover the pressure valve with anything.
- While the pressure cooker is in operation, never remove the lid. Extreme caution must be taken after cooking while removing the lid as serious burns can occur from the releasing steam. Always make sure the steam has been completely released. Let the appliance cool down and always use oven mitts while disassembling or removing accessories.
- DO NOT use this pressure cooker without the removable cooking pot in place.
- Do not attempt to dislodge food while the pressure cooker is plugged in.
- Do not fill the pressure cooker more than 1/full with food or 2/3 full with liquid. Do not fill more than 1/2 full, while cooking foods that expand during cooking.
- When cooking foods under pressure at least 1 cup (8 oz /230 ml) of liquid / water must be used.
- Foods such as apple sauce, cranberries, pearl barley, oatmeal or other cereals, split peas, noodles or pasta, or rhubarb should not be cooked under pressure. They can foam, froth or sputter and may block the floating valve Use different cooking function for these items
- If smoke is observed, turn the pressure cooker off immediately and unplug it from the power outlet.
• DO NOT use this unit for canning purposes.
• The pressure cooker must be unplugged:
A. After each use.
B. If it appears to be faulty.
C. Before cleaning or maintenance.
- Do not touch the outer surface of the appliance as it can get very hot during operation. Instead, use the handle or mitts.
- Never touch the internal part of the appliance while in use.
- The temperature of accessible surfaces may be high when the appliance is operating
- WARNING: Do not touch hot surfaces.
- WARNING: This equipment shall be used with CAUTION as this electrical appliance contains a heating function. Surface of this appliance is also different from other functional surfaces which can produce high temperatures. Since temperatures are differently perceived by different persons. The equipment must be touch only at intended handles and gripping surfaces with the help of heat protectors like gloves or similar type of clothing. Otherwise let it for sufficient time to cool down before touching the hot surfaces.
- The ducts in the pressure regulators allowing the escape of steam should be checked regularly to ensure that they are not blocked.
- The appliance must not be immersed for cleaning; the connector must be removed in case need to clean thoroughly with water.
- The appliance must be dried well before using again.
- Ensure the heating element, temperature sensor and pot are clean and dried before connecting the plug to the power socket.
- On the pressure limiting valve do not add any heavy object.
• After cooking make sure to switch of before opening lid. -
Do not use metallic spoons or scorchers to remove the food or cleaning the pot, to avoid any scratches of non-stick coating. It is recommended to use the wooden or silicone spoons.
-
Keeping warm time should not be more than 6 hours, to not to influence cooking effect.
- Make sure to hold it by handle in case need to move the pressure cooker from one place to another.
- Do not open the lid forcibly, if the floating valve fell down.
- The outer body and stainless steel is hot after cooking, make sure not to touch it to avoid any type of scalding.
- Do not place the inner pot directly on to the kitchen hob, only use it with pressure cooker.
- Do not expose the cooker to the high temperatures and place the cooker directly on to the kitchen hob.
- Neither touch or hold the pressure cooker as the outer surface is hot. Do not move it while working.
- To avoid a circuit overload when using this product, do not operate another high-wattage product on the same electrical circuit.
- A short power supply cord is provided with this product. An extension cord is not recommended for use with this product, but if one must be used:
- The marked electrical rating of the cord must be at least as great as that of the product.
- Arrange the extension cord so that it does not hang where it can be tripped over or pulled unintentionally.
CLEANING AND MAINTENANCE
Kindly refer to the cleaning and maintenance section for details on how to clean surfaces which comes in the contact of food.
3. TECHNICAL SPECIFICATIONS
| Model Voltage | Frequency | Power Capacity | Working Pressure | ||
| SS-10610 A | C 220-240V 50-60Hz | 1000W 6L | 40 – 70 Kpa |
4. PARTS DESCRIPTION
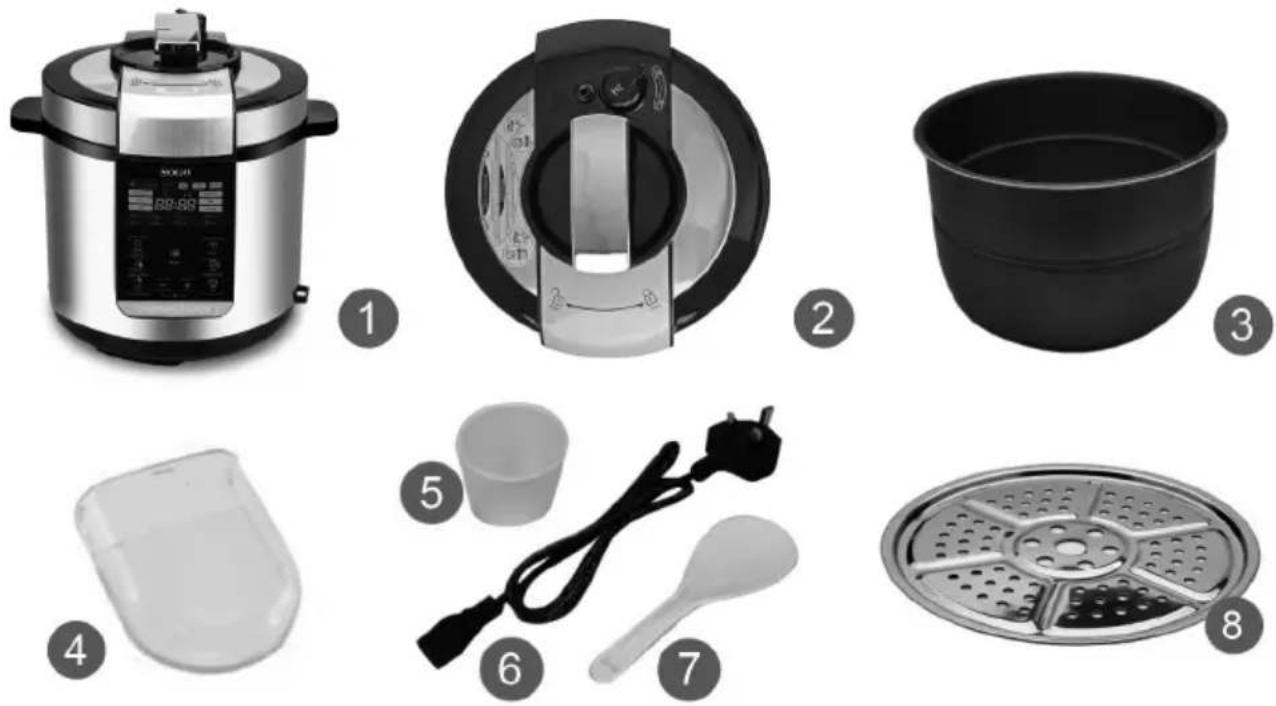
- Main Housing
- Lid Assembly (with handle, safety valves & rubber gasket)
- Aluminium removable cooking pot with non-stick coating
- Condensation cup
- Measuring cup
- Power supply cord
- Plastic spoon
- Stainless Steel Steam Plate (22cm)
5. INSTRUCTIONS OF USE / BEFORE FIRST USE
- Unpack the pressure cooker from the box.
- Remove all the packaging materials such as cardboard, plastics or Styrofoam.
- Read the manual thoroughly before use and keep safe the manual, warranty card, and receipt for future reference.
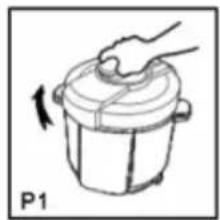
- Open the lid: to open the lid, hold it from the handle and turn it clockwise and pull it up as given in the picture below. (See Figure 1, 2).

natural_image
Hand holding a lid of a cooking pot with a hand moving a curved arrow (no text or symbols)
natural_image
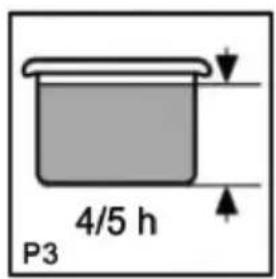
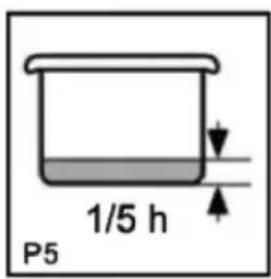
Illustration of a hand pouring liquid into a pot with an upward arrow, labeled P2 (no text or symbols on the diagram itself)- Take out the inner pot and fill in with food and water. Food and water quantity should not be exceeded than 4/5 (figure 3) and less than 1/5 (figure 5) of the height inner tank. And for the food which increases its volume during cooking, should not exceed than 3/5 (figure 4). (See Figure 3, 4 and 5).


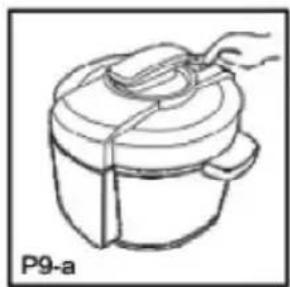
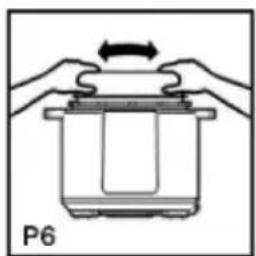
- Make sure there should not be any dirt or smear on the heating plate and outer side of the pot. Once you have filled the pot with the food, put it back in to the unit (See Figure 6). Make sure the sealant had fit on the aluminium cover plate border, then fix it on the shaft on the middle of the lid, Close the lid by turning it anti-clockwise until it gears with a clamping sound. (See Figure 7, 8).

natural_image
Illustration of hands pressing a button on a cooking pot (no text or symbols)
natural_image
Illustration of a hand pouring liquid into a pot with an arrow indicating downward motion (no text or symbols)
natural_image
Simple line drawing of a hand pressing down on a cooking pot with a curved arrow indicating motion (no text or symbols)NOTE: DO NOT USE ANY ABRASIVE MATERIALS TO CLEAN THE SURFACE DO NOT IMMERSE THE PRESSURE COOKER HOUSING OR LID
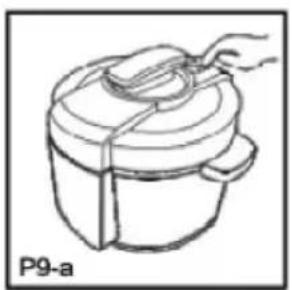
- Make sure the anti-blocking cover is fixed properly. Make sure the silicone ring is covered properly inside the steel coil of the lid. The silicone ring creates an air tight seal that ensures the pressure cooker operates correctly. See below:
natural_image
Line drawing of a cooking pot with a handle and lid, labeled P9-a (no text or symbols on the diagram itself)
- Attach the condensation container on to the rear of the housing.
- To ensure the correct fitting of the silicone ring, fill the removable cooking pot with approximately 11 cups of water. Place the lid on the unit and turn it anti-clockwise until it closed firmly in the locked position.
- Make sure the Floating valve is in the SEAL position.
- Before using the pressure cooker, make sure to check the rubber gasket, floating valve are clean and positioned properly.
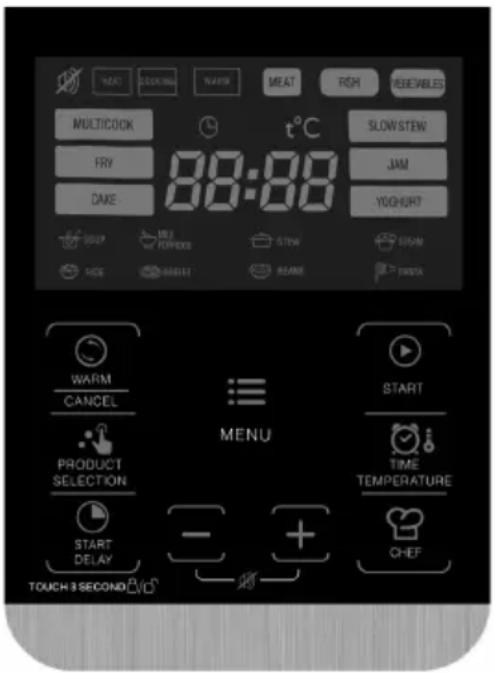
HOW TO USE THE PRESSURE COOKER: PANEL FUNCTIONS
There are 14 pre-set menu functions including 4 with 3 healthy food type selections.
With the help of these functions, you can cook all type of foods without too much effort.
NOTE: The time can be changed as per cooking function requirement.
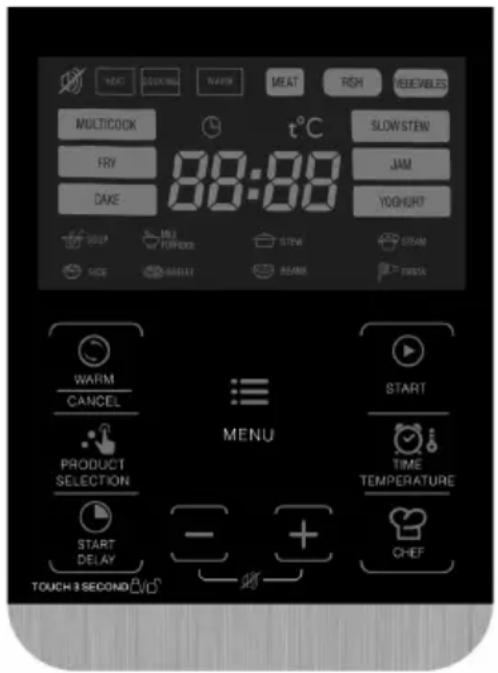
START DELAY FUNCTION
This function can be used to delay the cooking program as per need and requirement. You can delay cooking time from 30 minutes to maximum 24 hours with the help of "START DELAY" timer button (the time changes with the interval of 5 minutes). In order to use delay cooking time function as per need firstly select cooking menu from the screen panel followed by "START DELAY" button, then press "-" or "+" button and keep pressing until you get the desired time. Once you have reached your desired delaying time, press START button to confirm. The timer clock will start reverse counting and when reached 00, starts cooking.
NOTE: This function is represented by the time set, once select the "START DELAY" button desired delayed time digits appear and illuminates and clock start counting reverse.
Example: If you wish to program the pressure cooker to automatically turn on in 3 hours, select any menu function, example "RICE" function followed by "START DELAY" button then press the "+" button 3 times and screen shows 3:00 hrs.
Once the menu button and desired delay time are selected, the menu button and delay timer will illuminate and the unit will begin counting reverse. Once reached by the 00 the unit starts cooking.
NOTE: Perishable foods such as meat, poultry, fish, cheese and dairy products should not be left at room temperature for more than 2 hours and no longer than 1 hour if the temperature is 32^ C or above.
While pressing this button more than 3 seconds we can lock the menu to start the cooking and by pressing the same button we can unlock the menu function.
TIME AND TEMPERATURE BUTTON
With the help of this button, we can change the default time and temperature setting of menu functions. To use this function after selecting Menu function, switch the Time and Temperature button and then immediately with the help of “+” and “-” button we can change the time and temperature settings.
NOTE: The time setting can be changed in all the menu function and also working in the CHEF function mode
“-” / “+ ” BUTTON
These buttons help you to change the cooking time as per need and requirements, without using "DEFAULT COOKING TIME". These button helps you to cook with personalized menus and cooking any type of food with personalized time requirement.
In order to change the time with the help of these buttons, select any menu function and screen
shows the default time setting, to change the time as per requirement, press “-” or “+” button to adjust cooking minute. Press “-” and “+” buttons again to adjust hour after pressing the button TIME TEMPERATURE to switch cooking hour adjustment. After finishing the setting, press START button to confirm.
NOTE: With the help of these buttons, you can change the time for all the menu functions.
NOTE: To change the time, we must do it immediately after selecting the menu function; otherwise, in a few seconds, the menu functions will be locked and start cooking with the factory default time. Once the cooking process starts and in case need to change the cooking time, then we must start the function selection process again by canceling the current function, and selecting again any menu function followed by time setting
"WARM" and "CANCEL" FUNCTION
When the cooker is in standby mode, press WARM/CANCEL button, the cooker will enter into keep warm mode. The keep warm time will be counted up.
When the unit is in working mode with any menu function, then by pressing this button, it cancels the cooking process in between and unit enters into the standby mode
HOW TO SELECT MENU FUNCTION
Plug in the appliance and pressure cooker display with all cooking menus lights on. The appliance enters into standby mode. Keeps on pressing the menu button till the function you desired lights on and shows the default cooking time, press START button to confirm.
CHEF FUNCTION
This function only can be used in pressure cooking mode. The “CHEF” mode is individual function, you can use it directly without MENU button. All the setting step same as other functions. Do remember in CHEF mode, only the time setting can be changed. The temperature value will be same.
START BUTTON
With the help of start button, we can start cooking. After selecting any cooking menu function and changing the time (as per need and requirement) we need to press this button to start the cooking process
PRODUCT SELECTION FUNCTION
A special feature has been added in this pressure cooker, which is called Product Selection function. This function can be used to cook multiple variety of food, within one cooking function.
For example, if we choose SOUP cooking function then we will get 3 options of preparing different type of soup like “MEAT SOUP”, “FISH SOUP” and “VEGETABLE SOUP”. When we select soup function, Product Selection Function key & Icons illuminated, it means now we can choose to prepare any kind of soup as mentioned above among all 3 types of cooking menu functions.
Note: Product Selection Function only works with only FRY SOUP, STEW and STEAM cooking functions.
The second way for operation.
Take the soup for example.
Touch the "PRODUCT SELECTION" button☐ "FRY", "SOUP" "STEW" and "STEAM" functions in the display light up. Touch the "MENU" mode to select the "SOUP" function, the SOUP menu is keeping on lights, the display shows the default cooking time 00:45. Touch the
"PRODUCT SELECTION" button again to select food type MEAT, FISH AND VEGETABLE.
The first touch of PRODUCT SELECTION is meat soup, the display shows the default cooking time 00:45; the second touch is fish soup, the display shows cooking time 00:30; and the third touch is vegetable soup, the display shows 00:25.
Same operation for the function of fry, stew and steam. At last, touch START button to confirm.
| MENU FUNCTIONS | With pressure/ Without Pressure | Default cooking time (min) | The range of adjustment of cooking time/ Step | Pressure (Kpa) | Default cooking temp. (°C) | The range of adjustment of cooking temp. (°C)/ Step | |
| MULTICOOK / 30 | 1 min-12hrs/1 min | / 100 | 35-170/1°C | ||||
| Fry | Meat / 30 | 1-60 mins/ 1min | / 160 | 70-170/1°C | |||
| Fish / 20 | 1-60 mins/1min | / 160 | 70-170/1°C | ||||
| Vegetables / 10 | 1-60 mins/1 min | / 160 | 70-170/1°C | ||||
| Cake / 50 | 1 min-3hrs/ 5 mins | / 140 | 70-170/1°C | ||||
| Slow cook / 2h | 1 min- 12hrs/10 mins | / 95 7 | 70-110/1°C | ||||
| Jam / 1 | 1 min- 3hrs/1min | / 95 7 | 70-120/1°C | ||||
| Yogurt / 8h | 1 min-12hrs/ 10mins | / 40 3 | 70-60 /1°C | ||||
| Rice | YES | 15 | 1-3hrs /5mins | 40-70 | 150 | / | |
| Milk Porridge | YES | 25 | 1-60 mins/1 min | 40-70 | 120 | / | |
| Omelet | YES | 20 | 1-60 mins/1 min | 40-70 | 120 | / | |
| Bean | YES | 40 | 1-60 mins/1 min | 40-70 | 150 | / | |
| Pasta | / 8 | 1-60 mins/1 min | / 100 | 70-110 | /5°C | ||
| Chef | YES | 10 | 1-3hrs/ 1 min | 40-70 | 120 | / | |
| Soup | Meat | YES | 45 | 1-90 mins/5 mins | 40-70 | 150 | / |
| Fish | YES | 30 | 1-90 mins/5 mins | 40-70 | 150 | / | |
| Vegetables | YES | 25 | 1-90 mins/5 mins | 40-70 | 150 | / | |
| Stew | Meat | YES | 30 | 1-2hrs/ 5 mins | 40-70 | 150 | / |
| Fish | YES | 20 | 1-2hrs/ 5 mins | 40-70 | 150 | / | |
| Vegetables | YES | 15 | 1-2hrs/ 5 mins | 40-70 | 150 | / | |
| Steam | Meat / 20 | 1-60mins/1 min | / 100 | 70-130/5°C | |||
| Fish / 12 | 1-60mins/1 min | / 100 | 70-130/5°C | ||||
| Vegetables | / 5 | 1-60mins/1 min | / 100 | 70-130/5°C | |||
PRECAUTIONS
- Use oven mitts or gloves, while turning the vent knob as hot steam and liquid might release.
- Let the pressure cooker cool to room temperature before emptying and cleaning.
- DO NOT hold the VENT knob open.
- Using the quick release method will release extremely hot steam and liquid that can cause burn. Please use oven mitts or other items to protect your hands and arms. Keep face away from the steam vent.
- Please use oven mitts to hold or removing the cooking pot as the pressure cooker and cooking pot will be hot.
- NEVER FORCE THE LID OPENING. The lid will only open when the pressure is fully released.
- Once the cooking finishes unit will automatically enter in to KEEP WARM mode.
Note: Causes of unit overheating are:
- High mains voltage
- Operation of the unit with the pot empty
- Cooked dry for a long time.
TIPS AND RECOMENDATIONS
- NEVER deep fry or pressure fry in the pressure cooker.
- DO NOT set the pre-set timer for more than 1-2 hours while cooking perishable foods. If the room temperature is 32^ or above do not set the pre-set timer for more than 1 hour.
- The rubber gasket creates an air tight seal that is needed for the pressure cooker to operate properly. Check that it is in good condition and seated properly before each use.
- DO NOT hold the VENT knob when releasing pressure as it releases hot steam and liquid into the air. Keep face away from the appliance while using short bursts to release the steam.
- Letting the pressure cooker cool until the pressure is released on its own is another option for the pressure cooker.
- If you are unsure of the exact time when cooking under pressure, it is always better to under cook and use the short bursts of steam to release the pressure so you can check the cooking status. If it has not cooked as per your requirement you can cook for few minutes more.
- Never fill the pressure cooker more than 1 / 2 with food ingredients or 2/3 with liquid
- The pressure cooker must have some liquid (can be water) to create the steam and pressure needed while cooking with pressure.
- While cooking fresh fruits, low pressure must be used.
- If cooking beans (legumes) you might add a tbsp. of oil to the water to reduce the amount of foam that the beans can create.
- Less expensive cuts of meat are ideal for cooking in the pressure cooker as the fibers are broken down during cooking.
- NEVER try to remove the lid until the pressure has been completely released.
- NEVER cover the top of the lid or the valve opening with a cloth or any other object.
- PLEASE NOTE: If smoke is observed, press the CANCEL button immediately and unplug the power cord. Let the pressure cooker cool completely and try again. If the smoke is observed again, cancel the cooking function and take it to the nearest authorized service center or qualified technician.
- Always inspect your pressure cooker before each use. Do not use this unit if it has been damaged, dropped, left outdoors or dropped in water.
- When the LED display "E" it means there is a serious failure in the unit. Press the CANCEL button and unplug the power cord immediately. Once the unit has completely cooled down you can restart the pressure cooker. If the digital display again shows "E", and take it to the nearest authorized service center or qualified technician
- DO NOT use metal utensils with the cooking pot as it may scratch the non—stick surface. Use silicon or nylon utensils instead.
- DO NOT use this pressure cooker for the purpose of canning foods.
6. CLEANING AND MAINTENANCE
- Clean the cooking pot and steamer with warm and soapy water using a sponge or damp cloth, then rinse. Then wipe dry with cloth. Don't clean with abrasive brushes to avoid damaging the nonstick coating.
- Remove the dew collector and throw the water. Wash it with water and place it back to the rice cooker.
- Rice grains or other residues may stick on the heating plate. To ensure a proper contact with the cooking pot, rub the grains/residues away from the heating plate with fine sandpaper (NO.320), then wipe it with cloth again.
- NEVER immerse power cord, plug or pressure cooker housing in water or any other liquid. Clean the lid and housing parts with damp cloth first and dry cloth immediately afterwards and keep them dry.
7. TROUBLE SHOOTING
| Problem Cause Solution | ||
| There is overflow during cooking process | 1. PCB is defective | Take the appliance to your dealer or an authorized service center |
| 2. Electronic parts or the temperature sensor malfunction | ||
| The rice is not cooked | 1. Not enough water has been added. | 1. Add water according to the scale on the inside of the inner pot |
| 2. PCB is defective. | ||
| 3. Electronic parts or the temperature sensor malfunction. | 2. Take the appliance to your dealer or an authorized service center. | |
| Hard to close the lid | Lid has not been sealed properly | Place the lid properly and seal it well |
| Float valve is stuck by push rod | Push the rod | |
| Hard to open the lid | The float valve doesn’t fall down after exhausting | Press the float valve |
| Lid leak | Lid has not been sealed properly | Close the lid sealing it properly. |
| Sealing rubber has food Clean the sealing rubber | ||
| Float valve have leakage | Sealing rubber is damaged Rep | ace the sealing rubber |
| Float valve seals adhesive wear | Replace the float valve sealing ring | |
| Float valve can’t rise | The pot has too little food and water | As per instructions place the foods and water |
| Cover or pressure limiting valve leakage | Take it to technical service center | |
Error Codes:
| Error code Reason Solution | ||
| E1 Broken sensor circuit | Unplug it, let it cool down and take it to the nearest authorized service center for repairing. | |
| E2 Short circuit in the sensor | Unplug it, let it cool down and take it to the nearest authorized service center for repairing. | |
| E3 Over heating | Unplug and let it cool down completely before using again. | |
| E4 Low pressure mal-function | Unplug it, let it cool down and take it to the nearest authorized service center for repairing. | |
| E5 High pressure mal-function | Unplug it, let it cool down and take it to the nearest authorized service center for repairing. | |
| E0 Open Cover protection Close the lid |

PORTANT:
natural_image
Illustration of hands pressing a button on a cooking pot (no text or symbols)
natural_image
Illustration of a hand pouring liquid into a pot with an arrow indicating downward motion (no text or symbols)
natural_image
Simple line drawing of a hand pressing down on a cooking pot with an arrow indicating motion (no text or symbols)NOTE : NE PAS UTILISER DE MATÉRIAUX ABRASIFS POUR NETTOYER LA SURFACE NE PAS IMMERGER LE BOÎTIER OU LE COUVERCLE DE L'AUTOCUISEUR
natural_image
Line drawing of a cooking pot with a handle and label P9-a (no text or symbols on the diagram itself)
natural_image
Simple line drawing of a hand pressing down on a cooking pot with an arrow indicating rotation (no text or symbols)
natural_image
Illustration of a hand pouring liquid into a pot with an upward arrow, labeled P2 (no text or symbols on the diagram itself)natural_image
Illustration of hands pressing a component with an arrow indicating motion (no text or symbols)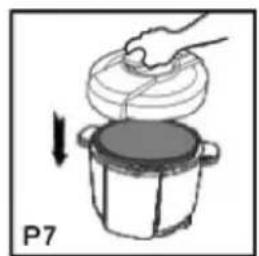
natural_image
Illustration of a hand pouring liquid from a lid onto a pot, with an arrow indicating downward motion (no text or symbols)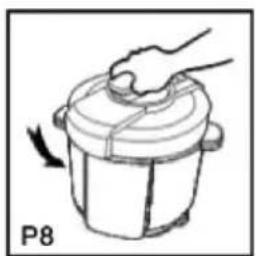
natural_image
Simple line drawing of a hand pressing down on a cooking pot with a curved arrow indicating motion (no text or symbols)natural_image
Line drawing of a cooking pot with a handle and label P9-a (no text or symbols on the diagram itself)
natural_image
Hand holding a cooking pot with a hand moving a side (no text or symbols)
natural_image
Illustration of a hand pouring liquid from a lid onto a pot, with an arrow indicating upward motion (no text or symbols)natural_image
Simple line drawing of a hand pressing down on a cooking pot with an arrow indicating rotation (no text or symbols)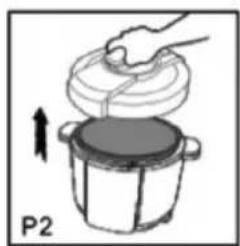
natural_image
Illustration of a hand pressing down on a cooking pot with an upward arrow, labeled P2 (no text or symbols on the diagram itself)natural_image
Illustration of hands pressing a component with an arrow indicating rotation (no text or symbols)
natural_image
Illustration of a hand pressing down on a cooking pot with a downward arrow indicating motion (no text or symbols)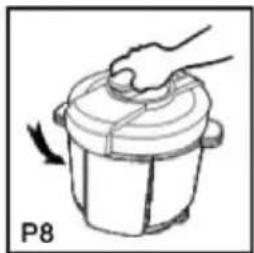
natural_image
Simple line drawing of a hand pressing down on a cooking pot (no text or symbols)NOTA: NON UTILIZZARE MATERIALI ABRASIVI PER PULIRE LA SUPERFICIE. NON IMMERGERE L'ALLOGGIAMENTO O IL COPERCHIO DELLA PENTOLA A PRESSIONE
natural_image
Line drawing of a cooking pot with a handle and lid, labeled P9-a (no text or symbols on the diagram itself)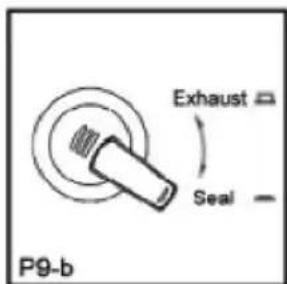
natural_image
Exterior view of a modern stainless steel rice cooker with digital display (no visible text or symbols)
natural_image
Close-up of a circular mechanical component with a central transparent lever and control buttons (no visible text or symbols)
natural_image
Black cylindrical container with a circular label containing the number 3 (no text or symbols on the container itself)
natural_image
White plastic object with rounded edges, labeled with number 4 in a circle (no text or symbols on the object itself)
natural_image
Set of seven numbered items: a cup, a cord, a spoon, and an electrical plug (no text or symbols visible)
natural_image
Circular metallic object with perforated side and central hole, no visible text or symbolsnatural_image
Simple line drawing of a hand pressing down on a cooking pot with an arrow indicating rotation (no text or symbols)
natural_image
Illustration of a hand pouring liquid into a pot with an upward arrow, labeled P2 (no text or symbols on the diagram itself)natural_image
Illustration of hands pressing a button on a cooking pot (no text or symbols)
natural_image
Illustration of a hand pouring liquid into a pot with an arrow indicating downward motion (no text or symbols)
natural_image
Simple line drawing of a hand pressing down on a cooking pot (no text or symbols)POZNÁMKA: K ČIŠTĚNÍ POVRCHU NEPOUŽÍVEJTE ŽÁDNÉ ABRAZIVNÍ MATERIÁLY. NEPONOŘUJTE KRYT TLAKOVÉHO HRNCE ANI VÍKO.
natural_image
Line drawing of a cooking pot with a handle and label P9-a (no text or symbols on the diagram itself)
FUNKCE "WARM" a "CANCEL"
undgå enhver form for skoldning.
natural_image
Simple line drawing of a hand pressing down on a cooking pot with an arrow indicating rotation (no text or symbols)
natural_image
Illustration of a hand pouring liquid into a pot with an upward arrow, labeled P2 (no text or symbols on the diagram itself)natural_image
Illustration of hands pressing a component with an arrow indicating motion (no text or symbols)
natural_image
Illustration of a hand pouring liquid from a lid onto a pot, with an arrow indicating downward motion (no text or symbols)
natural_image
Simple line drawing of a hand pressing down on a cooking pot (no text or symbols)BEMÆRK: BRUG IKKE SLIBENDE MATERIALER TIL AT RENG∅RE OVERFLADEN. NEDSÆNK IKKE TRYKKOGERENS HUS ELLER LÅG.
natural_image
Line drawing of a cooking pot with a handle and label P9-a (no text or symbols on the diagram itself)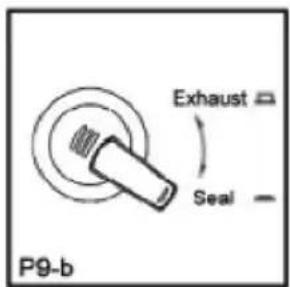
natural_image
Simple line drawing of a hand pressing down on a cooking pot with an arrow indicating rotation (no text or symbols)
natural_image
Illustration of a hand pouring liquid into a pot with an upward arrow, labeled P2 (no text or symbols on the diagram itself)- Vzemite notranji lonec in ga napolnite s hrano in vodo. Količina hrane in vode ne sme biti večja od 4/5 (slika 3) in manjša od 1/5 (slika 5) višine notranje posode. Za živila, ki med kuhanjem povečajo svoj volumen, pa ne sme presegati 3/5 (slika 4). (Glej slike 3, 4 in 5).


- Prepričajte se, da na grelni plošči in zunanji strani lonca ni umazanije ali madeža. Ko posodo napolnite s hrano, jo postavite nazaj v enoto (glejte sliko 6). Prepričajte se, da se tesnilna masa prilega aluminijastemu robu pokrova, nato ga pritrdite na gred na sredini pokrova, Pokrov zaprite tako, da ga zavrtite proti smeri urinega kazalca, dokler se ne zaskoči z zvokom zatikanja. (Glej sliki 7 in 8).
natural_image
Illustration of hands pressing a button on a cooking pot (no text or symbols)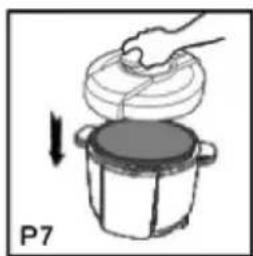
natural_image
Illustration of a hand pressing down on a cooking pot with an arrow indicating downward motion (no text or symbols)
natural_image
Simple line drawing of a hand pressing down on a cooking pot (no text or symbols)OPOMBA: ZA ČIŠČENJE POVRŠINE NE UPORABLJAJTE ABRAZIVNIH MATERIALOV. NE POTOPITE OHIŠJA ALI POKROVA LONCA POD PRITISKOM.
natural_image
Line drawing of a cooking pot with a handle and label P9-a (no text or symbols on the diagram itself)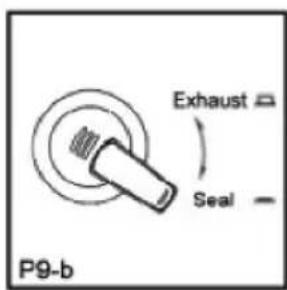
FUNKCIJA "WARM" in "CANCEL"
natural_image
Exterior view of a modern rice cooker with digital display (no visible text or symbols)
natural_image
Close-up of a circular mechanical component with a central knob and control buttons, no visible text or symbols.
natural_image
Black cylindrical container with a circular label containing the number 3 (no text or symbols on the container itself)
natural_image
Close-up of a transparent plastic container with a circular badge labeled '4' (no text or symbols on the container itself)
natural_image
Product photo showing a black cord with plug, cup, and spoon (no text or symbols)
natural_image
Circular metallic object with perforated edges and a central hole, labeled with the number 8 (no text or symbols on the object itself)- Glavno kućište
- Sklop poklopca (s ručkom, sigurnosnim ventilima i gumenom brtvom)
- Aluminijska uklonjiva posuda za kuhanje s neprijanjajućim premazom
- Posuda za kondenzat
- Mjerna posuda
- Kabel za napajanje
- Plastična žlica
- Parna ploča od nehrđajućeg čelika (22 cm)
5. UPUTE ZA UPORABU / PRIJE PRVE UPOTREBE
- Ekspres lonac izvadite iz kutije.
- Uklonite sve materijale za pakiranje poput kartona, plastike ili stiropora.
- Prije uporabe temeljito pročitajte priručnik i čuvajte priručnik, jamstvenu karticu i račun za buduću upotrebu.
- Otvorite poklopac: da biste otvorili poklopac, držite ga za ručku i okrenite u smjeru kazaljke na satu te povucite prema gore kao što je prikazano na slici ispod. (Vidi sliku 1, 2).
natural_image
Simple line drawing of a hand pressing down on a cooking pot (no text or symbols)
natural_image
Illustration of a hand pouring liquid from a lid into a pot, with an arrow indicating upward motion (no text or symbols)natural_image
Illustration of hands pressing a button on a cooking pot (no text or symbols)
natural_image
Illustration of a hand pouring liquid into a pot with an arrow indicating downward motion (no text or symbols)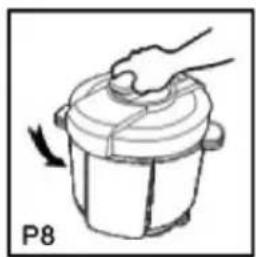
natural_image
Simple line drawing of a hand pressing down on a cooking pot (no text or symbols)NAPOMENA: NEMOJTE KORISTITI ABRAZIVNE MATERIJALE ZA ČIŠĆENJE POVRŠINE NEMOJTE URANITI KUĆIŠTE ILI POKLOPAC EKSPRES LONA
- Provjerite je li poklopac protiv blokiranja pravilno pričvršćen. Provjerite je li silikonski prsten dobro prekriven unutar čelične zavojnice poklopca. Silikonski prsten stvara zrakopropusnu brtvu koja osigurava pravilan rad ekspres lonca. Vidjeti ispod :
natural_image
Line drawing of a cooking pot with a handle and label P9-a (no text or symbols on the pot itself)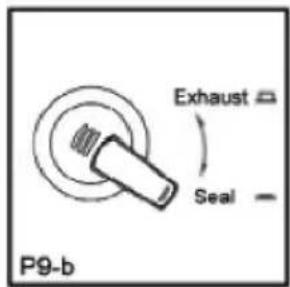
- Pričvrstite spremnik za kondenzat na stražnju stranu kućišta.
- Kako biste osigurali pravilno postavljanje silikonskog prstena, napunite uklonjivu posudu za kuhanje s približno 11 šalica vode. Postavite poklopac na jedinicu i okrećite ga suprotno od kazaljke na satu dok se čvrsto ne zatvori u zaključanom položaju.
- Provjerite je li plutajući ventil u položaju SEAL.
- Prije uporabe ekspres lonca provjerite jesu li gumena brtva, plutajući ventil čisti i pravilno postavljeni.
KAKO KORISTITI EKSPRES LONK: FUNKCIJE PLOČE
tamo su 14 unaprijed postavljeno Jelovnik funkcije uključujući 4 sa 3 zdrava hrana tip selekcije. S the pomoć od ove funkcije, vas pas kuhati tamo tip od namirnice bez također mnogo napor.
BILJEŠKA: The vrijeme pas biti promijenjeno as po kuhanje zahtjev funkcije.
FUNKCIJA ODGODE STARTA
Ovaj funkcije pas biti koristi se do odgoditi the kuhanje program as po potreba i zahtjev. Vas pas odgodite vrijeme kuhanja od 30 minuta do najviše 24 sata uz pomoć tipke "ODGODA POČETKA" (vrijeme se mijenja s intervalom od 5 minuta). Kako biste koristili funkciju odgođenog vremena kuhanja prema potrebi, prvo odaberite izbornik kuhanja na ploči zaslona, a zatim pritisnite gumb "ODGODA POČETKA", zatim pritisnite "-" ili "+" dugme i zadržati prešanje do vas dobiti the željeni vrijeme. Jedanaest vas imati dosegnuto vaš željeni odgađajući vrijeme, pritisnite START dugme do potvrđiti. The mjerač vremena sat htjeti start obrnuti brojanje a kada dođe do 00, počinje kuhati.
BILJEŠKA: Ovaj funkcije es zastupljeni po the vrijeme set, jedanaest odabrati the "START ODGODITI" gumb željene odgođene znamenke se pojavljuju i svijetle, a sat počinje brojati unazad. Primjer: Ako želite programirati ekspres lonac da se automatski uključi za 3 sata, odaberite bilo koj Jelovnik funkcije, primjer "RIŽA" funkcije pratio po "START ODGODITI" dugme zatim pritisnite the Tipka "+" 3 puta i ekran prikazuje 3:00 sata.
Nakon odabira gumba izbornika i željenog vremena odgode, gumb izbornika i mjerač vremena zasvijetlit će i the jedinica htjeti početi brojanje obrnuti. Jedanaest dosegnuto po the 00 the jedinica počinje kuhanje.
NAPÖMENA: Kvarljive namirnice kao što su meso, perad, riba, sir i mliječni proizvodi ne smiju se ostavljati soba temperatura za više od 2 sati i Ne više od 1 sat ako the temperatura es 32°C ili iznad. Dok prešanje ovaj dugme više od 3 sekundi mi pas zaključati the Jelovnik do start the kuhanje i Pritiskom na isti gumb možemo otključati funkciju izbornika.
VRIJEME I TEMPERATURA GUMB
S the pomoć od ovaj gumb, mi pas promijeniti the zadana vrijednost vrijeme i temperatura postavljanje od Jelovnik funkcije. Do koristiti ovaj funkcije nakon odabiranje Jelovnik funkcije, prekidač the vrijeme i temperatura dugme i zatim odmah pomoću gumba “+” i “-” možemo promijeniti postavke vremena i temperature.
BILJEŠKA: The vrijeme postavljanje pas biti promijenjeno u tamo the Jelovnik funkcije i također radeći u the Način rada CHEF
“-” / “+ “GUMB
Ovi gumbi vam pomažu da promijenite vrijeme kuhanja prema potrebi i zahtjevima, bez korištenja "DEFAULT KUHANJE VRIJEME." ove dugme pomaže vas do kuhati s personalizirani izbornici i kuhanje bilo koje vrste hrane uz prilagođeno vrijeme.
"TOPLO" i "OTKAZATI" FUNKCIJA
Kada the kuhalo es u pripravnost način rada, pritisnite TOPLO/OTKAZI gumb, the kuhalo htjeti ulaziti u način održavanja topline. Vrijeme održavanja topline će se računati.
Kada the jedinica es u radeći način rada s bilo koji Jelovnik funkcije, zatim po prešanje ovaj gumb, Artikel poništava proces kuhanja između i jedinica ulazi u stanje pripravnosti
KAKO DO ODABERI JELOVNIK FUNKCIJA
natural_image
Exterior view of a modern rice cooker with digital display (no visible text or symbols)
natural_image
Close-up of a circular mechanical component with a central knob and control buttons, no visible text or symbols.
natural_image
Black cylindrical container with a circular label containing the number 3 (no text or symbols on the container itself)
natural_image
Close-up of a transparent plastic object with a circular badge containing the number 4 (no text or symbols on the object itself)
natural_image
Product photo showing a black cord with a plug, a cup, and a spoon (no text or symbols visible)
natural_image
Circular metallic object with perforated edge and central hole, no visible text or symbolsnatural_image
Simple line drawing of a hand pressing down on a cooking pot (no text or symbols)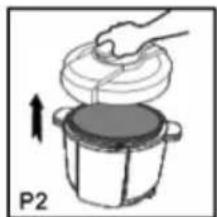
natural_image
Illustration of a hand pouring liquid from a lid into a pot, with an arrow indicating upward motion (no text or symbols)natural_image
Illustration of hands pressing a button on a cooking pot (no text or symbols)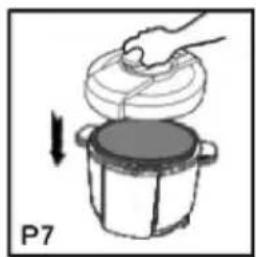
natural_image
Illustration of a hand pouring liquid into a pot with an arrow indicating downward motion (no text or symbols)
natural_image
Simple line drawing of a hand pressing down on a cooking pot (no text or symbols)UWAGA: DO CZYSZCZENIA POWIERZCHNI NIE NALEŻY UŻYWAĆ MATERIAŁÓW ŚCIERNYCH NIE ZANURZAĆ OBUDOWY ANI POKRYWY SZYBKOWARU
natural_image
Line drawing of a cooking pot with a handle and label P9-a (no text or symbols on the diagram itself)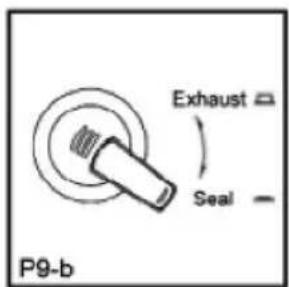
FUNKCJA WYBORU PRODUKTU
natural_image
Exterior view of a modern rice cooker with digital display (no visible text or symbols)
natural_image
Close-up of a circular mechanical component with a central knob and adjustment knobs, no visible text or symbols.
natural_image
Black cylindrical container with a circular label containing the number 3 (no text or symbols on the container itself)
natural_image
Close-up of a transparent plastic container with a circular badge labeled '4' (no text or symbols on the container itself)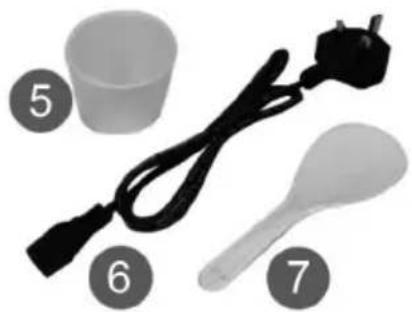
natural_image
Product photo showing a black cord with plug, cup, and spoon (no text or symbols)
natural_image
Circular metallic object with perforated edges and a central hole, labeled with the number 8 (no text or symbols on the object itself)natural_image
Simple line drawing of a cooking pot with a hand holding the lid, showing a rotation arrow (no text or symbols)
natural_image
Illustration of a hand pouring liquid from a lid into a pot, with an arrow indicating upward motion (no text or symbols)natural_image
Illustration of hands pressing a button on a cooking pot (no text or symbols)
natural_image
Illustration of a hand pouring liquid into a pot with an arrow indicating downward motion (no text or symbols)
natural_image
Simple line drawing of a hand pressing down on a cooking pot (no text or symbols)NOTĂ: NU UTILIZATI MATERIALE ABRAZIVE PENTRU A CURĂTA SUPRAFAȚA NU SCUFUNDATI CARCASA SAU CAPACUL OALEI SUB PRESIUNE
natural_image
Line drawing of a cooking pot with a handle and label P9-a (no text or symbols on the diagram itself)
natural_image
Exterior view of a modern rice cooker with digital display (no visible text or symbols)
natural_image
Close-up of a circular mechanical component with a central knob and control buttons, no visible text or symbols.
natural_image
Black cylindrical container with a circular label containing the number 3 (no text or symbols on the container itself)
natural_image
Close-up of a transparent plastic object with a circular badge containing the number 4 (no text or symbols on the object itself)
natural_image
Set of seven numbered items: a cup, a black cord with cable, a spoon, and an electrical plug (no text or symbols visible)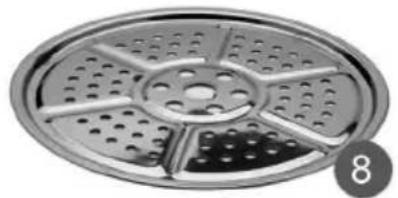
natural_image
Circular metallic object with perforated edge and central hole, no visible text or symbolsnatural_image
Simple line drawing of a hand holding a cooking pot with a lid, showing a rotation arrow (no text or symbols)
natural_image
Illustration of a hand pouring liquid from a lid into a pot, with an arrow indicating upward motion (no text or symbols)natural_image
Illustration of hands pressing a button on a cooking pot (no text or symbols)
natural_image
Illustration of a hand pouring liquid into a pot with an arrow indicating downward motion (no text or symbols)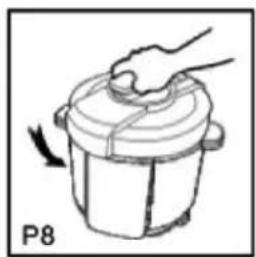
natural_image
Simple line drawing of a hand pressing down on a cooking pot (no text or symbols)natural_image
Line drawing of a cooking pot with a handle and label P9-a (no text or symbols on the diagram itself)
natural_image
Exterior view of a modern rice cooker with digital display (no visible text or symbols)
natural_image
Close-up of a circular mechanical component with a central knob and control buttons, no visible text or symbols.
natural_image
Black cylindrical container with a circular label containing the number 3 (no text or symbols on the container itself)
natural_image
Close-up of a transparent plastic container with a circular badge labeled '4' (no text or symbols on the container itself)
natural_image
Product photo showing a black cord with plug, cup, and spoon (no text or symbols)
natural_image
Circular metallic object with perforated edges and a central hole, labeled with the number 8 (no text or symbols on the object itself)natural_image
Simple line drawing of a cooking pot with a hand holding the lid, showing a rotation arrow (no text or symbols)
natural_image
Illustration of a hand pouring liquid from a lid into a pot, with an arrow indicating upward motion (no text or symbols)natural_image
Illustration of hands pressing a button on a cooking pot (no text or symbols)
natural_image
Illustration of a hand pouring liquid into a pot with an arrow indicating downward motion (no text or symbols)
natural_image
Simple line drawing of a hand pressing down on a cooking pot (no text or symbols)NOTA: NO UTILITZI MATERIALS ABRASIUS PER A NETEJAR LA SUPERFÍCIE NO SUBMERGEIXI L'OLLA DE PRESSIÓ NI LA TAPA
natural_image
Line drawing of a cooking pot with a handle and label P9-a (no text or symbols on the diagram itself)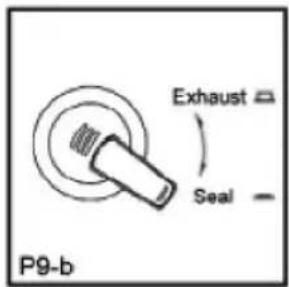
DÉCLARATION DE CONFORMITÉ
DECLARATION OF CONFORMITY
This device complies with EU Low Voltage Directive 2014/35/EC.
Electromagnetic Compatibility Directive 2014/30/EU. Directive 2015/863/EU on the restriction of the use of certain hazardous substances in electrical.
Directive 2009/125/EC on the eco-design requirements applicable to energy-related products.

This symbol on the product or on the packaging indicates that this product can't be disposed as normal rubbish or household waste. All the electrical, electronic equipment's and battery-operated units must recycle in proper manner and according to the local municipal laws. You can recycle them by taking them to government authorized disposal centres or specialized bins which you can find in any nearby big super markets, electronics or electro domestics products stores or malls who have these types of facilities available.
Designed by: SOGO based on European quality standards Imported by: Sanysan Appliances S.L, NIF: B98753056, C/ Barcas 2, 2, 46002 Valencia, Spain Product manufactured in CHINA. After-sales service: www.sogosat.com sogosat@sogosat.com / 0034 902 222 161


- Safety instructions for the user
- General precautions during the use of electrical
- equipment
- Restrictions on use to avoid personal injury
- Restrictions on use when used with children and rs
- Instructions to follow when using the appliance
- CLEANING AND MAINTENANCE
- TECHNICAL SPECIFICATIONS
- PARTS DESCRIPTION
- INSTRUCTIONS OF USE / BEFORE FIRST USE
- NOTE: DO NOT USE ANY ABRASIVE MATERIALS TO CLEAN THE SURFACE DO NOT IMMERSE THE PRESSURE COOKER HOUSING OR LID
- HOW TO USE THE PRESSURE COOKER: PANEL FUNCTIONS
- START DELAY FUNCTION
- TIME AND TEMPERATURE BUTTON
- “-” / “+ ” BUTTON
- "WARM" and "CANCEL" FUNCTION
- HOW TO SELECT MENU FUNCTION
- CHEF FUNCTION
- START BUTTON
- PRODUCT SELECTION FUNCTION
- The second way for operation.
- PRECAUTIONS
- TIPS AND RECOMENDATIONS
- CLEANING AND MAINTENANCE
- TROUBLE SHOOTING
- PORTANT:
- NOTE : NE PAS UTILISER DE MATÉRIAUX ABRASIFS POUR NETTOYER LA SURFACE NE PAS IMMERGER LE BOÎTIER OU LE COUVERCLE DE L'AUTOCUISEUR
- NOTA: NON UTILIZZARE MATERIALI ABRASIVI PER PULIRE LA SUPERFICIE. NON IMMERGERE L'ALLOGGIAMENTO O IL COPERCHIO DELLA PENTOLA A PRESSIONE
- POZNÁMKA: K ČIŠTĚNÍ POVRCHU NEPOUŽÍVEJTE ŽÁDNÉ ABRAZIVNÍ MATERIÁLY. NEPONOŘUJTE KRYT TLAKOVÉHO HRNCE ANI VÍKO.
- FUNKCE "WARM" a "CANCEL"
- BEMÆRK: BRUG IKKE SLIBENDE MATERIALER TIL AT RENG∅RE OVERFLADEN. NEDSÆNK IKKE TRYKKOGERENS HUS ELLER LÅG.
- OPOMBA: ZA ČIŠČENJE POVRŠINE NE UPORABLJAJTE ABRAZIVNIH MATERIALOV. NE POTOPITE OHIŠJA ALI POKROVA LONCA POD PRITISKOM.
- FUNKCIJA "WARM" in "CANCEL"
- UPUTE ZA UPORABU / PRIJE PRVE UPOTREBE
- NAPOMENA: NEMOJTE KORISTITI ABRAZIVNE MATERIJALE ZA ČIŠĆENJE POVRŠINE NEMOJTE URANITI KUĆIŠTE ILI POKLOPAC EKSPRES LONA
- KAKO KORISTITI EKSPRES LONK: FUNKCIJE PLOČE
- FUNKCIJA ODGODE STARTA
- VRIJEME I TEMPERATURA GUMB
- "TOPLO" i "OTKAZATI" FUNKCIJA
- KAKO DO ODABERI JELOVNIK FUNKCIJA
- UWAGA: DO CZYSZCZENIA POWIERZCHNI NIE NALEŻY UŻYWAĆ MATERIAŁÓW ŚCIERNYCH NIE ZANURZAĆ OBUDOWY ANI POKRYWY SZYBKOWARU
- FUNKCJA WYBORU PRODUKTU
- NOTĂ: NU UTILIZATI MATERIALE ABRAZIVE PENTRU A CURĂTA SUPRAFAȚA NU SCUFUNDATI CARCASA SAU CAPACUL OALEI SUB PRESIUNE
- NOTA: NO UTILITZI MATERIALS ABRASIUS PER A NETEJAR LA SUPERFÍCIE NO SUBMERGEIXI L'OLLA DE PRESSIÓ NI LA TAPA
- DÉCLARATION DE CONFORMITÉ
- DECLARATION OF CONFORMITY
Brand : Sogo
Model : SS-10610
Category : Flower pot