M650 - Microphone AnkerWork - Free user manual and instructions
Find the device manual for free M650 AnkerWork in PDF.
| Product Type | Wireless Microphone |
| Brand | AnkerWork |
| Model | M650 |
| Transmitter Dimensions | 45.5 × 45.3 × 23.6 mm |
| Transmitter Weight | 30 g |
| Receiver Dimensions | 43.2 × 35 × 30.4 mm |
| Receiver Weight | 37 g |
| Charging Case Dimensions | 135.3 × 54.2 × 48.3 mm |
| Charging Case Weight | 184 g |
| Power Supply | Rechargeable battery via USB-C (5V) |
| Battery Capacity (Transmitter) | 350 mAh |
| Battery Capacity (Receiver) | 350 mAh |
| Battery Capacity (Case) | 2560 mAh / 9.472 Wh |
| Battery Life (Transmitter) | 6 hours (15 hours with case) |
| Battery Life (Receiver) | 6 hours (15 hours with case) |
| Transmission Range | 200 m (line of sight) |
| Frequency Response | 50 Hz – 20 kHz |
| Sensitivity (Transmitter) | -36 dBV/Pa at 1 kHz (0 dB gain) |
| Signal-to-Noise Ratio | ≥ 70 dB (A-weighted) |
| Main Features | Built-in recording 7h, noise reduction, safety mode, touch screen, phone/camera/computer connection, windshields, magnetic clip |
| Maintenance and Cleaning | Clean with a soft, dry cloth; avoid moisture and liquids |
| Safety | Only use a 5V/2A or higher power adapter to charge the case |
| Spare Parts and Repairability | Windshields, transmitter covers, adapters (Lightning, USB-C), USB-C and AUX cables; firmware update via AnkerWork software |
| General Information | Wireless microphone with charging case, touch screen receiver, two transmitters, built-in recording, compatible with iOS/Android/Windows/Mac |
Frequently Asked Questions - M650 AnkerWork
User questions about M650 AnkerWork
0 question about this device. Answer the ones you know or ask your own.
Ask a new question about this device
Download the instructions for your Microphone in PDF format for free! Find your manual M650 - AnkerWork and take your electronic device back in hand. On this page are published all the documents necessary for the use of your device. M650 by AnkerWork.
USER MANUAL M650 AnkerWork
natural_image
Line drawing of a smart airbus case with open lid and internal components (no text or symbols)AnkerWork M650
Wireless Microphone
USER MANUAL
| English01 | Portugues do Brasil | 166 | |
| Čeština 16 | Русский | 181 | |
| Dansk 31 | Svenska 196 | ||
| Deutsch 46 | Türkçe 211 | ||
| Español 61 | 日本語 | 226 | |
| Suomi 76 | 한국어 | 241 | |
| Français 91 | 简体中文 | 256 | |
| Italiano 106 | 繁體中文 | 271 | |
| Nederlands 121 | لعربية | 286 | |
| Norsk 136 | הכלה | 301 | |
| Język polski 151 |
Table of Contents
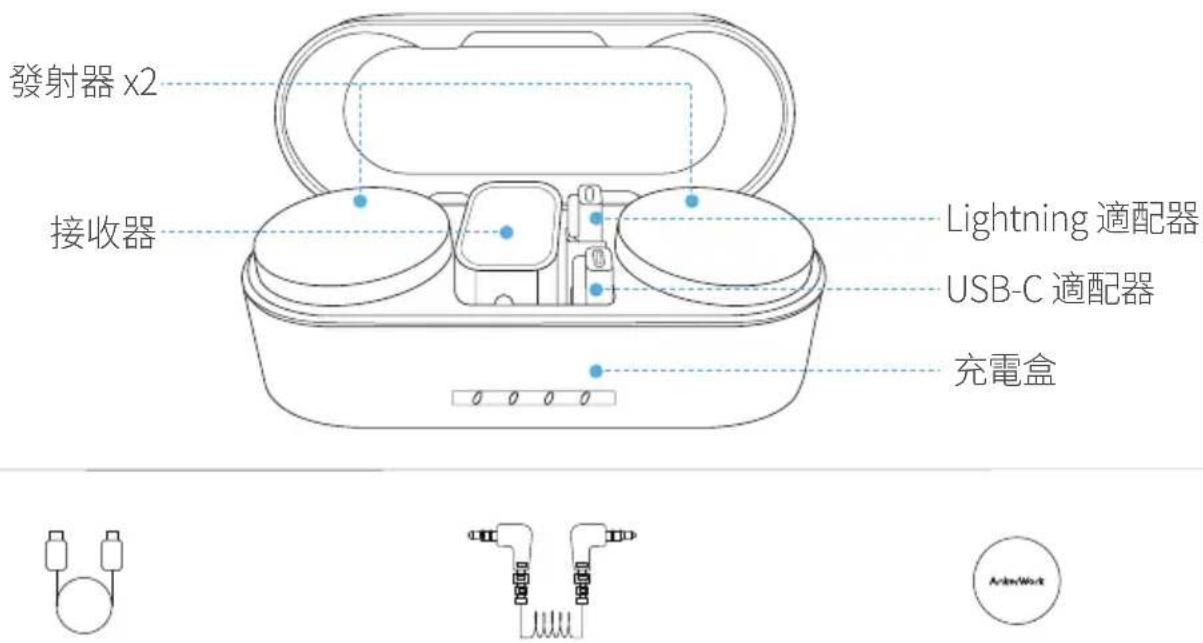
What's Included 02
At a Glance 02
- Transmitter 02
- Receiver 03
- Charging Case 03
Wearing 04
- Wearing a Transmitter 04
- Attaching a Windscreen 04
- Changing a Transmitter Cover 05
Charging 05
- Charging Your Microphone 05
- Checking Battery Level 06
Powering On / Off 06
Pairing 07
Using Your Microphone 08
- Connecting to a Phone 08
- Connecting to a Camera 08
- Connecting to a Computer 09
- On-Board Recording 09
Receiver Screen Guide 10
- Touch Control 10
- Settings 11
Mute 12
AnkerWork Software 13
Firmware Update 13
Specifications 13

To watch a video on basic operations, scan the QR code or visit this website: https://support.ankerwork.com/s/product/a085g000004znm4AAA/ankerwork-m650-wireless-microphone

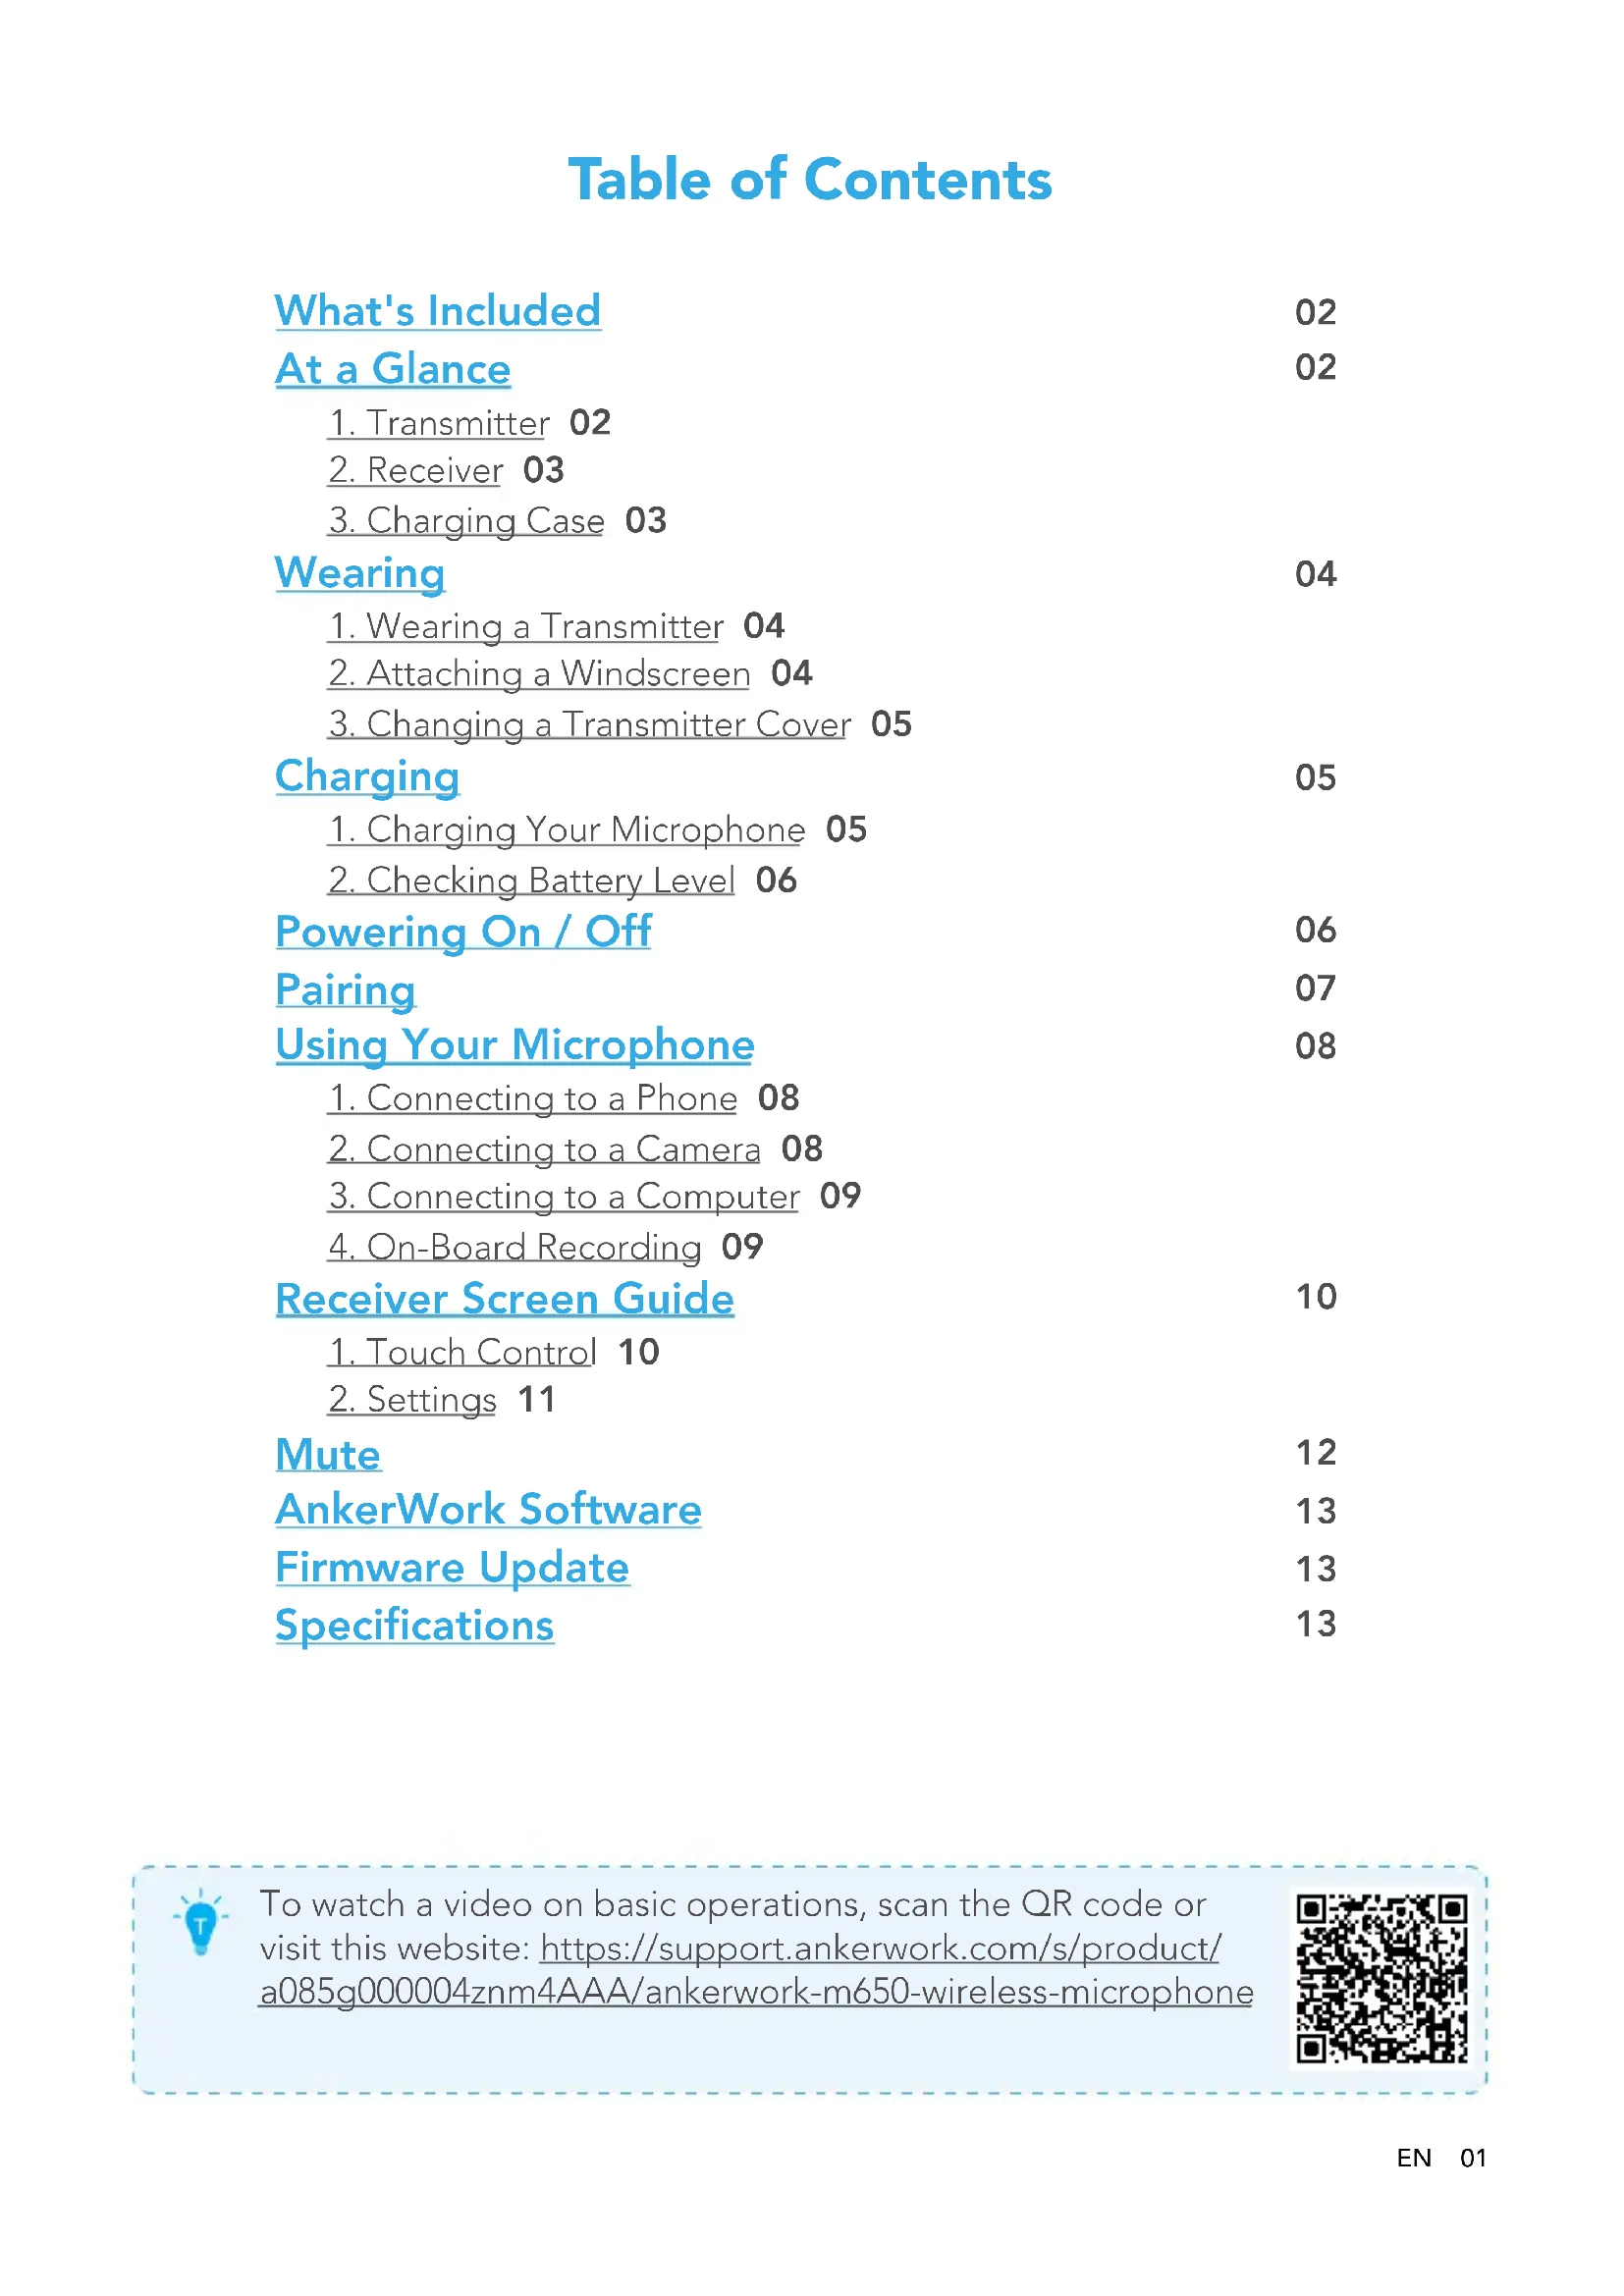
What's Included
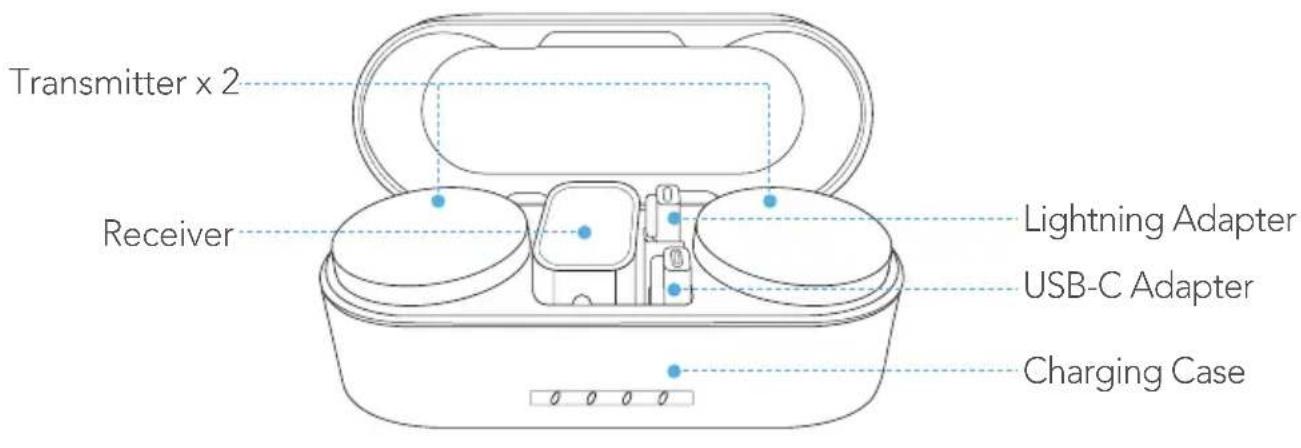
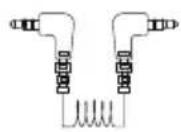

USB-C Cable AUX Cable (TRS) Replaceable
Transmitter Cover × 2
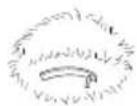

Windscreen × 2 Travel Case
At a Glance
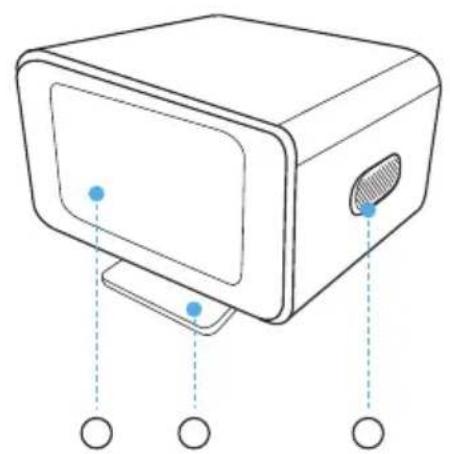
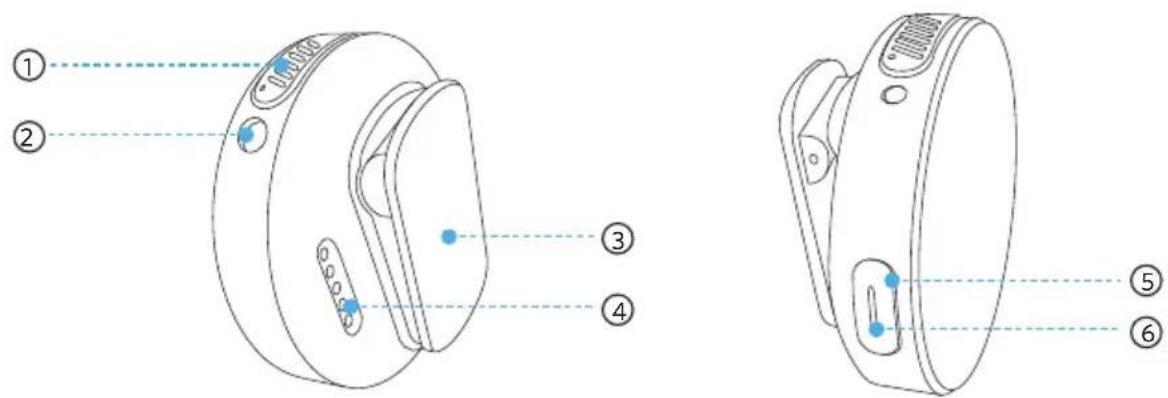
1. Transmitter
① Built-in microphone
② TRS input port
- Connect to a lavalier microphone or a windscreen.
③ Back clip / clip magnet
④ Charging pins
⑤ Multi-function button
- Press to mute / unmute microphone.
- Hold for two seconds to manually power on / off.
⑥ LED indicator
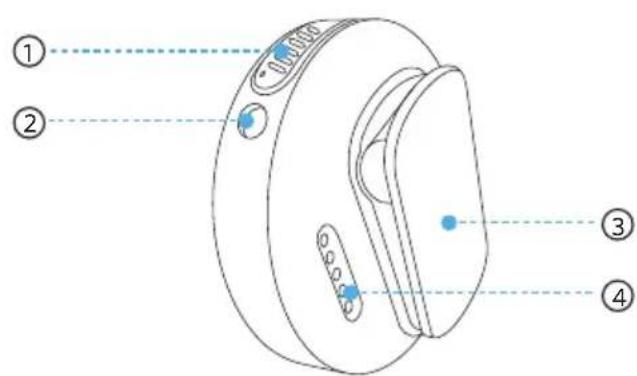
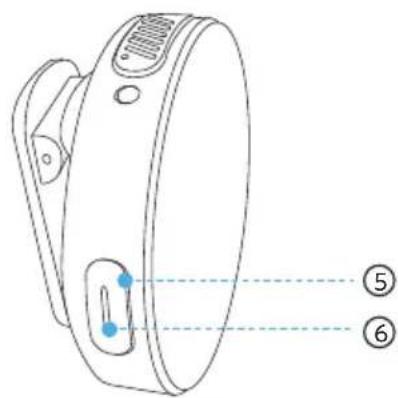
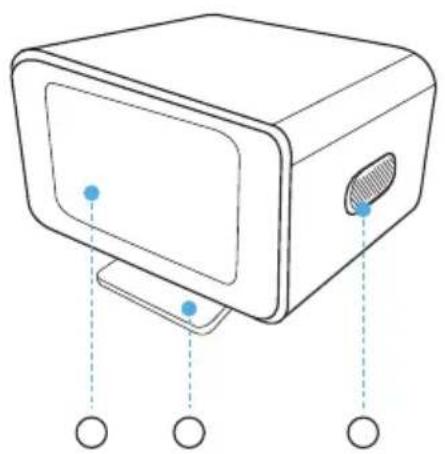
2. Receiver
natural_image
Line drawing of a computer monitor with control panel and buttons, no text or symbols present
① Touchscreen
② Built-in hot shoe adapter
③ Power button
- Press to lock / unlock the screen.
- Hold for two seconds to manually power on / off.
④ Expansion port
- Connect to your phone using the provided adapter.
⑤ Charging pins
⑥ USB-C port
- Connect to a power supply.
- Connect to your computer as an external microphone.
⑦ TRS output port
- Connect to your camera using the provided AUX cable.
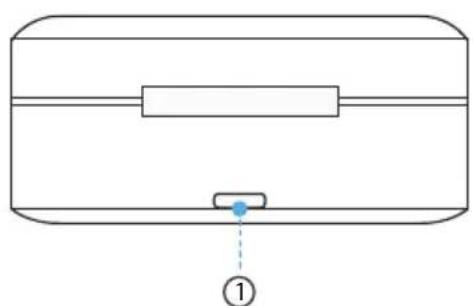
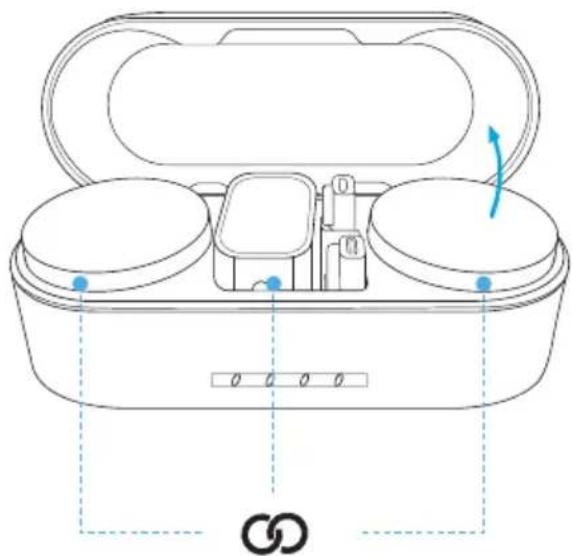
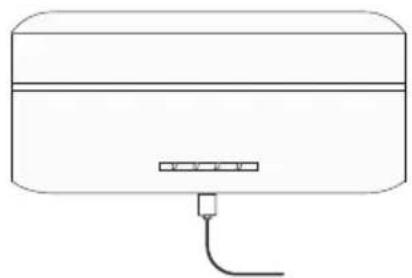
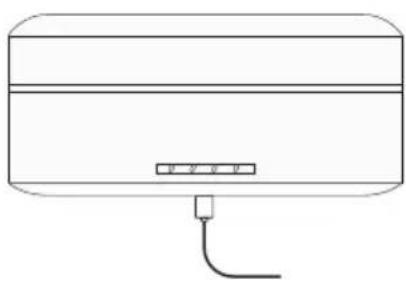
3. Charging Case
natural_image
Pure diagram of a rectangular object with internal horizontal lines and a small blue dot labeled '①' at the bottom (no text or symbols on the object itself)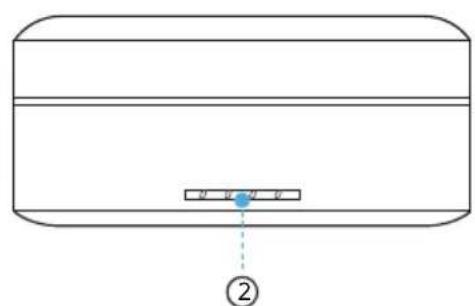
① USB-C port
- Connect to a power supply.
- Connect to AnkerWork PC software.
② LED indicator
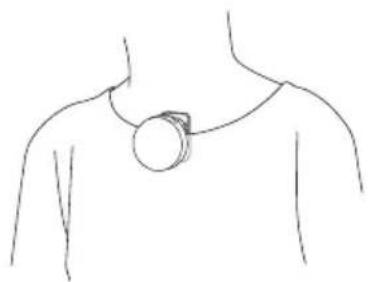
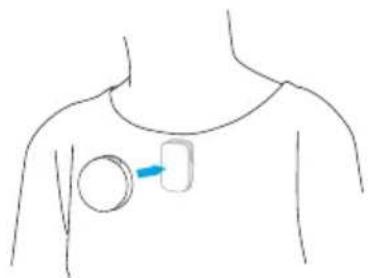
Wearing
1. Wearing a Transmitter
natural_image
Line drawing of a person's neck and shoulder with a circular pendant (no text or symbols)Option A: Attach the transmitter to your clothes using the back clip.
natural_image
Diagram showing a device with a slot and an arrow indicating transformation (no text or symbols)①

natural_image
Line drawing of a human torso with a circular object and a rectangular device attached to the chest (no text or symbols)②
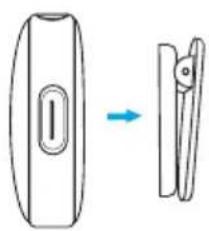
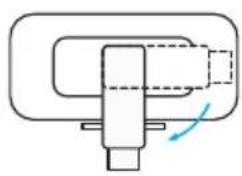
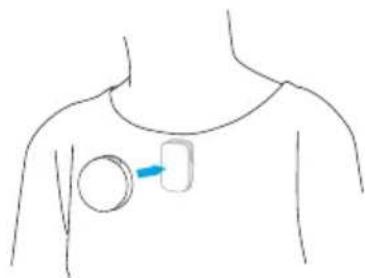
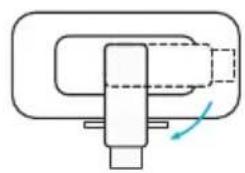
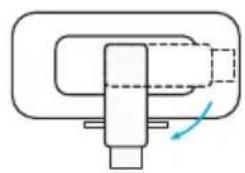
Option B: Separate the back clip from the transmitter. The clip magnet can be used to attach the transmitter.
2. Attaching a Windscreen
natural_image
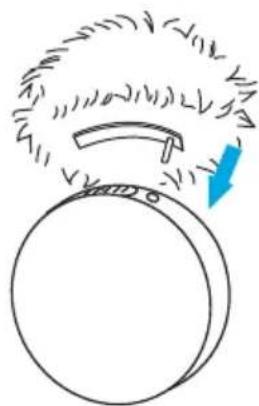
Simple line drawing of a circular object with a curved arrow and a blue arrow indicating direction (no text or symbols)To reduce wind noise while recording, insert a windscreen into the TRS input port on the transmitter.
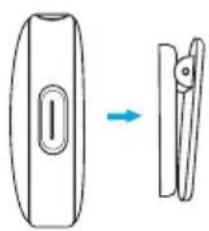
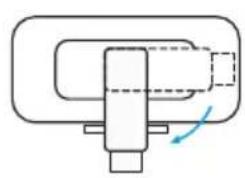
3. Changing a Transmitter Cover
natural_image
Line drawing of a mechanical component with a circular top and internal structure (no text or symbols)
natural_image
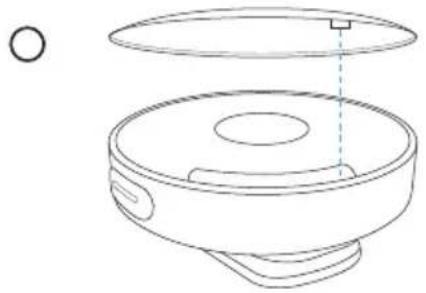
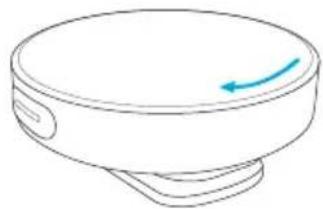
Simple line drawing of a circular object with a blue arrow pointing to its top surface, labeled with number 21 (no text or symbols on the object itself)To install a new cover, align it with the transmitter, and then turn the cover clockwise to lock.

To remove the cover, turn it counterclockwise.
Charging
1. Charging Your Microphone
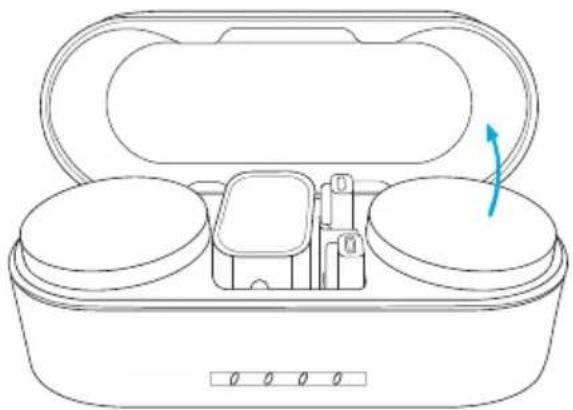
natural_image
Line drawing of a smartwatch with open case and two circular enclosures, no text or symbols present
natural_image
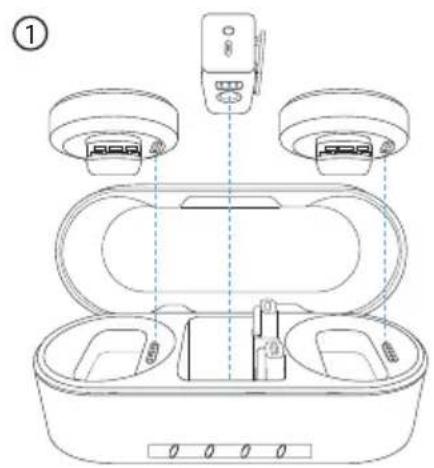
Simple line drawing of a rectangular device with a horizontal bar and a small connector at the bottom (no text or symbols)- Place the receiver and transmitters in the charging case and close it.
- Connect the charging case to the power supply by using the USB-C cable.
- The LED indicators on the charging case indicate the charging status.
| LED Battery level | during charging |
| ≤25% | |
| ○ 26%-50% | |
| ○ 51%75% | |
| ○ 76%-99% | |
| ○ 100% |
2. Checking Battery Level

natural_image
Line drawing of an open electronic device with internal compartments and a blue directional arrow (no text or symbols)Open the charging case, and the LED indicators will indicate the battery level.
| LED Battery level | |
| <10% | |
| ○ 10%-25% | |
| ○ 26%-50% | |
| ○ ○51%-75% | |
| ○ ○76%-100% |
Powering On / Off

Open the charging case, and the receiver and transmitters will automatically power on within four seconds.
To power off, return the receiver and transmitters to the case and close it.
- The LED indicator on the transmitter indicates the current status.
| LED Status | ||
| Steady blue for one second Powered on | ||
| Light off Powered off | ||
 | Flashing red slowly Low battery | |

- To manually power on or off, hold the button on the receiver or transmitter for 2 seconds.
- The receiver and transmitters will automatically power off after 30 minutes if they are not being used and are not connected.
Pairing
natural_image
Line drawing of a multi-stage electronic device with open lid and internal compartments, no text or symbols presentThe receiver and transmitters will pair with each other when powered on. When disconnected, place the receiver and transmitters into the case and they will pair automatically.
- The LED indicator on the transmitter indicates the current status.
| LED Status | ||
 | Flashing blue rapidly Pairing | |
 | Steady blue Connected | |
 | Flashing blue slowly Disconnected | |
Using Your Microphone
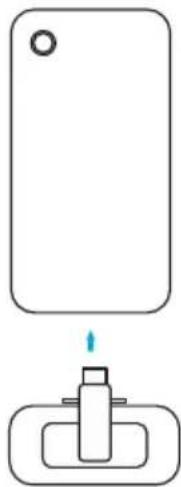
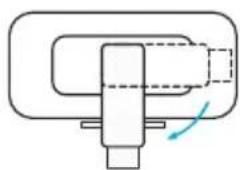
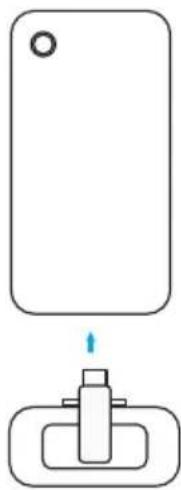
1. Connecting to a Phone
①
②

natural_image
Pure mechanical assembly diagram without any text, numbers, or symbols③

natural_image
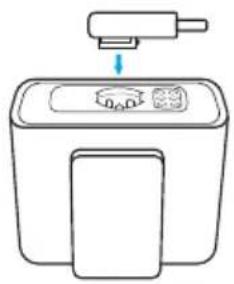
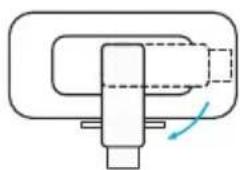
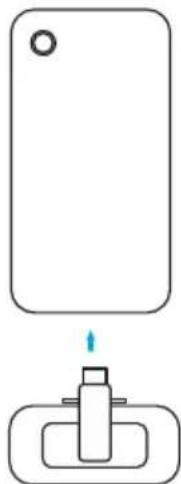
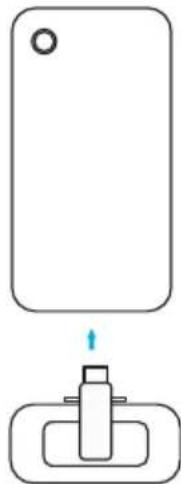
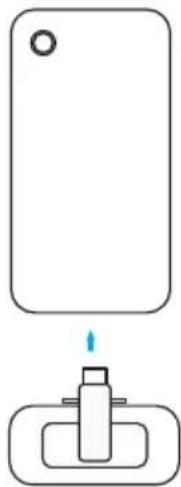
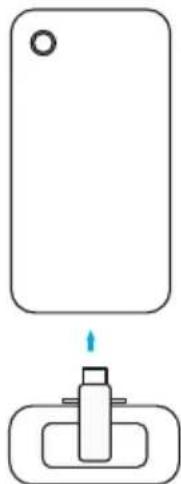
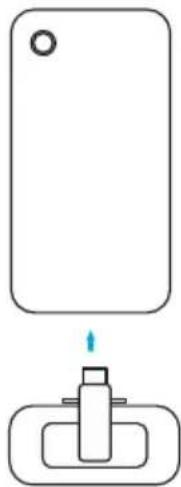
Simple diagram showing a rectangular object with a circular hole above it and a small mechanical component below (no text or symbols)Your microphone can record and transmit audio to a phone. To connect the receiver to the phone:
- Align the adapter with the groove on the receiver.
- Turn the adapter clockwise to lock.
- Plug the adapter into your phone.

- Your iPhone speaker cannot output sound when connected to the receiver. Please use Bluetooth headphones or speaker instead.
- Stereo mode and safe mode are not supported when using the lightning adapter. In this case, only mono mode is available.
- To monitor your audio while recording, plug your headphones into the receiver's TRS output port.
- To increase headphone volume, select 🔒 on the receiver's screen. See "Settings" in this manual.
- Selecting may distort recordings when the lightning adapter is used. In this case, select 📞 to check audio, and then return to 🏠 for final recording.
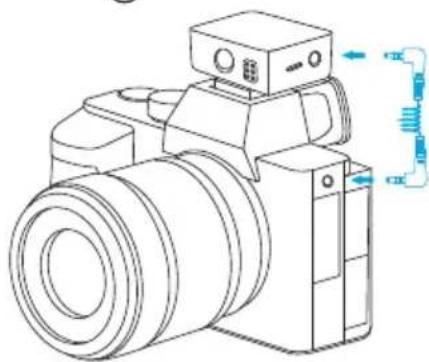
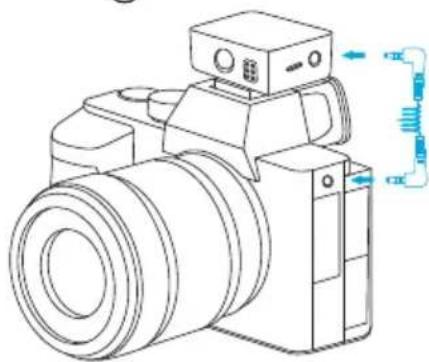
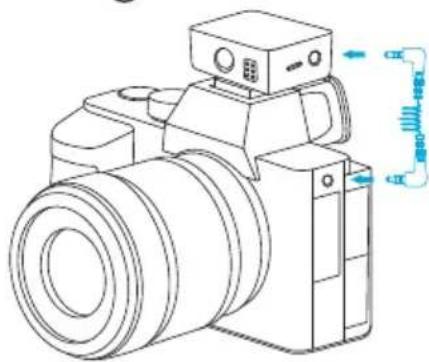
2. Connecting to a Camera
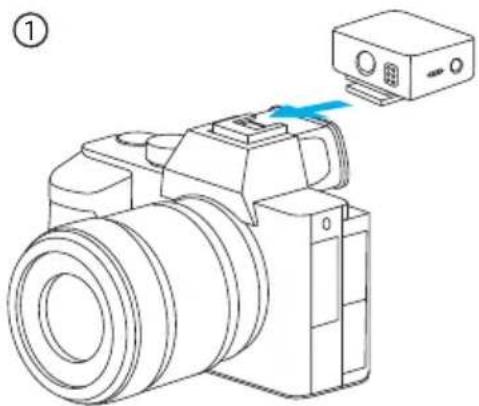
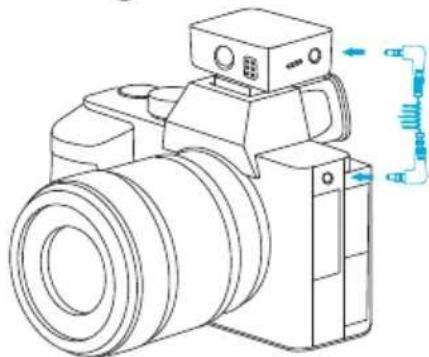
natural_image
Line drawing of a DSLR camera with a blue arrow pointing to the camera module (no text or symbols present)
natural_image
Line drawing of a digital camera with attached sensor and control panel (no text or symbols)Your microphone can record and transmit audio to a camera. To connect the receiver to the camera:
- Mount the receiver on the camera using the built-in hot shoe adapter.
- Connect the receiver and camera via the AUX cable.

• For best results, manually adjust the camera recording volume.
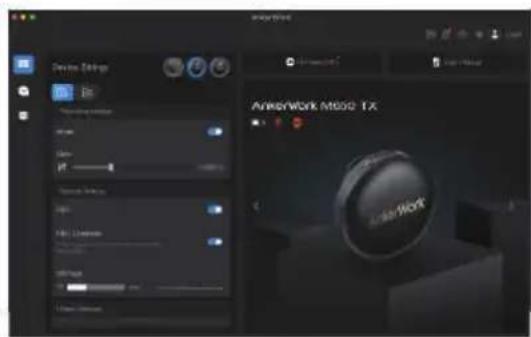
- Lower the camera gain to avoid sound distortion and reduce background noise. You can adjust the sound pickup gain via the receiver's screen.
- M650 may not be compatible with the wind noise suppression and noise reduction functions of your camera. It is recommended that you turn off both functions when recording.
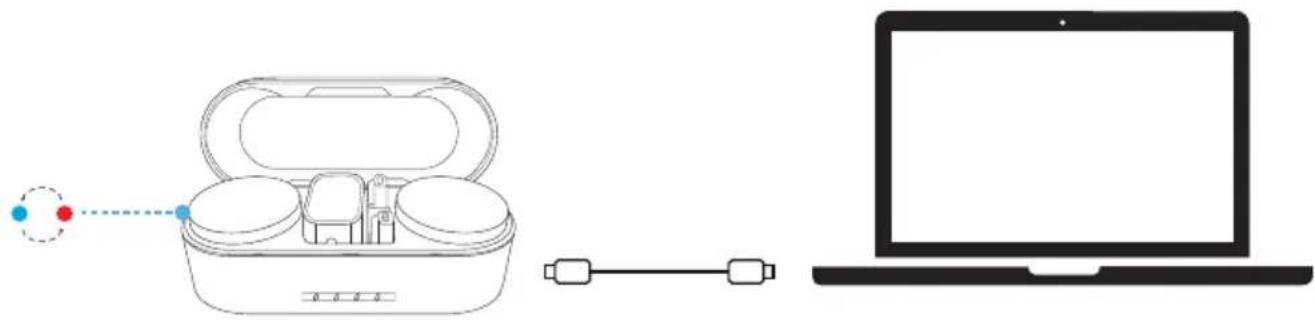
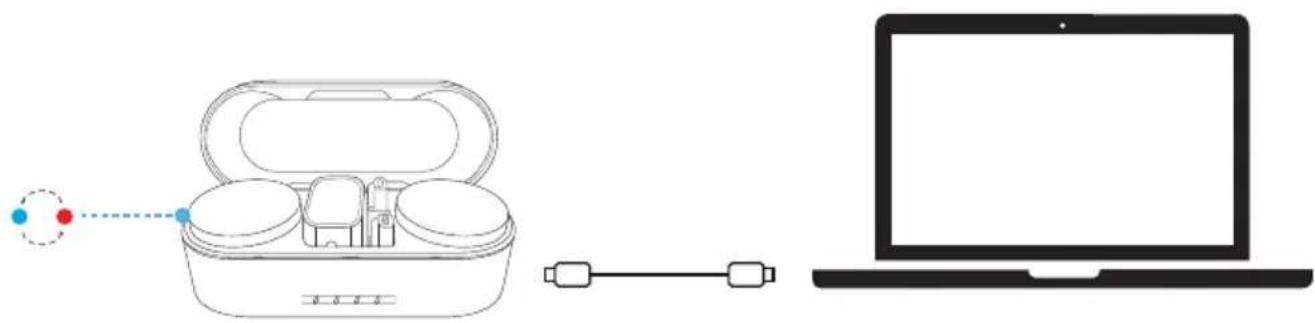
3. Connecting to a Computer
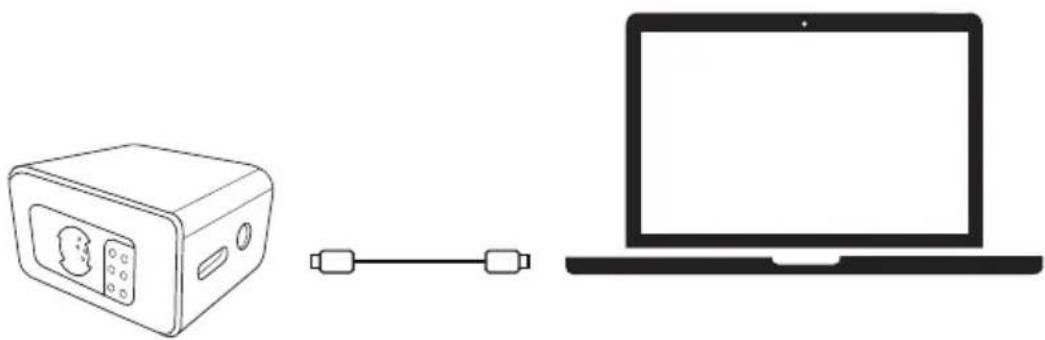
natural_image
Line drawing showing a device connected to a laptop via a cable (no text or symbols present)M650 can serve as an external microphone for a computer. Connect the receiver to the computer via the USB-C cable.

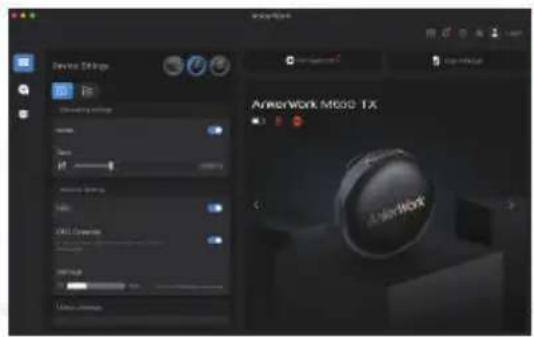
- You have to select AnkerWork M650 RX as the input device for your PC system and recording software.
4. On-Board Recording
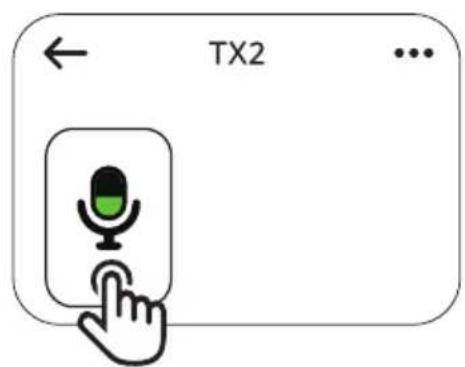
flowchart
graph LR
    A["TX1 Settings"] --> B["TX2 Settings"]
    B --> C["Hand Icon"]
    style A fill:#f9f,stroke:#333
    style B fill:#bbf,stroke:#333
    style C fill:#dfd,stroke:#333
①
②
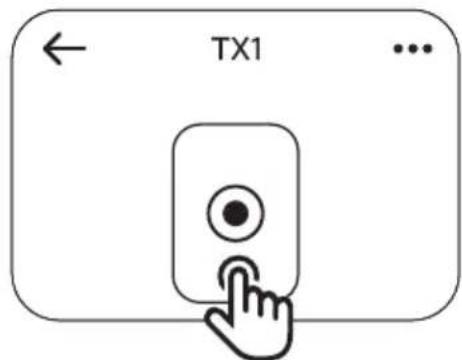
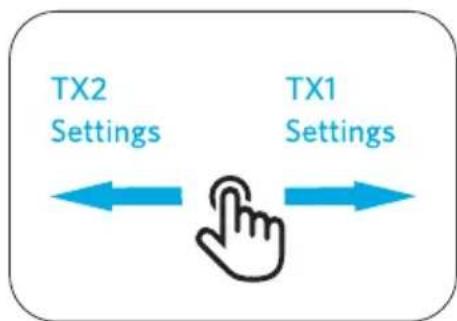
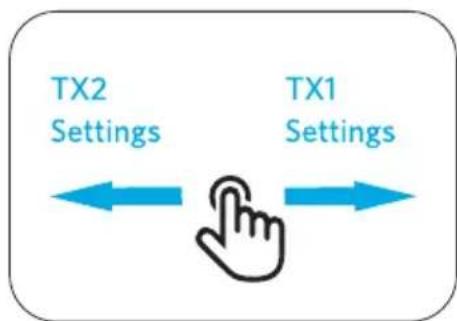
Each transmitter comes with built-in storage to record up to 7 hours of audio.
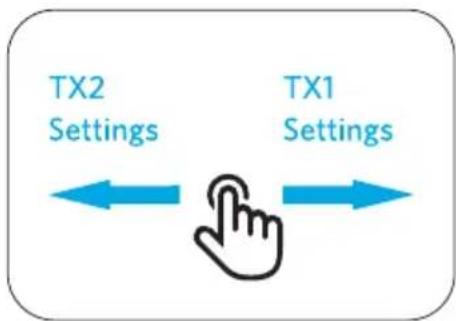
- Swipe left or right on the receiver's screen to access transmitter settings.
- Tap●to start recording, and tap again to stop. The audio file will be stored on the transmitter.

- Returning the transmitter to the charging case will stop recording.
- To export audio files, return the transmitter to the case and connect the case to your computer via the USB-C cable.
- When the storage is full, you can delete audio files or turn on "Overwrite Files" in the AnkerWork software.
Receiver Screen Guide

To watch a video on receiver screen guide, scan the QR code or visit this website: https://support.ankerwork.com/s/product/a085g000004znm4AAA/ankerwork-m650-wireless-microphone

1. Touch Control

flowchart
graph LR
    A["TX2 Settings"] <--> B["Hand Icon"]
    C["TX1 Settings"] <--> B
    style B fill:#f9f,stroke:#333
On the home page:
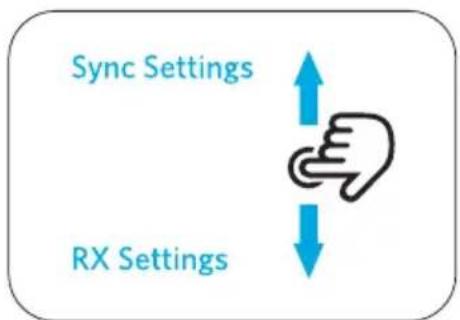
- Swipe down to set the receiver, or swipe up to synchronize settings on Transmitters 1 and 2.
- Swipe left / right to adjust settings on Transmitters 2 / 1.
2. Settings
Check the icons that you may see when setting your microphone.
| Noise reduction mode | [CSAT] | Turn off noise reduction. |
| [4XK] | Set noise reduction to a low level. | |
 | Set noise reduction to a high level. | |
| Sound channel | [KK6A] | Mono mode: Record audio onto one single channel. |
 | Stereo mode: Record audio onto left and right channels. (Transmitter 1 as left channel and Transmitter 2 as right channel) | |
| [SZ45] | ||
 | Indicates the left sound channel. | |
 | Indicates the right sound channel. | |
| Output mode |   | Camera mode: Set output gain at a suitable level to avoid sound distortion. Select this mode when you don't need to monitor audio. |
  | Headphone monitoring mode: Set output gain at a suitable level to increase headphone volume. Select this mode when you need to monitor audio. | |
| Recording |  | audio is being recorded. Tap to start recording. |
 | dio is being recorded. Tap to stop recording. | |
| Microphone |  | The microphone is on. Tap to mute the microphone. |
 | The microphone is muted. Tap to unmute the microphone. | |
| Safe mode |  | Turn on safe mode to record a backup audio track with a volume of -6dB. |
 | ||
 | Turn off safe mode. | |
| Audio file |  | Check the available recording time. |
 | Check the number of audio files. | |
| Gain control |  | Adjust the transmitter's gain level between -15dB and 15dB. |
 | Indicates the current gain level of the transmitter. | |
| Others |  | Indicates the real-time volume. |
 | Indicates the receiver. | |
| ### | Indicates Transmitter 1. | |
| ### | Indicates Transmitter 2. | |
| ### | Indicates the battery level. | |
 | Access more options. | |
 | Indicates the signal strength between the transmitter and receiver. | |
 | The touchscreen is locked. To unlock, press the button on the receiver. |
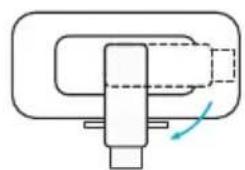
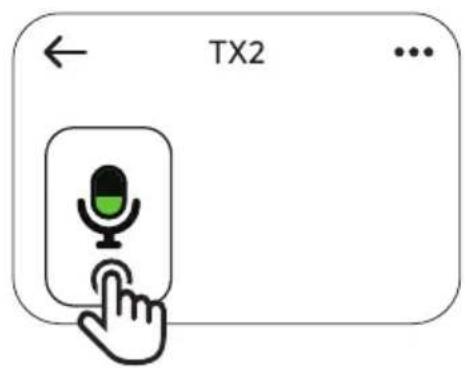
Mute
natural_image
Line drawing of a medical or surgical device with a hand cursor pointing to the button (no text or symbols)A

B
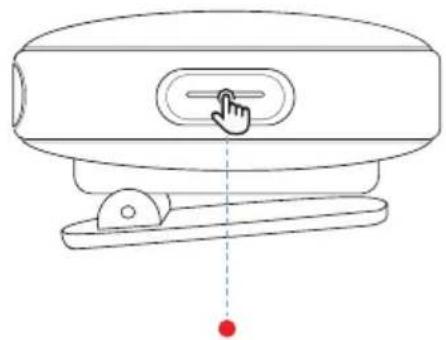
There are two ways to mute your microphone: by pressing the transmitter's button or by setting via the receiver's screen.
- The LED indicator on the transmitter turns steady red when the microphone is muted.
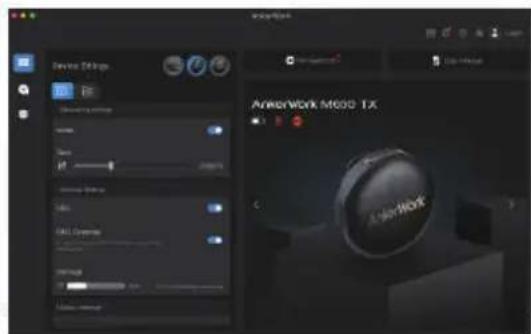
AnkerWork Software


Download the AnkerWork software to export recordings, adjust settings, update firmware, and more.
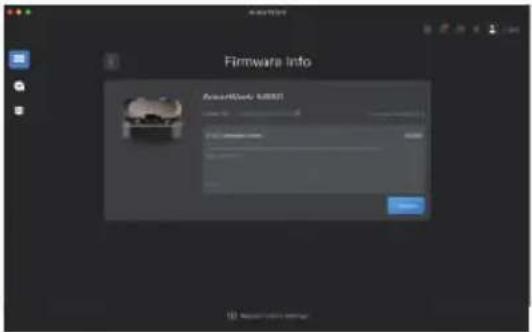
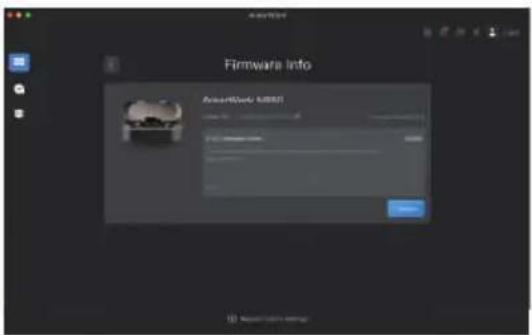
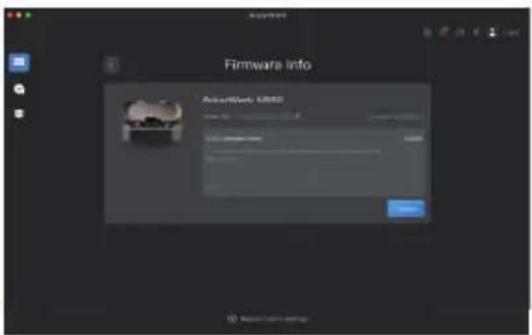
Firmware Update
natural_image
Diagram showing a wireless earbuds connected to a laptop via a cable, with no text or symbols present.- Return the receiver and transmitters to the charging case and leave the case open.
- Connect the charging case to the computer using the USB-C cable.
- Check for firmware updates by connecting your microphone to the AnkerWork software.
- During the update, the LED indicator on the transmitter lights up blue and red in a sequence.
Specifications
Specifications are subject to change without notice.
| Item Transmitter | |
| Input 5V | 0.66A |
| Weight 30g / 1.1 oz | |
| Dimensions 45.5×45.3×23.6 mm / 1.8×1.8×0.9" | |
| Battery capacity 350mAh | |
| Charging time 1.5 hours | |
| Operating time 6 hours (15 hours with the charging case) | |
| On-board recording 4GB / 7 hours | |
| Analog input 3.5 mm TRS (for a lavalier microphone) | |
| Transmission range 200 m / 656 ft (line of sight) | |
| Signal-to-noise ratio ≥ 70dB A-Weighted | |
| Equivalent noise 22dB A-Weighted (typical) | |
| Sensitivity -36dBV/Pa at 1KHz (gain = 0dB) | |
| Maximum sound pressure level | 120dB SPL |
| Polar pattern Omnidirectional | |
| Frequency range 50Hz - 20kHz | |
| Item Receiver | |
| Input 5V | ---0.72A |
| Weight 37g / 1.3 oz | |
| Dimensions 43.2×35×30.4 mm | / 1.7×1.4×1.2" |
| Battery capacity | 350mAh |
| Charging time 1.5 hours | |
| Operating time 6 hours (15 hours with the charging case) | |
| Analog output | 3.5 mm TRS (for headphones or a camera) |
| Item Charging case | |
| Input 5V | --- 3A |
| Output 5V | --- 0.8A (each pogo pin) |
| Weight 184g / 6.5 oz | |
| Dimensions 135.3×54.2×48.3 mm / 5.3×2.1×1.9" | |
| Battery capacity 2560mAh / 9.472Wh | |
| Charging time | 3 hours (using a power adapter with an output of 5V/2A or more) |
| Operating time | Fully charge the receiver and transmitters simultaneously 1.5 times |
Obsah
Obsah balení 17
Přehled 17
natural_image
Line drawing of a computer monitor with control panel and buttons, no text or symbols present
natural_image
Simple line drawing of a rectangular object with a horizontal bar and a small blue dot at the bottom, labeled with number 1 (no text or symbols on the object itself)
① Port USB-C
natural_image
Line drawing of a human torso with a circular object on the chest (no text or symbols)natural_image
Diagram showing a device with a slot and an arrow indicating transformation (no text or symbols)①

natural_image
Line drawing of a human torso with a circular object and a rectangular device attached to the chest (no text or symbols)②
natural_image
Simple line drawing of a circular object with a curved arrow and a blue arrow pointing downward (no text or symbols)natural_image
Technical line drawing of a mechanical component with a circular inset view (no text or symbols)
natural_image
Simple line drawing of a circular object with a blue arrow pointing to its side (no text or symbols)natural_image
Line drawing of a smartwatch with open case and two circular enclosures, no text or symbols present
natural_image
Line drawing of a rectangular electronic device with a cable and connector (no text or symbols)natural_image
Line drawing of a closed electronic device with multiple compartments and a handle, showing internal components and a blue arrow indicating rotation (no text or symbols)natural_image
Line drawing of a multi-stage electronic device with open lid and internal compartments, no text or symbols presentnatural_image
Line drawing of a kitchen appliance with a handle and control panel (no text or symbols)②

natural_image
Pure mechanical assembly diagram without any text, numbers, or symbols③

natural_image
Simple diagram showing a rectangular object with a circular hole above it and a small mechanical component below (no text or symbols)natural_image
Line drawing of a DSLR camera with a blue arrow pointing to the camera module (no text or symbols present)
natural_image
Line drawing of a digital camera with a mounted sensor and coiled cable (no text or symbols)natural_image
Line drawing showing a device connected to a laptop via a cable (no text or symbols)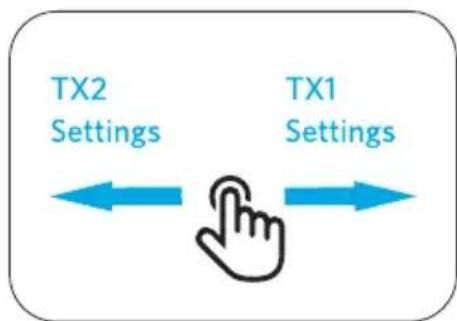
flowchart
graph LR
    A["TX2 Settings"] <--> B["Hand Icon"]
    C["TX1 Settings"] <--> B
    style B fill:#f9f,stroke:#333
natural_image
Line drawing of a device with a hand cursor pointing at the button, connected to a wall-mounted base (no text or symbols)A

B


natural_image
Line drawing of an earbuds device connected to a laptop via cable (no text or symbols)AnkerWork-software 43
Firmwareopdatering 43
Specifikationer 43

natural_image
Line drawing of a device with labeled points (no text or symbols present)
natural_image
Simple line drawing of a rectangular device with a horizontal bar and a small blue dot at the bottom, labeled with number 1 (no text or symbols on the diagram itself)
① USB-C-port
- Tilslut til en strømforsyning.
- Tilslut til AnkerWork-pc-software.
② LED-indikator
Montering i øre
natural_image
Line drawing of a person's neck and shoulder with a circular pendant (no text or symbols)natural_image
Diagram showing a device with a slot and an arrow indicating transformation (no text or symbols)①

natural_image
Line drawing of a human torso with a circular object and a rectangular device attached to the chest (no text or symbols)②
natural_image
Simple line drawing of a circular object with a curved arrow and a blue arrow indicating direction (no text or symbols)natural_image
Technical line drawing of a mechanical component with a circular inset view (no text or symbols)
natural_image
Simple line drawing of a circular object with a blue arrow pointing to its side (no text or symbols)natural_image
Line drawing of a smart air conditioner unit with open lid and internal compartments (no text or symbols)
natural_image
Line drawing of a rectangular appliance with a cable and connector, labeled with number ② (no text or symbols on the device itself)natural_image
Line drawing of a closed electronic device with open lid and internal compartments (no text or symbols)natural_image
Line drawing of a multi-stage electronic device with open lid and internal compartments, no text or symbols presentnatural_image
Line drawing of a kitchen appliance with a handle and control panel (no text or symbols)②
natural_image
Pure mechanical assembly diagram without any text, numbers, or symbols③
natural_image
Simple diagram showing a rectangular object with a circular hole above it and a small mechanical component below (no text or symbols)natural_image
Line drawing of a DSLR camera with a blue arrow pointing to the camera module (no text or symbols present)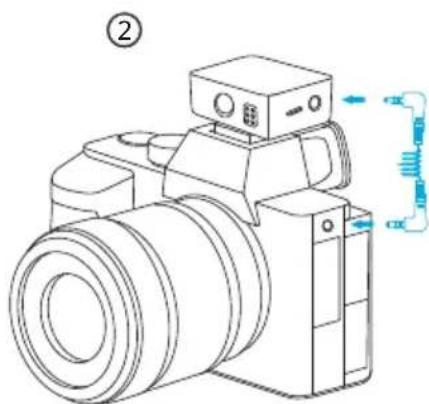
natural_image
Line drawing of a digital camera with no text or symbolsnatural_image
Line drawing showing a device connected to a laptop via a cable (no text or symbols present)②
flowchart
graph LR
    A["TX2 Settings"] <--> B["Hand Icon"]
    C["TX1 Settings"] <--> B
    style B fill:#f9f,stroke:#333
På startsiden:
natural_image
Line drawing of a device with a finger pressing a button, connected to a base plate and a red dot at the bottom (no text or symbols)A

B


Download og installer AnkerWork-softwaren for at eksportere optagelser, justere indstillinger, opdatere firmware m.m.
Firmwareopdatering
natural_image
Diagram showing a wireless earbuds device connected to a laptop via a cable, with no visible text or symbols.natural_image
Line drawing of a device with labeled points (no text or symbols present)
natural_image
Simple line drawing of a rectangular device with a horizontal bar and a small blue dot at the bottom, labeled with number 1 (no text or symbols on the diagram itself)
natural_image
Line drawing of a human torso with a circular object on the chest (no text or symbols)natural_image
Diagram showing a device with a slot and an arrow indicating transformation (no text or symbols)①
natural_image
Line drawing of a human torso with a circular object and a rectangular device attached to the chest (no text or symbols)②
natural_image
Simple line drawing of a circular object with a curved arrow and a blue arrow indicating direction (no text or symbols)natural_image
Line drawing of a mechanical component with a circular top and internal structure (no text or symbols)
natural_image
Simple line drawing of a circular object with a blue arrow pointing to its top surface, labeled with number 21 (no text or symbols on the object itself)
natural_image
Line drawing of a rectangular electronic device with a cable and connector, labeled with number ② (no text or symbols on the device itself)natural_image
Line drawing of a closed electronic device with open lid and internal compartments (no text or symbols)natural_image
Line drawing of a multi-stage electronic device with open lid and internal compartments, no text or symbols presentnatural_image
Line drawing of a kitchen appliance with a handle and control panel (no text or symbols)②
natural_image
Pure mechanical diagram showing a shaft and housing with no text or symbols③
natural_image
Simple line drawing of a device with a handle and base, no text or symbols presentnatural_image
Line drawing of a DSLR camera with a blue arrow pointing to the camera module (no text or symbols present)
natural_image
Line drawing of a digital camera with no text or symbolsnatural_image
Line drawing showing a device connected to a laptop via a cable (no text or symbols)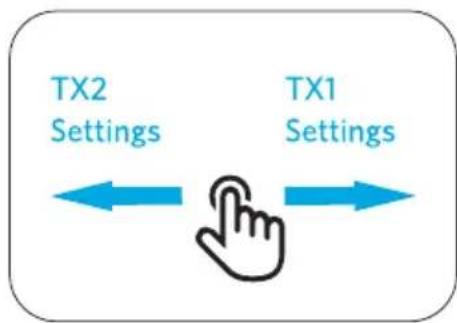
flowchart
graph LR
    A["TX1 Settings"] --> B["TX2 Settings"]
    B --> C["Hand Icon"]
    style A fill:#f9f,stroke:#333
    style B fill:#bbf,stroke:#333
    style C fill:#dfd,stroke:#333
Auf der Startseite:
natural_image
Line drawing of a medical or surgical device with a hand cursor pointing to the button (no text or symbols)A

B


natural_image
Diagram showing a wireless earbuds connected to a laptop via a cable, with no text or symbols present.natural_image
Line drawing of a computer monitor with control panel and buttons, no text or symbols present
natural_image
Pure diagram of a rectangular object with internal horizontal and vertical lines, and a small blue dot labeled '①' at the bottom (no text or symbols on the object itself)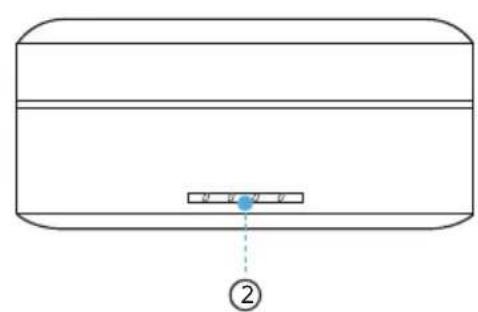
natural_image
Line drawing of a person's neck and shoulder with a circular pendant (no text or symbols)natural_image
Diagram showing a device with a U-shaped slot and a separate clip holding a circular object, both without any text or symbols.①

natural_image
Line drawing of a human torso with a circular object and a rectangular device attached to the chest (no text or symbols)②
natural_image
Simple line drawing of a circular object with a curved arrow and a blue arrow indicating direction (no text or symbols)natural_image
Line drawing of a closed electronic device with multiple compartments and a handle, showing internal components and a blue arrow indicating rotation (no text or symbols)natural_image
Line drawing of a multi-stage electronic device with open lid and internal compartments, no text or symbols present②

natural_image
Pure mechanical assembly diagram without any text, numbers, or symbols③

natural_image
Simple diagram showing a rectangular object with a circular hole and a small mechanical component below (no text or symbols)natural_image
Line drawing of a DSLR camera with a blue arrow pointing to the camera module (no text or symbols present)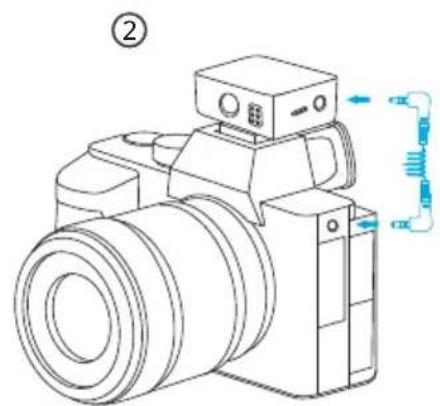
natural_image
Line drawing of a digital camera with attached sensor and control panel (no text or symbols)natural_image
Line drawing showing a device connected to a laptop via cable (no text or symbols)②

flowchart
graph LR
    A["TX1 Settings"] --> B["TX2 Settings"]
    B --> C["Hand Icon"]
    style A fill:#f9f,stroke:#333
    style B fill:#bbf,stroke:#333
    style C fill:#dfd,stroke:#333
natural_image
Line drawing of a device with a hand cursor pointing at the button, connected to a red dot (no text or symbols)A

B


natural_image
Line drawing of an earbuds device connected to a laptop via cable (no text or symbols)natural_image
Line drawing of a device with labeled points (no text or symbols present)
natural_image
Simple line drawing of a rectangular device with a horizontal bar and a small blue dot at the bottom, labeled with number 1 (no text or symbols on the diagram itself)
natural_image
Line drawing of a person's neck and shoulder with a circular pendant (no text or symbols)natural_image
Diagram showing a device with a U-shaped slot and a separate clip holding a circular object, both without any text or symbols.①

natural_image
Line drawing of a human torso with a circular object and a rectangular device attached to the chest (no text or symbols)②
natural_image
Simple line drawing of a circular object with a curved arrow and a blue arrow indicating direction (no text or symbols)natural_image
Technical line drawing of a mechanical component with a circular inset view (no text or symbols)
natural_image
Simple line drawing of a circular object with a blue arrow pointing to its side (no text or symbols)
natural_image
Line drawing of a rectangular electronic device with a cable and connector, labeled with number ② (no text or symbols on the device itself)natural_image
Line drawing of an open electronic device with internal compartments and a blue directional arrow indicating rotation (no text or symbols)natural_image
Line drawing of a multi-stage electronic device with open casing and internal compartments, no text or symbols present②

natural_image
Pure mechanical assembly diagram without any text, numbers, or symbols③
natural_image
Simple diagram showing a rectangular object with a circular hole above it and a small mechanical component below (no text or symbols)natural_image
Line drawing of a DSLR camera with a blue arrow pointing to the camera module (no text or symbols present)
natural_image
Line drawing of a digital camera with attached sensor and spring components (no text or symbols)natural_image
Line drawing showing a device connected to a laptop via a network cable (no text or symbols)②

flowchart
graph LR
    A["TX2 Settings"] <--> B["Hand Icon"]
    C["TX1 Settings"] <--> B
    style B fill:#f9f,stroke:#333
Kotisivulla:
natural_image
Line drawing of a computer monitor with a hand cursor pointing at the screen (no text or symbols)A

B
software.ankerwork.com


natural_image
Line drawing of an earbuds with a connected device to a laptop (no text or symbols)natural_image
Line drawing of a device with labeled points (no text or symbols present)
natural_image
Simple line drawing of a rectangular device with a horizontal bar and a small blue dot at the bottom, labeled with number 1 (no text or symbols on the diagram itself)
natural_image
Line drawing of a person's neck and shoulder with a circular pendant (no text or symbols)natural_image
Diagram showing a device with a slot and an arrow indicating transformation (no text or symbols)①

natural_image
Line drawing of a human torso with a circular object and a rectangular device attached to the chest (no text or symbols)②
natural_image
Simple line drawing of a circular object with a curved arrow and a blue arrow indicating direction (no text or symbols)natural_image
Technical line drawing of a mechanical component with a circular inset view (no text or symbols)
natural_image
Simple line drawing of a circular object with a blue arrow pointing to its side (no text or symbols)natural_image
Line drawing of a smartwatch with open case and two circular enclosures, no text or symbols present
natural_image
Line drawing of a rectangular electronic device with a cable and connector, labeled with number ② (no text or symbols on the device itself)natural_image
Line drawing of a closed electronic device with multiple compartments and a handle, showing internal components and a blue arrow indicating rotation (no text or symbols)natural_image
Line drawing of a multi-stage electronic device with open lid and internal compartments, no text or symbols presentnatural_image
Simple line drawing of a kitchen appliance with a handle and control panel (no text or symbols)②
natural_image
Pure mechanical assembly diagram without any text, numbers, or symbols③

natural_image
Simple line drawing of a device with a handle and base, no text or symbols presentnatural_image
Line drawing of a DSLR camera with an attached device (no text or symbols)
natural_image
Line drawing of a digital camera with no text or symbolsnatural_image
Line drawing of a device connected to a laptop via a cable (no text or symbols)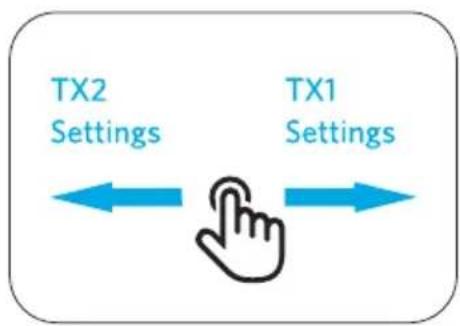
flowchart
graph LR
    A["TX1 Settings"] --> B["TX2 Settings"]
    B --> C["Hand Icon"]
    style A fill:#f9f,stroke:#333
    style B fill:#bbf,stroke:#333
    style C fill:#dfd,stroke:#333
natural_image
Line drawing of a device with a finger pressing a button, connected to a base plate and a red dot at the bottom (no text or symbols)A

B


natural_image
Diagram showing a wireless earbuds connected to a laptop via a cable, with no text or symbols present.natural_image
Line drawing of a device with labeled points (no text or symbols present)
natural_image
Simple line drawing of a rectangular device with a horizontal bar and a small blue dot at the bottom, labeled with number 1 (no text or symbols on the diagram itself)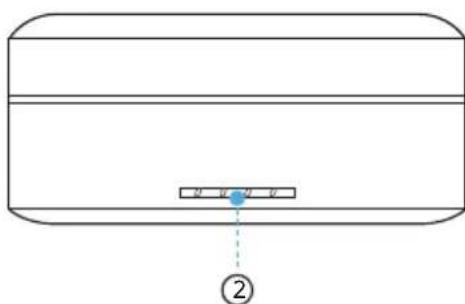
① Porta USB-C
natural_image
Line drawing of a person's neck and shoulder with a circular pendant (no text or symbols)natural_image
Diagram showing a device with a slot and an arrow indicating transformation (no text or symbols)①
natural_image
Line drawing of a human torso with a circular object and a rectangular device attached to the chest (no text or symbols)②
natural_image
Simple line drawing of a circular object with a curved arrow and a blue arrow indicating direction (no text or symbols)natural_image
Line drawing of a mechanical component with a circular top and internal structure (no text or symbols)
natural_image
Simple line drawing of a circular object with a blue arrow pointing to its top surface, labeled with number 21 (no text or symbols on the object itself)
natural_image
Line drawing of a rectangular electronic device with a cable and connector, labeled with number ② (no text or symbols on the device itself)natural_image
Line drawing of a closed electronic device with multiple compartments and a handle, showing internal components and a blue arrow indicating rotation (no text or symbols)natural_image
Line drawing of a multi-stage electronic device with open casing and internal compartments, no text or symbols present②

natural_image
Pure mechanical assembly diagram without any text, numbers, or symbols③

natural_image
Simple diagram showing a rectangular object with a circular hole above it and a small mechanical component below (no text or symbols)natural_image
Line drawing of a DSLR camera with an attached device (no text or symbols)
natural_image
Line drawing of a digital camera with no text or symbolsnatural_image
Line drawing showing a device connected to a laptop via a cable (no text or symbols)②

flowchart
graph LR
    A["TX1 Settings"] --> B["Hand Icon"]
    C["TX2 Settings"] --> B
    B --> D["Arrow Left"]
    B --> E["Arrow Right"]
Nella home page:
natural_image
Line drawing of a device with a hand cursor pointing at the button, connected to a red dot (no text or symbols)A

B


natural_image
Line drawing of an earbuds device connected to a laptop via cable (no text or symbols)natural_image
Line drawing of a computer monitor with control panel and buttons, no text or symbols present
natural_image
Simple line drawing of a rectangular object with a horizontal bar and a small blue dot at the bottom, labeled with number 1 (no text or symbols on the object itself)
natural_image
Simple line drawing of a rectangular container with a small blue object inside, labeled with number ② (no text or symbols on the diagram itself)① USB-C-poort
natural_image
Line drawing of a person's neck and shoulder with a circular pendant (no text or symbols)natural_image
Diagram showing a device with a slot and an arrow indicating transformation (no text or symbols)①

natural_image
Line drawing of a human torso with a circular object and a rectangular device attached to the chest (no text or symbols)②
natural_image
Simple line drawing of a circular object with a curved arrow and a blue arrow indicating direction (no text or symbols)natural_image
Line drawing of a mechanical component with a circular top and internal structure (no text or symbols)
natural_image
Simple line drawing of a circular object with a blue arrow pointing to its side (no text or symbols)natural_image
Line drawing of a smartwatch with open case and two circular enclosures, no text or symbols present
natural_image
Line drawing of a rectangular appliance with a cable and connector, labeled with number ② (no text or symbols on the device itself)natural_image
Line drawing of a closed electronic device with open lid and internal compartments (no text or symbols)natural_image
Line drawing of a multi-stage electronic device with open casing and internal compartments, no text or symbols present②

natural_image
Pure mechanical assembly diagram without any text, numbers, or symbols③

natural_image
Simple diagram showing a rectangular object with a circular hole above it and a small mechanical component below (no text or symbols)natural_image
Line drawing of a DSLR camera with a blue arrow pointing to the camera module (no text or symbols present)
natural_image
Line drawing of a digital camera with no text or symbolsnatural_image
Line drawing showing a device connected to a laptop via a cable (no text or symbols present)②


natural_image
Line drawing of an earbuds device connected to a laptop via cable (no text or symbols)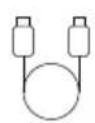


USB-C-kabel AUX-kabel (TRS) Utskiftbart
senderdeksel × 2

Vindskjerm × 2 Reiseetui
Kjapp oversikt
1. Sender
① Innebygd mikrofon
② TRS-inndataport
- Koble til en Lavalier-mikrofon eller en vindskjerm.
③ Baksideklips/klipsmagnet
④ Ladepinner
natural_image
Line drawing of a computer monitor with control panel and buttons, no text or symbols present
natural_image
Pure diagram of a rectangular object with internal components and a small blue dot labeled '①' (no text or symbols beyond label)
natural_image
Simple line drawing of a rectangular container with a small blue object inside, labeled with number ② (no text or symbols on the diagram itself)① USB-C-port
• Koble til en strømforsyning.
• Koble til AnkerWork PC-programvare.
② LED-indikator
Bruk
natural_image
Line drawing of a person's neck and shoulder with a circular pendant (no text or symbols)natural_image
Diagram showing a device with a U-shaped slot and a separate clip holding a circular object, both without any text or symbols.①

natural_image
Line drawing of a human torso with a circular object and a rectangular device attached to the chest (no text or symbols)②
natural_image
Simple line drawing of a circular object with a curved arrow and a blue arrow indicating direction (no text or symbols)natural_image
Line drawing of a mechanical component with a lid and base, showing internal structure (no text or symbols)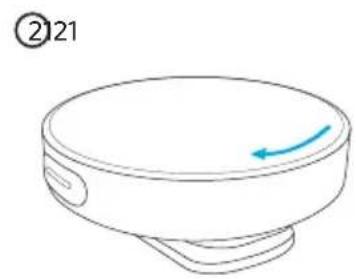
natural_image
Simple line drawing of a circular object with a blue arrow indicating direction (no text or symbols)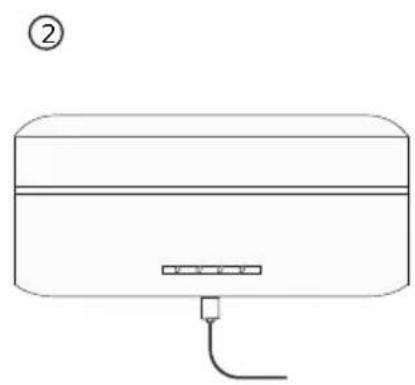
natural_image
Simple line drawing of a rectangular device with a horizontal bar and a small plug, labeled with number ② (no text or symbols on the device itself)natural_image
Line drawing of an open electronic device with internal compartments and a blue directional arrow indicating rotation (no text or symbols)natural_image
Line drawing of a multi-stage electronic device with open lid and internal compartments, no text or symbols presentMottakeren og senderne pares med hverandre når de slås på.
Når frakoblet, legger du mottakeren og senderne i etuiet. De pares da automatisk.
• LED-indikatoren på senderen indikerer gjeldende status.
②

natural_image
Pure mechanical assembly diagram without any text, numbers, or symbols③

natural_image
Simple diagram showing a rectangular object with a circular hole above it and a small mechanical component below (no text or symbols)natural_image
Line drawing of a DSLR camera with a blue arrow pointing to the camera module (no text or symbols present)
natural_image
Line drawing of a digital camera with attached sensor and control panel (no text or symbols)natural_image
Line drawing showing a device connected to a laptop via a network cable (no text or symbols)M650 kan fungere som en ekstern mikrofon for en datamaskin. Koble mottakeren til datamaskinen via USB-C-kabelen.

flowchart
graph LR
    A["TX2 Settings"] <--> B["Hand Icon"]
    C["TX1 Settings"] <--> D["Hand Icon"]
På hjemmesiden:
natural_image
Line drawing of a device with a hand cursor pointing at the button, connected to a base plate and a red dot (no text or symbols)A

B


natural_image
Line drawing of an earbuds device connected to a laptop via cable (no text or symbols)natural_image
Line drawing of a computer monitor with control panel and buttons, no text or symbols present
natural_image
Simple line drawing of a rectangular object with a horizontal bar and a small blue dot at the bottom, labeled with number 1 (no text or symbols on the object itself)
natural_image
Line drawing of a person's neck and shoulder with a circular pendant (no text or symbols)natural_image
Diagram showing a device with a slot and an arrow indicating transformation (no text or symbols)①

natural_image
Line drawing of a human torso with a circular object and a rectangular device attached to the chest (no text or symbols)②
natural_image
Simple line drawing of a circular object with a curved arrow and a blue arrow indicating direction (no text or symbols)natural_image
Technical line drawing of a mechanical component with no visible text or symbols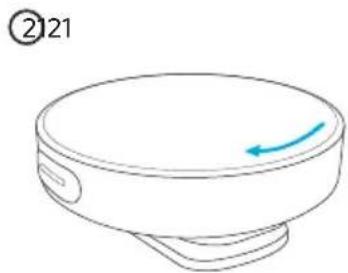
natural_image
Simple line drawing of a circular object with a blue arrow pointing to its side (no text or symbols)
natural_image
Line drawing of a rectangular electronic device with a cable and connector (no text or symbols)natural_image
Line drawing of a closed electronic device with open lid and internal compartments (no text or symbols)natural_image
Line drawing of a multi-stage electronic device with open lid and internal compartments, no text or symbols presentnatural_image
Simple line drawing of a kitchen appliance with a handle and control panel (no text or symbols)②

natural_image
Pure mechanical assembly diagram without any text, numbers, or symbols③

natural_image
Simple diagram showing a rectangular object with a circular hole above it and a small mechanical component below (no text or symbols)natural_image
Line drawing of a DSLR camera with an attached device (no text or symbols)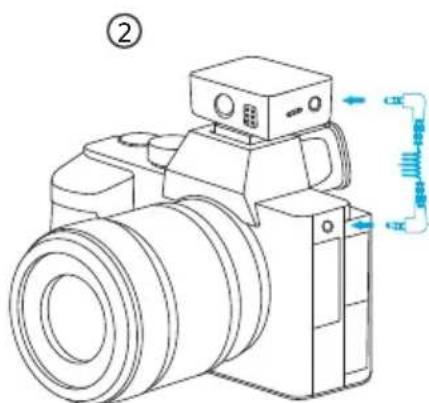
natural_image
Line drawing of a digital camera with no text or symbolsnatural_image
Line drawing showing a device connected to a laptop via a cable (no text or symbols present)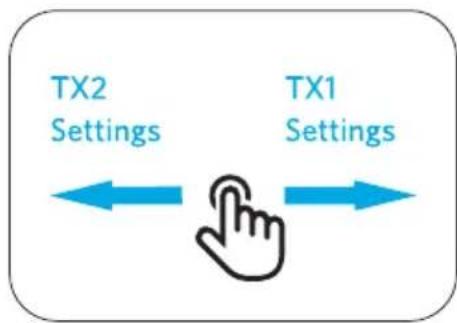
flowchart
graph LR
    A["TX2 Settings"] <--> B["Hand Icon"]
    C["TX1 Settings"] <--> D["Hand Icon"]
Na stronie głównej:
natural_image
Line drawing of a medical or surgical device with a hand cursor pointing to the button (no text or symbols)A
B


natural_image
Line drawing of an earbuds device connected to a laptop via cable (no text or symbols)natural_image
Line drawing of a device with labeled points (no text or symbols present)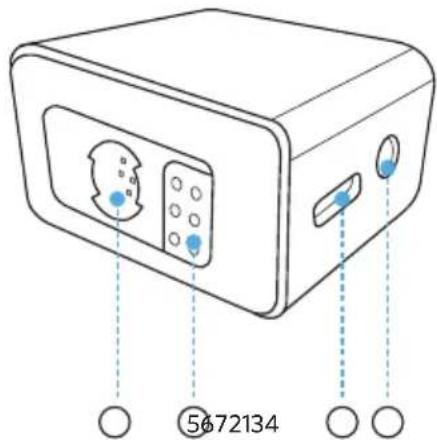
natural_image
Simple line drawing of a rectangular object with a horizontal bar and a small blue dot at the bottom, labeled with number 1 (no text or symbols on the object itself)
natural_image
Simple line drawing of a rectangular object with a small blue dot and dashed line, labeled with number ② (no text or symbols on the object itself)① Porta USB-C
natural_image
Line drawing of a person's neck and shoulder with a circular pendant (no text or symbols)natural_image
Diagram showing a device with a slot and an arrow indicating transformation (no text or symbols)①

natural_image
Line drawing of a human torso with a circular object and a rectangular device attached to the chest (no text or symbols)②
natural_image
Simple line drawing of a circular object with a curved arrow and a blue arrow indicating direction (no text or symbols)natural_image
Line drawing of a mechanical component with a circular top and internal structure (no text or symbols)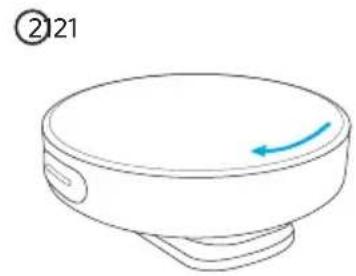
natural_image
Simple line drawing of a circular object with a blue arrow pointing to its top surface, labeled with number 21 (no text or symbols on the object itself)natural_image
Line drawing of a smart air conditioner unit with open lid and internal compartments (no text or symbols)
natural_image
Line drawing of a rectangular electronic device with a cable and connector, labeled with number ② (no text or symbols on the device itself)natural_image
Line drawing of a closed electronic device with open lid and internal compartments, showing a blue directional arrow (no text or symbols)natural_image
Line drawing of a multi-stage electronic device with open lid and internal compartments, no text or symbols present②
natural_image
Pure mechanical assembly diagram without any text, numbers, or symbols③
natural_image
Simple diagram showing a rectangular object with a circular hole above it and a small mechanical component below (no text or symbols)natural_image
Line drawing of a DSLR camera with a blue arrow pointing to the camera module (no text or symbols present)
natural_image
Line drawing showing a device connected to a laptop via a cable (no text or symbols)natural_image
Line drawing of a medical or surgical device with a hand cursor pointing at the button (no text or symbols)A

B

natural_image
Line drawing of an earbuds with a connected device to a laptop (no text or symbols)natural_image
Line drawing of a computer monitor with control panel and buttons, no text or symbols present
natural_image
Simple line drawing of a rectangular object with a horizontal bar and a small blue dot at the bottom, labeled with number 1 (no text or symbols on the object itself)
① Порт USB-C
natural_image
Line drawing of a human torso with a circular pendant on the chest (no text or symbols)natural_image
Diagram showing a device with a slot and an arrow indicating transformation (no text or symbols)①

natural_image
Line drawing of a human torso with a circular object and a rectangular device attached to the chest (no text or symbols)②
natural_image
Simple line drawing of a circular object with a curved arrow and a blue arrow indicating direction (no text or symbols)natural_image
Technical line drawing of a mechanical component with no visible text or symbols
natural_image
Simple line drawing of a circular object with a blue arrow pointing to its side (no text or symbols)natural_image
Line drawing of a smartwatch with open case and two circular enclosures, no text or symbols present
natural_image
Line drawing of a rectangular electronic device with a cable and connector (no text or symbols)natural_image
Line drawing of an open electronic device with internal compartments and a blue directional arrow (no text or symbols)natural_image
Line drawing of a multi-stage electronic device with open lid and internal compartments, no text or symbols presentnatural_image
Simple line drawing of a kitchen appliance with a handle and control panel (no text or symbols)②

natural_image
Pure mechanical assembly diagram without any text, numbers, or symbols③
natural_image
Simple diagram showing a rectangular object with a circular hole above it and a small mechanical component below (no text or symbols)natural_image
Line drawing of a digital camera with a blue arrow pointing to the camera module (no text or symbols present)
natural_image
Line drawing showing a device connected to a laptop via a network cable (no text or symbols)
flowchart
graph LR
    A["TX1 Settings"] --> B["TX2 Settings"]
    B --> C["Hand Icon"]
    style A fill:#f9f,stroke:#333
    style B fill:#bbf,stroke:#333
    style C fill:#dfd,stroke:#333
natural_image
Line drawing of a device with a hand cursor pointing at the button, connected to a red dot (no text or symbols)A

B


natural_image
Line drawing of an earbuds device connected to a laptop via cable (no text or symbols)INNEHÅLLSFÖRTECKNING
Vad som ingår 197
Överblick 197
natural_image
Line drawing of a computer monitor with control panel and buttons, no text or symbols present
natural_image
Simple line drawing of a rectangular object with a horizontal bar and a small blue dot at the bottom, labeled with number 1 (no text or symbols on the object itself)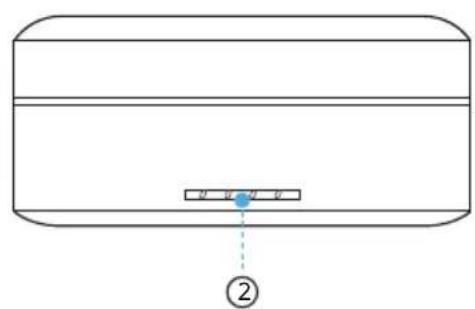
① USB-C-port
natural_image
Line drawing of a human torso with a circular object on the chest (no text or symbols)natural_image
Diagram showing a device with a slot and an arrow indicating transformation (no text or symbols)①

natural_image
Line drawing of a human torso with a circular object and a rectangular device attached to the chest (no text or symbols)②
natural_image
Simple line drawing of a circular object with a curved arrow and a blue arrow pointing downward (no text or symbols)natural_image
Technical line drawing of a mechanical component with a circular inset view (no text or symbols)
natural_image
Simple line drawing of a circular object with a blue arrow pointing to its side (no text or symbols)
natural_image
Line drawing of a rectangular appliance with a cable and connector, labeled with number ② (no text or symbols on the device itself)natural_image
Line drawing of an open electronic device with internal compartments and a blue directional arrow indicating rotation (no text or symbols)natural_image
Line drawing of a multi-stage electronic device with open lid and internal compartments, no text or symbols present②

natural_image
Pure mechanical assembly diagram without any text, numbers, or symbols③

natural_image
Simple diagram showing a rectangular object with a circular hole above it and a small mechanical component below (no text or symbols)natural_image
Line drawing of a DSLR camera with a blue arrow pointing to the camera module (no text or symbols present)
natural_image
Line drawing of a digital camera with no text or symbolsnatural_image
Line drawing showing a device connected to a laptop via a cable (no text or symbols present)②

flowchart
graph LR
    A["TX1 Settings"] --> B["TX2 Settings"]
    B --> C["Hand Icon"]
    style A fill:#f9f,stroke:#333
    style B fill:#bbf,stroke:#333
    style C fill:#dfd,stroke:#333
På startsidan:
natural_image
Line drawing of a device with a finger pressing a button, connected to a base plate and a red dot at the bottom (no text or symbols)A

B

natural_image
Line drawing of an earbuds and a laptop connected via a cable (no text or symbols)natural_image
Line drawing of a computer monitor with control panel and buttons, no text or symbols present
natural_image
Simple line drawing of a rectangular object with a horizontal bar and a small blue dot labeled '①' (no text or symbols on the object itself)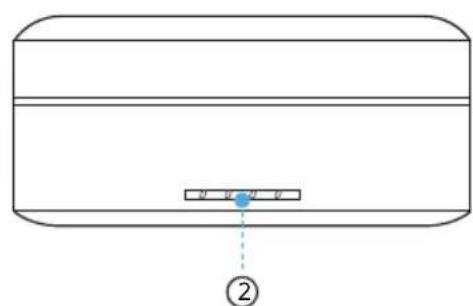
natural_image
Simple line drawing of a rectangular container with a small blue object inside, labeled with number ② (no text or symbols on the diagram itself)natural_image
Line drawing of a person's neck and shoulder with a circular pendant (no text or symbols)natural_image
Diagram showing a device with a slot and an arrow indicating transformation (no text or symbols)①

natural_image
Line drawing of a human torso with a circular object and a rectangular device attached to the chest (no text or symbols)②
natural_image
Simple line drawing of a circular object with a curved arrow and a blue arrow indicating direction (no text or symbols)natural_image
Technical line drawing of a mechanical component with a circular inset view (no text or symbols)
natural_image
Simple line drawing of a circular object with a blue arrow pointing to its side (no text or symbols)natural_image
Line drawing of a smartwatch with open case and two circular enclosures, no text or symbols present
natural_image
Line drawing of a rectangular appliance with a cable and connector, labeled with number ② (no text or symbols on the device itself)natural_image
Line drawing of a closed electronic device with open lid and internal compartments, showing a blue directional arrow (no text or symbols)natural_image
Line drawing of a multi-stage electronic device with open lid and internal compartments, no text or symbols present②
natural_image
Pure mechanical assembly diagram without any text, numbers, or symbols③

natural_image
Simple diagram showing a rectangular object with a circular hole above it and a small mechanical component below (no text or symbols)natural_image
Line drawing of a DSLR camera with an attached device (no text or symbols)②
natural_image
Line drawing of a DSLR camera with no visible text or symbolsnatural_image
Line drawing showing a device connected to a laptop via a network cable (no text or symbols)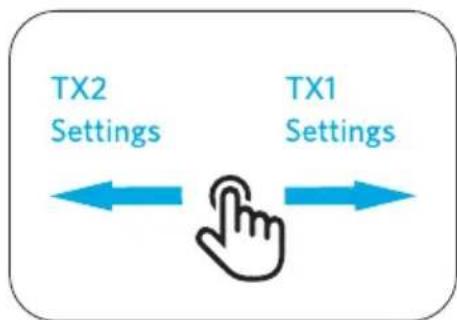
flowchart
graph LR
    A["TX2 Settings"] <--> B["Hand Icon"]
    C["TX1 Settings"] <--> B
    style B fill:#f9f,stroke:#333
Ana sayfada:
natural_image
Line drawing of a device with a hand cursor pressing a button, connected to a base plate and a red dot at the bottom (no text or symbols)A

B


natural_image
Line drawing of an earbuds device connected to a laptop via cable (no text or symbols)natural_image
Line drawing of a computer monitor with control panel and buttons, no text or symbols present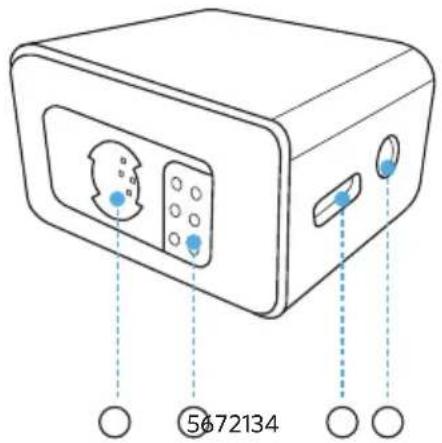
natural_image
Simple line drawing of a rectangular device with a horizontal bar and a small blue dot at the bottom, labeled with number 1 (no text or symbols on the diagram itself)
natural_image
Line drawing of a human torso with a circular object on the chest (no text or symbols)natural_image
Diagram showing a device with a slot and its side view, illustrating the process of transformation (no text or symbols present)①

natural_image
Line drawing of a human torso with a circular object and a rectangular device attached to the chest (no text or symbols)②
natural_image
Simple line drawing of a circular object with a curved arrow and a blue arrow indicating direction (no text or symbols)natural_image
Technical line drawing of a mechanical component with a circular inset view (no text or symbols)
natural_image
Simple line drawing of a circular object with a blue arrow pointing to its side (no text or symbols)natural_image
Line drawing of a smart air conditioner unit with two top-mounted fans and a central display unit (no text or symbols)
natural_image
Line drawing of a rectangular electronic device with a cable and connector, labeled with number ② (no text or symbols on the device itself)natural_image
Line drawing of a closed electronic device with multiple compartments and a handle, showing internal components and a blue arrow indicating rotation (no text or symbols)natural_image
Line drawing of a multi-stage electronic device with open lid and internal compartments, no text or symbols present②

natural_image
Pure mechanical assembly diagram without any text, numbers, or symbols③

natural_image
Simple diagram showing a rectangular object with a circular hole and a small mechanical component below (no text or symbols)natural_image
Line drawing of a DSLR camera with a blue arrow pointing to the camera module (no text or symbols present)
natural_image
Line drawing showing a device connected to a laptop via a network cable (no text or symbols)
flowchart
graph LR
    A["TX2 Settings"] <--> B["Hand Icon"]
    C["TX1 Settings"] <--> B
    style A fill:#fff,stroke:#000
    style C fill:#fff,stroke:#000
natural_image
Line drawing of a device with a hand cursor pointing at the button, connected to a wall-mounted base (no text or symbols)A

B


natural_image
Diagram showing a wireless earbuds connected to a laptop via a cable, with no visible text or symbols.natural_image
Line drawing of a computer monitor with control panel and buttons, no text or symbols present
natural_image
Simple line drawing of a rectangular device with a horizontal bar and a small blue dot at the bottom, labeled with number ① (no text or symbols on the diagram itself)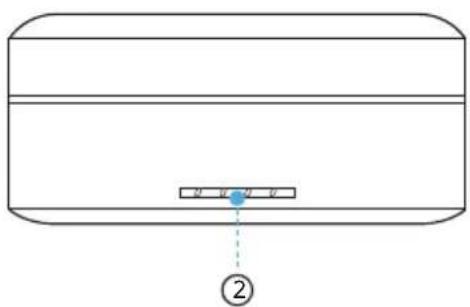
natural_image
Simple line drawing of a rectangular container with a small rectangular slot and a blue dot, labeled with number ② (no text or symbols on the diagram itself)natural_image
Line drawing of a person's neck and shoulder with a circular pendant (no text or symbols)natural_image
Diagram showing a device with a slot and an arrow indicating transformation (no text or symbols)①

natural_image
Line drawing of a human torso with a circular object and a rectangular device attached to the chest (no text or symbols)②
natural_image
Simple line drawing of a circular object with a curved arrow and a blue arrow indicating direction (no text or symbols)natural_image
Technical line drawing of a mechanical component with a circular top and side features (no text or symbols)②121
natural_image
Simple line drawing of a bowl with a blue arrow pointing to the lid (no text or symbols)natural_image
Line drawing of a smart air conditioner unit with open lid and control panel (no text or symbols)②
natural_image
Simple line drawing of a rectangular device with a horizontal bar and a small connector at the bottom (no text or symbols)natural_image
Line drawing of a closed electronic device with three compartments and a handle, showing internal components and a blue arrow indicating rotation (no text or symbols)natural_image
Line drawing of a multi-stage electronic device with open lid and internal compartments, no text or symbols present②
natural_image
Pure mechanical component diagram without any text, numbers, or symbols③

natural_image
Simple diagram showing a rectangular object with a circular hole above it and a small mechanical component below (no text or symbols)natural_image
Line drawing of a DSLR camera with an attached device (no text or symbols)②
natural_image
Line drawing of a DSLR camera with no visible text or symbolsnatural_image
Line drawing showing a device connected to a laptop via a cable (no text or symbols present)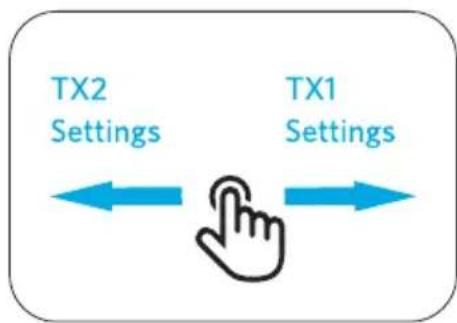
flowchart
graph LR
    A["TX2 Settings"] <--> B["Hand Icon"]
    C["TX1 Settings"] <--> D["Hand Icon"]
홈페이지에서:
natural_image
Line drawing of a device with a hand cursor pointing at the button, connected to a wall-mounted base (no text or symbols)A

B


natural_image
Diagram showing a wireless earbuds connected to a laptop via a cable, with no visible text or symbols.natural_image
Line drawing of a device with three circular markers pointing to its top and side (no text or symbols)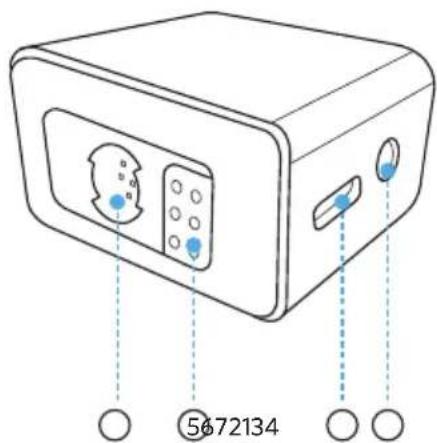
natural_image
Simple line drawing of a rectangular object with a horizontal bar and a small blue dot at the bottom, labeled with number 1 (no text or symbols on the object itself)
natural_image
Line drawing of a person's neck and shoulder with a circular pendant (no text or symbols)natural_image
Diagram showing a device with a slot and a separate clip, both without any text or symbols.①

natural_image
Line drawing of a human torso with a circular object and a rectangular device attached to the chest (no text or symbols)②
natural_image
Simple line drawing of a circular object with a curved arrow and blue arrow indicating direction (no text or symbols)natural_image
Line drawing of a mechanical component with a circular top and internal structure (no text or symbols)
natural_image
Simple line drawing of a circular object with a blue arrow pointing to its side (no text or symbols)natural_image
Line drawing of a smartwatch with open case and two circular enclosures, no text or symbols present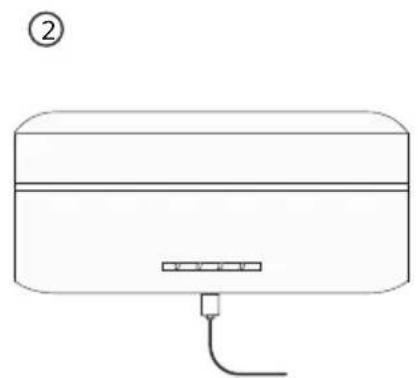
natural_image
Line drawing of a rectangular electronic device with a cable and connector, labeled with number ② (no text or symbols on the device itself)natural_image
Line drawing of a closed electronic device with three compartments and a handle, showing internal components and a blue arrow indicating rotation (no text or symbols)natural_image
Line drawing of a multi-stage electronic device with open lid and internal compartments, no text or symbols present开机后,接收器和发射器将相互配对。
②

natural_image
Pure mechanical assembly diagram without any text, numbers, or symbols③

natural_image
Simple diagram showing a rectangular object with a circular hole and a small mechanical component below (no text or symbols)natural_image
Line drawing of a DSLR camera with a blue arrow pointing to the camera module (no text or symbols present)②
natural_image
Line drawing of a DSLR camera with no text or symbolsnatural_image
Line drawing showing a device connected to a laptop via cable (no text or symbols)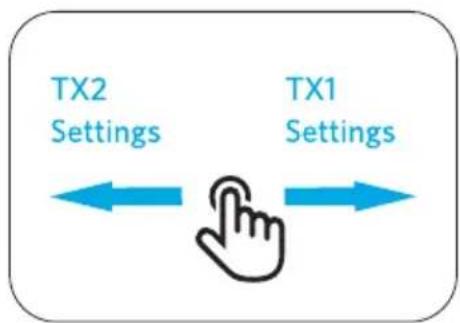
flowchart
graph LR
    A["TX1 Settings"] --> B["Hand Icon"]
    C["TX2 Settings"] --> D["Arrow Left"]
    E["Arrow Right"] --> F["Arrow Right"]
在主页上:
natural_image
Line drawing of a medical imaging device with a hand cursor pointing to the screen (no text or symbols)A

B


natural_image
Diagram showing a wireless earbuds connected to a laptop via a cable, with no visible text or symbols.https://support.ankerwork.com/s/product/
a085g000004znm4AAA/ankerwork-m650-wireless-microphone

内容物
natural_image
Line drawing of a computer monitor with control panel and buttons, no text or symbols present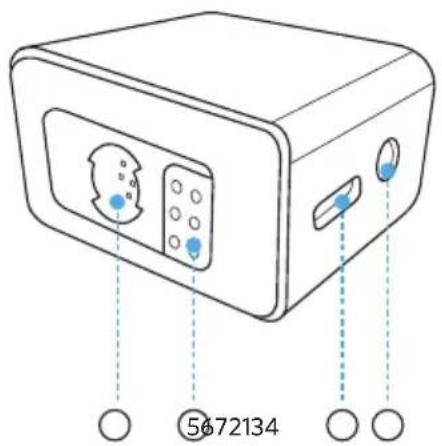
natural_image
Simple line drawing of a rectangular object with a horizontal bar and a small blue dot at the bottom, labeled with number 1 (no text or symbols on the object itself)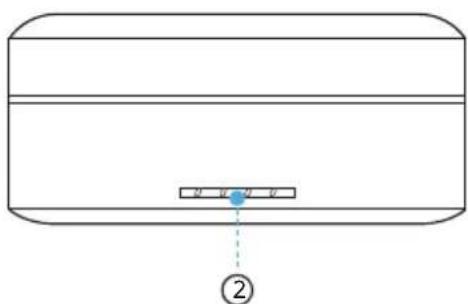
natural_image
Line drawing of a person's neck and shoulder with a circular pendant (no text or symbols)方法 A:使用背夾將發射器夾在衣服上。
natural_image
Diagram showing a device with a slot and a separate clip, both without any text or symbols.①

natural_image
Line drawing of a human torso with a circular object and a rectangular device attached to the chest (no text or symbols)②
natural_image
Simple line drawing of a circular object with a curved arrow and blue arrow indicating direction (no text or symbols)natural_image
Line drawing of a mechanical component with a circular top and internal structure (no text or symbols)
natural_image
Simple line drawing of a circular object with a blue arrow pointing to its side (no text or symbols)natural_image
Line drawing of a smartwatch with open case and two circular enclosures, no text or symbols present
natural_image
Line drawing of a rectangular electronic device with a cable and connector, labeled with number ② (no text or symbols on the device itself)| LED 充電期間的電池電量 | |
 [WED] [WESI] [SWI] [ZZTI] [ZHXI] [WED] [WESI] [SWI] [ZZTI] [ZHXI] | ≤slant 25% |
  [ASST] [SCXY] [ASST] [SCXY]  [BXO] [BXO] | 26%-50% |
[T3Y] [A3OW] [HBWH] [SB34]  | 51%-75% |
  [6YDB] [XKST] [BCTH] [SBCT] [6YDB] [XKST] [BCTH] [SBCT] |      [YWZ] [SKYY] [YWZ] [SKYY]  [DBDX] [XHBW] [ADWS] [DBDX] [XHBW] [ADWS] |
| ○ ○ ○ ○ | 100% |


2. 檢查電池電量
natural_image
Line drawing of a closed electronic device with three compartments and a handle, showing internal components and a blue arrow indicating rotation (no text or symbols)natural_image
Line drawing of a multi-stage electronic device with open lid and internal compartments, no text or symbols present開機時,接收器和發射器便會相互配對。
②

natural_image
Pure mechanical assembly diagram without any text, numbers, or symbols③
natural_image
Simple diagram showing a rectangular object with a circular hole and a small mechanical component below (no text or symbols)natural_image
Line drawing of a DSLR camera with a blue arrow pointing to the camera module (no text or symbols present)②
natural_image
Line drawing of a DSLR camera with no text or symbolsnatural_image
Line drawing showing a device connected to a laptop via a cable (no text or symbols present)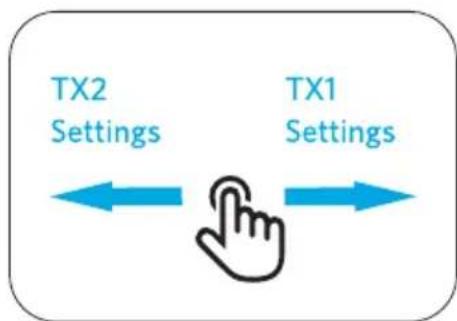
flowchart
graph LR
    A["TX2 Settings"] <--> B["Hand Icon"]
    C["TX1 Settings"] <--> B
    style B fill:#f9f,stroke:#333
請在首頁上:
natural_image
Line drawing of a device with a hand cursor pointing at the button, connected to a wall-mounted base (no text or symbols)A
B

natural_image
Diagram showing a wireless earbuds connected to a laptop via a cable, with no visible text or symbols.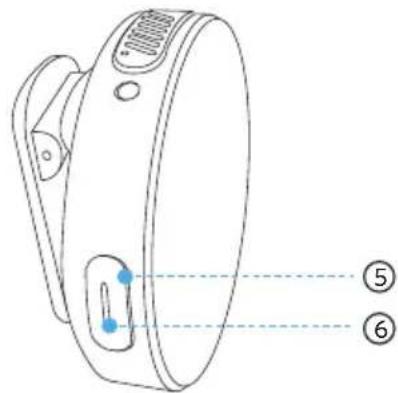
① ميكروfoon مدمج
TRS منفذ داخل ②
natural_image
Line drawing of a rectangular electronic device with labeled ports and connection points (no text or symbols)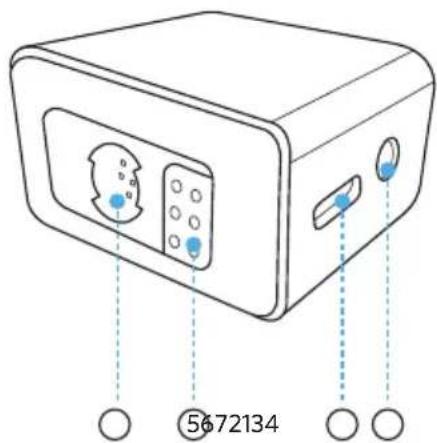
① شاشة تحمل باللمس
natural_image
Simple line drawing of a rectangular object with a horizontal bar and a small blue dot labeled '①' (no text or symbols on the object itself)
natural_image
Simple line drawing of a rectangular object with a small blue dot and a dotted line pointing to it, labeled with number ② (no text or symbols on the object itself)USB-C منفرذ ①
natural_image
Line drawing of a human torso with a circular object on the chest (no text or symbols)natural_image
Diagram showing a device with a double-headed arrow pointing to a pair of clothes (no text or symbols present)①

natural_image
Line drawing of a human torso with a circular object and a rectangular device attached to the chest (no text or symbols)②
natural_image
Simple line drawing of a circular object with a curved arrow and a blue arrow indicating direction (no text or symbols)natural_image
Technical line drawing of a mechanical component with a circular top and side view (no text or symbols)②121

natural_image
Simple line drawing of a cylindrical container with a blue arrow indicating direction (no text or symbols)natural_image
Line drawing of a smartwatch with open case and two circular enclosures, no text or symbols present②
natural_image
Simple line drawing of a rectangular device with a horizontal bar and a small connector at the bottom (no text or symbols)| مستوىprobability affecting Shchn | LED |
| ≤25% | |
| 26%-50% | |
| 51%-75% | |
| 76%-99% | |
| 100% |
natural_image
Line drawing of a closed electronic device with open lid and internal compartments, showing no text or symbolsnatural_image
Line drawing of a multi-stage electronic device with open casing and internal compartments, no text or symbols presentnatural_image
Line drawing of a kitchen appliance with a handle and control panel (no text or symbols)②

natural_image
Pure mechanical assembly diagram without any text, numbers, or symbols③

natural_image
Simple line drawing of a device with a circular button and a blue arrow pointing to a mechanical component (no text or symbols)natural_image
Line drawing of a DSLR camera with an attached projector (no text or symbols)
natural_image
Line drawing of a digital camera with no text or symbolsnatural_image
Line drawing of a portable electronic device with a circular vent and ports (no text or symbols)

natural_image
Simple line drawing of a laptop computer with blank screen (no text or symbols)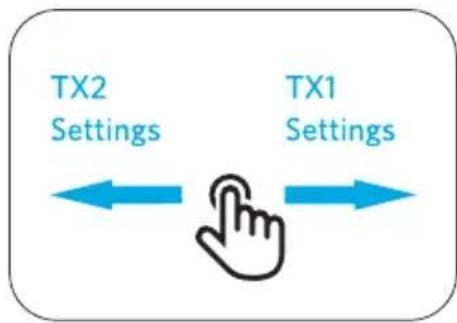
flowchart
graph LR
    A["TX1 Settings"] --> B["Hand Icon"]
    C["TX2 Settings"] --> B
    B --> D["Arrow Left"]
    B --> E["Arrow Right"]
natural_image
Line drawing of a medical device with a hand cursor pointing at the button (no text or symbols)A

B

natural_image
Line drawing of an earbuds device connected to a laptop via cable (no text or symbols)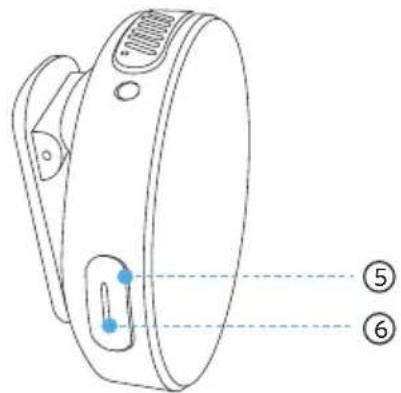
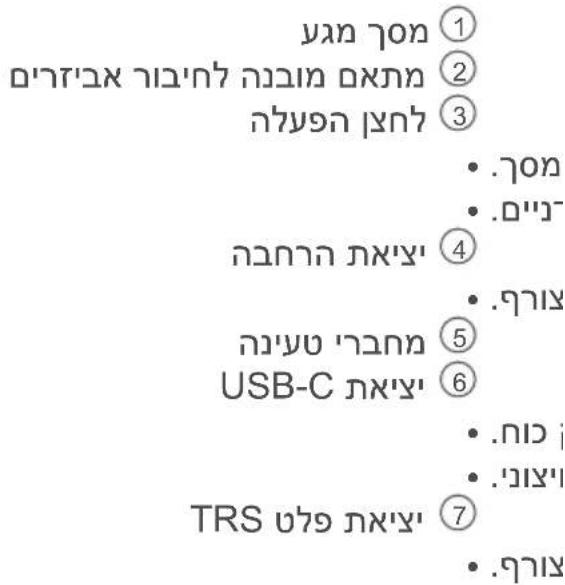
הכלה 1
TRS 2
הכלה/הכלה ③
הכלה ④
302 HE
תְבָר-הַעִי ⑤
• .1917
• .D"J"
הַרְשָׁה ⑥
הַלְרָה .2
natural_image
Line drawing of a rectangular electronic device with a screen and handle, connected to three circular markers (no text or symbols)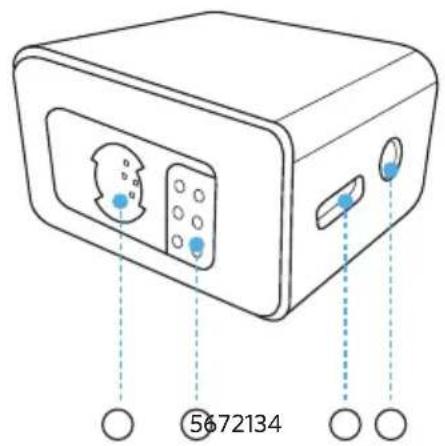
natural_image
Pure diagram of a rectangular object with internal components and a small blue dot labeled '①' (no text or symbols beyond label)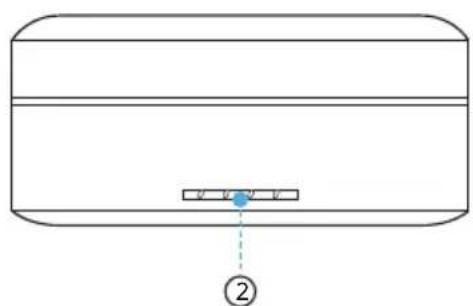
natural_image
Simple line drawing of a rectangular object with a small blue dot and a dotted line pointing to it, labeled with number ② (no text or symbols on the object itself)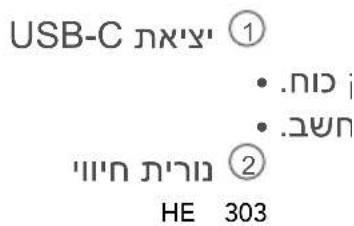
natural_image
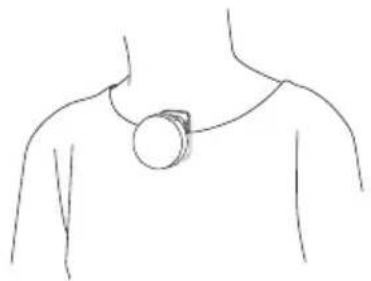
Line drawing of a human torso with a circular object on the chest (no text or symbols)natural_image
Diagram showing a device with a slot and a separate view of a clip or clip (no text or symbols)①
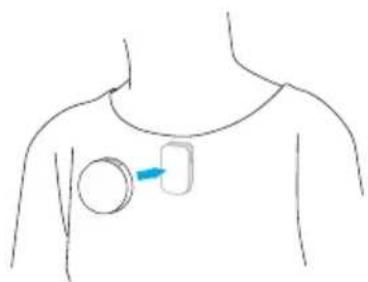
natural_image
Line drawing of a human torso with a circular object and a rectangular device attached to the chest (no text or symbols)②
natural_image
Simple line drawing of a circular object with a curved arrow and blue arrow indicating direction (no text or symbols)natural_image
Technical line drawing of a mechanical component with a circular top and side view (no text or symbols)②121
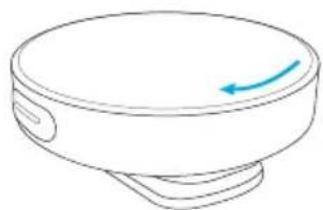
natural_image
Simple line drawing of a cylindrical container with a blue arrow indicating direction (no text or symbols)natural_image
Line drawing of a smartwatch with open case and two circular enclosures, no text or symbols present②

natural_image
Simple line drawing of a rectangular device with a horizontal bar and a small connector at the bottom (no text or symbols)natural_image
Line drawing of a closed electronic device with three compartments and a handle, showing internal components and a blue arrow indicating rotation (no text or symbols)natural_image
Line drawing of a closed-branded electronic device with multiple ports and a blue directional arrow indicating rotation (no text or symbols)natural_image
Line drawing of a kitchen appliance with a handle and control panel (no text or symbols)②
natural_image
Pure mechanical assembly diagram without any text, numbers, or symbols③
natural_image
Simple line drawing of a device with a circular button and a blue arrow pointing to a mechanical component (no text or symbols)natural_image
Line drawing of a DSLR camera with a blue arrow pointing to the camera module (no text or symbols present)
natural_image
Line drawing of a digital camera with no text or symbolsnatural_image
Line drawing of a portable electronic device with control panel and buttons (no text or symbols)

natural_image
Simple line drawing of a laptop computer with blank screen (no text or symbols)
flowchart
graph LR
    A["TX1 Settings"] --> B["TX2 Settings"]
    B --> C["Hand Icon"]
    style A fill:#f9f,stroke:#333
    style B fill:#bbf,stroke:#333
    style C fill:#dfd,stroke:#333
תְרָה בְּבָם
• אַרְתָה
.2-1 1
• .2/1
natural_image
Line drawing of a medical device with a hand cursor pointing at the button (no text or symbols)A

B