WOI4S8HM2SWA - Electric oven WHIRLPOOL - Free user manual and instructions
Find the device manual for free WOI4S8HM2SWA WHIRLPOOL in PDF.
| Product type | Built-in electric oven |
| Brand | Whirlpool |
| Model | WOI4S8HM2SWA |
| Power supply | 230 V, 50 Hz, 16 A (adjustable to 13 A) |
| Main functions | Natural convection, Fan forced, Grill, Turbo grill, Air Fry, Pizza, Steam+, Eco, Dough proofing |
| Automatic functions (6th Sense) | Stew, Meat, Bread, Pizza, Cakes |
| Cleaning | Smart Clean (low temperature steam cleaning), catalytic panels (depending on model) |
| Safety | Key lock, removable door, automatic switch-off |
| Lighting | Halogen bulb 40 W/230 V type G9, T300°C |
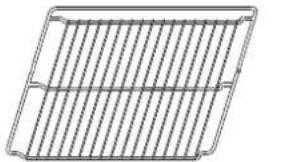
| Included accessories | Metal grid, drip tray, Air Fry tray, telescopic rails (depending on model) |
| Settings | Temperature, duration, delayed start, grill level, unit of measurement (°C/°F), rated current |
| Special programs | Air Fry (crispy cooking with less oil), Steam+ (steam cooking), Smart Clean, Fast Preheat |
| Maintenance | Clean external surfaces with a microfiber cloth, interior with Smart Clean or sponge, accessories dishwasher safe (except probe) |
| Spare parts and repairability | Halogen bulb, catalytic panels, grid supports, telescopic rails available through after-sales service |
| General information | Compliant with EU regulation 65/2014; registration at www.registerer10.eu; documentation at docs.whirlpool.eu |
Frequently Asked Questions - WOI4S8HM2SWA WHIRLPOOL
User questions about WOI4S8HM2SWA WHIRLPOOL
0 question about this device. Answer the ones you know or ask your own.
Ask a new question about this device
Download the instructions for your Electric oven in PDF format for free! Find your manual WOI4S8HM2SWA - WHIRLPOOL and take your electronic device back in hand. On this page are published all the documents necessary for the use of your device. WOI4S8HM2SWA by WHIRLPOOL.
USER MANUAL WOI4S8HM2SWA WHIRLPOOL
THANK YOU FOR BUYING A WHIRLPOOL PRODUCT In order to receive a more complete assistance, please register your product on www.registerer10.eu

Before using the appliance carefully read the Safety Instruction.
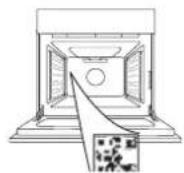
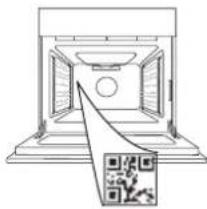
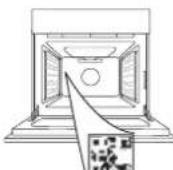
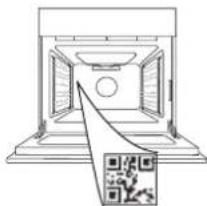
PLEASE SCAN THE QR CODE ON YOUR APPLIANCE IN ORDER TO REACH MORE INFORMATION

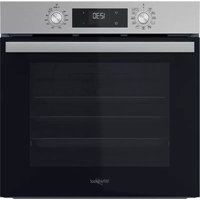
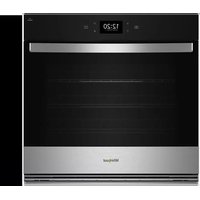
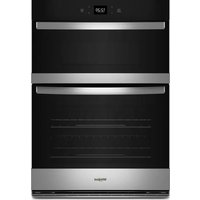
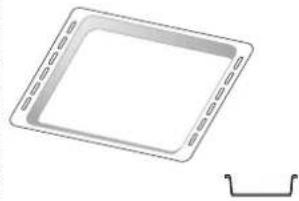
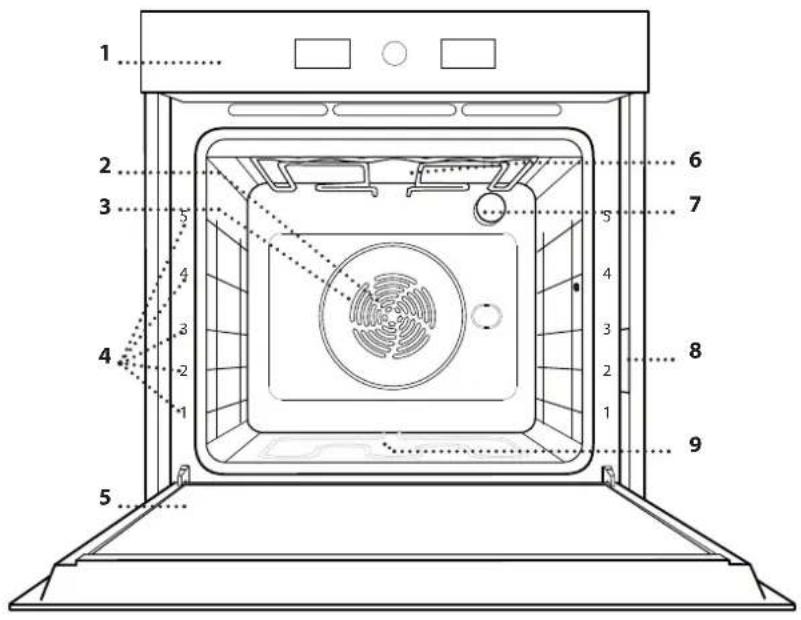
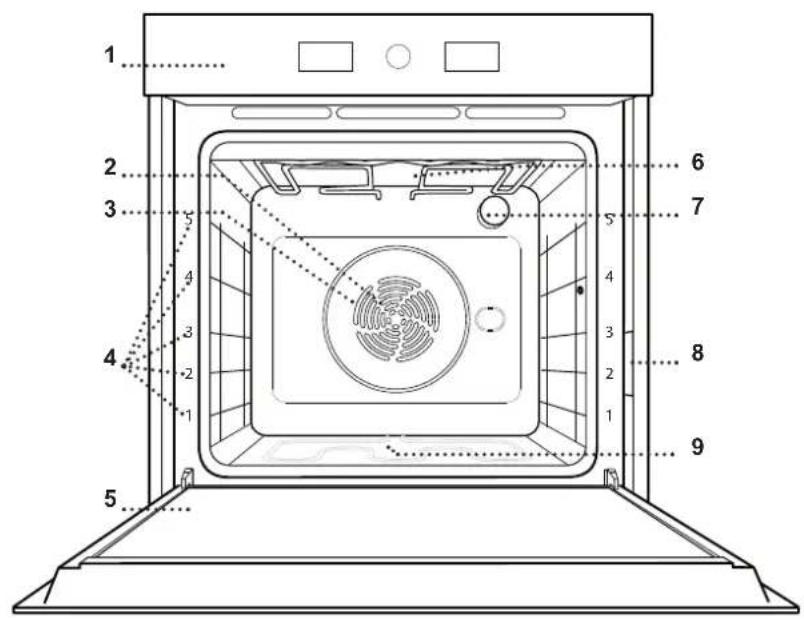
PRODUCT DESCRIPTION
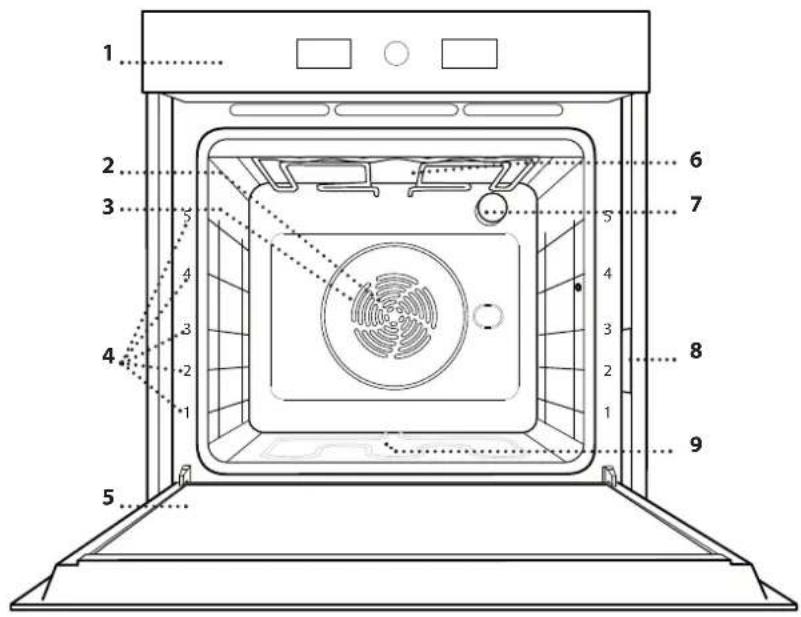
- Control panel
- Fan
- Circular heating element (non-visible)
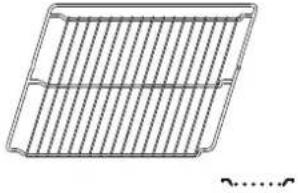
- Shelf guides (the level is indicated on the front of the oven)
- Door
- Upper heating element/grill
- Lamp
- Identification plate (do not remove)
- Lower heating element (non-visible)
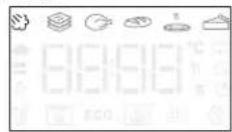
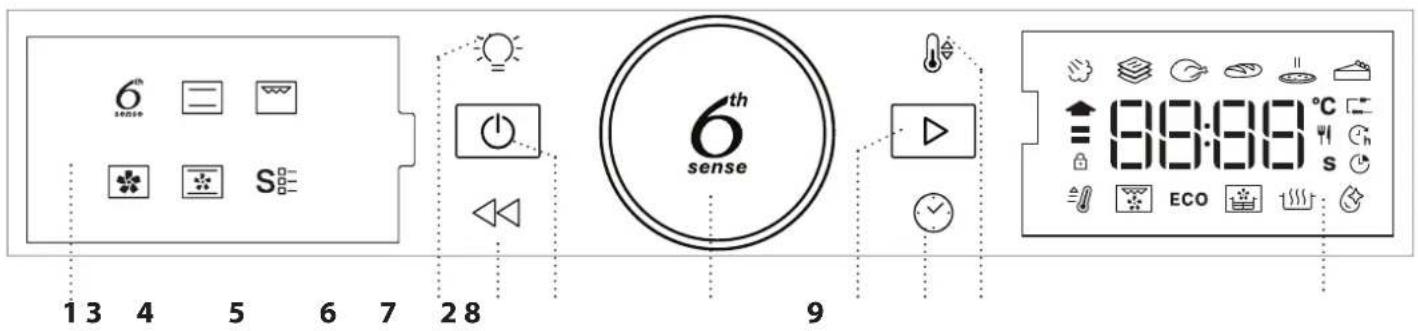
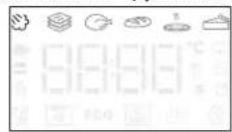
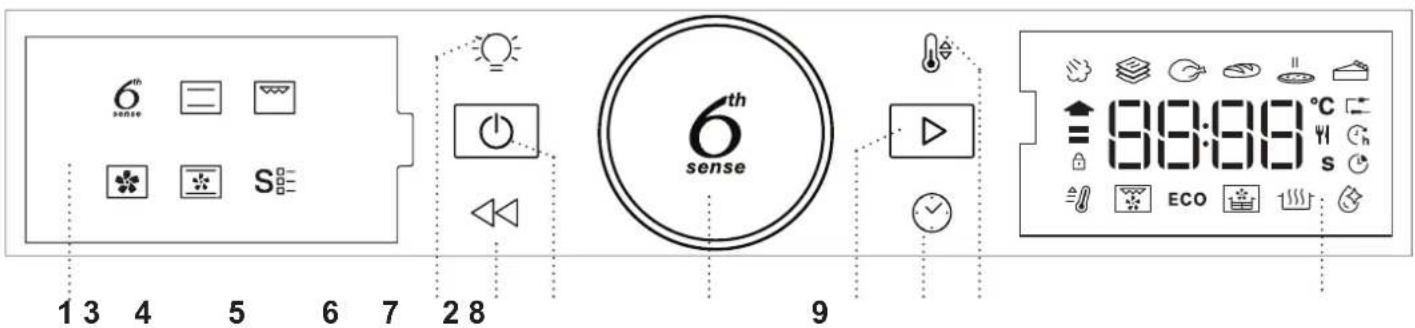
CONTROL PANEL

1. LEFT HAND DISPLAY
2. LIGHT
For switching the lamp on/off.
3. BACK
For returning to the previous screen. During cooking, allows settings to be changed.
4. ON/OFF
For switching the oven on and off and for stopping an active function at any time.
5. ROTARY KNOB
Turn this to navigate through the functions and adjust all of the cooking parameters. Press to select, set, access or confirm functions or parameters and eventually start the cooking program.
6. START
For starting functions and confirming settings.or a set value.
7. TIME
For setting the time as well as setting or adjusting the cooking time.
8. TEMPERATURE
For setting the temperature.
9. RIGHT-HAND DISPLAY
ACCESSIONS
Use to cook food or as a support for pans, cake tins and other ovenproof items of cookware.
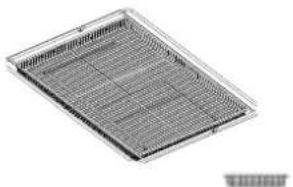
Use as an oven tray for cooking meat, fish, vegetables, focaccia, etc. or position underneath the wire shelf to collect cooking juices.
Use for cooking all bread and pastry products, but also for roasts, fish en papillotte, etc.
To facilitate inserting or removing accessories.
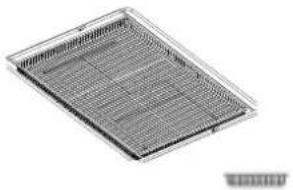
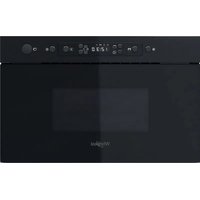
AIR FRY TRAY*
The number and the type of accessories may vary depending on which model is purchased.
Other accessories can be purchased separately; for orders and information contact the after sales service.
- Available only in certain models
To be used when cooking foods with Air Fry function, with a baking tray positioned at a lower level to collect possible crumbs and drip. It can be cleaned in the dishwasher.
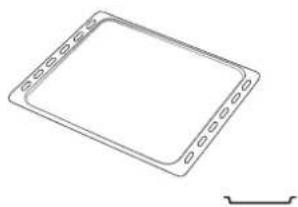
INSERTING THE WIRE SHELF AND OTHER ACCESSORIES
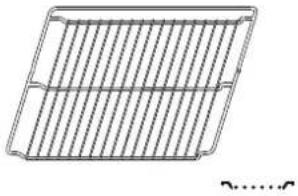
Insert the wire shelf horizontally by sliding it across the shelf guides, making sure that the side with the raised edge is facing upwards.
Other accessories, such as the drip tray and the baking tray, are inserted horizontally in the same way as the wire shelf.
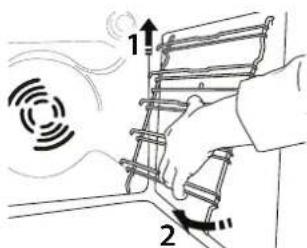
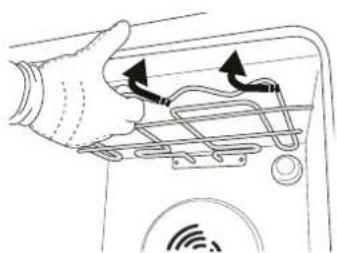
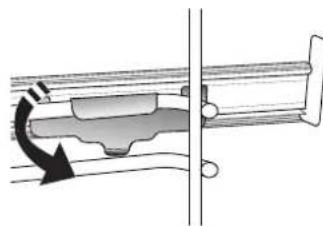
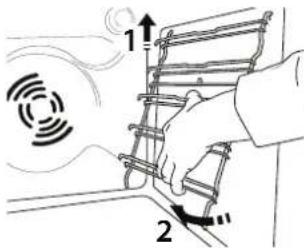
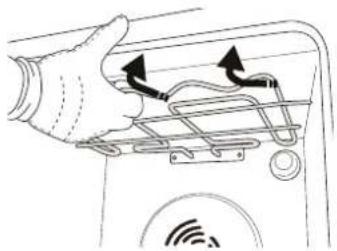
REMOVING AND REFITTING THE SHELF GUIDES
- To remove the shelf guides, lift them up and pull the lower parts out of their lodgings: The shelf guides can now be removed.
- To refit the shelf guides, first fit them back into their upper seating. Keeping them held up, slide them into the cooking compartment, then lower them into position in the lower seating.
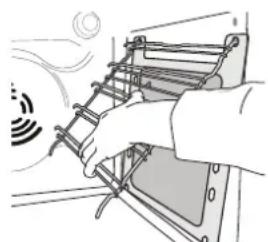
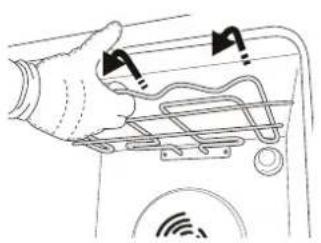
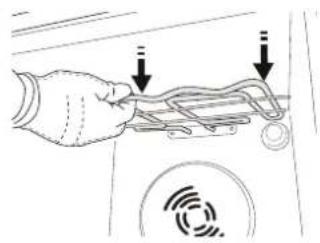
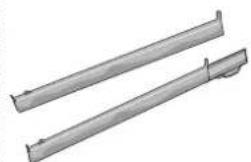
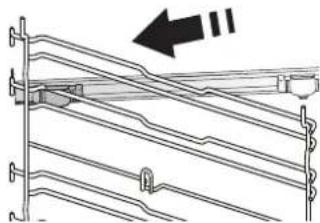
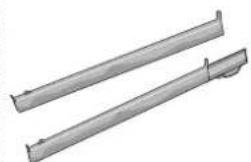
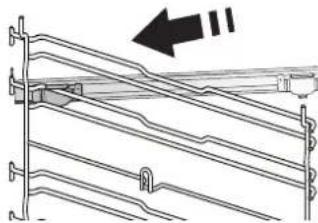
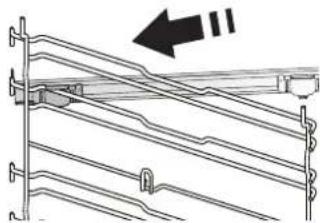
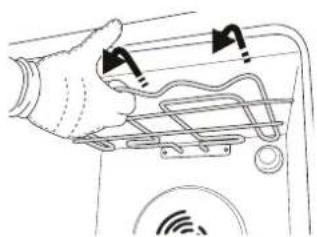
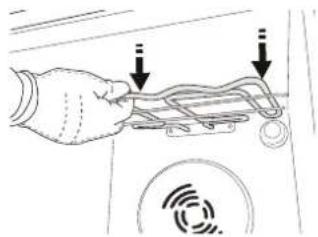
FITTING THE SLIDING RUNNERS (IF PRESENT)
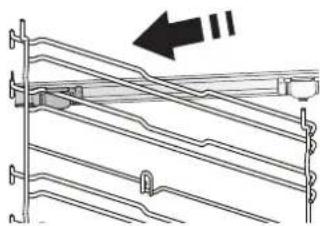
Remove the shelf guides from the oven and remove the protective plastic from the sliding runners.
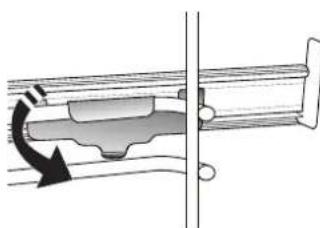
Fasten the upper clip of the runner to the shelf guide and slide it along as far as it will go. Lower the other clip into position.
Please note: The sliding runners can be fitted on any level.
FUNCTIONS

6TH SENSE
These allow automatic selection of the cooking method and the best temperature range for all types of food (Lasagna, Meat, Fish, Vegetables, Cakes & Pastries, Salt cakes, Bread, Pizza). To get the best from this function, follow the indications on the cooking table.
STEAM+
The Steam+ function allows to obtain excellent performances thanks to the presence of steam in the cooking cycle. This function suggests the ideal temperature for cooking a wide range of recipes; The cooking times and the water quantity (100 / 200ml) of the main dishes are shown in the relative cooking table that you can find online. Always activate the steam function when the oven is cold, and after pouring drinking water into the bottom of the cavity.
Note: The advised water quantity exceeds the cavity embossment capacity, but the bottom of the oven is designed to manage the advised excess water efficiently.
CASSEROLE
This function suggests the best temperature and cooking method for pasta dishes.
MEAT
This function suggests the best temperature and cooking method for meat.
BREAD
This function automatically suggests the best temperature and cooking method for all types of bread.
PIZZA
This function allows you to cook great homemade pizza, in less than 10 minutes like in a restaurant. The dedicated cooking cycle works at temperature level above 300 degree Celsius, delivering pizza soft inside, crunchy on the edges and with a perfectly even browning.
Combining this function with the Pizza Stone WPro accessory and preheating for 30 minutes can bake a pizza in 5-8 min. (For orders and information contact the after sales service or www.whirlpool.eu.)
PASTRY
This function suggests the best temperature and cooking method for all types of cake.

CONVENTIONAL
For cooking any kind of dish on one shelf only.

GRILL
For grilling steaks, kebabs and sausages, cooking vegetables au gratin or toasting bread. When grilling meat, we recommend using a drip tray to collect the
cooking juices: Position the tray on any of the levels below the wire shelf and add 500ml of drinking water.
FORCED AIR
For cooking different foods that require the same cooking temperature on several shelves at the same time. This function can be used to cook different foods without odours being transferred from one food to another. Consult the cooking table for correct level combination selection.
CONVECTION BAKE
For cooking meat, baking cakes with fillings on one shelf only.
S-SPECIAL FUNCTIONS
FAST PREHEAT
For preheating the oven quickly.

TURBO GRILL
For roasting large joints of meat (legs, roast beef, chicken). We recommend using a drip tray to collect the cooking juices: Position the pan on any of the levels below the wire shelf and add 500ml of drinking water.
ECO ECO CYCLE\*
For cooking stuffed roasting joints and fillets of meat on a single shelf. When this Eco Cycle is in use, the light will remain switched off during cooking. To use the Eco Cycle and therefore optimise power consumption, the oven door should not be opened until the food is completely cooked.
AIR FRY/CONVECT ROAST
Using dedicated air fry tray (provided with some models) allows you to cook French fries, chicken nuggets and more using less oil, resulting pleasantly crispy. Heating elements cycle to properly heat the cavity, while the fan circulates hot air. Position the food on the Air Fry tray in a single layer and follow Air Fry Cooking Table instructions for best performances. Alternatively, this function can be used to get great roasting results on meat and poultry, potatoes and vegetables, according to the cooking table recommendation. These recipes can be prepared using standard baking tray.
RISING
For optimal proving of sweet or savoury dough. To maintain the quality of proving, do not activate the function if the oven is still hot following a cooking cycle.
SMART CLEAN
The action of the steam released during this
special low-temperature cleaning cycle allows dirt and food residues to be removed with ease. Pour 200ml of drinking water on the bottom of the oven and only activate the function when the oven is cold.
- Function used as reference for the energy efficiency declaration in accordance with Regulation (EU) No. 65/2014
FIRST TIME USE
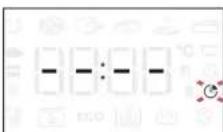
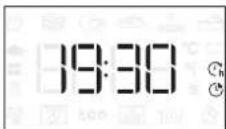
1. SET THE TIME
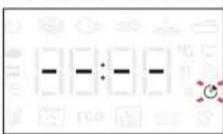
You will need to set the time when you switch on the oven for the first time.

The two digits for the hour will start flashing: Turn the knob to set the hour and press to confirm.

The two digits for the minutes will start flashing. Turn the knob to set the minutes and press to confirm.
Please note: To change the time at a later point, press and hold for at least one second while the oven is off and repeat the steps above.
You may need to set the time again following lengthy power outages.
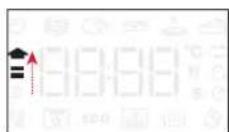
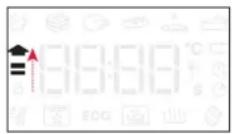
2. SETTINGS
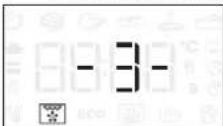
If required, you can change the default unit of measurement, temperature (^) and rated current (16 A).
With the oven off, press and hold for at least 5 seconds.

Turn the selection knob to select the unit of measurement, then press confirm.
16 A
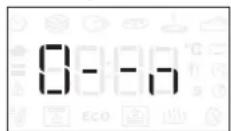
Turn the selection knob to select the rated current, then press confirm.
Please note: The oven is programmed to consume a level of electrical power that is compatible with a domestic network that has a rating of more than 3kW (16 A): If your household uses a lower power, you will need to decrease this value (13 A).
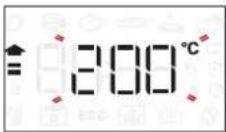
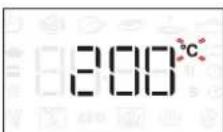
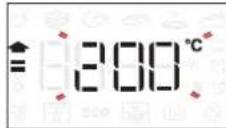
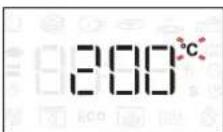
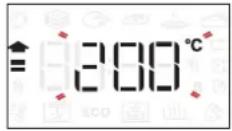
3. HEAT THE OVEN
A new oven may release odours that have been left behind during manufacturing: This is completely normal.
Before starting to cook food, we therefore recommend heating the oven with it empty in order to remove any possible odours. Remove any protective cardboard or transparent film from the oven and remove any accessories from inside it. Heat the oven to 200^ for around one hour, ideally using a function with air circulation (e.g. "Forced Air" or "Convection Bake").
Follow the instructions for setting the function correctly.
Please note: It is advisable to air the room after using the appliance for the first time.
DAILYUSE
1. SELECT A FUNCTION
When the oven is off, only the time is shown on the display. Press and hold to switch the oven on. Turn the rotary knob to view the main functions available on the left-hand display. Select one and press
To select a sub-function (where available), select the main function and then press confirm and go to the function menu.

Turn the rotary knob to select from amongst the subfunctions available on the right-hand display and then press confirm.
2. SET THE FUNCTION
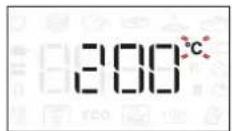
After having selected the function you require, you can change its settings. The display will show the settings that can be changed in sequence.
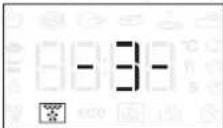
When the ^ C / F icon flashes on the display, turn the knob to change the value, then press confirm and continue to alter the settings that follow (if possible).
You can also set the grill level (3 = high, 2 = medium, 1 = low) at the same time.
Please note: Once the function has started, you can change the temperature or the grill level by pressing or by turning the knob directly.
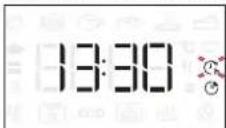
DURATION
When the icon flashes on the display, use the adjustment knob to set the cooking time you require and then press confirm.
You do not have to set the cooking time if you want to manage cooking manually: Press to confirm and start the function. In this case, you cannot set the end cooking time by programming a delayed start.
Please note: You can adjust the cooking time that has been
set during cooking by pressing turn the knob to change the hour and press confirm.
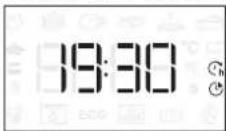
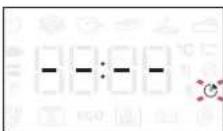
SETTING THE END COOKING TIME/DELAYED START
In many functions, once you have set a cooking time you can delay starting the function by programming its end time. Where you can change the end time, the display will show the time the function is expected to finish while the icon flashes.
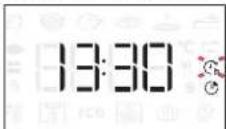
If necessary, turn the knob to set the time you want cooking to end, then press to confirm and start the function.
Place the food in the oven and close the door: The function will start automatically after the period of time that has been calculated in order for cooking to finish at the time you have set.
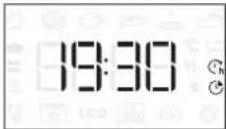
Please note: Programming a delayed cooking start time will disable the oven preheating phase: The oven will reach the temperature your require gradually, meaning that cooking times will be slightly longer than those listed in the cooking table.
During the waiting time, you can use the knob to change the programmed end time.
Press or to change the temperature and cooking time settings. Press confirm when finished.
3. ACTIVATE THE FUNCTION
Once you have applied the settings you require, press to activate the function.
You can press and hold at any time to pause the function that is currently active.
4. PREHEATING
Some functions have an oven preheating phase: Once the function has started, the display indicates that the preheating phase has been activated.
Once this phase has finished, an audible signal will sound and the display will indicate that the oven has reached the set temperature.
At this point, open the door, place the food in the oven, close the door and start cooking by pressing
Please note: Placing the food in the oven before
preheating has finished may have an adverse effect on the final cooking result.
Opening the door during the preheating phase will stop pause it.
The cooking time does not include a preheating phase. You can always change the temperature you want the oven to reach using the knob.
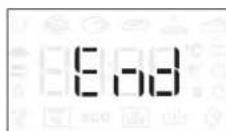
5.END OF COOKING
An audible signal will sound and the display will indicate that cooking is complete.
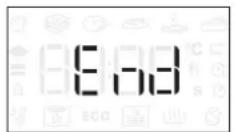
To extend the cooking time without changing the settings, turn the knob to set a new cooking time and press
6. 6^TH SENSE FUNCTIONS
SMART CLEAN
To activate the "Smart Clean" function, with the oven cold, distribute 200ml of water on the bottom of the oven cavity, then close the oven door.
Access special functions S and turn the knob to select from menu. then press to confirm.
Press to start immediately the cleaning cycle, or press set the end time/start delayed.
At the end of the cycle, let the oven coiling down
and remove any residual water in the oven and start cleaning using a sponge moistened with hot water (cleaning could be compromised if delayed by more than 15 minutes).
Please note: The duration and temperature of cleaning cycle cannot be set.
7. KEYLOCK
To lock the keypad, press and hold for at least five seconds.

Do this again to unlock the keypad.
Please note: This function can also be activated during cooking. For safety reasons, the oven can be switched off at any time by pressing
. NOTES
- Do not cover the inside of the oven with aluminium foil.
- Never drag pots or pans across the bottom of the oven as this could damage the enamel coating.
- Do not place heavy weights on the door and do not hold on to the door.
- Due to the higher temperature of the Pizza cycle it is expected to experience slightly higher cooling fan noise.
USEFUL TIPS
HOW TO READ THE COOKING TABLE
The table lists the best function, accessories and level to use to cook different types of food. Cooking times start from the moment food is placed in the oven, excluding preheating (where required). Cooking temperatures and times are approximate and depend on the amount of food and the type of accessory used. Use the lowest recommended settings to begin with and, if the food is not cooked enough, then switch to higher settings. Use the accessories supplied and preferably dark-coloured metal cake tins and baking trays. You can also use Pyrex or stoneware pans and accessories, but bear in mind that cooking times will be slightly longer.
COOKING DIFFERENT FOODS AT THE SAME TIME
Using the "Forced Air" function, you can cook different foods which require the same cooking temperature at the same time (for example: fish and vegetables), using different shelves. Remove the food which requires a shorter cooking time and leave the food which requires a longer cooking time in the oven.
MEAT
Use any kind of oven tray or pyrex dish suited to the size of the piece of meat being cooked. For roast joints, it is best to add some stock to the bottom of the dish, basting the meat during cooking for added flavour. Please note that steam will be generated during this operation. When the roast is ready, let it rest in the oven for another 10-15 minutes, or wrap it in aluminium foil.
When you want to grill meat, choose cuts with an even thickness all over in order to achieve uniform cooking results. Very thick pieces of meat require longer cooking times. To prevent the meat from burning on the outside, lower the position of the wire shelf, keeping the food farther away from the grill. Turn the meat two thirds of the way through cooking. Take care when opening the door as steam will escape.
To collect the cooking juices, we recommend placing a dripping pan filled with half a litre of drinking water directly underneath the wire shelf on which the food is placed. Top-up when necessary.
DESSERTS
Cook delicate desserts with the conventional function on one shelf only.
Use dark-coloured metal baking pans and always place them on the wire shelf supplied. To cook on more than one shelf, select the forced air function and stagger the position of the cake tins on the shelves, aiding optimum circulation of the hot air.
To check whether a leavened cake is cooked, insert a wooden toothpick into the centre of the cake. If the toothpick comes out clean, the cake is ready.
If using non-stick baking pans, do not butter the edges as the cake may not rise evenly around the edges.
If the item "swells" during baking, use a lower temperature next time and consider reducing the amount of liquid you add or stirring the mixture more gently.
For desserts with moist fillings or toppings (such as cheesecake or fruit tarts), use the "Convection bake" function. If the base of the cake is soggy, lower the shelf and sprinkle the bottom of the cake with bread crumbs or biscuit crumbs before adding the filling.
RISING
It is always best to cover the dough with a damp cloth before placing it in the oven. Dough proving time with this function is reduced by approximately one third compared to proving at room temperature (20- 25^ ). The rising time for pizza starts at around one hour for 1kg of dough.
| RECIPHE FUNCTION | SUGGESTED QUANTITY | PREHEAT | TEMPERATURE (°C) | DURATION (MIN.) | SHELF AND ACCESSORIES | ||
| FROZEN FOOD | Frozen French Fries 650 - 850g | Yes 20 | 30 | 4 2 | |||
| Frozen Chicken Nugget 500g | Yes 20 | 20 | 4 2 | ||||
| Fish Sticks 500g Yes | 2 | - 20 | 4 2 | ||||
| Onion Rings | 500g Yes | 200 15 - | 20 | 4 2 | |||
| VEGETABLES | Fresh Breaded Zucchini 400g | Yes 20 | 20 | 4 2 | |||
| Homemade Fries | 300 - 800 g | Yes | 200 | 20 - 40 | 4 2 | ||
| Mixed Vegetables | 300 - 800 g | Yes | 200 | 20 - 30 | 4 2 | ||
| MEAT AND FISH | Chicken Breasts | 1 - 4 cm | Yes | 200 | 20 - 40 | 4 2 | |
| Chicken Wings | 200 - 1500 g | Yes | 220 | 30 - 50 | 4 2 | ||
| Breaded Cutlet | 1 - 4 cm | Yes | 220 | 20 - 50 | 4 2 | ||
| Fish Fillet | 1 - 4 cm | Yes | 220 | 15 - 25 | 4 2 | ||
For cooking fresh or homemade foods, spread a thin layer of oil across the food surface.
In order to guarantee uniform cooking results, mix food halfway through the recommended cooking time.
| FUNCTIONS | Air Fry | |
| ACCESSIONS | Air Fry tray Oven tray or cake tray on wire shelf | Drip tray / Baking tray or oven tray on wire shelf |
COOKING TABLE
| REICPE FUNCTION PREHEAT TEMPERATURE (°C) COOK TIME (Min.) LEVEL AND ACCESSORIES | ||||
| Leavened cakes / Sponge cakes | -170 30 | 50 | 2 | |
| Yes 160 30 | 50 | 2 | ||
| Yes 160 30 | 50 | 4 1 | ||
| Filled cakes(cheesecake, strudel, apple pie) | -160 - 200 30 - 85 | 3 | ||
| Yes | 160 - 200 35 - 90 | 4 1 | ||
| Cookies / Small cakes | - | 160 - 170 | 20 - 40 | 3 |
| Yes | 150 - 160 | 20 - 40 | 4 | |
| Yes | 150 - 160 | 20 - 40 | 4 1 | |
| Choux buns | -180 - 200 30 - 40 | 3 | ||
| Yes | 180 - 190 | 35 - 45 | 4 1 | |
| Yes | 180 - 190 | 35 - 45* | 5 3 1 | |
| Meringues | - | 90 | 110 - 150 | 3 |
| Yes | 90 | 130 - 150 | 4 1 | |
| Yes | 90 140 - 160* | 5 3 1 | ||
| Pizza (Thin, thick, focaccia) | - | 310 | 7-12 | 2 |
| Yes | 220 - 240 20 - 40 | 4 1 | ||
| Yes | 220 - 240 | 25 - 50* | 5 3 1 | |
| Bread loaf 0,5 kg | -180 - 220 50 - 70 | 2 | ||
| Small bread | -180 - 220 30 - 50 | 3 | ||
| Bread | Yes | 180 - 220 30 - 60 | 4 1 | |
| Frozen pizza | Yes 250 10 - 15 | 2 | ||
| Yes 250 | 10 - 20 | 4 1 | ||
| Savoury pies(vegetable pie, quiche) | Yes | 180 - 190 45 - 60 | 2 | |
| Yes | 180 - 190 45 - 60 | 4 1 | ||
| Yes | 180 - 190 | 45 - 70* | 5 3 1 | |
| Vols-au-vent / Puff pastry crackers | Yes | 190 - 200 20 - 30 | 3 | |
| Yes | 180 - 190 20 - 40 | 4 1 | ||
| Yes | 180 - 190 | 20 - 40* | 5 3 1 | |
| FUNCTIONS | Conventional Grill Turbo Grill Forced Air Convect Bake ECO | |||
| AUTOMATICFUNCTIONS | Casserole Meat Bread Pizza function Pastry | |||
| ACCESSIONS | Oven tray or cake tray onDrip tray / Baking tray orDrip tray / Baking tray Drip tray with 500 ml ofwater | |||
| RECIPE FUNCTION PREHEAT TEMPERATURE (°C) COOK TIME (Min.) LEVEL AND ACCESSORIES | ||||
| Lasagne / Flans | -190-20040-80 | 3 | ||
| Baked pasta / Cannelloni - 190 - 200 25 | 60 | 3 | ||
| Lamb / Veal / Beef / Pork 1 kg - 190 - 200 | 60-90 | 3 | ||
| Chicken / Rabbit / Duck 1 kg - 200 - 230 | 50-80** | 3 | ||
| Turkey / Goose 3 kg - 190 - 200 90 - 150 | 2 | |||
| Baked fish / en papillote (fillets, whole) | Yes | 180-200 | 40-60 | |
| Stuffed vegetables (tomatoes, courgettes, aubergines) | Yes | 180-200 50-60 | 2 | |
| Toast | - | 3 (High) | 5 | |
| Fish fillets / Steaks | - | 2 (Mid) | 20-30*** | |
| Sausages / Kebabs / Spare ribs / Hamburgers | - | 2-3(Mid-High) | 15-30*** | |
| Roast chicken 1-1.3 kg | - | 2 (Mid) | 55-70** | |
| Roast beef rare 1 kg | - | 2 (Mid) | 35-50** | |
| Leg of lamb / Shanks | - | 2 (Mid) | 60-90** | |
| Roast potatoes | - | 2 (Mid) | 35-55** | |
| Vegetable gratin | - | 3 (High) | 10-25 | |
| Complete meal: Fruit tart (level 5) / lasagna (level 3) / meat (level 1) | Yes | 190 40-120* | ||
| Lasagna & Meat | Yes | 200 | 50-120* | |
| Meat & Potatoes | Yes | 200 | 45-120* | |
| Fish & Vegetables | Yes | 180 | 30-50 | |
| Stuffed roasting joints | ECO | - | 200 | 80-120* |
| Cuts of meat (rabbit, chicken, lamb) | ECO | - | 200 | 50-120* |
- Estimated length of time: dishes can be removed from the oven at different times depending on personal preference.
Turn food two thirds of the way through cooking (if necessary).
* Turn food halfway through cooking.
Please note: Dynamic Menu "Pastry Cakes" function uses upper and lower heating elements only, without forced air circulation. It doesn't require preheating.
| FUNCTIONS | Conventional | Grill | Turbo Grill | Forced Air | Convect Bake | ECO |
| AUTOMATIC FUNCTIONS | Casserole | Meat | Bread | Pizza function | Pastry | |
| ACCESSIONS | ...... Wire shelf | oven tray or cake tray on wire shelf | Drip tray / Baking tray or oven tray on wire shelf | Drip tray / Baking tray | Drip tray with 500 ml of water |
| FOOD RECIPE | QUANTITY | TIME(MIN.) | ACCESSORIES WATER | ||
| BREAD | Small breads 80-100 g 30 - 45 | 3 | 100 ml | ||
| Sandwich loaf in tin 300-500 g 40 - 60 | 3 | ||||
| Bread 500g-2 kg 50 - 100 | 3 | ||||
| Baguettes 200-300 g 30 - 45 | 3 | ||||
| PASTRIES | Cookies one tray 25 - 35 | 3 | |||
| Muffin | 30-60 g | 25 - 45 | 3 | ||
| Sponge Cake | 500-700 g 30 - 50 | 2 | |||
| Tart | one tray | 35 - 55 | 2 | ||
| MEAT | Roast | 1 kg | 60 - 110 | 3 | 200 ml |
| Ribs | 500g-1,5 kg | 50 - 75 | 3 | ||
| Chicken | 1-1,5 kg | 55 - 80 | 3 | ||
| Chicken/Turkey | 3 kg | 100 - 140 | 3 | ||
| FISH | Fillet Steak | 0.5-2 cm | 15 - 25 | 3 | |
| Fillet Steak | 2-4 cm | 20 - 35 | 3 | ||
| Whole Fish | 300- 600 g | 20 - 30 | 3 | ||
| Whole Fish | 600 -1200 g | 25 - 45 | 3 | ||
| VEGETABLES | Roasted Potatoes | 0.5-1.5 kg | 45 - 60 | 3 | |
| Stuffed Peppers | 1-2 kg | 35 - 55 | 3 | ||
| Roasted Broccoli | 0.3-1 kg | 30 - 50 | 3 | ||
| Roasted Zucchini | 0.5-1.5 kg | 30 - 50 | 3 |
Start the STEAM+ function only when the oven is cold. Opening the door and topping up the water during cooking may have an adverse effect on the final cooking result.
| ACCESSORIES | Air Fry tray | Oven tray or cake tray on wire shelf | Drip tray / Baking tray or oven tray on wire shelf |
MAINTENANCE AND CLEANING
Make sure that the oven has cooled down before carrying out any maintenance or cleaning.
Do not use steam cleaners.
Do not use wire wool, abrasive scourers or abrasive/corrosive cleaning agents, as these could damage the surfaces of the appliance.
Wear protective gloves.
The oven must be disconnected from the mains before carrying out any kind of maintenance work.
EXTERIOR SURFACES
- Clean the surfaces with a damp microfibre cloth. If they are very dirty, add a few drops of pH-neutral detergent. Finish off with a dry cloth.
- Do not use corrosive or abrasive detergents. If any of these products inadvertently comes into contact with the surfaces of the appliance, clean immediately with a damp microfibre cloth.
INTERIOR SURFACES
After every use, leave the oven to cool and then clean it, preferably while it is still warm, to remove any deposits or stains caused by food residues. To dry any condensation that has formed as a result of cooking foods with a high water content, leave the oven to cool completely and then wipe it with a cloth or sponge.
- Activate the "Smart Clean" function for optimum
cleaning of the internal surfaces. (Only in some models).
- Clean the glass in the door with a suitable liquid detergent.
- The oven door can be removed to facilitate cleaning.
- Dry out the bottom profile below the door of the oven if water residues are present after a cooking cycle.
ACCESSIONS
Soak the accessories in a washing-up liquid solution after use, handling them with oven gloves if they are still hot. Food residues can be removed using a washing-up brush or a sponge.
Do not clean Food Probe and Meat Probe (if present) in the dishwasher. Air Fry tray (if present) can be cleaned in the dishwasher.
CLEANING THE CATALYTIC PANELS
(ONLY IN SOME MODELS)
This oven is equipped with special catalytic panels that facilitate cleaning of the cooking compartment thanks to their special self-cleaning coating, which is highly porous and able to absorb grease and grime. These panels are fitted to the shelf guides: When repositioning and then refitting the shelf guides, make sure that the hooks at the top are slotted into the appropriate holes in the panels.
To make best use of the catalytic panels' self-cleaning properties, we recommend heating the oven to 200^ for around one hour using the "Convection Bake" function. The oven must be empty during this time. Then leave the appliance to cool down before removing any remaining food residues using a nonabrasive sponge.
Please note: Using corrosive or abrasive cleaning agents, stiff brushes, pan scourers or oven sprays could damage the catalytic surface and compromise its self-cleaning properties.
Please contact our After-sales Service if you require replacement panels.
REPLACING THE LAMP
- Disconnect the oven from the power supply.
- Unscrew the cover from the light, replace the bulb and screw the cover back on the light.
- Reconnect the oven to the power supply.
Please note: 40W / 230 V type G9, T300°C halogen bulbs.
The bulb used in the product is specifically designed for domestic appliances and is not suitable for general room lighting within the home. (EC Regulation 244/2009) Light bulbs are available from our After-sales Service.
If using halogen bulbs, do not handle them with your bare hands as your fingerprints could cause damage. Do not use the oven until the light cover has been refitted.
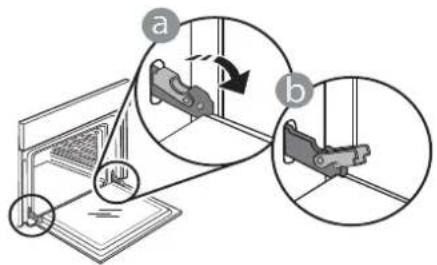
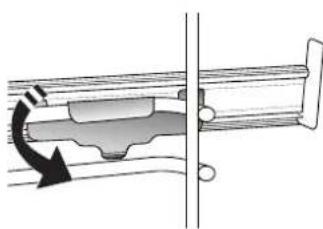
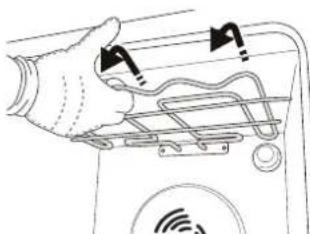
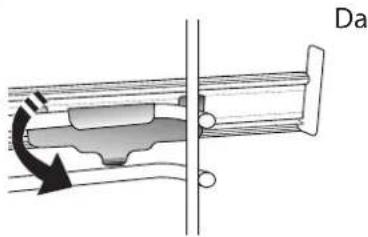
REMOVING AND REFITTING THE DOOR
- To remove the door, open it fully and lower the catches until they are in the unlock position.
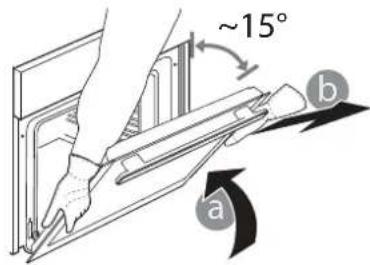
- Close the door as much as you can.
Take a firm hold of the door with both hands – do not hold it by the handle.
Simply remove the door by continuing to close it while pulling it upwards at the same time until it is released from its seating. Put the door to one side, resting it on a soft surface.
-
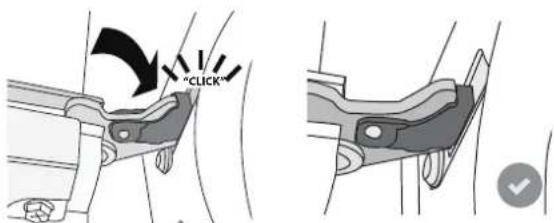
Refit the door by moving it towards the oven, aligning the hooks of the hinges with their seating and securing the upper part onto its seating.
-
Lower the door and then open it fully. Lower the catches into their original position: Make sure that you lower them down completely.

Apply gentle pressure to check that the catches are in the correct position.
- Try closing the door and check to make sure that it lines up with the control panel. If it does not, repeat the steps above: The door could become damaged if it does not work properly.
LOWER THE TOP HEATING ELEMENT
(ONLY IN SOME MODELS)
- Remove the lateral shelf guides.
- Pull the heating element out a little and lower it.
- To reposition the heating element, lift it up, pulling it slightly towards you, making sure it comes to rest on the lateral supports.
TROUBLESHOOTING
| Problem Possible cause Solution | ||
| The oven is not working. | Power cut. Disconnection from the mains. | Check for the presence of mains electrical power and whether the oven is connected to the electricity supply. Turn off the oven and restart it to see if the fault persists. |
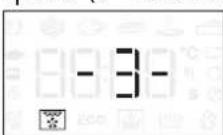
| The display shows the letter “F” followed by a number. | Software problem. | Contact the Call Center and state the number following the letter “F”. |
| The display shows unclear text and appears to be broken. | Another language set. Contact the Call Center.. | |
| Cooking cycle with probe ended without evident cause or error F3E3 is printed on the screen. | Food Probe is not properly connected. | Check connection of the food probe. |
Policies, standard documentation and additional product information can be found by:
- Using the QR code in your appliance
- Visiting our website docs.whirlpool.eu/docs
- Alternatively, contact our After-sales Service (See phone number in the warranty booklet). When contacting our After-sales Service, please state the codes provided on your product's identification plate.
TM/© 2025 Whirlpool. Produced under license.

BJIAGAPM B, YE 3AKYIMXTE IPOyKT HA WHIRLPOOL
3a da nonyuTe no-nbInHO cbDeIcTBne,
perncpauTe Baunn npoykt Ha
www.registerer10.eu

Ipeyn da n3noJ3BaTe ypea, npooyeteBHNMaTeHNO HnCTpyKunnte 3a 6e3onacHOCT.
MOJI,CKAHIPAITE QR KOДA HA BAISHI YPEД, 3A DA NOLYUITE NOBEYE INHOFPMAU
ОпUCAHNE HA UPEДА
NAHEJI 3A YNPABNEHNE
1. JIAB IINCNIIe
2.OCBETJEHNE
3a BkI./n3Kn. Ha lamnaTa.
3. HA3A
3a BpBuaHe KbM npEiXoDnHn ekpaH. I03BOnBa npomHa Ha HacTPOkNTe No BpeMe Ha rotBeHe.
4.BKJ./N3KJI.
3a BKNIOUBAHe N N3KNIOUBAHe Ha cyphHata N He3a6abHO cnnpaHe Ha n3nblHbHaHaTa yHKu.
5. POTAUHNOKONU
3aBbptete ro, 3a da ce npdBnKBaTe no yHKunTe n 3a HacTpoKa Ha napameTpne Ha rotBeHe. HatncheTe 3a n36upaHe, HactpoBaHe, DOCTbn I NOTBpXdaBaHe Ha yHKunTe nnnapameTpte, a Cbso n 3a Haayano Ha nporpaMaTa 3a rotBeHe.
6. START
3a CTapTnpaHe Ha yHKunn I NOTBbPjKaDaBaHe Ha HAcTPOkN. NN 3aJaDeHa CToHOCt.
7. BPEME
3a HactpoBbAe Ha yaca, KaKTo n 3a HactpoKa nn 3aDaBaHe Ha BpeMeTo 3a rotBeHe.
8. TEMINEPATYPA
3a 3aDaBaHe Ha TeMnepaTypaTa.
9. DECEH DUCNJIEN
ПИHAДLEЖHOCTN
PEWETbYEH PAOT TABA 3A OTUEXKAHE TABA 3A NUEHE* Nlb3r4aH


N3noJ3BaIte 3a npnroTbAHe Ha XpaHa nn KaTO ONopa 3a TaBn, fOpMn 3a KeKCOBe n DpyrOrHeynopHn rO TBapCKn CbIOBE.
N3noJ3BaIe KaTo TaBa 3a cypha 3a npuROTBaHe Ha Meco, p6a, 3eJeHcyu, fokauu n dp., nn pa3nOIOKeTe POp peWetbUHna paT 3a OTcExJaHe Ha COCOBete PnI rOTBeHe.
N3noJ3BaIte 3a npiroTbHHe Ha BCNUKu BnOBe Xn6 nCnaKnus, a CbTo Taka n Ha NeueHmeca,pnbabeprameHT n dp.
3a ynecheHne Ha NOCTABAHETO IN 13BaXdAHeTO H npHaAnExKHOCTN.
AIR FRY TABA*
Ja ce n3noJ3Ba npn roTBeHe Ha XpaHn C fYHKcIyTa Iopeu Bb3dyX, KaTO TaBaTa 3a neueHe ce NOCTaBHa IO-HNCKO HNBO, 3a Ja cb6npa eBEHTyaHn TPOxN KAnKn. MoKe Ja Ce NoUcNTBa B CbDOMnHa MaunHa.
БpoTиВuIbTHa npHaJnxHocHTe MoKe Ja e pa3nueH B 3aBucMocCT OTo 3aKypeHnMoEi.
Ipyn npnaHnexHoCT Moar Ta 6bTa3aKnyeHH OTdEHHo; 3a nopBcNn HOpMaqura Ce CbbPKeTe COTdeLa 3a CneepnoDaJk6eHO 06cnyXbaHe.
- Hanoi camo npn onpeidenen Moienn
IOCTABRHE HA PEWETbUHHRA PAFT IN Dpyrnte IPNHADJIEXKHOCTN
BkapaTe peWetbUHn paT XOpN3OHTaHOB BBB BODaHTe, KaTO BHUMBaTe NOBUNHaTnT CTpaHnueH p6 da e Harope.
Ipyrnte npHaJnEJXHOCTn, HAnpImep TaBaTa 3a OTcExJaHe n TaBaTa 3a neueHe, ce NOCTaBt XOpHIOHTaJIHO IO CbUIN Haun HATo peWetbHn paΦT.
CBAJARE NIOCTABRHE HA BODAUYTE HA PAFOBE
3a da cbaHnte HocauTe, NOBUNrHeTe rN uN3TerneTe DOHNTE qACTn Ha rHe3data m: CneI TOBa MoKe da N3BaAnTe Hocaua.
3a da noctabnte Hocayte o6paTHO, npbBO rnoCTaBeTe B rohnte nM rHe3da. IpbXTe Hocaya NOBUNrHaT, BKapaTe rOB BB cyphata n rO cnYChete Bbpxy DOHNTE rHe3da.
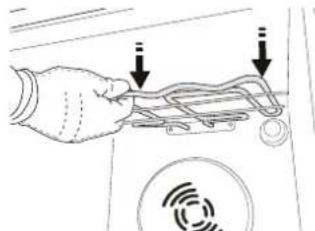
3AKPENBAHE HA NJIb3rAUYTE (AKO UMA)
CbaTe BOdaunte OT cypHaTa mXhete
PpeHn3HaTa PnactMaCa O T Nb3rauHTe.
3akpenete rohpata ck6a Ha nbl3raqa KbM Bodaqa I BkapaTe DOKpaHabTpe.
CnycheHaMCTOTO BTOpataCKo6a.
3a da 3akpenite BOdaqa, HATNCHE Te DOJHATA qact HcKo6ata 3dpaBO KbM BOdaqa. PpOBepTe daIIN Nb3raUnTe ce DBXkAT CBO6ONo.
Iobtopeo onncaHnte CTbIKN 3a npyra BODaHa CbOTO HNOB.
MOna, mMaTe npeDbuD: PJIb3raUHe MOraT da Ce MOHTnpaT Ha BcAko OT HnBaTa.
FUNCTIONS (ФУнкци)

6TH SENSE
Te3nΦyHKuIN NO3BOJRAbT HAnbJIHO aBTOMaTH3NpaHO nprirotBHe Ha BCNUKn TInOBe xpaHn (Ja3aH, Meco, p6a, 3eJeHcyu, KeiKObe n CnaKnU, CoIeH N KeiKObe, Xla6, Niua). 3a da n3NoI3BaTe Ta3nΦyHKuIN PO Han-Do6pNaHaunH, CneDbaiTe uHdNkaCUNTE B CbOTBeTHaTa rotBapcKa Ta6Nuca.
STEAM+
Функцяta Steam+ no3BOJBA da noctnHete OTnunH pe3yntaTn 6naIroapenHe Ha nyskaHTo Ha npaNo BpeMe Ha nporpaMaTa 3a rotBeHe. Ta3n fynKzua donycka abTomatuHo ndealHaTa TempepaTypa 3a npuroTBHe Ha uPOK h6op ot peueNT; BpeMeTo 3a rotBeHe N KOJIuYeCTBOTo BOda (100/200 m) 3a OCHOBHIne YeCTnA ca NOCOeHN B OTHocHTeHaTa Ta6nua 3a rotBeHe, KOrTo MoKe Da Hamepnte OHnH. BnHarn aKTINBpuTe fynKzua Tnpa, KOrato fypHaTa e CTyDena H nClek KaTO CTe HaJIeN PnTeeHa BOda B DOHaTa YAcT Ha fypHaTa.
3a6eJkKa: PpenOpbuaHOTo KOInueCTBO B0da npeBnUba KaNaunTeTa Ha peNeFa B KyxHaTa, Ho IbHOTo Ha oypHaTa e npoeKtupaHO TaKa, Ye da ynpabnaBa ekeTubHO npenOpbuaHOTo N3NlHo KOnIueCTBO B0da.
CASSEROLE (3AДУSEHЯCTY)
Ta3n fynkun yonycKa Hau-do6paTa TempepaTpa n MeTOJ 3a rotBeHe 3a JCTNA C nacta.
MECO
Ta3n ΦyHKZIa DOnycka Hai-Do6paT aTeMnepaTpa n MeToD 3a RotBeHe Ha MeCo.
XJIA6
Ta3n ΦyHKUa ABtOMaTnUH OIOnycka Hau-IO6paTa TempepaTypa N MeToJ 3a RotBeHe 3a BCuKu BnIOBE xJI6.
11NlA
Ta3nФyHKUBA BV N03BOJRABa da crotbnte Uydecha DomaSHA Nua 3a NO-MaIKo OT 10 MInHyTu KaTo B pecTopaHT. CneuAnHnT uKbN Ha rotBeHe Oepnpa np TEmpepatya Na 300 rpaDyca no UeJ3n, Kato OcnrypRa MeKa Nua OTBbTpE, Xpynkaba No KpanaTa n C nDeaHNo paBHomepHo 3auepbBaHe.
Ko6nHupaHeTo Ha Ta3n FyHKcua C akcecoapa Pizza Stone WPro n npedBapnteHto HarpBaHe 3a 30 MInHyTu MoKe Da n3neue Nua 3a 5-8 MInHyTu (3a nopBuKn uNfOpMaunCe cBbpxTe C otDeLa 3a CneInpOdaJxBeHo O6CnyXBaHe nn C www.whirlpool.eu.)
CIAADKNHIN
Ta3nΦyHKZnIaONyckaHa-Ido6pata TempepaTpya n MeTOd 3a rOTBeHe 3a BCNUKn BUNObe CnaDKuSh.

KOHBEHUNOHAJIHO TOTBEHE
3a roTbeHe Ha BCaKbN Actn CaMo Ha eHNO.

PUN
3a neueHe Ha rpnHa NpBpKoI, Ke6an, HadeHnCi, npriOTBHe Ha 3eJeHcyKOB OrpeTeH nPepuHa He XJIb. Korato NeueTe MECO, npenOpbUBaMe Da n3NoJ3BaTe TaBaTa 3a OTcEJaHe, 3a Da cb6nPate OTdEHNrTe npi NeueHeTo COKoe: IocTabeTe TabaHa HnKoe OT HnBaTa NOd peWeTbHnPaΦT nHaJIeNt B He NaIOBnH NITbP NiTEHa BODa.

ΦOPCnPAH Bb3dYX
3a roTBeHe Ha pa3JiUHn XpaHn, KOITOn 3NcKBaTe eHa
H Cb7a TempePaTypa Ha HAKoKo PaΦTa NO eHNO
CbIO BpeMe. Ta3n FyHKuM Goe Da ce N3NoI3Ba
3a roTBeHe Ha pa3JiUHn XpaHn 6e3 npemHaBaHe
Ha MInp3MnTE OT eHata XpaHa KbM dpYrata. BxKTe
Ta6JIuCaTa 3a roTBeHe 3a npabunHn I36Op Ha
KOM6NuHaCuN O T HBA.

ПЕЧЕС KOKBEКЦА
3a roTbeHe Ha Meco n N3nueHa TOpTu C PbIHeK Ha cAmO eINH paT.

SPECIAL FUNCTIONS (CNEUJAH N DYHKUN)
△ 6bP3O INPEIIB.3AΓPRAHE
3a 6b30 npedBapnteHNo 3aqrbaHe Ha ypHaTa.
TURBO GRILL (TYP60 TPNJ)
3a neuehe Ha eprn napceta Meco (JxKoJaH, roBexdo neyeho, nne).IpenopbUbaMe da n3no13BaTe TaBaTa 3a OTceKdaHe, 3a Da cb6upate OTdJIaHNTe npri rotBeHTo cokoe: IocTabete TaBaTa Ha HraKoe OT HbTa NOp peWeTbHnra paFT NHaJeITe B He rnoOBnH nHTbp NtTeHa BODa.
ECO EKoUkbl\*
3a npenuhe Ha eHNO HnBO Ha napyeTa MECO C nIbHKa nn nne. Pn n3non3BaHe Ha To3n Eko uKbn lamnata OCTaba n3KnUoyeHa NO Bpeme Ha rotBeHTo. 3a da n3noJ3BaTe nporpaMaTa ECO n cBoTbTHo Da ONtHMn3npate Notpe6NeHnEto Ha eHepnra, Tp86Ba Da He OTBaprTe BpaTuKaTa Ha cyphata, DOKato JCTneTo He CTAHe rTOBO.
EbPФPAI/KOHBEKTOBONEUEHE
I3noJ3BaHeTo Ha cneuHaHaTa TaBa 3a ebppaia (npedocTbAHa npn HAKo moJeN) Bn PO3BOJyBa Da npnroTBe TbpXeHn KapTOfN, nIIeUKN XaIKN N dpyrN, KATO n3NOJ3BaTe NO-MaKo Ma3HnHa, a pezytatbTe npnATHO xypknab. HarpeBaTeHNte enemEnu n3BbPWBat ZNKbl Ha npabUNHO 3aTOnJIHe Ha cyphata, DOKaTO BeHTnLaTOPbT dBxN rOpEunr Bb3dYx. Pa3noJoxTe xpaHATA Bbpxy Tabata 3a rotBeHe C ropeu Bb3dyx Ha eDIn Pepi n CneDbaiTe IHCTpykCUnTe OT Ta6nucata 3a rotBeHe C ropeu Bb3dyx 3a Na-Do6pn pe3yIITATn.
OcbEN TOBa Ta3nФyHKUma MoKe Da ce n3NoJ3Ba
3a NOCTnraHe Ha OTnUHn pe3yIaTn npn neueHe Ha Meco n Pnun, KAPTOu n 3eJeHuyn B CbOTBcTcBne C npenOpbKnte Ha Ta6nucata 3a rotBeHe. Teu peCNTn MoarTa da ce npnroTBAT CbC cTahdapTha Taba 3a neueHe.
BTACBAHE
3a ONTImaJIHO BtacBaHe Ha cnaIKO IIN COIeHO TecTo. 3a Da OcnIpynTe KaueCTBeHO BtacBaHe, He BKIIouBaIte yHKcIyraTa, aKo yphata e BCE oSe ropeuca cneI npedxOJHOTo rotBeHe.

SMART CLEAN
ДeиctBnetoHa napaTa,koTTo ce nycKa
No BpeMe Ha To3n CneuH en cNKbI Ha
NoUcHtBaHe,No3BOJRA leCHOTo NoUcHtBaHe Ha
3aMbpcBaHnI oCTaTbCn OT xpaHa. HajeTe 200
Ml BOJa Ha DbHOTo Ha cyPhaTa n aKTINBnpaTe
fYHKqNAta,Korato cyPhata e CTydeHa.
* YHKUHTa Ce n3NOJ3Ba KaTO eTaIIOHHa B IeKJIapauTAta eHeprnHaTa eΦeKTINBHOCT CbIacHO perIameHT (EC) 65/2014
yNOTPEBA 3A INPbB IbT
1.CBEPRABAHE HA YACOBHUKA
Korato BkIouHte fypHaTa 3a nbpBn nbT, Tpr6Ba da CBepnte yacOBHnka.

IbeteuΦpu 3a yacobete ue 3aNouHaT da MmraT: 3aBbptete
KoNueTo 3a HaCTpoiKa Ha Yaca N HaTnCHeTe 3a NOTBbPjKDaBaHe.

BBeTe cHpN 3a MNHyTnTe 1e 3aNouHaT da MNrA. Turn (3aBbptete)
KONUeTO 3a NaCTPOIka Ha MNHyTnTe N HaTnCHeTe 3a NOTBbPjXdAbaHe.
Molna, maaTe npedBnD: KoraTo nak nonckate da CBepnte YacOBHnKa, HATNCHeT N3aDpBXTe NOHe 3a eHa cekyHda, KORAto fypHATA e N3KlnOueHa; CJEd TOBa H3NbHHeTe ONncAHTE NO-ROpe CTbNKn.
CneI npOdbnKnteHNO ppeKbcBaHe Ha eNEkTpo3aXpaHbAHeTo MoKe Da ce HANOKn Da CBepuTe YacOBHnKa OTHOBO.
2. HACTPOIKN
Ipn Heo6xOaMocT MoKe Da npomeHnte MePaTa
eHNuca 3a TempepaTypata (^ no nopa3bnpaHe) HOMHaHnKa KOHCympaH TOK (16 A).
Pn n3KIOueHa cypHa HATNCHe T 3aApbXTe NOHE 3a neT CekyHn.
5Ee
3aBbptTe 6yToHa, 3a Da n36epeTe MePhata eHnHua, n CneT TOBa NOTBbPdTe C
16 A
3aBbPTeTe 6yToHa, 3a Da n36epeTe HOMHaHnHnTOK, nCneI TOBa NtBbPdTe C
MOnIa,ImaIte npEdbu:ΦypHata e npOpramnpaHa 3a CBbp3BaHe KbM DomaHa eEnKtpnuecka HnCTanaun, KOrTo N03BOLaBa BkInouBaHe Ha ypeNi C MoUHOCT nAd 3 kW (16 A):Ako BaataeKeKtpnuecka HnCTanaun e 3a No-MaKa MOHOC, Tp6Ba Da HaMaJInte Ta3N CTOnHOCT (13 A).
3.3AΓΡBAHE HA ΦΥPHATA
Hobata fypHa MoKe Ja n3nycka MmPn3Mn, Cbbp3aHc npoceca Ha HeHHTO npOn3BOdCTBO: Toba HAnbJIHO HopMaJIHO.
Ipei Da 3aNoHete Da roTbnte XpaHa BvB
fypHaTa, npenOpbUBaMe da Ha HarpeeTe npa3Ha,
3a Da npemaxheTe ocTaTbUHnTe Mnpu3Mn. CbaTe
IpePnA3HnA KapToH nnn npo3paUHO To oNIO
OT cyPhATA u N3BaTe HeAMnPauNTe Ce B He
pnuHaJdNeXhOCTn. HarpeIte cyPhATA do 200^ Iy
octabete Taka 3a OKoLo Yac, KaTO 3a No-Do6bp eΦeKT
BKluOHTe cIpKyuaqraTa Ha Bb3dyxa (HaNPmep
"Opcpan H b3dyx" nnn ,NeueHe c KOHBeKzna".
Cna3BaIte yka3aHnraTa 3a npaBnHo hAcTpOuBaHe Ha
fYHKuIyTa.
Moi, mai Te npedn: Cnei nbpBTo n3noJ3BaHe Ha ypea ce npenopbUba Da npobetpu TomeeHneTO.
BCEKnIaHEBHa YNOTPEBa
1. N36NPAHE HA ΦYHKU
Korato yphata e n3KIOueHa, Ha dncnpe Ce noka3Ba camo
yaocOBHKbT. HaTncHeTe n 3aApbXkTe 0, 3a da BKnIOuHTe cyphata. 3aBbptete 6yToHa, 3a da npereIate OCHOBHnTe fYHKnH, HAnuHn HaJeBnA dnCnnei. N36epTe XeHaHATA fYHKnHn HaTncHeTe
3a da n36epete noDphiyHKnra (Korato mHa), npbBO n36epete OCHOBnata yHKnna HaTNCheTe a da NOTBbpnte n da npemHeTe KbM MeHIO To Ha n36paHaTa yHKnra.

3aBbptTe BbptTae Ce 6yTOH, 3a da n36peTe HAKoOT HaJIuHHTe NOdФyHKtUN, NOKa3aHN Ha DecHnDINCNJIe, n HAInCHTe a Da NOTBbpDNTe.
2. HACTPOBBAHE HA ΦYHKUNRA
CneI KaTo Cte 136paJIi JekalaHaTa yHKUa, MoKTe Da npOMeHrTe HAcTpoKnTe I. DncJIeRr Noka3Ba NocNeIOBATEJHo HAcTpoKnTe, KOnTO MOrAT da ce npOMeHrT.
TEMPERATURE / STEAM LEVEL (TEMINEPATYPEA / HNBO HA IAPATA)
Korato Ha dncnne Mna CmboBt ^ C nnn F, 3aBbptete 6yToHa, 3a da npomeHnte cToHocTta, Cnei KoETO HATNCHeTe , 3a da NOTBbPdnte i Da npemHeTe KbM dpyrnte HAcTpOuKn (Korato e Bb3MOxHO).
CbueBpeMeHNO MoKe Da npomeHnte HNBOTO Ha rPnla (3 = cnlnHo, 2 = cpeNo, 1 = cna6o).
MOna nMaIte npedBnD: CneI CTapTnpaHe Ha
fYHKUra, Tempepatypata H NHBOTo Ha rPnla MOrat
da Ce npomeHr HanpaBO CHaTnCKaHe Ha 1nn Cbc
3aBbptaHe Ha 6yToHa.
ПОДьЖИТЕЛНСТ
Korato CnmbonbT Mura Ha dncnpea, n3noJ3BaTe
6yToHa, 3a Da HAcTpOnTe JKeJHaHOTo BpeMe 3a RotBeHe, n HaTnCHeTe Saa DA NOTBbPdnte.
He e Heo6xOIMO da 3aDaBaTe BpeMeTo 3a rotBeHe, aKO NCKaTe Da ynpablaBaTe rotBeHeTo pbuHO:HaTnChete , 3a Da NotBbPdnte n da cTaptnPate yHKunraTa. B TaKb CnyaH He MoKe da 3aDaBaTe Kpa Ha BpeMeTo 3a rotBeHe (END), KaTO nporpamnpate OTloKeH CTapT.
MOna,ImaTe npEbn; MoKeTe Da peryInpaTe 3aJaDeHOTo BpeMe 3a rotBeHe NO BpeMe Ha rotBeHe, KaTo HAtNCHeTe 3abptete 6yToHa, 3a da npomeHte BpeMeTo, HAtNCHeTe 3a NotBbpXJdeHne.
3AДАBAHE HA BPEMETO HA 3ABbPUSBAHE HA TOTBEHETO (END)/OTJIOXEH CTAPT
Pn MHoro yHKcui nCne KaTO 3aJaTe BpeMe 3a RotBeHe, MoKeTe Da OTNOKHTe CTapTa Ha 0yHKcIra, KaTo nporpaMnpate KpaHnHa c. Korato BpeMeTo Ha 3aBbPWBaHe Ha rotBeHTo MOKe Da ce IpOMeH, INcPiJeT NOKa3Ba OuaKaBHOTo BpeMe Ha 3aBbPWBaHe, a CmMBOJIbT Mna.
Ako e Heo6xOIMo, 3aBbptTe 6yToHa, 3a Da 3aJaTe BpeMeTo Ha npNKIOUbaHe Ha rOTBeHTo, Cnei KoETO HATNCHeTe ,3a Da NOTBbPdnte N da CTapTnpate fYHKnIraTa.
IocTabete xpaHaTa BBb cyphHata n 3aTbopeTe Bpatnukata: DyHKnraTa Ue cTaptnpa aBtOMaTHoCneI nepnoD OT Bpeme, KOIToe n3uNCHeh TaKa, Ye RotBeHeTo Da 3aBbPmN B 3aDaJeHnYac.
MOnIa,ImaIte npEdbu:PpOrpaMnpaHTo Ha OTNoKeH uac 3a CTapTnPaHe Ha rotBeHTo ue OTMeHn Pha3aTa 3a npEdbapntEno 3aRpaBaHe Ha cyphata:Opyhata NOCTepeHHo Ⅲe DOCTnHe Heo6xOdImaTa TempePaTypa, KOeTO O3HaUaBA,Ye BpEmTo 3a rotBeHe ige Ce pa3NnuabaJIeKO OT NOCOueHOTo B rotBapckata Ta6nua. IIO BpemeHa N3yakBaHTo MOKe C NOMoTuHa HA KOnPeTo Da npomeHnte nporpaMnpaHTo Bpeme Ha 3aBbpuBaHe Ha rotBeHTo.
HaTnchete nn nn 3a da npomeHnte hactpokkata 3a TemnepaTypa Ta nn BpeMeTo Ha rotBeHe. Korato npNKIOHTe, HATNCHE Ta da NotBbpNTe.
3.AKTUBPAHE HAФYHKUNTA
CneK KaTo npHIOXnTe Heo6xOUMnTe HAcTPOKn, HatncheTe >3a da aKTNBupate yHKnraTa.
No BCaKO BpeMe MoKe Da HaTnCHeTe N 3aDbpxKnte O, 3a Da NOCTaBtE aKTINBHata B MOMeHTa yHKuIHa nay3a.
4.3AΓPRABAHE
HЯковункив BKliouBaT a3a 3a npeDbapntelho
3arpaHa He H cyphHata: CneI cTapnpaHe Ha yHKunraTa Ha nCnJeA ce Noka3Ba HnDnKaunr 3a AKTNbpuHa Ha a3aTa Ha npedBapntenHo 3arpaHa.

Korato Ta3n fo3a npuklouu, ce yBa 3BykOB cunHaJ n Ha dncJIeJe Ce n3Bexka HOpMauny, ye fypHaTa e DOCTURHana 3adaHeHaTa TempepaTypa.
HaTo3n etan OTBOpTe BpaTuKhata, noCTaBeTe XpaHaTa BBb yPhaTn HaTNCHeTe P3a Da 3aNoUHe rotBeHTo.
MOnr, nMaIte npEbnD: Ako noCTaBnTe xpaHaTa BbB cyPhata, npEni npEbnBapnteHOTo 3arpaBaHe da 3aBbpSIn, pe3yNTaTbT OT rOtBeHTo MoKe Da He e 3aDOBOJNTeNeH.
OtBaprHTo Ha BpaTnUkata No Bpeme Ha a3aTa 3a npedBapntEnHO 3arPbAHe nocTabra Ha nay3a. BpemTo 3a rotBeHe He BKnIOuBa a3a 3a noDrpBaHe.
C nOMOHTa Ha 6yToHa MoKe IIO BCaKO BpeMe da npOMeHInTe TemnepaTypaTa, KOrTO NCKaTe Da 6bDe IOCTUHaTa.
5.END OF COOKING (KPAH HA TOTBEHETO)
PpO3ByuBa CnHn n DnCnIeT noka3Ba, yeroTBeHeTo e 3aBbPunno.
3a da ydbjxnte Bpemeto 3a rotBehe 6e3 da npomeHte HactpoiKTe, 3aBbptTe 6yToHa, 3a da 3aJaTe HOBa npOdbjXnTeJHoCT, HaTnCHete
6.6THSENSEΦYHKLIIM
SMART CLEAN (ИНТЕЛНИЕTHО ПОЧИСТВАЕ) 3a за akтувinate Функцята "Smart Clean",
n3yaKaIte fypHaTa da ce oxJaN u cunTe 200 ml BOa n O bHOTo Ha BbTpewHOCTTa, CneD KoETo 3aTBOpTe BpaTuKata Ha fypHaTa.
Bne3e B cneuaanHnTe yHKuN S E n 3aBbPteTe 6yToHa, 3a da n36epete @MeHIO.ToBa HATNCHEt a da NOTBbpDNTe.
HaTnCHete 3a He3a6aBEN CTapr Ha ZIKbna Ha NouchTbaHe Nn HaTnCHete a Da HAcTpOnTe BpeMeTo 3a Kpa/OTNoXeHnA CTapr..
B KpaHa uKbIa OCTpaHete OCTaHaIaTa BvB yphata BOda n 3aNoCHte NOUcTBaHe C NOMOHTa Ha Tb6a, HABnaxHeHa C ropeua BOda (NOuCtBaHeTo MOxke Da He e ycneSho, aKO ce 3abN C nobuee ot 15 MNHyTu).
MOnI, mAmIte npEbnI: IpoIbIJIxITeJIHOCTTa n Tempepatypata Ha cIKbJa 3a NOUcTbaHe He MoRaT da ce HAcTpOuBaT.
7.3AKJIIOUy BByTOHn
3a da 3aKnIOHTe 6yTOHnTe,HaTNCHeu 3aApbXkTe NOHe 3a neT CeKHydN.
HanpaBeTe cbuToTo, 3a da de6loKnpate 6yToHnTe.
MOna,ImaIte npedBnD:Ta3nФyHKuNMAOKe da ce aKTHBnpa n NO BpeMe Ha rotBeHe.OT cbo6paxeHnA, CBbp3aHn C 6e30NaChocCTT, fypHaTa MOKe Da ce N3KJIIOUH NO BCRAKO BpeMe C HATNCKaHe Ha。
.6ENEXKKN
He nokpnbaiTe BbTpewHocTtHa fypHaTa c anyMnHneBO oIIO.
Hukora He nbb3raIte TeHHkepu nn TuraHn NO DbHOTo Ha cyphHata, TbN KATO TOBa MoKe da Nobpeu NOKpTuNETo OT emaiJ.
He noctabray Te Tckn npedmetn Bbpxy Bpaata He ce npkTe 3a He.
- Iopapn no-Bncokata Tempepatypa Ha cukbna Pnca ce ouakba MaNKo nO-BncOK wym OT OxlaJdaun BENTnIaTOP.
ПОЛЕЗни СбВETN
KAK DA CE YETE FOTBAPCKATA TABNIUCA
B Ta6ncaTa ca nocoueHn Hau-noxOJaunTe
fynkun, npnaHadJeKHOCTn HnBa 3a npnroTBHe
Ha pa3nnuHn TInOBe xpaHn. BpeMeHaT3a
rotBeHe 3aNooYBaT OT MOMeHTa, B KOITOn XpaHaT a
ce noCTaBn BBb fypHaTaN He BKIOUcBAt
npedBapntEnHTo 3aRpaBaHe (Korato Ce u3NCKBa
taKOba). TemnepaTpnuTe n npoDbJnxTeHNOCTTa
Ha rotBeHe ca np6Ln3nteHNn N 3abncrT OT
KoINueCTBOTo Ha xpaHata N OT U3NON3BaHNTe
pinaHadJeXHoCTn. B Hauanoto n3non3BaIte Ha-
HnCKnTe npenOpbUbaHN cToHOCTHn N aKO XpaHaT a
He ce CROTBn Do6pe, npemHeTe KbM NO-BUCOKn
ctOHocTN. N3non3BaIte DOCTaBeHNTe C fypHaT a
pinaHadJeXHoCTn Nn MeTALHn fOpMN 3a KeIKObe n
Tabn 3a fypHa (3a npednoHTane TbMHo OcBeTeHN).
MoKe Da n3non3BaTe cbIo CbDoBE n akcecoapn
OT OrHeynpHO CTbKnO (PipeKc) IINI KameHHOBN
TAkNBa, Ho ImaTe npedBvD, ye npoDbJnxTeJIHOCTTa
Ha rotBeHe ige 6bJe MaJIKO NO-TOJMA.
EDHOBPEMEHNO IPNIOTBARE HA HAKOJIKO ACTN
C φyHKUraT,ΦOpCuPAH Bb3dYx" MoKe Da rotBtTe eHOBpemeHNO pa3nUHN XpaHNI, KOnTO N3NCKBaTe eHa Ncbua TempeaTypa Ha RotBeHe (HaNPmEp: np6a n 3eNeHuZu), N3NoJI3BaNk Pa3nUHN HNaBa. N3BaTe xpaHaTa, KOrTO N3NCKBa NO-MaNKo BpMe 3a RotBeHe, N OCTaBeTe BbB ΦypHaTa XpaHaTa, KOrTO N3NCKBa NO-DbIro BpMe 3a RotBeHe.
MEAT (MECO)
N3noJ3BaIte KaKbBTO n da e BnD TaBn 3a fypHa nnncBdoBe "PipeKc", noXoJaun 3a pa3Mepa Ha napyeTo Meco, Koeto Tpa6Ba Da ce neue. 3a neueHe Ha rolemnpaeta Meco, Hau-Do6pe e da npnbabnte MaKo 6yIbOH Ha IbHOTo Ha CbDa, KATO NOJINBaTe CbC COc MeCOTO No Bpeme Ha neueHe, 3a Da npndaTe BKyc. ImaiTe npedBnD, ye No Bpeme Ha Ta3n Oepaunr Ice ce noRnnapa. KoraTo MecOTO ce oneue, octabeTe ro BvB fypHaTa 3a OKOIO 10 - 15 MNHyTu nn rO obBuInTe B aanyMNHeBO foJNo.
Korato nCKaTe da neeTe MeCo Ha ckapa, n36epete napyeta c paBHomepHa de6enHna, 3a da ce noCTnHepaBHomepeHO onuHane. Mhoro de6enIte napyea Meco n3nCKBat no-dbIro BpeMe 3a neueHe. 3a da npedn3nte MeCOTO OT n3rapHe OTbH, CBanTe peWeTbHnra paHT Ha no-DoHn HnBO, C KOeTo xpaHata ce noCTabra dalev ot rpuHa. ObbpHeTe MeCOTO npi n3TuHaHe Ha DBe TpeTI ON TBeMeTO 3a rotBeHe. BHmAbaiTe npi OTbapAHe Ha BpaTuKaTa, 3aIoTO ue n3ne3e ropeua napa.
3a c6bupaHe Ha cokobete OT rotBeheTo
npenopbUbaMe Da NOCTaBtTe TaBaTa 3a OTceJdaHe C
PONOBuH NITbp NITeHa BOa B HeA HEnOcpeDCTBeHO
POd peWeTbUHn paΦT, Ha KOItO e NoCTaBeHa
XpaHaT. DOneIte, KOrato e Heo6xOdmo.
DESSERTS (ДECENTN)
TOrBete HnH DecepTu c KOHBeHcNoHaJIHaTa yHKuHa camo Ha eHN paΦT.
N3noJ3BaIte TbMHN MeTaN HOpMN 3a KeiKOBe N BnHaRn rN NOCTaBMyTe Ha npedocTaBeHnpeWetbueh paΦT. 3a da neueTe Ha nobuee ot eDIn paΦT, n36epeTe _YHK Ta 3a opcupan Bb3dyx u pa3noJoxTe waxMaTHO oopMNte 3a KeiKObe Ha paΦTOBete, KOeTo IoJnomara ONTUMaJIHaTa cUrkylaucn Ha ropeunr Bb3dyX.
3a da npOBepnTe daJIH KeiK c MaJ e n3neueH, NocTabeTe DbPBeHa KNeUka 3a 3b6N B UcHTbpa Ha KeiKa. Ako KLeuKaT a 3a 3b6N u3JIe3e YnCTa, KeiKbTe e rOTOB.
Ako n3no13BaTe He3aJenBauuΦopMn 3a KeiKOBe, He MaKeTe C MacNo p6oBeTe, TbN KaTO KeiKbT MoKe Da He ce HaunrHe paBHomepHo OKOJOp6oBeTe.
Ako n3dJIeNTo Ce "HaDyBa" no BpeMe Ha neueHe, n3nON3BaIte No-HnCKa TemnepaTpya CneDbaunia PtN O6MnCJIeTe HamaJIraBaHTo HA KOJInuEcTBOTeHuOCT, KOrTO Do6aBAre, IIN N0-BHNMaTeJHO pa36bPKBaHe Ha CmecTa.
3a cnaKnHc BnaJHH nBbHKn nIu TOnHr (yH3KeK nIu nnOobn naIOBe) n3NoJ3BaIte fYHKnraTApueHe c KOHBeKnua.AKO dONHaTa qact Ha KeKa e HeOponeueHa, CBaTe paΦTa Ha NO-dONHO HNBO N ppei Do6aBnHe Ha PbHKaTa NOPbcTe OCHOBAtHa KeKa C raneTa OT XJIb6 nII6NCBNTn.
BTACBAHE
BnHa n e ha- do6pe da noKpneTe TectOTo C BnaXHa Kbpna, npedn Da rnoocTabte BBb fypHata. BpemTo 3a BTacBaHe Ha TectOTo C Ta3n fynKcunCe HamaJraBa C np6n3nteHNo edHa TpeTa B cpaBHeHne Cbc CTaHa TempepaTpa (20 - 25^) . BpemTo 3a BTacBaHe Ha Niua 3anoUba OT OKoNo Yac 3a 1 kg Tecto.

TAbIuCA 3A TOTBEHE C TOPEU Bb3dYX
| PEUENITA ΦУнкшя | ПЕРОВЧАНО КOLINCHETS | ПЕДВAPITEЛНО ЗАРЯВЕ | TEМЕРATуРА (℃) | ПОНДБЛЖИЕЛНСТ (MMH.) | РАФТИ ПИИАДLEХОCTи | |
| 3ampa3eHахраHA | Замразецпьржени kapтофи | 650-850g Дa 200 25-30 | 42 | |||
| Замразецпileшkinхалки 500g 100 | 5-20 | 42 | ||||
| Рибни пьчши 500g Дa 220 15 | 42 | |||||
| Лучен кръчetedа 500g Дa 200 | 15 | 42 | ||||
| 3elenchuk | Пресни панирани тikвочи | 400 200 | 15-20 | 42 | ||
| Домашно риг罗тваши пьржени kapтофи | 300-800g Дa 200 20-40 | 42 | ||||
| Смесни зеленчци | 300-800g Дa 200 20-30 | 42 | ||||
| MECO M PRБA | Пileшки Грди 1-4cm | Дa | 200 20-40 | 42 | ||
| Пileшки КрILA | 200-1500g | Дa | 220 | 30-50 | ||
| Паимдан котлет | 1-4cm | Дa | 220 | 20-50 | ||
| Риба Фиle | 1-4cm | Дa | 220 | 15-25 |
3a nprirotbHe Ha npechn nn DomaHNO nprirotBeHH xpaHn pa3HeceTe TBHbK CIOI NO NOBpbXHOCTTa Ha xpaHaT. 3a da ce rapaHTnpaT paBHomepHn pe3yntaTn OT rotBeHTo, pa36bpKaIte XpaHaT a No cpeDaTa Ha npenopbHaHOTo BpeMe 3a rotBeHe.
2.И3TerIeTe HarpeBaTeTn MaJIko Iro CBAIeTe HaIOny.
3.3a da noctabute HapeBaTeJ OTHOB, NOBUNHete Ito n3dbpnaite neko KbM Ce6e cn, KaTO ce ybepnte, yeToIce 6nokupaHa CTpaHnUHnte ONOpn.

OTCTPAHЯBAHE HA HEN3ПРABHOCTN
| ПюбLEM Вьзможна ручина Ршениe | ||
| Фурнata не павOTи. | Нама зхранвае сеletonчөнөргий.Уреьт e иЗлioчөн оТ мөжата. | Пювэрет дали有很大 наразожене в мөжата и дали Фурнatura e вкlioоча кым мөжата.Изкочete и Вкlioочete урда оТноВ, за дддпес дали пюбlemьт не e оТстарен. |
| Надсплег се ИЗписва Бү KBВATERF и ч承载. | ПюбLEM сьс софтуера. | Сөрөгет се с Zeentьра 3a обслухвае на Клиенти и поочete Homeра сеДБү KBВATER "F". |
| ДисплегпokаЗва HeясеньTekst и ИЗлекдд e NOВр徳ен. | Hастpoeh e Дуг e3ik. | Сөрөгет се с Zeentьра 3a обслухвае на Клиents. |
| Цкьлт на Готveе сьс сOnдаe пухлочи 6e3 Видимапухин син ha ekpaHa eИЗписанa рөшka F3E3. | Сондата за xхан ha e сБөрзаHa павилно. | Пювэрет Вьзката Ha coндата 3a xхан. |
Ppabnata, cTaNapThata DOkymeHTaun n DonbHHTenHa HFOMaun 3a npOdyKta MoKeTe da HaMePnte, KaTo:
-
INON3BaHe Ha QR KOJa Ha BaWteTo yCTpOInCTBO
-
NocceuaBaHe Ha HauHy e6caT docs.whirlpool.eu/docs
IIN KATO CE CbpxkTe c OTena 3a Cnepnpoax6eHO 06cnyXbaHe (BxKTe TeleOHHN HOMep B rapaHNOHHaT KHXKa).Ppi KOHTKT c OTena 3a CneInpoax6eHO 06cnyXbaHe Cbo6uaBaTe KoOBeTe, NocouEH Ha IeHTnKauOnHHa Ta6enka Ha Baun ypei.
TM/© 2025 Whirlpool. Пожибени no по писн.

DEKUJEME VAM, ZE JSTE SI ZAKOUPII VYROBEK ZNACKY WHIRLPOOL
TEPLOTA / UROVEN PARY
RIST DRYPBAKKE BRADEPANDE * GLIDESKINNER *
Anwendes til tilberedning af mad eller som understotning til pander, kageforme og andre ovnfaste kogegrej.
INDSÄT RIST OG ANDET TILBEHØR
Gentag procedure for at lase tastaturet op.
PASTRY (KONDIITRITOOTED)
KUIDAS KUPSETUSTABELLIT LUGEDA
KYPSENNYSTAULUKON LUKEMINEN
ERI RUOKIEN KYPSENNYS SAMANAIAISESTI
AIR FRY -KYPSENNYSTAULUKKO
ZAHVALUJEMO VAM NA KUPOVINI PROIZVODA WHIRLPOOL
(SOLO IN ALCUNI MODELLI)
(SOLO IN ALCUNI MODELLI)
DEKOJAME, KAD [SIGIJOTE, "WHIRLPOOL" GAMIN]
Noredami gauti issamesne pagalba, uzregistruokite savo gaminj www.registerer10.eu

KEPIMAS ORE/KONVEKCINIS KEPSNYS
ISMANUSVALYMAS,SMART CLEAN
Valymo ciklo metu specialiai isleidziami zemost temperaturos garai, kad galetumete be vargo pasalinti ne'svarumus ir maisto likcuius. Orkaiteje ispilkite 200 ml vandens ir jjunkite siq fungcija, kai orkaite salta.
CEPSANA AR KONVEKCIJU
Ga'as un kuku ar pildijumu pagatavosanai tikai uz viena plagkta.

IPASASFUNKCIJAS

ATRA SILDISANA
ROOSTER LEKBAKJE BAKPLAAT * SCHUIFRAILS


Remove the shelf guides from the oven and remove the protective plastic from the sliding runners.

Turn the selection knob to select the rated current, then press confirm.
To select a sub-function (where available), select the main function and then press confirm and go to the function menu.

When the ^ C / F icon flashes on the display, turn the knob to change the value, then press confirm and continue to alter the settings that follow (if possible).
If necessary, turn the knob to set the time you want cooking to end, then press to confirm and start the function.
TAKK FOR AT DU KJØPTE ET WHIRLPOOL-PRODUKT
For aoppna en mer utfyllende assistanse, registrar Produktet ditt pa www.registerer10.eu

För du bruker apparatet mä du lese sikkerhetsanvisingene nøye.
SKANN QR-KODEN PÄ APPARATET FOR Å FÅ YTTERLIGERE INFORMASJON
PRODUKTBESKRIVELSE

- Kontrollpanel
- Vifte
- Rundt varmeelement (ikke synlig)
- Glimskinner (nivaret angitt pa ovenens forside)
- Dør
- Øvre varmeelement / grill
- Lyspaere
- Identifikasjonsplate (ma参加会议者)
- Varmeelement i bunnen (non-visible)
KONTROLLPANEL

1. VENSTRE DISPLAY
2.LYS
For a sla lampen p/a/av.
3. TILBAKE
Fárgàtilbake tilforige meny. Gjor det mulig a endre innstlinger mens tilberedningen pagar.
4. PÅ/AV
SETTE INN GLIDESKINNENE (HVIS TIL STEDE)
TRADISJONELL STEKING
HURTIGFORVARMING FREMSPOLING
VEDLIKEHOLD OG RENHOLD
At this point, open the door, place the food in the oven, close the door and start cooking by pressing
To extend the cooking time without changing the settings, turn the knob to set a new cooking time and press.
6. FUNKCJE 6TH SENSE
FUNKCJA SMART CLEAN
OBNIZYC GORNA GRZALKE
(TYLKO W NIEKTÖRYCH MODELACH)
REMOVER E REPOR A PORTA
VAMULTUMIMCAATIACHIZITIONATUNPRODUS WHIRLPOOL
TEPLOTA / UROVEN PARY
Ked' na displeji blika ikonka ^ C / ^ , otacanim gombika zmente hodnotu, potvrdtse stlacenim Pokracujte zmenou dalsich nastaveni (ak je to mozne).
OBCAJNA PRIPRAVA HRANE
- DISPLEJ SA DESNE STRANE
DODACI
| ŽICANA REŠETKA | PLEH ZA SAKUPLJANJE MASNOCE | PLEH ZA PEÇENJE* KLIZNE VODICE* | |
| Koristi se za priprepamu hrane ili kao držač za šerpe, kalupe za kolače i drugo posude za priprepamu hrane u pećnici. | Koristi se kao pleh za peçenje mesa, ribe, povrća, fokače itd. ili je možete postaviti ispod žiçane rešetke akо želite da prikupite saft od pećenja. | Koristi se za peçenje svih vrsta hleba i peciva, kao i peçenja, ribe u sopstvenom soku itd. | Da bi olakšale postavljanje ili uklanjanje dodataka. |
| PLEH ZA PRŽENJE VAZDUHOM* | |||
| Koristi se za priprepamu hrane pomoću funkcjije prženja vazduhom, takо što je pleh za peçenje postavljen na niži nivo radi pripekulanja moguciḥ mrvica ili masnoće. Može se prati u mašini za pranje sudova. | Količina i vrsta dodataka moze se razlikovati u zavisnosti od kuplejenog modela. Ostali pribor se moze kupiti zasebno; za porudžbine i informacije, obratite se postprodajnom servisu. *Dostupno samo na odredenim modelima | ||
STAVLJANJE RESETKI I DRUGIH DODATAKA
Horizontalno ubacite zičanu reşetku taksto cete je klizanjem pomeriti niz vodice, pritom vodeci računa da strana sa podignutom ivicom bude okrenuta nagore.
Dodatni pribor, kao sto je posuda za kapanje i pleh za pecenje, se postavlja horizontalno na isti nacin kao i zičana reşetka.
UKLANJANE I PONOVNO POSTAVLJANJE VODICA
- Da biste uklonili vodice, podignite ih, a zatim izvucite donji deo iz leziesta: Vodice se sada mogu izvaditi.
Za njihovo ponovno postavljanje, potrebno je da ih prvo postavite u gornje leziSTE. Drzeci ih, pustite ih da skliznu u unutrasnji deo pecnice, a potom ih spustite u polozaj u donjem leziStu.
POSTAVLJANJE KLIZNIH VODICA (AKO POSTOJE)
biste priocrvstili vodicu, donji deo zaice priocrvstite za nju. Vodite raucna da se klizaci slobodno krecu. Ponovite ove korake na drugoj vodici na istom nivou.
Obratite pažnju na sledece: Klizne vodice se mogu postaviti na bilo koji nivo.
FUNKCIJE

6TH SENSE
Ovo omogucava automatiski izbor načina pečenja i njabolji opseg temperature za sve vrste hrane (lazanju, meso, ribu, povrce, torte i kolaç, slane kolaç, hleb, picu). Da biste ovu funkciju iskoristili na njabolji način, sledite uputstva u tabeli za pečenje.

Funkcija Steam+ omogucava postizanje izvanrednih performansi zahvaljuuci prisustvu pare u ciklusu pecenja. Ova funkcija predlaze idealnu temperaturu za pecenje najrazlicitijih recepata; Trajanje kuvanja i kolićina vode (100 ml / 200 ml) za glavno jelo prikazani su u relativnoj tabeli kuvanja koju možete pronaçi na mrezi. Uvek aktiviraje funkciju pare kada je pečnica hladna i nakon što sipate vodu za piće na dno pečnice.
Napomena: Preporučena količina vode premašuje kapacitet udubljenja rene, ali je dno rerne dizajnirano tak do efikasno upravlja viskom vode.

Ova funkcija predlaze najbolju temperaturu i način pripreme pasta.

Ova funkcija predlaze najbolju temperaturu i način pripreme mesa.

Ova funkcija automatski predlaze najboljutemperaturi naacin pripreme svih vrsta hleba.

Ova funkcija vam omogucava da pripretite odlicnu domacu picu za manje od 10 minuta, kao u restoranu. Namenski ciklus za pripretmu hrane radi na temperaturama iznad 300 stepeni Celzijusa, takdo pica bude socnia iznutra, hrskava po ivicama i sa savrseno ujednacenim zapecenim koricama.
Kombinovanjem ove funkcije sa dodatkom Pizza Stone WPro i predzagrevanjem od 30 minuta pica se moze ispeci za 5 do 8 minuta. (Za porudzbine i informacije,OCRATE the text in the center of this page).

Ova funkcija predlaje najbolju temperaturi način pripreme svih vrsta kolaça.

KONVENCIONALNO
Za pripremu svih vrsta jela samo na jaknej reşetki.

GRILL
Koristi se za pečenje kotleta, ražnjića i kobasica, gratiniranog povrća ili za tostiranje hleba na rostilju. Kada grilujete meso, preporucujemo da koristite pleh za skupljanje masnoće da biste prikupili sukove od pečenja: Postavite pleh na bilo koji nivo ispod resetke i dodajte 500 ml vode za pije.

FORCED AIR (KRUZENJE VAZDUHA)
TM/© 2025 Whirlpool. Producerad under licenses.

ДякУЕМОЗПИДБАHнВИРОБ WHIRLPOOL
Длг OTримангбиьш NOBHOI DONOMOrn 3apectpyte cbi Bupi6 ha caNTi www.registerer10.eu

Ipeep BnKOpncTahHm npntpo yBaXHO npouHTaTe iHCTpykui3TexhIK6e3neKn.
BIDCKAHYNE QR-KOJ HA IPIPCTPOI,IOOB OTPMATN DOATKOBY IHOPMALIO
ONMC BIMPO6Y
1.Панель керваимя
2. BeHTnJIaTOp
3.KpyroBn HarpiBaJbHn neMeHT (HeBUNMn)
4. HanpamHДpewiTkn (piBHeB Bka3aHo Ha nepeHni CTopoHdiyXOoi wa)
5.Дверцета
6.Bepxhi HarpiBaIbHn eIeMeHT /rpnib
7.ламнока
8. NaCnOpTHa Ta6JnUka (He 3HimaTu)
9. KpyroBn HarpiBaIbHn enemHT (HEBUNMNI)
NAHEJIb KEPYBAHH
1.JIBN DNCJIEN
2.CBITJIO
IyBIMKHeHHBnMKHeHHnAMNoQn.
3.HA3AD
Дя BCTaHOBJIeHHa cacy, a TakoJ HanaHTyBaHHa 6o perJIOBaHHa cacy npIroTbAHHa.
8. TEMNEPATYPA
HanaTsyBaHHa TemnepaTpyn.
9.ПРABИДИСПЛЕI
Pnla
BCTAHOBJIeHHI TEIECKONIiHHX HANPIMHIX (3A HABHOCTI)
BntaHtB HanpMHI nppewiTK3 dyxOBOi wafo i 3HIMITb 3axnchi nactmacobi eJeMeHTN 3 TeneckoniuHnx HanpMHNX.
OnyctiHa Micue iHn3aTncka.
3amkhitb Bepxhi 3aTnckau TeleckoniuHoi HanpMHOi Ha HapmHi dny pewiKu Ta npocyhe Noro B3doBk HanpMHOI do ynopy.
Uo63afoikcybTuHaPmHy, MiuHO pUInChiB HxKHIO
yactHy 3aTnCKaJa Do
HaPmHOI dJe peWitKn.
IpekoHaItecA, 00 pyxy
TeleckOJIcHnx HaPmHnx
HiOro He 3aBaxaE.
PiobTopiB zu iDii 3 iHWO
HaPmHOIO dJe peWitKn Ha
TOMY K PIBHI.
3BepHt b ybary: TeneckoniuHi HanpMHi MOxHa BCTaHOBNIbAtn Ha 6yNb-RAKOMy pIBHi.
ФУнкцii

6TH SENSE
Ye 3a6e3neyuC abTomatnHn Bn6ip cnoc6y npnroTyBaHHra Ta HauKpaUoro Diana3OHy TeMnpaTpyn dny 6ydb-koTO TnPy CTpaBn (na3aHb, M'aco, pnb6a, oboqi, nporu Ta iHsa BnIiKa, coOni nporu, xni6, niua).ДЯ OTPMaHnHaNkpaUoro pe3ynbTaTy bID BnKOpNCtAHn YciEi FyHKui, DoTPmMyTeCb BkA3IBOK, HabeDeHnx y KynIHapHi Ta6nui.
STEAM ^+ (IAPA+)
Функця "Napa+"Даэ 3MORYdoCЯгТи BiДмHHnx pe3yIbTaTIB 3aBDAKIN BnKOpNCtAHHIO napi NiJ cac unkny roTyBaHH.у Функця pekomeHdye ideaIbHy tempepatypДЯ roTyBaHHshIpOKOrcneKtpy cTpaB; Yac npuroTyBaHHra KaIbKicTB OBDn (100/200 m)ДЯ OCHOBHnx cTpaB Bka3aHoY BiDnOBiHni Ta6nui npuroTyBaHH, Aky BuMOxete 3NaHTn B lIntePheTi.3aBXdN BMKaaiTeФункцio napi, KOnI dYXOBA waΦ axoJODHa, nnicla DoDaBaHHn NTHOi BOHN Ha DHO waΦn.
Ppimitka: PekomeHDoBaHa KINbKICTb BODn nepeBnUe NO3HaueHn O6'Em NOpOxHHn, aIe DHO dYXOBoi waN cnpoeKTObaHe TaKIM YHOM, 0o6 eEeKtNBHO BiBbOHTn peKomeHDoBaHn HaDNIWOK BOHN.
CASSEROLE (3ANIKAHKA)
UyHKiPeKomeHdyHaNKpaSy TemnepaTy Ta ONTmAbHn CnOci6 roTyBaHH Ja CtpaB i3 MaKapOHIB.
M'RCO
LЯ Функция pekomehdye haikpaaу TempepaTy Ta ONTUMaHbHn cnocio roTyBaHHЯ ДЯ M'ЯСнХ CTpaB.
XJI6
LüyHKiABTOMaTHUHO peKomeHdyE HaNKpaCy TemnepaTy Ta ONTMaJIbHNI cnoci6 roTyBaHHN dIe Bcix TUNIB xIi6a.
PILA
3a donomoroio ciéi fuykuii Bu 3mojkeTe npurotybaTn yudoy domaunHIO niuy MeHw Hix 3a 10xbuHH, hemOB 3 pectopany. 3abdkn cneiaIbHomy uNKny npuroTybaHH, kNn IpaIOe npI Tempepatyi noHaD 300 rpaucB Cenbcia, Nica BuxOAnTb M'koB BCEpeDiHi, 3 xpyctKOIO CKOpNHKOIO NO KpaX N 3 ideaIbHO pIBHomipHM NiDPym'HNHAM.
3a BnKopncTaHn 3 ciEIO fYHKciEIO KAMiHHn DnnaPiu Pizza Stone WPro, nicna nonepeHboro nporpiby dyxoboio aphi npotraom 30 xBnlnn, uac BnniKaHH na CTAHOBntb 5-8 XBnInn (3 nHTaHb 3aMOBneHb, a TAKOK dIra OTpMaHHn DOdaTKOoi IHoFpaui 3BepTaNTec Da CEHTpy nicnaipodaJxHOrO 6cNryROByBaHHa 6o Ha caT www.whirlpool.eu).
PASTRY(BMNIIKA)
LeyHKcipeKomeHnyeHaikpauy TemnepaTy Ta ONTmAlbHn Cnocio roTyBaHHn DnB BCix Tnib KOHNTEpcbKix Bnpo6iB.

TPADUNIINHINPEXIM
IЯ roTyBaHHa 6yDb-koI cTpaBn IuWe Ha ODiHn noNci.

TnB
Дя Cмжehн CTeKIB, Ke6a6i KOB6acOK, 3aIkaHH OBOUH i roTyBaHH rpiHok.ПID qac CmaXeHH M'ca Ha rpnii peKomeHdyEMO BnKOpNCTOBvBaTu NIOdoN DЯ 3bpaHH COky, SO BuTikaE NID qac roTyBaHH: IocTaBe NIDOn Ha 6yDb-ЯKOMy pIBHi NID peWitKOIO Ta HAnInTe B HbOrO 500 mI NITHOI BOIN.

KOHBEKLJIA
Длго odnochoro rotybaHHЯп bIMaraTb OndaKoBoI Tempeatypn,Ha KInbKOx pIBHx.ця Функця Даe 3Mory odnochho roTybaTN pi3Hi cTpaBn i npu cnbomy yHnKaTu 3MiWyBaHHaPOMaTIB.Длгпрвьнoro Bn6Opy Kom6iHaciipBHB03HaHOMTeC3 KyJIHapHOIO Ta6NlueO.

BUNIKAHH3 KOHBEKJIECIO
IЯ roTyBaHHaM'ca, BniiuKn nporib i3 HaunHkoTilbKn Ha Ondhi noliuci.
Turn the selection knob to select the unit of measurement, then press confirm.
16 A
06epTaOny pyKy Bn6Opy, 06epiTb HOMHaJIbHn CTpym i NiTBePdIb KHOKNKO
3BepHt b yBary: DxyOby 7afo 3anporpamOBaHO h cnoXnBaHH pIBH eIektpnHoi NOTyXHocTi, Cmichoro 3 n6yTOBOIO MEpeKeio 3 HomiHaIOM NoHaD 3 kBt (16 A): RaKIO y BaWII OCEJI BIKOpNCTOBYeTBc HIXKa NOTyXHICTb, Heo6xIDHO 3MeHHTNU CE 3NaueHNN (13 A).
3.ПОТРIBAHнДУXOBOЛшФИ
Hoba dyxoba wa a MoKe BnDInrTn 3anaxn, 10 3aunuNcra nCna II BnroTOBneHH: Lc zuikom HopMaNBHO.
Tomy, nepu Hix roTyBaTu iJy, peKomeHdyEmo nporpiu npOxHIO dYxOBy 7afo, uO6 ycHyTu 6ydb-aki MoKnBi 3anaxu.3HIMt bI3 dYxOBoi 7afo 3axnchy KapToHH ynaKOBky a6o npO3opy nIIbKy Ta BntarHITb 3 Hei BCE npnlaDJa. Iporpinte dYxOBy 7afo do 200 ^ C npotraqm npn6n3HO odHiei rOHN; DnA zboRo HaKnpaue BnKOpncTOBvBaTu fynKciio 3 cnPKyIauciio nobitrpa (HaNPnKlaad, "KohBeKciia" a6o "BunikahHr 3 KOHBeKciieO").
DotpmyTecb iHCTpyKciu, 0o6 npabnIbHo HanaTuBaTu yHKciio.
3BepHt b yBary: peKOMeHdyETbcra npoBITpTN npimiueHHnicn nepworo BnKOpncTahnn npnaay.
IODEHHE BIKOPNCTAHNRA
1.BNBP FYHKLII
Ha nncnnei BmKHeHoi nevi BiO6paKaetbca Nnue
HaTnCHiB i yTpmyTe 日 06 yBIMKHyTN dYXOBy
wafoy. NOBepHITb pyky, o6 nepernaHyTu rOnobHi
fHKui, doCTynHi Ha dnCnnei libOpuy. Bu6epitb
fHKciIO Ta HATnCHiTb .
O606paTn DpyroAHy fYHKciIO (3a Heo6xIDHocTi), 06epitb roOBHy fYHKciII, niITBepDbTe 3a DOIOMORIO Ta nepeuDiTb Do MeHIO fYHKciI.
IobepHtB kpyrny pyky, 0o6 o6paTu OndHy 3 dpyropanx yHKciu, IOCTynHnx Ha npabomy dncnnei, a Notim HATNCHTb KHONKy dna niTBepeJKeHH.
2.BCTAHOBJIeHHH KyHKLIi
Bn6paBwn Heo6xHny fynKciIO, BN MoXeTe 3mHNTi HanaWtYBaHHa. Ha dncnne i noeproBO 3'ABTmMyTbCra HanaWtYBaHHa, kI MOxHa 3mHNTn.
TEMNEPATyPA /PIBEHb NAPU

KoHa dncnnei Murotiime 3haoyk ^ C / ^, 3miHITb 3haueHHa o6epTaHHaM nepemkaay, iTBePbTe 3a Donomoro Ta npOobKItb npauOBaTu 3 HactynHMf yHKiaMn (3a MoKJNBOCTi).
Y ue yac taKoK MoKHa BCTaHOBnTi pBeHb rpnIO (3 = BucOKn, 2 = cepenHni, 1 = Hn3bKn).
3BepHtB yBary: Picra akTbauii fyHKuii 3MiHHTn TemnepaTy pIBHa rpnIO MOxHa, HATNCHyBwn a6o 6e3nocepEnhbo noBepHyBwn nepemukau.
TPUBAJIICTb
KoHa dncnne6nMae 3HaouK ,3a DonomorOIO KHONKN perynlOBAHN BCTaHOBtB 6axaHn Yac roTyBaHH, a NOTIM HaTNCHTb KHONKY DnI niTBePdJxKeHH.
He notpi6Ho 3aDaBaTu Yac roTyBaHHa, KaO Bu 6axaTe kepyBatn roTyBaHHaBpyHy: HatncHITb
KHOKNy 6 niTBePHT Ta 3anyCTNTu
yHKciIO.YcbOMy pa3i BN He 3MOKeTe BCTaHOBNTu
ac 3aBepWeHHr roTyBaHHrYepe3 nporpaMyBaHHr
3aTpIMKn 3anyCKy.
3BepHb ybary: kuo noTpiHo BiDperynobatn ac npiroTybaHH, kyn 6yo BCTaHOHeNo npnpiroTybaHHi, HATNCKaHTe :PiobepHtb nepemkauch 3MiHHTn rOHy Ta nI nd TBepdxHHaTCHtB
HAJIATYBAHH YACY 3ABEPWEHHI TOTYBAHH/3ATPUMKN 3ANYCKY
Дя 6araTboxФункiIM MoKHa BiIKnactn IxHi 3anyck, BCTaHOBbUH Yac 3aBepseHHN iICnBCTaHOBHeHH Yacy roTyBaHH. JkO y BaC E MOKJIINBICTb 3MiHHTu Yac 3aBepseHHN, Ha DnCnnei BiIO6paXaEtbcY lac, KOnI ΦyHKciI NOBHHa 3akIHHTn po6OTy, NOKMIROTNTb 3HaQOK .

3a Heo6xHocTi nobepHiB pyky perynIOBaHH, 0o6 BCTaHOBTN 6axKaHN yac 3aBepWeHH roTyBaHH, NOTIM HaTNCiTB DnI niTBePdxKeHH i 3anycky fHKii.
Ioknaiditb npodykTN Bdyxoby afoy Ta 3aunHItbDbepraTa: DyHKci 3anyctntbcra ABTomauHO uepe3neBHN npomixok yacy, kN 6yB po3paxoHaHn TaKm YHOM, 06 npuroTybaHHraabepuHIOc y BCTaHOBHeHn Bamu yac.
3BepHb yBary: y pa3i nporpaMyBaHHa cacy BdknaedeHoro 3aNycky roTyBaHHa a3y nonepedhboRo nporpipBaHH bye cKacOBaHO: P03irpiBaHH dYxOBOI waN do BCTaHOBneHOI TemnepaTpyn bye nocTynOBm, a ce O3Haue, 1o Yac roTyBaHH bye Tpoxn 6iNbIm 3a cac, HabeHenn y Ta6nui npiroTyBaHH.
Piud oukyBaHHa 3a donomoroIO nepeMkaa MoKaHa 3MiHHTn 3anporpaMoBAHN yac 3aBepweHHra TOTyBaHHa. HatncHtB a6o o6 3MiHHTn HalaTsyBaHHa Temnepatypn uacy roTyBaHHa. Iicna 3aBepweHHa HatncHtB nIiTBepJKeHHa.
3.AKTUBALIaYHKLIi
3actocyBaBnHnotpi6Hi HanaHTyBaHHaHTNCHTb 1,06akTNByBatn yHKciIO.
Bn Moxe B 6yDb-Яkn yac HaTnchTy n i yTpMByBaTH 06 np3ynHHTn aKTHBHy fYHKciIO.
4.ПОТРIBAHн
IeKyHKuII nepe6aauotb nonepeHne po3irpiBaHHBnpo6y:nicra 3anycky yHKcII Ha dncnlei 3'ABntbcnOBIDmneHH, 0o a3y nonepenHbOTo nporpiBaHHaKTNBObaHO.
Iicna 3aBepueHHa3n npolyHae 3ByKOBn cnHan, a Ha dncnnei 3'ABNTbcra CNObiueHH npo Te, zo duXOBA wa oocra 3adaHOiT empepatypn.
At this point, open the door, place the food in the oven, close the door and start cooking by pressing
3BepHiTb yBary: kIIO NOCTaBNTn Ixy B 7afoYo 3akInueHnnonepedhboI nporpibaHH, ce MoKe nOripuHTN OCTaTOHn pe3yNbTaT roTyBaHH.
Kaio Ha a3i nonepaHbO rpoRpaHH BiiuHHTn DBepuTa, 3a3HaueHy onepaio 6yde np3yHHeHO.
Yac rotyBaHH He BkIIOUaE a3y nonepeHboro nporpiBaHH.
Bn 3aBkDn MoKeTe 3MiHHTu TemNepaTyp,do AkoI MaE Harpitnc dyXOBA waΦa,3a DOnOMorOIO NepemNKaHa.
5.3ABEPUeHHrTOTYBAHHr
PpOyuHa3ByKOBn CnHan i Ha dncnnei 3'ABNTbcn NobidomJeHH npo Te, 10 npouec npuroTybaHH 3aBepseHo.

Ioo6 nooBxntu TpNBaictb roTyBaHH, He 3miHIOUHN HanaWtBuHH, o6epTaHHm nepeMnKaa BCTaHOBITb HOBy TpNBaictb roTyBaHH Ta HaTNCiTh.
6.ФУHKUII 6TH SENSE
SMART CLEAN (IHTEJIENKTYALbHE OUYIUEHHRA)
Ioo6 aKtBByBaTH yHKnCIO Smart Clean, y xonodhi dYxOBI W aphi o3noDinitb 200 Mn BOIN NO dHy kamepi dYxOBOI waT Ta 3akpniTe DBepuTa dYxOBOi
waΦn.
IpeenidtbooocnBuxyHKui S-Ta NOBepHyTb pyky dny Bn60py 3 MeHIO. NOTIM HaTncHITb Ia nTBePdKeHHJ.
HaTnCHiB D, 0o6 HeraiHo NoaTu NcKn OuyuHHeHH a6o HaTnCHiB 8 dIy BCTaHOBLeHHa KInCeBOrO yacy a6o BiKlanaDeHOrO yacy 3anycky.
Iicra 3aBepseHHaIKny daTe dYxOBOi
waof oxoOnHyTu Ta BnDaJIb 3aNNuKn BOuN 3
dyXOBOi wafo Ta po3NoHITb npoec YuSeHHa,
BnKOpNCToBvOuOyN 3BOJoxeHy rapayi Boi ry6Ky (UuSeHHa MoKe He DaTu 6axaHnx pezylbTaTIB 3a
ymOBn 3aTpIMKn 6Inbwe HIX Ha 15 XbnnH).
3BepHb yBary: TpnbAJIcTb zKkny Ta tempeaTypy UHHe HBCTaHOBHTn He MoXHa.
7.БЛOKУBAH.KHONOK
Uo63a6nkyBaTu KHONKn,HaTncHItb iYTPmMyTe KHOKNyKMIHIMyNpOTAROMn'AYTNCEkYNd.
BnKoHaTe 10 DiIO NOBTOPO, 106 po36IoKyBaTN KnaBAtypy.
3BepHb yBary: LIO cyHKuio TaKoX MOxHa yBIMKHyTN niD qac roTyBaHHa. 3 MIPkyBaHb 6e3neKn dYxOBy 7afo MoxHa BUMKHyTN 6yDb-KON, HATNCHYBUN
.ПРИМITКI
He hakpnbaiTe BHytpiHIO NOBepxHIO npnayy aIOMHIeBOIO oJbROIO.
Hikonn He nepecyBaIte kactpyni a6o cKOBopiKn no dHy dYxOBoI waΦn, ockInbKn ue MoKe NowKOINTN emaJIeBe NOKpTTT.
He cTaBTe Ha IBepi BaXki npEmdTei He TpMaIteCg 3a DBepi.
- Upe3 Bnuy TemnepaTy pukny "Piua" ouikyETb6iIbwn pibeh yumy BeHTnIaTopa, 0 oxoJOnjKvE.
KOPUCHI IOPAДN
YK YHTATN TABJIULIO TOTYBAHH
Y ta6nui HabeJeHO haikpaui yHKui, akceCyapu Ta pIBHI NOTXHOCTi, kci C1iD BUKOPNCTOByBaTN DIA rOTyBaHHa KOKpeTHnx CtpaB. BiDlIK Y acy rOTyBaHHaOuHaETbcra 3 MOMeHTy, KOJI N CtpaBy CTABTb y dxyOby wafo. Yac nonepeHboro nporpibaHH a dyxOBOoi wafo (Ako BOHO notpi6He) He BpaxOByETbcra. Bka3aHi TempepaTypa Ta Yac rOTyBaHH oipieHTOBHI; BOHI 3aIeKaatb BiD KInbKOcTi npOdyKTIB I TINY npUnaIDn, 0o BUKOPNCTOByETbcra. IOnuHaIte 3 HaMeHwOro peKOMeHDoBaHORO 3NaueHHa, a AkiO CTpaBA HeIOCTaTHbo rOToba, nepeiDiTB Do 6IlbWux 3NaueHb. BUKOPNCTOBuyTe npUdaJ3 KOMPNeKty n HadaBaIte nepeBaIy MeTaJIeBMfOpMaM DJI BnIcKn Ta JINCTam TEMHORO KOJIbOpy. Bu MoKeTe TAKOX KOpNCyBaTncs CKOBopiKaAMn Ta npUdaJm i3 "nipEKCy" a60 KepaIKn, aIe MaTe Ha yBa3i, 0o TpNBanictb rOTyBaHH 6ynde Deo 6Inbwoio.
TOTYBAHHI3HIX CTPAB OHOUACHO
3a donomorofoyHKqiiKoHBeKzraMoKHa Ondohuacno roTyBaTn pi3hi ctpabn, kni notpe6yIoTB OndaKoBoi TeMnepaTyPi roTyBaHHa (Ha npNKla: p6y N oOuy), BnKOpncTOBHyou n pi3Hi noNci. BuimMt b3 dYxOBoI waΦn cTpaby, kni NOTpi6HO MeHwe yacy Dnra roTyBaHHa, i 3aNNTe B Hi cTpaby, rKa roTyETbcr DOBwe.
M'RCO
BukopncToByte 6ydb-kynnPiDoH a6o nocyd i3 nipeKcy, 0n iIxOuHTb 3a po3mipom dny mMaTka M'ra, kyn noTpio hroTsyBaTu. Pnp cmaKeHHi mAtkiv M'rca Kpaue DoDaBatn TPOXn 6yNbHOhy Ha dHO nocdy, 3MooyouH Hm M'co Nd qac roTyBaHHa dny KpaUoro CmAky. 3BepHt b yBary, 0n nd qac ciEi onepauii yTBOpEOCTbcra npa. Konc cmaKeHHa roTOBA, daite ii nocToarN B dyXobii wafoe 10-15 xBnInn a6o 3aogHt b aIOMHIEby oJbry.
Jkso Bn xouete roTyBaTn M'raCo Ha rpnI, Bn6paTne 5MaTKo OndaKOBoi TOBUnHn NO Bci NdoBxNHi, 06 BOHn pIBHomipHO 3acmaXunnc. Dyjke TOBCTi 5MaTkn M'ara Notpi6Ho roTyBaTn DOwe. Uo6 M'aco He npuropao 330BHI, onyctitb pewiKtu HxKue, 06 iKa 3haxOuInacr noaJI BiD rpnI. IpepeBepHItb M'aco uepe3 DBi TpeTnH uacy roTyBaHH. BiDunHnTe DBepuTa 3 oBepeXnHcTIO, ockinbKn 3 dYxOBoi waΦn BHXODNTmE napa.
36 36 36 36 36 36 36 36 36 36 36 36 36 36 36 36 36 36 36 36 36 36 36 36 36 36 36 36 36 36 36 36 36 36 05 nntHO BOn 6eNocepeHbO n peWtKoU, Ha kii rTOyETbcra TpaBA. OJnBaIte BoY 3a Heo6xIDHOCTi.
DECEPTN
DenikaTHi DecepTu roTyuTe y cTaHapTHOMy peKmI nnue Ha oNHi nOnuCi.
Bukopnctobyte nuctn dny BnuiKu TemHoro
KoIbOpy n 06OB'3KOBO CTaBe ix Ha pewiTky, zo
BXOHTb Do KOMNKeTy NOCTaHaHH. 06 roTuBaTN
Ha KInbKOx NOniux, yCTaHOBITb fYHKcIO npMycOBoi
BEHTnJIaCi i PO3CTaBe foPMn Dny BnuiKu Ha
NoIunyx y IaxOBomy NOpAky, 0c cnpraTmme
ONTMaJbHi nIkpKylaI rapyOrO nobITpr.
Ioo6 nepeBipnTn rotOBHicTB npora 3 KncnoTtCTa, yctabTe depeB'any naNnuKy B ceHTp npora. JaKuo 3yboocntKa Bnnde uCToIO, npir rotOBn.
KIO Bu Bn KOpncToBye Te NcTn DnB BuniuKn 3 aHTnpurapHm NOKpTTM, He 3MaUyTe KpaIB, OckInbKn npir Moke NiDhAtnC HepiBHomipHO DOBkOJa KpaIB.
Kuio Bnip6 "po3yBaTbcra" niac BuNikAHnHa, HAcTyHoro pa3y BnKOpNCbOByTe HxKUy TemepaIpy Ta cnpo6yIe DoaBAtm MeHm o6'Em pIDHH a6o nepemiuyBatn cyMiO6epeXhIwe.
Дя rotybaHHЯ DecepTIB i3 BONoroIO haunHkoI a6o nocnnaHHaM (Ha npKnaIad, yI3KeIky a6o 0pkykTOBnx nporIB) BnKOpncToByte cyHKciIO BuNikAHn3 KOhBeKciEIO. JkIo OCHOBa NpOra rIeBka, onyctITb NOHIO HxJy e I nocuTe dHO NpOra Kpnxtamn XJI6a a6o neuBa, nepw HIXdoJaBaTn HaunHky.
BNUCTOIOBAHH
BaxkaHO 3aBXdHaKpNBaTu TICTo BOIoroTO
TKaHHIO, nepH HIX CTaBHTN Ioro B DyXOBy 7afoy.
Yac BNCTOIOBAHHraTicTa npn BVKOpNCtAHHi ciEi
fYHKciI 3MeHwyeTBcR np6n3HO Ha Ody TpeTHHy
y NopIBHHHI 3 BNCTOIOBAHHrM npn KIMhaTHHi
TemnepaTypi (20-25°C). Yac CXoJxHeHRA dny Niun
NouHaETbcra np6n3HO BiD OndHIE rOHN Ha 1 Kr
ticTa.

TOTYBAHHB AEPOPUNJI
| PEÇEΠ ΦΥΚΙΙΑ | PEKOMΕΝΟΒΑΗ ΚΙΙΚΙCTΙ | ΠΟΥΕΝΕ ΠΡΟΓΙΒΑΗ | ΤΕΜΕΡΑΤΥΑ (℃) | ΤΡΙΒΑΙΙCTΙ (xv.) | ΠΟΥΙΑΙ ΠΡΙΑΙΔΙΑ | ||
| Заморожения Kapтолая φρι | 3amopoxe ha Kaptoлая φρι | 50-85 | 25-30 | 4 2 | |||
| 3amopoxe hi kypaì n hareçti | 500 r | Tak | 200 | 15-20 | 4 2 | ||
| Riδni paliučni | 500 r | Tak | 220 | 15-20 | 4 2 | ||
| Kilbça uíbni | 500 r | Tak | 200 | 15-20 | 4 2 | ||
| Овочi | Паніроваиіцукінi | 400 r | Tak | 200 | 15-20 | 4 2 | |
| Домашия Kapтолая φρι | 300-800 r | Tak | 200 | 20-40 | 4 2 | ||
| Овоче acopti | 300-800 r | Tak | 200 | 20-30 | 4 2 | ||
| МУСОПИБА | Керчі grudи | 1-4 cm | Tak | 200 | 20-40 | 4 2 | |
| Керчі крпьця | 200-1500 r | Tak | 220 | 30-50 | 4 2 | ||
| Панірована котлета | 1-4 cm | Tak | 220 | 20-50 | 4 2 | ||
| Рибne φіиle | 1-4 cm | Tak | 220 | 15-25 | 4 2 | ||
IpybHcBHX aO DomawHix CtpaHaHeCt b ToHKn Wap OJIHa NoBepxHIO CtpaBn.
I06 rapaHTyBaTn pIBHomiphe npiroTyBaHH, nepemiiuyte kcy B cepenHi pekomehnoBaHoro iInTePbany npiroTyBaHH.
1.3Himitb6iHi HanpamHi JIpewiTkn.
- TpOxN BNTaRHiTb HarpiBaIbHn eIeMeHT i onyctITb Noro.
- Ⅲo6 nepemicttu HarpibaIbHn enemeHT, nHIMITb Ioro, TPOXn NotarHyBwn Ha ce6e, i nepekoHaTeCra, 0o BIn CNIPAeTbcra Ha 6okobi onopu.
NOWyK IUCYHEHHRA HECnPABHOCTEN
a a a a a a a a a a a a a a a a a a a a a a a a a a a a a a a a a a
WHIRLPOOL aas cipiaa nlae d sia 1e e jaae y aaii aill xuall na y jall y qall www.registerer10.eu

jglai jiai jia jia jia jia jia jia jia jia jia jia jia jia jia jia jia jia jia jia jia jia jia jia jia jia jia jia jia jia jia jia jia jia jia jia jia jia jia jia jia jia jia jia jia jia jia jia

C
aill aol .1
aolal .2
ylll yic .3
( yra)
4
jol j.4
Jol Jall Jia ( )
( )
5
i/ gail jai 6
aill .7
jaiil agl .8
(gelii)
laill iaic .9
p<11 a
6
.7
.8
.9
Jgll 5
1
1
1
1
1
1
1
1
1
suii 1
2 1
3
C 1
4
Jia jia xie jie Juaa +Steam aai,
y j 1 y
gill jai aeg gall clll qjgl 1a bdo 1i jll clll galeill paas no glal jsl 0e k

j 1
aalill gbal aylrjg oJra Jnlaaiy jll 2

a a a a a a a a a a a a a a a a a a a a a a a a a a

10 300 300 300 300 300 300 300 300 300 300 300
Pizza Stone 30 5-8
(eu.whirlpool.www
CONVENTIONAL

120 1

()GRILL

g 1 g 2 g 3 g 4 g 5 g 6 g 7 g 8 g 9 g 10 g 11 g 12 g 13 g 14 g 15 g 16 g 17 g 18 g 19 g 20 g 21 g 22 g 23 g 24 g 25 g 26 g 27 g 28 g 29 g 30 g 31 g 32 g 33 g 34 g 35 g 36 g 37 g 38 g 39 g 40 g 41 g 42 g 43 g 44 g 45 g 46 g 47 g 48 g 49 g 50
(1) FORCED AIR

gabll jyj yj jilb jill aolll aobly gbal
aegal gbal aagall oiai jay. cial gai j
gals lgs jy jpln no gll jlaill jno
gall
+ S
( 4) ( A,B)
()
()
PIZ

yduol biaol 2 y g aal yll lal 1000000000000000000000000000000000000000000000000
3
1 1
1
1
1
1
1
1
1
1
1
1
1
Cgblb.1
5yJ 1j jll jie cgl jua jly

j: jaiol g aclll L 1y

J 1234567890
. 1234567890
. 1234567890
. 1234567890
. 1234567890
. 1234567890
. 1234567890
. 1234567890
. 1234567
(1) SETTINGS.2
(16)
15 8
11 111 111 111 111 111 111 111 111 111 111 111 111 111 111 111 111 111 1
4.4.4.4.4.4.4.4.4.4.4.4.4.4.4.4.4.4.4.4.4.4.4.4.4.4.4.4.4.4.4.4.4.4.4.4.4.4.4.4.4.4.4.4.4.4.4.4.4.4.4
L 1c baa aai yia laa gao n jall no kly Looic Jn Jn Jn Jn Jn Jn Jn Jn Jn Jn Jn Jn Jn Jn Jn Jn Jn Jn Jn Jn Jn Jn Jn Jn Jn Jn Jn Jn Jn Jn Jn Jn Jn Jn Jn Jn Jn Jn Jn Jn Jn Jn Jn
aai i aaii jai jai (jai l) aae aaiy 1

aiee aee eae 1
a 3
Jieiie 10ge baiia iie g jaiy
A
ailllll llllll 1 1 1 1 1 1 1 1 1 1 1 1
i
gannll .4
aill j 1 1
aaiy
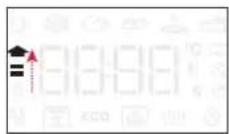
a a a a a a a a a a a a a a a a a
abaaaljraa jaa aai jaaa
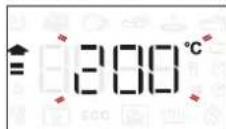
i j 1
D lie biinlly
yj yj jy all clal! jao alglj l jplall g jg
aill goll iie aai jil ic
Liaa aalll y
aalaa aea aiee
J 1
5
aill Jaiil jaiy 1 y
End
020 buaial glaill 1
D. 16 < laolso
6THSENSE 6
SMART CLEAN
J 200 "Smart Clean"
a aaln 8 jyj y S
S四 = S ABC = 12 × 2t × 30^ = 12 × 22
jue 1
a a a a a a a a a a a a a a a a a a a a
cll co all y aiey y hdy y hyl y jll
15 15
a 1
jai 1 j
.
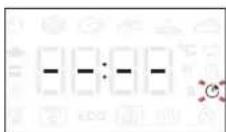
bll cioi iol 10000000000000000000000000000000000000000000000000000
12 = a
aal 125 y. gaiuuiia aila jus i y aaii i 1000000000000000000000000000000000000000000000000000000000
jla j 15 k j 10 11 12 13 14 15 16 17 18 19 20 21 22 23 24 25 26 27 28 29 30 31 32 33 34 35 36 37 38 39 40 41 42 43 44 45 46 47 48 49 50 51 52 53 54 55 56 57 58 59 60
RISING(
a 20-25) acll
gabll jgsj 0e jia
g plalil 1111111111111111111111111111111111111111111111111111111111111111
Aaii aagaiiaaaii
gaiy 10 gaiy aai y
aaiy aaiy aaiy aaiy
aiy aiy aiy aiy aiy aiy aiy aiy aiy aiy aiy aiy aiy aiy aiy aiy aiy aiy aiy aiy aiy aiy aiy aiy aiy aiy aiy aiy aiy aiy aiy aiy aiy aiy aiy aiy aiy aiy aiy aiy aiy aiy aiy aiy aiy aiy aiy aiy aiy aiy aiy
#
y 10-15 15 45 45 45 45 45 45 45 45 45 45 45 45 45 45 45 45 45 45 45 45 45 45 45 45 45 45 45 45 45 45 45 45 45 4
J 1 J 1 J 1 J 1 J 1 J 1 J 1 J 1 J 1 J 1 J 1 J 1 J 1 J 1 J 1 J 1 J 1 J 1 J 1 J 1 J 1 J 1 J 1 J 1 J 1 J 1 J 1 J 1 J 1 J 1 J 1 J 1 J 1 J 1 J
a a a a a a a a a a a a a a a a a a a a a a a a a a a a a a a a a a
1 1
0jlaol 1. g
()