6436 - Saw SOLO - Free user manual and instructions
Find the device manual for free 6436 SOLO in PDF.
User questions about 6436 SOLO
0 question about this device. Answer the ones you know or ask your own.
Ask a new question about this device
Download the instructions for your Saw in PDF format for free! Find your manual 6436 - SOLO and take your electronic device back in hand. On this page are published all the documents necessary for the use of your device. 6436 by SOLO.
USER MANUAL 6436 SOLO
AL-KO KOBER GROUP Kottz, Germany
This documentation or excerpts therefrom may not be reproduced or disclosed to third parties without the express permission of the AL-KO KOBER GROUP.


Dr. Wolfgang Hergeth
Managing Director
TRANSLATION OF THE ORIGINAL INSTRUCTIONS FOR USE
Contents
1 About these operating instructions 35
1.1 Symbols on the title page 35
1.2 Legends and signal words 35
2 Product description 35
2.1 Intended use 35
2.2 Possible foreseeable misuse 35
2.3 Residual risks 36
2.4 Safety and protective devices 36
2.5 Symbols on the appliance 36
2.6 Scope of supply 37
2.7 Product overview (01) 37
3 Safety instructions 38
3.1 Safety instructions for chain saws.... 38
3.2 Causes and operator prevention of kickback 39
3.3 Safety information when working 39
3.3.1Operator 39
3.3.2 Operating times 40
3.3.3 Working with the chain saw 40
3.3.4 Vibration load 40
3.3.5 Noise pollution 41
3.3.6 Handling of petrol and oil 41
3.3.7 Safety of persons, animals and property 41
4Assembly 42
4.1 Assembly of the guide rail and the saw chain (02 to 06) 42
5 Start-up 43
5.1 Fuel 43
5.1.1 Mixing fuel 43
5.2 Chain lubricant 43
5.3 Filling with service products (07) 44
5.4 Check the chain tension (06, 08) 44
5.5 Checking the chain brake (09) 45
6 Operation 45
6.1 Switching the engine on and off 45
6.1.1 Starting the engine (10, 11) 45
6.1.2 Switching off the motor (12) 46
6.2 At the end of a work session 46
6.3 Changing between normal/summer and winter operation (29) 46
7 Working behaviour and working technique. 47
7.1 Using the bumper spike (13) 47
7.2 Felling trees (14, 15) 48
7.3 Delimbing (16) 49
7.4 Cross-cutting (17, 18, 19) 49
7.5 Cutting converted timber 49
8 Maintenance and care 49
8.1 Removing/remounting the air filter cover (20) 50
8.2 Cleaning the air filter (21) 50
8.3 Checking/replacing the spark plug (22, 23) 51
8.4 Guide rail (25, 27) 51
8.5 Sharpening the saw chain (24) 51
8.6 Checking the chain lubrication (26) .... 52
8.7 Adjusting the chain lubrication (28) .... 52
8.8 Checking a standstill when the saw chain is running in idle 52
8.9 Setting the idling speed on the carburrettor 52
8.10 Chain maintenance table 53
8.11 Maintenance schedule.. 53
9 Help in case of malfunction 55
10 Transport. 56
11 Storage 56
12 Disposal 56
13 Technical data. 56
14 After-Sales / Service 57
15 Guarantee 58
16 Translation of the original EU declaration of conformity. 58
1 ABOUT THESE OPERATING INSTRUCTIONS
The German version is the original operating instructions. All additional language versions are translations of the original operating instructions.
Always safeguard these operating instructions so that they can be consulted if you need any information about the appliance.
Only pass on the appliance to other persons together with these operating instructions.
Comply with the safety and warning information in these operating instructions.
1.1 Symbols on the title page
Symbol Meaning

It is essential to read through these operating instructions carefully before start-up. This is essential for safe working and trouble-free handling.

Operating instructions

Never operate the petrol powered device in the vicinity of open flames or heat sources.
1.2 Legends and signal words

DANGER!
Denotes an imminently dangerous situation which will result in fatal or serious injury if not avoided.

WARNING!
Denotes a potentially dangerous situation which can result in fatal or serious injury if not avoided.

CAUTION!
Denotes a potentially dangerous situation which can result in minor or moderate injury if not avoided.
IMPORTANT!
Denotes a situation which can result in material damage if not avoided.

NOTE
Special instructions for ease of understanding and handling.
2 PRODUCT DESCRIPTION
These operating instructions describe a hand-operated chain saw that is powered by a petrol engine.
2.1 Intended use
The chain saw is exclusively designed for domestic gardening applications. In this application area the chain saw can be used for wood sawing work, e.g. for:
Sawing of tree trunks
Sawing of squared timbers
Sawing of branches, depending on the length of cut
The chain saw must only be used outdoors for working with wood. While in use, it is necessary to wear adequate personal protective equipment. Further applications, such as professional tree care within a tree, are expressly excluded. The operator is liable for any damage caused by improper operation. It is only permitted to use the saw chains and bar combinations stated in the operating instructions for this device. Any other application not in accordance with the designated use described here shall be regarded as misuse. The chain saw must not be used in the commercial sector.

CAUTION!
Danger of injury due to non-designated use!
If wood or other substances embedded with foreign bodies are sawn with the chain saw, injury can result.
Only use the chain saw for light wood sawing work.
Before sawing wood, check for foreign bodies, e.g. nails, screws, fittings.
2.2 Possible foreseeable misuse
- Do not saw off any branches that are directly or at an acute angle above the user or other persons.
Do not use old oil.
Do not use the tool in a potentially explosive atmosphere.
2.3 Residual risks
Even when using the device as intended, there is always a certain residual risk that cannot be excluded. The following hazards cannot be ruled out due to the nature and design of the device.
- Contact with the exposed teeth of the chain (risk of cutting)
Access to the moving chain (risk of cutting)
Sudden and unexpected movement of the bar (risk of cutting) - Separation of parts of the chain (e.g. risk of cutting/injury)
- Separation of parts of the wood being worked on
Inhalation of particles of the wood being worked on.
Emissions from the petrol engine.
Contact of the fuel (petrol/oil) with the skin.
Impairment of hearing during work if ear defenders are not used.
2.4 Safety and protective devices

WARNING!
Danger of serious injury from manipulated safety and protective devices
As a result of manipulated safety and protective devices, serious injury can occur when working with the chain saw.
Never deactivate safety and protective devices.
Only work with the chain saw if all safety and protective devices function correctly.
Protective cover of the guide rail
Before transport, the protective cover must be pushed onto the guide rail and saw chain to prevent injuries to persons and damage to objects.
Chain brake
In case of kickback, the chain brake is triggered by the hand guard and immediately brings the running chain saw to a standstill.
Safety locking switch
The throttle lever can only be depressed once the safety locking switch has been pressed.
2.5 Symbols on the appliance
Symbol Meaning

Pay special attention when handling this product!

Danger of kickback!
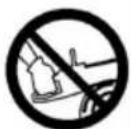
Do not operate the chain saw with one hand!

Wear a protective helmet, ear defenders and eye protection!

Wear protective gloves!

Wear sturdy shoes!

Read the operating instructions before starting operation.

Always operate the chain saw with both hands!

Primer

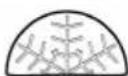
Sun: Normal/summer operation

Snowflake: Winter operation
Symbols are stamped on the machine for safe operation and maintenance. It is important that you heed these notes.
| Symbol Meaning | |
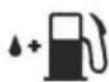
| Connection for refilling the fuel mixture Location: at the tank lid | |
| Connection for refilling the chain oil Location: at the oil tank cap | |
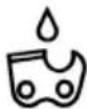
| Press the engine switch; set the switch to the "O" position – the engine will be switched off immediately. Location: On the left side of the rear handle | |
| Operating the air flap button: If you pull out the button, the air flap closes; if the air flap closes, press in the button to open the air flap again. Location: Air filter cover | |
| MIN MAX | Setting the oil pump: Using a screwdriver, turn the rod in the direction of the arrow until the MAX position is reached for a stronger flow of chain oil, or towards the MIN position for a reduced flow of chain oil. Location: Bottom of the drive unit |
| H | The screw under the "H" mark is used to adjust the mixture at high speed. Location: On the top left side of the rear handle |
| L | The screw under the "L" mark is used to adjust the mixture at low speed. Location: On the top left side of the rear handle |
| T | The screw above the "T" mark serves to adjust the idle speed. Location: On the top left side of the rear handle |
| Indicates the direction in which the chain brake is released (white arrow) or depressed (black arrow). Location: Front side of the guide rail | |
| Symbol Meaning | |
| indicates the direction in which the chain is mounted. Location: Front side of the guide rail | |
| Guaranteed sound level: 113 dB(A) |
2.6 Scope of supply
After unpacking, check that all the parts have been delivered.
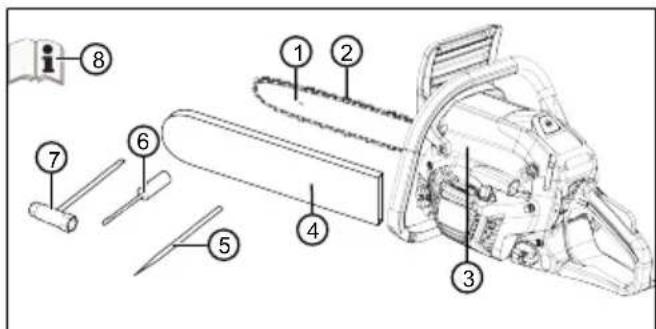
| No. Component |
| 1 Chain bar |
| 2 Saw chain |
| 3 Petrol chain saws |
| 4 Protective cover of the guide rail |
| 5 File |
| 6 Screwdriver |
| 7 Combination spanner |
| 8 Operating instructions |
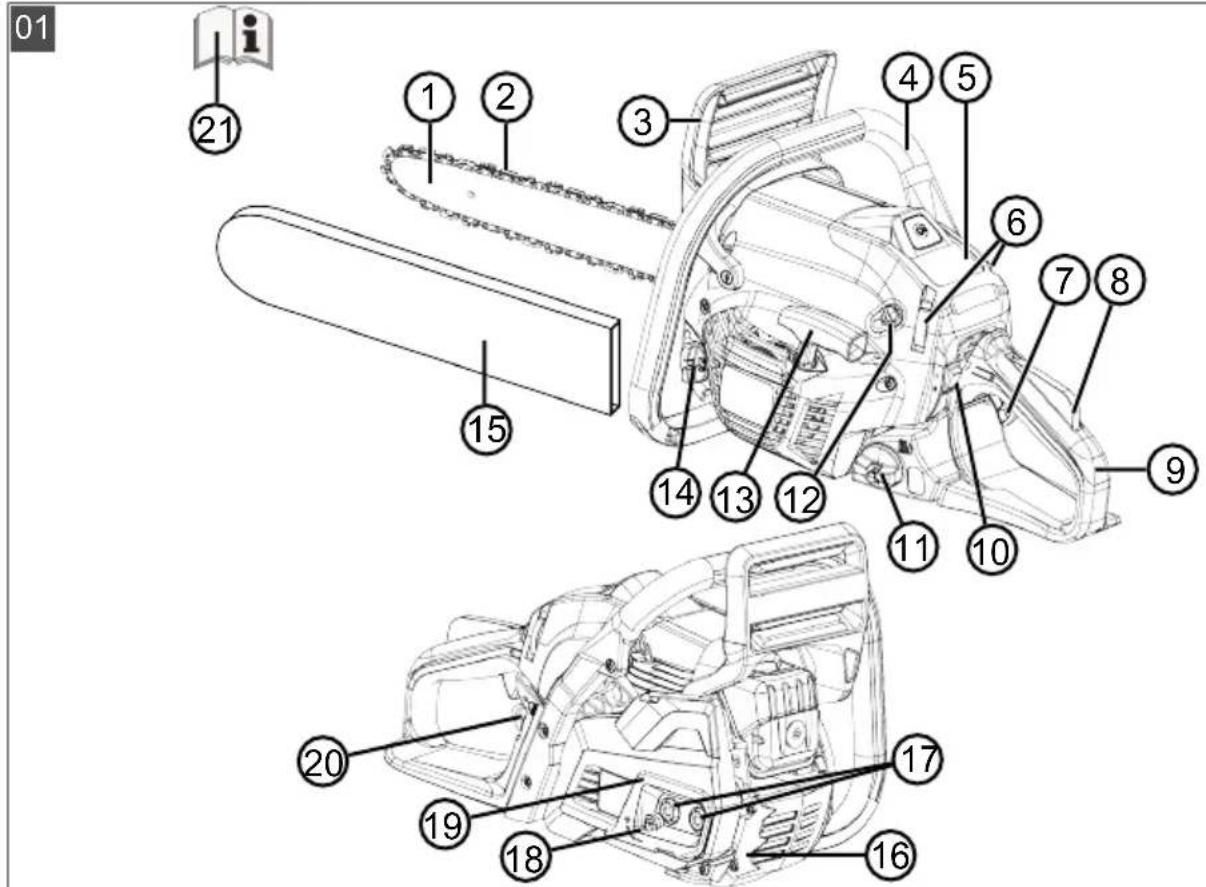
2.7 Product overview (01)
| No. Component |
| 1 Chain bar |
| 2 Saw chain |
| 3 Front hand guard |
| 4 Front handle |
| 5 Air filter cover |
| 6 Securing clips for air filter cover |
| 7 Throttle lever |
| 8 Safety locking switch |
No. Component
9 Rear handle
10 Rocker switch to turn off the engine, automatically resetting
11 Fuel tank
12 Choke knob (for cold start)
13 Starter grip
14 Oil tank
15 Protective cover of the guide rail
16 Tree grip
17 Fastening nuts for guide rail
18 Adjusting screw for chain tensioner
19 Rail fastener
20 Primer ball
21 Operating instructions
3 SAFETY INSTRUCTIONS
Check the device daily for damage and to ensure that it is in a condition for safe operation before every use and after every fall or other incidents, such as external force due to impact or bumps.
- Check the tightness of the fuel system and the functionality of the safety devices. Do not continue using devices that are not safe for operation. In case of doubt, consult your dealer.
- Wear ear defenders during work with the device, especially during a daily working period of more than 2.5 hours. The operation of the device causes intense noise that can cause hearing impairment in the user.
Wear gloves to cushion vibration and take regular breaks as a preventative measure against "white finger disease" (due to vibration-induced circulation problems in the hands). Using the device for a longer period of time may result in vibration-induced circulation problems in the hands. An exact period of use cannot be determined. This depends on a variety of factors. Observe your hands and fingers during constant use of the device. Consult a doctor if symptoms appear there, such as loss of feeling, pain, itching, impairment of physical strength or changes to the skin colour or the skin.
- Never run the motor in closed rooms and switch it off if you feel nauseous, dizzy or weak when using this device. Immediately consult a doctor. The device generates toxic exhaust gases when the motor is running. These gases can be odourless and invisible.
Never operate the device in the vicinity of open flames or heat sources. Petrol and lubricating oil vapours are highly flammable.
Wear a dust mask if sawdust, mist or smoke are generated when working with the device. These can be dangerous to health.
3.1 Safety instructions for chain saws
- Keep all parts of your body away from the saw chain when the saw is running. Before starting the saw, make sure that nothing is touching the saw chain. When working with a chain saw, one moment of inattention can mean your clothing or parts of your body coming into contact with the saw chain.
Always hold the chain saw with your right hand on the rear grip and your left hand on the front grip. Holding the chain saw with your hands the other way around increases the risk of injury and is not allowed. - Wear protective goggles and ear defenders. Further protective equipment is recommended for the head, hands, legs and feet. Appropriate protective clothing reduces the risk of injury due to flying chips and inadvertent contact with the saw chain.
- Do not work with the chain saw in a tree. Risk of injury when operating a chain saw in a tree.
Always make sure you are standing firmly and only use the chain saw if you are standing on firm, secure and level ground. Slippery ground or unstable standing surfaces such as on a ladder can lead to a loss of equilibrium or loss of control over the chain saw. -
When cutting a branch that is under tension, expect it to spring back. When the tension in the wood fibres is released, the branch under tension can hit the operator and/or cause a loss of control over the chain saw.
Take particular care when cutting undergrowth and young trees. The thin material can get caught in the saw chain and hit you or cause you to lose your balance. -
Carry the chain saw at the front grip when it is switched off, and have the saw chain pointing away from your body. Always put on the protective cover when transporting or storing the chain saw. Careful handling of the chain saw reduces the probability of inadvertent contact with the running saw chain.
Follow the instructions for lubrication, chain tensioning and changing accessories. An incorrectly tensioned or lubricated chain can either tear or increase the risk of kickback. - Keep the grips dry, clean and free from oil and grease. Greasy, oily grips are slippery and result in loss of control.
Only saw wood. Do not use the chain saw for work for which it is not intended. Example: Do not use the chain saw for sawing plastic, masonry or construction materials that are not made of wood. Using the chain saw for non-designated work can lead to dangerous situations.
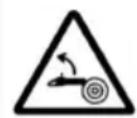
3.2 Causes and operator prevention of kickback
Kickback can occur if the tip of the chain bar touches an object or if the wood bends and traps the saw chain during cutting.
In many cases, contact with the tip of the bar can lead to an unexpected, rearward reaction causing the chain bar to be knocked upwards and towards the operator.
If the saw chain is trapped on the top edge of the chain bar, the bar can be forced violently back towards the operator.
Each of these reactions can result in you losing control of the saw, with the possibility of severe injury. Do not rely entirely on the safety devices installed on the chain saw. As user of a chain saw, you should take various measures to be able to work without accident and injury.
Kickback is the consequence of incorrect or faulty use of the tool. It can also be prevented by taking suitable precautions as described below:
Hold the saw firmly with both hands, with your thumb and fingers around the grips of the chain saw. Hold your body and arms in a position that allows you to withstand the kickback forces. If suitable measures are taken, the operator will be able to control the kickback forces. Never release the chain saw.
- Avoid any abnormal posture, and do not saw anything above shoulder height. This will avoid inadvertent contact with the tip of the bar, and allow better control of the chain saw in unexpected situations.
Always use replacement bars and saw chains prescribed by the manufacturer. Incorrect replacement bars and saw chains can lead to the chain breaking and/or to kickback.
Comply with the instructions of the manufacturer for sharpening and maintaining the saw chain. Depth limiters set too low increase the tendency to kickback.
3.3 Safety information when working
Heed the country-specific safety regulations, e.g. from the relevant trade associations, social security systems, authorities for industrial safety.
Only work in sufficient daylight or artificial lighting.
- Keep the working area free from objects (e.g. off-cuts) - danger of stumbling.
The user is responsible for accidents involving other people and their property.
3.3.1 Operator
- Young people under 16 years of age and people who do not know the operating instructions are not allowed to use the tool.
If you are working with a chain saw for the first time: Have the salesperson or another expert explain the operation of the chain saw, or attend a course.
To operate the chain saw, you must be rested and in good physical and mental health. If you must not exert yourself for health reasons, ask your doctor whether it is possible to work with a chain saw.
Take measures to protect yourself against vibration loads. The actual vibration values may differ from the values specified in the technical data, depending on what the tool is used for. In doing so, take account of the entire working process, i.e. also times during which the tool is operating without load, or is switched off. Suitable measures include regular maintenance and care of the tool and the tool attachments, keeping your hands warm, taking regular breaks and planning the working sequences effectively.
Determine the maximum handling period and set breaks in the work according to the vibration value.
3.3.2 Operating times
Heed the country-specific regulations for the operating times of chain saws. The operating times of chain saws can be limited by national and local regulations.
3.3.3 Working with the chain saw

WARNING!
Danger of serious injury.
If an incompletely mounted chain saw is used, serious injury can be caused.
Only use the chain saw when it has been fully mounted.
Before each use, perform a visual inspection in order to check that the chain saw is complete and does not contain damaged or worn components. Safety and protective devices must be intact.
Never work alone.
Always keep a first-aid kit to hand in case of accidents.
- Avoid touching metal objects in the ground or which are conductively connected to the ground.
The personal protective equipment comprises:
Protective helmet
Hearing protection (e.g. ear defenders, especially when working for than 2.5 hours a day)
Protective glasses or face visor incorporated in the protective helmet
Protective trousers with cut protection inlay
Sturdy working gloves
Safety boots with high-grip soles, steel toe caps, and cut protection inlays
- Do not use the chain saw above shoulder height, since safe handling is no longer possible in this way.
When changing position, switch off the engine and put on the chain guard. -
Switch off the petrol engine when not in use and put the chain guard in place.
-
Switch the chain saw off before putting it down.
- Do not use the chain saw for levering or moving wood.
Only specialist personnel are allowed to saw trunks that are thicker than the length of the chain bar.
Only start the cut once the saw chain is running, never switch on the chain saw already in the kerf.
Make sure that no saw chain oil gets onto the ground.
Do not undertake sawing work in the rain, snow or stormy weather.
Never disable safety and protective devices.
3.3.4 Vibration load

WARNING!
Danger due to vibration
The actual magnitude of the vibration emissions during the use of the appliance may deviate from that stated by the manufacturer. Observe the following influencing factors before or during use:
Is the appliance being used as intended?
Is the material being cut or processed in the proper manner?
Is the appliance in a proper condition of use?
Is the cutting tool properly sharpened or is the correct cutting tool installed?
Are the handle grips and any optional vibration grips mounted, and are they firmly attached to the appliance?
Only operate the tool at the combustion engine speed required for the respective work. Avoid using the maximum speed in order to reduce noise and vibrations.
The noise and vibrations of the tool may increase due to improper use and maintenance. This leads to health damage. In this case, immediately switch off the tool and have it repaired by an authorised service workshop.
The degree of stress due to vibration depends on the work to be performed or on the use of the tool. Estimate the stress and plan appropriate work breaks. This considerably
reduces stress due to vibration over the entire working time.
- Extensive use of the tool exposes the operator to vibrations, which can lead to circulatory issues ("white fingers"). To avoid this risk, wear gloves and keep your hands warm. If any symptoms of "white fingers" occur, immediately consult a physician. These symptoms include: Numbness, loss of feeling, tingling, itching, pain, reduced muscular strength, changes in the colour or condition of the skin. Normally these conditions affect the fingers, hands or pulse. The risk increases at low temperatures (below approx 10^ ).
Take long breaks during your working day so you can recover from the noise and the vibrations. Plan your work in such a way that the use of appliances that generate strong vibrations is spread over several days.
If you notice an unpleasant sensation or discoloration of the skin on your hands when using the tool, stop work immediately. Take sufficient work breaks. Without sufficient breaks, a hand/arm vibration syndrome can occur. - Minimise your risk of being exposed to vibrations. Maintain the tool according to the instructions in the operating instructions.
If the tool is used frequently, contact your dealer to purchase anti-vibration accessories (e.g. handles).
Define how the vibration load can be limited in a work plan.
3.3.5 Noise pollution
A certain level of noise exposure from this appliance is inevitable. Carry out noisy work at approved and specified time periods. Observe rest periods as necessary and restrict the duration of the work to a minimum. For your personal protection and protection of persons in the vicinity, appropriate hearing protection must be worn.
3.3.6 Handling of petrol and oil

DANGER!
Risk of explosion and fire
An escaping petrol/air mixture can cause an explosive atmosphere. Deflagration, explosion and fire can lead to serious and even fatal injuries if fuel is not handled properly.
Do not smoke when dealing with petrol.
Only handle petrol out of doors and never in enclosed spaces.
It is essential to heed the code of conduct stated below.
Only transport and store petrol and oil in containers approved for that purpose. Ensure that children have no access to stored petrol and oil.
In order to avoid ground contamination (environmental protection) when filling, ensure that no petrol or oil enters the soil. Use a funnel for filling.
- Never fill the appliance in enclosed spaces. Petrol vapours may gather at ground level, and thereby result in a deflagration or even an explosion.
- Immediately wipe any spilled petrol off the appliance and the ground. Allow textiles used to wipe off petrol to dry in a well ventilated place before disposing of them. Otherwise, sudden self-ignition may occur.
If petrol has been spilled, petrol vapours occur. For this reason, do not start the appliance at the same location but at least 3 m away.
- Avoid skin contact with mineral oil products. Do not inhale petrol vapours. When filling, always wear protective gloves. Change and clean protective clothing regularly.
Ensure that your clothing does not come into contact with petrol. If petrol has got onto your clothing, change it immediately.
Never fill the appliance while the engine is running or hot.
3.3.7 Safety of persons, animals and property
Use the appliance only for the purposes for which it is intended. Any non-intended use can lead to injury and property damage.
- Switch on the appliance only when there are no persons or animals in the working area.
- Maintain a safe distance to persons or animals, or switch off the appliance if persons or animals approach.
- Never direct the exhaust gas jet of the engine towards persons and animals or towards in-flammable products and objects.
- Do not reach into the vacuum and vent grilles when the engine is running. Injuries can occur due to rotating appliance parts.
Always switch off the appliance when not in use, e.g. when changing the work area, during service and maintenance, and when filling with the petrol/oil mixture. - Immediately switch off the appliance if there is an accident in order to avoid further injuries and/or property damage.
- Never operate the appliance with worn or defective parts. Worn or defective appliance parts can cause serious injuries.
- Keep the appliance out of the reach of children.
4 ASSEMBLY

DANGER!
Danger of fatal injury and danger of extremely severe injury.
Danger of fatal injury and danger of extremely severe injury when the engine is switched on.
- Carry out all work with the engine switched off.
IMPORTANT!
Danger of damage to the appliance
Danger of damage to the appliance due to improper assembly.
Unpacking and assembly must be carried out on a firm and level surface.
There must be sufficient space for moving the machine and the packaging, and suitable tools must be available.
IMPORTANT!
Danger of environmental damage
Danger of environmental damage due to improper disposal.
The packaging must be disposed of according to local regulations.

CAUTION!
Risk of injury
Sharp-edged and moving appliance parts can lead to injury.
Always wear sturdy working gloves when assembling the bar and chain.
- When installing the bar and chain, take the greatest of care so as not to impair the safety and efficiency of the machine; contact your dealer if you are in doubt.

NOTE
The machine is supplied with the bar and chain dismantled, and with the mixture and oil tanks empty.
Make sure that the chain brake is not activated before assembly. The chain brake is released when you pull the hand guard (01/3) in the direction of the handle (01/4).
4.1 Assembly of the guide rail and the saw chain (02 to 06)
- Loosen and remove the two hex nuts (02/1) using the supplied combination wrench and remove (02/a) the sprocket guard (02/2).
- Remove the plastic spacer (02/3); this spacer is only used for transporting the packaged machine and is not required any longer.
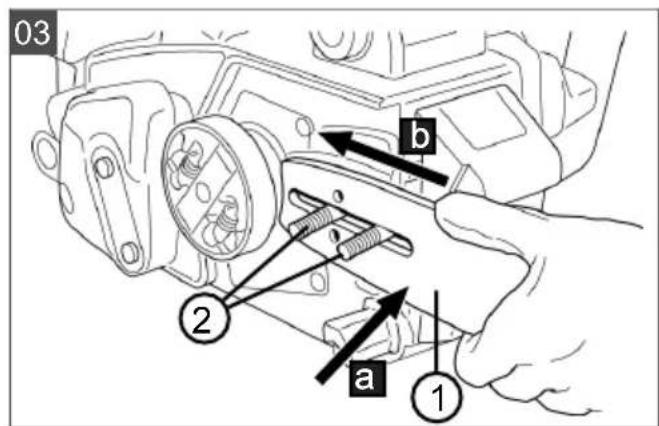
- Put (03/a) the groove of the guide rail (03/1) into the studs (03/2). Push the guide rail in the direction of the machine housing (03/b).
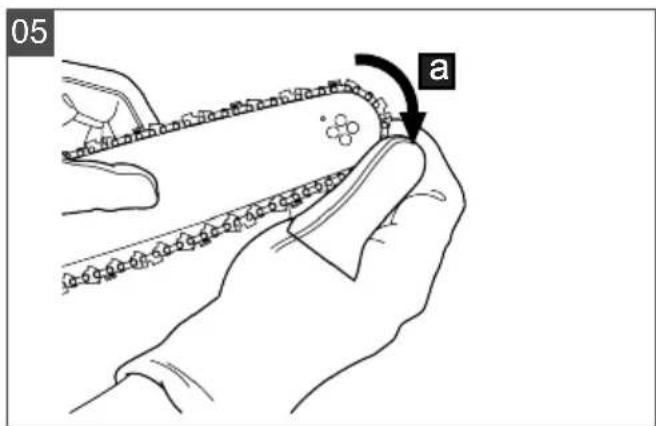
- Place the sawing chain (04/1) around the sprocket (04/2) and into the groove of the guide rail (04/3), while ensuring the correct running direction. Place the sawing chain over the reversing sprocket of the guide rail (05/a).
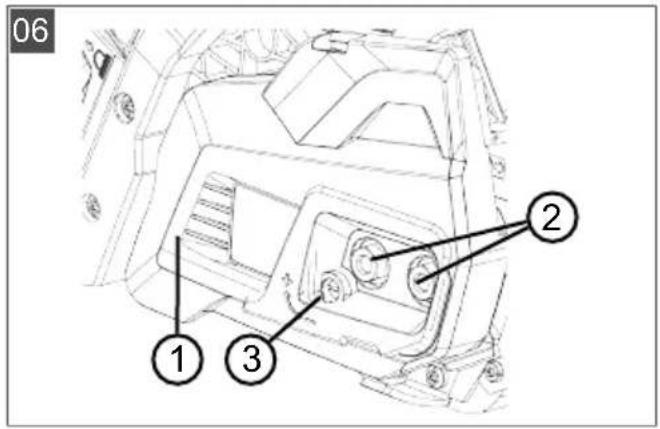
- Re-mount the sprocket guard (06/1), only slightly tighten the hexagon nuts (06/2).
- Push the guide rail away from the machine housing until the sawing chain is slightly taut.
- Only tighten the two hex nuts (06/2) to the extent that the sawing chain can be made even more taut.
- Turn the adjustment screw of the chain tensioner (06/3) until the sawing chain is correctly tensioned (see chapter 5.4 "Check the chain tension (06, 08)", page 44).
- Tighten the hexagonal nuts (06/2).
5 START-UP
5.1 Fuel
IMPORTANT!
Danger of damage to the appliance
Using petrol alone will damage the engine and invalidate the warranty.
Only use high-quality petrol and lubricating oil so as to ensure overall performance and the service life of the mechanical parts in the long term.

NOTE
Lead-free petrol tends to leave deposits in the tank if it is stored for more than 2 months. Always use fresh petrol!
This machine is equipped with a two-stroke engine that runs on a petrol/oil mixture.
Suitable oil
Use only high-quality synthetic two-stroke engine oils. Oils specially developed for such engines are available from your dealer, which can guarantee high performance.
Suitable petrol
Use only lead-free petrol with a minimum octane rating of 90 RON.
5.1.1 Mixing fuel

DANGER!
Risk of explosion and fire
Petrol and mixed fuel are highly inflammable!
- Exclusively store fuel and mixed fuel in containers specially approved for fuels, and keep them in a safe place away from heat sources and naked flames.
Never leave the containers within reach of children. - Do not smoke when mixing fuel, and attempt to avoid inhaling the petrol vapours.
IMPORTANT!
Danger of engine damage
Pure petrol will result in damage and complete failure of the engine. Guarantee claims against the manufacturer are excluded in this case.
Only operate the engine using the specified petrol/oil mixture ratio.

NOTE
The mixture is exposed to a continuous aging process. Do not prepare excessive amounts in order to avoid deposits forming.

NOTE
Regularly clean the petrol and mixture containers to remove any deposits.
An excessively lean mixture increases the risk of a premature piston seizure. The warranty shall be rendered void if the instructions on mixing the fuel, etc., in this manual are not followed.
In the table below you will find the correct mixing ratio, together with an example.
Mixing ratio Petrol Oil
50:1 and 1 part (50
Parts Fuel Oil)
5 litres 100 ml
- Pour about half of the specified quantity of fuel into an approved canister.
- Pour in the full volume of oil specified in the table.
- Add the rest of the petrol.
- Close the container and shake well.
5.2 Chain lubricant
IMPORTANT!
Danger of damage to the appliance
Due to the metallic abrasion it contains, the use of used oil for lubricating the chain would lead to premature wear of the guide rail and saw chain. Also, the warranty of the manufacturer will become void.
Never use used oil, only biologically degradable saw chain oil.
IMPORTANT!
Danger of environmental damage
The use of mineral oil for the chain lubrication leads to serious environmental damage.
Never use mineral oil, but only biologically degradable saw chain oil.
Do not use contaminated oil, since this can lead to blockage of the filter in the tank and irreparable damage to the oil pump.
Using high-quality oil is a decisive factor in achieving effective lubrication for the cutting elements; used or low-quality oil impairs lubrication and reduces the service life of the sawing chain and guide rail.
It is recommended that you fill the oil tank fully every time you refuel (by means of a funnel). The capacity of the oil tank is designed so that the fuel will run out before the oil does, thereby guaranteeing that the machine will not be operated without lubricant.
5.3 Filling with service products (07)

DANGER!
Risk of explosion and fire
An escaping petrol/air mixture can cause an explosive atmosphere. Deflagration, explosion and fire can lead to serious and even fatal injuries if fuel is not handled properly.
Do not smoke when dealing with petrol.
Only handle petrol out of doors and never in enclosed spaces.
It is essential to heed the code of conduct stated below.
Filling with fuel
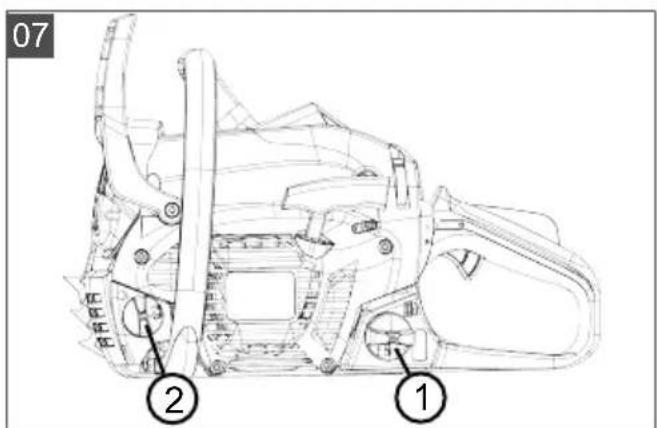
- Switch off the engine and pull the protective cover over the sawing chain.
- Clean the tank cap (07/1) and the surrounding area so that no dirt will drop into the tank.
- Open the tank cap (07/1) carefully because pressure may have built up inside.
- Pour in the fuel using a funnel.
- Put the filler cap on the fuel tank and screw it on tightly.
-
Clean up any spilled fuel on the ground and the device.
-
Only start the device again after the fuel vapours have evaporated.
Filling saw chain oil
- Switch off the engine and pull the protective cover over the sawing chain.
- Clean the oil tank cap (07/2) and the surrounding area so that no dirt falls into the tank.
- Unscrew the oil tank cap (07/2).
- Fill the saw chain oil using a funnel.
- Put the oil tank cap back on the tank and screw it on tightly.
- Clean up any spilled saw chain oil on the ground and the device.
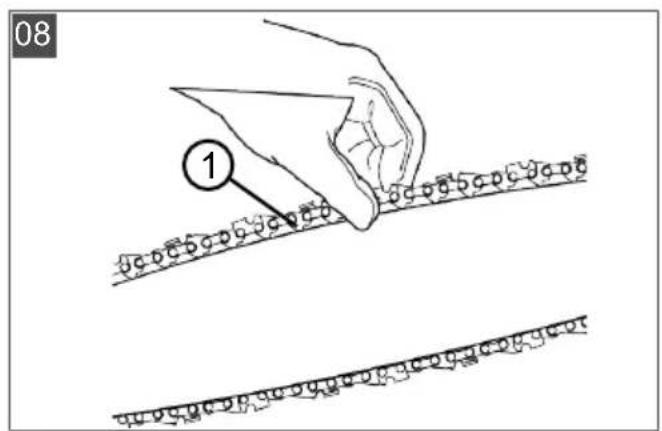
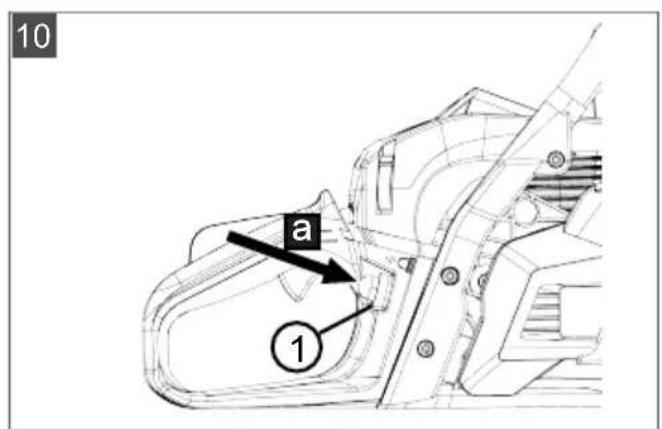
5.4 Check the chain tension (06, 08)

DANGER!
Danger of fatal injury and danger of extremely severe injury.
Danger of fatal injury and danger of extremely severe injury when the engine is switched on.
- Carry out all work with the engine switched off.
The tension is correct if the links do not come out of the guide (08/1) when you lift the chain in the middle of the guide rail, but the saw chain can still be turned.
Tightening the saw chain
- Loosen the hexagonal nuts (06/2) of the sprocket guard (06/1) with the supplied combination wrench.
- Turn the adjusting screw (06/3) of the chain tensioner until the saw chain is correctly tensioned.
- Tighten the hexagonal nuts (06/2).
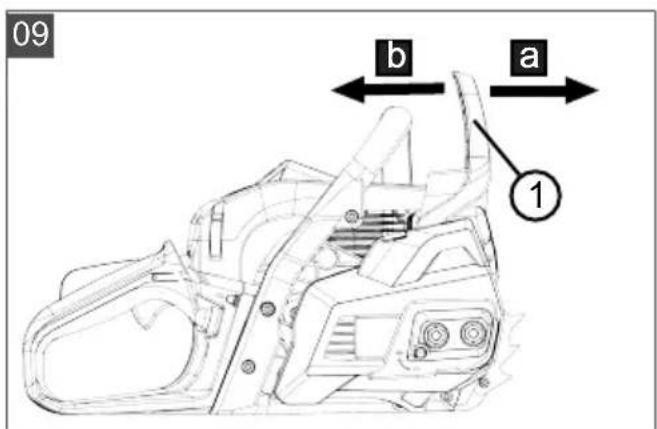
5.5 Checking the chain brake (09)

WARNING!
Danger of fatal injury and danger of extremely severe injury due to a defective chain brake
Extremely serious injury and even fatal injury of the operator can be caused if the chain brake does not function, e.g. due to kickback by the running saw chain.
Check the chain brake each time before starting work.
- Do not switch the chain saw on if the chain brake is defective. In this case, have the chain saw checked in a customer service workshop.
The unit is provided with a safety brake system (chain brake).
The chain brake was developed to immediately halt movement of the chain in case of kickback. The brake is normally actuated automatically through inertia.
This brake can also be actuated manually for control purposes.
- Start the engine and firmly hold the device grips with both hands.
- Operate the safety locking switch (01/8) and throttle lever (01/7) to keep the chain moving, then press the hand guard (09/1) forward using the back of your left hand (09/a); the chain must stop immediately.
- If the saw chain stops, immediately release the safety locking switch and then the throttle.
- Switch off the engine.
- Push the hand guard towards the rear to release the chain brake (09/b).
6 OPERATION
Comply with working time regulations in force in your country.
Grip the rear handle firmly with your right hand and the bow handle with your left hand, and hold them tightly.
Do not release the handles as long as the motor is running.
Do not use the chain saw if you are:
Tired
Unwell
Under the influence of alcohol, medicines and drugs
6.1 Switching the engine on and off

WARNING!
Risk of explosion and fire
An escaping petrol/air mixture can cause an explosive atmosphere. Deflagation, explosion and fire can lead to serious and even fatal injuries if fuel is not handled properly.
Do not start the engine unless you are at least 3 metres away from the place where you filled the fuel.
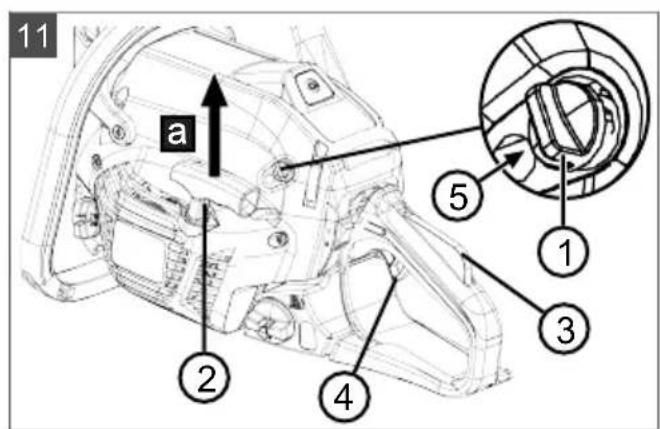
6.1.1 Starting the engine (10, 11)

CAUTION!
Risk of injury from cable starter
Due to rapid retraction of the cable starter, the hand is pulled too quickly towards the engine. This can lead to bruises and sprains.
Never wind the cable starter around your hand.
IMPORTANT!
Danger of damage to the appliance
If the cable starter is pulled out too far, this can cause damage.
Do not to pull the cable out fully or cause it to rub against the edge of the cable guide opening; also, do not let go of the handle in such a way that the cable is retracted in an uncontrolled manner.
IMPORTANT!
Danger of damage to the appliance
If the engine is operated at high speed and the chain brake actuated, the clutch may overheat.
Avoid letting the engine run at high speed with the chain brake actuated.
Cold start
A cold start means starting the engine after it has been switched off for at least 5 minutes or after re-filling with fuel.
- Place the device on a flat level surface, firmly grasp the front handle and press the device
onto the floor. If necessary, put the tip of your right foot on the rear handle.
- Press the hand guard forward to actuate the chain brake.
- Remove the protective cover of the saw chain.
- Press the primer ball (10/1) 3-4 times (10/a).
- Turn the rotary choke knob (11/1) clockwise to the end stop.
- Using your free hand, pull the starter grip (11/2) upwards (11/a) until resistance is felt.
- Do not release the starter grip; pull firmly several times until the engine starts for the first time. Turn the rotary choke knob (11/1) counterclockwise to the end stop.
- Pull the starter grip (11/2) firmly several times until the engine starts again.
- As soon as the engine is running, briefly press the safety locking switch (11/3) and throttle lever (11/4). Thus, the throttle valve of the carburettor is released from the locked position.
- Let the device run at idle for about one minute.
- To release the chain brake, pull back the hand guard.
Warm start
If the motor is only briefly shut down, the start procedure can be performed only by pressing the primer ball but not turning the choke knob.
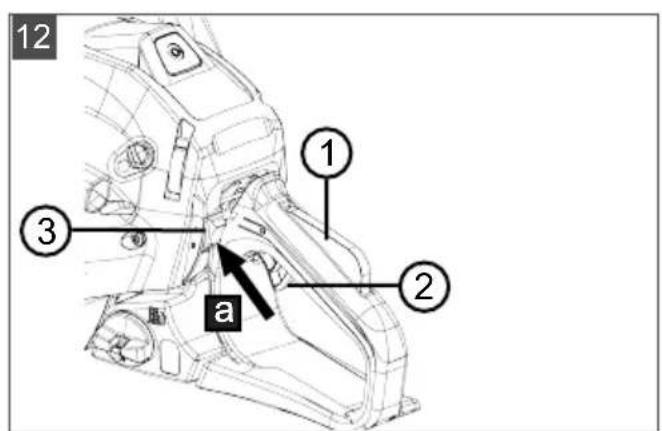
6.1.2 Switching off the motor (12)
- Release the safety locking switch (12/1) and then the throttle lever (12/2).
- Allow the engine to run at idling speed for a few seconds.
- Press the rocker switch (12/3) into position "0" button (12/a).
6.2 At the end of a work session

WARNING!
Risk of injury by cutting
The sharp links of the saw chain can cause serious laceration injuries.
Switch off the motor.
Wear protective gloves.

WARNING!
Danger of fire
The heated machine can ignite waste cuttings (e.g. sawdust, remains of branches or leaves).
- Allow the engine to cool down before you place the machine in a room.
To reduce the risk of fire, the machine must be cleaned to remove saw chips, twigs, leaves or surplus grease. -
Containers with cutting residues must not be stored inside rooms.
-
Switch off the engine (see chapter 6.1.2 "Switching off the motor (12)", page 46).
- Allow the device to cool down.
- Remove all traces of saw chips or oil residues.
- If the saw chain is very dirty, remove the saw chain and leave it to soak for a few hours in a container of special cleaner. Then rinse it with clean water and spray with an appropriate anticorrosion product before mounting it on the device again.
- Pull the protective cover over the saw chain before cleaning up the device.
6.3 Changing between normal/summer and winter operation (29)
To prevent the carburettor from icing up at low ambient temperatures (less than 5^ ), it is possible to heat the intake air by positioning the slider insert in winter operation. The slider insert can be accessed directly after removing the air filter cover, using a screwdriver.

IMPORTANT!
Danger of engine damage due to overheating!
If the chain saw is operated at more than 5^ and the sliding insert is in the Winter position, this can cause it to overheat.
Before operating, check the ambient temperature and, if necessary, adjust the position of the sliding insert.
-
Remove the air filter cover (see chapter 8.1 "Removing/remounting the air filter cover (20), page 50).
-
Pull the slider insert (29/1) out of the frame (29/a) by hand.
-
Turn the slider insert horizontally (29/b):
Above 5^ i.e. normal/summer operation The sun icon (29/2) must be visible in normal/summer operation.
Below 5^ i.e. winter operation: The snowflake icon (29/3) must be visible in winter operation.
4. Turn the slider insert vertically (29/c).
5. Push the sliding insert into the frame (29/d).
6. Mount the air filter cover (see chapter 8.1
"Removing/remounting the air filter cover (20)," page 50).
7 WORKING BEHAVIOUR AND WORKING TECHNIQUE

DANGER!
Danger of fatal injury due to inadequate technical knowledge!
Inadequate technical knowledge can result in extremely serious up to fatal injury!
Only trained and experienced people are allowed to fell trees and lop branches.

DANGER!
Danger of fatal injury from uncontrollable movements of the machine
The moving saw chain develops enormous forces that could lead to the sudden uncontrollable swerving and throwing out of the chain saw.
Always hold the chain saw with both hands, the left hand on the front handle and the right hand on the rear handle. Regardless of whether you are left- or right-handed.

DANGER!
Danger of fatal injury due to kickback!
The operator can be fatally injured by kickback of the appliance.
It is essential to comply with the measures in order to avoid any kickback.

CAUTION!
Danger to health from inhaling hazardous substances!
The inhalation of lubricating oil steam, exhaust gases and sawdust can lead to health impairments.
Always use the prescribed personal protective equipment.

CAUTION!
There is a risk of injury when the chainsaw is blocked
If you try to pull out a cutting apparatus when the cutting apparatus - i.e. the saw chain and guide rail - is blocked while the engine is running, there is a risk of injury and risk of damaging the device.
- Switch off the engine and pry open the cut (with a wedge, for example), or make a relief cut using a second chain saw or cutting apparatus. Remove the jammed cutting apparatus as soon as the cut opens up.
Follow the instructions and procedures stated in the following sections to avoid blocking or jamming of the chainsaw.

NOTE
Courses in the use of chain saws and techniques for felling trees are regularly held by various forestry organisations.
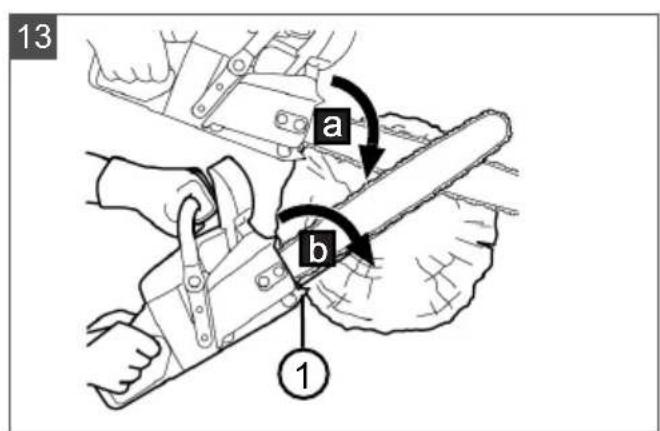
7.1 Using the bumper spike (13)
- Stick the bumper spike (13/1) into the trunk and make an arc motion with the chain saw (13/a) so that the chain saw cuts into the wood.
- Repeat this work step several times, moving the point of contact of the bumper spike (13/b).
7.2 Felling trees (14, 15)

DANGER!
Danger of fatal injury from a falling tree!
Having no escape route when felling a tree represents a danger of serious and even fatal injury!
Do not start the felling work until you are sure there is an unobstructed escape route away from the tree to be felled.

DANGER!
Danger of fatal injury from an uncontrollably falling tree!
Uncontrolled falling trees can lead to extremely serious and even fatal injury!
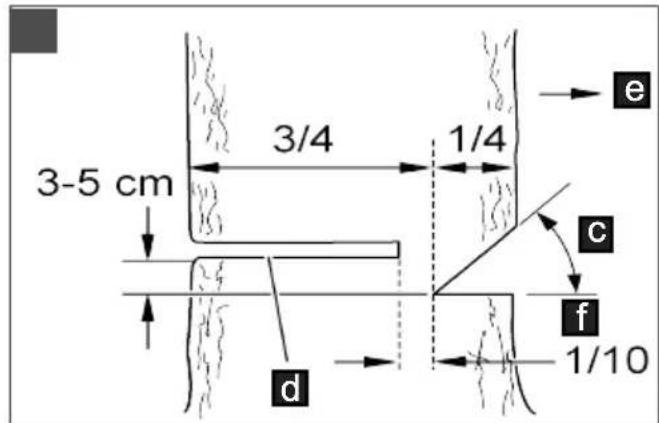
In order to guarantee controlled felling of a tree, leave a bridge between the undercut and the back cut. The length of this bridge should be approx. 1/10 of the trunk diameter.
- Do not carry out any felling work in windy conditions.

NOTE
Only use wedges made from wood, plastic or aluminium.
Take the following measures before starting felling work.
Make sure that no other people, animals or objects are in the danger area.
The safe distance from other workplaces or objects should be at least 212 tree lengths.
Watch out for power lines and other people's property. If necessary, notify the power supply company or the property owner.
Judge the falling direction of the tree. Factors influencing the falling direction of the tree:
Natural lean of the tree
Height of the tree
Branches growing on one side
Level ground or slope
Asymmetrical growth, wood damage
Wind direction and wind speed
Snow load
- When working on a slope, always work uphill of the tree to be felled.
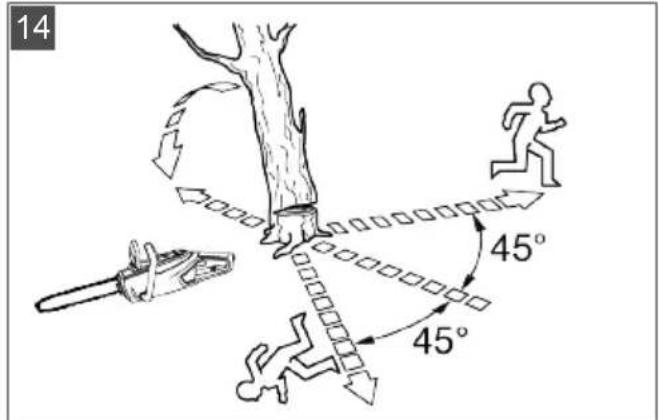
Establish your escape route in advance, and make sure that there are no obstacles in the way. The escape route should be at an angle of approx. 45^ diagonally behind the falling direction (14).
The trunk must be free from growth, branches and foreign bodies (e.g. dirt, stones, loose bark, nails, staples, wire, etc.).
Make an undercut a back cut in order to cut down a tree.
- During back cuts and cross-cuts, place the bumper spike firmly against the wood to be cut.
- Saw the first undercut (15/c) horizontally, then the second undercut at an angle of at least 45^ from above. This prevents the chain saw becoming trapped when you make the second undercut. The undercut must be as close as possible to the ground and in the required felling direction (15/E). The depth of the undercut should be about 1/4 of the diameter of the trunk.
- Cut the back cut (15/d) exactly horizontally opposite to the undercut. The back cut must be made 3-5 cm above the horizontal undercut.
- Saw in the back cut (15/c) sufficiently deep so that a bridge (15/f) of at least 1/10 the trunk diameter remains between the undercut (15/C) and the back cut (15/d). This bridge prevents the tree from twisting and falling in the wrong direction. The tree should start to fall when the back cut (15/d) approaches the bridge (15/f). If the tree falls whilst you are sawing:
Interrupt the back cut if the tree does fall in the wrong direction or leans back and traps the chain saw. To open the cut and fell the tree, drive in wedges in the direction of the required felling line.
- Immediately pull the chain saw from the cut, switch it off and put it down.
Walk away in the direction of the escape route.
Watch out for falling branches and twigs.
- If the tree remains standing, drive wedges into the back cut in order to cause it to fall in a controlled way.
- At the end of sawing work, immediately remove your ear defenders and listen out for signals or warning calls.
7.3 Delimbing (16)
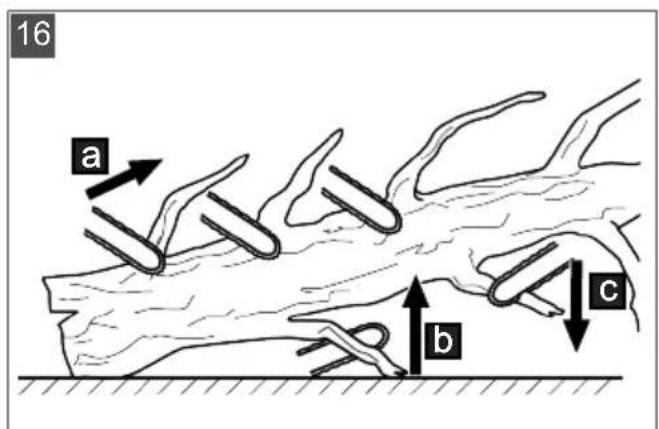
Heed the following points during this work:
- Brace the chain saw against the tree trunk and sequentially cut off the freely accessible branches on the tree trunk, one after the other (16/a). When working on a slope, carry out preparatory work from below to above.
Leave larger, downward-pointing branches supporting the tree standing at first.
Cut off smaller branches with one cut.
Pay attention to branches under tension, and first saw through them a little from above, then from underneath upwards, in order to prevent the chain saw becoming trapped (16/b).
First saw free-hanging branches a little from below, then saw entirely through them from above downward (16/c).
Only experienced or trained people should make plunge cuts, longitudinal cuts and boring cuts.
7.4 Cross-cutting (17, 18, 19)
Heed the following points during this work:
- When working on a slope, always stand uphill from the tree trunk, because it could roll away.
Guide the chain saw so that there is no part of your body in the extended sweep arc of the saw chain.
Positioning the chain on the trunk:
Position the bumper spike directly adjacent to the cut edge and allow the chain saw to pivot about this point.
The chain saw can slip sideways or jump easily when it is positioned. This depends on the wood and the condition of the saw chain. For this reason, always hold the chain saw firmly.
At the end of the cut, the chain saw swings due to its own weight because it is no longer supported in the cut. Counteract this in a controlled way and do not apply pressure so the saw chain does not touch the ground.
After finishing the cut, wait for the saw chain to come to a halt before you switch off the chain saw.
Always switch off the motor of the chain saw before you go to the next tree.
The entire length of the tree trunk is in contact with the ground:
Saw through the tree trunk from above, without cutting into the ground (17/a).
Tree trunk is lying raised at one end:
To prevent the chain saw becoming trapped and the wood splintering, first saw through 1/3 of the trunk diameter from below (18/a), then saw through the remainder from above, parallel to the cut made from below (18/b).
Tree trunk is lying raised at both ends:
To prevent the chain saw becoming trapped and the wood splintering, first saw through 1/3 of the trunk diameter from above (19/a), then saw through the remainder from below, parallel to the cut made from above (19/b).
7.5 Cutting converted timber
Heed the following points during this work:
Use a secure cutting surface (sawing trestle, wedges, beams).
Make sure you are standing securely and that your bodyweight is evenly distributed.
Secure logs to prevent them twisting.
Only start the cut once the saw chain is running. Never switch on the chain saw already in the kerf.
Do not secure the wood with your foot and do not get another person to hold it.
8 MAINTENANCE AND CARE

DANGER!
Risk of injury or death due to improper maintenance
Maintenance work carried out by unqualified persons and the use of non-approved spare parts can result in serious injuries and even death during operation of the appliance.
- Do not remove or deactivate any safety installations.
Use only approved OEM spare parts.
Ensure through regular and proper maintenance that the appliance is in a clean and functional condition at all times.

DANGER!
Danger of fatal injury and danger of extremely severe injury.
Danger of fatal injury and danger of extremely severe injury when the engine is switched on.
- Carry out all work with the engine switched off.

CAUTION!
Risk of injury
Sharp-edged and moving appliance parts can lead to injury.
Always wear protective gloves during maintenance, care and cleaning work.
- Correct maintenance is essential to retain the original efficiency and working safety of the machine.
Make sure that all nuts and screws are firmly tightened so as to be certain that the machine is always operating under good conditions.
Never use the device with worn-out or damaged parts. The damaged parts must be renewed and are never allowed to be repaired.
Prior to the maintenance work:
Switch off the engine and let it cool down.
Remove the spark plug connector.
Wear protective gloves when working on the saw chain.
- Do not remove the chain guard unless you need to work on the guide rail or the chain itself.
- Dispose of oils, petrol or other contaminating substances according to the regulations.
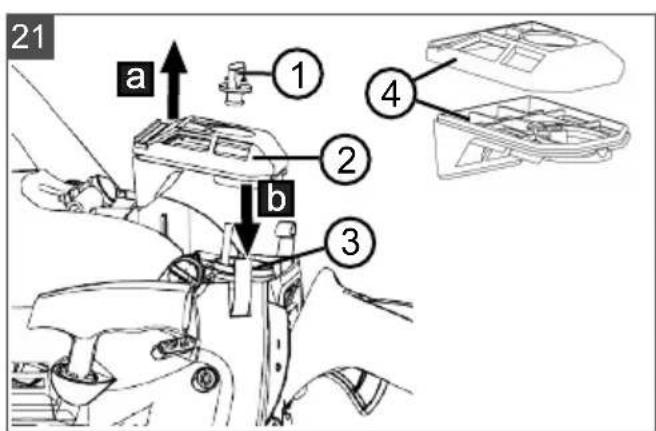
8.1 Removing/remounting the air filter cover (20)
Removing the air filter cover
- Insert a screwdriver between retaining clip (20/1) and air filter cover (20/2).
- Using the screwdriver, push the retaining clips away from the air filter cover (20/a).
- Pull off the air filter cover from the device (20/c).
Mounting the air filter cover
- Push the tab (20/3) of the air filter cover under the housing, then place the air filter cover on the device.
- Press the retaining clips (20/1) onto the air filter cover (20/b) until they snap into place.
8.2 Cleaning the air filter (21)
IMPORTANT!
Hazard due to dirty, damaged or missing air filter
The device engine can suffer irreparable damage if the air filter is missing, dirty, or defective.
- Cleaning the air filter is a prerequisite for correct operation and a long service life of the device. To prevent damage to the engine, do not work without a filter or if the filter is damaged.
Cleaning should be carried out after every 15 hours of machine use. - Never wash the filter element; it must always be replaced if it becomes too dirty or is damaged.
Removing the air filter
- Switch off the engine and let it cool down.
- Remove the air filter cover (see chapter 8.1 "Removing/remounting the air filter cover (20), page 50).
- Loosen the wing nuts (21/1).
- Pull the air filter (21/2) up and away (21/a).
- Cover the intake opening (21/3) with a clean cloth. This prevents dirt particles from falling into the carburetor space.
- Separate both parts of the air filter (21/4).
Cleaning the air filter
- Clean the nylon filter with a brush or fine bristles; if necessary, blow off particles carefully from the inside to the outside with compressed air.
Mounting the air filter
- Put both parts of the air filter (21/4) back together.
- Place (21/b) the air filter (21/2) on the intake opening (21/3).
- Fasten the air filter tightly with the wing nuts (21/1).
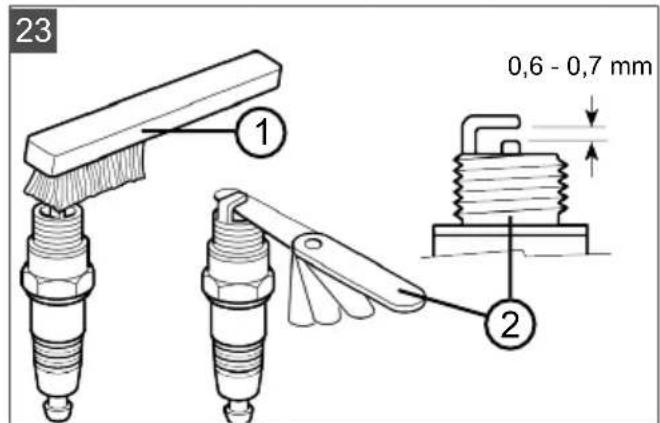
8.3 Checking/replacing the spark plug (22, 23)
In case of damage to the insulation, strong electrode erosion or heavily oil-contaminated electrodes, the spark plug must be replaced.
Preparation
- Switch off the engine and let it cool down.
- Remove the air filter cover (see chapter 8.1 "Removing/remounting the air filter cover (20), page 50).
- Remove the spark plug connector (22/1).
Check the electrode spacing (23)
- Remove the spark plug (22/2) with the supplied combination wrench.
- Clean the electrode with a brush (23/1).
- Measure the distance (23/2). The gap dimension must be 0.6-0.7 mm.
Changing the spark plug
- Remove the spark plug (22/2) with the supplied combination wrench.
- Screw in the new spark plug until it stops.
- Push the spark plug connector onto the spark plug.
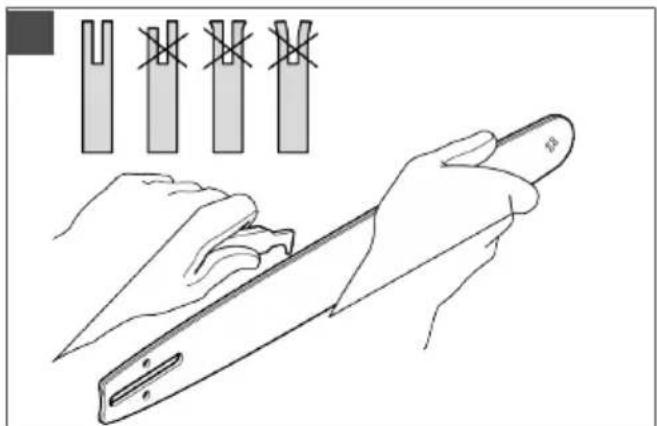
8.4 Guide rail (25, 27)
To prevent asymmetrical wear, the guide rail should be turned around regularly.
The following maintenance work must be carried out:
Grease the bearing of the reversing sprocket (27).
Clean (25) the groove of the guide rail with a scraper (not included in the scope of supply).
Clean the lubrication holes.
Use a flat file to remove burrs from the guide flanks and compensate for any deviations between the guides.
The guide rail must be replaced if:
The depth of the groove is less than the height of the pulling link (which is never allowed to touch the base of the groove);
The inner guide wall is worn to such an extent that the chain tilts to the side.
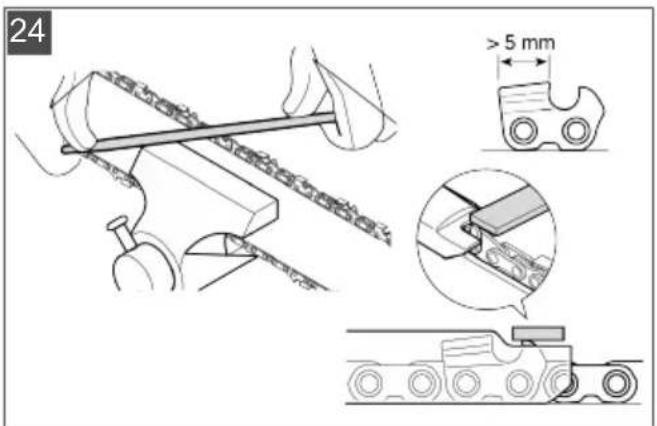
8.5 Sharpening the saw chain (24)

DANGER!
Danger of fatal injury due to kickback!
Improperly sharpened saw chain increases the danger of kickback and thus the danger of fatal injury.
Sharpen the saw chain properly to reduce the risk of kickback.

NOTE
Inexperienced chain saw operators are recommended to have the saw chain sharpened by a specialist at the customer service.
The saw chain must always be well-sharpened for reasons of safety and efficiency.
Sharpening is required if:
The saw chips are like sawdust.
Greater force is necessary for cutting.
The cut is not straight.
Vibration increases.
Fuel consumption increases.
If you get trained customer service personnel to sharpen the chain for you, they will be able to do this with the appropriate tools for a minimum of material removal and even sharpening of all teeth.
You can sharpen the saw chain yourself using special round files whose diameters are adapted to the specific chain type (see chapter 8.10 "Chain maintenance table", page 53). A certain amount of skill and experience is necessary to avoid damage to the teeth.
To sharpen the saw chain:
- Switch off the engine, release the chain brake, and clamp the guide rail firmly in a suitable vice with the saw chain mounted, while ensuring that the chain can move freely.
- Tension the chain if it is slack.
- Place the file in the corresponding guide and then guide the file through the opening of the tooth making sure that you keep an even angle according to the tooth profile.
-
Only perform a few strokes of the file and exclusively in the forwards direction, then repeat the working step on all teeth in the same orientation (right or left).
-
Reverse the position of the guide rail in the vice and repeat the working step on the remaining teeth.
- Check that the limit tooth does not project beyond the checking tool, and file off any projection using a flat file, then round down the profile.
- After sharpening, clean away all filings and dust, then lubricate the saw chain in an oil bath.
The chain must be renewed if:
The length of the teeth is less than 5mm
Where applicable: The mark on the teeth of the cutting elements is exceeded;
The play on the links at the chain rivets is excessive.
8.6 Checking the chain lubrication (26)
Never operate the device without sufficient chain lubrication. Otherwise you reduce the service life of the device. You should therefore check the amount of oil in the oil tank and the oil supply each time before starting work.
- Start the device.
- Hold the running chain saw about 15 cm above a tree stump or a suitable foundation.
A light oil film should form on the tree stump (26/1) if there is sufficient lubrication.
8.7 Adjusting the chain lubrication (28)

DANGER!
Danger of fatal injury and danger of extremely severe injury.
Danger of fatal injury and danger of extremely severe injury when the engine is switched on.
- Carry out all work with the engine switched off.
The oil supply rate can be adjusted with an adjusting screw. The adjusting screw is on the bottom of the device (28/1).
Use a small screwdriver to adjust the supply rate:
Turn it clockwise to decrease the supply rate
Turn it counterclockwise to increase the supply rate
When working, you should regularly check whether there is sufficient oil present in the oil tank.
8.8 Checking a standstill when the saw chain is running in idle

WARNING!
Danger from moving saw chain
A saw chain moving at idling speed can cause life-threatening injuries when working.
-
Never work with the chain saw when the saw chain is moving at idling speed.
Before every use, check that the saw chain is at a standstill if the engine is running at idling speed. -
Start the engine and let it run at idling speed.
-
Check that the saw chain is stationary.
-
If the saw chain is moving, the following errors could be present:
Idle speed is too high (see chapter 8.9 "Setting the idling speed on the carburettor", page 52).
The coupling is defective, contaminated or incorrectly set. Contact an AL-KO service centre.
8.9 Setting the idling speed on the carburettor
The idling speed is specified in the technical data (see chapter 13 "Technical data", page 56). It is best adjusted with the aid of a speed counter.
If the idling speed is correctly set, the engine runs round at idling speed and the saw chain does not move. Depending on the operating location (mountain, lowland), the idling setting must be corrected using the "T" idling speed stop screw.

NOTE
The regulating screws "L", for idle fuel mixture, and "H", full load mixture, may only be adjusted by an AL-KO service station.
The saw chain moves without the throttle being applied:
The idling speed is too high.
- Turn the "T" idling stop screw (11/5) anticlockwise a little until the saw chain no longer moves.
The engine continually dies if the throttle is not applied:
The idling speed is too low.
- Turn the "T" idling stop screw (11/5) clockwise a little until the engine runs smoothly. If the optimum carburettor setting cannot be adjusted by turning the "T" idling speed stop screw, have the carburettor optimally adjusted by an AL-KO service station.
8.10 Chain maintenance table

WARNING!
Danger of serious injury.
Use of an unapproved saw chain or guide rail on the chain saw can result in serious injuries.
Use only approved saw chains and guide rails.
The table shows the values for different chain types.
| Chain type File diameter Top plate angle | Down angle Head tilt angle (55°) | Depth gauge setting | ||
| Rotational angle of the tool | Inclination angle of the tool | Side plate angle | ||
| 91P053X 5/32" 30° 0° 80° 0.025" | ||||
| 91P057X 5/32" 30° 0° 80° 0.025" | ||||
| Depth gauge setting File | ||||
8.11 Maintenance schedule
The following jobs may be carried out by the user. All other work must only be carried out by a specialist service centre.
The following information relates to normal application conditions. Under special conditions such as working for a particularly long time, the specified maintenance intervals will have to be shortened accordingly.
Maintenance schedule
| One-time after 5 operating hours | Before starting work | Every week | Every 50 operating hours | Every 100 operating hours | As required | Before/after the season, annually | |
| Carburettor | |||||||
| Check idling speed X | |||||||
| Air filters | |||||||
| Clean X | |||||||
| Renew X | |||||||
| Spark plug | |||||||
| Check electrode gap, adjust if necessary | X | X | |||||
| Renew X X | |||||||
| Silencer | |||||||
| Visual inspection for condition | X | ||||||
| Fuel tank, oil tank | |||||||
| Clean X X | |||||||
| Chain brake | |||||||
| Functional check X | |||||||
| Clean, grease articulation points | X | X | |||||
| Chain lubrication | |||||||
| Check X X | |||||||
| Saw chain | |||||||
| Visual check for condition, check sharpness | X | ||||||
| Resharpen X X | |||||||
| Renew, if necessary renew the chain sprocket as well and grease the chain sprocket bearing | X | ||||||
| Chain bar | |||||||
| Visual inspection for condition | X | ||||||
| Turn over the guide rail X | |||||||
| Grease the reversing sprocket | X |
Maintenance schedule
| One-time after 5 operating hours | Before starting work | Every week | Every 50 operating hours | Every 100 operating hours | As required | Before/after the season, annually | |
| Clean the chain groove/oil hole | X | ||||||
| Clean the inside of the protective cover | X | ||||||
| All accessible screws (except set screws) | |||||||
| Retighten X X X | |||||||
| Complete machine | |||||||
| Visual inspection for condition | X | ||||||
| Clean (including air inlet, cylinder cooling vanes) | XXXX |
9 HELP IN CASE OF MALFUNCTION

CAUTION!
Risk of injury
Sharp-edged and moving appliance parts can lead to injury.
Always wear protective gloves during maintenance, care and cleaning work.

NOTE
If you encounter any malfunctions that are not listed in this table or that you cannot rectify yourself, please contact our customer service.
| Malfunction Cause Remedy | ||
| The engine cannot be started or dies immediately. | Incorrect operation Start the engine as described in these operating instructions. | |
| Dirty spark plug or faulty electrode gap | Clean or replace the spark plug. | |
| Dirty air filter Clean or replace the air filter | ||
| The guide rail and saw chain become hot when running. Generation of smoke. | The saw chain is tensioned too tightly. | Reduce chain tension. |
| Oil tank is empty. Replenish the saw chain oil. | ||
| The oil entry hole and/or groove of the guide rail are dirty. | Clean the oil entry hole and groove of the guide rail. | |
| Engine running, but the saw chain does not move. | The saw chain is tensioned too tightly. | Reduce chain tension. |
| Device errors Contact an AL-KO service centre. | ||
Malfunction Cause Remedy
Only sawdust is thrown out, rather than wood chips. The chain saw has to be pushed through the wood.
The saw chain is blunt. Sharpen the saw chain or contact an AL-KO service centre.
Device vibrates unusually. Device errors Contact an AL-KO service centre.
10 TRANSPORT

WARNING!
Danger of fatal injury and danger of extremely severe injury.
During transport, a running saw chain can lead to extremely serious and even fatal injury.
Never carry and transport the chain saw with the saw chain running.
Before transporting, carry out the measures mentioned above.
Before transporting, carry out the following measures:
- Switch off the engine.
- Allow the device to cool down.
- Remove all traces of saw chips or oil residues.
- Pull the protective cover over the guide rail. Only carry the chain saw using the handle. When doing this, the guide rail points to the rear.
In vehicles: Secure the chain saw against tipping over, damage and leakage of service products.
11 STORAGE
Thoroughly clean the appliance after each use and - if present - attach all covers. Store the appliance in a dry, lockable place out of the reach of children.
Carry out the following jobs before intervals in work lasting for longer than 30 days:
- Completely drain the fuel and oil.
- Remove the saw chain and guide rail, clean it and spray it with rust-proofing oil.
- Thoroughly clean the device and store it in a dry place.
IMPORTANT!
Danger of damage to the appliance
Dried-on/sticky saw chain oil can lead to damage to oil-channelling components after lengthy storage.
- Remove the saw chain oil from the appliance before an extended period of storage.
12 DISPOSAL

Before disposing of the device you must empty the fuel tank and the engine oil tank!
Petrol and motor oil do not belong in household waste or the public sewer system, but should be collected and disposed of separately.
Packaging, equipment and accessories are made from recyclable materials, and must be disposed of accordingly.
13 TECHNICAL DATA
| Type 6436 6442 | ||
| Item no. 127429 127430 | ||
| Engine type 2-stroke 2-stroke | ||
| Engine displacement 35.2 cm³ 41.9 cm³ | ||
| Maximum engine power in kW (according to ISO 7293) | 1.45 | 1.7 |
| Easy Start system | Yes / primer | Yes / primer |
| Idle speed | 3000 ± 400 min-1 | 3000 ± 400 min-1 |
| Maximum speed | 12000 min-1 | 12000 min-1 |
| Fuel Lead-free petrol | with at least 90 RON | Lead-free petrol with at least 90 RON |
| Mixing ratio 1:50 1:50 | ||
| Volume of fuel tank 270 cm | 3 | 270 cm³ |
| Oil tank volume 230 cm | 3 | 230 cm³ |
| Guide rail: | ||
| ■ Type Oregon | 140SDEA041 | Oregon 160SDEA041 |
| Length/effective cutting length 35/33 cm 40/37 cm | ||
| Chain sprocket: | ||
| ■ Number of teeth 6z/6T 6z/6T | ||
| ■ Pitch 3/8" 3/8" | ||
| Saw chain: | ||
| ■ Type Oregon | 91P053X | Oregon 91P057X |
| ■ Pitch 9.525 mm (3/8") 9.525 mm (3/8") | ||
| ■ Driving link width | 1.27 mm (0,05") | 1.27 mm (0,05") |
| Maximum chain speed | ≤22.86 m/s | ≤22.86 m/s |
| Chain guard | Yes / automatic | Yes / automatic |
| Weight of the chain saw when the tanks are empty: | ||
| ■ Weight with guide rail and saw chain | 5.38 kg | 5.45 kg |
| ■ Weight without guide rail and saw chain | 4.75 kg | 4.75 kg |
| Sound pressure level LpA (as per DIN EN ISO 22868) | 101.1 dB(A) [K = 3.0 dB(A)] | 101.5 dB(A) [K = 3.0 dB(A)] |
| Sound power level LwA (as per DIN EN ISO 22868) | 109.9 dB(A) [K = 3.0 dB(A)] | 110.0 dB(A) [K = 3.0 dB(A)] |
| Equivalent total vibration value (as per DIN EN ISO 22867): | ||
| Front handle (K = 1.5 m/s²) | 6.57 m/s² | 6.47 m/s² |
| Rear handle (K = 1.5 m/s²) | 6.88 m/s² | 6.96 m/s² |
14 AFTER-SALES / SERVICE
In the event of questions of warranty, repair or spare parts, please contact your nearest AL-
KO Service Centre. These can be found on the Internet at:
www.al-ko.com/service-contacts
15 GUARANTEE
We will resolve any material or manufacturing faults on the appliance during the legal warranty period for claims relating to faults, in accordance with our choice either to repair or replace. The legal warranty period is determined by the legislation of the country in which the appliance was purchased.
Our warranty promise applies only if:
These operating instructions are heeded
The appliance is handled correctly
Original spare parts have been used
The warranty becomes void in the case of:
Unauthorised repair attempts
Unauthorised technical modifications
Non-intended use
The guarantee excludes:
Paint damage that can be attributed to normal wear and tear
Wear parts that are marked with a frame xxxx (x) on the spare parts card
- Internal combustion engines (these are covered by the guarantee provisions of the corresponding engine manufacturers)
The guarantee period commences with purchase by the first end user. The date on the proof of purchase is decisive. In the event of a guarantee claim, please take this guarantee declaration and the original proof of purchase, and contact your dealer or the nearest authorised customer service centre. This statement does not affect the purchaser's statutory claims for defects against the vendor.
16 TRANSLATION OF THE ORIGINAL EU DECLARATION OF CONFORMITY
We hereby declare that this product in its marketed form conforms to the requirements of the harmonised EU Directives, EU safety standards and the product-specific standards.
Product
Chain saw
Serial number
G4011022
Type
6436
6442
Sound power level
EN ISO 3744
measured/guaranteed
6436:109.9/113 dB(A)
6442:110.0/113 dB(A)
Type examination as per
2006/42/EC Annex IX
BM 18SHW0351-01
Manufacturer
AL-KO Geräte GmbH
Ichenhauser Str. 14
D-89359Kotz
Germany
EU directives
2006/42/EC
2014/30/EU
2000/14/EC
Conformity evaluation
2000/14/EC - Appendix V
Notified body
Duly authorised person for technical file
Andreas Hedrich
Ichenhauser Str. 14
D-89359Kotz
Germany
Harmonised standards
DIN EN ISO 11681-1:2011
DIN EN ISO 14982:2009
Kotz, 11/01/2018

Dr. Wolfgang Hergeth
Managing Director
VERTALING VAN DE ORIGINELE GEBRUIKERSHANDLEIDING Inhoudsopgave
2 PRODUCTOMSCHRIJVING
www.al-ko.com/service-contacts
15 GARANTIE
www.al-ko.com/service-contacts
15 GARANTÍA
Dr. Wolfgang Hergeth Managing Director
TRADUZIONE DEL MANUALE PER L'USO ORIGINALE
Summario
www.al-ko.com/service-contacts
15 GARANZIA
Dr. Wolfgang Hergeth Managing Director
PREVOD ORIGINALNIH NAVODIL
Kazalo vsebine
www.al-ko.com/service-contacts
15 GARANCIJA
www.al-ko.com/service-contacts
15 JAMSTVO
Možebitne greške u materijalu ili proizvodnji na urešaju uklonit Čemo tijekom zakonskoga roka zastare za jamstvo na nedostatke prema vlastitom izboru popravljanjem ili zamjenskom dostavom. Rok zasta-re odrešuje se prema pravu države u kooj je urešaj kuplejen.
Dr. Wolfgang Hergeth Managing Director
PREKLAD ORIGINÁLNIHO NÁVODU K POUŽITÍ
Obsah
www.al-ko.com/service-contacts
15 ZÁRUKA
3 BEZPEČNOSTNÉ POKNY
3.3.5 Zatazenie hlukom
www.al-ko.com/service-contacts
15 ZÁRUKA
7.4 Kapa trad (17, 18, 19)
7 ARBEIDSFREMTREDEN OG ARBEIDSTEKNIKK

FARE!
8 VEDLIKEHOLD OG PLEIE

FARE!
Livsfare pga. feil vedlikehold
www.al-ko.com/service-contacts
15 GARANTI
www.al-ko.com/service-contacts
15 TAKUU JA TUOTEVASTUU
Dr. Wolfgang Hergeth Managing Director
ORIGINALIOS NAUDOJIMO INSTRUKCIJOS VERTIMAS
Turinys
1 Apie sia naudojimo instrukcija 415
www.al-ko.com/service-contacts
15 GARANTIE
Galimus irenginio medziagu ar gamybos defektus istatymu numatytu pretenziju del trukumreiskimo.
senaties termino laikotarpiu mes saliname saveru nuoziu rremonto arba keitimo budu. Senaties terminas nustatomas kiekvienu konkreciu atveju pagal salies, kurioje irenginys buvo jsigytas, teises aktus.
7.4 Koka garinăsana (17, 18, 19)
www.al-ko.com/service-contacts
15 GARANTIE
Yka3bIbaeHa onachyU cHTyaunIO, KO-Topa,ecn ee He n36exKaTb, npBODNT K CMEPTN INN cepbe3HbIM TpaBMam.

PNEynpKDEHNE!
Yka3bIbaeHa NotEHuaJIbHO OnaChyIO cnTyaunIO, KOtOpA, ecn ee He n36eKAtb, MoKET npNBecTN K CMEPTN IIN cepBe3HbIM TpaBMam.

OCTOPOXHO!
Yka3bIbaeHa notehnnaIbHO onaChyO cnTyauNIO, KOtOpAa, ecnn ee He n36eKATb, MOKeT PnVBecTN TpaBMam JERKO IN CpeHHe TjXeCTN.

BHIMAHNE!
Yka3bIbaeHa cnTyauHIO, KOtopa, ecn ee He n36exKaTb, MoXe T npBecTu K MyueCTBeHHOMy yuep6y.

ПОНМЕЧАНЕ
CneuaNbHbIe yka3aHnI dnn o6nreHnnoHmHaHnI nKcnpyatau.
2 OINCAHNE IPODyKTA
B 3TOM pyKOBOIDCTBE NO 3KcNpyaTuIN ONuCAHa pyHnA ZENHn PA, KOtOpA nOlyuAe TNTaHne O T 6eH3nHOBOrO DBNrAten.
2.1 NcnoB3OBAHne no Ha3HaueHnIO
LeHHa nHa paCCHTaHa NCKHIOHTeBHO Ha npImeHHe B pNycaTe6Hom xO3yIcTBe. B 3- Toi oBnactu cHnHa nHa NOxOHT dPaacnIOBKn DpeBecnbl, HApIMep, IJ:
PacnIOBKn 6peVeH
PacnIOBKn 6pyca
Pe3ka BETBeB B 3aBnCmOCTn OT dInHbI pe3- KU
LcHnHa nHa DoJxHa nCNoJIb3OBAtbcr ToIbKO dJa pa6oTbI c DepeBOM Ha OTKpbITom BO3dYxe. Bo Bpemra pa6oTbI Heo6xoDmIO nCNoJIb3OBAtbc COOTBeTCTByUOuHe CpeCTBa INHINBIVaJIbHO 3aunTbI. PnpMeHHe N B Dpynx UeJx, HApnPmep, dJa npocceCNOHaJIbHOro yXoDa 3a KPOHO JpeBa, KaTeOpNueCKn 3anPeueHo. Oepatop HeCet OTBeTCTBeHHOCtB 3a yUep6, npuHHeHhBIOwn6kAmn OepaTopa. IJRA 3TOrO yCTpoi
CTBa pa3pe7aetcN cNoJIb3OBaTb TOnIbKO nINbHbIe cEN N KOM6nHaUcN UHN, yKa3aHHbIe B pyKOBODCTBe NO 3KcIIpyATAuN. NcNoJIb3OBaHHe, KOToPOe IpoTINBOpEuyNT OINCAHHOMy B HAcTOr-1eM DOkUMeHTe, CHTaETcN cNoJIb3OBaHHeM He No Ha3HaueHIO.
Lennnna He npedha3haueha nncnoB30BaHn B KOMMepuecknx ceJx.

OCTOPOXHO!
Onachoctb TpaBmnpOBaHn npu nC- noJb3OBAHn He no Ha3HaueHnO!
PacnIOBka ceHNoI pIoJ dpeBecnbl IIN dpYnx MaTePnaIOB, KOtOpble coDeprXaT NOCTOPOHHe IpeDMeTbI, MOKeT npNBecTI K TpaBMe.
IcnoJb3yIte cenHyIO nIy ToJIbKO dIpaCnIOBKn IeKoI dpeBecnHbl.
OcmoTpuTe dpeBecnHy neped pacnnIOBkoH aHaIuHne nocToPOHHx npEMeTOB, HApnPmep rBO3dei, WypnoB, pHTnHroB.
2.2ПиМерьн He npabNbHoro nCNoJIb3OBAHn
He obpe3aTb BETK, KOtOpbIe pacnoJoxeHbI npraMo IIN IOD OCTpbIM yIOM HaI NOJIb3O-BaTeJIem IIN dpyrIMN JIuaMn.
3anpeucaetcncnoB3OBaTb Otpa6oTaHHe MacNo.
He pa3pewaeTcNcNoIb3OBA Tb yCTpoIcTBO BO B3pbIOoNaCHO cpeJe.
2.3 OctaToHbIe pNCKn
Дамп ри ИспОьзOBAHи yCTpoIcTBA NO Ha3Hа-унIO cyUeCTByeT OCTaTOUHbI pNCK, KOTOpbI HeBO3MOxKHO NCKIQUHTb. KoHCTpyKUma YCTpoIcTBA He NO3BOJAreT NCKIQUHTb CNeDyUOuNe O-nachOCTn.
KoHTaKT C OTKpbITbIMN 3y6bYMaM N cEN (ONaHOCtB NOpe3OB).
IocTyn K BpaaHoueicra cenn (onacnoctb nope3OB).
Bhe3aHoe HnepeDbHeHoe nepemeueHne nIbHO uINbI (Oanachoctb nope3OB).
UdaneHne YacteY cenn (onachoctb nope3OB/ TpaBMnpoBaHna).
UdaenHe uacteI o6pa6oTaHHoJ dpeBecnHbl.
UdaneHne yactnuek o6pa6oTaHHoI dpeBeCINHbI.
BbI6poCblOT 6eH3nHOBOrO DnBnraTeTnA.
KoHTaKT KOxN C TOnJIbOM (6eH3INHom/Mac- JIOM).
HapyuheHne cnyxa BO Bpempa60tbl,ecnHe nCNOJb3OBaTb 6epyuH.
2.4 PpeoXpaHntbHbIe n 3aunTHbIe yCTpOuCTBa

PPEyPPEKDEHNE!
Onachocb cepbe3HbIX TpaBM, Bbl-3BaHHbIX MaHnPyInpOBAHne IpeDoXpaHNTeJIbHbIMN 3aUHTbIMN y-CTpoiCTBaMn
I3-3a MaHnHyIpOBaHn npeOxpaHnTeNbHbIMN 3aUHTbIMN yCTpOiCTBaMn npi pa6Ote C cENHOI NIOI MOYr BO3HNKHyTb cepBe3HbIe TpaBMbl.
HnB Koem Cnyae He BbIBOJNTe N3 cTpor npedoxpaHntbHbIe n 3a- uHThIe yctpoiCTBa!
Pa6oTaIe c cenHoi nIOi, TOnbko ecn BCE npedoxpaHnteNbHbIe n3a- uHThie yCTpoHcTba pa6oTaIOT npaBnJbHO.
3aHTbIKoKyxHaPaBIAOeIHHbI
Bo n36eXaHHe TpaBMnPOBaHnI JHOe I NOBpeKdEHNI PpeDMeTOB NpeD TpaHCnOpTnpOBKO HnHa npBaNIOU OINbI INIIbHyO UeNbBCerda CneDyET HaDeBaTb 3aUNTHbIKoKxY.
Topmo3 zenn
Topmo3eenn 3aynyckaetcraaHTbIM uNTKOM BO Bpemr o6patnoi OTdauH NHeMeJneHHO OCTa-HabnBaet DBNkUyIOc PnIbHyIO cenb.
KhONka 6IoknpoBkn 3aunTbI
PbIarra3a MoKet 6bITb NOBepHyT,TOJIbKO ecNn 6blna Haxkata KHONka 6JOKINPOBKN 3aunTbl.
2.5 CnMBOJIbHa yCTpOINCTBe
CnmboJ 3haueHne

Co6JIIOJaTe OcO6yIO OCTOpOK-HocTb npi pa6ote!
Onachoctb otdaun!
CnMBoJ 3HaueHHe
Pp np pa6oTe c zenHoi nnoH He depkaTb HcTpymeHT OHOI pyKoI!

Hocnte 3aunTHbIe KACKy,6epuun n ouKn!

Pa6oTaB 3aunTHbIX nepuATkax!

IcnoJIb3yIte npOuHyIO 6yBb!

IpeB BBOOM B 3KcNpyaTauIO npOHTe pyKOBoCTBO NO 3KcNpyaTaun!

PnpapBoTe c ceHNoI nnoi HCTpymEnT Bcerda CJeDyET DepxKaTb DByma pykami!

БakДпЯбEH3HOBO-MACJIHONcme-CN

Hacoc nodkaKn

ConHc:obuHbI/JeTHnpeKIM
Xnonbcha:3mHn peKIM
Ha yctpoiCTBe BbltAmnoBaHbI 3NaKn, co6nIO-DeHne KOtOpBix Heo6xOdmo dny 6e30nacHO 3KcIIpyatauN 6e30nacHOro Texo6cnyXuBaHna. Bcerda co6IouaTe 3Tu ykaaHn.
CNMBON 3NaueHne
NATpy6OK IJRAI O3anpaBKn ropouey CMEcBIO
PacnoJoxHe:Ha KpbIuKe TOnJIuBHorO 6aka
Patapy6okДЯdo3anpaBknZeHbIM MacnOM
PacnoJoxeHne:Ha KpbIuKe MacJnHoro 6aka

IcnojIb3OBAHHe BbIKIOuTeTn DnIRaTeTn.EcnI nepeBecTu BbIKIOUaTeNb B noIOxKeHne «O»,DbIRaTeNb cpa3y OTKnIOuHTc.
PacnoJoxHe: cIeBa OT 3aIHei pyuKn

NcnoJb3OBAHne KONKn BO3DyUHOro Klanana.Bo3DyUHbI KNanah 3aKpbIbAeTcR npn BbITrNBAHNI KONKNOTKpbIbAEtCra npn HaxaTuHa Hee.
PacnoOnoKeHne: KpbIuKa BO3dUHoro HnJIbTpTa
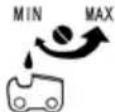
PerynpoBka MacJHoro Haocca. NobopauBaTe CtepXeHb OTBeptKo B HApabLeHn OTMeTKn MAX, yTo6bl yBeJIuHTb KOJIuYeCTBO NOdaBaEMOr MACJa, INN B HApabLeHn OTMeTKn MIN, yTo6bl yMeHbIHTb erO.
PacnoJoxeHHe: HxKHrA CTOpOHa npBODHO 6Joka

BnHT nOd 3HaKOM «H» npedHa3Ha-ueH dIpeRyInpOBaHnCmecn npN BbICOKO YactOTE BpaSeHn.
PacnoJoxKeHne: CBepxycneBaHa 3aDHe npyKe

BnHT nOd 3HaKOM «L» npeDHa3Ha-ueH dIypeRyIpOBaHnCmecn npN Hn3KO uactote BpaueHn.
PacnoJoxHe: CBepxCy CneBa Ha 3aHn pyKe

BnHT Ha3NaKOM «T» npedHa3HaueH dIpeynpoBaHna YacTobl BpaueHnHa XOIOCTOM XOdy.
PacnoJoxHe: CBepxCyneBa Ha 3aHn pyKe
CnB0J 3HaueHne
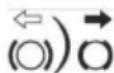
Ioka3bIbaet, B KaKOM HappaBHeHn OTnyckaetc (6eJra cTpeJka) nJn AKTNbpyetc (YePna cTpeJka) TOPMO3 ceH.
PacnoJoxeHne:Ha nepeDHeu qaCTn HappaBnaIooJe IINHbI

Ioka3bIbaet, B KaKOM HAnpaBHeHn yCTaHOBHeHa Uenb.
PacnoJoxeHne:Ha nepeDHeu qaCTn HappaBnaIOUeI uHHbl

TapaHTnpoBaHHbI ypoBeHb 3ByKOBOrO daBHeHn:113 d5(A)
2.6 KomnjeKT noCTaBKn
Iocne pacnakOBKn y6eHNTecb, YTO BCE KOMNoHeHTbl DOCTaBNeHbl.
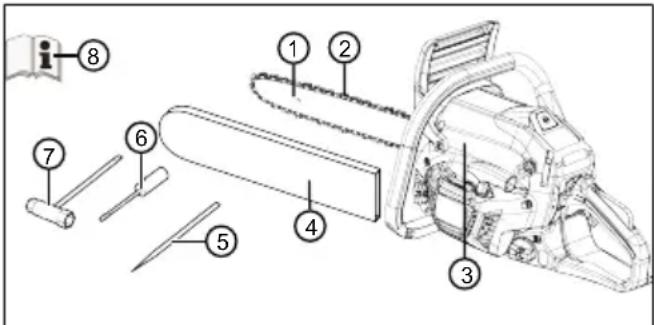
Ho- KOMNOHeHTa Mep
1 HanpaBnaJouaJy uHa
2Пиьнаяць
3 Lennar 6en30nna
43aunTHbIKoKyxIJaHappaBnIoueJUINHbI
5 HanInbHnK
6 OTBepTk
7 Kom6HnHPOBaHHbI raeHbI KJIIOU
8 PykoBoDCTBO no 3Kcnnyatau
2.7 O63op npoDyKta (01)
Ho- KOMNOHeHTa Mep
1 HanpaBnaIouaI shHa
2Пиьнаяць
Ho- KOMNOHeHTa Mep
3 PpeHn 3aunTHbI uNTOK
4IpeepnHraCnyckOBaRcKo6a
5 KpbIwKa BO3DyWHOrO 7nJIbTpA
6 PpeOxpaHnteHbHbIe cKobI dJa KpbIuKN BO3dUHOro pNlbTp a
7 Pbyar r3a
8 KhoNka 6JIOKINPOBKN 3aUNTbI
93aHnra cnyckoBa cko6a
10 KnaBnHa KaJInChOro Tnna dJa BbIKNIO- YeHnA DnurTaTeJI, KOtOpa CaMOCTOa TeIbHO c6paCbBaetcra
11 ToJIINBHybI 6aK
12 Pykoryka npoccejna (dny xolodhoro nycka)
13 PyuKa cTapTepa
14 MacJHb6aK
15 3aunTHbIKoKxIJaHnpaBnaIOuei
16 3y6a7bI ynp
17 Kpenexhble raikn dna HanpaBIAO- 申
18 YCTaHOBOUHbI BnHT HaTJXNTeJIe-
19 PeIbcoBbie ckpenneHn
20 NopuHnHK HAcOa noKaU
21 RykoBoDCTBO no 3KcnnyaTaun
3 YKA3AHNЯ NO TEXHnKE B3OnACHOCTN
I IpoBepaTe yctpoiCTBO eKeJHeBHO nepeKaKdbIM npimHeHem n Nocne naDeHn INI dpyrNx IHcUdENTOB, TaNX KAK BO3deINCTBnE Cnbln lnn ydapa, Ha HAnuNe NOBpeKdEHn n 6e3OnacHyo 3KcPnIyatauNo.
I IpoBepaTe repMeTnHocTb TOnJIbHOcNCTeMbI pa6OTocNo6HocTb npEoXpaHITeNbHbIX yctpoiCTB. He nCnoJIb3yIte nepe3apJxAemblc yctpoiCTBa. B cIyuae comHeHnO sbpatntecb K dInIepy.
Ipn pa6oTe c yctpoiCTBOM HocHTe 6epuHn, oc6eHHO ecNn eKeDHeBHOe Bpempa6oTbI
npeBbIaet 2,5 yacOB. Ppi pa6Ote ycTPOINCTBa CO3daeTcra CnIbHbI Wym, KOTOpBI MOKET npNBecTu K HapUWeHna Cnyxa OnepaToPa.
Hocnte aHTBnBbpaQIOHHbIe nepaTkn pe- rnyrnpHO deNaIte nepepbIBbl B kaueCTBe npOphnakTnueckoMepbl npOTNB 60ne3HN PeHo. Boone dInTeBHOE nCNoB3OBaHne yctpoNCTBa MoKet npINBeCTN K BO3HKnHOBeHnHO HApUWeHnKPOBOObpaSeHn pyK n3-3a Bn6paun. He ydaetcraYCTaHOBnTB ToCHyO npOdoJXnTEbHOCTb paobToI. OHa 3aBNCNT ot pa3nHybIX paKTopOB. PpN nCNoB3OBaHn YcTPOCTBa CNeDInTe 3a pykAmn I naB- cAmn. B cnyuae BO3HKnHOBeHn TaKx CmITOMOB, KaK Notepra UyBCTBnTeBHOCTN, 60nn, 3yD, ocna6JIeHne Cnbl TeTa nnN INMeHeHn ZBETA INN COCTOHHN KOKN, o6paTIn- Tecb K BpaCy.
He 3anyckaIte DBNrataTeB 3akpbItbIX NOMeUeHnX N OTKnIOuaIte eRO,ecN Bbl cyVBCTByeTe TOuHOTy, rOIOBOKpyKeHne UIN Cna6oCTb Pn INcNoJIb3OBAHn YcTPOINCTBa. HeMeDInHNO O6paNTIECb K BpaCy. PpN 3anycke DBNrataTeJ 3TO yCTpoINCTBO rHeepnpyET TokCnHbIe Ra3bl. 3TN rA3bl MOryT He HmEtB 3a- naxa I 6bITb HEBINIMbIMN.
He nCnoJb3yIte yCTpOJcTBo B6Jn3N OTKpbI-TOrO pIaMeH Nnn NCTouHKnOB TenJa. Napbl 6eH3nHa H Cma3OuHOro MaCna JERKO BocnJa-MehReMbIe.
HaedeBaIte npOTNBONbIeBOB peCnnpaTOp, ecN BO BpEMpa60tbc yCTPOcTBOM Bo3HnKHyT ONuIKN, NblN NII dBlM. 3TO MOxET 6bIb OnaCHO nIg 3DopOBbJ.
3.1 Yka3aHnno TExnke 6e3onacHOCT npn o6paueHH n cenHo nnlo
Держinte BCE ча'teЯ NOДальше OT BpaaaIOUSeIcEN.пepeTtem кak BKJIIOuATb ПИЛ, cIeIyET y6eIITbcrB TOM,чTOцELb He KOHTaKTIpye T C KaKIMnII6O npEmdTaMn. KpaTKOBpeMeHHaRe HBNMaTeIbHOCTb пri pa6ote C ceHNoIПИ loNMOJtnpINBECTN K IONaDaHNU ODEJdbl NII NaCTe TeJaВDbNIXyUcScaIeNb.
IpaBoi pyKoI depXnTe cenHyIO nIy 3a 3aHIO pUky, a IeBOI - 3a nepeHIOI. PnpdePbBaITecb IMeHNO 3ToI cxEMbl: B npOTINBOM Cnyae pNCK NOnyuEHHa TpaBMbl yBeJIuHBAETcra.
HaedeBaIte 3aunTHbIe OUKN CpeCDTBA 3aunTBIOprAHOB clyxa.Kpome TOrO, peKOMeHdyETcNcNOJb30BaTb CpeCDTBA
ДЯЗАСТБI RОЛБИ,pyK,HOR n CTynHe.
Hadnexaця 3aunTHa Odexkaet
pnc TpaBMIpOBaHn B pe3yNbTaTe nonadaHnA CTPyKKn NnCnyaHOrO cOpNKoCHObEHNc PnJIbHOUeNbIO.
He nCnoJb3yIte cenHyIO nnIy, haxOJaCb Ha DepeBe. Pn nCnoJb3OBAHm INCTpyMeHTa Ha DepeBe cyIeCTByeT BepoTHOCb TpaBMnpOBaHn.
O63aTeNbHO 3aHMaIte ycToUHBOe noLoXeHne H NcNoJIb3yIte cENHyIO nIy TOJbKO Ha TBepDo, HAdExKHO npABHO NobepxHocTn. Ha cKoJIb3KO nn HeCTa-6nJIbHO ONOPHO NOBepXHOCTn (HaNPIMep, Ha NeCTHnCe) MOxHO IerKO NotepaPBHOBeCne INI KOHTPOJB Na d cENHO nnIOJ.
POMHHTe, YTO HAnpJxKeHHa BEtKa npN OTNNJIbAHm MOXeT OTnpyXnHtB. PocIe CHrTIN HaPjxKeHn B DpeBeChbIX BOJIOKHax BeTKa MoXeT yDapITb OepaTopa IIN BBi6NtB n3 eO pyK cENHyo nnNy.
Ipn cpe3aHn noJnecka n MoNoBix DepeBbeB co6IouaHTe oc6bUO OCTOpoxHOCTb.ToHKNE BcTKMOryT 3anyTaTbcraB UeINu Ydapntb Bac NIn BBBeCTNu Bac N3 paBHOBeCn.
I IJIpeHocn cENHOI NIIbI BbIKIOUHTe ee n depKNTe 3a nepeDHOO pyuKy, NOBepHyB NIIbHOJ cENbIO OT TeJa. TpaHCnOPTNPOBaT b XpaHNTb cENHyIO NlNy CJeDyET TObKO B 3aUnTHOM YexNe. ByTe KpaIHe OCTOpOXHbI npI o6paUeHNc cENHOI NIIoN, yTObI CHN3NTb BEPOrTHOCb HEnpeHaMEpeHHOrO COpNKoCHOBeHNc CBpaUOSeNCr cENbIO.
Co6IIOdaIte HNCTpyKcHn NO CMa3bIBaHNIO,HaTJXeHHIO cEN N 3aMeHe npHaJdJIexHoCTeH. HenpaBUNbHO HATryTaH nnCMA3aHHa Yenb MoKeT IOnHyTb. TaKke Bo3pactaET pNCK OTDAH.
Cneinte, TTo6bl pykN 6bln cyxmN uHCTbIMN, 6e3 Maenux CneoB Macna HIN CMA3KN. PykN, BbIMa3aHHbIe MacnOM HIN CMA3KO, CTaHOBATc CKOJIb3KIMN, IN Bbl MOKeTe NOTeprTb KOHTPOJb HAD NINOJ.
Pa3pewaetc nINNTb TOnbKO dpeBecnHy. He nCnoJb3yIte nNly dJa BbINOJIHeHn HenpeDycMOrpeHHbIX pa60.TpIMep: IJa pa3pe3aHn pNactMaccOBbIX n3deI N, KnpNCHoK KnaDKu Nn CTPOTeNb-HbIX MaTePnaHOB (KpOme DepeBraHHbIX). VcNoJIb3OBAHHe cENHOI nINbI He no Ha3Ha-
YeHIO MOKET PnIBeCTN K BO3HnKHOBeHIO O- NaChbIX CNTyaCNI.
3.2ПичнblOTdauHmepblДЯ ee npedotbpaueHn
O6paTHa oTdaa BO3HnKaeT, KOrDa KoHeu Ha npabJIkoIe IINHbI HataIKnBaETcHa KaKoI nI60 ppeMTe IIN KOrDa dpeBecnHa Crn6aETcN INIIbHra cenb 3axnMaetc B IpONJIe.
KoHTaKT KOHcA HAnpaBnIooJe IINHbIC KaKIMnn60 npEeMeTOM B HeKOTOpbIX CnyaX MoKeT npNBecTI K O6paTHOH OTBeTHOH peakun, npKOTOpO HAnpaBnIooJy IINHa CMeUaETcB BBePx B HApBaBHeHH NOnb3OBaTeJI.
3aueMJIeHne NIIbHOJ cENn Ha BepxHeN KpOMKe HAnpaBnaIOUeI uINbI peJIbCa MoKet npNBecTN Kpe3KOMy CMeUeHIO uINbI B HAnpaBJeHIn NOJIb3OBaTeJIa.
IIO6aN3 3Tnx peakun MOKeT npNBecTN K NOTepe KOHTpOJa HaNd NINOu N, KaK CNeDCTBue, K TAgKeJIbIM TpaBMam. He cNeDuYe TOnaratbcnKINouHTeNbHO Ha BCTPOeHHbIe 3aUNTHbIe Y-CTPOiCTBa CEHNOI NINbl. IOnb3OBaTeNb CEHNOI NINbl DOJXeH PnHrTb Pd Mep DnI pPeDoTbpaUeHNA TpaBM n HeCChACThBX CInyaeB.
O6paTHa OToaayraBJIeTcCJeDCTBnEM HenpaBnIbHO rHrPamOTHO rONb3OBaHnIHCTpyMeHTo. He dOnyCTtB ee, CoJIIODaIte CNeDuOuIne Mebp IpeoctOpOXHOCTN.
IpoquHO depKHTe cHnyo nny o6eHMn pykam, comKHyB naIbUbi BOKpyr puek. PacnoJaratb TeNo npyKn cJeDyET TaKIM 6pa3OM, yTo6bl MoXHO 6blIO npOTNBOdienCTBOBaTb 6bathO tDaue. EcIn BCE Heo6xOdMble MepbI ppeOCTOpoxHocTn 6blI IN ppeINHtBI B COOTBeTCTBm C yKa3aHNMy IO TexHnke 6e3OnacHocTn, onepaTop cnpabITbcra C 6bpathO tDauee. Hn B Koem clyuae He OTnyckaiTe cEHNYo nny.
I36eraTe Heydo6Horo noJoxHenra TeJa H He Nnnte Bblwe ypOBna nneu. 30 To no- 3BOJare TnyWe KOHTPOINPOBaTb cenHyIO nnLy B HeOxuaHHbx CNTyaunrx N I36eratb COnpNKoCHOBENRA KOHca UHHbIC dpyrMM npedmetamn.
IcnoJb3yIte TOnbKO npedncaHhbie npoN3BODHTeJIem 3aNaChbIe uHHbIu NIIbHbIe cenn. B npOTnbHom cnUyae BO3-MoKeH pa3pbIB cEN, KOToPbI npNBEdet K o6paTHOH OTdauye.
CobnDaeIpeoctabHbIe npOn3-BoNTeIeMHCTpyKcNnNo 3aToUKe nTexO6cyXuBaHHIO NIIbHOJ cENN.CnIi
KOM Hn3Kn OrpaHnHTeIb rIy6uHbI Bpe3a-HnA NOBblaaet BepoTHOCTb 6paTHOJ OTda-4n.
3.3 Yka3aHnno TeXnKe 6e3OnacHOCTN BO BpeMpa6oTbI
Co6IIOdaIte yka3aHnno TeXnke 6e3oNaCHOCTN B KOHKpeTHbIX CTpaHax, HApnPmEp, yKa3aHnno NO Texnke 6e3oNaChOCTn npOpeCCHoHaNbHbIX ACCounauN, oHDoB COuaNaHBOro OBeCeNeUHnra, OpraHOB 3dpaBOOxpaHeHnra.
IcnoIb3yIte yCTpOietBO TOnbKO npN DOCTaTOUHOM DHeBHom IIN NCKycCTBeHHOM OCBe-
Pa6o7a 30Ha, C6o6oHna OT nocToPOHHnx npeMeTOB (HaNPmEep, o6pe3KOB) - onacHOCTb CNOTbIKAHN.
OnepaTop nINn NOJb3OBaTeJIb OTBeUaIOT 3a JN3Hb INMUYeCTBO DpyNX JNU.
3.3.1 OnepaTopbI
YCTPOIcTBO 3aPpeuaeTcra NcNoJIb3OBaTb DeTAM B BO3pacte Do 16 Iet n IucaM, He O3HaKOMJIeHHbIM C pyKOBoDCTBOM NO 3KcNpyaTa-UN.
EcnnBbpa6oTaete CcENHOI NIOI BnepBbIE:Nonpocnte npOdaBua IIN dpYrOroCneuAnCTa ObJcHNTb, KaK ObaaATbcraCcENHOI NIOI, INI npOInde KypcbI.
JIO6O YeIOBek, pa6oTaUcHm C cENHOI NIO, DOJKeH 6bITb OTDOXHyBWM, 3DOpOBbIM HaxODntbcra B XopoWei fOpme. Ecnn no COCTOHNIO 3DopOBbYyTomJIeHne 3aIpeua-ETCA, Heo6xOIMO CNPoCnTb y Bpaua, MOxHO IIN pa6oTaTb C cENHOI NIOI.
IpeepnHmMaTe Mepbl, Yo6bl 3aunTntb c6b ot Bn6paunOHnoHarpy3kn.ФakTueckne 3haeHnBn6paun MoYr OTnUuATbcr OT yka3aHHbIX B TexHueckx XapakTePcNTkax B 3aBNCIMOCtN OT CNO6aNCNoB3OBAHn INCTpyMeHTa.YuHTbIBaIte BeCb pa6oHn IpoceC, BKIOUay MOMeHbI, KOrDa INCTpyMeHT pa6oTaET Ha XOJIocTOM XOy NIN BvIKNUoyen. 3TN MeOpnpraTn, NOMMO BCero IpoUero, BKIOUaOT TaKke peRyJnApHoe TexO6cnyKINBaHne n YXoD 3a INCTpyMeHTom n erO KOMNoHErTaMn, COxpaHeHne TepJa pyK, peryIrpHbIe nepepbIBbl, a TaKke npabInbHoe PnaHnpOBAHne pa6oero npoccca.
OpneHTnpyacb Ha ypoBHeB Bn6paun, y-CTaHOBtTe MaKcImaIbHyIO npOdoJKNTeIbHocTb pa6oTbI npepebIBOB.
3.3.2 Bpempa6oTbI
Co6JIHOdaIte B OTHOWeHn B BpeMeHn pa6oTbI
CenHbIX NII KOHKpeTHoN CTpaHbI. BpeM pa6oTbI
CENHbIX NII MOKeT ORpaHHuBaTbcra HaUNOHaJIb- HbIMN MeCTHbIMn PpaBnJaMn.
3.3.3 Pa60Ta c zenHoi nIIOJ

PNEyPENPEKDEHNE!
Onachoctb cepbe3HbIX TpaBM.
B cnyuae nCnoJb3OBAHnHe noNHOCTbIO cO6paHHo CEHNHO nnbl cyueCTByeT pNCK NOyUeHn cepbe3HbIX TpaBM.
He nCnoB3yIte ueHnyo nIy, noka OHa He 6yTe noJHoCTbIO co6paHa.
BbINOJIHnIe Bn3yaJIbHbI OCMOTp nepeK KaJdblm NcNoJIb3OBAHnEM, YTO6bl y6eINtbcraB TOM, YTO cENHa- rIIa NOpHOCTbIO CO6paHa n He coDEpxNT NOBpeXJeHHbIX INN IN3-HoWeHHbIX DeTanei. Bce npEdoxpaHHTeJIbHbIE n 3aUHTHbIE ycTpoIcTBa DOJIKHBI NCpabHO cyHKUHOHropOBaTb.
Hikorda He pa6oTaIe B OOnHOky.
Bcerda depknte hartoBe anTeky Ha cnyuay paHeHn.
I36eraTe KOHTaTa C MeTaNHeCKMn IpeDMeTam, HaxOJaUIMMCB 3eMJIe NIN 3JIeKTPuYeCKn COeDInHeHHbIMN C Hei.
CpeCTBa INDINBnDyaJIbHOJ 3aIHTb I BKNHOJyAOT:
3aHTHaKaKa;
cpeCTBa 3aunTbI cnyxa (Hanpimep,6e-pyu),oco6ehno,koIpa6oynI dehb coCTabnreT 6oJee 2,5 yacOB;
3aHTbIe OcKn Nn UNTOK 3aHTOH KACKN;
3aHTbIe WTAHbIC BCTaBKOJ DnA 3aTbI OT NOpe3OB;
I npOuHbIe pa6oUne nepuaTkn;
3aHTbIe 6OTnHKn Ha TOJCTOINoDOWBe CO CTAHbIM HOCKOM IN BCTaBKOIN JIA 3a- UTbI OT NOpe3OB.
He nCnoB3yIte ueHny Nnly Bblwe ypoBna nnue, 6e3oNaChra paOta B OTom noJoxKeHN He BO3MOxHa.
Pn CMeHe MeCTa BbIKIOUHTe DBNrATeNHaDeHbTe UENHyO 3aUNTy.
EcnBbI He nCnOJb3yeTe 6eH3nHOBbI DBNrTaTeJIb, OCTaBbTe erO OCTbITb HAnDeHbTe cENHyIO 3aUHTy.
KnaIte cenHyIO NnIy TOnbKO B BbIKIOueH-HOM COCTOHN.
He nCnoJb3yIte cenHyIO NnIy B KaueCTBe MexaHnueckoro pbIuragA IIN IJIpeMeIeHNr dpeBecuHbl.
BpebHa,ToIuHa KOToPbIX npeBbIaaeT dHHy NnJbHOI uHbI, DOnXHbI paCnJIINBaTbcra ToJbKO KBaJIncuNpOBaHHbIM nepcoHaIOM.
IpnctabnTe DnKyUocn NnBHyO cenb KobpaTaBbAemomy MaepnaNy TOnbKOc pa6oTaIOeN NnBHOJ cENbIO, HN B KOEM cnYae He NOdKnIOuayTe pa6oTAIOU OeHNy IO NnLy K NnBHOJ cEN.
CneIte 3a Tem, yTo6bI MacNo IJra cMa3KINJIbHOJ CENH He NOnaDaNO B 3emNIO.
He nInIte BO Bpemr IoxkJ, Cheronada nnu
HnBkoem cIyuae He BbIOUnte n3 cTPO npEdoxpaHNTeNbHbIe N 3aunTHbIe yCTpO- CTBa.
3.3.4 Bn6paunHna Harpy3ka

PNEyIPEXDEHNE!
Onachoctb Bn6paun
ФakTnueckoe 3NaueHne Bn6paunOHnoHm 3MnCCnn npu nCNoB3OBaHn yCTPOCTBa MoKet OTJInuatbCra OT 3aRBJeHHoTO pOn3BOAnTeJeM 3NaueHna. HaJIIODaIte CNeDyUOuine paKTopb I Bo3dEINCTBnI DO INN BO BpeMa nCNoB3OBaHNr:
IcnoJb3yETcJn yCTpoiCTBO noHa3HaueHIO?
MATEPnApa3pe3aHnno6pa6oTah npaBnBHO?
HaxoHTcTJyUcTPOBCTBO BXopo- uem paOchcoCTOHN?
IpaBnblno n3aoctpeHnnu yctaHOBneH peKyuN INCHTPMENT?
YcTaHOBHeHJI NKPOHHTeHbI N, ecNI Tpe6yETcA, DOnONHHTeNBhIE Bn6paUHOHBIMpyK, INNtHO JIN OHn COeHNHeHbIC YCTPOINCTBOM?
3Kcnpnyatnpyte yctpoiCTBO TOnbKO C cactOTOB BpaueHnA DnurateJIg BHyTpeHnero crotpan, Heo6xOIMoI dIg OTdeJbHOJ pa60tbl. N36eaiTe MaKcImaJIbHOJ YactOTbl
BpaueHn, YTO6bI CHN3NTb yPOBeHb Wyma N Bn6paun.
I3-3a HnnpabHbHO NcNoJb3OBaHnN TexHnueckoro 06cnyKbAHnY Shm N Bn6pauny UcTpoiCTBa MOrT NOBicuTbcS. 3To HaHocNT BpeD 3dOpOBbU OeNoBeka. B TaKx CnyaX HeMeDJIeHNO BblKnIOuaIte yCtpoiCTBO N O6paITecb 3a erO peMOHTOM B aBTOpN3OBaHnHbI CepBnCHbI cEHTp.
CTeNEHb Bn6paUHOHOro HaprJKeHn 3aBnCnT OT BblIOJIHReMoI pa60tbi NII INcNoJIb3OBAHn yCTpOInCTBa. OueHnTe n yctaHOBnTe COOTBeTCTByUOuNe nepepbIBbI B pa60te. Bpe3yIbTaTe Bn6paUOnHnHa rpy3ka B TeueHne BCero pa6Oyeo BpeMeHn 6yDet 3NaHTeJIbHO CHNXeHa.
Диntьная зкплyaatauaу yctpoicTba noBBepraet onepaTopa Bn6paunu N MoKet Bbl3BaTb npobIeMbIC KpOBoO6paueHneM (CIMNTOM «6eIoro nalba?).YTo6bl yMeHbUHTb 3OT pNcK, Hocnte nepchatkn I depxNte pyKn B TeNle.B cnyae obnapyKeHna CImNToma «6eIoro nalba?» HeMeIeHNO o6paTntecb K Bpaay. 3TN CImNTOMbl BKIOUcaHO T Ce6r: OHeMeHne, Notepu YyBCTBnTeJIbHOCTN, NOKaJIbIBaHne, 3yd, 6OJIb, Cna6OCTb, N3MeHne Ubeta nn COCToHnRA KOxN. O6bIuHO 3TN CImNTOMbl BInraHOT Ha NaJIbCuBI, pyKN JINn NyIbc. Ppr Hn3Knx Tempeatypax (npimepHo Hnke 10 ^ C ) onachOCTb NObIIaAetcR.
ДелаиTe BO Bpempa6oeryDндпeЛьНьieперрыБы,чTOБы OTdoxHyTBOTшуMaИВn6paun.ПланиPynte cBOIO pa6Oty takIMOBpa3OM,чTOБы pa3dJIHTb 3KcNpyaTaUryyCTpoiCTB,KOTOpbie CO3daIOT CINlbHbIe BN6paun,Ha HeckoJIbKO dHei.
EcnBbI NOyBCTByeTe DnCKOMΦopT INN DnCXPOMU KOxN Prn NcNoJb3OBaHIn y- cTpoiCTBa B pykax, HemeJeHHo IpeKpaTITe pa6Oy. YCTAHOBNTe DOCTaTOHbIe NepepbI BB Pa6Ote. Pa6Ota 6e3 DoCTaTOHbIX nepepbIOB MoKeT PnBEcTN K MeCTHO Bn6paLOnHOH BoJe3HN.
MHHIMN3npyTe pnc B03deJeCTBnBn6pa- Cn. BbIOJHnTe 06cnyKnBaHne np6opa B COOTBeTCTBnC INHCTpyKuIaMn B pyKOBoDCTBe NO 3KcnNyataun.
Ecnn obopydOBaHne nCnoJb3yeTcra qacto, 6paTntecb K dInepy, yTo6bl npNo6peCTn aHTNBn6paCIOHOHbIe akceccyapbl (HaNPmEp, pyKn).
B pnahe paobtbl onpeJeNITe, KaK MoXHO O- rpaHnHTb Bn6paunOHHyo Harpy3ky.
3.3.5 Akyctyncheckary Harpy3ka
HeKOTopa akyCTnuecka Harpy3ka, BbI3BaHHa 3TmU yCTpOInCTBOM, Hen36exHa. BblOnHnTe WymHbIe pa60tby CytAHOBJIeHHbIe n Onpede- IeHHbIe cPOKn. Pn Heo6xOIMocTn CneJyET yYHTbIBaTB yKa3AHN OTHOCINTEJbHO «TnxXu CaCOB» n ORpaHnUHBaTB npOIOJXITeNbHOCTb pa60tbi Han6OJee Heo6xOIMbIM. Jna ObecneHu HnHOn 3aUnTbI n 3aUnTbI nIu, HaxOJauxxCn IOBn3OCTn, Heo6xOIMo HocNTb bepuHn.
3.3.6 06paueHne c 6eH3HHOM n MacJom

ONACHOCTb!
B3pbIBO- n noxapoonacHocTb
YTeUka TOnJIbBa / Bo3DyUHoi CMeCN npINBOJNT K BO3HNKHOBEnIO B3pIIBOO-nacHO aTMocOepebl. BocnJaMaHeHne, B3pIIB IN NOXAP MOrT BO3HNKHyTB B pe-3yIbTaTe HEnpaBnIbHOrO O6paJeHnC TOJIbOB M K cepBe3HbIM TpaBMam I da-Jke CMEPTN.
He kypnte npn o6pauehen c 6eH3n-HOM.
O6paaIteCb C TOIIINBOM TOnbKO Ha OTKpbITOM BO3dYxe, a He B IOMeHIn.
O63aTeIbHo co6IIOaIte nepe- YnCJIeHHbIe HIXe HopMbI NOBeHnIy.
TpaHcnpTnpuIte n xpaHnTe TOnnBO n MacNo TOnbKO B pa3peWeHHbIX KOHTeHepax. Y-6eINTecb, yTO DeTN He NMeOT DoCTyNa K XpaHraUeMycs 6eH3nHy n Macny.
YTo6bI n36ExKaTb 3aRpa3HeHnna NoUbbl (OxpaHa OkpykaOuSei cpebl), yBeDNTecb, YTO npn 3aONHeHH 6eH3nH mAcNo He nonaDaet HENOCPeCDtBeHNO Ha 3emNIO. NcOnb-3yInTe BOPOHky dnn 3aONHeHnra.
3anpaBraIte yCTpOncTBO 3aKpbItOM nome- uHn. IonaDaHne Ha noJ MOKe T npNBecTN K HAKONJIeHnIO napOB 6eH3nHa, n, TaKIM o6pa3OM, Bbl3BaTb BocPNaMeHeHne INI daKe B3pbIB.
HemeIeHNO npoTpnte npoJIHToe TOnnBO cyCTpoIcTBa n 3emNI. OctabTe TKAH, KOToPbIMN Bbl BbITepNI 6eH3IN, CyuNTbcr B CyXOM IN XopoIO BeHTNJNpyEmOM MeCTe, ppeJxde Yem IN yTuIN3NPOBaTb. B npOTNBOM Clyuae MOKeT Bo3HKnHyTb BHe3aHHOe CamOBO3ROPaHne.
B cnyucae npoHnTna 6eH3nHa Bo3nKaIO T npa-bi 6eH3nHa. N03tOMy He 3anyckaIte y-
CTPOICTBOB TOMKe MeCeTe,aHa pacCTOARHn HeMeHee3MOT Hero.
I36eraTe KOHTaKa KOncN C HePTe npOdyKtAmn. He BdbixaTe napbI 6eH3nHa. Bcerda Hocnte 3aunTHbIe nepaTkn BO Bpemdo3a-npaBKn.PeryJrpHo 3aMeHnTe n OUnsauTe 3aunTHyIO odexdY.
CneiTe 3a Tem, yTo6bI OeJda He KOHTaK-TnpoBaHa c 6eH3nHom. B cnyuae nonaHaHa 6eH3nHa Ha oDejdy 3aMeHnte ee.
He 3anpaBnTe BkIoueHHoe ycTpoiCTBO npa6oTaUeM nI ropayem Dnuratene.
3.3.7 BezonaacHocTb IIOe, XNBOTHbIX N MyuaceCTBa
IcnoB3yIne yctpoNCTBO TOnbKO dnyTex 3aadu, nJa KOTOpBX OHO npEydCMOTpeHo. HeueJeBoe nCNoB3OBAHne MOKeT npNBecTn K TpaBMam m MaTePnaJbHomy ueepe6y.
He BkIouaTe yCTpoiCtBO,ecnB pa6oey 3OHe HaxOJaTcJIIOJN JxNBOThbIe.
ДерхиTe yCTpoiCTBO Ha 6e3OanHom paCCTOAHN OT JIODeI XKIBOTbIX NIN BvIKHIOuHTe erO Bcnyae np6JIHXeHnA JIODeI NIN KIBOTbIX.
He HapabnIe BbIXIOHyO ra3OByO CTpyo DBrIaTeJI Ha JIOeN XJBOTbIX, a TaKKe Ha BOCIIaMeHryIOUeCe IpoDyKTbl NpeiMetbl.
He npikacaiTecb K 3a6opHOn n BeHTnIauN OHHO peWetKam, ecnn DBratEnb pa6oTa et. Bpaauuuee cAeta N O6OpydoBaHnma Moryt HaeCTn TpaBMbl.
Bcerda BbIKIouaTe ycTPOiCTBO, KOrda OHO He Tpe6yeTcra, HAnpIMep npu n3MeHeHN pa6oey 30hbl, B cnyae npOBeJeHnpa6ot no TexHnueCKOMy 06CnyKBAHNIO uXOdy, npu 3aONHeHN 6eH3O-MacJHOn CMecn.
HemeJeHNO BbIKIOaIte yCTpoiCTBO npn HeCuaCTHom clyuae, YTO6bl ppeoTbpaTtB daNbHeiune TpaBMbl N MaTePnaIbHbIy- uep6.
He 3Kcnpnyatnpyte yctpoiCTBO C H3HOuHnBIMN INI NOBpeXDeHHbIMN DeTaJAMN.13HOUeHHbIE INI NOBpeXDeHHbIE DeTaJI NMOrT npNBecTN K cepbe3HbIM TpaBMam.
XpaHnTe yCTpOncTBO B HeoCTynHom JIa TeEn MeCte.
4 MOHTAX

ONACHOCTb!
OnachocTb JnJnn3Hn nnacchoctb TjKeJIbIX TpaBM.
OnachOCTb JnJ Kn3Hn I OnaCHOCTb Cepe3HbIX TpaBM npn BKIOUeHHOM DnIraTeJIe.
Bce DeiCTBnA CneDyET BbINONHrTb TOnbKO NocIe BbIKIOUcEHNr DnuraTeJr.
BHIMAHNE!
Onachoctb IOBpeKdEHHaOpydoBaHn
Onachoctb nobpejdeHnOBOpydoBaHnI3-3a HnPaBnBHoro MoHTaxa.
ДяpacnaKOBи moHTaxa yCTpoNCTBa BbIbnpaTe poBHyO yCTOnHnByIO NOBepXHOCTb,
HaKOTOPOBBcMOXeTe CBO6OJHO nepemeaTb yCTPOIcTBOn uYnakOBky. POrTOBBe Heo6xOIMbIn HCTpyMeHT.
BHIMAHHE!
Onachoctb HaHeceHn yuep6a okpyXaIOUeI cpeIe
ONaChocb HaHeceHn yUep6a OkpykaIoue IcpeB pe3yIbTaTe HnPaBnIb-HoYtIN3aun.
Ytun3npyTe ynaKOBky B COOTBETCTBUN C MeCTbIMN HOPMaM.

OCTOPOXHO!
Onachoctb TpaBMnpoBaHn
Двикшпесс DeTANI N DeTANI C OCTpbIMKpaAMM MOrY T npNBecTN K TpaBMam.
Pn yctaHOBKe NINbHO WINbIu cENI O63aTeNbHO HAdeBaIte npOuHbIe 3aUNTHbIe nepuaTKn.
YTo6bI o6ecneuTb MaKcMaJIbHyO 6e3oNaChOCTb N aΦΦeKTnBHOCTb y- cTpoiCTBa B eKcnIyatauN, Heo6xoDIMo yCTaHOBt b NJIbHyIO uHHy n cEB C Oco6oN TuaTeJIbHOCTbIO. Pn HAnuN comHeHn obpaauA- TeCb K npOdaBu.

ПРИМЕЧАНЕ
YcTpoIcTO NOCTaBJIeTCr C DeMOHTnPobAHHO NINbHO WInHO N cEnbIO, a TaKKe C NcYCTbIM TOnNHBbIM M MacJHbIM 6aKom.
Ipeed MoTaxkom y6eHntecb, yTO TOpMo3 cenn He haxat. Topmo3 cenn ocbo6xdaetcra, ecn Bbl NotHnTe 3aunTHbI uNTOK (01/3) B HappaBJIeHN CNyCKOBO CKoBe (01/4).
4.1 MoNTaK HappaBJIauOe IuHbI nIuNbHO uenn (02-06)
- Ocna6bTe Dba ueCTnRpaHNo raKn (02/1) c nOMoUbKOmbuHPOBaHOrO raeHOrO KJIHOu a uJaIte (02/a) 3aunTy 3Be3doUKN (02/2).
- CHIMMTE Пл actIKOBYIO ДИСТаHCUOHHU OpoKnaIky (02/3).ОнИСПОЛБ3уETсЯТOLьКОпи ТраHCnOpTIpOBKe yIaKOBaHHOrO yCTpOiCTBa I 6OJIbSe He HUxHa.
- Hacadnte (03/a) raiky haprablaioe uHnHbI (03/1) Ha ctonopHbIe BnHTbI (03/2). CdbnHbTe (03/b) hnapablaIOune uHnbI B haPpablenu KOpnyca MaunHbI.
- YctaHOBInTe pINbHyU cIeNb (04/1) Ha 3Be3- doUky (04/2) n HacaInTe raIky HappaBJIIO- uen shnbl (04/3), co6JIIOJaHappaBJIeHne DvIXeHnry. YcTaHOBInTe (05/a) pINbHyU cIeNb Ha 3Be3doUky HappaBJIIOuJe Shnbl.
- Choba yctaHOBnTe 3aunTy 3Be3doUKN (06/1), cJIeRka 3aTaNHe IecTNrpaHbIe raIKN (06/2).
- OToBnraTe HnnpaBnaIouyU uHny Do Tex nOp, Noka NIIbHa r cenb He 6ydt Cnerka HataHyTa.
- 3aTaNHe o6e wecTnRpaHHbIe raIKN (06/2) TaK, yTO6bl NIIbHa rEnb ocTabaIacb HaTaNHyToi.
- Bpaaay yctaHOBOHbI BnHT HATXKNTeJIa cenn (06/3), npabInbHo HacTpOte HataKeHne pIIbHoi cenn (cm. 2Jana 5.4 "PpoepeKa HamxkeHua cenu (06, 08), Cmp. 476).
- 3aTaNHeIe IecTnIpaHbIe raIKN (06/2).
5 BBOI B 3KcPJIyATAUHO
5.1 TonNnBO
BHIMAHNE!
Onachoctb noBpeKdEHHaOpydoBaHn
IcnoJIb3OBAHHe YnCTOrO 6eH3nHa BeDeT K NOBpeKdEHNIO DnIraTeJn aHHyInpOBAHnIO rapaHTn.
UTo6bI o6ecneuHTb BbICOKyIO npOn3-BOaNTeJIbHOCTb I dNITeJIbHbI CpOK CnyKbI MExaHnuecknx DeTaJeN, NCNoJIb3yIte TOJIbKO BbICOKKaueCTBeHHbIe 6eH3nH N MacNo.

ПРИМЕЧАНЕ
He3TnI npoBaHHb 6eH3nH o6pa3yeT ocadok npxpanenDolbwe 2 MecaueB. NcnoB3yTe TOnbKO CBexn 6EH3nH!
BbYXTaKTHbI DnBraTeJIb yCtpoiCTBa pa6Otae Ha 6eH3nHOBO-MacnHaOHcmecn.
PoaXoJaeeMacno
NcnoIb3yIte TOJIbKO BbICOKOKaueCTBeHHOE CnHTeTnueckoe MacNo 2-TaKTHbIX DBrIaTeNei. KynITb MacNO, pa3pa6OtaHHoe dIraTakNX DBrIaTeNei n rapaHTnpUoJee BbICOKYIO pON3BOIDnTeNbHOCTb, MOXHO B CneuNaHIN3IpOBaHHOM MaRa3nHe.
PoaXoJaun 6eH3nH
Icnoj3ynte TOnbKO He3TnIpOBAHHbI 6eH3IN C MHNMaJIbHbIM OKTaHOBbIM YNCJOM 90.
5.1.1 CmeunBaHne TOnnBa

ONACHOCTb!
B3pbIbO- n noxapoonacHocTb
Behn H roToBa Cmecb JERKO BocnnaMeHJOTc!
XpaHnTe 6eH3nH n rTObYIO CMEcB B CneuHaJIbHO npeHa3HaueHHbIX dJIa 3TORO KaHnCTpax, B 6e3OnacHom Me- cTe, BdJIH OT NCTOuyHKOB TepJa HJN OTKpbItoro PJIaMeHN.
He octabnayTe kaHnctpbI BIOCTyn-HOM dIy DeTeMecTe.
He Kypnte Bo Bpemn npiroTOBneHn- Cmecn n 36eaiTe BdbixaTb napbl 6en3nHa.
BHIMAHHE!
Onachocb nobpeckdHn DnurTaTeJ
YHCTbI 6eH3nM MoKET npNBecT N NOBpeXDeHIO I ONHOMy OTKa3y DBNrAteJI. B 3tOM cIyae npOn3BOJTeIIO He MOry 6bITb 3aABNeHbI KaKne-1N6o npTeH3nn No rapaHTn.
Bcerda 3KcnpnyatnpyTe DnurateIb c6eH3o-MacnaHOcmecbU bYcta-HOBJIeHHOM KO3ΦΦNueHTE CMeuBaHn.

ПРИМЕЧАНЕ
Cmeb noBepKeHa HenpepbIBHOMy CTapeHIO. Yo6bl N36eKaTb 06pa3OBAHNr OcaKa, He rTOOBtE CINWKOM MHO-TO CMEcN.

ПРИМЕЧАНЕ
PerynphO ouuauTe KaHncTpbl dnn cmecn n beH3nHa ot ocadka.
B clyuae HeoctaToCHoM Cmecb yBeJIuHNaEeTcR onacHOCTb npexdeBpeMeHHo Kopp03nKo16bl n3-3a nloxOcmecn. IapaHTna anHynpyeTcB Cnyuae HecobJIOHeH NHCtpkUIN NO CMeHNBaHNTOIINBA N T.D. 3TOrO pyKOBOIDCTBa.
Hnke npBODntc Ta6nua npaBnIbHOcoTHOweHnCMeunBaHn CnpMepamn.
CooTHoUeHne cMe- WnBaHn
BeH3nH MacNo
50:1 (50 chaTei To- nBa 1 chaTb macna)
5π100m
- Hanen Te B noDxOJaIyU KaHnCTpy np6nn-3nteJIbHO IIOOBHy yKa3aHHOro KOJIueCTBa 6eH3nHa.
2.ДобавытBECE Macno,уka3aHHoe B COOTBETCTByIOUe CTPOKe Ta6nIcbl. - Dó6aBbTe ocTbUmIc8eH3nH.
- 3aKpoTe n XopoTo BCTpXHnTe KaHnCTpy.
5.2 Cma3ka dny cenn
BHIMAHNE!
Onachoctb noBpeKdEHHaOpydoBaHn
IcnoJb3OBaHne OTPa6oTaHHoro Macna Inra Cma3Kn Uen, KOTOpoe CoepKNT MExaHueeCKne PpIMecu, PpINBOuNT K IpeXdEBpeMeHHOMy H3HocU HappaBnA IOuei WInHbI NIIbHOJ UEN. B Cnyuae IcNoJb3OBaHnO TpAbToHHOrO Macna rapaHTnHbIe O6raTeJIbCTBa Ipon3BODntTepaIOT cnly.
3anpeuaeTcNcNoB3OBaTb Otpa-6oTaHHoe MacNo,ДЯ Cma3Kn ZeHn DOnyckaTcNcNoB3OBaHne TOnb-Ko 6nopa3NaIraeMOrO Macna.
BHIMAHNE!
Onachoctb HaheceHn yuep6a okpy-kaioe n cpe
IcnoIb3OBAHne MNHepaIbHO macna Inra Cma3Kn UeIN PnpBOIDNT K cepBe3HO My yuepe6y OkpykaUoie cpeJe.
3anpeuaeTcNcNoB3OBaTb MNHe- paHoe Macno,ДЯ CMa3Kn ZeNi DOnycKaeTcNcNoB3OBaHne TOnb- KO 6nopa3NaIraEMoRTO macna.
HnB Koem Cnyae He nCnoJb3yIe 3aRpa3HeHHo e MacNo - 3TO npuBeTe K 3acOpEnIO qNtpa B 6ake N HeycTpaHMoI NOlOMKe MaCJHOrO Ha-coca.
ДялэффektubHOrO cma3bIbAHnpeKyuix KOMnoHErTOB CneDyET npIMeHrTb TOnbKO BbICOKoKaueCTBeHHoe MacNo. IcNoIb3OBaHHoe nIIu Hn3KOCOPTHoe MacNo He OblaAeT Tpe6yEmbIMN cMa3bIBaIOUmm CBOICTBaMn N COKpaUaet CpokCJIyXbI pINbHOI CEEN IN HAnpABJIOUeI ShHbI.
PeKOMeHdyETcN ONHOCbTO 3aIpaBnTb MacJIHbIbak npk kaxdOm 3aINBaHn TOnIIbA (Yepe3 BOpOHky).BMeCTMnOcTbMacJrHO Bo paCCHTuHa TaKIM o6pa3OM, yTO TOnJIbO paCXoDyETcPaHbIe MaCna. 3To rapaHTnpyET NOCToHHOe HAnuHe CMa3Kn B pa60TaUoUem yCTpOInCTBe.
5.3 3aONHeHne TOnnBOM (07)

ONACHOCTb!
B3pbIbO- n noXapoonacHocTb
YTeUka TOnnBa / Bo3DyUHoi CMeCIN npNBOiNT K BO3HNUKHOBEnIO B3pIIBOO-nacHOI aTMocOpepbI. BocPnAmEHeHne, B3pIB NIOXap MOrTy BO3HNUKHyTb B pe-3yNbTaTe HEnpaBnIbHOro 6oPaUeHnca TOONBOM K cepBe3HbIM TpaBMam I da-Jke CmepTN.
He kypnte npn o6pauehen n c 6eH3n-HOM.
O6paaItec b c TOnNIBOM ToNbKO Ha OTKpbITOM BO3dUxE, a He B NOME-
O63aTeIbHo co6IouaIte nepe- YnCJIeHHbIe HIXe HopMbI NOBeHnIy.
3aONHeHnTOJINBOM
- BbIKIOUHTe DnIRaTeJIb N CHIMITE 3aIHTHyIO KpbIUKy HAD NINbHOJ CENbIO.
2.ПрOTPnTe KpbIshky 6aka (07/1)и npuIeraiO- Une oblactn, YTObI rpa3b He nonaJa B 6ak. - AkkypaTHO 3akpyTInTe KpbIuKy 6aka (07/1), YTO6bI B HEM CΦOpMnPoBAJIOcB JaBJIeHne npn Heo6xoDmOCTn.
- 3aJIeITe TOnIIbO C NOMoU bIO BOpOHKn.
- HaneHbTe Ha 6ak KpbIuKy 6aka n 3aTnHTe BnHTbl.
- OuICTnte nI yCTpoiCTBO OT npOJIntoro TOIIIBa.
- 3anyckaIte yctpoiCTBO TOnbKO nocne nCnapeHna napOB TOnnBa.
3aJIbKa ueHoro macna
- BbIKHIOHTe DBIRATeIN CHIMITE 3aIHTHyIO KpbIshky HAD NIIbHOJ cENbIO.
2.ПрOTРNTe KpbIshKy MacnHoro 6aka (07/2) n npIneraioune O6naCTn, YTO6bI rpr3b He no-nanaB 6ak. - OTBHTNTe KpbIuKy MacJHoro 6aka (07/2).
- 3aJIeIte MaCNo IaIg cIeHNO nIIbI c NOMO- UBOPOHKn.
- Hadehhe Ha 6ak Kpbikky MacnaHoro 6aka n 3aTAHTE BHTbl.
- OuHCTnTe nOJ n yCtPoNcTBO OT npOJIrTOMaCna dJa CEHNHOI NIIbl.
5.4 PpOBepka HaTaeHnIeenn (06, 08)

ONACHOCTb!
Onachoctb JnJnn3Hn nn Onachoctb TjKeJIbIX TpaBM.
Onachoctb JnJxN3Hn n Onachoctb cepbe3hIX TpaBM npn BKIOUeHHOM DBNrataTeIe.
Bce DeiCTBnA CJeDyeT BbINOJHrTb TOnbKO NocIe BbIKIOUeHnA DnraTeJIa.
HaTaeHHe HaCTpoEHO npaBnIbHO, ecn npi IODHMaHm NIIbHOJ cEN NocpeDIne HappaBJIIOUe 1INHbI 3JEMeHTbI He BblNaIaIOT n3 HaNpabLaIOUe (08/1), Ho nIbHaJ cEnb BCE eIe MoKcET BpaTaTbcra.
HaTaeKeHne nIbHOJ ceni
- OTBnHTnte ⅢeCTnIpaHbIe raiKn (06/2) 3a- ⅢntbI 3Be3dOChN (06/1) c NOMoCbHO IMeHO- ⅢeROcKOM6uHnpOBaHHOr RaeyHOro KJIoua.
2.Bpaaay yctahOBouhbi BNHT (06/3) HatajnteJIa cENI, npabunbHO hactpoTe HataxeHne nJbHO cENI. - 3aTaNHe TseCTnrgpaHbIe raIKN (06/2).
5.5Поберкa Торmoэцenn(09)

PPEyPPEKDEHNE!
Onachoctb dnn Jn3Hn npck TjkeJbIX TpaBM n3-3a HncnpabHoro TopMo3a cenn
EcnTopmo3eHnHe pa6oTaET,Ha npimep,BcnyaeOTdauHpa6oTaIOUeienEOHNOINbI,3TOMOKETnpNBecTN KcMbIM cepbe3HbIM TpaBMamN daKe Cmeptn ONepaTopa.
PpOBepeTe TOpMo3 ceni nepei KaKdbIM Haayanom pa6oTbi.
He BkIouaTe ueHyu nIy, ecn TopMo3 cENn HeNCpAbeH. B 3tOM cLyue o6paTITecb 3a npOBepKoI cENHO nnblB CneuaJIN3npOBAHHyIO MaCTepCKyIO.
YcTpoIcTBO OCHaUeHO npEdoXpaHHTeJIbHbIM TopMO3OM (TopMO3OM Uen).
Topmo3 cenn — 3TO yctpoiCTBO, KOTOPoe npedHa3NaueHo DnA HeMeDnEHHoOcTaHOBKn DBNKeHnI NIIbHOu cENB CnUyae O6paTHoN OTaun.
O6bIyHO TOpMo3 cENn aKTNBpyeTcA bTOMaTNueCKN INHePcneN.
TUMTOPMO3OM TAKKe MOXHO ynpabnBbpyHyO.
- 3anyctte Dniratel, npouho ydepkna y- cTPOIcTB0 3a o6e pykn.
- HaxMMTe KONky 6JIOKINPOBKN 3aUNTbI (01/8) n pbUar Ra3a (01/7), YTO6bl 3aNcyCTNTb DBN-KeHne cENn, 3aTEM HaxMMTe (09/a) Ha 3a- uHTbI Nt (09/1) TbINbHOc CTOpOH JaDOHN; INlbHna cENb DOJXHa HeMeDJIeHHO OCTaHOBTbcr.
- Ecnn nIbHna ceNb octaHOBntc, HemeiJIeHHo OTnycTne KONKy 6JIOKnpOBKn 3aun- Tbl npHuar ra3a.
- BbIKIOUHTe DnurTaTeJIb.
- Yo6bl OCBO6oNDtB TOPMo3 cENI, NOTAHnTe (09/b) 3aunTHbI uHT Ha3aD
6 YIINPABJIENHE
CobnIpaTe HaunohbHbIe noIOxehnpeTAMHTpyUoune DOyuctmoe Bpempa60tbl.
O6xbATnTe 3aHIOpUky npaBOi, a DyROByI Opykny IeBOI pyKoI, n ydepxnBaIte y-CTPOINCTBO.
He otnyckaTe pyuKn, noka pa6oTaet DnurataTeJIb.
He nCnoB3yIe Te enHyIO nnIy:
npi yctanoctn,
PnIIOXOMcMoOyBCTBnI,
IIOI BO3DnCTBnEM aIKOROJIaMeNKA-MeHTOB NIN HApKOTNKOB.
6.1 BkIIOueHHe/BBIKIOueHne DBnraTeJa

PPEyPPEKDEHNE!
B3pbIBO-nnoxapoonacHocTb
YTeKa TOnnBa / Bo3dyuHoi CMeCN npNBOiT K BO3HKnHOBeHIO B3pbIBOO-nacHOI aTMocfepbl. BocnIaMeHeHne, B3pbIB N NOxap MOryT BO3HKnHyTB B pe-3yNbTaTe He npaBnIbHoro O6paueHnca TOONBOM K cepbe3HbIM TpaBMam I da-Jke Cmeptn.
3anyckaIte DnurateJIb Ha pacCToHn He MeHee 3 M ot MecTa 3anpaBKN.
6.1.1 3anyck DnurataTeJ (10, 11)

OCTOPOXHO!
Onachoctb TpaBMnpoBaHn Tpocom cTapTepa
H3-3a 6bictporo o6paTHoro XOda Tpoca CTapTepa pyka cnnkOM 6bictpo BtarnBaetcB Dnuratel. 3TO MOKeT npBeCTN K yuIN6am n pactxkeHNm.
HnB Koem cnyae He HamaTbBaIe Tpoc CTapTepa Ha pyky.
BHIMAHNE!
Onachoctb noBpeKdEHHaOpydoBaHn
Ecnn Tpoc cTapTepa cNnKoM 3aTaryT, 3TO MOKeT npNBecTu K NOBpeXdeHnIO.
He BbITIaBte Tpoc Do ynpa, He TaUNTe eTo BDOJIb CTeHKn BByOXoHOrO OTBepCTnI He OTnyckaIte pyKy pe3KO (Tpoc DOJnxEHN HaMaTbI-BaTbcN NOCTeNEHNO).
BHIMAHNE!
Onachoctb noBpeKdEHHaOpydoBaHH
Ecnn Dniratelb pa6oTaet Ha BbICOKOckopocTN n npn BKIOueHHom TOpMO3e cenn MyfTA MoKET nepeIpeTbcra.
I36eraTe 3anycka DnBraTeJHa BBICOKO CKOpocTn npN BKIOueHHOM TOpMO3e ceni.
XoJIoHbI nyck
XoIOHbIpyck-3TOyCKDIBrAteJIa,KOJa OH BbIKIOueH B TeueHne KaK MmHmym 5 MmHyT ININ NocNe DO3AnpaBKN TOINNBOM.
1.ПрпаркунTe yctpoiCTBO Ha poBHOI NOBepxHocTN, ydepxNBAuTe nepeDnIO CnyCKOByIO cKo6y I npnxMNTe yctpoiCTBO BHN3.Прн Heo6xOdMOCTo NaHactynite Ha 3aDnIO CnyCKOBYIO cKo6y HOckOM HOrn.
2.AKTHBpyuTe TOPMo3 cenn, nepemecTNb 3a- uHTbI uNT BnepeD.
3. CHIMITE 3aunTHyIO KpbIuKy C NJIbHOJ ue-
4. Haxmte (10/a) noiunnHK hacoca nokaKn (10/1) 3-4 pa3a.
5. ПовернITE руковские дроссан (11/1) по ч�ов стpeлке до уnapа.
- Рков Тяпштей Вьерх (11/a) ручу стапта (11/2), пoka не почуВсТБуЕт coNPOTиВлe-нue.
- He otnyckaite pyky cnaptepa, TAHnte ee HeckoIbko pa3, Noka DnurataJIb He 3anyCTITcB nepBbI pa3. NobepHnte pyKoTky dpoocceIa (11/1) npotnb YacOBoi CTpeKN do ynpa.
- IotTHe pyKc CTapTepa (11/2) HeckoIbko pa3, NOKa DnRaTeNb He 3anycntTC CHOBA.
- KaK TOnbKO DnBraTeJIb 3aNyCTITcR, KpaTkoBpeMeHHO HaxMITE KHOJky 6IOKIpOBKn 3aUHTBI (11/3) n pbUar ra3a (11/4). B pe-3yNbTaTe IpOceJIbHaJ 3acNoHka Kap6IopaTopa OCBo6OuNTcR n3 3a6IokIpOBaHHoro noIIOXeHn.
- OCTaBbTe yCTPOINCTBO pa6OtaTb Ha xOIOCTOM XOdy OKOJMO MNHyTbl.
- Otnyctnte Topmo3 ceni, nepemecnB 3a- uHTbI uNT Ha3aD.
Topayn nyck
EcnI DnIraTeIb 3anyueH ToJIbKO Ha KOpOTKoe BpeM, IpoUeCC NyCKa MOxHO BblONHHTb ToJIbKO HaxKaTHeM NOuINHnKa HAcOcA NoDKauchK, 6e3 NOBOPoTa pyKn dPoCCeJIbHO 3acNoHKn.
6.1.2 BbIKHoueHne DnRaTeTn (12)
- HemeДленHo OTnyctnte KhoNky 6IOKnpOBKn 3aunTbI (12/1) n pbuar ra3a (12/2).
- HeckoIbko cekyHd BnIaTeN doJKeH pa6oTaTb Ha XOIOCTOM XOdy.
- Haxmte (12/a) knaBnuy KynncHoro Tnpa (12/3) B noNoxhen «0».
6.2 Nocne 3aBepuenpa6oT

PPEyPPEKDEHNE!
Onachoctb TpaBMnpOBaHn BO BpeMnJIeHn
OctpbIe 3JemEHTbl NIIbHOJ cEN MOryT CTaTB npuHOB pe3aHbIX paH.
BbIKIOUHTe DnuratEnb.
Hocnte 3aunthbIe nepuATkn.

PNEyPExKDeHne!
Poxkapoonacnoctb
HarpeT MaunHa MoXeT BocnnaMeHHTb 6pe3Kn (Ha npImep, OnpKn, BeToMb Nn NCTb).
JaTe DnurTaTeIIO OCTbITb, nepeTEm KaK CTaBNTb yCTpOJCTBO B NoMeueHne.
UTo6bI He DoNyCTnTb NoXapa, Oun- 7aIte yCTpoNCTBO OT ONNLOK, 0pe3KOB BEtOK, JInCTbeB IN 36blTOHcMaa3Kn.
He octabnIte emKocTb c 6pe3Ka-MN B NOMeUeHIN.
- BbIKHIOHTe DnBtateJIb (CM. 3naea 6.1.2 "BblKIIouHeue dBuZamena (12), Cmp. 478).
2.ДаTe yCTpoNCTBy OCTbITb.
-
TuaTeIbHo ydaJIte BCE OnJIKN i CneIbI Macna.
-
Ecni nIbHa rCenb OueHb rpa3Ha, ChIMTe ee I NOIOXnTE Ha HeCKoJIbKO YacOB B emKoCTb CO CneuAlhBIM UcTraUm CpeDCTBOM. Pocne 3TOrO IpomOnTe cENb YnCToB BOIOJ, NpeE MoHTaxOM o6pbI3raTe aHTN-Kopp03NoHHbIM CnpEeM IO6pa6OtaTe y-CTPOJCTBO.
-
Перед ouнстков усточь в симптацHTHyк Кршку Нд пьбов сению.
6.3 IepeKJIoueHne MExdy HopMaJIbHbIM/ IeTHMn 3mHMn peXmamn (29)
YTo6bI N36ExaTb 06Mep3aHnA Kap6Hpata np Hn3Knx Tempeatypax (HnKe 5 ^ C ), Hactpoite NOOrpeB BCacbIBaEMO BO3dyxa, IN3MeHNB NOJIOXHe 3acNoHKn.ДлЯ NOlyeHn DOCTyna K 3acNoHKe CHIMITE KpbIuKy BO3dUshoroФиNb- Tpa.

BHIMAHNE!
Onachoctb nobpejdeHn DBNrTaTeJn B pe3yIbTaTe neperpeBa
Ecni ueHna nIa 3KcNlyaTnpyeTc npn TemnepaType 6oJee 5^ aJeMeHT 3acNoHKn HaxOuTcB 3mHem NOLOXeHN, MoKeT npOn3OuTN nepeRpeB.
Ipeed 3kcnnyataune npOBepbTe TemnepaTpy okpykaiouei cpebl npH Heo6xOUMocTN OTperylnpuyTe noJIOXeHne 3JIeMeHTa 3acNOHN.
1.Демонтугу Кршky Bo3duyHoroФиьТра (cM.27a8 8.1"Monmax/ demohmax KpbuKu 603dyuHosoФunbmpa (20), Cmp.482).
2. BpyHyIO CHIMMITE (29/a) 3JIeMeHr 3aCIOHKn (29/1) c paMbI.
3. Повернite (29/b) сеMuNT 3acNoHKn B rOpn-3OHTaIbHoe nOJOxKeHne:
BbIe 5 ^ C to eCTb obHyh/JeTHn peKIM: cIMBOJ COJIHca (29/2)doJKeH 6bITb BIDeH BObUHOM/JeTHeM peKIMe.
Hxke 5°C, To ecTb 3mHn pexnM: CmB0J CHEKnHKn (29/3)doJKeH 6bITb BN-DeH B 3IMHem peXnme.
Pa3pewaeTcNcNoB3OBaTb TOnbKO KInHbY N3 DepeBa, NlaCTMaCCbI Nn aJIbOMHHy.
Ipejde yem Haayatb Baiky, Heo6xOIMOBbInonHnTb cneDyioune pa60tbl.
Y6eIntecb,HTOBONACHOH3OHEHETdpyrNX NIIU,XIBOTbIXNJINPpeDMETOB.
Be3onacHoe paCCToHHe MeKdy DpyrHmPa-6oOuMn MecTAmN NII PpeDMeTAMN DOJXHO coCTaBnTb He MeHee 212 dInn DepeBa.
O6paaIte BHNMaHHe Ha JINHH CHa6KeHn H uJyKyo CO6CTBeHHoCTb. Pn Heo6XoIMoCTn ONOBecTITe 3HePROcHa6KaioUoe nped-ppnraTne IIN Co6CTBeHHNKOB.
Ouene HapnbneHne naeHnnapeBa. Peaouee 3NaueHne dna HapabHnna deHnna DepeBa nMeOT
ecTeCTBeHHbI HaKNoH DepeBa;
BbICota DepeBa,
POCT CYKOB C OJHOI CTOPHbI;
pacnoJoxKeHne Ha paBHHHe nnCKNoHe,
acnMMeTpNHyI pocT, NOBpeJdeHne. dpeBeCInHbI,
HappaBneHne nCKopoCtb BeTpa.
Cherobar Harpy3ka
Pn pacnoJoxeHn Ha cKIOHe pa6oTaTe BbIe cBaJIbAemOrO DepeBa.
Y6eIntecb, YTO B BbIbpaHNo 3OHe OTXoHa Het npenTCTBn. 3OHa OTXoDa DOJxHa paCnoIaratbcr npimepHo nOy rIOM 45^ no dIaROHaHn B HAnpabLeHHn, npOTNBONIOJXHOM HAnpabLeHHo BaIKn (14).
CTBOJdoJIKeH 6bITb OUnIeH OT KcCTapHNKOB, BETOK IN NOCTOPOHHX IpeIMeTOB (HaInpMep, rpa3n, kAmHe, OTCnaNbaUoSeiCk Kopbl, TBO3Dei, cKO6, npOBoJOKN t. d.).
YTo6bI CBAInTb DepeBO, Heo6xoJIMo BblIOJIHNb IBa NODINa I ODNH BAIOUHyI npOnnI.
- Пи валke и распл�ьани наджно упи-Te 3учатый уpop в распл�ьаemoe DepeBO.
- Chaujia BbINOHNTE NOIN (15/c) rOpN3OH TaIbHO, 3aTeM HAKIOHNO CBepy NOyrgom He MeHee 45^ .TO No3BOJNT N36ExKaTb 3aXIMAHNA ZENHO NNbl I Prn BbINOJIHEnB TOpOro NOIINa.IoINI DOnKHeN 6bITb KaK MoXHO 6NIKe K 3emne IN HaxODHTbcR B Tpe-6yEmOM HanpaBNeHH BaNK (15/e).Ipy6HaNoDIINa DOJXHa COCTabNtB OKOIO 1/4 dnaMetpa CTBOJa.
- BbInonHnTe BaOnHyB nponn (15/d) HanpoTnB noDnna ToUHO rOpN3oHTaNbHo. BaOnyHbI nponn Heo6xOdmo DeJaTa h 3-5 cm Bblwe rOpN3oHTaNbHoro noDnna.
4.Глубинвалочогорponиla(15/d)doJxha 6bIb TaKoI,чTo6bl Mexky noJnilom(15/c) nBaJOnHbIM nponlom(15/d)ocTaJcR HeJOpn(15/f)He MeHee 1/10 dJaMeTpca CTBoJa. 3TOr HeJOpNl PpeOToBpaaet BpaSeHne n NaJeHne DepeBa BV HEnpaBInbHom HanpaBJIeHn.Iprnpi6JIxKeHn BaJOnHOro nponI na(15/d)K HeJOpNly(15/f)DepeBO doJXHo
Haatab nadaTb.
EcnIepeBO naaet BO BpemnneHna:
Ecni DepeBO nadaetB HenpaBnIbHOM HappaBneHn IIN OTKIOHaeTcR Ha3aN 3axmae TcENHyIO NUY, PpeKpaTnte nnIITb. IIn pa3xImaHn IpnOuNa I nepeHoCa DepeBa B HyXHOe HappaBneHne B6eTe B Tpe6yEmyIO NHHIO NaDeHn KNIH.
HemeIeHbBBeNTe cenHyIO NnJy n3 npOnla,OTKnHOHTeNOTJoxKe ee.
ToonnteB30HyOTXoJa.
CneiTe 3a naDaIOUIMMBETKAMN.
- Ecnn DepeBo npoOnJaet CToaTb, B6nB KInHbA BAlNoHyBn PpOnnJ, BblOnHnTe KOHTpOInpyEmyBaNky.
- По 3аьершени пасиловочьх paбOT HeMeДпенHo ChIMITE CpeДCTBa 3aцntbI CnyxaN CпeДNTe 3a CnHаMaN NIn PpeDynpexJaTOUIMN TOnOCOBbIMKOMaHdAMN.
7.3 O6pe3aHne BeToK (16)
Pn TaKnx pa6oTax Heo6xOdImo co6HOnaTaB cNeDyUoee:
O6opnTe ueHny nIy K CTBOy n OTnInTe (16/a)doCTynHbIe BETKn OndHy 3a dpyroI npraMo co CTBOJa. Pa6oTaIte Ha cKnOnax CHN3y BBepx.
Kpynhie, HnpaBneHHbIe BHN3 BeTKn, Ha KOTOpblc ONnpaETcA DepeBO, Noka OCTaBBTe.
MeIknE BETKn OTnInJnte 3a OdINn npneM.
CneIte 3a HapJxKeHHbIMn BETkAmn npacnnBaIte nx nO ndHcN3y BBePx, YTO6bl 3aTeM ppeDfTbPATAHb 3axImaHne cenHO nnbl (16/b).
Chayana OTNINITE BUCYNE BeTBN CHN3y, a 3aTEM CBepxy (16/c).
Bpe3aHne, npoJolbHbI npOnnI npOnnI no cxeme «cepue» DOJXHbIBbINOJIHrTbcra TOJbKO ONbITbIMN I OByeHHbIMN JIOdBMI.
7.4 PonepeuHa paCnIIOBka depeBa (17, 18, 19)
Pn TaKnx pa6oTaX Heo6xOaMo co6HOnaTb cNeDyUooee:
Pn paonnojxeHn Ha cknOHe Bcerda paobTaIte Bblwe CTBOna DepeBa, NocKoNbky OH MoKeT CkATNTbcr BHn3.
BéniTe ΚeHny nIy TaK, YTObbl BydInHeH-HOM dHaNa3OHe NOBOPTa NIIbHOJ cENn He HaxoDnINCb YaCTn TeNa.
PnKpeHnte cenHyIO nIy KCTBOny:
YcTaHOBnTe 3y6aTbI ynop HenocpeiCTBeHHo PAnOM C KpOMKo pe3a N NOBaPauBaIte cENHyIO NnIy OTHOCnTeNbHO 3TOI TOkN.
LcENHnIa MoKET cKoJIb3NtB B6OK npu yCTaHOBKe IIN OTCKaKNBaTb. 3TO 3aBNCnT OT DepeBa N COCTOHNr NIIbHOJ CEnn. BcerDa KpEnKO depXInTe cenHyIO nnIy.
B KOHcpe pa3pe3a ueHHa nnla nobopauBa-etcraoD co6CTBeHHbIM BECOM,NOTOMy yTo OHa 60JIbWe He yDepXnBaETcR B pa3pe3e. KoHTpOInpyuTe ee n He npndaBnBaIte, YTO6bl NINbHa r cenb He KacanaC 3emnn.
Iocne 3aBepweHn paCnna DoXkntEcB OCTaHOBKn NIIbHOJ cEN, IpexJe Yem OTKIOUcTb CEHNyO NINy.
Bcerda BbIKIOuAte TBnraTeIb cENHOI nIbI, npexde Yem nepexoINTb K cJeDyUOeMy DepeBy.
OmbaIHa CTBOJa DepeBa ONIPAeTcpaBHOmePHo:
PacnnaBaTe CTBOI CBepxu n He Bpe3aTecb B 3emJIO (17/a).
CTBOJ DepeBa ONIPAeTcOHN KOHcOM:
YTO6bI 36eKaTb 3axImaHnra ceHNoiNbI paCSePJIeHnRA DepeBa, Chayala nOdIIInTe (18/a) CTBOJ cH3y Ha 1/3 dNaMeTp a CTBOna, 3aTeM DoPiNITE (18/b) CBepx npaIeJIbHO Do HIXKHeRo NODnla.
CTBOJ DepeBa ONipaTc8 OboUMN KOUaMn:
YTO6bI N36ExaTb 3axKMaHnA ZenHOJ NNbI I pacuennneHnA DepeBa, Chauana noDnnnte (19/ a) CTBOJ CBepxHa 1/3 DnaMetpa CTBOna, 3aTeM Donnnte (19/b) CN3y npapannelbHo Do BepxHe- ro noDnna.
7.5ПonepeuHа pacnnoBka nIonomatepeNaIOB
Pn TaKnx pa6oTax Heo6xOdmo co6nOdaTb cNeDyUouee:
IcnoJb3yIte 6e3oNaChyIO u yCTOuNByIO OnpOpy dIpaCnINOBKn (Ko3JIb, KInHb, 6pyCb).
CneiTe 3a yCTOuHBbIM NOIOxHeHEm npabHOMepHbIM paCnpedeJeHnEM MaccbI TeJa.
KpyrIbIe NIIOMaTePnaJIbI 3akpeNITe BO n3-6exKaHne npokpyuBaHn.
UcTaHabnBaIte pa6oTaIOuO nIbHyU cenb TOnbko Ha npoIN. Hn B Koem cnyuae
He noKIOUaTe pa6oTaOuIyU cENHyU nIy K NIIbHOI cENI.
He ydepkuaTe pnilomatepnaI horoi He npocnte noepkaTb erO dpyrorO ueNoBeKa.
8 TEXOBCLNYKIBAHNE I YXOD

ONACHOCTb!
Yrpo3a Xn3Hn n3-3a HeHaJnEkaUero 06cnykBaHn
O6cnykuaHne HeKbAinΦuNpOBaHHblMN JIuamn, a TaKKe NcNoJb3OBaHne Hepa3peeHHbIX 3aNpacteM MoryT npNBecTN K cepbe3HbIM TpaBMam N daXe K CMeptN BO BpeM pa60TbI.
He ydaIyTe npedoxpaHnTeNbHbIe npucnocO6JIeHnI He BbIOJte nx n3 cTpor.
IcnoJb3yTeToJbko pa3peUeHHbIe opunHaJIbHbIe 3aNactn.
Y6eIntecb, yTO yCTpOINCTBO HAXO-NTcB pa6oHem N UcTOM COCTOHN PyTeM peyIrpHO N HaJIeXa-UIero 06CnyKINBaHn.

ONACHOCTb!
OnachocbДЯЖИЗНиOnachocb TЯкелbIX TpaBM.
Onachoctb JnJXn3Hn n Onachoctb cepbe3hIX TpaBM npn BKIOueHHOM DBNrataTeIe.
Bce DeiCTBnA CneDyET BbINONHrTb TOnbKO NocIe BbIKIOUeHnA DBrarTeJIa.

OCTOPOXHO!
Onachoctb TpaBMnpoBaHn
Двикушиеся DeТаИ N DeТаИ C OCTpbIMKpaAMMOryT npVBecTN K TpaBMam.
Bcerda Hocnte 3aunTHbIe nepuATkn BO Bpemr Texnueckoro OcbnyknaHn, yXoDa n OunchTk!
O6a3aTeNbHO BbINOHnIeHaJaEkaUee TeXo6cLyXnBaHne dIra CoXpaHeHnBbICOKoN 0ΦΦeKTHBHOCTn N EKcPnyaTaunOHn6e3oNaCHOCTNu yCTpOuCTBa.
Xopoio 3aTnBaIe BCE BnHTbI n raIKN, UTo6bl rapaHTnpoBaTb HaJeKHOe FyHKUO-HnpOBaHne ycTpoiCTBa.
He nCNoB3yIte yCTpoiCTBO C n3HOWeHHbIMn nnIOBpeXDeHHbIMn DeTaNMy. He nbITaITeCb peMOHTuPoBaTb IOBpeXDeHHbIe DeTaN. 3aMeHnIte nx,
IpeepnpoBeHnempa60ntnoTexHnueckomy 6cbnyKbAHIO:
BbIKIOUHTe DnIraTeJIb I daIte Emy OCTbITb.
OTcoeHNHTe WTeKepe CBeu 3axnraHna.
Pa6oTajc nHbHOJ cenbIO,HaedeBaIte 3a- uHTbIe nepuATKn.
HaedeBte 3aunTHyO KpbIuKy Ha HappaBnaIouyIO uHy (ecnTToJIbKO BbI He BblOnJHareTe paobtI Ha cAmOI HAppaBJIooUeNHeNJn Ha ceEN).
HaJIeJauIIM o6pa3OM yTuIN3npyIte MaCIO, 6eH3nH n dpyrIe 3aRpy3HryOuIne BeIeCTBa.
8.1 MoHTaX/JeMoHTaX KpbIuKn BO3dUshoro qnIbTp(a20)
ДемоNTах Крblшк BO3dUshHOrO ФньТра
- BCTaBbTe OTBepKyu MeJy npeOxpaHntJIbHOI cko6oN (20/1) n KpbIshKOI BO3dUshHoroΦnIbTpA (20/2).
- C nOMOu bIO OTBepTKN BbITaUNTe (20/a) npedeoxpaHnTeJIbHyIO cKo6y n3 KpbIuKN BO3dUHoro qnnbTpa.
- CHIMITE (20/c) KpbIuKy BO3dUshoro QnIb- Tpa c yCTpoiCTBa.
MOHTaX KpbIuKIN BO3dyuHoroФиNbTppa
- CdBnHbTe 3bYOK (20/3) KpbIuKn BO3dUshHO T O pNJIbTp a NOD KOpNycOM, 3aTeM yCTaHOBNTe KpbIuKy BO3dyuHOrO pNJIbTp a Ha yCTpOINCTBO.
2.ПижимаTe (20/b) npeOxpaHnTeIbHbIe cko6bl (20/1)Ha KpbIuKe Bo3dUwHoroФИNb- Tpa Do UeIuKa.
8.2 OuInCTka BO3dUshoro fHnbTpa (21)
BHIMAHNE!
Onachoctb n3-3a 3arpa3HeHn, HeNCnpabHOCTN IIN OTCYCTBnB BO3dUHoroΦnIbTp a
ДВИГATEЛь yCTPOnICTBA NOДВЕРЖЕн He-NonpaBnMbIM NOBpeJdeHnM npN 3a-rgp3HeHn, HeuCnPaBHOcTn nIIN OTCyTCTBm BO3DyUHOrO ΦNbTpα.
Uto6bI oecneuTb 6ecnepe6oHyopap60Tu n dInTeNbHbI cPOK cnyX6bIyCTPOcTBa, Heo6xOdmo peryJrnpHo uNCTnB BO3DyHbI QnIbTp. HeNCNoJIb3yIne yCTPOcTBO, eCNI BO3DyHbI QnIbTp He yCTaHOBNeH INIOBpeXJeH. 3TO MOKeT Bbl3BaTbNOJOMKy DBNrataTjra.
BbINOHnTe OunchkUyepe3KaJdbie 15 YacOB 3KcNJIyatau.
Фильтуpoшилелемпн Heьзя CTираТь И erо Heo6xOДМО Bcerda 3aMeHЯТь, KaT ToJIbKO OH CtaHOBIT-СЯ СПИшКOM 3aIrpЯЗHeH ИИ ПОВpeKДeH.
Ioo6paKeHnM 6e3oNaCHOCTN u 3ΦΦeKTHBHOCTN, INIbHa cenb DOJXHa 6bITb BceIda XOpOo 3aToyeHa.
3aToUka Tpe6byetc, ecn:
ONINIKMEnKHe,KaK Nblb;
nIJIeHHe Tpe6Byet 6oJbux ycunni;
I npoNn NmeeT HnepMyo OopMy;
yBéNnUBaetc Bn6paζn;
yBéNJUHBAeTcpaCXoTOnnBa.
O6paaIaTeCb IIN 3aTOcKN B CNEuaIIN3nPOBaH HbI cepBnCHbI cHTp, pacnoIarauoI IN Heo6XODIMbIMN IHCTpyMeHTAMN. 3TO rapaHTnpyET MInHMaJIbHbI CBem MaTePnaJa C cEN N paB-HomepHyIO 3aTOcKBy BCex 3y6beB.
CamocToTeJbHO 3aToCHbNtB NnIbHyU cenb MOxHo C nOMoUbCneuaHbHO KpyrIoro HannbHnka, dAmEtP KOtOPO rnoD6npaETcC yyeTOMnapaMeTPOB cENn (cm. 2a8a 8.10 "Napamempbu cenu u duamemp HanunbHuKa", Cmp. 485).YTO6bl 3aToHTb cEnb 6e3 NOBpeKdEHHra 3y6beB, Tpe6yETcHaJIuHHe ONpeDeEHNO ONbTa n HaBBIKOB.
ДяЗATOкнпьнOцEN:
-
BbIKIOUHTe DnIRaTeIb, OTNcyTne TOPMO3 cENi HAdexH0 3aΦNKcnpyIte HAnpaBnIO- uYIO uHHy C NlNbHOI cENbIO B TnCKax TaKIM o6pa3OM, YTO6bl NlNbHaJ cENb MoRJa CBO- 6oHDNo DBnIRaTbcra.
-
Ecnn nIbHa r cenb pactaHynacb, hataHnte ee.
3.YCTaHOBHTe HAnINbHnK B COOTBeTCTByIOUeHnPaBnIOuSe, a 3aTeM 3aBeIITe erO B Bblpe3 Ha 3y6e, coXpaHra paBHOMepHbI HAKNo N0 OTHoWeHnIO K npocnIIO 3y6a. - BbINOJIHnTe HeCKoJIbKO npoxoOB HAnIJIbHNKOM (ToJIbKO Bnepei) n NobTOpnte 3TO DeiCTBHe Ha BCEx 3y6bJx C TaKo Jx OpiEHTaTcNei (npaBoN nn neBOi).
- NpeBepHnTe HnnpaBnIouyO uHy, 3akpe-nITE ee B TnCKax I NOBTOpHTe OnncAHoe BbIe DeJCTBnE Ha OCTaBwIXc3y6bJx.
- Y6eIntecb, yTO orpaHnHTeJIbHbIy6 He BbICTynaet HAD KOHTPOJbHbIM INHCTpyMeHToM. Pn Heo6xOAnMOcTn O6ToUHe BbICTyPnIOCKm HaINJBHKOM N 3aKpyrInTe pO-ΦnJb.
- Поссе заочи Тшательно уберпг Te MeТаJIнчecкne OпИнКи И пьл, a 3aTeM NOLOKHTe ПИльHyTO ueb B MacЯHyO BaHHy.
Cenb cneyuET 3aMeHnTB,ecnI:
ДИИнэз6beMeHbIe5MM;
Ipn Hauu: He npBbIaIe OTMeTky Ha 3y6bIpxeKyuX 3BeHbeB;
3a3Op Ha 3aKJIeNKax 3JIeMeHTOB cENI CINU KOM 6OJIbWoI.
www.al-ko.com/service-contacts
15 TAPAHTIN
Mbl yctpaHnem Bo3MOxHbIe DepeKtbl MaTePnaIOB nJIN npOn3BOcCTBa B TeueHne Cpoka daBHocTn, yCTaHOBJIeHHoro 3aKOHOM B OTHOseHn peKlAmauN NO KaueCTBy, nyTeM pEmoHTa nJIN 3aMeHbI n3DeJn. Cpok DaBHOCrO ONpeJeTcra 3aKOHODaTeJBcTBOM cTpaHbI, B KOTopoN 6blno npNo6peTeHo y-CTpoiCTBO.
Hahe rapaHTnHoe o6a3aTeNbCTBO DeIcTbTeJIb- rapaHTn aHHynpyetc npn:
HO TOJIbKO npN:
CobIoudaIte daHHoe pyKOBOcTBO no 3Kcnnyatau
cAmOCToTeIbHbIX NOnbITkax pEmoHTa;
cAmOCToTeJIbHbIXTexHnueckNXn3MeHeHHx;
NcNoJIb3OBaHmHe IIO Ha3HaueHnIO.
HaIeKaemOpaehn;
NcNoJIb3OBaHnOpuHaJIbHbIX 3aNaChbIX qacteI.
TapaHTnHe pacnpocTpahreTcHa:
IOBpeKdEHHaNakOKpaCooHOro NOKpbITnB, Bbl3BaHHbIe HOpMaJIbHbIM N3HOCOM;
n3HaunBaUoIeecraactn,O603HaueHHbE B BeDOMOCTN 3aNaChbIX qacteepamKoXXXXXXX(x)
BnraTeHn BHyTpeHHero cropanna (Ha Hx paonpoctpaHIOTCra rapaHTnHbIe nOJOKeHN COOTBeCTByUoero npOn3BOIDTeJI).
FapantnHbI cPOK hauHaeTcnoCne nOKyNk NepBbIM KOHeuHbIM NOIb3ObaTeJIeM. OnpeJeIoum
fakTopom cnjKNT dAta Ha DoKymHe, NoDTBepXdaIOUeM nOKynKy. ObpaaatcEcb C HAcToaum
cepTnΦnKaTOM I DOKyMeHTOM, NoDTBepXdaIOUeM nOKynKy, K CBOeMy dIlepy IIN B 6InxKaIshn AB-
TOPn3OBaHHbI cepBnCHbI ceHTp. Hactoan CEPTnΦnKaT He kacaetcra rapaHTnpyeMbIX 3aKOHOM
npab Ha npTeH3nn nOKyNaTeJRA npodabuy.
16 PEPEBOI OPINHANBHOJ DEKJIAPAUIN COOTBETCTBNA CTAHДAPTAM EC
HactoIIm 3aBnem, yTo daHbI npOyKT B peAIn3yEmoHa pbHke fOpMe COOTBeTCTByet Tpe6oBaHnM rapMOHN3npOBaHHbIX dIpeKTHB EC, cTaHdaptOB 6e3OnacHocTN EC n CneuaJIbHbIX cTaHdapTOB, pacnpoCTpaHraIOxxCra Ha daHHbI npOyKT.
PpOaYKT
Lennha nla
CepinHbI Homep
G4011022
PpOn3BODHTeJIb
AL-KO Geräte GmbH
Ichenhauser Str. 14
D-89359Kotz
Пиц,OTBETCTBEHHoe 3a coCTaBJIeHne DOKyMeHTa
Andreas Hedrich
Ichenhauser Str. 14
D-89359Kotz
Tnn
6436
6442
DnpeKTHBbIEC
2006/42/EC
2014/30/EC
2000/14/EC
TapMOHn3npoBaHHbIe cTaHdApTbI
DIN EN ISO 11681-1:2011
DIN EN ISO 14982:2009
YpoBHeb 3ByKOBO MOUHOCTN
EN ISO 3744
I3MepeHHbI/rapaHTnpoBaHbI
6436:109,9/113 dE(A)
6442:110,0/113 dE(A)
OueHka COOTBeTCTBnA
2000/14/ECПиножени V
IcnbItaHne TnIOBoro 6pa3-za corlacho
2006/42/EC Пуложени IX
BM 18SHW0351-01
YNoJHOMOeHHbI opraH
CnBbDHOWeHH 3MiUyBaHH
BehnMactno
50:1 (50 qactnH naIbHorO i 1 qactnHa macna)
5 nitrB 100 m
- HajiNe B cneiaJbHy KaHicTp y npn6nn3Ho noJOBnHy 6eH3nHy.
2.ДоаиTe BCE MaCTnIIO,3a Ta6JIneIeI.
3.ДоанTe 6eH3nH,иO 3aIINBcR. - 3akpiTe npo6ky i cnIbHo ctpychItb.
5.2 Mactnno dny naHciora
YBARAI
He6e3neka nowkoJxehn o6naHaHn
BnKOpncTaHH BldnpaCbObaHOro Macna 3MaueHH NaHcIora,Ke Mictb MexaHiDomiKu, np3BoNDtB Do nepeDuacHOrO 3Hocy HapRaBnOooi uHN Ta IaHcIora. Y pa3i BnKOpncTaHH Bi- npaCbObaHOro Macna rapaHTiHi 30- 6OB'3aHH Bnpo6HnKa BtpaauTb cnny.
3a6bOpHReTbcBnKOpNCToByBaTn BiDnpaCboBaHe MacNo, DnA 3Ma- uEHH NaHOra Do3BOJraeTbcBnKOpNCTaHH TInbKn BiOpO3KnAdHoro Macna.
YBAI!
He6e3neka 3anOdiHnHaKoHnBkoJnHbomy cepedobnuy
BukopncTahnMihepaIbHoroMacna 3MaueHHaHcIora3anOioe cepNo3Hy SKoDy HABKoNshbOMy cepedobu.
3a6bOpHcTbcBnKOpncToByBaTu MIHepaIbHe MacNo,ДЯ 3MaueHHaHOra Do3BoJrEbC BnKOpNCTaHHa TINbKn Biop03KnaHOro MacNa.
He BnKOpNCToBMyTe MaCTNIO, 1o MiCTNtB Domiukn, 106 He 3acMitITn 6aKa i He 3ab
Дату Macларому Hacocу He3BOPOTHX NOUKO-DxeHb.
BaxnBO BnKOpNCTOByBaTu MaCTNu BnCOKoi
kocTi, 06 do6pe 3MaCTuN DeTani NnIbHoro a-
napaTy; BiDnpaCbOBAHe MaCTuNo a6o MaCTuNo
norHOJ kocTi 3HnKyOTb ePeKTNBHICTb MaCTuNa i ckopoCyIOb TepMih CnyKb NnIaNbHoro NaH-
zura i HanpamHOi ShHH.
3aBXd peKoMeHdyEcTbCra NOBHiCTIO HAnOBHIOBaTn MacJHnB 6ak (3a DonOMoroI niKu) Opa3y NiJ Yac 3aJIbVaHHra NaINBa; OckIbKn O6'em 6aka Dn MaCTnPa PO3paxObaHa TaKIM YINOM, Uo6 NaIbHe BITpaTInOcpaHHe, HIX MaCTnNo, ce Do3BOJRAE yHnKaTn BVkOpNCtAHHr MaUHN 6e3 MaCTnJa.
5.3 3aHbHHn naIbHorO (07)

HE6E3NEKA!
Bn6yxo-i noxekOHe6e3neKa
Bntik 6eH3O-nOBITpraHOI cymiWi npn3BO-DNTb DO BnHKHeHH Bv6yXoHe6e3neu-HOI aTMocpepn. 3aImaHH, Bv6yx i noKexa MOkyTb BnHKHyTN B pe3yJbTati He npabNtBHO NOBxKeHH 3 naINBOM Ta npn3BeCTn Do cepNo3Hx TpaBM i HABiTb Cmepti.
He naJIitb niI qac noBOJKeHHa 3 6eH3nHOM.
IpaIouTe 3 naINBOM IuSe Ha BiIDKpITomy NObitpi, a He B npMiuEHHi.
Oob'3KOBO DoTpMuyTeCe nepeiHueHx Hxue HOpm noBeiHKn.
3aINBaHHn naIbHorO
- BmKHiTb DnHyH i 3HIMiTb 3axnCy Kpnkky HAd NIIJIbHIM NaHcIyOrom.
- OuicTiB KpUk Ky 6aka (07/1) Ta dIiHky HABKOJIO Hei, 6OB B 6ak He nOTpanNB 6pyd.
- AkypaTHo 3akpyiTb KpNIkky 6aka (07/1), 0o6 B HbOMy CcOpMyBaIocr TnCK.
- 3aInIe naiIbHe 3a DonomoroIO BOpOHKn.
- OdaHITb Ha 6ak KpUkky 6aka Ta 3aTARHiTB
- OvnctiB niDnory ta npuctriB iD po3nntoro naIbHoro.
- 3anyckaTe npncTpi TijbKn nicJyBnnapoByBaHHa napn naJIbBa.
3aINBaHHJaHcIHorOBOrMaCTnJa
-
BumkhHtB DnHyH i 3HIMiTb 3axnchy Kpnkky HaI NIIJIbHm NaHcIOrom.
-
OuNCTiB KpUk Ky MacnHoro 6aka (07/2) Ta DInnKHy HABKONo Hei, Uo6 npu 3a npabnnHHi B 6ak He noTpanNB 6pyd.
- BiDkpyTITb np6ky macnHoro 6aka (07/2).
- 3aIInTe IaHcIroBe MaCTnIO 3a DOnOMOrOBO BOpOHKn.
- OJrHtB Ha 6ak KpNiky MacnHoro 6aka Ta 3aTHiB rBuHTn.
- Ouncitb niDnory Ta npncptpi BID po3nntoro JauHIOROBOrO MaCTnla.
5.4 Npebipka Hatay IaHcIora (06, 08)

HEBE3NEKA!
Pn3nk cmepti a6o Tjkknx TpaBM.
Pn3nk CmepTi a6o cepno3Hx TpaBM uepe3 HeBnMkHeHn DnHyH.
Bci onepauii BIKOHyOTbcra 3 BIMKHeHIM DBNyHOM.
HaTg HauaToBaHo npabInbHo, kUo nI qac NiHimaHn nnJaBHO rAnuTo rNocepeHi HanpMaHoi uHH eJeMeHTn He BuaDaKtB 3 Ha-mpHoi (08/1), aIe nnAaBn IaHcUr BCE ue MoKe o6epTaTnc.
HaTg nIyJIbHOro naHcIora
- BidkpyTiB WeecntnnpaHni raKn (06/2) 3axncty 3ipouKn (06/1) 3a Donomoro HaraBHoro KOM- 6iHOBaHoro raKOBOrO KIOya.
- HatnckaTe HaIeXHm YINHom Ha perynoBaalbHn TBnHT (06/3) peryIaTopa HataRy nIJIbHO rHaNcIra dIra DocrHeHH Heo6xIdHO HO HAry NIIaJIbHO rHaNcIra.
- 3aTgHtB ueCTnrgpaHHi raKu (06/2).
5.5 Ipebeipka ranbma naHciora (09)

PONEPEDKEEHHRA
Pn3nk Cmepti a6o cepno3Hnx TpaBM uepe3 HecnpaBHe rJbMo JauHcIora
Kaio raIbmo IaHOra He npauo, ce MoKe npn3BecTn Do cepno3Hnx TpaBM i HabiTb cMepti onepaTopa, Hanpknad, y pa3i BiDaui npauooyoro nnraJbHoro IaHOra.
IpeBipraTe ralmo naHciora nepeD noaTkom po6OTn.
He BMkaTe eJekTpOnnky, KaTo raIbMo IaHcIora HecnpaBHe. B zuoMy BnnaKy BiDnpaBTe NIIJIbHn IaHcIg Ha NepeBipKy B MaIcTepeHIO 3 06CnyroByBaHHKaIcHTiB.
Pnucpi OcaeHO cntemoh ekctpeHOro raMbMyBaHHra (raIbMa naHciora).
TaNbMo NaHOra 一 趙 npncTpri, npn3NaueHn DnI HeraiHOI 3ynHHKpyxu nIIaBHoro NaHOrra B pa3i 3BOpOTHO BIDaHi. 3a3Bnuay raNbMo NaHOra AKTNBycBcA BtOMaTHUHO IHePciEIO.
LIMraJIbMOM TAKOX MOKHa KepyBaTN BpyHy.
- 3anycitb DnBryH, MiUHO yTpmyuOu npnctpii 3a o6nDbipyKn.
- Hatnchitb KhoNky 6NoKyBaHHra3axncty (01/8) i BaJinb ra3y (01/7), 0o6 3ayncttn pyx IaHzIora, notim HataChItb (09/a) Ha pyHOMy 3axncti (09/1) TINbHOIO CTopoHOIO doLoHi; INIIaJIbHNI JauHcIg NOBHeH HeaHHO 3ynnHHTNCr.
3.Якwo nnilaHnnaHcIg 3ynHHTbcra, He- raHOBiDnyctiTb KHOKky 6NOKyBaHHra3axnctTy i Baxknb ra3y.
4.BUMKHiB DBNyH. - 506 ocna6nt raIbmo naHcIra, nepeBedeItb pyHn 3axnCT Ha3aD (09).
6 EKCnIyATAUIA
DToPmMyTecb HaioHaJIbHINX NonoKeHb, zo perIamEnTyIOb DOnyCTUmN Yac po6oTH.
O6xonitb 3aHIO pyky npaBOIO, a DyROBypyky liBOIO pykoIO, i yTpmyTe npncTpiI.
He BiDnyckaIte pyuKn, nOKn npauKoe DBNrHy.
3a6opOHeHO BnKOpNCToBvBaTn NaHcIroBv NIIJy:
KOJIN BTOMJIeHI,
y pa3i noraHoro camonoyT,
3HAXOINTECB NID BNNIBOM aIKORIOJIO, MeDnKaMeHTiB a6o HApKOTnKIB.
6.1 YbIMKHeHHBIMKHeHHBnryHa

PONEPEDKEHHBn6yxo-i noxekone6e3neka
Bntik 6eH30-noBITpRAHOI cyMIi npn3BODNTb DO BHNKHeHHB N6yXOHe6e3neuHOI aTMocFepn. 3aImaHH, B6yX i noJexka MOxTyB BUNKHyTN B pe3yIbTati HnpabNtBHOrO NOBODxEHn3 NaIbHM Ta npn3BeCTn Do cepNo3Hnx TpaBM i HaBiTb Cmepti.
3anyctItb DBNrHyHa BiDcTaHi He MeHsE 3 MeTpB BiMicra BnKoHaH H3anpaBky.
6.1.1 3anyck Dvryna (10, 11)

OBEPEKHO!
He6e3neka TpaBMyBaHHaTPOCOM CTapTepa
Yepe3 WbNdkn 3BopOTHn xiT Tpoca CTapTepa pyka 3aHaDTo WbNdko BtaryEcbrB DnHy. Lc moKe npNBecTu Do ydapii po3TgHeh.
YkoHomy pa3i He HAMOTyIte NyCKOBn Tpoc Ha pyky.
YBAGA!
He6e3neka nowkoJxehn o6naHaH-H
KIO TPOC CTAPTepa CNbHO 3aTMy-TN, ue MOKe IpnBeCTn Do N0sKOJKeH-H.
He BOLOciTb Ioro B3doBx KpaO OTBOpy HAnpMaHoi TpOca i BiDny-CKaIe pyuKy NoCTynoBO, 06 II NO-BepHenHa MicSe He 6yNo He-KOHTPoNboBaHIM.
YBAGA!
He6e3neKa noxkoJxehnO6naHaH-H
KIO DBNYH npaue Ha BnCoki WBNKocti i 3 yBIMKHeHm rAblMOM IaHcIOra, MyTa MoKe neperpitncra.
YHnKaIe 3aNyCKy DbNryHa Ha BnCOKII WBNiKOCTI 3 yBIMKHeHm rAJIbMOM IaHcIgA.
XoJIoHn nycK
XoJIoHNIpyck-ueIyCKDIBNHyHa,KoIN BIn BN-MKHeHIIpOTaROMAKMIIMyM5XBUNIH a6o nicJIaDO3aPbAVKn NaINBOM.
- Ppnpapkyte npncpi Ha pibHn nobepxhi, ytpmyTe npeHIO cnyscoby i npntCHiB npncpti BHN3. 3a notpe6n Hacty-niTb Ha 3aHIO cnyscoby cko6y HOCKOM HOrn.
- AKTNByIe ralbmo IaHcIora, nepemictNBwI pyuHm 3axnCT BnepeI.
- 3HIMITb 3axnchy KpNkky 3 NINJbHOro NaHcIora.
- Hatnciht (10/a) niДшннннннннннн (10/1) 3-4 pa3n.
-
Повернштейтук дросел (11/1) 3a roДиHHNKOBIO CTPIKIO DO ynpOy.
-
RykoTo TaHrHiB Bropy (11/a) pyuKy cTapTepa (11/2), nOKn He BiDyuTe onip.
- He BiDnyckaiTe pyuKy CTapTepa, TarrHITb II KINbKa pa3iB, DOKN DBnHyN He 3anyCTntbcr Bnepwe. NOBepHtB pyuKy dpocen (11/1) npOTn roDHHNKOBOIO CTpiKIO DO ynopy.
- Поверни ручусторpa (11/2) кльka pa-3iB, ДOKИ DBIryн He 3anyCTNtbcr 3HOBy.
- ΜΟΥΝΑ ΜΑγγινηλαγκτιντυς, ΜΒικό ΚαHαπεινιθίν Κλούκγανηλαχιστγ (11/3) i Αβακήν ταγ (11/4). Σρεγιλτι προεζήνα 3αςπικήκα καρδύρατopa 3ΒιλνΗπιντυς 3 αδύκο-KOBaHOrO ΜΟλοχεnhγ.
- 3aπiTe npicTpri npaioBaTu Ha xoNocToMy XOdy np6n3Ho Ha XBnInHy.
- BiDnycTiB rAInbMo IaHciIora, nepemicTnBwn pyuHm 3axnCT Ha3aI.
Tapnyn nyck
KUO DUNyH 3anyuHo TINbKn Ha KOpOTKn Yac, PPOuec Ncyk MOxHa BnKOHaTN TINbKn HATNCKaHNrPiDUnnHnKa HAcoca NiKauch, He NOBepTaOny puKy dPoceJIbHOi 3acNIHKn.
6.1.2 BmKHeHHa DBnryHa (12)
- HeraHb BiDnycItb KhoNky 6IokyBaHHa 3aXncty (12/1) i BaXinb rasy (12/2).
- Bnpoobk kInbKOx cekyHd BnryH Mae npa- tOBATn Ha XOIOCTOMy XOdy.
- Hattchitb (12 / a) KnaBiwry Kylichoro Tnny (12/3) B noJoxeHHI «0».
Iepw HIX NOATN Bnpy6ky, Heo6xIDHO BnKOHATN Taki po60tN:
Ipekehntecy,0BHe63neuHn 30Hi Hema iHux oci6,Tbapun afo npedmetib.
Be3neuHa BiDcTaHb MIX iHsIMn pOboyIMn Miczamn a6o npEmdTaMn Mae cTahOBHTn He MeHwe 2 1/2doBxHn DepeBa.
3BepTaIe yBary Ha niiH noCTaUHHn i uxy BnaChicb. 3a Heo6xIDHOCTi cNOBicITb eHeprONoCTaUaJIbHe NiDnprncmCTBO a6o BnaCHnKIB.
OuiHb HnprMOK naIHn depeBa. BpiuBHe 3naeHHn IaHnpaMKy naIHn Hn depeBa MaIb:
npipoDnHaxnl DepeBa,
BnCota DpeBa;
3poCTaHHr iIOK 3 OndHoro 60ky,
po3TaUyBaHHHa pIBHHi a6o cxnni;
acIMMeTpNHe 3pOCTaHH, NOUKOJXeHHn DepeBnH;
HanpMOK i WBnKicTb BiTp;
CHIROBE HabaTaXeHHA.
Upa3i po3TaUyBaHHHa cxnI npaOHTe Bn- 3BaJIHOBaHOrO DepeBa.
IpekoHaTecra, yu Bn6paHni 30Hi BiXoOy HemaepeukoJ. 3oHa BiXoOy Mae po3a- WOBByBaTnc np6n3No nKytom 45^ 3a di aroHaJIIO B Hanpymky, npOTnJIeXHOMy Ha- npamky BaNK (14).
CTOB6yp MaC 6byTn OunuHEnn BiD YarapHnKIB, rInok i CTOpOHHix npEmdetB (HaPnKnad,6pydy, KaMeHIB, KopN, 10 BiDwapOBycTBcR,UBxiv, cko6, dpoTy too).
Iio6 3BaJIHTn DepeBO, Heo6XiIDHO BIKOHaTn Dba niDnna i OINH BaIOUHn IpnnI.
1.ПдчасВиубУваньТаpo3пИюВаньHa-ДiINHO 3aTuschITb 3y6uaty niDnopy y DepeBO, 卢po3пИюTOB.
2.Cnoatky BnKoHaTe NiDn (15/c) ropn30H TaIbHo,NotIM HABCKOCN 3Bepxu NiD Kytom He MeHwe 45^ .Le DO3BOJNTb yHNKHyTN 3aTnC KaHHra IaHIOROBoI NnN niD Yac BnKOHaHHa DpyrOro NiDnny. NiDnNIOBaHHa MaE 6yTu kOMora 6nXqHM Do 3emNi Ta 3haxoINTnc B Heo6xIDHomy Hanpmi 3BaJIIOBaHHa (15/e). Tn6nHa NiDnNIOBaHHa MaE CTAHOHTn PnI- 6n3Ho 1/4 diametpa cTOB6ypa.
3. 3po6itb BaOnHn npOnn (15/d) nABnpOt niiNny toUHO roPn3oHTaIbHo. BAnOHi npOnn Heo6xIdNo po6uTn Ha 3-5 cm Bnue roPn3oHTaIbHo rO niDnIy.
4.ГлбинваВалочHorO npoHny(15/d)noBHHa 6yTu TakoU,uO6 mK nIДnIOM(15/c)iBa- IIOCHNm npoHNUOBAHnM(15/d)3aIIuINBCa HeDOnn(15/f)He MeHwe 1/10 diAmetpa CTOB6ypa.LeH HeDOnn3ano6irae o6epTaH HIO i NaIDIHNO DepeBa B HEnpabUNbHOMy Ha- npRMy.PiI qac HAbJnxKeHry BaNoCHOro npoHny(15/d)do HeDOnnHy(15/f)DepeBO Ma cNoHaTn NaDaTu.
JaKuo depeBo naaC nIac po3nIIOBaHHa
KIOpeBO NaAe B HnpaBnHOMy HnnpMky uN BiXnIeTbcra Ha3ad i 3aTnCKae IaHcIroBy nIy, npnnHITb nIyT. Dn po3tncKaHH nponny i nepHeceHHA depeBa BVOTpi6Hn HnnpMOK B6nIte B Heo6xIDHy liHIO naIHn KnH.
HeraHOBuBeiTb naHcIorOBy nny 3 npOnNy, BmKHiTb i BiKnadItb ii.
BidiinDy 3ohy BiDxOy.
CTeKTe 3a naIauHmI rIrkamn.
5.Якuto DepeBO npoObKye cTOrTu, B6NBuN KInHn B BaNoUHn npOnn, 3po6Ib KOHTpoJbOBAHe 3BaJIIOBHaHHa.
6.ПсЯЗаВерш�ня po3nHIOBbHnx po6IT HeraHNo 3HIMITb 3axNCHi HabyuHnKi i CTeXKe 3a CnHnAmn a6o nonepdKyBaJIbHnMn roJIOCOBnMn KOMaHdAmN.
7.3 O6pi3aHHr rIOK (16)
IiD qac uix po6it Heo6xioHO DoTpmyBaTu TaKx nyHKTIB:
O6inpitb IaHIOROBy NnIy Do cTOb6bpa i BiInnIyTe (16/a) DocTynni rIrkn OndHy 3a OHOIO nprMo 3i cTOb6bpa. IpaioNe Ha cxnIax 3HN3y Bropy.
BeNiKi, cnpaMoBaHbHN3 rJKN, Ha aKi cnipa-etbcr DepeBO, NOK 3aJIuWTe.
Dpi6Hi rIKN BiDnJyIe 3a Odn pa3.
CTeXTe 3a HAppyKeHmriKamn i po3nnIIOHTe IX NO ODiHi BHN3y BVropy, 06 3anObirTN (16/b) 3atNcKaHHo NaHOrOBoi NJI.
Cnoatky Biinjne Bncrey iin3n3y, a notim Bropi (16/c).
Bpi3aHH, no3doBxHn npoHn i npoHn 3a cxemOIO «Cepue» MaOTb BnKOHyBaTnCn TINbKn DocBiDyeHmN i Obi3HaHmN JIOdbMn.
7.4ПопeрчHepo3ПиЛюВангдeрЕВa(17, 18,19)
IiD qac uix po6it Heo6xioHOn DoTpmyBaTu TaKnx nyHKTIB:
Ppno po3TaUyBaHnHa cxnIi 3aBxDn npa- pOHTe Bnue cTob6ypa DepeBa, OckIbKn BiH MOKe CKOTNTNCBHN3.
BédiIb IaHIOROBy NiNy TaK, 0o6 y noOBeXeHomy diana3OHi NOBOPTy NIIJIbHOrO IaHIOra He 3HaXODINNCy UactInn Tina.
PnpkiniTb naHcHOrOBy nIy do cTob6ypa:
BctaHOBiB 3y6uaty niDnopy 6e3nocepeHbO npraI 3KpOMKO 3apy6ka i noBeptaIte IaHIOROBy nNpy BIDHOcHIOciToUKN.
IaHIOROBa Nnna MoKe KOB3aTu y6ik nIac BcTaHOBHeHH a6o BiDcKaYBaTu. Ce3JIeKNTb BiD DepeBa Ta CTaHy NnJnB-Horo NaHOra. 3aBXd MiUHO TpMaITe IaHIOROBy Nnly.
Y kiu po3pi3y naHuroBa nna nobepTaetb- cniBnacHO BaroTO, TOM yo BOHa 6JIb- ue He ytpmUyETbcB po3pi3. KoHTpOIOHe
ii I He npndaBIOte, 06 IIJIaIbHn IaH zuIg He TopKaBCz 3emni.
Iic7aBepWeHHp03nnyDoyekaTec3yHnHKnNJIaJIbHOraNaHcUora,nePw HIX 3HiMaTN NaHcUROBy nIy.
3aBXn BmNkaTe DBNrHy NaHcIOrOBoi NII, nepu HIX nepexoDHTN Do HactynHoro depeBa.
3araBHa DOBXnHa CTOBbypa DepeBa CnnpaETbCra pIBHomipHo:
PoznienTe cToB6yp 3Bepx y i He Bpi3aTecB 3em10 (17/a).
CTOB6yp DepeBa cnipaetcb ODNHM KINHcEM:
I U6 yHnKHyTN 3aTnCKaHH NaHcIOrOBoi nnn i po3uennHeHH DepeBa, cNoatky niIINnIyTe (18/a) CTob6yp 3Hn3y Ha 1/3 diametpa CTob6ypa, Notim NiIINnIyTe (18/b) 3BepxynapaneJbHo Do HNKnHbO rPiNnIy.
CTOB6yp DepeBa cnpaetbc8 o6oma kiHcAIMN:
Uo6 yHnKHyTn 3aTnCKaHH naHcIgOrBOoi nJiN i po3uennHeHn depeBa, cnoaTky niIInnayTe (19/ a) cTob6yp 3BepxHa 1/3 diAmetpa cTob6ypa, notim niIINnIyTe (19/b) 3HN3y napaneIbHo do BepXhboro niDnIy.
7.5 Ponepeuhe po3nnHOBaHHnIbnomatepiajib
IiD qac uix po6iT Heo6xIDHO dOTpIMyBaTu TaKnx nyHKTIB:
BukopncToByte 6e3neHy ta cTiky onopy dIpa po3nIIIOBaHHa (Ko3n,KnHn,6pycn).
CTeKTe 3a CTiIKM NOIOKeHHaI i pIBHomipHnM po3NoJInOM Macn Tina.
Kpyrni nnnomatepiann 3akpinitb, uo6 yHnKHyTN npokpyuBaHHa.
PnuctabJnTe nNkY do o6pO6nIOBaHOro MaTepiany TInbKn 3 npaUOnyHM nIJIbHm IaHcIgrom. HikoJn He BMnKaIte eJeKtpo- nNkY 3 yKe npuctabJeHm Do MaTepiany IaHcIgrom.
He ytpmyte nnilomatepiian Horoio i He npocitb notpmaTn Ioro INUHy.
8 TEXHlUHE OBCJlyROByBAHHaT A DOrIaD

HEBE3NEKA!
3arpo3a KNTTIO uepe3 HeHaJIeXHe 06CnyroByBaHHa
O6cnyrobyBaHH HeKBaJIiΦiKOBaHIMN Oco6amn, a TAKoX BnKOpNCtAHn HeD03-BOJeHx 3apanChnx YactNH MoKyTb PnBecTN Do cepNo3HN TpaBM i HabiTb Do Cmepti niJ qac po6OtN.
He 3HimaTe 3aNo6ixHi npNCTocyBaHHa I He BnBObTe ix 3 naDy.
BnKOpncToByte TiIbKn Do3BOJeHi opnirHaJIbHi 3anachi YactuHn.
IpekeohaiTecra, 0 npncpti3haXoHTbcBpo6oyomy i nctomyCTaHI uJxom peryIpyHoro i HaneKHOO6cIyROByBaHH.

HEBE3NEKAI
Pn3nk cmepti a6o Tjkknx TpaBM.
Pn3nk cmepti a6o cepno3Hx TpaBM uepe3 HeBIMKHeHn DBNyH.
Bci onepauii BIKOHyOTbc3 BN-MKHeHIM DBNrHyOM.

OBEPEXHOI
He6e3neKa TpaBMyBaHHa
Pyxomi Detani Ta Detani 3 roctpumkpaam MOkyb npn3Bectn Do TpaBM.
3abxHn Hocitb 3axnci pykabu n iD Yac Texhichoro ocbnyrobyBaHHa, DOrJy Ta ouHcHHe
I IpaBnIbHe TexO6cnyroByBaHHraE rONOBHnM dIa 36epeXeHHaNepBicHnx ekCnpyataiHnX xapaKTePncTnK iHaDInHOCTi niD Yac po-6OTn MaunHn.
CπiδκηγιTe 3a TmM, Σοδ rαικN i ΓΒνΗΤι 6υπι 3aTЯгнуTi, ζε ποЗнayatʌmE, ΣΟ Maшина 6e3neuHa πι ἀς ροθτι.
YkoHomy pa3i He BnKOpNCTOBuYe npn-ctpi 3i 3HOWeHmN a6o NOnKoJKeHmN qa-CTnHAM. NOnKoJKeHi DeTani cIiD 3aBxDi 3amIHOBaTI, IX He MoXHa pEmOHTyBaTI.
Ipeen npoBeHnHm po6it 3 texHiHoro o6cnyroByBaHHa:
3ynnHItb DnHyH i Do3BOJbTe Nomy OxOnohyTN.
BnmiTb cbiyKy 3anaIIOBaHHr.
PiJyacpo60Tu3nIJIaHbHmJaHcIOromHa- TaIe 3axuChi pyKaBnKn.
HaiaraTe 3axnchy KpnKy, 3a BInHrTKOM BnapKIB, KOI npauoTe 6e3nocepHbO 3 HapRMHO uHIO afo 3 nIIJIbHM NaHcHOrom.
He po3nBaIe B HABKOIIHbOMy cepeoBnI MaCTnIO, 6eH3IN Ta iHsi 3a6pydHiOuippeoBHH.
8.1 MoHTaX/ДeMOHTaX KpUshKn NOBITpyHoro ФiNbTpA (20)
Demontax KpnuKn nobitprHoro pInbtpa
- BCTaBTe BnKpyTKy MIX 3anobixHOIO cKOBOIO (20/1) i KpNshkoH NOBITPraHoro fIbTpa (20/2).
- 3a donomoro BnKpyKn BntTnHtB (20/a) 3a-nobixHy cKoby 3 KpnuKN nobITpHaHOro pInb-tpa.
- 3HIMITb (20/c) KpNkky NOBITpyHoro φINbTpα 3 npNCtpoI.
MoHTaK KpNshKn NOBITpyHoro 0inbtpa
- Nocyhte 3nuk (20/3) KpnknoBipraHoro Ibtpa nKopnycom, a Notim BCTaHObitb Kpnky nobipraHoro IbTpHa npncpii.
2.ПиТиСkaIte (20/b)ЗanobixHi ckO6n (20/1) Na KpNiUoi NOBITprHOrO φINbTpA Do KnaCaH Hr.
8.2 OuHnHn NOBITpyHoro fNbTpa (21)
YBAI!
He6e3neka uepe3 3a6pydHeHH, He-cnpabHocti a6o BiDcyTHictb NOBITpHoro pIbTpTa
BnHy npncpo CXnbHn Do Hno- npabHnx nookxKeHb y pa3i 3a6pyd- HeHH, HecnpabHOcti a6o BiCyTHOCTI nobitpHoro fInbtpa.
OuHHeHH NOBITPnHO FOJIbTpA dyXe BaxKnBe dIra napHOi pOboTu i TpNBanoro TepmiHy cnyx6n npNcTpo. He npaIOte 6e3 nobITPnHO FOINbTpA a6o 3 NOnKoJKeHM NOBITPnHM FOINbTpOM,ue 3aBdactb DBNrHy UsKOJKeHb.
OuHHeHH BnKOHyeTbcya Hepe3 KoxHi 15 roDnH po60Tu.
■ΦIbtpyBaHn eJemEHT He MoKHa npaTn i NOro Heo6xIDHO 3aBXdN3amIHOBaTn, OoiHO BiH CTae 3aHaDTo 3a6pydHeHn a6o NowkoJKeHn.
Demontk NOBITpHoro pInbTpA
- 3ynnHtB dBHyH i D03BOJbTe Nomy oxoohyTN.
- 3HIMITb KpUkU NOBITpHoro fInbTpA (INB. po3di8.1 "MoHmax/DeMOHmax KpuuKu NoEimpHHOz fInbmpa (20), cmopinka 511).
3.Ocna6Te raay-6apAHnK (21/1). - NotarytB Bropy (21/a) noBITpyHn iNbTp (21/2).
- 3akpnTe BnycknO OTBip (21/3) uNcToIO TkaHHHOIO. Lc dONOMOKe yHnKHyTN noTppannHnHaCTnHOK 6pyDy B KaMepy Kap6Iopatopa.
- BiДКЛIOUчITb OБиДВI YaCtИH NOBiTPaHOrO ФЛьТра (21/4).
Nouctitb nobitpHn fibtp
- OuHCTIb HeJIOHOBn fIbTp neH3Jem a60 TOHKOU 5ITKOU, JaKuo Heo6XiHo, akypaTHO npOdyIte CTNCHeHM NOBITpy 3cepeDHH Ha-3OBHi.
MONTAX NOBITPraHoro qinbtpa
- 36epitb oBnBi yactHn noBipraHoro pInb-tpa (21/4).
- BCTaBTe (21/b) NOBITpHn IbTp (21/2) y Bnyckn OTBip (21/3).
- 3aTЯHITb NOBITpHn ΦiNbTp 3a DONOMOROraKu (21/1).
8.3 Ipebeipka/3aMiHa CbiuKn 3anaIIOBaHHa (22, 23)
Y pa3i NOwKOJxHHe i3OJauii, CnBHoro 3Hocy eNeKtpoDIB a6o CnBHoro 3a6pydHeHHeNEKtpoDIB MaCTINOM, cIiD 3amHHTn CBiUky 3anaIOBaHH.
PiDrotyBaHHa
- 3ynHITb DnHyH i Oo3BOJbTe Nomy oxoOnohyTN.
2.3HIMITb KpUkU NOBITPraO pINbTpa (nVB. po3di 8.1 "MOnmax/DeMoHmax KpuuKu noEimpno0 fInbmpa (20),cmopinka 511). - 3HIMITb HakoHeuHK CBiKu 3aNaJIIOBaHHa (22/1).
Ipebeipka BiDcTaHi mix eNeKtpoamn (23)
- BnIMt b CbiKy 3anaIOBaHHa (22/2) 3a DOnOMoroHO HABHOrO KOMbIHOBaHOrO raIKOBOROKIHOyA.
- OuHCTIb (23/1) eNeKTpOuTkoIO.
- BumipraTe (23/2) BiDcTaHb. BiDcTaHb Mae CTaHOBHTU 0,6-0,7 MM.
3aMiHa CbiUKN 3anaJIIOBaHHN
- BnmiTb cbiy 3anaIOBaHHa (22/2) 3a donoMoroIO HAIBHO KOM6iHOBAHO raIKOBORO KIOUa.
- YkpyTitb HOBy cBiKy 3anaHOBaHHn Do KnaLcAHHa.
- BctaHOBITb KOBnaOc CBiUKN 3anaIOBaHHHa CBiKy 3anaIOBaHH.
8.4 HanpMaHa 1nHa (25, 27)
3a06 3anobirn acmeptnuHomy 3Hocy, HapymHy uHy cnid peryIpaHo MiHrtn.
Heo6xio HO BnKohyBaTu Taki pOboTu 3 TexHiuHoro
06cnyroByBaHHa:
3maueHHnpiDwnnHnka 3ipouKn HnnpMHOI nn (27).
OuHHeHHraHKn HApPmHOi 3a DOnOMoHO CKpe6Ka (He BXoHTb B KOMnNeKT NoCTaBKn) (25).
OunuehnnoTbopibJna3MaueHHN.
Плоским НаннКOM ВидаяТи 3адирkn 3 60- kIB i BupiBHOВATn MOxЛИВу HeBiДNOBIДHiCTb piBHiB mix HaNPaMHmN.
Cni3amHHTn HnprMHy uHHy, aKUo:
Tn6Ha BIMK MeHsA 3a BucOTy NaHOK (aKi HIKON He NOBHHI TOPKaTcRdHa);
BHyTpIiHr CTiHka HnPamMHOI 3HOWeHa Ha-CTiINbKn, IIO NaHcIg HaxnIeTbcra B6ik.
8.5 HataraHHnIaJIbHoro naHcIora (24)

HEB3NEKA!
He6e3neka dIJI KNTTJYepe3 BiDauY!
HenpaBnIbHO 3aToUeHn nnIbHn IaHOr 36IbWye pn3NK BiDaqi i, TaKIM YINOM, pN3NK CMePeTJIbHNX TpaBM.
IpaBnIbHo 3aTooyTe nIIaIbHn IaH-ior, 06 3MeHUnTn pN3NK BiJaqi.

ПРИМITKA
HeoCbiueHm KopnctyBaayam NaHIO-ROBnx NIOK peKOMeHyEMO BiDAtu NIIaBHN LaHcIg dJa 3aToCyBaHHy cepBiChy cnyk6y.
3 MipkyBaHb 6e3neKn Ta epeKTHBHOCTi pOboTN dyke BaXKnBO, 0o6 NnJnBn JnHcIg 6yB Do-6pe 3aToueHn.
Heo6xioBnKohyBaTu 3aToeHH, KOIN:
BnD TnpCn HaraDye NIN;
ДяплайнгnotpiбндokладатиЗачHi 3yCnJIJI;
NIIJIHHH HenpIeM;
36inbwyecbcbiopaia.
36inbuyetybcBnTpata naHBA.
KUO BIKOHAN3aTOyBaHHDOpyAcTbcnCneuii3OBAHOMU CEHTpy, IORO BIKOHAOHBnCneuiBHOmy 0bnaHaHHI, 0o 3a6e3neuHtMiHimaBn 3pi MaTepiany i pIBHomipHe 3aToueHNBAcix pi3aJIbHnx KpOMOK.
CamoctiHNO 3aToHTN nINJIbHN IaHIOr MOxHa 3a DoIOMOrO cneuaIbHoro KpyrIoro HannKa, diametp koro Ni6npaIoTb i3 ypaXyBaHHamnapaMeTpib IaHcIora (DVB. po3di8.10 "TaBnuu o6cny2oeyeaHnaHoua", cmopiHKa 514).Uo6 3aToHTN IaHcIor Be3 NowKoJKeHHra 3y6-UIB, Notpi6Ha HaABHicTB neBHoro DocBiNy Ta HauK.
ДяЗATOUeHnIINJIbHOrOlaHcIora:
- BumkhItb DnBryh, 3BiIbHItb ralbmo IaHcIora i MiUHO 3a6IOkyIte HAprrMHy UINHy 3 BCTaHOBJIeHIM NIIJIbHIM NaHcIOrom 3a DONo-MOROHO HAJExKHO 3ATNCKHO pNtOCyBaHN, NepeKoHaBwIsCb B TOMy, 00 NiJIaJIbHNI NaHcIg pyXaEtbcra BInbHO.
- HataHITb nIIaJIbHN JAnuO, RaIIO BIn Ocna6JeHn.
- BctaHOBiBt b HauNIOK Ha CneuiabHy HaprMHy, Notim BCTaBTe HauNIOK B 3anaDHy 3y6-ua, NiTpmyOuN NoCTiHn Haxn 3a npoFiIem pIXyO' KpOMKn.
- Ппкладиь habилok kinьka pa3iB BnKlIOHcnepeDy i nobToPiT bio DiIHO Ha BCix pi3aIb-Hnx KpOMkax y TOMy X Hanpamky (npabi a6o nibi).
5.ПомиЯнTepo3TaUyBaHHHaHnPmHOi uHHN B 3aTnCKHOMy npncTOcyBaHHi Ha npOTnJIeKHe i NOBTopiTB zu Diu Ha iHux pi3aJIbHnx KpOMkax. - Npebipte, 3o 3y6e-06mexyBaH He BnctTynae 3a Kpa npnaDy, 5O BnKOpNCTOByETbcraIg NpeBipKn, 6pO6iT MoJINBn BnCTyn PLOCKIM HAnlKOM, 3akpyrInBUn npOphiInb.
7.ПиязяЗатоуehнЯВидaniITb Bci cniДиOBpo6- KI INI HANIKOM I 3MaCTITb NINJbHNI NaHcIgY MaCTINbHi BaHHI.
Cni3amHHTNaHcIg, KOIN:
Довхиha pixyuoi KpOMKn 3HnKyETbca Do 5 MM a6o MeHwe;
3a HaBHOCTi: He nepeBnUyTe no3HaKy Ha 3y6qx piaIbHnx IaHok;
3a3op JaHOK Ha 3aKJleNkax 3aBeInkN.
8.6 IpeBipka cncTeMn 3MaueHnHaHcIora (26)
YXODHOMy pa3i He BUKOPNCOTBynte npncptpi 6e3doCTaTHbOiT KINbKOcTI naHIOROBOrMaCTnla. IHaKWe TepMin cnyx6n npncptpo CKOpOTNbcr. Tomy nepe3anyckom nepeBipraTe pIBeh MaCTnla B MacnHOMy baky Ta noDauy MaCTnla.
- 3anycttb npnctpi
- TpmaTe pOboOnn nIJIbHn NaHOr npI6N3HO Ha 15 cm HAd nHem a6o NiIXOJaUOIOBepxHeIo.
y pa3i doCTaTHboi KINbKOci 3Ma3KN Ha nHi yTBoPioetbcra Nerka MacnaHa nnibka (26/1).
8.7 BctaHOBJIeHHn CnCTEmn 3MaueHHn JauHcIora (28)

HEBE3NEKA!
Pn3nk cmepti a6o TjKkTx TpaBM.
Pn3nk Cmepti a6o cepno3Hnx TpaBM uepe3 HeBIMKHeHn DBNyH.
Bci onepauii BIKOHHyOTbcra 3 BN-MKHeHIM DUNIyHOM.
BntpaTamapeyIIOEb83aDOnOMoTOpeyIIOBaIbHOToBnHTa.PeyIIOBaIbHnI BnHT 3haxOHTbcBnHXHiYacTnHi npCTpOo (28/1). BnKOpNCtOByTe HeBeNkUBy BnKpyTKy dnnpeyIIOBaHHBNTpaTn:
3a TOnHHNKOBOIO CTPIJKOIO JINMa MeHsoi BNTPaTN
IpoTn rOaHHNKOBoi cTpiIKn dJa 6iJbwoi BHTpaTn
Perynno nepeBipraTe, nn doCTaTHbO MaCTnA B MacnHomy 6aky.
8.8 IpekeohaTeC, 0o nIyIbHn IaHIOr 3ynHReTbcra Ha XOIOCTOMy XOdy

PONEPEKHEHHI
He6e3neKa, NOB'3aHa 3 pyxOMm nIJIbHIM NaHcIOrom
Pyxomn nIyIbHn IaHcIor MoKe npuBecTu Do He6e3neHnx DnJ XHTT TaBm Ni d ac po6oTu Ha XOIOCTOMy XOdy.
YxodHomy pa3i He npaouTe 3 NaHIOROBOI NINOIO, KOIN NIIJIb-HN IaHOr npaioE Ha XOIOCTOMy XOy.
Ipeed KOxHnM BnKOpNCtAHHm peBipraTe, YN 3yINHnBCa NIIaJIbHn NaHcIg, KOnI DnRHyN npaIOc Ha XONOCTOMy XOdy.
- 3anycitb DnurHy i daaTe Nomy nonpaKOBa- Tn Ha XOIOCTOMy XoDi.
- IpepeKoHaITeC8, 10 nIIaJIbHn JaHcIor HepyxOMn.
3.Якwo nIJIbHn IaHcIg nepeMiuaeTbcra, MOKytb BUNKHUTN Taki NOMJIKN:
3aHaTb BnCOKa Yactota OeepTaHnHa XoIOCTOMy XOy (DVB. po3di 8.9 "BcmaHOBJIeHHa YacmOmu OeepMaHHa XoIOcmomy XOy Ha Kap6Iopamopi", cmOpiHa 513).
HecnpabHicTB,3a6pydHeHHa6o HenpaBnIbHe BCTaHOBHeHHMyΦTn. 3BepHiTbcrdo cepbiCHoro ueHTpy KOMnaHii AL-KO.
8.9 BctaHOBHeHHaCTOTn 06ePTaHHHa XOJocTOMy XoMy Ha Kap6IopaTopi
Yactota o6epTaHH Ha XOIOCTOMy XOdy Bka3aHa B TexhiHnx xapaKtepnctnKax (DHB. po3din 13 "TexhiHx xapaKmepucmuKu", cmopiHka 518). II MOXHa HanaHTyBaTn 3a DOonomoTO Taxometpa. RaKIO yactota o6epTaHH Ha XOIOCTOMy XOdy 3aDaHa npabInbHO, DBNrH 6yde pauObaTn, i INIJIbHn IaHcIg He 6yde pyxatncs. 3aJeXHo BiD Micu BnKOpNCtaHHra (Ropn, Hn3HN) NOTpi6He KOpNryBaHH Ha OIOCTOrO XOdy 3a DOonomoTO CTOnOPHOro TBnHTa «T».

PIMITKA
PerynIOBaJIbHI rBHTn dIra roipoyoi cymi- i npx xOIOCTOMy xdI «L» i NOBHOro HabaHTaXeHHRAH>MOKe peryIOBaTn TiIbKn cepBicHNI cEHr AL-KO.
PnIJIbHn IaHcIor nepemiuotbc8e3 nodaqi rasy:
Yactota o6epTaHHHa XoNocTomy XOy 3aHaTTO BnCoka.
- Tpoxn noBepHitb rBnHT «T» (11/5) npotn roDHHNKOBoi cTpiIKN, DOKN NIIJIbHn NaHcIg He nepeCTaHe pyxaTncr.
BnHy3aBXd3yHnHcTbCra,KaOra3He nOdaCTbcR:
Yactota o6epTaHHa XoNocTomy XOy 3aHaTTO Hn3bKa.
- TpOxN NOBepHITb rBnHT xOJocTOrO xOy «T» (11/5) 3a roDHHNKOBoIO cTpIKNo, DOKN DBnRVH He noUHe pauuOBaTn PJIaBHO.
KUO ONTUMaJIbHe peryNJIOBaHHaKap6IopaTopa ⅢJXOM OeptAHnCTONOPHOro TBnHTa XOnocToHO xOy《T》HEMOxNBE,3BepHITbCnAOnOTMaNb-HORo peryNJIOBaHHaB CepBicn UeHTp AL-KO.
8.10 Ta6nua o6cnyroByBaHHaHnOra

NONEPEDKEHHRA!
Pn3nk OTpMaHHcepNo3Hx TpaBM.
BnKOpNCaHHa naHcIHoroi nni He cAHkuHOBaHOI nnIbHoro naHcIOra a- 6o HapmHOI uHH MoKe npNBecTn Do cepNo3Hx TpaBM.
BukopncToByTe TIlbKn caHKcioHOBaHi nIJIbHi IaHcIOrn i HaprMHi
Y Ta6nui noka3aHi 3HaueHHe nn pyi3Hnx TnIIB naHcIqIb.
9 YCYHEHHRA HECNPABHOCTEIN

OBEPEXHOI
He6e3neKa TpaBMyBaHHa
Pyxomi DeTani Ta DeTani 3 roctpumKpaMm MoKyb npn3BecTu Do TpaBM.
3aBxHn Hocitb 3axnChi pykabuNi niD Yac Texhichoro o6cnyroByBaHHa, DOrJy Ta oUeHH!

ПРИМITKA
Y pa3i BnHnKHeHH NaKoJXeHb, KI He 3a3NaYeHi B ciN Ta6nCi, a60 NoKoDxKeHb, 3 KIMN KOpNCyBaH He MoXe BnopaTnCama, CnID 3BepHyTnc DO Ha-woi CnyXb NiIDTPmKn.
www.al-ko.com/service-contacts
15「APAHTI
До 3akihueHHA CTPOky DaBHOCTi peKnaMaui, yctaHOBJeHOrO 3a 3akoHOM, Bnpo6Hk yCyBaE MOxNBI DepeKTn MaTePiaIy uBnPo6HnHi 6paK IJnxom pemOnTy a6o 3amHn (Ha cBiBnB6ip). CToPK daBHOCTI Bu3HaayetbCra 3aKOHOdABCTBOM KpaIHn, y kki npInaD 6byNo KynHeNo.
Tapaantir 36epiraetbce nIe 3a TaKnx yMOB:
TapaHTia anyHIOeTbCra 3a TaKnx yMOB:
IotpmyTeCzBoro noci6Hnka 3 ekcnnyatauii
CamaobinbHn peMOHT
BukopncTaHH npUaHy 3a npuHaeHHaM
CamaBihha 3MiHa TexHiHnx XapaKTePncTnK
BukopncTaHHOpriHaJIbHx3aIyactnH
BnKOpIcTaHHHe 3a npu3HaueHHaM
TapaTia He nouHpoetbca Ha:
I OwkoJxHnJaKoap6OBOrO NOKpTTa, CnpuHHe 3BnuAHm 3HOUyBaHHM
YactHnH, 3HOyIOBcR, No3HaueHi y BiIDOMocTI 3anachnx YactHn paMkoIO; xxxxx (X)
BbHyHn BHyTpiiHbOro 3ropaHHa (ie rapaHTiBnpo6HnKa DbHyHa)
BidiRapaHTIHorO TepmiHy po3noHnaeTbcra 3 daTu npud6aHHn Bnpo6y nepuHm KInueBm CNOXNaYcH. DaTa npud6aHHn Bka3aHa B yeky. Y pa3i BuHnKHeHHra rapaHTiHorO BnnaDky 3BepHiTbcra 3 iEIO 3aBOTo Ta opirHaiom KBntaHci, lo NiTBePdxKy e NOKyny, do CBORO DnJepa a6o B Hau6JInxKyu ABTOpN3OBaHy cepbichy cnj6y. Lc rapaHTiHe 3obov'3aHHn He 3MiHoc BCTaHOBneHi 3akOHom PpeTeH3II NOKynrdo npodabzur.
16 PEKJIAD OPINIHJIbHOI DEKJIAPAciB IIDIOBIDHOCTI CTAHAPTAM EC
Mn 3aBnEMo, uo cei Bpi6 y fOpmi, B kii BIn npedctabneHn Ha pNHky, BiNobiJae BmOram rapMOHi3OBaHnx DnpeKtNB EC, cTaNdaptiB 6e3neKn EC i 3actocOBHx Do Hboro cTaNdaptiB.
Bupi6
JaHcIyOrBa nnJa
CepiHnHOMep
G4011022
Bnpo6Hnk
AL-KO Geräte GmbH
Ichenhauser Str. 14
D-89359Kotz
YnoBHOBaXeHa OcO6a, 0o cKlaJaDOKyMeHTaIIO
Andreas Hedrich
Ichenhauser Str. 14
D-89359Kotz
Tun
6436
6442
DnpeKTHBn EC
2006/42/EC
2014/30/EC
2000/14/EC
TapmoHizobahi cTaHdaptu
BIMipraHn/rapaHToBaHn
6436:109,9/113 έB(A)
6442:110,0/113 dБ(A)
7.4 Aagaci enine kesme (17, 18, 19)
Dr. Wolfgang Hergeth Managing Director