CS 3635 - Saw SOLO - Free user manual and instructions
Find the device manual for free CS 3635 SOLO in PDF.

| Product type | Cordless chainsaw |
| Brand | Solo (AL-KO system) |
| Model | CS 3635 |
| Guide bar length | 35 cm |
| Weight (with guide bar and chain) | 4.1 kg |
| Power supply | Lithium-ion battery 36 V (AL-KO 36V system) |
| Maximum chain speed | 24 m/s |
| Chain oil tank volume | 280 ml |
| Chain brake | Combined electric and mechanical brake, braking time < 0.15 s |
| Overload protection | Integrated, automatically stops the device in case of overload |
| Sound power level (L_wA) | 101.3 dB(A) (K=3 dB(A)) |
| Sound pressure level (L_pA) | 93.3 dB(A) (K=3 dB(A)) |
| Vibration value (EN 62841-4-1) | 3.257 m/s² (K=1.5 m/s²) |
| Intended use | Sawing light wood: cutting wood, pruning, felling small trees, firewood |
| Safety devices | Chain brake, start lock, hand guard, overload protection |
| Regular maintenance | Air filter cleaning, chain sharpening, tension check, automatic lubrication |
| Chain/guide bar references | Chain 90PX052X (127736), Guide bar 144MLEA041 (127737) |
| Warranty | Statutory warranty against manufacturing defects (repair or replacement) |
| After-sales service | www.alko-garden.com/service-contacts |
Frequently Asked Questions - CS 3635 SOLO
User questions about CS 3635 SOLO
0 question about this device. Answer the ones you know or ask your own.
Ask a new question about this device
Download the instructions for your Saw in PDF format for free! Find your manual CS 3635 - SOLO and take your electronic device back in hand. On this page are published all the documents necessary for the use of your device. CS 3635 by SOLO.
USER MANUAL CS 3635 SOLO
natural_image
Line drawing of a chain-linking machine (no text or symbols)


Inhaltsverzeichnis
Deutsch 8
English....31
Nederlands 52
Français....75
Español 98
Italiano 122
Slovenščina 145
Hrvatski....166
Српски....187
Polski....211
Česky 235
Slovenská 256
Magyar 278
Dansk 300
Svensk....321
Norsk 341
Suomi 361
Lietuvių 382
Latviešu 404
Român 426
български 448
Русский 473
Україна....498
© 2024
AL-KO KOBER GROUP Kötz, Germany
This documentation or excerpts therefrom may not be reproduced or disclosed to third parties without the express permission of the AL-KO KOBER GROUP.

natural_image
Line drawing of a person using a saw to cut tree bark in a forest (no text or symbols)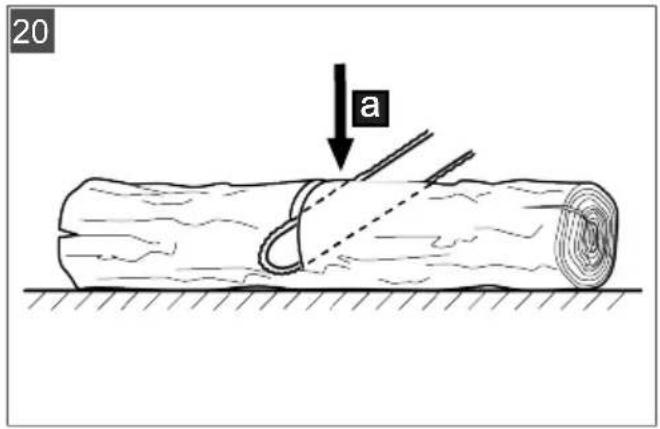
flowchart
graph TD
    A["①"] --> B["②"]
    B --> C["45°"]
    D["③"] --> E["④"]
    F["④"] --> G["④"]
    style A fill:#f9f,stroke:#333
    style B fill:#ccf,stroke:#333
    style C fill:#cfc,stroke:#333
    style D fill:#fcc,stroke:#333
    style E fill:#cff,stroke:#333
    style F fill:#ffc,stroke:#333
    style G fill:#cfc,stroke:#333

1 About these operating instructions...... 32
1.1 Symbols on the title page 32
1.2 Legends and signal words...... 32
2 Product description 32
2.1 Designated use.... 32
2.2 Possible foreseeable misuse.... 33
2.3 Residual risks ...... 33
2.4 Safety and protective devices...... 33
2.4.1 Switch-on protection.... 33
2.4.2 Chain brake/chain brake bracket. 33
2.4.3 Overload protection.... 33
2.5 Symbols on the appliance.... 33
2.5.1 Safety signs.... 33
2.5.2 Operating signs 34
2.6 Product overview (01 - 03).... 34
2.7 Scope of supply (04).... 35
2.8 Optional accessories 35
3 Safety instructions.... 35
3.1 General electrical machine safety warnings 35
3.1.1 Work area safety 35
3.1.2 Electrical safety 35
3.1.3 Personal safety.... 36
3.1.4 Electrical machine use and care . 36
3.1.5 Battery machine use and care..... 36
3.1.6 Service 37
3.2 Safety instructions for chain saws ..... 37
3.3 Safety notes for rechargeable battery and charger.... 38
3.4 Safety instructions for work.... 38
3.4.1 Operator 38
3.4.2 Operating times.... 38
3.4.3 Vibration load 38
3.4.4 Noise pollution.... 39
3.4.5 Working with the chain saw..... 39
4 Installation.... 40
4.1 Installing chain bar and saw chain (05 - 08) 40
5 Commissioning 41
5.1 Charging the rechargeable battery..... 41
5.2 Checking and topping up the saw chain oil (09)....41
5.3 Testing the function of the chain brake 41
5.3.1 Testing the chain brake with motor switched off (10) 42
5.3.2 Testing the chain brake with motor switched on (10) 42
6 Operation.... 42
6.1 Checking the chain tension 42
6.2 Testing the chain brake.... 42
6.3 Determining the charge status of the battery 43
6.4 Fitting and removing the battery (11). 43
6.5 Switching the chain saw ON and OFF (12).... 43
6.6 Reducing the speed of the saw chain [ECO mode function] (13) 43
6.7 Setting the oil quantity for the saw chain (14) 43
6.8 Switching the LED light ON and OFF (15).... 43
7 Working behaviour and working technique.... 43
7.1 Felling trees (16, 17) 44
7.2 Delimbing (18).... 45
7.3 Cross-cutting (19 - 22)...... 45
7.4 Cutting converted timber 45
8 Maintenance and care 45
8.1 Cleaning the chain sprocket interior... 46
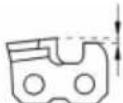
8.2 Sharpening the saw chain (23) ..... 46
8.3 Checking, turning and greasing the chain bar (24, 25) 46
8.4 Chain maintenance table 47
8.5 Cleaning the air filter (26)...... 47
9 Help in case of malfunction 47
10 Transport 48
11 Storing the appliance.... 49
12 Disposal 49
13 Technical data.... 50
14 After-Sales/Service 51
15 Information on the Declaration of Confor-
mity.... 51
16 Warranty.... 51
1 ABOUT THESE OPERATING INSTRUCTIONS
The German version is the original operating instructions. All additional language versions are translations of the original operating instructions.
- Keep these operating instructions in a safe place at all times so that they can be consulted if you need any information about the appliance.
■ Only pass on the appliance to other persons together with these operating instructions.
■ Comply with the safety and warning information in these operating instructions.
1.1 Symbols on the title page
Symbol Meaning

It is essential to read through these operating instructions carefully before start-up. This is essential for safe working and trouble-free handling.

Operating instructions
Handle Li-Ion rechargeable batteries with care! In particular, observe the notes on transport, storage and disposal in these operating instructions!
1.2 Legends and signal words
⚠️ DANGER! Denotes an imminently dangerous situation which will result in fatal or serious injury if not avoided.
WARNING! Denotes a potentially dangerous situation which can result in fatal or serious injury if not avoided.
CAUTION! Denotes a potentially dangerous situation which can result in minor or moderate injury if not avoided.
IMPORTANT! Denotes a situation which can result in material damage if not avoided.
NOTE Special instructions for ease of understanding and handling.
2 PRODUCT DESCRIPTION
These operating instructions describe a hand-held electric chain saw that is powered by a rechargeable battery.
All batteries (Bxxx Li) and chargers (Cxxx Li) from the AL-KO 36V system can be used.
IMPORTANT! Danger of damage to the appliance and battery. If the appliance is operated with an unsuitable battery, both the device and the battery may be damaged.
■ Only operate the appliance with the specified rechargeable battery.
i NOTE Further information can be found in the operating instructions for the batteries and chargers from the AL-KO 36V system:
■ Batteries: Doc. No. 441630, 443549
■ Chargers: Doc. No. 441633, 443551
2.1 Designated use
The chain saw is designed exclusively for domestic, DIY and gardening applications. In this sector, the chain saw can be used for light wood sawing work, e.g. for:
Cutting timber
Pruning hedges
Sawing firewood
■ Felling small trees (e.g. fruit trees)
Thanks to the electric drive, the battery chain saw can be used not only on open ground, but also in closed rooms for sawing wood. Any application other than that described here is regarded as misuse.
This appliance is intended solely for use in non-commercial applications. Any other use as well as unauthorised conversions or modifications are regarded as contrary to the intended use and will result in voiding of the warranty as well as loss of conformity; the manufacturer will thus decline any responsibility for damage and/or injury suffered by the user or third parties.
CAUTION! Risk of injury due to non-designated use! If wood or other substances embedded with foreign bodies are sawn with the chain saw, injury can result.
■ Only use the chain saw for light wood sawing work.
■ Before sawing wood, check for foreign bodies, e.g. nails, screws, fittings.
2.2 Possible foreseeable misuse
Do not saw off branches that are directly above or at an oblique angle above the user or other persons.
■ Do not use old oil to lubricate the saw chain.
In order to protect the environment, mineral saw chain oil should not be used.
Note: Find out whether mineral saw chain oil is prohibited in your country!
■ Do not use the appliance in a potentially explosive atmosphere.
2.3 Residual risks
Even when using the appliance as intended, there is always a certain residual risk that cannot be excluded. The following hazards cannot be ruled out due to the nature and design of the device.
■ Contact with the exposed teeth of the chain (risk of cutting).
■ Access to the moving chain (risk of cutting).
■ Sudden and unforeseen movement of the chain bar with saw chain (risk of cutting).
■ Separation of parts of the chain (e.g. risk of cutting/injury).
■ Separation of parts of the wood being worked on.
■ Impairment of hearing during work if ear defenders are not used.
2.4 Safety and protective devices
WARNING! Danger of serious injury from manipulated safety and protective devices. As a result of manipulated safety and protective devices, serious injury can occur when working with the chain saw.
■ Never deactivate safety and protective devices!
■ Only work with the chain saw if all safety and protective devices function correctly.
2.4.1 Switch-on protection
If the operator applies the throttle quickly several times in succession, the chain saw switches off for a few seconds to protect the electronics and the saw chain. In this case, wait until the chain saw can be switched on again.
2.4.2 Chain brake/chain brake bracket
The chain saw has a manual chain brake that is triggered by the chain brake bracket, for example if kickback occurs. If the chain brake is tripped, saw chain and motor are stopped immediately.
2.4.3 Overload protection
The chain saw is equipped with an overload protection which switches off in case of overload.
After a cooling-down phase, the chain saw can be switched on again.
2.5 Symbols on the appliance
2.5.1 Safety signs
| Symbol Bedeutung | |
 | Wear protective gloves! |
 | Wear sturdy shoes! |
 | Read the operation instructions before starting operation! |
 | Always operate the chain saw with both hands! |
 | Pay special attention when handling this appliance! |
 | Danger of kickback! Never saw with the tip of the chain bar! |
 | Do not operate the chain saw with one hand! |
Symbol Bedeutung
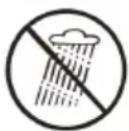
Do not use in the rain! Protect against moisture!

Wear a protective helmet, ear defenders and eye protection!
2.5.2 Operating signs
Symbol Meaning
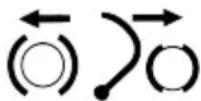
■ Push the chain brake bracket (hand guard) forwards: Apply the brake.
■ Push the chain brake bracket (hand guard) back: Release the brake.
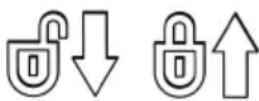
Slacken (-) or tension (+) the saw chain.
Tighten or loosen twist lock.
Saw chain running direction (under cover for chain sprocket)
Increase or decrease the lubrication of the saw chain.
Identification of the tank for the saw chain oil
Symbol Meaning

Switch the LED light on and off.

Switch between ECO and Power mode.
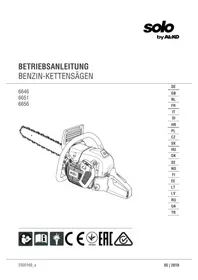
2.6 Product overview (01 - 03)
Chain saw (01, 02)
| No. Component |
| 1 Saw chain |
| 2 Chain bar |
| 3 Bumper spike |
| 4 LED light |
| 5 Chain brake bracket (hand guard) |
| 6 Handle |
| 7 Button for LED light |
| 8 Rechargeable battery cover |
| 9 ECO button: Reduce the speed of the saw chain. |
| 10 Status display |
| 11 ON/OFF button |
| 12 Release lever / presence detection |
| 13 Rear handle with gripping surface |
| 14 Throttle lever |
| 15 Chain tension adjustment wheel |
| 16 Chain sprocket cover |
| 17 Twist lock for chain sprocket cover |
| 18 Twist lock of the chain oil tank |
| 19 Viewing aperture of the chain oil tank |
| 20 Protective cover of the chain bar |
Status of the indicator lights (03)
| No. Component/display |
| 1 ON/OFF button |
No. Component/display
2 LED for chain brake (green/red):
■ Flashes green: Chain saw is in WAIT mode. The release lever (02/12) must be pressed within 5 s to switch on the chain saw.
■ Lights up green: Release lever is pressed. Chain saw is ready for operation.
■ Lights up red: Chain brake is activated.
■ Flashes red:
The overload protection device has switched off the chain saw, or
■ overheating of the chain saw or battery
3 LED for oil level (red): Lights up when the oil level is low. Top up with saw chain oil!
4 LED for ECO mode (green): Lights up when ECO mode is activated.
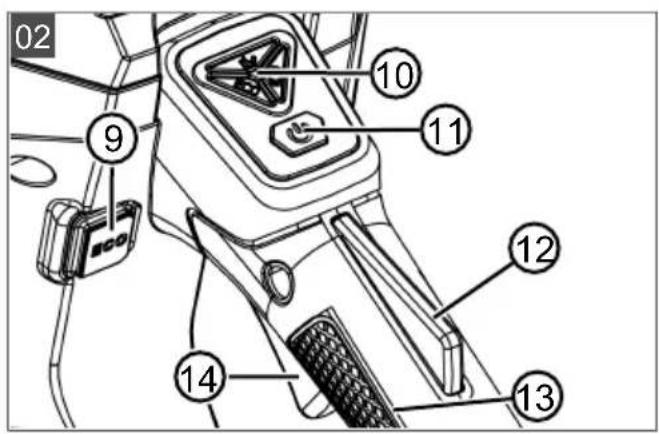
2.7 Scope of supply (04)
NOTE The rechargeable battery and the charging unit are not included.
After unpacking, check that all the components have been delivered.
No. Component
1 Battery chain saw
2 Chain bar
3 Saw chain
4 Protective cover of the chain bar
5 Operating instructions
2.8 Optional accessories
The following products can be purchased separately:
Product Item No.
| AL-KO battery belt BBA 40 113786 |
| solo by AL-KO battery belt | 127573 + |
| BB40 with battery adapter | 127579 |
Saw chains and chain bars, see chapter 8.4 "Chain maintenance table", page 47.
3 SAFETY INSTRUCTIONS
3.1 General electrical machine safety warnings
WARNING! Read all safety warnings, instructions, illustrations and specifications provided with this machine. Failure to follow all instructions listed below may result in electric shock, fire and/or serious injury.
■ Save all warnings and instructions for future reference.
The term "machine" in the warnings refers to your mains-operated (corded) machine or battery-operated (cordless) machine.
3.1.1 Work area safety
- Keep work area clean and well lit. Cluttered or dark areas invite accidents.
- Do not operate machines in explosive atmospheres, such as in the presence of flammable liquids, gases or dust. Machines create sparks which may ignite the dust or fumes.
- Keep children and bystanders away while operating a machine. Distractions can cause you to lose control.
3.1.2 Electrical safety
■ Machine plugs must match the outlet. Never modify the plug in any way. Do not use any adapter plugs with earthed (grounded) machines. Unmodified plugs and matching outlets will reduce risk of electric shock.
- Avoid body contact with earthed or grounded surfaces, such as pipes, radiators, ranges and refrigerators. There is an increased risk of electric shock if your body is earthed or grounded.
- Do not expose machines to rain or wet conditions. Water entering a machine will increase the risk of electric shock.
- Do not abuse the cord. Never use the cord for carrying, pulling or unplugging the machine. Keep cord away from heat, oil, sharp edges or moving parts. Damaged or entangled cords increase the risk of electric shock.
■ When operating a machine outdoors, use an extension cord suitable for outdoor
use. Use of a cord suitable for outdoor use reduces the risk of electric shock.
If operating a machine in a damp location is unavoidable, use a residual current device (RCD) protected supply. Use of an RCD reduces the risk of electric shock.
3.1.3 Personal safety
■ Stay alert, watch what you are doing and use common sense when operating a machine. Do not use a machine while you are tired or under the influence of drugs, alcohol or medication. A moment of inattention while operating machines may result in serious personal injury.
Use personal protective equipment. Always wear eye protection. Protective equipment such as dust mask, non-skid safety shoes, hard hat or hearing protection used for appropriate conditions will reduce personal injuries.
■ Prevent unintentional starting. Ensure the switch is in the off-position before connecting to power source and/or battery pack, picking up or carrying the machine. Carrying machines with your finger on the switch or energising machines that have the switch on invites accidents.
■ Remove any adjusting key or wrench before turning the machine on. A wrench or a key left attached to a rotating part of the machine may result in personal injury.
- Do not overreach. Keep proper footing and balance at all times. This enables better control of the machine in unexpected situations.
■ Dress properly. Do not wear loose clothing or jewellery. Keep your hair and clothing away from moving parts. Loose clothes, jewellery or long hair can be caught in moving parts.
If devices are provided for the connection of dust extraction and collection facilities, ensure these are connected and properly used. Use of dust collection can reduce dust-related hazards.
Do not let familiarity gained from frequent use of machines allow you to become complacent and ignore machine safety principles. A careless action can cause severe injury within a fraction of a second.
3.1.4 Electrical machine use and care
- Do not force the machine. Use the correct machine for your application. The correct machine will do the job better and safer at the rate for which it was designed.
- Do not use the machine if the switch does not turn it on and off. Any machine that cannot be controlled with the switch is dangerous and must be repaired.
■ Disconnect the plug from the power source and/or remove the battery pack, if detachable, from the machine before making any adjustments, changing accessories, or storing machines. Such preventive safety measures reduce the risk of starting the machine accidentally.
■ Store idle machines out of the reach of children and do not allow persons unfamiliar with the machine or these instructions to operate the machine. Machines are dangerous in the hands of untrained users. - Maintain machines and accessories. Check for misalignment or binding of moving parts, breakage of parts and any other condition that may affect the machine's operation. If damaged, have the machine repaired before use. Many accidents are caused by poorly maintained machines.
- Keep cutting tools sharp and clean. Properly maintained cutting tools with sharp cutting edges are less likely to bind and are easier to control.
Use the machine, accessories and tool bits etc. in accordance with these instructions, taking into account the working conditions and the work to be performed. Use of the machine for operations different from those intended could result in a hazardous situation. - Keep handles and grasping surfaces dry, clean and free from oil and grease. Slippery handles and grasping surfaces do not allow for safe handling and control of the machine in unexpected situations.
3.1.5 Battery machine use and care
■ Recharge only with the charger specified by the manufacturer. A charger that is suitable for one type of battery pack may create a risk of fire when used with another battery pack.
■ Use machines only with specifically designated battery packs. Use of any other battery packs may create a risk of injury and fire.
- When battery pack is not in use, keep it away from other metal objects, like paper clips, coins, keys, nails, screws or other small metal objects, that can make a connection from one terminal to another.
Shorting the battery terminals together may cause burns or a fire.
■ Under abusive conditions, liquid may be ejected from the battery; avoid contact. If contact accidentally occurs, flush with water. If liquid contacts eyes, additionally seek medical help. Liquid ejected from the battery may cause irritation or burns.
- Do not use a battery pack or tool that is damaged or modified. Damaged or modified batteries may exhibit unpredictable behaviour resulting in fire, explosion or risk of injury.
Do not expose a battery pack to fire or excessive temperature. Exposure to fire or temperature above 130°C may cause explosion.
■ Follow all charging instructions and do not charge the battery pack or machine outside the temperature range specified in the instructions. Charging improperly or at temperatures outside the specified range may damage the battery and increase the risk of fire.
3.1.6 Service
■ Have your machine serviced by a qualified repair person using only identical replacement parts. This will ensure that the safety of the machine is maintained.
■ Never service damaged battery packs.
Service of battery packs should only be performed by the manufacturer or authorized service providers.
3.2 Safety instructions for chain saws
General chain saw safety warnings
- Keep all parts of the body away from the saw chain when the chain saw is operating. Before you start the chain saw, make sure the saw chain is not contacting anything. A moment of inattention while operating chain saws may cause entanglement of your clothing or body with the saw chain.
■ Always hold the chain saw with your right hand on the rear handle and your left hand on the front handle. Holding the chain saw with a reversed hand configuration increases the risk of personal injury and should never be done.
- Hold the chain saw by insulated gripping surfaces only, because the saw chain may contact hidden wiring. Saw chains contacting a "live" wire may make exposed metal parts of the chain saw "live" and could give the operator an electric shock.
■ Wear eye protection. Further protective equipment for hearing, head, hands, legs and feet is recommended. Adequate protective equipment will reduce personal injury from flying debris or accidental contact with the saw chain.
- Do not operate a chain saw in a tree, on a ladder, from a rooftop, or any unstable support. Operation of a chain saw in this manner could result in serious personal injury.
■ Always keep proper footing and operate the chain saw only when standing on fixed, secure and level surface. Slippery or unstable surfaces may cause a loss of balance or control of the chain saw.
When cutting a limb that is under tension, be alert for spring back. When the tension in the wood fibres is released, the spring loaded limb may strike the operator and/or throw the chain saw out of control.
■ Use extreme caution when cutting brush and saplings. The slender material may catch the saw chain and be whipped toward you or pull you off balance.
- Carry the chain saw by the front handle with the chain saw switched off and away from your body. When transporting or storing the chain saw, always fit the guide bar cover. Proper handling of the chain saw will reduce the likelihood of accidental contact with the moving saw chain.
■ Follow instructions for lubricating, chain tensioning and changing the bar and chain. Improperly tensioned or lubricated chain may either break or increase the chance for kickback.
- Cut wood only. Do not use chain saw for purposes not intended. For example: do not use chain saw for cutting metal, plastic, masonry or non-wood building materi-
als. Use of the chain saw for operations different than intended could result in a hazardous situation.
Do not attempt to fell a tree until you have an understanding of the risks and how to avoid them. Serious injury could occur to the operator or bystanders while felling a tree.
■ Follow all instructions when clearing jammed material, storing or servicing the chain saw. Make sure the switch is off and the battery pack is removed. Unexpected actuation of the chain saw while clearing jammed material or servicing may result in serious personal injury.
Causes and operator prevention of kickback
Kickback may occur when the nose or tip of the guide bar touches an object, or when the wood closes in and pinches the saw chain in the cut.
Tip contact in some cases may cause a sudden reverse reaction, kicking the guide bar up and back towards the operator.
Pinching the saw chain along the top of the guide bar may push the guide bar rapidly back towards the operator.
Either of these reactions may cause you to lose control of the saw which could result in serious personal injury. Do not rely exclusively upon the safety devices built into your saw.
As a chain saw user, you should take several steps to keep your cutting jobs free from accident or injury.
Kickback is the result of chain saw misuse and/or incorrect operating procedures or conditions and can be avoided by taking proper precautions as given below:
- Maintain a firm grip, with thumbs and fingers encircling the chain saw handles, with both hands on the saw and position your body and arm to allow you to resist kickback forces. Kickback forces can be controlled by the operator, if proper precautions are taken. Do not let go of the chain saw.
Do not overreach and do not cut above shoulder height. This helps prevent unintended tip contact and enables better control of the chain saw in unexpected situations.
■ Only use replacement guide bars and saw chains specified by the manufacturer. In-correct replacement guide bars and saw chains may cause chain breakage and/or kickback.
- Follow the manufacturer's sharpening and maintenance instructions for the saw chain. Decreasing the depth gauge height can lead to increased kickback.
3.3 Safety notes for rechargeable battery and charger
Please observe the safety instructions for the battery and charger in the separate operating instructions:
Batteries: Doc. No. 441630, 443549
■ Chargers: Doc. No. 441633, 443551
3.4 Safety instructions for work
■ Heed the country-specific safety regulations, e.g. from the relevant trade associations, social security systems, authorities for industrial safety.
■ Only work in sufficient daylight or artificial lighting.
- Keep the working area free from objects (e.g. off-cuts) – danger of stumbling.
■ The user is responsible for accidents involving other people and their property.
If you are working with a chain saw for the first time:
- Have the salesperson or another expert explain the operation of the chain saw, or attend a course.
Prior to the first use, at the very least practice cutting round wood on a saw frame or stand.
3.4.1 Operator
■ Young people under 16 years of age and people who do not know the operating instructions are not allowed to use the tool.
To operate the chain saw, you must be rest-ed and in good physical and mental health. If you must not exert yourself for health reasons, ask your doctor whether it is possible to work with a chain saw.
3.4.2 Operating times
Heed the country-specific regulations for the operating times of chain saws. The operating times of chain saws can be limited by national and local regulations.
3.4.3 Vibration load
■ Danger due to vibration
The actual magnitude of the vibration emissions during the use of the appliance may deviate from that stated by the manufacturer.
Observe the following influencing factors before or during use:
Is the appliance being used as intended?
Is the material being cut or processed in the proper manner?
Is the appliance in a proper condition of use?
Is the cutting tool properly sharpened or is the correct cutting tool installed?
Are the handle grips and any optional vibration grips mounted, and are they firmly attached to the appliance?
■ Only operate the tool at the motor speed required for the respective work. Avoid using the maximum speed in order to reduce noise and vibrations.
The noise and vibrations of the tool may increase due to improper use and maintenance. This leads to health damage. In this case, immediately switch off the tool and have it repaired by an authorised service workshop.
The degree of stress due to vibration depends on the work to be performed or on the use of the tool. Estimate the stress and plan appropriate work breaks. This considerably reduces stress due to vibration over the entire working time.
- Extensive use of the tool exposes the operator to vibrations, which can lead to circulatory issues ("white fingers"). To avoid this risk, wear gloves and keep your hands warm. If any symptoms of "white fingers" occur, immediately consult a physician. These symptoms include: Numbness, loss of feeling, tingling, itching, pain, reduced muscular strength, changes in the colour or condition of the skin. Normally these conditions affect the fingers, hands or pulse. The risk increases at low temperatures.
Take long breaks during your working day so you can recover from the noise and the vibrations. Plan your work in such a way that the use of appliances that generate strong vibrations is spread over several days.
If you notice an unpleasant sensation or discolouration of the skin on your hands when using the tool, stop work immediately. Take sufficient work breaks. Without sufficient breaks, a hand/arm vibration syndrome can occur.
- Minimise your risk of being exposed to vibrations. Maintain the tool according to the instructions in the operating instructions.
If the tool is used frequently, contact your dealer to purchase anti-vibration accessories (e.g. handles). - Avoid working with the tool at temperatures below 10 °C. Define how the vibration load can be limited in a work plan.
3.4.4 Noise pollution
A certain level of noise exposure from this appliance is inevitable. Carry out noisy work at approved and specified time periods. Observe rest periods as necessary and restrict the duration of the work to a minimum. For your personal protection and protection of persons in the vicinity, appropriate hearing protection must be worn.
3.4.5 Working with the chain saw
WARNING! Danger of serious injury. If an incompletely mounted chain saw is used, serious injury can be caused.
■ Only use the chain saw when it has been fully mounted.
Before each use, perform a visual inspection in order to check that the chain saw is complete and does not contain damaged or worn components. Safety and protective devices must be intact.
WARNING! Risk of injury due to chain saw being started inadvertently. A chain saw that is started inadvertently can lead to serious injury. Therefore, remove the rechargeable battery during:
■ Inspection, adjusting and cleaning work
■ Work on the cutting equipment
■ Leaving the chain saw
Transport
Storage
■ Maintenance and repair work
Danger
■ Never work alone.
■ Always keep a first-aid kit to hand in case of accidents.
- Avoid touching metal objects in the ground or which are conductively connected to the ground.
■ The personal protective equipment comprises:
- Protective helmet
■ Hearing protection (e.g. ear defenders, especially when working for than 2.5 hours a day)
■ Protective glasses or face visor of the protective helmet
■ Protective trousers with cut protection in-lay
Sturdy working gloves
■ Safety boots with high-grip sole and steel toe caps
- Do not use the chain saw above shoulder height as safe handling is no longer possible in this position.
■ When changing position, switch off the motor and fit the chain guard.
- When chain saws are not in use, always fit the chain guard and remove the battery.
■ Switch off the chain saw before putting it down.
- Do not use the chain saw for levering or moving wood.
■ Only specialist personnel are allowed to saw trunks that are thicker than the length of the chain bar.
■ Only start the cut once the saw chain is running; never switch on the saw with the saw chain already in the kerf.
■ Make sure that no saw chain oil gets onto the ground.
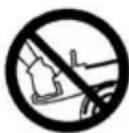
- Do not undertake sawing work in the rain, snow or stormy weather.
■ Never disable safety and protective devices.
■ Position the cable between battery and chain saw so that it does not get caught on branches or similar when cutting.
4 INSTALLATION
WARNING! Danger of serious injury. If an incompletely mounted chain saw is used, serious injury can be caused.
■ Only use the chain saw when it has been fully mounted.
Before each use, perform a visual inspection in order to check that the chain saw is complete and does not contain damaged or worn components. Safety and protective devices must be intact.
CAUTION! Danger of laceration injuries.
The sharp edges of the saw chain can cause laceration injuries when assembling.
■ Before installation, remove the rechargeable battery.
■ Wear safety gloves when installing the saw chain and the guide rail.
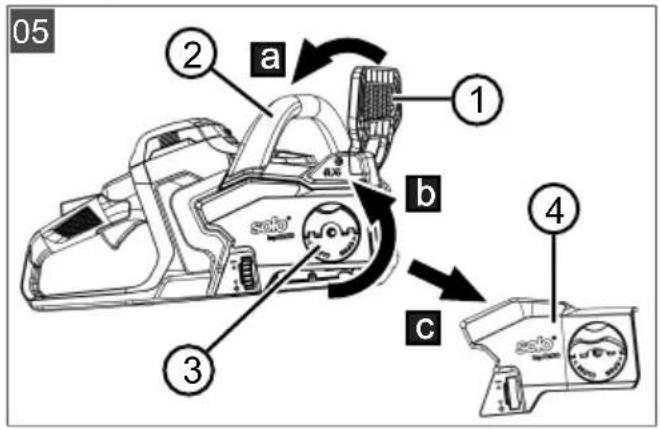
4.1 Installing chain bar and saw chain (05 - 08)
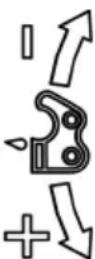
- Pull chain brake bracket (05/1) in the direction of bow handle (05/2) (05/a) in order to release the chain brake.
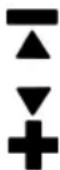
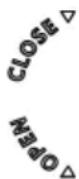
- Fold out twist lock (05/3) and turn in OPEN direction (05/b).
- Remove chain sprocket cover (05/4) (05/c).
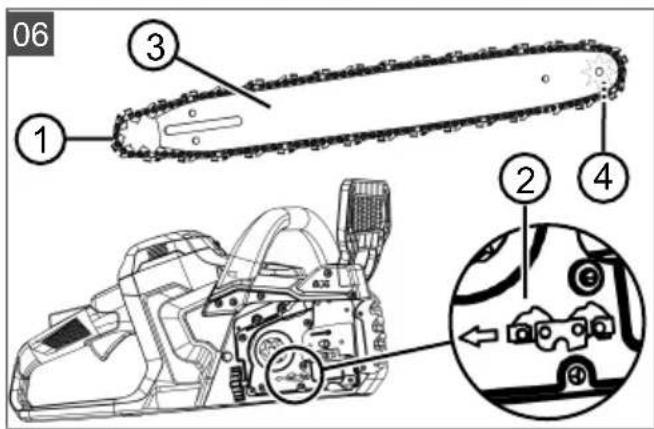
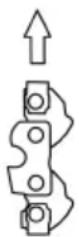
Installing the chain bar with saw chain
- Place the saw chain (06/1) around the chain bar (06/3) in the direction of travel (06/2). Ensure that the saw chain is fully in the chain bar groove and has been guided around the reversing sprocket (06/4) of the chain bar.
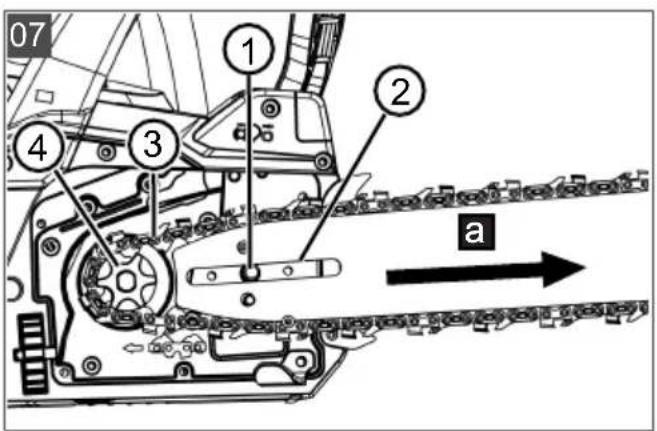
- Fitting the chain bar with saw chain on the chain saw:
■ The guide pin (07/1) must be engaged in the slot (07/2) of the chain bar.
■ The saw chain (07/3) must be placed around the sprocket (07/4).
- Push the chain bar with saw chain forwards as far as it will go (07/a).
- Fit the chain sprocket cover again.
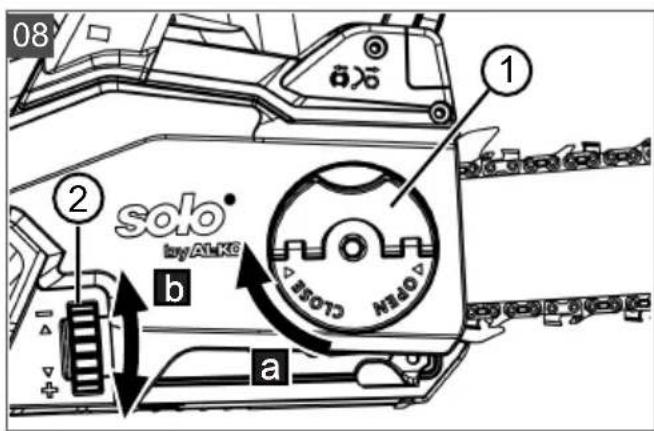
- Turn the twist lock (08/1) in CLOSE direction (08/a) and fold in the twist lock.
Adjusting the tension of the saw chain
- Turn adjustment wheel (08/2) (08/b) to set the chain tension:
■ Tension the saw chain: +
■ Slacken the saw chain: -
NOTE The saw chain has been tensioned correctly when:
It is in contact with the underside of the guide rail and can be pulled through by hand.
It can be lifted by 3 – 4 mm in the middle of the guide rail.
5 COMMISSIONING
⚠️ DANGER! Danger of fatal injury and danger of extremely severe injury. Lack of knowledge of the safety instructions and operating instructions can lead to extremely serious and even fatal injury.
Read and follow all safety instructions and instructions for use in these operating instructions as well the operating instructions which are referred to before you start using the chain saw.
WARNING! Danger of serious injury. Serious injury can be caused if there are damaged components on the chain saw.
Before each use, perform a visual inspection in order to check that the chain saw is complete and does not contain damaged or worn components. Safety and protective devices must be intact.
5.1 Charging the rechargeable battery
The battery and charger are not included. All batteries (Bxxx Li) and chargers (Cxxx Li) from the AL-KO 36V system can be used.
The rechargeable battery is partially charged. Fully charge the rechargeable battery before using it for the first time. The rechargeable battery can be charged in any charge status. Interrupting charging does not damage the rechargeable battery.
i NOTE Further information can be found in the operating instructions for the batteries and chargers from the AL-KO 36V system:
■ Batteries: Doc. No. 441630, 443549
■ Chargers: Doc. No. 441633, 443551
CAUTION! Danger of fire during
charging! Due to heating of the charger, there is a danger of fire if it is placed on an inflammable surface and is not adequately ventilated.
■ Always use the charger on a non-inflammable surface or in a non-combustible environment.
If available: Keep the ventilation slots free.
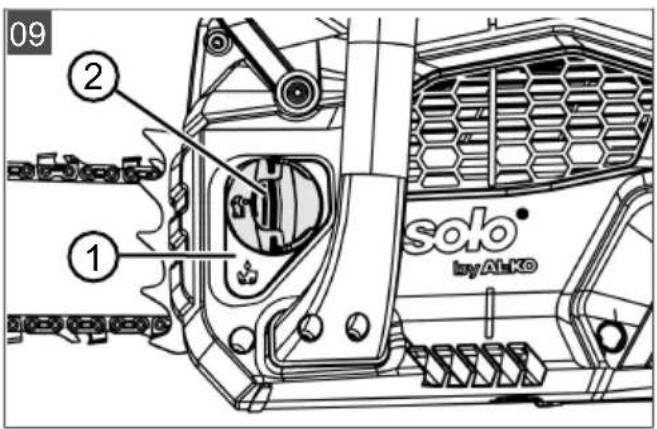
5.2 Checking and topping up the saw chain oil (09)
IMPORTANT! Danger of damaging the chain saw. The chain saw will be severely damaged if there is too little or even no saw chain oil in the tank or if it has dried/is sticky. Dried/sticky saw chain oil can lead to damage to oil-channelling components and the oil pump. Damage also occurs if used oil is used. The use of used oil leads to environmental damage!
■ For start-up work, fill saw chain oil into the tank.
■ Do not use any used oil!
■ Each time before changing the rechargeable battery at the latest, fill the tank with saw chain oil again.
The saw chain and chain bar are continuously supplied with oil during operation by means of an automatic oiler system. The saw chain oil protects against corrosion and premature wear.
There must always be sufficient saw chain oil in the tank to adequately lubricate the saw chain.
Use only environmentally friendly, biodegradable, high-quality saw chain oil for lubrication of the saw chain and chain bar. This oil must be transported and stored in approved and appropriately labelled containers.
Filling with saw chain oil
- Tilt the chain saw so that the chain oil tank (09/1) is at the top.
- Unscrew the plug (09/2) of the chain oil tank.
- Fill the chain oil tank completely with saw chain oil.
- Close the chain oil tank again with the plug.
Checking the oil level
Every time before starting work or at each battery change, check the oil level and top up the saw chain oil if necessary.
- Press the ON/OFF button (02/11) to switch on the chain saw.
- Check whether the red LED (03/3) for low oil level lights up in the status display.
- If the LED is red: Top up with saw chain oil.
5.3 Testing the function of the chain brake
The chain saw has a manual chain brake that is activated by the chain brake bracket if, for example, kickback occurs.
If the chain brake is activated, saw chain and motor are stopped immediately.
⚠️ DANGER! Danger of fatal injury as a result of negligent handling! Extremely serious injury and even fatal injury can be caused as a result of careless and unexpected movements of the chain saw.
- Pay attention to safety and work with a high level of concentration when using the chain saw.
- Do not press any switch when releasing the chain brake.
⚠ WARNING! Danger of fatal injury and danger of extremely severe injury due to a defective chain brake. If the chain brake does not function, the operator may be very seriously injured or even killed by the running saw chain, e.g. In the event of a kickback.
- Check the chain brake each time before starting work.
- Do not switch the chain saw on if the chain brake is defective. in this case, have the chain saw checked in a customer service workshop.
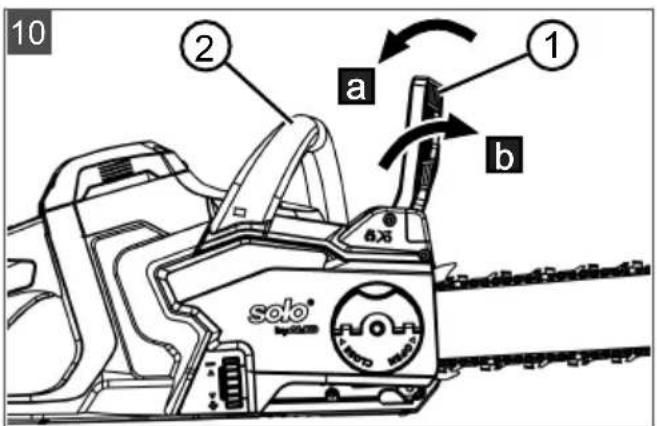
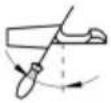
5.3.1 Testing the chain brake with motor switched off (10)
- Pull out the rechargeable battery (see chapter 6.4 "Fitting and removing the battery (11)", page 43).
- To release the chain brake, pull chain brake bracket (10/1) in the direction of bow handle (10/2) (10/a). The saw chain can be pulled through by hand.
- Push chain brake bracket (10/1) forwards (10/b) to activate the chain brake. It must not be possible to pull the saw chain through.
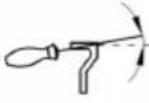
5.3.2 Testing the chain brake with motor switched on (10)
i NOTE Release the chain brake each time before switching on the chain saw.
- Hold the chain saw securely and firmly at the bow handle and rear handle.
- Pull chain brake bracket (10/1) in the direction of bow handle (10/2) (10/a) to release the chain brake.
- Switch on the motor (see chapter 6.5 "Switching the chain saw ON and OFF (12)", page 43).
- Push chain brake bracket (10/1) forwards (10/b). Saw chain and motor must stop immediately. The LED for the chain brake (03/2) lights up red.
6 OPERATION
⚠️ DANGER! Danger of fatal injury and danger of extremely severe injury. Lack of knowledge of the safety instructions and operating instructions can lead to extremely serious and even fatal injury.
Read and follow all safety instructions and instructions for use in these operating instructions as well the operating instructions which are referred to before you start using the chain saw.
■ Comply with working time regulations in force in your country.
Grip the rear handle firmly with your right hand and the bow handle with your left hand, and hold them tightly.
- Do not release the handles as long as the motor is running.
■ Do not use the chain saw if you are:
Tired
Unwell
■ Under the influence of alcohol, medicines and drugs
6.1 Checking the chain tension
Frequently check the chain tension, because new saw chains stretch.
At operating temperature, the saw chain stretches and hangs down.
NOTE The saw chain has been tensioned correctly when:
It is in contact with the underside of the guide rail and can be pulled through by hand.
It can be lifted by 3 – 4 mm in the middle of the guide rail.
CAUTION! Danger of injury due to the saw chain jumping off! An insufficiently tensioned saw chain can jump off during operation and lead to injury.
■ Frequently check the chain tension. The chain tension is too low if the drive links come out of the groove on the underside of the chain bar.
■ Re-tension the saw chain properly if the chain tension is too low.
6.2 Testing the chain brake
Procedure see chapter 5.3 "Testing the function of the chain brake", page 41.
WARNING! Danger of fatal injury and danger of extremely severe injury due to a defective chain brake. If the chain brake does not function, the operator may be very seriously injured or even killed by the running saw chain, e.g. In the event of a kickback.
- Check the chain brake each time before starting work.
Do not switch the chain saw on if the chain brake is defective. in this case, have the chain saw checked in a customer service workshop.
6.3 Determining the charge status of the battery
i NOTE Further information can be found in the operating instructions for the batteries and chargers from the AL-KO 36V system:
Batteries: Doc. No. 441630, 443549
■ Chargers: Doc. No. 441633, 443551
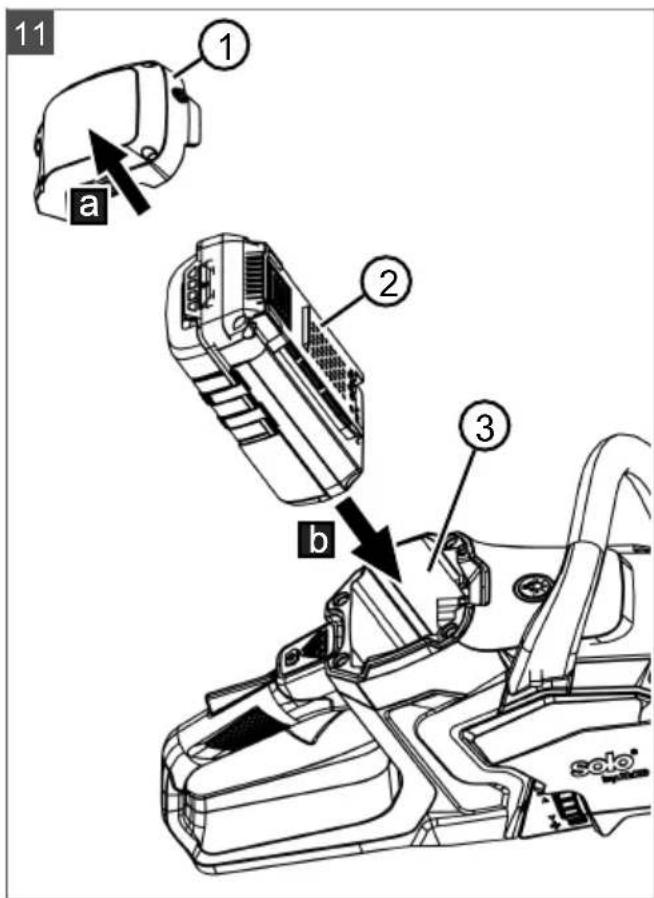
6.4 Fitting and removing the battery (11)
- Remove cover cap (11/1) (11/a).
- Push the battery (11/2) into the battery slot (11/3) from above until it engages (11/b).
- Attach the cover cap again.
Carry out the same steps to remove the battery.
6.5 Switching the chain saw ON and OFF (12)
CAUTION! Danger of hearing impairment! The operation of the chain saw causes intense noise that can cause hearing impairment.
■ During work with the chain saw, wear ear defenders.
i NOTE Release the chain brake each time before switching on the chain saw.
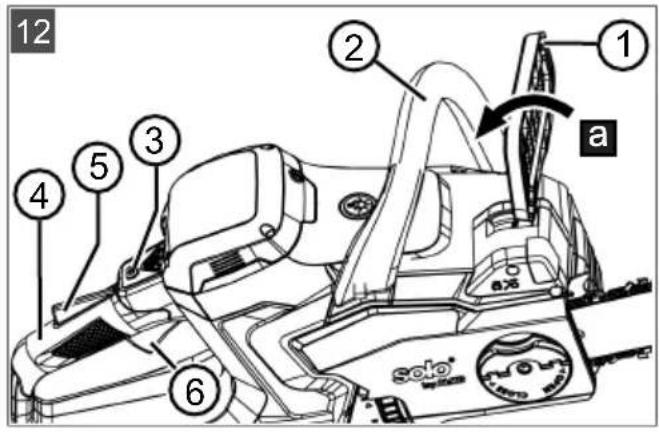
Switching the chain saw ON
- Release the chain brake (12/1) (12/a).
-
With the left hand: Hold the chain saw at the bow handle (12/2).
-
With the right hand:
■ Hold the rear handle (12/4).
■ Press the ON/OFF button (12/3). The LED for the chain brake (03/2) flashes green.
■ Within 5 s, press and hold the release lever (12/5). The LED for the chain brake (03/2) lights up green.
■ Press and hold throttle lever (12/6).
Switching the chain saw OFF
■ Press the ON/OFF button, or:
■ Release the release lever.
The chain saw switches off automatically within 5 s.
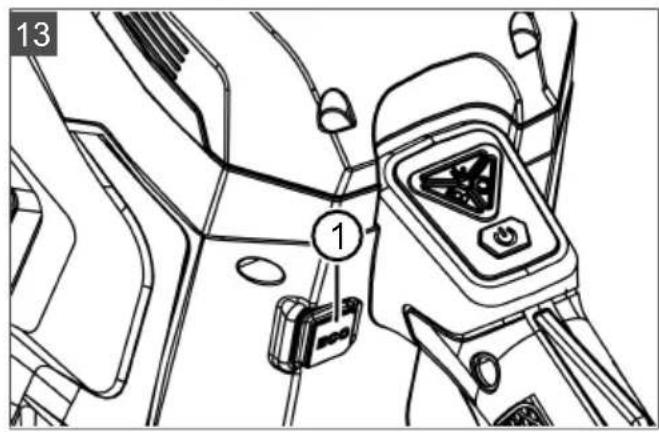
6.6 Reducing the speed of the saw chain [ECO mode function] (13)
The ECO mode function allows you to reduce the speed of the saw chain. This prolongs the operating time of the battery.
- Press the ECO button (13/1).
- Press the ECO button again to deactivate ECO mode.
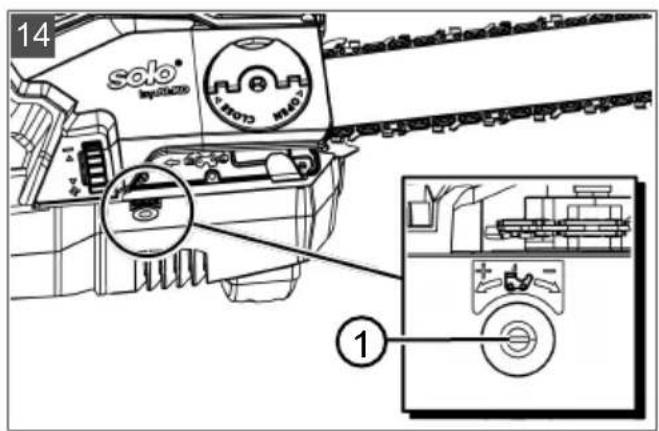
6.7 Setting the oil quantity for the saw chain (14)
The amount of saw chain oil dispensed during sawing can be adjusted.
- Turn adjusting screw (14/1) in the desired direction:
■ +: Increase lubrication of the saw chain. -
Reduce lubrication of the saw chain.
-
During sawing, check that the saw chain is sufficiently lubricated.
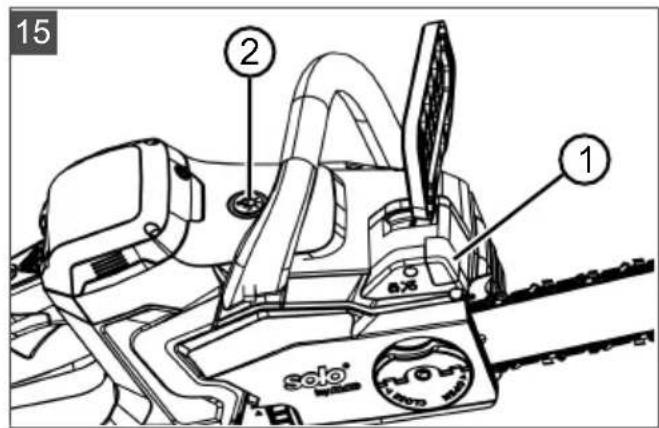
6.8 Switching the LED light ON and OFF (15)
- Press button (15/2) to switch on the LED light (15/1).
- Press the button again to switch the LED light off.
The LED light switches off automatically after 15 minutes.
7 WORKING BEHAVIOUR AND WORKING TECHNIQUE
NOTE Courses in the use of chain saws and techniques for felling trees are regularly held by various forestry organisations.
DANGER! Danger of fatal injury due to inadequate technical knowledge! Inadequate technical knowledge can result in extremely serious up to fatal injury!
■ Only trained and experienced people are allowed to fell trees and lop branches.
DANGER! Danger of fatal injury from splintered wood! Wood chips caught up in the chain can cause extremely serious and even fatal injury!
■ Remove loose chips and wood splinters from the part to be sawn.
7.1 Felling trees (16, 17)
Observe the following points before and during felling operations:
- When felling trees, care must be taken to ensure that other persons are not exposed to danger, that no supply lines are connected and that no damage to property is caused. If a tree comes into contact with a supply line, the utility company must be informed immediately.
Also pay attention to other people's property, animals or objects. These must not be in the danger zone. Immediately notify the owner in case of damage.
■ The safe distance from other workplaces or objects should be at least 212 tree lengths.
■ Judge the falling direction of the tree. Factors influencing the falling direction of the tree:
Natural lean of the tree
■ The position of larger branches
Height of the tree
■ Branches growing on one side
Level ground or slope
■ Asymmetrical growth, wood damage
■ Wind direction and wind speed
Snow load
■ When working on a slope, always work uphill of the tree to be felled.
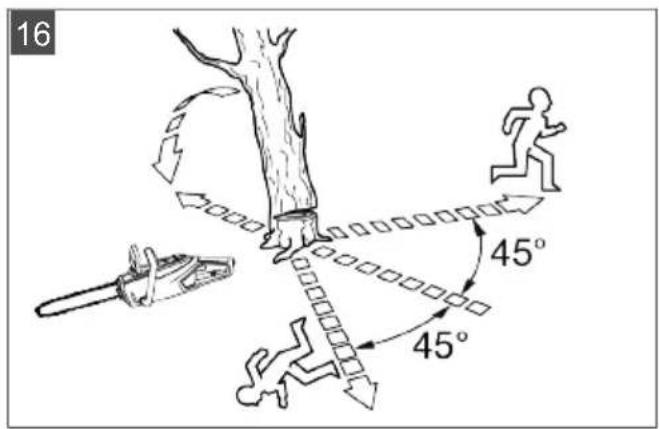
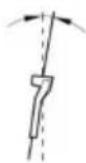
■ Make sure that there are no obstacles in your predetermined escape route. The escape route should be at an angle of approx. 45^ backwards from the falling direction (16).
The trunk must be free of growth, branches and foreign bodies (e.g. dirt, stones, loose bark, nails, staples, wire, etc.).
Make two undercuts and one back cut in order to fell a tree.
-
During back cuts and cross-cuts, place the bumper spike firmly against the wood to be cut.
-
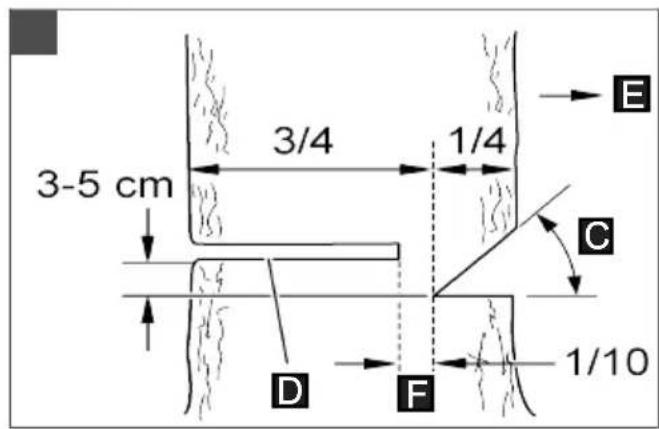
First saw the undercut (17/C) horizontally, then at an angle of at least 45^ from above. This prevents the chain saw becoming trapped when you make the second undercut. The undercut must be as close as possible to the ground and in the required felling direction (17/E). The depth of the undercut should be about 1/4 of the diameter of the trunk.
-
Saw the back cut (17/D) exactly horizontally opposite to the undercut. The back cut must be made 3-5 cm above the horizontal undercut.
-
Saw in the back cut (17/D) sufficiently deep so that a bridge (17/F) of at least 1/10 of the trunk diameter remains between the undercut (17/C) and the back cut (17/D). This bridge prevents the tree from twisting and falling in the wrong direction. The tree should start to fall when the back cut (17/D) approaches the bridge (17/F). Do not saw through the bridge! If the tree falls whilst you are sawing:
Interrupt the back cut if the tree falls in the wrong direction or leans back and traps the chain saw. To open the cut and fell the tree, drive in wedges made of wood, plastic or aluminium in the direction of the required felling line.
- Immediately pull the chain saw out of the cut, switch it off and put it down.
■ Walk away in the direction of the escape route.
■ Watch out for falling branches and twigs.
- If the tree remains standing, drive wedges into the back cut in order to cause it to fall in a controlled way.
Note: Use only wedges made of wood, plastic or aluminium.
- At the end of sawing work, immediately remove your ear defenders and listen for signals or warning calls.
Only experienced or trained people should make plunge cuts, longitudinal cuts and boring cuts (17).
⚠️ DANGER! Danger of fatal injury from a falling tree! Having no escape route when felling a tree represents a danger of serious and even fatal injury!
- Do not start the felling work until you are sure there is an unobstructed escape route away from the tree to be felled.
⚠️ DANGER! Danger of fatal injury from an uncontrollably falling tree! Uncontrolled falling trees can lead to extremely serious and even fatal injury!
In order to guarantee controlled felling of a tree, leave a bridge between the undercut and the back cut. The length of this bridge should be approx. 1/10 of the trunk diameter.
- Do not carry out any felling work in windy conditions.
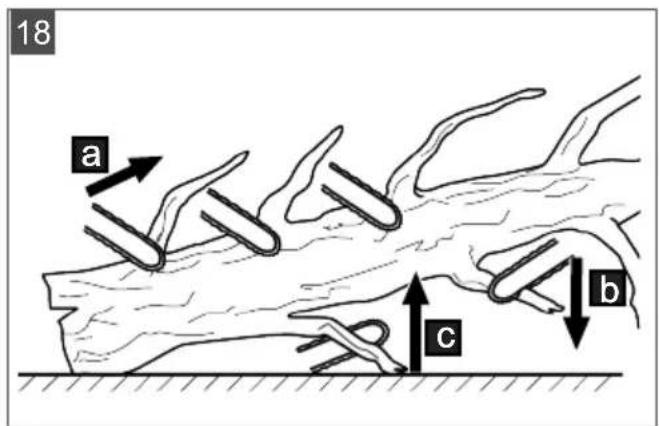
7.2 Delimbing (18)
Delimbing is the separation of branches from the felled tree. Observe the following points:
■ Support the chain saw against the tree trunk with the bumper spike during the work.
Leave larger, downward-pointing branches supporting the tree standing at first.
■ Cut off smaller branches with one cut.
■ Saw off branches systematically and sequentially from the tree (18/a). First, saw off any branches that might hinder you. Then cut off the branches that create tension. Finally saw off the main branch at the base.
■ Saw off free-hanging branches from above (18/b), but not from below.
■ Pay attention to branches under tension, and saw through these from underneath upwards (18/c) in order to avoid the chain saw becoming trapped.
7.3 Cross-cutting (19 - 22)
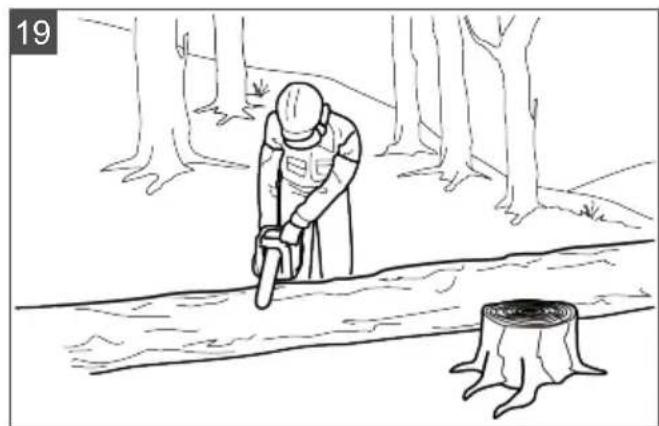
Cutting to length means dividing the felled tree into sections. Observe the following points:
■ Ensure that your feet are stable and that your body weight is evenly distributed over both feet. If possible, the trunk should be backed and supported by branches, beams or wedges.
- When working on a slope, always stand uphill of the tree trunk as it could roll away (19).
■ Guide the chain saw so that there is no part of your body in the extended sweep arc of the saw chain.
■ Position the bumper spike directly adjacent to the cut edge and allow the chain saw to pivot about this point. Do not exert any pressure at the end of the cut.
In order to maintain full control of the chain-saw at the moment of sawing, reduce the contact pressure towards the end of the cut without releasing the tight hold on the chain-saw handles.
■ Make sure that the saw chain does not touch the ground.
At the end of the cut, wait for the saw chain to come to a halt before you pull out the chain saw.
■ Always switch off the motor of the chain saw before you go to the next tree.
The entire length of the tree trunk is uniformly in contact with the ground:
■ Saw through the tree trunk from above (20/a), without cutting into the ground.
Tree trunk is lying raised at one end:
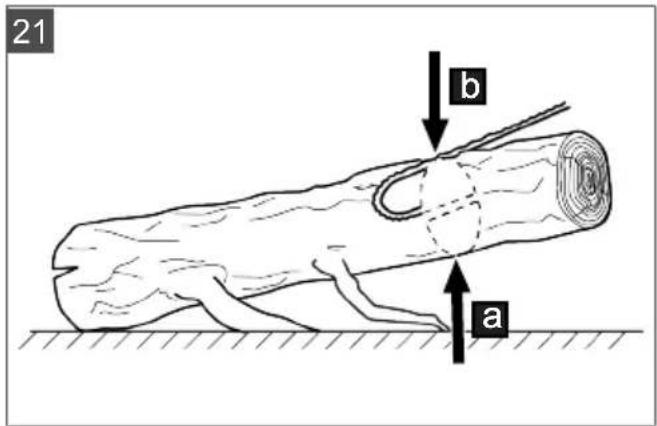
To prevent the chain saw becoming trapped and the wood splintering, first saw through 1/3 of the trunk diameter from below (21/a), then saw through the remainder from above, down as far as the cut made from underneath (21/b).
Tree trunk is lying raised at both ends:
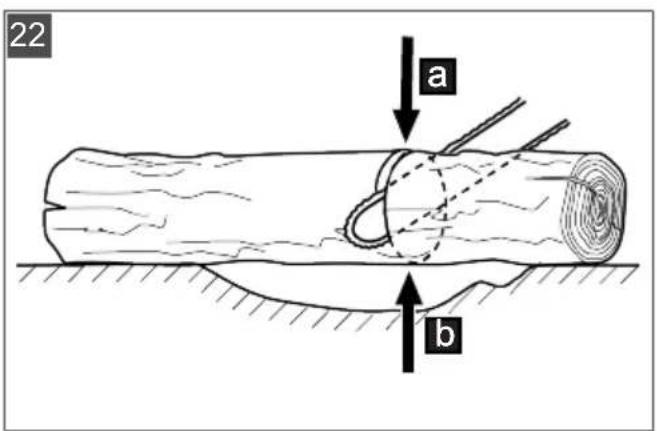
To prevent the chain saw becoming trapped and the wood splintering, first saw through 1/3 of the trunk diameter from above (22/a), then saw through the remainder from underneath, up as far as the cut made from above (22/b).
⚠️ DANGER! Danger of fatal injury due to kickback! The operator can be fatally injured by kickback of the appliance.
It is essential to comply with the measures in order to avoid any kickback.
7.4 Cutting converted timber
Heed the following points during this work:
■ Use a secure cutting surface (sawing trestle, wedges, beams).
■ Make sure you are standing securely and that your bodyweight is evenly distributed.
- Secure logs to prevent them twisting.
■ Only start the cut once the saw chain is running. Never switch on the chain saw already in the kerf.
- Do not secure the wood with your foot and do not get another person to hold it.
8 MAINTENANCE AND CARE
WARNING! Danger of cuts and lacerations. Danger of cuts and lacerations when reaching into sharp-edged, moving appliance parts and into cutting tools.
Before maintenance, care and cleaning work, always switch off the appliance. Remove the rechargeable battery.
■ Always wear protective gloves during maintenance, care and cleaning work.
The chain saw complies with all relevant safety standards. Repairs are only allowed to be performed by qualified specialists, and with the exclusive use of genuine spare parts.
■ After each use, check the chain saw for wear and renew any damaged components.
- Do not get the machine wet or expose it to moisture. Clean plastic parts with a cloth and do not use any cleaning agents or solvents.
■ Clean the cooling air slots if they are blocked.
- Do not spray the chain saw not with water and do not use a high-pressure cleaner.
■ Only use spare parts specified by the manufacturer.
8.1 Cleaning the chain sprocket interior
Thoroughly clean the chain saw after each use.
- Remove the rechargeable battery and place the chain saw on a stable base.
- Unbolt the cover of the chain sprocket.
- Clean the inside with a suitable brush.
- Remove the saw chain and take out the guide rail.
- Clean the groove in the rail and the oil inlet bore.
8.2 Sharpening the saw chain (23)

DANGER! Danger of fatal injury due to
kickback! Improperly sharpened saw chain increases the danger of kickback and thus the danger of fatal injury.
■ Sharpen the saw chain properly to reduce the risk of kickback.

NOTE Inexperienced chain saw operators
are recommended to have the saw chain sharpened by a specialist at the customer service.
The saw chain must always be well-sharpened for reasons of safety and efficiency.
Sharpening is required when:
■ The saw chips are like sawdust.
■ Greater force is necessary for cutting.
■ The cut is not straight.
■ Vibration increases.
If you get trained customer service personnel to sharpen the chain for you, they will be able to do this with the appropriate tools for a minimum of material removal and uniform sharpening of all teeth.
You can sharpen the saw chain yourself using special round files whose diameters are adapted to the specific chain type (see chapter 8.4 "Chain maintenance table", page 47). A certain amount of skill and experience is necessary to avoid damage to the teeth.
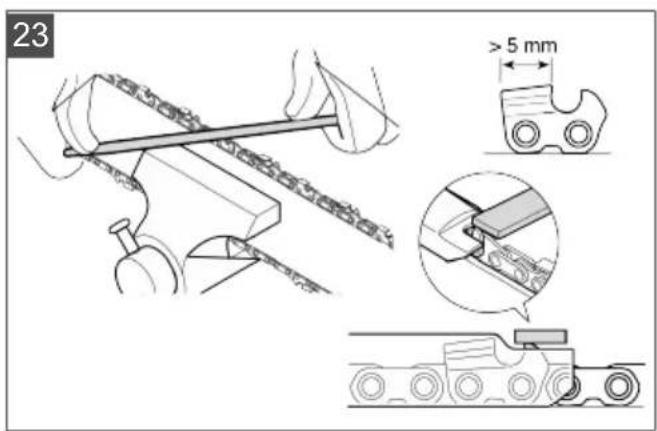
To sharpen the saw chain:
- Switch off the chain saw and remove the battery.
- Release the chain brake.
- Clamp the chain bar with fitted saw chain in a suitable vice, taking care that the saw chain can move freely.
-
Tension the chain if it is slack.
-
Place the file in the corresponding guide and then guide the file through the opening of the tooth, making sure that you keep an even angle according to the tooth profile.
-
Perform just a few strokes of the file and exclusively in the forwards direction, then repeat the working step on all teeth in the same orientation (right or left).
-
Reverse the position of the chain bar in the vice and repeat the working step on the remaining teeth.
-
Check that the limit tooth does not project beyond the checking tool, and file off any projection using a flat file, then round down the profile.
-
After sharpening, clean away all filings and dust, then lubricate the saw chain in an oil bath.
The chain must be replaced if:
■ The length of the teeth is less than 5 mm;
■ Where applicable: The mark on the teeth of the cutting elements is exceeded;
■ The play on the links at the chain rivets is excessive.
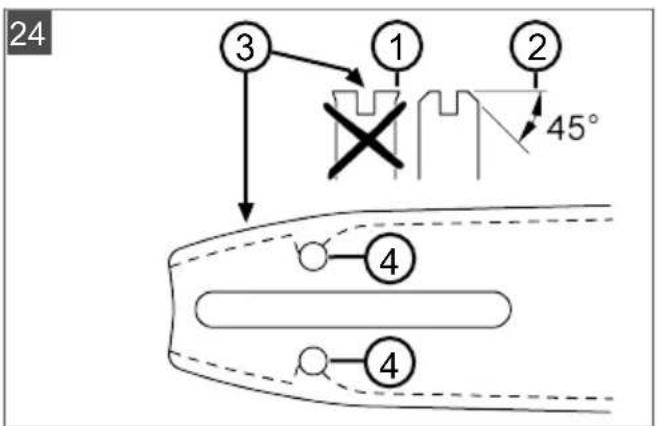
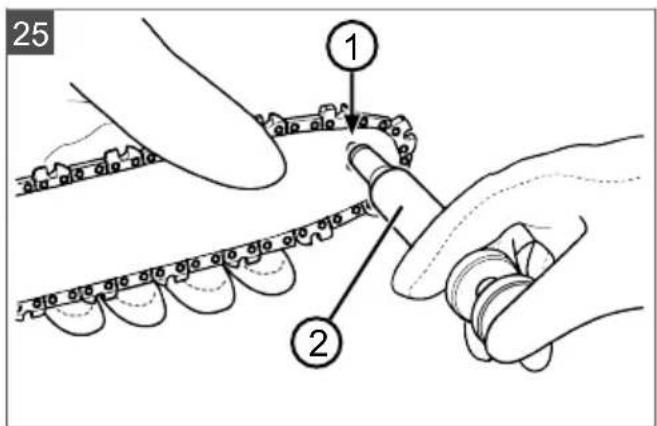
8.3 Checking, turning and greasing the chain bar (24, 25)
Checking the chain bar
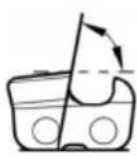
Regularly check the chain bar for damage. If necessary, remove protruding burrs (24/1), i.e. file off at an angle of 45^ (24/2).
Turning the chain bar
The chain bar must be turned over after each chain sharpening and chain change in order to avoid one-sided wear.
Greasing the chain bar
- Carefully clean groove in rail (24/3) and oil inlet bores (24/4).
- Carefully clean lubricating hole (25/1) on both sides.
- Use a grease gun (25/2) to pump in sufficient grease on both sides until the grease emerges evenly at the tips of the sprocket. Keep turning the sprocket while doing this.
8.4 Chain maintenance table
WARNING! Danger of serious injury. Use of an unapproved saw chain or guide rail on the chain saw can result in serious injuries.
■ Use only approved saw chains and guide rails.
| Chain saw Article numbers | Saw chain, chain bar | File diameter | Top plate angle | Down angle | Head tilt angle (55°) | Depth gauge |
 |  |  |  | |||
 | Turn angle of the tool | Tilt angle of the tool | Side angle | |||
 |  |  | ||||
| CS 3635 127736, 127737 | 90PX052X, 144MLEA041 | 4.5 mm 30° | 0° 75° 0.64 mm | |||
| CS 3635 127201, 127489 | 91P052X, 140SDEA041 | 4.0 mm 30° | 0° 80° 0.64 mm | |||
| CS 3640 127750, 127749 | 90PX056X, 164MLEA041 | 4.5 mm 30° | 0° 75° 0.64 mm | |||
| CS 3640 127546, 127490 | 91P056X, 160SDEA041 | 4.0 mm 30° | 0° 80° 0.64 mm | |||
 Depth gauge File Depth gauge File |  | |||||
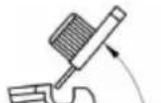
8.5 Cleaning the air filter (26)
To protect the inside of the appliance from soiling, the air intake area for the motor cooling system is fitted with an air filter. If the dust load is low, brushing from the outside is sufficient. If the dust load is high:
- Remove screw (26/1).
- Remove filter cover (26/2).
- Remove the filter (26/3).
- Clean the filter (tap on a firm surface or blow out).
- Install the filter again.
- Secure the filter cover with the screw again.
9 HELP IN CASE OF MALFUNCTION
CAUTION! Risk of injury. Sharp-edged and moving appliance parts can lead to injury.
■ Always wear protective gloves during maintenance, care and cleaning work.
■ Switch off the appliance and remove the rechargeable battery.
NOTE For malfunctions that are not listed in this table or that you cannot resolve yourself, please contact our customer service.
| Malfunction Cause Remedy | ||
| Engine does not start. No battery voltage present. Have the power supply checked by a qualified electrician. | ||
| Overload protection has switched off. | Wart until the overload protection re-establishes the power supply. | |
| Chain brake engaged. Release the chain brake. | ||
| The chain bar and saw chain become hot when running. Generation of smoke. | The saw chain is tensioned too tightly. | Reduce chain tension. |
| Oil tank is empty. Replenish the saw chain oil. Check the oil tank for damage. | ||
| The oil entry hole and/or groove of the chain bar are dirty. | Clean the oil entry hole and groove of the chain bar. | |
| Engine running, but the saw chain does not move. | The saw chain is tensioned too tightly. | Reduce chain tension. |
| Appliance errors Contact a service centre of the manufacturer. | ||
| Only sawdust is thrown out, rather than wood chips. The chain saw has to be pushed through the wood. | The saw chain is blunt. Sharpen the saw chain or contact one of the manufacturer's service centres. | |
| Appliance vibrates unusually. Appliance errors Contact a service centre of the manufacturer. | ||
10 TRANSPORT

WARNING! Danger of fatal injury and anger of extremely severe injury. During
transport, a running saw chain can lead to extremely serious and even fatal injury.
■ Never carry and transport the chain saw with the saw chain running.
■ Before transporting, carry out the measures mentioned above.
Before transporting, carry out the following measures:
- Switch off the chain saw and remove the rechargeable battery.
- Fit the chain guard.
- Carry the chain saw only at the bow handle. Guide rail and saw chain should be facing to the rear.
- In vehicles: Secure the chain saw against tipping over, damage and leakage of chain oil.

NOTE The nominal energy of the recharge- e battery is more than 100 Wh. Therefore, ob- ve the following transport instructions.
The Li-ion rechargeable battery contained in the appliance is subject to the hazardous goods law, but can be transported under simplified conditions:
The rechargeable battery can be transported on public roads by the private user without further conditions provided it is packaged for retail sale and the transport serves personal purposes.
■ Commercial users who carry out the transport in connection with their main activity (e.g. delivery from and to building sites, or demonstrations) can also take advantage of this simplification.
In both cases, it is essential to take the mandatory precautions mentioned above to prevent any leakage of the contents. In other cases, it is essential to comply with the regulations of the hazardous goods law. In the case of non-compli-
ance, severe penalties can be imposed on the sender and possibly the transporter.
Additional notes on transport and shipment
■ Only transport or send the li-ion rechargeable battery in an undamaged condition.
For transporting the rechargeable battery, only use the original cardboard box or a suitable hazardous goods cardboard box (not required for rechargeable batteries with a nominal energy less than 100 Wh).
■ Tape off exposed rechargeable battery contacts to avoid a short circuit.
- Secure the rechargeable battery against shifting in the packaging to avoid damage to the rechargeable battery.
■ Ensure the correct marking and documentation of the shipment for transport or shipping (e.g. by parcel service or freight forwarding).
- Check in advance that transport with the selected service provider is possible and indicate the shipment.
We recommend involving a hazardous goods specialist in preparation of the shipment. Also heed any further national regulations.
11 STORING THE APPLIANCE
■ Remove the rechargeable battery from the appliance after every use.
■ Thoroughly clean the appliance and – if present – attach all covers.
■ Store the appliance in a dry, lockable place out of the reach of children.
Carry out the following jobs before intervals in work lasting for longer than 30 days:
■ Empty the oil tank for the saw chain oil.
■ Remove the saw chain and chain bar, clean and spray with corrosion protection oil.
IMPORTANT! Risk of damage to the appli-
ance. Dried/sticky saw chain oil can lead to damage to oil-channelling components or the oil pump after lengthy storage.
■ Remove the saw chain oil from the chain saw before each extended period of storage.
12 DISPOSAL
Information on the German Electrical and Electronic Equipment Act

■ Electrical and electronic appliances do not belong in household waste, but should be collected and disposed of separately!
■ Used batteries or rechargeable batteries that are not installed permanently in the old appliance must be removed before disposal. Their disposal is regulated by the battery law.
- Owners or users of electrical and electronic appliances are obliged by law to return them after use.
■ The end user bears personal responsibility for deleting his personal data from the old appliance to be disposed of.
The symbol of the crossed-through rubbish bin means that electrical and electronic appliances may not be disposed of in the household rubbish.
Electrical and electronic appliances can be handed in at the following places at no charge:
■ Public service disposal or collection points (e.g. municipal building yards)
■ Points of sale of electrical appliances (stationary and online) if dealers are obliged to take them back or offer this voluntarily.
These statements only apply to appliances that are installed and sold in the countries of the European Union and are subject to European Directive 2012/19/EU. Different provisions may apply to the disposal of electrical and electronic appliances in countries outside the European Union.
Information on the German Battery Act (BattG)

■ Used batteries and rechargeable batteries do not belong in household waste, but should be collected and disposed of separately.
For safe removal of batteries or rechargeable batteries from the electrical appliance and for information on their type or chemical system, follow the further information within the operating or installation instructions.
- Owners or users of batteries and rechargeable batteries are obliged by law to return them after use. Return is limited to the handover of customary household quantities.
Used batteries can contain harmful substances or heavy metals that can cause damage to the environment and human health. Reuse of the used batteries and use of the resources contained therein contributes to the protection of these two essential commodities.
The symbol of the crossed-through rubbish bin means that batteries and rechargeable batteries may not be disposed of in household rubbish. In addition, if the symbol Hg, Cd or Pb appears under the rubbish bin, this stands for the following:
■ Hg: Battery contains more than 0.0005 % mercury
Cd: Battery contains more than 0.002 % cadmium
■ Pb: Battery contains more than 0.004 % lead
Rechargeable batteries and batteries can be handed in at the following places at no charge:
■ Public service disposal or collection points (e.g. municipal building yards)
■ Points of sale of batteries and rechargeable batteries
■ Disposal points of the common take-back system for the used batteries of appliances
■ Disposal point of the manufacturer (if not a member of the common take-back system)
These statements apply only to rechargeable batteries and batteries that are sold in the countries of the European Union and that are subject to European Directive 2006/66/EU. Different provisions can apply to the disposal of rechargeable batteries and batteries in countries outside the European Union.
13 TECHNICAL DATA
| Chain saw CS 3635 CS 3640 | ||
| Art. No. 127733 127745 | ||
| Maximum speed 24 m/s | ||
| Length of the chain bar 35 cm 40 cm | ||
| Chain bar in delivery condition (Article No.) 144MLEA041 | (127737) | 164MLEA041(127749) |
| Saw chain in delivery condition (Article No.) 90PX052X | (127736) | 90PX056X(127750) |
| Drive link thickness 1.1 mm | ||
| Chain sprocket pitch 3/8" | ||
| Chain brake combined electric and mechanical brake | ||
| Chain stopping time (EN 62841-4-1) max. 0.15 s | ||
| Chain run-on time (EN 62841-4-1) max. 2 s | ||
| Chain oil tank volume | 280 ml | |
| Weight with chain bar and saw chain | 4.1 kg 4.2 kg | |
| Overload protection | integrated | |
| Sound power level L_wA (EN 62841-4-1) | 101,3 dB(A),K = 3 dB(A) | 101,3 dB(A),K = 3 dB(A) |
| Sound pressure level L_pA (EN 62841-4-1) | 93,3 dB(A),K = 3 dB(A) | 93,3 dB(A),K = 3 dB(A) |
| Vibration value (EN 62841-4-1) | 3,257 m/ s^2 K = 1,5 m/ s^2 | 3,257 m/ s^2 K = 1,5 m/ s^2 |
\* Notes:
The vibration emission value given has been measured according to a standardised test method and can be used to compare one power tool with another.
The vibration emission value can also be used for an initial assessment of the exposure (vibration exposure degree).
The vibration emission value may differ from the given value during actual use of the power tool, depending on how the power tool is used.
14 AFTER-SALES/SERVICE
In the event of questions of warranty, repair or spare parts, please contact your nearest AL-KO Service Centre. These can be found on the Internet at:
www.alko-garden.com/service-contacts
Further information on spare parts can be found at:
www.alko-garden.com/spareparts
- Try to keep the vibration load as low as possible. Exemplary measures to reduce vibration are the wearing of gloves when using the tool and limitation of the working time. All parts of the operating cycle must be taken into account (e.g. times when the power tool is switched off and those in which it is switched on but runs without load).
Batteries and chargers
All batteries (Bxxx Li) and chargers (Cxxx Li) from the AL-KO 36V system can be used.
15 INFORMATION ON THE DECLARATION OF CONFORMITY
We hereby declare, as the exclusively responsible party, that this product in its marketed form meets the requirements of the harmonised EU Directives, EU safety standards and the product-specific standards. The Declaration of Conformity forms part of the operating instructions and is included with the machine.
16 WARRANTY
We will remedy any material or manufacturing defects discovered in the device during the statutory period of limitation for claims for defects by repair or replacement at our discretion. The period of limitation is determined in each case by the law of the country in which the device was purchased.
Our warranty promise applies only if:
■ These operating instructions are observed
■ The device is handled correctly
■ Original spare parts have been used
The warranty becomes void in the case of:
■ Unauthorised repair attempts
■ Unauthorised technical modifications
■ Use for other than the intended purpose
The warranty does not include:
■ Paint damage attributable to normal wear
■ Wear parts that are marked with a box xxxxxx (x) on the spare parts card
The warranty period commences with the purchase by the first end user. The date on the proof of purchase is decisive. In the event of a warranty claim, please contact your dealer or the nearest authorised customer service centre with this declaration and the original proof of purchase. This declaration does not affect the purchaser's statutory claims for defects against the vendor.
VERTALING VAN DE ORIGINELE GEBRUIKERSHANDLEIDING
Inhoudsopgave
2 PRODUCTBESCHRIJVING
10 Transport ....162
11 Shranjevanje naprave 163
12 Odstranjevanje.... 163
13 Tehnični podatki.... 164
14 Servisna služba/servis 165
15 Informacije o izjavi o skladnosti.... 165
16 Garancija.... 165
1 K TEM NAVODILOM ZA UPORABO
14 SERVISNA SLUŽBA/SERVIS
10 transport ....317
11 Opbevaring af maskinen 318
12 Bortskaffelse 318
13 Tekniske data.... 319
14 Kundeservice/service.... 320
15 Information til overensstemmelseserklæringen 320
16 Garanti 320
1 OM DENNE BRUGSANVISNING
7 ARBEIDSFREMTREDEN OG ARBEIDSTEKNIKK
8 VEDLIKEHOLD OG PLEIE
Imported by: AL-KO Gardentech UK Ltd, Murray way, Wincanton, Somerset, BA9 9RS / UK | +44 (0) 1963 828055 shop.uk@al-ko.com | www.alko-garden.uk