USER MANUAL 231753 Hendi
EN: Dishwasher, electronic User Manual pg. 3
Keep these instructions with the appliance.
natural_image
Simple line drawing of a house with an arrow pointing left, labeled 'INDOOR' below (no other text or symbols)
For indoor use only.


Thank you for purchasing this Hendi appliance. Read this manual carefully, paying particular attention to the safety regulations outlined below, before installing and using this appliance for the first time.
Safety regulations
- The appliance is intended for professional use and can be operated only by qualified personnel. This appliance is not intended for household use.
- Only use the appliance for the intended purpose it was designed for as described in this manual.
- The manufacturer is not liable for any damage caused by incorrect operation and improper use.
- Keep the appliance and electrical plug away from water and other liquids. In the event the appliance falls into water, immediately remove the power plug from the socket. Do not use the appliance until it has been checked by a certified technician. Failure to follow these instructions will cause life threatening risks.
- Never attempt to open the housing of the appliance by yourself.
- Do not insert objects into the housing of the appliance.
- Do not touch the plug with wet or damp hands.
- DANGER OF ELECTRIC SHOCK! Do not attempt to repair the appliance by yourself, repairs are only to be conducted by qualified personnel.
- Never use a damaged appliance! When it's damaged, disconnect the appliance from the socket and contact the retailer.
- WARNING! Do not immerse the electrical parts of the appliance in water or other liquids.
- Never hold the appliance under running water.
- Regularly check the power plug and cord for any damage. When damaged it must be replaced by a service agent or similarly qualified person in order to avoid danger or injury.
- Make sure the cord does not come in contact with sharp or hot objects and keep it away from open fire. Never pull the power cord to unplug it from the socket, always pull the plug instead.
- Make sure that the power cord and/or extension cord do not cause a trip hazard.
- Never leave the appliance unattended during use.
- WARNING! As long as the plug is in the socket the appliance is connected to the power source.
- Turn off the appliance before unplugging it from the socket.
- Connect the power plug to an easily accessible electrical socket so that in case of emergency the appliance can be unplugged immediately.
- Never carry the appliance by the cord.
- Do not use any extra devices that are not supplied together with the appliance.
- Only connect the appliance to an electrical outlet with the voltage and frequency mentioned on the appliance label.
- Never use accessories other than those recommended by the manufacturer. Failure to do
so could pose a safety risk to the user and could damage the appliance. Only use original parts and accessories.
- This appliance should not be operated by persons with reduced physical, sensory or mental capabilities, or persons that have a lack of experience and knowledge.
- This appliance should, under any circumstances, not be used by children.
- Keep the appliance and its power cord out of reach of children.
- WARNING: ALWAYS switch off the appliance and unplug from power socket before cleaning, maintenance or storage.
Special Safety Regulations
- This dishwasher is delivered with water inlet and outlet hoses. According to its construction, the connection of the machine to water and power supply must be performed by an authorized and locally recognized installer by keeping the existing specifications.
- Before connecting the appliance, check that the connection data on the data plate (voltage and connected load) match the mains electricity supply.
- No technical modifications are allowed in this appliance. The manufacturer is not responsible for any possible damages resulting due to modifications.
- The same applies in case that the appliance is used for any other purpose except the one anticipated, in case of fault or improper use. The water inside the dishwasher is not potable.
- Use, maintenance and repair of dishwasher should be performed only by persons familiar with these works and informed for any possible risks.
Water softeners

CAUTION: all appliances requiring constant connection with the water supply system (including this appliance) must have an additional water softener attached in order to remove calcium and magnesium compounds. The softener must be used in compliance with the manufacturer's recommendations set out in the user's manual.
- If the softener is not attached or is misused and/or regenerated, the distributor shall reject all complaints entailing repairs required due to the limescale build-up in the appliance.
- It is recommended to use softeners from the wide range offered by HENDI. Ask your HENDI sales representative for assistance in the selection of the appropriate model. We recommend the following agents for the proper regeneration of the softeners: Salt tablets, 25 kg bags - code: 231265
| General Hardness of water |
| °dGH | °fH | mmol/l | °e | Water softener |
| above 24 above 40 above 4,2 above 28 Necessary | | |
| 18 - 24 | 32 - 40 | 3,2 - 4,2 | 22 - 28 | Necessary |
| 12 - 18 | 19 - 32 | 2,1 - 3,2 | 13 - 22 | Necessary |
| 4 - 12 | 7 - 19 | 0,7 - 2,1 | 5 - 13 | Necessary |
| below 4 | below 7 | below 0,7 | below 5 | Not required |
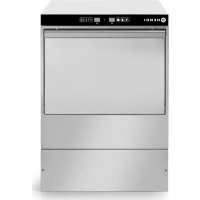
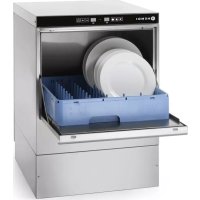
Intended use
- This appliance is intended for washing crockery, such as glasses, cups, plates and cutlery. Any other use may lead to damage of the appliance or personal injury.
- Operating the appliance for any other purpose shall be deemed a misuse of the device. The user shall be solely liable for improper use of the device.
Grounding installation
This appliance is classified as protection class I and must be connected to a protective ground. Grounding reduces the risk of electric shock by providing an escape wire for the electric current.
This appliance is fitted with a power cord that has a grounding wire and grounded plug. The plug must be plugged into an outlet that is properly installed and grounded.
Preparation before first use
- Open the package. Before setting up the appliance, check it for any externally visible damage due to transportation. If in any doubt, call for a specialist to check it (from the authorized local dealer who sold the appliance).
- Place the dishwasher at the installation area, close to the necessary water and power supply (the ground should be sufficiently stable).
- Remove the protective foil protecting the steel housing of the dishwasher from scratches. Any remaining adhesive residue should be careful-
ly removed. Do not use any scouring materials. Leaving the protective foil can cause difficult to remove adhesive glue foil to the dishwasher's steel housing.
- The appliance should be placed horizontally. Possible inclinations should be corrected using a spirit level.
- Following the successful installation, the dishwasher should be cleaned thoroughly with a conventional detergent before it is put into operation.
Connection to the water supply
ATTENTION: The connection with the water supply should be made according to the current safety standards.
The dishwasher may be connected to water supply with maximum inlet temperature 60^ C/130°F. In case you need connection with water supply of high temperature please contact our Factory or our distributor or our local dealer.
- The water supply hose should have a flap valve (non-return valve) according to DIN 1988.
- The water supply hose/pipe should be rinsed be-
fore the appliance's connection.
- The water supply hose/pipe should have a minimum internal diameter of 16 mm and the connection with the hose should be 3/4 inch.
- All hose collars should be adjusted in a fixed position before the appliance is put into operation.
- The dishwasher can be only connected to a well-functioning softener.
ATTENTION: The water pressure must be between 2 and 5 bar.
Drainage connection
- The outflow is accomplished through gravity force (natural flow). The outlet hose should be connected either directly to the main drainage - where a pipette for odours is anticipated, or water runs directly to a drainage well in the ground,
which has a pipette for odours.
ATTENTION: The outlet hose should not be placed higher than a level of 650mm from the lower side of the dishwasher's dispenser.
Electrical Network connection
ATTENTION: All electrical work must be carried out by a suitably qualified and competent person.
- The dishwasher operates under specific voltage depending on the type of the dishwasher.
- You should supply the power, depending on the appliance's power reception (the electrical connection should be made by authorized electricians). Specifications should be met according
Protective duct connection and voltage compensation
- The electrical safety of this appliance is ensured only if the protective duct has been connected and checked properly. The corresponding specifications should be met at this point (see paragraph 1.5).
- In addition, the appliance should include a voltage compensation system.
to the corresponding parts of DIN, VDE, D100, the EVU connection terms, the relevant ZH 1/37, chapter 7.2 - as well as the current specifications for accident prevention.
- Respectively, the appliance must be connected to a direct power supply electrical installation through an H07 RN-F cable with load relief of the appliance.
- For this reason, the backside of the appliance has a screw with the indication “voltage compensation”.
- Following the electrical connection, the action of the protective duct, the voltage compensation and the insulation value should be checked according to the existing provisions of DIN VDE.
Technical specyfication
| Item no. 230268 231753 237 | 540 231340 23656 | 7 236574 | | | | |
| Type | 40x40 | 50x50 | Hood 50x50 | 50x60 |
| Max. hight of tableware [mm] | 295 | 335 | 400 | 450 |
| Operating voltage and frequency [V/Hz] | 230 / 50 400 / 50 230 / 50 | 400 / 50 |
| Rated input power [kW] | 2,8 | 6,6 | 2,8 | 8,6 | 5,0 | 7,1 |
| Temperature of washing / rinse water [°C] | 62 / 85 |
| Standard equipment | Rinse aid and detergent dispenser and drain pump | Rinse aid and detergent dispenser |
| Waterproof protection class | IP44 |
| Amount (pcs.)/lenght of washing cycle (s.) | 3/60, 120, 180 |
| Net weight (approx.) [kg] | 39 | 55 | 135,5 | 57 |
| Outer dimension [mm] | 470x510x(H)710 | 570x600x(H)830 | 750x880x(H)1390 | 595x730x(H)1340 |
REMARK: Technical specification is subjected to change without prior notification.
Instructions for the dishwasher's regular operation
- The appliance is exclusively used to clean dishes, cups, glasses, silverware, etc. following their use during lunches/dinners.
- You should pay special attention that the items to be washed are suitably placed for dishwashing.
• Silverware should be cleaned from food residues,
if not washed right after lunch / dinner (colouring and spots from certain foodstuffs).
- Do not wash in this appliance items which has been in contact with acids, mineral oil, grease, gasoline or colours and solvents (industrial chemicals).
Preparation of dishes for washing
- Do not let food residues dry onto the dishes. In order to avoid filter blockage as well as the cleaning water to become dirty quickly, you should remove large food residues, olive pips, lemon peels, tooth picks, etc., before you place
the dishes in the basket.
- We recommend you to leave in water for a while or rinse the glassware that has food residues dried on.
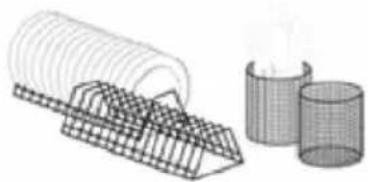
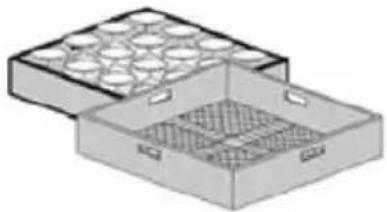
Filling of basket
- Put glasses, cups, large plates, etc. with the opening facing down in the anticipated baskets. Do not pile one on top of the other.
- Glasses should not touch each other (damage in glass, stains due to contact).
- Place cutlery in the appropriate basket made of
synthetic material, with the handle facing down. Silverware may be placed freely on the levelled plastic basket. In any case, you should avoid overloading the basket.
• Water supply hoses should remain free (not blocked or stretched).
natural_image
3D illustration of a coiled spring component with a base plate and screw base (no text or symbols)
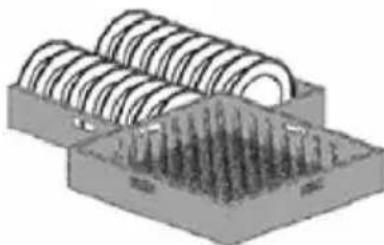
Correct insertion of the plates in the baskets with pins.

natural_image
Illustration of a two-compartment storage tray with circular compartments and mesh patterns (no text or symbols)
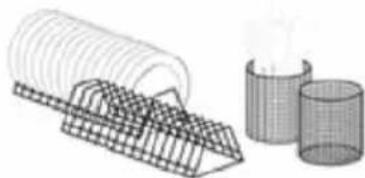
Correct insertion of glass in open baskets
natural_image
Illustration of a wire meshing device and two geometric shapes (no text or symbols)
Correct insertion of saucers and cutlery
natural_image
Diagram of a kitchen or processing setup with a tray, stove, and directional arrows indicating flow or movement (no text or symbols)
Proper insertion of full baskets
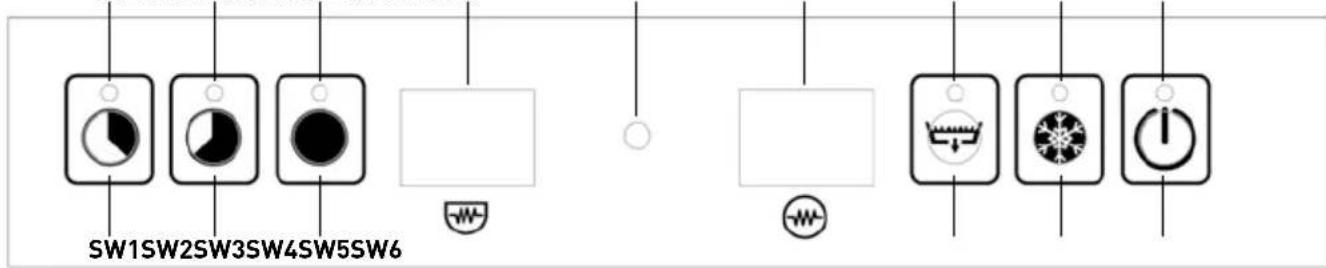
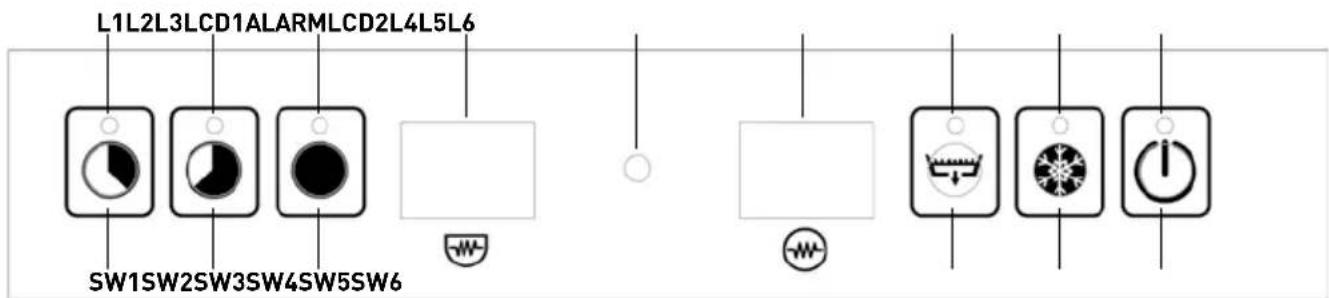
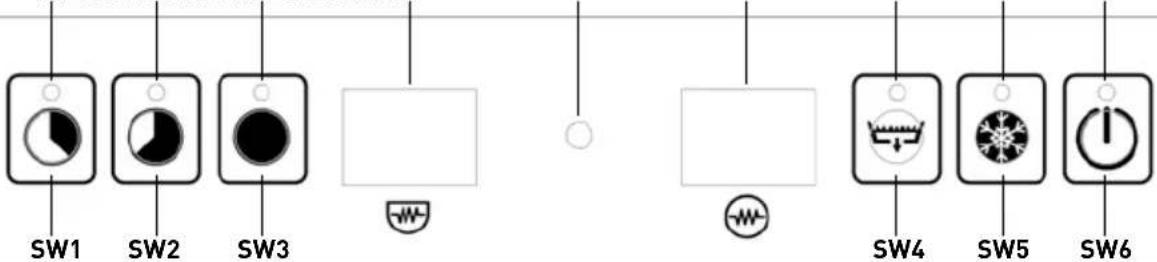
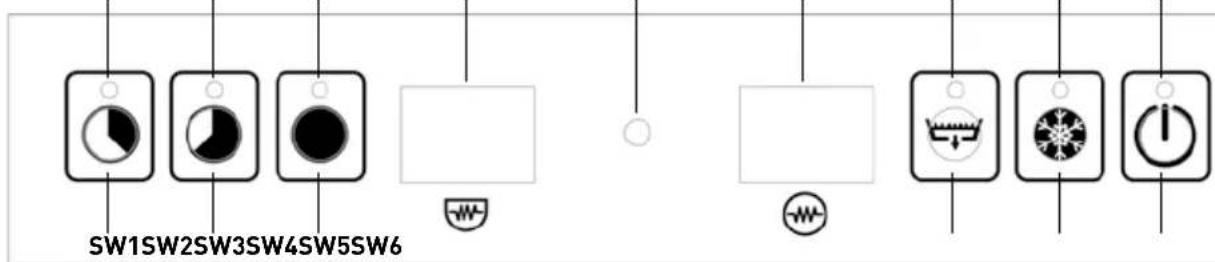
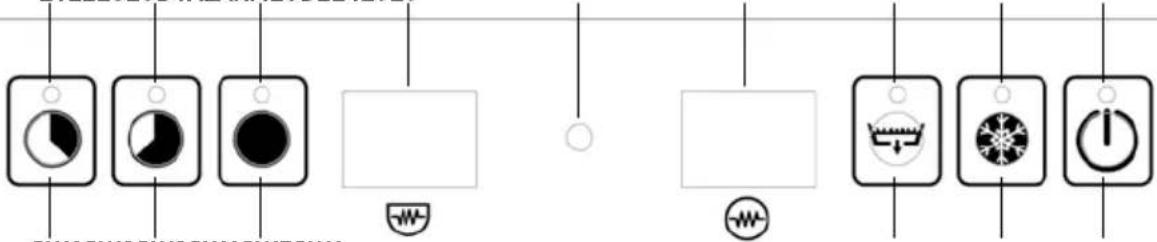
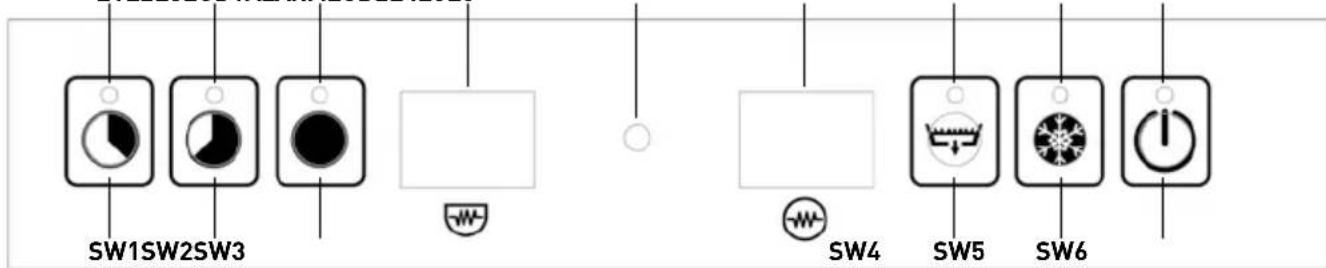
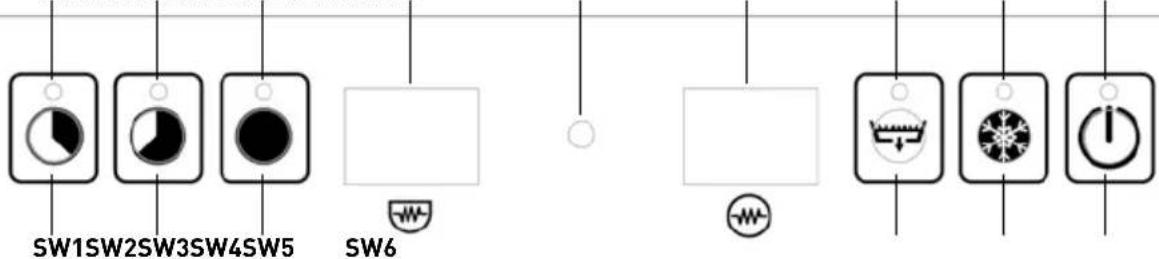
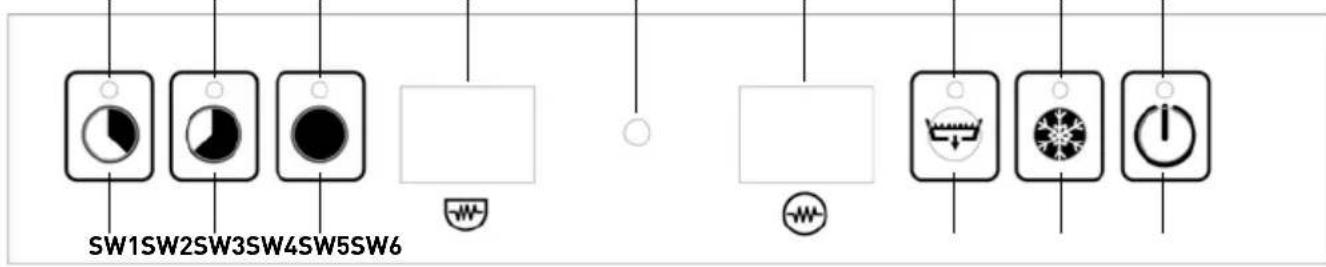
Control Panel
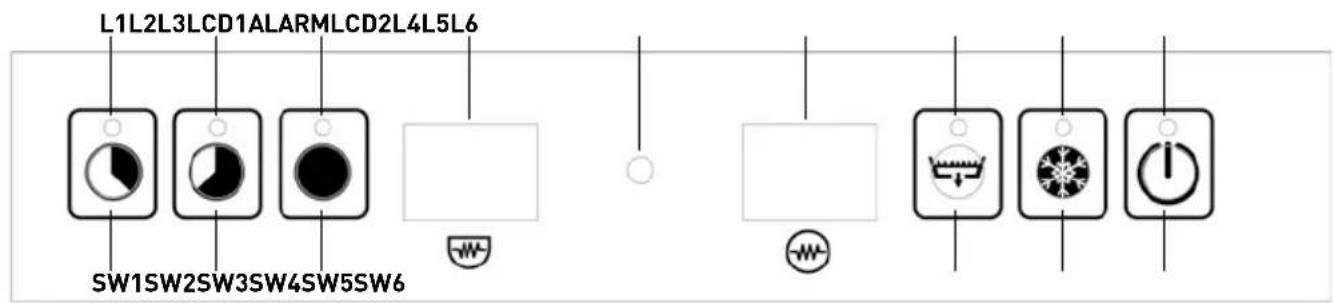
| BUTTON | NAME | DESCRIPTION | NOTES |
| SW1 | CT1 | Short Cycle Button | Duration 1 min |
| SW2 | CT2 | Medium Cycle Button | Duration 2 min |
| SW3 | CT3 | Long Cycle Button | Duration 3 min |
| SW4 | DB | Drain Pump Button | |
| SW5 | CRB | Cold Rinse Button | |
| SW6 | ON | ON/OFF Switch | |
| LED TABLE | COLOR |
| L1 | LED of short cycle selection | |
| L2 | LED of medium cycle selection | |
| L3 | LED of long cycle selection | |
| L4 | Drain in Progress | |
| L5 | Cold Rinse Selected | |
| L6 | LED of ON/OFF Switch | |
Switching ON
In order to start the machine, press the Button SW6 (ON) for 3 sec. The LED L6 flashes red and a buzzer sounds.
Procedures before washing
Since the washing machine is switched on, the boiler and the wash tank start filling with water. Next, the machine gets filled with detergent and rinse aid. During these, a "FILL" message appears on the Dash. After the tanks are filled with water and the necessary detergent and rinse aid liquids are captured, the boiler's heating resistance and the wash tank's heating resistance start working sequentially (after reaching boiler's temperature of operation, its resistance shuts down and the wash tank starts heating). On the LCD1 & LCD2
screens the current temperature of each tank is displayed alternately (when LCD 1 shows "bt" then LCD 2 displays boiler's temperature; when LCD 1 shows "tt", then LCD 2 displays tank temperature). In case that the wash tank's heating resistance is ON, a dot in the right lower corner of LCD1 is lit, while in case that the boiler's heating resistance is ON a dot in the right lower corner of LCD2 is lit. For that reason, symbol (representing the tank) is shown beneath of LCD1 & symbol (representing the boiler) is shown beneath of LCD2.
Standby
During Standby operation (after the automatic set up procedures), LCD 1 & LCD 2 should dis-play the temperature of the wash tank & boiler tank alternately.
- LCD1 - "bt" or "tt" (alternating)
- LCD2 - “-- °C”
Thermo-Protector
In order to start the first washing cycle of the day, both temperatures in the tank and the boiler must reach operational values (60°C & 85°C respectively). In all the other cycles, due to Thermo-Protector system, if the temperature in the boiler is not appropriate for rinsing, the washing cycle continues
If the machine stays on Standby mode for more than 30 min, then it turns into sleeping mode for minimizing power consumption. When this occurs, LCD 1 & LCD 2 turn off and L6 is fla-shing. By pushing SW6, the machine is again ready for operation.
until the rinse water becomes sufficiently heated. A message on the screen informs the user that the washing cycle continues; LCD1 shows the current value of the water temperature in the boiler and LCD2 shows "ht" (i.e. heating).
Washing Cycle Selection - Start
This washing machine has three washing cycle program options. The user could choose between short, medium and long program by pushing one of the buttons SW1, SW2 or SW3 accordingly. After pushing the corresponding button, the washing cycle starts automatically, UNLESS the door is accidentally open. In the latter case a message "door" is shown in the Dash and the washing starts again as soon as the door is closed. The remaining time (in seconds) is displayed on the Dash.
IMPORTANT: In case that the door is open accidentally before program is finished, the washing stops
and the timer resets. Therefore, in order to finish the cycle, you should start the procedure from the beginning.
NOTE: 10 sec before finishing main wash the draining pump starts working and it stops 10 sec after rinse cycle.
After completion of the washing cycle, a message "end" on the dash informs the user that the program is finished. The message appears until the door is opened again.
Draining
This machine has draining pump, so that the draining cycle is performed automatically. If you want to perform draining on demand, please remove the overflow hose that is placed on the wash tank and press the Button SW4. After 15 sec the draining starts and LED L4 flashes.
During draining, an internal check of the system is performed, ensuring that the heating resist-t-anc-
es are switched off. In that sense, any possible overheating caused by heating re-sistances not immersed in water is avoided. As soon as draining stops, for the next 30 sec the system performs self-cleaning (door must be closed).
NOTE: After every On-Demand draining execution, the machine shuts down.
Filling of Detergent and Rinse Aid
This machine is equipped with peristaltic pumps for the rinse aid and the detergent filling. The filling inlets for each one are the two corresponding hoses which should be immersed in the appropriate tanks.
The filling procedure is performed in two stages. The initial filling (when you turn the machine on)
and additional re-fillings after each washing cycle: 1st Stage: During automatic preparation (before the first wash) the machine receives from the tank soap for 180 sec and rinse aid for 35 sec. This could be adjusted from the user th-rough the User Menu *Check Section "User Menu".
2nd Stage: During every complete washing & rins-
ing cycle, the machine receives detergent for 13 sec and rinse aid for 12 sec. This could be adjusted from the user through the User Menu *Check Section "User Menu".
NOTE: In case that you need to adjust the Detergent or Rinse Aid from the User Menu, please bear in mind that for each second the corresponding pump captures the following liquid quantities:
• Detergent pump: 0.83 ml/sec
- Rinse Aid pump: 0.19 ml/sec
By multiplying these quantities with the time duration (seconds) that the pump works, you can calculate the volume of each liquid that it is used.
WARNING: The machine receives rinse aid during washing cycle and detergent during rinsing cycle.
Cold Water Rinse
This machine has Cold Water Rinse operation. It could be activated in order to be performed after every washing cycle or for On Demand occasions. In order to perform a Cold Water Rinse after one washing cycle, press Button SW5 for 1 sec. A single sound buzz will inform you that the machine is set up for a single cold rinse performance. Then, LED L5 will be on, while the procedure is performed.
In case that you wish to perform Cold Water Rinse after each washing cycle, press hold But-ton SW5 for 5 sec while the machine is on Standby mode. A double sound buzz will inform you that the machine is set up for a cold rinse performance after every washing cycle (LED L5 will lit). Should you undo the selection, please repeat the above procedure.
Shutting down the machine
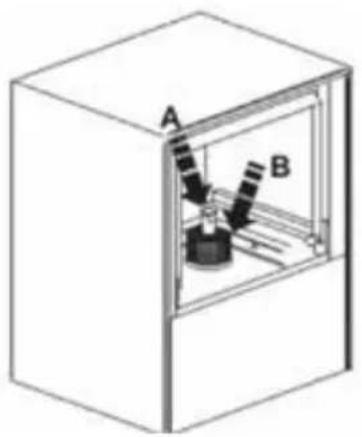
natural_image
Diagram of a mechanical device inside a transparent enclosure, labeled A and B (no text or symbols on the diagram itself)
In case that you want to shut down the machine, remove the overflow hose in the wash tank and press the Button SW4. The machine is going to drain automatically the used water, perform a self-cleaning cycle and then shut down. An alternative way is to press continuously the Button SW6 until the indication "OFF" appears in the first line of the screen (it will take about 5 sec). The recommended way is the first.
ECO Function
In case that the machine is in Standby operation for more than 15 minutes, the Boiler's temperature lowers in order to avoid unnecessary power con-
sumption. During these intervals, if the door of the washing machine opens, the ECO Function stops.
Soft Start Function
This machine is equipped with Soft Start System that enables the water pump to start with lower
pressure and gradually increases it, so that the sensitive crystals are not damaged.
In order to enter the User's Menu, shut down the machine and press hold Buttons SW1, SW3 & SW6 at the same time for 3 sec with the door closed. LED L6 flashes and a beeper sounds three times. Message "conf" appears for a few seconds and the User's Menu is activated.
Find the parameter that you wish to adjust using Buttons SW3 and SW4 for navigation inside the menu. The corresponding parameter will be displayed on the screen.
Should you wish to increase the amount (+), press Button SW1.

Should you wish to decrease the amount (-), press Button SW2.
After defining the value, press Button SW5 once in order to register the value in the memory.
In the matrix that is presented below you can find a short description of the functions that can be ad-
justed by the user, as well as their default values. In order to exit the User's Menu, press hold Button SW6 for 3 sec. The beeper sounds three times and message "off" appears on the screen. After closing the User's Menu, the machine is shut down.
| No | Parameter | Range | Default | Indication |
| 1 TEMPERATURE MODE C/F CC |
| 2 | BOILER TEMPERATURE | 30-92°C | 85°C | bt |
| 3 | TANK TEMPERATURE | 30-70°C | 60°C | tt |
| 4 | DETERGENT TIME AT FILLING | 100 - 300 s | 180 s | dF |
| 5 | DETERGENT TIME AT CYCLE | 0 - 30 s | 13 s | dc |
| 6 | RINSE AID TIME AT FILLING | 0 - 90 s | 35 s | rF |
| 7 | RINSE AID TIME AT CYCLE | 0 - 30 s | 12 s | re |
| 8 | COLD RINSE | 0 (NO) - 1(YES) | 1 | Cr |
| 9 | DRAINING DURATION | 20 -60 s | 25 s | Cd |
Maintenance and Repair
After 50.000 washing cycles, a Service reminding message will be displayed in the screen. Regular maintenance, performed by licensed technician
using original spare parts is essential for proper function of the machine.
Alarm Indications
If the system records any malfunction, then a warning message will be displayed on the screen. If such a condition occurs, please advise the fol-
lowing table which describes the problem shortly. Should you need further assistance, don't hesitate to contact your local re-seller.
ALARM
PROBLEM DESCRIPTION
| Alarm 1 | Water filling time excession |
| Alarm 2 | The water level during draining is not reduced |
| Alarm 3 | Excess time of boiler heating |
| Alarm 4 | Excess time of tank heating |
| Alarm 5 | Water temperature in the boiler is above limits |
| Alarm 6 | Water temperature in the wash tank is above limits |
| Alarm 7 | Cold rinse alarm |
| Alarm 8 | Bath thermometer not connected |
| Alarm 9 | The bath tub thermometer is defective |
| Alarm 10 | Boiler thermometer not connected |
| Alarm 11 | The boiler thermometer is damaged |
| Alarm 12 | The washing cycle was completed but the boiler did not heat up properly (the heating time in the Thermo-protector function was exceeded). |
Troubleshooting
| PROBLEM CAUSE SOLUTION |
| The dishwasher does not operate properly | Connection interruption Check the connection |
| You have not turned the switch of the appliance ON | Turn the switch ON |
| Main switch / or fuse has not been activated / or it is faulty | Check the main switch / or fuse |
| The switch of the appliance is faulty Refer to the authorized local dealer who sold the appliance or directly to the manufacturer |
| The water inlet valve is faulty | |
| The door is not closed Close the door |
| You have not turned the water supply on | Turn the supply on |
| The appliance operates, but the switch LED does not light on | The LED is faulty Change the LED |
| Boiler heating does not operate | Switch or main switch or fuse has not been activated | Check the switch of the appliance and the main switch or fuse |
| The safety thermostat of the boiler is faulty | Refer to the authorized local dealer or the manufacturer |
| The 93 °C thermal fuse of the boiler is faulty |
| Pressure regulator is faulty | Refer to the authorized local dealer or the manufacturer |
| “Boiler heating” relay is faulty |
| Boiler fuse is burned out | Refer to the authorized local dealer or the manufacturer |
| Boiler heating operates, but LED does not turn on | Faulty LED Change LED |
| Dispenser heating does not operate | Switch N1 of the appliance or main switch or fuse has not been activated | Activate the corresponding switch or fuse |
| “Compartment heating” relay is faulty | Wait |
| The 85 °C thermal fuse is faulty. The dispenser's fuse is burned out | The thermostat switch of 60°C heating is faulty | Refer to the authorized local dealer or the manufacturer |
| “Compartment heating” relay is faulty |
| Pump motor does not operate | Main switch or fuse is not activated. The door is not closed. | Activate the main switch or fuseClose the door |
| Main relay is faulty | Refer to the authorized local dealer or the manufacturer |
| Pump motor is faulty |
| Program selection switch is faulty |
PROBLEM CAUSE SOLUTION
| Motor operates, but pump does not rotate | An object has jammed the pump fin | Refer to the authorized local dealer or the manufacturer |
| Salts or detergent have been petrified following non-operation of the appliance | Rotate the screw on the backside of the motor, until it rotates freely |
| Items do not dry (dishes, glasses, etc.) | Compartment has no drying aid Insert drying aid to the compartment |
| Drying valve is faulty | Refer to the authorized local dealer or the manufacturer |
| Program switch is faulty |
| Rinsing arms do not rotate |
| Basket does not rotate |
Warranty
Any defect affecting the functionality of the appliance which becomes apparent within one year after purchase will be repaired by free repair or replacement provided the appliance has been used and maintained in accordance with the instructions and has not been abused or misused in any way. Your statutory rights are not affected. If the appliance is claimed under warranty, state where and when it was purchased and include proof of purchase (e.g. receipt).
In line with our policy of continuous product development we reserve the right to change the product, packaging and documentation specifications without notice.
Discarding & Environment
When decommissioning the appliance, the product must not be disposed of with other household waste. Instead, it is your responsibility to dispose to your waste equipment by handing it over to a designated collection point. Failure to follow this rule may be penalized in accordance with applicable regulations on waste disposal. The separate collection and recycling of your waste equipment at the time of disposal will help conserve natural resources and ensure that it is recycled in a manner that protects human health and the environment.
For more information about where you can drop off your waste for recycling, please contact your local waste collection company. The manufacturers and importers do not take responsibility for recycling, treatment and ecological disposal, either directly or through a public system.
natural_image
3D illustration of a coiled spring component mounted on a base plate (no text or symbols)
natural_image
Illustration of a multi-compartment storage box with multiple compartments and grilles (no text or symbols)
natural_image
Illustration of a wire meshing tool and two cylindrical containers (no text or symbols)
natural_image
Diagram of a kitchen or stove with a pot and upward arrow indicating heat or airflow (no text or symbols)
L1L2L3LCD1ALARMLCD2L4L5L6
natural_image
Diagram of a mechanical device inside a transparent enclosure, labeled A and B (no text or symbols on the device itself)
natural_image
3D diagram of a mechanical component with coiled spring-like structures and a base plate (no text or symbols)
natural_image
Illustration of a two-compartment drawer with multiple compartments filled with circular patterns (no text or symbols)
natural_image
Illustration of a wire meshing tool with a cylindrical component and two separate cylinders (no text or symbols)
natural_image
Diagram of a kitchen or storage area with a stove and directional arrow indicating flow or movement (no text or symbols)
L1L2L3LCD1ALARMLCD2L4L5L6

- LCD1 - "bt" of "tt" (afwisselend)
- LCD2 - “-- °C”
natural_image
Diagram of a mechanical device inside a transparent enclosure, labeled A and B (no text or symbols on the device itself)
PROBLEEM OORZAAK OPLOSSING
natural_image
3D diagram of a mechanical component with coiled spring and base plate (no text or symbols)
natural_image
Illustration of a two-compartment storage tray with circular compartments (no text or symbols)
natural_image
Illustration of a wire meshing device and two cylindrical containers (no text or symbols)
natural_image
Diagram of a kitchen or processing room with a tray holding a stove and a stack of steam rising from the chimney (no text or symbols)
natural_image
Diagram of a mechanical device inside a transparent enclosure, labeled A and B (no text or symbols on the device itself)
natural_image
3D diagram of a mechanical component with coiled spring-like structures and a base plate (no text or symbols)
natural_image
Illustration of a two-compartment storage tray with circular compartments (no text or symbols)
natural_image
Illustration of a wire meshing tool and two cylindrical containers (no text or symbols)
natural_image
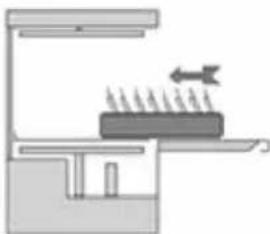
Diagram of a kitchen or storage unit with a tray, stove, and directional arrow indicating flow or movement (no text or symbols)
Insertion correcte des paniers complets.
Panneau de commande
natural_image
Diagram of a mechanical device inside a transparent enclosure, labeled A and B (no text or symbols on the device itself)
PROBLÈME CAUSE SOLUTION
natural_image
3D illustration of a mechanical component with coiled spring and base plate (no text or symbols)
natural_image
Illustration of a two-compartment storage tray with circular compartments (no text or symbols)
natural_image
Illustration of a wire meshing device with a cylindrical container nearby (no text or symbols)
natural_image
Diagram of a kitchen or processing setup with a tray, stove, and directional arrows indicating flow or movement (no text or symbols)
L1L2L3LCD1ALARMLCD2L4L5L6
natural_image
Diagram of a scientific instrument inside a transparent enclosure labeled A and B (no text or symbols on the instrument itself)
PROBLEMA CAUSA SOLUZIONE
natural_image
3D illustration of a coiled spring component with a base plate (no text or symbols)
natural_image
Illustration of a two-compartment storage tray with multiple circular compartments (no text or symbols)
natural_image
Illustration of a wire meshing device and two cylindrical containers (no text or symbols)
natural_image
Diagram of a kitchen or heating setup with a stove and directional arrow (no text or symbols)
BUTONUL NUME DESCRIERE NOTE
natural_image
Diagram of a mechanical device inside a transparent enclosure, labeled A and B (no text or symbols on the device itself)
PROBLEMĂ CAUZĂ SOLUȚIE
natural_image
3D illustration of a mechanical component with coiled spring and base plate (no text or symbols)
natural_image
Illustration of a two-hole storage tray with circular compartments (no text or symbols)
natural_image
Illustration of a wire meshing device and two cylindrical containers (no text or symbols)
natural_image
Diagram of a mechanical setup with a moving component and directional arrow (no text or symbols)
L1L2L3LCD1ALARMLCD2L4L5L6
natural_image
Diagram of a mechanical device inside a transparent enclosure, labeled A and B (no text or symbols on the diagram itself)
natural_image
3D diagram of a mechanical component with coiled spring-like structures and a base plate (no text or symbols)
natural_image
Illustration of a two-compartment storage tray with circular compartments (no text or symbols)
natural_image
Illustration of a wire meshing tool and two cylindrical containers (no text or symbols)
natural_image
Diagram of a kitchen or storage unit with a tray, stove, and directional arrow indicating flow (no text or symbols)
L1L2L3LCD1ALARMLCD2L4L5L6
SW1SW2SW3SW4SW5SW6
natural_image
Diagram of a mechanical device inside a transparent enclosure, labeled A and B (no text or symbols on the diagram itself)
natural_image
3D diagram of a mechanical component with coiled spring-like structures and a base plate (no text or symbols)
natural_image
Illustration of a two-compartment storage tray with multiple circular compartments (no text or symbols)
Pravilno umetanje stakla u otvo-
rene košare
natural_image
Illustration of a wire meshing tool and two cylindrical containers (no text or symbols)
Ispravno umetanje tanjura i
pribora za jelo

natural_image
Diagram of a cooking setup with a stove and a tray, no text or symbols present
Ispravno umetanje punih košara
Upravljačka ploča
L1L2L3LCD1ALARMLCD2L4L5L6
| TIPKA | NAZIV | OPIS | NAPOMENE |
| SW1 | CT1 | Gumb kratkog ciklusa | Trajanje 1 min |
| SW2 | CT2 | Tipka za srednji ciklus | Trajanje 2 min |
| SW3 | CT3 | Gumb za dugi ciklus | Trajanje 3 min |
| SW4 | DB | Gumb pumpe za izbacivanje vode | |
| SW5 | PLOČA | Gumb za hladno ispiranje | |
| SW6 | NA | Prekidač za uključivanje/isključivanje | |
| LIJEVANI STOL | BOJA |
TIPKA NAZIV OPIS NAPOMENE
| L1 LED lampica za odabir kratkog ciklusa |
| L2 LED srednjeg ciklusa |
| L3 | LED žaruljica odabira dugog ciklusa |
| L4 Pražnjenje urina u tijeku |
| L5 Odabrano hladno ispiranje |
| L6 | LED sklopka za uključivanje/isključivanje |
Uključivanje
Za pokretanje stroja, pritisnite tipku SW6 (ON) na 3 sekunde. LED LL6 treperi crveno i oglašava se zvučni signal.
natural_image
Diagram of a mechanical device inside a transparent enclosure, labeled A and B (no text or symbols on the device itself)
Ako želite isključiti uređaj, izvadite preljevno crijevo iz spremnika za ispiranje i pritisnite tipku SW4. Uređaj će automatski izbaciti vodu, izvesti ciklus samočišćenja i zatim isključiti uređaj. Alternativni način je kontinuirano pritiskati tipku SW6 dok se pokazatelj „OFF“ ne pojavi u prvoj liniji zaslona (oko 5 sekundi). Preporučeni način je prvi.
ECO funkcija
natural_image
3D diagram of a dual-plate electrical connector with coiled and shavings components (no text or symbols)
natural_image
Isometric illustration of a two-compartment storage unit with internal compartments (no text or symbols)
natural_image
Illustration of a wire meshing tool with a cylindrical container and two separate geometric shapes (no text or symbols)
natural_image
Simple line drawing of a kitchen appliance with a tray and a stove, no text or symbols present
natural_image
Diagram of a mechanical device inside a transparent enclosure, labeled A and B (no text or symbols on the device itself)
natural_image
3D illustration of a mechanical component with coiled spring-like structures and a base plate (no text or symbols)
natural_image
Illustration of a two-compartment storage tray with circular compartments (no text or symbols)
natural_image
Illustration of a wire meshing tool with a cylindrical container nearby (no text or symbols)
natural_image
Diagram of a kitchen or processing setup with a tray, stove, and directional arrow (no text or symbols)
GOMB NÉV LEÍRÁS MEGJEGYZÉSEK
natural_image
Diagram of a mechanical device inside a transparent enclosure, labeled A and B (no text or symbols on the diagram itself)
natural_image
3D illustration of a coiled spring component with a base plate (no text or symbols)
natural_image
Illustration of a two-hole storage cabinet with circular compartments (no text or symbols)
natural_image
Illustration of a grid-patterned mechanical component with cylindrical and rectangular parts beside it (no text or symbols)
natural_image
Diagram of a kitchen or storage area with a stove and directional arrow indicating flow or movement (no text or symbols)
natural_image
Diagram of a mechanical device inside a transparent enclosure, labeled A and B (no text or symbols on the device itself)
natural_image
3D diagram of a mechanical component with coiled spring and base plate (no text or symbols)
Parandage varrastega plaatide
sisestamist korvidesse.
natural_image
Illustration of a two-compartment storage tray with circular compartments (no text or symbols)
natural_image
Illustration of a wire meshing tool and two cylindrical containers (no text or symbols)
natural_image
Diagram of a kitchen setup with a stove and a tray, showing heat transfer arrows (no text or labels)
L1L2L3LCD1ALARMLCD2L4L5L6
natural_image
Diagram of a scientific instrument inside a transparent enclosure, labeled A and B (no text or symbols on the instrument itself)
EKO funktsioon
natural_image
3D illustration of a mechanical component with coiled spring and base plate (no text or symbols)
natural_image
Illustration of a two-compartment storage unit with circular compartments and mesh patterns (no text or symbols)
natural_image
Illustration of a wire meshing device and two cylindrical containers (no text or symbols)
natural_image
Simple line drawing of a kitchen setup with a stove and a tray, no text or symbols present
natural_image
Diagram of a mechanical device inside a transparent enclosure, labeled A and B (no text or symbols on the device itself)
natural_image
3D illustration of a mechanical component with coiled spring and base plate (no text or symbols)
natural_image
Illustration of a two-compartment storage tray with multiple compartments (no text or symbols)
natural_image
Illustration of a wire meshing device and two cylindrical containers (no text or symbols)
natural_image
Diagram of a kitchen or oven with a tray holding a stove and a bed, showing heat transfer arrows (no text or symbols)
natural_image
Diagram of a scientific instrument inside a transparent enclosure labeled A and B (no text or symbols on the device itself)
natural_image
3D diagram of a mechanical component with coiled spring-like structures and a base plate (no text or symbols)
natural_image
Illustration of a two-compartment drawer with multiple compartments filled with circular patterns (no text or symbols)
natural_image
Illustration of a wire meshing tool with a cylindrical component and two separate cylinders (no text or symbols)
natural_image
Diagram of a kitchen or storage area with a stove and directional arrow indicating flow or movement (no text or symbols)
L1L2L3LCD1ALARMLCD2L4L5L6
natural_image
Diagram of a mechanical device inside a transparent enclosure, labeled A and B (no text or symbols on the device itself)
natural_image
3D diagram of a mechanical component with coiled spring and base plate (no text or symbols)
natural_image
Illustration of a two-compartment storage tray with circular compartments (no text or symbols)
natural_image
Illustration of a wire mesh construction with a cylindrical component and two separate geometric shapes (no text or symbols)
natural_image
Diagram of a cooking setup with a tray, stove, and upward arrow indicating motion (no text or symbols)
natural_image
Diagram of a mechanical device inside a transparent enclosure, labeled A and B (no text or symbols on the device itself)
natural_image
3D illustration of a mechanical component with coiled spring and base plate (no text or symbols)
natural_image
Illustration of a two-compartment storage box with multiple circular compartments (no text or symbols)
natural_image
Illustration of construction materials including a wire mesh, cylindrical concrete, and a triangular foundation (no text or symbols)
natural_image
Diagram of a kitchen or storage area with a tray and a stove, showing heat transfer direction (no text or symbols)
| TLAČIDLO | NÁZOV | POPIS | POZNÁMKY |
| SW1 | CT1 | Tlačidlo Krátky cyklus | Trvanie 1 min |
| SW2 | CT2 | Tlačidlo Stredný cyklus | Trvanie 2 min |
| SW3 | CT3 | Tlačidlo Dlhý cyklus | Trvanie 3 min |
| SW4 | DB | Tlačidlo vypúšťacieho čerpadla | |
| SW5 | CRB | Tlačidlo studeného plákania | |
| SW6 | ZAPNUTÝ | Vypínač ZAP/VYP | |
TLAČIDLO NÁZOV POPIS POZNÁMKY
natural_image
Diagram of a mechanical device inside a transparent enclosure, labeled A and B (no text or symbols on the device itself)
ALARM POPIS PROBLÉMU
| Alarm 1 Nadbytok času plnenia vodou |
| Alarm 2 | Hladina vody počas vypúšťania nie je znížená |
| Alarm 3 Nadmerný čas ohrevu kotla |
| Alarm 4 | Nadmerný čas zohrievania nádrže |
| Alarm 5 Teplota vody v ohrievači je nad limitmi |
| Alarm 6 | Teplota vody v nádrži na premývací roztok je nad limitmi |
| Alarm 7 Alarm studeného oplachovania |
| Alarm 8 Teplomer komory nie je pripojený |
| Alarm 9 | Teplomer vaničky je chybný |
| Alarm 10 | Teplomer ohrievača nie je pripojený |
| Alarm 11 Teplomer kotla je poškodený |
| Alarm 12 | Umývací cyklus bol dokončený, ale kotol sa nezahrial správne (prekročil sa čas ohrevu funkcie termoprotektora). |
Riešenie problémov
natural_image
3D illustration of a mechanical component with coiled spring and base plate (no text or symbols)
natural_image
Illustration of a two-compartment storage unit with circular compartments and internal compartments (no text or symbols)
natural_image
Illustration of a wire meshing device and two cylindrical containers (no text or symbols)
natural_image
Diagram of a kitchen or oven setup with a stove and a tray, no text or symbols present
natural_image
Diagram of a mechanical device inside a transparent enclosure, labeled A and B (no text or symbols on the diagram itself)
PKS Hendi South East Europe SA
5 Metsovou Str.
18346 Moschato, Athens, Greece
Tel: +30 210 4839700
Email: info@pks-hendi.com
Hendi Polska Sp. z o.o.
ul. Firmowa 12
62-023 Robakowo, Poland
Tel: +48 61 658 7000
Email: info@hendi.pl
Hendi Italia S.R.L.
Via Leonardo da Vinci 4
39100 Bolzano (BZ), Italy
Tel: +39 800 727 438
Email: office.italy@hendi.eu
Hendi Food Service Equipment GmbH
Ehring 15
1208, 12/F Exchange Tower
33 Wang Chiu Road, Kowloon Bay, Hong Kong
Tel: +852 2154 2618
Email: info-hk@hendi.eu
Hendi Food Service Equipment Romania S.R.L.
www.youtube.com/HendiEquipment
- Changes, printing and typesetting errors reserved.
- Änderungen, Druck- und Satzfehler vorbehalten.
- Wijzigingen, druk- en zetfouten voorbehouden.
- Zastrzega się możliwość zmian, błędów w druku i składzie.
- Sous réserve d'erreurs de modification, d'impression et de composition.
- Con riserva di modifiche, errori di stampa e composizione.
- Rezervate modificările, tipărirea și errorile de tipărire.
- Мы оставляем за собой право вносить изменения, ошибки печати и набора.
- Επιφυλάσσονται αλλαγές, εκτύπωση και στοιχειοθεσία.
- Pridržane su promjene, pogreške u ispisu i slanju slova.
-
Změny, chyby tisku a sazby vyhrazeny.
-
A változtatások, a nyomtatási és a betűzési hibák fenntartva.
- Всі права захищені щодо змін, можливі помилки друку та верстки.
- Neid juhiseid võidakse muuta ja need võivad sisaldada trükivigu.
- Šī instrukcija var tikt mainīta, tajā tāpat var būt drukas klūdas.
- Šios instrukcijos gali būti keičiamos, jose taip pat gali pasitakyti spausdinimo klaidy.
- Alterações, impressão e erros de composição reservados.
- Reservado el derecho a realizar modificaciones, errores de impresión y tipografía.
- Zmeny, chyby v tlači a sadzbe vyhradené.
- Spremembe, liskanje in tipnastavitev napake shranjenih.