Sound Blaster Live Player 5.1 - Soundcard CREATIVE - Free user manual and instructions
Find the device manual for free Sound Blaster Live Player 5.1 CREATIVE in PDF.
User questions about Sound Blaster Live Player 5.1 CREATIVE
0 question about this device. Answer the ones you know or ask your own.
Ask a new question about this device
Download the instructions for your Soundcard in PDF format for free! Find your manual Sound Blaster Live Player 5.1 - CREATIVE and take your electronic device back in hand. On this page are published all the documents necessary for the use of your device. Sound Blaster Live Player 5.1 by CREATIVE.
USER MANUAL Sound Blaster Live Player 5.1 CREATIVE
Information in this document is subject to change without notice and does not represent a commitment on the part of Creative Technology Ltd. No part of this manual may be reproduced or transmitted in any form or by any means, electronic or mechanical, including photocopying and recording, for any purpose without the written permission of Creative Technology Ltd. The software described in this document is furnished under a license agreement and may be used or copied only in accordance with the terms of the license agreement. It is against the law to copy the software on any other medium except as specifically allowed in the license agreement. The licensee may make one copy of the software for backup purposes.
Copyright © 2000 by Creative Technology Ltd. All rights reserved.
Version 2.0
October 2000
Sound Blaster and Blaster are registered trademarks, and the Sound Blaster Live! logo, the Sound Blaster PCI logo, EMU10K1, E-mu Environmental Modeling, Environmental Audio, Creative Multi Speaker Surround, and DynaRAM are trademarks of Creative Technology Ltd. in the United States and/or other countries. E-Mu and SoundFont are registered trademarks of E-mu Systems, Inc. PCWorks and FourPointSurround are trademarks of Cambridge SoundWorks, Inc. Microsoft, MS-DOS, and Windows are registered trademarks of Microsoft Corporation. All other products are trademarks or registered trademarks of their respective owners.
This product is covered by one or more of the following U.S. patents:
4,506,579; 4,699,038; 4,987,600; 5,013,105; 5,072,645; 5,111,727; 5,144,676; 5,170,369; 5,248,845; 5,298,671; 5,303,309; 5,317,104; 5,342,990; 5,430,244; 5,524,074; 5,698,803; 5,698,807; 5,748,747; 5,763,800; 5,790,837.
Regulatory Information
The following sections contain regulatory notices for Europe.
FCC Part 15: This equipment has been tested and found to comply with the limits for a Class B digital device, pursuant to Part 15 of the FCC Rules. These limits are designed to provide reasonable protection against harmful interference in a residential installation. This equipment generates, uses, and can radiate radio frequency energy and, if not installed and used in accordance with the instructions, may cause harmful interference to radio communications.
However, there is no guarantee that interference will not occur in a particular installation. If this equipment does cause harmful interference to radio or television reception, which can be determined by turning the equipment off and on, the user is encouraged to try one or more of the following measures:
☐ Reorient or relocate the receiving antenna.
☐ Increase the distance between the equipment and receiver.
☐ Connect the equipment into an outlet on a circuit different from that to which the receiver is connected.
Consult the dealer or an experienced radio/TV technician.
Caution
To comply with the limits for the Class B digital device, pursuant to Part 15 of the FCC Rules, this device must be installed in computer equipment certified to comply with the Class B limits.
All cables used to connect the computer and peripherals must be shielded and grounded.
Operation with non-certified computers or non-shielded cables may result in interference to radio or television reception.
Modifications
Any changes or modifications not expressly approved by the grantee of this device could void the user's authority to operate the device.
Safety Information
CAUTION: This device is intended to be installed by the user in a CSA/TUV/UL certified/listed IBM AT or compatible personal computers in the manufacturer's defined operator access area. Check the equipment operating/installation manual and/or with the equipment manufacturer to verify/confirm if your equipment is suitable for user-installed application cards.
Compliance
This product conforms to the following Council Directive:
☐ Directive 89/336/EEC, 92/31/EEC (EMC)
Welcome to SB Live! Player 5.1
What's in the Package .... 1
What You'll Need....1
Before You Start ....2
Identifying Connectors on your Audio Card:....2
What's Next... Follow Easy Steps 1-2-3 ....3
Step 1: Installing the Audio Card ....4
Step 2: Installing Device Drivers....5
Step 3: Installing the Software....7
If You Have a Problem 8
Returning a product for repair....8
Limited Warranty....9
Creative European Help Line.... 145
Creative European Help Line.... 145
Creative European Help Line .... 145
Creative European Help Line ...... 145
Creative European Help Line ...... 145
Creative European Help Line ...... 145
Creative European Help Line ...... 145
Välkommen till SB Live! Player 5.1
Creative European Help Line ...... 145
Velkommen til SB Live! Player 5.1
Creative European Help Line ...... 145
Velkommen til SB Live! Player 5.1
Creative European Help Line ...... 145
Creative European Help Line ...... 145
Vítá vás SB Live! Player 5.1
Creative European Help Line ...... 145
Creative European Help Line ...... 145
Creative European Help Line .... 145
Welcome to SB Live! Player 5.1
This Product Guide provides easy-to-follow instructions that describe how to quickly install and setup SB Live! Player 5.1 on your computer.
What's in the Package
Your SB Live! Player 5.1 installation pack contains the following hardware, software, and documentation items:
☐ SB Live! Player 5.1 audio card.
☐ Software Pack (on CD-ROM only) containing Creative Utilities and Drivers for Windows ^® 95/98, Windows ^® NT 4.0/2000 and Windows ^® ME
☐ CD-ROM audio cable.
□ CD SP/DIF Cable
☐ This Product Guide.
☐ 3rd Party software (on CD-ROM only)
What You'll Need
The system requirements for SB Live! Player 5.1 are as follows:
☐ Genuine Intel® Pentium® class processor: 166 MHz for Windows 95/98 or Windows Millennium Edition, 200 MHz for Windows NT 4.0 or Windows 2000
Intel or 100% compatible motherboard chipset
☐ Windows 95, 98 or Millennium Edition, Windows NT 4.0 or Windows 2000
☐ 16 MB RAM for Windows 95/98 or Millennium Edition (32 MB RAM recommended), 32 MB RAM for Windows NT 4.0, 64 MB RAM for Windows 2000
☐ 160 MB of free hard disk space
☐ Open half-length PCI 2.1 compliant slot
☐ Headphones or amplified speakers (available separately)
☐ CD-ROM drive required for software installation

3rd Party software may have higher system requirements
Before You Start
Open the SB Live! Player 5.1 installation pack and verify that you have received all items on the packaging list. If any of these items are missing or damaged, contact the dealer from whom you purchased your SB Live! Player 5.1 installation pack.
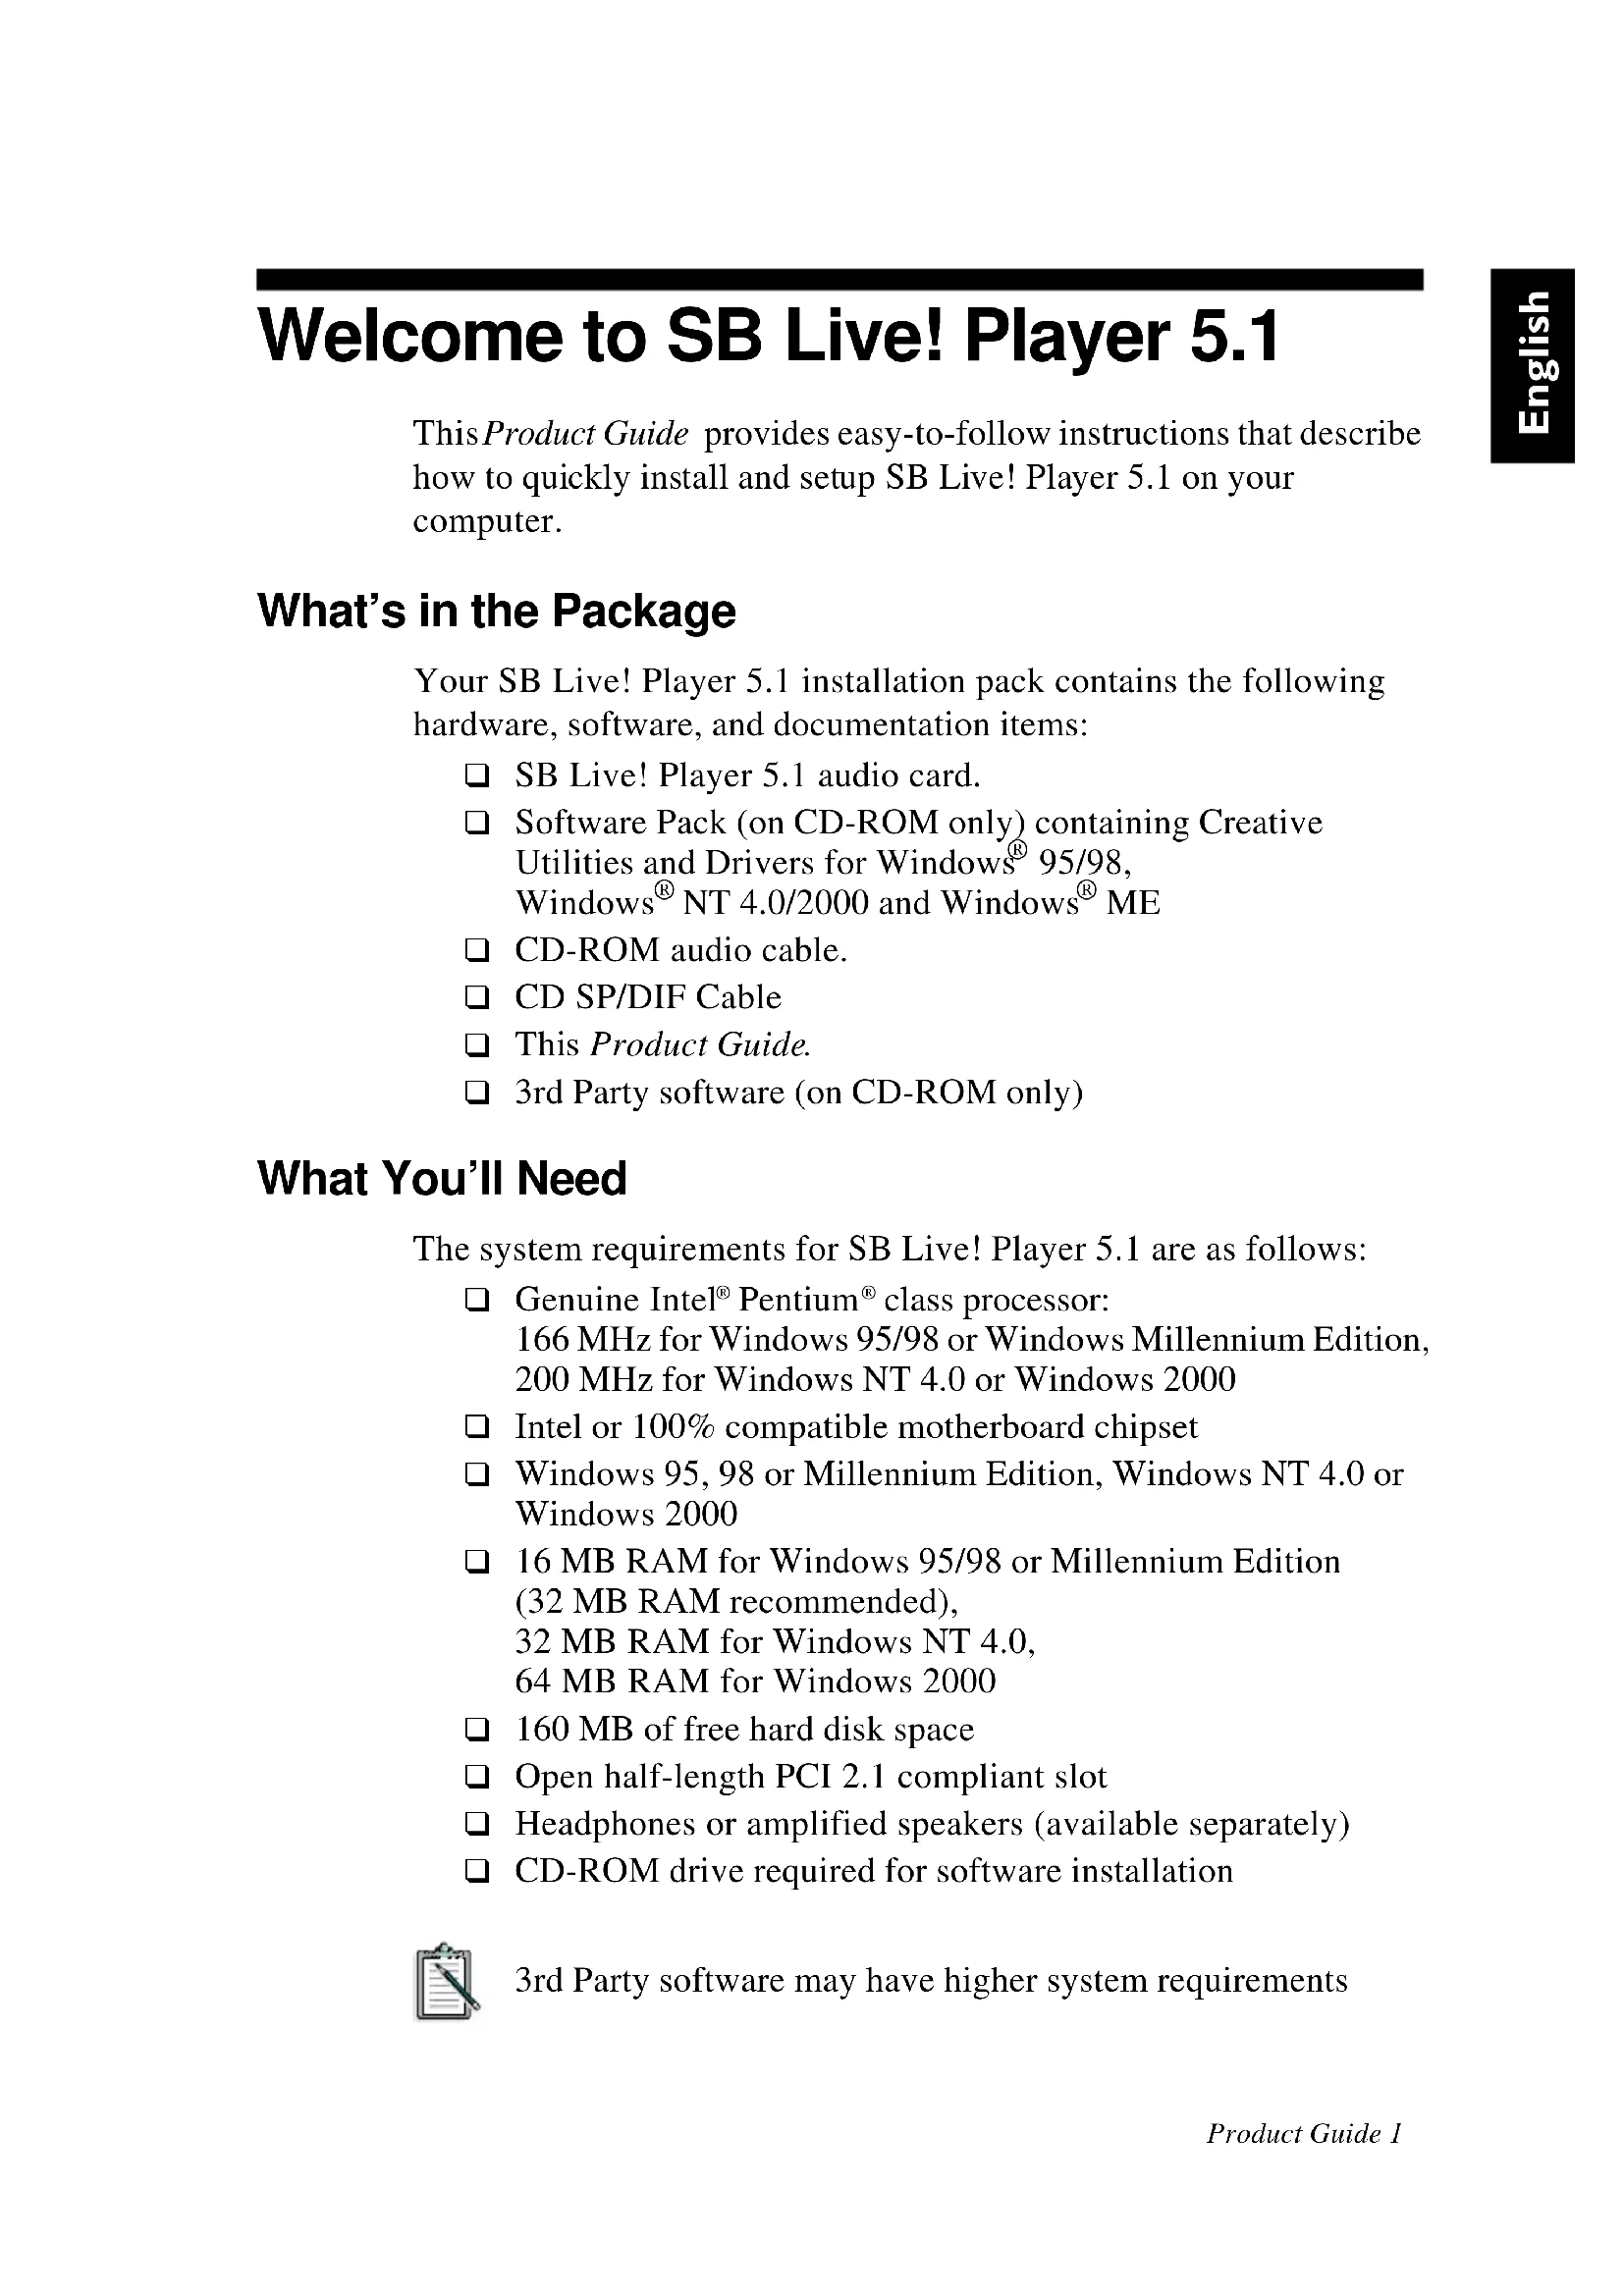
Identifying Connectors on your Audio Card
text_image
CD Audio connector Connects to the Analog Audio output on a CD-ROM or DVD-ROM drive using a CD audio cable. Telephone Answering Device connector Provides a mono connection from a standard voice modem, and transmits microphone signals to the modem. Analog/Digital Out jack 6-channel or compressed AC-3 SPDIF output for connection to external digital devices or digital speaker systems. Also supports centre and subwoofer analog channels for connection to 5.1 analog speaker systems. Line In jack Connects to an external device (such as a cassette, DAT, or MiniDisc player). Microphone In jack Connects to an external microphone for voice input. Line Out jack Connects to powered speakers or an external amplifier for audio output. Also supports headphones. Rear Out jack Connects to powered speakers or an external amplifier for audio output. Aux connector Connects to internal audio sources such as TV Tuner, MPEG, or other similar cards. CD SPDIF connector Connects to the SPDIF (Digital Audio) output (where available) on a CD-ROM or DVD-ROM drive. Audio Extension (Digital I/O) connector Connects to the Digital I/O card or Drive Bay (available separately). Joystick/MIDI connector Connects to a joystick or a MIDI device. You can buy an optional MIDI kit that allows you to plug in the joystick and MIDI device simultaneously. Warning: This is not an IDE interface. Do not connect to your IDE devices.Jacks and connectors on the SB Live! Player 5.1 card.

Static electricity can damage sensitive electronic components. Discharge your body's static electric charge by touching a grounded surface, for example, the metal plate of your computer chassis, prior to installing the SB Live! Player 5.1 audio card.
What's Next... Follow Easy Steps 1-2-3
Follow Easy Steps 1-2-3 to quickly install SB Live! Player 5.1 audio card on your computer:
Step 1

Installing the Audio Card
• Install card in spare expansion slot
- Connect CD-ROM audio cable
- Connect powered speakers or headphones
For more information, refer to “Step 1: Installing the Audio Card” on page 4.
Step 2

Installing Device Drivers
- Insert installation disk in CD-ROM drive
- For Windows 95/98/ME installation, use Update Device Driver Wizard and follow instructions
- For Windows NT 4.0/2000 installation, use Creative Audio Softwarescreen and follow instructions
- Check device drivers are correctly installed
For more information, refer to “Step 2: Installing Device Drivers” on page 5.
Step 3

Installing the Software
- Insert installation disk in CD-ROM drive
- Use Install Selected Components screen and follow instructions
For more information, refer to “Step 3: Installing the Software” on page 7.

Step 1: Installing the Audio Card
To install the SB Live! Player 5.1 audio card, follow these steps:
-
Turn off and unplug your computer and all peripheral devices.
-
Remove the computer cover. If necessary, consult your computer manual for instructions.
-
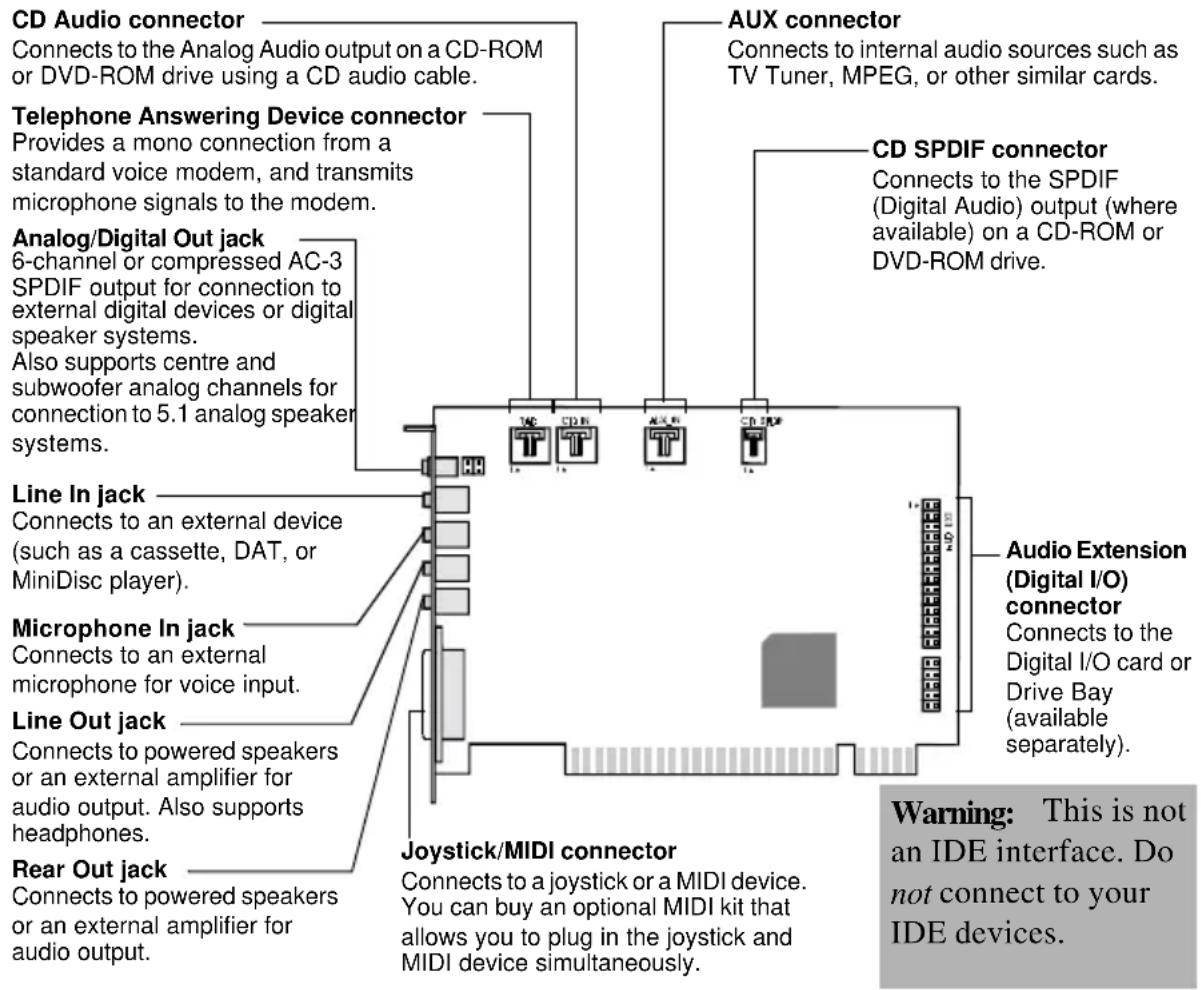
Locate a spare PCI expansion slot for the SB Live! Player 5.1 card. With the slot cover removed, hold the card by its top edge and carefully press it firmly into the slot. Fasten the retaining bracket with a screw.
text_image
ii. Fasten the card to the slot with a screw. Unused brackets i. Gently press the audio card into the slot. PCI slot ISA slotSecuring the audio card to the PCI expansion slot.
-
Plug one end of the CD-ROM audio cable into the CD Audio connector on the card and plug the other end of the cable into the internal audio connector at the rear of the CD-ROM drive.
-
Connect powered speakers or headphones into the appropriate jack on the card. Refer to the section "Identifying Connectors on your Audio Card:" on page 2.
-
Replace the computer cover and turn on your computer and all peripheral devices.

Step 2: Installing Device Drivers
If you are running Windows 95/98/ME, follow these steps:
- Turn on your computer.
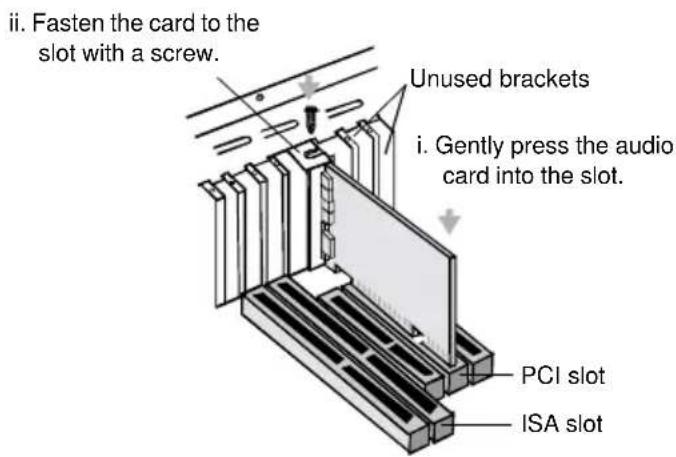
Windows 95/98/ME starts and briefly displays a message that the new hardware (audio card) has been detected. Then the following screen appears:
text_image
Update Device Driver Wizard This wizard will complete the installation of: PCI Multimedia Audio Device by searching your local drives, network, and Internet locations for the most current driver. If you have a disk or CD-ROM that came with this device, insert it now. It is recommended that you let Windows search for an updated driver. To do this, click Next to continue. < Back Next > Cancel- Read the instructions on screen and click Next.
Windows searches for the device driver. If none is found, the Update Device Driver Wizarddialog box re-appears.
-
Click Other Locations. The Select Other Locationsdialog box appears.
-
Click Browse. The Browse for Folder dialog box appears.
-
Double-click the CD-ROM drive icon and select the folder: Audio\English\Win9xdrv or Wdmdrv.
-
Click OK twice and then click Finish when the Update Device Driver Wizard dialog box re-appears. The required files are copied to your computer's hard disk.
-
If the Copying Files dialog box notifies you that the a3d.dll file cannot be found, then repeat steps 4 and 5, select the a3d.dll file, and then click OK twice. Thea3d.dll file is copied to your computer's hard disk.
-
Click Finish when the Update Device Driver Wizard dialog box re-appears and then restart your computer.

To check that device drivers are correctly installed, click on the System icon in the Control Panel. Select Device Manager and double-click on Sound, Video and Game Controllers icon to view installed drivers. If a ? or ! icon appears beside the listed device driver, select the device, click Remove and repeat steps 1-8.
If you are running Windows NT 4.0/2000, follow these steps:
- Turn on your computer.
- Insert the installation disc into your CD-ROM drive. The Creative Audio Softwarescreen appears.
- Follow the instructions on screen to complete the installation, after which you must reboot your PC.

To check that device drivers are correctly installed, click on the Multimedia icon in the Control Panel. Select Devices and double-click on Sound, Video and Game Controllers icon to view installed drivers. If you encounter problems, select the device, click Remove and repeat steps 1-3.

Step 3: Installing the Software
To install the SB Live! Player 5.1 software, follow these steps:
- Turn on your computer.
- Insert the installation disc into your CD-ROM drive, Windows starts and the following screen appears.
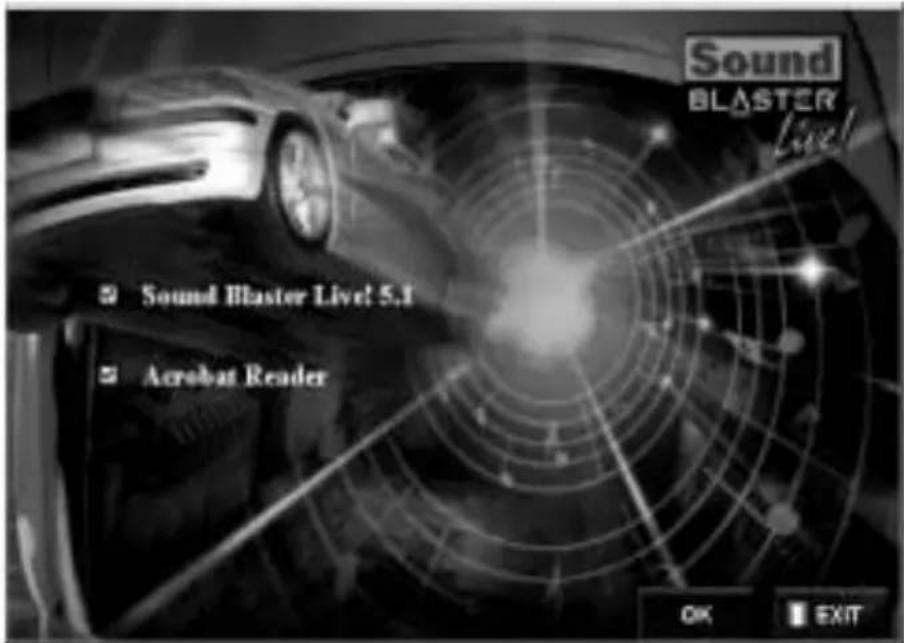
text_image
Sound BLASTER Live! Sound Blaster Live! 5.1 Acrobat Reader OK EXIT-
Click OK.
-
Follow the instructions on screen to install the software.

If you need more detailed information on the installation and usage of your SB Live! Player 5.1 card, refer to the online guide, SB Live! Player 5.1 User's Guide on your installation CD.
In Windows 95/98/NT 4.0, 2000 and ME double click the .exe file in D:\MANUALS\ENGLISH\
The Acrobat Reader 4.05 is now installed. Double-click the icon and select File, Open D:\MANUALS\ENGLISH\ENGLISH.PDF to access the online Guide.
If You Have a Problem
Please retain all contents including packaging and proof of purchase until you are fully satisfied with product.
If you find that you have a problem with your Creative product and believe that it needs to be repaired or replaced, you should verify the purchase date and take the appropriate action as detailed below:
Less than 30 days since date of purchase
Should your store receipt indicate that the product is less than 30 days old, you have the option of calling Technical Support for assistance or returning the full product to the dealer/reatailer for a replacement or credit (see Creative Technical Services section for contact numbers).
More than 30 days since date of purchase
First contact European Technical Support (see Creative Technical Services section for contact numbers) to establish the nature of the problem and details on our repair returns procedure. Creative Labs requires that all returns for repair/replacement must first be issued with an authorisation number.
Returning a product for repair
☐ Contact Technical Support to receive your authorisation number for repair/replacement of product.
☐ Technical Support will communicate how to return the product in question for repair/replacement.
☐ You should only return the hardware item in question and return it to the address detailed by technical support. Please retain all software, accessories and the original packaging.
☐ Please quote the authorisation number clearly on the outside of the packaging, in which you return the hardware item in question.
Upon receipt of the faulty item, Creative Labs will process your request and arrange return.

Creative may replace or repair the product with new or reconditioned parts, and the faulty parts will become the property of Creative. The warranty period for your repaired/replacement item is 90 days from the date of shipment from Creative, or what is left on the original item's warranty, whichever is longer.
To avoid tariffs when shipping a product to Creative Labs from outside the E.U., you must complete the relevant customs documentation before shipping the product (please allow 30 days).
Limited Warranty
Creative Labs (Ireland) Limited (“Creative”) warrants to you, the original purchaser only, that the hardware product will be free of defects in materials and workmanship for a period of two years after the date of purchase, or such other period as may be expressly specified by Creative or required by applicable law (“Warranty Period”).
Creative's entire liability and your remedy will be, at Creative's sole discretion, the repair or replacement (with the same or similar model) of any hardware or accompanying item(s) not meeting the “Limited Warranty” explained above that is returned to Creative's authorised distributor or dealer during the Warranty Period with a copy of your receipt.
What this warranty does not cover
To the maximum extent permitted by applicable law, Creative disclaims all other warranties and conditions, expressed or implied, including the conditions of quality, merchantability or fitness for a particular purpose with respect to the use of this product. Creative also disclaims any obligation to support products for all operating environments - for example, by ensuring interoperability with future versions of software or hardware. In no event shall Creative or its licensors be liable for any indirect, incidental, special or consequential loss or for any lost profits, savings or data arising from or relating to the use of this product, even if Creative or its licensors have been advised of the possibility of such loss.
Specifically, this warranty does not cover failures of the product which result from accident, abuse, misuse, alterations (by persons other than Creative or its authorized repair agents), moisture, corrosive environments, shipping, high voltage surges, or abnormal working conditions. This warranty does not cover normal wear and tear. You are specifically advised to take a backup copy of any software provided with the Creative product for security purposes.

This warranty gives you specific legal rights. You may have other rights which vary from country to country. Certain limitations in this warranty are not permitted by the jurisdiction of some countries, so some limitations here may not apply to you.
text_image
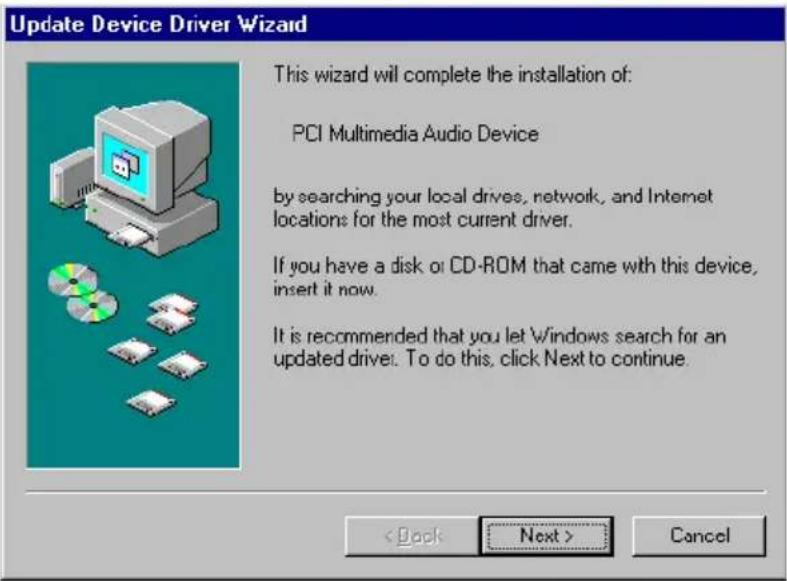
Update Device Driver Wizard This wizard will complete the installation of: PCI Multimedia Audio Device by searching your local drives, network, and Internet locations for the most current driver. If you have a disk or CD-ROM that came with this device, insert it now. It is recommended that you let Windows search for an updated drive. To do this, click Next to continue. < Back Next > CancelInstallera drivrutiner
Steg 2: Installera drivrutiner
text_image
Update Device Driver Wizard This wizard will complete the installation of: PCI Multimedia Audio Device by searching your local drives, network, and Internet locations for the most current driver. If you have a disk or CD-ROM that came with this device, insert it now. It is recommended that you let Windows search for an updated drive. To do this, click Next to continue. < Back Next > CancelSystemkrav for SB Live! Player 5.1:
☐ Pentium® prosessortype:
166 MHz for Windows 95/98/ME,
200 MHz for Windows NT 4.0/Windows 2000
Intel eller 100 % kompatibelt hovedkortbrikkesett
☐ Windows 95, 98, ME eller Windows NT 4.0 eller 2000
☐ 16 MB RAM for Windows 95/98/ME (32 MB RAM anbefales), 32 MB RAM for Windows NT 4.0, 64 MB RAM for Windows 2000
☐ 160 MB ledig harddiskplass
☐ Ledig PCI 2.1-kompatibelt spor i halv lengde
☐ Hodetelefoner eller høyttalere med forsterker
☐ CD-ROM-stasjon for installasjon av programvare

text_image
Update Device Driver Wizard This wizard will complete the installation of: PCI Multimedia Audio Device by searching your local drives, network, and Internet locations for the most current driver. If you have a disk or CD-ROM that came with this device, insert it now. It is recommended that you let Windows search for an updated driver. To do this, click Next to continue. < Back Next > Canceltext_image
Update Device Driver Wizard This wizard will complete the installation of: PCI Multimedia Audio Device by searching your local drives, network, and Internet locations for the most current driver. If you have a disk or CD-ROM that came with this device, insert it now. It is recommended that you let Windows search for an updated driver. To do this, click Next to continue. < Back Next > Canceltext_image
Update Device Driver Wizard This wizard will complete the installation of: PCI Multimedia Audio Device by searching your local drives, network, and Internet locations for the most current driver. If you have a disk or CD-ROM that came with this device, insert it now. It is recommended that you let Windows search for an updated driver. To do this, click Next to continue. < Back Next > Canceltext_image
Update Device Driver Wizard This wizard will complete the installation of: PCI Multimedia Audio Device by searching your local drives, network, and Internet locations for the most current driver. If you have a disk or CD-ROM that came with this device, insert it now. It is recommended that you let Windows search for an updated driver. To do this, click Next to continue. < Back Next > Canceltext_image
Update Device Driver Wizard This wizard will complete the installation of: PCI Multimedia Audio Device by searching your local drives, network, and Internet locations for the most current driver. If you have a disk or CD-ROM that came with this device, insert it now. It is recommended that you let Windows search for an updated driver. To do this, click Next to continue. < Back Next > Canceltext_image
Update Device Driver Wizard This wizard will complete the installation of: PCI Multimedia Audio Device by searching your local drives, network, and Internet locations for the most current driver. If you have a disk or CD-ROM that came with this device, insert it now. It is recommended that you let Windows search for an updated driver. To do this, click Next to continue. < Back Next > CancelCreative European Help Line
CREATIVE LABS (IRELAND) LTD.,
Technical Support Department,
Ballycoolin Business Park, Blanchardstown,
Dublin 15, Ireland.
Fax: +353 1 8205052
United Kingdom
Tel +44 (0) 870-876 08 76
Germany
Tel +069-66982900
Ireland
Tel +353 1 820 7555
France
Tel +33 1 55 46 87 77
Spain
Tel +34 (91) 66 25 116
Italy
Tel +39 02 4828 0000
Austria
Tel +43 (01) 589 244 320
Belgium
Tel +32 (02) 7171 198
Denmark
Tel +45 3525 9498
Finland
Tel +358 (09) 2294 3101
Norway
Tel +47 2305 0401
Sweden
Tel +46 (08) 7519 147
Holland
Tel +31 (0) 205040616
Switzerland
Tel +41 (01) 2121 868
Portugal
Tel 800 8 53066
Czech Republic
Tel 353 1 8066964
Poland
Freephone 00 800 353 1229
Hungary
Freephone 06 800 12222
Russia
Tel +353 1 8066967
Operating Hours/Heures d'ouverture/Offnungszeiten/ Ore d'ufficio/Horario de oficina/Openingstijden/Horário de abertura
EUROPE
Mon-Fri : Business Hours Sat-Sun & Public Holidays : Closed
Lun. au vend.
Mo-Fr
Lunedì-venerdì
Lunes-Viernes
Maandag-Vrijdag
To receive technical support via the Internet, please e-mail: support@europe.creative.com
Web Site www.creative.com