Zen Nano Plus - Mp3 player CREATIVE - Free user manual and instructions
Find the device manual for free Zen Nano Plus CREATIVE in PDF.
User questions about Zen Nano Plus CREATIVE
0 question about this device. Answer the ones you know or ask your own.
Ask a new question about this device
Download the instructions for your Mp3 player in PDF format for free! Find your manual Zen Nano Plus - CREATIVE and take your electronic device back in hand. On this page are published all the documents necessary for the use of your device. Zen Nano Plus by CREATIVE.
USER MANUAL Zen Nano Plus CREATIVE
Zen Nano Plus CLE_QS.book Page i Tuesday, May 10, 2005 10:48 AM


English....I
Français....14
Deutsch 28
Italiano ....41
Español....54
Nederlands....67
Português....80
Svenska 93
Norsk....106
Dansk....119
Suomi 132
Česky 145
Polski....158
Русский .....171

i


text_image
Zen Nano Plus CLE_QS.book Page ii Tuesday, May 10, 2005 10:48 AM ii

Zen Nano Plus CLE_QS.book Page 1 Tuesday, May 10, 2005 10:48 AM
English
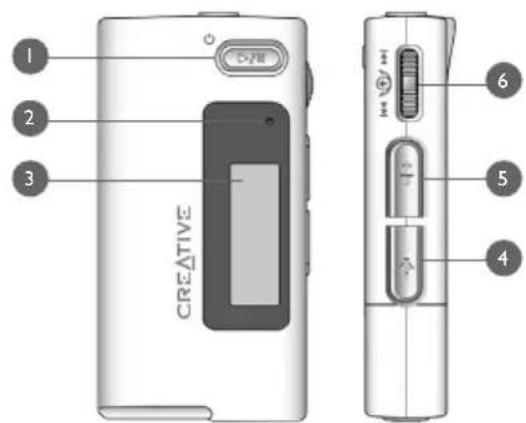
Your Player At A Glance
text_image
CREATIVE 1 2 3 6 5 4| 1. Play/Pause button | Press and hold to turn the player on and off.Press once to start playing tracks, and press again to pause playback. |
| 2. Microphone | A built-in microphone that lets you make digital voice recordings. |
| 3. LCD | Displays menu options. |
| 4. Volume Decrease button | Press to decrease the volume. |
| 5. Volume Increase button | Press to increase the volume. |
| 6. Scroller | Turn the Scroller to scroll through menu options and press the Scroller to select them. This action is also referred to as "Scroll Select".During playback, turn the Scroller to move between tracks, or turn and hold the Scroller to move within a track. |


Zen Nano Plus CLE_QS.book Page 2 Tuesday, May 10, 2005 10:48 AM


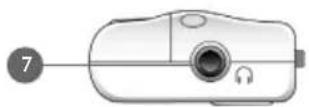
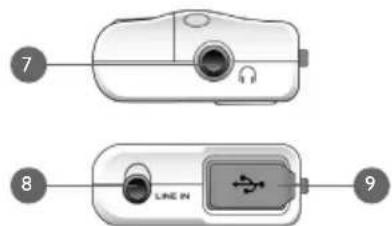
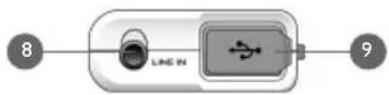
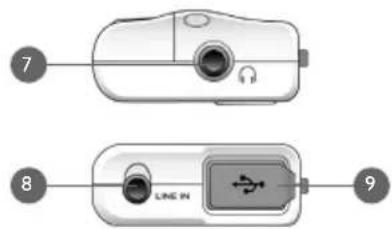
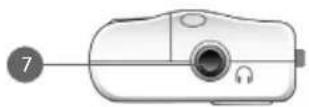
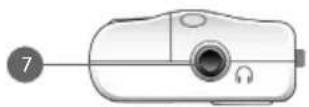
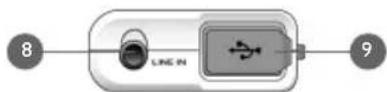
| 7. Headphone jack | Connect headphones to this jack. |
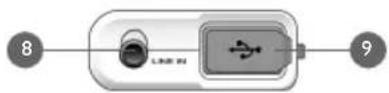
| 8. Line In jack | Connect external stereo sources, such as cassette players, CD players and MiniDisc players, to this jack. Note that this is not a digital (optical) input jack. |
| 9. USB port | Connect your computer to this port using the supplied USB cable. |
Using the Scroller
You can use the scroller to select menu options. We use the term "Scroll Select" when we want you to use the Scroller to scroll to a menu option, and then select it by pressing the Scroller.

flowchart
graph LR
    A["Start"] --> B["Play Mode"]
    B --> C["End"]
- Turn the Scroller to scroll through menu options on your LCD until the option that you want, such as Play Mode is highlighted.
- Press the Scroller to select this menu option.

2


Getting Started
1 Set up computer
DO NOT connect your player to your computer before setting up the software.
I. Turn on your computer.
2. If you have Windows XP or Windows 2000, you must log in as an administrator in Windows before you can set up the software. For more information, refer to your operating system's online Help.
3. Insert the Installation and Applications CD into your CD-ROM/DVD-ROM drive. Your CD should start automatically. If it does not, follow the steps below:
i. Start Windows Explorer.
ii. On the left pane, click the My Computer icon.
iii. Right-click the CD-ROM/DVD-ROM drive icon, and then click AutoPlay.
- Follow the instructions on the screen to complete the installation.

During the installation process, Windows 98 SE users will be prompted to insert the Windows 98 SE installation CD into the CD-ROM/DVD-ROM drive. Insert the installation CD into the CD-ROM/DVD-ROM drive and then click the OK button. If you did not receive a Windows 98 SE installation CD with your system, but received a Recovery Disk, the necessary Windows files may be located at c:\windows\options\cabs (replace c:\ with the drive letter of your hard disk drive).
- If prompted, restart your computer.


3


Zen Nano Plus CLE_QS.book Page 4 Tuesday, May 10, 2005 10:48 AM


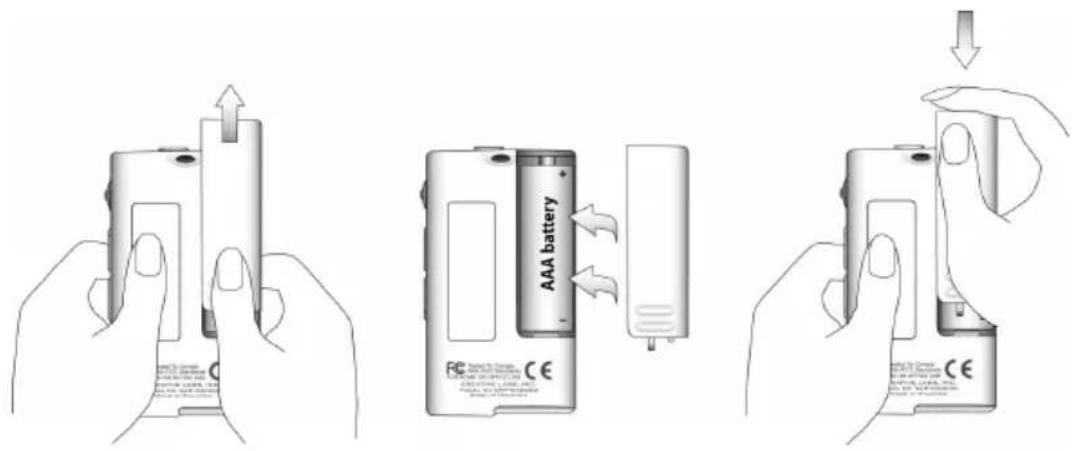
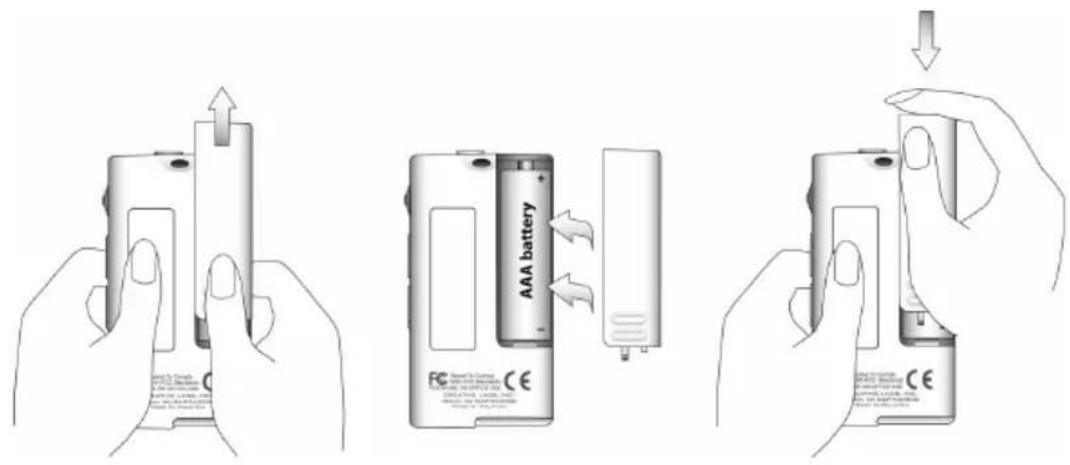
2 Insert battery
Use one AAA alkaline battery with your player.
text_image
Diagram showing three-step battery charging process: adding, double battery, and discharging to a terminal.When you turn on your player for the first time, the menu will be in English.
To change the language
I. Press the Scroller. The main menu appears.
2. Scroll Select the Settings option .
3. Scroll Select the Language option .
4. Scroll Select the language that you want.
4


Zen Nano Plus CLE_QS.book Page 5 Tuesday, May 10, 2005 10:48 AM


Transfer music
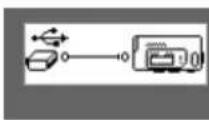
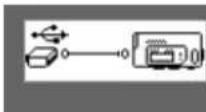
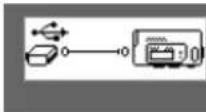
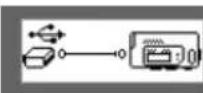
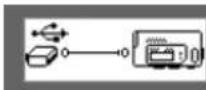
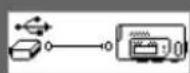
I. Flip open the rubber cover of your player's USB port.
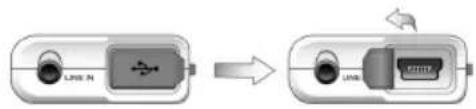
flowchart
graph LR
    A["USB IN"] --> B["Switch"]
    B --> C["USB"]
- Connect your player to your computer's USB port using the supplied USB cable. Do not press the buttons on your player while connecting it to your computer.

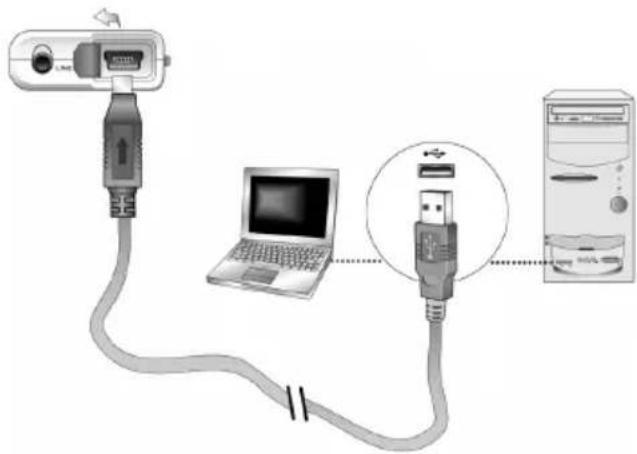
text_image
Diagram showing connection between a USB device, laptop, and server with labeled ports and cable connections
Your computer's USB port may be located on the front, back or side panels.
- Start Windows Explorer on your computer.
You will notice that your player is recognized as a Removable Disk in Windows Explorer.


5


Zen Nano Plus CLE_QS.book Page 6 Tuesday, May 10, 2005 10:48 AM


- Transfer audio files (MP3 or WMA files) to your player using a drag-and-drop operation. You can also transfer data files using Windows Explorer. For more information about using Windows Explorer, refer to its online Help.
- For more advanced song management tasks, you can use Creative Zen Nano Plus Media Explorer or Creative MediaSource Player/Organizer. Creative MediaSource Player/Organizer is your digital music center for playing, creating, organizing and transferring digital music. To launch Creative MediaSource Player/Organizer, double-click the Creative MediaSource Player/Organizer shortcut icon 📋 on your desktop.
For more information about using Creative MediaSource Player/Organizer, refer to its online Help.


WMA files with Digital Rights Management (DRM) cannot be copied to your player using Windows Explorer. You can only do so with applications that support this technology, such as Creative Zen Nano Plus Media Explorer, Creative MediaSource Player/Organizer, or Windows Media Player.

6


Zen Nano Plus CLE_QS.book Page 7 Tuesday, May 10, 2005 10:48 AM


4 Disconnect player
Before disconnecting your player from your computer, use the Windows Eject or Safely Remove Hardware icon on the Taskbar to safely disconnect your player. If not, your player may not be able to function normally. Follow these steps below to safely disconnect your player.
To stop your player in Windows XP, Windows 2000 or Windows Me: Click the Safely Remove Hardware icon 📋 on the Taskbar, click Safely remove USB Mass Storage Device, and disconnect your player when you are prompted to do so.

text_image
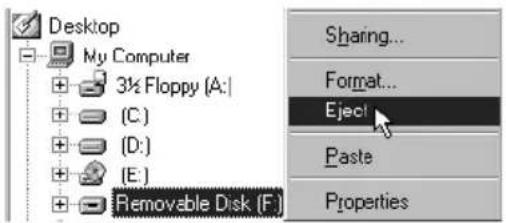
Safely remove USB Mass Storage Device - Drive(E) 12:05 PMTo stop your player in Windows 98 SE: In Windows Explorer, right-click the Removable Disk icon, click the Eject option, and disconnect your player when you are prompted to do so.
text_image
Desktop My Computer 3½ Floppy (A:) (C:) (D:) (E:) Removable Disk (F:) Sharing... Format... Eject Paste Properties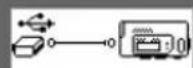
Make sure that this status diagram appears on the LCD for at least five seconds before disconnecting your player.
7


Zen Nano Plus CLE_QS.book Page 8 Tuesday, May 10, 2005 10:48 AM


5 Play music
I. Press and hold the Play/Pause button 📊 until your player turns on.
The CREATIVE logo appears on the LCD, followed by the Zen Nano Plus logo. Music stored in your player starts playing automatically. Note that your player comes preloaded with some music to get you started.
2. Press the Volume Increase and Volume Decrease buttons to adjust the volume.
3. After you have finished using your player, press and hold the Play/Pause button until the Power off message disappears.

- Remember to set the volume at a moderate level. Listening to music at high volumes can impair your hearing.
- For your safety and the safety of others, do not use headphones while driving, cycling or any other activity that requires your full attention.

As with any digital media-based storage device, data should be backed up regularly. We strongly recommend that you observe the usage precautions laid out in this booklet, and also back up the data in your player regularly. In no event will Creative be liable for any indirect, incidental, special or consequential damages to any persons caused by Creative's negligence, or for any lost profits, lost savings, loss of use, lost revenues or lost data arising from or relating to this device, even if Creative has been advised of the possibility of such damages. In no event will Creative's liability or damages to you or any other person ever exceed the amount paid by you for the device, regardless of the form of the claim. Some countries/states do not allow the limitation or exclusion of liability for incidental or consequential damages, so the above limitation or exclusion may not apply to you.
8


Zen Nano Plus CLE_QS.book Page 9 Tuesday, May 10, 2005 10:48 AM


Some Basic Functions
Playing music
I. Press the Scroller. The main menu appears.
2. Scroll Select the Music option .
3. Scroll to the audio track that you want to play and press the Play/Pause button
Listening to FM radio
Your player's default FM region is International
You can automatically scan for all available radio stations and save up to 32 radio presets.
I. Connect headphones to the Headphone jack.
2. Press the Scroller. The main menu appears.
3. Scroll Select the FM Radio option .
4. Press the Scroller and Scroll Select the Autoscan option ☐™ The player scans and stores all radio stations that it can receive. At the end of the autoscan, it automatically saves all stations as presets and tunes in to the first preset.
5. Turn the Scroller to select the preset station you want.


9


Zen Nano Plus CLE_QS.book Page 10 Tuesday, May 10, 2005 10:48 AM


MP3 encoding
You can directly encode or "rip" music to your player, instead of ripping music on your computer first and then transferring it to your player.
I. Connect the Line In jack on your player to the line output of an external stereo source, such as a CD or MiniDisc player, using the supplied Stereo cable.
2. Press the Scroller. The main menu appears.
3. Scroll Select the MP3 Encoding option .
4. Press the Play/Pause button to start the encoding. An encoding progress bar appears on the LCD and encoding starts.
5. On your external stereo source, start playing the song you want to encode.
6. Press the Play/Pause button to end the encoding.
The first encoded track is named EN001, the second encoded track is named EN002, the third encoded track is named EN003, and so on.
Locking your player
Locking your player disables all buttons on your player except the Scroller. Lock your player when you want to prevent buttons from being accidentally pressed.
I. Press the Scroller. The main menu appears.
2. Scroll Select the Lock option . 🔒 appears at the top right corner of the LCD.
3. To unlock your player, press any button and Scroll Select the Unlock option
For more information, read the User's Guide in the Installation CD.
Go to d:\manual\

10


Zen Nano Plus CLE QS.book Page 11 Tuesday, May 10, 2005 10:48 AM


Frequently Asked Questions
Can I use my player as a portable data storage device?
Yes, you can. You can transfer data files using Creative Zen Nano Plus Media Explorer or Windows Explorer.
Why does my player skip certain tracks?
The player will only play valid media formats (MP3 and WMA files). Other types of media formats will be skipped.
Why are some files/tracks corrupted when transferred to my player?
Transfer may have been interrupted. Before disconnecting your player from your computer, stop your player first. For more information on stopping your player, see to "Disconnect player" on page 9.
Can I play DRM-protected WMA files on my player?
Yes. To transfer DRM-protected WMA files to your player, you can use Creative Zen Nano Plus Media Explorer or Creative MediaSource Player/Organizer.
Where can I get official information on all Zen products?
Visit www.creative.com for updates and downloads relating to all Zen products, Creative's MP3 players and accessories.


11


Zen Nano Plus CLE QS.book Page 12 Tuesday, May 10, 2005 10:48 AM


More Information
Creative Knowledge Base
Resolve and troubleshoot technical queries at Creative's 24-hour self-help Knowledge Base. Go to www.creative.com and select your region.
Register your product!
Registering your product ensures you receive the most appropriate service and product support available. You can register your product during installation or at www.creative.com/register.
Please note that your warranty rights are not dependent on product registration.
Customer Support Services and Warranty
You can find Customer Support Services, Warranty and other information in the Installation and Applications CD.
| Customer Support Services | d:\support\ |
| Warranty d:\warranty\ | \warranty.chmPlease keep your Proof of Purchase for the duration of the warranty period. |
| User's Guide d:\manual\ | \manual.chm |
(replace d:\ with the drive letter of your CD-ROM/DVD-ROM drive,
Copyright © 2005 Creative Technology Ltd. All rights reserved. The Creative logo, Zen and Creative MediaSource are trademarks or registered trademarks of Creative Technology Ltd. in the United States and/or other countries. Microsoft, Windows and the Windows logo are registered trademarks of Microsoft Corporation. All other products are trademarks or registered trademarks of their respective owners and are hereby recognized as such. All specifications are subject to change without prior notice. Actual contents may differ slightly from those pictured.
12


Safety Information
Refer to the following information to use your player safely, and to reduce the chance of electric shock, short-circuiting, damage, fire, hearing impairment or other hazards.

Improper handling may void the warranty for your player. For more information, read the warranty available with your product.
- Do not dismantle or attempt to repair your player, battery or power adapter.
- Do not expose your player or battery to temperatures outside the range of 0^ to 45^ (32°F to 113°F).
- Do not pierce, crush or set fire to your player or battery.
- Keep your player or battery away from strong magnetic objects.
- Do not subject your player to excessive force or impact.
- Do not expose your player or battery to water or moisture.
If your player is moisture-resistant (see product packaging for details), take care not to immerse your player in water or expose it to rain. - Do not listen to audio at high volume for prolonged periods of time.
- The battery must be recycled or disposed of properly. Contact local agencies for recycling and disposal information.
- Do not allow metal objects to touch the terminals of your battery.
Refer all servicing to Creative or authorized repair agents.
If there is leakage, an offensive odor, discoloration or deformation during charging or use, remove the battery and do not use it again. Clean your hands well before touching food or sensitive areas, for example, your eyes.


13


Français
Zen Nano Plus CLE_QS.book Page 15 Tuesday, May 10, 2005 10:48 AM


text_image
7 8 LINE IN 9flowchart
graph LR
    A["Play Mode"] --> B["Action Mode"]
Zen Nano Plus CLE_QS.book Page 17 Tuesday, May 10, 2005 10:48 AM


2 Insérez la pile
text_image
Diagram showing three-step battery charging process: adding a battery, adding an AAA battery, and adding a second aid.Zen Nano Plus CLE_QS.book Page 18 Tuesday, May 10, 2005 10:48 AM


flowchart
graph LR
    A["Device 1: USB icon"] --> B["Device 2: Battery icon"]
Zen Nano Plus CLE QS.book Page 19 Tuesday, May 10, 2005 10:48 AM


Zen Nano Plus CLE_QS.book Page 20 Tuesday, May 10, 2005 10:48 AM


text_image
Desktop My Computer 3½ Floppy (A:) (C:) (D:) (E:) Removable Disk (F:) Sharing... Format... Eject Paste Properties

Zen Nano Plus CLE QS.book Page 21 Tuesday, May 10, 2005 10:48 AM


Zen Nano Plus CLE_QS.book Page 22 Tuesday, May 10, 2005 10:48 AM


natural_image
Pure geometric diagram with intersecting lines and a circular pattern (no text or symbols)

Zen Nano Plus CLE_QS.book Page 23 Tuesday, May 10, 2005 10:48 AM


Encodage MP3
Zen Nano Plus CLE QS.book Page 24 Tuesday, May 10, 2005 10:48 AM


Zen Nano Plus CLE_QS.book Page 25 Tuesday, May 10, 2005 10:48 AM


Zen Nano Plus CLE QS.book Page 27 Tuesday, May 10, 2005 10:48 AM


IMPORTANT- A LIRE AVEC ATTENTION
Zen Nano Plus CLE_QS.book Page 29 Tuesday, May 10, 2005 10:48 AM


text_image
7 8 LINE IN 9Zen Nano Plus CLE_QS.book Page 31 Tuesday, May 10, 2005 10:48 AM


2 Batterie einlegen
text_image
Diagram showing three-step battery charging process: adding an AC to a battery, adding an AAA battery, and finally adjusting the power.Zen Nano Plus CLE_QS.book Page 32 Tuesday, May 10, 2005 10:48 AM


3 Musik übertragen
Zen Nano Plus CLE QS.book Page 33 Tuesday, May 10, 2005 10:48 AM


Zen Nano Plus CLE_QS.book Page 34 Tuesday, May 10, 2005 10:48 AM


text_image
Desktop My Computer 3½ Floppy (A:) (C:) (D:) (E:) Removable Disk (F:) Sharing... Format... Eject Paste Properties

Zen Nano Plus CLE_QS.book Page 36 Tuesday, May 10, 2005 10:48 AM


Zen Nano Plus CLE_QS.book Page 37 Tuesday, May 10, 2005 10:48 AM


MP3-Encoding
Zen Nano Plus CLE QS.book Page 38 Tuesday, May 10, 2005 10:48 AM


Zen Nano Plus CLE QS.book Page 39 Tuesday, May 10, 2005 10:48 AM


Creative Knowledge Base
Zen Nano Plus CLE QS.book Page 40 Tuesday, May 10, 2005 10:48 AM


Zen Nano Plus CLE_QS.book Page 41 Tuesday, May 10, 2005 10:48 AM
Italiano
Aspetto del lettore

text_image
1 2 3 CREATIVE 6 5 4Zen Nano Plus CLE_QS.book Page 42 Tuesday, May 10, 2005 10:48 AM


Zen Nano Plus CLE_QS.book Page 44 Tuesday, May 10, 2005 10:48 AM


text_image
Diagram showing three-step battery charging process: adding a battery, adding an AAA battery, and adding a DC power adapter.Zen Nano Plus CLE_QS.book Page 45 Tuesday, May 10, 2005 10:48 AM


Zen Nano Plus CLE QS.book Page 46 Tuesday, May 10, 2005 10:48 AM


Zen Nano Plus CLE_QS.book Page 47 Tuesday, May 10, 2005 10:48 AM


text_image
Desktop My Computer 3½ Floppy (A:) (C:) (D:) (E:) Removable Disk (F) Sharing... Format... Eject Paste Properties
Zen Nano Plus CLE_QS.book Page 48 Tuesday, May 10, 2005 10:48 AM


Zen Nano Plus CLE_QS.book Page 49 Tuesday, May 10, 2005 10:48 AM


Funzioni di base
Zen Nano Plus CLE_QS.book Page 50 Tuesday, May 10, 2005 10:48 AM


Codifica MP3
Zen Nano Plus CLE_QS.book Page 51 Tuesday, May 10, 2005 10:48 AM


Domande frequenti
Zen Nano Plus CLE QS.book Page 52 Tuesday, May 10, 2005 10:48 AM


Creative Knowledge Base
Zen Nano Plus CLE_QS.book Page 55 Tuesday, May 10, 2005 10:48 AM


text_image
7 8 LINE IN 9flowchart
graph LR
    A["Play Mode"] --> B["Action Mode"]
Zen Nano Plus CLE_QS.book Page 57 Tuesday, May 10, 2005 10:48 AM


text_image
Diagram showing three-step battery charging process: adding an AC to a battery, adding an AAA battery, and finally adjusting the power.Zen Nano Plus CLE_QS.book Page 58 Tuesday, May 10, 2005 10:48 AM


text_image
Diagram showing connection between a USB device, laptop, and desktop tower with labeled ports and cable connections
Zen Nano Plus CLE_QS.book Page 59 Tuesday, May 10, 2005 10:48 AM


Zen Nano Plus CLE_QS.book Page 60 Tuesday, May 10, 2005 10:48 AM


text_image
Desktop My Computer 3½ Floppy (A:) (C:) (D:) (E:) Removable Disk (F:) Sharing... Format... Eject Paste Properties

Zen Nano Plus CLE QS.book Page 61 Tuesday, May 10, 2005 10:48 AM


Zen Nano Plus CLE_QS.book Page 62 Tuesday, May 10, 2005 10:48 AM


Zen Nano Plus CLE_QS.book Page 63 Tuesday, May 10, 2005 10:48 AM


Codificación de MP3
Zen Nano Plus CLE QS.book Page 64 Tuesday, May 10, 2005 10:48 AM


Zen Nano Plus CLE QS.book Page 65 Tuesday, May 10, 2005 10:48 AM


Zen Nano Plus CLE_QS.book Page 67 Tuesday, May 10, 2005 10:48 AM
Nederlands
Zen Nano Plus CLE_QS.book Page 68 Tuesday, May 10, 2005 10:48 AM


Zen Nano Plus CLE_QS.book Page 70 Tuesday, May 10, 2005 10:48 AM


2 batterij plaatsen
text_image
Diagram illustrating battery charging process with labeled components and directional arrows indicating charging directionZen Nano Plus CLE_QS.book Page 71 Tuesday, May 10, 2005 10:48 AM


muziek overbrengen
Zen Nano Plus CLE_QS.book Page 72 Tuesday, May 10, 2005 10:48 AM


Zen Nano Plus CLE_QS.book Page 73 Tuesday, May 10, 2005 10:48 AM


4 Speler loskoppelen
text_image
Desktop My Computer 3½ Floppy (A:) (C:) (D:) (E:) Removable Disk (F:) Sharing... Format... Eject Paste Properties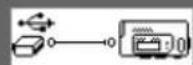
Zen Nano Plus CLE_QS.book Page 75 Tuesday, May 10, 2005 10:48 AM


Zen Nano Plus CLE_QS.book Page 76 Tuesday, May 10, 2005 10:48 AM


MP3-codering
Zen Nano Plus CLE QS.book Page 77 Tuesday, May 10, 2005 10:48 AM


Veelgestelde vragen
Creative Knowledge Base
Zen Nano Plus CLE QS.book Page 81 Tuesday, May 10, 2005 10:48 AM


text_image
7 8 LINE IN 9Zen Nano Plus CLE_QS.book Page 83 Tuesday, May 10, 2005 10:48 AM


2 Inserir a pilha
text_image
Diagram showing three-step battery charging process: adding an upward arrow, adding a battery labeled 'AAA battery' with arrows indicating charging direction.Zen Nano Plus CLE_QS.book Page 84 Tuesday, May 10, 2005 10:48 AM


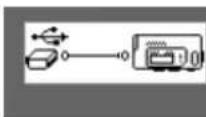
3 Transferir música
text_image
Diagram showing connection between a device via USB cable to a laptop and a server tower, with an icon indicating the setup.
Zen Nano Plus CLE QS.book Page 85 Tuesday, May 10, 2005 10:48 AM


Zen Nano Plus CLE_QS.book Page 86 Tuesday, May 10, 2005 10:48 AM


4 Desligar o leitor
text_image
Desktop My Computer 3½ Floppy (A:) (C:) (D:) (E:) Removable Disk (F:) Sharing... Format... Eject Paste Properties

Zen Nano Plus CLE QS.book Page 87 Tuesday, May 10, 2005 10:48 AM


5 Reproduzir música
Zen Nano Plus CLE_QS.book Page 88 Tuesday, May 10, 2005 10:48 AM


Zen Nano Plus CLE_QS.book Page 89 Tuesday, May 10, 2005 10:48 AM


Codificação de MP3
Zen Nano Plus CLE QS.book Page 90 Tuesday, May 10, 2005 10:48 AM


Zen Nano Plus CLE QS.book Page 91 Tuesday, May 10, 2005 10:48 AM


Mais Informações
Creative Knowledge Base
Zen Nano Plus CLE QS.book Page 92 Tuesday, May 10, 2005 10:48 AM


Zen Nano Plus CLE_QS.book Page 93 Tuesday, May 10, 2005 10:48 AM
Svenska
Snabböversikt

text_image
CREATIVE 1 2 3 6 5 4Zen Nano Plus CLE_QS.book Page 94 Tuesday, May 10, 2005 10:48 AM


Zen Nano Plus CLE QS.book Page 95 Tuesday, May 10, 2005 10:48 AM


Komma igång
1 Ställ in datorn
Zen Nano Plus CLE_QS.book Page 96 Tuesday, May 10, 2005 10:48 AM


2 Sätt i batteriet
text_image
Diagram showing three-step battery charging process: adding an AC to a battery, adding an AAA battery, and finally adjusting the battery.Zen Nano Plus CLE_QS.book Page 97 Tuesday, May 10, 2005 10:48 AM


Överföra musik
flowchart
graph LR
    A["LINK IN"] --> B["Switch"]
    C["LINKS"] --> D["Device"]
Zen Nano Plus CLE_QS.book Page 98 Tuesday, May 10, 2005 10:48 AM


Zen Nano Plus CLE_QS.book Page 99 Tuesday, May 10, 2005 10:48 AM


text_image
Desktop My Computer 3½ Floppy (A:) (C:) (D:) (E:) Removable Disk (F:) Sharing... Format... Eject Paste Properties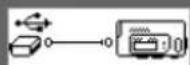
Zen Nano Plus CLE_QS.book Page 101 Tuesday, May 10, 2005 10:48 AM


Zen Nano Plus CLE_QS.book Page 102 Tuesday, May 10, 2005 10:48 AM


MP3-kodning
Zen Nano Plus CLE QS.book Page 103 Tuesday, May 10, 2005 10:48 AM


Zen Nano Plus CLE QS.book Page 104 Tuesday, May 10, 2005 10:48 AM


Mer information
Creatives Knowledge Base
Kundsupport d:\support\
Garanti d:\warranty\
Zen Nano Plus CLE_QS.book Page 107 Tuesday, May 10, 2005 10:48 AM


text_image
7 8 LINE IN 9flowchart
graph LR
    A["Device with scroll icon"] --> B["Play Mode Icon"]
    B --> C["Target Icon with musical note"]
Zen Nano Plus CLE_QS.book Page 109 Tuesday, May 10, 2005 10:48 AM


2 Sette inn batteri
Bruk ett alkalisk AAA-batteri til spilleren.
text_image
Diagram showing three-step battery charging process: adding an AC to a battery, adding an AAA battery, and finally adjusting the battery.Zen Nano Plus CLE_QS.book Page 110 Tuesday, May 10, 2005 10:48 AM


3 Overføre musikk
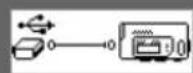
I. Åpne gummidekselet på spillerens USB-port.

text_image
LINK INtext_image
Diagram showing connection between a USB device, laptop, and server with labeled ports and cable connections
Datamaskinens USB-port kan være plassert foran, på baksiden eller på en av sidene.
Zen Nano Plus CLE_QS.book Page 111 Tuesday, May 10, 2005 10:48 AM


Zen Nano Plus CLE_QS.book Page 112 Tuesday, May 10, 2005 10:48 AM


text_image
Desktop My Computer 3½ Floppy (A:) (C:) (D:) (E:) Removable Disk (F:) Sharing... Format... Eject Paste Properties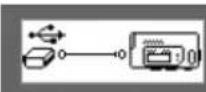
Pass på at dette statusdiagrammet vises på LCD-skjermen i minst fem sekunder før du kobler fra spilleren.

112


Zen Nano Plus CLE_QS.book Page 113 Tuesday, May 10, 2005 10:48 AM


5 Spille musikk
Zen Nano Plus CLE_QS.book Page 114 Tuesday, May 10, 2005 10:48 AM


Zen Nano Plus CLE_QS.book Page 115 Tuesday, May 10, 2005 10:48 AM


MP3-koding
Zen Nano Plus CLE_QS.book Page 116 Tuesday, May 10, 2005 10:48 AM


Vanlige spørsmål
Zen Nano Plus CLE_QS.book Page 117 Tuesday, May 10, 2005 10:48 AM


Flere opplysninger
Creative Knowledge Base
Zen Nano Plus CLE_QS.book Page 119 Tuesday, May 10, 2005 10:48 AM
Dansk
Zen Nano Plus CLE_QS.book Page 120 Tuesday, May 10, 2005 10:48 AM


flowchart
graph LR
    A["Circle icon"] --> B["Play Mode"]
    B --> C["Hand icon"]
Zen Nano Plus CLE_QS.book Page 122 Tuesday, May 10, 2005 10:48 AM


text_image
Diagram showing three-step battery charging process: adding a CD to a battery, adding an AAA battery, and finally adjusting the power.Zen Nano Plus CLE_QS.book Page 123 Tuesday, May 10, 2005 10:48 AM


Overførsel af musik
Zen Nano Plus CLE_QS.book Page 124 Tuesday, May 10, 2005 10:48 AM


Zen Nano Plus CLE_QS.book Page 125 Tuesday, May 10, 2005 10:48 AM


Zen Nano Plus CLE_QS.book Page 127 Tuesday, May 10, 2005 10:48 AM


Zen Nano Plus CLE_QS.book Page 128 Tuesday, May 10, 2005 10:48 AM


MP3-kodning
Zen Nano Plus CLE QS.book Page 129 Tuesday, May 10, 2005 10:48 AM


Zen Nano Plus CLE QS.book Page 130 Tuesday, May 10, 2005 10:48 AM


Creative Knowledge Base
Zen Nano Plus CLE_QS.book Page 133 Tuesday, May 10, 2005 10:48 AM


text_image
7 8 LINE IN 9flowchart
graph LR
    A["Bird Icon"] --> B["Play Mode"]
    B --> C["Hand Icon"]
Zen Nano Plus CLE_QS.book Page 135 Tuesday, May 10, 2005 10:48 AM


2 Pariston asentaminen
text_image
Diagram illustrating battery charging process with labeled components and directional arrows indicating movementZen Nano Plus CLE_QS.book Page 136 Tuesday, May 10, 2005 10:48 AM


text_image
Diagram showing connection between a USB device via cable to a laptop and server, with an icon indicating the setup.
Zen Nano Plus CLE QS.book Page 137 Tuesday, May 10, 2005 10:48 AM


Zen Nano Plus CLE_QS.book Page 138 Tuesday, May 10, 2005 10:48 AM


text_image
Desktop My Computer 3½ Floppy (A:) (C:) (D:) (E:) Removable Disk (F:) Sharing... Format... Eject Paste Properties
Zen Nano Plus CLE QS.book Page 139 Tuesday, May 10, 2005 10:48 AM


Zen Nano Plus CLE_QS.book Page 140 Tuesday, May 10, 2005 10:48 AM


Zen Nano Plus CLE QS.book Page 141 Tuesday, May 10, 2005 10:48 AM


MP3-koodaus
Zen Nano Plus CLE_QS.book Page 142 Tuesday, May 10, 2005 10:48 AM


Zen Nano Plus CLE QS.book Page 143 Tuesday, May 10, 2005 10:48 AM


Lisätietoja
Creativen Knowledge Base -tietokanta
Zen Nano Plus CLE QS.book Page 144 Tuesday, May 10, 2005 10:48 AM


Turvallisuustiedot
Zen Nano Plus CLE_QS.book Page 145 Tuesday, May 10, 2005 10:48 AM
Česky
Zen Nano Plus CLE_QS.book Page 146 Tuesday, May 10, 2005 10:48 AM


Zen Nano Plus CLE_QS.book Page 148 Tuesday, May 10, 2005 10:48 AM


2 Vložení baterie
text_image
Diagram showing three-step battery charging process: adding an AC to a battery, adding an AAA battery, and finally adjusting the battery.Zen Nano Plus CLE_QS.book Page 149 Tuesday, May 10, 2005 10:48 AM


Přenos hudby
text_image
Diagram showing connection between a USB device via cable to a laptop and server, with a close-up of the USB port.
Zen Nano Plus CLE_QS.book Page 150 Tuesday, May 10, 2005 10:48 AM


Zen Nano Plus CLE QS.book Page 151 Tuesday, May 10, 2005 10:48 AM


text_image
Desktop My Computer 3½ Floppy (A:) (C:) (D:) (E:) Removable Disk (F.) Sharing... Format... Eject Paste Properties
Zen Nano Plus CLE_QS.book Page 152 Tuesday, May 10, 2005 10:48 AM


5 Přehrávání hudby
Zen Nano Plus CLE QS.book Page 153 Tuesday, May 10, 2005 10:48 AM


Zen Nano Plus CLE QS.book Page 154 Tuesday, May 10, 2005 10:48 AM


Kódování MP3
Zen Nano Plus CLE QS.book Page 155 Tuesday, May 10, 2005 10:48 AM


Časté dotazy
Zen Nano Plus CLE QS.book Page 156 Tuesday, May 10, 2005 10:48 AM


Další informace
Creative Knowledge Base
Zen Nano Plus CLE_QS.book Page 159 Tuesday, May 10, 2005 10:48 AM


Zen Nano Plus CLE_QS.book Page 161 Tuesday, May 10, 2005 10:48 AM


2 Wkładanie baterii
text_image
Diagram showing three-step battery charging process: adding an AC input, adding an AAA battery, and adjusting a DC power supply.Zen Nano Plus CLE_QS.book Page 162 Tuesday, May 10, 2005 10:48 AM


Przenoszenie muzyki
Zen Nano Plus CLE QS.book Page 163 Tuesday, May 10, 2005 10:48 AM


Zen Nano Plus CLE_QS.book Page 164 Tuesday, May 10, 2005 10:48 AM


text_image
Desktop My Computer 3½ Floppy (A:) (C:) (D:) (E:) Removable Disk (F:) Sharing... Format... Eject Paste Properties
Zen Nano Plus CLE QS.book Page 165 Tuesday, May 10, 2005 10:48 AM


Zen Nano Plus CLE_QS.book Page 166 Tuesday, May 10, 2005 10:48 AM


Zen Nano Plus CLE_QS.book Page 167 Tuesday, May 10, 2005 10:48 AM


Kodowanie MP3
Zen Nano Plus CLE QS.book Page 168 Tuesday, May 10, 2005 10:48 AM


Zen Nano Plus CLE QS.book Page 169 Tuesday, May 10, 2005 10:48 AM


Creative Knowledge Base
Zen Nano Plus CLE_QS.book Page 171 Tuesday, May 10, 2005 10:48 AM
Краткие указания
Zen Nano Plus CLE QS.book Page 172 Tuesday, May 10, 2005 10:48 AM


Zen Nano Plus CLE_QS.book Page 174 Tuesday, May 10, 2005 10:48 AM


2 Установка батареи
text_image
Diagram illustrating battery charging process with labeled components and directional arrows indicating charging directionZen Nano Plus CLE_QS.book Page 175 Tuesday, May 10, 2005 10:48 AM


Zen Nano Plus CLE_QS.book Page 176 Tuesday, May 10, 2005 10:48 AM


Zen Nano Plus CLE_QS.book Page 177 Tuesday, May 10, 2005 10:48 AM


text_image
Desktop My Computer 3½ Floppy (A:) (C:) (D:) (E:) Removable Disk (F:) Sharing... Format... Eject Paste Properties

Zen Nano Plus CLE QS.book Page 180 Tuesday, May 10, 2005 10:48 AM


Zen Nano Plus CLE QS.book Page 181 Tuesday, May 10, 2005 10:48 AM


Типичные вопросы
Creative Knowledge Base
Zen Nano Plus CLE QS.book Page 184 Tuesday, May 10, 2005 10:48 AM


Zen Nano Plus CLE_QS.book Page 185 Tuesday, May 10, 2005 10:48 AM


Notes


185


Zen Nano Plus CLE_QS.book Page 186 Tuesday, May 10, 2005 10:48 AM


- Creative Product
- Produit Creative
- Prodotto Creative
- Creative-Produkt
- Producto Creative
- Creative Product
- Creative Produkt
- Creative tuote
- Creative Produkt
- Creative produkt
- Creative produkt
• Výrobek firmy Creative - Produto Creative
• Creative продукт
• Creative Labs termék
• Προιόν Creative
• „Creative" produktas - Produkt Creative
- Dealer Stamp
• Cachet revendeur
• Timbro del rivenditore - Händlerstempel
- Sello distribuidor
- Dealer stempel
- Forhandler stempel
• Jälleenmyyjä leima - Äterförsäljare stämpel
- Forhandler stempel
- Pieczątka dilera
- Razítko prodejce
- Carimbo do Agente
• Печать дилера
• A kereskedelmi cég bélyegzoje
• Σφραγίδα Αντιπροσώπου
• Pardavéjo spaudas
• Pečiatka predajcu
• Purchase Date
- Date d'achat
- Data di acquisto
- Kaufdatum
- Fecha de compra
• Aankoopdatum
• Kjøbsdato
- Ostopäivä
- Inköposdatum
•Købsdato
- Data zakupu
- Datum koupy
- Data de compra
• Покупное число
- Az vásárlás dátuma
• Ημερομηνία Αγοράς
- Isigijimo data
• Dátum nákupu
- Name and Address of Customer • Kundens navn & adresse
- Nom et adrese du client
- Nome e indirizzo del cliente
• Name & Anschrift des Käufers - Nombre & dirección del cliente
• Naam & adresvan de klant
• Kundens navn & adress
• Asiakkaan nimi & osoite
• Kundens namm & adress - Imię i adres klienta
- Meno a adresa zákazníka
- Nome e morada do comprador
• Фамилия и адрес покупателя
• A Vásárló neve és címe
• Ημερομηνία Αγοράς Όνομα & Διεύθυνση του Πελάτη - Pirkėjo vardas, pavardė ir adresas
- Meno a adresa zákazníka