SoupEeasy CBL01.000BS - Blender KENWOOD - Free user manual and instructions
Find the device manual for free SoupEeasy CBL01.000BS KENWOOD in PDF.
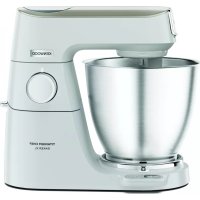
| Brand | Kenwood |
| Model | CBL01.000BS |
| Category | Blender / Soup Maker |
| Type | Heating soup maker with blender function |
| Bowl capacity | 1.0 L min - 1.5 L max |
| Automatic programs | Creamy soups (23 min), Chunky soups (25 min), Compote (21 min), Blend (4 min), Clean (3 min) |
| Cooking temperature | 100 °C |
| Keep warm | 40 minutes (creamy soups and chunky soups programs) |
| Pause function | Yes, up to 3 minutes |
| Power supply | 220-240 V, 50/60 Hz (earthed plug) |
| Bowl material | Heat-resistant plastic |
| Blade material | Stainless steel |
| Safety | Motor unit/lid locking, overflow sensor, automatic standby stop |
| Cleaning | Built-in Clean program (1 L water + 2 drops washing-up liquid); do not immerse the motor unit |
| Main spare parts | Bowl, blades, motor unit/lid, power connector |
| Repairability | Authorised Kenwood service centre (see www.kenwoodworld.com) |
| Warranty | Legal warranty according to country of purchase |
| Country of manufacture | China |
Frequently Asked Questions - SoupEeasy CBL01.000BS KENWOOD
User questions about SoupEeasy CBL01.000BS KENWOOD
0 question about this device. Answer the ones you know or ask your own.
Ask a new question about this device
Download the instructions for your Blender in PDF format for free! Find your manual SoupEeasy CBL01.000BS - KENWOOD and take your electronic device back in hand. On this page are published all the documents necessary for the use of your device. SoupEeasy CBL01.000BS by KENWOOD.
USER MANUAL SoupEeasy CBL01.000BS KENWOOD
English 2 - 8
Nederlands 9 - 16
Français 17 - 24
Deutsch 25 - 33
Italiano 34 - 41
Português 42 - 49
Español 50 - 57
Dansk 58 - 64
Svenska 65 - 71
Norsk 72 - 78
Suomi 79 - 85
Türkçe 86 - 92
Česky 93 - 100
Magyar 101 - 108
Polski 109 - 116
Ελληνικά 117 - 125
Slovenčina 126 - 132
Українська 133 - 140
عربي 13V-131


flowchart
graph TD
    A["7"] --> B["X 1 X 2 X 3 X 4"]
    B --> C["X 1"]
    C --> D["25:00"]
    D --> E["24:59"]
    E --> F["×"]

    G["8"] --> H["PAUSE"]
    H --> I["Max 3MIN"]
    I --> J["14:58"]
    J --> K["14:59"]
    K --> L["14:58"]
    L --> M["End"]

    N["9"] --> O["KEEP WARM"]
    O --> P["00:00"]
    P --> Q["39:59"]

    R["10"] --> S["'BEEP' X 10"]
    S --> T["00:00"]
    T --> U["End"]

    V["11"] --> W["1"]
    W --> X["2"]

Safety
- Read these instructions carefully and retain for future reference.
- Remove all packaging and any labels.
- If the plug or cord is damaged it must, for safety reasons, be replaced by Kenwood or an authorised Kenwood repairer in order to avoid a hazard.
- DO NOT touch the sharp blades. Handle the blades with care to avoid injury when emptying the goblet, removing the blade from the goblet and during cleaning.
- CAUTION: Avoid contact with steam coming out of the spout area when pouring and out of the lid during operation.
- Caution: the outside of the goblet and motor unit will get hot during use and will remain HOT after the appliance is switched off. Always remove the lid using the lid handle and lift and pour using the goblet handle.
- Be careful if hot liquid is poured into the appliance as it can be ejected out of the appliance due to sudden steaming.
- Never use a damaged appliance. Get it checked or repaired: see ‘Service and Customer Care’.
- Never leave the appliance unattended when it is operating.
- Do not fill below the 1 litre minimum level or exceed the 1.5 litre maximum fill level marked on the inside of the goblet.
- CAUTION: Before removing the lid from the goblet switch off and wait until the blades have completely stopped.
- Always switch off the appliance and disconnect from the supply if it is left unattended and before assembling, disassembling or cleaning.
- Do not operate the appliance when empty or below the minimum fill level.
- Never let the top section of the motor unit, cord or plug get wet.
- Do not let excess cord hang over the edge of a table or worktop or touch hot surfaces.
- This appliance should only be used on a stable, flat heat resistant surface or table.
- This appliance is not suitable for chopping meat or processing ice or frozen ingredients.
- Do not use for heating milk.
- This appliance is not intended to be operated by means of an external timer or separate remote-control system.
- Misuse of your appliance can result in injury.
- WARNING: Be careful to avoid any spillage on the connector, during cleaning, filling or pouring.
- The heating element surface is subject to residual heat after use.
- Caution: Do not operate the appliance on an inclined surface.
- Always attach the power supply connector to the appliance first, then plug into the power supply. To disconnect, switch off, remove plug from the power supply first and then the power supply connector from the appliance.
- The connector must be removed before the appliance is cleaned and the connector socket must be dried before the appliance is used again.
- Appliances can be used by persons with reduced physical, sensory or mental capabilities or lack of experience and knowledge if they have been given supervision or instruction concerning use of the appliance in a safe way and if they understand the hazards involved.
- Children should be supervised to ensure that they do not play with the appliance.
- This appliance shall not be used by children. Keep the appliance and its cord out of reach of children.
- Only use the appliance for its intended domestic use. Kenwood will not accept any liability if the appliance is subject to improper use, or failure to comply with these instructions.
Food safety
- Cook meat (including poultry), fish and seafood thoroughly.
• Always ensure food is piping hot before eating.
- Food should be eaten shortly after cooking or allowed to cool quickly and then refrigerated as soon as possible.
Care and Cleaning
Refer to illustration 13 - 16
- The marked on the product indicates the parts that must not be immersed in water or any other liquids.
- Do not immerse the motor unit or goblet in water. Keep the connectors clean and dry. Wipe the overhead motor unit and outside of the goblet with a damp cloth, then dry.
- Use the ‘Easy Clean’ programme to clean the inside of the goblet and blades. Add 1 litre water and 2 drops of washing up liquid. DO NOT add too much detergent as this may cause the liquid to overflow. Plug in and select the ‘Easy Clean’ program. Once the program finishes rinse the blade and inside of the goblet.
- If food sticks or burns on the inside of the goblet, remove as much as possible using a spatula. Fill the goblet with warm soapy water and allow to soak. Remove any stubborn deposits using a cleaning brush. Any discolouration of the goblet will not affect its performance.
Before plugging in
- Make sure your electricity supply is the same as the one shown on the underside of your appliance.
- This appliance conforms to EC Regulation 1935/2004 on materials and articles intended to come into contact with food.
Before Using For The First Time
- Wash the parts: see 'Care and Cleaning' section.
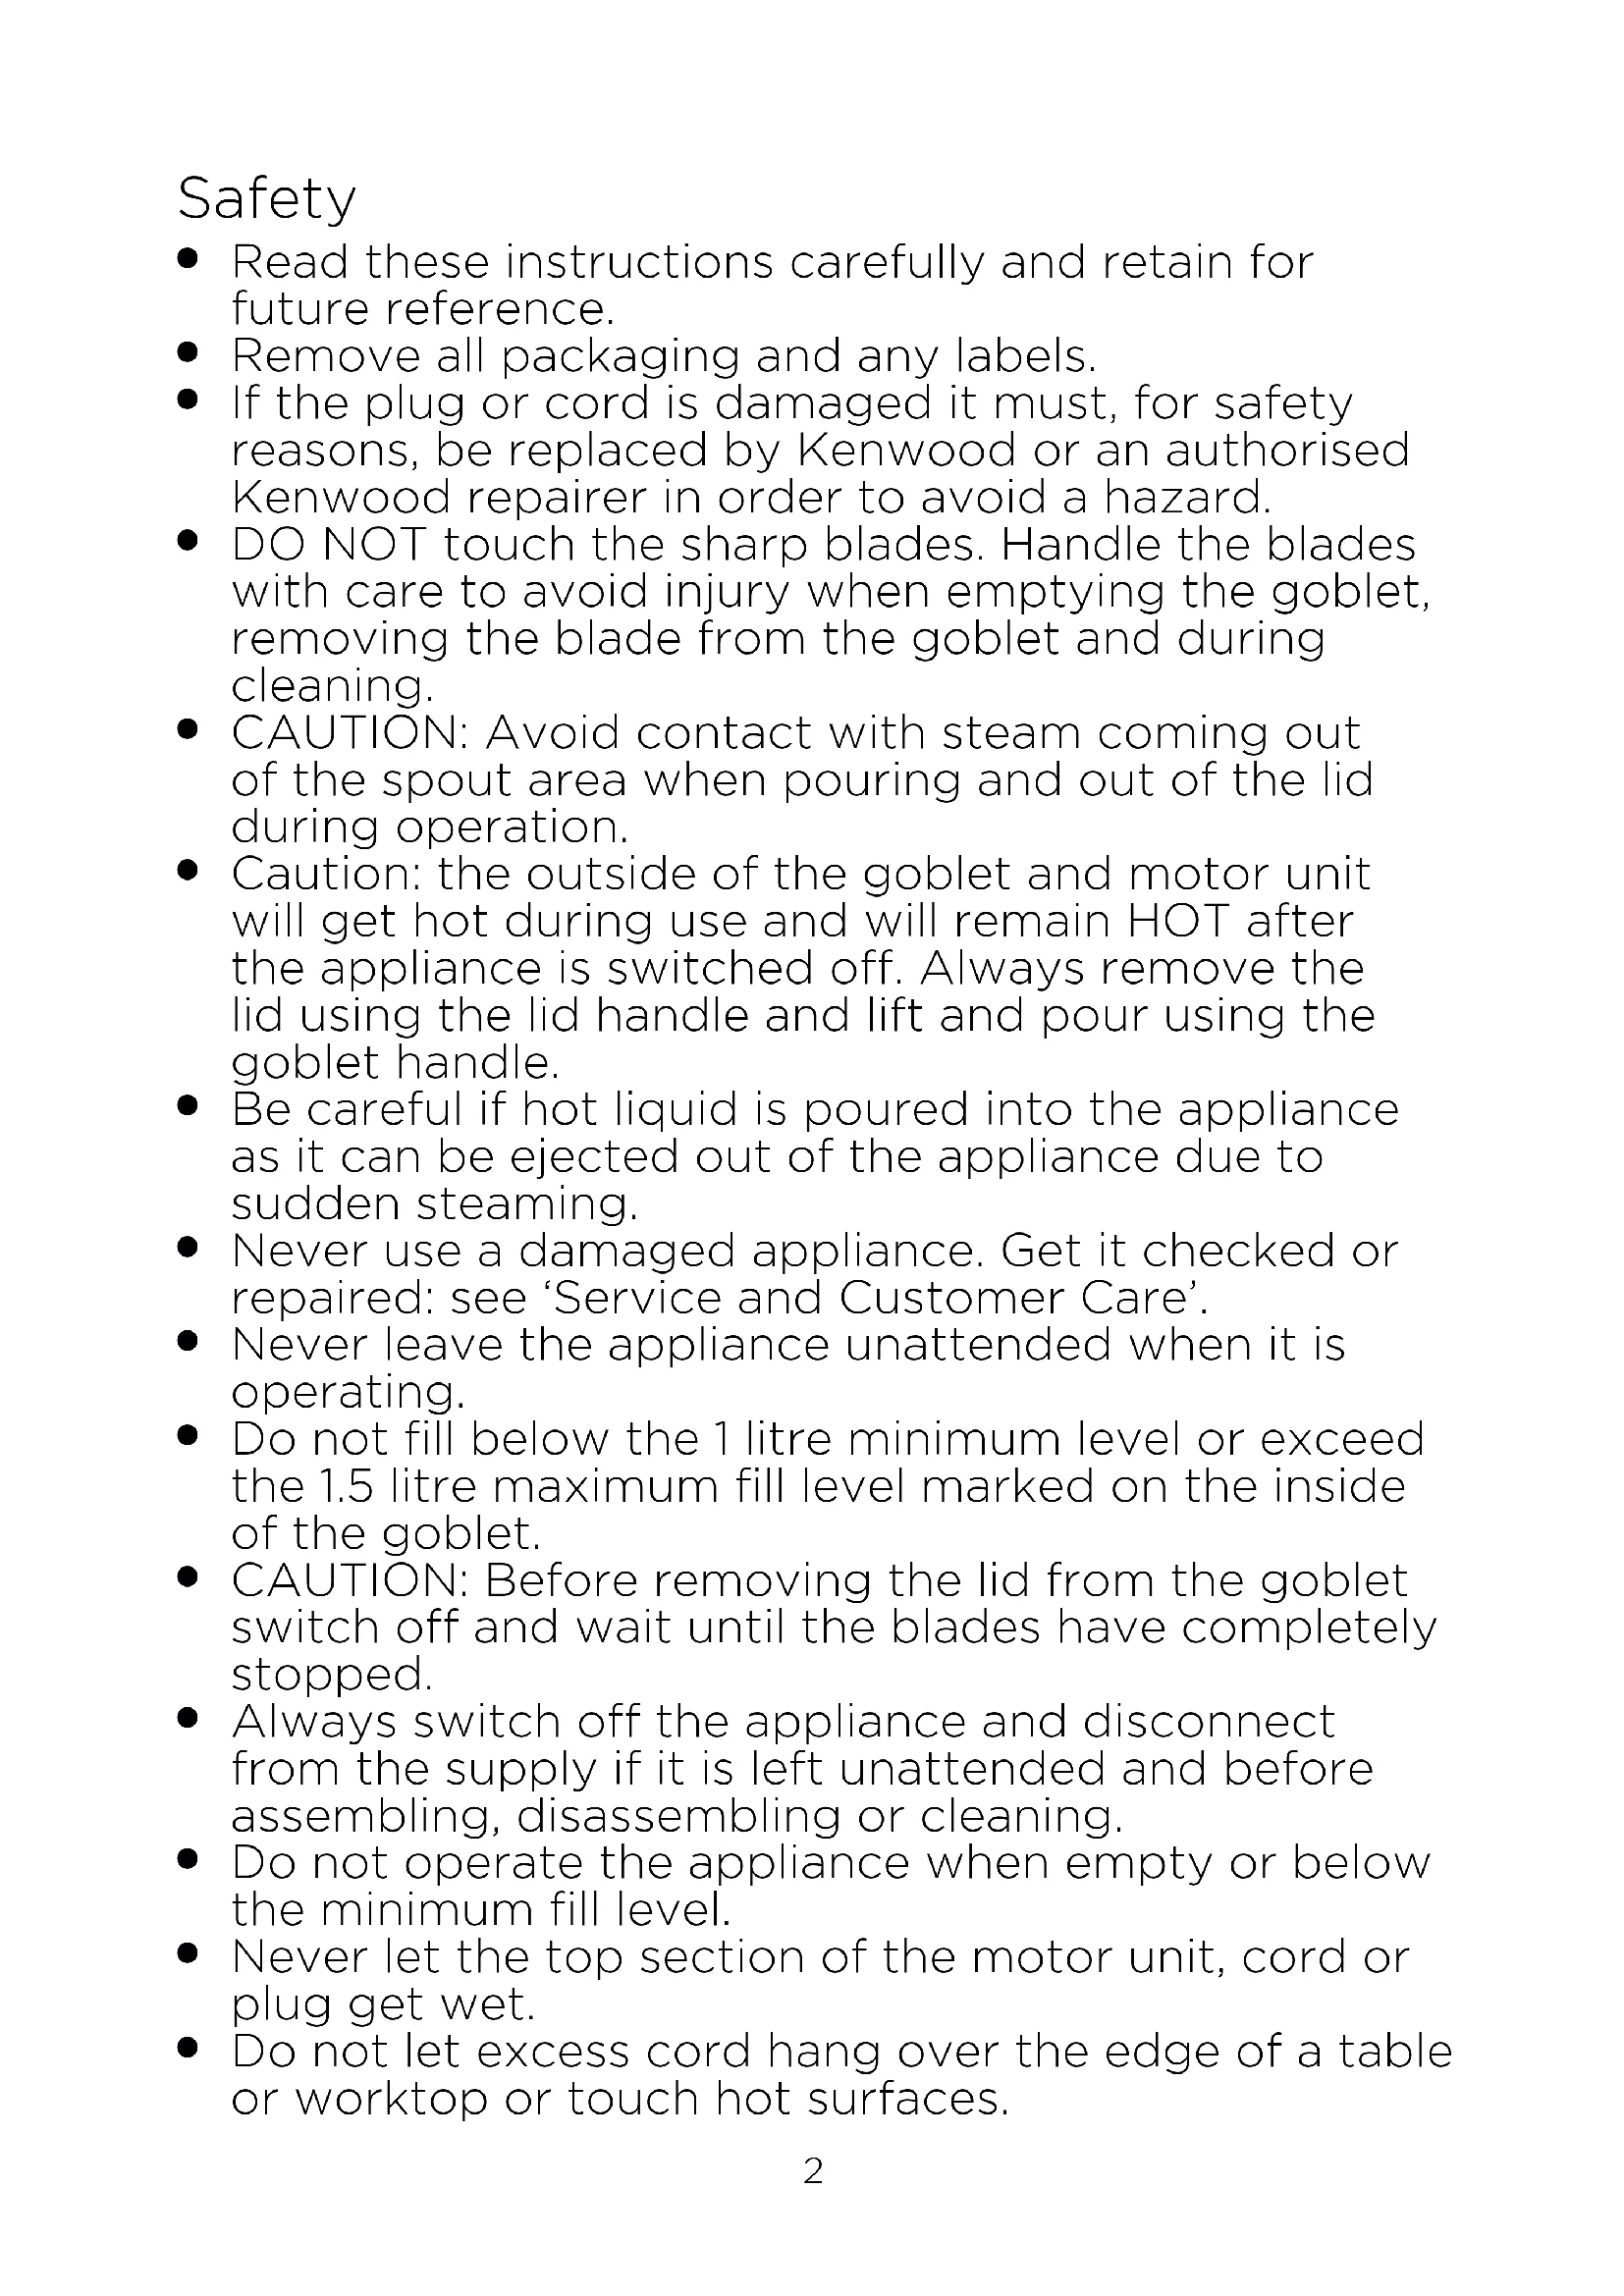
Key
① Motor unit handle
② Control panel
③ Motor unit/lid
④ Processing blade
⑤ Goblet
⑥ Power supply connector
⑦ Power cord
⑧ Cancel button
⑨ Start/Pause button
⑩ Display screen
⑪ Keep Warm indicator light
⑫ Programme selector button
⑬ Smooth Soup programme indicator light
⑭ Chunky Soup programme indicator light
⑮ Blend programme indicator light
⑯ Compote programme indicator light
⑰ Easy Clean programme indicator light
| Function Function explained | ||
 | Programme selector button | Press until required programme is selected.The indicator light under the selected programme will light up and flash. |
 | Cancel Press and | hold down for 2 seconds at any time to cancelthe selected programme. The selection will default back to Smooth Soup and 23:00. |
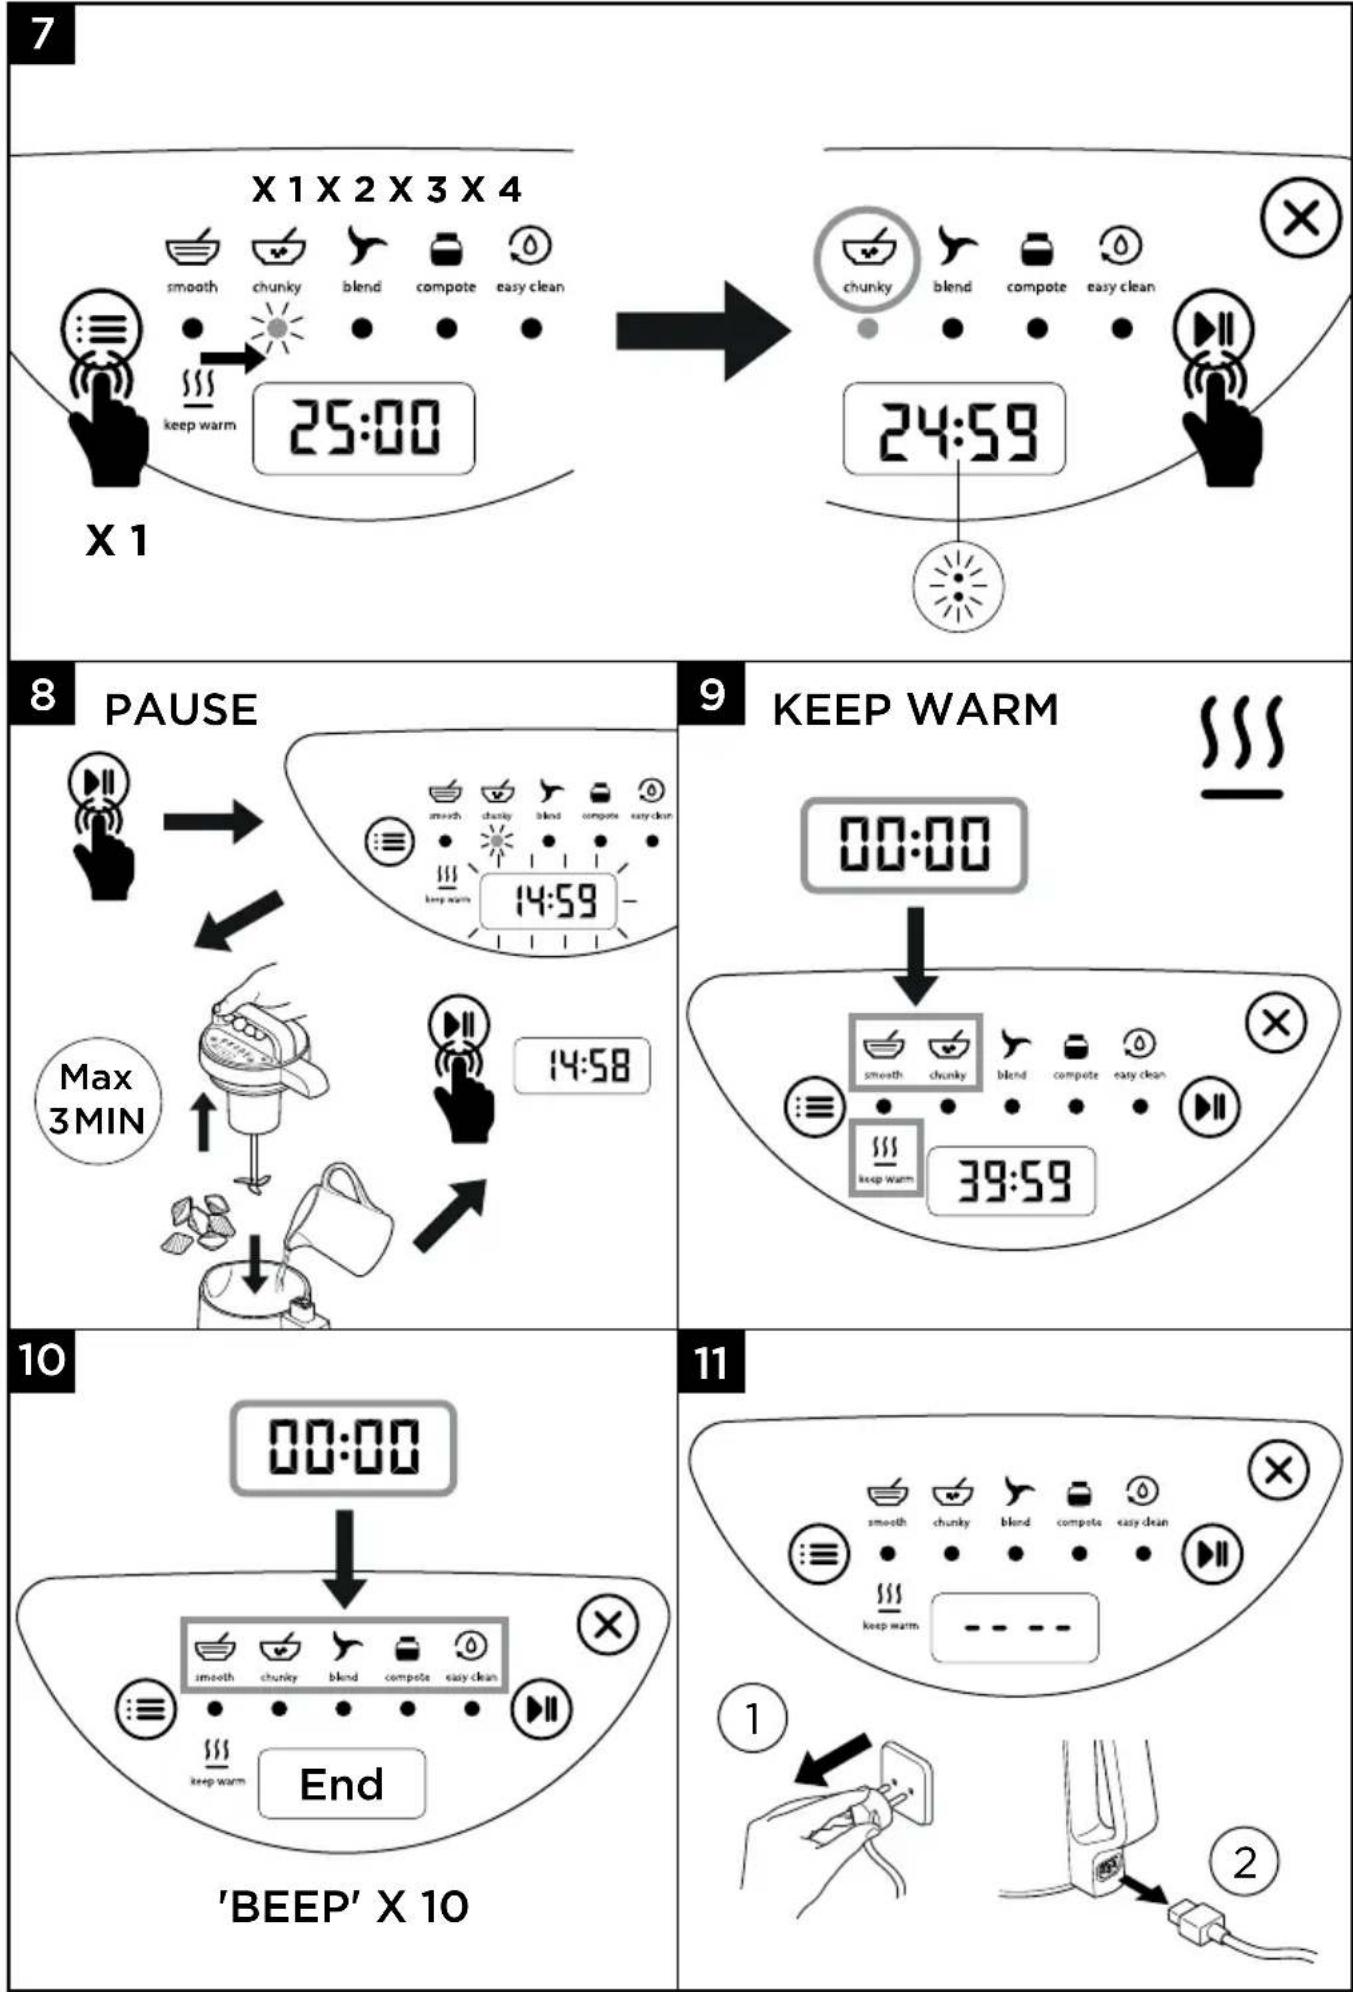
 | Start/Pause Press | once after the programme is selected to start the countdown.To pause a programme during operation press this button and the light under the selected programme and the display screen will flash. Countdown will pause for a maximum of 3 minutes.Note: After 3 minutes of no activity the programme will be cancelled and the appliance will go into standby mode until it is unplugged or any of the buttons are pressed. |
 keep warm keep warm | Keep Warm At the end of the 'Smooth' and 'Chunky' Soup programmes the Soup Maker will automatically go into the 'Keep Warm' mode for 40 minutes.Smooth soup only - During the 'Keep Warm' mode the blades will intermittently stir the ingredients.After 40 minutes has elapsed the appliance with go into standby mode until unplugged. | |
| --- | Standby mode Once a programme has finished or there is no activity for more than 3 minutes the appliance will automatically go into standby mode until unplugged or any of the buttons are pressed. | |
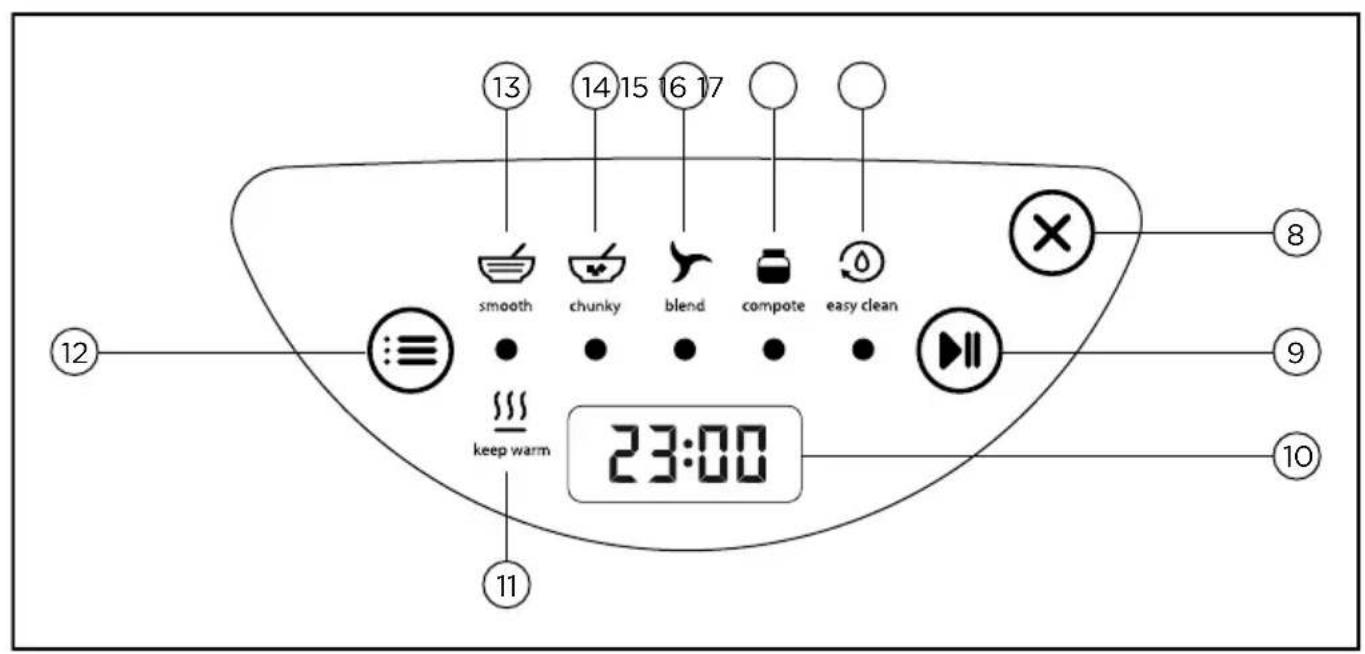
To use your Soup Maker
Refer to Illustrations 1 - 12
1 Add the food to the goblet. For best results always add the liquid last.
- Ensure the fill level is between the 1.0 L MIN and 1.5 L MAX mark inside the goblet.
2 Fit the motor unit/lid and plug in.
3 Press the 'Programme selector' button to select the required programme - keep pressing until
the indicator light under the relevant programme will light up and flash. Refer to the programme chart for timing information.
4 Press the 'Start/Pause' button and the display screen will start to countdown and: will flash.
5 At the end of the selected programme unplug and remove the motor unit/lid before lifting or pouring from the goblet.
| Programme Qty | °C | (mins) | Blending Cycle (secs) | |||
 smooth smooth | Smooth Soup | 1 L - 1.5 L 100 | 23 3 X 30s | ON2 X 30sOFF | 40 mins | |
 chunky chunky | Chunky Soup | 1 L - 1.5 L 100 | 25 No | blending | 40 mins | |
 compote compote | Compote 8 | 00g Fruit 150ml liquid | 100 21 6 X 10s | ON/10s OFF | N/A | |
| [ZSG2] easy clean | Easy Clean | 1 L water 2 drops of washing up liquid | 60 3 6 X 15s | ON/15s OFF | N/A | |
 blend blend | Blend Drinks Chilled Soups | 1 L - 1.5 L No | heating 4 6 X 25s | ON/15s OFF | N/A | |
Hints and Tips
- Do not process frozen food allow to defrost before adding to the goblet.
- The blend programme is not suitable for chopping dry ingredients without liquid.
- Cut ingredients into even sized pieces as this will assist with even cooking.
- Use the 'Pause' function to add food items such as milk, cream, yoghurt etc., during the last 10 minutes of cooking. This will prevent food burning or sticking to the bottom of the goblet.
- When making soups and where required we recommend that meats are browned and vegetables sautéed in a pan on the stove prior to adding to the blending goblet to ensure cooked thoroughly.
- If you require a smoother result after cooking use the blending programme.
Service and Customer Care
- If you experience any problems with the operation of your appliance, before requesting assistance refer to the 'Troubleshooting Guide' section in the manual or visit www.kenwoodworld.com.
- Please note that your product is covered by a warranty, which complies with all legal provisions concerning any existing warranty and consumer rights in the country where the product was purchased.
- If your Kenwood product malfunctions or you find any defects, please send it or bring it to an authorised KENWOOD Service Centre. To find up to date details of your nearest authorised KENWOOD Service centre visit www.kenwoodworld.com or the website specific to your Country.
- Designed and engineered by Kenwood in the UK.
• Made in China.

IMPORTANT INFORMATION FOR CORRECT DISPOSAL OF THE PRODUCT IN ACCORDANCE WITH THE EUROPEAN DIRECTIVE ON WASTE ELECTRICAL AND ELECTRONIC EQUIPMENT (WEEE)
At the end of its working life, the product must not be disposed of as urban waste. It must be taken to a special local authority differentiated waste collection centre or to a dealer providing this service.
| Troubleshooting Guide | ||
| Problem Cause Solution | ||
| Soup Maker not operating. | No power and no lights on.The motor unit is not locked on correctly. | Check Soup Maker is plugged into the power supply.Check that the power supply connector is fitted to the goblet correctly.Check that overhead motor unit/lid is fitted and connected to handle area correctly. |
| Motor Unit/lid cannot be fitted. | Goblet overfilled. Remove | some of the ingredients and ensure the ingredients is spread evenly to allow the lid to be fitted. |
| Excessive vibrations. | The appliance is unstable and not on a flat surface.Too much ingredients being processed. | This appliance should only be used on a stable, flat heat resistant surface or table.Remove some of the ingredients. |
| ---- shown on screen. | Appliance in standby mode. | Unplug if the cooking process is finished or press any button to reactivate the Soup Maker. |
| Liquid splashing out of spout area. | Goblet overfilled.Easy Clean programme - more than 1 litre of water added and too much detergent added. | Check that ingredients not filled above the max level marked inside the goblet.Add 1 litre water and 2 drops of washing up liquid. |
| Ingredients burning on the bottom of the goblet. | Milk being heated.Insufficient liquid added. | The appliance is not designed to heat up milk. Use the 'Pause' function and add milk, cream etc within last 5-10 minutes of the programme.Add more liquid. |
| Problem Cause Solution | ||
| Poor Blending performance. | Insufficient processing time.Insufficient liquid added.Large pieces of food or too much ingredients being processed. | Restart the programme and blend for longer.Add more liquid.Remove some of the ingredients and chopped the food down into small even sized pieces. |
| Food insufficiently cooked | Large pieces of food or too much ingredients being processed.Raw meat being cooked. | Remove some of the ingredients and chopped the food down into small even sized pieces.It is recommend that meats are browned in a pan on the stove prior to adding to the blending goblet to ensure cooked thoroughly. |
| Error code E0 Overfill sensor faulty. Contact your nearest authorised Kenwood Service Centre or visit www.kenwoodworld.com to arrange repair. | ||
| Error code EF Goblet filled above MAX mark and overfill sensor activated. | Unplug the appliance, remove the motor unit and leave to cool for 3 minutes. Remove some of the ingredients and ensure that not filled above the MAX level. Refit the motor unit, plug in and operate as normal. | |
| If the problem persists contact your nearest authorised Kenwood Service Centre.To find up to date details of your nearest Kenwood Service Centre visit www.kenwoodworld.com or the website specific to your country. | ||
Nederlands
[Non-Text]
[Non-Text]
smooth
chunky
compote
easy clear
blend
smooth
chunky
compote
easy clear
blend
[Non-Text]
[Non-Text]
[Non-Text]
[Non-Text]
[Non-Text]
[Non-Text]
[Non-Text]
[Non-Text]
[Non-Text]
[Non-Text]
[Non-Text]