USER MANUAL LC 551VBP HUSQVARNA
Huskvarna 25 November 2015

Justering at drivrem
Taita kahva eteenpain.
Työasento
Taita kahva pystyasentoon.

Stang for knivclutch
LC 551VBP
Stangen for knivclutchen aktiverer kniven. Nár grepet om knivclutchen er sluppet, skal knivene stoppe i lopet av 3 sekunder.

Lyddemper

ADVARSEL! Bruk aldri en maskin uten lyddemper eller med defekt lyddemper. En defekt lyddemper kan øke lydnivæt og brannfaren betraktelig. Ha verktøy for brannslokking tilgengelig.
- Still gasshendelen i chokestilling.

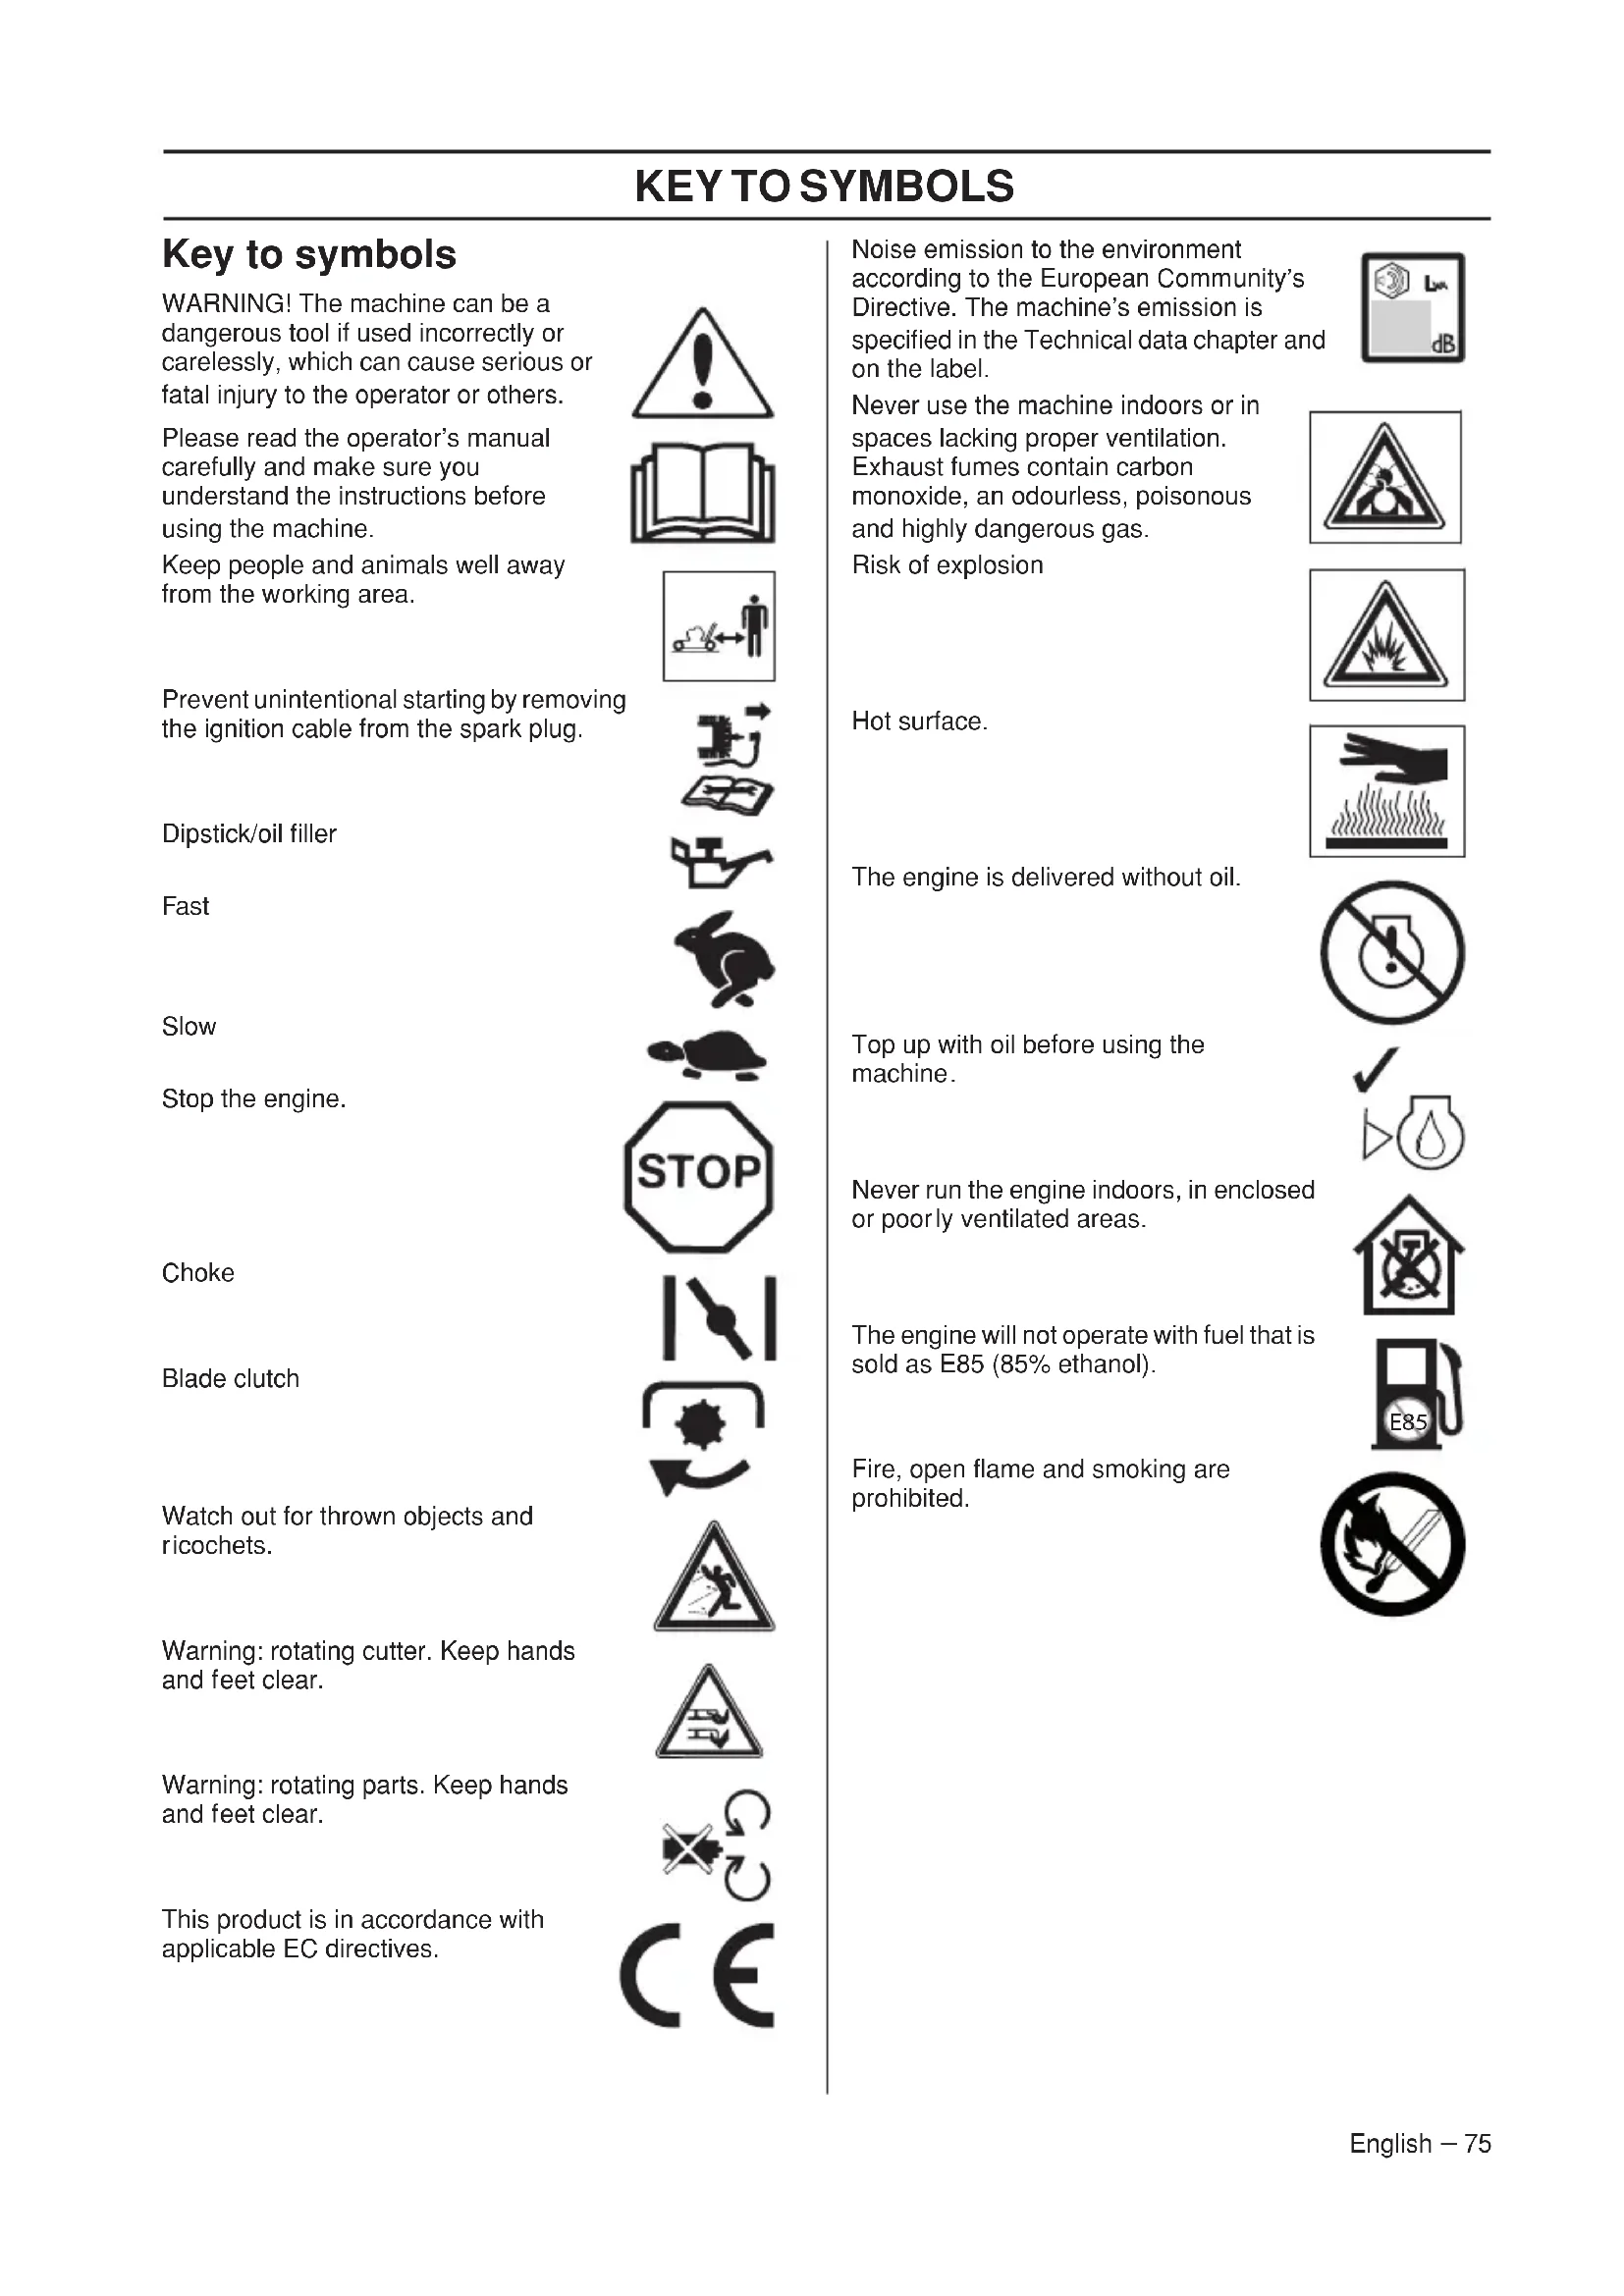
WARNING! The machine can be a dangerous tool if used incorrectly or carelessly, which can cause serious or fatal injury to the operator or others.
Please read the operator's manual carefully and make sure you understand the instructions before using the machine.
Keep people and animals well away from the working area.
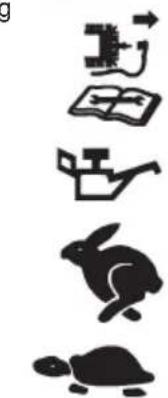
Prevent unintentional starting by removing the ignition cable from the spark plug.
Dipstick/oil filler
Fast
Slow
Stop the engine.
Choke
Blade clutch
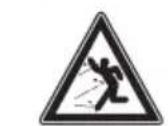
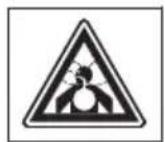
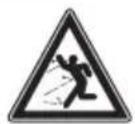
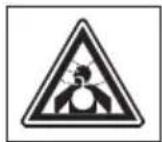
Watch out for thrown objects and ricochets.
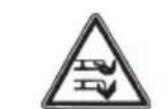
Warning: rotating cutter. Keep hands and feet clear.
Warning: rotating parts. Keep hands and feet clear.
This product is in accordance with applicable EC directives.


Noise emission to the environment according to the European Community's Directive. The machine's emission is specified in the Technical data chapter and on the label.
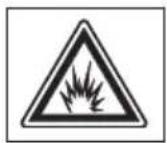
Never use the machine indoors or in spaces lacking proper ventilation. Exhaust fumes contain carbon monoxide, an odourless, poisonous and highly dangerous gas. Risk of explosion
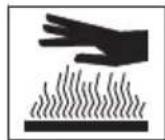
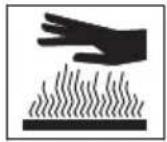
Hot surface.
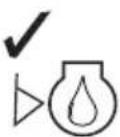
The engine is delivered without oil.
Top up with oil before using the machine.
Never run the engine indoors, in enclosed or poorly ventilated areas.
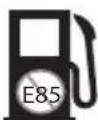
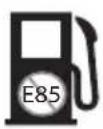
The engine will not operate with fuel that is sold as E85 (85% ethanol).
Fire, open flame and smoking are prohibited.


Explanation of warning levels
The warnings are graded in three levels.
WARNING!

WARNING! Used if there is a risk of serious injury or death for the operator or damage to the surroundings if the instructions in the manual are not followed.
IMPORTANT!
IMPORTANT! Used if there is a risk of injury to the operator or damage to the surroundings if the instructions in the manual are not followed.
CAUTION!
CAUTION! Used if there is a risk of damage to materials or the machine if the instructions in the manual are not followed.
Contents Dear Customer,
KEY TO SYMBOLS
Key to symbols 75
Explanation of warning levels 76
PRESENTATION
Contents 77
Dear Customer, 77
PRESENTATION
What is what on the lawn mower? 78
PRESENTATION
What is what on the lawn mower? 79
MACHINE'S SAFETY EQUIPMENT
General 80
ASSEMBLING AND ADJUSTMENTS
General 81
Handlebar 81
Cutting height 82
Catcher 83
Mulcher insert 83
Rear discharging 83
FUEL HANDLING
General 84
Fuel 84
Fueling 84
Transport and storage 84
OPERATING
Personal protective equipment 85
General safety precautions 85
Basic working techniques 86
Transport and storage 86
Starting and stopping 86
MAINTENANCE
General 88
Maintenance schedule 88
General inspection 88
Spark plug 90
Adjusting the drive belt 90
Air filter 90
Oil change 90
Fuel system 90
Adjusting the controls 90
TECHNICAL DATA
Technical data 91
EC Declaration of Conformity 92
Congratulations on your choice to buy a Husqvarna product! Husqvarna is based on a tradition that dates back to 1689, when the Swedish King Karl XI ordered the construction of a factory on the banks of the Husqvarna River, for production of muskets. The location was logical, since water power was harnessed from the Huskvarna River to create the water-powered plant. During the more than 300 years in existence, the Husqvarna factory has produced a lot of different products, from wood stoves to modern kitchen appliances, sewing machines, bicycles, motorcycles etc. In 1956, the first motor driven lawn mowers appeared, followed by chain saws in 1959, and it is within this area Husqvarna is working today.
Today Husqvarna is one of the leading manufacturers in the world of forest and garden products, with quality as our highest priority. The business concept is to develop, manufacture and market motor-driven products for forestry and gardening, as well as for the building and construction industry. Husqvarna's aim is also to be at the front edge for ergonomics, usability, security and environmental protection. That is the reason why we have developed many different features to add to our products within these areas.
We are convinced that you will appreciate with great satisfaction the quality and performance of our product for a very long time to come. The purchase of one of our products gives you access to professional help with repairs and service whenever this may be necessary. If the retailer who sells your machine is not one of our authorized dealers, ask for the address of your nearest service workshop.
It is our wish that you will be satisfied with your product and that it will be your companion for a long time. Think of this operator's manual as a valuable document. By following its content (usage, service, maintenance, etc), the life span and the second-hand value of the machine can be extended. If you sell this machine, make sure that the operator's manual is passed on to the buyer.
Thank you for using a Husqvarna product.
Husqvarna AB has a policy of continuous product development and therefore reserves the right to modify the design and appearance of products without prior notice.
PRESENTATION
LC451S
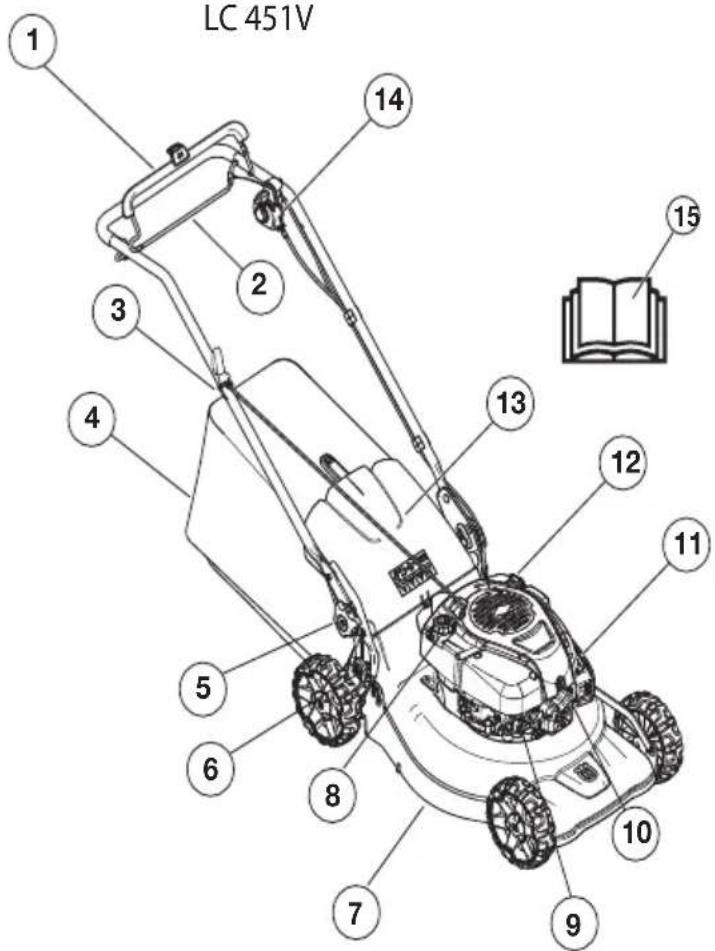
LC 451V
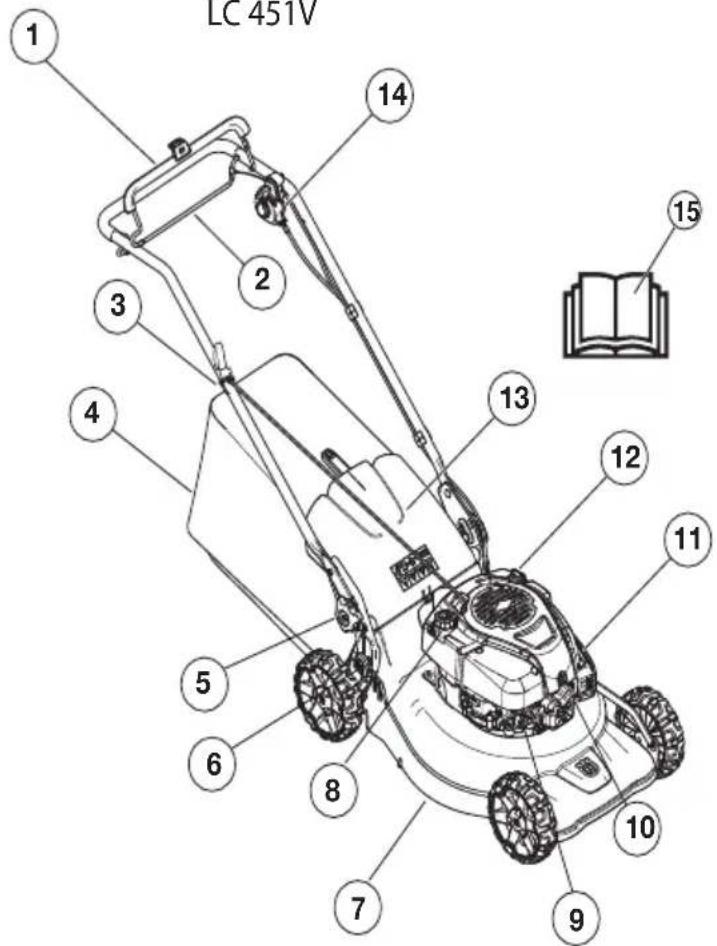
What is what on the lawn mower?
1 Engine brake handle
2 Propulsion bar
3 Starter handle
4 Catcher
5 Locking lever for handle height adjustment
6 Cutting height control
7 Cutting cover
8 Refuelling
9 Air filter
10 Spark plug
11 Muffler
12 Dipstick/oil filler
13 Back shield
14 Speed limiter (LC 451V)
15Operator's manual
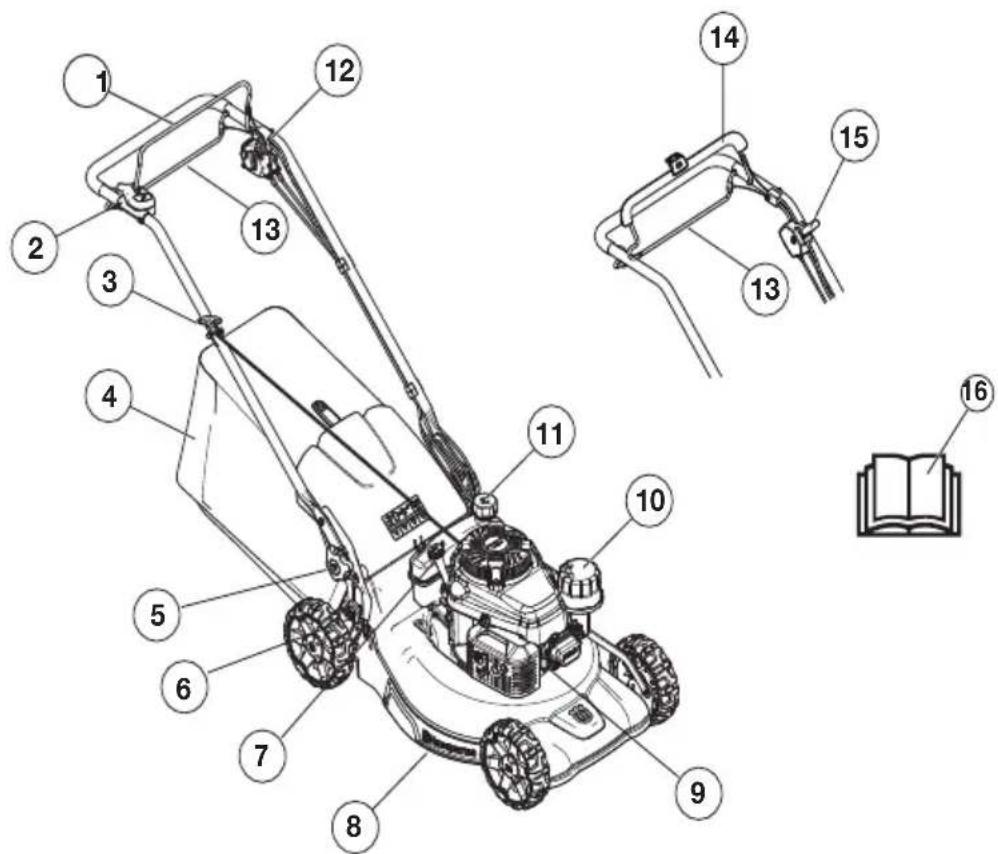
PRESENTATION
LC 551VBP
LC 551SP
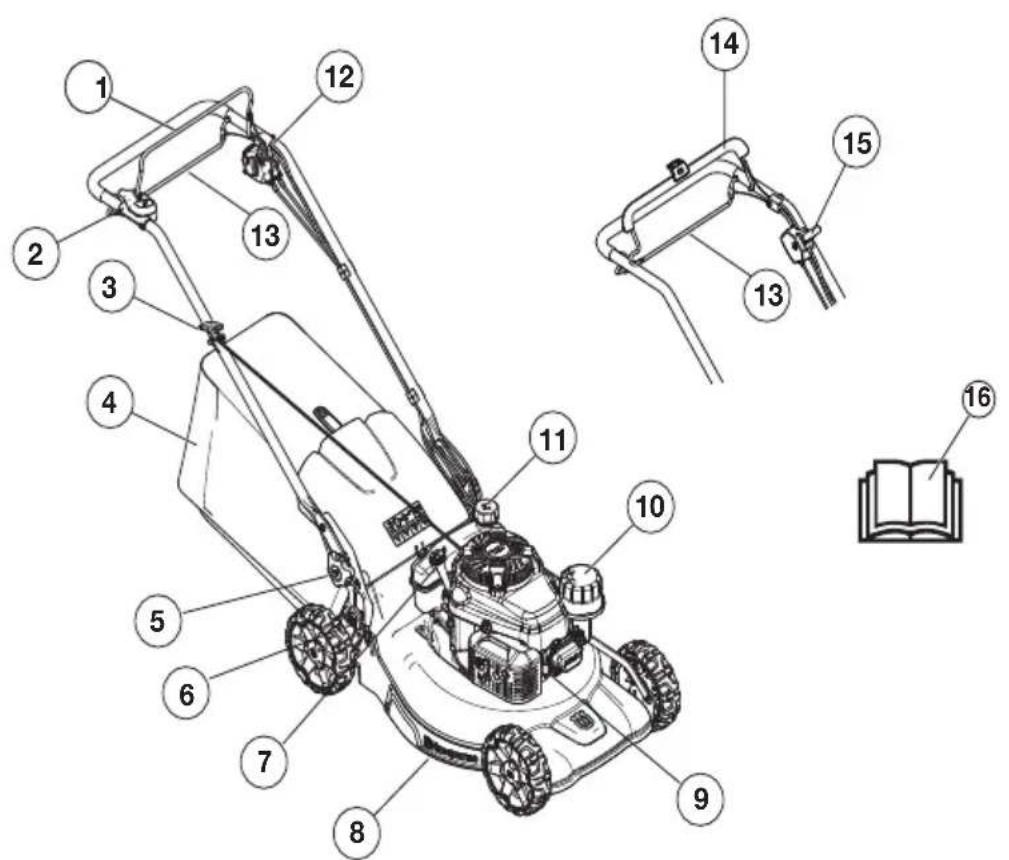
What is what on the lawn mower?
1 Blade clutch bar (LC 551VBP)
2 Lock for handle (LC 551VBP)
3 Starter handle
4 Catcher
5 Locking lever for handle height adjustment
6 Cutting height control
7 Dipstick/oil filler
8 Cutting cover
9 Spark plug
10 Air filter
11 Refuelling
12 Gas/speed control (LC 551VBP)
13 Propulsion bar
14 Engine brake handle (LC 551SP)
15 Throttle trigger (LC 551SP)
16 Operator's manual
MACHINE'S SAFETY EQUIPMENT
General
This section describes the machine's safety equipment, its purpose, and how checks and maintenance should be carried out to ensure that it operates correctly.

WARNING! Never use a machine that has faulty safety equipment! If your machine fails any checks contact your service agent to get it repaired.
Do not modify this product or use it if it appears to have been modified by others. Prevent unintentional starting by removing the ignition cable from the spark plug.
Cutting cover
- The cutting cover is designed to reduce vibration and to reduce the risk of cuts.
Checking the cutting cover
- Make sure the cutting cover is not damaged and that there are no visible defects such as cracks in the protective outer cutting cover.
Engine brake handle
LC 451S, LC 551SP, 451V
- The engine brake is designed to stop the engine.
When the grip on the engine brake handle is released, the engine should stop.
Inspecting the engine brake handle
Start the machine according to the starting instructions, see "Starting and Stopping", and then release the brake handle. The engine brake should always be adjusted so that the engine stops within 3 seconds.
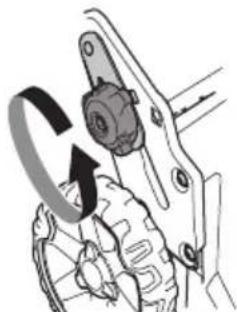
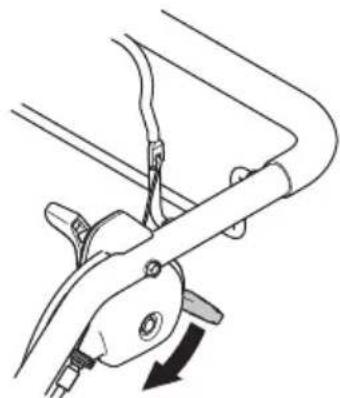
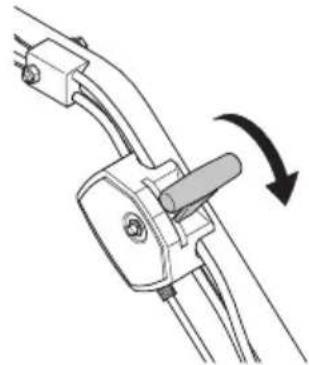
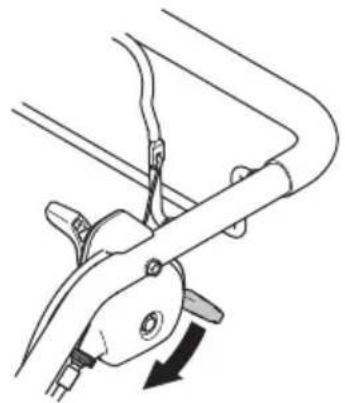
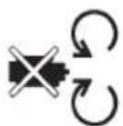
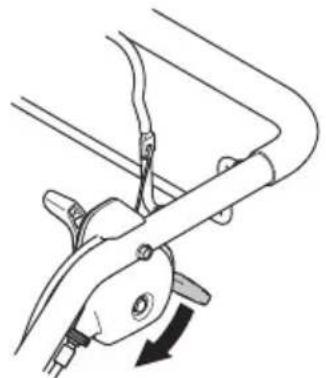
Blade clutch bar
LC 551VBP
The blade clutch bar enables the blade. Once the grip on the blade clutch bar has been released, the blades should stop within 3 seconds.
Muffler

WARNING! Never use a machine without a muffler, or with a faulty muffler. A damaged muffler may substantially increase the noise level and the fire hazard. Keep fire fighting equipment handy.
The muffler gets very hot during and after use. This also applies during idling. Be aware of the fire hazard, especially when working near flammable substances and/or vapours.
- The muffler is designed to keep noise levels to a minimum and to direct exhaust fumes away from the user.
Inspecting the muffler
- Check regularly that the muffler is complete and secured correctly.
ASSEMBLING AND ADJUSTMENTS
General

IMPORTANT! Prevent unintentional starting by removing the ignition cable from the spark plug.
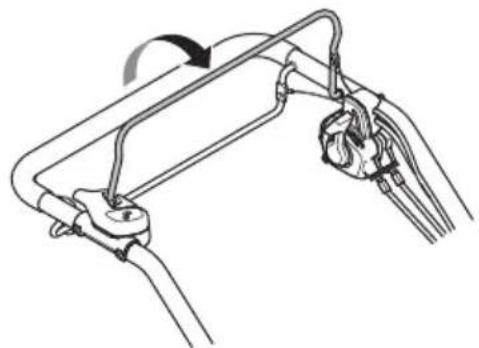
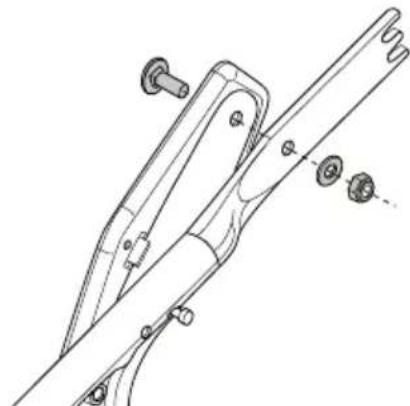
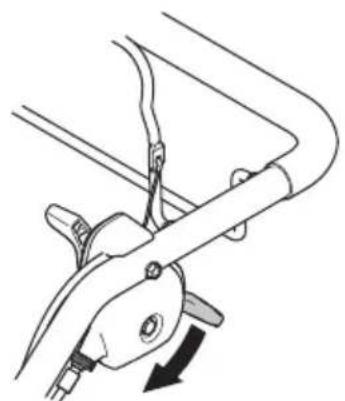
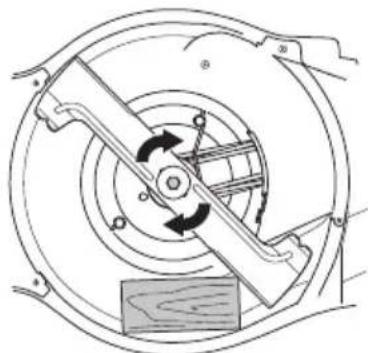
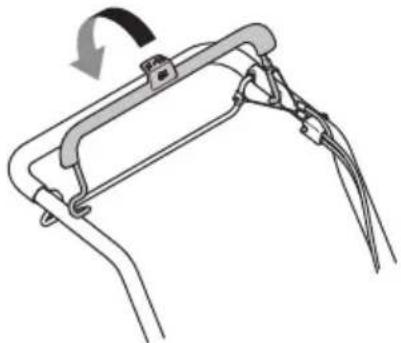
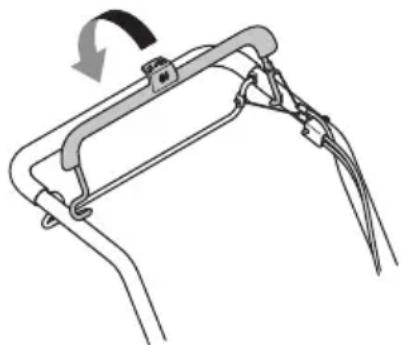
Handlebar
Assembly
1 Loosen the lower knobs on both sides of the machine. Check that the plastic washer is correctly in place in the recess in the handle attachment.
2 Fit the handlebar folded forward with the plastic washer placed between it and the handle attachment.
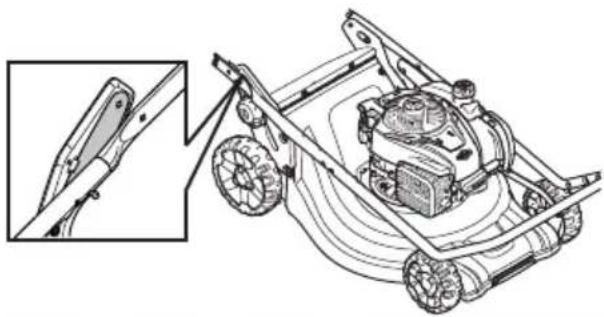
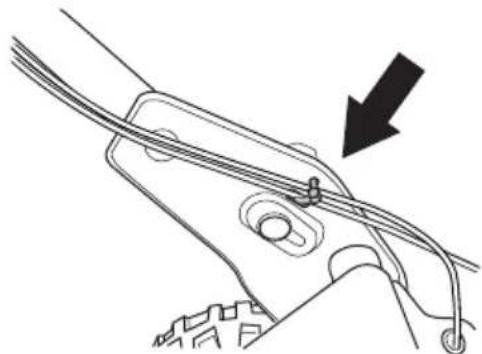
CAUTION! Check that cables and wires run along the inside of the handlebar and are not twisted around each other.
3 Fasten the handlebar to the handle attachment with screw, washer and bolt.
4 Unfold the handlebar and fasten the knob on both sides of the machine. Adjust to a suitable height. For more information, see "Adjustment".
5 Place the wires in the cable bracket. Make sure the wires are not twisted around each other. Fasten the cable bracket underneath the handlebar.
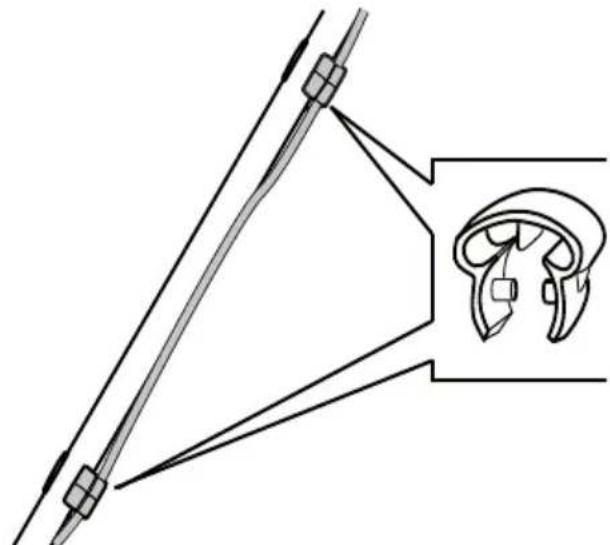
6 Run the wires along the underside of the handlebar. Insert the wires into the second cable bracket, which is then fastened to the upper part of the handlebar.
7 Fix the cables to the handle support by using a cable tie.
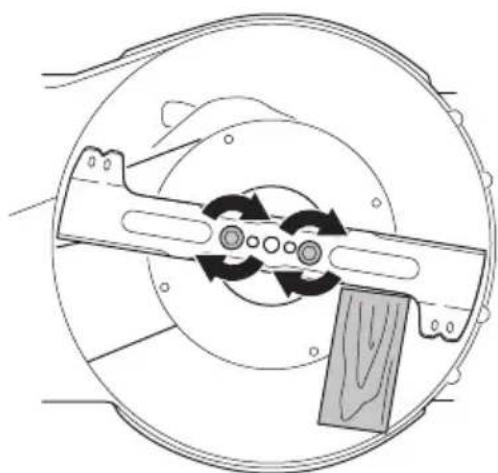
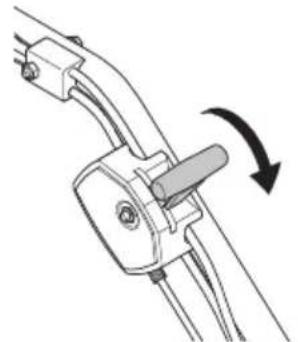
Settings
Handle height
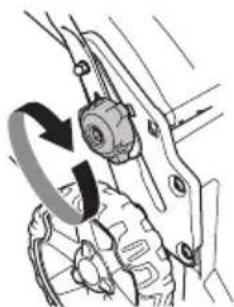
- Loosen the lower knobs.
- Slide the knobs to the ends of the grooves on both sides of the machine.
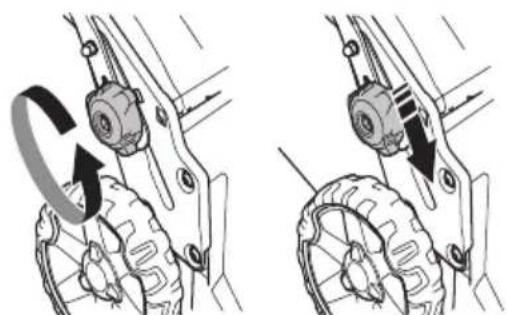
- Handle height can be set to 2 different positions,
- Adjust to a suitable height.
ASSEMBLING AND ADJUSTMENTS
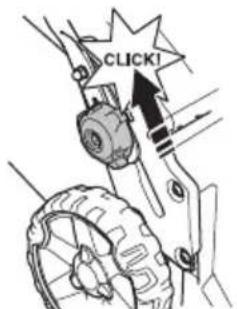
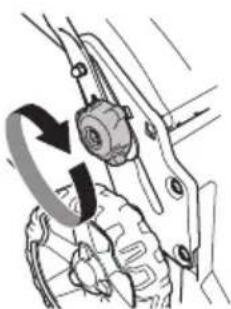
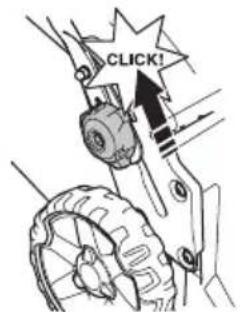
- Slide the knobs up towards the handle until they stop and a click is heard. Tighten the knobs properly.
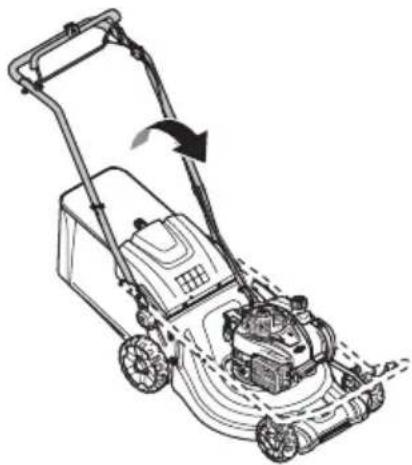
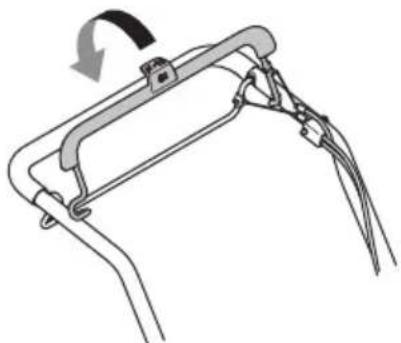
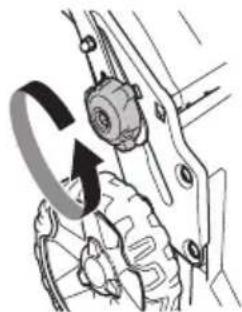
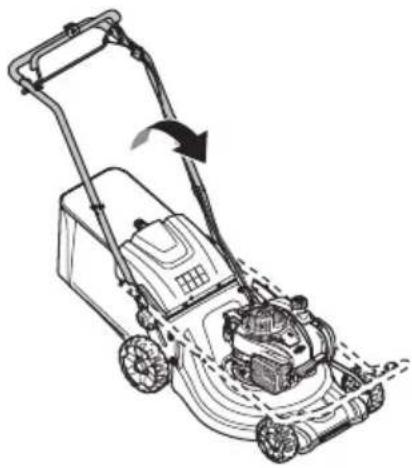
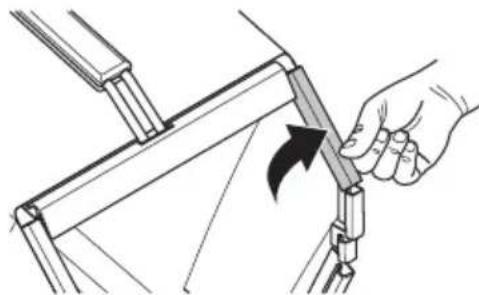
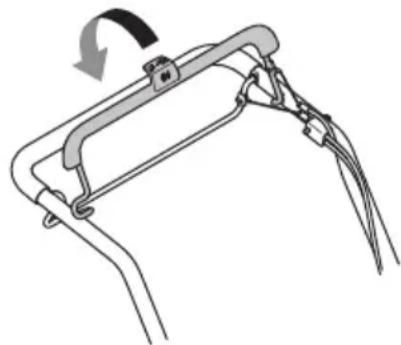
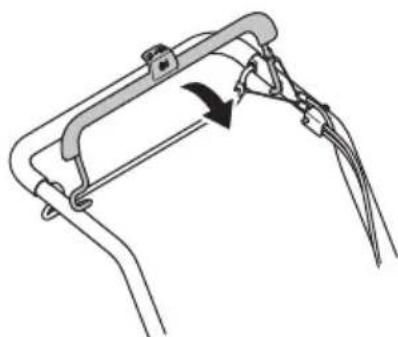
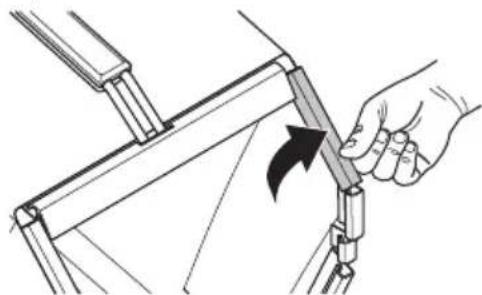
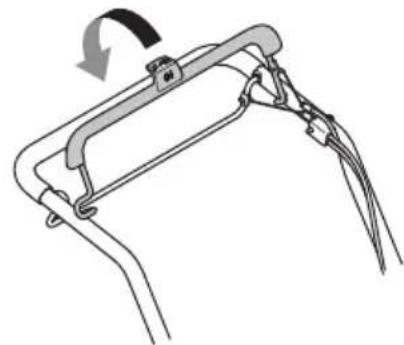
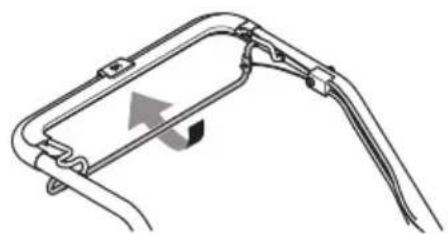
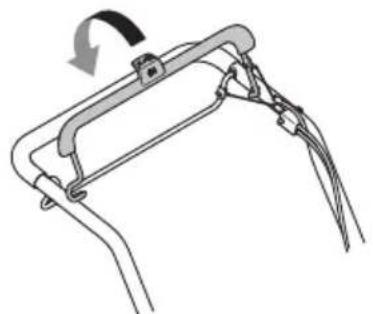
Transport position
The handle assembly can be folded to minimize space needed for transport and storage.
- Loosen the lower knobs.
- Slide the knobs to the ends of the grooves on both sides of the machine.
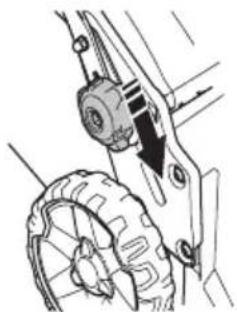
Operating position
- Fold the handle to its upright position.
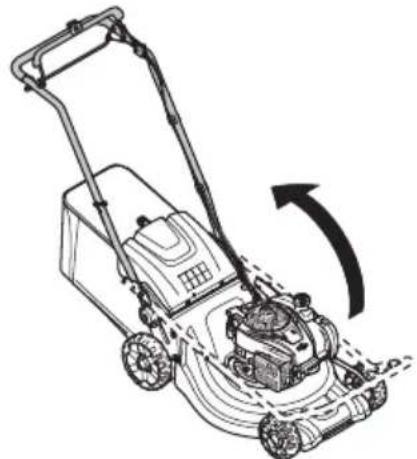
- Slide the knobs up towards the handle until they stop and a click is heard.
- Screw on the handle with the knob.
Cutting height
NOTICE! Do not set the cutting height too low as there is a risk that the cutters might hit ground with unevenness.
The machine is equipped with central cutting height adjustment.
- To adjust the cutting height, press the height adjuster towards the wheel and then move it forwards to give a lower cutting height and backwards to give a higher cutting height.
- The cutting height can be adjusted in 6 different steps.
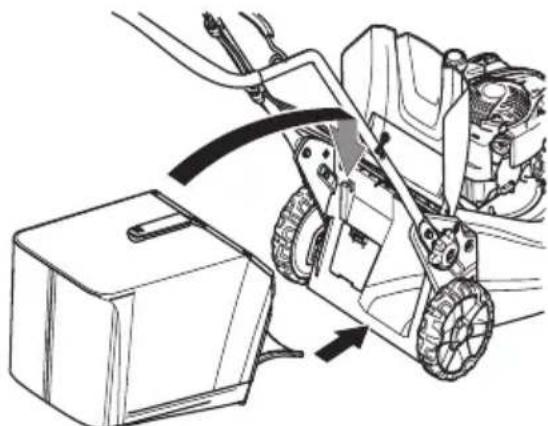
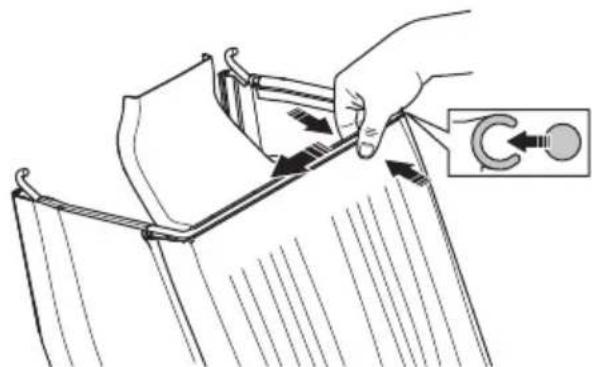
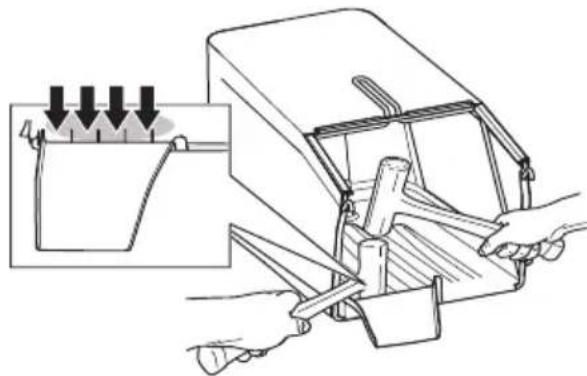
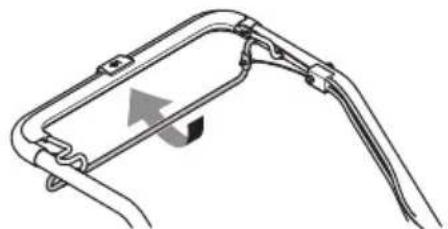
Catcher
- The collector's handle situated on the frame must be placed over the collector bag.
- Place the bottom of the frame into the groove underneath the collector. Fasten the frame by pressing it into the groove. Start with the part of the frame in the illustration and then press gradually forward towards the tongue of the collector.
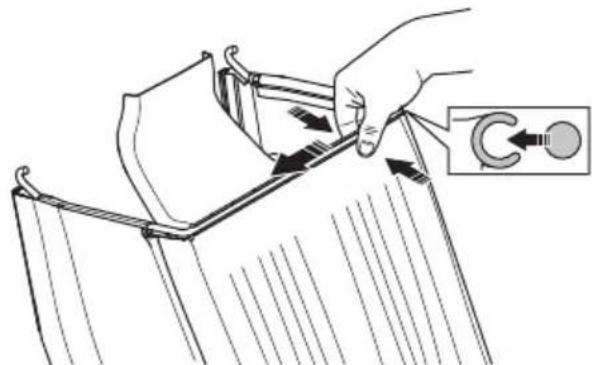
- A few taps with a rubber mallet may be necessary to fasten the frame part under the tongue. Tap the frame between the reinforcements on the tongue.
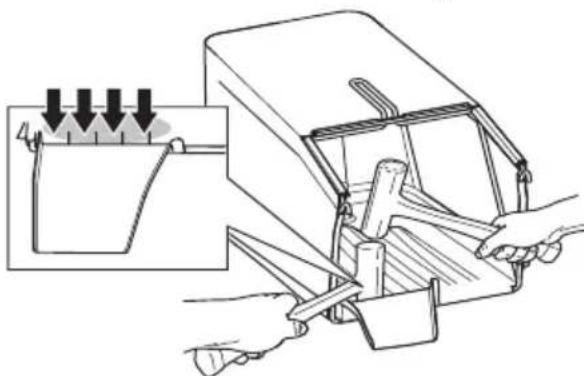
- Secure the frame by using the quick-action clips.
Make sure the machine's discharge deck is clean and free from grass cuttings.
- Fit the dagger bottom in the discharge hole.
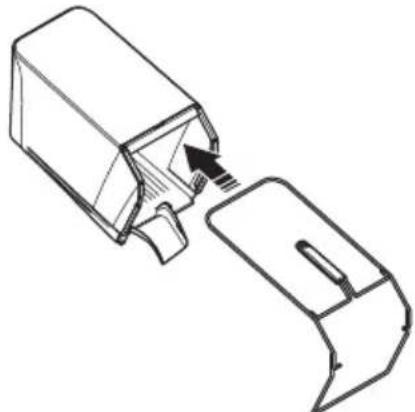
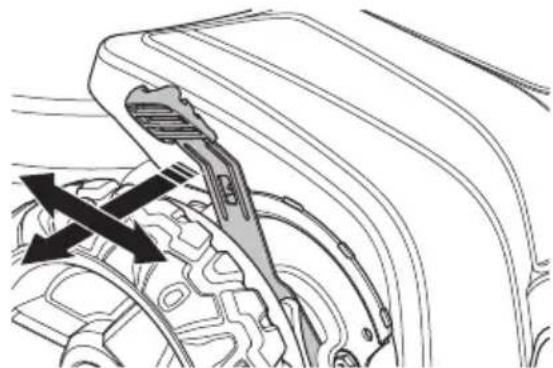
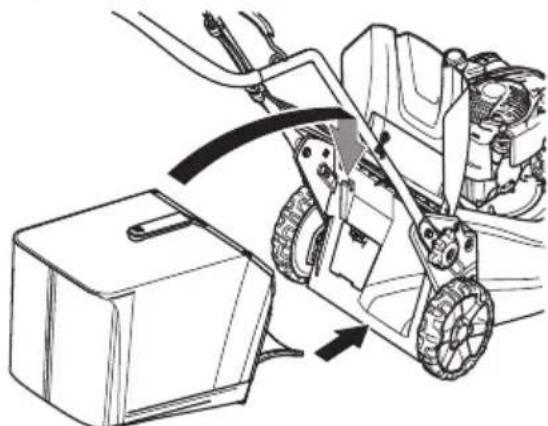
Mulcher insert - Accessories
A mulching-kit is available as an accessory, to make the machines equipped with a catcher able to be used with mulching function. The kit contains of a mulch plug and a blade.
- Raise the discharge guard to mount / dismount the mulch plug.
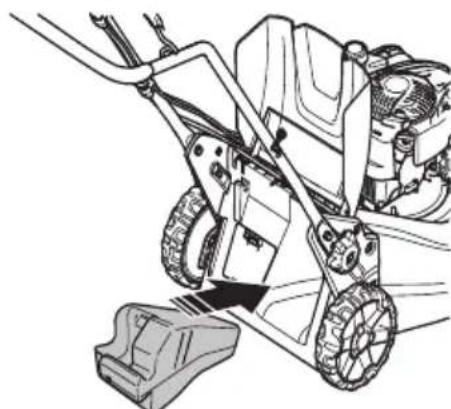
- Replace the blade with the supplied Combi blade. For more information, see "Cutting equipment".
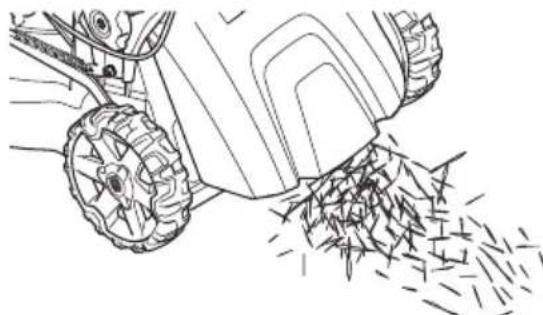
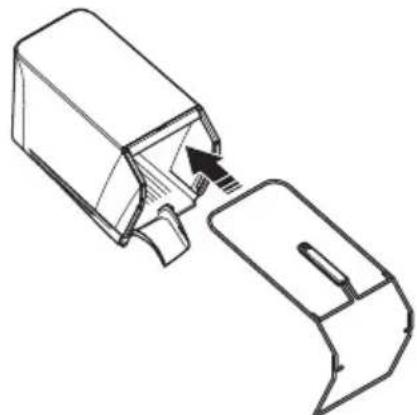
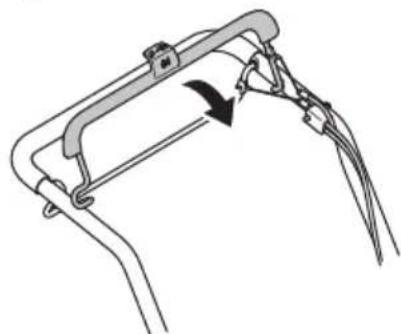
Rear discharging
The machine can also be used without the mulcher insert and collector.
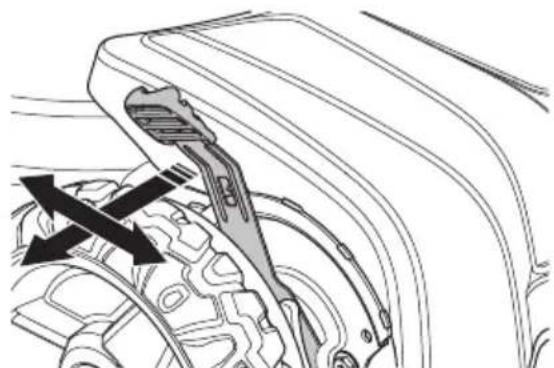
- Lift up the back shield and remove the catcher.
- Remove the mulch plug.
- Close the shield.
General

WARNING! Running an engine in a confined or badly ventilated area can result in death due to asphyxiation or carbon monoxide poisoning.
Fuel and fuel fumes are highly flammable and can cause serious injury when inhaled or allowed to come in contact with the skin. For this reason observe caution when handling fuel and make sure there is adequate ventilation.
The exhaust fumes from the engine are hot and may contain sparks which can start a fire. Never start the machine indoors or near combustible material!
Do not smoke and do not place any hot objects in the vicinity of fuel.
Fuel
NOTICE! The machine is equipped with a four-stroke engine. Make sure that there is always sufficient oil in the oil tank.
Petrol
- Use good quality unleaded or leaded petrol.
- The lowest octane recommended is 90 (RON). If you run the engine on a lower octane grade than 90 so-called knocking can occur. This gives rise to a high engine temperature, which can result in serious engine damage.
- Use low-emission petrol, also known as alkylate petrol, if it is available.
Engine oil
NOTICE! Check the oil level before starting the lawn mower. A too low oil level can cause serious damage to the engine. See instructions in the section "Maintenance".
- The engine oil should be changed the first time after 5 hours running time. Refer to Technical Data for recommendations on which oil type to use. Never use oil intended for two-stroke engines.
Fueling

WARNING! Always stop the engine and let it cool for a few minutes before refuelling.
Use a fuel can at all times to avoid spillage.
When refuelling, open the fuel cap slowly so that any excess pressure is released gently.
Clean the area around the fuel cap.
Tighten the fuel cap carefully after refuelling. Negligence may lead to the start of a fire.
Move the machine at least 3m from the refuelling point before starting it.
Never start the machine:
- If you have spilled fuel or engine oil on the machine. Wipe off the spill and allow the remaining fuel to evaporate.
- If you have spilled fuel on yourself or your clothes, change your clothes. Wash any part of your body that has come in contact with fuel. Use soap and water.
- If the machine is leaking fuel. Check regularly for leaks from the fuel cap and fuel lines.
Transport and storage
- Store and transport the machine and fuel so that there is no risk of any leakage or fumes coming into contact with sparks or open flames, for example, from electrical machinery, electric motors, electrical relays/ switches or boilers.
- When storing and transporting fuel always use approved containers intended for this purpose.
Long-term storage
- When storing the machine for long periods the fuel tank must be emptied. Contact your local petrol station to find out where to dispose of excess fuel.
Personal protective equipment
You must use approved personal protective equipment whenever you use the machine. Personal protective equipment cannot eliminate the risk of injury but it will reduce the degree of injury if an accident does happen. Ask your dealer for help in choosing the right equipment.
Always wear:
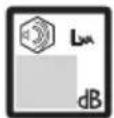
- Use ear muffs if the noise level exceeds 85 db.
- Sturdy, non-slip boots or shoes.
- Heavy, long pants. Do not wear shorts, sandals or go barefoot.
- Gloves must be worn when required, for example when fitting, inspecting or cleaning cutting attachments.
General safety precautions
This section describes basic safety directions for using the machine. This information is never a substitute for professional skills and experience.
- Please read the operator's manual carefully and make sure you understand the instructions before using the machine.
- Keep in mind that the operator is responsible for accidents or hazards occurring to other people or their property.
- The machine must be kept clean. Signs and stickers must be fully legible.
Always use common sense
It is not possible to cover every conceivable situation you can face. Always exercise care and use your common sense. If you get into a situation where you feel unsafe, stop and seek expert advice. Contact your dealer, service agent or an experienced user. Do not attempt any task that you feel unsure of!

WARNING! This machine produces an electromagnetic field during operation. This field may under some circumstances interfere with active or passive medical implants. To reduce the risk of serious or fatal injury, we recommend persons with medical implants to consult their physician and the medical implant manufacturer before operating this machine.

WARNING! The machine can be a dangerous tool if used incorrectly or carelessly, which can cause serious or fatal injury to the operator or others.
Never allow children or other persons not trained in the use of the machine to use or service it.
The machine should not be used by people with reduced physical or mental capacities or people who are unsuitable for health reasons to operate the machine, without supervision of a person responsible for their safety.
Never allow anyone else to use the machine without first ensuring that they have read and understood the contents of the operator's manual.
Never use the machine if you are fatigued, while under the influence of alcohol or drugs, medication or anything that could affect your vision, alertness, coordination or judgement.

WARNING! Unauthorized modifications and/or accessories may lead to serious injury or death to the user or others. Under no circumstances may the design of the machine be modified without the permission of the manufacturer.
Do not modify this product or use it if it appears to have been modified by others.
Never use a machine that is faulty. Carry out the checks, maintenance and service instructions described in this manual. Some maintenance and service measures must be carried out by trained and qualified specialists.
Always use genuine accessories.
Work area safety
- Branches, twigs, stones, etc. should be removed from the lawn before you start to mow.
- Objects hitting against the cutting attachment could be thrown and cause damage to people and objects. Keep people and animals well away.
- Never use the machine in bad weather, for instance in fog, in rain, damp or in wet locations, strong winds, intense cold, risk of lightning, etc. Working in bad weather is tiring and can lead to dangerous conditions, e.g. slippery surfaces.
-
Observe your surroundings to ensure that nothing can affect your control of the machine.
-
Beware of roots, stones, twigs, pits, ditches etc. Tall grass can hide obstacles.
- Mowing slopes can be dangerous. Do not use the lawn mower on very steep slopes. The lawn mower should not be used on inclines greater than 15 degrees.
- On sloping ground you should work along the slope. It is much easier to work along a slope than it is to work up and down it.
- Be careful when you are approaching hidden corners and objects that could block your view.
Work safety
- A lawn mower is only designed to mow lawns. All other use is forbidden.
- Wear personal protective equipment. See instructions under the "Personal protective equipment" heading.
- Do not start a lawn mower unless the cutter and all covers are fitted correctly. Otherwise the cutter could come loose and cause personal injuries.
- Make sure the cutter does not hit foreign objects such as stones, roots or the like. This can make the cutter dull and bend the engine shaft. A bent axle gives imbalance and heavy vibration, which results in a great risk of the cutter becoming loose.
- The brake handle must never be permanently anchored to the handle when the machine is running.
- Place the lawn mower on firm, flat surface and start it. Make sure that the cutter cannot come into contact with the ground or other objects.
Always place yourself behind the machine. Allow all the wheels to remain on the ground and keep both hands on the handle when mowing. Keep your hands and feet away from the rotating blades.
- Do not tilt the machine when the engine is running.
- Pay particular attention when pulling the machine towards you during work.
- Never lift up the lawn mower or carry it around when the engine is running. If you must lift the lawn mower, first switch off the engine and disconnect the ignition lead from the spark plug.
- Do not mow the lawn while walking backwards.
- The engine should be switched off when moving over ground that is not to be mowed. For example, gravel paths, stone, shingle, asphalt, etc.
- Never run with the machine when it is running. You should always walk with the lawn mower.
- Shut down the engine before changing the cutting height. Never make adjustments with the engine running.
- Never leave the machine unsupervised with the motor running. Turn off the motor. Ensure the cutting attachment has stopped rotating.
- If any foreign object is hit or if vibrations occur stop the machine immediately. Disconnect the HT lead from the spark plug. Check that the machine is not damaged. Repair any damage.
Basic working techniques
- Always cut with a sharp blade for optimal results. A dull blade gives an uneven cut and the grass becomes yellow on the surface of the cut.
- Never mow more than 1/3 of the length of the grass. This especially applies during dry periods. Mow first with the cutting height set high. Then check the result and lower to an appropriate height. If the grass is really long, drive slowly and mow twice if necessary.
- Cut in different directions each time in order to avoid stripes in the lawn.
Transport and storage
- Secure the equipment during transportation in order to avoid transport damage and accidents.
- Store the equipment in a lockable area so that it is out of reach of children and unauthorized persons.
- Store the machine and its equipment in a dry and frost proof place.
- For transport and storage of fuel, see the section "Fuel handling".
Starting and stopping
Before starting

WARNING! Please read the operator's manual carefully and make sure you understand the instructions before using the machine.
Wear personal protective equipment. See instructions under the "Personal protective equipment" heading.
- Keep people and animals well away from the working area.
- Perform daily maintenance. See instructions in the section "Maintenance".
- Ensure the ignition lead sits correctly on the spark plug.
Starting
LC 451S, LC 451V
- The engine brake handle must be held against the handlebar when the engine is started.
- Position yourself behind the machine.
- Grip the starter handle, slowly pull out the cord with your right hand until you feel some resistance (the starter paws grip). Pull with force to start the engine. Never twist the starter cord around your hand.
OPERATING
LC 551SP
With a cold engine:
- Set the throttle control in the choke position. The throttle control regulates the engine speed, and thereby also the rotation speed of the blades.
- The engine brake handle must be held against the handlebar when the engine is started.

- Position yourself behind the machine.
- Grip the starter handle, slowly pull out the cord with your right hand until you feel some resistance (the starter pawls grip). Pull with force to start the engine. Never twist the starter cord around your hand.
- Set the throttle control to full throttle.

LC 551VBP
With a cold engine:
- Set the throttle control in the choke position.
- Position yourself behind the machine.
- Grip the starter handle, slowly pull out the cord with your right hand until you feel some resistance (the starter pawls grip). Pull with force to start the engine. Never twist the starter cord around your hand.
- Set the throttle control to full throttle.


With a warm engine:
- Use the same starting procedure as for a cold engine but without setting the choke control in the choke position.
Drive
- Push the propulsion bar in towards the handle in order to start the drive.

- To only stop the drive with the engine running, release only the propulsion bar.
Stopping
LC 451S, LC 451V, LC 551SP
- Stop the engine by releasing the engine brake handle.
LC 551VBP
Move the throttle to the stop posit


General

WARNING! The user must only carry out the maintenance and service work described in this Operator's Manual. More extensive work must be carried out by a service workshop.
Switch off the engine before carrying out any checks or maintenance. Prevent unintentional starting by removing the ignition cable from the spark plug.
The life span of the machine can be reduced and the risk of accidents can increase if machine maintenance is not carried out correctly and if service and/or repairs are not carried out professionally. If you need further information please contact your nearest service workshop.
CAUTION! When the machine is tilted, make sure the air filter always is placed in the highest position.
Always use genuine accessories.
Maintenance schedule
In the maintenance schedule you can see which parts of your machine that require maintenance, and with which intervals it should take place. The intervals are calculated based on daily use of the machine, and may differ depending on the rate of usage.
| Before starting | Weekly mainten- ance | Monthly mainten- ance | Yearly |
| General inspection | Spark plug | Air filter | Cleaning under the belt guard** |
| External cleaning | Muffler* | Fuel system | Cleaning under the wheel plates** |
| Oil level | | | Adjustment of the gearbox stop** |
| Cutting equipment | | | |
| Cutting cover* | | | |
| Inspecting and adjusting the drive belt | | | |
| Engine brake handle* | | | |
| Blade clutch bar | | | |
*See instructions in the section "Machine's safety equipment".
** Conducted by authorised service workshop.
Please see the engine Operator's Manual for additional information about servicing the engine.
General inspection
- Check that nuts and screws are tight.
External cleaning
- Brush leaves, grass and the like off of the lawn mower.
- Do not use a high pressure washer to clean the machine.
- Never flush water directly on the engine.
- Clean the air intake on the starter. Check the starter and star ter cord.
- When cleaning under the cutting deck, turn the machine with the spark plug upwards. Empty the fuel tank.
Oil level
WARNING!
If engine oil is spilled onto the BBC, the BBC will not perform properly. The blade engagement time as well as the blade stop time may be severely increased. If engine oil is spilled on the BBC, it should be replaced.
IMPORTANT! Allow the machine to cool. Hot oil can cause severe burn injuries.
The lawn mower should stand on flat ground when you check the oil level. Check the oil level with the dipstick on the oil filler cap.
- Remove the oil cap and wipe the dipstick clean.
- Put the dipstick back in.
- If the oil level is low, fill using engine oil up to the upper level on the dipstick.
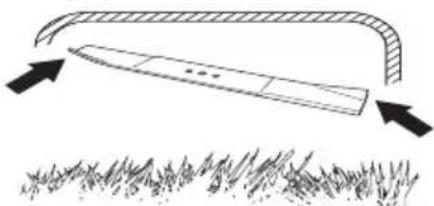
Cutting equipment

WARNING! Always wear heavy-duty gloves when servicing and maintaining the cutting equipment. The cutters are very sharp and cuts can occur very easily.
- Check the cutting attachment for damage or cracks. A damaged cutting attachment should always be replaced.
- Always ensure the cutter is well ground and balanced correctly.
CAUTION! The blades should be balanced after sharpening. Balancing, replacing or sharpening the blades should be conducted by a service workshop. Damaged blades should be replaced when hitting obstacles that result in a breakdown. Let the service centre assess whether the blade can be sharpened or must be replaced.
MAINTENANCE
Dismantling

WARNING! Prevent unintentional starting by removing the ignition cable from the spark plug.
- Lock the blade with a wooden block. Loosen the blade bolt and remove the blade bolt, the washer and the blade. Remove the blade bolt by turning the bolt counter-clockwise.
- Make sure the blade bracket is free of damage. Also check that the blade bolt is undamaged and that the engine shaft is not bent.
Assembly
- The blade must be mounted with the angled ends pointing up towards the cover.
LC 451S, LC 451V, LC 551SP
- Place the cutter with the friction washer against the cutter bracket. Make sure the cutter centers correctly on the shaft.
- Lock the blade with a wooden block. Fit the washer and tighten the bolt correctly by turning clockwise. The bolt should be tightened with a torque of 70Nm .
- Pull the blade around by hand and make sure it rotates freely.
LC 551VBP
- Place the blade against the blade bracket. Center the blade on the shaft
Center the blade on the shaft
- Lock the blade with a wooden block.
The bolts should be tightened with a torque of 50 Nm when refitting the blade.
- Test run the machine.
IMPORTANT!
Always exercise care and use your common sense. Avoid all situations which you consider to be beyond your capability. If you still feel uncertain about operating procedures after reading these instructions, you should consult an expert before continuing. Contact an authorised service workshop.
Always use genuine parts. For more information, see the "Technical data" section.
Spark plug
NOTICE! Always use the recommended spark plug type! Use of the wrong spark plug can damage the piston/cylinder.
- If the machine is low on power, difficult to start or runs poorly at idle speed: always check the spark plug first before taking other steps.
If the spark plug is dirty, clean it and check the electrode gap. For more information, see the "Technical data" section. Replace the spark plug if necessary.
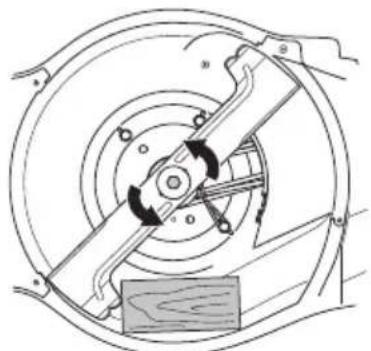
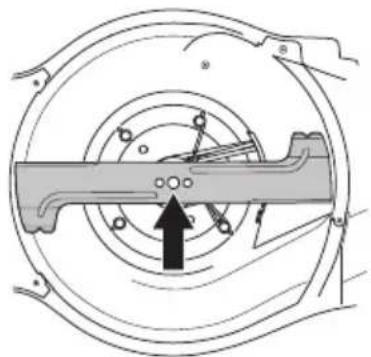
Adjusting the drive belt
If the drive feels slow, it may be due to a worn belt. The belt must in this case be replaced. Contact an authorised service workshop.
Air filter
- Remove the air filter cover and take out the filter.
An air filter that has been in use for a long time cannot be cleaned completely. The filter must therefore be replaced with a new one at regular intervals. A damaged air filter must always be replaced.
- When reassembling, make sure that the filter completely seals against the filter holder.
Clean the paper filter
- Clean the filter by knocking the filter against a flat surface. Never use solvent with petroleum, for example, kerosene, or compressed air to clean the filter.
Oil change
IMPORTANT! Allow the machine to cool. Hot oil can cause severe burn injuries.
- Empty the fuel tank.
- The machine has an oil drain plug.
- Place a pan under the drain and remove the plug.
- Please see the engine Operator's Manual for more information.
- Ask where you can dispose of surplus engine oil at your local petrol station.
- Fill with new engine oil of the right quality. See instructions in the section "Technical data".
Fuel system
- Check that the fuel cap and its seal are not damaged.
- Check the fuel hose. Replace if necessary.
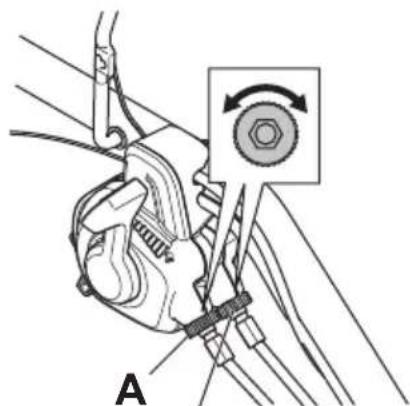
Adjusting the controls
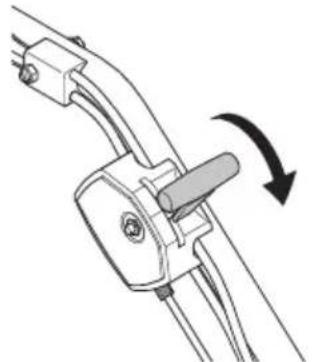
LC 551VBP
Adjusting the speed (A) and throttle (B) controls
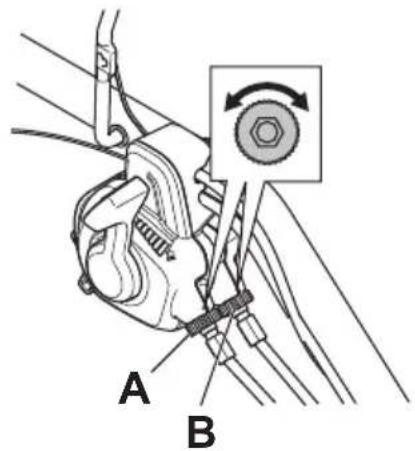
(A) For higher speed, adjust so that the cable sheath is shortened.
(B) If the choke or stop position can not be engaged, adjust the length of the cable sheath.
NOTE!
The gear can not be engaged while the machine is running.
TECHNICAL DATA
Technical data
| LC 451S LC 551 | SP LC 451V LC 551VBP | |
| Engine |
| Engine manufacturer | Briggs & Stratton DOV 750 | Kawasaki FJ180V | Briggs & Stratton DOV 750 | Kawasaki FJ180V |
| Cylinder displacement, cm3 | 140 161 140 161 | | | |
| Speed, rpm 2900 2800 2900 2800 | | | | |
| Nominal engine output, kW (see note 1) 2,6@2900 2.9@2800 | 2,6@2900 2,9@2800 | | | |
| Ignition system |
| Spark plug | Champion QC12YC | NGK BPR5ES | Champion XC12YC | NGK BPR5ES |
| Electrode gap, mm 0,5 0,6-0,8 0,5 0,6-0,8 | | | | |
| Fuel and lubrication system |
| Fuel tank capacity, litre 1,0 1,9 1,0 1,9 | | | | |
| *Engine oil | SAE 30/SAE 10W-30 | SAE 30/SAE 10W-30 | SAE 30/SAE 10W-30 | SAE 30/SAE 10W-30 |
| Oil tank capacity, litre 0,55 0,7 0,55 0,7 | | | | |
| Weight |
| Machine with empty tank, kg | 41 | 51 | 41 | 54 |
| Noise emissions (see note 2) |
| Sound power level, measured dB(A) | 97 | 97 | 97 | 96 |
| Sound power level, guaranteed LWA dB(A) | 98 | 98 | 98 | 98 |
| Sound levels (see note 3) |
| Sound pressure level at the operators ear, dB(A) | 87 | 87 | 86 | 84 |
| Vibration levels, a hveq (see note 4) |
| Handle, m/s2w bag / w.o bag | 4,0/4,0 | 4,5/3,8 | 5,5/5,3 | 4,5/4,2 |
| Cutting system |
| Cutting height, mm | 26-74 | 26-74 | 26-74 | 26-74 |
| Cutting width, cm | 51 | 51 | 51 | 51 |
| Cutter | Collect | Collect | Collect | Collect |
| Article number | 5875908-10 | 5875908-10 | 5875908-10 | 5821494-10 |
| Bagger capacity, litre | 65 | 65 | 65 | 65 |
| Drive |
| Speed, km/h | 4 | 4 | 3-6 | 3-6 |
Note 1: The power rating of the engine indicated is the average net output (at specified rpm) of a typical production engine for the engine model measured to SAE standard J1349/ISO1585. Mass production engines may differ from this value. Actual power output for the engine installed on the final machine will depend on the operating speed, environmental conditions and other values.
Note 2: Noise emissions in the environment measured as sound power (LwA) in conformity with EC directive 2000/14/EC.
Note 3: Noise pressure level according to ISO 5395. Reported data for noise pressure level has a typical statistical dispersion (standard deviation) of 1.2dB(A)
Note 4: Vibration level according to ISO 5395. Reported data for vibration level has a typical statistical dispersion (standard deviation) of 0.2m / s^2
*Use engine oil of quality SF, SG, SH, SJ or higher. See the viscosity chart in the engine manufacturer's manual and select the best viscosity based on the expected outside temperature.
(Appplies to Europe only)
Husqvarna AB, SE 561 82 Husqvarna, Sweden, tel: +46 36-145600, declares that the motor mowers Husqvarna LC 451S, LC 451V, LC 551SP, LC 551VBP as from 2016 serial numbers and onwards (the year is clearly stated on the rating plate followed by the serial number), complies with the requirements of THE COUNCIL'S DIRECTIVE:
of May 17, 2006 "relating to machinery" 2006/42/EC.
of February 26, 2014 "relating to electromagnetic compatibility" 2014/30/EU.
of May 8, 2000 "relating to the noise emissions in the environment" 2000/14/EC.
For information relating to noise emissions, see the Technical data chapter.
The following standards have been applied: ISO 5395, ISO 14982
(Unless stated otherwise, it is the latest published revision of the standard that is referred to.)
Notified body: 0404, SMP Svensk Maskinprovning AB, Box 7035, SE-750 07 Uppsala, has issued reports regarding the assessment of conformity according to annex VI of the COUNCIL'S DIRECTIVE of May 8, 2000 "relating to the noise emissions in the environment" 2000/14/EC.
The certificates have the numbers: 01/901/260, 01/901/279, 01/901/261, 01/901/280
Huskvarna 25 November 2015

Claes Losdal, Development Manager/Garden Products
(Authorized representative for Husqvarna AB and responsible for technical documentation.)
SYMBOLERKLÄRUNG
Symbolerklarung
Zet de gashendel in chokestand.
Attention: projections et ricochets.
Loscertificadostenenel numero:01/901/260,01/901/279,01/901/261,01/901/280
I nclude 189
Os certificados tem os他们在:01/901/260,01/901/279,01/901/261,01/901/280
Claes Losdal, Development Manager/Garden Products
Uzemanyagkeverek 251
Tankolas 251
Abizonyitvanyok szemai:01/901/260,01/901/279,01/901/261,01/901/280
Huskvarna, 2015. november 25.

SIGURNOSNA OPREMA STROJA
Opencito 265
MONTIRANJE I PODESAVANJA
Opencito 266
Ruce 266
Visina rezanja 267
Sakuplajc 268
SIGURNOSNA OPREMA STROJA
Općenito
Sertifikaatide numbrid on: 01/901/260, 01/901/279, 01/901/261, 01/901/280
Huskvarna, 25. november 2015

Claes Losdal, arendusdirektor/aiandustoothed.
Certifikaty maju cisla: 01/901/260, 01/901/279, 01/901/261, 01/901/280
Huskvarna 25 novembra 2015

N3BECTNE! He 3aIaBaIe BncoUHaTa Ha
pIaIe TbIbpIe HnCKO, TbI KaTO mAp nCK
pe3IuTe Da IonaIHaT Ha CKJIoHOBe C
HepaBHOCTN.
MaHHaTe o6OpyDbHa c ceHTpaJIHo peryJInpaHe Ha BnCOuHbTa Ha KoCeHe.
3a da perylnpate BncoynHaTa Ha KocHe, HATNCHEte ycTpoiCTBOTO 3a perylnpae Ha
BnCOuHaTa KbM KOJIeIIO To N CJIeI TOBa rnpemecTeTe Hanpei, 3a Da ocNrgyPte NoMaJka BnCOUHa Ha KoCeHe, HHa3aD 3a noToJMA BnCOUHa Ha KoCeHe.
BucounHaTa Ha p3aHe MoKe Ia 6bIpeRyIpaHa B 6 pa3JIuHn CTeNeHn.
KoJIeKTOp
-ДрьнкаТаHaКол ekTopаe pa3noJIoHeHaВbpxy paMaTaИТя6BaДa 6Бдe nocTaBeHaВbpxy Top6aTHaKoIekTopa.
- NocTaBeTe DoJHaTa YacT Ha paMaTa B KaHaJa NaKD KOJIeKTopa. 3aKpenete paMaTa, KaTo Ra HATnCHETe B KaHaJa. 3aNoUHeTe C yAcTTa OT paMaTa OT INIOCTpaUNrTa N cJeD TOBa HAtnCKaIte NoCTeHNO HanpeD KbM e3Nka Ha KOJIeKTopa.
- MojHe Ja ca HuyHn HnKoJko YyKBaHn C rMyMeHo yKYe, 3a Da 3aKpenTe YacCTTa OT
pamata noe3nka. YyKHeTe pamata, 3a da BNe3e MeHdy noDCNJHeHTE qactHa e3nka.
3aKpeneTe paMaTa c nOMoTtHa 6bp0eJeCTBaunn
- YBepTe ce, Ye nJaTΦopMaTa 3a pa3ToBapBaHe Ha MaUnHaTa e UnCTa N no He r HrMa oTp3aHa TpeBa.
CbpeTe KoJIeKTopa Bbpxy rOpHnHa 10uACHTo.
- NocTaBeTe 3b6a Ha KOJIeKTopa B nlaTΦopMaTa 3a pa3TOBapBaHe Ha MaunHaTa.
HaIooHeTe OTBopa Ha CyBaJa KaBM DoJaHaTa Yact Ha npCtBaKa 3a CyBaJN.
Hnkora He cTapTnpaIte MaunHaTa:
- Ako cTe pa3JIeJIr rOpINBO INJIMoTOpHO MacNo Bbpxy MaunHaTa. N3TpNIte pa3JIaIIOTo ce rOpINBO INJIMacJIoN OCTaBeTe OCTaTbUInTe OT rOpINBOTo Da Ce IN3napAIT.
Ako cTe n3JIeI rOpNBO Bbpxy ce6e cn IJnI npexNTe Cn ce npeo6JIeueTe. N3MnIe Te3N qactn Ha TAnTo Cn, KOnTO ca 6NJN B KOHTaKT C rOpNBO. N3NoJI3BaIte canyH n BOJa.
- Ako MaunHaTa NMa Teu Ha rOpNBo. IpoBepaBaiTe peIOBHO 3a TeOBe oT KanaKa N MapKyuHrTe 3a rOpNBOTo.
TpaHcnpT n cxbxpaHeHne
CbxpaHraBaTe n TpaHCnOpTnpaIe MaunHaTa n ropNBoto TaKa, Ye da Hma OnacHocTe BeHTyaJIeH Teu NIn N3napEnJa Da BJIa3aT B KOHTaKT C NCKpn NIn OTKpNT PAmbK, HanpIMep OTeJKeKtpNuecKn MaunHn, eJeKTpoDBrVaTeJn, eJeKTPnuuecKn/CnIOBn npebKJIouBaTeJn NIn HaPeBaTeJn.
- TOpuBoTo Tp86Ba Ia ce cbxpaHЯBa n TpaHCnOpTnpa B CneUHaJIHo ppeJHa3HaueHn 3a Ta3N UeI N Odo6peHn Ty6n.
PpoIbJIIXHTeJHo cBxpaHaBaHe
Ako MaHHaTa 1e ce cBxpaHra 3a no-npoIbJIHNTeJeH nepNoI cIeJBa rOpNBnIpe3epBoap Da 6bIe N3npa3HeN.ObbpHeTceKbM 6eH3HocTaHcIyTa Cn 3a INHOpMaUKNbIe Da I3JIeTe N3NIuBka oT rOpNBO.
JInuHa 3auntHa eKnnpOBka
Pp npa6ota c MaunHaTa Tpa6Ba BnHar n da
noJ3BaTe JnUHa 3aUnTHa eKnInpoBka Oo6peHa
OT CbOTBeTHO BeOMCTBo. JnUHaTa 3aUnTHa
eKnInpoBka He N3KJIIOuBa PnCK OT TpaBMn, Ho
HaMaJIyBa cepNo3HocTt Ha TpaBMata npi
3IonoJyKa. IomOJeTe CBOr DnCTpn6yTop 3a
nomoN pnp N36opa Ha noDxoJa7a eKnInpoBka.
Heo6xoJIMo e BnHar n Da N3NoJ3BaTe:
-Из不动产抵押贷款担保合同》HAN 85 db.
Kopabn 60Tuyn nIn o6yBKn, KOITo He ce XJb3rAeT.
-Дьги naHTaLoHn OTe 3dpaB nJaT. He Hocete Kbcn naHTaLoHn, caHdaJIu He pa6oTe 6ocn.
-Пин hyд ТрбВа Да ce HocT pБKaBUN, HanpIMeP np MoTAn, orJIeД nIIN noYnCTBaHe. Ha peHneHTe npncnoc6JIeHn.
OchOBHn npeIpa3Hm MepKn nToTexHnKaTa 3a 6e3oNaChocT
To3n pa3dJIOnICBa OCHOBHNTe npenopbKN 3a 6e3onacHa pa6oTa c MaunHaTa. Ta3n INHOpMaLna He MoKe Da 3aMeHN pOfecNoHaJHaTa KBaJIHnKAcNn I ONHT Ha eINH CneLNaJIncT.
-Ппдддддддддддддддддддддддддддддддддддддддддддддддддддддддддддддддддддддддддддддддддддддддддддддддддддд徳
-прочTeTE BHHMaTeJIHo pБКOBOДcTBОTo 3a
eKcnNoaTaUЯ n ce y6eJeTe, Que ro pa3bUpaTe
npaBnIHo.
He 3a6paBraI Te, ye onepaTopbTe oTROBopeH npn HeuacTHN cLyuaH uIN OAnchOCTN, cLyuHInCe Ha dpyrN Xopa UIN TExHO NMyueCTBO.
MaunHaTa Tp6Ba Da ce noDnBpaHya UcTa. 3NaUte n CTnKepeTe Tp6Ba Da 6bDaT HAnbJIHO YeTMN.
BnHaN ce ocIaHnyTe Ha 3IpaBna CMNCbl
HeBnHaMOneJaCePpeUyraDNBCaKABb3MOHnCaTyaun, KOrTo MoNe Ja Ce C6JIbckaTe. BnHarpa6oTeTe c NOBnIeHo BHNMaHne N Ce OcJNaHnTeHa 3dpaBnCn pa3ym.AKO ce OKaHeTe BCtYaun, B KOrTO CyBCTBaTe HeyBepeHocT, ppeYCTaHOBeTe pa6ota n Ce NoCBBeTaBnTe Cbc Cneuajnt. CbPKeTe Ce CBaun DnIbP, cepBn3eH areHT nnC onNTeh Notpe6bntel Ha INcTpymEHTa pr3aHe. N6BaRbaTe pa6ota, 3a KOrTO cmTaTe, ye He cTe doCTaTBuHO KBaInNupan!

PPEyIPEXJEHNE!Ta3nMaunHa
c63daba eJekTpomarHHTHO NOJe No
BpeMe Ha pa6oTa. Pn HraKoN
06ctOaTeJIcTbA TOBa NOJe MoKe Da
IHTEpeepnpa C aKTINBH NIn NaCINBH
MeiUHcN NmIaHTaHTN. 3a Da
HaMaJIHTe pNCa OT cepNo3Ho IN
ΦaTAJIHO HapaHbAHe, Hne
PpeOpYBaMe JNuCaTa C MeiUHckN
IMPaHTaHTN Da ce KoHcyIITpaT c
JeKapr cN n npOn3BoDnteJa Ha
MeiUHckN IIMPaHTaHT, PpeDN da
3anoHa Tda pa6oTc Ta3n MaunHa.

PNEyPENHEE!MaHnHaTaMoKe Da ce OKaHe onaceHnHCTpyMeHT aKO ce n3NoJ3Ba HnPaBnJHo Nn 6e3rpnHHo, KoTo MoHe da DoBeDe do cepno3HO NnI fataJHo HapaHbAHe Ha onepaTopa NnI dpyn JNuca.
Hnkora He no3BoJyBaIte Ha deca nn IpyrXopa da n3noJ3BaTnn 06cnyBaT MaunHaTa, 6e3 da ca 06yuHen ppeDbapuTeJHo.
MaunHaTa He 6nBa Da ce n3noJ3Ba oT Xopa C NOHKeHN Hn3NueCKn Nm yMcTBHeH Bb3MOxHocTu Nm Xopa, KOInTo He e noXoJaIoo Da pa6oTc MaunHaTa nopAaN 3npaBOcnBn npuHH, 6e3 Ha6JIooJeHne OToOBoK, OTroBopeH 3a TExHaTa 6e3OnacHocT.
Hnkora de donyckaTepyru da n3noJ3BaT MaunHaTa 6e3 da cTe ce y6eNJI,Ye Te ca pa36paNI cbIbPkaHHeTo B HcTpkyKUInTe 3a eknloaTaUN.
Hrkora He n3noJ3BaIe MaunHaTa aKo cTe yMopeHN, aKO cTe yNoTpe6aBaN aIKoxoJI nn aKO B3eMaTe MeNkameHTN, KOInTO Bb3JeNCTBaT Ha 3peHnETo BN, ppeLcHKaTa BN NNI KoopDnHaCnTA BN.

PPEyPENDEHNE! Hepa3peweHn
n3MeHeHnI n/nn npncnoc6JeHn
MOraT da DoBeaT do cepno3Ho
HaPaHbAHe nn CmbpTHn clyuAn Ha
noTpe6nteJn nn dpyrn Iua. Pn
NkAKBn 06ctoTeJIcTBa He 6nBa da
ce BHacrT n3MeHeHnB
n'bpBOHaJaHaTa KoHcTppyKUHa
MaunHaTa 6e3 pa3peWeHne Ha
npOn3BOdnteJI.
Hrkora He npomeHaTe Ta3n MaunHa no Haun, KOTo He CbOTBeTcTa Ba Ha opnHaJIHaTa KOHCTpyKUry, H He n3noJ3BaIte KOraTO Ce BnJa, Ye e 6nJa npomeHa OTHaKoI dpyr.
He pa6oTe c Hen3npaBHa MaunHa.
H3BbPwBaIte OnncAHnte B ToBa
pbKOBODCTBO 3a EKcnNoaTaUna
peDoBHn npoBepKN, noDpBHKa N cepBN3. OnpeJeHn onepaunno
noDpBHKaTaN cepBN3a ce
N3BbPWBat eINHCTBeHOOT
KBaJIHnCUnpaHn CneUmaJIInCTN.
Ioi3yBaTe cAmO opuHaJIHn npucnoc6JeHn.
БezonaHocT ha pa6oThaTa o6JaCT
KlnoHOBe,BeiKN,KambHnIpyrTpr6BaJa 6bDaT npemaxHaTNOT MopabaTa,peuN da 3anoCHTe Da Kocnte.
- PpeIMeTn, yIpyIu peKeIooTo o6OpyIbAHe, MoaT Da 6bDaT N3XBbPLeH N da npNHyT BpeIHa xopa n IpeIMeTn. Ha6JIu3o He 6NuBa Ia IMa BbHUn Hxa npNBOTHn.
- HnKora He n3noJ3BaIte MaunHaTa B looBpeMe, HapnpMep npi MbIa, IbXd, BJaHHoBpeMe nn Ha MoKpn MeCTa, npn cnilHnBeTpoBe, MHOrO cnJeH CTyI, pNcK OT MbJHnA N T.H. Pa6oTaTa B loo BopeMe e n3MopHTJIHa NMOHe da IOBeDe Do VB3HNKBaHe Ha ONacHnCITyaUu, HapnpMep Do noRaTa Ha XJIb3raBuNyUacTbU.
- Ha6IIOdaBaTe oKoJHaTa cpeJa, 3a Ja cTe cnrgpHn, Ye HNsO HMa Ja nonpeuHa pa6oTa Ta BVc MaunHaTa.
BHHMaBaIe 3a KopeH, KaMbHn, BeiKN, AMN, DynKn n T. H. Bucokata TpeBa MoHe Da Kpne npenrTCTBna.
KocHeTo no cKIOH MoHe da 6bJe onaCHO.He H3NoJ3BaITe KocaKaTa Ha MHOro cTpBMnckJHOBe. KocaKaTa He 6NBA da ce n3NoJ3BaHa cKJHOBe, no-CTpbMHn oT 15 rpaDyca.
BnKIOHeH TepeH CJIeIbA npoxOHaTa nTbTeKa Da ce npokapa HnpRAKO Ha cKIOHa. 3HaHTeJIHO no-JeCHO e Da ce DBNHITe HAnpRA KO Ha cKIOHa, OTKoJIKoTo Da ce N3KaUBaTe IcJIIN3aTe No cKIOHa.
BnMaBaTe, KOraTo npn6nHbAte cKpntu bTIn npeDMeTu, KOTo MoarTa 6Jokupat 3PHTeJIHOTo BN NOJe.
БezonaHocT npa6oTa
KocaykaTa e c3daHeHa camo 3a KocHe Ha mopabn. Bcnkn npyrgn ynoTpe6n ca 3a6paHeHn.
-ИзплзВаиTe ЛИЧаТа 3aПNTHa eKINIpOBKa. BИн ykaЗанЯТа в раДeЛ ЛИчHa 3aПNTHa eKINIpOBKa.
He cTaptnpaTKe Kocayka,OCBeH aKo pe3eUbT n BCnuk Kaan ca nocTaBeH npaBnJHo.B npoTnBeH cLyaupe3eUbT MoHe da ce pa3xla6n I da npeDn3BnKa TpaBMn.
- YBepTe ce, ye pe3eT HЯMa da ydApn DpyrN o6ekTu, KaTo HAnpImep KAmbHn, KopeHn Nn DpyrN. ToBa MoKe Da 3aTbNn pe3eua n da orbHe DByceKUHOHHra BaI Ha DBrTaTeJI. AKe o rBHaTa, ocTa MoKe Da npuHn Dnc6aHaNC n CInHn Bn6paCUn, KoETo Da IDoBeDe Do roJAM pNcK 3a ocBo6OxDabAHe Ha pe3eua.
- PbykaTa 3a cnnpaKaTa HNKora He 6nBa da 6bJe nepMaHeHTHO 3acToNopeHa,doKaTo MaunHaTa pa6oTu.
- NocTaBeTe KocauKaTa Ha Cta6nJIHa, nIOCKa NOBbpxHocT Ia CTapTnpaIte. YBepeTe ce,Ye pe3eCbT He MoKe Ia BJe3e B KOHTaKT Cbc 3emrTa nn DpyrNo6ekTu.
BnHaH6bJeTe 3aMaunHaTa. N03BoJeTe BCNUKn KOJIeJa Da OCTaHaT Ha 3emrTa N npbHTe n DBeTe CN pIe Ha pkoXBaTKaTa, KOraTo Kocnte. IpbHTe pIcTe N KpaKaTa cN daJeU OT BbpTAAnte ce ocTpneTa.
HeHaKJaHnTeMaunHaTa,Korato eKeKTpOdBnRaTeJrPa60Tu.
Oco6eHO BnMaBaTe, KOraTo IbPaTe MaunHaTa KbM ce6e cn no BpeMe Ha pa6oTa.
- Hikora He BdnraTe NIn HocTe KocaKaTa, DOKaTo DnRaTeJaT pa6OT. Ako ce HaIra Da BnIRHeTe KocaKaTa, NpBo N3KJIIOyeTe DnRaTeJN IN3KJIIOyeTe Ka6eJa 3a 3anaBaHeTo oT 3anaJIteJHaTa cBeu.
He Kocete TpeBHaTa nIoU, B'bpBeiKn Ha3a.d.
-ДИгаTeJЯТТрЯ6ВаДа 6Бдe ИЗКЛIOуЕн, KOraTo ce npuДВиЖВaTe Ipe3 NOBbpxHocT, KOraTo HЯMaДа 6Бдe КосяHa. HanpIMep, n'bTeKn C YaKbЛ, KaMbK, peUHn KaMbHn, acФaANTИдр.
Hikora He TnayaTe c MaunHaTa,doKaTo Ta pa6oTu. BnHar Tp8Ba Da BbpBNTe C KocayKaTa.
-ИЗключeteДВигаTeJIЯ,пpeДиДа npomehnte BИсоуннаТаHa рязawe.ИнкORA He perулupaTe,ДOKaToДВигаTeJIЯ pa6OTn.
- Hikora He ocTabaIe MaunHaTa 6e3 HaI3Op,doKaTo DnurataJeT pa6Ot. N3KJIuOteDnurataJyBepTe ce, ye peKeHToOobopydBaHe e cnpaNo da ce BbptN.
Ako HkaKaBb CtpaHnueH 06eK T 6bJe yJapeH IIN ce noLyuAT Bn6paUIn, BeDHa r cnpTe MaunHaT. Pa3KaueTe HT-ka6eJa oT 3anaJIteJIHaTa CBeU. PpOBepTe MaunHaTa JaII He e NobpeEHa. NopabTe BCa Ka nobpeJa.
OchOBHn npHHcHn Ha pa6oTa
BnHaH npenHeTe c ocTpo ocTpne 3a onTmMaJIH pe3yIaTn. N3TbNeHOTo ocTpne DaBa HepaBeH cpe3 n TpeBaTa CTaBA XbI Ta no NOBbpxHocTTa Ha cpe3a.
- HnKora He KocTe NoBce oT 1/3 OT nbJlnHaTa Ha TpeBaTa. ToBa ce OTHacr oc6eHo 3a cyxN nepNoi. NpBBo KocTe npn BncoUHa Ha pR3aHe, 3aJaEHa Ha BncoKa. CJeI ToBa npoBepTe peyltata n HaMaJIeTe do cboTBeTHaTa BncoUHa. Ako TpeBaTa e MHO r Dblra, kapaTe 6abHo I - aKO e Heo6xoImO - OKocTe DBA nTt.
- PeHHeTe BceKN nT B pa3JIuHn nocOKn, 3a Da n36erHeTe JINHN B MopaBaTa.
TpaHcnpT n cBxpaHeHne
- O6e3onacete o6opyDbaHeTo no BpeMe Ha TpaHcnpTnpaHe, 3a Ja n36erHeTe noBpeJa NnHcNdeHTN.
CbxpahBaTe 60pyDbaHeTo B3akJIOUBAO ce MrcTo, TaKa Ye Da 6bJe N3BbH DoCTbNa Ha DeuN HeynbHOMoEHN JIua.
CbxaHbAaTeMaunHaTaNo6OpyBaHeToHa cyxoN3auntetoCTKpeH Macto.
- 3a TpaHcnopTnpaHe n 3apeKdaHe c rOpNBO Bn. pa3deJa r3apeKdaHe c rOpNBo".
Статуше и захова:
IpeNi Ia 3anoUheTe

PNEUYNPEKJDEHNE! PpeiDa 3anoHeTe pa6oTa c MaunHaTa npOyeTe BnMaTeJHo pkoBoDcTBoTo 3a ekCnIooaTaun I ce y6eTe, ye ro pa3bnpate npabuJHo. N3no3BaIte JnUHaTa 3aunTHa eknnpOBka.BNK yKa3aHnra Ta B pa3deJnUHa 3aunTHa eknnnpOBka.
B30HaTaHa pa6Ota He 6nBa Da NMa BbHnHn Xopa.
ИЗБьршВаиTe BCEKNДНЕВНТEXHNYECKO 06слунвае.Вн.yka3aHЯТаВ pa3дeЛ rПоДрБнKa".
- YBepTe ce, Ye Ka6eJIbT 3a 3anaJIbHaHeTo e npaBnIHo nocTaBeH B 3anaJIteJHaTa CBeII.
CTapTnpaHe
LC 451S, LC 451V
PbkoBtKaTaHa cnpaKaTa Ha DnBraTeJr Tp6Ba Da ce DbpHn Cpeu ropHoTo ynpaBHeHne npi CTapTnpaHe Ha DnBraTeJr.
- 3actaHete 3aMauHHaTa.
XBaHeTe DpBKKaTa Ha CTapTepa Nn3TerIeTe 6aBHO CTapTepHna Whyp cJaCHaTa pKa Do noJIOKeHne, KOraTo ycETnTe CbnpOTnBa (3b6uNTe Ha CTapTepa 3auenBaT).N3DbpaNaTe cnHNo uHpy,doKaTo DBVaTeJrT 3anaJI. He 6bBa HIKORA Da HaBnBaTe CTapTepHna Whyp oKoJo pKaTa cn.
LC 551SP
PnCTyDnIbNarateJI:
- YctaHOBeTe peryIaTopa Ha npocelIOBaTa KJIana B noJIoHeHne 3aJeICTBaH cMyKaU. PeryIaTOpbT Ha npocelHaTa KJIana peryInpa o6opOTte Ha DnBraTeJn CbTo Ta Ka CKoPoCTTa Ha BbpTeHe Ha HOHOBeTe.
PbkoBtKaTaHa cnpaKaTa Ha DBVaTeJr Ta6Ba Da ce DpbHn Cpeu ropHoTo ynpaBHeHne npi CTapTnpaHe Ha DBVaTeJr.
- 3acTaHeTe 3aД MaшинHaTa.
XBaHHeIpBHKaTaHa CTapTepaNn3TerJIeTe 6aBHO CTapTepHnaUHypC DAnCHaTa pKaDo nOIOHeHne, KOraTo YcETNTe CbnpOTnBa (3b6uHTe Ha CTapTepa 3auenBaT).NdBpNaTe cnHNo UHypa, DoKaTo DBVaTeJrT 3anaJi. He 6uBa HNKora Da HaNBaTe CTapTePnHaHyp OKoJIo PbKaTa cn.
3aainTe peryIaTopa Ha npoceJHaTa KJIana Ha nBJHa ra3.
LC 551VBP
PnCTyDEN DBNrataJI:
- YctaHOBeTe peryIaTopa Ha npocelNoBaTa KJana B noJOnKeHne 3aJeNcTBAh CMyKaU"
3acTaHeTe 3aMauHHaTa.
XBaHeTe DpBHKaTa Ha CTapTepa Nn3TerIe Te 6aBHO cTapTepHna Whyp C DaChHa Ta pKa Do noLoHeHne, KOraTo yceTnTe cbnpOTnBa (3b6uHTe Ha cTapTepa 3aCenBaT).NdBpaNaTe cnllno Whupa,doKaTo DBVaTeJrT 3anaJI. He 6NBa HNKora Da HaBnBaTe cTapTepHna Whyp OKoJo PbKaTa cn.
3aainTe peryIaTopa Ha npocelHaTa Klanha nblHa ra3.

CTonbI DnBiratTeJI:
-Пилагаite cьшata npoцeдура, KaKTo npi CTydeH DBnrgaTeJ, Ho 6e3 da Na nocTaBAre TcMyKaau B CMyKaauHo noLoHeHne.
3aDnBnBaHe
HaTnCHHeIocTa3a3aBnHbAHeKbM pBkoXBaTKaTa,3aJa cTapTnpaTe 3aBnHbAHeTo.
3a da cnpeTe caMo 3aBnHbHeTo,doKaTo DnrgaTeJrPa6oTu,ocBo6OJeTe JocTa 3a 3aBnHbAHe.
N3KJIIOUyBaHe
LC 451S, LC 451V, LC 551SP
Cnpete DnBraTeJRA, KaTo OTnycheTe DpBHKaTa Ha cnnpaayKaTHa DnBraTeJRA.

LC 551VBP
PpemecTeTe ra3Ta B cTOn nO3nUa

OcHOBHn npHHznn

IPEyPENHEHNE!NoTpe6nTeJrT Tp6Ba Da n3Bbpwba cmo pa6oTaTa no NoDpBHKKaTa n 06cJyKBAHeTo, OINcaHN B To3N HapbYHk Ha onepaTopa. No-KpyNHte pemHTn Tp6Ba Da ce n3BbpWBat B cepBN3.
N3KJIIOUyBaITe DVBraTeJnpeiN
N3n'bJIHHeHHeTo Ha KaKBInTo N Da e
npOBepKn NJIu TeXHuecKa
NoDpBHKa. IpeDoTbPaTeTe
HeKeJaHO CTapTnpaHe, KaTO N3BaINTe
3anaJIITeJIHHaKa6eI O T
3anaJIITeJIHaTa CBeI.
EknpnoaTaUHOHHnT cpoK Ha MaunHaTa MoHe Da 6bJe HamaJIeH, a pNcKbT OT HeuacTHn CnyaH yBeIuYeH, aKO TexHueCKoTo 06cLyXBaHe Ha MaunHaTa He ce npOBeHda npaBnHo n aKO 06cLyXBaHeTo N/nnpeMoHTHnTe DeHocTN He ce N3nBnHBaT npOecNoHaJIHo. AKO mMaTe HyJa da O OSe NHOpMaUry, MoJIa, 06bPHeTe Ce KbM Hai-6JIN3KN cepBN3.
BHIMAHHE!PnHaKJaHHe Ha MaunHaTa BnHaN Ce yBepaBaiTe,Ye Bb3DyHnT FInIbpe pa3noJIOKeH Bb3MOHHo HAI-BiCOKO.
-Полувайтесамо opигиНалини npсncnoc6леня.
TexHnuecko 06cIyXBaHe
PergylnpaHe Ha 3aBnKBaunpeMbk
AkoIbHHeHToe6aBHO,TOBaMoHeJaCeIbJIHN HaI3HoceHpeMbK.BTo3nClyuayTpr6BaJa cMeHHTe peMbKa.ObbpHeTe ce KbM yIbHOMoSeH cepBn3.
Bb3duyweHnIITbp
-ДемоHTираNTe KanakaHa Bb3dUshnЯФЛТьрИВБ3dUshnЯФЛТьрT.
Bb3dyweH fNtbp, n3no3yBaH nbIro Bpeme, He MoKe Da ce noocn HAnbJHo. ETo 3aOHa onpeJeHn INTEpBaJn OT Bpeme ToT Tpa6Ba da ce NODMeH c HOB. NOBpeEn Bb3dyweH fNtbp Tp86Ba da 6bJe HnpeMeHHcMeHe.
Korato ro MoHTnpaTe oTHOBo, npOBepeTe daJIH cnTbpBt npJra nIbTHo KbM IbpKaTeJa Ha cnITbpa.
NoucTeExapTneHnaΦnTbp
-ПочиTeTe ФнлТьpa, KaTo roЧуКHeTe B nIoocKa noBbpxHocT. HnKOra He n3noI3BaIte pa3TBOpHTeHa HeФTeHa oChOBa, KaTo HanpIMep KepocuH, IJIbВb3dUx NOd HaNJaRaHe, 3a DaNoCHTneФнlTbpa.
CmHa Ha MacJIoTO
3AIONOMHETE!OCTaBeTeMaunHaTaJa ce oxlaan. IopeoTo MaJIO MoHe Da npuHHn TeHKN n3rapaHn.
-Изпраэнеpeэрвараза зугьо.
MaHnHaTa pa3noJa r c n3nyckaTeJHa npo6Ka 3a MacNo.
- NocTaBeTe cBn noi KaHaJa 3a n3ToUbaHe mMaxHeTe npo6kata.
Molna, HanpaBeTe cnpaBka c HcTpyKuNTe 3a eKcnloaTaun Ha DnraTeJra 3a noBeue HHopMaun.
-ПОИТаTeВМecThaTa6eH3nHOCtHaUKbIe MoHeTeДaИЗЛeeTeИЗЛишоToMOTOpHo MacNo.
3apeTe c HOBo MoTopHo MacNo c Heo6xoIMMoTo KaueCTBO. BnHTe HhCTpyKcUNTe Bpa3dJIrTExHnueckn XapaKTepNCtIKN".
TOpNBHa CnCTema
- YBepeTe ce, Ye KanaUKaTa Ha pe3epBoapa N HeHoTo ynTbTheHne He ca NOBpeDeHN.
- PpOBepTe Mapkya 3a rOpNbTo. Ppn Heo6xoDnMoCT ro noDMHeTe.
Hac troika ha perylaTopnTe
LC 551VBP
HactpoKaHa peryJatOpnte Ha o6opOTnTe (A) n ra3Ta (B)
B
(A) 3a no-BncoKn o6opOt HacTpoIe TaKa, Ye Ka6eJHaTa 06BvBkA da ce Ckbn.
(B) Ako cmykauyt nJIn cTOn no3nUraTa He MoRaT da 6bDaT aKTINbupaHn, perylnpaIte IbJIHHaTa Ha Ka6eJHaTa O6BvBka.
IpeaKaTa He MoHe da 6bDe aKTHBnPaHa,doKaTo MaHnHaTa pa6oTu.
TEXHINUeCKN XAPAKTEPNCNUKNI
TexHnueckxapaKTepeNCTnKn
| LC 451S LC 55 | ISP LC 451V LC | 551VBP | |
| Двига teл |
| Пробимею-teл на дыгателя | Briggs & Stratton DOV 750 | Kawasaki FJ180V | Briggs & Stratton DOV 750 | Kawasaki FJ180V |
| Осem на симпдьра, см³ | 140 161 140 161 | | | |
| Скорост, рtm 2900 2800 2900 2800 | | | | |
| Номиная похODа мошноct на[eilektroдьога teл, кW (Вж. заменнka 1) | 2,6@2900 2.9@2800 2,6@290 | 0 2,9@2800 | | |
| Заплителна сисема |
| Заплителна сбец | Champion QC12YC | NGK BPR5ES | Champion XC12YC | NGK BPR5ES |
| Хлабина мени度过[eilektroдье, ММ 0,5 0,6-0,8 0,5 | 0,6-0,8 | | | |
| Сисема на зхранвае/cмазвае |
| Вмесимост на горовниpezerвогар, лintри 1,0 | 1,9 1,0 1,9 | | | |
| *Двига telлно масло | SAE 30/SAE 10W-30 | SAE 30/SAE 10W-30 | SAE 30/SAE 10W-30 | SAE 30/SAE 10W-30 |
| Вмесимost на маслосяня pezerвогар, лintри 0,5 | 0,7 0,55 0,7 | | | |
| Терло |
| Маша на с пазен pezerвогар, Кг | 41 | 51 | 41 | 54 |
| Шуто в Emиси (Вж. заменнka 2) |
| Равшице на звковая[eфekt, Изөрөнө В dB (A) | 97 | 97 | 97 | 96 |
| Равшице на звковая[eфekt, rapантурано LWA dB (A) | 98 | 98 | 98 | 98 |
| Равшице на shуma (Вж. заменнka 3) |
| НИВо на shума пri ухото на paбOTeши, dB(A) | 87 | 87 | 86 | 84 |
| Равшице на вибрацьЯт,a_hveq (Вж. заменнka 4) |
| Ръкoxьватka, m/s² w bag / w.o bag | 4,0/4,0 | 4,5/3,8 | 5,5/5,3 | 4,5/4,2 |
| Рекеша сисема |
| Височина на ряданe, mm | 26-74 | 26-74 | 26-74 | 26-74 |
| ШирINA на ряданe, cm | 51 | 51 | 51 | 51 |
| Нон | Collect | Collect | Collect | Collect |
| Сереген Homep | 5875908-10 | 5875908-10 | 5875908-10 | 5821494-10 |
| КаразитET на писставкatinga за чьал,在ліtrп | 65 | 65 | 65 | 65 |
| Задвигвае |
| Сkopocst, km/h | 4 | 4 | 3-6 | 3-6 |
3a6eJekka 1: HomnHaHnHaTa MoHocT Ha eJeKToDnBnAteJle cpeJHaTa HeTHa MoHocT (npn yKa3aHnTe 0b./MnH.) Ha dBnraTeIc bCc TaHapTha npOn3BoDnTeJIHocT 3a MoJeJa eJeKToDnBnAteJ, N3MepeH cnPMA SAE cTaHApTa J1349/ISO1585. DnBaTeJIte MacoBO npOn3BoDcTBo MOnke Ja ce OTKJIOHBArOT Ta3N CTOHCT. JeIcTBnTeJIHaTa n3XoJHa MoHocT 3a DnBaTeJle, INcTaJIpaH Na KpaIIHaTa MaINHa, Ie 3aBnCt OT pa6Othata ckopocT, ycNoBnTa Ha OKoJIHaTa CpeJa n dpyrN cToHocTn.
3a6eJHKa 2: WymoBa eMncnB OOKJIHaTa CpeJa, n3MepeHa KaTo 3ByKOB eΦeKT (LwA) cIaCHO EO dIupeKTHBa 2000/14/EO.
3a6eJekka 3: HbO Ha 3BykoBoTo HaIraHe cbrIacHo ISO 5395. OTcTeHnTe daHHn 3a HbOTo Ha 3BykoBoTo HaJIraHe IMaT TnNvHa cTaTncTnuecka dncnepcn (ctaHapTHo OKKIOHeHne) ot 1,2 dB(A).
3a6eJHK4:PaBnHHeHa Bn6paCInTe cBrlacHo ISO 5395.OTYeTeHNte daHHN 3a paBnHSeTo Ha Bn6paCnIMMAt TnNnUHa CtAtnCTnuecka Dncnepcna (ctAnIapTHo OTKIOHeHne) ot 0,2 m/s2.
*H3noJ3BaIte DnIgAteJIHo MacNo C KaueCTBO SF, SG, SH, SJ nIi c no-BnCOKo KaueCTBO. BnHTe Ta6IuCaTa C BuCKO3nteTn B HapbYnHa Ha npOn3BOIoTeJIy Ha DnBiratJIy Nn36epTe ONTmAlHnBnCKO3ntETc npRMO ouKaBAHaTa OKoJIHa TeMnepaTypa.
EO-уверенье за сбOTВETCTBNE
(BaIIndHo cMo B paMKnTe Ha EBpona)
Ceptnikatte ca n3daenH noi Homep: 01/901/260, 01/901/279, 01/901/261, 01/901/280
Huskvarna, 25 HoemBpN 2015 r.

Claes Losdal, MeHHnHbP 'Pa3pa6OTKn n Pa3BnTne/ΓpaHnCKn npOdykTn'
(OTopn3npaH npeIcTaBtTeHa HUsqvarna AB n OTroBOpHk 3a TexHueeckaTa dokyMeHTaLIA.)
YcIIOBHeIe 0603HaueHnIa
PNEUYPENDEHNEIpn
HepnpaBnJIbHOM NJIH He6peXHom NCNoJIb3OBAHm MaUNHa MoJcET
6bIb onachbIM INHCTpyMeHTOM, KOtOpbIMoKHeT npuHHHTb
cepbe3HbIe NOBpeKdEHHN IIN
TpaBMy CO CmepTeJbHbIM NcXoJOM JnA NOJIb3OBATeJIa IINI JIpyrNIX.
BHHMaTeJIbHo n3yUHTe 3TO
PykoBoIcTBo Iy6eIITecb,HTo Bam noHrTHbI erO nHcTpkyuN,do HauJala NcnoJIb3OBaHn INHcTpymeHTa.
I03a6oTbTeCb, yTo6bB pa6oey 3OHe He HaxoNIOcb JIOeN HINBOTHbx.
PpeIO TBpaTnTe HnpeHaMepeHHbI 3anyck,OTcoeINHB Ka6eJb OT CBeuH 3aHHraHna.
MacIoomepHbI uyn / Maclo3aINBHa ropIOBnHa
БуICTpo
MeIeHNo
OctaHOBNTe DBNrataTeJIb.
Poc
MyfTa Hoxa
BepertecbOTcKaKnBaIOux npedMeTOB nPKoWetOB.
BHMaHHe:BpaauoIuNecpeHuIue
actn. IepKHTe pyKn n HOrn Ha
6eOanachom pacctOAHnn.
PpeynpeHHeHne:BpaauounecAuctn.ⅡepKHTe pyKn HOrn Ha6e3onacHom paccToaHIn.


JaHoe n3JeIne OTBeueAETpe6oBaHnM COOTBeTCTByIOxNINpeKtnB EC.
3MnccnIyMaBOKpyHaOuO cyepy cornaHOn DnpeKtNB Ebponeckoro Coo6eCTBa. 3MnccnMaINHb npNBeDeHa BrJaBE 'Texnueckne xapaKTepncTKN'Ha Ta6nueKe.
HnKoIa He noJIb3yIteCb MaINHO B NOMeUeHN HIN B HeNpOBeTpNBaeMbIX MecTax.B BbIXlonHbIX ra3ax coDeHHITcra OKncb yIepoDa -- 6ecuBtHi, RaOBtBu N KpaHe onaChbI ra3.
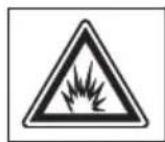
OnachocTb B3pbIbA
Topya noBepxHocTb.
BnraTeIb noCTabJIeTc863 MacJa.
IpeHHaJlOM3KcNJIyatauIN ycTpoiCTBa 3anpaBbTe ero MacJiom.
Bnrgatelb He doJIHe pa6oTaTb BHyTpni NOMEeHnI npn nIOXoB BeHTNJLALN.
Дигагел He Moжет pa60TaTb Ha TOnJIbe c MapKIpOBkoE85 (85% eTaHOLa).
3anpeaaetc Kypntb n
NCNoJb30BaTb NCTOCHNK
OTKpbITo 0rH.


IopcHHeNKe K ypoBnAm npeDynpexdEHN
CyueCTByeT Tpr npovBn npedynpeKeHneHn.
PPEyPPEKIDEHNE!

PNEyPENJDEHNE!NcnoJIb3yeTcR, KOrda Heco6IIOJeHne INHCTpyKun pyKOBoODCTBa MoKeT Co3DaTb yrpo3y npuHHeHn cepBe3HbIX TpaBM IIN cMepTN onepaTopa NII NOBpeKdEHN HaxOJaUeOcR pAnOM IMUeCTBa.
BAHHO!
BAJH0!IcnoJIb3ayetc, KOrda HecO6JIIOJeHne INHcTpyKUpyKOBoDCTBa MoHeT co3DaTb yRpo3y npuHHeHnra TpaBM onepaTopy nIN noBpeHdEHNr HaxoJaIeOc prdOM mMyuecTba.
BHIMAHHE!
BHIMAHHE!IcnoJIb3yeTcra,KOrda Heco6JIIODeHne IHCTpyKcIpyKOBoIDCTBa MoHeT CO3JaTb yrpo3y NOBpeHJdeHn MaTePnaJIOB NJI MaINHbl.
ПЕЗ entalя
CoeepHaHne YBaHaembI nokynaTeIb!
IORCHEHNE CIMBOJIOB
YcNoBbIe 06o3HaueHn.. 390
PoncHHeNk ypoBnM npeDynpexdEHH ... 391
PPE3EHTAUZ
CopeHHne 392
YBaHaembl nokyntb! 392
PPE3EHTAUH
UToecTbTuToHara3oHokocnIke? 393
PPE3EHTAUH
UToecTbTuToHara3oHokocnIke? 394
CPEICTBA3AUHTbMAHINHb
O6uine cBeJeHn 395
C6OPKA IN HACTPOIKN
O6uHe cBeHnI 396
Pylb 396
Bbicota cTpHHKn 398
C6opHnK 398
HacaKaIJa MyJbUropoBaHnra 399
3aHnBbIbPoc 399
ПРавиJAOBPAUSEHINCTOJIINBOM
06nncBeHn 400
ToJIInBo 400
3a npaBka TOnJIbOM 400
TpaHcnpTpOvBa n xpaHeHne 400
3KCNJYATAUIN
CpeIcTBA 3aunTb onepaTopa 401
06uHmeMepb6e3oNaChocTN 401
OchOBHbI npHcInbI pa6oTb 403
TpaHcnopTnpoBkA IN xpaHeHne 403
3anyckIOCTaHOBKa 403
TEXHINCHECKOE OBCJYKBAHNE
O6uHe cBeHnra 405
TpaΦNK TexHnuecko 06cJnyHnBaHn 405
O6ua npoBepka 405
Cbeua 3aHnraHn 407
Perynilopbka npnBoDHoro pemHna 407
Bo3nyuHbI ΦnIbTp 407
3aMeHa MacJa 408
TOnJIbHaJa CnCTema 408
PerylnopBka opraHOB ynpaBJeHn 408
TEXHNUECKNE DAHHbIE
TexHnueckne daHHbIe 409
DEKJAPAUH COOTBETCTBNA EC 410
Mblno3paBJaem Bac c Bb6opom HnHcTpymeHa Husqvarna!ΦnpMa Husqvarna 6epet CBoe hauaLo B 1689 roy, kOrda KopoJb KapI XI nocTaHOBNi co3dA Tb fo no IroTOBLeHNIO MyKeToB Ha 6epery peKn Huskvarna. MecTo oKOIo peKn Huskvarna 6blno pa3ymhblm Bb6opor, Ta KaK 3HeprNra TeueHn BObl NCNoJIb3OBAJnacB B npOn3BODCTBe.B TeueHne 60Jee 300 JET cyueCTBOBaHn fo a6pkn Husqvarna Ha He npOn3BOAnIOCb MHoHeCTBO pa3NJuHbIX N3JeLIn, HaunHnO T KaMHOB IN DO COBpeMeHHbIX KxOHbIX MaUNH, WBeHbX MaUNHOK, BeLOncnEDoB, MoTOUKNIOB nT.D.B 1956 rody 6blNa BblNyueHa nepBaJ 6EH3OMOTOpHnra ra3OHokocnla, nocJe yero B 1959 rody 6blNa BblNyueHa nepBaJ MOTOPHa NiHa. B 3ToI o6Lnactn npOn3BODCTBa DeTeJIbHoCTb Husqvarna ocUeCTBJIaTeTc n ceoDNHa.
CeroHn Husqvarna YBJIeTcOdHm N3 BeDyux B MInpe npOn3BOJNTeJeN 3DeJIIN DJIa JecHbIX n caoBix pa6oT cAmoro BbICOKOr KaueCTBa N MoohocTN. CeJIb 6n3Heca 3akIouaeTcB TOM, TTo6b pa3pa6aTBaTB, npOn3BOJNTb N pacnpocTpaHbHa pblHKe N3DeJIIN C MOTOpHbIM npNoBOJOM IJIpa6oTb B Jecy N B caNy, a TaKHe B CTpOnTeJIbCTBe N B npOMblJeHHom KOMJIeKce. Phpma Husqvarna TaKHe CTpeMntc 6bTb BnepeDN B 3rHOHmKe, yDo6CTBe NOJIb3OBaHN, 6eONacHocTN N eKOJIoRNI, N no 3ToN npUHyNE 6blIO pa3pa6oTaHO MHOro pa3JIuHbIX fYHKUIN, KOtOpBie yLyUshaOT npOdyKUIO B 3Tnx O6laCTAx. Mb y6eJeHb B TOM, qTO Bbl No DocToHcTBy oUeHnTE KaueCTBO HaWeRO N3DeJIIN MMOHOCTB N OCTaHeTecb DOBOJbHbIM NM Ha npOTJHeHN IJIteJIbHorO BpemEH. Ppno6peTeHne KaKOrIb60 n3 HaNX n3DeJIIN, daET Bam DoCTyn K npOeCCNOHaJIbHOI NOMOUI no erpMeHTy N 06cLyuHnBaHIO, ecNJ B 3Tom BCE-TaKN Bo3NHKnHET Heo6xoJIMocTb. EcNJ MaunHa 6blJa npNo6peTeHa He B OdnHom n3 HaNX CneUaNlHiNpOBaHHx MaarAHOB, y3HaIeB 6JIiKaIWeE cepBnCHOH MaTePckOn.
Haedeemc, yTo Bb ocTaHeTecb DOBohB BaWei MaunHO, n 6To OHa 6yDet BaWIM cnyTHKOM Ha DoJIROe BpEMr. POMHnTe o TOM, yTo HAcTOJUeepyKOBOIDCTBO ABLJeTCaEHNBIM DOKUMeHTOM. BInNoJIHr Tpe6oBaHNr INCTpyKuIN (noIb3OBAHne, cepBnc, o6ClyKHBaHne n T..), Bb 3NaHTeJIbHO npOJaNTE cPOK CLyKbMaunHbI N noDnHMnTe ee BTOpNHyIO cTOnMocTb. KOrDa Bbl 6yTe npOdaBaTb BaWy MaunHy, He 3a6yDbTe nepeDaTb INCTpyKUIO HOBOMy BlaJeMbU.
Cnacn6o 3a To, yTo Bb noJb3yeTecb HcTpymeHtom Husqvarna!
Husqvarna AB nocToHHo pa6oTaet Ha, da3pa60TkOcBOnx H3deJInn no3ToMy octabJIaET 3a co60n npABo HA BHeCeHne n3MeHeHn B fOpMy n BHeUHn BNd 6e3 npDeBapuTeNbHbIX npEduynpeKJeHn.
ПЕЗ entaцья
LC 451S
LC 451V
UTo eCTb UTo Ha rα3oHOKOJIke?
1PykoTka TopMo3a DnurataJIa
2Cko6a npNBoJa
3PykaCTapTepa
4 C 6 o p H n K
5 Pyuar 6JIOKIpOBKn IJIa peryIINpOBKn BbICOTbI pyKOaTkn
6 Pbyar peryunopBKn BbcoTb KoJeHnA
7 Pekyuaa deka
83aJIbBaHnToJnBa
9 Bo3nyHbI ΦnJIbTp
10 Cbea 3aHnHaHn
11IywnTeJIb
12 MaclonomepHbI uyn / maclo3aINBnaI roPIOBnHa
13 3aHnH nITOK
14 OrpaHnHTeIb nepeKJIouaTeJia cKopocTn (LC 451V)
15PykoBooCTBO no 3KcnLyatauN
PPE3EHTAUZ
LC 551VBP
LC 551SP
UTo eCTb UTo Ha rα3OHOKOCNIke?
13aHHMHoH pbyar HoHa (LC 551VBP)
2OrpaHnUHTeJIbpyuKn(LC551VBP)
3Pyka cTapTepa
4 C 6 o p H n K
5 Pyuhar 6JIOKIpOBKn IJIa peryIINpOBKn BbICOTbI pyKOaTKN
6 PyuarperynupOBN BICOTkoeHnA
7 MacJomepHbI uyn / macJIO3aINBHa rOpJIOBnHa
8 Pechyuaia nka
9 Cbeua 3aHnraHn
10 Bo3nyuHbI ΦnIbTp
11 3aJIbAHH TOnJIbA
12 UnpaBJIeHne ra30M/cKOpocTbIO (LC 551VBP)
13 Cko6a npnBoda
14PykoTka TopMo3a DnBraTeJIa(LC 551SP)
15 Kypok raza (LC 551SP)
16PykoBoDCTBO no 3KcnIyatau
06uie cBeHnIa
B daHOM pa3eJe paccMaTpnaOTcra pa3nHybI 3aHTbI npncnoc6JeHMaunHbI,IX pa6oTa, IN npBeHebl OCHOBHe IpnHcUInbI npabNu, KOToBle Heo6xOIMo co6JIOdaTb dJIy o6ecneHn6e3onacHou pa6oTbI.

PNEyPENEHNE! HNKOrJa He NOJb3yITeCb MaunHOc DeΦeKTHbIMN əJIeMeHTaMn 3aunTb. EcIn B pe3yJIbTaTe 3TNx npOBepOK 6yDyT o6HApYHeHb HeNCpABHoCTN, HeMeJLeHHO BblOBeNTe CneUaJIncTa dJIpeMOHTa.
HnkOrda He MoNnHnPyuTe MaunHy HacToIbKO, UTo6bI ee KOHCTpyKcna 6oJIbWe He COOTBeTCTBOBaJa opINHaJIbHOMy IcNOJIHeHIO, N He OcyueCTBnIe ee EKnIyTaUIO, ecIn BblNoOzpeBaete, UTo OHa 6bla MoNnHnPoBaHa DpyrIM JnC0M. PpeDoTBpaTnTe HnpeDHaMepeHHb3anyck, OTCoeDNHB Ka6eJIb OT CBeu3aKnRaHn.
PechyzaЯ deka
KpbIkaДЯн HoHcHpea3pa6oTaHaДJI CHINHEHNA Bn6paCUNu yMeHbSeHnPaSCKa noJyHeHnNope3OB.
PpOBeRpapeNyuueIeKn
- Y6eIITecb,чTo peHyuaJa DeKa He HMeeT NOBpeHHdeHn I TaKnx BnIMbIX DeΦeKTOB,KaK TpeuHbIBepxHe 3aunTHoN KpbIiKe peKyuSeI deKn.
PykoTka TopMo3a DnVraTeJIa
LC 451S, LC 551SP, 451V
TopMo3 DBnRaTeJIpyeHa3HaueHДJIocTaHOBKn DBnRaTeJIpycNcYcKe pyKoRTKTOpMo3a DBnRaTeJIb OcTaHaBJIbAeTcJ.
HnKorda He BkIouaTe MaunHy:
- EcInn Bbl npJInn TOnJIINBO nIIMOTOpHoe MOTOpHoe MacNo Ha MaunHy. Bbltpnte npoJIInTOe TOJIINBO nIIMacNo I daITe ocTaTKaM ToJIINBa HcnapNTbcra.
- EcJN Bbl npOJIIN TOnJIINBO Ha ce6y IIN CBOO OeHJy, CMeHInTe OJeKJy. NOMoIte Te YacTn TeJa, KOToPbIe 6blN B KOHTaKTe C TOnJIINBOM. NoJIb3yITecbMbIOM IN BOIOI.
- EcIHa MaunHe npOnCxOuNT yTeUka TonJIbBa. PeryIaRHO npoBepaTe KpbIuKy TonJIuBHorO 6aka nIuaHn Ha npedMeT npoTeKaHn.
TpaHcnpTnpoBka n xpaHeHne
CJIeIyET XpaHnTb N TpaHCnpTIpOBA Tb MaunHy N ToJIInBO TaKIM O6pa3OM, YTo6bl He 6blno pncKa KOHTa KTA NOITeKOB ININ napOB c NCKpAMN INO TKeBtBM ORHeM, HApPIMep, y 3JIeKTpoMaunH, 3JIeKTpoDBnraTeJeN, 3JIeKTpuYecknx IN CnIOBbX NepeKJIIOuTaTeJeN/ HarpeBaTeJeN KOITNoB.
ToJIbBO BcerIa cJIeIyET XpaHITb I TpaHCnOpTIpOBaTb B CneIuaJIbHbIX eMKocTJX, npEHa3HaueHHbIX JJIa 3ToJ UeJI.
ДиTeJIbHoe xpaHeHne
- Ipeed Tem, KaHanpaBnTb ycTpoiCTBO HaДЛNTeJIbHoe xpaHeHne, cIeDyET onopoHHHTb TOnJIHBHbI 6ak. BBycHITe Ha MeCTHoH 6eH3O3aPbAOuHoi CTaHcUN, KyaBa Bbl MoJTe CJIHTb OTPa6OTabWee TOnJIIBO.
CpeicTba 3aunTbI onepaTopa
Bo Bpempa60Tb C MaunHOB bI DOJHHb IcnoJIb3OBA Tb CneuaJIbHbIe Oo6peHHbIe cpeCTBa 3aunTbI. CpeIcTba JnHOn 3aunTbI He MoYr NOLHOICKIIIOHTb PnCK NOJyEHN TpaBM, HO npn HecuactHom CJUyae OHN CHINKAOT TJeecTb TpaBM. ObpaauTeCb 3a NOMOUsK K dInlepy npn noD6ope cpeCTB 3aunTbI.
Bcerda nCnoJb3yIe:
- EcIy ypoBeHb Wyma npBbICNT 85 neu6eJI, nCnoJIb3yIte HayuHnKn.
- YcToHnBaI HecKoJIb3Jaa O6yBb.
-Почные Длинные 6рк. He Hocnte yKpaшеня, WopTb IJI NaHdaJIN, He XOДNTe 6ocNKOM.
-Пи Heo6xOIMocTn noJIb3yTecb 3aIHTbIMN nepuATKaMn, HapnpMeP npMoHTIpOBaHIn, ocMoTpe NIN YncTKe peKyuJero 06OpuyIOBaHna.
O6uIe mepb6e3oNaChocTn
B 3ToM pa3Jepe paccMaTpnaTcra OCHOBHbIe npaBnla 6e3oNaChocTu npna pa6oTe c MaunHOJ. OHaKo DaHHa INHΦOpMaLr HNKOrJa He MoKeT 3aMeHHTb noDrTOBKn I npaKTNuEcKO rOnbTa npoΦecCnoHaJIbHOrO noJIb3OBaTeJIa.
BHHMaTeIbHo I3yUHTe 3To PyKoBOIcTBo I y6eIITecb, YTO Bam NoHrTHbI eR O HnCtpyKuIN, Do Haçaλa NcNoJIb3OBAHnI INCtpyMeHTa.
-ПOMHHTe O TOM,чTo onepaTop Hecet OTBETCTBeHHOCTb 3a BO3MOHhbIe HeCcuACTHbIe CJIyauN IIN aBapuN, KOToPbIe CTaJIN npuHOn TpaBM INI NOPuN IMUseCTBa dpyrNX IIOJeN.
MaHHy Heo6xOIMo CoepHaTb B YnCTOTe. 3HaKn Hn KaJIeKN DoJIHHbI 6bTb XopoWu BNHbl.
Bcerda pykoBooCTByntecb 3npabIM CMBICJOM
HeB03MOHHo npeBnDteBt Bce CNTyaCIN, KOToPbIE MOryT Bo3HKnHyTb nepei Bamn. Heo6xOIMMo co6IIOaTb octOpOHocTb npyKoBOJCTBOBaTbc 3IpaBBm cMbICJOM. EcJI N Bk KaKo-JIu6o cHTyaUIn NouyBCTByeTe ce6r HeyBepenHO, 6paTntecb 3a COBeTom K cneuaJIncTy. Cnpocnte BaWeero DInlepa, cnpocnte COBeTa B cNeuaJIIn3nPoBAHHo MaTepckCo INy OnbTHoro noJb30BaTeJr. N36eaiTe
NcnoJIb3OBAHnI,ДЛЯ KOTOPOROBi He CHTaTe ce6JIOCTaTOUHO noIroTObJIeHHbIM!

IPEyIPEHJEHNE!BoBpeMa6oTbI yctpoiCTBOco3daeT 3JIeKTPomarHHTHOneNoJe.B onpeJeHHbIXo6cToaTeJIbCTBax3TO NOJeMOKeTco3JaBaTaBnomExnIJIaNaccNBbIXnAKTINBbIXMeDInCnHCKNX NmIIaHTaTOB.Bo n36eHaHHe pncKa cepbe3HOHNcMePteJbHOITpaBMblIuCaM C MeDInCHKIMN NmIIaHTaTMPeKOMeHNdyeTCr npOKOHcyJIbTIPOBaTbcraBpaQOM IN3rOToBHTeJEMmIIaHTaTa,npexHe qem npicTuNaTB KkCnLyatauIN DaHHoro ycTpoiCTBa.

IPEJUYPENHEHNE!Ipn
He npaBnblbHom nIe He6peHHOM
NcnoJIb30BaHN MaUNHa MoHeT 6bITb
OanacHbIM INcTpymeHTOM, KOtOpbI
MOHeT npuHHTb cepbe3HbIe
NoBpeXdEHNr IIN TpaBMyc
CMePTeJIbHbIM NcxoDm IJI
IOJIb30BaTeJIr IIN dJIa Dpynx.
3anpeaaetcanyckaTbK ynpabLeHnIO nIpeMoHTy MaHHbI DeTeN IIN B3pocJIbIX, He IMeOuX COOTBeTCTByUoEe NOIroTOBKn.
HaHHyo MaunHy 3anpeeHo
HCNoJIb3OBA Tb JIuCaM C Hn3NuEcKIMN
JINy UMCTBeHHbIMn HApUWeHNrMA, JIN
JIuam, He cnoc6hBm YnpaBnTb
DaHHoMaunHO No CoCToAHNO
3DopOBb. 3KnJyaTaLnaMaUNHbI
DaHHbIMN JIuaMn pa3peWaeTcR
TOJIbKO NO npncMoTpOM JIuC,
OTBETCTBeHHbIX 3a INx 6e3OnacHOCTb.
He donyckaITe K noJIb3OBAHIO MaunHOJ nocToPOHHIX JNU, He y6eINBwncb B Haayane B TOM, YTO OHn NOHJIN COepKaHHe NHCTpyKUHN.
Hnkorda He pa6oTaTe c MaunHo, ecn Bby yctaIn, BblnnI aJkoRoIb, nI npHmaeTe JeKapcTbA, KOtOpBHe MOry OKa3bIBaTb BnIaHne Ha 3peHne, peakuIO nn KoopDnHaUIO.

IPEyIPEJDEHNE!BHeceHne
Hepa3peeHHbIX N3MeHeHNI/INn
NcNoJIb3OBAHHe HepeKOMeHIOBaHHbIX
npncnoc6JIeHNI MoKeT npNBecTN K
cepbe3HO TpaBMe IINn DaKe K
CmepTeJbHomY NcXoNy IJa
NOJIb3OBATeJIr INn dpyrnx JInu. Hn npN
KaKNX 06CToA TeJIbCTBax He
DOnyckaETcBHeCEHne N3MeHeHNI B
NepBOHaayJIbHyIO KOHCTpyKUIO
MaunHb 6e3 pa3peHnI
N3rTOBHTeJI.
HnkOrda He MoNnHcnpyTe MaunHy HactoIbKO, Yo6bI ee KOHcTpkyKUra 6oJIbWe He COOTBeTCTBOBaJa opnHaJIbHOMy NcNoJHHeHIO, N He OcyueCTBIAe Te ee KcNlyaTaUIO, ecN BblnoO3peBaete, yTo OHa 6bla MoNnHcnpoBaHa DpyrIM JInCtOM.
HnKorda He nCnoB3yIte deEeKTHyU MaunHy. IpOBoOnTe peryJraPbHe ocMoTpbI, yXoN o6cLyHHBaHne B COOTBeTcTBm C daHHbM pyKOBoODcTBOM. HeKoTopbIe onepaLNo yXoNy I 06cLyHHBaHIO BbINOJIHrJOc TOLbKO noDroOBoHEHHBMn cneLnaJIncTaMn.
Iolb3yI TeCb ToIbKO opINHaJIbHbIMN 3aIyactMn.
Bezonachoctb pa6oeryo mecta
-Перд Началов pa60ть Heo6хоДиMo yДаЛNTb cуacTKa BeTKN, KaMHи T.Д.
MaHnHa MoKeT Bb6paCbIBaTb HApyHy nOcTopoHHne npeiMeTb, OKa3aBWeecr noI HoKaMn, YTO MoKeT CTaTb npuHOn TpaBM IJIIOBpeKdEHNr NMyeCTBa. He IcNoJIb3yIte MaINHy, ecJI rAOM HaXoJrTcJIIOI INI JN HVBOTHe.
HnKOrJa He nCnoJIb3yIte MaunHy npn He6JarOpnpyTHbIX noROdHbIX ycIOBnX, HApNIMep B TymaH,doKDb, pNcNlJBHom BeTpe, Ha cblbix yacTKax, pNn Hn3KNx TeMnepaTypax Bo3dyxa, pncKe ydapa MoJHmN I T.Д. 3KcnLyatauMaHnbl npn nloXoJ noOde yTomTeJIbHa nMOHeT npNBecTu K BO3NHKnHOBeHIno onachbIX cnTyalu, HApNIMep, n3-3a CkOJIb3Knx nobepxHocTei.
- PpOBePbTe, UTo6bI nO6JIIN3OCTn He 6blIO HnUeTo TaKOrO, UTo MoJHET NOBJIaTb Ha BaUy pa6OTo c MaunHOH.
- Pn pa6oTe c MaunHoi 06paauaIte BHNMaHHe KaOpHn, BeTKN, KaMHN, RaMbI, KaHaBBn npOuHne npenTcTBn. B BbICoKoTpaBe npenTcTBnMOryT 6bITb He3aMeTHbl.
- CkaunBaHne TpaBbHa cKIOHax MoHeT 6bITb onacbIM. He nCnoJb3yIe Ra3OHOKocNky Ha oueh Kpytbix CKloHax. HeIb3a NOJb30BaTbcra3OHOKocNkoHnOBepxHocTEx C yKIOHOM, npEByiAiooM 15 rpaDycob.
Ha cKJHOHax nyTb cIeJeYET npOKJaIbIiBaTb noI npAIMbIM yrJLOM K cKJIOHy. Iopa3do Jerepe pa6oTaTb nonepek cKJIOHa, Yem noDHMmaCb IN onyCKaIcB no cKJIOHy.
-Пи npi6JIHHeHnK 3aKpbITbIM NOBopoTaM nIIN o6BeKTam, KOTOpbIE MoYr 3aTpydNHaTb 063Op, cJeNyET 6blb Oco6eHHo OCTopoHHbIM.
TexHnka 6e3oNaChOCTN
- Ra3oHokocnJa npeHa3HaueHa NCKJIOUHTeJIbHOДЛKoSeHnRA3oHa. 3anpeuaeTcIcNoJIb3OBA TbMaSHHy He nO Ha3HaueHIO.
-ПоьзуТecb cpeДТВam ИнДИВДУаЛьНо 3auntb.См.раздeЛ 'CpeДТВа 3auntbI noJb3OBAteJI'
Hikorda He 3anyckaTe ra3oHoKocnky c oTcyTcTByUIMN NIN HeKoppeKTHO ycTaHOBJIeHHbIM KOHyXaMNI IN HeKoppeKTHO ycTaHOBJIeHHbIM HOJOM. B npOTNBOM cJyuae HOH MOHeT HaHeCTN TpaBMy.
- Y6eHITb, UTo B HOxH He nonaJIn nocTopoHHne npEIMTebl, HApnpMep, KaMHN, KopHN T.d. 3To MoHeT 3aTyHtB HOxH N npNBecTn K NCKpNBLeHnO BaJa. Ppi crn6aHn Ocn HapyuaeTc8 6aJaHCnPOBka u yBeJIuHBAeTc8 ypoBeHb BV6paUIN, UTo MOHeT npNBecTn K CHNXeHIO HaJeXHoCTN KpePEna DeTaJIeR Ra3OHOKOcNJK.
3anpeaaetcHa npoDoJIHHTeJIbHoe BpeM 3aKpenJIb pyUkY TopMo3a npn pa6oTaIOeMaunHe.
- Pn3anycke ra3oHOKocnJa doJHKha 6bITb pa3MeueHa Ha poBHO rOpN3oHTaJIbHOI noBepxHocTn. IpOBepbTe, uTo6b HOH He npuWeB cOpNKOCHOBeHe C rpyHTOM nJI KAKIM-JIn6o npEdMeTOM.
- Pn pa6oTe c MaunHoi cJeDyET Bcerda HaxoINTbcra 3aAn. PnBbIOJHeHN pa6oT BCE KOleca DOnHHb HaxoINTbcra Ha 3eMne. PyKoTky cJeDyEt depHaTb o6eIMn pyKaAMn. He np6JIHHaIte pyKn JIn Horn K BpaauOuMc4 ppe3am.
- HeJIb3a HAKJIoHrTb MaunHy npn pa6oTaioeM DBnraTeJe.
-БудьTe oc6oВнIMaTeJbHbI npi nepeДВиЖeHn Ra3OHoKOCuIKN B CBOO cToPOHy.
HnKoIa He noHmMaITe Hn He nepeHocITe ra30HoKocNkpy npnaPaoUeM DnRaTeJe. TTo6bNoHNrTa30HoKocNkky,ocTaHOBnTe
IbIraTeJIb NOTCOeINHHTe Ka6eJIb OT CBeuN 3aHHraHn.
- He noictpnraTe raoH Bo BpeM yBnHexHnB o6paTHOM HanpaBneHN.
-Пи поемеши noучаску, He
ндлжшему Кошени, Heo6хоДимо
octahabnBaTb DBnraTeJB. Hanpimep, пи
пемеши no ГраиньIM ДорokКam,
KaMHЯМ, raJIbKe, acФальТу И.T.D.
He 6eraTe c pa6oTaOeIra3oHOKoJIkoJ.
Pn pa6oTe c ra3oHOKoJIKO BceIa XoJNTe MeJeHHo.
- OTKJIouHTeДВIraTeJIb,прЕдeЧEMИЗМЕHINTБ ВсOTу cKaшИВaHЯ.нИКOrДа He BыЮЛHЯITe peRyIIpOBkU npi pa6ToaIoSeM dVBraTeJIe.
He ocTaBnIeMaunHy c pa6oTuOuIM DnRaTeJeM 6e3 npncMoTpa. BbKJIouHt e DnRaTeJb. Heo6xoDmO y6eIHTbc8, qTO HOX OCTaHOBUNCra.
- EcIIN nonaTeT noCToPOHHN npEIMeT, IJI IN npi cnIbHO Bn6paUN, HeMeIJIeHNO ocTaHOBInTe MaunHy. CHIMITE cBeUHO Ka6eJIb co CBeuN. PpOBepbTe HeT JI NaMaUNHe NOBpeHDeHN. PpN HAIChN NOBpeHDeHN, ycTpAHNTe nx.
OchOBHbIe npnHcInbI pa60TbI
-Дя onTmajbHoro pe3yIbTaTa cNeIyET NcnoJIb3OBA Tb ocTpoe Ne3BHe. 3aTyINBWeecn Ne3BHe 6yJeT cTpnuH HepoBHO, IN MeCTe cpe3a TpaBa 6yJeT HeJIrTeTb.
- He ckaaBaiTe 60Jee 1/3 BceiДIINHbI TpaBbl. 3TO Kacaetc, B nepByo OuepeDb, 3acyuNIBOro BpemeHrOda. BbIOJIHnTe nepBoe cKaaBHaHne Ha 60JIbWei BbcOte. 3aTeM npOBepbTe pezylbTaT i CKocNIte TpaBy Do Heo6xoDMOrO ypoBn. EcIn TpaBa BbcOka, nepeDnRaIte Ra30HOKocNkUy MeIJIeHNO I, npn Heo6xOIMOCtN, nCNoJIb3yIte ra30HOKocNkUy DBA pa3a.
- EcJIb BvI XOTITe N36EHaTb 06pa3OBAHnna NoIoc Ha BaWeM rA3OHe, HyKHO KaHDbI pa3 cTpNUp erO B pa3HbIX HanpaBJIeHNx.
TpaHcnpTnpOBka n xpaHeHne
HaJeHHo 3aKpeNJIte o6OpyIOBaHne Bo BpEmr TpaHCnOpTIpOBKn BO n36eKaHne NOBpeHKeHnI HecuactThbIX cJyAaeB.
XpaHnTe 60bpyOBAHHe B3aKpbBaemHa 3amOK NOMEeHn, He IocTynHom IJIa ITei N NOcTopoHHx.
XpaHnTe HnCtpymeHT BCyXOM TcNlOM NOMeHIN.
- PeKOMeHdauCn no TpaHcnpTIpOBKe n XpaHeHnIO ToNlNbA npBBeJeHbI B pa3JeIe 'IpaBnla o6paueHnra c ToNlNBom'.
3anyck n ocTaHOBka
Ipeid Haayalom pa6oTbI

IPEyIPEXJEHNE! BnMaTeJIbHo
N3yUHe Te 3To PyKoBOcTBo N
y6eIITecb, YTO Bam noHrTHbI erO
INCTpyKuNN, Do NaHaJa
INcNoJIb30BaHnI INCTpyMeHTa.
NoIb3yTecb cpeCTBaMn HINIBNUYaJIbHOJ 3aUNTbl.CM.pa3JeI 'CpeIcTBa 3auNTbl noJIb3OBAteJl'.
- P03a6oTbTecb, yTo6bI B pa6oey 3OHe HaxoOnIOcB JIODeN XINBOTHbIX.
- BbINOJIHЯIe eHeIeHBoe 06cLyHHBaHne. CM. yKa3aHnB pa3JeJe "TexHueckoe 06cLyHHBaHne".
- y6eIntecb B KoppeKTHoCTn noDKJIIOUeHna Ka6eJRA CBeYe 3aHHraHna.
3anyck
LC 451S, LC 451V
-Пи зауcke ДВИгаTeЯ пинмпe pyKoяТКу TopMo3a DBИгaTeЯ KpyKoяТКe.
BcTaTb3aMaunHoi.
B3aTbC3a pyky cTape, npaBoi pykoI MeJenHNo NotaHyTb Ha ce6y Tpoc, noka He nouyBCTByeTc COnpOTnBJIeHne (ctapTeBxOHT B 3auenJeHne). Pe3KO NotaHyTb Tpoc, YTo6bl 3aBeCTn DnRrTaTeNb. HNKoRaHe NaKpyuBaYte cTapTObB uHyp BoKpyr pyKn.
LC 551SP
PnXoJIoNOM DvRaTeJIe:
- YcTaHOBnTe pbyar 3acNoHKn B noLoHeHne DpocceInpoBaHn. KoJIueCTBO o6oPoTob DBnRaTeJ, a TaKHe cKopoCt b BpaSeHn HoxKe peYnIpyeTc pyKoIra3a.
-ПиЗanyckeДВИгаTeЯ npINHmITe pyKoTky TopMo3a DBIVaTeJI KpyKoTKe.
BcTaTb 3a MaunHoi.
B3aTbCya pyky cTapTepa, npaBoi pyKoM MeIeHNoNotHyTb Ha ce6y Tpoc, noka He noCyBCTByeTc conpoTnBJIeHne (cTapTe BxOJNT B 3aUenJeHne). Pe3ko NotHyTb Tpoc, yTo6bl 3aBeCTn DnurTaTeNb. HIKoRaHe HaKpyuBaIe cTapTOBbI Whyp BoKpyr pyKn.
- YcTaHOBt b ynpaBHeHne r30M Ha "noJIhblr43".

LC 551VBP
PnXoJIOHOM DBNrTaTeJe:
- YctaHOBNTe pbUar 3acJIOHKn B noJIoXHeHne DpOcCEJIINPOBaHnI.
BcTaTb 3a MaunHoi.
B3aTbCya pyky cTape, npaBoi pykoI MeJleHNo notaHyb Ha ce6y Tpoc, noka He noCyBCTByeTc coPOTnBJIeHne (cTapTeBxOHT B 3aUeJIeHne). Pe3KO notaHyb Tpoc, YTO6bl 3aBeCTN DnurTaTeJb. HNKOrda He HAKpyuBaIte cTapToBbI shHyp BOKpyr pyKn.
- YcTaHOBnTb ynpaBHeHne ra30M Ha "noJIhBiI ra3".

Pn ropayem Dnuratene:
IcnoJb3yTe THe npOeDpy, YTo H npXoJIOHOM DnVrAteJe, Ho 6e3 NocTaHOBKn BO3dUH0 3acJOhKn B 3aKpbIToe noJIOKeHne.
PbIur BKJIoueHn npNBoDa
BpyKoTky JnAynyCa npNoa.
-ДяocTaHOBKnTOJbKO npNBoJa(HeOCTaHaBJIbBaIDBrAteJIb),OTnyCTnteToJbKOHTaHrynocTyNaTeJbHOrO DBNHHeHNA.
OctaHOBka
LC 451S, LC 451V, LC 551SP
- OctaHOBIne IbIraTeJIb, OTnycTINB pyKoTky TopMo3a IbIraTeJIa.
LC 551VBP
IpebeNTe 3acNoHky B noJIOKeHne ocTaHOBKn

O6uie cBeHnIa

PNEUYPENHEHIE!NoIb30BaTeJIb MoJHe T BblIOJIHrTb ToJIbKO TaKHe pa6Otbl No 06cIyHHBaHHIO H cepBcCy, KOToPbIe ONIcaHbIB DaHHOM pykoBOJCTBe no pa6Ote.Bce npOue pa6Otbl DOJIHXbIBblIOJIHrTbcra ABTOPI30BAHHoMaCTepCKoN O6cJIyHHaHHIO.
IpepeBbINOJIHeHnEM npOBepOK nJTI Texo6cLyHNBaHNA BbIKJIOuayTe DBrIgatJIb.IpeOToBpaTnte HenpeHaMepeHHbI 3aynck, oTcoeINHb Ka6eJIb O T CBeuN 3aHNraHn.
Cpok cJy6bMaHbMoKeT 6bTb yKopoueH npck aBapu yBeJIuYe, ecn o6cLyHbAHne MaHbHe BblnoJHReTcnpaBnIbHbIM 06pa3oM n ecn cepBnc n/nn peMOHT He 6bln BblnoJHHebl npoecchoHaIbHo. EcIn Bam Tpe6yeTcdoNoJIHtTeJIbHaer HOpMaun, 6paTNTecb B 6JHHaWyo MacTepckyIO no 06cLyHbAHIO.
BHIMAHHE!EcHHeo6xoDnMoHaKJIOHNtB MaunHy,y6eIITecb,HTO Bo3NyUHbIΦNJbTp HaxoINTcB B BepxHeM NOLOKeHIN.
-ПользуITEcTOJbKOOpuRnHaJIbHbIMN 3aunactyMn.
TpaΦnK TexHnueckoOro 06cJyHnBaHn
B rpaΦke 06cLyJHbAHy yKa3aHo, KaKne YacTn MaINHb Tpe6yIOT TexHueckOrO 06cLyJHbAHnry, n C KaKIMN INTEPBAJIaMn OHO IOnHHo npou3BOuNTbcr. 3TN INTEPBAJIb paCCHTaHbI NCXoJa N3 eKeJHeBHoro UcNoJb30BaHnry MaINHbI, N MoTy MeHArTbcr B 3aBNCUMOCTn OT YaCTOTbl NCNoJIb3OBAHnry.
BAHHO! DoHdntecb noHNHeHn TaMepaTpyb MaunHb. Iopayee MacNo MoKeT cTaTb npuHoh OHorOB.
Ipn npoBepKe ypoBnHa Macna nocTaBbTe ra30HoKocnKy Ha poBHyIO nobepxHocTb.C nOmoBIO n3MepnteJbHOrO cTepeHHa KpbIiKe MacNo3anpaBOuHOrO OTBepCTnA N3MepeTe ypoBeHb Macna.
- ChrTb KpbIky MacJHoro 6aKa Hacyxo BItepTeB uyn.
BepHyTb uyn Ha MecTo.
-ПинзКомуpoBHe MacJa 3aJIeTe MacNo Do BepxHrO ypoBnI N3MepNTeJbHOro cTepHHa.
Pechyüee o6opuObaHne

PNEUYPENJEHNE!Pn peMoHTe peHuIero 6OpyIOBaHNA Bcerda oDeBaIte KpenKne pa6Oue nepaTKn. HoHn OueHb ocTpble n mMn Bcerda Ierko nope3aTbcra.
- PpOBeBpTe peHcyuee 6OpUdoBaHnne Ha HAnuue NoBpeKDeHn nn Tpeunn. PObpeJdeHoe peHcyuee 6OpUdoBaHnne cJeNyEt 683aTeIbHo 3aMeHHTb.
- Y6eINtB, yTO HOHN HAnEHHO yCTaHOBJIeHbI n c6aJahCnpoBaHbl.
BHIMAHHE! Nocne 3aToUKN HoHN Heo6xOdNMO c6aHaHcnpoBaTb. BaJaHcnpOBka, 3aMeHa n 3aTOUKa HOKeI DOJIHHa BbIOJHrTBcR MaCTepckOn no 06cJyKHBaHIIO.
PnCToJIKHOBeHn C npenTcTBnEM, npNBEdHM K noJOMKe, Heo6xoJIMo 3aMeHnTb NOBpeHdEHHbIe Hoxn. MaTepcKa n06cLyHbAHIO DOJIHHa ONpeJeNtB, cJeDyET JIN 3aTOUHTb HOK IJN JyUwe eO 3aMeHnTb.
Pa36opka

PNEyPENHEHNE!PpeoTbpaTnte HenpeHaMepeHHb 3anyck, OToeINHB Ka6eJb oT CBeu 3aKnraHna.
3a6IokpyTe HOH DepeBHHbIM 6pyckom. Ocna6bTe 6oT HOnHa N CHIMNTe 6oT HOnHa,
Hn Hn. Chmnte 60Jr HOHa, NOBepHyB ero npTnB YacOBn CTpeJIKN.
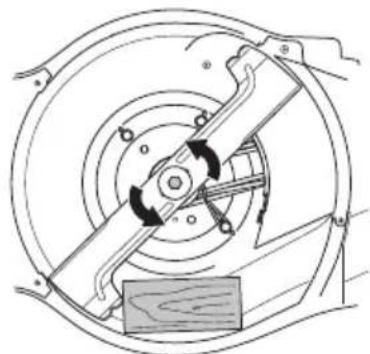
OcMoTpeTb KpenIeHHe Je3Bn Ha HAnuHne noBpeJdeHn. TaKHe Heo6xoDnMo y6eINTbcra, YTO BnHT HoHa He noBpeJdeH, a BaJI DnRgATeJIa He corHyT.
C6opka
HHeo6xOIMO yCTaHaBnBaTb TaKIM 6pa30M, YTo6bI HaxoJIeNecr noD yrIOM Kpa8 6bln 6paueHb I BBeP x no OTHoEHNIO K KpbIiKe.
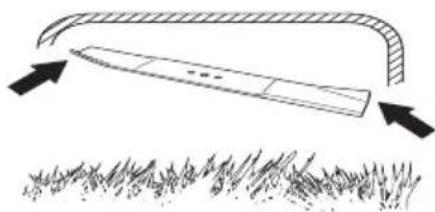
LC 451S, LC 451V, LC 551SP
-Помecтпе ренийушей устюсТВОСФпкционно мфToи HanpoTив Крштейнahpeнушero устюсТВa.У6eДNTeCb,чTopeнушee устюсТВe npabuЛьноOTцЕНТРОВАнHaBaJIe.
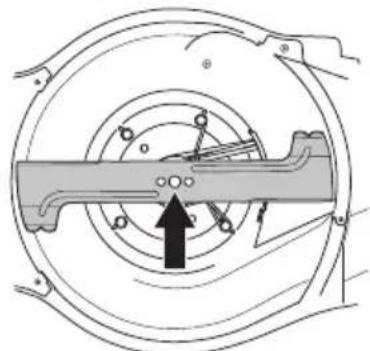
3a6IokpyTe HOH IepeBHHbIM 6pyckOM. YcTaHOBHTe Wai6y N3aTAHNTe 6oJIT, NOBepHyB
ero no yacobon cTpeJke. MomeHT 3aTAAKn 6oJtapaBEN 70 Hm.
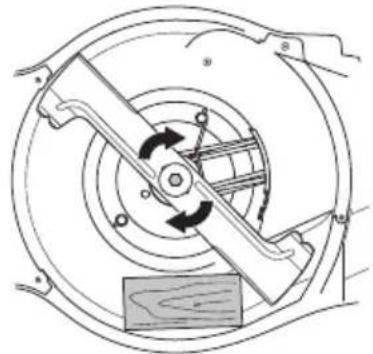
PeDyKTop He MoKeT 6bITb BKJIIOueH Ha pa6oTaioUeM ycTpOuCTBe.
TEXHnueCKNE DAHHbIE
TexHnueckne daHHbIe
(ToIbko IJIa EBponbl)
Husqvarna AB, SE 561 82 Husqvarna, IBeu, TeI.: +46 36-145600, HacToaM 3aBJIeT, YTO MoTopHbIe raOHOKocnHusqvarna LC 451S, LC 451V, LC 551SP, LC 551VBP c cepInbIMn HomepAmn 2016 roJa n daJee (roI npOnBaODCTBa cheKo yKaazHa naCnOpTHoN Ta6JIuUKe pAIDom C cepINbIM HomepOM) COOTBeTCTByIOT Tpe6OBaHnM INPEKTINBBI COBETA EC:
- oT 17 Ma8 2006 roDa, 'o MaunHax mexaH3MaX' 2006/42/EC.
ot 26 feBpaJIb 2014 roJa, "o6 3JneKtpomarHHTHO COBMecTUMocTn" 2014/30/EU.
- ot 8 Maia 2000 roda o6 3mccnn yma B Okpynaioyio cpey" 2000/14/EC.
IOnoJIHnTeJIbHaN HΦOpMaζη no ΜmccnμM υyma npnbEeHa B pa3JeIe Texnueckne xapakTepncnK.
Былncnoьзовсblcneуоиe ctaHapTbI:ISO 5395,ISO 14982
(EcHn He yKa3aHo nHaue, noDpa3yMeBaetc noCleHna ony6NkoBaHHa peKaun cTaHapTa.)
3apernctpnpoBaHHa opraHn3aun: 0404, SMP Svensk Maskinprovning AB, noTuBb nHdeKc 7035, SE-750 07 Uppsala, npedctabnla oTteb o6 ouHeKke cootBeTcTBnA corIacHo npJIoHeHIO VI K IINPEKTNBECOBETA oT 8 Ma2 2000 r. 'o6 mccnn uyma B Okpykaioyio cpey' 2000/14/EC.
CepTnФнКaТam npncBoeH Homep: 01/901/260, 01/901/279, 01/901/261, 01/901/280
Huskvarna, 25 Hóra6p8 2015 roda

Claes Losdal,ДиpeKTop oTdeJa pa3pa6ToK/CaOBA TeXnIka
(ynoHMOeHHb npeCtBaNTeIb Husqvarna AB, oTBeTcTBeHHb 3a TexHnueckyio DoKyoMeHTaIIO.)
Bn3HaueHnCmBoJiB
YBAI! BnKOpncToByeTbcS, kUO icHy e n3NK cepno3Hoi TpaBMn cMepti KopNcTyBaay, a6o 3NaHnx noKoHeHb HABKOJIuHix o6'kTtB HAcJIIOK NOPyueHHI hCTpykuJ, HabeJeHNx y CbOMy noci6Hky.
Ipepe ekcnnyaTaUicHo KyJIbTnBaTopa yBaHNo npouHTaTe Ue KepiBnTuBO Ta nepeKoHaNTEcb, 0u Bam BCE 3po3yMlNo.
CniKyuTe 3a Tm, 106 JIOuT Ta TBapHn3HaXoDnIINcra DaJIeKO BiD po6oOio 30Hn.
Для 3an6iraHЯ HeHaBMnchHOro 3anycky DnurHyHa BiD'εdHaIe npoBiD 3anaIOBaHHa BiCbiKu 3anaIOBaHHa.
BmipIOBaJIbHnIyn/OTBipJla 3aJIbAHHaONJIbN
UBNko
TobijbHo
3ynHItb DnHyH.
UToPka
3eHnEHHHOHa
OcTepiraTecpaKoWety Ta npedMetiB, 0o BiDcKaKyOTb.
Ybara: o6epTaJIbHnPi3eUb. He Ha6JIxKaITe Do HbOrO pyKu Ta HorN.
Ybara: o6epTaJIbHI yactHn. He Ha6JIHHaHTe Do HxpyKn Ta Horn.


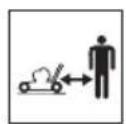
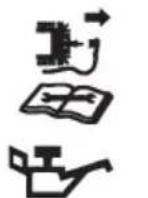


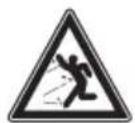
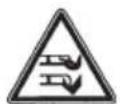
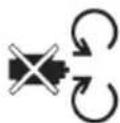
LcH Bnpi6 BiNobiJaE HaJIeHHM BmOram EC.

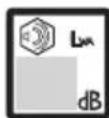
UyMoBI BIKnIy HaBKOJIuHHe cepeIOBNIe BiINOBiJaIOb HOpMaE C. TeTaNbHIuy IHOpMaIio npo UyMoBI BIKNID INCTpyMeHTy NOdaHO y po3diJI "TexHiHi DaHi" Ta Ha 6ipui.
Hikojn He KopncTytec
InctpymehTom y npmiueHHi a6o B Micx, De Hemae HaJeHXoI BeHTnlaui. Buxlonni DnMI MicTAYb MOOHCKnD ByrJIeIO, OtpyHn Ta dyHe He6e3neuHn ra3 6e3 3anaxy.
He6e3neKa Bn6yxy
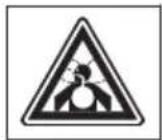
Tapya noBepxH.
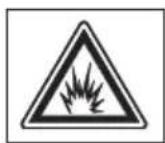
OINBa He BxOiNTb Do KOMnJIeKTy nocTaayHH.
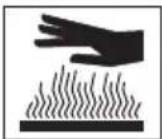
HanoBHItb oJINBOU nepe, BIKOpNCTaHHaMaunHn.

HikoJI He 3anyckaIte DnHyH y 3aKpHTnx YI nOraHO npoBiTpIOBaHNx npMiuueHHax.
Дигун He npaIOBATmE 3 naINBOM MapKn E85 (BmicTeHaHoy 85%).

BorOHB, BiKpnte noJyM'ikypiHn 3a6OpOHeHi.
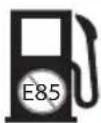

OncaHЯ piBHiB nonepeJHeHЯ
IchyOtB TpN pIBH nonepedHeHH.
YBAI!

YBAI!BnKOpncToByeTbcra,JaKIO icHype n3NK TpaBMyBaHHa KopNCTyBaay a6o NowkoJHHeHHa HABKOJIuHix 06'ekTIB BHaCJIIOK npuyehnIHcTpkykui,HaBeJeHnx y CbOMy KepiBHuNTBI.
BAHJIINBO!
BAJIINBO!BnKOpncToByeTbcra,ЯKIO icHyepnIK TpaBMyBaHHa KopncTyBaay a6o nowkoJHHeHHaBkoJHmHix 06'KTiB BHaCJIIOK npuyehnnIHCtpyKciH,HaBeJeHx y Lbomy KepiBnucTbi.
YBAR!
YBAI! BnKOpncToByeTbcra, kKIO icHye p3NK noKoJHeHH HaBKOJIuNHiX 06'EKTiB a6o npICTpOIO, BHacJIIOK nopUWeHH iHcTpkyLcii, HabeJeHx y Icbomy KepiBHNCTBI.
3mict ⅢaHOBnKOpncTyBauy,
YMOBHI N03HAUEHH
UaHOBnKOpncTyBaCy,413
PPE3EHTALI
IeTaJIra3oHokocapKn 414
PPE3EHTALI
TeTajra3oHoKocapKn 415
YCTATKOBAHNДЛЯБE3NEUHOI
POBOTNI PNUCTPOIO
3araalbHe 416
MOHTAK TAHAJI TYBAHHY
3araJIbHe 417
PyKIB'417
Bucota pi3aHH 418
TpaBo36ipHnK 419
BcTaKaIJIa MyJbUyBaHHA 419
3aHnBnucK 419
POBOTA 3 NAIINBOM
3araalbHe 420
Pablhe 420
3anpaBJIeHHnaJIINBOm 420
TpaHcnopTyBaHH Ta 36epiraHH 420
KOPNUCTYBAHH
Oco6ncTe 3axnche cnopdHeHH.421
3araIbHi npabuJa 6e3neKn 421
OchOBH npHOMn po6oTn 422
TpaHcnopTyBaHH Ta 36epiraHH 423
ПускТаВиMuKaHHЯ423
TEXHlUHE OBCJLYTOBYAHHH
3araJIbHe 425
Ipaqik npoBeHennr TexHiuHoro
06cnyroByBaHH 425
3araIbHa nepeBipka 425
Cbiuka 3anaJIeHHH 427
PeryIIOBaHH npNBIiHoro naca 427
PoiipraHnIJIbTp 427
3amHa oJINBn 427
CncTeMa naJnBa 427
BcTaBka IJIa MylbUyBaHHa - HacaIKN
PpIaIJa IJI MyJbUyBaHHa,Ke npOdaTbcra OKpeMo,IO3BoJRAE BIKOpNCToByBaTN KocapKn 3 ycTaHOBJIeHIM TpaBO36ipHnKOM IJI MaJbUyBaHHa. Io KOMnJIeKTy BxOdntb 3aIyuka IJI MyJbUyBaHHa Ta JIe30.
ПиДИМITb 3axnchy KpnKBy BInnyckHOrO OTBOpY, 06 BCtAHOBHTN/3HrTn 3arJnyKBy JnMyJbUyBaHHa.

3amHITb Jezo Ha Kom6iHoBaHe Jezo, 0BxOaNTb Do KOMnKeTy NocTauaHHa. 06IobiDaTncs6JIbWe, nIB. po3di 'Pikyu cnpaHHeHHa'.
3aHnBnynck
MaunHOo MoHHa KopnCTyBaTncs 6e3 ycTaHoBKn BCTaBKn JIy MyJbUyBaHH Ta 36ipHnKa.
PiHIMtB3aHHiIuNTOKIBNTARHTb TpaBo36ipHnK.
-3HimItb 3aIyuky IJI MyJbUyBaHHA.
3akpnte uNTOK.
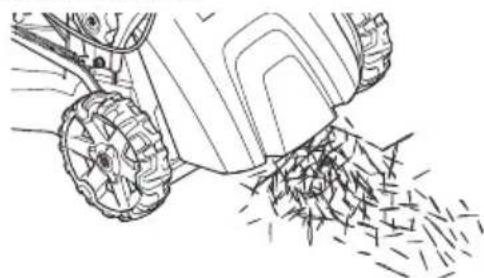
3aRaJIbHe

YBAI!Po6oTaIbUryHaB i30JIbObaHOMy nnorAoH npOBiTpOBAHOMy npMiuEHH MoKe npn3BeCTN Do CmepTi BHaCJIIOK JaDyXn OTrpyEHHa MOHOKcIDom ByrJleIO.
PajnBO Ta Ioro Bnnap JereKo 3aMauTbcra IMokyTb 3aBdaTn cepno3Hoi ukoDn npn BdxhaHHi Ta noTpanJAAHHi Ha Kipy. Tomy 6ybTe o6epeHHi npn po6oti 3 naJINBOM i nepeKoHaHTecr, 10 npmIueHHa DoCTaTHBo npoBITpOEtbcra.
BnxionHi ra3n MaOt b BnCOky TemnepaTpy i MoHcyb MicHTn icKpn, BiD kNx MOHNBe 3arOpHH. HikoJI He BMKaIe IHCtpyMeHT y npMlueHHi cn 6IJI NERKO3aIMcTnx MaTepiJIIB.
He naIbTu ngapok Ta He cTaBTe rapaunx npedMeTIB no6n3y naNBA.
PajbHe
YBA!KocapKy 06laHaHo QOTnpuTakTHIM DBNyHom.3aBKnInepeBipRNe,IO B MacJHOMy 6aCi E DocTaTHbO OJINBn.
Besh3nH
BVKOpNCToByIte Raichn6eH3nH,RAKIMCTNTb HHi CBNHeCb.
MiHimaJIbHe peKOMeHIOBaHe OKTaHOBe YnCJIo dopiBHOe 90 (YncIo RON).Pnp BnKOpNCtAHHi 6eH3nHy 3 OKTaHOBm YnCJIoM, HnHcIM 3a 90, MOHNBn TaK 3BaHn CtykIT. Lc cnpuHnRe neperpiB IbNryHa, 1O MoNe npNBecTn Do NOro cepno3HOr o NowKOdJeHHra.
-Пи можлвocTiВИКОпСТОБуЛte 6eH3иI3 Hn3bKIMpiBHeMВИКДiB ⅢKiДЛVBиxpeOВиN (Tak 3BaHn aJIknat).
TnMaJa
YBAI! Npeed 3anyckom ra3oHoKocapKn nepeBipTe piBeHb OJIINB. 3aHaTTo Hn3bKni piBeHb OJIINB MoNe CnpuHHTn cepNo3Hi NOkOJHeHHa DBInrhya.IHcTpyKciDnBiTbcraBpo3diI"TexHiue He o6clnyoByBaHHa".
MoTOpHy oJINBy noTpi6Ho Bneppe 3aMiHHTuYepe3 5 roDIn pO6OTn DBnryHa. nIB.《TexHiXapaKTePncTnKN》3aIJI peKoMeHdaIiBiHocHO TnPy BnKOpNCToBMyeMOro MaCTnJa.HikoJI He BnKOpNCToBvYTe OJINBy, npN3HaueHydJI DBoTAkTHnx DBnVHyHb.
3anpaBJIeHHaJIINBOM

YBAI!peep3anpaBHeHnM 06OB'AKOBO BIMKHiTb DBNyH i DaTe Iomy OxIoHOHTn npOTaROM KeJIbKOx XBNIuH.
3aBnBn BnKOpncToByTe KaHicTpny 6eH3nHy, 0o6 yHnKHyTN npoJIbHaHH.
Pn3a npabci BiKpyuyeKe Kpnky naIbHoro 6aky nobJIbHo,06 nocTynoBO 3MeHINTN TnCK.
BntpiTb kpnKy naJIINBHO 6aKy Ta noBepxHIO 6iIra ropIOBHN.
IicJ3a npabHeHHo6epeHHo,aJe ⅢJIbHo 3aKpHTe KpHkY.He6aIicTb MOHe npu3BecTNdo noKeHi.
IpeMeCiTiB KyIbTnBaTop npHaIMHi Ha 3 MeTpN BiD MicUa 3anpaBleHnnepeTtM, k3anyctNTuNo.
B HODHomy paazi He BMKAaTe iHCTpyMeHT:
- RaKIO Bn npOJIIN naJIbHe a6o MoTOpHc MaCTIno Ha npIcTpIi. BnTpIb IHcTpMyeHT Ta 3aueKaITe, nOKN BnnapyIObCra 3aJIuSKn naJIbHorO.
- Kaio Bn po3JIIN naJInBO Ha ce6e qn cBn oJr, nepeoJrHITbcra. BmNte YacTnH TiJa, Ha kI noTpanNIIO naJInBO.ДЯ CbOro cKOpNCaTaNTeca MIIOM Ta BOIOJ.
KIO iHcTpymeT npOnyckaI naJIINBO. Perynpno nepeBipnTe, uN KpnuKa 6aKy Ta Tpy6Kn naiNBHe cncTMemn He npOnyckaIOTb naJIInBa.
TpaHcnpTyBaHHaTa 36epirahnra
36epiraTe Ta TpaHcnOpTyIte iHcTpymeHTi naJIbBO TaK, 0o6 HabiTb y BnnaIky BnToKy naJIbBa YI NOrO BUnapIB BOHN He NoTpanJLIny KoHTaKT 3 BiIkpNTIM BORHeM Ta IckpAMN BiEJeKTPnUHIN MaunH, DBNrHyHIB, eJeKTPnUHIN xeJIe/BmIkauiv Cn 6oIInePb.
-Дя 36epiraHЯЧиpebeeHЯ naINBa KOpNCTyITeCBy BiIDNoBIHNMn EMHOCTaMn, npn3HaueHIMNДЯ TAKNX CIJIeN.
IOBROcTpoKObe 36epiraHHA
-ПиЗбepirahHiIHcTpymeHT npToTROM IOBGrO Yacy, naJIINBn6ak NOBnHeH 6yTu nopoKhim. Ioo6doBiTaTcR,de Kpaue 3JITn HaJINWok naJIINBa, 3BepHiTbcraHa MicUeBy 6eH303anpaBky.
Oco6nCTe 3axncHe cnopdHexHHa.
KoHoro pa3y npn p60Ti 3 iHCTpyMeHTOM Heo6xioHO KOpNCTyBaTncB iDIOBIHNM Ooc6nTUM 3axnCHm CnpaJHeHHM. Ooc6nTe 3axnCHe CnpaJHeHHaHE MoKe NOBHCtIO NIKBiDyBaTu He6e3neKy TpaBMYaBaHHa, aJe npn HeuacHomy BInaKnCy BOHO 3Hn3NTb Ctynih BaKkOci TpabMN. 3BepHiTbcN Do npoDaBcN no Donomory y BN6opi npaBNbHoro cnpaJHeHHa.
06OB'ЯЗКОВВДЯгАte:
JaKpO pBeH yMy nepeBnue 85 nB, BnKOpncToByntpoTnuyMoBi HaBuHNKn.
MiChi uepeBnKn a6o 060Tu 3 HeCJIN3bKOIO nIDOWBOIO.
- Lynkio BoBri wTaHn. He HndraTHe Ha cac po60TN WOpTN, caHdaJI, a TaKoX He XoDiTb 6ocOHJ.
3a Heo6xiHocTi Tpe6a HaIraTn pyKaBnuKn, HanpIKlaI niI yac ycTaHOBJeHHN, nepeBipKn a60 YIeHHN piaJIbHnx HacaDOK.
3araJIbHi npaBnla 6e3neKn
Ley po3diOnncye oChOBn npabNla 6e3neKn npKopncTyBaHHi MexaHcyHO nnkoIO. Lci HOpMauiB XoHOMy pa3i He 3amHnTb npOpeciHnx HaBuOK Ta DocBiNy.
-Перд ekcnлyaTaLciEуЛьТиВаТора yBaHnO npoHTaITe ue KepiBnUcTBo Ta nepeKoHaITeCb, lo Bam BCE 3po3yMlNo.
- Pam'YaTae, 0cme Bn, KopncTyBaay, E BiNIOBidaJIbHIM3aTe, 06IIOJNaTaIXHeMaHHe HapaHaJIncHa He6e3neKy Ta He cTpaaJIb BiD HeuacnX BnuadKIB.
CJIkyTe 3a Tm, 06n npncpti 6yB YnCTn. Yci nomiTKn Ta no3HaCKn MaOTb 6yTN qITKMM Ta po36ipJINBUMN.
3aBnKopncTyTeC8 3OpOBm Iy3DOM
HemoxnBO nepd6aHTB noci6Nky Bci cntyaui, Rki MoKyTB BVHNKHyTN iD yac BNKOpNCTaHH npncTPO.3aBKn 6yNbTe o6epeHHi Ta KepyTeCra 3doPobm rny3oM. Kaio BVHNKJa cNTyaLia, KOJIN Bn He BnEBHeHi y BnachHi 6e3neCi, 3ynHITbcr Ta 3BepHIbcr 3a nopaoIO do faxIBz. 3BepHiTcR Do Baworo dIepa, ceHTpy 6cbNyroByBaHHry DocBidiyeHOro KopNCTyBaHa. He 6epiTcR 3a BVKOHAHH po6OTn, kIOo BN He MaTe ocTaTOHOI BnEBHeHocTi!

YBAI!Пдчacpo6OTncei ihcTpymeHT cTBOpoe eJleKTPomarHiTHe noJe.Ke noJe moHe 3a Deeknx yMOB B3aE MoTNI 3akTNBHIMN YI nacNBHMMeDnUHMMiIMnlaHTaTaMn. IJIЯ 3MeHWeHHpyn3NKCy cepno3HNx a6o CmepTeJbHnx TpaBM,nepeI noaTKOM po6OTn 3 IHcTpymeHTOM MPeKOMeHnyMo Oco6am 3 MeDnUHMMiIMnlaHTaTMn npOKohcylbTyBaTncs3i CBOIM Nikapem Ta Bnpo6Hnikom MeDnUHOro IMnlaHTaTy.

YBAI! BnKOpncToByeTbcS, kKIO icHye pn3NK cepno3HOI TpaBMN uCmepti KopncTyBaHa, a6o 3NaHnx nowkoJHeHb HABKOJIuHIX 06'ekTiB BHaClIIOK npuyWeHHI hCTpykCiin, HaBeJeHNx yCbOmy Noci6HNIky.
HikoJNe HeO3BOJIaIte IITaM a6o HeniTOBJeHM JIOdAM BnKOpNCToByBaTn npncTpia 60 3diChIOBaTu NOro TexHiuHe 06cLyroByBaHHra.
IHCtpymeHT He MoHHa
BVKOpncToByBaTn 0co6am i3
o6MeKeHIMN f3NCHIMN yH
pO3yMOBIMM MOHJIINBOcTAMn a60
oc6am, kKi 3 MeJnUHNx npuHn He
npndaTHi IJy ynpaBJIHH
IHCTpyMeHTom, 6e3 HaJMy oco6n,
jKa BiINOBIJaac 3a ixHIO 6e3neKy.
3a6opohReTbcK KopncTyBaHHa LIM npncTpoem 6ydb-Komy iHwOMy 6e3 nonepeHbOi nepeBipKN po3yMiHHa 3MicTy cboRo noci6nka KopncTyBaHa.
B HODHMy pa3i He KopncTyIeTecr IHCTpyMeHTOM, Jkso Bn BTomJIeHi, BHNBaJIn cnpTHi Hanoi, npinMaTe JIKn a6o-He6yDb, 0o MoHe HeRaTINBHO BNInHyTu Ha Baw 3ip, peakio, KoopDnHaCIO pyxIBcBiOmicTb.

YBAI! BHeceHn 3MiH Yu
BnKOpncTaHHaKcEcCyapiB, He
CXBaJIeHx BInpo6HNIkOM, MoHe
npn3BeCTn Do TpaBMN KopNCTyBaHa Qn
IHnx IIODei, a6o Do CmepTeJIbHnX
HacJIiKnIB. 3a JOnHnX ObCTaBNH He
3MIHOHTe KOHCtpyKci iHCTpyMeHTy
6e3 Do3BOJy BInpo6HnKa. 3aBXdN
KopNCtynTeCn OpriHaJIbHmM
3aunactINHAM Ta npNJaNJaM.
He BHOCHTb 3MiH Do LbOro Bnpo6y Ch BNKOpNCTOBynte NOro, RaIIO BnBNTbcra, IIO Do HbOro 6yIi BHeceHi 3MiHn IHmMn Oco6amn.
HikoJNe He KopnCTyTEcHecnpaBHm
InCTpyMeHToM. DToPmYTeC
InCTpyKu3 nepeBipKn, DoIy Ta
06cLyroBaHH, 0 HaBeJeHi y
noci6NHy. DeKa 3axoNi 3 DoIy Ta
06cLyroBaHHNoBHHi
3diChIOBaTncs CneiaJIbHo
niIroTOBHeHmN faxIBzAMN.
3aBnKopntyTeo npHaJIbHIMN 3aunactnHAM Ta npnaadm.
Бezneka po6ooyi 30Hn
-Перд поаTkOM cKoшуВаннслд npi6paTи 3 ra30Hy rIKN, cykN, KaMHHToIo.
- PpeMeTn, kki BdapnoTbcra 06 piaaIbHy HacaKky, MoHytb 6yTu BiKnHyTi i 3aBdaTn NowkoJHeH JIOJaM Ta MaHy. CJIiKyuTe 3a TIm, 06 JIONi I TBapHH 3HaxoDInncr Ha DoCTaTHi BiCTaHi Bi Micu cKOswyBaHH.
3a6oponeHo BnKOpncToByBaTn IHcTpymeHt y noraHy norody, HapnkJa, niD yac TymaHy, dooY a6o y BoIornx Micx, npi CnilbHomy BiTpi, xoNoDi, pN3NKy BpaKeHH 6JInckKaBkoIO Toio. Po6oTa B noraHy norody BTomLoe, a TaKOH cTBopOe DoaTKoBy He6e3neKy, HapnkJa, cnIsbKi nobepxHi.
-ПepeKoHaITeCЯ,лоЛION,TВариHу 6yДь- 卢iHше HabkoJIO BAC He nepeWkoJHaTmE KepyBaHHIO iHCTpyMeHTOM.
- BepeHiTbcKa KopiHHa, KaMiHHa, cyKiB, JaM, KaHaB Too. IpeewkoDi MoHytb XOBaTncy BnCokin TpaBi.
CkoWyBaHHHa cxnJax MoHe 6yTN He6e3neuHm.He KopncTyItecra30HOKocapKOHO dyHe KpyTnx cxnJax. Ra30HOKocapKy He moHb BnKOpncTOByBaTu Ha cxnJax KpyTiue 15 rpaDyciB.
Ha cxnIcIipnaIOBAtN B3IOBx HbOro. Ha6araTo IerWe npaIOBaTn B3IOBx cxnJy, aHIX BrOpY-BHN3.
-БудьTe o6epeHHi,Ha6JIINHauOuHc bdo npnxoBaHnx KyTIB i npeДMeTiB,ЯKI MoHvTb 3a6IokyBaTu Bawe noJe 3opy.
Texhika 6e3nekn
-
Ra3oHokocapKy npn3HaueHo TjIbKn IJnaCKoUyBaHHra3oHiB. 3a6OpOHReTbcBnKOpncToByBaTH npncTpH He 3a npn3HaueHHm.
KopncTyIeTcOocNCTNM 3axnCHnM cnopJdHeHnM. IHcTpkyLii DnBiTbcy y po3diJIi nID 3afoJOBkOM "OcoNcTe 3axnche cnopJdHeHHa."
3a6oponeTbcraeknnyatybaTn ra30HOKocapky 6e3 npabnIbHO BCTaHOBJeHOro pi3u Ta Bcix KOhyxIB. IHaKwe p3eMuKe BiD'edHaTnci 3aBdaTN TpaBMN.
CniKyuIte,06 pi3eUb He 3auiNIAB CTOpOHnI npEiMeTn,Taki Jk KamiHnKopiHHaToio.Bid zuBo p3eUb MoKe 3aTynnTncsA,bal DnBryHa-norHyTuNCs.3irHyTa Bic cnpuHnE dnc6aJlAnc i cnJIbHy Bi6paIIO,Io npu3BOdntb Do BeNIKO rPi3NKy Bi'EDHaHHraPi3Ia.
Pyuka ralbma hikoJn He noBHHa 6ytn noctiHno 3akpinHeHa Bpyuci, KoJn iHcTpymeHT yBIMKHeHn.
-
NocTaBTe raoHokocapKy Ha TBepHy pibHy nobepxHIO BBIMKHiTb ii. IpekeHaItec, iO pi3eLb He MoNe 3aueHITn 3emJIo a60 iHwi npedMeTN.
3aBnDn cTne no3aNy IHcTpMeHtA. NiJ vacCKoUyBaHHK KOJIeCa MaOTb 3aJIiWAtncHa 3emJI, a o6NDbI pyKn Tpe6a TpIMaTn Ha pyuCi. He ha6JIiXhaiTe pyKn Ta Hor n do fpe3 0o 0eptTaIOTBcR.
He HaxnJIaIe IHCtpymeHT, KOJI IN DBIgHyH yBIMKHeHIn.
-БудьTe Oco6LInBO NnJIbHi,ЯкsoТягHeTe IHcTpymeHTdoce6e nIac po6oTu.
3a6oHЯeTbcra ndHimaTu a6o nepeHocHTn ra3oHoKocapKy 3 yBIMKHeHIM DBNyHom. JaKuo Tpe6a nHraTn raoHoKocapKy, cnoUaTKy BmKHiTb DnHy Ta BiD'EdHaTe npoBiD 3anaJIIOBaHHaBID CBIuKN 3anaJIIOBaHHa
He pyxaTe KocapKy, nepecyBaIOuHcB cnHIOBnepeI.
- Pn nepemieHHi no diJHci, kky He Tpe6a ckowyBaTu, DnBryh Tpe6a BmMkHyTu. Ce, HanpNKJaD, oopiKKn, nocuNaHi rpaBiEM, KaMiHHraIbKa, acFaJIbT Toio.
3a60pOHaTeBc8 6IITN 3 yBIMKHeHIM IHCTpyMeHTOM.3ra3oHoKocapKOIO cJIiD 3aBKn IITN KpOKOM.
BIMKHiTb DnHyH, nepH Hix 3MiHIOBaTN BnCOTy piaHHra. 3a6opOHReTbcra BVKOHyBaTN peryIIOBaHH npN BBIMKHeHOMy DnHyHi.
HikoJn He 3aJIuHaIe iHcTpMyENT 3 yBIMKHyTm DBNyHom 6e3 HargJy. BIKJIOUHTb DBNyH. NpeKeHaIteC, io piaJbHa HacaJa npnnHnla o6epTaTncr.
- Pn yapi 6ydb-akn cToPOHHi npEIMeT qn noBb Bi6paui HeaHNo 3ynHITb IHcTpMeHT. Bi'edHaIe npoBd BncoKoi HanpyrN Bi d CbiKN 3anaJIOBaHHa. IpeBipTe, uHcTpMeHT He nowkoJHeH. BiDpemOHTuTE 6ydb-Ke nowkoJHeHHa.
OchOBHi npHOMn po6OTn
3aBnBn BnKOpncToBy Te roctpe Je3o,06 OTrMaTOnTmAlbHi pe3yJbTaTn. Tyne Je3o piHe HepiHbO, I TpaBa Ha noBexHi po3pi3y KOBTie.
He ckowyte 6iNbwe 1/3 doBHHn TpaBn. Lc o6blBO BaKlnBO B cyxipepoDn.CnoaTkY Tpe6a BVKOHyBaTN cKOwYBaHH 3 BeJIkoIO BncToIO pi3aHH. NOtIM nepeBipTe pezylbTaTNI 3MeHwITb II Do noTpi6HOI BNCOTN. JkIo TpaBa DyHe DOBra, BeiTB r3OHOKocapKy noBIbHo I BVKOHaTe cKOwYBaHH nBiHi, JkIo Ce Heo6XiNo.
KociTb Ⅲopa3y B pI3Hnx HAnpMaKax, 06 Ha ra3oHi He 6yIo cmYr.
TpaHcnpTyBaHHaTa 36epirahnra
HaHIO 3aKpinitb cnpaJHHn iI qac TpaHCnopTyBaHH, 06 yNkHyTN noWKoJHeHH Ta HeuachNX BnnaKIB.
36epiraTe MexaHHy NIKy y MicLx He DoCTynHx DiTAM Ta CTOpOHIM Oco6am.
36epiraTe npncTpi Ta o6laHaHHaHnHO Hboro B cyxomy Mici npu TemnepaTypi Bnue 0 rpaDyciB.
- IhOpMaIio 36epirAHnTa TpaHCnOpTyBaHH naJbHOro MoKHa 3HaHTy y po3diJI "Po6Ota 3 NaJbHnM".
Пуск Та Вимикання
Pepen noaTko p6oToN

YBAI! Npee ekcnnyaTauiE KylbTnBaTopa yBaHNo npouHTaTe Ue KepiBnUcTBo Ta nepeKoHaTecb, 00 Bam Bce 3po3yMio.
KopncTyTecr oocntm 3axnchm cnopraHHeHHM. Ihctpykui DnBiTbcy po3di niid 3aroJIOBkoM "Oocnte 3axnche cnpraHKeHHa."
CJIkyTe 3a Tm, 06 JIOJn Ta TBapHHI 3HaxoJINcraJaNEKO BiD po6Ooi 3OHN.
3iinCHIOTe 0oHnTHexHiHn orIaI HctpyKciDnBiTbcB Bpo3diI"TexHiHne 06cLyroByBaHH".
-NepekoHaTecs, npoBid 3anaJIOBaHH npaBnIbHo 3'edHaHO 3i CbiKoTO 3anaJIOBaHH.
Nyck
LC 451S, LC 451V
- PepeKoHaTecr, 0 KoPnIbHa cKo6a Je3a He Mae noKoJHeH. TaKoN nepeBipTe, u6oT pi3u He Mae noKoJHeH, i uBn DnryHa He BnHyBc.
36upaHH
-Ne3o cIiD ycTaHOBJIIOBaTn TaK, 06 Kpa3 KyTaMn 6yJIn cnPraMoBaHi Bropy, Do KpnKn.
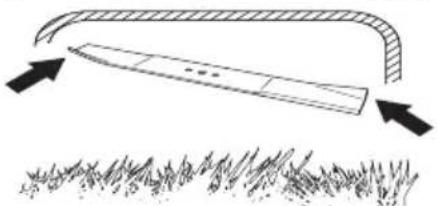
LC 451S, LC 451V, LC 551SP
- Po3TaWyIe pi3eUb i3 φρικιηHoIO wαn6oIO Ha KπiINbHΠ cKo6i pi3u. ΠepeKoHaNTEc8, ξo pi3eUb BipHO BiDuceHTpOBAHm Ha BaJI.

3a6IokyIte IINCK 3a IONOMORO IepeB'JHOro 6pycKa.IpknlaIbIb Wai6y Ta MiUHO 3aTARHITb 6oTT 3a RoINHHNKOBIO CTPIIKOIO. BoNT cJIi MlUHO 3aTARHyTI 3 acnllm 70 HOM
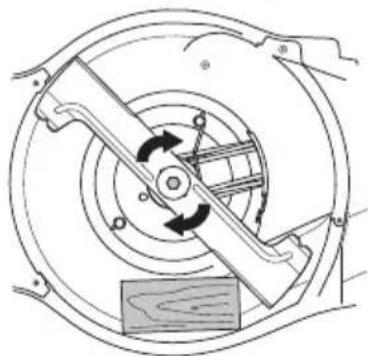
- PpokpyTitb Jezo BpyHy Ta nepekoHaHTecra, 00 BOHO 06epTaetbcra BiJbHo.
LC 551VBP
- Nomicitb Hix HaBnpoTc KcO6n KpinHeHHa. BidaeHTpyTe Hix Ha BaNy
BiIeHTpyTe HiHa BaJy
3a6IokyuTe nnck 3a donomoroOepeB'HO6pycka.
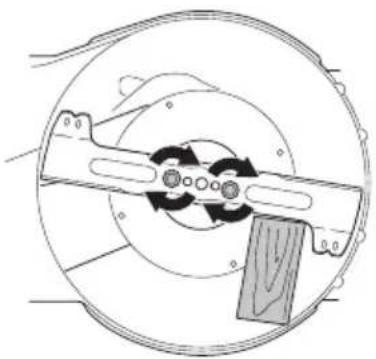
IiD yac NOBTOPO BcTaHOBHeHHaJe3a 6oJIu cIi3aTAYBaTHaMMeHTOM 50 H6M.
- 3ДисИТь TECTOBи nyck npnlaу.
BAHJIINBOI
3aBn6yIbTe 06epeHHi Ta KepuTEcra
3dOpOBIM rIy3dOm.YHnKaIte cNtYaci,aki
BHXoJrTb 3a MeHi Baunx MoJInBocTe. KaIO
nicJa O3HaioMJIeHHa 3IHCTpyKUAMN y Bac
3aIIuTaBcR cyMHIBu IooToTOR, JK
KOpNCTyBaTnc iHcTpMyeHTOM,nepeI
npOoBHeHHa Heo6XiHO npOKOHcyJByBaTncra
y cneuaicTa. 3BepHiTbcra do aBTOpn3ObaHorO
cepBicHoro ceHTpy.
3aBKn KopnCTyTecr opurHaIbHmN 3anuactnHaM.NoKnaIHiWi BiDomocTi nVB.y po3di《TexHiDiHi》.
Cbiuka 3anaJIeHHa
YBAI!3aBnKopncTytecpeKoMeHDoBaHmCbiyKaM3anaJeHHa!
BnKopncTaHHHeBiINoBIHNxCbiOc3aIaJIeHH MoKe npu3BeCTN Do NOnKOJxHHeHH npuH/ cnJIiHpy.
KIOHCTpymeHT Btpaae noTyHHicTB, noraHO npauoe Ha XOJocTomy xOdy uNoIoro BaHKo 3aBeCTn, nepeBipTe CBiUky 3anaJIeHHra nepu HIK nepeuTN Do 6yNb-RAkX iHnx dii.
KIO CbiUka 3anaJIIOBaHHa 3a6pydHeHa, nouNCTiTb ii Ta nepeBipTe npOMiHK MIn eJekTpoJaMn.
DoknaHiBiOmoCTiINb.ypo3diIi《TexHiHni DaHI》.3amHtBcbiKy3anaJIIOBAHH3a notpe6n
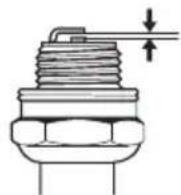
PerguHbHaHn npBvHoro naca
PnHIO imoBipHO naIHr Tary MoKe 6yTu 3HoWeHn nac. Y TaKomy BInaKy nac cIiD 3AmHHTN. 3BepHiTbcra do aBTopn3OHaHOro cepBicHOro ceHTpy.
PobitpHnIpbTp
3HIMITb KpnuKy noBtprHoro oIbtpy Ta BNTaRHiTb oIbTp.
- HeMoHJIbBO NOBHCIO ONUCTHTN NOBItpHnI bTp, AKN BIKOpNCTOByBaBCy npOTaROM DoBrOro Yacy. Tomy Yac BiD Yacy NOro CnId 3amHOBaTn.IoWkoJHeHn IJIbTp o6OB'raKOBo nOTpi6HO 3AmIHNTn.
- Pn noBToP Homy 36npaHHi cJIiKyI Te, 0o6 fiNbTp iJbHo cIB Ha TpMau fIbTpY.
HomepncepTuKaTIB:01/901/260,01/901/279,01/901/261,01/901/280
TycKBapHa, 25 lacToana 2015 poky.

Klaec IocdaI (Claes Losdal), DnpekTop BiDiiny po3po60K / CaoBaTexHika
(YnoBHOBaHexHn npedctabHnK KomnaHii Husqvarna AB, 0o BiDnobiJa3a TexHiHy doKymeHTaIIO).
HHHEHΓHΣYMBOΛΩN
Hπηήνησι οὐμόλων
NPOHIADONIOIHSHTo mnxavma
mnpni va yivni nnikivduvo.H
anpOAnxtnnlambdaovn xPon
mnpni va exni w anotelna
oBapno h bavaio tropaumatou
xnipotn n aawv atowv.
DiaBaoT npoonKTiKa Tc Odyinc XpnoWs KAI KATavOnTo To mpinxOpnu npiv xpnoIpoInOnTo To unxAynua.
Kpatnnt aoxtna npoc tnv npyaia atoua n zwa paia ano tvnpiox npyaiaac.
Anokniotn tvnpintwn akouia c nkkivnonc yacovtac to kalwo 0 nKtpoviknc avapnnc ano to mouzi.
Aniktns Otaunn/nnpwn Aaiou
PnYopa
Apya
Oniothetaia Eaywyn
To unxavma unopei enions va xpanooineix wpiic to Eaptna xoptoaiinavonc kal to oullknt.
Avaonkowte Tioo npootateutko kaumka aapieote tv kdo.
ApaieoTe TnV Taia EtnpouatoC
Kλεισε TO προστατειτό Kαλυμία.
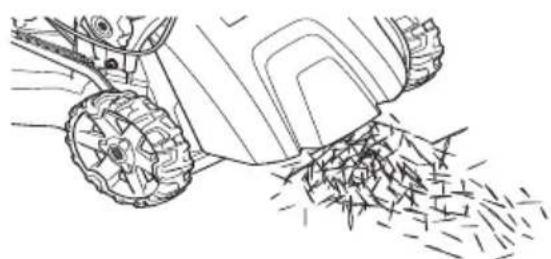
Tnvika

IPOHIADONIOIHs! To va doueueTe eva kivtnnpa eea eevkaiaotno avenapkwc aepioevo xwpo unopei va npokaleoietavato loyawaoquaacn loyw dnlambdaipiaocn e movoeidio tou aZtou.
To kaouipo kai oivaaouiaonis tou nivai
nou nu npankta kai npopni va
npokaleouv o6apc6la6nc kata tnv
nioVon kai kata tnv npn To depua.
Na niotn loiov npoogntikoi n to
xnipoiou tou kauoiou kai va povtiqntn
va unapxni kaos nganipoioc.
Ta aepia nEaywyn ano tov kivtnnpa niva kauta kal nival duvat o va npiexouv onivnnpnc nou npopov va pokaedouv .Note mnv Eknivatn to unxavna on nOwtnpiKo xwo np KovTa on nuPAnkta uIka!
Mny KaniVcTe Kai mny TOnoTheTeIe Kanoio 0epmo aVTKEIevo kovTa o Kaouipo.
Miya kauoiou
HMHIΩH! To mnxavnua nival nEonlauevo nEvav tntpaxpovo kivntnpa,ΦpvTiOn wotn va unapxni naVToTn n owtn nooToTnTa laoiou oTo pnnpouap laoiou.
Bnvzivn
Na xpnaiouoini aouBn n oauBdoxo Bnvzivn kaIns noiotntac.
uviotwuevoc eaxiooc apiOoKOTaviw evai Ta 90 (RON). AvouaueTe Tov KIVNTnpa Me BeVzivn XaunlOtepwokTaviw aTO 90 nOpEi va POKAnthei peTapioua. Auto Epipei auEneV thepuokpaia KIVNTpA, Tou mOpEi va POKaEeI ooBapEc BAbEc.
Xpnouonotbnvzivxauuawvknouwv, ywwntkai av aakuauwevn bnvziv,av diatitntai.
Aabi kivtnpna.
\SHMHIO\$\HlambdaeyTnTo nniinoo laiou, npiv ano Tnv nnkivnoTou xlookotikou ykaov.To noluxaunAo ninnno laiou mopni va npokaeanoi obaapn bAaBn 0tov kivntnpa.AvatpeEtn otic obnyinc tnC nvotntac un tiTao "Suvtnpnoon".
To kivtnpa npenlaavtikataota nTv npwnpopaunta ano 5 wnpnAitoupyiac. AvatpeEtn oTa TnxviKa stoixnia yia ouotaoic oxntika unTov tuno laiou no npenla va
XpnouoioiOnn. Mn xpoauonoinit note laoi npooipoevo yia dixpovouc kivntnpns
TémuαρηηρBouáp

IPOHIADONIOIHs! Na oBhvnTn navTa Tov KInThpa Ka va Tov aHvntn va Kpuwni Yia liya anr npiv ano Tnv nnavanAnpwoan.
XpnoiHnoiEITE navTa Iinavtn, yia va anoepuyETe tuxov diappoe.
Tia To yEmuva avoiEtnTo tana un apyec Kivonic, wotn va diaquyni n ninan ano ngatuaevo kaouio.
Kaθapiot n TnV npioxyn yupw ano TnV TaTa Kaouipou.
Biodto Ta npoonktia nnta ano kao ymuota Tou pncnpbouap. Tuxov aueania nvexntai va odnynoi on npkayia.
Piv EavaBaaltn npoc unTaivnoTn To uXavna ToulaXIOrTo 3 m ano To onmuio nou ymuiaat Bnvzivn.
Mn BaIaItn note nmuPoc To mXavna:
Av piEtn kaouio n to lai kivtnp aTo uXavna.
Skouniotn tic otayovnc kal apnoTn to kaouio nau anoevi va ngatmuotni.
Hav extnn xuonl kaouio npnvw oac n 0ta pouxa. aaaaEtn poxa. Iauvnt onoiobnoTn epos. tou oawatoc oac exni ean no naapn to kaoumo. XpnooioiOnt anaouvi kal npo.
- Av éxntn δiappo n kauoiou: néxyntn taktika yia diappoe c an to kanaki kauoiou kai tic ωληνωπις kauoiμv.
Mntaφopá kai anoθήκnuon
AtooNknuntnkai nntaepnnt To nnxavna kai To kaoumo wotn va unapxni kivduvoc tuxov diappoec navathetaiaonic va eiphouv on nanaopn anivthnpnc nyuuvcphioync, onwc ia napadnyama, ano nAnktpikec mxaevc, nAnktpokivtnpnc, nAnktpikoCdeltaokntnc/diaokntnc pnuatoc n thnpauvtnpnc.
- Otav anothenkuntn kal netapepn tn kaouio npenni va xpoioiouovtal naVTOn nyknKpivcva doxnia nou npooipocvta yauTo ToV KOtio.
Akoouhotnvyia diaikacoidonwocntvkkivnon Kpuou kivnpaaalaa xwiic to diakottntook oTn 0eon took.
Skavδαλn ykaζiou
Ta IioTooiNTka exouv touc apiOouc: 01/901/260, 01/901/279, 01/901/261, 01/901/280
Huskvarna 25 Noεμβριou 2015

Claes Losdal, avantuEg/Ipoiovta knou
(HéouoiobotnévoacavtnpooosoctncHusqvarna AB kai unuubuvoc yia nTV nXviK nKunpiowon.)
SEMBOLLERIN AÇIKLANMASI
Sembollerin aciklamasi
Scrtifikalarin numaralar: 01/901/260, 01/901/279, 01/901/261, 01/901/280
Huskvarna, 25 Kasim 2015