
LC 353iVX - Electric mower HUSQVARNA - Free user manual and instructions
Find the device manual for free LC 353iVX HUSQVARNA in PDF.
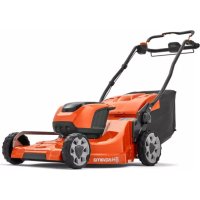



| Product Type | Battery-powered electric lawn mower |
| Brand | Husqvarna |
| Model | LC 353iVX |
| Cutting width | 53 cm |
| Cutting height | 20-75 mm, adjustable to 6 positions |
| Weight without battery | 28 kg |
| Motor type | BLDC (brushless) 36 V |
| Motor speed (nominal) | 3000 rpm |
| Motor speed (SavE) | 2600 rpm |
| Power supply | Husqvarna lithium-ion battery (not included), voltage 36 V |
| Grass collector capacity | 60 liters |
| Automatic drive | Yes, adjustable speed (4 levels, 3.0-4.5 km/h) |
| SavE function | Battery saving mode for extended runtime |
| High load function | Automatic increase of speed in tall or wet grass |
| Bluetooth connectivity | Yes (compatible with Husqvarna Connect app) |
| Sound power level (guaranteed) | 98 dB(A) |
| Sound pressure level | 86 dB(A) |
| Vibrations (handle) | 2.64 m/s² |
| Maintenance and cleaning | Clean with dry cloth, do not use water |
| Safety devices | Motor brake handle, anti-restart, safety key, cutting deck |
| Spare parts and repairability | Blade, bolt, collector, mulching kit optional; repair by authorized workshop |
Frequently Asked Questions - LC 353iVX HUSQVARNA
User questions about LC 353iVX HUSQVARNA
0 question about this device. Answer the ones you know or ask your own.
Ask a new question about this device
Download the instructions for your Electric mower in PDF format for free! Find your manual LC 353iVX - HUSQVARNA and take your electronic device back in hand. On this page are published all the documents necessary for the use of your device. LC 353iVX by HUSQVARNA.
USER MANUAL LC 353iVX HUSQVARNA
LC 247i, LC 347iVX, LC 353iVX
EAC
EN Operator's manual 2-26
Troubleshooting.... 19 Transportation, storage and disposal.... 21 Technical data.... 22 Declaration of Conformity.... 25 Registered trademarks.... 26
Introduction
Product description
The product is a pedestrian-controlled rotary lawn mower. The grass is collected in a grass catcher. Remove the grass catcher to get rear discharge of the grass. Attach a mulch kit (accessory) to cut the grass into fertilizer.
Intended use
Use the product to cut grass. Do not use the product for other tasks.
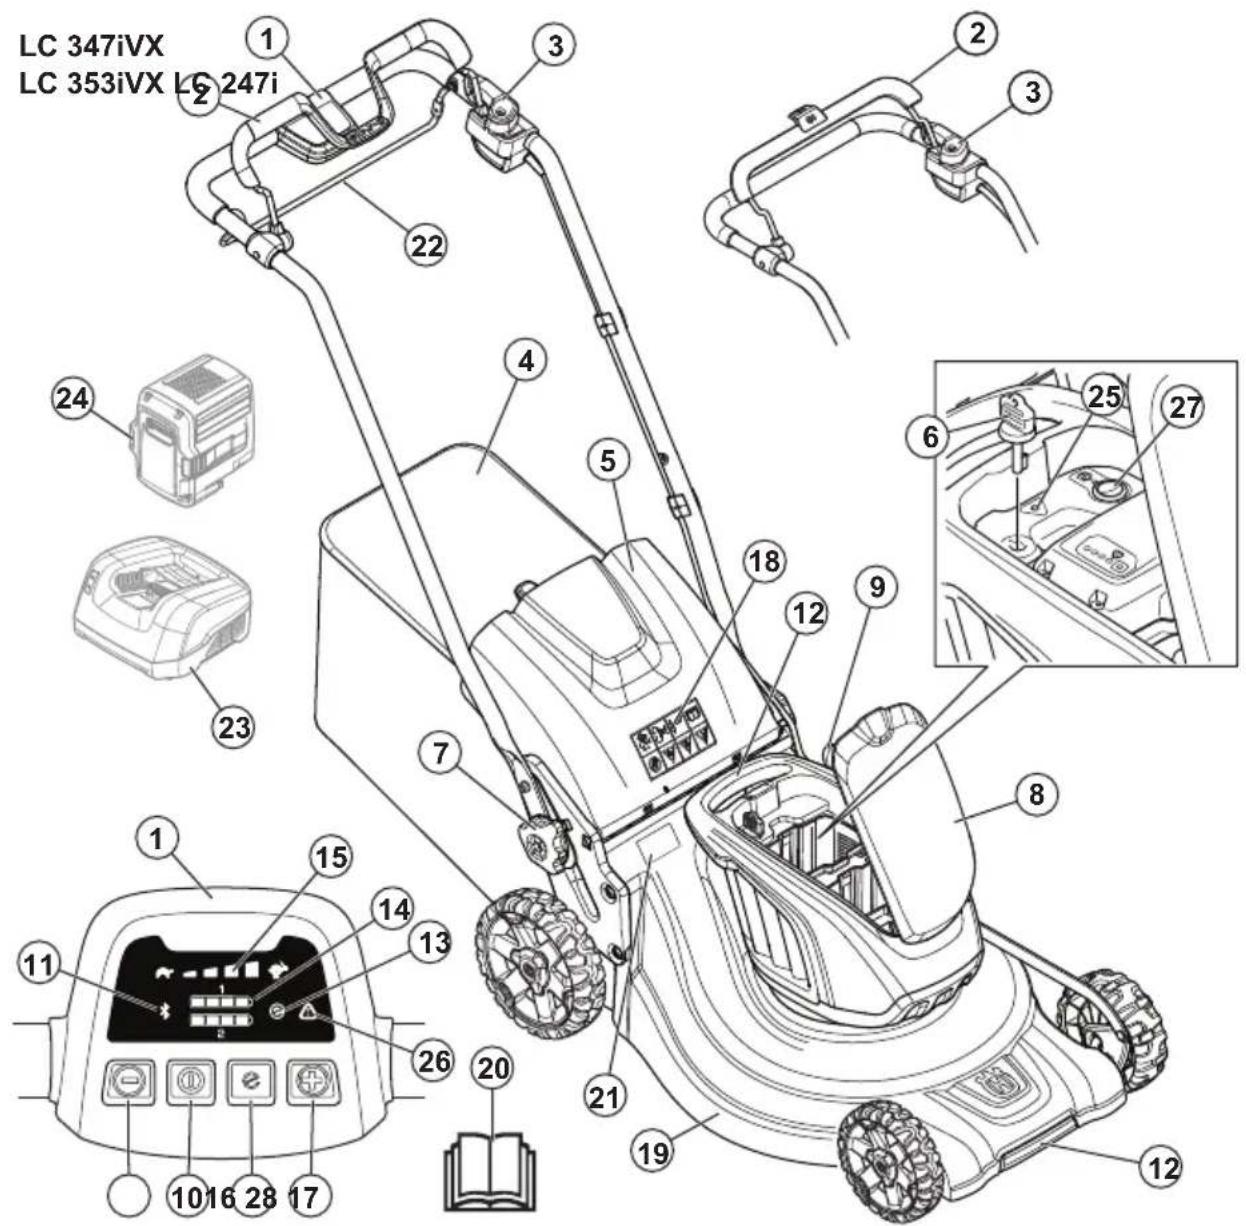
- Control panel (LC 347iVX, LC 353iVX)
- Motor brake handle
- Start inhibitor
- Grass catcher
- Rear cover
- Safety key
- Handle knob
- Battery cover
- Cutting height control
- ON/OFF button
- Indicator for Bluetooth® wireless technology
- Lift handles
- SavE indicator
- Battery indicator
- Speed level indicator (LC 347iVX, LC 353iVX)
- Decrease speed button (LC 347iVX, LC 353iVX)
- Increase speed button (LC 347iVX, LC 353iVX)
- Symbols
- Cutting cover
- Operator's manual
- Rating plate
- Drive bail (LC 347iVX, LC 353iVX)
- Battery charger (Accessory)
- Battery (Accessory)
- Error LED (LC 247i)
- Error LED (LC 347iVX, LC 353iVX)
- SavE button (LC 247i)
- SavE button (LC 347iVX, LC 353iVX)
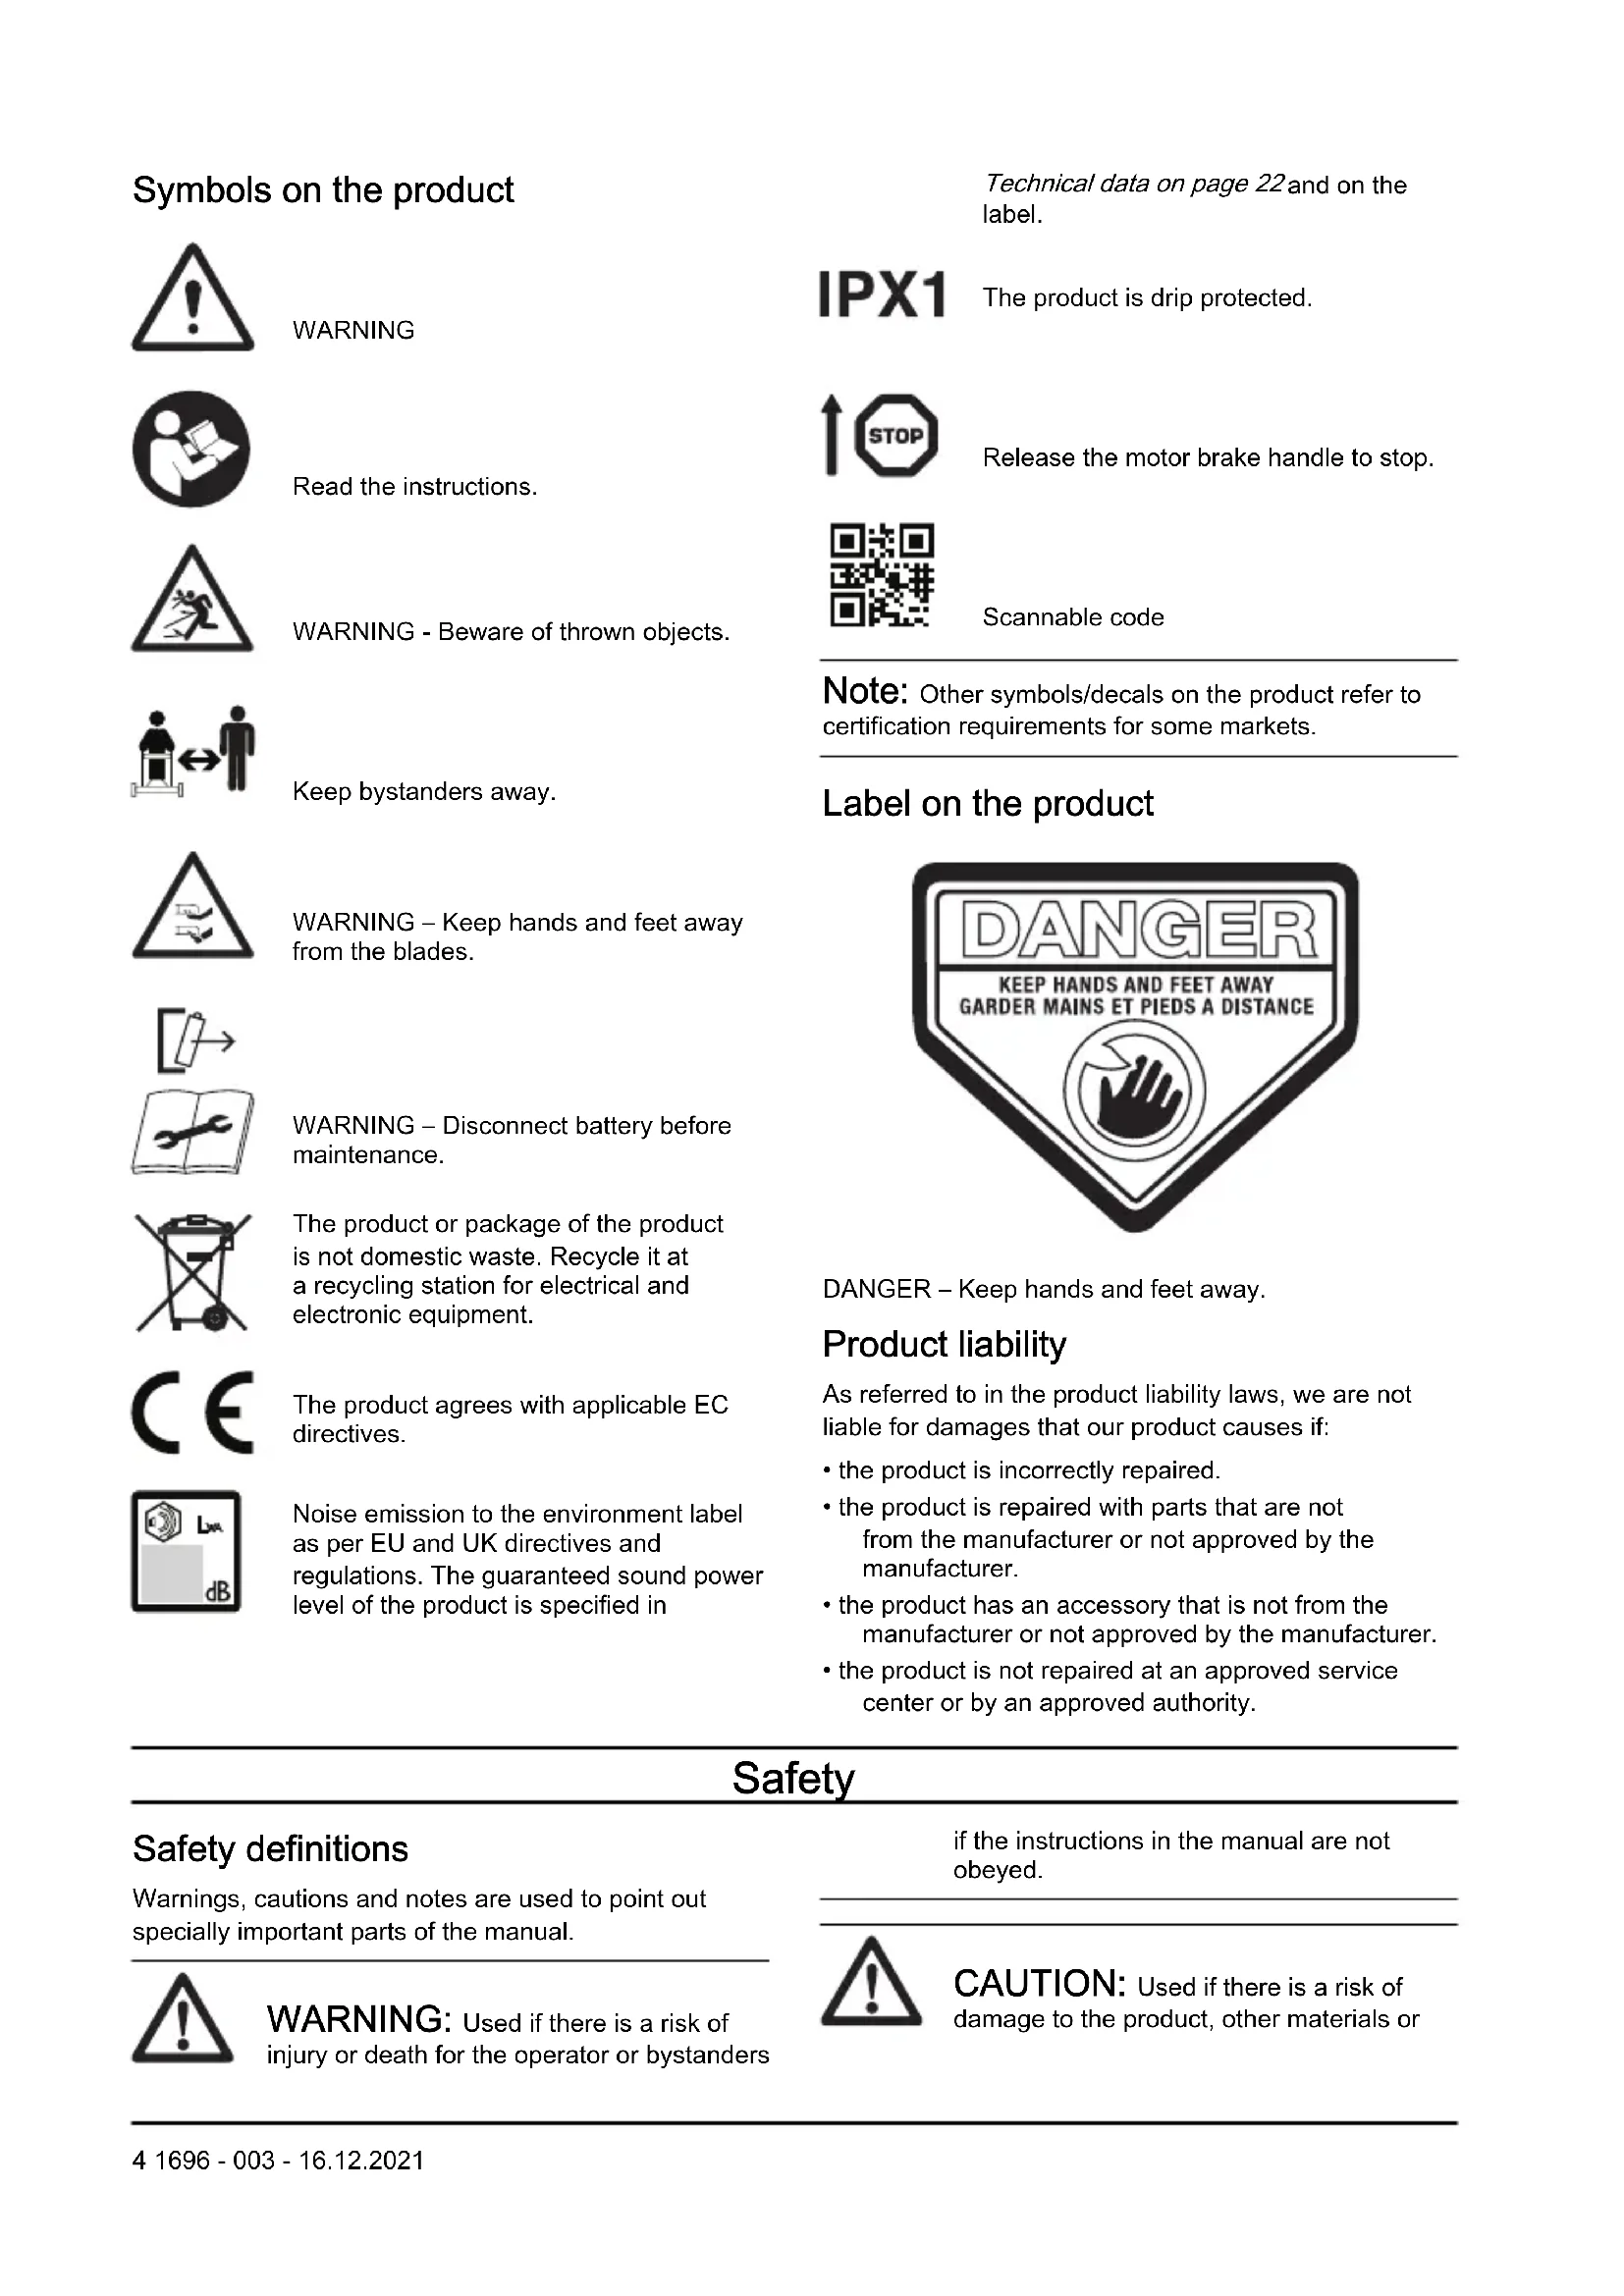
Symbols on the product
WARNING
Read the instructions.
WARNING - Beware of thrown objects.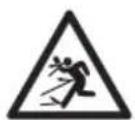
Keep bystanders away.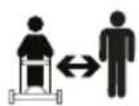
WARNING – Keep hands and feet away from the blades.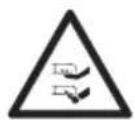
WARNING – Disconnect battery before maintenance.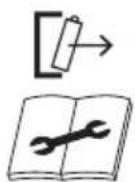
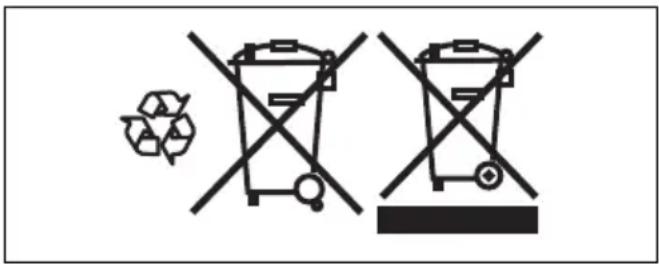
The product or package of the product is not domestic waste. Recycle it at a recycling station for electrical and electronic equipment.
The product agrees with applicable EC directives.
Noise emission to the environment label as per EU and UK directives and regulations. The guaranteed sound power level of the product is specified in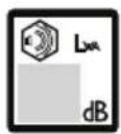
Technical data on page 22 and on the label.
The product is drip protected.
Release the motor brake handle to stop.
Scannable code
Note: Other symbols/decals on the product refer to certification requirements for some markets.
Label on the product

DANGER – Keep hands and feet away.
Product liability
As referred to in the product liability laws, we are not liable for damages that our product causes if:
• the product is incorrectly repaired. • the product is repaired with parts that are not from the manufacturer or not approved by the manufacturer. • the product has an accessory that is not from the manufacturer or not approved by the manufacturer. • the product is not repaired at an approved service center or by an approved authority.
Safety
Safety definitions
Warnings, cautions and notes are used to point out specially important parts of the manual.

WARNING: Used if there is a risk of injury or death for the operator or bystanders if the instructions in the manual are not obeyed.
CAUTION: Used if there is a risk of damage to the product, other materials or the adjacent area if the instructions in the manual are not obeyed.

CAUTION: Used if there is a risk of damage to the product, other materials or
the adjacent area if the instructions in the manual are not obeyed.
Note: Used to give more information that is necessary in a given situation.
Save all warnings and instructions for future reference. The term "product" in the warnings refers to your mains-operated (corded) product or battery-operated (cordless) product.

WARNING: Read all safety warnings, instructions, illustrations and specifications provided with this product. Failure to follow all instructions listed below may result in electric shock, fire and/or serious injury.
Save all warnings and instructions for future reference. The term "product" in the warnings refers to your mains-operated (corded) product or battery-operated (cordless) product.
Do not operate the product in explosive atmospheres, such as in the presence of flammable liquids, gases or dust. The product create sparks which may ignite the dust or fumes.
- Keep work area clean and well lit. Cluttered or dark areas invite accidents.
- Do not operate the product in explosive atmospheres, such as in the presence of flammable liquids, gases or dust. The product creates sparks which may ignite the dust or fumes.
- Keep children and bystanders away while operating the product. Distractions can cause you to lose control.
Electrical safety
- Product plugs must match the outlet. Never modify the plug in any way. Do not use any adapter plugs with earthed (grounded) products. Unmodified plugs and matching outlets will reduce risk of electric shock.
- Avoid body contact with earthed or grounded surfaces, such as pipes, radiators, ranges and refrigerators. There is an increased risk of electric shock if your body is earthed or grounded.
- Do not expose products to rain or wet conditions. Water entering a product will increase the risk of electric shock.
- Do not abuse the cord. Never use the cord for carrying, pulling or unplugging the product. Keep cord away from heat, oil, sharp edges or moving parts. Damaged or entangled cords increase the risk of electric shock.
- When operating a product outdoors, use an extension cord suitable for outdoor use. Use of a cord suitable for outdoor use reduces the risk of electric shock.
- If operating a product in a damp location is unavoidable, use a residual current device (RCD) protected supply. Use of an RCD reduces the risk of electric shock.
Personal safety
- Stay alert, watch what you are doing and use common sense when operating a product. Do not use a product while you are tired or under the influence of drugs, alcohol or medication. A moment of inattention while operating products may result in serious personal injury.
- Use personal protective equipment. Always wear eye protection. Protective equipment such as dust mask, non-skid safety shoes, hard hat or hearing protection used for appropriate conditions will reduce personal injuries.
- Prevent unintentional starting. Ensure the switch is in the off-position before connecting to power source and/or battery pack, picking up or carrying the product. Carrying products with your finger on the switch or energising products that have the switch on invites accidents.
- Remove any adjusting key or wrench before turning the product on. A wrench or a key left attached to a rotating part of the product may result in personal injury.
- Do not overreach. Keep proper footing and balance at all times. This enables better control of the product in unexpected situations.
- Dress properly. Do not wear loose clothing or jewellery. Keep your hair and clothing away from moving parts. Loose clothes, jewellery or long hair can be caught in moving parts.
- If devices are provided for the connection of dust extraction and collection facilities, ensure these are connected and properly used. Use of dust collection can reduce dust-related hazards.
- Do not let familiarity gained from frequent use of products allow you to become complacent and ignore product safety principles. A careless action can cause severe injury within a fraction of a second.
Product use and care
- Do not force the product. Use the correct product for your application. The correct product will do the job better and safer at the rate for which it was designed.
- Do not use the product if the switch does not turn it on and off. Any product that cannot be controlled with the switch is dangerous and must be repaired.
- Disconnect the plug from the power source and/or remove the battery pack, if detachable, from the product before making any adjustments, changing accessories, or storing products. Such preventive safety measures reduce the risk of starting the product accidentally.
- Store idle products out of the reach of children and do not allow persons unfamiliar with the product or these instructions to operate the product. Products are dangerous in the hands of untrained users.
- Maintain products and accessories. Check for misalignment or binding of moving parts, breakage of parts and any other condition that may affect the
product's operation. If damaged, have the product repaired before use. Many accidents are caused by poorly maintained products.
- Keep cutting tools sharp and clean. Properly maintained cutting tools with sharp cutting edges are less likely to bind and are easier to control.
- Use the product, accessories and tool bits etc. in accordance with these instructions, taking into account the working conditions and the work to be performed. Use of the product for operations different from those intended could result in a hazardous situation.
- Keep handles and grasping surfaces dry, clean and free from oil and grease. Slippery handles and grasping surfaces do not allow for safe handling and control of the product in unexpected situations.
Service
- Have your product serviced by a qualified repair person using only identical replacement parts. This will ensure that the safety of the product is maintained.
- Never service damaged battery packs. Service of battery packs should only be performed by the manufacturer or authorized service providers.
Battery tool use and care
- Recharge only with the charger specified by the manufacturer. A charger that is suitable for one type of battery pack may create a risk of fire when used with another battery pack.
- Use products only with specifically designated battery packs. Use of any other battery packs may create a risk of injury and fire.
- When battery pack is not in use, keep it away from other metal objects, like paper clips, coins, keys, nails, screws or other small metal objects, that can make a connection from one terminal to another. Shorting the battery terminals together may cause burns or a fire.
- Under abusive conditions, liquid may be ejected from the battery; avoid contact. If contact accidentally occurs, flush with water. If liquid contacts eyes, additionally seek medical help. Liquid ejected from the battery may cause irritations or burns.
- Do not use a battery pack or tool that is damaged or modified. Damaged or modified batteries may exhibit unpredictable behavior resulting in fire, explosion or risk of injury.
- Do not expose a battery pack or tool to fire or excessive temperature. Exposure to fire or temperature above 130°C / 265°F may cause explosion.
- Follow all charging instructions and do not charge the battery pack or tool outside the temperature range specified in the instructions. Charging improperly or at temperatures outside the specified range may damage the battery and increase the risk of fire.
Lawnmower safety warnings
- Do not use the lawnmower in bad weather conditions, especially when there is a risk of lightning. This decreases the risk of being struck by lightning.
- Thoroughly inspect the area for wildlife where the lawnmower is to be used. Wildlife may be injured by the lawnmower during operation.
- Thoroughly inspect the area where the lawnmower is to be used and remove all stones, sticks, wires, bones, and other foreign objects. Thrown objects can cause personal injury.
- Before using the lawnmower, always visually inspect to see that the blade and the blade assembly are not worn or damaged. Worn or damaged parts increase the risk of injury.
- Before use, check the supply cord and any extension cord for signs of damage or aging. Do not use the lawnmower if the cord is damaged or worn. If the cord is damaged or worn during use, switch off the lawnmower and do not touch the cord before disconnecting it from the supply. A damaged supply cord or extension cord may result in electric shock, fire and/or serious injury.
- Check the grass catcher frequently for wear or deterioration. A worn or damaged grass catcher may increase the risk of personal injury.
- Keep guards in place. Guards must be in working order and be properly mounted. A guard that is loose, damaged, or is not functioning correctly may result in personal injury.
- Keep all cooling air inlets clear of debris. Blocked air inlets and debris may result in overheating or risk of fire.
- While operating the lawnmower, always wear non-slip and protective footwear. Do not operate the lawnmower when barefoot or wearing open sandals. This reduces the chance of injury to the feet from contact with the moving blade.
- While operating the lawnmower, always wear long trousers. Exposed skin increases the likelihood of injury from thrown objects.
- Do not operate the lawnmower in wet grass. Walk, never run. This reduces the risk of slipping and falling which may result in personal injury.
- Do not operate the lawnmower on excessively steep slopes. This reduces the risk of loss of control, slipping and falling which may result in personal injury.
- When working on slopes, always be sure of your footing, always work across the face of slopes, never up or down and exercise extreme caution when changing direction. This reduces the risk of loss of control, slipping and falling which may result in personal injury.
- Use extreme caution when reversing or pulling the lawnmower towards you. Always be aware of your surroundings. This reduces the risk of tripping during operation.
- Keep the supply cord away from the cutting blades. A damaged supply cord may result in electric shock, fire and/or serious injury.
- Switch off and remove plug from mains if the cord is entangled or damaged. Entangled or damaged cords can increase the risk of electric shock.
- Do not touch blades and other hazardous moving parts while they are still in motion. This reduces the risk of injury from moving parts.
- When clearing jammed material or cleaning the lawnmower, make sure all power switches are off and the power cord is disconnected. Unexpected operation of the lawnmower may result in serious personal injury.
Residual current device
- Use a residual current device with a tripping current of maximum 30 mA.
General safety instructions

WARNING: Read the warning instructions that follow before you use the product.
- This product is dangerous if used incorrectly or if you are not careful. Injury or death can occur if you do not obey the safety instructions.
- This product produces an electromagnetic field during operation. This field may under some circumstances interfere with active or passive medical implants. To reduce the risk of serious or fatal injury we recommend persons with medical implants to consult their physician and the medical implant manufacturer before operating this product. • Always be careful and use your common sense. If you are not sure how to operate the product in a special situation, stop and speak to your Husqvarna dealer before you continue.
- Keep in mind that the operator will be held responsible for accidents that involve other persons or their property.
- Keep the product clean. Make sure that you can clearly read signs and decals.
- Never allow children or people unfamiliar with these instructions to use the appliance. Local regulations may restrict the age of the operator. • Always monitor a person, with decreased physical capacity or mental capacity, that uses the product. A responsible adult must be there at all times.
- Do not use the product if you are tired, ill, or under the influence of alcohol, drugs or medicine. This has a negative effect on your vision, alertness, coordination and judgment.
- Do not use the product if it is defective.
- Do not change this product or use it if it is possible that it has been changed by others.
Work safety

WARNING: Read the warning instructions that follow before you use the product.
- Use this product to cut grass lawns only. It is not permitted to use it for other tasks.
- Use personal protective equipment. Refer to Personal protective equipment on page 8.
- Make sure that you know how to stop the motor quickly in an emergency.
- Do not operate the product in rain or wet conditions. The risk of electrical shock increases if water enters the product.
- Do not operate the product unless the blade and all covers are attached correctly. An incorrectly attached blade can come loose and cause personal injury.
- Make sure that the blade does not hit objects such as stones and roots. This can damage the blade and bend the motor shaft. A bent axle causes heavy vibration and a very high risk that the blade becomes loose.
- If the blade hits an object or if vibrations occur, stop the product immediately. Stop the motor, turn the safety key to 0 and remove the battery. Wait until moving parts stop. Examine the product for damages. Tighten loose parts. Repair damages and replace damaged parts. Let an approved service agent do the repair.
- Never attach the motor brake handle permanently to the handle when the motor is started.
- Put the product on a stable, flat surface and start it. Make sure that the blade does not hit the ground or other objects. Always stay behind the product when you operate it.
- Let all the wheels stay on the ground and keep 2 hands on the handle when you operate the product. Keep your hands and feet away from the rotating blades.
- Do not tilt the product when you start the motor or during operation of the product.
- Be careful when you pull the product rearward.
- Never lift up the product when the motor is started. If you must lift the product, first stop the motor, turn the safety key to 0 and remove the battery.
- Do not walk rearward when you operate the product.
- Stop the motor when it is necessary to tilt the product for transportation or before you move across areas without grass, for example paths made of gravel, stone and asphalt.
- Do not run with the product when the motor is started. Always walk when you operate the product.
- Stop the motor before you change the cutting height. Never make adjustments with the motor started.
- Never let the product stay out of view with the motor started. Stop the motor and make sure that the cutting equipment does not rotate.
- The vibrations in the product during operation can be different from the declared vibration value in Technical data on page 22. The difference is caused by variations in how the product is used. If you operate the product frequently or for long periods of time, take breaks regularly to prevent injury from vibrations.
Safety instructions for operation
Personal protective equipment

WARNING: Read the warning instructions that follow before you use the product.
- Personal protective equipment cannot fully prevent injury but it decreases the degree of injury if an accident does occur. Let your dealer help you select the right equipment.
- Use heavy-duty slip-resistant boots or shoes. Do not use open shoes or go with bare feet.
- Use heavy, long pants.
- Use protective gloves when necessary, for example when you attach, examine or clean the cutting equipment. We recommend to use hearing protection.
Safety devices on the product

WARNING: Read the warning instructions that follow before you use the product.
- Do not use a product with defective safety devices.
- Do not remove or do modifications to safety devices.
- Do a check of the safety devices regularly. If the safety devices are defective, speak to your Husqvarna service agent.
To do a check of the cutting cover
The cutting cover decreases vibrations in the product and decreases the risk of injury from the blade.
Examine the cutting cover to make sure that there are no damages such as cracks.
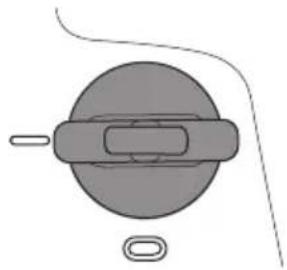
To do a check of the safety key
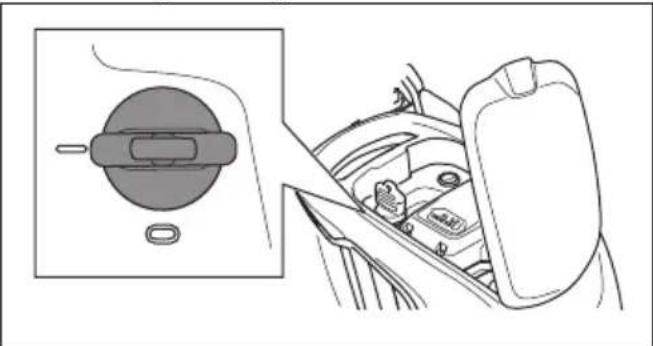
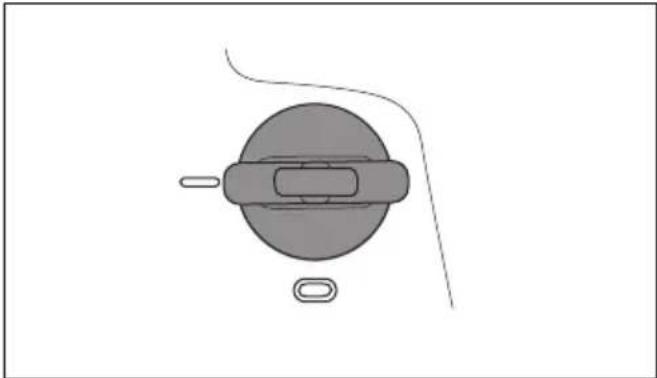
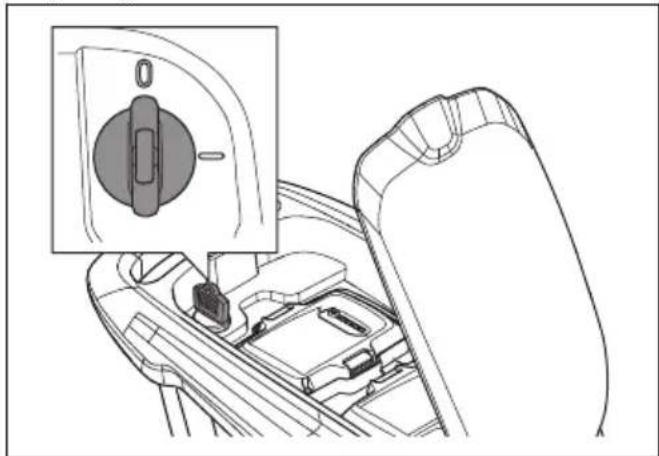
The safety key is below the battery lid. The safety key connects the battery that supplies the motor with power.
Start and stop the motor to do a check of the safety key.
If the safety key operates correctly, the motor can only start when the safety key is in position 1.
To do a check of the motor brake handle
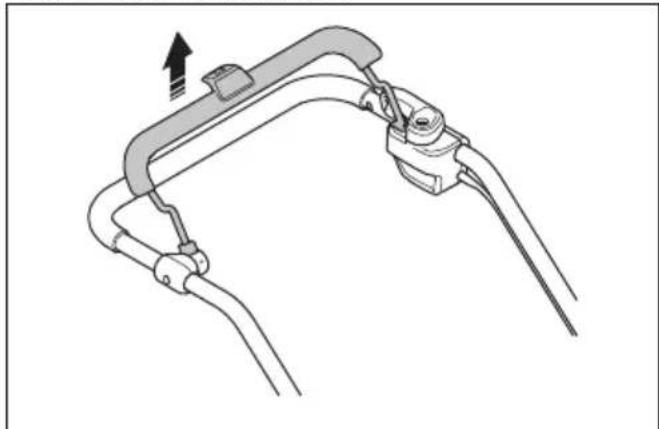
The motor brake handle stops the motor. When the motor brake handle is released, the motor stops.
- Start the product. Refer to Operation on page 11.
- Release the motor brake handle.
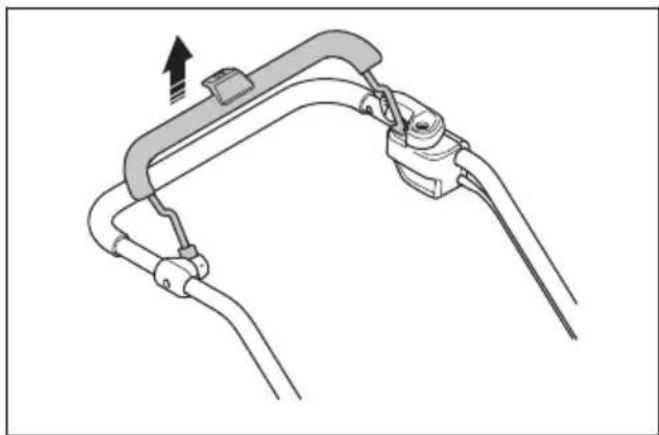
Make sure that the product stops. If the motor does not stop in 3 seconds, let an approved Husqvarna service agent adjust the motor brake.
To do a check of the start inhibitor
Do a check of the start inhibitor to make sure that it prevents operation of the motor.
- Push the motor brake handle in the direction of the handlebar. The start inhibitor stops the movement.
- Push the start inhibitor out.
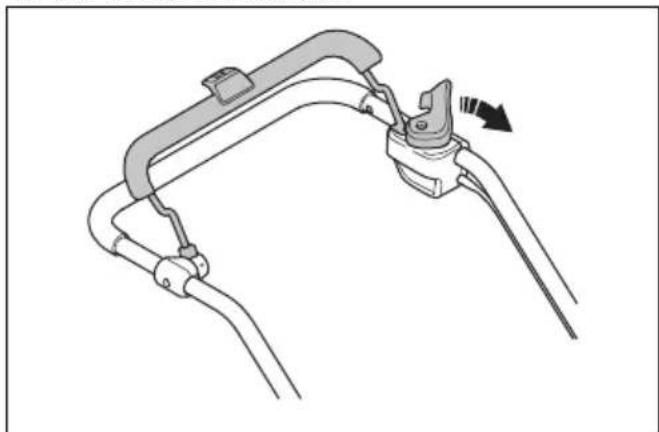
- Release the start inhibitor and make sure that it goes back to its initial position.
Battery safety

WARNING: Read the warning instructions that follow before you use the product.
- Use Husqvarna rechargeable batteries as a power supply for related Husqvarna products only. To prevent injury, do not use the battery as a power supply for other devices.
- Do not use non-rechargeable batteries.
- Risk of electrical shock. Do not connect the battery terminals to keys, coins, screws or other metal. This can cause a short circuit of the battery.
- Do not put objects into the air slots of the battery.
- Keep the battery away from sunlight, heat or open flame. The battery can explode and cause burns and/or chemical burns.
- Keep the battery away from rain and wet conditions.
- Keep the battery away from microwaves and high pressure.
- Do not try to disassemble or break the battery.
- If the battery leaks, do not let the liquid touch your body or eyes. If you have touched the liquid, clean the area with a large quantity of water and get medical aid.
- Use the battery in the product only when the ambient temperature is between 5°C - 40°C.
- Use the battery charger only when the ambient temperature is between 5°C and 40°C.
- The battery will not charge if the battery temperature is more than 50°C.
- Do not clean the battery or the battery charger with water. Refer to "To clean the battery and the battery charger" on page 18.
- Do not use a defective or damaged battery.
- Keep batteries in storage away from metal objects such as nails, coins, jewellery.
Battery charger safety

WARNING: Read the warning instructions that follow before you use the product.
- Use the QC battery chargers to charge Husqvarna replacement batteries only.
- Risk of electrical shock or short circuit. Do not put objects into the air slots of the charger. Do not try to disassemble the battery charger. Do not connect the charger terminals to metal objects. Use an approved mains socket.
- This product produces an electromagnetic field during operation. This field may under some circumstances interfere with active or passive medical implants. To reduce the risk of serious or
fatal injury, we recommend persons with medical implants to consult their physician and the medical implant manufacturer before operating this product.
- Regularly make sure that the power cord of the battery charger is not damaged and that there are no cracks in it.
- Do not lift the battery charger by the power cord. To disconnect the battery charger from a mains socket, pull out the plug. Do not pull the power cord.
- Keep the power cord and extension cables away from water, oil and sharp edges. Make sure that the cable is not pinched in doors, fences or equivalent. It can cause the charger to become energized.
- Do not clean the battery charger with water.
- The battery charger can be used by children aged from 8 years and above and persons with reduced physical, sensory, or mental capabilities or lack of experience and knowledge if they have been given supervision or instruction concerning use of the battery charger in a safe way and understand the hazards involved. Children shall not play with the battery charger. Cleaning and user maintenance shall not be made by children without supervision.
- Do not charge non-rechargeable batteries in the battery charger.
- Do not use the battery charger near flammable materials or materials that can cause corrosion. Do not cover the battery charger. Pull out the plug to the battery charger if there is smoke or fire.
- Do not use a defective or damaged battery charger.
- Only charge the battery indoors in a room with good airflow and away from sunlight. Do not charge the battery in wet conditions.
Safety instructions for maintenance

WARNING: Read the warning instructions that follow before you use the product.
- To prevent accidental start during maintenance, turn the safety key to 0 and remove the battery. Wait at minimum 5 seconds before you start the maintenance.
- Only do the maintenance work written in this operator's manual. More extensive work and professional repairs must be done by an approved service agent. Speak to your nearest service agent for more information.
- Do the maintenance work correctly to increase the lifetime of the product and decrease the risk of accidents.
- Replace damaged, worn or broken parts. Always use original spare parts from the manufacturer. Other spare parts can cause damage to the product and increase the risk of accidents.
- To prevent injury, do not remove or do modifications to safety devices.
- Put on heavy duty gloves when you use the cutting equipment. The blade is very sharp and cuts can easily occur.
- Keep the cutting edges sharp and clean for the best and safest performance.
- Let your service agent regularly examine the product and make necessary adjustments and repairs.
- Obey the instructions for how to change accessories. Only use accessories from the manufacturer.
- When not in operation, keep the product, battery and battery charger apart in a dry, indoor and locked area. Make sure that children and persons that are not approved cannot get access to the product, battery or battery charger.
Assembly
Introduction

WARNING: Before you assemble the product, read the safety chapter.

WARNING: To prevent accidental start during assembly, turn the safety key to 0, remove the battery and wait at minimum 5 seconds.
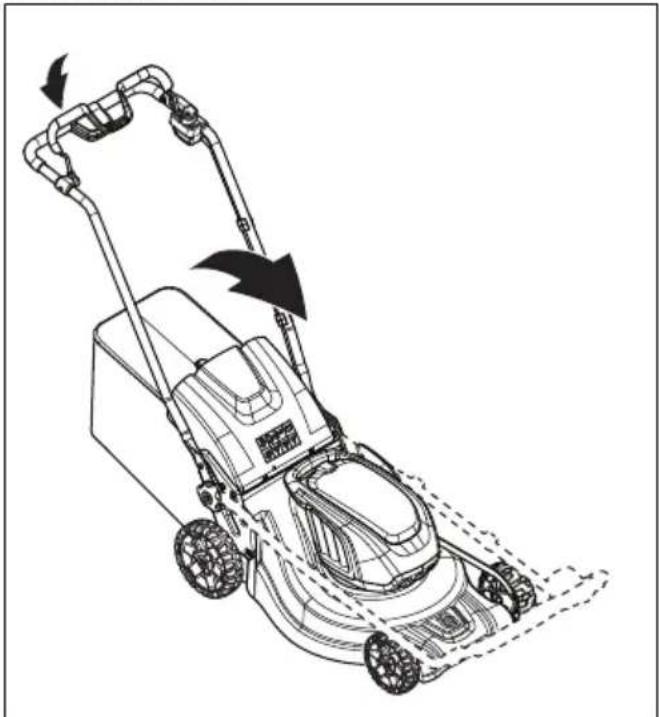
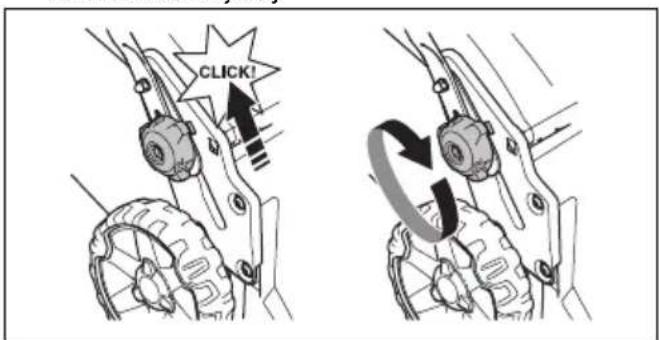
To adjust the handle
- Loosen the lower knobs.
- Move the knobs to the lower end of the grooves on the left and the right side of the product.
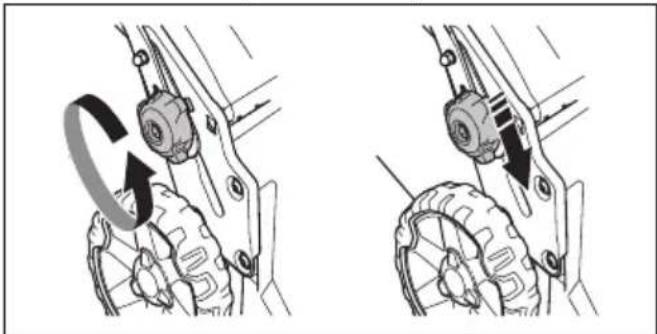
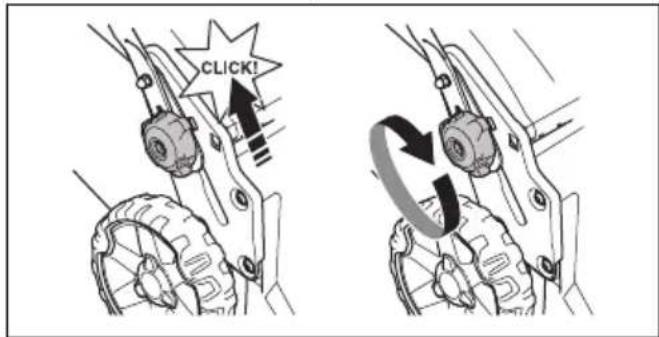
- Set the handle height in one of the 2 available positions.
- Move the knobs up in the direction of the handle until they stop and you hear a click.
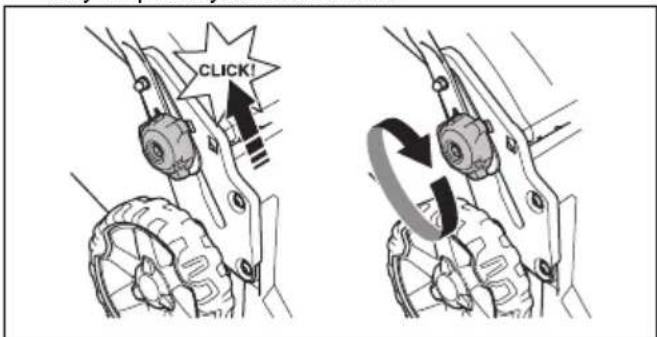
- Tighten the knobs fully.
To assemble the grass catcher
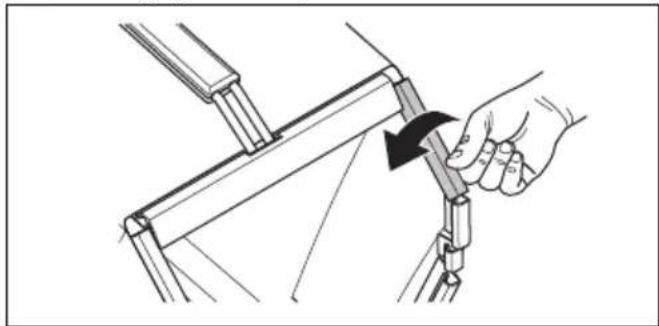
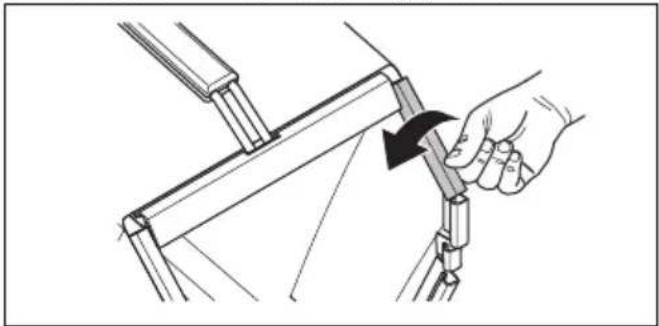
- Attach the grass catcher frame to the grass bag with the rigid part of the bag on the bottom. Keep the handle of the frame on top of the grass bag.
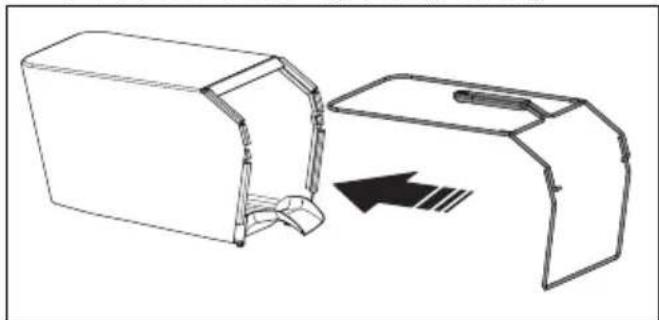
- Attach the bottom section of the grass catcher frame in the groove on the bottom of the grass catcher.
- Attach the grass bag to the grass catcher frame with the clips.
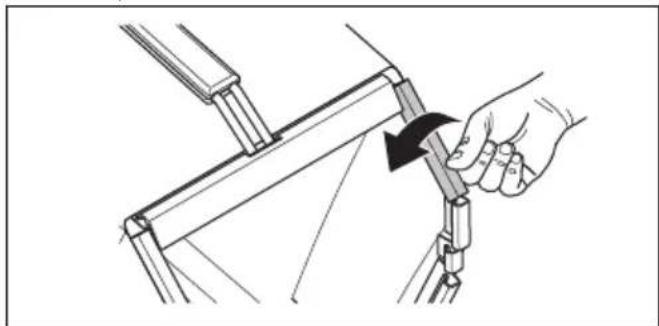
- Lift the rear cover.
- Attach the grass catcher to the top edge of the chassis.
- Put the lower part of the grass catcher into the grass discharge channel.
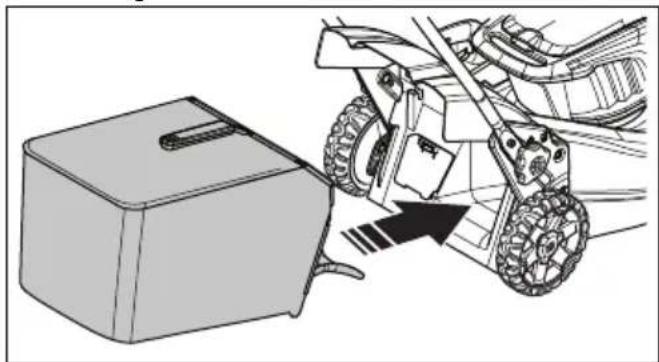
To assemble the mulch plug (accessory)
- Lift up the rear cover and remove the grass catcher.
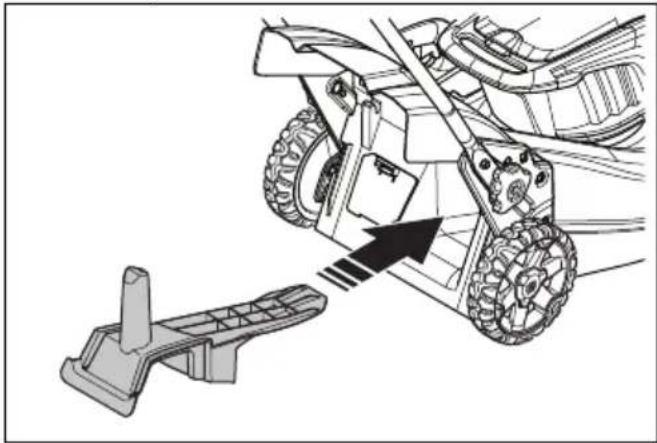
- Put the mulch plug into the discharge channel.
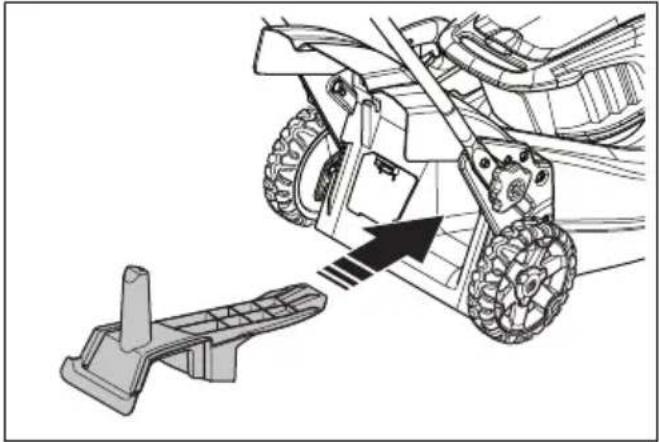
- Replace the blade with the mulch blade that is supplied in the mulch kit. Refer to To replace the blade on page 18.
Operation
Introduction

WARNING: Before you operate the product, you must read and understand the safety chapter.
Husqvarna Connect
Husqvarna Connect is a free app for your mobile device. The Husqvarna Connect app gives extended functions for your Husqvarna product:
• Extended product information. • Information about, and help with, product parts and servicing.
To start to use Husqvarna Connect
- Download the Husqvarna Connect app on your mobile device.
- Register in the Husqvarna Connect app.
- Follow the instruction steps in the Husqvarna Connect app to connect and register the product.
Note: Husqvarna Connect app is not available for download in all markets. Speak to your servicing dealer for more information.
Bluetooth® information (LC 347iVX, LC 353iVX)
Bluetooth® wireless technology
The Bluetooth® wireless technology symbol appears when your mobile device is connected to the product.
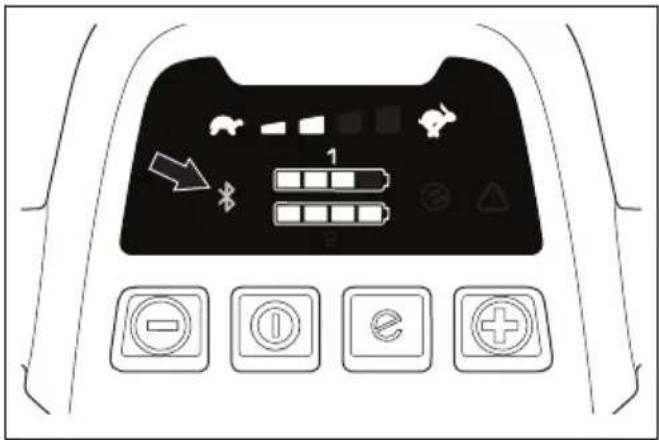
To set the product in operation position
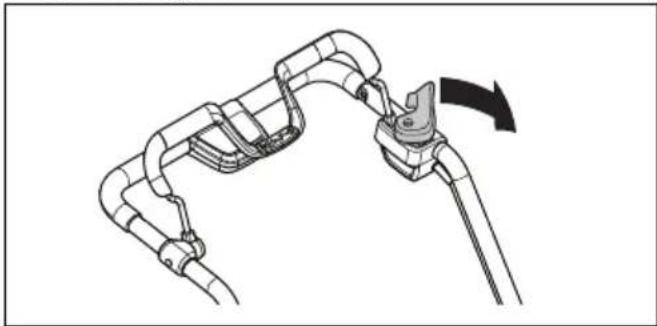
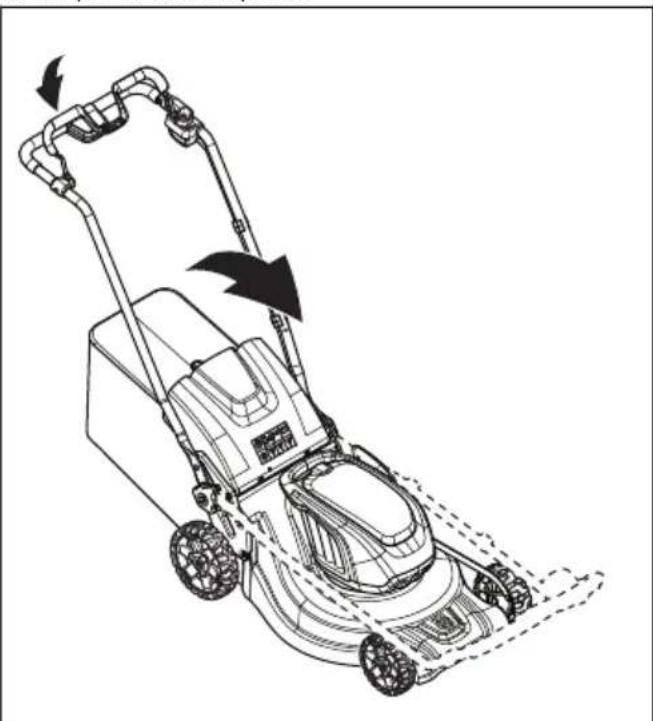
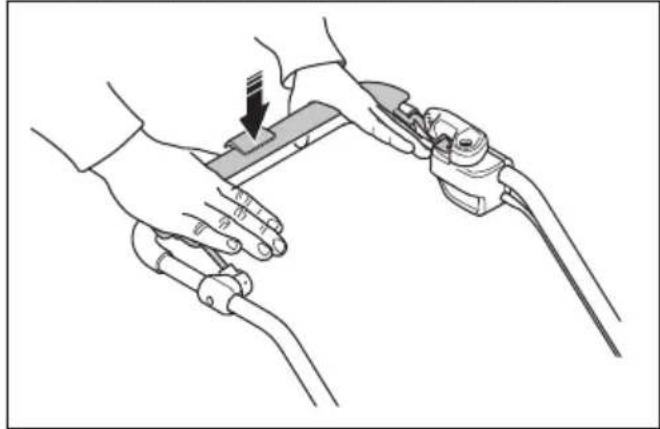
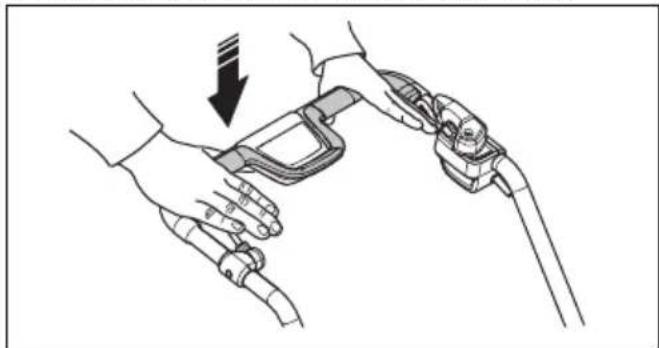
- Fold the handle to the upright position.
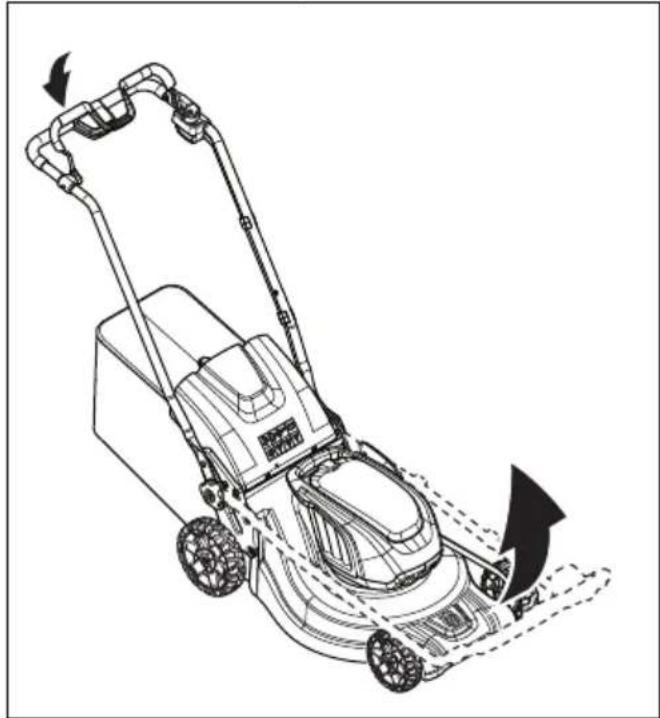
- Move the knobs up in the direction of the handle until they stop and you hear a click.
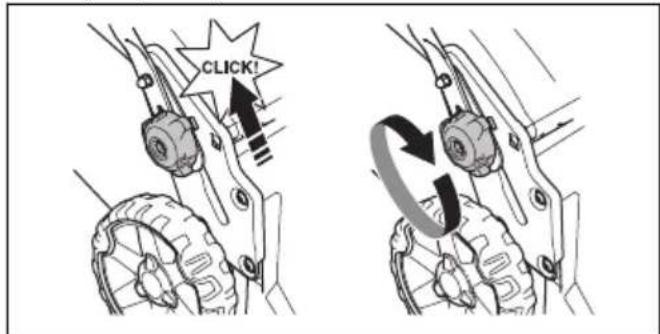
- Tighten the knobs fully.

WARNING: Do not operate the product unless the handle is fully folded up and set in one of the applicable height positions. Refer to "To adjust the handle" on page 10.
To set the cutting height
The cutting height can be adjusted in 6 levels.
- Move the cutting height lever down to decrease the cutting height.
- Move the cutting height lever up to increase the cutting height.
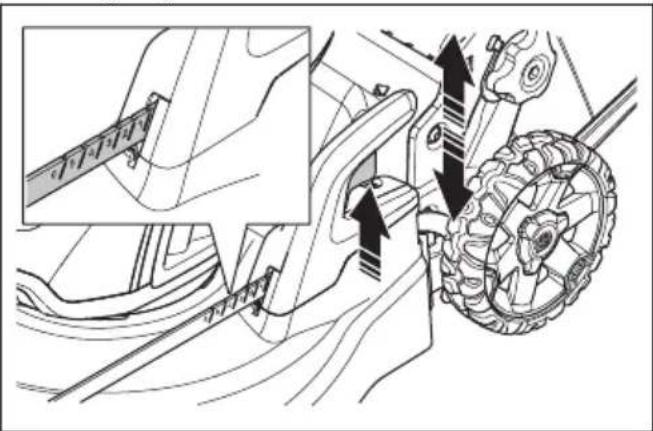

CAUTION: Do not set the cutting height too low. The blades can hit the ground if the surface of the lawn is not level.
Battery

WARNING: Before you use the battery, you must read and understand the safety chapter. You must also read and understand the operator's manual for the battery and the battery charger.
Keep the battery and the battery charger in correct ambient temperatures.
| Ambient temperature | |
| Operation of the battery | 5 °C - 40 °C |
| Charging of the battery | 5 °C - 40 °C |
Battery status
The display shows the remaining battery capacity and if there are problems with the battery. The battery capacity is shown for 5 seconds after the product is switched off or the battery indicator button is pressed. The warning symbol on the battery is on when an error has occurred. See Battery on page 19.
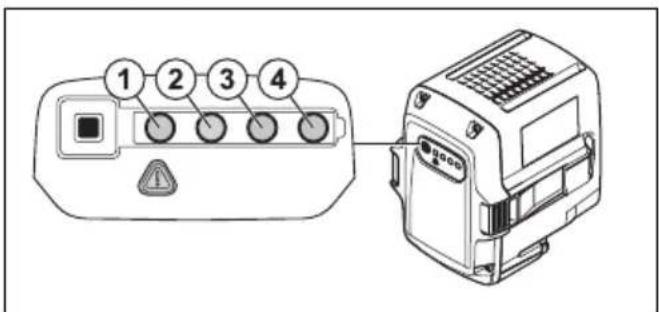
| LED lights Battery status | |
| All LEDs are lit Fully charged | (75-100%) |
| LED 1, LED 2, LED 3 are lit | The battery is 50%-75% charged |
| LED 1, LED 2 are lit The battery is 0%-25% charged. | |
| LED 1 is lit The battery is empty. Charge the battery. | |
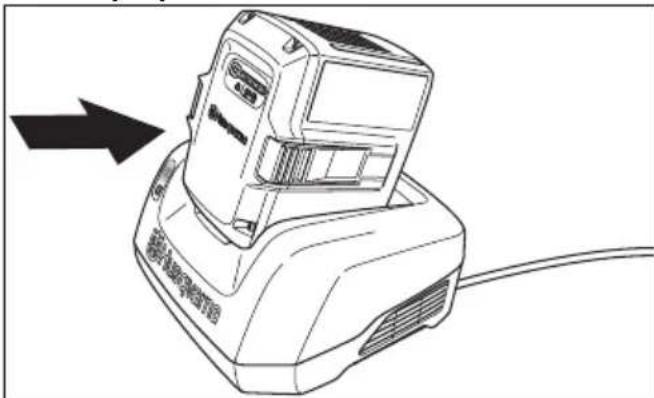
To charge the battery
Charge the battery before the first use. The battery is only 30% charged when supplied to the customer.
Note: The battery charger must be connected to the voltage and frequency specified on the rating plate.
The battery does not charge if the battery temperature is above 50°C. The battery charger decreases the temperature of the battery before it starts to charge.
- Connect one end of the power cord for the battery charger into the socket of the battery charger.
- Connect the other end of the power cord for the battery charger in a grounded mains socket. The LED on the battery charger flashes green one time.
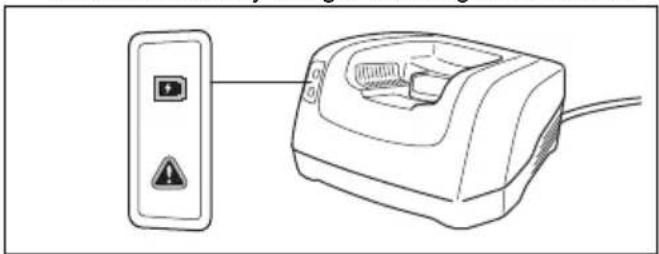
- Put the battery in the battery charger. The green light on the charger comes on when the battery is correctly connected to the battery charger.
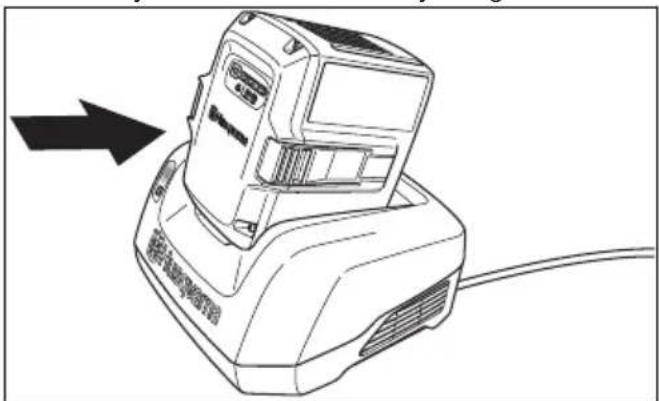
- When all LEDs on the battery have come on the battery is fully charged. Charge the battery for maximum 24 hours.
- To disconnect the battery charger from the mains socket, pull the plug, not the power cord.
- Remove the battery from the battery charger.
Battery charging status
A Husqvarna Li-ion battery can be charged or used at all charging levels. The battery is not damaged. A fully charged battery will not decrease its charge when the battery is left in the charger.
| LED display Charging status | |
| LED 1 flashes 0%-25% | |
| LED 1 is lit, LED 2 flashes | 25%-50% |
| LED 1, LED 2 are lit, LED 3 flashes | 50%-75% |
| LED 1, LED 2, LED 3 are lit, LED 4 flashes | 75%-100% |
| LED 1, LED 2, LED 3, LED 4 are lit | Fully charged |
To start the product (LC 247i)
- Open the battery lid.
- Put a charged battery in 1 of the battery holders. For longer operation time, put a second charged battery in the other battery holder.
- Turn the safety key to 1.
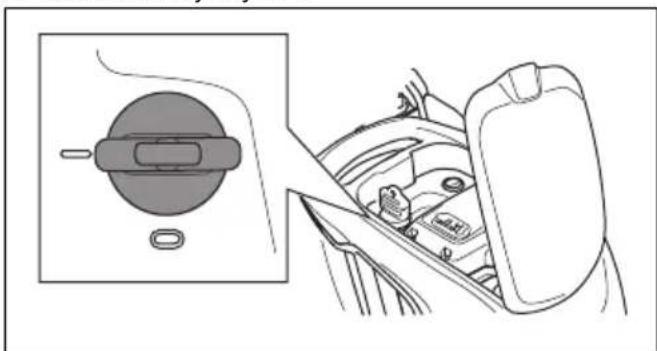
- Stay behind the product.
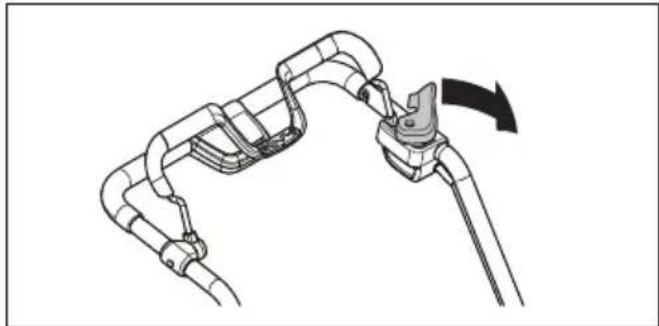
- Loosen the start inhibitor.
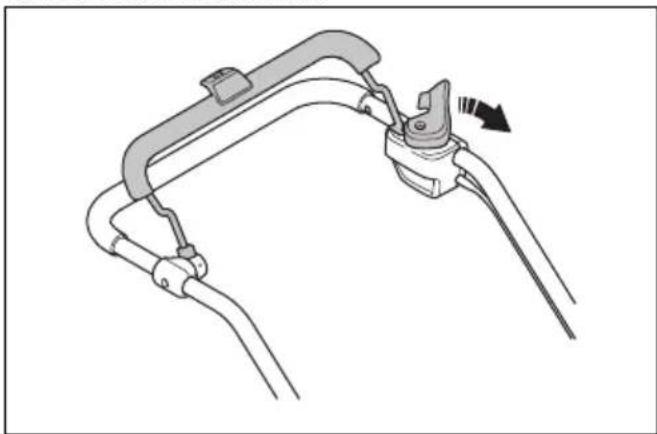
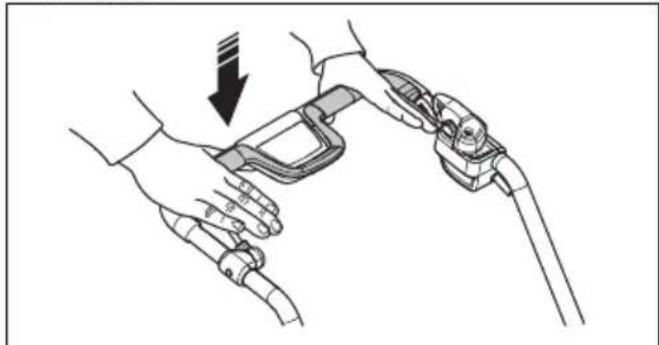
- Push the motor brake handle in the direction of the handlebar.

To start the product (LC 347iVX, LC 353iVX)
- Open the battery lid.
- Put a charged battery in 1 of the battery holders. For longer operation time, put a second charged battery in the other battery holder.
- Turn the safety key to 1.
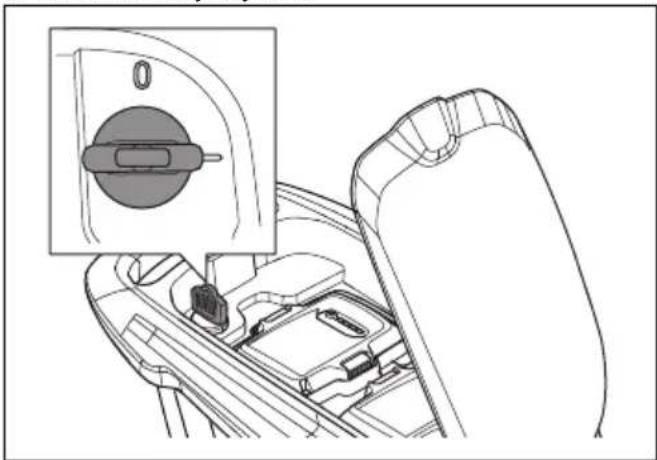
- Stay behind the product.
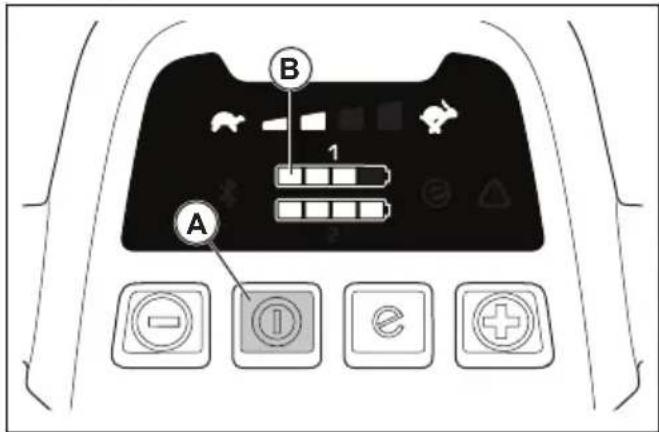
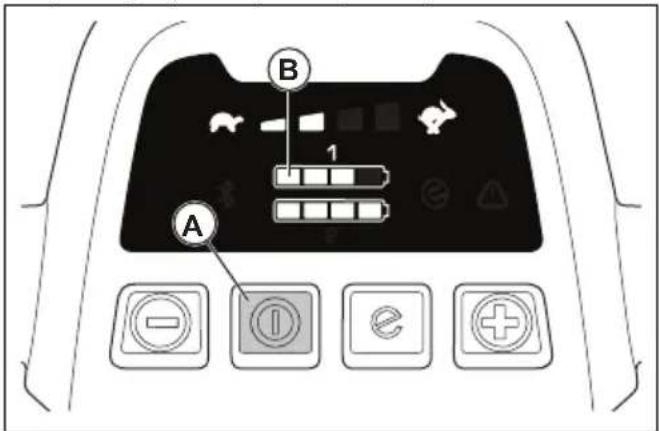
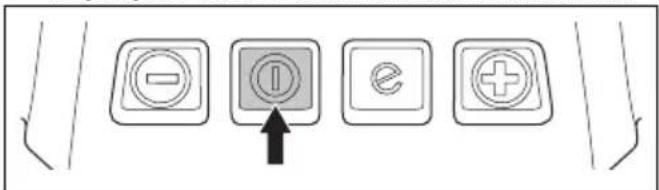
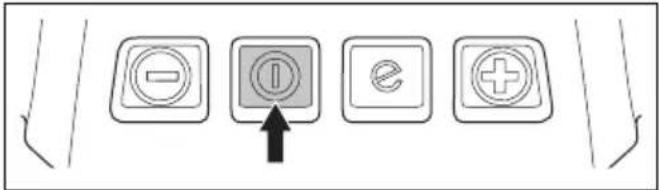
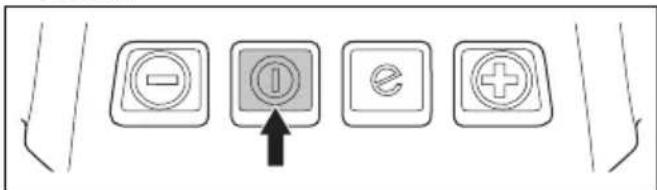
- Push the ON/OFF button (A) on the control panel. The display comes on. The battery indicator (B) shows the battery charge of the 2 batteries. The number of the battery that operates is shown adjacent to the battery indicator. For models LC 347iVX, LC 353iVX, the display also shows the set speed.
- Loosen the start inhibitor.
- Push the motor brake handle in the direction of the handlebar.
To use the drive on the wheels LC 347iVX, LC 353iVX
- Pull the drive bail in the direction of the handlebar to start the drive.
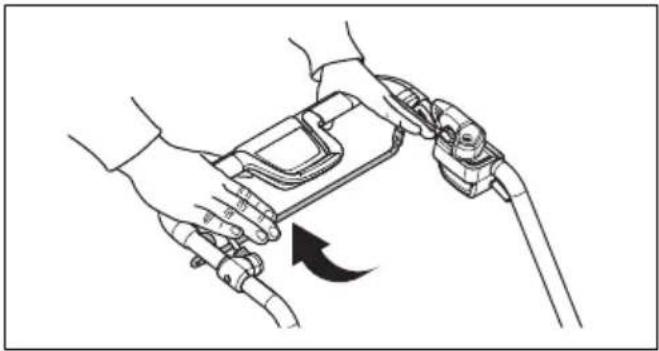
- Push + and - on the control panel to set the drive speed in 4 steps.
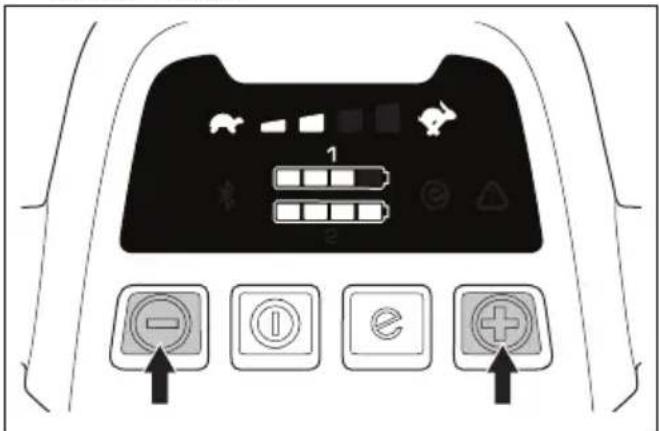
- Release the drive bail to disengage the drive, for example when you go near an obstacle.
To use the SavE™ function (LC 247i)
The product has a battery saving function (SavE™) that gives longer operation time.
- Push the SavE™ button to position 1 to start the function.
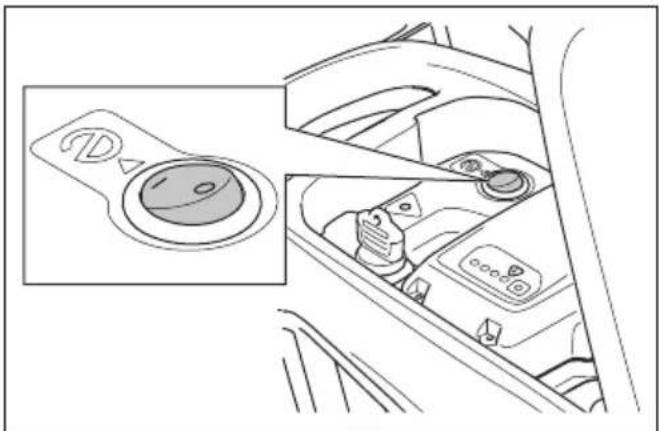
- Push the SavE™ button to position 0 to stop the function.
Note: The SavE™ function stops automatically if the ground conditions make it necessary to have a higher output. The SavE™ function starts automatically again when the ground conditions let it.
Note: The SavE™ function stops automatically if the ground conditions make it necessary to have a higher output. The SavE™ function starts automatically again when the ground conditions let it.
To use the SavE™ function (LC 347iVX, LC 353iVX)
The product has a battery saving function (SavE™) that gives longer operation time.
- Push the SavE™ button (A) to start the function. The SavE™ symbol (B) on the display comes on.
- Push the SavE™ button again to stop the function. The SavE™ symbol (B) on the display goes out.
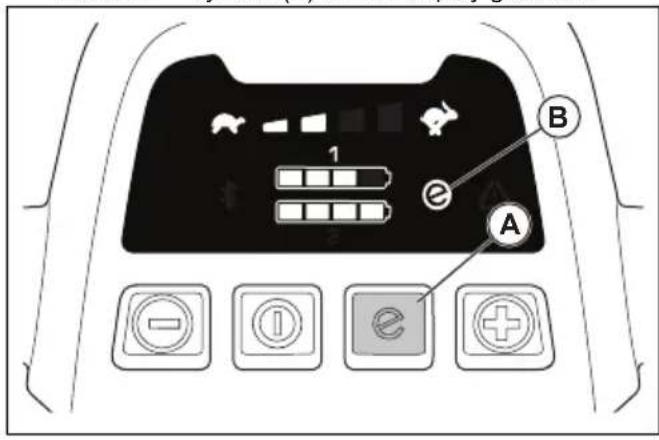
Note: The SavE™ function stops automatically if the ground conditions make it necessary to have a higher output. The SavE™ function starts automatically again when the ground conditions let it.
High load function
When the product cuts long or wet grass, the motor automatically increases rpm. The motor goes back to standard mode when high load is not necessary.
Automatic restart
During operation, the blade and motor can temporarily stop because of obstacles such as grass blockage below the cutting cover. If this occurs and you keep the motor brake handle pushed down, the product tries to restart automatically. If the product does not restart in 5 seconds, it can be necessary to clean below the cutting cover. Refer to To clean the product on page 18.

WARNING: Before a check of the cutting cover, release the motor brake handle, turn the safety key to 0, remove the battery and wait at minimum 5 seconds. There is a risk of injury if the obstacle is removed and the product accidentally starts.
To stop the product (LC 247i)

WARNING: Turn the safety key to 0 before you let the product out of view.
- Release the motor brake handle to stop the motor.
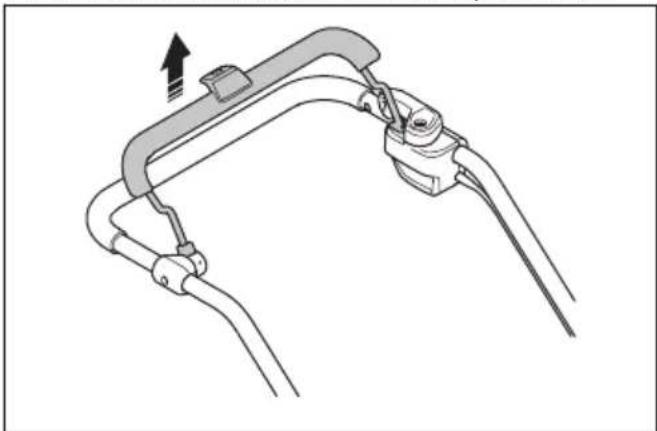
- Open the battery lid and turn the safety key to 0.
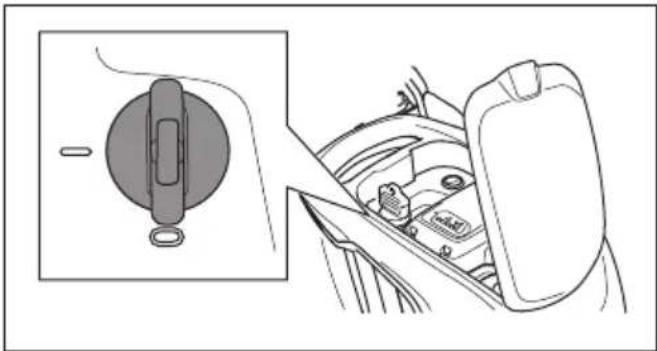
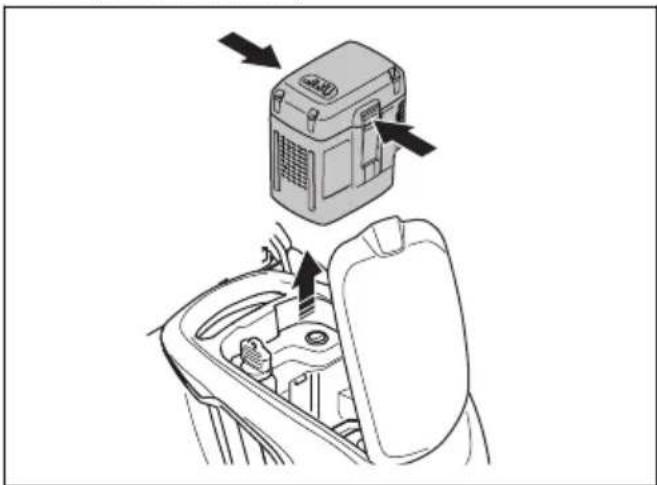
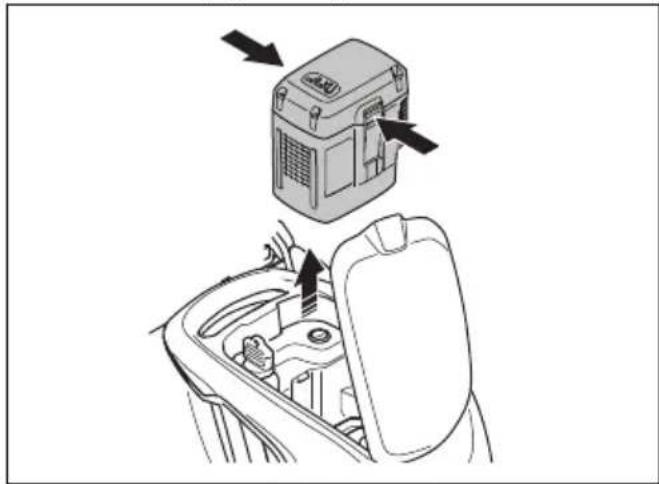
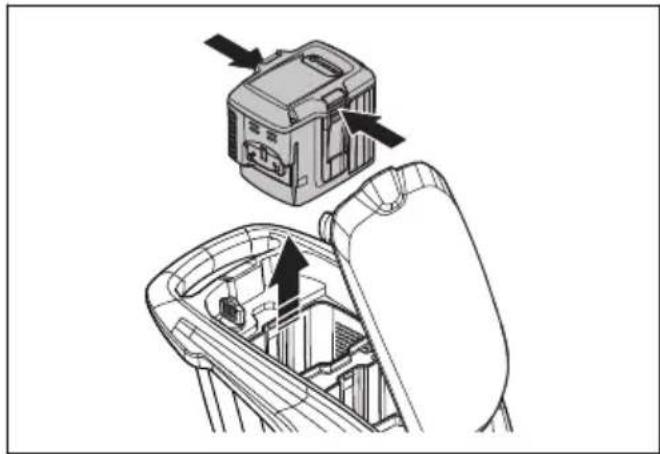
- To remove the battery, push the 2 release buttons and pull out the battery.
- Charge the battery if it is weak. For more information, refer to "To charge the battery" on page 13.
To stop the product (LC 347iVX, LC 353iVX)

WARNING: Turn the safety key to 0 before you let the product out of view.
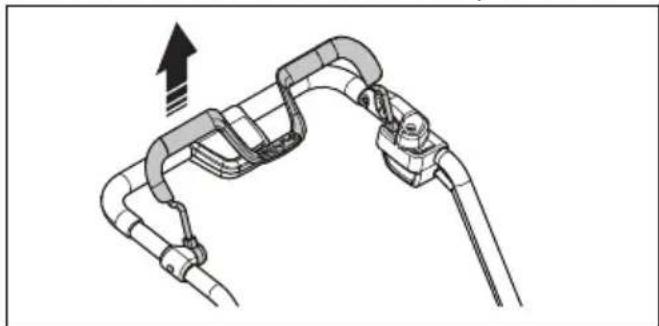
- Release the motor brake handle to stop the motor.
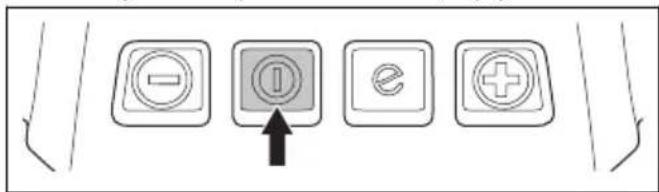
- Push the ON/OFF button on the control panel. All LED lights and symbols on the display go out.
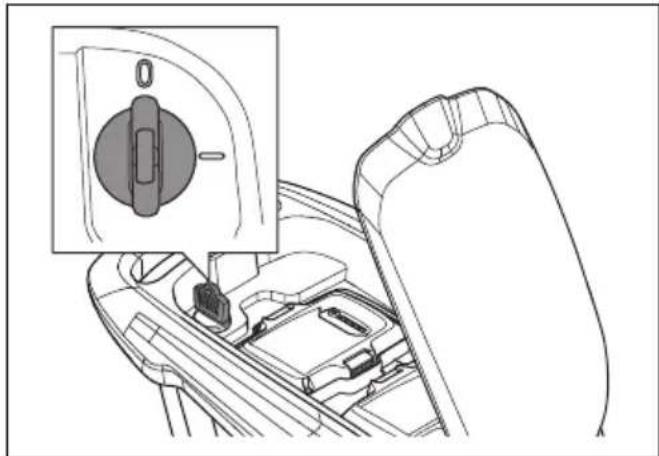
- Open the battery lid and turn the safety key to 0.
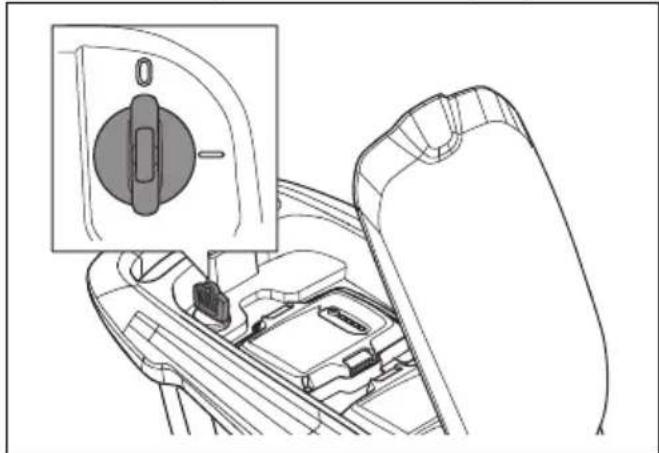
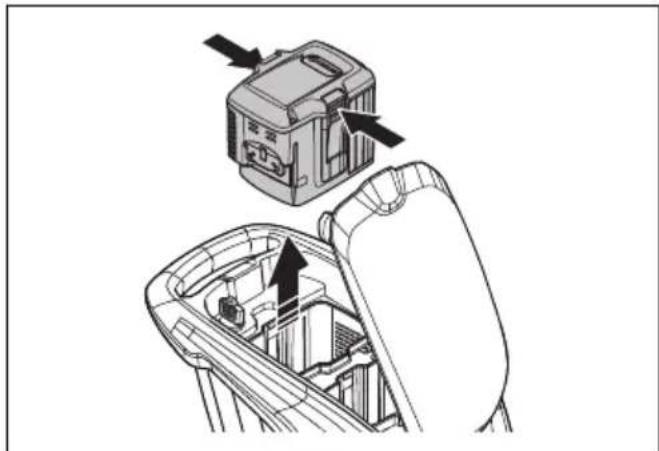
- To remove the battery, push the 2 release buttons and pull out the battery.
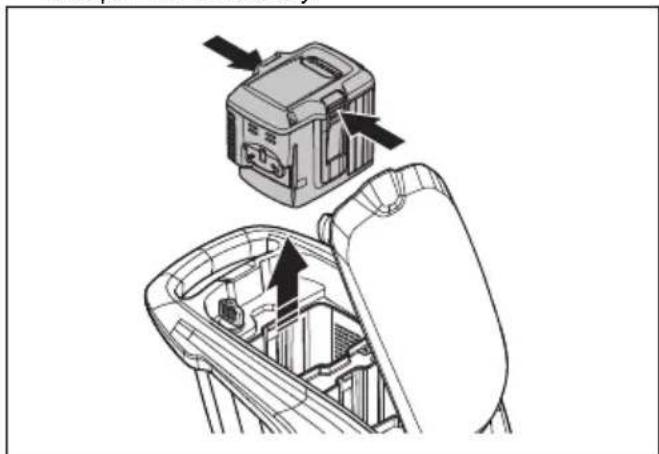
- Charge the battery if it is weak. For more information, refer to "To charge the battery" on page 13.
Note: The product is automatically de-energized if you do not operate it for some minutes. To start the product again, refer to "To start the product (LC 347iVX, LC 353iVX)" on page 14.
To get a good result
- Always use a sharp blade. A blunt blade gives an irregular result and the cut surface of the grass becomes yellow. A sharp blade also uses less energy than a blunt blade.
- Do not cut more than 1/3 of the length of the grass. Cut first with the cutting height set high. Examine the result and lower the cutting height to an applicable level. If the grass is very long, drive slowly and cut 2 times if necessary.
- Cut in different directions each time to prevent stripes in the lawn.
- Keep the cutting cover clean. Buildup from grass and dirt on the inner side of the cutting cover can decrease the cutting result. Refer to To clean the product on page 18.
To cut grass without a grass catcher or mulch plug attached
- Lift up the rear cover and remove the grass catcher.
- If a mulch plug and a mulch blade are attached, remove them.
- Close the rear cover before you operate the product.
When you operate the product, the cut grass discharges below the rear cover.
Maintenance
Introduction

WARNING: Before you do maintenance, you must read and understand the safety chapter.
For all servicing and repair work on the product, special training is necessary. We guarantee the availability of professional repairs and servicing. If your dealer is not a service agent, speak to them for information about the nearest service agent.
For more detailed information, refer to www.husqvarna.com.
Maintenance schedule
The maintenance intervals are calculated from daily use of the product. The intervals change if the product is not used daily.
For maintenance identified with * see instructions in Safety on page 4.
| Each use | Monthly | Each season | |
| Do a general inspection X | |||
| Clean the product X | |||
| Do a check of the start inhibitor * X | |||
| Make sure that the safety devices on the product are not defective * X | |||
| Examine the cutting equipment X | |||
| Examine the cutting cover * X | |||
| Do a check of the motor brake handle * X | |||
| Make sure that the ON/OFF button operates correctly and is not defective X | |||
| Examine the battery for damage X | |||
| Do a check of the battery charge X | |||
| Make sure that the release buttons on the battery operates correctly and that the battery locks into the product | X | ||
| Examine the battery charger for damage and make sure that it operates correctly. | X | ||
| Examine the connections between the battery and the product. Also examine the connection between the battery and the battery charger. | X |
To do a general inspection
• Make sure that the nuts and screws on the product are tightened. • Make sure that the cables on the product are not in a position where they can get damaged.
To clean the product
- Clean plastic parts with a clean and dry cloth.
- Do not use water to clean the product. Water can enter the battery or the motor and cause short circuit or damage to the product.
- Do not use a high pressure washer to clean the product.
- Do not flush water directly on the motor.
- Use a brush to remove leaves, grass and dirt.
To clean the battery and the battery charger

WARNING: Do not clean the battery or the battery charger with water.
• Make sure that the battery and the battery charger are clean and dry before you put the battery into the battery charger. - Clean the battery terminals with compressed air or use a soft and dry cloth. - Clean the surfaces of the battery and the battery charger with a soft and dry cloth.
To examine the cutting equipment

WARNING: To prevent accidental start, turn the safety key to 0, remove the battery and wait a minimum 5 seconds.

WARNING: Use protective gloves when you do maintenance on the cutting equipment. The blade is very sharp and cuts can easily occur.
- Examine the cutting equipment for damage or cracks. Always replace a damaged cutting equipment.
- Look at the blade to see if it is damaged or blunt.
Note: It is necessary to balance the blade after it is sharpened. Let a service center sharpen, replace and balance the blade. If you hit an obstacle that causes the product to stop, replace the damaged blade. Let the service center estimate if the blade can be sharpened or must be replaced.
To replace the blade
Refer to Technical data on page 22 for the correct type of blade.

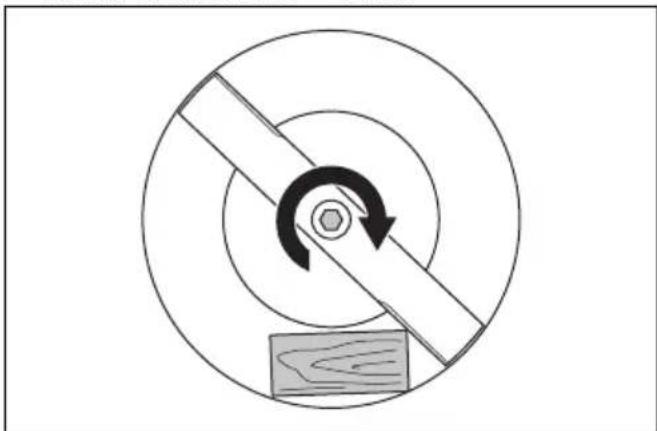
WARNING: Lock the blade with a block of wood to prevent injury to fingers when you replace the blade. The blade can be moved when the motor is off and fingers can become trapped between the blade and stationary parts.
- Lock the blade with a block of wood.
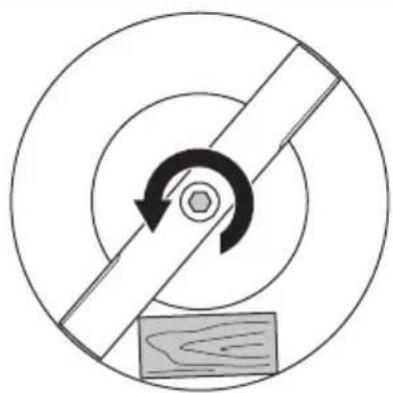
- Remove the blade bolt.
- Remove the blade.
- Examine the blade support and blade bolt to see if there are damages.
- Examine the motor shaft to make sure that it is not bent.
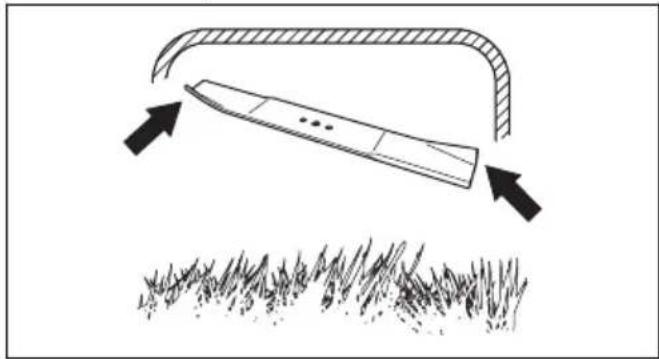
- When you attach the new blade, point the angled ends of the blade in the direction of the cutting cover.

- Make sure that the blade is aligned with the center of the motor shaft.
- Lock the blade with a block of wood. Attach the spring washer and tighten the bolt and washer with a torque of 23–28 Nm.
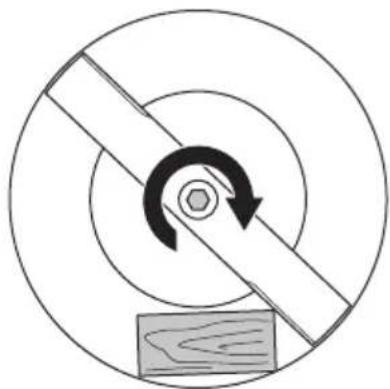
- Pull the blade around by hand and make sure that it turns freely.

WARNING: Use heavy duty gloves. The blade is very sharp and cuts can easily occur.
- Start the product to do a test of the blade. If the blade is not correctly attached, there is vibration in the product or the cutting result is unsatisfactory.
Troubleshooting
Battery
| LED on the battery Cause | Solution | |
| The green LED flashes. | The battery voltage is low. Charge the battery. | To charge the battery on page 13. |
| The error LED flashes. | The battery is weak. Charge the battery. | Refer to on page 13. |
| The temperature in the work environment is too high or too low. | Use the battery in temperatures between 5 °C - 40 °C. | |
| Overvoltage. Make sure that the mains | voltage is the same as on the rating plate on the product. | |
| Remove the battery from the battery charger. Wait 5 seconds and try again to charge the battery. If the problem continues, speak to an approved service agent. | ||
| The error LED is on. The | cell difference too much (1V). Speak to | an approved service agent. |
Battery charger
| LED on the battery charger | Cause Solution | |
| The error LED flashes. | The temperature in the work environment is too high or too low. | Use the battery charger in temperatures between 5 °C - 40 °C. |
| The error LED is on. S | Speak to an approved service agent. |
Lawn mower
The warning indicator (error LED) is found below
the battery lid ((LC 247i)) or on the control panel
((LC 347iVX, LC 353iVX)).
| Problem Error LED (number of flashes) | Cause Solution | |
| Error LED flash-es. The product does not operate correctly. | 3 The blade is blocked. Turn the safety key to 0 to prevent ac- cidental start. Remove the battery and wait a minimum of 5 seconds. Remove possible obstacles and make sure that the blade can rotate freely. If the prob- lem continues, speak to an approved service agent. | |
| 5 The motor speed drops too much, and the motor stops. | Increase the cutting height. Refer to To set the cutting height on page 12. | |
| 61 | The wheels or transmission is blocked. Turn the safety key to 0 to prevent ac- cidental start. Remove the battery and wait a minimum of 5 seconds. Remove the possible obstacles and make sure that the wheels can rotate freely. If the problem continues, speak to an ap- proved service agent. | |
| 10 The motor control is too hot. Stop the motor and wait until it has be- come cool. | ||
| Error LED flashes. The product stops. | 0 Battery connector failure. Examine the battery connector. | |
| 3 There is overload in the mo- tor. | Increase the cutting height. Refer to To set the cutting height on page 12. | |
| 8 The battery is weak. Charge the battery. Refer to To charge the battery on page 13. | ||
| 9 Battery error or no signal from battery. | Put the battery in the product correctly and examine the battery connector. If the error LED on the battery flashes. Refer to Battery on page 19. | |
| 12 Incorrect start procedure. The motor brake handle has been engaged before the motor starts. | Release the motor brake handle and wait approximately 5 seconds. Push the motor brake handle down again to start the product. | |
| Other errors. If other | errors occur, turn the safety key to 0, remove the battery and speak to an approved service agent. | |
Transportation, storage and disposal
Introduction

WARNING: To prevent unintentional start during transport, turn the safety key to "0", remove the battery, and wait at least 5 seconds.
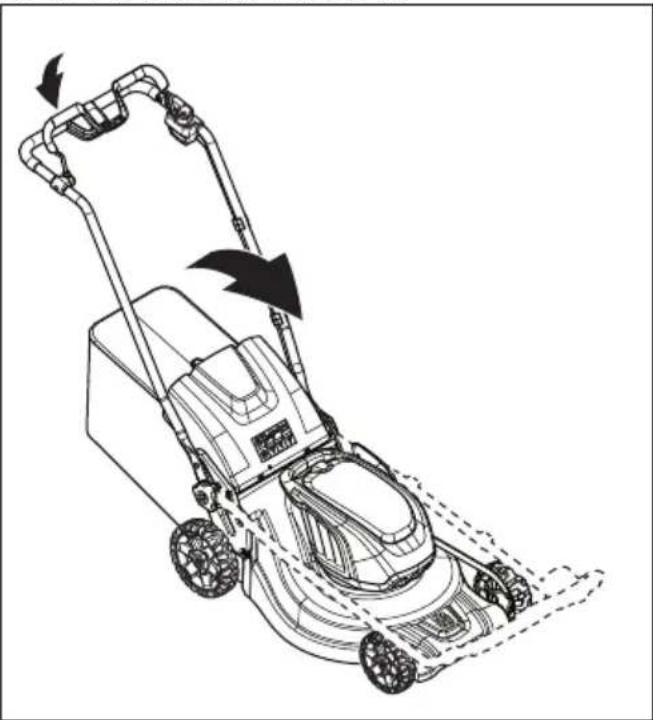
To set the product in transport position
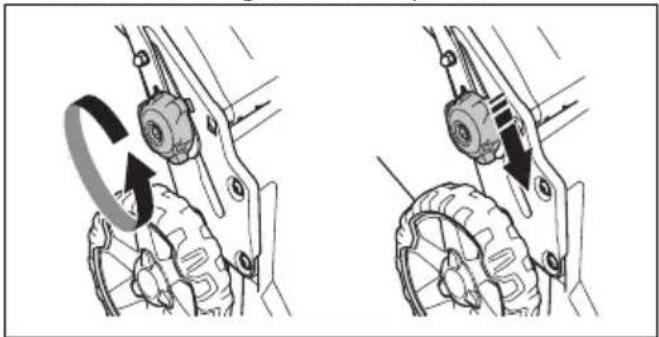
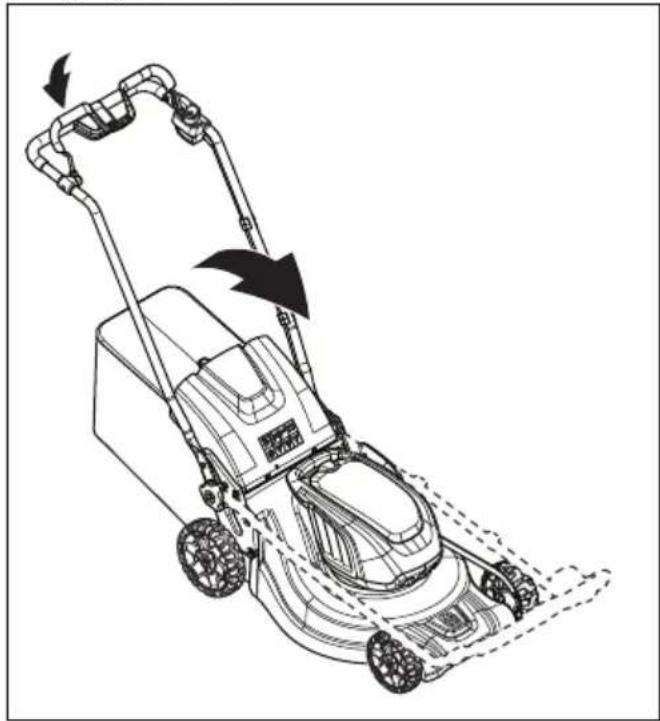
- Loosen the lower knobs.
- Move the knobs to the lower end of the grooves on the left and the right side of the product.
- Fold the handle forward.
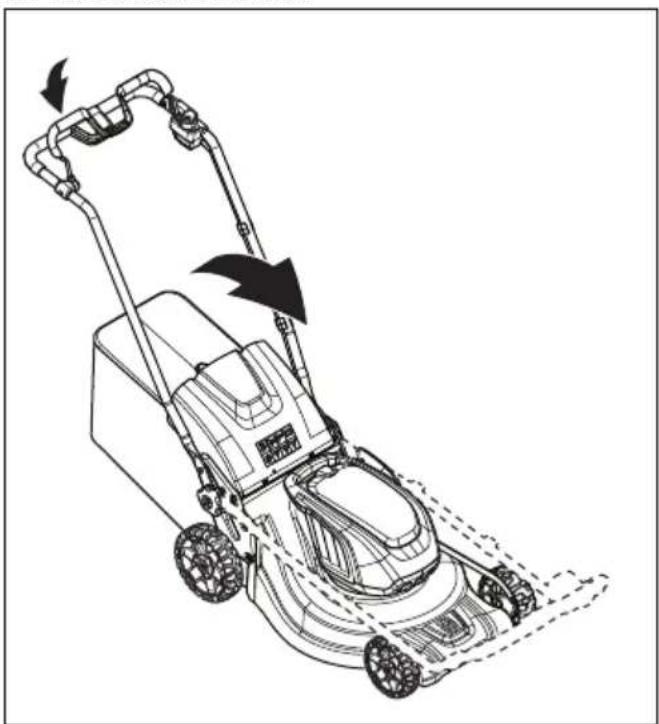
- Remove the grass catcher.
Transportation
• The Dangerous Goods Legislation requirements apply to the contained Li-ion batteries. - For commercial transports, special requirements on package and labels must be obeyed. - Make sure that you obey the regulations for dangerous material when you prepare the product for transport. Local regulations can apply. • Always remove the battery for transport. - Put tape on the battery connectors and make sure that the battery cannot move around during transport. - Attach the product during transport.
Storage
- Before storage, let the product become cool. • Always remove the battery for storage. • To prevent accidents, make sure that the battery is not connected to the product during storage.
- Keep the battery charger in a closed and dry space.
- Keep the battery and the battery charger in a dry space where there is no moisture or frost.
- Disconnect the battery from the battery charger during storage.
- Do not keep the battery where static electricity can occur. Do not keep the battery in a metal box.
- Keep the product where the ambient temperature is between -10°C and 40°C.
- Keep the battery where the ambient temperature is between 5 °C and 25 °C and out of sunlight.
- Keep the battery charger where the ambient temperature is between 5 °C and 45 °C and out of sunlight.
- Make sure that the battery is charged to 30% - 50% before you put it in storage for long periods.
- Keep the product, battery and battery charger in a locked area out of reach for children and not approved persons.
- Clean the product and make sure that the grass catcher is empty.
- Do the maintenance procedures given in this operator's manual. Refer to Maintenance on page 17.
- Do a complete servicing before you put the product in storage for a long time.
Disposal
Symbols on the product or the packaging of the product indicate that this product cannot be handled as domestic waste. It must be submitted to an appropriate recycling station for the recovery of electrical and electronic equipment.
By ensuring that this product is taken care of correctly, you can help to counteract the potential negative impact on the environment and people that can otherwise result through the incorrect waste management of this product. For more detailed information about recycling
this product, contact your municipality, your domestic waste service or the shop from where you purchased the product.
Technical data
Technical data
| LC 247i LC 347iVX LC | 353iVX | ||
| Cutting motor | |||
| Motor type BLDC (brushless) | 36V | BLDC (brushless)36V | BLDC (brushless)36V |
| Motor speed – SavE, rpm 2600/min 2600/min | 2600/min | ||
| Motor speed – Nominal, rpm 3000/min 3000/min | 3000/min | ||
| Motor speed – High load, rpm 3500/min 3500/min | 3500/min | ||
| Motor output – max. kW 0.96 0.96 1.05 | |||
| Motor output – Nominal, kW 0.75 0.75 0.9 | |||
| Drive motor | |||
| Motor output – Nominal, kW N/A 0.25 0.25 | |||
| Self walk speed, km/h N/A 3.0–4.5 3.0–4.5 | |||
| Speed adjustment levels N/A 4 4 | |||
| Weight | |||
| Weight without bag (excl. battery), kg 24.5 26 | 28 | ||
| Weight with bag (incl. 2 x BLi30), kg | 30.5 32.0 34.5 | ||
| Battery | |||
| Type of battery | Husqvarna Battery Series | ||
| Battery runtime | |||
| Battery runtime, min, (free run) with SavE activated, with one Husqvarna 7.7 Ah battery (Bli30). | 62 | 62 | 46 |
| Battery runtime, min, (free run) with standard mode activated, with one Husqvarna 7.7 Ah battery (Bli30). | 43 | 43 | 28 |
| Noise emissions 2 | |||
| Sound power level, measured dB (A) 94 94 97 | |||
| Sound power level, guaranteed LWA dB (A) 95 | 95 98 | ||
| Sound levels 3 | |||
| Sound pressure level at the operator's ear, dB (A) | 82 82 86 | ||
| Vibration levels 4 | |||
| Handle, m/s 2 | 0.42 0.42 2.64 | ||
| Cutting equipment | |||
| Cutting height, mm 20-75 mm 20-75 mm 20-75 | mm | ||
| Cutting width, cm 47 47 53 | |||
| Blade Standard Collect 5905934-10 Collect 5905934-10 Collect 5940757-10 | |||
| Blade accessory Mulch 5907010-10 Mulch 5907010-10 Mulch 5950072-10 | |||
| Grass catcher capacity, liters 55 55 60 | |||
| Radio frequency data for Bluetooth® | LC 247i LC 347iVX LC 353iVX | ||
| Frequency band, GHz | N/A | 2.4-2.4835 2.4-2.4835 | |
| Output power, max. dBm | N/A | 4 | 4 |
| Approved batteries | Type | Battery capacity, Ah | Voltage, V | Weight, lb/kg |
| BLi20 | Lithium-ion | 4.0 | 36 | 2.6/1.2 |
| BLi30 | Lithium-ion | 7.7 | 36 | 4.2/1.9 |
| Approved chargers for the specified batteries, BLi | Input voltage, V Frequency, Hz Power, W | ||
| QC80 | 100–240 | 50–60 80 | |
| 40-C80 | 100-240 | 50-60 | 68.8 |
| Approved chargers for the specified batteries, BLi Input vol | ltage, V Frequency | Hz Power, W | |
| QC250 100–240 50–60 250 | |||
Declaration of Conformity
EU Declaration of conformity
We, Husqvarna AB, SE-561 82 Huskvarna, Sweden, tel: +46-36-146500, declare on our sole responsibility that the product:
| Description Lawn mower | |
| Brand Husqvarna | |
| Type / Model LC 247i | |
| Identification Serial numbers dating from 2021 and onwards | |
complies fully with the following EU directives and regulations:
| Directive/Regulation Description | |
| 2006/42/EC "relating to machinery" | |
| 2014/30/EU "relating to electromagnetic compatibility" | |
| 2000/14/EC "relating to the noise emissions in the environment" | |
| 2011/65/EU “on the restriction of the use of certain hazardous substances in electrical and electronic equipment” |
and that the following standards and/or technical specifications are applied: EN 62841-1:2015+AC:2015, EN 62841-4-3:2021+A11:2021, EN ISO 12100:2010, EN 55014-1:2017+A11:2020, EN 55014-2:2015, EN IEC 63000:2018.
Notified body: 0404, RISE SMP Svensk Maskinprovning AB, Box 7035, SE-750 07 Uppsala has certified conformity with the council's directive 2000/14/EC, conformity assessment procedure: Annex VI.
For information relating to noise emissions, refer to Technical data on page 22.
Huskvarna, 2021-12-01
Claes Losdal, Development Manager/Garden Products, Husqvarna AB
Responsible for technical documentation

EU Declaration of conformity
We, Husqvarna AB, SE-561 82 Huskvarna, Sweden, tel: +46-36-146500, declare on our sole responsibility that the product:
| Description Lawn mower | |
| Brand Husqvarna | |
| Type / Model LC 347iVX, LC 353iVX | |
| Identification Serial numbers dating from 2021-12-01 and onwards | |
complies fully with the following EU directives and regulations:
| Directive/Regulation Description | |
| 2006/42/EC "relating to machinery" | |
| 2014/53/EU "relating to radio equipment" | |
| 2000/14/EC "relating to the noise emissions in the environment" | |
| 2011/65/EU “on the restriction of the use of certain hazardous substances in electrical and electronic equipment” |
and that the following standards and/or technical specifications are applied: EN 62841-1:2015+AC:2015, EN 62841-4-3:2021+A11:2021, EN ISO 12100:2010, EN 55014-1:2017+A11:2020, EN 55014-2:2015, EN IEC 63000:2018, EN ETSI 300 328 v.2.2.2, EN 50663: 2017, ETSI EN 301 489-1 V2.2.3, ETSI EN 301 489-17 V3.2.4.
Notified body: 0404, RISE SMP Svensk Maskinprovning AB, Box 7035, SE-750 07 Uppsala has certified conformity with the council's directive 2000/14/EC, conformity assessment procedure: Annex VI.
For information relating to noise emissions, refer to Technical data on page 22.
Huskvarna, 2021-12-01
Δ · 2 m
Claes Losdal, Development Manager/Garden Products, Husqvarna AB
Responsible for technical documentation

Registered trademarks
The Bluetooth® word mark and logos are registered trademarks owned by Bluetooth SIG, inc. and any use of such marks by Husqvarna is under license.
Contents

4. Remove the grass catcher.
Transportation
Checking the engine brake handle

Using the wheel drive (LC 347iVX, LC 353iVX)
Technical data
Technical data
Checking the engine brake handle
The engine brake handle stops the engine. When the engine brake handle is released, the engine stops.
- Start the product. See Operation on page 87.
- Release the engine brake handle.

How to start the product (LC 347iVX, LC 353iVX)
- Press the SavE TM button to position 0 to stop the function.
Technical data
Technical data

Technical specifications
Technical data

Technical data
Technical data

Technical data Technical data
Checking the engine brake handle
The engine brake handle can be used to stop the engine. When the engine brake handle is released, the engine stops.
Assembling the mulching plug (accessory)
Bluetooth® information (LC 347iVX, LC 353iVX)

Starting the product (LC 347iVX, LC 353iVX)
Using the product on wheels (LC 347iVX, LC 353iVX)
- Charge the battery if it is empty. For more information, see Battery charging on page 195.
(LC 347iVX, LC 353iVX) Stopping the product

Technical data
Technical data

- Tilt the handle forward.
Technical data
Technical data

DANGER – keep hands and feet away.
Product reliability
- Check that the product has stopped. If the motor does not stop within 3 seconds, adjust the motor brake at a Husqvarna service center.
Checking the ignition lock
- Set the handle height to one of the two available positions.
- Move the wheels up toward the handle until they stop with a click.
Assembling the chipper attachment (accessory)
- Replace the blade with the chipper blade from the chipper kit. See Replacing the blade on page 275.
Operation
Introduction

WARNING: Before operating the product, you must read and understand the safety chapter.
Husqvarna Connect
Husqvarna Connect is a free mobile application. The Husqvarna Connect app provides you with additional functions for your Husqvarna product.

- Place the battery in the battery charger. If the battery is correctly connected to the battery charger, the green indicator on the charger turns on.
- When all LED indicators on the battery are lit, the battery is fully charged. Charge the battery for a maximum of 24 hours.
- To disconnect the battery charger from the wall outlet, pull the plug, not the cable.
- Remove the battery from the battery charger.
Battery charger status
You can charge or use the Husqvarna lithium-ion battery at any charge level. The battery is not damaged. A fully charged battery will not discharge when left in the charger.
| LED zaslon Stanje punjenja | |
| Indikator LED 1 treperi 0% | -25% |
| Svijetli indikator LED 1, indikator LED 2 treperi | 25% – 50% |
| Svijetle indikatori LED 1, LED 2, indikator LED 3 treperi | 50% – 75% |
| Svijetle indikatori LED 1, LED 2, LED 3, indikator LED 4 treperi | 75% – 100% |
| Svijetle indikatori LED 1, LED 2, LED 3 i LED 4 | Potpuno napunjena |
Starting the product (LC 247i)
- Open the battery cover.
- Insert a charged battery into one of the battery compartments. For longer run time, insert a second charged battery into the other battery compartment.
- Turn the safety key to 1.
- Stand behind the product.
- Release the start interlock.
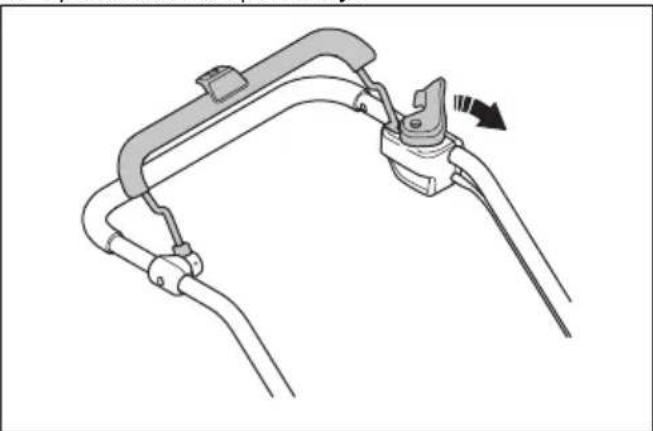
Starting the product (LC 347iVX, LC 353iVX)
- Open the battery cover.
- Insert a charged battery into one of the battery compartments. For longer run time, insert a second charged battery into the other battery compartment.
- Turn the safety key to 1.
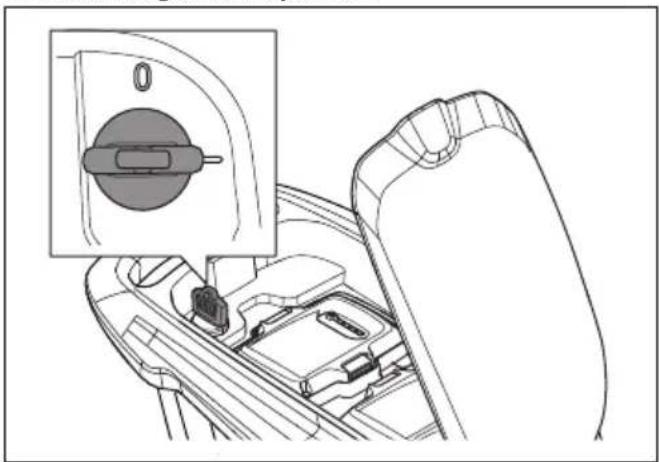
- Stand behind the product.
- Press the ON/OFF button (A) on the control panel. The display turns on. The battery indicator (B) shows the charge level of the 2 batteries. The number of inserted batteries is shown next to the battery indicator. For models LC 347iVX and LC 353iVX, the set speed is also shown on the display.
- Release the start interlock.
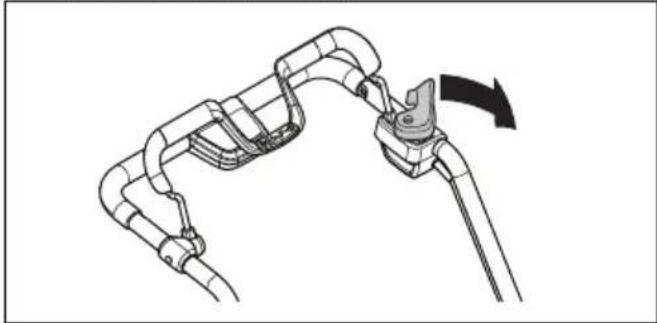
Using the wheel drive LC 347iVX, LC 353iVX
- Press + and - on the control panel to set the drive speed in 4 steps.
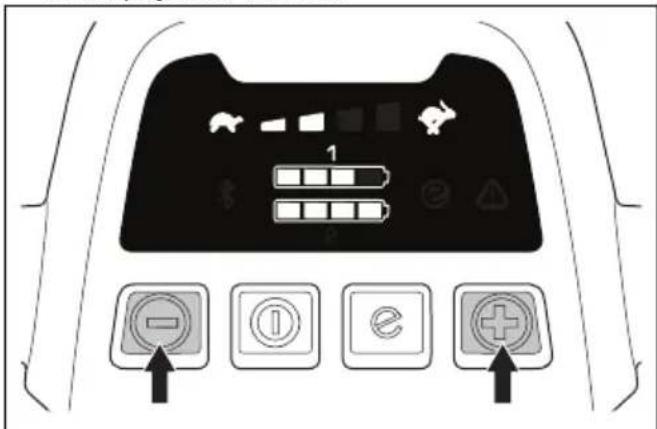
- Press the SavE TM button to position 0 to stop the function.
- Open the battery cover and turn the safety key to 0.
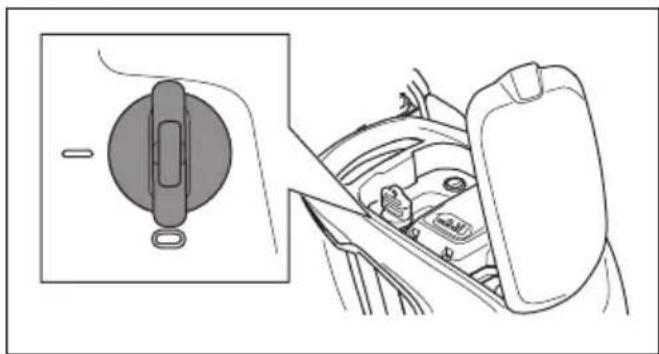
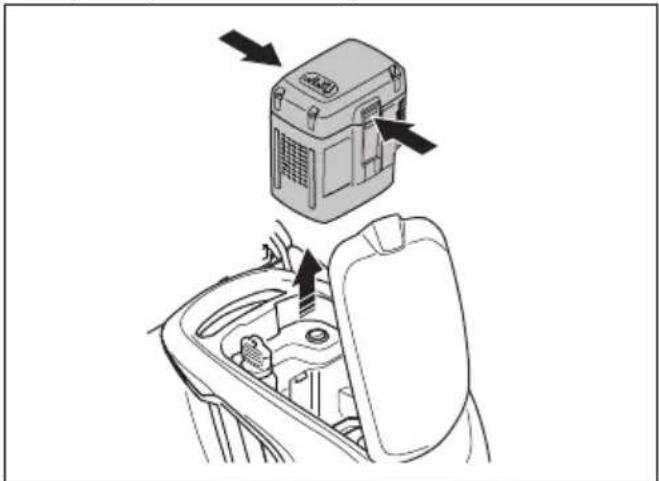
- To remove the battery, press the 2 release buttons and take out the battery.
- Replace a weak battery. For more information, see the section Replacing the battery on page 270.
Stopping the product (LC 347iVX, LC 353iVX)

WARNING: Before leaving the product unattended, turn the safety key to 0.
- Release the engine brake handle to stop the engine.
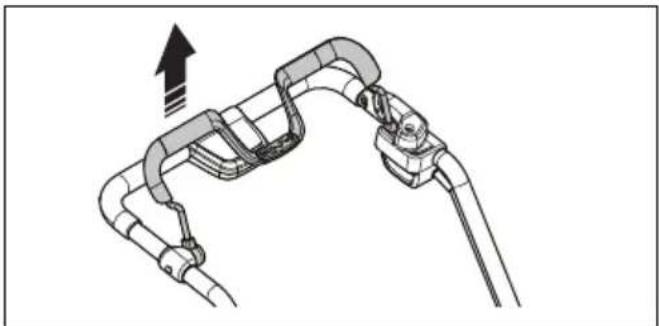
- Press the ON/OFF button on the control panel. All LED indicators and symbols on the display turn off.
- Open the battery cover and turn the safety key to 0.
- To remove the battery, press the 2 release buttons and take out the battery.
- Replace a weak battery. For more information, see the section Replacing the battery on page 270.
Note: The product stops automatically if it is not used for a few minutes. To restart the product, see Starting the product (LC 347iVX, LC 353iVX) on page 271.
For a good result
- The blade must be aligned with the center of the motor shaft.
- Block the blade with a wooden block. Install the elastic split ring and tighten the screw and washer to a torque of 23–28 Nm.
Technical data
Technical data
| LC 247i LC 347iVX LC | 353iVX | ||
| Rezni motor | |||
| Vrsta motora BLDC (beskontaktni) | 36 V | BLDC (beskontaktni)36 V | BLDC (beskontaktni)36 V |
| Broj okretaja motora – SavE, o/min 2600/min | 2600/min 2600/min | ||
| Broj okretaja motora – nazivni, o/min 3000/min | 3000/min 3000/min | ||
| Broj okretaja motora – veliko opterećenje,o/min | 3500/min 3500/min 3500/min | ||
| Snaga motora – maks. kW 0,96 0,96 1,05 | |||
| Snaga motora – nazivna, kW 0,75 0,75 0,9 | |||
| Pogonski motor | |||
| Snaga motora – nazivna, kW Nije dostupno 0,25 | 0,25 | ||
| Brzina samostalnog hoda, km/h Nije dostupno | 3,0 – 4,5 3,0 – 4,5 | ||
| Razine prilagodbe brzine Nije dostupno 4 4 | |||
| Težina | |||
| Težina bez vreće (bez baterije), kg 24,5 26 28 | |||
| Težina s vrećom (s 2 x BLi30), kg | 30,5 32,0 34,5 | ||
| Baterija | |||
| Vrsta baterije | Serije baterije Husqvarna | ||
| Trajanje baterije | |||
| Trajanje baterije, min, (slobodni pogon) s uk-ljučenom funkcijom SavE, s jednom baterijom tvrtke Husqvarna od 7,7 Ah (Bli30). | 62 62 46 | ||
| Trajanje baterije, min, (slobodni pogon) s uk-ljučenom standardnim načinom rada, s jed-nom baterijom tvrtke Husqvarna od 7,7 Ah (Bli30). | 43 43 28 | ||
| Emisije buke 42 | |||
| Razina jačine zvuka, mjerena u dB (A) | 94 94 97 | ||
| Razina jačine zvuka, zajamčena LWA dB (A) | 95 95 98 | ||
| Razine buke 43 | |||
| Razine tlaka zvuka na uhu rukovatelja, dB (A) | 82 82 86 | ||
| Razine vibracije 44 | |||
| Ručka, m/s 2 | 0,42 0,42 2,64 | ||
| Rezna oprema | |||
| Visina rezanja, mm 20 – 75 mm 20 – 75 mm 20 – 75 mm | |||
| Širina rezanja, cm 47 47 53 | |||
| Standardni nož Skupljanje, | 5905934-10 | Skupljanje,5905934-10 | Skupljanje,5940757-10 |
| Dodatna oprema za nož Malčiranje | 5907010-10 | Malčiranje5907010-10 | Malčiranje5950072-10 |
| Zapremnina sakupljača trave, litri 55 55 60 | |||
| Podaci o radijskoj frekvenciji za Bluetooth® | LC 247i LC 347iVX LC 353iVX | ||
| Frekvencijski pojas, GHz Nije dostupno | 2,4 – 2,4835 2,4 – 2,4835 | ||
| Izlazna snaga, maks. dBm Nije dostupno | 4 4 |
| Odobrene baterije Vrsta | Kapacitet baterije, Ah | Napon, V | Težina, lb/kg |
| BLi20 | Litij-ion | 4,0 | 36 |
| BLi30 | Litij-ion | 7,7 | 36 |
| Odobreni punjači za navedene baterije, BLi | Ulazni napon, V | Frekvencija, Hz | Snaga, W |
| QC80 | 100 – 240 | 50 – 60 | 80 |
| 40-C80 | 100 – 240 | 50 – 60 | 68,8 |
| QC250 | 100 – 240 | 50 – 60 | 250 |
Declaration of conformity
EU declaration of conformity
We, Husqvarna AB, SE-561 82 Huskvarna, Sweden, tel.: +46-36-146500, declare under our sole responsibility that the product:
| Opis Kosilica | |
| Marka Husqvarna | |
| Vrsta / Model LC 247i | |
| Identifikacija Serijski brojevi iz 2021 i noviji | |
is fully compliant with the following EU directives and regulations:

Technical data
Technical data
| LC 247i LC 347iVX LC | 353iVX | ||
| Nyírómotor | |||
| Motortípus BLDC (kefe nélküli) | 36 V | BLDC (kefe nélküli)36 V | BLDC (kefe nélküli)36 V |
| Motor fordulatszáma – SavE, ford./perc 2600/min 2600/min 2600/min 2600/min 2600/min 2600/min 2600/min 2600/min 2600/min 2600/min 2600/min 2600/min 2600/min 2600/min 2600/min 2600/min 2600/min 26 | 300/min 3000/min 3000/min 3000/min 3000/min 3000/min 3000/min 3000/min 3000/min 3000/min 3000/min 3000/min 3000/min 3000/min 3000/min 3000/min 3000/min 3000/min | 3500/min 3500/min 3500/min 3500/min 3500/min 3500/min 3500/min 3500/min 3500/min 3500/min 3500/min 3500/min 3500/min 3500/min 3500/min 3500/min 3500/min 350 | 3500/min 3500/min 3500/min 3500/min 3500/min 3500/min 3500/min 3500/min 3500/min 3500/min 3500/min 3500/min 3500/min 3500/min 3500/min 3500/min 35 |
| Motor fordulatszáma – Névleges, ford./perc 3000/min 3000/min 3000/min 3000/min 3000/min 3000/min 3000/min 3000/min 3000/min 3000/min 3000/min 3000/min 3000/min 3000/min 3000/min 3000/min 30 | 3500/min 3500/min 3500/min 3500/min 3500/min 3500/min 3500/min 3500/min 3500/min 3500/min 3500/min 3500/min 3500/min 3500/min 3500/min 3500/min 3 | 3500/min 3500/min 3500/min 3500/min 3500/min 3500/min 3500/min 3500/min 3500/min 3500/min 3500/min 3500/min 3500/min 3500/min 3500/min 3500/min 35 | 3500/min 3500/min 3500/min 3500/min 3500/min 3500/min 3500/min 3500/min 3500/min 3500/min 35 |
| Motor fordulatszáma – nagy terhelés, ford./perc | 3500/min 3500/min 3500/min 3500/min 3500/min 3500/min 3500/min 3500/min 3500/min 3500/min 3500/min 3500/min 3500/min 3500/min 3500/min 35 | 3500/min 1999/1999/1999/1999/1999/1999/1999/1999/1999/1999/1999/1999/1999/1999/1999/1999/1999/1999/1999/1999/1999 | 3500/min 1999/1999/1999/1999/1999/1999/1999/1999/1999/1999/1999/1999/1999/1999/1999/1999/1999/1999/19 |
| Motor teljesítménye – max. kW 0,96 0,96 1,05 | 3500/min 3500/min 3500/min 3500/min 3500/min 3500/min 3500/min 3500/min 3500/min 3500/min 3500/min 3500/min 35 | 3500/min 1999/1999/1999/1998/1998/1998/1998/1998/1998/1998/1998/1998/1998/1998/1998/1998/1998/1998/1998/1998/1998/1998/1998/199 | 3500/min 1999/1999/1999/1999/1999/1999/1999/1999/1999/1999/1999/1999/1999/1999/1999/1999/1999/1999/ |
| Motor teljesítménye – névleges, kW 0,75 0,75 0,75 0,75 0,75 0,75 0,75 0,75 0,75 0,75 0,75 0,75 0,75 0,75 0,75 0,75 0,75 0,75 0,75 0,75 0,7 | 0,9 | ||
| Hajtómotor | |||
| Motor teljesítménye – névleges, kW N/A 0,25 0,25 0,25 | |||
| Önjárás sebessége, km/h N/A 3,0-4,5 3,0-4,5 | |||
| Sebességfokozatok száma N/A 4 4 | |||
| Tömeg | |||
| Tömeg zsák nélkül (akkumulátor nélkül), kg 24,5 26 28 | |||
| Tömeg zsákkal (2 x BLi30 akkumulátorral),kg | 30,5 32,0 34,5 | ||
| Akkumulátor | |||
| Akkumulátor típusa | Husqvarna akkumulátor sorozat | ||
| Akkumulátor üzemideje | |||
| Akkumulátor üzemidő, min., (üresjárat) SavE funkcióval, egy 7,7 Ah-s Husqvarna (Bli30) akkumulátorral. | 62 62 46 | ||
| Akkumulátor üzemidő, min., (üresjárat) nor-mál üzemmódban, egy 7,7 Ah-s Husqvarna (Bli30) akkumulátorral. | 43 43 28 | ||
| Zajkibocsátás 46 | |||
| Hangteljesítményszint, mért dB (A) érték 94 94 | 97 | ||
| Hangteljesítményszint, garantált, LWA dB (A) | 95 95 98 | ||
| Zajszintek 47 | |||
| Hangnyomásszint a felhasználó fülénél, dB (A) | 82 82 86 | ||
| Rezgésszintek 48 | |||
| Fogantyú, m/s 2 | 0,42 0,42 2,64 | ||
| Vágófelszerelés | |||
| Vágási magasság, mm 20-75 mm 20-75 mm | 20-75 mm | ||
| Vágási szélesség, cm 47 47 53 | |||
| Standard kés Gyűjtő 5905934-10 Gyűjtő 5905 | 934-10 Gyűjtő 5940757 | -10 | |
| Tartozék kés Mulch 5907010-10 Mulch 59070 | 10-10 Mulch 5950072 | -10 | |
| Fügyűjtő úrtartalma, liter 55 55 60 | |||

Technical data
Technical data
Inspecting the motor brake handle
Assembling the multi-plug (optional accessory)
Setting the product in the operating position

- Fold the handle forward.
- Remove the grass catcher.
Transportation
Technical specifications
Technical specifications
Checking the engine brake handle
The engine brake handle stops the engine. When the engine brake handle is released, the engine stops.

Starting the product (LC 347iVX, LC 353iVX)
- Turn the blade by hand and check that it rotates freely.

Technical data
Technical data
Checking the engine brake handle

- To remove the battery, press both release buttons and remove the battery.
- To remove the battery, press both release buttons and remove the battery.
Technical data
Technical data
Check the engine brake handle
Mounting the mulch plug (accessory)

| LED-display Laadstatus | |
| LED 1 knippert 0%-25% | |
| Led 1 brandt, led 2 knip-pert | 25%-50% |
| Led 1 en led 2 branden, led 3 knippert | 50%-75% |
| Led 1, led 2 en led 3 bran-den, led 4 knippert | 75%-100% |
| Led 1, led 2, led 3, led 4 branden | Volledig opgeladen |
Starting the product (LC 347iVX, LC 353iVX)
Technical data
Technical data
Claes Losdal, Development Manager/Garden Products, Husqvarna AB
Claes Losdal, Development Manager/Garden Products, Husqvarna AB
Check the engine brake handle
The engine brake handle stops the engine. When you release the engine brake handle, the engine stops.
- Start the product. See Operation on page 446.
- Release the engine brake handle.
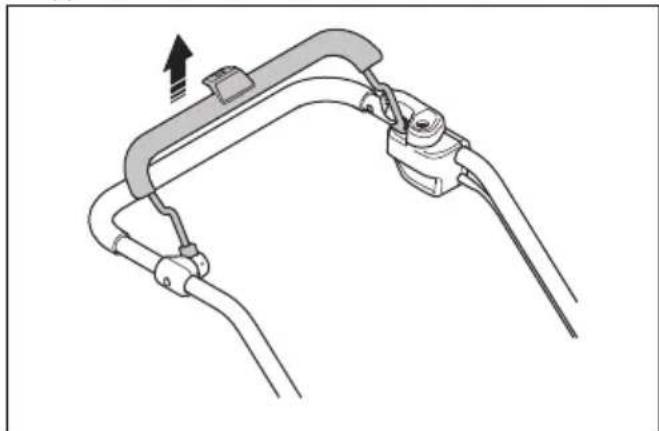
- Check that the product stops. If the engine does not stop within three seconds, you must have an approved Husqvarna service workshop adjust the engine brake.
Check the start interlock
How to set the product in the working position

- Place the battery in the battery charger. The green lamp on the charger lights up when the battery is correctly connected to the charger.
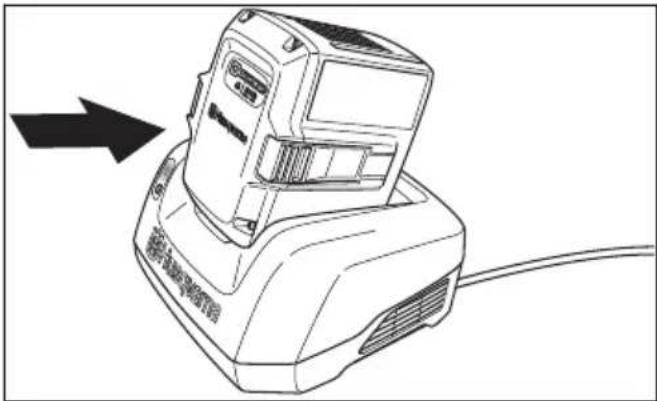
- When all LED indicators on the battery light up, the battery is fully charged. Charge the battery for a maximum of 24 hours.
- To disconnect the charger from the wall outlet, pull on the plug itself, not the cord.
- Remove the battery from the battery charger.
Battery charge status
A Husqvarna Li-ion battery can be charged or used at any charge level. The battery will not be damaged. The charge level of a fully charged battery does not decrease when the battery is left in the charger.
| LED-display Ladestatus | |
| LED 1 blinker 0–25 % | |
| LED 1 lyser, LED 2 blinker | 25–50 % |
| LED 1, LED 2 lyser, LED 3 blinker | 50–75 % |
| LED 1, LED 2, LED 3 ly-ser, LED 4 blinker | 75–100 % |
| Lampe 1, lampe 2, lampe 3 og lampe 4 tennes | Fulladet |
How to start the product (LC 247i)
- Stand behind the product.
- Release the start interlock.
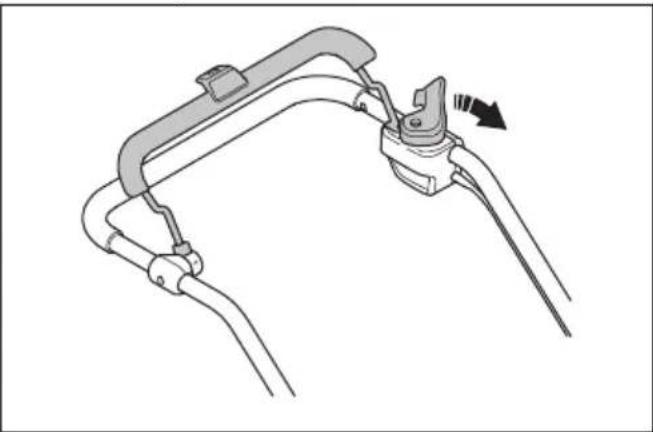
How to start the product (LC 347iVX, LC 353iVX)
- Stand behind the product.
- Press the ON/OFF button (A) on the control panel. The display turns on. The battery indicator (B) shows the battery level of the two batteries. The number of the battery in use is shown next to the battery indicator. For models LC 347iVX, LC 353iVX, the display also shows the set speed.
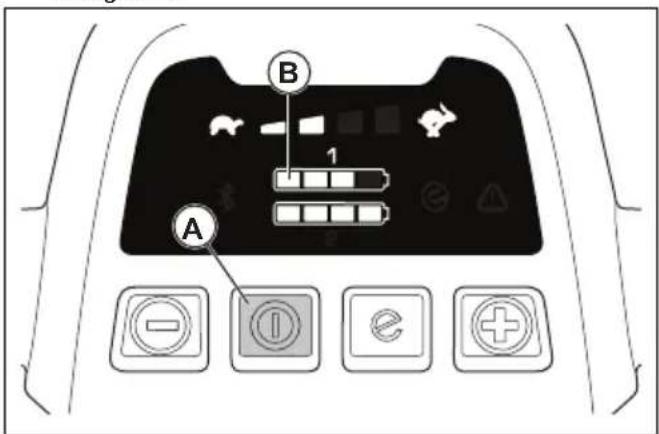
- Release the start interlock.
How to use the wheel drive LC 347iVX, LC 353iVX
- Press the ON/OFF button on the control panel. All LED lamps and symbols on the display turn off.
- Tilt the unit forward.
- Empty the collector.
Transport
Technical data
Technical data
| LC 247i LC 347iVX LC | 353iVX | ||
| Klippemotor | |||
| Motortype BLDC (børsteløs) | 36 V | BLDC (børsteløs)36 V | BLDC (børsteløs)36 V |
| Motorhastighet – SavE, turtall 2600/min 2600/min 2600/min | |||
| Motorhastighet – nominell, turtall 3000/min 3000/min 3000/min | |||
| Motorhastighet – høybelastning, turtall 3500/min 3500/min | |||
| Motoreffekt – maks. kW 0,96 0,96 1,05 | |||
| Motoreffekt – nominell, kW 0,75 0,75 0,9 | |||
| Drivmotor | |||
| Motoreffekt – nominell, kW Ikke tilgjengelig 0,25 0,25 | |||
| Selvgående hastighet, km/t Ikke tilgjengelig 3,0–4,5 3,0–4,5 | |||
| Nivåer for hastighetsjustering Ikke tilgjengelig 4 4 | |||
| Vekt | |||
| Vekt uten pose (uten batteri), kg 24,5 26 | 28 | ||
| Vekt med pose (inkl. 2 stk. BLi30), kg | 30,5 32,0 34,5 | ||
| Batteri | |||
| Batteritype | Husqvarna-batteriserien | ||
| Batteriets driftstid | |||
| Batteriets driftstid, min., (frikjøring) med Sa-vE aktivert, med ett Husqvarna 7,7 Ah-batteri (Bli30) | 62 | 62 | 46 |
| Batteriets driftstid, min., (frikjøring) med stan-dardmodus aktivert, med ett Husqvarna 7,7 Ah-batteri (Bli30) | 43 | 43 | 28 |
| Støyutslipp 70 | |||
| Lydeffektnivå, målt dB (A) | 94 | 94 | 97 |
| Lydeffektnivå, garantert LWA dB (A) | 95 | 95 | 98 |
| Lydnivåer 71 | |||
| Lydtrykknivå ved brukerens øre, dB (A) | 82 | 82 | 86 |
| Vibrasjonsnivåer 72 | |||
| Styre, m/s 2 | 0,42 0,42 2,64 | ||
| Klippeutstyr | |||
| Klippehøyde, mm | 20–75 mm | 20–75 mm | 20–75 mm |
| Klippebredde, cm | 47 | 47 | 53 |
| Kniv, standard Oppsamling | 5905934-10 | Oppsamling5905934-10 | Oppsamling5940757-10 |
| Knivtilbehør Mulch 5907010-10 Mulch 5907010-10 Mulch 5950072-10 | |||
| Gressoppsamlerkapasitet, liter 55 55 60 | |||
- Extended product information. • Information about, and help with, product parts and servicing.


Use the SavE™ function (LC 347iVX, LC 353iVX)
Information about Bluetooth® (LC 347iVX, LC 353iVX)
Bluetooth® wireless technology

Technical data
Technical data

Starting the unit (LC 347iVX, LC 353iVX)
Technical data
Technical data
- Push the buttons upward toward the handle until they stop and you hear a click.
- Tighten the knobs fully.


| LED svetlá Stav batérie | |
| Všetky LED svetlá svietia Pl | Ine nabitá (75 – 100 %) |
| Svieti LED 1, LED 2, LED 3 | Batéria je nabitá na 50 % – 75 % |
| Svieti LED 1, LED 2 Batéria | je nabitá na 25 % – 50 % |
| Svieti LED 1 Batéria je nabitá na 0 % – 25 %. | |
| Bliká LED 1 Batéria je vybitá. Nabite batériu. | |
Charging the battery
- When all LED indicators on the battery are lit, the battery is fully charged. Charge the battery for a maximum of 24 hours.
- When disconnecting the battery charger from the wall outlet, pull on the plug, not the cord.
- Remove the battery from the battery charger.
Battery charge status
- Press the ON/OFF button on the control panel. All LEDs and symbols on the display will turn off.
- Fold the handle forward.
Manufacturer's liability
- Make sure the product has stopped. If the motor does not stop within 3 seconds, the product must be checked by an authorized Husqvarna service technician, who must then adjust the motor brake.
Checking the ignition lock
- Insert the lower part of the grass catcher frame into the groove at the bottom of the grass catcher.
- Place the grass bag onto the grass catcher frame and secure it with the clips.
- Replace the blade with the mulching blade included in the mulching kit. See the section Replacing the blades on page 608.
Operation
Introduction

WARNING: Before using the product, you must read and understand the safety chapter.
Husqvarna Connect

- Push the engine brake handle toward the handle.
Starting the product (LC 347iVX, LC 353iVX)
- Push the engine brake handle toward the handle.
For wheel drive LC 347iVX, LC 353iVX
- Open the battery cover and turn the safety key to position 0.

- Open the battery cover and turn the safety key to position 0.
- Remove the blade screw.
- Remove the blade.
- Check that the blade support and blade screw are not damaged.
- Check the motor shaft and make sure it is not bent.
- When you attach the new blade, point the angled sides of the blade in the direction of the blade cover.
- Make sure that the blade is aligned with the center of the motor shaft.
- Block the blade with a wooden block. Attach the spring washer and tighten the screw and washer with a torque of 23–28 Nm.
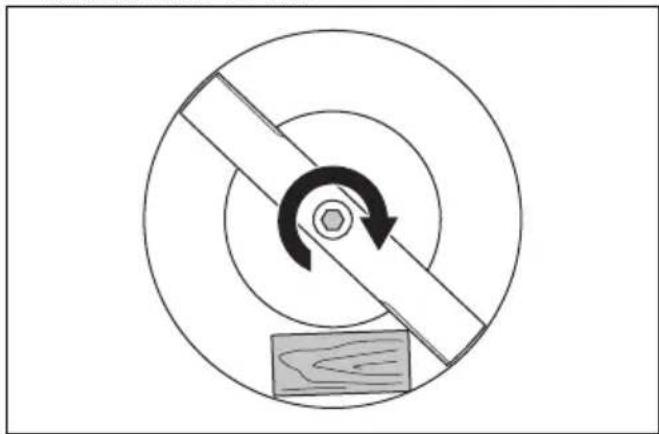
- Turn the blade by hand and make sure that it rotates freely.

- Remove the grass catcher.
Transport
Technical data
Technical data
DANGER – keep hands and feet away.
Checking the engine brake lever
The engine brake lever stops the engine. When the engine brake lever is released, the engine stops.
• Start the product. See Operation on page 625 - Release the engine brake lever.
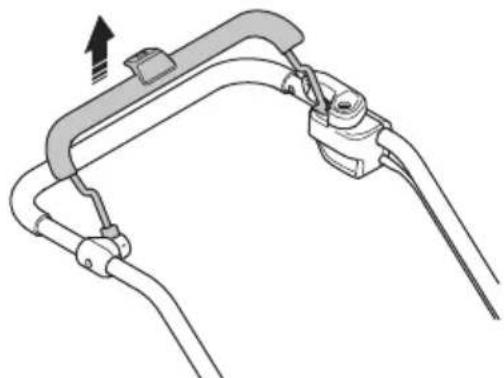
- Make sure that the product stops. If the engine does not stop within 3 seconds, have an authorized Husqvarna service agent adjust the engine brake.
Starting inhibitor check
Perform the starting inhibitor check to ensure it prevents engine operation.
- Press the engine brake lever toward the steering wheel. The starting inhibitor stops movement.
- Press the starting inhibitor outward.
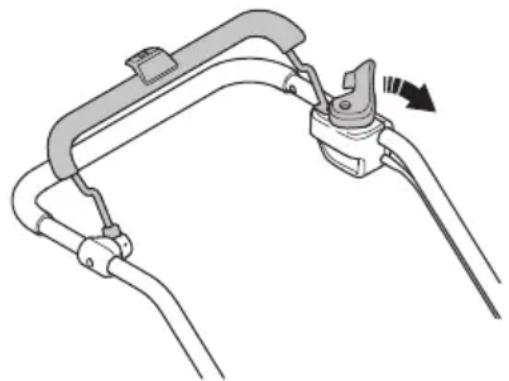
- Place the handle in one of the 2 height positions.
- Move the buttons upward in the direction of the handle until they stop and you hear a click sound.
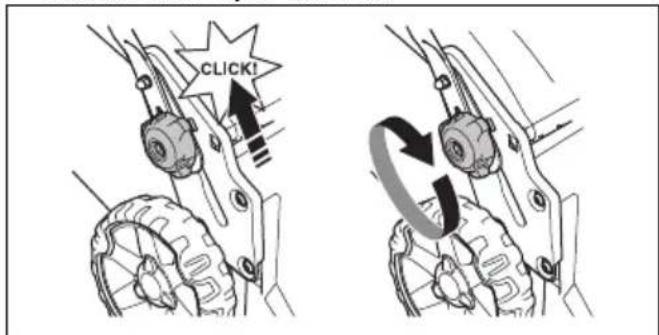
- Tighten the buttons completely.
Assembling the grass catcher
- Place the lower part of the grass catcher frame into the groove at the bottom of the grass catcher.
- Attach the grass bag frame with the couplings.
Installing the mulching plug (accessory)
- Raise the rear cover and remove the grass catcher.
- Install the mulching plug in the grass discharge channel.
- Replace the blade with the mulching blade from the mulching kit. See Replacing the blade on page 632.
Operation
Introduction

- Move the knobs upward toward the handle until they stop and you hear a click.
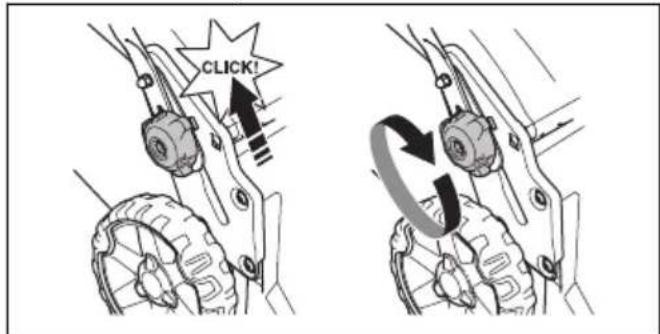
- Tighten the knobs fully.

WARNING: Do not use the product if the handle is not fully open and set to one of the given height positions. See Adjusting the handle on page 624.

- The battery is fully charged when all LED lights on it are lit. Charge the battery for a maximum of 24 hours.
- To disconnect the battery charger from the wall outlet, pull the plug, not the power cord.
- Remove the battery from the battery charger.
Battery charging status
The Husqvarna lithium-ion battery can be charged or used at all charge levels. The battery is not damaged. A fully charged battery will not lose charge when left on the charger.
| LED displej Status punjenja | |
| LED br. 1 trepće 0%-25% | |
| LED br. 1 svetli, LED br. 2 trepće | 25%-50% |
| LED br. 1, LED br. 2 svet-le, LED br. 3 trepće | 50%-75% |
| LED br. 1, LED br. 2, LED br. 3 svetle, LED br. 4 trepće | 75%-100% |
| LED br. 1, LED br. 2, LED br. 3, LED br. 4 svetle | Potpuno napunjeno |
Starting the product (LC 247i)
- Open the battery cover.
- Insert a charged battery into 1 of the battery compartments. For longer operating time, insert a second charged battery into the other battery compartment.
- Turn the safety key to position 1.
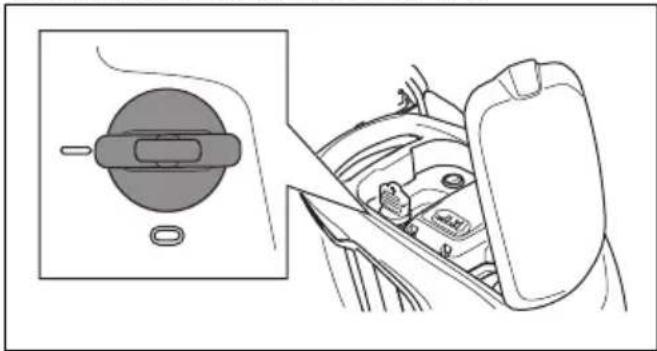
- Stand behind the product.
- Loosen the start inhibitor.
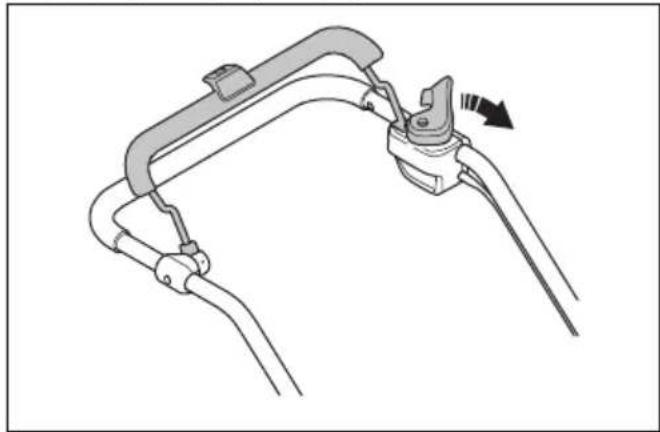
Starting the product (LC 347iVX, LC 353iVX)
- Open the battery cover.
- Insert a charged battery into 1 of the battery compartments. For longer operating time, insert a second charged battery into the other battery compartment.
- Turn the safety key to position 1.
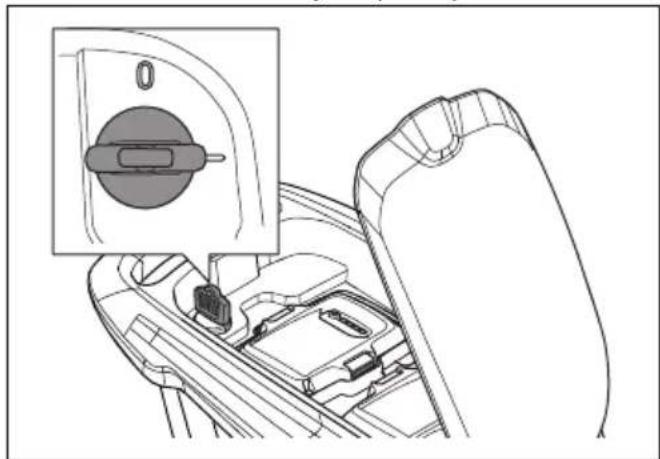
Using the wheel drive (LC 347iVX, LC 353iVX)
- Pull the drive shaft toward the handlebar to engage the drive.
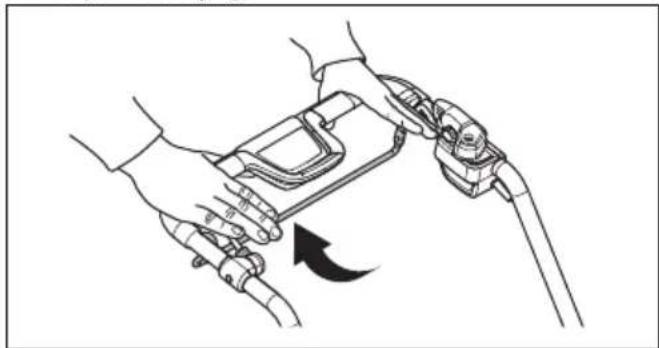
- Press + and - on the control panel to set the drive speed in 4 steps.
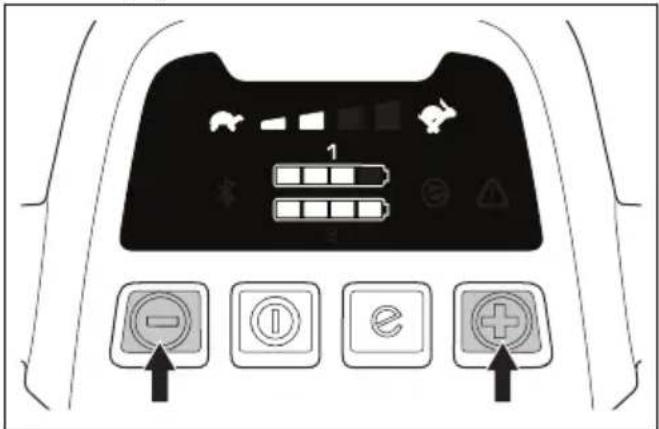
- Release the drive lever to disengage the drive, for example, when you are near an obstacle.
Using the SavE™ function (LC 247i)
The product has a battery saving function (SavE™) that provides longer operating time. - Press the SavE™ button to position 1 to start the function.
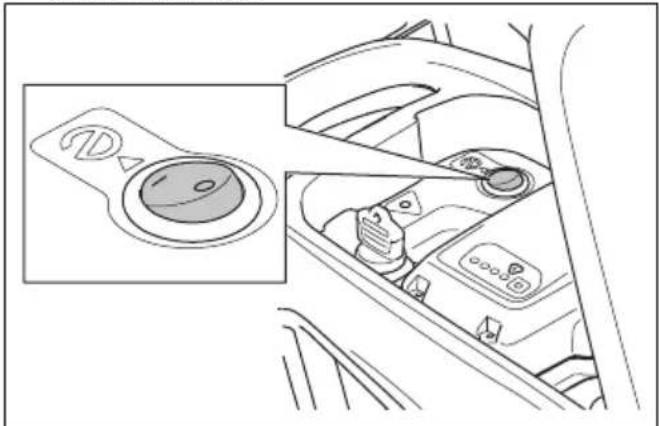
- Press the SavE™ button to position 0 to stop the function.
- To remove the battery, press the 2 release buttons and pull out the battery.
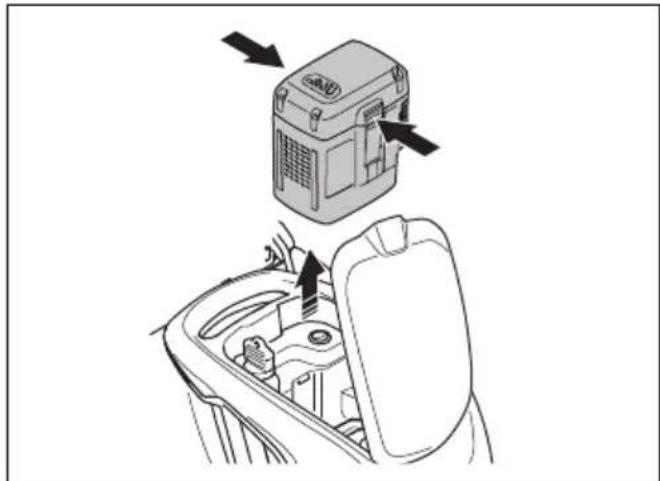
- Charge the battery if it is empty. For more information, see Charging the battery on page 627.
Stopping the product (LC 347iVX, LC 353iVX)

- Press the ON/OFF button on the control panel. All LED lights and symbols disappear from the display.
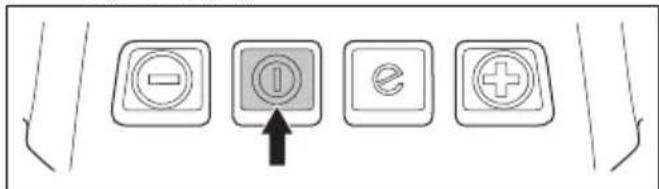
- To remove the battery, press the 2 release buttons and pull out the battery.
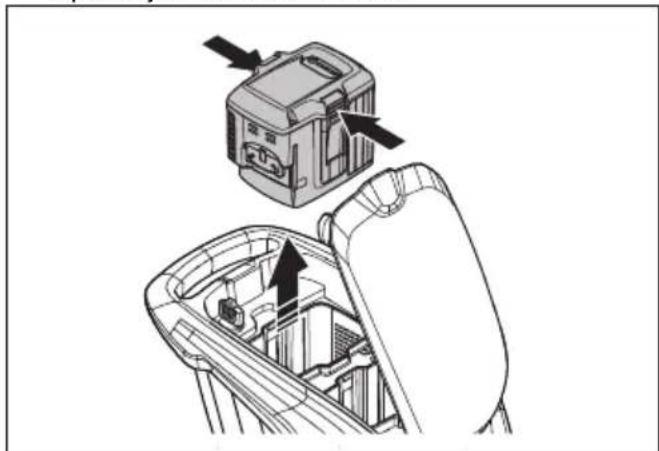
- Charge the battery if it is empty. For more information, see Charging the battery on page 627.
Note: The product stops automatically if you do not operate it for a few minutes. To start the product, see Starting the product (LC 347iVX, LC 353iVX) on page 628.
For good results
- Always use a sharp blade. A dull blade gives an uneven result and the cut grass surface becomes yellow. A sharp blade also uses less energy than a dull blade.
- Do not cut more than 1/3 of the grass length. First cut with a high cutting height. Check the result and lower the cutting height to an acceptable level. If the grass is really tall, drive slowly and cut twice if necessary.
- Cut in different directions each time to avoid stripes on the lawn.
- The mowing deck must be clean. Grass and dirt deposits on the inside of the mowing deck can reduce mowing results. See Cleaning the product on page 632
Mowing grass without the grass catcher and mulching plug
- Lift the rear flap and remove the grass catcher.
- If the mulching plug and mulching blade are installed, remove them.
- Close the rear flap before operating the product.
When using the product, the cut grass is ejected under the rear flap.
Maintenance
Introduction

- Remove the blade screw.
- Remove the blade.
- Inspect the blade support and blade screw for damage.
- Inspect the motor shaft to make sure it is not bent.
- When installing a new blade, point the bent ends of the blade in the direction of the mowing deck.
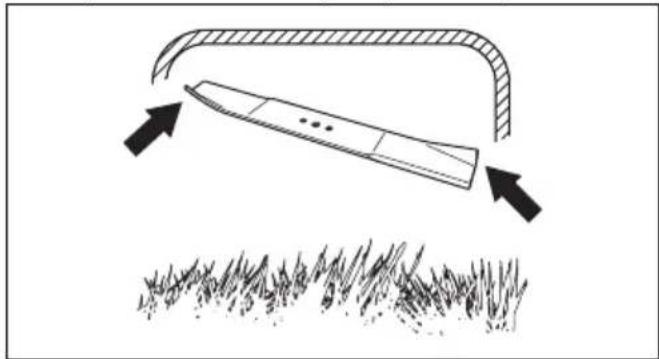
- Make sure the blade is aligned with the center of the motor shaft.
- Block the blade with a piece of wood. Install the spring washer and tighten the screw and washer to a torque of 23 to 28 Nm.
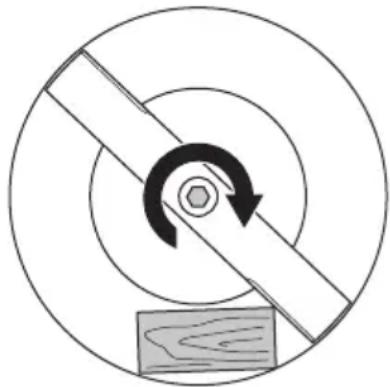
- Pull the blade by hand to check that it rotates freely.

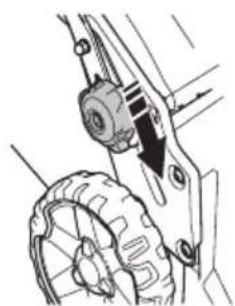
- Fold the handle forward.
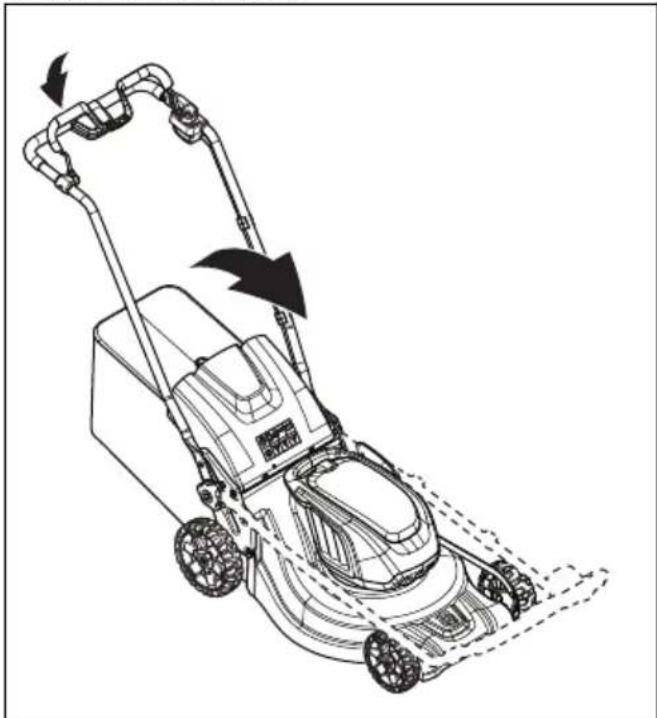
- Remove the grass catcher.
Transport
- Requirements for the transport of dangerous materials apply to the contained lithium-ion batteries.
- For commercial transport, special requirements listed on the packaging and labels must be observed.
- Ensure compliance with dangerous goods transport regulations when preparing the product for transport. Local regulations may apply.
- Always remove the battery before transport.
- Place tape on the battery connectors and make sure the battery cannot move during transport. • Secure the product during transport.
Storage
- Wait for the product to cool down before storing.
- Always remove the battery before storage.
- To prevent accidents, make sure the battery is not connected to the product during storage.
- Keep the battery charger indoors and in a dry area.
- Keep the battery and battery charger in a dry area free from moisture or frost.
- Disconnect the battery from the battery charger during storage.
- Do not store the battery in places where static discharge may occur. Do not store the battery in a metal box.
- Store the product in a place where the temperature is between -10 °C and 40 °C.
- Store the battery in a place where the temperature is between 5 °C and 25 °C and out of direct sunlight.
- Store the battery charger in a place where the temperature is between 5 °C and 45 °C and out of direct sunlight.
- Make sure the battery is charged to 30% - 50% before storing for an extended period.
- Store the product, battery, and battery charger in a locked place out of the reach of children and unauthorized persons.
- Clean the product and make sure the grass catcher is empty.
- Perform the maintenance tasks described in this operator's manual. See Maintenance on page 631
- Perform complete service before storing the product for an extended period.
Disposal
Symbols on the product or its packaging indicate that this product cannot be handled as household waste. It must be taken to an appropriate recycling facility for the recovery of electrical and electronic equipment.
Technical data
Technical data
| LC 247i LC 347iVX LC | 353iVX | ||
| Motor košenja | |||
| Tip motora BLDC (bez četkica) | 36 V | BLDC (bez četkica)36 V | BLDC (bez četkica)36 V |
| Brzina motora – SavE, o/min 2600/min 2600/min 2600/min | |||
| Brzina motora – nominalna, o/min 3000/min 3000/min 3000/min | |||
| Brzina motora – veliko opterećenje, o/min 3500/min 3500/min 3500/min | |||
| Izlazna snaga motora – maks. kW 0,96 0,96 1,05 | |||
| Izlazna snaga motora – nominalna, kW 0,75 0,75 0,9 | |||
| Pogonski motor | |||
| Izlazna snaga motora – nominalna, kW Nije dostupno 0,25 0,25 | |||
| Brzina samostalnog hoda, km/h Nije dostupno | 3,0-4,5 3,0-4,5 | ||
| Nivoi podešavanja brzine Nije dostupno 4 4 | |||
| Težina | |||
| Masa bez kese (bez akumulatora), kg 24,5 26 | 28 | ||
| Masa sa kesom (sa 2 x BLi30), kg 30,5 32,0 34,5 | |||
| Akumulator | |||
| Vrsta akumulatora Husqvarna serija akumulatora | |||
| Vreme rada akumulatora | |||
| Vreme rada akumulatora, min, (slobodan rad) sa aktiviranom funkcijom SavE, sa jednim Husqvarna 7,7 Ah akumulatorom (BLi30). | 62 62 46 | ||
| Vreme rada akumulatora, min, (slobodan rad) sa aktiviranim standardnim režimom, sa jednim Husqvarna 7,7 Ah akumulatorom (BLi30). | 43 43 28 | ||
| Emisija buke 98 | |||
| Nivo zvučne snage, mereno dB (A) 94 94 97 | |||
| Nivo zvučne snage, garantovano LWA dB (A) 95 95 98 | |||
| Nivoi zvuka 99 | |||
| Nivo zvučnog pritiska na uho rukovaoca, dB (A) | 82 82 86 | ||
| Nivoi vibracije 100 | |||
| Ručka, m/s2 | 0,42 0,42 2,64 | ||
| Oprema za rezanje | |||
| Visina košenja, mm 20-75 mm 20-75 mm 20-75 mm | 5 mm | ||
| Širina košenja, cm | 47 47 53 | ||
| Sečivo Standard | Collect 5905934-10 | Collect 5905934-10 | Collect 5940757-10 |
| Oprema za sečivo | Mulch 5907010-10 | Mulch 5907010-10 | Mulch 5950072-10 |
| Kapacitet hvatača trave, litara | 55 55 60 | ||
| Podaci o radio frekvenciji za Bluetooth® | LC 247i LC 347iVX LC 353iVX | ||
| Opseg frekvencije, GHz Nije dostupno | 2,4-2,4835 2,4-2,4835 | ||
| Izlazna snaga, maks. dBm Nije dostupno | 4 4 | ||
| Odobreni akumulatori Tip Kapacitet akumula- | tora, Ah | Napon, V Težina, lb/kg | |
| BLi20 Litijum-jonski 4,0 36 2,6/1,2 | |||
| BLi30 Litijum-jonski 7,7 36 4,2/1,9 | |||
| Odobreni punjači za navedene akumulatore, BLi Ulazni na- pon, V Frekvencija, Hz Snaga, W | |||
| QC80 100–240 50–60 80 | |||
| 40-C80 | 100–240 50–60 | 68,8 | |
| QC250 | 100–240 50–60 | 250 | |
Declaration of Conformity
EU Declaration of Conformity
We, Husqvarna AB, SE-561 82 Huskvarna, Sweden, tel: +46-36-146500, declare under our sole responsibility that the product:
| Opis Kosačica za travu | |
| Marka Husqvarna | |
| Tip/model LC 247i | |
| Identifikacija Serijski brojevi od 2021 i nadalje | |
Install the mulching plug (accessory)

- Stand behind the product.
- Release the start interlock.
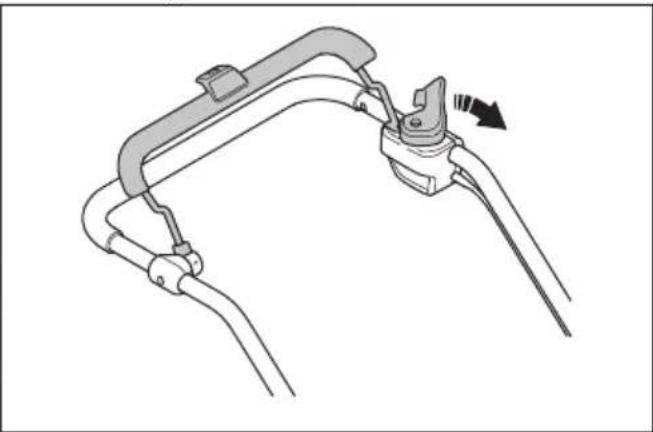
Start the product (LC 347iVX, LC 353iVX)
- Fold the handle forward.
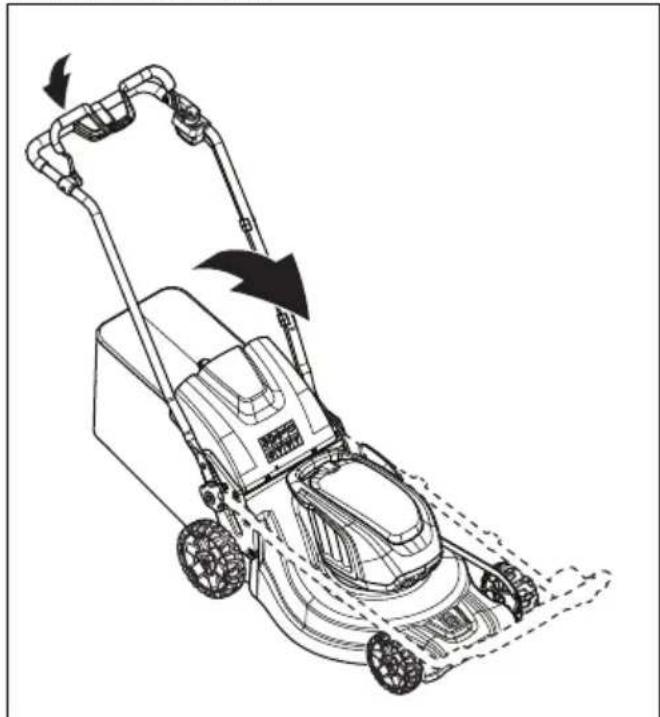

Registered trademarks

Danger - keep hands and feet away.
Product liability
Check the motor brake handle
Install the ground cover insert (accessory)
Place the product in the working position
- Fold the handle up to the vertical position.
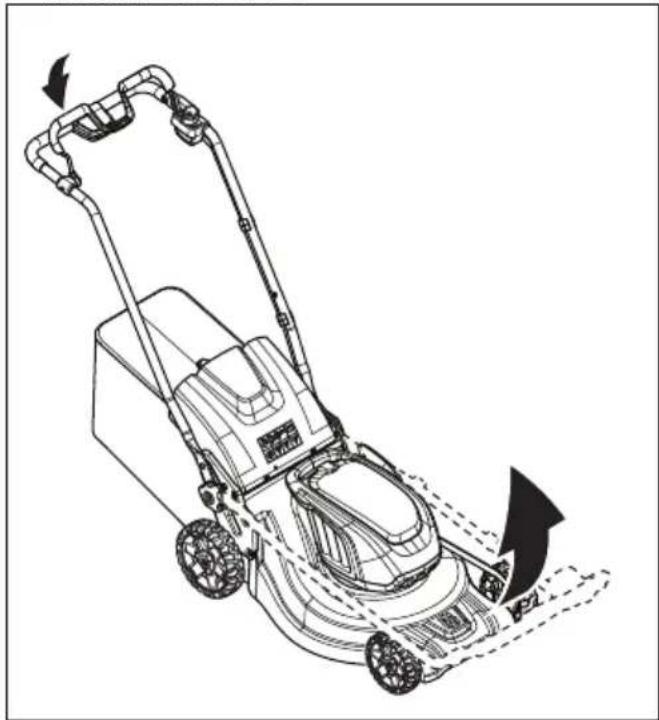

- Stand behind the product.
- Release the start interlock.
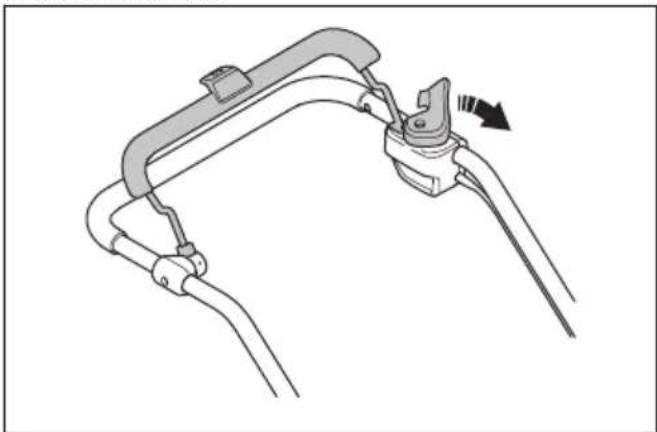
- Push the motor brake handle toward the handlebar.
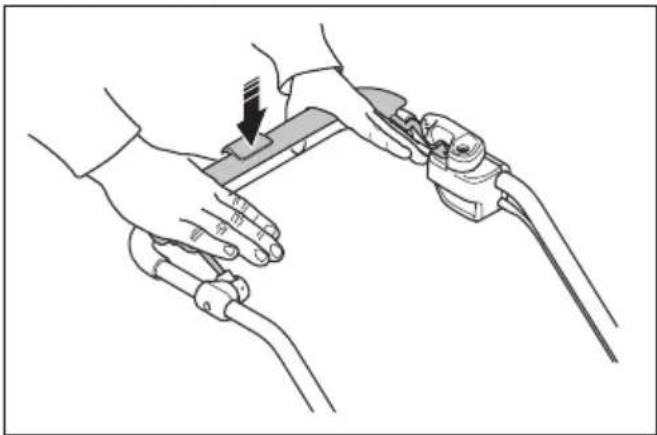
- Push the motor brake handle toward the handlebar.
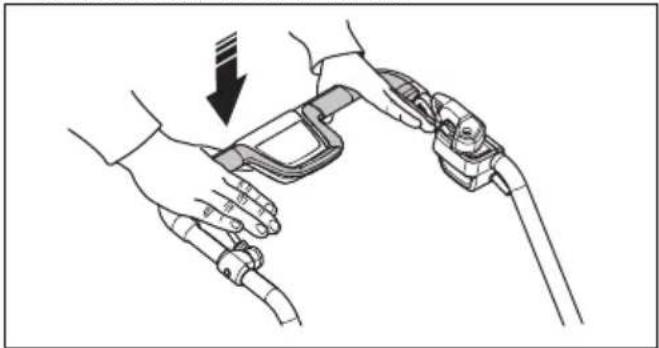
- Open the battery cover and turn the safety key to 0.
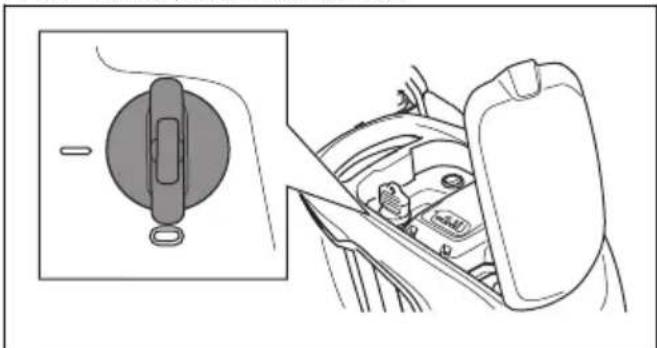
- Open the battery cover and turn the safety key to 0.
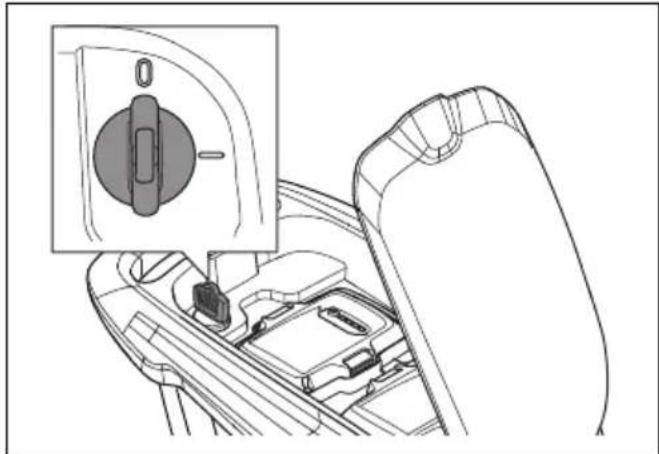
- Rotate the blade by hand to ensure it turns freely.

- Fold the handle forward.
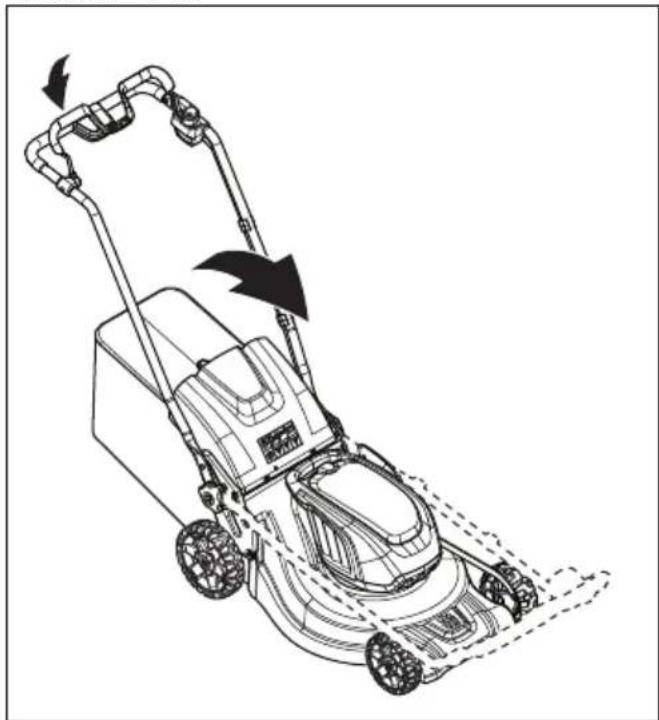
- Remove the grass bag.
Transport
Technical specifications
Technical specifications
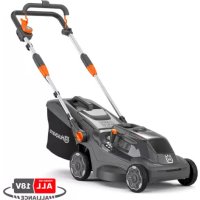
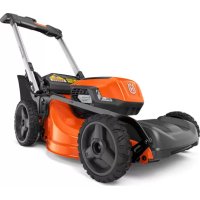
- INTRODUCTION
- PRODUCT DESCRIPTION
- INTENDED USE
- SYMBOLS ON THE PRODUCT
- LABEL ON THE PRODUCT
- PRODUCT LIABILITY
- SAFETY
- SAFETY DEFINITIONS
- SAVE ALL WARNINGS AND INSTRUCTIONS FOR FUTURE REFERENCE. THE TERM "PRODUCT" IN THE WARNINGS REFERS TO YOUR MAINS-OPERATED (CORDED) PRODUCT OR BATTERY-OPERATED (CORDLESS) PRODUCT
- DO NOT OPERATE THE PRODUCT IN EXPLOSIVE ATMOSPHERES, SUCH AS IN THE PRESENCE OF FLAMMABLE LIQUIDS, GASES OR DUST. THE PRODUCT CREATE SPARKS WHICH MAY IGNITE THE DUST OR FUMES
- ELECTRICAL SAFETY
- PERSONAL SAFETY
- PRODUCT USE AND CARE
- SERVICE
- BATTERY TOOL USE AND CARE
- LAWNMOWER SAFETY WARNINGS
- RESIDUAL CURRENT DEVICE
- GENERAL SAFETY INSTRUCTIONS
- WORK SAFETY
- SAFETY INSTRUCTIONS FOR OPERATION
- PERSONAL PROTECTIVE EQUIPMENT
- SAFETY DEVICES ON THE PRODUCT
- TO DO A CHECK OF THE CUTTING COVER
- TO DO A CHECK OF THE SAFETY KEY
- TO DO A CHECK OF THE MOTOR BRAKE HANDLE
- TO DO A CHECK OF THE START INHIBITOR
- BATTERY SAFETY
- BATTERY CHARGER SAFETY
- SAFETY INSTRUCTIONS FOR MAINTENANCE
- ASSEMBLY
- TO ADJUST THE HANDLE
- TO ASSEMBLE THE GRASS CATCHER
- TO ASSEMBLE THE MULCH PLUG (ACCESSORY)
- OPERATION
- HUSQVARNA CONNECT
- TO START TO USE HUSQVARNA CONNECT
- BLUETOOTH® INFORMATION (LC 347IVX, LC 353IVX)
- BLUETOOTH® WIRELESS TECHNOLOGY
- TO SET THE PRODUCT IN OPERATION POSITION
- TO SET THE CUTTING HEIGHT
- BATTERY
- BATTERY STATUS
- TO CHARGE THE BATTERY
- BATTERY CHARGING STATUS
- TO START THE PRODUCT (LC 247I)
- TO START THE PRODUCT (LC 347IVX, LC 353IVX)
- TO USE THE DRIVE ON THE WHEELS LC 347IVX, LC 353IVX
- TO USE THE SAVE™ FUNCTION (LC 247I)
- TO USE THE SAVE™ FUNCTION (LC 347IVX, LC 353IVX)
- HIGH LOAD FUNCTION
- AUTOMATIC RESTART
- TO STOP THE PRODUCT (LC 247I)
- TO STOP THE PRODUCT (LC 347IVX, LC 353IVX)
- TO GET A GOOD RESULT
- TO CUT GRASS WITHOUT A GRASS CATCHER OR MULCH PLUG ATTACHED
- MAINTENANCE
- MAINTENANCE SCHEDULE
- TO DO A GENERAL INSPECTION
- TO CLEAN THE PRODUCT
- TO CLEAN THE BATTERY AND THE BATTERY CHARGER
- TO EXAMINE THE CUTTING EQUIPMENT
- TO REPLACE THE BLADE
- TROUBLESHOOTING
- BATTERY CHARGER
- LAWN MOWER
- TRANSPORTATION, STORAGE AND DISPOSAL
- TO SET THE PRODUCT IN TRANSPORT POSITION
- TRANSPORTATION
- STORAGE
- DISPOSAL
- DECLARATION OF CONFORMITY
- EU DECLARATION OF CONFORMITY
- REGISTERED TRADEMARKS
- CONTENTS
- CHECKING THE ENGINE BRAKE HANDLE
- USING THE WHEEL DRIVE (LC 347IVX, LC 353IVX)
- HOW TO START THE PRODUCT (LC 347IVX, LC 353IVX)
- TECHNICAL DATA
- TECHNICAL SPECIFICATIONS
- ASSEMBLING THE MULCHING PLUG (ACCESSORY)
- STARTING THE PRODUCT (LC 347IVX, LC 353IVX)
- USING THE PRODUCT ON WHEELS (LC 347IVX, LC 353IVX)
- (LC 347IVX, LC 353IVX) STOPPING THE PRODUCT
- PRODUCT RELIABILITY
- CHECKING THE IGNITION LOCK
- ASSEMBLING THE CHIPPER ATTACHMENT (ACCESSORY)
- BATTERY CHARGER STATUS
- STARTING THE PRODUCT (LC 247I)
- USING THE WHEEL DRIVE LC 347IVX, LC 353IVX
- STOPPING THE PRODUCT (LC 347IVX, LC 353IVX)
- FOR A GOOD RESULT
- INSPECTING THE MOTOR BRAKE HANDLE
- ASSEMBLING THE MULTI-PLUG (OPTIONAL ACCESSORY)
- SETTING THE PRODUCT IN THE OPERATING POSITION
- CHECK THE ENGINE BRAKE HANDLE
- MOUNTING THE MULCH PLUG (ACCESSORY)
- CHECK THE START INTERLOCK
- HOW TO SET THE PRODUCT IN THE WORKING POSITION
- BATTERY CHARGE STATUS
- HOW TO START THE PRODUCT (LC 247I)
- HOW TO USE THE WHEEL DRIVE LC 347IVX, LC 353IVX
- TRANSPORT
- USE THE SAVE™ FUNCTION (LC 347IVX, LC 353IVX)
- INFORMATION ABOUT BLUETOOTH® (LC 347IVX, LC 353IVX)
- STARTING THE UNIT (LC 347IVX, LC 353IVX)
- CHARGING THE BATTERY
- MANUFACTURER'S LIABILITY
- FOR WHEEL DRIVE LC 347IVX, LC 353IVX
- CHECKING THE ENGINE BRAKE LEVER
- STARTING INHIBITOR CHECK
- ASSEMBLING THE GRASS CATCHER
- INSTALLING THE MULCHING PLUG (ACCESSORY)
- USING THE SAVE™ FUNCTION (LC 247I)
- FOR GOOD RESULTS
- MOWING GRASS WITHOUT THE GRASS CATCHER AND MULCHING PLUG
- INSTALL THE MULCHING PLUG (ACCESSORY)
- START THE PRODUCT (LC 347IVX, LC 353IVX)
- CHECK THE MOTOR BRAKE HANDLE
- INSTALL THE GROUND COVER INSERT (ACCESSORY)
- PLACE THE PRODUCT IN THE WORKING POSITION
Brand : HUSQVARNA
Model : LC 353iVX
Category : Electric mower