Urban Premium FSV015 - Vacuum packaging machines FOODSAVER - Free user manual and instructions
Find the device manual for free Urban Premium FSV015 FOODSAVER in PDF.
| Product type | Home vacuum packaging machine |
| Brand | FoodSaver |
| Model | Urban Premium FSV015 |
| Dimensions (L x W x H) | Approximately 41 x 24 x 15 cm |
| Weight | Approximately 1.4 kg |
| Power supply | 220-240 V, 50 Hz, 140 W |
| Main functions | Vacuum and seal, seal only, moist food mode |
| Included accessories | Portable vacuum sealer, drip tray, sealing gaskets |
| Accessory compatibility | FoodSaver™ bags and rolls, jars, food containers, bottle stoppers |
| Cleaning and maintenance | Drip tray dishwasher safe (top rack); removable gaskets washable with soapy water; wipe body with a soft cloth |
| Safety | Do not immerse; use on a stable, dry, flat surface; unplug before cleaning; do not use an extension cord |
| Spare parts and repairability | Replaceable sealing gaskets (recommended annually); available at www.foodsavereurope.com |
| Warranty | 2 years from date of purchase, subject to presentation of receipt |
Frequently Asked Questions - Urban Premium FSV015 FOODSAVER
User questions about Urban Premium FSV015 FOODSAVER
0 question about this device. Answer the ones you know or ask your own.
Ask a new question about this device
Download the instructions for your Vacuum packaging machines in PDF format for free! Find your manual Urban Premium FSV015 - FOODSAVER and take your electronic device back in hand. On this page are published all the documents necessary for the use of your device. Urban Premium FSV015 by FOODSAVER.
USER MANUAL Urban Premium FSV015 FOODSAVER
Important Safeguards
This appliance can be used by children aged from 8 years and above and persons with reduced physical, sensory or mental capabilities or lack of experience and knowledge if they have been given supervision or instruction concerning use of the appliance in a safe way and understand the hazards involved. Children shall not play with the appliance. Cleaning and user maintenance shall not be made by children without supervision.
If the supply cord is damaged, it must be replaced by the manufacturer, or its service agent or a similarly qualified person in order to avoid a hazard.
Always use the appliance on a stable, secure, dry and level surface.
- CAUTION: THIS SEALER IS NOT FOR COMMERCIAL USE. Never use this appliance for anything other than its intended use. This appliance is for household use only. Do not use this appliance outdoors.
- Never immerse the appliance or power cord and plug in water or any other liquid.
- Do not use the appliance if it has been dropped or if there are any visible signs of damage.
- Ensure the appliance is switched off and unplugged from the supply socket after use, before cleaning.
- To disconnect, unplug the power cord from the electrical outlet. Do not disconnect by pulling on the cord.
- Do not use an extension cord with the appliance.
- Use only accessories or attachments recommended by the manufacturer.
- When reheating foods in FoodSaver™ bags make sure to place them in water at a low simmering temperature below 75^ (170°F).
FOODS INSIDE BAG CAN BE DEFROSTED BUT NOT REHEATED IN A MICROWAVE OVEN. When defrosting foods in the microwave in FoodSaver™ bags make sure not to exceed maximum power of 180 watts (defrost setting), maximum time of 2 minutes and maximum temperature of 70^ (158^) .
FoodSaver™ Vacuum Sealing System
Why Vacuum Package?
Exposure to air causes food to lose nutrition and flavour, and also enables many types of bacteria, mould and yeast to grow. The FoodSaver™ vacuum packaging system removes air and seals in flavour and quality. With a full line of FoodSaver™ bags, and canisters to expand your options, you can now enjoy the benefits of a scientifically proven food storage method that keeps food fresh up to five times longer.
The FoodSaver™ System Saves Time and Money
- Spend less money. With the FoodSaver™ system, you can buy in bulk or buy on sale and vacuum package your food in desired portions without wasting food.
- Save more time. Cook ahead for the week, preparing meals and saving them in FoodSaver™ bags.
- Marinate in minutes. Vacuum packaging opens up the pores of food so you can get that great marinated flavour in just 20 minutes instead of overnight.
- Make entertaining easy. Make your signature dish in advance so you can spend quality time with your guests.
- Enjoy seasonal or specialty foods. Keep highly perishable or infrequently used items fresh longer.
Control portions for dieting. Vacuum package sensible portions and write the calories and fat content on the bag. - Protect non-food items. Keep camping and boating supplies dry and organised for outings. Protect polished silver from tarnishing by minimizing exposure to air.
FoodSaver™ Accessories
Get the most out of your FoodSaver™ appliance with easy-to-use FoodSaver™ bags, canisters and accessories.
FoodSaver™ Bags and Rolls
FoodSaver™ bags and rolls feature special channels that enable the efficient removal of air. The multiply construction makes them an especially effective barrier to oxygen and moisture and helps to prevent freezer burn. FoodSaver™ bags and rolls come in a variety of sizes.
FoodSaver™ Canisters
FoodSaver™ canisters are simple to use and ideal for vacuum packaging delicate items such as muffins and other baked goods, liquids and dry goods.
FoodSaver™ Fresh Zipper Bags
FoodSaver™ Zipper Bags feature special channels that enable the efficient removal of air. The multiply construction makes them an especially effective barrier to oxygen and moisture.
FoodSaver™ Fresh Containers
FoodSaver™ Fresh Containers are simple to use and ideal for vacuum packaging delicate items such as muffins and other baked goods, liquids and dry goods.
FoodSaver™ Bottle Stopper
Use FoodSaver™ bottle stoppers to vacuum package wine, non-carbonated liquids and oils. This will extend the life of the liquid and preserve the flavour. Don't use the bottle stopper on plastic bottles.
FoodSaver™ Quick Marinator
The quick marinator infuses food with flavour in minutes instead of hours using vacuum power to penetrate marinades deep into the food.
Ordering
To order FoodSaver™ bags, rolls and accessories please visit www.foodsaver.co.uk.
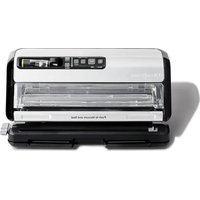
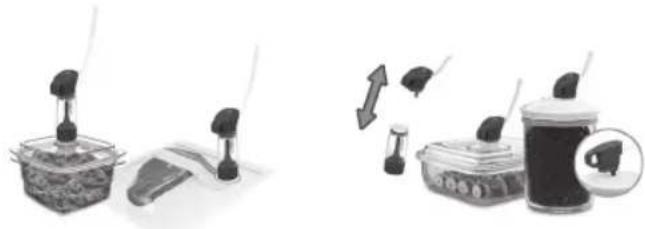
Parts
Referring to Fig. 1:
A Upper gasket
Power light
B Removable drip tray
Progress lights
Lid latch
Sealing progress light
Lower gasket
Seal Only button
Sealing strip
Vacuum and Seal button
F Control panel
Moist Food button
6 Accessory port
Overheat warning light
Handheld sealer
Making a bag from a FoodSaver™ roll
You can make your own custom sized bags from a FoodSaver™ roll. Referring to Fig. 2:
- Plug your vacuum sealer into a mains supply socket. Press both latches and open the lid. Place the open end of the roll over the sealing strip E so that the end of the roll butts up to the front edge of the lower gasket. Don't let the end of the bag enter the drip tray.
- Close the lid all the way until the latches ⑨ pop out. When correctly closed, a green band will appear around the latch and the green power light 1 will come on.
- Press the Seal Only button L or the Vacuum and Seal button M.
- When the red sealing progress light goes out, press both latches and remove the roll. The end of the roll will now have been sealed.
- Measure the required length for the item being packaged. Add an extra 75mm to allow the bag to be sealed then cut the roll straight across.
Using Your Vaccum Sealer
Referring to Fig. 3:
- Place the item to be packaged into the bag. You can use a ready made FoodSaver™ bag or make your own from a FoodSaver™ roll.
- Place the open end of the bag into the slot of the drip tray 8.
- Close and latch the lid. When correctly closed, a green band will appear around the latch and the green power light ① will come on.
- Press the Vacuum and Seal buttonM.
- Your vacuum packager will start to remove the air from the bag and then seal it. When the progress lights 1 have stopped and the red sealing progress light has gone out, the process is complete.
Packaging moist foods
If you are packaging foods that are moist or are very juicy, press the Moist Food button BEFORE pressing the Vacuum and Seal button.
Sealing a bag without removing any air
To seal a bag without extracting the air from it press the Seal Only button. You can seal the types of bag that are used to package snacks such as potato crisps, tortilla chips, etc.
Sealing delicate items
Some items such as pastries, bread, biscuits, etc. can be crushed when sealing. To prevent this, use the Seal Only button 1 as follows:
- Follow steps 1, 2, 3 and 4 of 'Using Your Vacuum Sealer'.
- Press the Seal Only button before crushing occurs. This will immediately stop more air from being extracted and then seal the bag.
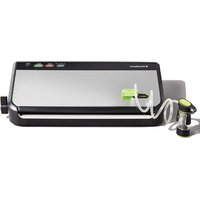
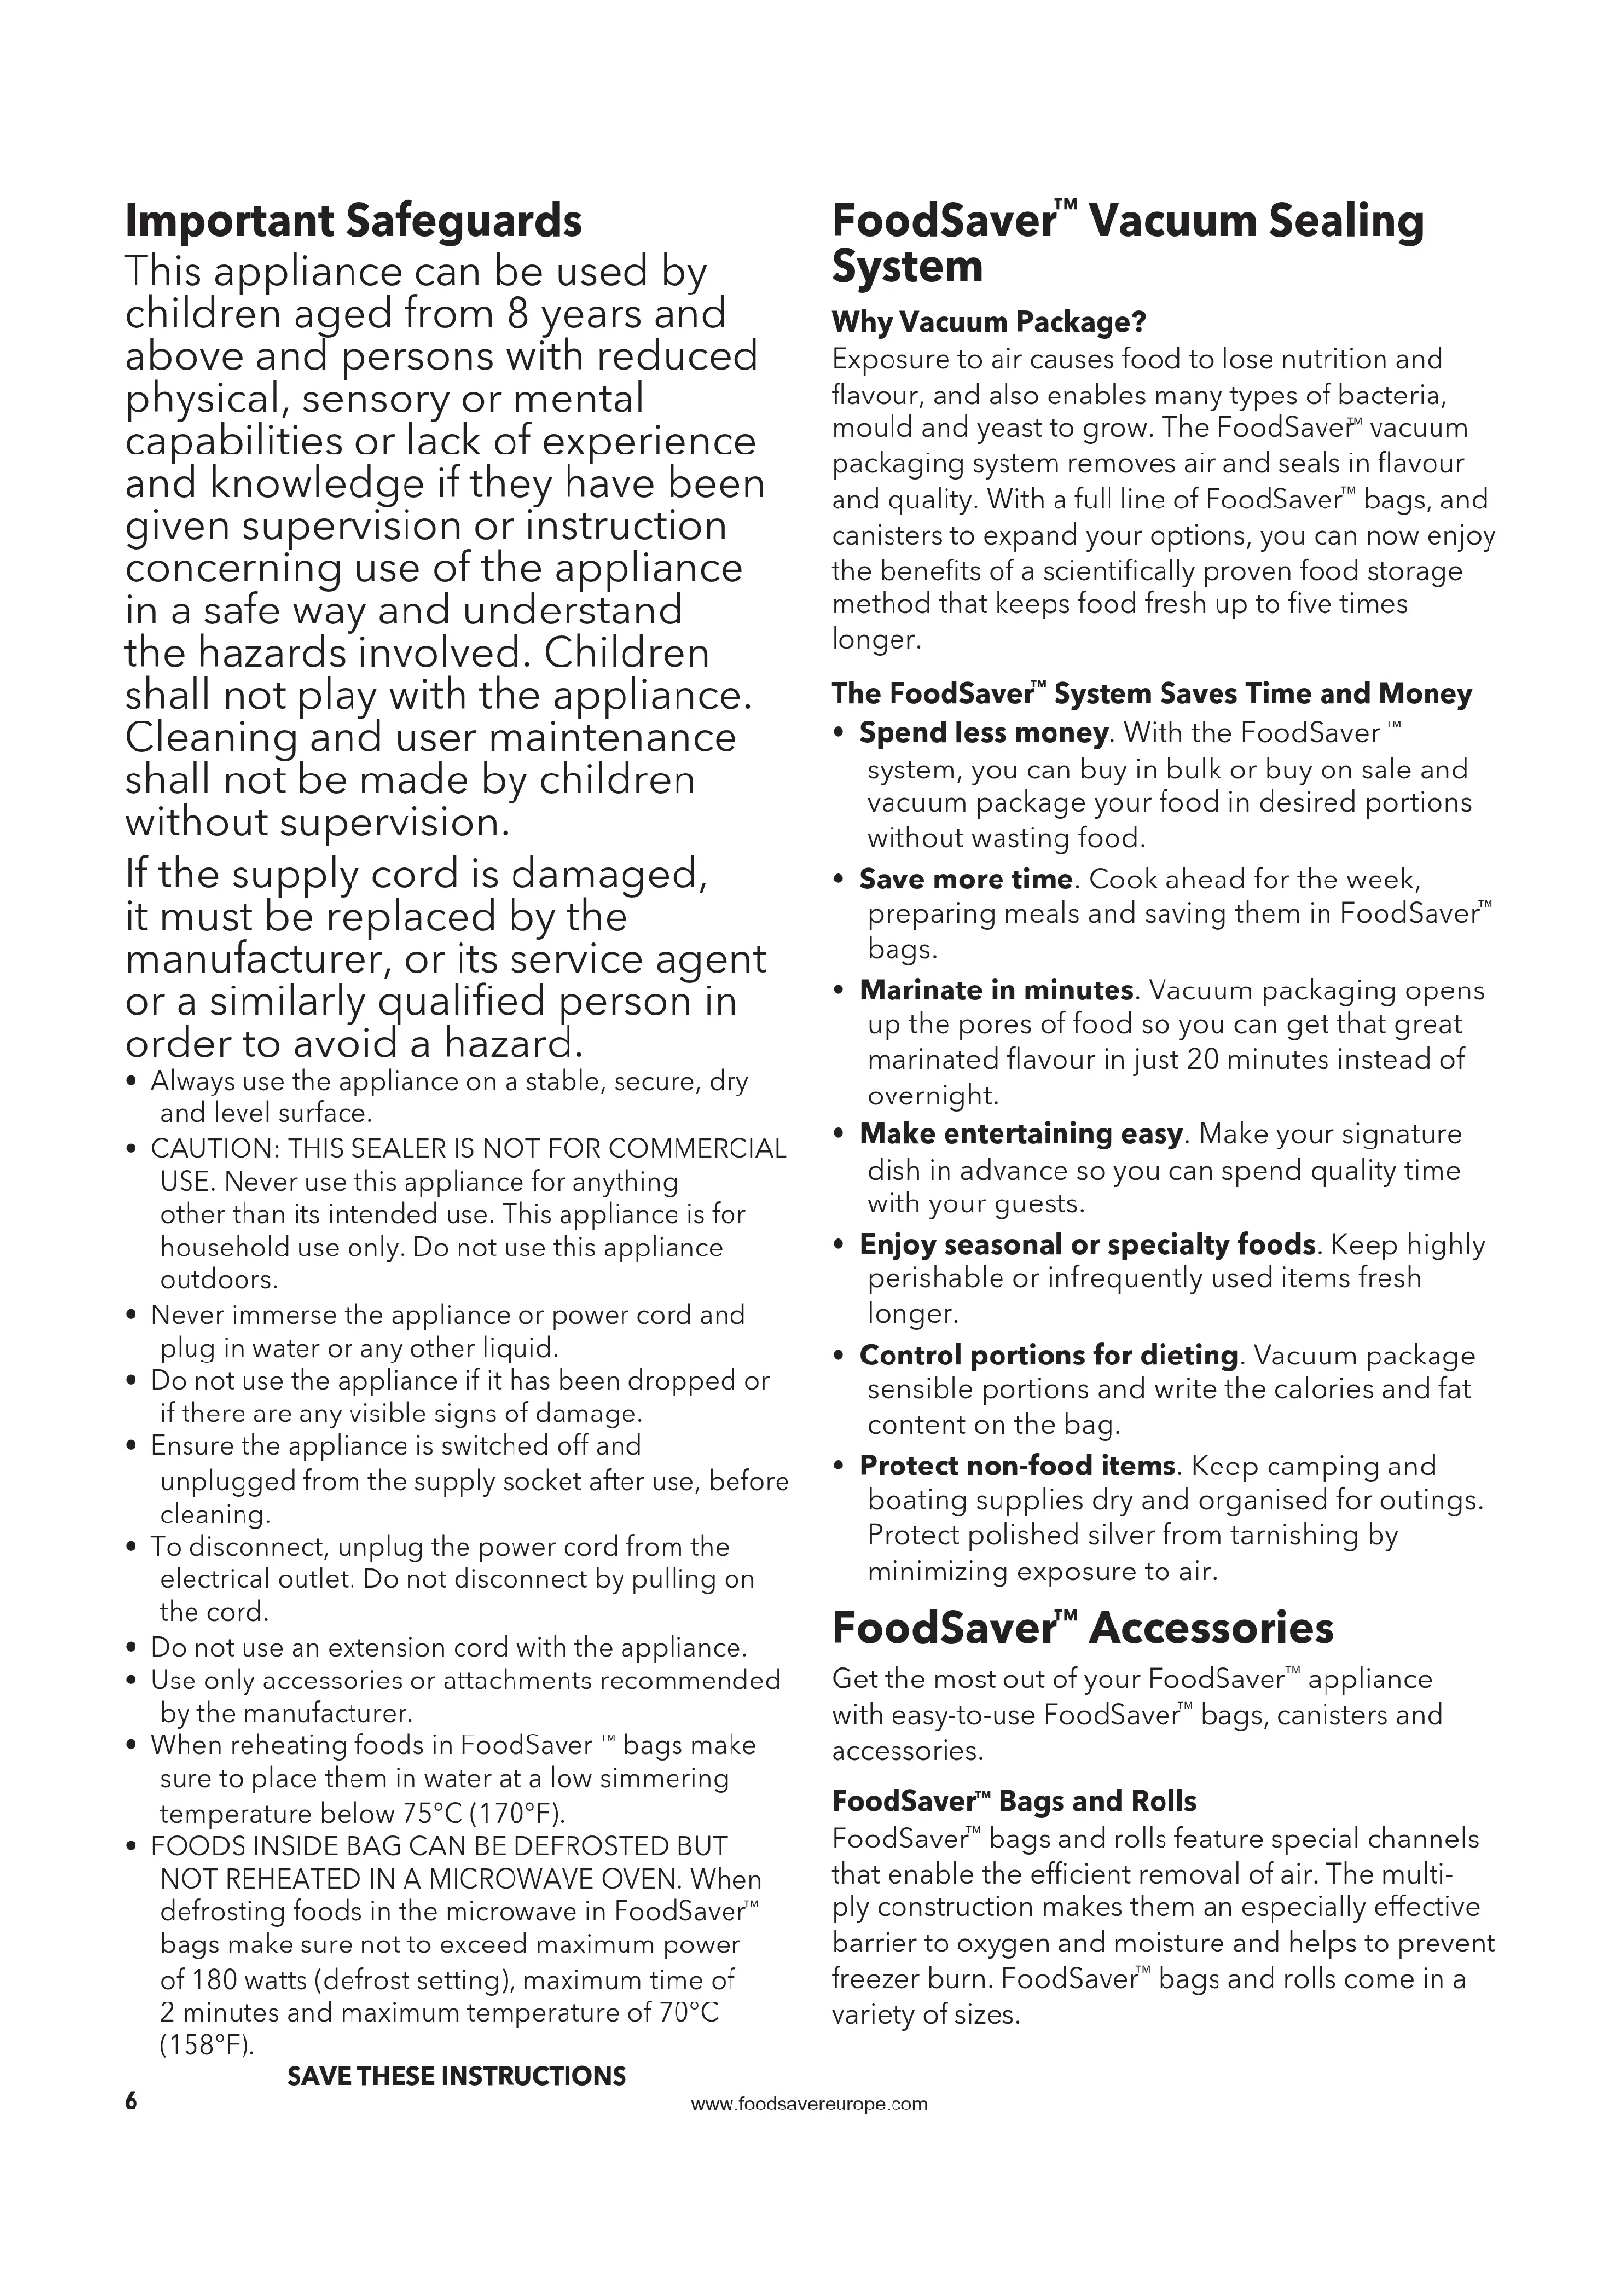
Using FoodSaver® accessories
To vacuum seal a Fresh Zipper Bag or Fresh Container:
- Insert the connector end of the handheld sealer H into the accessory port G on the FoodSaver® appliance.
- Fit the end of the handheld sealer over the valve on the accessory and make sure that it is connected firmly. Follow any specific instructions that come with the FoodSaver accessory.
Note: To vacuum seal a FoodSaver Canister, remove the reservoir (clear bottom section) of the sealer by pulling it down and off the top section. Insert the tip of the sealer into the port on the canister.
- Press the Vacuum and Seal button M
- When the progress lights 1 have stopped and the red sealing progress light K has gone out, the process is complete.
Care and Cleaning
Never immerse the unit or power cord and plug in water or any other liquid. Always unplug the unit before cleaning.
Wipe over the body of the unit with a soft, dry cloth.
Remove and empty the drip tray after each use. Wash it in warm soapy water or place it in the top rack of a dishwasher. Dry thoroughly before refitting.
Check the upper gasket A, lower gasket D and around the drip tray to make sure they are free from food debris. Wipe the gaskets with a warm soapy cloth if needed. The gaskets may be removed for cleaning. Clean them with warm, soapy water. Dry thoroughly then carefully refit.
Remove the reservoir of the handheld sealer after each use. Wash it in warm soapy water and air dry thoroughly before replacing.
To keep your FoodSaver™ appliance operating effectively, we recommend that you replace the gaskets every year.
To order replacements, please visit www.foodsaver.co.uk or contact FoodSaver™ Brand Customer Service on 0800 525 089.
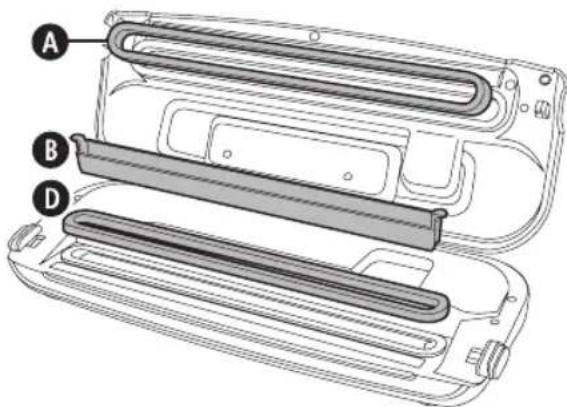
Storage
Close the lid to the first 'click' until the latches catch but don't pop out and reveal the green band. This is enough to secure the lid but avoids compressing the gaskets (which may cause incorrect functioning of the unit).
Wrap the cable around the cleats underneath the unit. The unit can be stored stood upright as shown.
Storage Guide, Hints and Tips
Vacuum Packaging and Food Safety
The vacuum packaging process extends the life of foods by removing most of the air from the sealed container, thereby reducing oxidation, which affects nutritional value, flavour and overall quality. Removing air can also inhibit growth of microorganisms, which can cause problems under certain conditions:
To preserve foods safely, it is critical that you maintain low temperatures. You can significantly reduce the growth of microorganisms at temperatures of 4^ or below.
Freezing at -17^ does not kill microorganisms, but stops them from growing. For long-term storage, always freeze perishable foods that have been vacuum packaged, and keep refrigerated after thawing.
It is important to note that vacuum packaging is NOT a substitute for canning and it cannot reverse the deterioration of foods. It can only slow down the changes in quality. It is difficult to predict how long foods will retain their top-quality flavour, appearance or texture because it depends on age and condition of the food on the day it was vacuum packaged.
Important: Vacuum packaging is NOT a substitute for refrigeration or freezing. Any perishable foods that require refrigeration must still be refrigerated or frozen after vacuum packaging. To avoid possible illness, do not reuse bags after storing raw meats, raw fish or greasy foods. Do not reuse bags that have been microwaved or simmered.
Thawing and Reheating Vacuum Packaged Foods

Always thaw foods in a refrigerator or a microwave oven - do not thaw perishable foods at room temperature.
Foods inside bag can be defrosted but not reheated in a microwave oven. When defrosting foods in the microwave in FoodSaver™ bags make sure not to exceed maximum power of 180 watts (defrost setting), maximum time of 2 minutes and maximum temperature of 70^ (158^) . You can also reheat foods in FoodSaver™ Bags by placing them in water at a low simmer below 75^ (170^) . Follow any specific instructions that come with the FoodSaver™ specialty bags.
Preparation Guidelines
Meat and Fish


For best results, pre-freeze meat and fish for 1-2 hours before vacuum sealing in a FoodSaver™ Bag. This helps retain the juice and shape, and guarantees a better seal. If it's not possible to prefreeze, place a folded paper towel between meat or fish and top of bag, but below seal area.
Leave a paper towel in bag to absorb excess moisture and juices during the vacuum sealing process.
Note: Beef may appear darker after vacuum sealing due to the removal of oxygen. This is not an indication of spoilage.
Hard Cheeses

To keep cheese fresh, vacuum seal it after each use. Make your FoodSaverTM Bag extra long, allowing 25mm of bag
material for each time you plan to open and reseal, in addition to the 75mm room you normally leave between contents and seal.
Simply cut sealed edge and remove cheese. When you're ready to reseal the cheese, just drop it in bag and reseal.
Important: Due to the risk of anaerobic bacteria, soft cheeses should never be vacuum sealed.
Vegetables

Vegetables need to be blanched before vacuum sealing. This process stops the enzyme action that could lead to loss of flavour, colour and texture.
To blanch vegetables, place them in boiling water or in the microwave until they are cooked, but still crisp. Blanching times range from 1 to 2 minutes for leafy greens and peas; 3 to 4 minutes for snap peas, sliced courgette or broccoli; 5 minutes for carrots; and 7 to 11 minutes for corn on the cob. After blanching, immerse vegetables in cold water to stop the cooking process. Finally, dry vegetables on a towel before vacuum sealing.
Note: All vegetables (including broccoli, Brussels sprouts, cabbage, cauliflower, kale, turnips) naturally emit gases during storage. Therefore, after blanching, they must be stored in freezer only.
When freezing vegetables, it is best to pre-freeze them for 1-2 hours or until solidly frozen. To freeze vegetables in individual servings, first place on a baking sheet and spread them out so they are not touching. This prevents them from freezing together in a block. Once they are frozen, remove from baking sheet and vacuum seal vegetables in a FoodSaver™ Bag. After they have been vacuum sealed, return them to the freezer.
Important: Due to the risk of anaerobic bacteria, fresh mushrooms, onions and garlic should never be vacuum sealed.
Leafy Vegetables

For best results, use a canister to store leafy vegetables. First wash the vegetables, and then dry with a towel or salad spinner. After they are dried, put them in a canister and
vacuum seal as normal. Store in the refrigerator.
Fruits

When freezing soft fruits or berries, it is best to pre-freeze them for 1-2 hours or until solidly frozen. To freeze fruit in individual servings, first place on a baking sheet and spread them out so they are not touching.
This prevents them from freezing together in a block. Once they are frozen, remove from baking sheet and vacuum seal fruit in a FoodSaver™ Bag.
After they have been vacuum sealed, return them to the freezer. You can vacuum seal portions for baking or in your favourite combinations for easy fruit salad all year round. If storing in the refrigerator, we recommend using a FoodSaver™ Canister.
Baked Goods

To vacuum seal soft or airy baked goods, we recommend using a FoodSaverTM
Canister so they will hold their shape. If using a bag, pre-freeze for 1-2 hours or
until solidly frozen. To save time, make cookie dough, pie shells, whole pies, or mix dry ingredients in advance and vacuum seal for later use.
Coffee and Powdery Foods

To prevent food particles from being drawn into vacuum pump, place a coffee filter or paper towel at top of bag or canister before vacuum sealing. You can
also place the food in its original bag inside a FoodSaverTM Bag, or use a FoodSaverTM Universal Lid with the original container to vacuum seal.
Liquids

Before you vacuum seal liquids such as soup stock, pre-freeze in a casserole dish, loaf pan or ice cube tray until solid.
Remove frozen liquid from pan and vacuum seal in a FoodSaver™ Bag. You
can stack these 'frozen bricks' in your freezer.
When you're ready to use, just cut corner of bag and place in a dish in microwave or drop into water at a low simmer, below 75^ (170^)
To vacuum seal non-carbonated bottled liquids, you can use a FoodSaver™ Bottle Stopper with the original container.
Remember to leave at least 25mm of room between contents and the bottom of the Bottle Stopper. You can reseal bottles after each use.
Pre-Made Meals, Leftovers and Sandwiches

Efficiently store your pre-made meals, leftovers and sandwiches in the stackable, lightweight FoodSaverTM
Containers. They are microwaveable, top
rack dishwasher safe and come with a custom adaptor.
The lightweight containers will be ready to head off to the office, to school or the great outdoors whenever you are!
Snack Foods

Your snack foods will maintain their freshness longer when you vacuum seal them. For best results, use a FoodSaver™ Canister for crushable items like crackers.
Troubleshooting
| Problem Solution | |
| Overheat warning light 0 comes on | ·The unit has overheated. Wait until the overheat warning light goes out before using. |
| Pump operates for more than 2 minutes without air being removed. | ·Make sure the open end of the bag is inserted into the drip tray. ·Check to make sure both gaskets are fitted properly. ·Check to make sure that at least one end of the bag is sealed. ·Open the unit and check to make sure that there are no foreign objects, dirt or debris on the upper or lower gaskets. ·Make sure there is enough room at the top of the bag (75 mm) so it will fit into the drip tray with lid closed and latched. ·Make sure the handheld sealer is not attached. ·Make sure the lid is fully closed (the green band is showing around the latch and the green power light is on). |
| Bag is not sealing properly. | ·There is too much liquid in the bag. Freeze the bag contents before vacuuming. ·To prevent wrinkles in the seal, gently stretch the bag flat while inserting the bag into the drip tray and continue to hold bag until vacuum pump starts. ·Create a second seal above the first seal on the bag to ensure a proper seal when sealing moist foods. |
| Nothing happens when latch is closed and Vacuum and Seal button or Seal Only button is pressed. | ·Make sure the lid is fully closed (the green band is showing around the latch and the green power light is on). |
| If you need further assistance: | ·Please visit www.foodsavereurope.com. |
Fitting a Plug (UK/Ireland only)
If the plug is not suitable for the socket outlets in your home, it can be removed and replaced by a plug of the correct type. If you remove the plug it must not be connected to a 13 amp socket and the plug must be disposed of immediately.
NOTE: If the terminals in the plug are not marked or if you are unsure or in doubt about the installation of the plug please contact a qualified electrician.
If a 13A 3-pin plug is fitted, it must be an ASTA approved plug, conforming to BS1363 standard. Replacement fuses must be BSI or ASTA BS1362 approved.
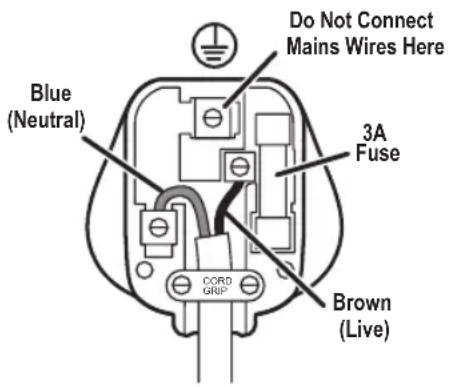
The wires in the mains lead are coloured as such:
BROWN-LIVE
- BLUE - NEUTRAL
Please note that the colour of these mains wires may not correspond with the colour markings that identify the terminals in your plug.
The BROWN coloured wire must be connected to the terminal, which is marked with the letter "L" or is coloured RED.
The BLUE coloured wire must be connected to the terminal, which is marked with the letter "N" or is coloured BLACK.
DO NOT CONNECT either of these wires to the earth terminal in the plug. The earth terminal plug is marked with the letter "E", or with the earth symbol 口 or coloured GREEN, or GREEN and YELLOW.
Guarantee
Please keep your receipt as this will be required for any claims under this guarantee.
This appliance is guaranteed for 2 years after your purchase as described in this document.
During this guaranteed period, if in the unlikely event the appliance no longer functions due to a design or manufacturing fault, please take it back to the place of purchase, with your till receipt and a copy of this guarantee.
The rights and benefits under this guarantee are additional to your statutory rights, which are not affected by this guarantee. Only Jarden Consumer Solutions (Europe) Limited ("JCS (Europe)" has the right to change these terms.
JCS (Europe) undertakes within the guarantee period to repair or replace the appliance, or any part of appliance found to be not working properly free of charge provided that:
you promptly notify the place of purchase or JCS (Europe) of the problem; and
the appliance has not been altered in any way or subjected to damage, misuse, abuse, repair or alteration by a person other than a person authorised by JCS (Europe).
Faults that occur through, improper use, damage, abuse, use with incorrect voltage, acts of nature, events beyond the control of JCS (Europe), repair or alteration by a person other than a person authorised by JCS (Europe) or failure to follow instructions for use are not covered by this guarantee. Additionally, normal wear and tear, including, but not limited to, minor discoloration and scratches are not covered by this guarantee.
The rights under this guarantee shall only apply to the original purchaser and shall not extend to commercial or communal use.
If your appliance includes a country-specific guarantee or warranty insert please refer to the terms and conditions of such guarantee or warranty in place of this guarantee or contact your local authorized dealer for more information.
Waste electrical products should not be disposed of with Household waste. Please recycle where facilities exist. E-mail us at enquiriesEurope@jardencs.com for further recycling and WEEE information.
Jarden Consumer Solutions (Europe) Limited 5400 Lakeside
Cheadle Royal Business Park Cheadle
SK83GQ
United Kingdom
Consignes importantes
degradation de la consistance.
Jarden Consumer Solutions (Europe) Limited 5400 Lakeside
Cheadle Royal Business Park Cheadle
SK83GQ
United Kingdom
Referring to Fig. 3:
Jarden Consumer Solutions (Europe) Limited
5400 Lakeside
Cheadle Royal Business Park
Cheadle
SK83GQ
United Kingdom
www.foodsavereurope.com.
Almacenamento
Jarden Consumer Solutions (Europe) Limited
Edif. Vázquez Krasnow
www.foodsavereurope.com.
Conservazione
Jarden Consumer Solutions (Europe) Limited 5400 Lakeside
Cheadle Royal Business Park
Cheadle
SK83GQ
United Kingdom
Jarden Consumer Solutions (Europe) Limited 5400 Lakeside
Cheadle Royal Business Park
Cheadle
SK83GQ
United Kingdom

Runda FoodSaverTM -burkar
FoodSaver™ Fresh-burkar
Jarden Consumer Solutions (Europe) Limited
5400 Lakeside
Cheadle Royal Business Park
Cheadle
SK8 3GQ
United Kingdom

Tärkeitä varotoimia
Jarden Consumer Solutions (Europe) Limited
5400 Lakeside
Cheadle Royal Business Park
Cheadle
SK8 3GQ
United Kingdom
Varsellys for overoppheting
H Handholdt forsegler
Jarden Consumer Solutions (Europe) Limited 5400 Lakeside
Cheadle Royal Business Park
Cheadle
SK83GQ
United Kingdom

WAZNE ZASADY BEZPIECZENSTWA
www.foodsavereurope.com.
Przechowywanie
Jarden Consumer Solutions (Europe) Limited 5400 Lakeside
Cheadle Royal Business Park
Cheadle
SK83GQ
United Kingdom
Jarden Consumer Solutions (Europe) Limited 5400 Lakeside
Cheadle Royal Business Park Cheadle
SK83GQ
United Kingdom
www.foodsavereurope.com.
Uskladnenie
Jarden Consumer Solutions (Europe) Limited
5400 Lakeside
Cheadle Royal Business Park
Cheadle
SK83GQ
United Kingdom

Jarden Consumer Solutions (Europe) Limited
5400 Lakeside
Cheadle Royal Business Park
Cheadle
SK83GQ
United Kingdom
Baxn npedna3Hmepkn
To3n ypeJ moKe Da ce n3noJ3Ba OT deca Ha Bb3pact Na 8 rOuHn N OT JnUca C HamaJIeHn fN3nueCKn, CETNBn nn PCNXnueCKn Bb3MOxHOCTn, nn 6e3 OINT nn PO3HaHnA, aKo ca nOd HabIoHeHne nn Ca 6nIn INCTpykTnpaHn 3a 6e3OnaChyNOTpe6a Ha ypeDa n pa3bupat OnacHOCTnte, CBbp3aHn C Herobata ekCnloaTaunra. DeCaTa He Tp6Ba Da cn nIgpaT C ypeJa. POnucTBaHeto n IODPbXkKaTa He Tp6Ba Da ce n3BbpWBat OT Deca, KOnTO He ca nOd HabIOHeHne.
Ako 3axpaHbua Kabe en noBpeDen, Tp6Ba Da 6bDe 3aMeHeN OT npOn3BOdnteJr, OT HeROB CepBn3eH PpeDCTaBNTeJ nnOT NDo6HN KBaINΦuPaHn JNuca, 3a Da HJaMa 3aJIaxa 3a 6e30NaChOcTTa.
BnHaI nocTaBraIe ypeJa Bbpxy Cta6uINHa, HAdEckDHa, cyXa I paBHa nobBpXHocT.
BHNIMAHNE:TO3N yPEd 3A 3ANEYATBAHE HE E INPEDAHA3HauEH 3A TbPROBCKN LcEJI.NHKora He n3noJ3BaIte ypeDa 3a ceJI,pa3nUHn OT HeROBOTo npedHa3NaueHne.To3N ypeE caMo 3a DomaUnHa ynoTpe6a. He n3noJ3BaIte ypeDa Ha OTKpIto.
- HnKora He notanay Te ypea nn 3axpaHbau nkaeI n ⅢeNcena BbB Boda nn npyn TeuHocn.
- He n3noI3BaIte ypeIa, aKo e 6nI n3nyckan nIaKo IMa BnIMn CneI NOT NOBpeIa.
- Празда письпг Te KbM NOUHCTBaHe, yBepTe ce, ye ypeIbTe eN3KlIOHEn Ye Ue IeNCEJIbTe E N3BaIeH OT MpeXOBn KaTAKT cIeD yNoTpe6a.
3aДаИЗКЛIOHHTe,I3BaIeTe 3axpaHbAUNЯ Ka6eI OT eJIeKTPnueCkNЯ KOHTaKT. He IbPnaIte Ka6eNa,3a Da ro IN3KJIIOHHTe.
- He n3noIaBaiTe yDJIknte n cypeJa.
- I3noI3BaIte eIINHCTBeHO aKCEcoApn IIn IpnCTaBKn, npenopbuaHOn OT pON3BOIDTeN.
- Пи затонл�е наха на в пикове FoodSaver He 3abpaBte Дгп посты В Загра Тбнcka Tempepatya, noD 75^ (170^)
XPAHINHTHNTE IPOyKTN B IINKA MOAT DA BbDAT PA3MPA3EHN, HO HE INI PPETONJIENB MINKPOBbJIHOBA FUPHA. KoraTo pa3mpa3BaTe xpaHInn IPOyKTN B PIIIKOBe FoOdsaverM MKNPOBbJHOBA FpyHa, ce IORpIXe Ta He Ce npEbnabat MaKcImaJIHa MoUHocT OT 180 Bata (hAcTpoiKa 3a pa3mpa3BaHe), MaKcImaJIHo BpeMe OT 2 MNHyTu MAKcImaJIHa Tempepatya ot 70^ (158^)
Cnctema 3a BakyymipaHe n 3aneuatbahe FoodSaver
PpeBapnteHNO npiroTBeHNЯCTNIA OCTaHaJa XpAna N CaHDbuYn

CbxaHbaTe eФnKaCHO BaUIne npeDbapntelno npiroTbeHЯCTnO,octaHaXpaHaN CaHBuBnB IKeHTe,NoCTabuNcEeHbA Dpyra,KyTNl FoodSaver.Te ca noDxOJa3a MKNpOBbHOBa fypHa,Morat Da ce H3MNBat B rOpHata KooHNua Ha
CbDOMNHaMaHnA Hc DoCTaBt CbC CnEuaIeH aIaTep.
Jeknte Kyttnu Iec ca c Bac, KbdeTo n da ce HAMpaTe, B oΦnca, BVynnIe nn Ha n3JET.
3akycn

BaunTe 3aKcN 3e 3a3a3T NO-dbIro CBeJceTTa cn, KOrato rB BakyyMnpate N 3aneyataTe.3a Hau-Do6pn pe3yIITaN 3nON3BaNTe KyTna FoodSaver" 3a TpoUJIINI npOdyKTn, KaTO HaPImep CoNEH 6nCKBHTN.
Jarden Consumer Solutions (Europe) Limited 5400 Lakeside
Cheadle Royal Business Park
Cheadle
SK83GQ
United Kingdom
OdynoeI Oe antwaleia yeuons, xpawatoCkui npns.
Ia to zepaioa Tuw laxavikw, baTe ta oe bpaoto vepo n 0to fooupvo mikopecuataw mexpi va maayeputeouv aaaa va eivai akopa tpaayava. O xpovoczpatiogatoc noikalei ato 1e2 aeTia yia pfauawon laxavika kai apakca, 3e4 aeTTia yia uTicAia, koLokthetaKoMuEvo oe fetc n npokoLo, 5 aeTTia yia ta kapota kai, 7e 11 aeTia yia to kaalauToki. Meta to zepaioa BuHIOTE ta laxavika o epooepo vepo yia va otauatnoei n diadikaoia maayepepatoC. TeLoC, OTeywote ta laxavika oia TETOETA PPIV ta OTeyavOTIONE.
Jarden Consumer Solutions (Europe) Limited
5400 Lakeside
Cheadle Royal Business Park
Cheadle
SK8 3GQ
United Kingdom
UK: Jarden Consumer Solutions (Europe) Limited
5400 Lakeside, Cheadle Royal Business Park,
Cheadle, SK8 3GQ, United Kingdom
e-mail: enquiriesEurope@jardencs.com
Tel: +44 (0)161 621 6900
FR: Jarden Consumer Solutions (Europe) Limited
92705 Colombes, France
e-mail: serviceinfoFrance@jardencs.com
Tel: +33 149 64 20 60
ES/PT: Jarden Consumer Solutions (Europe) Limited
Edif. Vázquez Krasnow
For Customer Service details, please see the website.
© 2017 Jarden Consumer Solutions (Europe) Limited.
All rights reserved. Imported and distributed by Jarden Consumer Solutions (Europe) Limited,
5400 Lakeside, Cheadle Royal Business Park, Cheadle, SK8 3GQ, United Kingdom.
Jarden Consumer Solutions (Europe) Limited is a subsidiary of Newell Brands Inc. (NYSE: NWL).
The product supplied may differ slightly from the one illustrated due to continuing product development.
Printed In China
5400 Lakeside, Cheadle Royal Business Park, Cheadle, SK8 3GQ, United Kingdom.